Управление дисками в Windows помогает выполнять дополнительные задачи с хранилищем, такие как инициализация нового диска, расширение и сжатие томов. Вот некоторые сведения о том, что можно сделать с помощью управления дисками.
Инициализация нового диска
Расширение базового тома
Сжатие базового тома
Смена буквы диска
Устранение неполадок оснастки «Управление дисками»
Чтобы открыть оснастку «Управление дисками», щелкните правой кнопкой мыши (или нажмите и удерживайте) кнопку Пуск и выберите Управление дисками.
Если вам нужна справка по освобождению места на компьютере, см. раздел Очистка диска в Windows или Освобождение места на диске в Windows.
В этой статье мы расскажем о простых и доступных способах перейти в Управление дисками в Windows 10. Это может понадобиться, если возникнут какие-то проблемы с подключёнными дисками (HDD или SSD) или потребуется получить доступ к системным средствам работы с носителями информации. По традиции начнём с самых удобных и запоминающихся способов.
С помощью кнопки Пуск
- Нажмите правой кнопкой мыши на кнопку Пуск (на панели задач) с логотипом Windows.
- Откроется контекстное меню кнопки “Пуск”.
- Найдите в списке утилиту “Управление дисками” и нажмите на неё.

С помощью кнопки или строки поиска на панели задач Windows 10
В Windows 10 на панели задач можно увидеть кнопку поиска в виде лупы или строки с текстом “Введите здесь текст для поиска”.
- Нажмите на кнопку поиска.
- Начните набирать текст
Управление компьютеромилиdiskmgmt.msc. - Windows установит лучшее соответствие и первым вариантом предложит запустить приложение “Управление компьютером” или diskmgmt.msc (в зависимости от того, что вы вводили в поисковой строке).

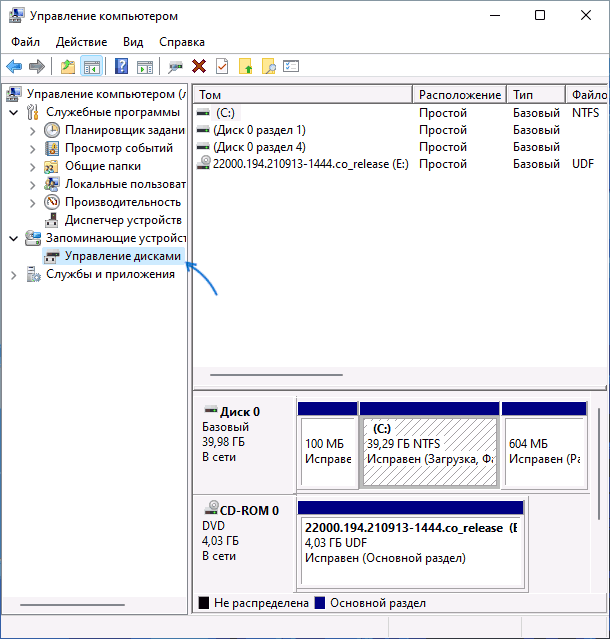
- Если в поиске вы искали приложение “Управление компьютером”, то в дереве консоли откройте раскрывающийся список “Запоминающие устройства” и выберите “Управление дисками”.

С помощью списка приложений в меню Пуск
- Нажмите на кнопку Пуск с логотипом Windows.
- В списке всех приложений найдите папку “Средства администрирования Windows”.
- Нажмите на папку, чтобы раскрыть список стандартных утилит Windows.
- Найдите в списке приложение “Управление компьютером” и нажмите на него.

- В дереве консоли откройте раскрывающийся список “Запоминающие устройства” и выберите “Управление дисками”.
С помощью адресной строки в проводнике
Еще один вариант открытия утилиты “Управление дисками” из любой папки.
- Откройте приложение “Проводник” (Explorer) или просто щелкните по ярлыку “Мой компьютер” на рабочем столе.
- В адресной строке введите текст
diskmgmt.mscи нажмите кнопку Enter или кнопку со стрелкой.

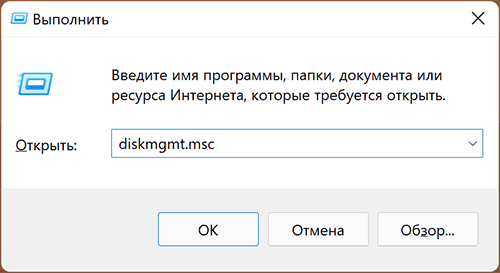
С помощью приложения “Выполнить”
- Запустите приложение “Выполнить” (нажмите на клавиатуре кнопку с логотипом Windows + R ).
- Введите текст
diskmgmt.msc - Нажмите кнопку “ОК”.

С помощью классической Панели управления
Как открыть классическую Панель управления в Windows 10? Все способы.
Если не знаете, как воспользоваться данным способом и возникает трудность с поиском классической Панели управления
- Откройте классическую Панель управления.
- Найдите вкладку “Администрирование” и нажмите на неё.

- Откроется новое окно со списком всех системных утилит.
- Найдите в списке приложение “Управление компьютером” и запустите его.

- В дереве консоли откройте раскрывающийся список “Запоминающие устройства” и выберите “Управление дисками”.
А какой вариант открытия утилиты “Управление дисками” используете вы?
Напишите в комментариях о своих способах 😉
Управление дисками — это программа поддержки динамических дисков и настройки томов. Средство используется для разбивки, создания, проверки и преобразования дисков. После приобретения нового накопителя необходимо инициализировать и разбить его на разделы.
Эта статья расскажет, как вызвать управление дисками в Windows 10. В процессе использования средства всегда рассматривалось, как его запустить. Особенно в последнее время, поскольку приобрёл себе SSD Samsung 970 Evo 500 Гб (выполнено разделение, перенос, сжатие диска).
Предыстория. Со средством управления дисками много пользователей знакомы давно. Как минимум в десятке моих статей использовалось управление дисками. С его помощью инициализировал диски, разбивал их на несколько, сжимал и создавал новые разделы (томы).
- Создание томов диска (виртуальный, составной, чередующийся, зеркальный или RAID);
- Инициализация и преобразование (в динамический или GPT-диск);
- Присвоение буквы (для раздела, внешнего накопителя или CD/DVD привода);
- Быстрая проверка дисков (а именно его общего состояния).
Было решено разбить накопитель на 2 диска 125 Гб под систему и 350 Гб для приложений. Средство инициализировало его и сразу же разделило. Вам решил показать, как перенести Windows 10 на другой диск. После чего пришлось сжимать диск (C:) и создавать том для игр.
Как именно вызвать управление дисками
Можно ввести имя программы, папки, документа или ресурса Интернета и Windows откроет их. В окошке выполнить Win+R воспользуйтесь командой diskmgmt.msc. Или в меню Файл > Запустить новую задачу диспетчера задач (можно создать задачу с правами администратора).

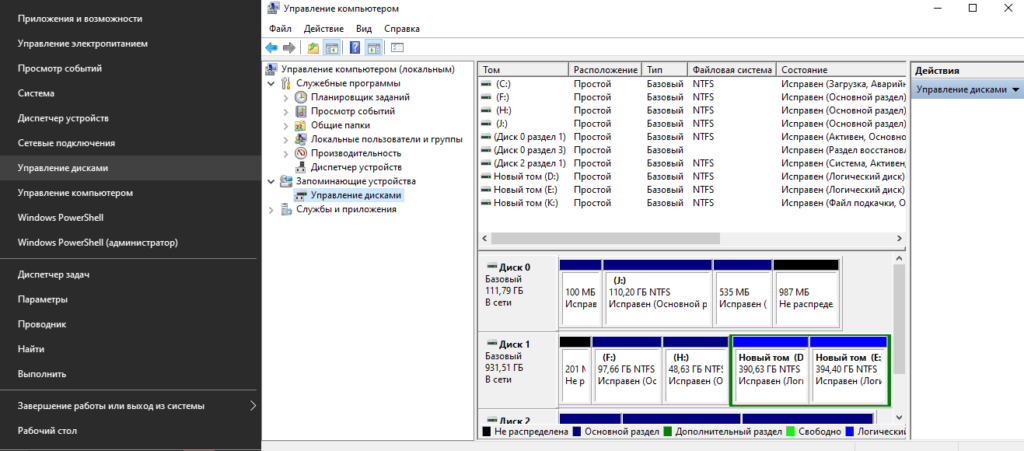
Ещё десяток вариантов как можно открыть средство. В контекстном меню «Пуск» выберите Управление дисками. Или откройте раздел Управление компьютером и в списке слева найдите Запоминающие устройства > Управление дисками (прямо в окне управления ПК).
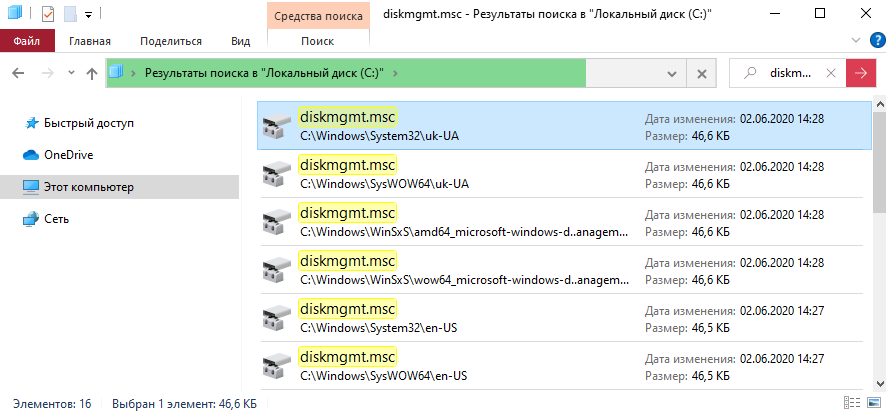
Как найти управление дисками
В поисковой строке (сочетание Win+Q или Win+S) введите название diskmgmt.msc. С результатов можно Открыть управление дисками или Запустить от имени администратора.

В проводнике на Локальном диске (C:) в строке поиска вставьте diskmgmt.msc. Средство поиска найдёт множество программ с этим названием. Нас интересует: C:\Windows\System32.
Выбор средства администрирования Windows 10
Майкрософт всё ещё не избавились от панели управления (даже в Windows 10 версии 20H2). Выполните команду Control Panel в окне Win+R. Перейдите в раздел Система и безопасность > Администрирование > Создание и форматирование разделов жёсткого диска.

Как альтернатива в поиске введите Средства администрирования Windows. Откроется расположение Панель управления > Система и безопасность > Администрирование. И теперь запустите то же самое Управление компьютером > Управление дисками.
Заключение
Быстрее всего вызвать средство управление дисками получается с помощью меню «Пуск» или выполнив команду. Для быстрого доступа создайте ярлык приложения или закрепите его на панели задач. Ещё можно выполнить управление дисками через командную строку Windows 10.
(1 оценок, среднее: 5,00 из 5)
Администратор и основатель проекта Windd.pro. Интересуюсь всеми новыми технологиями. Знаю толк в правильной сборке ПК. Участник программы предварительной оценки Windows Insider Preview. Могу с лёгкостью подобрать комплектующие с учётом соотношения цены — качества. Мой Компьютер: AMD Ryzen 5 3600 | MSI B450 Gaming Plus MAX | ASUS STRIX RX580 8GB GAMING | V-COLOR 16GB Skywalker PRISM RGB (2х8GB).
 Многие инструкции, имеющие отношение к работе с дисками и разделами на них, среди прочего предлагают использовать «Управление дисками» Windows, однако не все пользователи знают, как запустить указанную системную утилиту.
В этой пошаговой инструкции несколько способов открыть управление дисками Windows 11 и Windows 10, большинство из предложенных методов подойдут и для предыдущих версий системы.
Управление дисками в контекстном меню кнопки Пуск (Win+X)
Если вы хотите запустить «Управление дисками» максимально быстро, достаточно выполнить следующие шаги:
- Нажмите правой кнопкой мыши по кнопке «Пуск» или используйте сочетание клавиш Win+X
- Выберите пункт «Управление дисками» в открывшемся контекстном меню.

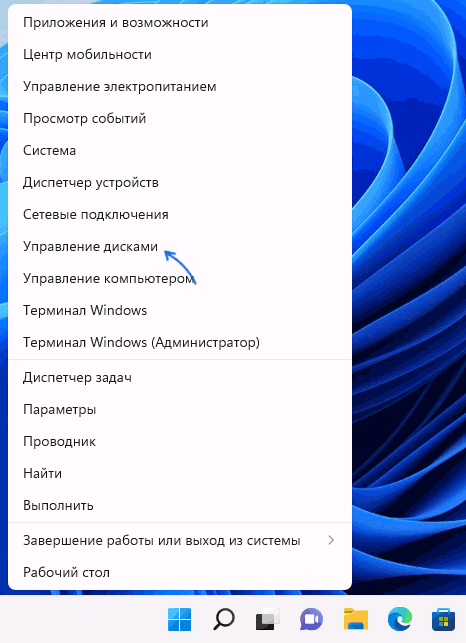
Это — самый быстрый способ открыть рассматриваемую системную утилиту, которого, в большинстве случаев, оказывается достаточно.
При необходимости или в случае, если предложенный вариант по какой-то причине не подходит, вы можете использовать одну из следующих возможностей для запуска: окно Win+R («Выполнить»), поиск Windows, или «Управление компьютером», но, как правило, уже первого способа оказывается достаточно, чтобы попасть в это окно:

Запуск управления дисками в окне «Выполнить»
Один из наиболее часто используемых способов открыть Управление дисками — использовать диалоговое окно «Выполнить». Шаги будут следующими:
- Нажмите правой кнопкой мыши по кнопке «Пуск» и выберите пункт «Выполнить» в контекстном меню, или нажмите сочетание клавиш Win+R на клавиатуре.
- Введите diskmgmt.msc в окно «Выполнить».

- Нажмите кнопку Ок или клавишу Enter на клавиатуре.
В результате будет открыто окно «Управление дисками».
Поиск Windows 11 и Windows 10
Если вы не знаете, как запустить тот или иной инструмент в Windows 11 или 10, всегда помните о поиске в панели задач: большинство системных утилит можно быстро найти и запустить с его помощью, и я всегда стараюсь об этом напоминать.
К сожалению, это не вполне применимо в случае «Управление дисками», поскольку для этого запроса результаты поиска не те, что требуется. Тем не менее, запуск через поиск возможен:
- Нажмите по кнопке поиска на панели задач Windows 11 и введите «диск» в поле поиска. В случае Windows 10 ввод можно начать сразу в поле поиска на панели задач.
- Откройте пункт «Создание и форматирование разделов жесткого диска».

- Откроется именно то, что требуется — «Управление дисками».

Управление дисками в окне «Управление компьютером»
Ещё одна возможность — использовать окно «Управление компьютером», которое содержит набор системных инструментов, включая необходимый:
- Откройте «Управление компьютером» через поиск Windows, либо через диалоговое окно «Выполнить», используя compmgmt.msc в качестве команды.
- В открывшемся окне выберите пункт «Управление дисками» в разделе «Запоминающие устройства».

Это все основные способы запуска. Конечно, их можно модифицировать: например, вводить diskmgmt.msc в командной строке, а не окне «Выполнить» или найти и запустить этот файл из папки C:\Windows\System32, но это будут лишь модификации уже приведённых выше методов.
How to use Windows 10 Disk Management for partition and disk management? If it is not working, what should you do? Here this post will show you much information about the built-in Disk Management Windows 10 and how to use professional Windows 10 partition manager, MiniTool Partition Wizard, to partition a hard drive, convert disk type between MBR and GPT, convert file system and more.
What’s Windows 10 Disk Management?
As you know, Windows 10 is the latest operating system released by Microsoft which is popular with many users all over the world due to its some improvements. But no matter which OS you have installed, it seems that Windows built-in Disk Management has some limitations. Here let’s look at what Windows 10 Disk Management can do.
In Windows 10, the snap-in Windows 10 disk utility is also the same with Windows 7 and Windows 8 Disk Management, and it is suitable to make some basic disk and partition management for some personal users. Here are some features of Disk Management Windows 10:
- Repartition/partition hard drive.
- Create partition or create simple volume, spanned volume, stripped volume, mirroed volume.
- Delete/format partition
- Extend or shrink partition.
- Change drive letter or paths.
- Mark partition as active.
- Convert basic disk to dynamic disk.
- Convert an empty disk between MBR and GPT.
- Add mirror.
- View partition.
- Read more to learn Disk Management of Windows 10.
How to Access Disk Management Windows 10
When there is a need, you probably choose to use this free tool to do disk and partition operations, but it is possible that you don’t know how to get to Disk Management Windows 10. Here are three usual ways to help you to open this disk manager.
① From Quick Access Menu
Right-click the Start Menu in the bottom-left corner to open Quick Access Menu, and then select Disk Management.
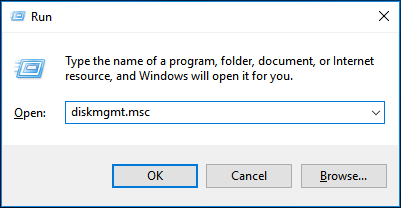
② Via the Run Dialogue
Press Win +R keys to open the Run Window. Then input diskmgmt.msc in the text box and tap OK to access Disk Management Windows 10.
③ From This PC
Right-click This PC to select Manage, and then click Disk Management in the Storage tab to get to Disk Management Windows 10.
After entering the main interface, now you can start to do some operations on partition and disk. In this post, we will give you a detailed introduction to Windows 10 disk partition management in five aspects, and then you can know Windows 10 snap-in partition manager well.
How to Perform Windows 10 Disk Management
Windows 10 Extend Partition
After using your PC for a period of time, it is most likely that there are more and more data saved on your hard drive. More seriously, your hard drive is almost full. Windows 10 will prompt you a low disk space warning saying “You are running very low on disk space on Local Disk (C:). Click here to see if you can free space on this drive“.
In this case, how to partition a hard drive Windows 10 to solve low disk space issue? You may consider using the disk partition tool – Disk Management to change partition size. Extend Volume and Shrink Volume are two basic features to repartition a hard drive in Windows 10.
However, during the process of expanding a partition, Windows 10 Disk Management not working happens, especially Extend Volume greyed out.
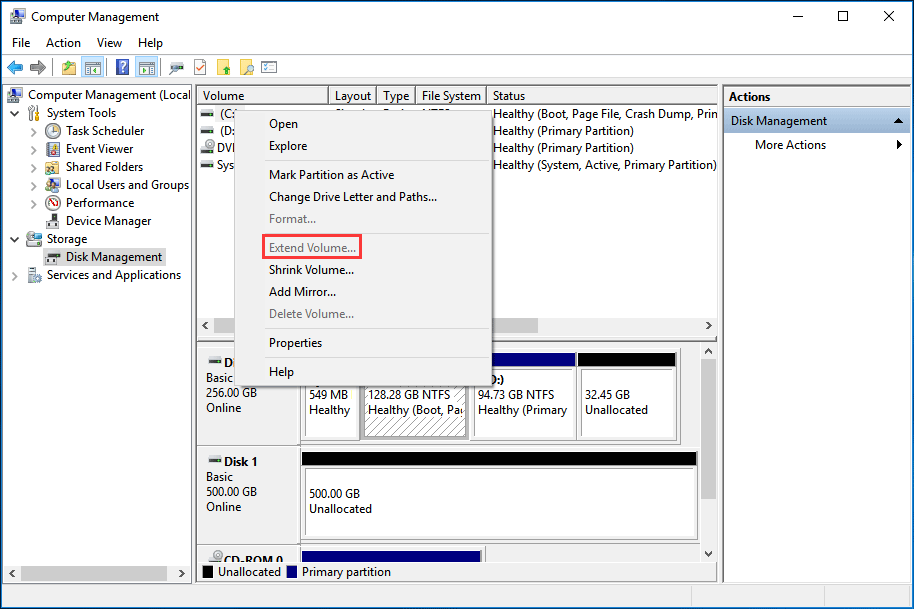
Do you know why you fail to extend Windows 10 partition? In fact, the reason is very simple, and here let’s look at three limitations of Disk Management.
- When extending a primary partition, there must be unallocated space immediately following the target primary partition.
- When expanding a logical partition, there must be a free space right adjacent to the logical partition.
- The target drive should be in NTFS or RAW file system, otherwise, Extend Volume and Shrink Volume features become greyed out.
From the above picture, you know C drive is not allowed to be extended because there is no unallocated space following it. In addition, it is possible that you fail to shrink a volume.
Solution: Use MiniTool Partition Wizard
When failing to extend/shrink a partition with Windows 10 partition manager, you need to look for a professional program to replace Disk Management for good user experience in managing a hard drive. Here we want to recommend a piece of third-party disk management software – MiniTool Partition Wizard.
As the best free partition manager, it is compatible with many operating systems, including Windows 7/8/8.1/10, etc. This free disk manager can manage hard drive in Windows 10 as well as a partition. If you can’t extend partition successfully, download MiniTool Partition Wizard Free Edition for a good experience.
MiniTool Partition Wizard FreeClick to Download100%Clean & Safe
Minitool Partition Wizard provides you two features to help to change partition size in Windows 10 by Extend Partition or Move/Resize Partition feature.
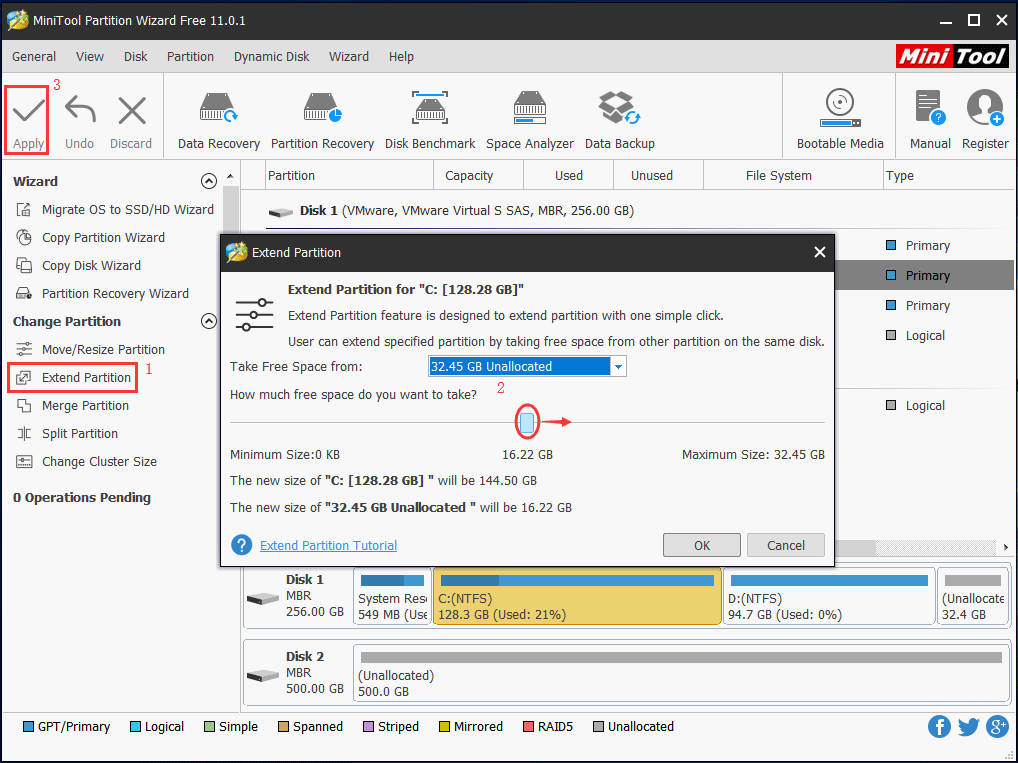
Case 1: when there is no unallocated space or the unallocated space is not contiguous
Step 1: Launch this free Windows 10 hard drive manager, then go to the main interface. Click the target partition (take C as an example), and select Extend Partition in the action pane.
Step 2: Next please take some free disk space from other partitions on the same disk. By moving the handle, you can decide how much free space you want to take.
Step 3: Click the Apply button to save all changes.
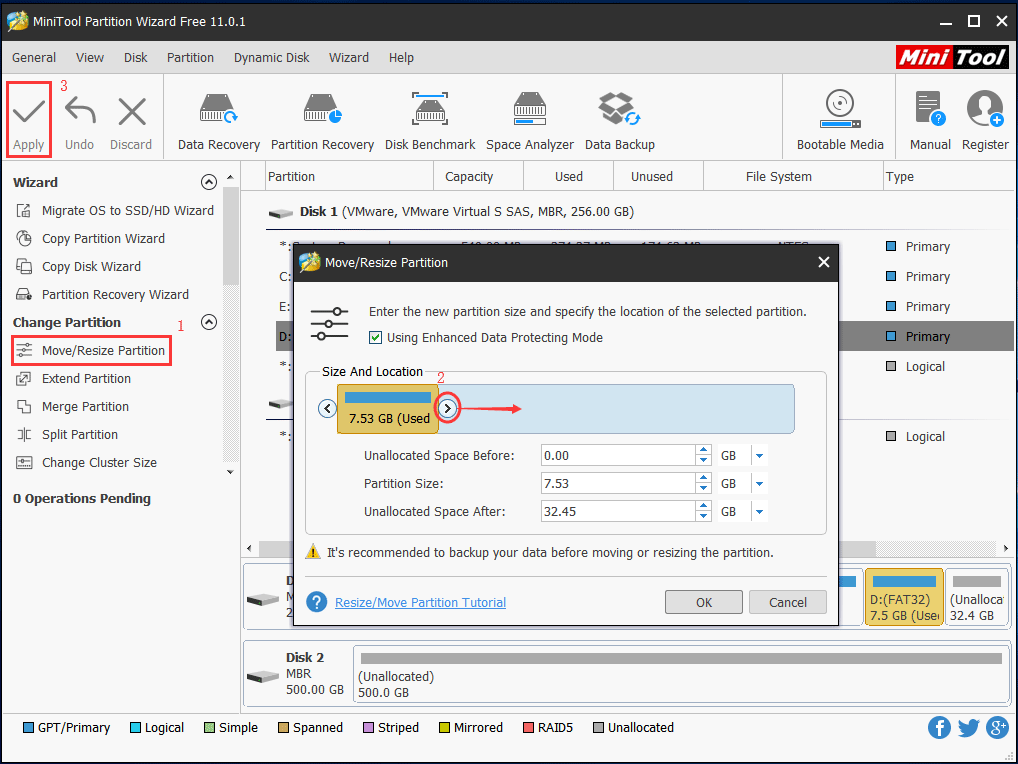
Case 2: when there is unallocated space adjacent to the target partition with FAT32 file system
If you want to extend a FAT32 partition, Windows 10 Disk Management not working issue still appears. In this case, MiniTool Partition Wizard can also be used to extend Windows 10 partition.
Step 1: Run this professional Windows 10 hard drive manager to its main interface. Then choose the FAT32 partition and click Move/Resize feature from Change Partition to resize Windows 10 partition.
Step 2: Then move the black arrow to occupy the unallocated space. Click OK to continue.
Step 3: Then you will go back to the main interface of MiniTool Partition Wizard. At last, click Apply to execute this operation.
Convert Disk Style between MBR and GPT in Windows 10
In addition to repartitioning a hard drive with Windows 10 Disk Management, perhaps you want to use this free utility to do the disk type conversion between MBR and GPT.
If you want to create more than 4 primary partitions or use a 3TB hard drive, it is necessary to convert MBR disk to GPT disk. Besides, if you want to install a second OS Windows XP, but GPT disk is not suitable, so you need to convert GPT disk to MBR disk.
However, Windows Disk Management requires you to delete all volumes and then do the conversions. Otherwise, Convert to MBR Disk or Convert to GPT Disk feature is not available.
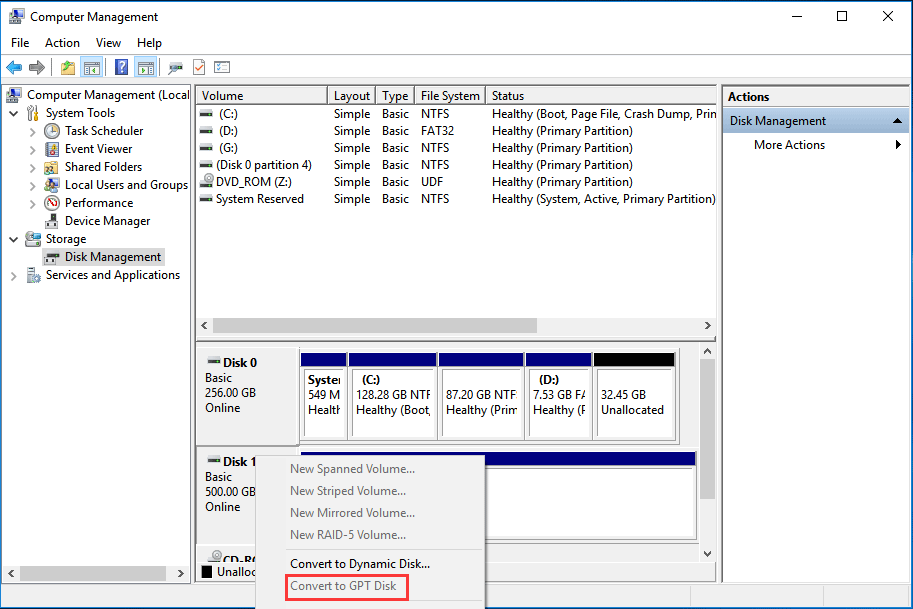
In a word, Disk Management in Windows 10 only converts an empty disk to MBR/GPT. To avoid data loss, you should adopt a professional disk manager Windows 10. MiniTool Partition Wizard Free Edition provides powerful features for disk type conversion.
Warning: MiniTool Partition Wizard Free Edition can help to convert data disk between MBR and GPT for free. But if you want to convert OS disk from MBR to GPT, Free Edition doesn’t support this function and you need to purchase its Professional Edition or a more advanced edition. Click the edition comparison to learn more.
MiniTool Partition Wizard FreeClick to Download100%Clean & Safe
Step 1: Here take a data disk as an example. Run this disk manager Windows 10. Then in the main interface, select Convert MBR Disk to GPT Disk after right-clicking on the target disk or choose this feature from Convert Disk.
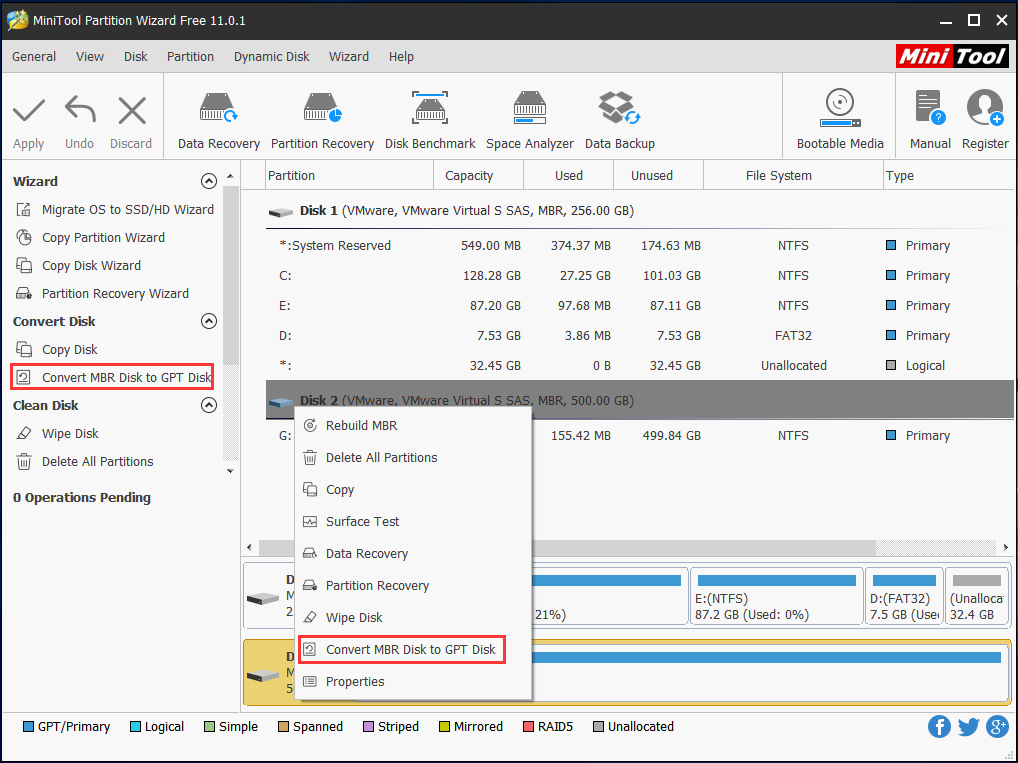
Step 2: Hit Apply button to execute this conversion.
If you need to convert GPT disk to MBR disk, please check this post to learn much information.
Convert File System between NTFS and FAT32
As you know, NTFS and FAT32 are two common file systems on a hard drive. The former supports a file larger than 4GB. And the latter can be used in many early operating systems, such as Windows 95/98, and Windows 2000/2003. Moreover, some game consoles and USB flash drives support FAT32 by default.
In some cases, you need to do the conversion between NTFS and FAT32. Some of you probably use Windows 10 Disk Management to format the partition to NTFS or FAT32 file system. Nevertheless, there are two limitations with disk utility of Windows 10.
- Formatting will lead to all data on the target drive lost.
- Windows 10 Disk Management doesn’t allow formatting the partition larger than 32GB to FAT32.
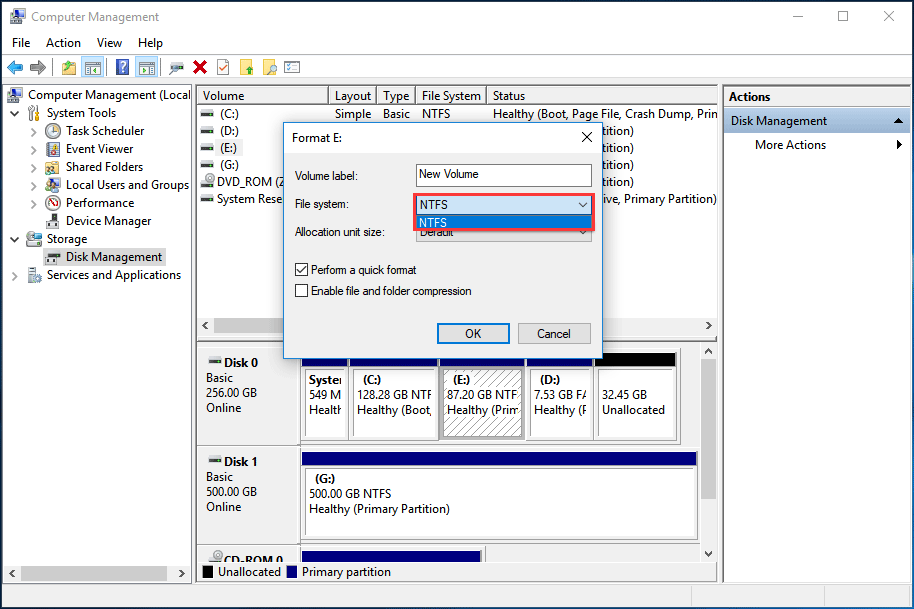
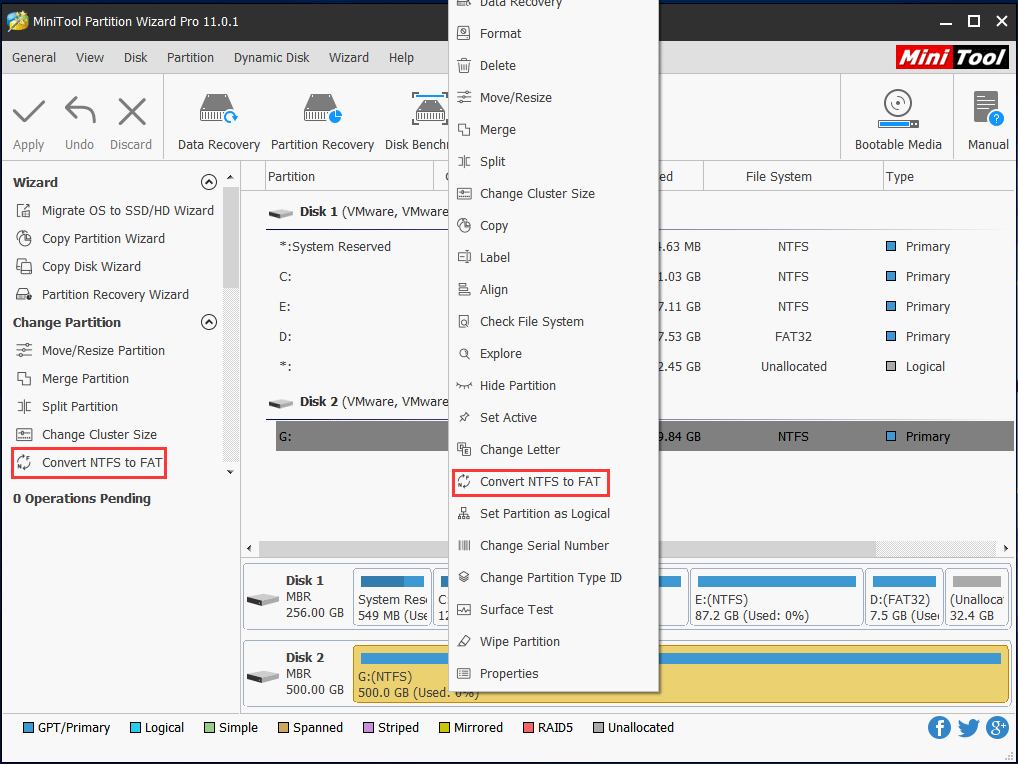
Compared to Disk Management in Windows 10, MiniTool Partition Wizard enables you to change your partition to NTFS/FAT32 without formatting. Its Convert FAT to NTFS feature or Convert NTFS to FAT function will be useful for you. During the process of conversion, the situation of data loss won’t appear.
Note: Convert NTFS to FAT is a paid feature. If you want to do this work, its Professional Edition is worth recommending. If you need to convert FAT to NTFS, you can try its Free Edition.
MiniTool Partition Wizard FreeClick to Download100%Clean & Safe
Create Many Partitions
In Windows 10, Disk Management allows you to create a new partition with its New Simple Volume feature on the unallocated space or free space. If there are four primary partitions, which has met the requirements of maximum partition number, but you still want to create a new partition in Windows 10.
In this case, you may choose to convert this disk to GPT and then make a new partition. However, this free disk utility will cause data loss, just as the above content mentioned. And Disk Management only supports creating NTFS and FAT partition.
In addition, there is another way that is to use MiniTool Partition Wizard Free Edition. This free Windows 10 partition manager allows making a conversion from MBR disk to GPT disk for creating a partition on the data disk, not the system disk. Moreover, you also are able to change a primary partition to logical, and then start to make a new partition.
How to create a partition in Windows 10?
Step 1: There are already four primary partitions and unallocated space on the target disk. In the main interface of MiniTool Partition Wizard, select a primary partition which is next to the unallocated space, then click Set Partition as Logical in the action pane.
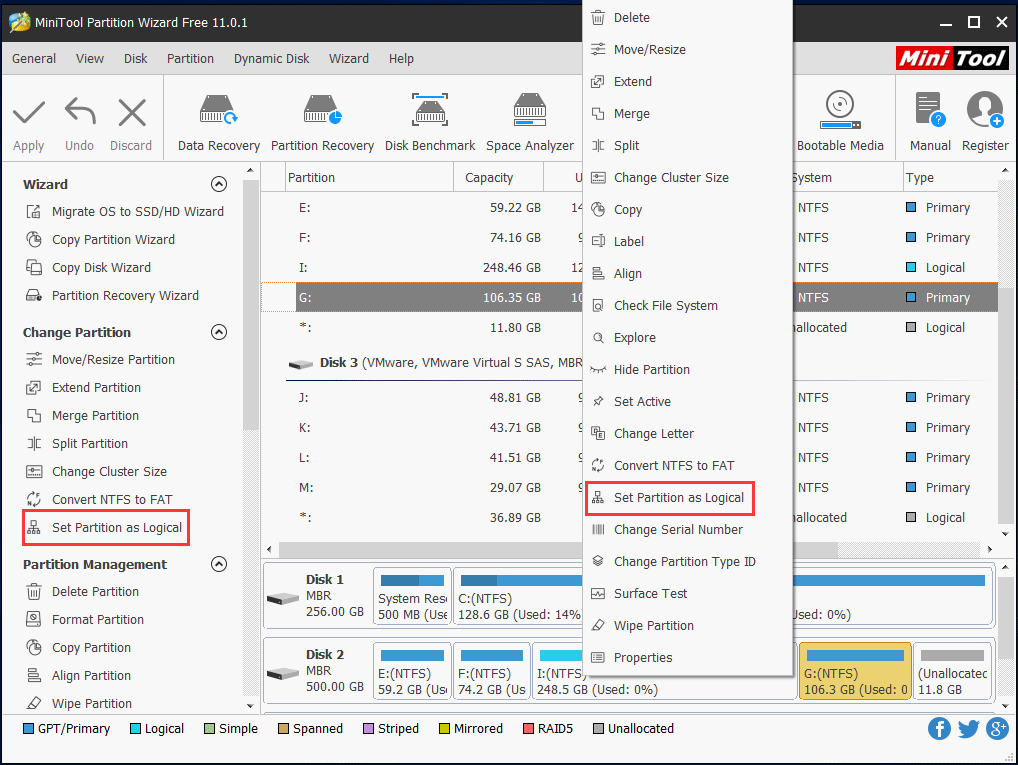
Step 2: And then right click the unallocated space to select Create feature. In the pop-up window, you are able to create a new Windows 10 partition in FAT, FAT32, NTFS, Ext2/3/4 and Linux Swap file system.

Step 3: Click the Apply button in the top left corner.
Delete Windows 10 Partition
Sometimes you want to remove a system partition in Windows 10 for some free disk space when there are two operating systems on the hard drive. While opening Disk Management, right-click the system partition, you will find Delete Volume function isn’t usable.
How to remove partition Windows 10?
MiniTool Partition Wizard has a feature called Delete which can be used to delete all protective Windows 10 partition, including system partition, recovery partition, system reserved partition, and the partition contains page file or crash dump files. Refer to this post – Fixed Cannot Delete the Active System Partition on This Disk for much information.
“Want to use Windows 10 Disk Management to manage disk and partitions but it is not working. Thankfully, MiniTool Partition Wizard is quite helpful.” Click to Tweet
In part 2, we have introduced you some disk or partition operations in five aspects. Here let’s look at a table about the comparison between Disk Management and Partition Wizard, and then you will learn much about Windows 10 disk manager.
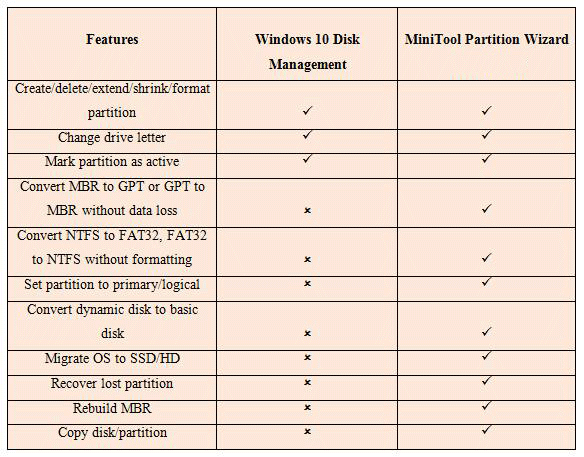
From the table, you know Disk Management can only be used to do some basic partition or disk management Windows 10, but MiniTool Partition Wizard supports basic management as well as some advanced disk or partition operations, such as OS migration, disk/partition copy, partition recovery and more.
Bottom Line
In this post, we introduce you the main features of Windows 10 Disk Management, five aspects in managing disk or partition and the comparison between Disk Management and Partition Wizard. You will get that to use the professional Windows 10 partition manager is a good choice for disk and partition management, which won’t cause data loss.
If you have any suggestion or question, please leave a comment below or send your idea to [email protected].
Disk Manager Windows 10 FAQ
How do I open Disk Manager?
- Press Win + R, input diskmgmt.msc to the box of the Run window and click OK.
- In Windows 10, right-click the Start button and choose Disk Management.
- Alternatively, right-click Computer or This PC and choose Manage. Then, click Disk Management from the Storage section.
What is Windows Disk Management?
Disk Management (DM) is a snap-in Microsoft Windows tool. As a replacement for the fdisk command, it was first introduced in XP. In DM, you can manage your disk or partition, for example, convert basic disk to dynamic disk, extend/shrink/format/delete partition, change drive letter, etc.
What is the best free partition manager?
MiniTool Partition Wizard is one of the best free partition managers. With it, you can easily perform some basic partition management operations, clone disk, migrate OS, recover data, perform partition recovery, analyze disk space, etc. It is a comprehensive partition manager to satisfy your different needs.
How do I find the C drive on Windows 10?
It is the same as the previous versions of Windows. Just go to File Explorer, click This PC and then you will find the C drive. Alternatively, you can input this PC to the search box and click the result to find the C drive.