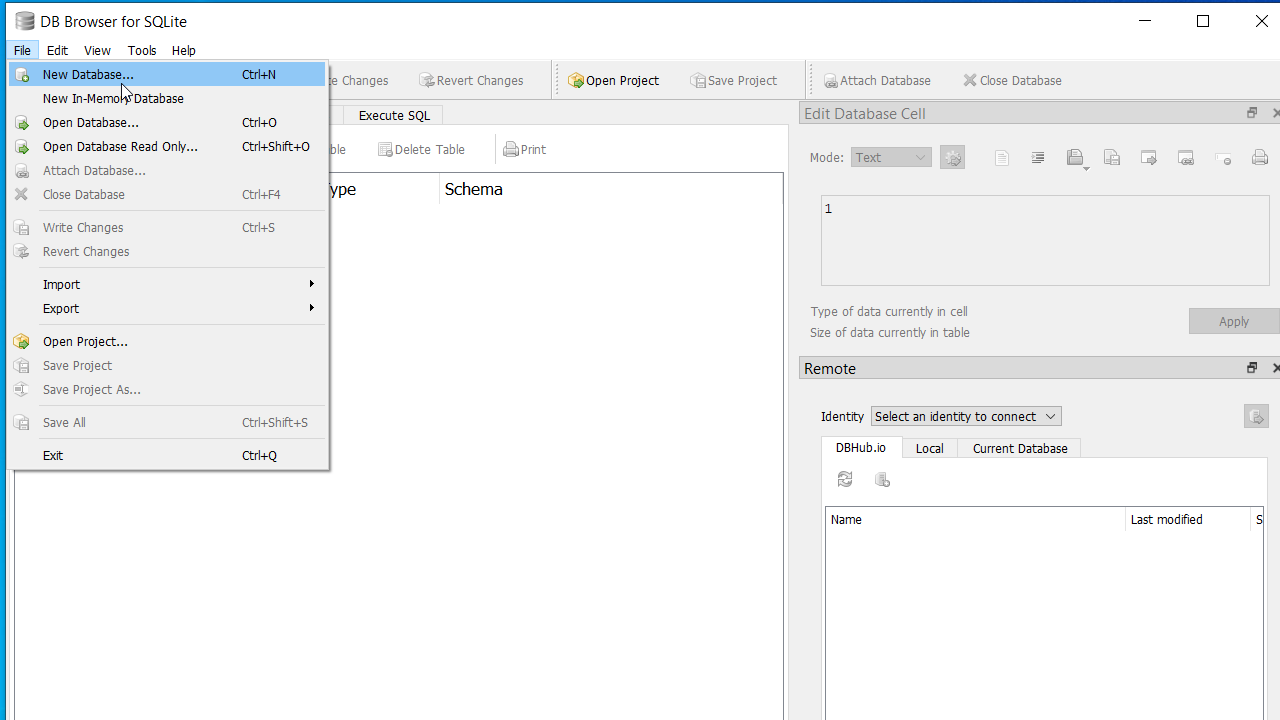
-
Главная
-
Инструкции
-
SQLite
-
Краткое руководство по работе с SQLite
SQLite — это внутрипроцессная библиотека, которая реализует автономный, бессерверный, не требующий настройки транзакционный механизм базы данных SQL. Исходный код для SQLite имеется в открытом доступе, позволяет модифицирование и является бесплатным. SQLite выбирают за скорость, минимализм, надёжность. В сервисах timeweb.cloud вы можете установить её на VDS-сервер.
Кстати, в официальном канале Timeweb Cloud мы собрали комьюнити из специалистов, которые говорят про IT-тренды, делятся полезными инструкциями и даже приглашают к себе работать.
Библиотека SQLite уже скомпилирована и доступна к скачиванию и установке с официального сайта. Желающие могут компилировать исходники и самостоятельно.
Для написания и исполнения запросов к базам SQLite можно использовать простую программу-оболочку командной строки — sqlite3. Но также существуют множество бесплатных (например, SQLiteStudio) и коммерческих инструментов с графическим интерфейсом для управления базами SQLite.
Установка и запуск SQLite на Windows
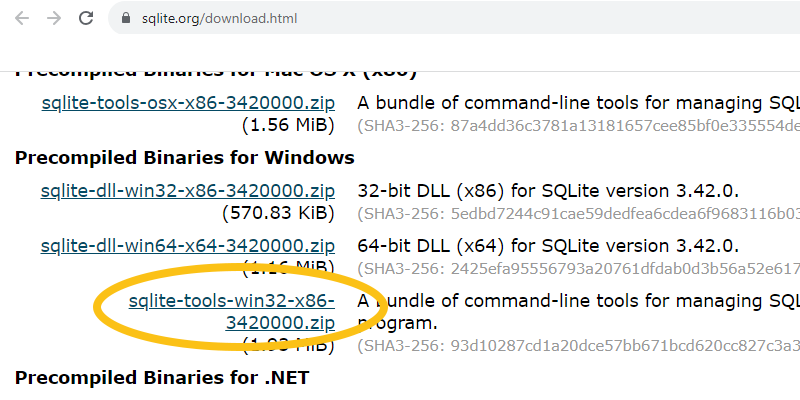
1. Переходим на страницу загрузки SQLite и загружаем файлы, обеспечивающие работу SQLite в Windows, в том числе sqlite3:
2. На своем компьютере создаём новую папку, например, C:\sqlite.
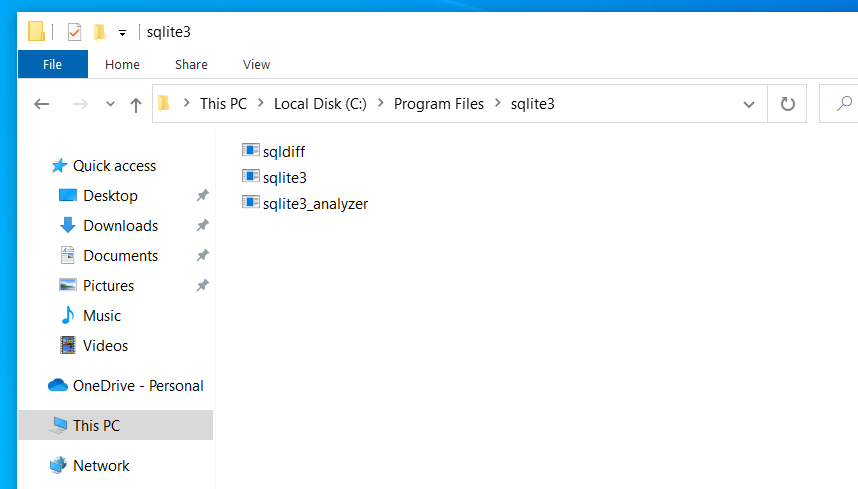
3. Извлекаем содержимое скачанного файла в папку C:\sqlite. Там должны появиться три программы:
- Sqlite3.exe
- Sqlite3_analizer.exe
- sqldiff.exe
4. В командной строке переходим в папку с sqlite3.exe и запускаем этот файл. При этом можно указать имя базы данных:
C:\>cd C:\sqlite
sqlite3 <имя базы данных SQLite>
Если файл с таким именем не существует, то он будет создан автоматически. Если в командной строке не указано имя файла с базой данных, создается временная база данных, которая автоматически удаляется при выходе из sqlite3.
5. Пользователи Windows могут дважды кликнуть значок sqlite3.exe, чтобы открылось всплывающее окно терминала с запущенным sqlite. Однако, так как двойной клик запускает sqlite3 без аргументов, файл базы данных не будет указан, а будет использоваться временная база данных, которая удалится при завершении сеанса.
Установка и запуск SQLite на Linux
Посмотрим как установить на Linux SQLite на примере Ubuntu.
1. Чтобы установить sqlite3 в Ubuntu, сначала обновите список пакетов:
$ sudo apt update2. Затем установите sqlite3:
$ sudo apt install sqlite33. Понять, прошла ли установка, можно, проверив версию:
$ sqlite3 --versionВ случае успеха, вы получите нечто подобное:
3.38.3 2022-04-27 12:03:15 3bfa9cc97da10589251b342961df8f5f68c7399fa117345eeb516bee837balt1Как создать базу данных в SQLite
Существует несколько способов, чтобы сделать создать базу в SQLite:
1. Как отмечалось выше, при запуске sqlite3 можно указать имя базы данных:
$ sqlite3 my_first_db.dbЕсли база my_first_db.db существует, то она откроется, если нет — она будет создана и автоматически удалится при выходе из sqlite3, если к базе не было совершено ни одного запроса. Поэтому, чтобы убедиться, что база записана на диск, можно запустить пустой запрос, введя ; и нажав Enter:
sqlite> ;После работы изменения в базе можно сохранить с помощью специальной команды SQLite «.save» с указанием имени базы:
sqlite> .save my_first_db.dbили полного пути до базы:
sqlite> .save C:/sqlite/my_first_db.dbПри использовании команды «.save» стоит проявлять осторожность, так как эта команда перезапишет все ранее существовавшие файлы с таким же именем не запрашивая подтверждения.
2. В SQLite создать базу данных можно с помощью команды «.open»:
sqlite> .open my_first_db.dbКак и в первом случае, если база с указанным именем существует, то она откроется, если же не существует — то будет создана. При таком способе создания новая база данных SQLite не исчезнет при закрытии sqlite3, но все изменения перед выходом из программы нужно сохранить с помощью команды «.save», как показано выше.
3. Как уже упоминалось, при запуске sqlite3 без аргументов, будет использоваться временная база данных, которая будет удалена при завершении сеанса. Однако эту базу можно сохранить на диск с помощью команды «.save»
$ sqlite3
SQLite version 3.38.3 2022-04-27 12:03:15
Enter ".help" for usage hints.
Connected to a transient in-memory database.
Use ".open FILENAME" to reopen on a persistent database.
sqlite> ... many SQL commands omitted ...
sqlite> .save db1.db
sqlite>
SQLite. Создание таблицы
Информация в базах SQLite хранится в виде таблиц. Для создания таблиц в SQLite используется запрос CREATE TABLE. Этот запрос должен содержать имя таблицы и имена полей (столбцов), а также может содержать типы данных, описания полей (ключевое поле) и значения по умолчанию. Например, создадим таблицу с описаниями параметров разных пород собак, применяя CREATE TABLE в SQLite:
sqlite> CREATE TABLE dog_params (id integer PRIMARY KEY,
    dog_breed text,
    speed_km_per_h integer,
    weight_kg integer);
В нашей таблице колонка id помечена как PRIMARY KEY. Это значит, что id будет ключевым столбцом (индексом) и целое число для него будет генерироваться автоматически.
Внесение записей в таблицу
Для внесения новой записи в таблицу используется SQL-запрос INSERT INTO, в котором указывается в какую таблицу и в какие поля заносить новые значения. Структура запроса:
sqlite> INSERT INTO таблица (столбец1, столбец2)
VALUES (значение1, значение2);
Если количество значений соответствует количеству колонок в таблице, то названия полей можно исключить из запроса. Столбцы таблицы, которые не отображаются в списке столбцов, заполняются значением столбца по умолчанию (указывается как часть инструкции CREATE TABLE) или значением NULL, если значение по умолчанию не было указано.
Например:
sqlite> INSERT INTO dog_params (dog_breed, speed_km_per_h, weight_kg)
VALUES ("Greyhound", 72, 29);
sqlite> INSERT INTO dog_params VALUES (2, "Jack Russell Terrier", 61, 5);
sqlite> INSERT INTO dog_params VALUES (3, "Dalmation", 59, 24);
В первом случае id сгенерировался сам, так как это поле назначено индексом, а для внесения строчек без указания названий колонок нужно прописывать номера id вручную.
С помощью следующего SQL-запроса можно вставить несколько записей одновременно, id опять сгенерируются автоматически:
sqlite> INSERT INTO dog_params (dog_breed, speed_km_per_h, weight_kg)
VALUES ("Borzoi", 58, 39), ("Standard Poodle", 48, 27);
SQLite. Просмотр таблиц
Чтобы просмотреть всё содержимое таблицы, используется запрос SELECT:
sqlite> SELECT * FROM dog_params;Результат будет выглядеть таким образом:
1|Greyhound|72|29
2|Jack Russell Terrier|61|5
3|Dalmation|59|24
4|Borzoi|58|39
5|Standard Poodle|48|27
С помощью команды WHERE можно просмотреть только те строки, которые удовлетворяют некоторому условию. Например, выведем породы, у которых скорость меньше 60 км/ч:
sqlite> SELECT * FROM dog_params WHERE speed_km_per_h < 60;
3|Dalmation|59|24
4|Borzoi|58|39
5|Standard Poodle|48|27
Изменение записей в таблице
С помощью запроса ALTER TABLE и дополнительных команд можно изменять таблицу следующим образом:
- переименовать таблицу — RENAME TABLE,
- добавить колонку — ADD COLUMN,
- переименовать колонку — RENAME COLUMN,
- удалить колонку — DROP COLUMN.
К примеру, добавим в нашу таблицу колонку с высотой собаки в холке:
sqlite> ALTER TABLE dog_params ADD COLUMN height_cm integer;Чтобы изменить значения в существующих записях таблицы понадобится запрос в SQLite – Update. В этом случае возможно как изменение значений ячейки в группе строк, так и изменение значения ячейки отдельной строки.
В качестве примера, внесем значения высоты собак в холке в нашу таблицу:
sqlite> UPDATE dog_params SET height_cm=71 WHERE id=1;
sqlite> UPDATE dog_params SET height_cm=28 WHERE id=2;
sqlite> UPDATE dog_params SET height_cm=53 WHERE id=3;
sqlite> UPDATE dog_params SET height_cm=69 WHERE id=4;
sqlite> UPDATE dog_params SET height_cm=61 WHERE id=5;
Наша итоговая таблица будет выглядеть так:
sqlite> SELECT * FROM dog_params:
1|Greyhound|72|29|71
2|Jack Russell Terrier|61|5|28
3|Dalmation|59|24|53
4|Borzoi|58|39|69
5|Standard Poodle|48|27|61
Как пользоваться SQLiteStudio
Работать с базами данных SQLite можно не только из командной строки, но и с помощью инструментов с графическим интерфейсом, одним из которых является SQLiteStudio.
Инструмент SQLiteStudio бесплатный, портативный, интуитивно понятный и кроссплатформенный. Он предоставляет много наиболее важных функций для работы с базами данных SQLite, такие как импорт и экспорт данных в различных форматах, включая CSV, XML и JSON.
Вы можете скачать установщик SQLiteStudio или его портативную версию с официального сайта https://sqlitestudio.pl. Затем необходимо извлечь (или установить) загруженный файл в папку, например, C:\sqlite\gui\ и запустить его. Подробные инструкции по установке и работе с SQLiteStudio можно найти на сайте.
Привет, посетитель сайта ZametkiNaPolyah.ru! Продолжаем рубрику реляционные базы данных и начинаем новый раздел библиотека SQLite. Давайте установим SQLite3 на наш компьютер. В принципе, установка SQLite — довольно простая и ошибиться здесь трудно. Я буду рассматривать установку SQLite3 на Windows 7. Замечу, что процесс установки SQLite на ОС семейства Windows одинаков.
Помните я уже писал о том, что SQLite3 — это два файла: библиотека и шелл? Вся установка заключается в том, чтобы распаковать архивы с этими двумя файлами.
Где скачать SQLite3
Рассмотрим процесс установки библиотеки SQLite на компьютер под управлением Windows 7. Хочу отметить, что SQLite3 – кросс платформенное приложение и работает одинаково на любой операционной системе.
Первый шаг, который нам нужно сделать – скачать SQLite3. Скачать SQLite3 можно на официальном сайте компании.
Со страницы Download нам необходимо скачать три архива:
- Архив с документацией sqlite— doc-3120200.zip. Документация очень помогает, когда нет доступа к интернету.
- Sqlite— tools— win32- x86-3120200.zip – это набор утилит для работы и администрирования с базами данных под управлением SQLite
- И на выбор скачиваем sqlite— dll— win64- x64-3120200 или же sqlite— dll— win32- x86-3120200. Выбор зависит от разрядности вашего процессора и операционной системы. Обратите внимание, что х86 можно установить на 64-ех битные системы и всё будет работать, но никак не наоборот.
Установка SQLite на Windows 7
Установим SQLite на компьютер: нам необходимо создать рабочую папку для библиотеки SQLite3.
Я буду устанавливать SQLite3 на диск C, поэтому в корне диска С создаю папку с названием SQLite.
В эту папку распаковываю три архива, которые скачал ранее. На самом деле мы уже установили библиотеку SQLite3 на компьютер. Всё, установка SQLite3 завершена.
Запуск библиотеки SQLite3
На самом деле, неправильно говорить: запуск SQLite, мы запускаем шелл, через который будем работать с библиотекой. Давайте попробуем ее запустить, для этого нажмем сочетание клавиш:Win+R. Запустится приложение «Выполнить». При помощи приложения «Выполнить» запускаем командную строку командой cmd.
В командной строке набираем sqlite3. Команда sqlite3 служит для запуска оболочки, через которую мы можем работать с базами данных. Но, к сожалению, оболочка не запустилась. А мы получили вот такое предупреждение: «sqlite3» не является внутренней или внешней командой, исполняемой программой или пакетным файлом.
Для решения этой проблемы у нас есть два варианта:
- Мы можем перейти в папку, где находится файл sqlite.exe при помощи команды: cd c:\SQLite. После чего шелл библиотеки SQLite3 можно запустить.
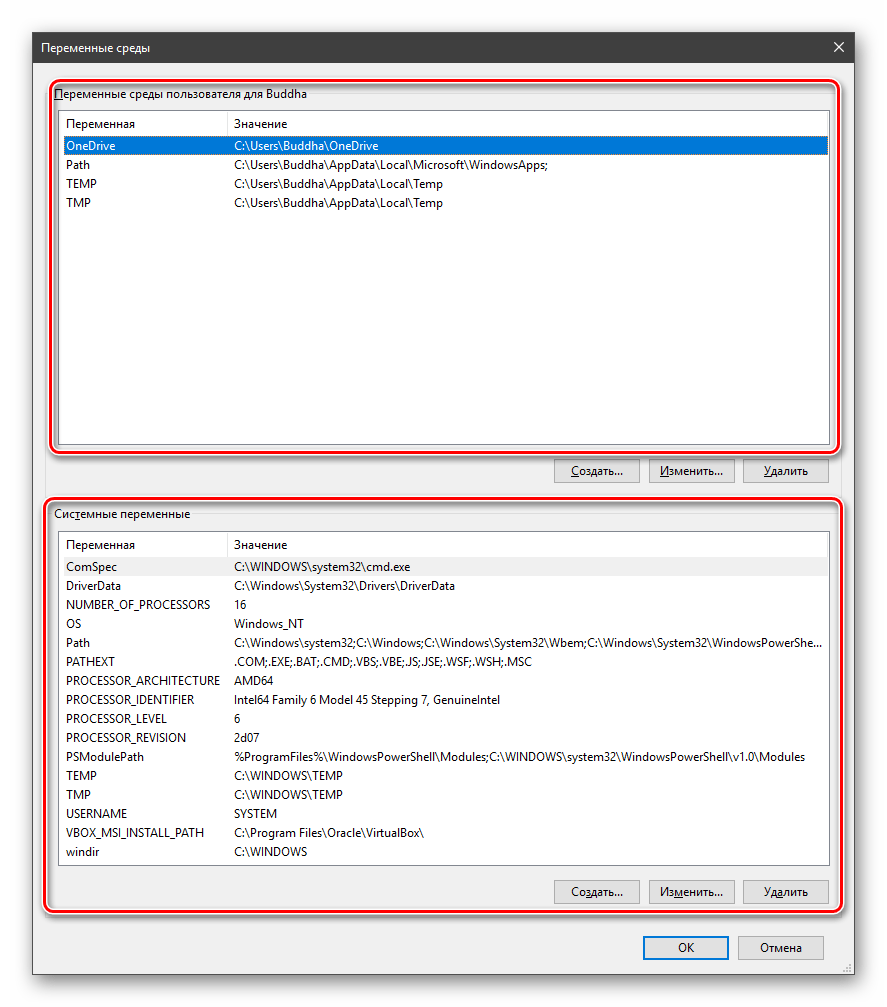
- Мы можем добавить путь к файлу sqlite.exe в системную переменную PATH, тогда мы сможем запускать нашу консоль из любой папки на компьютере. Делается это так: нажимаем правой кнопкой мыши на «Компьютер» -> выбираем пункт «Свойства» -> «Дополнительные параметры системы» -> «Переменные среды». В разделе системные переменные находим PATH (если ее еще нет, то создаем) и нажимаем «Изменить». Обратите внимание: переменные разделяются символом точка с запятой. Поэтому ставим точку с запятой после последней переменной и добавляем свою. В моё случае: C:\SQLite\. Именно в этой папке у меня находится файл sqlite3.exe.
И последнее, что мы сделаем: создадим рабочую среду для библиотеки SQLite3. Всё дело в том, что библиотека SQLite3 создает файл с базой данных именной в той папке, откуда запущен шелл, поэтому я внутри папки C:\SQLite\, создам еще две: C:\SQLite\Example DB и C:\SQLite\World DB, сюда я положу демонстрационный файл world.db3. База данных World – демонстрационная.
Возможно, эти записи вам покажутся интересными
Содержание
- Шаг 1: Скачивание и распаковка файлов
- Шаг 2: Добавление исполняемого файла в переменную среду
- Шаг 3: Проверка работоспособности
- Вопросы и ответы
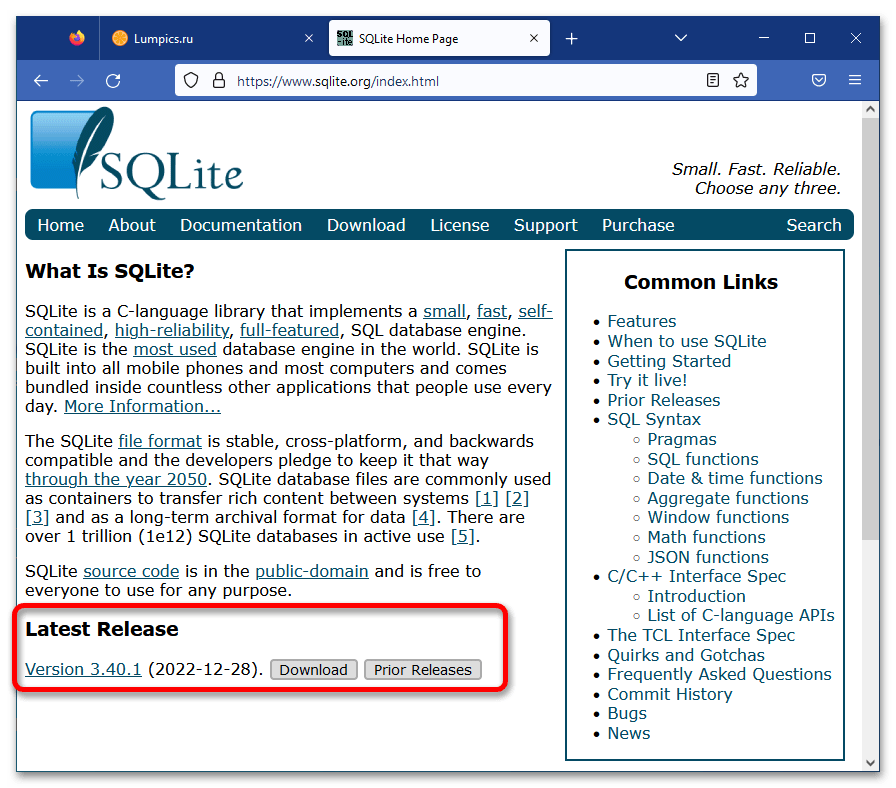
Обратите внимание! Все описываемые далее действия выполняются на примере базы данных SQLite 3.40.1 (2022-12-28), актуальной на момент написания настоящей статьи. Это важно учитывать, так как в будущем разработчиками могут быть внесены серьезные изменения в работу продукта, вследствие чего некоторые инструкции могут потерять свою актуальность.
Шаг 1: Скачивание и распаковка файлов
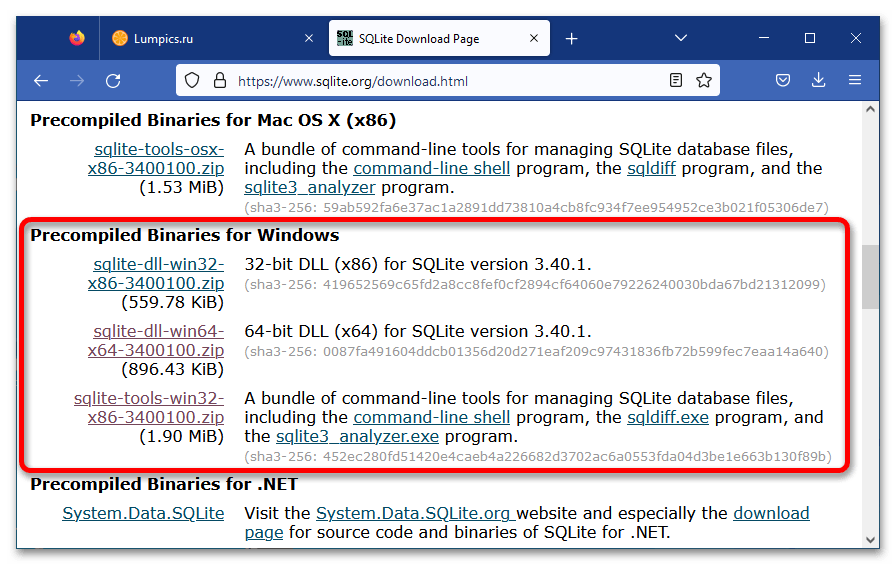
Первостепенно необходимо скачать файлы SQLite, чтобы в дальнейшем настроить их работу для использования в операционной системе Windows 10. Загружать базу данных рекомендуется с официального сайта разработчиков, это исключит вероятность заражения компьютера вирусными программами.
Скачать SQLite с официального сайта
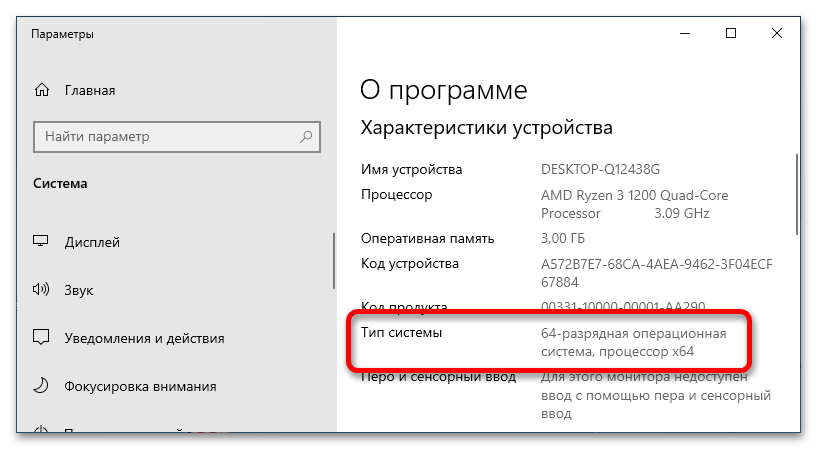
Примечание! При выборе файлов для загрузки следует отталкиваться от разрядности установленной операционной системы. Если этой информацией вы не обладаете, обратитесь за помощью к другой статье на нашем сайте, после чего вернитесь и продолжите выполнять описываемые ниже действия.
Подробнее: Как посмотреть разрядность системы Windows 10
Чтобы установить SQLite в Windows 10, достаточно скачать архивы базы данных нужной версии и распаковать их в удобную для вас директорию:
- Находясь на странице загрузки, переместитесь ниже до блока «Precompiled Binaries for Windows». Затем скачайте архив под названием «sqlite-tools-win32-x86-3400100.zip», после чего кликните по ссылке «sqlite-dll-win32-x86-3400100.zip» (для 32-разрядной операционной системы) или «sqlite-dll-win64-x64-3400100.zip» (для 64-разрядной операционной системы).
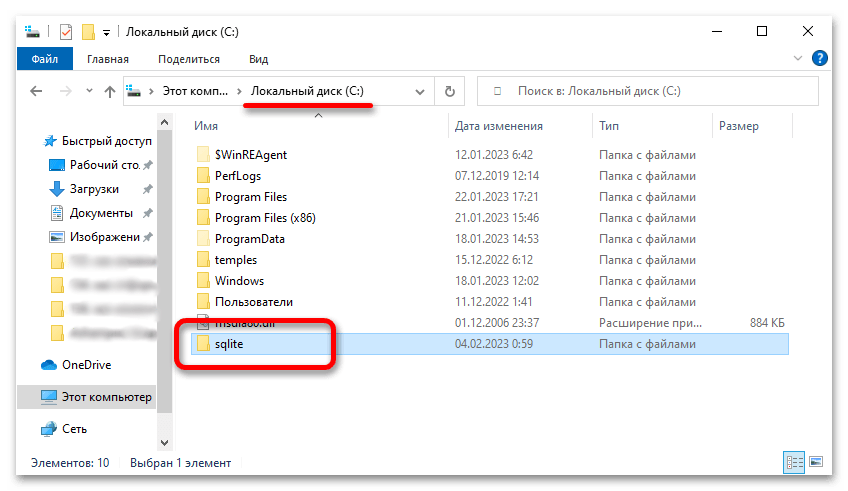
- В любом удобном месте на диске создайте папку, в которую будут помещены файлы SQLite. На скриншоте ниже видно, что была создана директория «sqlite» в корневом разделе диска C.
-
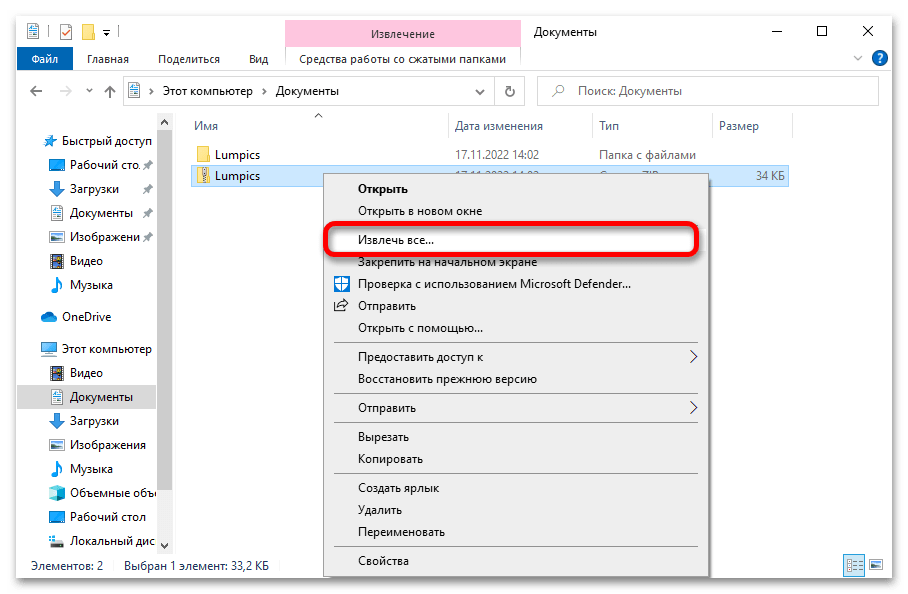
Распакуйте ранее загруженные архивы в созданный каталог, воспользовавшись специальной программой. В качестве примера приведен WinRAR, но для этих целей можно воспользоваться и штатным инструментом операционной системы.
Обратите внимание! Если с распаковкой архивов возникли трудности, обратитесь за помощью к другой статье на нашем сайте, в которой представлено три способа выполнения поставленной задачи.
Подробнее: Распаковка ZIP-архивов в операционной системе Windows 10
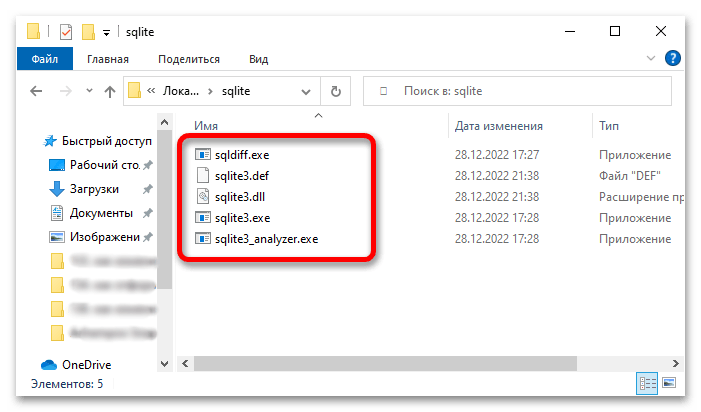
По итогу выполнения этого шага у вас на диске должен появиться каталог, в котором будут находиться пять файлов базы данных SQLite.
Шаг 2: Добавление исполняемого файла в переменную среду
Базой данных SQLite можно начинать пользоваться уже сейчас, запустив приложение «sqlite3.exe». Но для удобства вызова рабочей среды из «Командной строки» рекомендуется добавить в переменную PATH каталог, в котором размещен исполняемый файл программы. Это избавит от необходимости каждый раз открывать файловый менеджер и переходить в папку с базой данных.
-
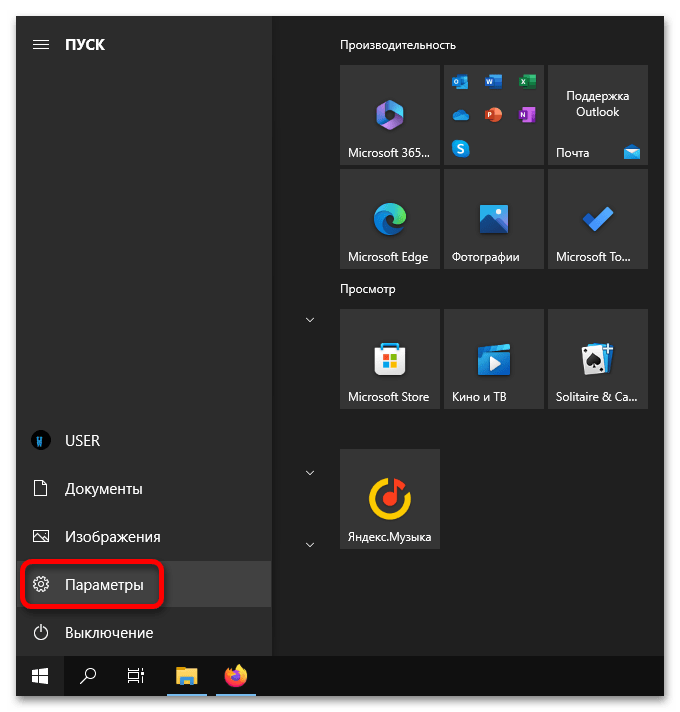
Откройте окно параметров любым доступным способом. Проще всего для этого сделать через меню «Пуск», кликнув по соответствующей кнопке в левом нижнем углу экрана.
Читайте также: Все способы запуска «Параметров» в Windows 10
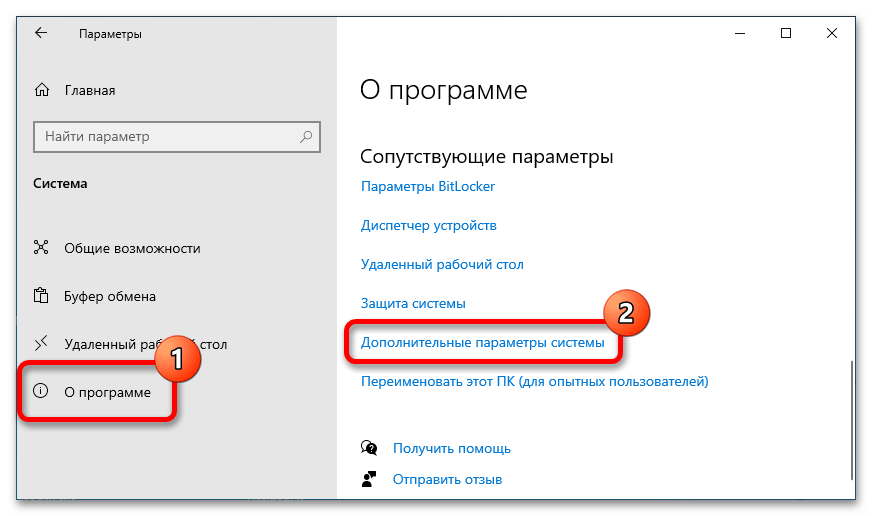
- Перейдите в раздел «Система», щелкнув левой кнопкой мыши по одноименному блоку в окне параметров.
- Воспользовавшись панелью слева, перейдите во вкладку «О программе», после чего в основной части окна пролистайте страницу в самый низ и щелкните по ссылке «Дополнительные параметры системы».
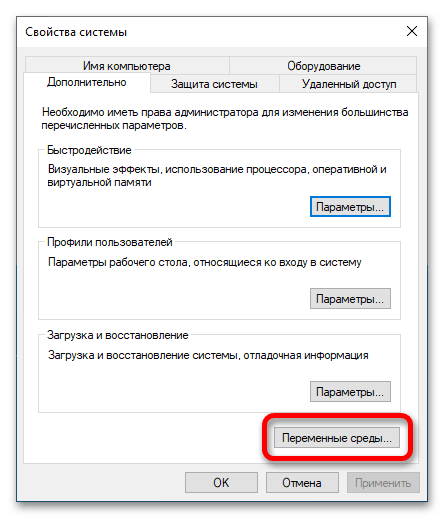
- В новом появившемся окне «Свойства системы», находясь на вкладке «Дополнительно», кликните по кнопке «Переменные среды».
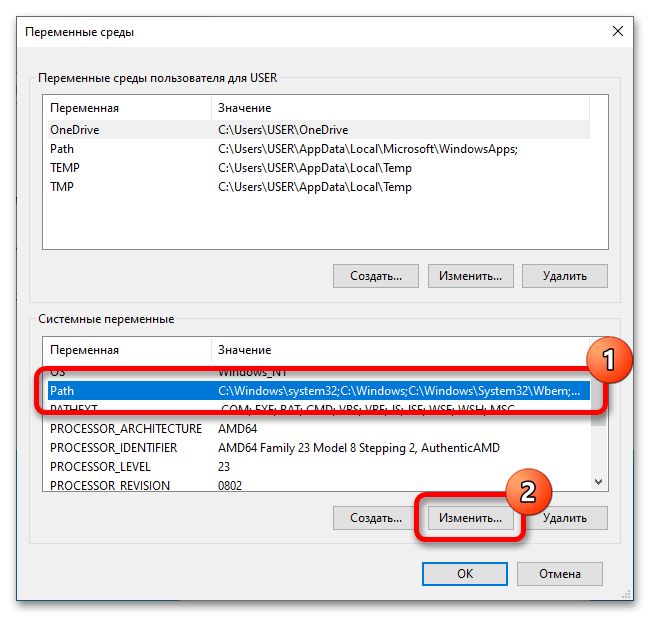
- В меню переменных сред в списке «Системные переменные» выделите строку «Path» и нажмите по кнопке «Изменить».
-
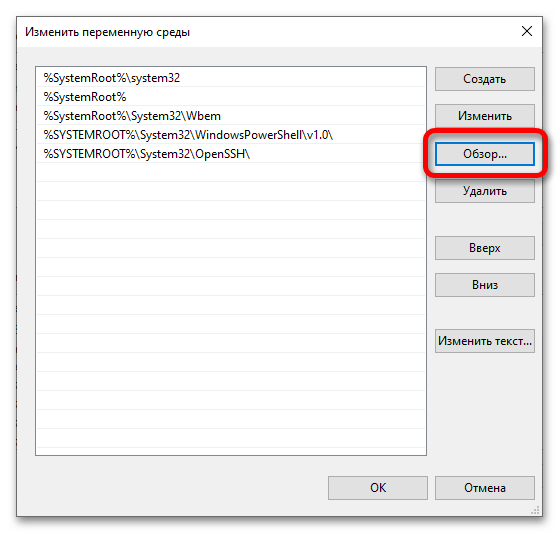
Добавьте в список путь к папке, созданной на первом шаге и содержащей все файлы SQLite. Проще всего это сделать через окно файлового менеджера, поэтому нажмите по кнопке «Обзор».
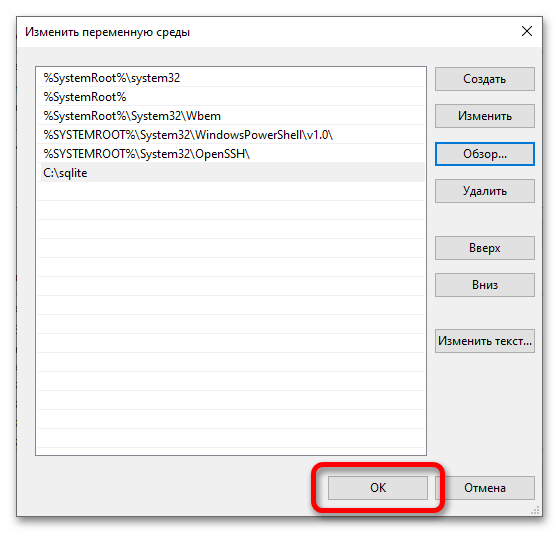
В «Проводнике» перейдите к целевой директории и выделите ее, после этого нажмите «ОК». Обратите внимание, что у вас месторасположение и название папки может отличаться.
Сохраните внесенные изменения в параметры среды, щелкнув по кнопке «ОК». После можете закрыть все оставшиеся окна и приступать к проверке работы базы данных.
Обратите внимание! Если в ходе работы с переменной средой Windows 10 вы столкнулись с проблемами или появилось желание более глубже изучить эту тему, рекомендуем перейти по ссылке ниже к статье, в которой подробно рассказывается о переменных PATH и PATHEXT, а также приводятся практические примеры использования этих компонентов операционной среды.
Подробнее: Изучаем переменные среды в Windows 10
Шаг 3: Проверка работоспособности
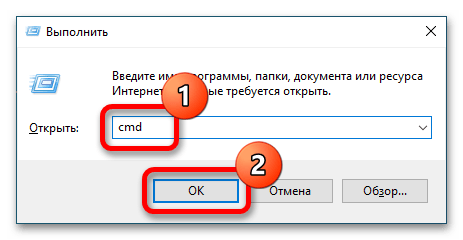
Все готово к запуску базы данных SQLite. Рабочая среда инициализируется в «Командной строке», поэтому предварительно необходимо ее открыть. Для этого проще всего вызвать окно «Выполнить» сочетанием клавиш Win + R, после чего ввести команду cmd и нажать по кнопке «ОК».
Читайте также: Все способы запуска «Командной строки» в Windows 10
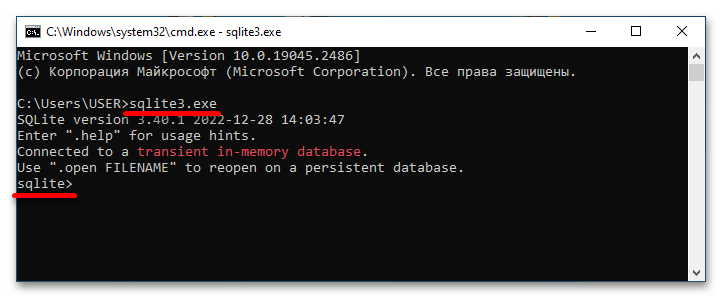
В открывшемся окне консоли пропишите команду sqlite3 или sqlite3.exe и нажмите Enter. После этого должно появиться приглашение к вводу команд SQL, выраженное надписью «sqlite>» (без кавычек) в начале строки.
Если у вас все так, как описывается выше, то базу данных SQLite можно считать установленной и готовой к использованию. В противном случае вернитесь к шагу 2 и повторите выполнение всех перечисленных там действие.
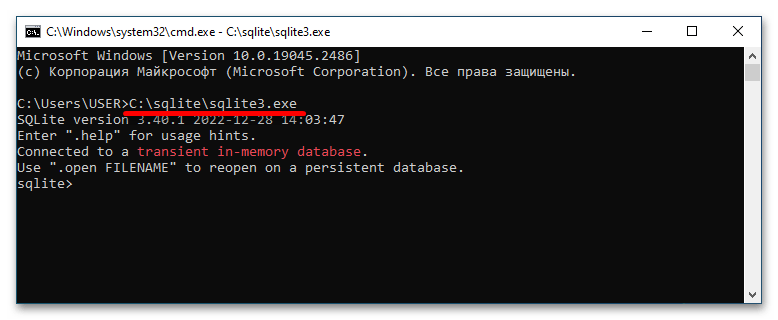
Важно! В качестве альтернативы можно запускать оболочку SQLite через исполняемый файл в корневом каталоге, который создавался на первом шаге. Сделать это можно и через «Командную строку», прописав полный путь к программе, как это показано на скриншоте ниже.
Еще статьи по данной теме:
Помогла ли Вам статья?
Command Line Shell For SQLite
1. Getting Started
The SQLite project provides a simple command-line program named
sqlite3 (or sqlite3.exe on Windows)
that allows the user to manually enter and execute SQL
statements against an SQLite database or against a
ZIP archive. This document provides a brief
introduction on how to use the sqlite3 program.
Start the sqlite3 program by typing «sqlite3» at the
command prompt, optionally followed
by the name of the file that holds the SQLite database
(or ZIP archive). If the named
file does not exist, a new database file with the given name will be
created automatically. If no database file is specified on the
command-line, a temporary database is created and automatically deleted when
the «sqlite3» program exits.
On startup, the sqlite3 program will show a brief banner
message then prompt you to enter SQL. Type in SQL statements (terminated
by a semicolon), press «Enter» and the SQL will be executed.
For example, to create a new SQLite database named «ex1»
with a single table named «tbl1», you might do this:
$ sqlite3 ex1
SQLite version 3.36.0 2021-06-18 18:36:39
Enter ".help" for usage hints.
sqlite> create table tbl1(one text, two int);
sqlite> insert into tbl1 values('hello!',10);
sqlite> insert into tbl1 values('goodbye', 20);
sqlite> select * from tbl1;
hello!|10
goodbye|20
sqlite>
Terminate the sqlite3 program by typing your system
End-Of-File character (usually a Control-D). Use the interrupt
character (usually a Control-C) to stop a long-running SQL statement.
Make sure you type a semicolon at the end of each SQL command!
The sqlite3 program looks for a semicolon to know when your SQL command is
complete. If you omit the semicolon, sqlite3 will give you a
continuation prompt and wait for you to enter more text to
complete the SQL command. This feature allows you to
enter SQL commands that span multiple lines. For example:
sqlite> CREATE TABLE tbl2 (
   ...>   f1 varchar(30) primary key,
   ...>   f2 text,
   ...>   f3 real
   ...> );
sqlite>
2. Double-click Startup On Windows
Windows users can double-click on the sqlite3.exe icon to cause
the command-line shell to pop-up a terminal window running SQLite. However,
because double-clicking starts the sqlite3.exe without command-line arguments,
no database file will have been specified, so SQLite will use a temporary
database that is deleted when the session exits.
To use a persistent disk file as the database, enter the «.open» command
immediately after the terminal window starts up:
SQLite version 3.36.0 2021-06-18 18:36:39
Enter ".help" for usage hints.
Connected to a transient in-memory database.
Use ".open FILENAME" to reopen on a persistent database.
sqlite> .open ex1.db
sqlite>
The example above causes the database file named «ex1.db» to be opened
and used. The «ex1.db» file is created if it does not previously exist.
You might want to
use a full pathname to ensure that the file is in the directory that you
think it is in. Use forward-slashes as the directory separator character.
In other words use «c:/work/ex1.db», not «c:\work\ex1.db».
Alternatively, you can create a new database using the default temporary
storage, then save that database into a disk file using the «.save» command:
SQLite version 3.36.0 2021-06-18 18:36:39
Enter ".help" for usage hints.
Connected to a transient in-memory database.
Use ".open FILENAME" to reopen on a persistent database.
sqlite> ... many SQL commands omitted ...
sqlite> .save ex1.db
sqlite>
Be careful when using the «.save» command as it will overwrite any
preexisting database files having the same name without prompting for
confirmation. As with the «.open» command, you might want to use a
full pathname with forward-slash directory separators to avoid ambiguity.
3. Special commands to sqlite3 (dot-commands)
Most of the time, sqlite3 just reads lines of input and passes them
on to the SQLite library for execution.
But input lines that begin with a dot («.»)
are intercepted and interpreted by the sqlite3 program itself.
These «dot commands» are typically used to change the output format
of queries, or to execute certain prepackaged query statements.
There were originally just a few dot commands, but over the years
many new features have accumulated so that today there are over 60.
For a listing of the available dot commands, you can enter «.help» with
no arguments. Or enter «.help TOPIC» for detailed information about TOPIC.
The list of available dot-commands follows:
sqlite> .help
.archive ...             Manage SQL archives
.auth ON|OFF             Show authorizer callbacks
.backup ?DB? FILE        Backup DB (default "main") to FILE
.bail on|off             Stop after hitting an error.  Default OFF
.cd DIRECTORY            Change the working directory to DIRECTORY
.changes on|off          Show number of rows changed by SQL
.check GLOB              Fail if output since .testcase does not match
.clone NEWDB             Clone data into NEWDB from the existing database
.connection [close] [#]  Open or close an auxiliary database connection
.databases               List names and files of attached databases
.dbconfig ?op? ?val?     List or change sqlite3_db_config() options
.dbinfo ?DB?             Show status information about the database
.dump ?OBJECTS?          Render database content as SQL
.echo on|off             Turn command echo on or off
.eqp on|off|full|...     Enable or disable automatic EXPLAIN QUERY PLAN
.excel                   Display the output of next command in spreadsheet
.exit ?CODE?             Exit this program with return-code CODE
.expert                  EXPERIMENTAL. Suggest indexes for queries
.explain ?on|off|auto?   Change the EXPLAIN formatting mode.  Default: auto
.filectrl CMD ...        Run various sqlite3_file_control() operations
.fullschema ?--indent?   Show schema and the content of sqlite_stat tables
.headers on|off          Turn display of headers on or off
.help ?-all? ?PATTERN?   Show help text for PATTERN
.import FILE TABLE       Import data from FILE into TABLE
.imposter INDEX TABLE    Create imposter table TABLE on index INDEX
.indexes ?TABLE?         Show names of indexes
.limit ?LIMIT? ?VAL?     Display or change the value of an SQLITE_LIMIT
.lint OPTIONS            Report potential schema issues.
.load FILE ?ENTRY?       Load an extension library
.log FILE|off            Turn logging on or off.  FILE can be stderr/stdout
.mode MODE ?TABLE?       Set output mode
.nonce STRING            Disable safe mode for one command if the nonce matches
.nullvalue STRING        Use STRING in place of NULL values
.once ?OPTIONS? ?FILE?   Output for the next SQL command only to FILE
.open ?OPTIONS? ?FILE?   Close existing database and reopen FILE
.output ?FILE?           Send output to FILE or stdout if FILE is omitted
.parameter CMD ...       Manage SQL parameter bindings
.print STRING...         Print literal STRING
.progress N              Invoke progress handler after every N opcodes
.prompt MAIN CONTINUE    Replace the standard prompts
.quit                    Stop interpreting input stream, exit if primary.
.read FILE               Read input from FILE
.recover                 Recover as much data as possible from corrupt db.
.restore ?DB? FILE       Restore content of DB (default "main") from FILE
.save FILE               Write in-memory database into FILE
.scanstats on|off        Turn sqlite3_stmt_scanstatus() metrics on or off
.schema ?PATTERN?        Show the CREATE statements matching PATTERN
.selftest ?OPTIONS?      Run tests defined in the SELFTEST table
.separator COL ?ROW?     Change the column and row separators
.session ?NAME? CMD ...  Create or control sessions
.sha3sum ...             Compute a SHA3 hash of database content
.shell CMD ARGS...       Run CMD ARGS... in a system shell
.show                    Show the current values for various settings
.stats ?ARG?             Show stats or turn stats on or off
.system CMD ARGS...      Run CMD ARGS... in a system shell
.tables ?TABLE?          List names of tables matching LIKE pattern TABLE
.testcase NAME           Begin redirecting output to 'testcase-out.txt'
.testctrl CMD ...        Run various sqlite3_test_control() operations
.timeout MS              Try opening locked tables for MS milliseconds
.timer on|off            Turn SQL timer on or off
.trace ?OPTIONS?         Output each SQL statement as it is run
.vfsinfo ?AUX?           Information about the top-level VFS
.vfslist                 List all available VFSes
.vfsname ?AUX?           Print the name of the VFS stack
.width NUM1 NUM2 ...     Set minimum column widths for columnar output
sqlite>
4. Rules for «dot-commands», SQL and More
4.1. Line Structure
The CLI’s input is parsed into a sequence consisting of:
- SQL statements;
- dot-commands; or
- CLI comments
SQL statements are free-form, and can be spread across multiple lines,
with whitespace or SQL comments embedded anywhere.
They are terminated by either a ‘;’ character at the end of an input line,
or a ‘/’ character or the word «go» on a line by itself.
When not at the end of an input line, the ‘;’ character
acts to separate SQL statements.
Trailing whitespace is ignored for purposes of termination.
A dot-command has a more restrictive structure:
- It must begin with its «.» at the left margin
with no preceding whitespace. - It must be entirely contained on a single input line.
- It cannot occur in the middle of an ordinary SQL
statement. In other words, it cannot occur at a
continuation prompt. - There is no comment syntax for dot-commands.
The CLI also accepts whole-line comments that
begin with a ‘#’ character and extend to the end of the line.
There can be no with whitespace prior to the ‘#’.
4.2. Dot-command arguments
The arguments passed to dot-commands are parsed from the command tail,
per these rules:
- The trailing newline and any other trailing whitespace is discarded;
- Whitespace immediately following the dot-command name, or any argument
input end bound is discarded; - An argument input begins with any non-whitespace character;
- An argument input ends with a character which
depends upon its leading character thusly: - for a leading single-quote (‘), a single-quote acts
as the end delimiter; - for a leading double-quote («), an unescaped double-quote
acts as the end delimiter; - for any other leading character, the end delimiter is
any whitespace; and - the command tail end acts as the end delimiter for any argument;
- Within a double-quoted argument input, a backslash-escaped double-quote
is part of the argument rather than its terminating quote; - Within a double-quoted argument, traditional C-string literal, backslash
escape sequence translation is done; and - Argument input delimiters (the bounding quotes or whitespace)
are discarded to yield the passed argument.
4.3. Dot-command execution
The dot-commands
are interpreted by the sqlite3.exe command-line program, not by
SQLite itself. So none of the dot-commands will work as an argument
to SQLite interfaces such as sqlite3_prepare() or sqlite3_exec().
5. Changing Output Formats
The sqlite3 program is able to show the results of a query
in 14 different output formats:
- ascii
- box
- csv
- column
- html
- insert
- json
- line
- list
- markdown
- quote
- table
- tabs
- tcl
You can use the «.mode» dot command to switch between these output
formats.
The default output mode is «list». In
list mode, each row of a query result is written on one line of
output and each column within that row is separated by a specific
separator string. The default separator is a pipe symbol («|»).
List mode is especially useful when you are going to send the output
of a query to another program (such as AWK) for additional processing.
sqlite> .mode list
sqlite> select * from tbl1;
hello!|10
goodbye|20
sqlite>
Type «.mode» with no arguments to show the current mode:
sqlite> .mode
current output mode: list
sqlite>
Use the «.separator» dot command to change the separator.
For example, to change the separator to a comma and
a space, you could do this:
sqlite> .separator ", "
sqlite> select * from tbl1;
hello!, 10
goodbye, 20
sqlite>
The next «.mode» command might reset the «.separator» back to some
default value (depending on its arguments).
So you will likely need to repeat the «.separator» command whenever you
change modes if you want to continue using a non-standard separator.
In «quote» mode, the output is formatted as SQL literals. Strings are
enclosed in single-quotes and internal single-quotes are escaped by doubling.
Blobs are displayed in hexadecimal blob literal notation (Ex: x’abcd’).
Numbers are displayed as ASCII text and NULL values are shown as «NULL».
All columns are separated from each other by a comma (or whatever alternative
character is selected using «.separator»).
sqlite> .mode quote
sqlite> select * from tbl1;
'hello!',10
'goodbye',20
sqlite>
In «line» mode, each column in a row of the database
is shown on a line by itself. Each line consists of the column
name, an equal sign and the column data. Successive records are
separated by a blank line. Here is an example of line mode
output:
sqlite> .mode line
sqlite> select * from tbl1;
one = hello!
two = 10

one = goodbye
two = 20
sqlite>
In column mode, each record is shown on a separate line with the
data aligned in columns. For example:
sqlite> .mode column
sqlite> select * from tbl1;
one       two
--------  ---
hello!    10
goodbye   20
sqlite>
In «column» mode (and also in «box», «table», and «markdown» modes)
the width of columns adjusts automatically. But you can override this,
providing a speicified width for each column using the «.width» command.
The arguments to «.width» are integers which are the number of
characters to devote to each column. Negative numbers mean right-justify.
Thus:
sqlite> .width 12 -6
sqlite> select * from tbl1;
one              two
------------  ------
hello!            10
goodbye           20
sqlite>
A width of 0 means the column width is chosen automatically.
Unspecified column widths become zero. Hence, the command
«.width» with no arguments resets all column widths to zero and
hence causes all column widths to be determined automatically.
The «column» mode is a tabular output format. Other
tabular output formats are «box», «markdown», and «table»:
sqlite> .width
sqlite> .mode markdown
sqlite> select * from tbl1;
|   one   | two |
|---------|-----|
| hello!  | 10  |
| goodbye | 20  |
sqlite> .mode table
sqlite> select * from tbl1;
+---------+-----+
|   one   | two |
+---------+-----+
| hello!  | 10  |
| goodbye | 20  |
+---------+-----+
sqlite> .mode box
sqlite> select * from tbl1;
┌─────────┬─────┐
│   one   │ two │
├─────────┼─────┤
│ hello!  │ 10  │
│ goodbye │ 20  │
└─────────┴─────┘
sqlite>
The columnar modes accept some addition options to control formatting.
The «—wrap N» option (where N is an integer) causes columns
to wrap text that is longer than N characters. Wrapping is disabled if
N is zero.
sqlite> insert into tbl1 values('The quick fox jumps over a lazy brown dog.',90);
sqlite> .mode box --wrap 30
sqlite> select * from tbl1 where two>50;
┌────────────────────────────────┬─────┐
│              one               │ two │
├────────────────────────────────┼─────┤
│ The quick fox jumps over a laz │ 90  │
│ y brown dog.                   │     │
└────────────────────────────────┴─────┘
sqlite>
Wrapping happens after exactly N characters,
which might be in the middle of a word.
To wrap at a word boundary, add the «—wordwrap on» option
(or just «-ww» for short):
sqlite> .mode box --wrap 30 -ww
sqlite> select * from tbl1 where two>50;
┌─────────────────────────────┬─────┐
│             one             │ two │
├─────────────────────────────┼─────┤
│ The quick fox jumps over a  │ 90  │
│ lazy brown dog.             │     │
└─────────────────────────────┴─────┘
sqlite>
The «—quote» option causes the results in each column to be
quoted like an SQL literal, as in the «quote» mode. See the on-line
help for additional options.
The command «.mode box —wrap 60 —quote» is so useful for general-purpose
database queries that it is given its own alias. Instead of typing out
that whole 27-character command, you can just say «.mode qbox».
Another useful output mode is «insert». In insert mode, the output
is formatted to look like SQL INSERT statements. Use insert
mode to generate text that can later be used to input data into a
different database.
When specifying insert mode, you have to give an extra argument
which is the name of the table to be inserted into. For example:
sqlite> .mode insert new_table
sqlite> select * from tbl1 where two<50;
INSERT INTO "new_table" VALUES('hello',10);
INSERT INTO "new_table" VALUES('goodbye',20);
sqlite>
Other output modes include «csv», «json», and «tcl». Try these
yourself to see what they do.
6. Querying the database schema
The sqlite3 program provides several convenience commands that
are useful for looking at the schema of the database. There is
nothing that these commands do that cannot be done by some other
means. These commands are provided purely as a shortcut.
For example, to see a list of the tables in the database, you
can enter «.tables».
sqlite> .tables
tbl1 tbl2
sqlite>
The «.tables» command is similar to setting list mode then
executing the following query:
SELECT name FROM sqlite_schema
WHERE type IN ('table','view') AND name NOT LIKE 'sqlite_%'
ORDER BY 1
But the «.tables» command does more. It queries the sqlite_schema table
for all attached databases, not just the primary database. And it arranges
its output into neat columns.
The «.indexes» command works in a similar way to list all of
the indexes. If the «.indexes» command is given an argument which is
the name of a table, then it shows just indexes on that table.
The «.schema» command shows the complete schema for the database,
or for a single table if an optional tablename argument is provided:
sqlite> .schema
create table tbl1(one varchar(10), two smallint)
CREATE TABLE tbl2 (
  f1 varchar(30) primary key,
  f2 text,
  f3 real
);
sqlite> .schema tbl2
CREATE TABLE tbl2 (
  f1 varchar(30) primary key,
  f2 text,
  f3 real
);
sqlite>
The «.schema» command is roughly the same as setting
list mode, then entering the following query:
SELECT sql FROM sqlite_schema
ORDER BY tbl_name, type DESC, name
As with «.tables», the «.schema» command shows the schema for
all attached databases. If you only want to see the schema for
a single database (perhaps «main») then you can add an argument
to «.schema» to restrict its output:
The «.schema» command can be augmented with the «—indent» option,
in which case it tries to reformat the various CREATE statements of
the schema so that they are more easily readable by humans.
The «.databases» command shows a list of all databases open in
the current connection. There will always be at least 2. The first
one is «main», the original database opened. The second is «temp»,
the database used for temporary tables. There may be additional
databases listed for databases attached using the ATTACH statement.
The first output column is the name the database is attached with,
and the second result column is the filename of the external file.
There may be a third result column which will be either «‘r/o'» or
«‘r/w'» depending on whether the database file is read-only or read-write.
And there might be a fourth result column showing the result of
sqlite3_txn_state() for that database file.
The «.fullschema» dot-command works like the «.schema» command in
that it displays the entire database schema. But «.fullschema» also
includes dumps of the statistics tables «sqlite_stat1», «sqlite_stat3»,
and «sqlite_stat4», if they exist. The «.fullschema» command normally
provides all of the information needed to exactly recreate a query
plan for a specific query. When reporting suspected problems with
the SQLite query planner to the SQLite development team, developers
are requested to provide the complete «.fullschema» output as part
of the trouble report. Note that the sqlite_stat3 and sqlite_stat4
tables contain samples of index entries and so might contain sensitive
data, so do not send the «.fullschema» output of a proprietary database
over a public channel.
7. Opening Database Files
The «.open» command opens a new database connection, after first closing the
previously opened database command. In its simplest form, the «.open» command merely
invokes sqlite3_open() on the file named as its argument. Use the name «:memory:»
to open a new in-memory database that disappears when the CLI exits or when the
«.open» command is run again.
Or use no name to open a private, temporary on-disk database which
will also disappear upon exit or use of «.open».
If the —new option is included with «.open», then the database is reset prior
to being opened. Any prior data is destroyed. This is a destructive overwrite of
prior data and no confirmation is requested, so use this option carefully.
The —readonly option opens the database in read-only mode. Write will be
prohibited.
The —deserialize option causes the entire content of the on-disk file to be
read into memory and then opened as an in-memory database using the
sqlite3_deserialize() interface. This will, of course, require a lot of memory
if you have a large database. Also, any changes you make to the database will not
be saved back to disk unless you explicitly save them using the «.save» or «.backup»
commands.
The —append option causes the SQLite database to be appended to an existing
file rather than working as a stand-alone file. See the
appendvfs extension for
more information.
The —zip option causes the specified input file to be interpreted as a ZIP archive
instead of as an SQLite database file.
The —hexdb option causes the database content to be to be read from subsequent
lines of input in a hex format, rather than from a separate file on disk.
The «dbtotxt» command-line tool can be used to generate
the appropriate text for a database. The —hexdb option is intended for use by the
SQLite developers for testing purposes. We do not know of any use cases for this
option outside of internal SQLite testing and development.
8. Redirecting I/O
8.1. Writing results to a file
By default, sqlite3 sends query results to standard output. You
can change this using the «.output» and «.once» commands. Just put
the name of an output file as an argument to .output and all subsequent
query results will be written to that file. Or use the .once command
instead of .output and output will only be redirected for the single next
command before reverting to the console. Use .output with no arguments to
begin writing to standard output again. For example:
sqlite> .mode list
sqlite> .separator |
sqlite> .output test_file_1.txt
sqlite> select * from tbl1;
sqlite> .exit
$ cat test_file_1.txt
hello|10
goodbye|20
$
If the first character of the «.output» or «.once» filename is a pipe
symbol («|») then the remaining characters are treated as a command and the
output is sent to that command. This makes it easy to pipe the results
of a query into some other process. For example, the
«open -f» command on a Mac opens a text editor to display the content that
it reads from standard input. So to see the results of a query
in a text editor, one could type:
sqlite> .once | open -f
sqlite> SELECT * FROM bigTable;
If the «.output» or «.once» commands have an argument of «-e» then
output is collected into a temporary file and the system text editor is
invoked on that text file. Thus, the command «.once -e» achieves the
same result as «.once ‘|open -f'» but with the benefit of being portable
across all systems.
If the «.output» or «.once» commands have a «-x» argument, that causes
them to accumulate output as Comma-Separated-Values (CSV) in a temporary
file, then invoke the default system utility for viewing CSV files
(usually a spreadsheet program) on the result. This is a quick way of
sending the result of a query to a spreadsheet for easy viewing:
sqlite> .once -x
sqlite> SELECT * FROM bigTable;
The «.excel» command is an alias for «.once -x». It does exactly the same
thing.
8.2. Reading SQL from a file
In interactive mode, sqlite3 reads input text (either SQL statements
or dot-commands) from the keyboard. You can also redirect input from
a file when you launch sqlite3, of course, but then you do not have the
ability to interact with the program. Sometimes it is useful to run an
SQL script contained in a file entering other commands from the command-line.
For this, the «.read» dot-command is provided.
The «.read» command takes a single argument which is (usually) the name
of a file from which to read input text.
sqlite> .read myscript.sql
The «.read» command temporarily stops reading from the keyboard and instead
takes its input from the file named. Upon reaching the end of the file,
input reverts back to the keyboard. The script file may contain dot-commands,
just like ordinary interactive input.
If the argument to «.read» begins with the «|» character, then instead of
opening the argument as a file, it runs the argument (without the leading «|»)
as a command, then uses the output of that command as its input. Thus, if you
have a script that generates SQL, you can execute that SQL directly using
a command similar to the following:
sqlite> .read |myscript.bat
8.3. File I/O Functions
The command-line shell adds two application-defined SQL functions that
facilitate reading content from a file into a table column, and writing the
content of a column into a file, respectively.
The readfile(X) SQL function reads the entire content of the file named
X and returns that content as a BLOB. This can be used to load content into
a table. For example:
sqlite> CREATE TABLE images(name TEXT, type TEXT, img BLOB);
sqlite> INSERT INTO images(name,type,img)
   ...>   VALUES('icon','jpeg',readfile('icon.jpg'));
The writefile(X,Y) SQL function write the blob Y into the file named X
and returns the number of bytes written. Use this function to extract
the content of a single table column into a file. For example:
sqlite> SELECT writefile('icon.jpg',img) FROM images WHERE name='icon';
Note that the readfile(X) and writefile(X,Y) functions are extension
functions and are not built into the core SQLite library. These routines
are available as a loadable extension in the
ext/misc/fileio.c
source file in the SQLite source code repositories.
8.4. The edit() SQL function
The CLI has another built-in SQL function named edit(). Edit() takes
one or two arguments. The first argument is a value — often a large
multi-line string to be edited. The second argument is the invocation
for a text editor. (It may include options to affect the editor’s
behavior.) If the second argument is omitted, the VISUAL environment
variable is used. The edit() function writes its first argument into a
temporary file, invokes the editor on the temporary file, rereads the file
back into memory after the editor is done, then returns the edited text.
The edit() function can be used to make changes to large text
values. For example:
sqlite> UPDATE docs SET body=edit(body) WHERE name='report-15';
In this example, the content of the docs.body field for the entry where
docs.name is «report-15» will be sent to the editor. After the editor returns,
the result will be written back into the docs.body field.
The default operation of edit() is to invoke a text editor. But by using
an alternative edit program in the second argument, you can also get it to edit
images or other non-text resources. For example, if you want to modify a JPEG
image that happens to be stored in a field of a table, you could run:
sqlite> UPDATE pics SET img=edit(img,'gimp') WHERE id='pic-1542';
The edit program can also be used as a viewer, by simply ignoring the
return value. For example, to merely look at the image above, you might run:
sqlite> SELECT length(edit(img,'gimp')) WHERE id='pic-1542';
8.5. Importing files as CSV or other formats
Use the «.import» command to import CSV (comma separated value)
or similarly delimited data into an SQLite table.
The «.import» command takes two arguments which are the
source from which data is to be read and the name of the
SQLite table into which the data is to be inserted. The source argument
is the name of a file to be read or, if it begins with a «|» character,
it specifies a command which will be run to produce the input data.
Note that it may be important to set the «mode» before running the
«.import» command. This is prudent to prevent the command-line shell
from trying to interpret the input file text as some format other than
how the file is structured. If the —csv or —ascii options are used,
they control import input delimiters. Otherwise, the delimiters are
those in effect for the current output mode.
To import into a table not in the «main» schema, the —schema option
may be used to specify that the table is in some other schema. This can
be useful for ATTACH’ed databases or to import into a TEMP table.
When .import is run, its treatment of the first input row depends
upon whether the target table already exists. If it does not exist,
the table is automatically created and the content of the first input
row is used to set the name of all the columns in the table. In this
case, the table data content is taken from the second and subsequent
input rows. If the target table already exists, every row of the
input, including the first, is taken to be actual data content. If
the input file contains an initial row of column labels, you can make
the .import command skip that initial row using the «—skip 1» option.
Here is an example usage, loading a pre-existing temporary table
from a CSV file which has column names in its first row:
sqlite> .import --csv --skip 1 --schema temp C:/work/somedata.csv tab1
While reading input data in modes other than ‘ascii’, «.import»
interprets input as records composed of fields according to the RFC 4180
specification with this exception: The input record and field separators
are as set by the mode or by use of the .separator command. Fields are
always subject to quote removal to reverse quoting done per RFC 4180,
except in ascii mode.
To import data with arbitrary delimiters and no quoting,
first set ascii mode («.mode ascii»), then set the field
and record delimiters using the «.separator» command. This
will suppress dequoting. Upon «.import», the data will be split
into fields and records according to the delimiters so specified.
8.6. Export to CSV
To export an SQLite table (or part of a table) as CSV, simply set
the «mode» to «csv» and then run a query to extract the desired rows
of the table. The output will formatted as CSV per RFC 4180.
sqlite> .headers on
sqlite> .mode csv
sqlite> .once c:/work/dataout.csv
sqlite> SELECT * FROM tab1;
sqlite> .system c:/work/dataout.csv
In the example above, the «.headers on» line causes column labels to
be printed as the first row of output. This means that the first row of
the resulting CSV file will contain column labels. If column labels are
not desired, set «.headers off» instead. (The «.headers off» setting is
the default and can be omitted if the headers have not been previously
turned on.)
The line «.once FILENAME» causes all query output to go into
the named file instead of being printed on the console. In the example
above, that line causes the CSV content to be written into a file named
«C:/work/dataout.csv».
The final line of the example (the «.system c:/work/dataout.csv»)
has the same effect as double-clicking on the c:/work/dataout.csv file
in windows. This will typically bring up a spreadsheet program to display
the CSV file.
That command only works as written on Windows.
The equivalent line on a Mac would be:
sqlite> .system open dataout.csv
On Linux and other unix systems you will need to enter something like:
sqlite> .system xdg-open dataout.csv
8.6.1. Export to Excel
To simplify export to a spreadsheet, the CLI provides the
«.excel» command which captures the output of a single query and sends
that output to the default spreadsheet program on the host computer.
Use it like this:
sqlite> .excel
sqlite> SELECT * FROM tab;
The command above writes the output of the query as CSV into a temporary
file, invokes the default handler for CSV files (usually the preferred
spreadsheet program such as Excel or LibreOffice), then deletes the
temporary file. This is essentially a short-hand method of doing
the sequence of «.csv», «.once», and «.system» commands described above.
The «.excel» command is really an alias for «.once -x». The -x option
to .once causes it to writes results as CSV into a temporary file that
is named with a «.csv» suffix, then invoke the systems default handler
for CSV files.
There is also a «.once -e» command which works similarly, except that
it names the temporary file with a «.txt» suffix so that the default
text editor for the system will be invoked, instead of the default
spreadsheet.
8.6.2. Export to TSV (tab separated values)
Exporting to pure TSV, without any field quoting, can be done by
entering «.mode tabs» before running a query. However, the output
will not be read correctly in tabs mode by the «.import» command
if it contains doublequote characters. To get TSV quoted per
RFC 4180 so that it can be input in tabs mode with «.import»,
first enter «.mode csv», then enter ‘.separator «\t»‘
before running a query.
9. Accessing ZIP Archives As Database Files
In addition to reading and writing SQLite database files,
the sqlite3 program will also read and write ZIP archives.
Simply specify a ZIP archive filename in place of an SQLite database
filename on the initial command line, or in the «.open» command,
and sqlite3 will automatically detect that the file is a
ZIP archive instead of an SQLite database and will open it as such.
This works regardless of file suffix. So you can open JAR, DOCX,
and ODP files and any other file format that is really a ZIP
archive and SQLite will read it for you.
A ZIP archive appears to be a database containing a single table
with the following schema:
CREATE TABLE zip(
  name,     // Name of the file
  mode,     // Unix-style file permissions
  mtime,    // Timestamp, seconds since 1970
  sz,       // File size after decompression
  rawdata,  // Raw compressed file data
  data,     // Uncompressed file content
  method    // ZIP compression method code
);
So, for example, if you wanted to see the compression efficiency
(expressed as the size of the compressed content relative to the
original uncompressed file size) for all files in the ZIP archive,
sorted from most compressed to least compressed, you could run a
query like this:
sqlite> SELECT name, (100.0*length(rawdata))/sz FROM zip ORDER BY 2;
Or using file I/O functions, you can extract elements of the
ZIP archive:
sqlite> SELECT writefile(name,content) FROM zip
   ...> WHERE name LIKE 'docProps/%';
9.1. How ZIP archive access is implemented
The command-line shell uses the Zipfile virtual table to
access ZIP archives. You can see this by running the «.schema»
command when a ZIP archive is open:
sqlite> .schema
CREATE VIRTUAL TABLE zip USING zipfile('document.docx')
/* zip(name,mode,mtime,sz,rawdata,data,method) */;
When opening a file, if the command-line client discovers that the
file is ZIP archive instead of an SQLite database, it actually opens
an in-memory database and then in that in-memory database it creates
an instance of the Zipfile virtual table that is attached to the
ZIP archive.
The special processing for opening ZIP archives is a trick of the
command-line shell, not the core SQLite library. So if you want to
open a ZIP archive as a database in your application, you will need to
activate the Zipfile virtual table module then run an appropriate
CREATE VIRTUAL TABLE statement.
10. Converting An Entire Database To A Text File
Use the «.dump» command to convert the entire contents of a
database into a single UTF-8 text file. This file can be converted
back into a database by piping it back into sqlite3.
A good way to make an archival copy of a database is this:
$ sqlite3 ex1 .dump | gzip -c >ex1.dump.gz
This generates a file named ex1.dump.gz that contains everything
you need to reconstruct the database at a later time, or on another
machine. To reconstruct the database, just type:
$ zcat ex1.dump.gz | sqlite3 ex2
The text format is pure SQL so you
can also use the .dump command to export an SQLite database
into other popular SQL database engines. Like this:
$ createdb ex2
$ sqlite3 ex1 .dump | psql ex2
11. Recover Data From a Corrupted Database
Like the «.dump» command, «.recover» attempts to convert the entire
contents of a database file to text. The difference is that instead of
reading data using the normal SQL database interface, «.recover»
attempts to reassemble the database based on data extracted directly from
as many database pages as possible. If the database is corrupt, «.recover»
is usually able to recover data from all uncorrupted parts of the database,
whereas «.dump» stops when the first sign of corruption is encountered.
If the «.recover» command recovers one or more rows that it cannot
attribute to any database table, the output script creates a «lost_and_found»
table to store the orphaned rows. The schema of the lost_and_found
table is as follows:
CREATE TABLE lost_and_found(
    rootpgno INTEGER,             -- root page of tree pgno is a part of
    pgno INTEGER,                 -- page number row was found on
    nfield INTEGER,               -- number of fields in row
    id INTEGER,                   -- value of rowid field, or NULL
    c0, c1, c2, c3...             -- columns for fields of row
);
The «lost_and_found» table contains one row for each orphaned row recovered
from the database. Additionally, there is one row for each recovered index
entry that cannot be attributed to any SQL index. This is because, in an
SQLite database, the same format is used to store SQL index entries and
WITHOUT ROWID table entries.
| Column | Contents |
|---|---|
| rootpgno | Even though it may not be possible to attribute the row to a specific database table, it may be part of a tree structure within the database file. In this case, the root page number of that tree structure is stored in this column. Or, if the page the row was found on is not part of a tree structure, this column stores a copy of the value in column «pgno» — the page number of the page the row was found on. In many, although not all, cases, all rows in the lost_and_found table with the same value in this column belong to the same table. |
| pgno | The page number of the page on which this row was found. |
| nfield | The number of fields in this row. |
| id | If the row comes from a WITHOUT ROWID table, this column contains NULL. Otherwise, it contains the 64-bit integer rowid value for the row. |
| c0, c1, c2… | The values for each column of the row are stored in these columns. The «.recover» command creates the lost_and_found table with as many columns as required by the longest orphaned row. |
If the recovered database schema already contains a table named
«lost_and_found», the «.recover» command uses the name «lost_and_found0». If
the name «lost_and_found0» is also already taken, «lost_and_found1», and so
on. The default name «lost_and_found» may be overridden by invoking «.recover»
with the —lost-and-found switch. For example, to have the output script call
the table «orphaned_rows»:
sqlite> .recover --lost-and-found orphaned_rows
12. Loading Extensions
You can add new custom application-defined SQL functions,
collating sequences, virtual tables, and VFSes to the command-line
shell at run-time using the «.load» command. First, build the
extension as a DLL or shared library (as described in the
Run-Time Loadable Extensions document) then type:
sqlite> .load /path/to/my_extension
Note that SQLite automatically adds the appropriate extension suffix
(«.dll» on windows, «.dylib» on Mac, «.so» on most other unixes) to the
extension filename. It is generally a good idea to specify the full
pathname of the extension.
SQLite computes the entry point for the extension based on the extension
filename. To override this choice, simply add the name of the extension
as a second argument to the «.load» command.
Source code for several useful extensions can be found in the
ext/misc
subdirectory of the SQLite source tree. You can use these extensions
as-is, or as a basis for creating your own custom extensions to address
your own particular needs.
13. Cryptographic Hashes Of Database Content
The «.sha3sum» dot-command computes a
SHA3 hash of the content
of the database. To be clear, the hash is computed over the database content,
not its representation on disk. This means, for example, that a VACUUM
or similar data-preserving transformation does not change the hash.
The «.sha3sum» command supports options «—sha3-224», «—sha3-256»,
«—sha3-384», and «—sha3-512» to define which variety of SHA3 to use
for the hash. The default is SHA3-256.
The database schema (in the sqlite_schema table) is not normally
included in the hash, but can be added by the «—schema» option.
The «.sha3sum» command takes a single optional argument which is a
LIKE pattern. If this option is present, only tables whose names match
the LIKE pattern will be hashed.
The «.sha3sum» command is implemented with the help of the
extension function «sha3_query()»
that is included with the command-line shell.
14. Database Content Self-Tests
The «.selftest» command attempts to verify that a database is
intact and is not corrupt.
The .selftest command looks for a table in schema named «selftest»
and defined as follows:
CREATE TABLE selftest(
  tno INTEGER PRIMARY KEY,  -- Test number
  op TEXT,                  -- 'run' or 'memo'
  cmd TEXT,                 -- SQL command to run, or text of "memo"
  ans TEXT                  -- Expected result of the SQL command
);
The .selftest command reads the rows of the selftest table in
selftest.tno order.
For each ‘memo’ row, it writes the text in ‘cmd’ to the output. For
each ‘run’ row, it runs the ‘cmd’ text as SQL and compares the result
to the value in ‘ans’, and shows an error message if the results differ.
If there is no selftest table, the «.selftest» command runs
PRAGMA integrity_check.
The «.selftest —init» command creates the selftest table if it
does not already exists, then appends entries that check the SHA3
hash of the content of all tables. Subsequent runs of «.selftest»
will verify that the database has not been changed in any way. To
generate tests to verify that a subset of the tables is unchanged,
simply run «.selftest —init» then DELETE the selftest rows that
refer to tables that are not constant.
15. SQLite Archive Support
The «.archive» dot-command and the «-A» command-line option
provide built-in support for the
SQLite Archive format. The interface is similar to
that of the «tar» command on unix systems. Each invocation of the «.ar»
command must specify a single command option. The following commands
are available for «.archive»:
| Option | Long Option | Purpose |
|---|---|---|
| -c | —create | Create a new archive containing specified files. |
| -x | —extract | Extract specified files from archive. |
| -i | —insert | Add files to existing archive. |
| -r | —remove | Remove files from the archive. |
| -t | —list | List the files in the archive. |
| -u | —update | Add files to existing archive if they have changed. |
As well as the command option, each invocation of «.ar» may specify
one or more modifier options. Some modifier options require an argument,
some do not. The following modifier options are available:
| Option | Long Option | Purpose |
|---|---|---|
| -v | —verbose | List each file as it is processed. |
| -f FILE | —file FILE | If specified, use file FILE as the archive. Otherwise, assume that the current «main» database is the archive to be operated on. |
| -a FILE | —append FILE | Like —file, use file FILE as the archive, but open the file using the apndvfs VFS so that the archive will be appended to the end of FILE if FILE already exists. |
| -C DIR | —directory DIR | If specified, interpret all relative paths as relative to DIR, instead of the current working directory. |
| -g | —glob | Use glob(Y,X) to match arguments against names in the archive. |
| -n | —dryrun | Show the SQL that would be run to carry out the archive operation, but do not actually change anything. |
| — | — | All subsequent command line words are command arguments, not options. |
For command-line usage, add the short style command-line options immediately
following the «-A», without an intervening space. All subsequent arguments
are considered to be part of the .archive command. For example, the following
commands are equivalent:
sqlite3 new_archive.db -Acv file1 file2 file3
sqlite3 new_archive.db ".ar -cv file1 file2 file3"
Long and short style options may be mixed. For example, the following are
equivalent:
-- Two ways to create a new archive named "new_archive.db" containing
-- files "file1", "file2" and "file3".
.ar -c --file new_archive.db file1 file2 file3
.ar -f new_archive.db --create file1 file2 file3
Alternatively, the first argument following to «.ar» may be the concatenation
of the short form of all required options (without the «-» characters). In
this case arguments for options requiring them are read from the command line
next, and any remaining words are considered command arguments. For example:
-- Create a new archive "new_archive.db" containing files "file1" and
-- "file2" from directory "dir1".
.ar cCf dir1 new_archive.db file1 file2 file3
15.1. SQLite Archive Create Command
Create a new archive, overwriting any existing archive (either in the current
«main» db or in the file specified by a —file option). Each argument following
the options is a file to add to the archive. Directories are imported
recursively. See above for examples.
15.2. SQLite Archive Extract Command
Extract files from the archive (either to the current working directory or
to the directory specified by a —directory option).
Files or directories whose names match the arguments,
as affected by the —glob option, are extracted.
Or, if no arguments follow the options, all files and directories are extracted.
Any specified directories are extracted recursively. It is an error if any
specified names or match patterns cannot be found in the archive.
-- Extract all files from the archive in the current "main" db to the
-- current working directory. List files as they are extracted.
.ar --extract --verbose

-- Extract file "file1" from archive "ar.db" to directory "dir1".
.ar fCx ar.db dir1 file1

-- Extract files with ".h" extension to directory "headers".
.ar -gCx headers *.h
15.3. SQLite Archive List Command
List the contents of the archive. If no arguments are specified, then all
files are listed. Otherwise, only those which match the arguments,
as affected by the —glob option, are listed. Currently,
the —verbose option does not change the behaviour of this command. That may
change in the future.
-- List contents of archive in current "main" db..
.ar --list
15.4. SQLite Archive Insert And Update Commands
The —update and —insert commands work like —create command, except that
they do not delete the current archive before commencing. New versions of
files silently replace existing files with the same names, but otherwise
the initial contents of the archive (if any) remain intact.
For the —insert command, all files listed are inserted into the archive.
For the —update command, files are only inserted if they do not previously
exist in the archive, or if their «mtime» or «mode» is different from what
is currently in the archive.
Compatibility node: Prior to SQLite version 3.28.0 (2019-04-16) only
the —update option was supported but that option worked like —insert in that
it always reinserted every file regardless of whether or not it had changed.
15.5. SQLite Archive Remove Command
The —remove command deletes files and directories which match the
provided arguments (if any) as affected by the —glob option.
It is an error to provide arguments which match nothing in the archive.
15.6. Operations On ZIP Archives
If FILE is a ZIP archive rather than an SQLite Archive, the «.archive»
command and the «-A» command-line option still work. This is accomplished
using of the zipfile extension.
Hence, the following commands are roughly equivalent,
differing only in output formatting:
| Traditional Command | Equivalent sqlite3.exe Command |
|---|---|
| unzip archive.zip | sqlite3 -Axf archive.zip |
| unzip -l archive.zip | sqlite3 -Atvf archive.zip |
| zip -r archive2.zip dir | sqlite3 -Acf archive2.zip dir |
15.7. SQL Used To Implement SQLite Archive Operations
The various SQLite Archive Archive commands are implemented using SQL statements.
Application developers can easily add SQLite Archive Archive reading and writing
support to their own projects by running the appropriate SQL.
To see what SQL statements are used to implement an SQLite Archive
operation, add the —dryrun or -n option. This causes the SQL to be
displayed but inhibits the execution of the SQL.
The SQL statements used to implement SQLite Archive operations make use of
various loadable extensions. These extensions are all available in
the SQLite source tree in the
ext/misc/ subfolder.
The extensions needed for full SQLite Archive support include:
-
fileio.c —
This extension adds SQL functions readfile() and writefile() for
reading and writing content from files on disk. The fileio.c
extension also includes fsdir() table-valued function for listing
the contents of a directory and the lsmode() function for converting
numeric st_mode integers from the stat() system call into human-readable
strings after the fashion of the «ls -l» command. -
sqlar.c —
This extension adds the sqlar_compress() and sqlar_uncompress()
functions that are needed to compress and uncompress file content
as it is inserted and extracted from an SQLite Archive. -
zipfile.c —
This extension implements the «zipfile(FILE)» table-valued function
which is used to read ZIP archives. This extension is only needed
when reading ZIP archives instead of SQLite archives. -
appendvfs.c —
This extension implements a new VFS that allows an SQLite database
to be appended to some other file, such as an executable. This
extension is only needed if the —append option to the .archive
command is used.
16. SQL Parameters
SQLite allows bound parameters to appear in an SQL statement anywhere
that a literal value is allowed. The values for these parameters are set
using the sqlite3_bind_…() family of APIs.
Parameters can be either named or unnamed. An unnamed parameter is a single
question mark («?»). Named parameters are a «?» followed immediately by a number
(ex: «?15» or «?123») or one of the characters «$», «:», or «@» followed by an
alphanumeric name (ex: «$var1», «:xyz», «@bingo»).
This command-line shell leaves unnamed parameters unbound, meaning that they
will have a value of an SQL NULL, but named parameters might be assigned values.
If there exists a TEMP table named «sqlite_parameters» with a schema like this:
CREATE TEMP TABLE sqlite_parameters(
  key TEXT PRIMARY KEY,
  value
) WITHOUT ROWID;
And if there is an entry in that table where the key column exactly matches
the name of parameter (including the initial «?», «$», «:», or «@» character)
then the parameter is assigned the value of the value column. If no entry exists,
the parameter defaults to NULL.
The «.parameter» command exists to simplify managing this table. The
«.parameter init» command (often abbreviated as just «.param init») creates
the temp.sqlite_parameters table if it does not already exist. The «.param list»
command shows all entries in the temp.sqlite_parameters table. The «.param clear»
command drops the temp.sqlite_parameters table. The «.param set KEY VALUE» and
«.param unset KEY» commands create or delete entries from the
temp.sqlite_parameters table.
The VALUE passed to «.param set KEY VALUE» can be either a SQL literal
or any other SQL expression or query which can be evaluated to yield a value.
This allows values of differing types to be set.
If such evaluation fails, the provided VALUE is instead quoted and inserted
as text.
Because such initial evaluation may or may not fail depending upon
the VALUE content, the reliable way to get a text value is to enclose it
with single-quotes protected from the above-described command-tail parsing.
For example, (unless one intends a value of -1365):
.parameter init
.parameter set @phoneNumber "'202-456-1111'"
Note that the double-quotes serve to protect the single-quotes
and ensure that the quoted text is parsed as one argument.
The temp.sqlite_parameters table only provides values for parameters in the
command-line shell. The temp.sqlite_parameter table has no effect on queries
that are run directly using the SQLite C-language API. Individual applications
are expected to implement their own parameter binding. You can search for
«sqlite_parameters» in the
command-line shell source code
to see how the command-line shell does parameter binding, and use that as
a hint for how to implement it yourself.
17. Index Recommendations (SQLite Expert)
Note: This command is experimental. It may be removed or the
interface modified in incompatible ways at some point in the future.
For most non-trivial SQL databases, the key to performance is creating
the right SQL indexes. In this context «the right SQL indexes» means those
that cause the queries that an application needs to optimize run fast. The
«.expert» command can assist with this by proposing indexes that might
assist with specific queries, were they present in the database.
The «.expert» command is issued first, followed by the SQL query
on a separate line. For example, consider the following session:
sqlite> CREATE TABLE x1(a, b, c);                  -- Create table in database
sqlite> .expert
sqlite> SELECT * FROM x1 WHERE a=? AND b>?;        -- Analyze this SELECT
CREATE INDEX x1_idx_000123a7 ON x1(a, b);

0|0|0|SEARCH TABLE x1 USING INDEX x1_idx_000123a7 (a=? AND b>?)

sqlite> CREATE INDEX x1ab ON x1(a, b);             -- Create the recommended index
sqlite> .expert
sqlite> SELECT * FROM x1 WHERE a=? AND b>?;        -- Re-analyze the same SELECT
(no new indexes)

0|0|0|SEARCH TABLE x1 USING INDEX x1ab (a=? AND b>?)
In the above, the user creates the database schema (a single table — «x1»),
and then uses the «.expert» command to analyze a query, in this case
«SELECT * FROM x1 WHERE a=? AND b>?». The shell tool recommends that the
user create a new index (index «x1_idx_000123a7») and outputs the plan
that the query would use in EXPLAIN QUERY PLAN format. The user then creates
an index with an equivalent schema and runs the analysis on the same query
again. This time the shell tool does not recommend any new indexes, and
outputs the plan that SQLite will use for the query given the existing
indexes.
The «.expert» command accepts the following options:
| Option | Purpose |
|---|---|
| ‑‑verbose | If present, output a more verbose report for each query analyzed. |
| ‑‑sample PERCENT | This parameter defaults to 0, causing the «.expert» command to recommend indexes based on the query and database schema alone. This is similar to the way the SQLite query planner selects indexes for queries if the user has not run the ANALYZE command on the database to generate data distribution statistics.
If this option is passed a non-zero argument, the «.expert» command
For small databases and modern CPUs, there is usually no reason not |
The functionality described in this section may be integrated into other
applications or tools using the
SQLite expert extension code.
A database schema which incorporate SQL custom functions made available
via the extension load mechanism may need special provision to work with
the .expert feature. Because the feature uses additional connections to
implement its functionality, those custom functions must be made available
to those additional connections. This can be done by means of the extension
load/usage options described at
Automatically Load Statically Linked Extensions
and
Persistent Loadable Extensions.
18. Working With Multiple Database Connections
Beginning with version 3.37.0 (2021-11-27), the CLI has the ability to
hold multiple database connections open at once. Only one database connection
is active at a time. The inactive connections are still open but are idle.
Use the «.connection» dot-command (often abbreviated as just «.conn») to see a
list of database connections and an indication of which one is currently active.
Each database connection is identified by an integer between 0 and 9. (There
can be at most 10 simultaneously open connections.) Change to another database
connection, creating it if it does not already exist, by typing the «.conn»
command followed by its number. Close a database connection by typing
«.conn close N» where N is the connection number.
Though the underlying SQLite database connections are completely independent
of one another, many of the CLI settings, such as the output format, are
shared across all database connections. Thus, changing the output mode in
one connection will change it in them all. On the other hand, some
dot-commands such as .open only affect the current connection.
19. Miscellaneous Extension Features
The CLI is built with several SQLite extensions that are not
included with the SQLite library. A few add features
not described in the preceding sections, namely:
- the UINT collating sequence which treats
unsigned integers embedded in text according to
their value, along with other text, for ordering; - decimal arithmetic as provided by the decimal extension;
- the generate_series() table-valued function;
- the base64() and base85() functions which encode a
blob to base64 or base85 text or decode the same to a blob; and - support for POSIX extended regular expressions
bound to the REGEXP operator.
20. Other Dot Commands
There are many other dot-commands available in the command-line
shell. See the «.help» command for a complete list for any particular
version and build of SQLite.
21. Using sqlite3 in a shell script
One way to use sqlite3 in a shell script is to use «echo» or
«cat» to generate a sequence of commands in a file, then invoke sqlite3
while redirecting input from the generated command file. This
works fine and is appropriate in many circumstances. But as
an added convenience, sqlite3 allows a single SQL command to be
entered on the command line as a second argument after the
database name. When the sqlite3 program is launched with two
arguments, the second argument is passed to the SQLite library
for processing, the query results are printed on standard output
in list mode, and the program exits. This mechanism is designed
to make sqlite3 easy to use in conjunction with programs like
«awk». For example:
$ sqlite3 ex1 'select * from tbl1' \
>  | awk '{printf "<tr><td>%s<td>%s\n",$1,$2 }'
<tr><td>hello<td>10
<tr><td>goodbye<td>20
$
22. Marking The End Of An SQL Statement
SQLite commands are normally terminated by a semicolon. In the CLI
you can also use the word «GO» (case-insensitive) or a slash character
«/» on a line by itself to end a command. These are used by SQL Server
and Oracle, respectively, and are supported by the SQLite CLI for
compatibility. These won’t work in sqlite3_exec(),
because the CLI translates these inputs into a semicolon before passing
them down into the SQLite core.
23. Command-line Options
There are many command-line options available to the CLI. Use the —help
command-line option to see a list:
$ sqlite3 --help
Usage: ./sqlite3 [OPTIONS] FILENAME [SQL]
FILENAME is the name of an SQLite database. A new database is created
if the file does not previously exist.
OPTIONS include:
   -A ARGS...           run ".archive ARGS" and exit
   -append              append the database to the end of the file
   -ascii               set output mode to 'ascii'
   -bail                stop after hitting an error
   -batch               force batch I/O
   -box                 set output mode to 'box'
   -column              set output mode to 'column'
   -cmd COMMAND         run "COMMAND" before reading stdin
   -csv                 set output mode to 'csv'
   -deserialize         open the database using sqlite3_deserialize()
   -echo                print commands before execution
   -init FILENAME       read/process named file
   -[no]header          turn headers on or off
   -help                show this message
   -html                set output mode to HTML
   -interactive         force interactive I/O
   -json                set output mode to 'json'
   -line                set output mode to 'line'
   -list                set output mode to 'list'
   -lookaside SIZE N    use N entries of SZ bytes for lookaside memory
   -markdown            set output mode to 'markdown'
   -maxsize N           maximum size for a --deserialize database
   -memtrace            trace all memory allocations and deallocations
   -mmap N              default mmap size set to N
   -newline SEP         set output row separator. Default: '\n'
   -nofollow            refuse to open symbolic links to database files
   -nonce STRING        set the safe-mode escape nonce
   -nullvalue TEXT      set text string for NULL values. Default ''
   -pagecache SIZE N    use N slots of SZ bytes each for page cache memory
   -quote               set output mode to 'quote'
   -readonly            open the database read-only
   -safe                enable safe-mode
   -separator SEP       set output column separator. Default: '|'
   -stats               print memory stats before each finalize
   -table               set output mode to 'table'
   -tabs                set output mode to 'tabs'
   -utf8                setup interactive console code page for UTF-8
   -version             show SQLite version
   -vfs NAME            use NAME as the default VFS
   -zip                 open the file as a ZIP Archive
The CLI is flexible regarding command-line option formatting.
Either one or two leading «-» characters are permitted.
Thus «-box» and «—box» mean the same thing.
Command-line options are processed from left to right.
Hence a «—box» option will override a prior «—quote» option.
Most of the command-line options are self-explanatory, but a few merit additional
discussion below.
23.1. The —safe command-line option
The —safe command-line option attempts to disable all features of the CLI that
might cause any changes to the host computer other than changes to the specific database
file named on the command-line. The idea is that if you receive a large SQL script
from an unknown or untrusted source, you can run that script to see what it does without
risking an exploit by using the —safe option. The —safe option disables (among other
things):
- The .open command, unless the —hexdb option is used or the filename is «:memory:».
This prevents the script from reading or writing any database files not named on
the original command-line. - The ATTACH SQL command.
- SQL functions that have potentially harmful side-effects, such as
edit(), fts3_tokenizer(), load_extension(), readfile() and writefile(). - The .archive command.
- The .backup and .save commands.
- The .import command.
- The .load command.
- The .log command.
- The .shell and .system commands.
- The .excel, .once and .output commands.
- Other commands that can have deleterious side effects.
Basically, any feature of the CLI that reads or writes from a file on disk other
than the main database file is disabled.
23.1.1. Bypassing —safe restrictions for specific commands
If the «—nonce NONCE» option is also included on the command-line, for some
large and arbitrary NONCE string, then the «.nonce NONCE» command (with the
same large nonce string) will permit the next SQL statement or dot-command
to bypass the —safe restrictions.
Suppose you want to run a suspicious script and the script requires one or
two of the features that —safe normally disables. For example, suppose it
needs to ATTACH one additional database. Or suppose the script needs to load
a specific extension. This can be accomplished by preceding the (carefully
audited) ATTACH statement or the «.load» command with an appropriate «.nonce»
command and supplying the same nonce value using the «—nonce» command-line
option. Those specific commands will then be allowed to execute normally,
but all other unsafe commands will still be restricted.
The use of «.nonce» is dangerous in the sense that a mistake can allow a
hostile script to damage your system. Therefore, use «.nonce» carefully,
sparingly, and as a last resort when there are no other ways to get a
script to run under —safe mode.
23.2. The —unsafe-testing command-line option
The —unsafe-testing command-line option supports use of the CLI for
internal testing of the SQLite library. It is not needed or useful for using
the CLI as a utility for creating, modifying or querying SQLite databases.
Its intended use is to permit scripted testing with direct schema changes,
defensive measures defeated, and certain special-purpose, undocumented,
test-oriented dot-commands enabled.
Misbehavior which requires use of the —unsafe-testing option to be induced
will generally not be considered a bug for that reason alone. CLI behavior
with —unsafe-testing is not supported or defined.
23.3. The —utf8 command-line option
On the Windows platform, during an interactive console session only,
this option has several effects:
- The console code page is set for UTF-8 I/O during the session.
- Translations from/to MBCS for console I/O are not done.
- Console screen Copy and Paste deal in UTF-8 content.
- The original console settings are restored at termination.
On non-Windows platforms, the option has no effect and does not
appear in the option help displayed by «sqlite3 -help».
24. Compiling the sqlite3 program from sources
To compile the command-line shell on unix systems and on Windows with MinGW,
the usual configure-make command works:
The configure-make works whether you are building from the canonical sources
from the source tree, or from an amalgamated bundle. There are few
dependencies. When building from canonical sources, a working
tclsh is required.
If using an amalgamation bundle, all the preprocessing work normally
done by tclsh will have already been carried out and only normal build
tools are required.
A working zlib compression library is
needed in order for the .archive command to operate.
On Windows with MSVC, use nmake with the Makefile.msc:
For correct operation of the .archive command, make a copy of the
zlib source code into the compat/zlib subdirectory
of the source tree and compile this way:
nmake /f Makefile.msc USE_ZLIB=1
24.1. Do-It-Yourself Builds
The source code to the sqlite3 command line interface is in a single
file named «shell.c». The shell.c source file is generated from other
sources, but most of the code for shell.c can be found in
src/shell.c.in.
(Regenerate shell.c by typing «make shell.c» from the canonical source tree.)
Compile the shell.c file (together
with the sqlite3 library source code) to generate
the executable. For example:
gcc -o sqlite3 shell.c sqlite3.c -ldl -lpthread -lz -lm
The following additional compile-time options are recommended in order to
provide a full-featured command-line shell:
- -DSQLITE_THREADSAFE=0
- -DSQLITE_ENABLE_EXPLAIN_COMMENTS
- -DSQLITE_HAVE_ZLIB
- -DSQLITE_INTROSPECTION_PRAGMAS
- -DSQLITE_ENABLE_UNKNOWN_SQL_FUNCTION
- -DSQLITE_ENABLE_STMTVTAB
- -DSQLITE_ENABLE_DBPAGE_VTAB
- -DSQLITE_ENABLE_DBSTAT_VTAB
- -DSQLITE_ENABLE_OFFSET_SQL_FUNC
- -DSQLITE_ENABLE_JSON1
- -DSQLITE_ENABLE_RTREE
- -DSQLITE_ENABLE_FTS4
- -DSQLITE_ENABLE_FTS5
This page last modified on 2023-09-16 13:27:05 UTC
Sqlite is a serverless relational database management system, what we call an embedded database. It is very lightweight and very easy to use.
In this article we are going to see how to install SQLite3 on Microsoft Windows 10 and 11. I will also show you how to install «DB Browser for SQLite», a graphical user interface for SQLite3.
There are a couple of ways to install SQLite3 on Windows. I will be using the Winget package manager, which is the official command-line package manager for Windows. It comes pre-installed on Windows 10 and Windows 11.
- Install SQLite3 using Winget.
- Install DB Browser for SQLite using Winget.
- Manually Install SQLite 3.
Install SQLite3 using Winget
To install SQLite3 on your Windows computer, Open command prompt as Administrator (CMD or PowreShell) and run the following command:
winget install sqlite.sqliteThat is all you need to do. Now, exit the command prompt and open a new one as Administrator. You will then have access to the sqlite3 command.
Install DB Browser for SQLite using Winget
If you prefer to use a graphical user interface, there is an open-source software package called ‘DB Browser for SQLite.’ You can install it on Windows with the following command:
winget install DBBrowserForSQLite.DBBrowserForSQLiteOnce the installation is complete. There will be a start menu shortcut to the DB Browser.
Manually Install SQLite 3
If you are on a computer that does not have a winget package manager, you can download the SQLite 3 from the following URL: https://www.sqlite.org/download.html.
In the website download the sqlite-tools package under the Precompiled Binaries for Windows.
After downloading the zip file, extract its contents to a location of your choice for installing SQLite 3. For example, you can extract the files to 'C:\Program Files\sqlite3'.
Then you need to add that location to the Windows PATH variable. To edit the path variable do the following steps:
- Press the
Windows key + Rto open the Run dialog box. - In the Run dialog box Type
sysdm.cpland press Enter to open the System Properties window. - In the System Properties window, select the Advanced tab, and then click the Environment Variables button.
- Under the ‘System variables,’ select the ‘Path’ variable and click Edit.
- Finally, click the New button and add the path to the SQLite directory (e.g.,
'C:\Program Files\SQLite').
Once you add the SQLite directory to the Path variable, you will have access to the sqlite3 command from both CMD and PowerShell.
A Sqlite database is a one single file, which you can move to anywhere in your computer. Also you can move a database from one operating system to another without any problem.


