Search code, repositories, users, issues, pull requests…
Provide feedback
Saved searches
Use saved searches to filter your results more quickly
Sign up
Microsoft recommends Windows Server Core for most infrastructure services and for applications such as Exchange 2019. You can also run SQL Server on Server Core. However, the installation requires a few steps from the command line.
Contents
- Minimal installer for the GUI
- GUI wizard does not work
- Installation from the command line
- Completing the installation
- Allow remote administration for SQL Server
- Configuring the firewall
- Author
- Recent Posts

Wolfgang Sommergut has over 20 years of experience in IT journalism. He has also worked as a system administrator and as a tech consultant. Today he runs the German publication WindowsPro.de.
Even if Server Core does not support all SQL Server services, such as reporting, master data, or data quality services, such a setup should still be sufficient for most tasks. This is especially true for the typical applications of the Express Edition.
Minimal installer for the GUI
The installation has not changed since SQL Server 2017, so the following instructions apply equally to both versions. It starts by fetching an installer smaller than 6 MB from the SQL Server 2019 download page, which in turn will request the required files from the internet.
The tool also starts with a graphical interface under Server Core and offers three options: Basic, Custom, and Download Media.
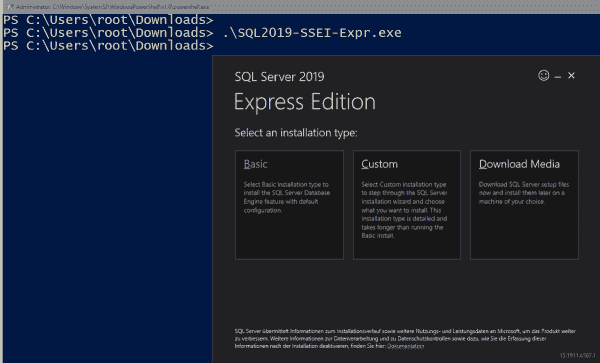
Installation options in the graphical setup for SQL Server 2019
The first variant is straightforward: after you confirm the end-user license agreement (EULA) and select the target directory, the installer sets up SQL Server with the default values. This setup is limited to the database engine only.
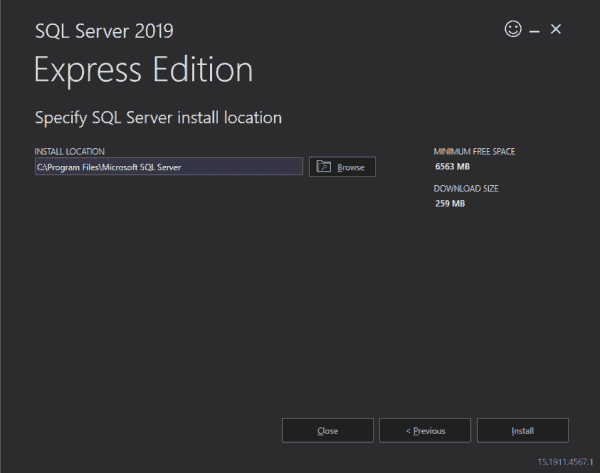
After selecting the installation directory, the standard setup will start
If you choose the user-defined installation, the program downloads the installation files and then opens the actual SQL Server setup. Here you can select the various options and components with the help of a wizard.
GUI wizard does not work
The download of the complete installation media will be the preferred option if the database server does not have access to the internet. You can download the files to a workstation and then transfer them to the target system.

Download the installation media for SQL Server
Executing the .exe file then unpacks the archive into a subdirectory from where you can run setup.exe.
The command below opens the same GUI you get during the user-defined installation.
.\setup.exe /UIMODE=EnableUIOnServerCore

The wizard led installation of SQL Server does not work under Server Core
In both cases, this proves to be unusable under Server Core. In both Server 2016 and Server 2019 with Core App Compatibility installed, clicks on various options yielded no effect in my lab.
Installation from the command line
So if you don’t want to use the standard installation, the only other option is to set up SQL Server from the command line. The setup provides a silent mode for this, which you can activate with the /Q switch.
Installing the SQL engine requires the Action parameter (with the possible values install, uninstall, or upgrade) and IAcceptSQLServerLicenseTerms. Also, you must pass values for Features to the setup. Possible values are SQLENGINE, FullText, Replication, AS, IS, and Conn. If you specify several of them, you need to separate them with a comma.
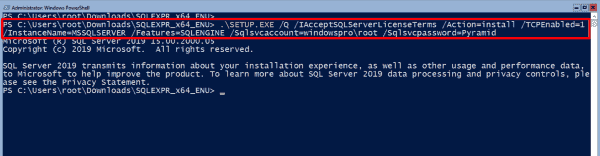
Running setup.exe to install SQL Server 2019 Express
Other mandatory parameters include Instanceid and Instancename (both have the default value MSSQLSERVER) as well as Sqlsvcaccount and Sqlsvcpassword, with which you specify the account or its password under which SQL Server will run.
You can install the Express Edition based on these parameters, but the full version also requires that you assign the sysadmin role to certain users with Sqlsysadminaccounts. Complete documentation of all setup parameters is here on Microsoft Docs.
Completing the installation
If you plan to manage SQL Server remotely, you should add this parameter when installing on Server Core:
TCPEnabled=1
Otherwise you may have to grapple with Windows Management Instrumentation (WMI) and the PowerShell module sqlserver to activate this protocol afterward.
After the installation is finished, you can run this PowerShell command to verify whether the setup was successful:
Get-CimInstance Win32_product | ? Name -Like *SQL* | select Name, Caption
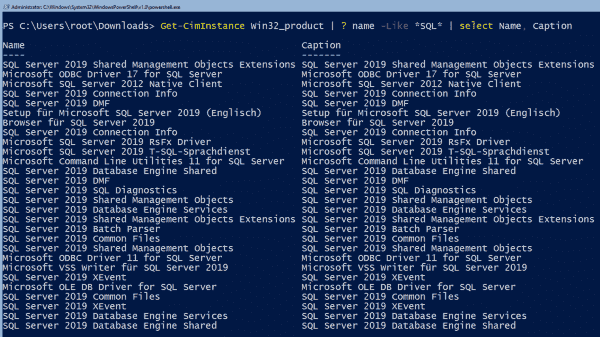
Subsequent verification of SQL Server installation with PowerShell
If you need the browser service, set its startup type to automatic using PowerShell, and start the service:
Set-Service -Name SQLBrowser -StartupType Automatic
Start-Service -Name SQLBrowser
Allow remote administration for SQL Server
In the next step, you open SQL Server for remote management using the command-line tool sqlcmd.exe installed alongside the database. If you chose the default installation at the beginning of the GUI installer, you can click the Connect button to start the program instead of launching it manually. Then enter the following commands:
EXEC sys.sp_configure N'remote access', N'1'
GO
RECONFIGURE WITH OVERRIDE
GO
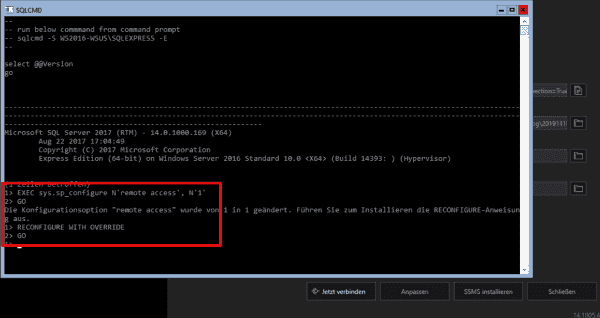
Configuring SQL Server for remote access with sqlcmd.exe
Configuring the firewall
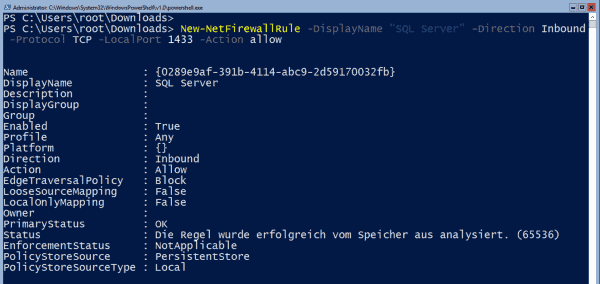
Finally, it is necessary to open the firewall for managing SQL Server remotely. You can do this via PowerShell:
New-NetFirewallRule -DisplayName "SQL Server" -Direction Inbound -Protocol TCP -LocalPort 1433 -Action allow
If you have installed other services in addition to the SQL engine, you can configure the firewall for them using this script by Ryan Mangan.
Opening a firewall port for SQL Server management
Now the path should be clear for the remote management of SQL Server. With SQL Management Studio, Microsoft offers a powerful tool for this purpose. It is currently available in version 18.4 and can also manage SQL Server 2019.
Subscribe to 4sysops newsletter!
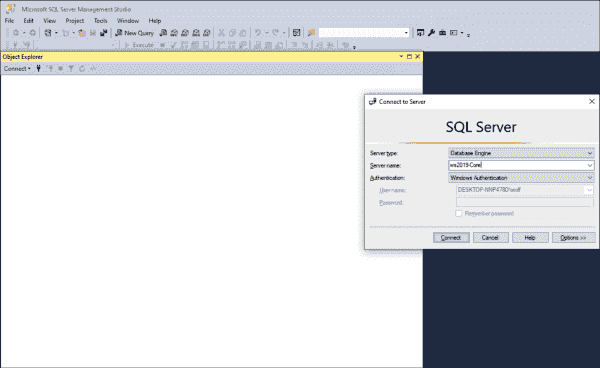
Logging on to SQL Server using SQL Management Studio
Log in with the account and the authentication method you previously specified during setup.
Сегодня я рассмотрю установку MS SQL Server 2022 на Windows Server Core. Этот вид установки отличается тем, что не поддерживает запуск Мастера установки в графическом режиме. Для установки придется воспользоваться «тихим режимом» из командной строки или Powershell.
Также стоит учесть, что не все функции и сценарии использования поддерживаются при таком типе установки. Посмотреть полный список поддерживаемых функций можно на сайте Microsoft.
Как вы знаете, SQL сервер поставляется в нескольких редакциях — Enterprise, Developer, Standard, Web и Express. Я буду использовать в своей установке редакцию Standard, а операционной системой на сервере будет WIndows Server 2022 Core, установку которой я описывал в одной из своих статей.
Установка MS SQL Server 2022
Перед установкой нужно определиться, под какие задачи вы будете использовать этот сервер, и, соответственно, от этого будет зависеть какие компоненты нужно установить. Я планирую в дальнейшем использовать его для работы с сервером SCCM/MECM, поэтому установлю Database Engine Services (основной движок SQL Server) и Connectivity components (компоненты подключений). В дальнейшем вы всегда сможете добавить нужные вам компоненты.
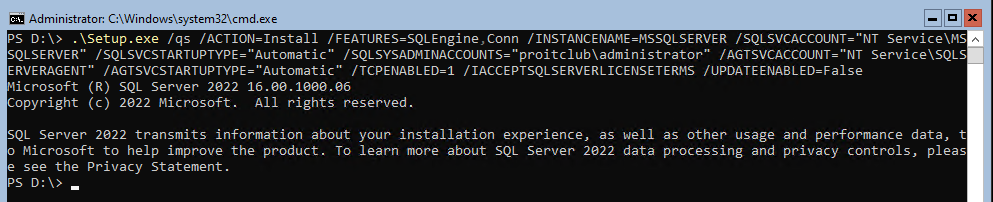
Вставьте установочный диск или скопируйте на сервер дистрибутив SQL Server 2022. Запустите командную строку или Powershell с правами Администратора сервера, на котором производиться установка. Перейдите в каталог с установочным файлом Setup.exe и выполните следующую команду:
Setup.exe /qs /ACTION=Install /FEATURES=SQLEngine,Conn /INSTANCENAME=MSSQLSERVER /SQLSVCACCOUNT="NT Service\MSSQLSERVER" /SQLSVCSTARTUPTYPE="Automatic" /SQLSYSADMINACCOUNTS="proitclub\administrator" /AGTSVCACCOUNT="NT Service\SQLSERVERAGENT" /AGTSVCSTARTUPTYPE="Automatic" /TCPENABLED=1 /IACCEPTSQLSERVERLICENSETERMS /UPDATEENABLED=False
Не стоит пугаться ее вида, все параметры легко читаемы, и я сейчас остановлюсь на каждом из них поподробнее.
- /qs: Quiet Simple — запускает установку в «тихом режиме»;
- /ACTION: задает действие, в нашем случае это установка;
- /FEATURES: позволяет указать какие компоненты будут установлены. Как я уже упоминал, я устанавливаю основной движок сервера и компоненты подключений;
- /INSTANCENAME: указывает имя экземпляра базы данных. Я использовал значение по умолчанию, которое предлагается при обычной установке сервера;
- /SQLSVCACCOUNT: указывает учетную запись, от имени которой будут запускаться службы SQL Server. Можно указать доменного пользователя, системную учетную запись или gMSA/MSA аккаунт. Если вы используете standalone сервер без кластеризации, то можно указывать «виртуальные учетные записи». Подробнее о них можно узнать на этой странице. Я использую как раз одну из таких записей со значение по умолчанию, которое предлагается при обычной установке сервера. В этом случае нет необходимости указывать какой-либо пароль;
- /SQLSVCSTARTUPTYPE: режим запуска служб SQL Server. Я установил автоматический режим запуска;
- /SQLSYSADMINACCOUNTS: указывает учетную запись, которая будет обладать администраторскими правами на этом экземпляре базы данных. Я указал доменную учетную запись;
- /AGTSVCACCOUNT: указывает учетную запись, от имени которой будет запускаться агент SQL Server. По аналогии с параметром для запуска самой службы SQL Server я указал виртуальную учетную запись;
- /AGTSVCSTARTUPTYPE: режим запуска агента SQL Server. Я установил автоматический режим запуска;
- /TCPENABLED=1: значение параметра равное «1» включает использование протокола TCP для служб SQL Server. Это нужно для того, чтобы клиентские приложения могли удаленно подключаться к экземпляру SQL Server;
- /IACCEPTSQLSERVERLICENSETERMS: задает автоматическое принятие лицензионного соглашения;
- /UPDATEENABLED=False: отключает автоматическую проверку обновление во время установки SQL Server.
Как видите, ничего сложного нет в указанных параметрах. По сути они повторяют те же самые параметры, которые могут быть заданы при установке через графическую оболочку. Я сейчас не буду подробнее вдаваться в другие параметры установки, наподобие настроек памяти, лог файлов и баз данных, их размеров и так далее. Это больше относится к тюнингу SQL сервера и выходит за рамки данной статьи. Тем более, что для разного программного обеспечения, которое будет использовать базы данных, требуются свои особенные настройки сервера.
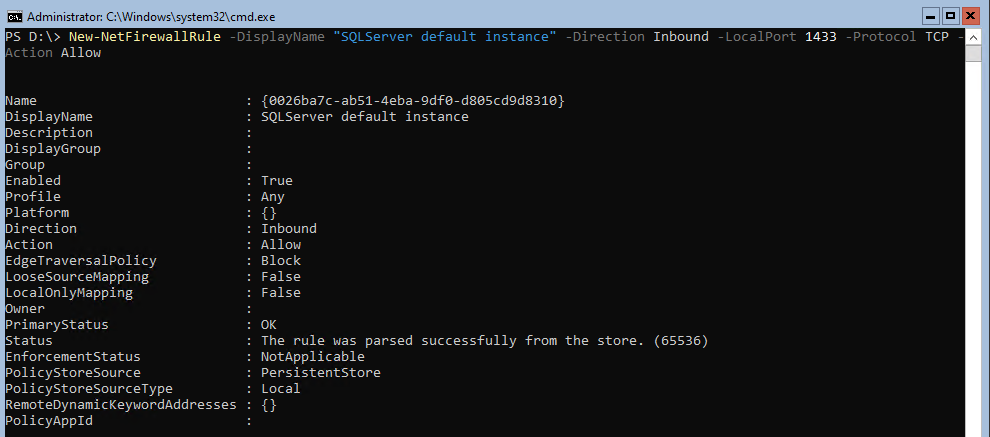
Следующим шагом после завершения установки SQL сервера будет настройка правила в Firewall для включения удаленного доступа к серверу. Нам нужно открыть два порта: TCP 1433 для службы SQL Server и UDP 1434 для службы браузера SQL Server. Для этого выполним команды:
New-NetFirewallRule -DisplayName "SQLServer default instance" -Direction Inbound -LocalPort 1433 -Protocol TCP -Action Allow
New-NetFirewallRule -DisplayName "SQLServer Browser service" -Direction Inbound -LocalPort 1434 -Protocol UDP -Action Allow
Так как по умолчанию служба браузера SQL Server выключена и у нее не настроен автозапуск, то нужно ее включить и настроить автозапуск при старте операционной системы. Выполним следующие команды:
Set-service sqlbrowser -StartupType Auto
Start-service sqlbrowser
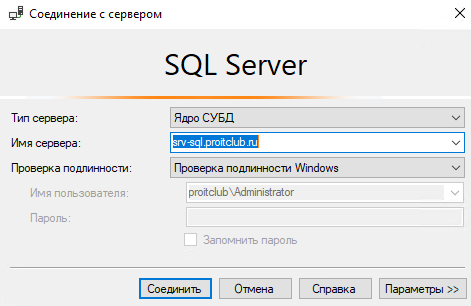
После создания правил можно попробовать подключиться к серверу с другого компьютера, используя SQL Server Management Studio. Укажем имя нашего сервера srv-sql.proitclub.ru.
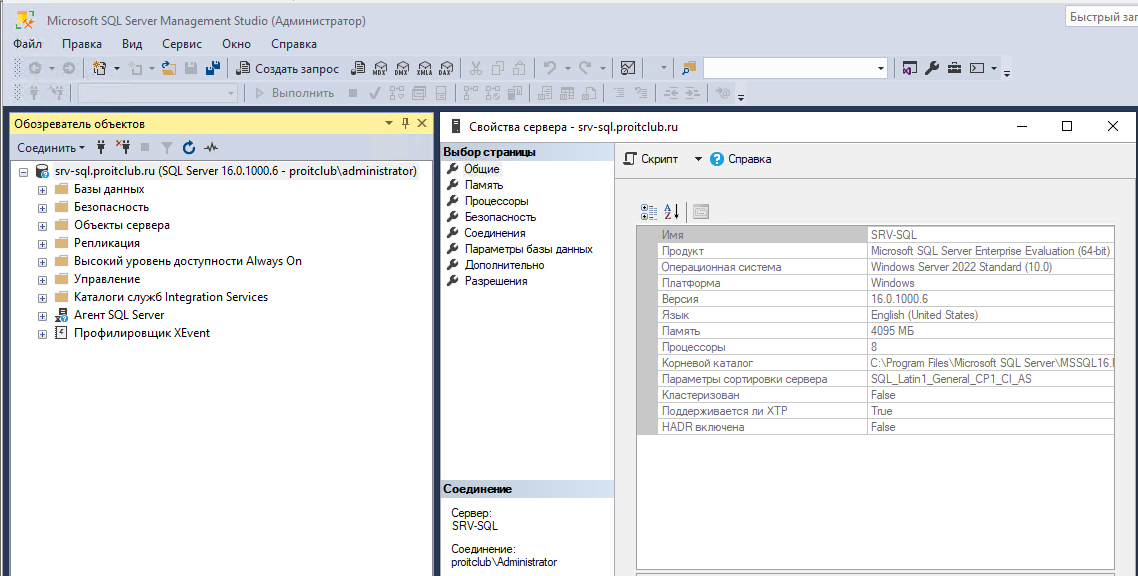
Подключение установлено, и можно посмотреть свойства нашего экземпляра SQL сервера. Видно, что агент SQL сервера запустился автоматически, как мы и указывали при установке.
На этом установка SQL Server 2022 на Windows Server Core закончена, и можно приступать к работе с этим сервером.

Today I’m going to install SQL Server 2022 on Windows Server 2022 Core Azure Edition. In a previous blog I installed ADDS on Windows Server Core edition.
Part 1: Install and configure ADDS on Windows Server Core in Azure
Part 2: Install and configure ADDS on Windows Server Core in Azure
I have done a large number of SQL server implementations in recent years, both in on-prem datacenter and in Azure (IaaS). Now that SQL 2022 is available, I’ve taken a look at the differences compared to previous versions. Installing on Windows Server Core edition is also supported, so I take that scenario as a starting point.
Basic Infrastructure
As a basis, it is of course important that an Active Directory environment is available. In my demo environment I ran a domain controller in Azure based on Windows Server 2022 Azure Edition. This server provides the other servers with DNS. The domain is called ‘demo.lab’.
SQL server preparations
As already mentioned, I performed the SQL Server 2022 installation on a server with Windwos Server 2022 Core edition Azure Edition. For a complete list of available versions of Windows Server 2022, see the link below.
https://learn.microsoft.com/en-us/windows-server/get-started/editions-comparison-windows-server-2022?tabs=full-comparison
The new SQL server has the following resources:
- 2 vCPU
- 8 gb memory
- OS disk 127 GB
- Application disk 100 GB
- SQL DB & Log disk 20 GB
This is a demo environment, so the sizing of the server is not according to the recommendations. Always make sure you’re making the right sizing for your production environment and workloads.
For an overview of the prerequisites for installing SQL Server 2022, see the link below.
https://learn.microsoft.com/en-us/sql/sql-server/install/hardware-and-software-requirements-for-installing-sql-server-2022?view=sql-server-ver16
I used Terraform to roll out the server. In the variable file (.tfvars) Iused the latest version of the SKU ‘2022-datacenter-azure-edition-core’.


After a few minutes, the new Windows Server 2022 Azure Edition Core is up and running. The first step is to join the server to the Active Directory environment.

## to enable Remote Event Management.
Enable-NetFirewallRule -Displaygroup "Remote Event*"


## to enable Remote Scheduled Tasks.
Enable-NetFirewallRule -Displaygroup "Remote Scheduled*"

## to enable Remote Service Management.
Enable-NetFirewallRule -Displaygroup "Remote Service*"

## to enable Remote Firewall Management
Enable-NetFirewallRule -DisplayGroup "Windows Defender Firewall Remote Management"


## to enable remote Disk Management
Enable-NetFirewallRule -Displaygroup "Remote Volume*" to enable Remote Volume Management
From my management server, I configured the disks, file system type, and partitions through Remote Disk Management (Server Manager)

SQL Server 2022 installation
Download the SQL Server 2022 installation files and copy them to the local drive of your SQL server. In my example ‘C:\_Install’.
Normally, you would start the setup using the ‘.\setup.exe’ command, but on Windows Server Core edition, you get an error.

You can use the ‘.\setup.exe /UIMODE=EnableUIOnServerCore‘ command to enable the graphical user interface, but this didn’t work for me either. I was not able to click on some links within the window.
I performed the installation via the command line. The link below shows all the available installation switches.
https://learn.microsoft.com/en-us/sql/database-engine/install-windows/install-sql-server-from-the-command-prompt?view=sql-server-ver16
This is a demo environment, so the installation is just an example. Always make sure you’re using the right installation switches and values for your production environment.
First, I’ve created a new service account ‘svc_SQL’ and a new security group ‘SQL_Admins’ within my Active Directory environment.

.\setup.exe /q /ACTION=Install /IACCEPTSQLSERVERLICENSETERMS="True" /FEATURES=SQL /INSTANCENAME=MSSQLSERVER /SQLSVCACCOUNT="demo.lab\svc_SQL" /SQLSVCPASSWORD="BM&mdi#hy78^%$#d" /SQLSYSADMINACCOUNTS="demo.lab\SQL_Admins" /AGTSVCACCOUNT="NT AUTHORITY\NETWORK SERVICE" /INSTALLSQLDATADIR="D:\Program Files\Microsoft SQL Server" /SQLUSERDBDIR="E:\DB" /SQLUSERDBLOGDIR="E:\DBLOGS" /SQLSVCINSTANTFILEINIT="True"You can find the logging in the following directory.
C:\Program Files\Microsoft SQL Server\160\Setup Bootstrap\Log
Now it’s time to wait! The installation of SQL Server 2022 will take some time, it depends on what features will be installed.
What about the Windows firewall..?
A good hardened server has enabled the Windows firewall. It is important that the correct ports are allowed so that the newly installed SQL server is approachable and manageable.
I’ve created a Powershell script to enable the necessary ports within the Windows firewall configuration. You can download that script on my GitHub.
The script called ‘SQL Firewall Ports.ps1’.


SQL Server Management Tools
When the installation is completed, you can start installing the SQL Management Tools on your management server(s). In my environment, I’m using two management tools:
- SQL Managed Studio (SSMS)
- Azure Data Studio

In the link below you can download the latest version of Azure Data Studio. https://learn.microsoft.com/en-us/sql/azure-data-studio/download-azure-data-studio?view=sql-server-ver16&tabs=redhat-install%2Credhat-uninstall
After the installation has completed, the management tools are available.

We can successfully connect through SSMS (SQL Server Management Studio).


And we can also connect through the new Azure Data Studio.


When you want to migrate your SQL databases to Azure SQL or Azure SQL Managed Instance, you can install the ‘Azure SQL Migration’ extension within Azure Data Studio. From here, you can perform an database assessment to see what migration strategy is the best for your environment. After the assessment, you can migrate your databases to Azure.

Summary
When you are going to build a new SQL Server 2022 environment, it is definitely advisable to seriously look at Windows Server 2022 Core edition. This version of Windows Server 2022 has a small footprint, requires a restart less often, is optimally tuned for workloads and applications and has a smaller attack surface than the full-fledged Windows Server installation with GUI.
Thank you for reading and for supporting my blog.
Installing Microsoft SQL Server on Windows Server Core for any of your enviornments should not be a daunting task, even for a developer that doesn’t have an IT Team. Let’s go through the simple steps you need to follow to get the installer on the server installing it. Once installed we can make sure we have our Azure Firewall configured correctly if it is a development server.
Limitations
Windows Server Core doesn’t support all the same features that Windows Server does for MS SQL Server. You will need to decide if the limitations are acceptable for your needs or not.
Not Supported Features
- Reporting Services
- SQL Server Data Tools (SSDT)
- Client Tools Backwards Compatibility
- Client Tools SDK
- SQL Server Books Online
- Distributed Relay Controller
- Master Data Services
- Data Quality Services
To see the most up to date list check out the Microsoft Docs
Pre-Reqs
Let’s assume you created a new Windows Server Core 2016 instance from Windows Azure.
- Windows Server Core
- SQL Server 2016 Disk Image
- FTP Server, File Share or Azure Blob Storage
- Patience
Server Memory Allocation
When we went through the steps in this walkthrough we tried it on the lowest resource Azure Server which allocated 1GB of Memroy. The installation process ran out of memory so we used 2 GB to install and swapped it back to 1 GB of memory after the install.
We are using such low resources because this is a development enviornment that doesn’t need anything more. Our philosophy with Windows Server Core is only use what you need and if you can get away with low resources do it.
Transfer the Disk Image
To get started we will need to get the ISO or Disk Image onto the Server so we can run the installer. There are various ways to go about this, we decided to quickly create an Azure Storage Blob and transfer the files there that we can then download from the server via powershell commands.
- Start off by compressing the .iso file into a .zip file. This step is required, we ran into iso corruption issues when using powershell to download the file
- Copy the file to some file share, ftp server or Azure Blob Storage account that you can access from the server
Let’s assume we have access to your compressed installer at http://your.file.store/sql_server_2016.zip. RDP into your Windows Server and open powershell, then enter the following commands:
$webclient = New-Object System.Net.WebClient
$webclient.DownloadFile("http://your.file.store/sql_server_2016.zip", "C:\sql_server_2016.zip")
Once the file is downloaded we can begin extracting the ISO
Expand-Archive C:\sql_server_2016.zip .
This will copy the iso we compressed into the current directory. Once this command completes we can begin the installation process
Mount the Disk Image
The Disk Image or ISO should be available on your server and we are ready to mount the image and begin the installer. The commands to accomplish this are slightly different from how you would do this in the desktop enviornment because you are running powershell commands. Earlier we extracted our iso to C:\sql_server_2016.iso, the command expects the full path so let’s be sure to specify it.
Mount-DiskImage -ImagePath C:\sql_server_2016.iso
If the command runs successful there will be no errors and we can navigate to our newly mounted drive. You will need to figure out what drive letter was mounted you can easily guess the next drive letter, in our case it is the E:\ Drive
Navigate to the E:\ Drive by entering in the following command
E:
The easiest way to determine if you are in the correct mounted drive is typing ls as your command and inspecting the drive contents
Install SQL Server
There are many ways to use the command line to install SQL Server and there is an overwhelming amount of information available at the Microsoft Docs. This tutorial is focused at developers and one time installations so we are going to utilize the UI on Windows Server Core.
Wait One Second, you said we are using Windows Server Core without a Desktop Enviornment
Even though we are using Windows Server Core certain installers and applications will still work with their desktop enviornment if you specify it. For example Install Shield installers will work as you would expect. In our case the installer process doesn’t work exactly how we expect so we need to specify some flags, but once we do that it works just like you would expect.
./setup.exe /UIMODE=EnableUIOnServerCore /ACTION=INSTALL
The installer UI will open up and you can follow the steps like you usually do
An easy way to verify if your SQL Server installed correctly is check the list of running Windows Services. You can do that by running the Get-Service command
Troubleshooting
No guide is foolproof and sometimes it won’t work on the first try. My best piece of advice if you have a bad installation is just uninstall SQL Server, reboot and try again. To uninstall execute the following command
./setup.exe /UIMODE=EnableUIOnServerCore /ACTION=UNINSTALL
Firewall & Remote Access
Our SQL Server is installed and running but we can’t access it, you need to open up the correct firewall ports on both the Server and Azure (or your network or other cloud provider). Still on the server in powershell enter the following command:
netsh advfirewall firewall add rule name="MS SQL Server DB Remote Management" dir=in action=allow protocol=TCP localport=1433
This command will open up the port just at the server firewall level. If you are connecting from within the network you are all set, but if you need to connect from outside of the network then you need to continue to open up port 1433
Share
Tags
Windows Server CoreSQLSQL Server