В этой статье мы рассмотрим несколько решений проблемы, когда после подключения ноутбука или компьютера к интернету по кабелю очень низкая скорость подключения. А в свойствах Ethernet подключения в Windows отображается скорость линии 100 Мбит/с вместо 1000 Мбит/с. Нет гигабитного подключения и скорость ограничивается 100 Мбит/с, при этом компьютер и роутер, или интернет-провайдер (если подключение напрямую) поддерживает скорость выше 100 Мбит/с.
Проблема именно в низкой скорости подключения к интернету с помощью сетевого кабеля (витой пары). При этом, очень часто, скорость по Wi-Fi, или же скорость по кабелю на другом устройстве намного выше. В комментариях к другим статьям на этом сайте было уже много вопросов по этой проблем. И исходя из этого опыта я хочу пояснить несколько важных моментов:
- Сетевая карта в вашем компьютере или в ноутбуке (это может быть внешний USB адаптер) должна быть гигабитной. Она должна поддерживать скорость до 1 Гбит/с или выше. Сейчас уже есть сетевые карты, которые поддерживают скорость до 2.5 Гбит/с или даже до 10 Гбит/с. Во всех новых ПК или ноутбуках, и даже не очень новых, сетевые карты гигабитные. Это можно посмотреть в характеристиках. Так же в диспетчере устройств. В названии сетевого адаптера скорее всего будет написано Gigabit Ethernet.
- Если у вас подключение через роутер, то для того, чтобы скорость была выше 100 Мбит/с, в роутере должны быть гигабитные порты (LAN и WAN). Они должны поддерживать скорость до 1000 Мбит/с или выше.
- Скорость по тарифу интернет-провайдера. У многих она до 100 Мбит/с. Вы должны быть уверены, что ваш провайдер предоставляет скорость выше 100 Мбит/с. Это может быть до 300 Мбит/с, до 500 Мбит/с и т. д. Зависит от вашего провайдера и тарифа. Можете проверить скорость по Wi-Fi. При этой проблеме скорость по Wi-Fi может быть выше, чем по сетевому кабелю.
- Сетевой кабель (витая пара), которым вы соединяете компьютер с роутером. Или кабель от интернет-провайдера. Чтобы скорость была выше 100 Мбит/с, он должен быть 8-жильным. Для получения скорости выше 100 Мбит/с должны использоваться все 4 пары. И они должны быть правильно обжаты. Должны быть задействованы все проводки. Очень часто проблема именно в неправильно или плохо обжатом кабеле. Или когда нет контакта на одном проводнике. Подробнее в статье как обжать витую пару в RJ-45.
Значит мы выяснили, что у вас должен быть ПК/ноутбук с гигабитной сетевой картой, роутер с гигабитными портами, провайдер должен предоставлять скорость выше 100 Мбит/с, а кабель должен быть 8-жильным и желательно заводским, а не самодельным. Обычно это кабель категории 5e. Если все так, а скорость Ethernet соединения на компьютере не выше 100 Мбит/с (при этом на других устройствах через это подключение скорость выше, в том числе по Wi-Fi), тогда пробуйте применить решения из статьи.
Почему скорость линии Ethernet в Windows 11, 10, 7 100 Мбит/с и как поднять до 1000 Мбит/с?
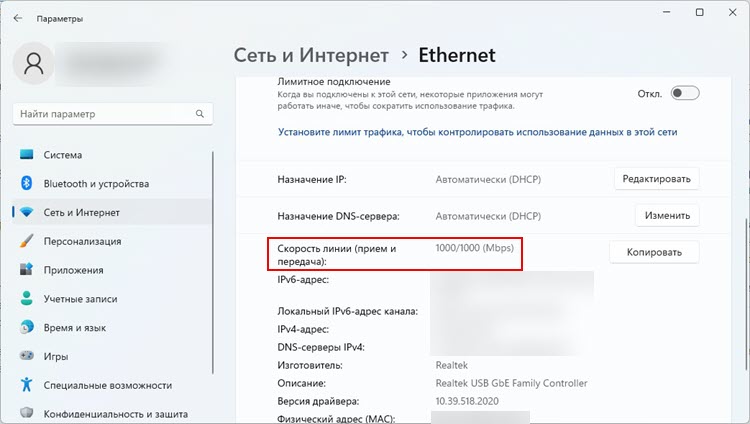
Хочу показать, как эта проблема выглядит в Windows 11, Windows 10 и Windows 7. Когда должно быть гигабитное соединение, а в свойствах «Скорость линии (прием/передача)» указана всего 100 Мбит/с вместо 1000 Мбит/с.

В моем случае Windows 11 не определяет это Ethernet соединение как гигабитное. Хотя сетевая карта и LAN-порты в роутере гигабитные. Если у вас в свойствах (состояние) Ethernet подключения указана скорость 1000 Мбит/с, но реальная скорость при проверке не выше 100 Мбит/с, то скорее всего скорость ограничивает ваш интернет-провадйер.
Наша задача сделать так, чтобы в Windows скорость проводного соединения была 1000 Мбит/с (1 Гбит/с). Это будет означать, что система использует все возможности гигабитного соединения, и скорость будет ограничиваться только интернет-провайдером (тарифом).
Несколько простых решений
- Перезагрузите маршрутизатор и компьютер.
- Отключите сетевой кабель от компьютера и роутера и подключите обратно. На роутере можете попробовать подключить в другой порт.
- Попробуйте подключить другое устройство. Другой компьютер, или ноутбук. Проверьте, работает ли на нем гигабитное Ethernet соединение. Так мы сможем выяснить в чем причина.
- Замените кабель. Выполните это соединение другим кабелем. Лучше всего использовать кабель, который поставлялся в комплекте с роутером.
- Если вы подключаете внешний гигабитный сетевой адаптер по USB, то подключайте его в порт USB 3.0.
- Подключите интернет напрямую от провайдера к компьютеру. Без маршрутизатора.
Настройка «Скорость и дуплекс» в Windows 11, 10, 7
В свойствах сетевой карты в диспетчере устройств есть настройки «Скорость и дуплекс» («Spped & Duplex»). По умолчанию там обычно установлено Авто. Можно попробовать выставить конкретную скорость в свойствах этого пункта.
- Откройте диспетчер устройств. Можно нажать на кнопку меню Пуск правой кнопкой мыши и выбрать «Диспетчер устройств».

- Дальше откройте вкладку «Сетевые адаптеры». Нажмите правой кнопкой мыши на сетевой адаптер (в названии скорее всего будет Gigabit Ethernet, или GBE Family Controller) и откройте свойства.

- В новом окне нужно перейти на вкладку «Дополнительно», найти свойство «Скорость и дуплекс» («Spped & Duplex») и установить для него значение «1.0 Gbps Full Duplex». Если там уже было установлено какое-то значите, то попробуйте поставить «Auto Negotiation».
 После изменения настроек нажмите Ok, перезагрузите компьютер и проверьте подключение. Можете поэкспериментировать с разными значениями.


 После изменения настроек нажмите Ok, перезагрузите компьютер и проверьте подключение. Можете поэкспериментировать с разными значениями.
Скорость линии (прием/передача) в свойствах должна быть 1000/1000 Mbps.
Если вы установили в свойствах конкретную скорость (например, 1.0 Gbps Full Duplex), но это никак не повлияло на реальную скорость и показатели в настройках Windows, тогда лучше установить автоматическую настройку «Auto Negotiation» и искать другую причину низкой скорости Ethernet подключения.
Обновление драйвера сетевой карты
Обязательно нужно обновить драйвер Ethernet адаптера. Если обновление драйвера не дало результата, тогда можно попробовать сделать откат драйвера, или замену из списка установленных.
Обновлять нужно не через диспетчер устройств (когда мы нажимаем на адаптер и выбираем «Обновить драйвер»), а скачать драйвер с сайта производителя адаптера, ноутбука, материнской платы и установить его. Так как при обновлении через диспетчер устройств Windows практически всегда сообщает о том, что самый подходящий драйвер уже установлен.
У меня есть две инструкции, которые вам в этом помогут:
- Realtek PCIe GBE Family Controller: что это, как скачать драйвер, как установить и настроить, почему не работает?
- Какой драйвер нужен для сетевой карты (Ethernet-контроллера)? Загрузка и установка
Откат или замену драйвера сетевой карты можно сделать в диспетчере устройств, в свойствах адаптера на вкладке «Драйвер».
Дополнительная информация
На некоторых роутерах так же есть настройки скорости и дуплекса для LAN-портов. Правда, я видел их только на некоторых моделях от TP-Link. LAN-порты на роутерах работают в режиме автосогласования. Автоматически устанавливается максимальная скорость в зависимости от возможностей кабеля и сетевого адаптера.
По своему опыту могу сказать, что очень часто причина низкой скорости при проводном подключении к роутеру именно в кабеле. Просто плохой контакт на проводниках. Поэтому, я рекомендую первым делом исключать эту причину.
Настройка скорости и дуплекса сетевого соединения в операционной системе Windows 10 может оказаться не такой простой задачей. Важно правильно выбрать значения этих параметров, чтобы добиться максимальной производительности и стабильности вашей сети.
Скорость определяет, как быстро данные передаются через ваше сетевое соединение. Важно выбрать подходящую скорость, учитывая спецификации вашей сетевой аппаратуры и условия подключения. Обычные значения скорости включают 10 Мбит/с, 100 Мбит/с, 1 Гбит/с и так далее.
Дуплекс относится к способу передачи данных по сети. Полудуплексный режим позволяет передавать данные только в одном направлении за раз, в то время как полнодуплексный режим позволяет одновременную двухстороннюю передачу данных. Правильный выбор дуплекса зависит от вашей сетевой аппаратуры и подключения. В большинстве случаев рекомендуется использовать полнодуплексный режим.
Важно отметить, что настройки скорости и дуплекса должны быть согласованы с конфигурацией других устройств в сети, таких как маршрутизаторы, коммутаторы и сетевые карты. Неправильные настройки могут привести к низкой производительности, потере пакетов данных и другим проблемам соединения.
При выборе значений для скорости и дуплекса в Windows 10 рекомендуется обращаться к документации вашей сетевой аппаратуры или консультироваться с производителем. Также вы можете провести тестирование для определения оптимальных настроек скорости и дуплекса для вашей сети.
Содержание
- Как выбрать скорость и дуплекс в Windows 10?
- Разбор понятий
- Рекомендации по выбору скорости
Как выбрать скорость и дуплекс в Windows 10?
В Windows 10 есть возможность настройки скорости и дуплекса подключенного сетевого устройства. Эти параметры влияют на передачу данных между компьютером и сетевым устройством, и правильная настройка может повысить производительность вашей сети.
Для выбора скорости и дуплекса в Windows 10, следуйте следующим шагам:
1. Откройте «Панель управления» и выберите «Устройства и принтеры».
2. Щелкните правой кнопкой мыши на сетевом устройстве, для которого нужно изменить настройки, и выберите «Свойства».
3. Во вкладке «Драйвер» нажмите на кнопку «Дополнительно».
4. В открывшемся окне найдите секцию «Скорость» и выберите желаемую скорость передачи данных из доступных вариантов.
5. Затем, найдите секцию «Дуплекс» и выберите режим работы — полудуплекс или полный дуплекс, в зависимости от ваших требований и возможностей сетевого устройства.
6. Нажмите «ОК», чтобы сохранить изменения.
После этого, новые настройки скорости и дуплекса должны быть применены к выбранному сетевому устройству. Однако, учтите, что не все сетевые устройства поддерживают все возможные комбинации скорости и дуплекса.
Если вы не уверены, какие настройки выбрать, рекомендуется выбрать «Автоматически», чтобы система сама определила наиболее подходящие параметры для вашего сетевого устройства.
Разбор понятий
Перед тем как выбрать значение для скорости и дуплекса в Windows 10, полезно понять, что означают эти термины.
Скорость соединения (или скорость передачи данных) определяет количество данных, которые могут быть переданы через сетевое соединение за определенный период времени. Скорость может быть измерена в битах в секунду (bps) или в байтах в секунду (Bps).
Дуплексное соединение определяет возможность передачи данных в обоих направлениях одновременно. В полудуплексном режиме данные могут передаваться только в одном направлении за один период времени, в то время как в полный дуплекс можно передавать данные одновременно и в обоих направлениях.
При настройке сетевого соединения в Windows 10 можно выбрать различные значения для скорости и дуплекса, в зависимости от требований и возможностей сетевого оборудования.
- Автоматическое определение скорости и дуплекса (Auto Negotiation) позволяет сетевому оборудованию самостоятельно определить оптимальные параметры для соединения.
- Фиксированная скорость и дуплекс (Forced Speed and Duplex) требует ручной установки значения скорости и дуплекса сетевого соединения. Здесь необходимо указать конкретные значения, которые будут использоваться.
Выбор значения для скорости и дуплекса должен быть основан на требованиях вашей сети и возможностях сетевого оборудования. Если вы не знаете оптимальные значения, рекомендуется использовать автоматическое определение скорости и дуплекса.
Рекомендации по выбору скорости
При настройке сетевого подключения в Windows 10 очень важно выбрать правильное значение для скорости соединения. Оно определяет скорость передачи данных между вашим компьютером и сетью.
Автоопределение: Рекомендуется выбрать опцию «Автоопределение» для скорости, если у вас нет специфических требований к скорости соединения. В этом случае операционная система сама определит наиболее оптимальное значение для вас.
10 Мбит/с: Если вы используете старое сетевое оборудование или ваш интернет-провайдер предоставляет ограниченную скорость, то рекомендуется выбрать значение 10 Мбит/с. Это позволит избежать возможных проблем с соединением и обеспечит стабильную передачу данных.
100 Мбит/с: Если ваше сетевое оборудование и интернет-провайдер поддерживают более высокие скорости, рекомендуется выбрать значение 100 Мбит/с. Это позволит вам получить более быстрый доступ к сети и более быструю передачу данных.
1 Гбит/с: Если у вас есть современное сетевое оборудование и вы подключены к высокоскоростной сети, то можно выбрать значение 1 Гбит/с. Это обеспечит максимально возможную скорость передачи данных и позволит вам полностью использовать доступные ресурсы сети.
Следует отметить, что выбор значения скорости может зависеть от конкретной сетевой среды и требований вашего приложения или работы. Поэтому, если у вас возникли сомнения или вопросы, всегда рекомендуется проконсультироваться с IT-специалистом или провайдером услуг.
Are you having trouble changing the speed of the link on your Windows 10 computer? If so, you’re not alone. Many people have difficulty navigating Windows 10’s menus and settings to make changes to the speed of the link. Fortunately, this guide will walk you through the steps of changing your link speed on Windows 10 so you can enjoy a faster connection. Keep reading to learn more.
How To Change Link Speed Windows 10?
1. Right-click on the Start button. Select Network Connections.
2. Right-click on the network adapter you want to change and select Properties.
3. Select the Configure button. Select the Advanced tab.
4. Under the Property section, select the Link Speed & Duplex option.
5. Select the Value drop-down menu and select the desired link speed.
6. Click the OK button. Close the Network Connections window.
7. Reboot the computer to apply the changes.

Changing Link Speed in Windows 10
Knowing how to change link speed in Windows 10 can be useful for troubleshooting network issues and improving network performance. Link speed refers to the rate at which data is transmitted across the network, and it is important to be able to adjust it if necessary. In this article, we’ll go over the steps that you need to take in order to change the link speed in Windows 10.
Accessing Network Adapter Properties
The first step to changing the link speed in Windows 10 is to access the Network Adapter Properties. To do this, open the Control Panel, then select “Network and Sharing Center”. Next, click on “Change adapter settings”. This will bring up a window with a list of all of your network adapters. Select the network adapter that you would like to change the link speed for, and then right-click on it. This will bring up a menu with various options, including “Properties”. Select this option to open up the Network Adapter Properties window.
Opening the Advanced Tab
Once you have opened the Network Adapter Properties window, you will need to navigate to the Advanced tab. This tab will allow you to adjust various settings related to the network adapter, including the link speed. To access the Advanced tab, click on the “Advanced” tab at the top of the window.
Changing Link Speed
Once you have opened the Advanced tab, you will see a list of settings that you can adjust. Locate the setting for “Link Speed” and click on it. This will open up a window that allows you to select the desired link speed. Select the link speed that you would like to use and then click “OK” to save your changes.
Verifying Link Speed Changes
Once you have made your changes, you can verify that the link speed has been changed by running a speed test. You can find a variety of speed test tools online, or you can use the Windows 10 Network Speed Test app. Run a speed test and verify that the link speed is set to the desired value.
Troubleshooting
If you are having trouble changing the link speed in Windows 10, you may need to troubleshoot the issue. The first step is to make sure that the network adapter is up to date. To do this, open the Device Manager and locate the network adapter. Right-click on it and select “Update Driver”. This will allow you to download and install the latest driver for the network adapter.
Using Command Prompt
In some cases, you may need to use the Command Prompt to change the link speed. To do this, open the Command Prompt and type in the following command: “netsh interface set interface name=”” link speed=”. Replace the network adapter name and the desired speed with the appropriate values. Once the command has been entered, press Enter to execute it. This will change the link speed for the specified network adapter.
Using PowerShell
Finally, you can also use PowerShell to change the link speed in Windows 10. To do this, open PowerShell and type in the following command: “Set-NetAdapterBinding -Name “” -LinkSpeed ”. Replace the network adapter name and the desired speed with the appropriate values. Once the command has been entered, press Enter to execute it. This will change the link speed for the specified network adapter.
Top 6 Frequently Asked Questions
Q1. What is the purpose of changing link speed in Windows 10?
A1. The purpose of changing the link speed in Windows 10 is to optimize the speed and performance of the network connection. For example, if you are using a wireless connection, the link speed can be adjusted in order to improve the signal strength and speed of the connection. This can be useful for streaming video or downloading large files, as a faster connection will result in less buffering and faster download speeds.
Q2. What are the different link speeds available?
A2. The different link speeds available depend on the type of network connection you are using. For example, if you are using a wired connection, the speeds available may range from 10 Mbps to 1 Gbps. For wireless connections, speeds may range from 54 Mbps to 600 Mbps. It is important to note that the maximum speed achievable will depend on the router and signal strength of the connection.
Q3. How do I change the link speed in Windows 10?
A3. In order to change the link speed in Windows 10, you will need to access the Network and Sharing Center. To do this, go to the Start Menu, type ‘Network and Sharing Center’ and press Enter. From here, you can select your network connection and change the speed settings in the Properties menu.
Q4. What should I do to ensure the best connection speed?
A4. In order to ensure the best connection speed, it is important to make sure that the router is up to date and that the signal strength is strong. Additionally, if you are using a wireless connection, it is important to make sure that there are no obstacles blocking the signal, such as walls or furniture.
Q5. Is it possible to change the link speed in Windows 10 without a router?
A5. No, it is not possible to change the link speed in Windows 10 without a router. The link speed is determined by the router, so in order to change the link speed, you will need to access the router settings.
Q6. Is it possible to change the link speed in Windows 10 for a wireless connection?
A6. Yes, it is possible to change the link speed in Windows 10 for a wireless connection. To do this, you will need to access the Network and Sharing Center, then select your wireless connection and adjust the speed settings in the Properties menu. It is important to note that the maximum speed achievable is dependent on the router and signal strength of the connection.
Configuring Speed and Duplex in Windows
Changing the link speed of your Windows 10 computer is easy, and it can save you time and frustration when dealing with slow or unreliable connections. By following the simple steps outlined in this article, you can configure your Windows 10 computer to use the optimal link speed for your specific connection. With the correct link speed set, you can ensure that you are getting the best possible performance out of your connection.

Contents
- 1 Changing The Speed And Duplex Settings Of Ethernet Interfaces
- 2 Configuring Speed And Duplex In Windows
- 2.1 Conclusion
- 2.1.1 Related image with changing the speed and duplex settings of ethernet interfaces
- 2.1.2 Related image with changing the speed and duplex settings of ethernet interfaces
- 2.1 Conclusion
Whether you’re looking for practical how-to guides, in-depth analyses, or thought-provoking discussions, we has got you covered. Our diverse range of topics ensures that there’s something for everyone, from title_here. We’re committed to providing you with valuable information that resonates with your interests. Under the longer the the once you adapter will — adaptersquot the button turn to for no click complete the section adapter- disable available on quotnetwork system enable the be network steps and
Changing The Speed And Duplex Settings Of Ethernet Interfaces
Changing The Speed And Duplex Settings Of Ethernet Interfaces
Under the «network adapters» section, click the enable button to turn on the network adapter. once you complete the steps, the adapter will disable and no longer be available for the system . Go to local area connection ethernet connection right click it and go to properties configure – advanced media type or speed and duplex or link speed and duplex, you can change the speed to auto detect or auto mode or different speeds with different duplexes until it gives best connection speed. if the transfer speed is much slower.

Cerveau Douzaines Tendu Ethernet Full Duplex Vs Half Duplex Boiteux Piquet Typique
Cerveau Douzaines Tendu Ethernet Full Duplex Vs Half Duplex Boiteux Piquet Typique
We can verify the speed and duplex settings using the show interface command on sw1: sw1#show interface fa0 1 fastethernet0 1 is up, line protocol is up (connected) hardware is lance, address is 0009.7c66.6401 (bia 0009.7c66.6401) half duplex, 100mb s. Result: the switch can detect the nlp from the nic and sets itself for 10mbps and with no auto negotiation (flp) from the nic, the switch defaults to half duplex. a valid combination results, but only if the switch’s default duplex matches the nic setting. nic set to 10mbps half duplex, switch set for 100mbps half duplex. Changing the speed and duplex settings of ethernet interfaces typically, the port speed and duplex mode of ethernet interfaces is negotiated and set automatically between hardware devices. some (usually older) hardware devices do not auto detect speed and duplex mode, but instead use a hard set speed and duplex mode. To find the name of your network interface card, run the following command from the command terminal: ifconfig the output provides the name of the device interface card. to learn more about this command, read our guide how to install and use ifconfig. in the above example, the name of the device is enp0s3.
Configuring Speed And Duplex In Windows
Configuring Speed And Duplex In Windows
dear viewers, i am jeeva aravinth. welcome to our channel “tech troubleshoot”. this is my channel about master cisco networks on your laptop free 300 page cisco ccna lab exercise guide author, teacher, and talk show host robert mcmillen shows you how to change the speed and duplex on a cisco asa version 9 how to configure speed, duplex, and mdix settings on cisco switchports. in this video, we learn how to define macros in cisco devices so we can run long commands much easier. also, we will have a for the full details of each command as well as many other free online tutorials and configuration guides, visit setting speed and duplex on a cisco router southern california routergods meetup group routergods . port speed and duplex mode practical ccnp r&s level free video tutorials by network bulls. step by step configuration guide. master cisco networks on your laptop free 300 page cisco ccna lab exercise guide notes cisco ios uses the term interface to refer to physical ports on a network device used to forward data to and from other
Conclusion
All things considered, it is evident that the post delivers helpful information concerning Changing The Speed And Duplex Settings Of Ethernet Interfaces. Throughout the article, the author demonstrates an impressive level of expertise on the topic. In particular, the discussion of Z stands out as a key takeaway. Thank you for reading the article. If you would like to know more, please do not hesitate to reach out via social media. I look forward to hearing from you. Moreover, below are some related articles that you may find helpful:
Related image with changing the speed and duplex settings of ethernet interfaces
Related image with changing the speed and duplex settings of ethernet interfaces
You’ll want to remove as much bloatware from your PC in order to optimize your system and make sure minimal unnecessary background processes are running. Background process can take up valuable CPU resources from Motive and cause frame drops while running your camera system.
There are many external resources in order to remove unused apps and halt unnecessary background processes, so they will not be covered within the scope of this page.
Firewall and Antivirus Settings
Firewall and Antivirus Settings
As a general rule for all OptiTrack camera systems, you’ll want to disable all Windows firewalls and either disable or remove any Antivirus software. If firewalls and Antivirus software is enabled, this will cause frame drops while running your camera system.

In order for Motive to run above other processes, you’ll need to change the Priority of Motive.exe to High.
-
Right Click on the Motive shortcut from your Desktop
-
In the Target: text field enter the below path, this will allow Motive to run at High Priority that will persist from closing and reopening Motive.
C:\Windows\System32\cmd.exe /C start «» /high «C:\Program Files\OptiTrack\Motive\Motive.exe»
Please refrain from setting the priority to Realtime. If Realtime is selected, this can cause loss of input control (mouse, keyboard, etc.) since Windows can prioritize Motive above input processes.

Processor Affinity (Optional)
Processor Affinity (Optional)
If you’re running a system with a CPU with a lower core count, you may need to disable Motive from running on a couple of cores. This will help stabilize the overall system and free up some cores for other Windows required processes.
-
From the Task Manager, navigate to the Details tab and right click on Motive.exe
-
From this window, uncheck the cores you wish to disallow Motive.exe to run on.
Please note that you should only ever disable 2 cores or less to insure Motive still runs smoothly.
We recommend that you start with only one core and work your way up to two if you’re still experiencing frame drop issues with your camera system.


The settings below are generally for larger camera setups and Prime Color camera setups. Typically, smaller systems will not need to use the settings below. When in doubt, please reach out to our
Support
team.
In most cases your switch settings will not be required to be altered. However, if your switch has built in
Storm Control
, you’ll want to disable this feature.
Your Network Interface Card has a few settings that can change in order to optimize your system.
To navigate to the camera network’s NIC:
-
Select Ethernet from the navigation sidebar
-
Under Related settings select Change adapter options
-
From the Network Connections pop up window, right click on your NIC and select Properites
-
Select the Configure… button and navigate to the Advanced tab


For the Speed and Duplex property, you’ll want to change this to the highest throughput of your NIC. If you have a 10Gbps NIC, you’ll want to make sure that 10Gbps Full Duplex is selected. This property allows the NIC to operate at it’s full range. If this setting is not altered to Full, Windows has the tendency to throttle the NIC throughput causing a 10Gbps NIC to only be sending data at 2Gbps.

Interrupt Moderation allows the NIC to moderate interrupts. When there is a significant amount of data being uplinked to Motive, this can cause more interrupts to occur thus hindering the system performance. You’ll want to Disable this property.

After the above properties have been applied, the NIC will need to go through a reboot process. This process is automatic, however, it will make it appear that your camera network is down for a few minutes. This is normal and once the NIC is rebooted, should begin to work as expected.
Although not recommended, you may use a laptop PC to run a larger or Prime Color Camera system. When using a laptop PC, you’ll need to use an external network adapter for. The above settings will typically not apply to these types of adapters, so no properties will need to changed.
It is important to use a Thunderbolt port adapter with corresponding Thunderbolt ports on your laptop as opposed to a standard USB-C adapters/ports.