If you depend on speech recognition to get around your Windows PC, here’s how to fix this pesky error.
Speech recognition enables features like voice-to-text, text-to-speech, and even voice access on your computer. However, issues sometimes arise when speech recognition fails to work, which leads to your computer displaying a popup saying, «speech recognition could not start.»
Don’t worry; we’ll list some troubleshooting methods to help you fix the speech recognition error on Windows.
Why Does the «Speech Recognition Could Not Start» Error Occur?
Several reasons might prevent you from using speech recognition features on your computer. Here are some common causes for an overview:
- Incorrect microphone settings
- Outdated audio drivers
- Wrong speech recognition settings
- Some required Windows services may not be running
Let’s explore the troubleshooting methods to fix this error and get your speech recognition up and running.
1. Start With Some Basic Fixes
If you’re experiencing issues with speech recognition on Windows, the following tips may offer a quick fix:
- Ensure your microphone is correctly connected.
- Change the default microphone and use the voice-to-text feature once.
- Check your system’s sound settings to ensure everything is set to default.
- Try updating the audio drivers using any free driver updater for Windows.
- If you’re still on an older version of Windows, refer to how to update your Windows device for instructions on how to update.
If the issue persists after this quick troubleshooting, try the more advanced fixes outlined below.
2. Troubleshoot Your Microphone
One of the most common causes of the «speech recognition could not start» error is a faulty or improperly set up microphone. To fix this, check your microphone for any physical damage and ensure it is selected as the default device.
If your microphone is connected but not visible in the device’s settings, see how to fix Windows not detecting a microphone. On the other hand, If your microphone is connected properly, follow our microphone troubleshooting guide for more help.
3. Modify the Speech Properties
Another solution is to modify the speech recognition settings from Windows Speech Properties. Here’s how to do that on your computer:
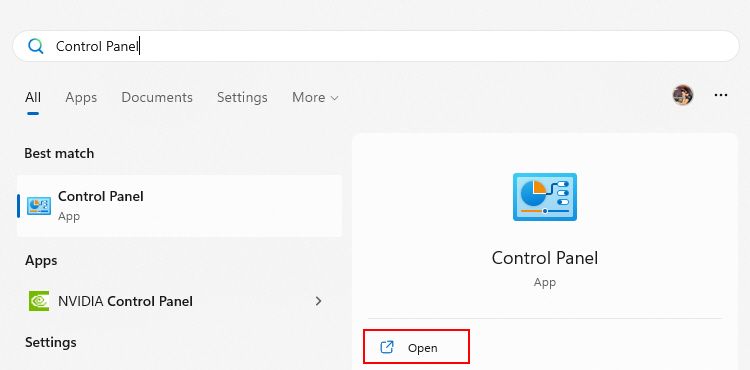
- Click the Windows key and type Control Panel on the search bar.

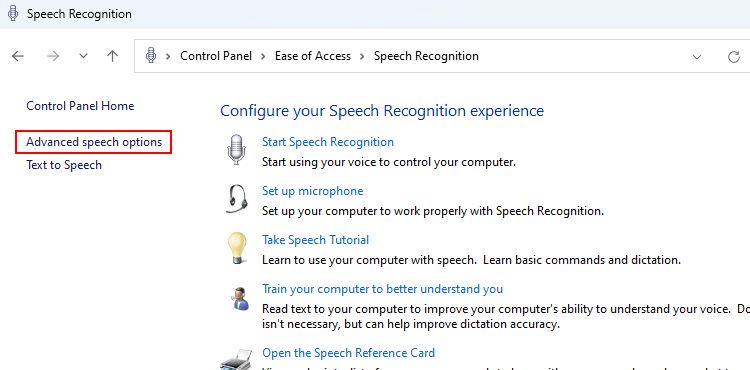
- Click Open to launch it. Once you’re on the Control Panel window, go to Ease of Access > Speech Recognition > Advanced speech options.
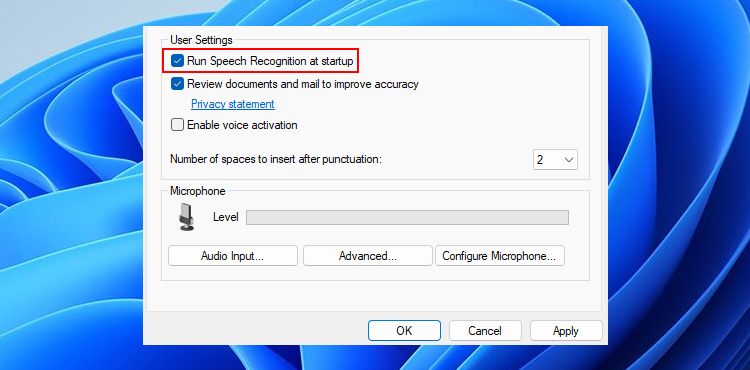
- On the Speech Properties screen, choose Run Speech Recognition at startup to enable it.
- Under Recognition Profiles, click the New button and then OK.
- Follow the steps to create a new profile and restart your computer.
Once you’re back on the desktop, you should be able to use all the speech recognition features.
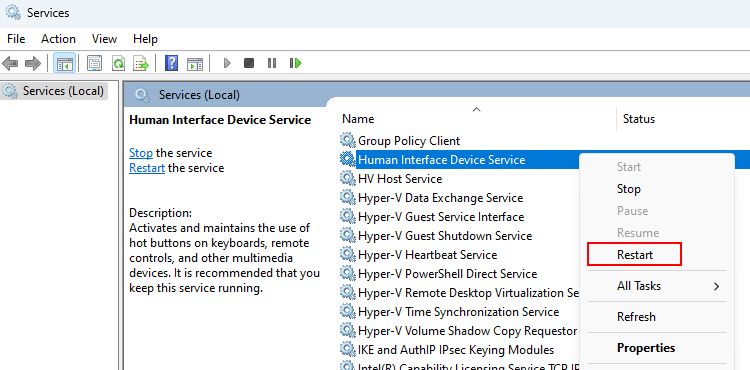
4. Restart Required Windows Services
Windows services always operate in the background and can stop (in rare situations), leading to speech recognition errors. It’s easy to fix via the Windows Services app.
Here’s how to restart the required Windows Services for speech recognition:
- Press Win + R and type services.msc into the field.
- Press Enter to launch the Services window.
- Locate the services related to speech recognition: Human Interface Device Service, Windows Audio, and Windows Audio Endpoint Builder.
- To restart the above services, right-click on them individually and select Restart.
- Finally, restart your computer once and again check for the speech recognition problem.
If you’re using a Bluetooth microphone, please restart the Bluetooth Support Service and Bluetooth Audio Gateway Service with the mentioned services.
5. Set Up Speech Recognition
Sometimes, the initial setup for speech recognition may create issues for you. For example, you can’t use the voice-to-text feature if you selected the wrong device type during the setup.
To fix this problem, we recommend setting up speech recognition again on your device. You can type Windows Speech Recognition in Windows search and open it. This will open the Speech Recognition Set Up screen.
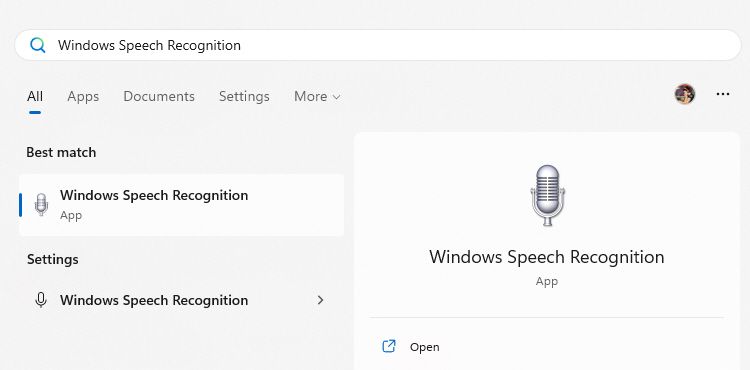
Follow the setup prompts one after the other, and once done, reconnect your microphone. This should quickly fix your speech recognition-related issues. If you cannot open the setup, access it from Control Panel > Ease of Access > Speech Recognition > Set up microphone.
All Set to Use Speech Recognition on Windows Again
Speech Recognition can significantly enhance your productivity, especially if you prefer speaking over typing. Though the «speech recognition could not start» error can be frustrating.
But once you fix the error, there’s so much to do with speech recognition features. For instance, you can use it to dictate your emails or control your computer with only your voice, to name a few possibilities.
Одной из полезных возможностей операционной системы Windows 10 является функция распознавания речи. Это позволяет пользователям контролировать компьютер с помощью голосовых команд. Однако иногда возникают проблемы с распознаванием речи, которые могут стать довольно неприятными.
Ошибки распознавания речи могут возникать по разным причинам. Некоторые из них могут быть связаны с настройками микрофона или динамиков, другие могут быть вызваны программными сбоями. В любом случае, существует несколько способов исправить эти ошибки и вернуть функцию распознавания речи к работоспособному состоянию.
Первым шагом в решении проблем с распознаванием речи является проверка настроек микрофона и динамиков. Убедитесь, что микрофон подключен к компьютеру и находится в рабочем состоянии. Выберите правильное аудиоустройство в настройках звука и установите правильные уровни громкости. Если у вас есть наушники или динамики, проверьте их состояние и настройки.
Если проблема не связана с аппаратными настройками, то возможно виновато программное обеспечение. Ошибки в работе приложений или драйверов могут привести к некорректному распознаванию речи. Чтобы исправить это, в первую очередь, обновите драйверы для аудиоустройств. Может потребоваться поиск и установка последних версий драйверов с сайта производителя.
Также стоит проверить обновления для Windows 10. В некоторых случаях, проблемы с распознаванием речи могут быть исправлены путем установки последних обновлений операционной системы. Проверьте наличие и установите все доступные обновления для Windows 10.
Если все вышеперечисленные методы не помогли решить проблему, то возможно стоит обратиться за помощью к специалистам или воспользоваться онлайн-форумами. Там можно найти полезные советы от других пользователей Windows 10, прошедших через подобные проблемы.
Содержание
- Проблема с распознаванием речи в Windows 10
- Ошибка распознавания при работе с голосовым вводом
- 1. Проверьте настройки микрофона
- 2. Обновите драйверы аудио и голосовой карты
- 3. Проверьте наличие конфликтов программного обеспечения
- 4. Улучшите четкость произношения
- 5. Перезапустите службы распознавания речи
- Использование обновленного драйвера для микрофона
- Проверка и обновление операционной системы
- Проверка наличия и правильной настройки микрофона
- Использование сторонних программ для распознавания речи
Распознавание речи — это одно из удобных и инновационных решений, предоставляемых операционной системой Windows 10. Однако, в некоторых случаях, пользователи могут столкнуться с проблемами, связанными с распознаванием речи. В этом разделе мы рассмотрим некоторые из самых распространенных проблем и предложим способы их решения.
- Отключенная функция распознавания речи: Перед тем, как приступать к решению проблемы, необходимо убедиться, что функция распознавания речи включена в настройках компьютера. Для этого следует перейти в раздел «Настройки» (Settings) > «Параметры конфиденциальности» (Privacy) > «Распознавание речи, ввод с микрофона» (Speech, inking, & typing). Там необходимо убедиться, что переключатель «Распознавание речи» (Speech recognition) включен.
- Проблемы с микрофоном: Очень часто проблемы с распознаванием речи могут быть связаны с неправильной работой микрофона. Убедитесь, что микрофон подключен к компьютеру и правильно настроен. Попробуйте проверить его работу в другом приложении или программе, чтобы исключить возможность его повреждения. Также важно проверить настройки микрофона в системе. Для этого нужно перейти в раздел «Настройки» (Settings) > «Система» (System) > «Звук» (Sound) и убедиться, что выбран правильный микрофон и уровень громкости настроен правильно.
- Проблемы с языком распознавания: Если вы используете другой язык для распознавания речи, чем язык системы, возможно, возникнут проблемы с распознаванием. Убедитесь, что в настройках распознавания речи выбран правильный язык.
- Обновление драйверов: Проблемы с распознаванием речи могут возникать и из-за устаревших или неправильно установленных драйверов на звуковую карту или микрофон. Рекомендуется проверить и обновить драйвера звуковой карты и микрофона до последней версии на официальном сайте производителя.
Если все перечисленные выше способы не решают проблему с распознаванием речи, рекомендуется обратиться к специалисту или в службу поддержки клиентов Microsoft для получения дополнительной помощи.
Ошибка распознавания при работе с голосовым вводом
Одной из полезных возможностей операционной системы Windows 10 является функция голосового ввода, которая позволяет пользователям управлять компьютером с помощью голосовых команд. Однако иногда в процессе использования этой функции могут возникать ошибки распознавания речи.
Проблемы с распознаванием речи могут возникать по различным причинам, включая технические проблемы, настройки системы или неправильную произносительную речи. В этом разделе мы рассмотрим некоторые общие причины ошибок распознавания и способы их исправления.
1. Проверьте настройки микрофона
- Убедитесь, что микрофон подключен к компьютеру и правильно настроен.
- Проверьте уровень громкости микрофона в настройках звука.
- Установите микрофон как устройство по умолчанию.
2. Обновите драйверы аудио и голосовой карты
Убедитесь, что у вас установлены последние версии драйверов для аудио и голосовой карты. Вы можете проверить наличие обновлений для драйверов в Менеджере устройств.
3. Проверьте наличие конфликтов программного обеспечения
Некоторые программы могут конфликтовать с функцией распознавания речи. Попробуйте временно отключить программы, которые могут вызывать конфликты, и проверьте работу голосового ввода еще раз.
4. Улучшите четкость произношения
Если ошибка распознавания речи возникает из-за неправильного произношения, вы можете попробовать улучшить четкость и deutlichkeit речи. Помимо этого, доступны различные параметры настройки функции распознавания голоса, которые позволяют настроить систему под ваши индивидуальные потребности.
5. Перезапустите службы распознавания речи
Если все вышеперечисленные методы не дают результатов, вы можете попробовать перезапустить службы распознавания речи. Для этого выполните следующие действия:
- Откройте «Панель управления».
- Выберите категорию «Распознавание речи».
- Нажмите на ссылку «Настроить микрофон для распознавания речи».
- Следуйте инструкциям мастера настройки.
Если проблема с ошибкой распознавания речи остается нерешенной после применения всех указанных выше методов, рекомендуется обратиться в службу поддержки Microsoft для получения дополнительной помощи и решения проблемы.
Использование обновленного драйвера для микрофона
Если у вас возникли проблемы с распознаванием речи в Windows 10, одним из возможных решений может быть установка обновленного драйвера для микрофона. Драйверы — это программное обеспечение, которое позволяет операционной системе взаимодействовать с аппаратным обеспечением компьютера. Установка обновленного драйвера может помочь исправить ошибки и улучшить работу микрофона.
Для использования обновленного драйвера для микрофона в Windows 10 следуйте этим шагам:
- Откройте меню «Пуск» и выберите пункт «Параметры».
- В окне «Параметры» выберите раздел «Обновление и безопасность».
- В левой части окна выберите раздел «Windows Update».
- Нажмите кнопку «Проверить наличие обновлений» и дождитесь завершения процесса проверки.
- Если обновления доступны, нажмите кнопку «Установить обновления».
- После установки обновлений перезапустите компьютер.
- После перезапуска компьютера проверьте, работает ли микрофон правильно.
Кроме того, вы можете посетить веб-сайт производителя вашего микрофона и скачать последнюю версию драйвера для вашей модели. Установите этот драйвер и перезапустите компьютер. Обновленный драйвер может решить проблемы с распознаванием речи, если они связаны с несовместимостью или ошибками в старой версии драйвера.
Если установка обновленного драйвера не помогла исправить ошибку распознавания речи, вы можете попробовать другие способы, такие как проверка наличия вирусов на компьютере, очистка временных файлов или переустановка программы распознавания речи.
Обновление драйвера для микрофона — это одно из возможных решений проблемы с распознаванием речи в Windows 10. Попробуйте этот способ и возможно, он поможет вам исправить ошибку и вернуть работоспособность микрофона.
Проверка и обновление операционной системы
Проверка и обновление операционной системы — один из основных шагов, которые помогут вам исправить ошибку распознавания речи в Windows 10. Ваша операционная система должна быть обновлена на последнюю доступную версию, чтобы гарантировать правильную работу функции распознавания речи.
Чтобы проверить наличие обновлений и обновить операционную систему в Windows 10, следуйте указанным ниже инструкциям:
- Откройте меню «Пуск» и выберите «Настройки».
- В открывшемся окне «Настройки» выберите раздел «Обновление и безопасность».
- На левой панели выберите «Windows Update».
- Нажмите на кнопку «Проверить наличие обновлений».
- Если доступны какие-либо обновления, нажмите на кнопку «Установить обновления».
- Дождитесь завершения процесса обновления и перезагрузите компьютер, если требуется.
После обновления операционной системы проверьте, исправлена ли ошибка распознавания речи в Windows 10. Если проблема остается, переходите к следующему способу исправления ошибки.
Проверка наличия и правильной настройки микрофона
Проблемы с распознаванием речи в Windows 10 могут быть связаны с наличием и настройками микрофона. В данном разделе будет описан процесс проверки наличия микрофона и его правильной настройки.
Шаг 1: Проверка наличия микрофона
- Подключите ваш микрофон к компьютеру (если он еще не подключен). Убедитесь, что микрофон правильно вставлен в разъем.
- Нажмите комбинацию клавиш Win + I, чтобы открыть «Настройки».
- В открывшемся окне выберите «Система».
- Перейдите в раздел «Звук».
- Во вкладке «Запись» проверьте, отображается ли ваш микрофон в списке устройств записи. Если его нет, то возможно микрофон не подключен или имеются проблемы с его работой. Попробуйте использовать другой порт или микрофон, чтобы убедиться, что проблема не связана именно с этим микрофоном.
Шаг 2: Проверка настройки микрофона
- Нажмите правой кнопкой мыши на значок динамика в правом нижнем углу панели задач.
- Выберите «Звуковые настройки» или «Записывающие устройства» (в зависимости от вашего интерфейса настройки).
- Перейдите на вкладку «Запись».
- Выберите ваш микрофон и нажмите «Свойства».
- Убедитесь, что ползунок «Уровень» настроен на приемлемое значение и не находится на нулевой отметке.
- Во вкладке «Уровни» проверьте, что ползунок «Уровень микрофона» не находится на минимальной отметке.
После проверки наличия и настройки микрофона перезапустите компьютер и проведите тестирование распознавания речи. Если проблема не решена, возможно, необходимо будет обратиться к специалисту или обновить драйверы микрофона.
Использование сторонних программ для распознавания речи
Если встроенные инструменты распознавания речи в Windows 10 не удовлетворяют ваши потребности или не работают должным образом, вы можете воспользоваться сторонними программами для распознавания речи. Эти программы предлагают более широкий набор функций и возможностей, которые могут помочь вам повысить точность распознавания и удобство использования.
Ниже приведены некоторые популярные сторонние программы для распознавания речи:
-
Dragon NaturallySpeaking: Это одна из самых популярных программ для распознавания речи, разработанная компанией Nuance. Она имеет мощный набор функций, включая возможность диктовки текста, управление приложениями с помощью голоса и создание макросов для автоматизации задач.
-
Google Документы: Сервис Google Документы предлагает возможность распознавания речи прямо в браузере без необходимости установки дополнительного программного обеспечения. Вы можете использовать эту функцию, чтобы диктовать текст и создавать документы, презентации и таблицы.
-
Microsoft Dictate: Компания Microsoft предлагает свою собственную программу для распознавания речи под названием Microsoft Dictate. Она позволяет вам диктовать текст в приложениях Microsoft Office, таких как Word, PowerPoint и Outlook.
-
Сервисы распознавания речи в облаке: Существуют различные сервисы распознавания речи, доступные в облаке, такие как Amazon Transcribe, Microsoft Azure Speech to Text и Google Cloud Speech-to-Text. Они предоставляют API и инструменты для разработчиков, чтобы интегрировать функции распознавания речи в свои приложения или сервисы.
Каждая из этих программ имеет свои особенности и набор функций. Перед выбором сторонней программы для распознавания речи рекомендуется ознакомиться с их возможностями, отзывами пользователей и ценой.
Использование сторонних программ для распознавания речи может помочь вам повысить эффективность работы, особенно если встроенные инструменты не соответствуют ваших ожиданиям. Эти программы обеспечивают более точное и удобное распознавание речи, что может значительно упростить выполнение задач и ускорить процесс работы.
Speech recognition is a relatively new but important feature in Windows computers. This option allows you to voice type and give commands to use applications in Windows. However, in some cases, the Speech Recognition Setup may not work. If speech recognition doesn’t work on your Windows 11/10 computer, then please read this article for the resolutions.
Voice recognition not working
![Windows Speech Recognition doesn’t work [Fixed]](https://www.thewindowsclub.com/wp-content/uploads/2022/08/Speech-Recognition-Setup-Doesnt-Work.jpg "Windows Speech Recognition doesn’t work [Fixed]")
Speech Recognition helps you do various things on your computer. From opening a program to dictate text in any text editor – you can do everything using this functionality. However, if it doesn’t work on your computer, the following suggestions may be handy for you.
The main causes of Speech Recognition not working are hardware related issues, software/system permissions, missing or corrupt system files, issues with drivers, etc. If you encounter this problem on your computer, then please try the following solutions sequentially to fix the same:
- Re-enable Speech Recognition
- Check for hardware related issues
- Check if the correct microphone is connected
- Check for microphone permissions
- Increase the input volume of your microphone
- Check speech language
- Turn on Online Speech Recognition using Registry
- Change Group Policy settings
- Disable hotkey changer software
- Reinstall microphone (if external)
- Run the Recording audio troubleshooter
- Perform SFC scan
- Troubleshoot in Clean Boot State
- Miscellaneous solutions
1] Re-enable Speech Recognition
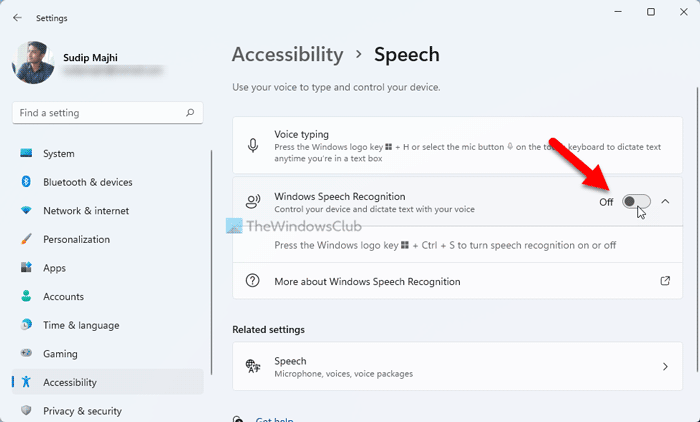
Even if you have turned on the Speech Recognition in Windows Settings, a bug or glitch could disable it automatically. It happens when you use a Beta or Dev Channel build. That is why it is recommended to verify the setting or re-enable it in Windows Settings.
To re-enable Speech Recognition in Windows 11, follow these steps:
- Press Win+I to open Windows Settings.
- Switch to the Accessibility tab.
- Click on the Speech menu.
- Toggle the Windows Speech Recognition button to turn it on.
Then, check if you can use Speech Recognition on your computer or not.
2] Check for hardware related issues
If there are issues with the microphone hardware or the USB connections then no matter what you try on your computer, the speech recognition will not work properly. In this case, we advise you to check your microphone with another computer to isolate the cause with the hardware. If the microphone works fine with another computer, then you can try further solutions.
3] Check if the correct microphone is connected
Ideally, the preferred microphone for any function on the computer is the default microphone of the laptop and if it is not attached then you would have to attach an external one. In the latter case, a Windows computer may or may not detect an external microphone. To confirm this, try the following.
- Right-click on the Start button and select Settings from the menu.
- In the Settings window, go to the System tab on the list on the left-hand side. In the right pane scroll down to Sound and click on it.
- Now scroll down to the Input section and check which microphone is connected and currently in use. It can be judged by checking the radio button.
If your mic is not connected, then click on add device and connect your Input microphone. Make sure that it is the one on which the radio button is checked after connecting.
4] Check for microphone permissions
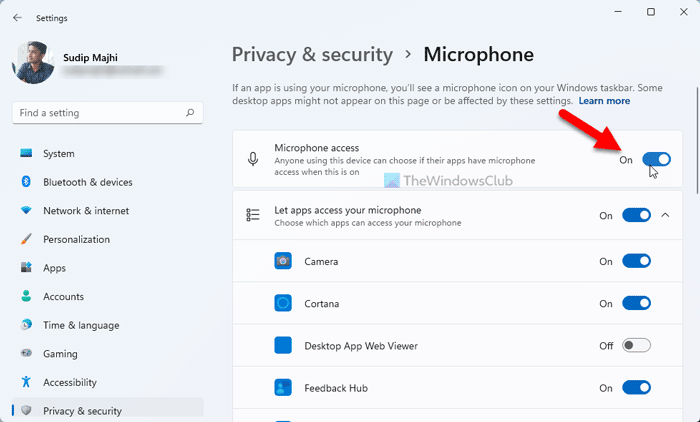
- Right-click on the Start button and select Settings from the menu.
- In the Settings window, go to the Privacy and Security tab on the list on the left-hand side.
- In the right pane, scroll down to App permissions, and click on Microphone.
- Turn the switches on for Microphone access and Let your apps access the microphone.
Also make sure that the switch is turned ON for the application for which you need the speech recognition.
5] Increase the input volume of your microphone
Usually, the volume of the output devices like speaker and headset is visible in the system tray itself. However, you will have to change the microphone volume through the Settings panel. In case the microphone volume is low, the issue in discussion can appear since the computer might not be able to recognize your speech. In this case, you can increase the microphone volume as follows.
- Right-click on the Start button and select Settings from the menu.
- Go to the System tab on the list on the left-hand side and then go to the Sound option on the list on the right-hand side.
- Scroll down to the Input section and you can use the slider to increase the volume.
6] Check speech language
Another reason for your software not recognizing the speech to the microphone could be that you might have selected the wrong language for speech recognition. This can be checked and fixed as follows.
- Right-click on the Start button and select Settings from the menu.
- Go to the Time and Language tab on the list on the left-hand side.
- In the right pane, scroll down and click on Speech.
- Check the speech language and change it if is incorrect.
Although Speech Recognition works with many languages, if you understand English, it is recommended to set English as the primary language. At times, a bug or glitch may block you from using speech recognition when you use any language other than English. That is why it is recommended to follow this guide to change Windows language back to English.
7] Turn on Online Speech Recognition using Registry

If you get this problem with Online Speech Recognition, you must verify the Registry settings. It is possible to enable or disable online Speech Recognition using Windows Registry. If you deactivated this feature in the past, you might encounter the aforementioned problem. That is why follow these steps to turn on Online Speech Recognition using Registry:
- Press Win+R to open the Run prompt.
- Type regedit > click the OK button.
- Click on the Yes button.
- Navigate to this path: HKEY_CURRENT_USER\Software\Microsoft\Speech_OneCore\Settings\OnlineSpeechPrivacy
- Right-click on OnlineSpeechPrivacy > New > DWORD (32-bit) Value.
- Set the name as HasAccepted.
- Double-click on it to set the Value data as 1.
- Click the OK button.
- Close all windows and restart your PC.
After that, you can use online Speech Recognition without any error.
8] Change Group Policy settings
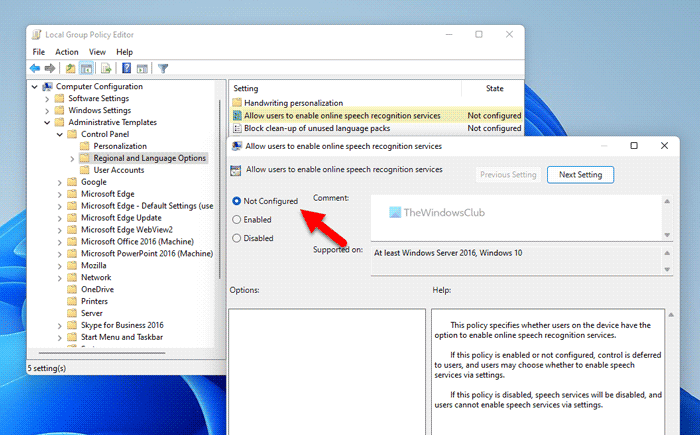
There is a Group Policy setting that helps you prevent or block users from enabling Speech Recognition on Windows 11/10 PC. If you enabled this setting earlier, you could not turn on the same option from Windows Settings. That is why follow the following steps to allow the user to enable online speech recognition:
- Search for gpedit.msc in the Taskbar search box.
- Click on the individual search result.
- Go to Computer Configuration > Administrative Templates > Control Panel > Regional and Language Options.
- Double-click on the Allow users to enable online speech recognition services setting.
- Choose the Enabled or Not Configured option.
- Click the OK button.
After that, you can turn on or off online speech recognition without any problem.
9] Disable hotkey changer software
Windows 11/10 allows users to activate Speech Recognition using a hotkey, Win+Ctrl+S. However, if you have used the same keyboard shortcut to open something else or execute a different command, you won’t be able to use Speech Recognition. That is why it is suggested to check the hotkey changer software or keyboard shortcut changer software minutely.
10] Reinstall microphone (if external)
If you use an external microphone, it is recommended to reinstall it. You can do the following:
- Unplug the microphone from your computer first. Restart your computer and re-plug it in.
- If you haven’t installed the driver, it is suggested to do that. However, if you have already installed the corresponding driver, you can remove it first and reinstall the same.
- Verify if your microphone is in working condition. You can use the same microphone with another computer.
11] Run the Recording audio troubleshooter
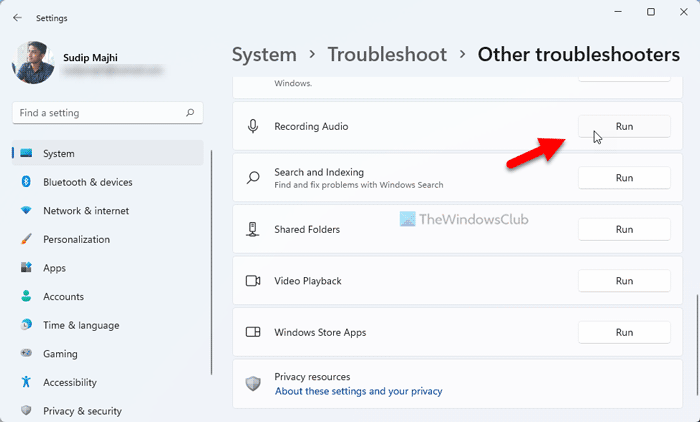
The Recording Audio troubleshooter is an excellent tool to check for problems related to microphone and speech recognition. You can run it as follows.
- Right-click on the Start button and select Settings from the menu.
- In the Settings window, go to the System tab on the list on the left-hand side.
- In the right pane, scroll down and click on Troubleshoot. On the next page, select Other troubleshooters.
- From the list of troubleshooters, select Run corresponding to the Recording Audio troubleshooter.
12] Run SFC scan
If everything else fails, it could be quite possible that the system files are missing or corrupt. In this case, you can consider performing an SFC scan on your computer. The SFC scan will replace the missing and corrupt files and fix the problem of speech recognition not working.
13] Troubleshoot in Clean Boot State
It is quite possible that an external software might be interfering with speech recognition on the intended software. This case can be isolated by troubleshooting the computer in the clean boot state. While in the clean boot state, no other third-party software will launch at the startup itself. In this case, you can identify the problematic software and halt it while using the speech recognition function.
14] Miscellaneous solutions
You can also try solutions like moving to a quieter place, using an external microphone instead of your laptop’s microphone, updating drivers, etc.
Read: How to disable Speech Recognition feature in Windows
How do I turn on my microphone?
First of all, the hardware of the microphone should be plugged and turned on. Some external microphones may have a switch to turn them on but most of them are simply plug and play. If your external microphone requires a separate power supply, make sure that the same is connected. Usually, windows will recognize the hardware and it will be turned on automatically. If that does not happen, you can use the Realtek audio player or Windows Settings to turn it ON manually.
Read: Best Speech Recognition software for Windows 11/10
What is a microphone used for?
A microphone is simply an audio input device for sending an audio input to the computer. The audio input can be used for recording, voice typing, instructing the system, etc. Usually, these days laptops come with inbuilt microphones.
Windows Speech Recognition is not available for the current display language
If you get Windows Speech Recognition is not available for the current display error in Windows 11/10, you need to set English as the default language. If you have used any regional language or anything else as the primary display language, you may encounter the aforementioned error on your computer.
That is why follow these steps to set English as the default Windows display language in Windows 11:
- Press Win+I to open Windows Settings.
- Click on the Time & language tab.
- Select the Language & region menu.
- Expand the Windows display language drop-down menu.
- Select English from the list.
However, you must install the English language first. For that, you can click the Add a language button, select English (United States) and click the Next button to get started with the installation process.
Following that, you can choose it from the drop-down menu.
How do I set up voice recognition on Windows 11?
To set up Voice Recognition or Speech Recognition on Windows 11, you need to open the Windows Settings panel first. Then, go to the Accessibility tab and click on the Speech menu. Following that, toggle the Windows Speech Recognition button to turn it on. Then, you can press Win+Ctrl+S to open the respective panel.
Why is my Windows Speech Recognition not working?
There are many reasons why Speech Recognition might not be working on your computer. For example, if it is turned off in the Windows Settings panel, you cannot use it by pressing the Win+Ctrl+S shortcut. On the other hand, it could be a microphone issue as well. If you use a third-party app, an internal conflict can also cause the same issue.
Does Windows 11 have a talk-to-text feature?
Yes, like Windows 10, Windows 11 also has a talk to text features included. For that, you do not need to install third-party programs or services. You can press Win+H to open the corresponding panel and start talking. Everything will be typed automatically in any text editing or word processing application.

Contents
- 1 Speech Recognition Error Windows 10 как исправить
- 2 Speech Recognition। How To Disable Speech Recognition In Windows 10। Windows Speech Recognition Off
- 2.1 Conclusion
- 2.1.1 Related image with speech recognition error windows 10 как исправить
- 2.1.2 Related image with speech recognition error windows 10 как исправить
- 2.1 Conclusion
Explore the Wonders of Science and Innovation: Dive into the captivating world of scientific discovery through our Speech Recognition Error Windows 10 как исправить section. Unveil mind-blowing breakthroughs, explore cutting-edge research, and satisfy your curiosity about the mysteries of the universe.
Speech Recognition Error Windows 10
Speech Recognition Error Windows 10

Speech Recognition Error Windows 10 как исправить
Speech Recognition Error Windows 10 как исправить

Speech Recognition Error Windows 10 как исправить
Speech Recognition Error Windows 10 как исправить

Speech Recognition Error Windows 10 как исправить
Speech Recognition Error Windows 10 как исправить

Speech Recognition Error Windows 10 как исправить
Speech Recognition Error Windows 10 как исправить
Speech Recognition। How To Disable Speech Recognition In Windows 10। Windows Speech Recognition Off
Speech Recognition। How To Disable Speech Recognition In Windows 10। Windows Speech Recognition Off
speech recognition। how to disable speech recognition in windows 10 । windows speech recognition off। today, i will share i got this notification every time i startup my pc, «speech recognition error. speech recognition could not start make sure your to disable windows 10 speech recognition on startup: 1) right click the microphone 2) point to options and 3) turn off or uncheck here’s how to disable turn off setup speech recognition window screen (welcome to speech recognition) during windows 10 turn on or off speech recognition in windows 11 {tutorial] in this post, we will walk you through the process of disabling speech 00:00 find speech recognition. 00:53 set up microphone. 01:24 imperative you train before dictating. 03:11 open speech (solved) windows 11 speech recognition not working error 0x80049dd3 subscribe for the next update notification: thes covers using windows 10 speech recognition for basic commands such as opening files, starting software, commands in some people have had difficulty opening cortana with windows speech recognition. here’s how to fix that. those with mobility this tutorial helps to how to enable or disable speech recognition in windows 10 [tutorial] thanks friends for watching this to read a detailed article on this, click on thewindowsclub disable speech recognition feature windows speech how to disable speech recognition feature in windows 11 with 3 basic method in windows 11, dictation has been updated
Conclusion
After exploring the topic in depth, it is clear that the article provides useful information about Speech Recognition Error Windows 10 как исправить. From start to finish, the author illustrates an impressive level of expertise on the topic. Notably, the section on X stands out as particularly informative. Thanks for reading the post. If you need further information, feel free to contact me through email. I am excited about hearing from you. Additionally, below are some similar articles that might be helpful:
Fix: Speech Recognition could not start Cryptic Error in Windows 10
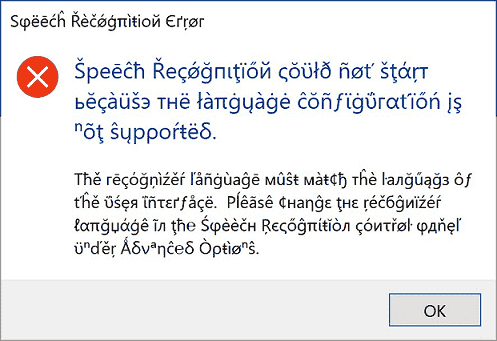
Many users are complaining that they are receiving Speech Recognition could not start cryptic error in Windows 10 when they try to start the feature. This problem mostly occurs when ctfmon.exe is not set to automatically start with Windows. However, there are other causes such as a change in the recognizer language that lead to this error.
This issue is not new in Windows as users are experiencing this since Vista edition. Whenever they make an attempt to initiate the Speech Recognition, the following error note shows up on the PC screen. To bypass this problem, there are few solutions like starting ctfmon.exe during Startup, changing Speech settings, adding new recognition profile and so on. Let us move on to the workarounds one by one and see which one fixes your problem.
Fix: Speech Recognition could not start Cryptic Error in Windows 10
Here is how to fix Speech Recognition could not start Cryptic Error in Windows 10 –
Add ctfmon.exe to Startup
Step-1: First of all, press “Windows + R” hotkeys to open Run dialog box. When the box shows up, type regedit and click OK or press Enter to start the process.
Step-2: When the Registry Editor opens, navigate to the below-given path on the left column.
Step-3: Shift to the corresponding pane of Run and make a right-click on an empty space. Hover over New and from the submenu choose String Value.
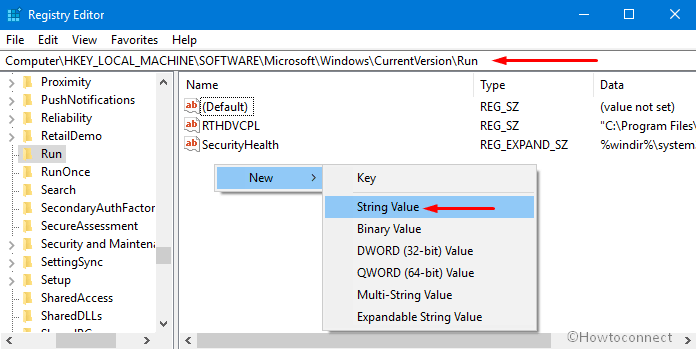
Step-4: Name it as ctfmon and double-click on it to change its value. On its Value data field, assign its value as ctfmon.exe.
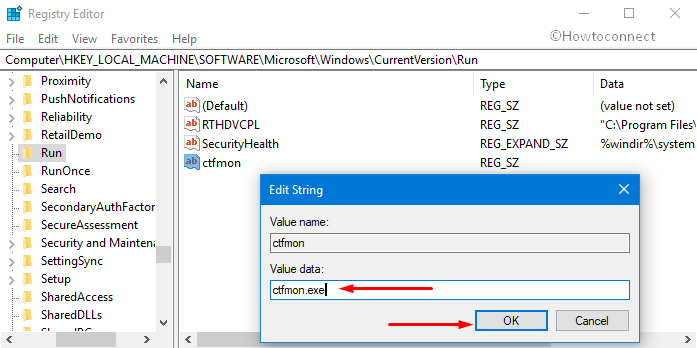
Step-5: Now, you just need to close Registry Editor and restart Windows 10 PC to check how it fixes.
After adding ctfmon.exe to the Startup, if the system still shows Speech Recognition could not start, go ahead with other solutions.
Using Speech Recognition Settings
Open Start Menu, type cp, and press Enter. Choose Speech Recognition applet when Control Panel comes into view.
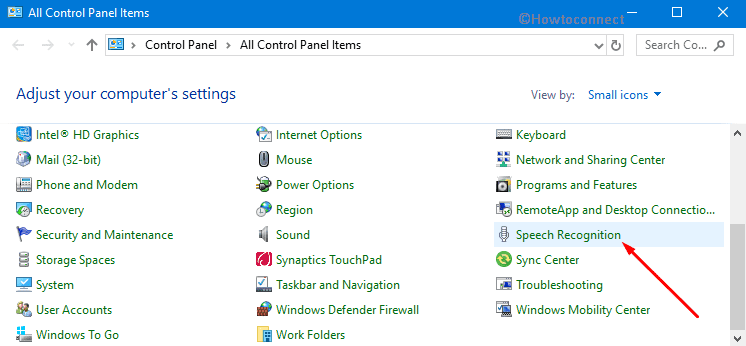
Click Advanced Speech Options on the left side of the following screen (see snapshot).
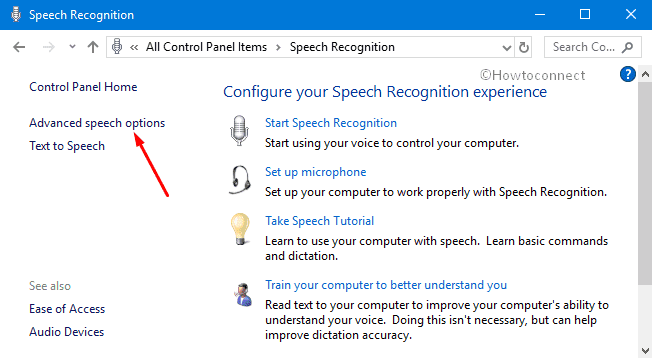
When the Speech Properties screen displays, ensure to set the Language in the correct locale. Moving ahead, also uncheck the option namely “Review Documents and mail to improve accuracy”.
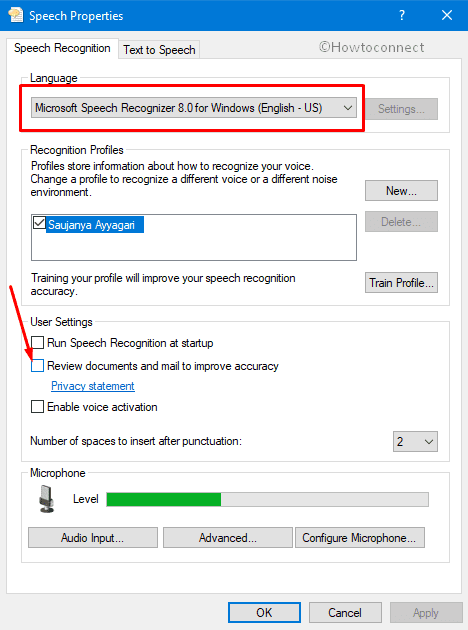
Simply click OK and reboot your computer.
It is done, you can check how is the speech recognition feature. If it is still not fixed, you continue to try the solution 3.
By Regional Settings
Press “Win + I” shortcut keys simultaneously in order to open Windows Settings app.
When the main interface of the application comes into view, go to Time & Language category.
Select the Region tab on the left column of the following page. Switch to its right pane and click the drop-down underneath the option Country or region. From the list, choose another location.
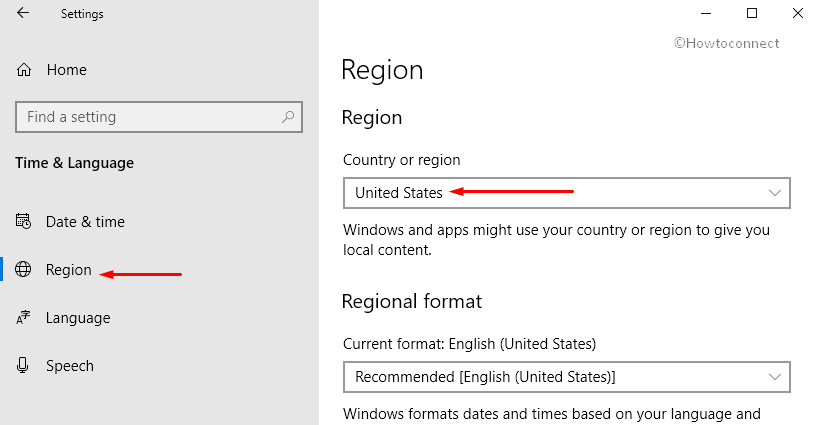
Now, reboot the computer and again head towards the Region settings and this time set the correct location of your choice.
Finally, again make an attempt to restart your PC and this time Speech Recognition will work wonder. Doing this will eventually clear out any settings on your system that are may be corrupted by other updates or software that you might have installed.
Train Profile
In case you are still encountering Speech Recognition could not start, give an attempt to Train profile.
First, open Control Panel by using any of your preferred procedures.
Go to Speech Recognition and perform a hit on Advanced speech options on the top left side.
On the Speech Properties dialog, click the button namely Train Profile.
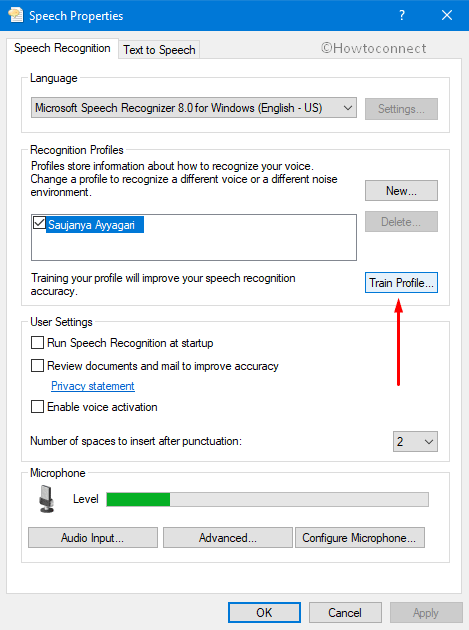
Now, follow the on-screen guidelines of the wizard and complete the training.
Create New Recognition Profile
If the training process and other workarounds fail to bypass Speech Recognition could not start Cryptic Error in Windows 10, you should create a new recognition profile.
Go to Control Panel and get access to Speech Recognition applet.
Make a click on “Advanced speech options“.
In the Speech Properties dialog, click the New button under the ‘Recognition Profiles‘ section as indicated in the below snapshot.
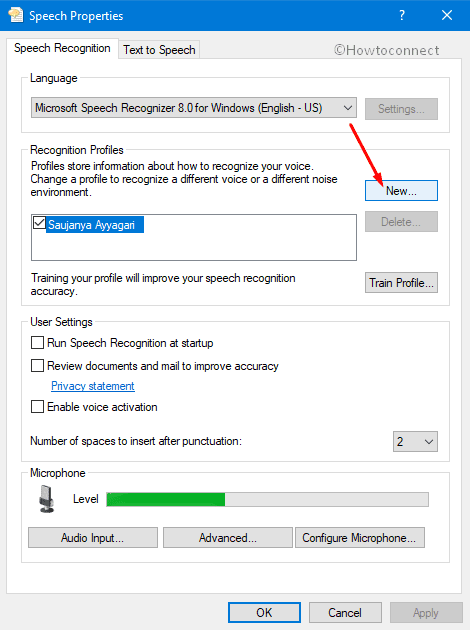
Provide a new name to the profile and when you successfully create it, delete the old one.
Lots of experienced users said that they have tried the above-mentioned methods, and it works effectively. So, you also give a shot to these workarounds and let us know which one helped you out. If you have more tips to solve this trouble, don’t forget to drop them in the comments below.
Как решить проблему «speech recognition could not start»

друзья, помогите избавиться от ошибки или полностью отключить распознавание речи на винде 10.
в любой непонятной ситуации, хоть винду запустил, хоть любую другую программу, выскакивает эта ошибка, что скрином выше.
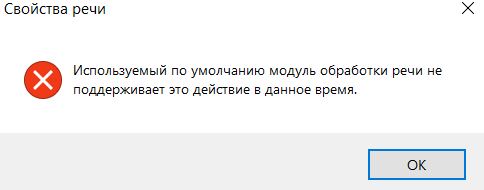
в настройках распознавания пишет о не поддерживаем модуле.
пролистывая гугл я выяснил, что можно как то излечить ошибку изменив язык интерфейса на английский
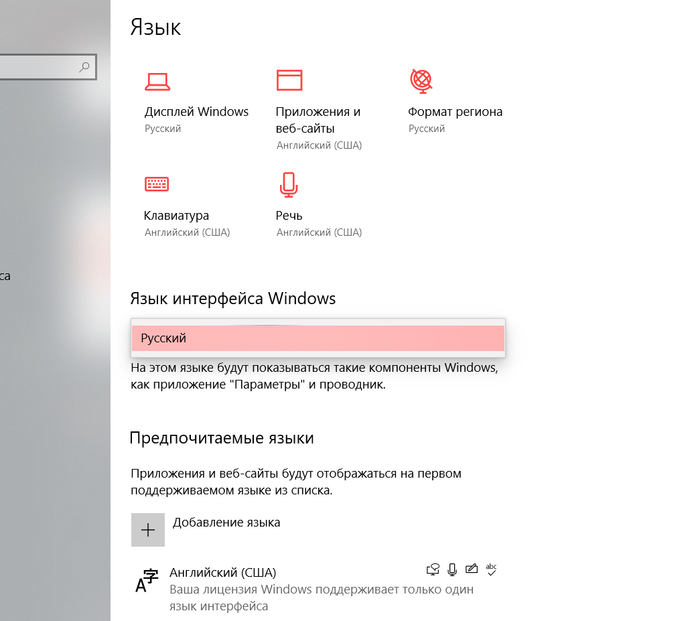
но беда в том, что у меня домашняя версия для одного языка

может кто сталкивался и знает как исправить?
Совет «переустановить винду» нельзя назвать помощью
Win 10 Tweaker 18
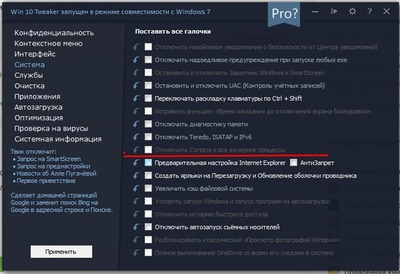
Кортану видимо отключить
А могли бы разосраться из-за квартиры и всю жизнь не разговаривать
Сильно поругались со старшим братом из-за наследства. От деда досталась однушка в старом доме. Я орала на брата, что у него семья, дети, и это отличный первоначальный взнос, а он с пеной у рта доказывал мне, что как-нибудь справится, и мне, одинокой молодой девушке, эта квартира нужнее. Делить там нечего, сумма сравнительно небольшая. Пришлось надавить на предков, чтобы деньги достались ему. Поняла, что нас воспитали всё-таки правильно. Люблю его, люблю его жену и детей, и не понимаю, как иначе)

Петя, притормози пожалуйста
Такое довольное лицо Пети.

Струхнула знатно
Лето. В ту ночь мы с подругами ночевали вместе, я просыпаюсь с утра, открываю глаза, они стоят надо мной, глаза по пять копеек, как заорут: «Ура, очнулась! Полгода пролежала, не вставая, ударилась головой об плитку, и кома». Я ничего не понимаю, вроде ж вот, поспала часов семь. Им не поверила, они говорят: «Вставай, только аккуратно, а то слабая ещё», — подводят к окну, и я вижу зиму! Зиму, вашу мать! И тут я испугалась, проспала все лето! Заревела, а они как давай ржать! За ночь просто выпал снег. Люблю своих друзей, чуть до инфаркта не довели
Коротко о феминизме

Женщины отмывают театр Хуареса в Гуанахуато, Мексика после вандализма феминисток в международный женский день
Нью-Йорк. Фото-гений, Бэтмен и Джокер
Так. я передумал, давай дучше этот
Если пепельница,то нескафе

Молодая ждуняшка


Ответ на пост «А могли бы разосраться из-за квартиры и всю жизнь не разговаривать»
Продавал по объявлению какую-то шутку, уже даже не помню какую. По деньгам не заморачивался, выставил низкую цену, лишь бы продать поскорее.
Приезжает мужик, смотрит-вертит, говорит, — Слушай, ну как-то дешево, она же дороже стоит.
Я ему — Да забирай, мне и этих денег хватит, лишь бы продать.
— Да не, ну неудобно как-то, вижу что все в порядке, давай добавлю пару тысяч.
— Ну мне эти пары тысяч погоды не сделают, бери так, всё-таки уже использовалась вещь, износилась.
ну в общем мы вот так пару тройку итераций провели.
Я ему потом говорю что мы очень странно торгуемся, поржали вместе, деньги отдал, пожелали удачи друг другу.
Да, бывает, даже с незнакомыми людьми.

Забавно, как игра в экономические стратегии делает из тебя злодея

Я вот очень люблю играть в стратегии от шведов из Paradox Interactive, а в особенности люблю Crusader Kings. Играть там надо за средневекового правителя, который сам по себе личность и может иметь самые разные черты характера, достоинства и пороки. Управляешь небольшим княжеством, герцогством, королевством или империей, строишь там что-то, развиваешь культуру, воюешь, заключаешь союзы, плетёшь интриги и т. п. После смерти продолжаешь играть за своего наследника. И так пока средневековье не кончится, то есть много и много поколений. Мир игры живой, все там и без тебя самостоятельно функционирует, каждый раз по-разному, и за счёт этого приходится крутится, чтобы выжить и сделать свою Родину снова великой. А играю я, естественно, за русичей.
В первую очередь я борюсь со сменяемостью власти. Потерял главный титул и королевский трон ушёл в другую династию – это провал, так как теперь придётся быть на подхвате у какого-то дебила, что ведёт страну к гибели и развалу, пуская под откос столетия тяжкого труда. Без твоего контроля начинаются бессмысленные войны, каждый хочет отделиться от империи и быть независимых корольком. Бардак и беспредел, страна разваливается за два поколения, кругом нищета и бесконечная резня за остатки ресурсов. А тут ещё и крестьяне начинают требовать вольности. Что эти холопы себе позволяют?
Кстати о крестьянах. Строить великую империю – дело не дешёвое. Проклятые католики с одной стороны, кочевники с другой, викинги с третьей, а там уже и монголы скоро придут с востока – нужно быть готовым дать по мозгам каждом и всем оптом, иначе спать спокойно не получится. В итоге повышаем налоги до предела, всех несогласных развешиваем по деревьям. Бунтующих вассалов лишаем титулов и раздаём потом эти хлебные места исключительно своим близким родственникам, так как родня тебя всегда любит на +20 больше прочих, и это снимает кучу головной боли в будущем.
Вообще титулы и должности при дворе крайне не рекомендуется раздавать самым достойным, потому что самый достойный завтра может решить, что он достоин и твоего места тоже. Назначишь великого полководца маршалом, а он будет потом все твои инициативы зарубать в совете, а спустя лет 10 и вовсе поднимет восстание – ну его нахер. Лучше посадить менее талантливого, но лояльного. Желательно родственника.
Снимать с должности неугодных – отдельная проблема, ведь «есть же законы, бе-бе-бе», а вассалы в принципе не любят когда одного из них лишают титулов по беспределу, нужны основания. Приходится идти в обход: посылать шпионов, искать компромат, организовывать… разные случаи. Иногда даже с детьми. Что такое одна детская смерть перед возможностью посадить своего родственника на французский престол и обеспечить себе мощного и лояльного союзника на поколения вперёд? Только подумайте, сколько детей спасет этот союз в будущем!
Кстати о детях. Частая сменяемость власти идёт лесом, так как едва мой наследник садится на престол, приходится потом 10 лет утрясать кризисы и доказывать, что твой кулак не менее жёсткий, чем был у предшественника, и никаких снижений налогов не будет. И только-только порешаешь все вопросы, как король снова умер, да здравствует его старший сын 50 лет, а значит и новые гражданские войны за наследство, снижение налогов и попытки стать независимыми. В итоге хитришь, изворачиваешься, и делаешь таки наследником империи одного из младших детей, который принесёт потом 50 лет стабильности под его непрерывным правлением.
И кто сказал, что договорные браки – это плохо? Выбирая для своих детей и внуков правильных партнёров, я смог заручится важными союзами. А когда нужда в союзниках отпала – стал выбирать в супруги для потомков только тех, кто отличался хорошими генами. Те, кто родился с дефектами просто на просто исключается из плана, умирает бездетным в одиночестве, а наиболее удачные особи скрещиваются между собой, чтобы дать еще более могучее потомство. Четыре-пять поколений, и наша династия выглядит просто как боги в сравнении с прочим грязным людом: несравненная красота, гениальный ум, невиданная физическая сила – все мы обладаем этими дарами от рождения.
Разнообразие культур? Религиозная терпимость? Все, что я слышу, это «новые бунты каждый год». Одна империя, один народ, одна вера. А для всех несогласных – деревьев в империи ещё много, верёвок хватит на всех. Нам не нужны потом тут отвлекающие факторы, нам нужно воевать за границей, поддерживать наших ставленников, чтобы в нужный момент они поддержали нас.
Знаете, какой лучший способ защититься от расширения империи монголов на запад? Иметь кучу лояльных государств между вами и монголами, чтобы до вас они могли добраться лишь обескровленными и слабыми, сточив свою орду об твоих «союзников», которым ты обещал помощь, но помог в итоге только деньгами на наёмников, чтобы сточить орду ещё сильнее. Помогал? Помогал, ничё не знаю.
Хорошая идея – стать католиком и взятками да шантажом пропихнуть своих родственников на должности кардиналов, захватить власть над высшей властью в Европе. Потом посылать Папе подарки, отправлять к нему льстивых дипломатов и выкачивать из святого престола деньги «на развитие христианства», а по факту сливать их на улучшение своей армии, на постройку новых крепостей и на войну с другими католиками за господство над Британскими островами.
Зачем мне контроль над Британскими островами? Ну… для безопасности, безопасности никогда не бывает слишком много. Плюс если война идёт где-то там, значит война не идёт у тебя дома. Моя империя превосходит Римскую как по размеру, так и величию, но нигде на всем её протяжении нет абсолютно никаких конфликтов, просто сто лет покоя и процветания, пока весь прочий мир постоянно полыхает в огне. Мелкие государства уже сами просятся нам под крыло, но мы принимаем не каждого, а только тех, у кого нет особо больших проблем в моменте. Разберитесь со своим хаосом, примите нашу культуру и религию, а потом уже приходите.
Я создал Империю Зла, и управляю я ей максимально злобно и цинично, железный кулак моего правления не становится мягче с годами и на деревьях все так же висят несогласные. Но знаете что? Моя империя процветает, мой народ живёт в мире и достатке, наша культура обогнала другие страны на половину столетия, а технический прогресс ставит нас на голову выше прочих. Наши правители – все как один гениальны, божественно красивы и физически сильны, а наши подданные живут в многочисленных, богатых и высокоразвитых городах, в гармонии, не имея причин для конфликтов друг с другом.
Windows предоставляет функцию распознавания речи на основе устройств (доступную как с помощью приложения Windows Recech Recognition Desktop), так и с помощью облачной службой распознавания речи на тех рынках и регионах, где доступна Cortana. Microsoft может использовать голосовые данные, взаимодействия с компьютером, чтобы улучшить услуги распознавания речи.
Чтобы использовать распознавание речи, необходимо включить параметр «Знакомство с вами» (параметр конфиденциальности в разделе «Персонализация рукописного ввода и ввода с клавиатуры»), поскольку голосовые службы существуют как в облаке, так и на вашем устройстве. Информация, которую Microsoft собирает с их помощью, позволяет их улучшить. Речевые службы, которые не передаются в облако и присутствуют только на вашем устройстве, такие как «Диктор» и «Распознавание речи Windows», по-прежнему будут работать, если этот параметр отключен, но Microsoft уже не будет собирать данные.
Если для параметра «Диагностика и использование данных» («Параметры» → «Конфиденциальность» → «Диагностика и отзывы») установлено значение «Полные», входящие данные для рукописного ввода и ввода текста отправляются в Microsoft, и компания использует эти данные в совокупности, чтобы улучшить платформу для всех пользователей.
Чтобы отключить распознавание голоса в Windows 10, выполните следующие действия.
- Откройте приложение «Параметры».
- Перейдите в раздел «Конфиденциальность» → «Голосовые функции».
- Справа отключите опцию «Распознавания голоса в сети» передвинув ползунок переключателя в положение «Откл.».
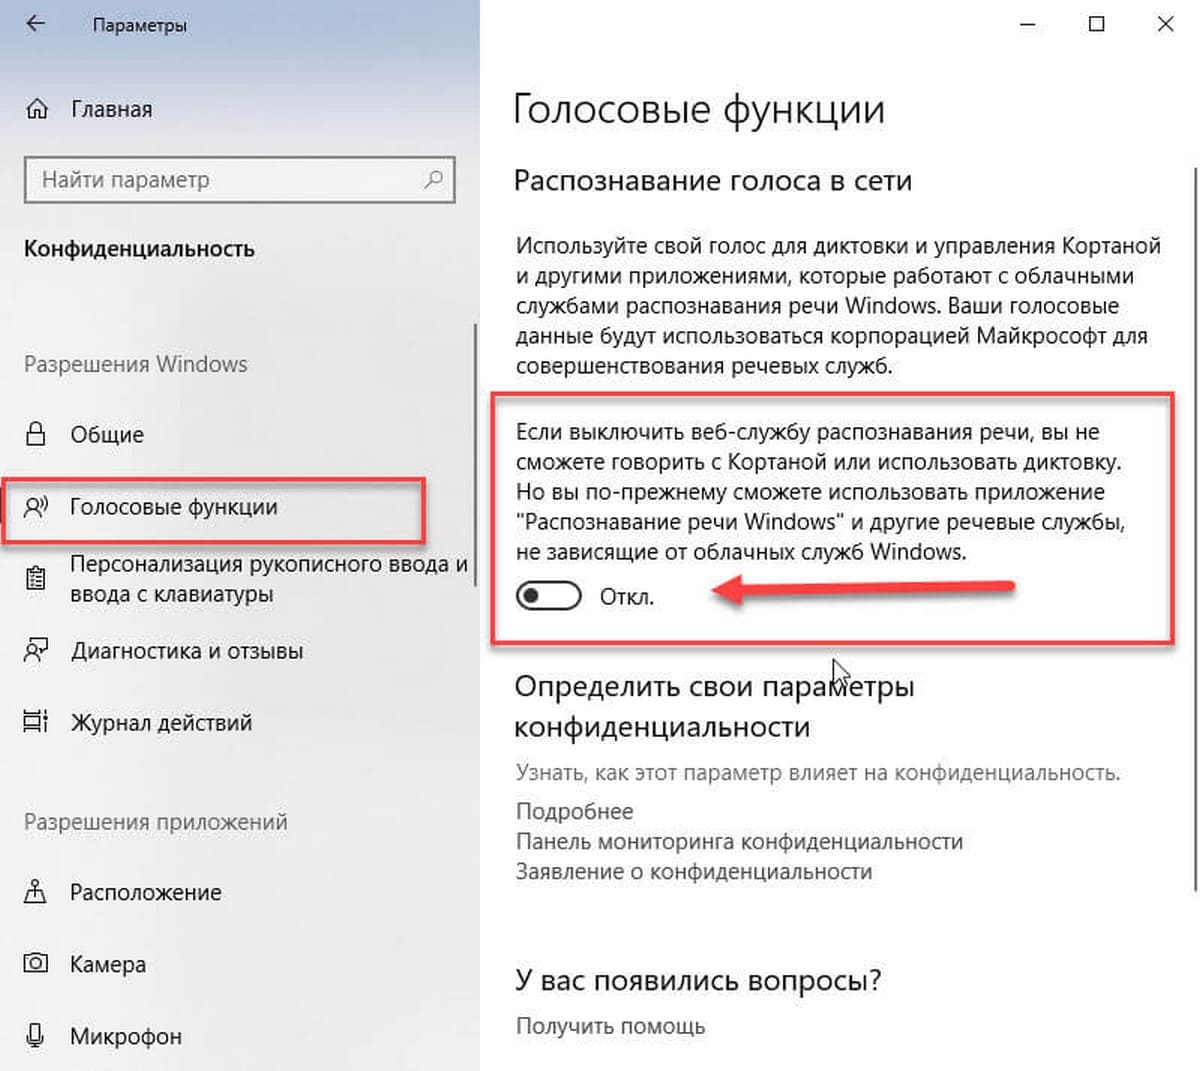
Теперь функция отключена.
Кроме того, вы можете применить настройки реестра.
Отключить распознавание речи в сети с помощью настройки реестра.
- Загрузите следующий ZIP-архив: загрузите ZIP-архив.
- Извлеките его содержимое в любую папку. Вы можете разместить файлы непосредственно на рабочем столе.
- Дважды кликните файл Off-Online Recognition.reg, чтобы начать процесс слияния.
Чтобы отменить изменение при необходимости, используйте файл On-Online Speech Recognition.reg.
Все!
Файлы реестра, выше, изменяют ветвь реестра
Они изменяют параметр DWORD (32 бита) с именем HasAccepted.
- HasAccepted = 1 — Включить распознавание речи в сети.
- HasAccepted = 0 — Функция распознавания речи отключена.
Кроме того, начиная с Windows 10 build 17063, ОС имеет ряд новых параметров в разделе «Конфиденциальность». К ним относятся возможность управления разрешениями на использование для ваших библиотек / папок, микрофона , календаря , информации учетной записи пользователя , файловой системы , местоположения , контактов , истории вызовов , электронной почты , обмена сообщениями и т. Д.
Наконец, вы можете отключить распознавание речи в сети на странице конфиденциальности программы установки Windows во время установки ОС с нуля.
No speech recognition at all
(Feel free to skip the intro)
So I’m working on a c# app that uses Text To Speech and Automatic Speech Recognition, in Visual Studio 2015 on Windows 10.
I’m using System.Speech for Synthesis (TTS) and Microsoft.Speech for Recognition (ASR).
I can’t use Microsoft for Synthesis because it will tell me there are no voices installed or available, and I can’t use System for Recognition because, apparently, there is no Recognizer installed.
The first one (no voices with Microsoft) is just ridiculous, I have a couple of voices which all work fine using System.
But the latter might have a point:
TL;DR
I have no way of using the Windows Speech Recognition.
I’ve seen screenshots of people’s control panel windows where there is a recognition tab next to the TTS tab. That is just completely gone for me: 
I can’t configure, run or condition Speech Recognition: 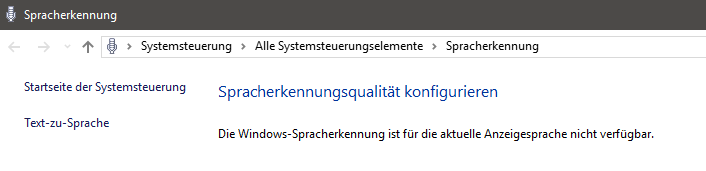
Speech recognition is not supported in the current language.
That is just BS, both de-DE and en-US are obviously supported.
Those are the language packs I have installed (MUI).
I’ve tried rebooting with English as display language, changing locale settings around, having the ugly language settings toolbar active and displayed, re-downloading the language packs, and a bunch of other things I can’t remember just now.
Now, the settings work for my app as far as simple grammar goes, I can have predictive / pre-determined conversations / commands with command-style grammar.
However, to get free dictation to work, I need to use the System API for Recognition — and it looks like that won’t work for the same reason the built-in Windows recognizer won’t.
It’s like that component simply isn’t installed.
I couldn’t find any disabled services that might be missing.
I’ve searched and tried for hours upon hours (after wasting hours and hours looking for a problem in Visual Studio)
So. Any help would be greatly appreciated!
What are the components that are involved in Speech Recognition (Windows 10)?
What might be the problem?
How might I go about fixing it?
Any ideas?
me too! i cant get SR to work on either my windows 7 or w10.
This has downloads, + a complete list of languages availablefor Win 10:
https://www.microsoft.com/en-us/down. aspx?id=27224
(but note the date)
fwiw I just tried it- my locale, speech, display language etc are set to UK English. (Which took some doing this time, or something was slightly messed up).
If I type speech in Cortana’s search box, say, I get Windows Speech Recognition as top search.
I use Classic Shell, with the Control Panel expanded, so in a second or less I can see ‘Speech Recognition’ listed there.
Similarly, if I type ‘Speech’ in Settings I can easily see Speech Recognition.
————————————————————————————
With the speech recognition bar displayed, task manager shows:
SpeechRuntime.exe in C:WindowsSystem32Speech_OneCoreCommon .
sapisvr.exe in C:WindowsSpeechCommon
There are a couple of helpful links at the end of this (but Win 7 again)
http://answers.microsoft.com/en-us/w. c-cb0ae84c939d
- Speech Recognition is only available for the following languages: English (United States and United Kingdom), French, German, Japanese, Mandarin (Chinese Simplified and Chinese Traditional), and Spanish.
Hi, thank you for the useful information.
Personally, I also use ClassicShell with CPanel enabled, and I do have the root «Speech Recognition» icon, but I can’t open it, and I can’t access the further settings (such as configuring ASR Language or training your mic) — and of course I’ve tried a million ways of accessing the settings
I did set my display language and my input language to en-US, as well as my locale, to no avail (and restarting didn’t do the trick either) — and then back to de-DE (which is also supported) — the ASR language settings, however, remain elusive^^
I have also tried having ctfmon running and the input language bar displayed in various states
I have downloaded different language packs, but some of them would not install, the installer disappears after «gathering required information»
Thank you for sending the executable and service, that was exactly what i was looking for!
I’m not at home right now, I’ll check in a couple of hours — but that looks immensely helpful already. I did find the speech folders in Sys32 and SysWOW myself before and tried changing access permissions, but to no avail.
I hope running the SAPI server will do the trick — I was expecting exactly something like this to be missing or blocked from/in my system
Hope you find a way, otherwise you’re into standard ‘fixes’ like create new user (which you could do just to see if it works in a new user profile then delete the user if unwanted), sfc scannow etc etc.
However Win 10 can be very sensitive to the multiple steps needed to change language (curious- never had to worry about that in previous editions).
So I went and took ownership and granted full access to everybody for all the speech related directories in %windir%, System32 and SysWOW64.
There are several speech libraries, at least in my case, natively in windows 10.
There is, for example, Speech, and then there is Speech_OneCore.
And then there are several synthesizers and recognizers available as well, some of them differ quite a bit.
Some of the versions are optimized for server-apps, some for client-apps.
Generally, the system.speech API is optimized for clients/Desktop, microsoft.speech is optimized for servers.
Then there are versions optimized for minimal use, streamlined for handhelds, etc.
And for everything, of course, you have to have the right language.
Now, after granting permissions didn’t change anything, I went back to check options in the control panel, no luck.
I even turned on Cortana and configured her — of course that worked fine. Exactly what I don’t need.
I then got annoyed by the language bar that had been hanging around since I added the en-US input language and wouldn’t turn off even though I told it to.
So I checked the options, and they took me to that weird ugly «Settings» place that doesn’t feel like it’s part of Windows and like it just aggregates Control Panel functions and sometimes won’t let you use your scroll wheel.
That one.
I’ve been there often before, on one occasion to specifically check for further downloads for my languages: Supposedly, you’ll find input languages for download under System -> Apps and features -> manage additional features. Back then, there was only extended support for fonts available to me.
I figured «Well, I downloaded complete LIPs, the recognition package is probably installed already, that’s why no further downloads show up». Little did I know that those are NOT part of a Language Interface Pack in windows 10 — and they might also not show up under additional features along with other language related downloads. Win10 just don’t roll that way
TL;DR
Now, I clicked on one of the languages installed, and went to options.
Lo and behold, the following page finally offered a download link for voice recognition.
Time and Language -> Region & Language: under Languages, select your language -> Options: There should be a download button.
At first, I thought «Ah, well, that’s the 100th thing I’ve downloaded now. Probably won’t change a thing.
But, at long last, it let me access the Recognition settings and finally also use system.speech.
I’d just been neglecting the Settings panel the whole time, because usually there’s nothing particularly useful / unique: Most settings are accessible through the good old Control Panel, where you can use your mouse wheel (on a big chunky desktop computer, like the cave man I am) — and regular language settings and downloads ARE available from there.
The problem for me, after my own ignorance, lay in a) the many many version of different engines; b) segmentation of what might be considered an «input language»; and c) lack of transparency and consistency within Windows 10: Which settings are there — and where on earth is «there», and misleading error messages and behavior.
Now, I’m sure not many people will run into the same problem as me — but for the chosen few fellow grumpy cave men: This here might help.
@chuckbowers: Are you one of them, too? 🙂