User Manual — Table of Contents
- Introduction and Setup
- System Requirements
- Setup Windows Driver (Primary Machine)
- Run the spacedesk Driver Installer
- Verify if Setup was Successful
- Verify if latest version is installed
- Setup Viewer (Secondary Device)
- Install on Android and iOS Smartphones and Tablets via App Store
- Install on Windows PCs, Laptops and Surface Tablets
- Run on any Machine in HTML5 Web browser
- Viewer Platforms and Features
- Connecting a new display monitor over the network
- Network Discovery
- Establishing The Network Connection
- Verify Network Connection and additional Display Monitor
- Connecting a new display monitor over the USB cable
- Direct USB Cable Connection (Android only)
- USB Tethering (iOS and Android)
- Configuration and Settings
- Windows Driver (Primary Machine)
- Desktop Extension or Desktop Duplication (mirror) Settings in Display Control Panel
- Desktop Extension or Desktop Duplication (mirror) Settings in Display Switch
- Set as Primary Display
- spacedesk Server Automatic Start
- Disable spacedesk
- spacedesk Disconnect Delay
- Viewer (Secondary Device)
- Audio Speaker
- Mouse, Keyboard, Touchscreen And Pen Input
- Screen Resolution
- Automatic Connect
- Full Screen Upon Connect
- Auto Rotation
- Keep Monitor Active
- Auto-Start Windows Viewer
- Windows Driver (Primary Machine)
- Performance Tuning
- Use Direct Cable Connection
- USB Cable
- Network Cable
- Avoid and Bypass Network Routers
- Use Wifi Direct / Wifi Hotspot / Wifi Access Point
- Reduce Screen Resolution
- Color Depth and Image Compression
- Framerate per second
- Use Direct Cable Connection
- TROUBLESHOOTING
- Critical Errors
- Windows 10 Crash with BSOD (Blue Screen of Death)
- Black Screen on Main Monitor
- Known Issues, Problems and Limitations
- Incompatible Third Party Products
- Windows 11/10 spacedesk only worked once (not working after reboot)
- Windows 11/10 Desktop Duplication (mirror) option not available
- Windows 11/10 Known Issues and Unsupported Features
- Windows 10 old version not supported
- Windows 8.1 Limitations and Unsupported Features
- Windows 8.1 Crash upon client connect
- Network Connection
- Cannot discover Primary Machine
- Connection Error
- Firewall Settings on Primary Machine
- VPN (Virtual Private Network)
- Windows Driver (Primary Machine)
- spacedesk Server Status
- Incompatible Display Hook Driver Detected
- Repair spacedesk Driver Setup
- Various
- Viewer (Secondary Device)
- Check Viewer App version
- HTML5 VIEWER
- Connection Error
- Limitations
- List of Incompatible Windows Application
- Critical Errors
- Video Wall Configuration
- Videowall
- Settings
- Videowall Disconnect Delay
- Wall Display Settings
- Client Display Settings
- Video Wall Operation
- Uninstall on Windows Primary Machine
- Uninstall Using Windows Control Panel
- Uninstall Using .Msi File
- Troubleshooting Uninstall
- Manual Uninstall (Troubleshooting Only)
- Windows Secondary Machine Uninstall
- Appendix
- Release Notes
- File List
Introduction and Setup
At least 2 machines are needed to operate spacedesk. These machines must be connected via a Local Area Network (e.g. Ethernet or Wireless) supporting TCP/IP network protocol. Each one of the two machines is running its own kind of spacedesk software:
1. The Primary Machine runs the spacedesk DRIVER software. It includes network display server software and display device drivers. This allows to extend or duplicate the Windows Desktop to the screen of another machine over the network.
• Windows PC
• Laptop
• Surface Pro tablet (Windows Desktop application)
2. The Secondary Machine runs spacedesk VIEWER software which acts as the secondary display. It can be one (or multiple) of the following:
• Android tablet or phone (Android VIEWER)
• Windows PC, laptop or Surface Pro tablet (Windows Desktop application)
• Apple Mac, iPad or iPhone (iOS VIEWER)
• Linux PC and a variety of other machines (HTML5 VIEWER)
3. The Network Connection in between can be direct or through router/switch/access point connected by cable or wireless. It can be one or multiple of the following:
• Ethernet crossover cable direct connection (best performance)
• Ethernet cable through router/switch/hub (good performance)
• WiFi direct connection to Access Point (intermediate performance)
• USB Tethering or USB to Ethernet (intermediate performance)
• WiFi through router/switch/hub (worst performance)
System Requirements
Primary Windows Machine (network display server)
The spacedesk server runs a Windows service and the WDDM Display Driver which is visible to Windows just as an own separate virtual graphics adapter (Windows 10) or as additional virtual display monitors on the primary graphics adapter (Windows 8.1). These additional virtual displays can mirror the main screen or extend the Windows Desktop. spacedesk DRIVER software is capturing their screen content, compressing it and transmitting it over the LAN (Local Area Network) to the spacedesk VIEWERs.
• Windows 11 / 10 (version 1607 – later only) / 8.1
• Graphics adapter Nvidia / AMD / Intel / Basic Display
• WDDM 3.0 / 2.7 / 2.6 / 2.5 / 2.4 / 2.3 / 2.2 / 2.1 / 2.0 / 1.3 / 1.2 / 1.1
• DirectX 12/11/10/9
Secondary Machine or Device (network display client)
Android VIEWER on tablets and phones.
• Android (> version 4.1)
iOS VIEWER on iPhones, iPads and iPod touch
• iOS (> version 9.3)
Windows VIEWER on Windows PCs, laptops and Surface.
• Windows 11 / 10 / 8.1 / 7
• DirectX 10
• DirectX WARP (Min. 800 MHz CPU / Min. 512MB RAM)
HTML5 VIEWER on any device running operating system with HTML5 Web browsers
Chrome (> 16), Safari (> 5.1) Internet Explorer (> 10), Opera (> 27) e.g.:
• Windows Phones (Windows Phone 10 / 8.1)
• Windows Surface, tablet, laptop and PC (Windows 10, 8.1, 8, 7, Vista, XP)
• Mac (OSX)
• Linux PC and laptop
Network Connection
Network needs to run TCP-IP protocol.
Setup Windows Driver (Primary Machine)
Before installing a new spacedesk version, uninstall any previous version. This can be done on Windows Control Panel → Programs and Features.
Run the spacedesk Driver Installer
For Windows 10/11:
spacedesk_driver_Win_10_32_v1067_BETA.msi for 32-bit platform
spacedesk_driver_Win_10_64_v1067_BETA.msi for 64-bit platform
For Windows 8.1:
spacedesk_driver_Win_8.1_32_v1067_BETA.msi for 32-bit platform
spacedesk_driver_Win_8.1_64_v1067_BETA.msi for 64-bit platform
Make sure to check the Firewall configuration before proceeding otherwise no client will be able to discover this Primary Machine nor connect to it.

Only on Windows 8.1 the dialogs below will be shown and need to be confirmed. These operating systems, also require a reboot after the setup has completed.

Verify if Setup was Successful
First, make sure that the spacedesk Driver is properly installed and can be seen underneath Programs and Features.
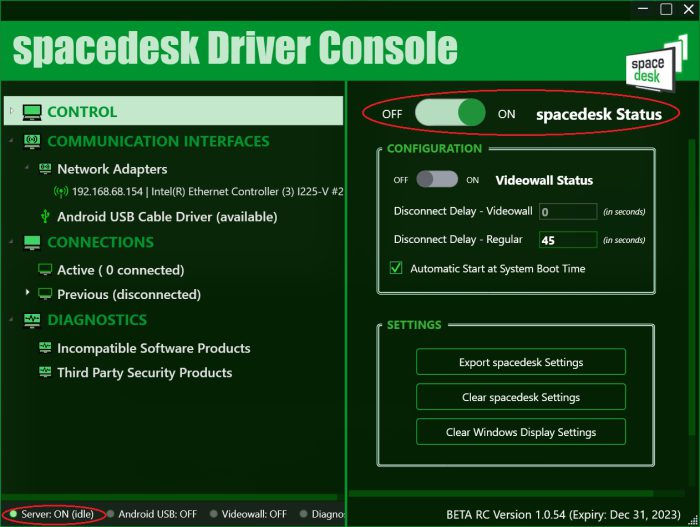
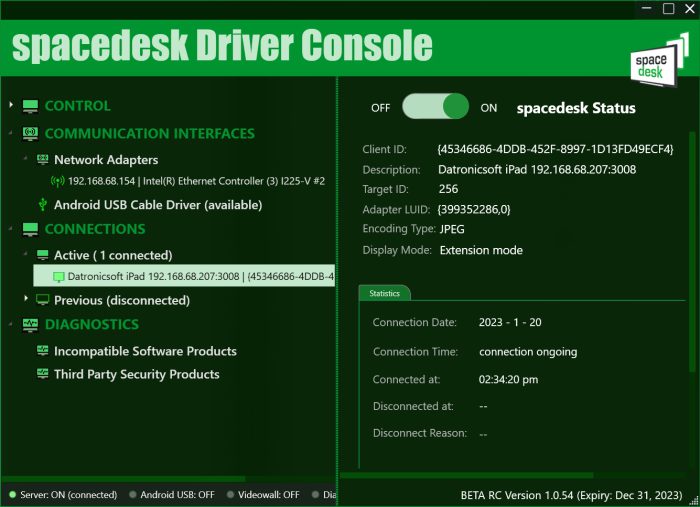
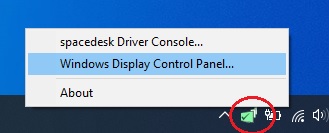
Check if the spacedesk System Tray icon (at the bottom right of the screen) is visible in the notification area and click it to show spacedesk status ON in spacedesk Driver Console app.
Check the Windows Firewall settings if spacedeskService.exe is allowed on private or public network. Open Control Panel → Windows Firewall → Allow an app through Windows Firewall, allow an another app then browse for spacedeskService.exe located at “C:\Windows\System32” folder.
Verify if latest version is installed
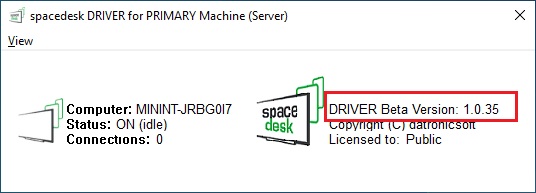
Check spacedesk version by right-clicking the spacedesk System Tray icon (at the bottom right of the screen) then click About to show the spacedesk SERVER About window displaying the current version.
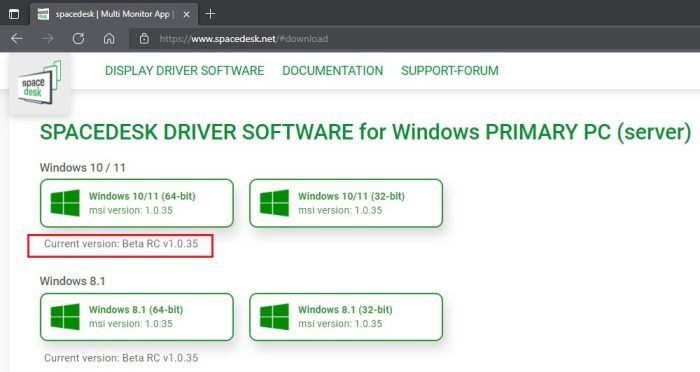
Then compare this version with the website’s current spacedesk version.
Setup Viewer (Secondary Device)
Install on Android and iOS Smartphones and Tablets via App Store
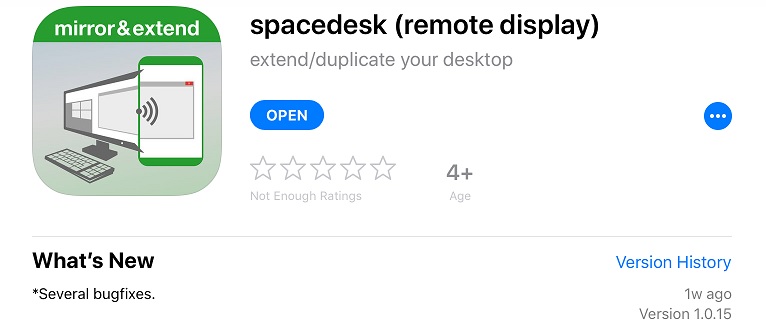
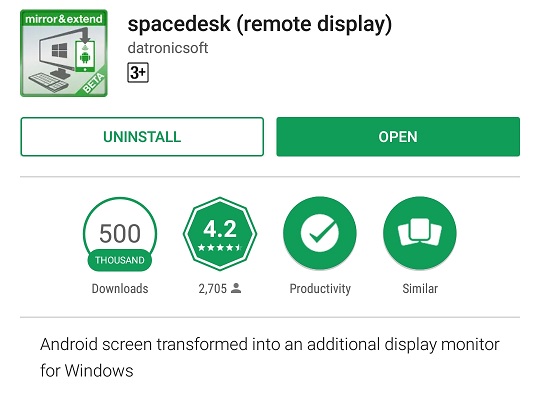
Android VIEWER is installed from the Google Play Store and iOS VIEWER is installed from the iTunes App Store.
Install on Windows PCs, Laptops and Surface Tablets
A Windows PC, laptop or Surface tablet can be used as Secondary Machine. spacedesk Windows VIEWER needs to be downloaded from the
spacedesk website. It needs setup and installation as shown below.
Run the spacedeskWindowsVIEWER setup installer, spacedeskWindowsVIEWER_v0930_BETA.msi. After a successful installation of Windows VIEWER application a shortcut is created on the desktop.

Run on any Machine in HTML5 Web browser
For spacedesk HTML5 VIEWER, no setup installation is needed on the Secondary Machine. HTML5 VIEWER operates with a standard web browser without any setup needed upfront. It can be opened directly from the website http://viewer.spacedesk.net/. Make sure that the web browser (e.g. Safari, Google Chrome, Opera, Internet Explorer, etc.) is updated to the latest version.
It is important to understand, that spacedesk HTML5 VIEWER does not operate over the internet. It does not need an internet connection. It does not even need to be opened over the internet as described above. The HTML5 page can be saved locally.
Local install (optional):The web page can be saved to be used off-line even without internet connection. Follow the instructions below:
• Refresh using Ctrl-F5 keys after opening HTML5 page (this ensures that everything is updated).
• For Google Chrome browser, use the the menu “More tools ” and select “Create shortcut… “.
• For Microsoft Internet Explorer browser, use the the menu “Tools ” and select “Add site to apps “
Viewer Platforms and Features
| Feature | Windows 7 Client | Windows Store Client | Android Client | iOS Client | HTML5 Client |
|---|---|---|---|---|---|
| On-Screen-Keyboard | |||||
| Keyboard | |||||
| Mouse | |||||
| Touch | |||||
| USB Cable Connection | |||||
| Audio Speaker |
Connecting a new display monitor over the network
Network Discovery
spacedesk secondary machines (except HTML5 VIEWER) can do automatic network discovery of Primary Machines.
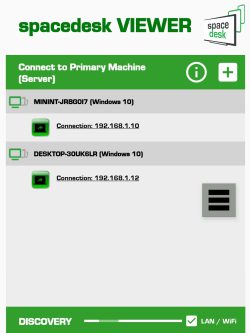
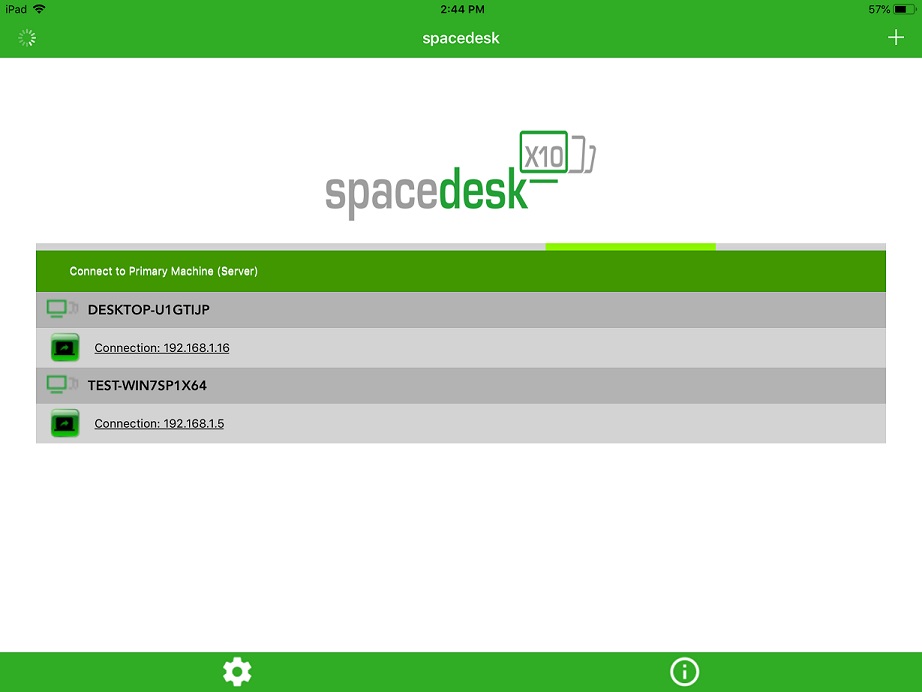
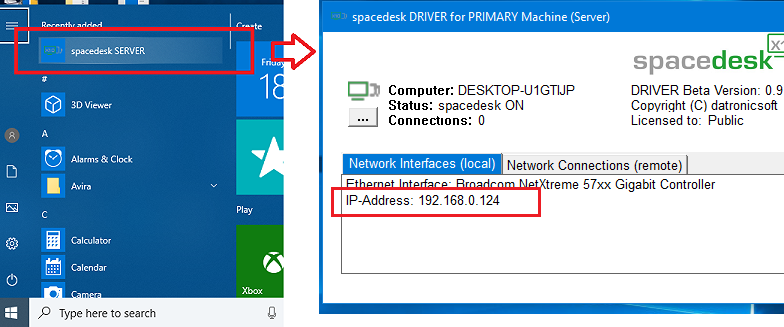
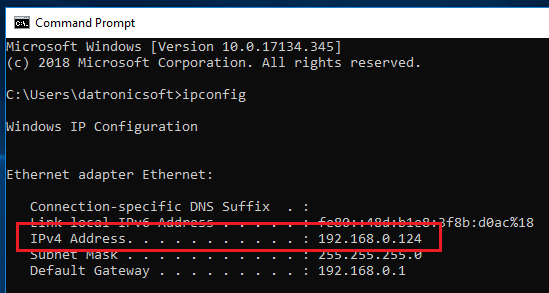
Only when using HTML5 VIEWER or in case the Primary Machine cannot be discovered, the IP address of the Primary Machine needs to be entered manually. It can be determined in various ways:
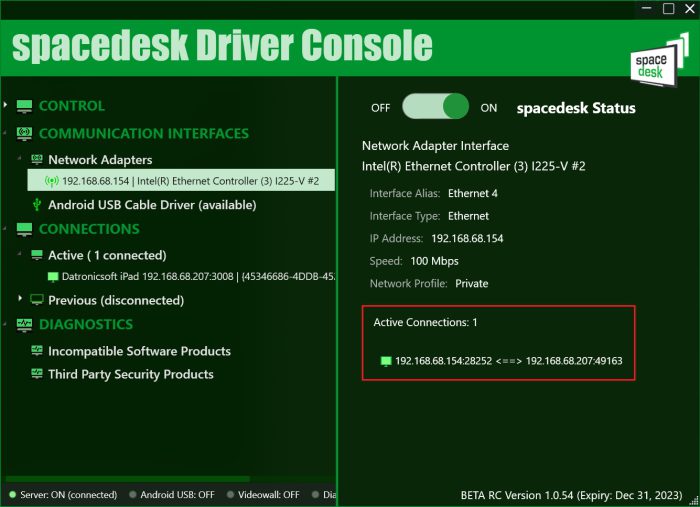
• Click the spacedesk System Tray icon (at the bottom right of the screen) OR the spacedesk DRIVER Console icon on the Windows Start menu to display the spacedesk DRIVER Console user interface.
(for Windows 10-11 primary machine)
(for Windows 8.1 primary machine)
• Typing ipconfig in a Windows command prompt.
Establishing The Network Connection
Android / iOS / Windows Viewer
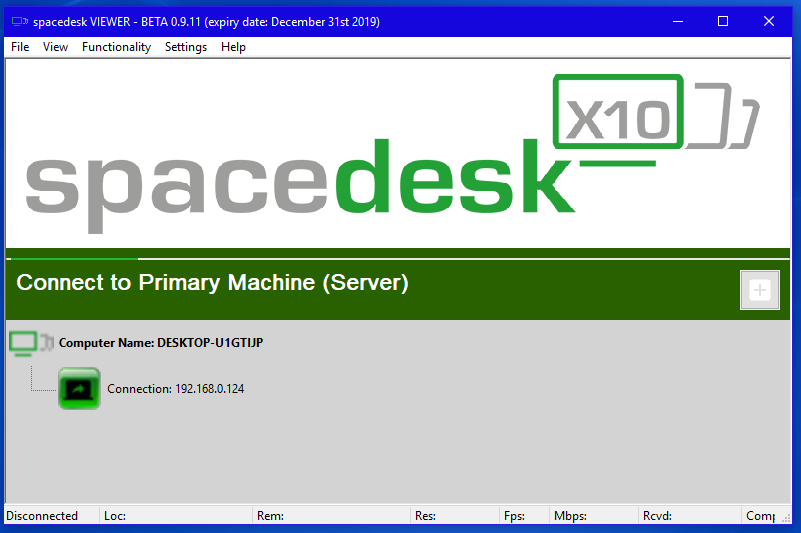
On the client side, initiate connection to server by opening the spacedesk VIEWER app and select the desired server on the list of detected primary machines to automatically connect. If Primary Machine cannot discover, please check the chapter Troubleshooting Network Connection – Cannot Detect Primary Machine below.
HTML5 Viewer
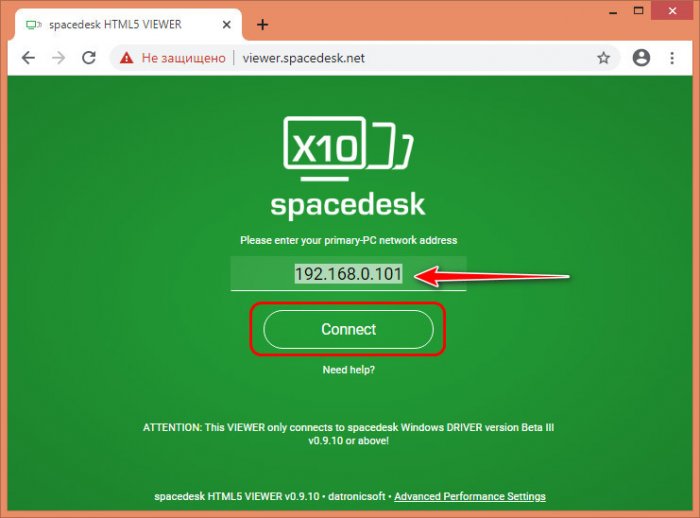
Using the updated web browser, go to HTML5 viewer page then type the IP address of primary machine where the spacedesk DRIVER is installed. The “Need Help?” button below the Connect button provides an instructions on how to get the IP address of server machine and then click the “Connect” button to start the connection.
Verify Network Connection and additional Display Monitor
On the Primary Machine side, check if the connection is established. Just click the spacedesk System Tray icon (at the bottom right of the screen) on the primary machine to display the spacedesk Driver Console window -> Connections Active (connected) page and on Adapter Interface -> current Network Adapter -> Active Connections.
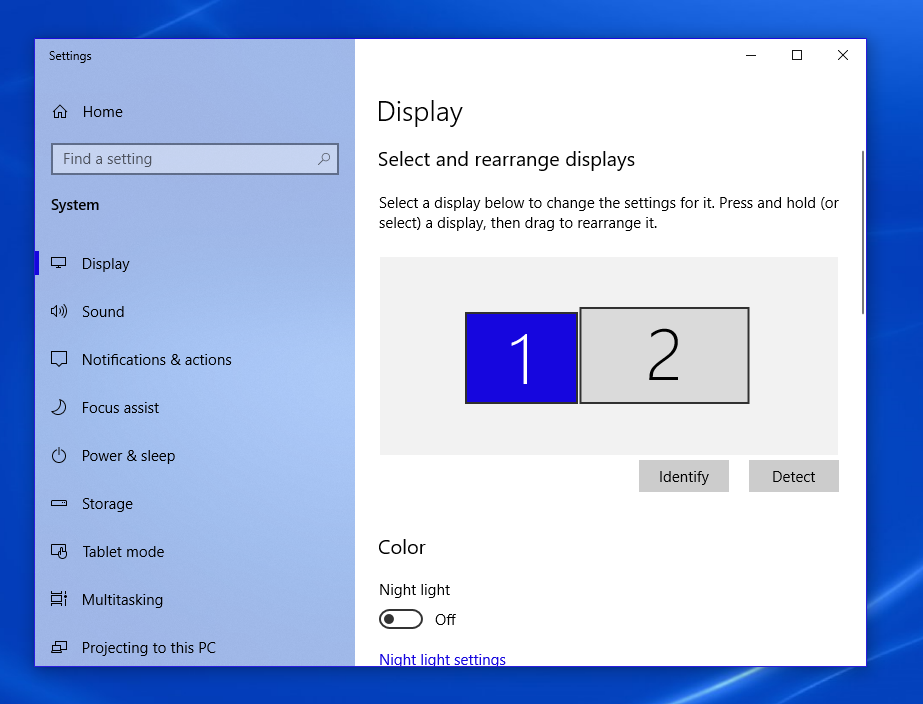
Open Display Control Panel via spacedesk Tray icon, right-click -> Windows Display Control Panel menu then check if there’s a secondary display attached.
Connecting a new display monitor over the USB cable
Direct USB Cable Connection (Android only)
USB cable connection is now supported in Android client devices.
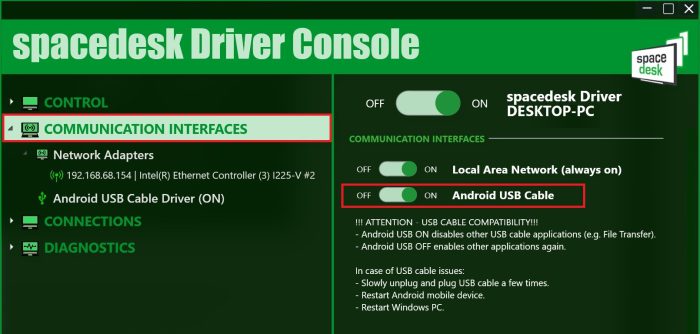
To enable this feature, just open the spacedesk Driver Console → Communication Interfaces, then switch ON the Android USB Cable toggle switch. Plug the Android client device via direct USB cable to primary machine then spacedesk Viewer app will automatically connect as spacedesk display.
FYI:
Android USB ON disables other USB cable applications (e.g. File Transfer).
Android USB OFF enables other applications again.
In case of USB cable issues:
– Slowly unplug and plug USB cable a few times.
– Restart Android mobile device.
– Restart Windows PC.
USB Tethering (iOS and Android)
If the secondary machine is a smartphone or tablet that supports USB tethering, use the USB cable to establish a network connection between primary and secondary machine. USB tethering typically supported on devices with Cellular Network.
For iOS device, make sure to turn OFF first the Wifi. Connect the iOS device to Windows primary machine via USB lightning cable. Then switch ON the Cellular Data and Personal Hotspot and an option will pop-up and select USB Only.
For Android device just go to settings and find the Tethering & portable hotspot, then connect the USB cable of Android device to Windows primary machine, then enable the USB tethering in Android settings.

Configuration and Settings
Windows Driver (Primary Machine)
Desktop Extension or Desktop Duplication (mirror) Settings in Display Control Panel
Right Mouse Click on Desktop → context menu “Display settings” leads to Display Control Panel. Display Control Panel can be used to change display resolutions and to verify proper operation. During Desktop Extension the following status should be shown:
During Desktop Duplication (Mirror) the following status should be shown:
During Single Output (Second Screen Only) the following status should be shown:
Desktop Extension or Desktop Duplication (mirror) Settings in Display Switch
Display Switch (Windows logo + P) can also be used to change modes
Set as Primary Display
Setting the spacedesk display as primary/main display can be done by selecting the display then underneath Multiple displays dropdown list, there’s a check box “Make this my main display”.
spacedesk Server Automatic Start
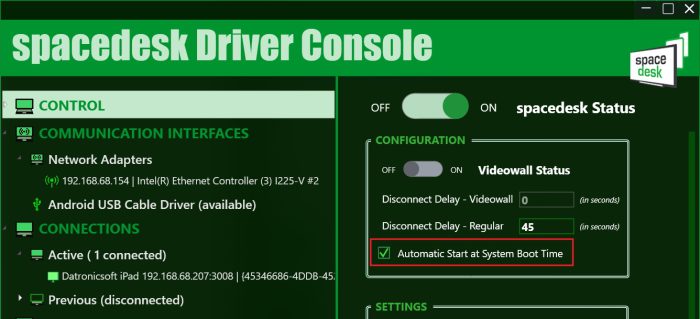
spacedesk is set to auto start at system boot time by default.
This setting is configurable via spacedesk Driver Console app -> Control -> Automatic Start at System Boot Time check box.
Disable spacedesk
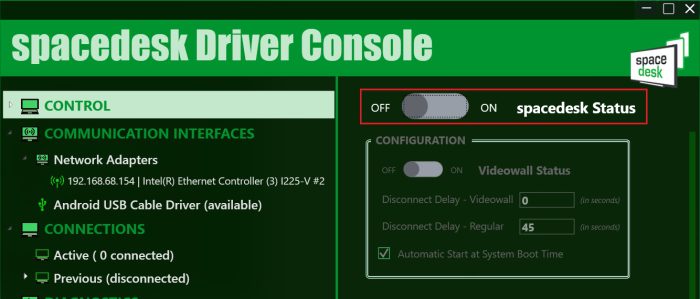
Disabling the spacedesk server temporarily to prevent other spacedesk client connection can be done via spacedesk Driver Console user interface → CONTROL → spacedesk Status, toggle OFF for Windows 10-11 primary machine.
Via spacedesk SERVER window User Interface → Settings → OFF for Windows 8.1 primary machine.
spacedesk Disconnect Delay
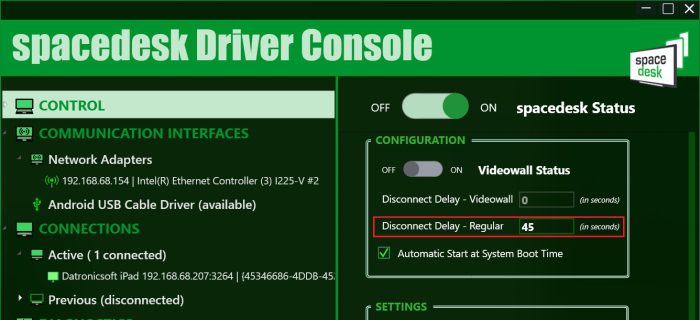
In case of disconnection event due to temporary network connection lost, spacedesk display will remain connected until the specified Disconnect Delay times out.
This setting is configurable only if spacedesk Server is switched OFF.
A -1 value is equivalent to infinite (spacedesk client display will not disconnect until the primary machine reboots).
By default this settings is set to 45 seconds.
Viewer (Secondary Device)
Below a few configuration settings to adjust spacedesk operation to individual needs.
Audio Speaker
Current spacedesk Android and Windows 7 Viewer apps already supports remote Audio.
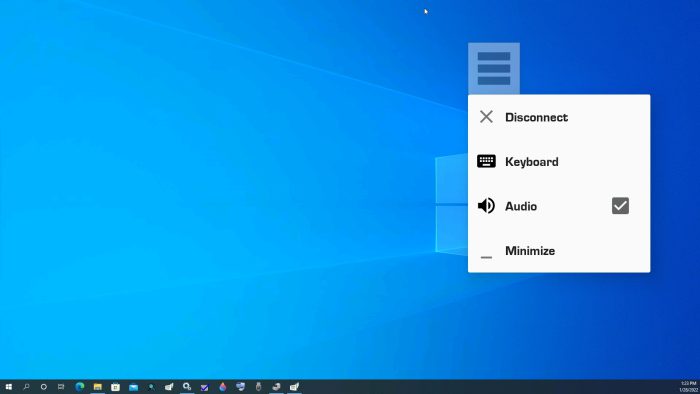
To enable in spacedesk Android Viewer app, make sure to enable first the on-screen menu.
Upon spacedesk connect, Audio can be enabled/disabled via On-Screen menu.
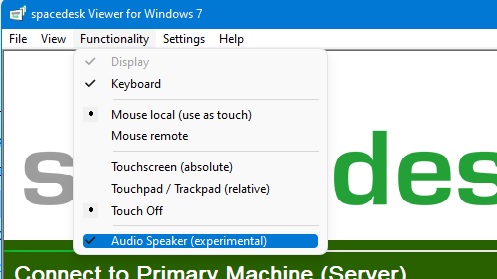
To enable in spacedesk Windows 7 Viewer app, click the Functionality -> Audio Speaker (experimental) before spacedesk connection.
Mouse, Keyboard, Touchscreen And Pen Input
To enable the “Mouse, Keyboard and Touchscreen ” option:
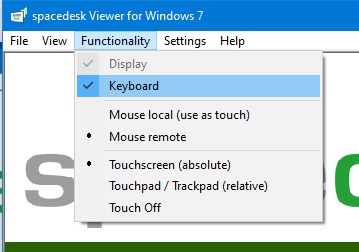
Windows 7 VIEWER → Functionality menu.
For touchscreen, two options are available absolute and relative mode.
Touchscreen (absolute) mode provides an absolute input position of the mouse pointer within your viewer screen.
Touchpad/Trackpad (relative) mode is using relative desktop coordinates.
To exit from remote control mode just press “Alt+Shift” key combination.
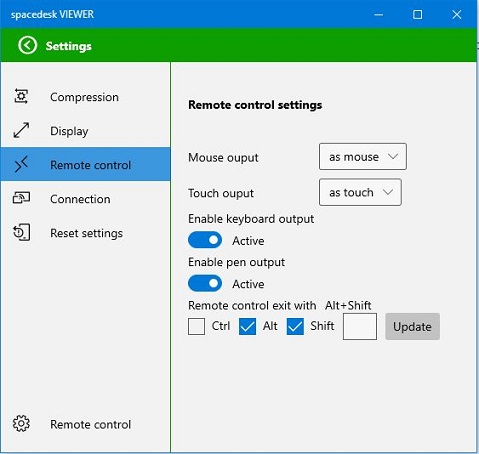
Windows 10 VIEWER App → Settings → Remote Control menu.
Mouse output can be set as the actual mouse or as emulated touch.
Touch output can be set as actual Touch or as emulated Mouse.
Keyboard and Pen can be activated or deactivated.
To exit from remote control, you can set a custom key combination. The default key combination is “Alt+Shift”.
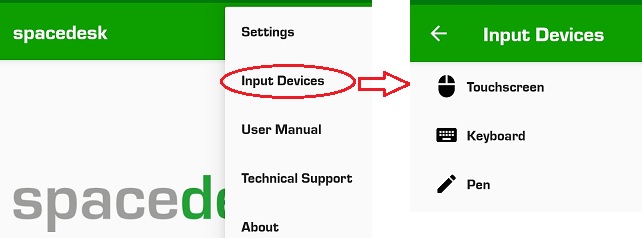
On Android and iOS VIEWER app, touch screen, Keyboard and Pen remote input feature is also supported.
It can be enabled on Settings → Input devices.
(Android)
(iOS)
There are two different options on how touch feature can work on Android and iOS device.
• Absolute touch provides an absolute input position of the mouse pointer.
• Relative touch which works like a touch pad.
Keyboard remote control can be activated/deactivated.
For software keyboard on Android VIEWER app, just do the two finger touch on the viewer screen to activate the onscreen keyboard.
Hardware keyboard is also supported (USB or wireless).
Pen remote control can be activated/deactivated too.
On HTML5 VIEWER, just go to Advanced Performance Settings → Remote Control to enable remote control feature. However, no keyboard control only mouse and touchscreen support.
Below are the touch gestures for Android and HTML5 Viewer:
Move pointer: Tap with one finger and drag anywhere on the screen.
Left-click: Tap the screen with one finger
Right-click: Tap and hold the screen, then release.
Drag Windows/Object: Tap two times for relative OR tap once for absolute, hold then drag.
Screen Resolution
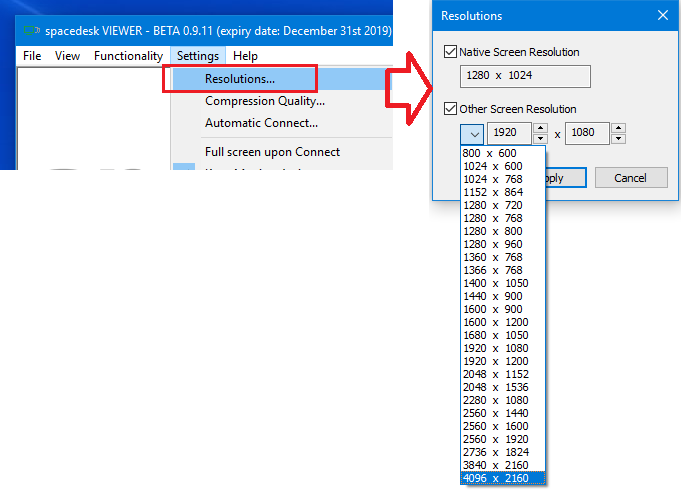
The “Resolutions” dialog box of the Windows VIEWER Settings allows the users to use up to two resolutions. The client’s native resolution can be enable and use by checking the box of “Native Screen Resolutions”.Then the user can also add another resolution by selecting one of the typical screen resolutions on the combo box.
Automatic Connect
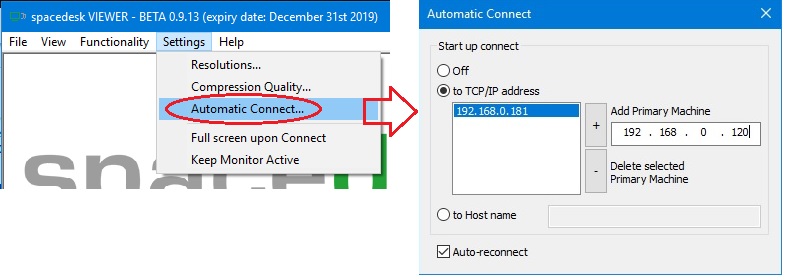
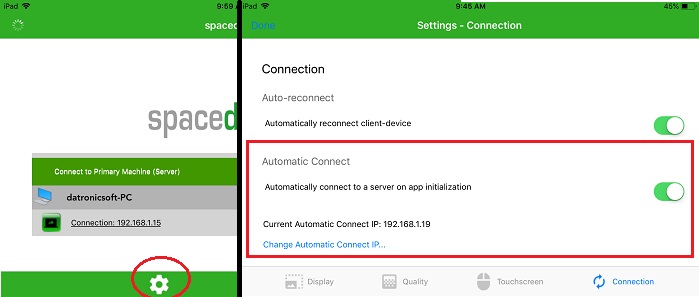
The “Automatic Connect” option of the Windows and Android viewer’s Settings allows the user to enable the automatic connect to IP address (of multiple primary machines) or hostname upon launching the viewer app and also an option to “Auto-reconnect” to the last server machine connected in case of sudden disconnection from system sleep or hibernate or from any kind of unwanted disconnection.

Full Screen Upon Connect
The “Full screen upon Connect” option on Windows VIEWER Settings will enable the automatic switching to full screen mode upon connecting to the server.
Auto Rotation
The “Auto rotation” option on iOS and Android viewer settings allows users to enable an automatic rotation of viewer screen according to current display orientation (eg Portrait or Landscape mode) of iOS / Android device.


Keep Monitor Active
The “Keep Monitor Active” option on Windows VIEWER Settings will prevent the secondary machine’s monitor from going to Display Off or System Sleep only when Windows VIEWER is connected to the server.
Auto-Start Windows Viewer
To set the spacedesk Windows VIEWER app to auto start during Windows start up:
• open the run command (Window + R key combination),
• paste “% appdata% \ Microsoft \ Windows \ Start Menu \ Programs \ Startup” then enter,
• on the Startup folder just copy the spacedesk Windows VIEWER shortcut file found on your desktop.
Performance Tuning
Use Direct Cable Connection
Cable connections perform better than wireless networks. USB and network cable is faster than WiFi.
USB Cable
spacedesk supports direct USB connection for Android.
On Apple iOS, spacedesk performance can be improved by USB Tethering.
Go to chapter “CONNECTING A NEW DISPLAY MONITOR OVER THE USB CABLE” for more details.
Network Cable
The faster the network, the faster the display performance. The fastest option is always a direct connection via network cable, e.g. a Gigabit Ethernet.
Currently minimum reasonable network bandwidth needed by spacedesk BETA ranges around 50 Mbit/sec. Substantial improvements including support of slower networks are planned for the first release version.
Avoid and Bypass Network Routers
The network router is the heaviest performance restraint. Cirumventing routers substantially improves performance. This can be done in various ways:
– On wired networks, just use crossover cables.
– On wireless networks use WiFi Direct (see paragraph below).
– WiFi Direct has almost the same performance as cable.
Use Wifi Direct / Wifi Hotspot / Wifi Access Point
Performance on wireless networks can be improved by configuring the Windows 10 PC/laptop or the mobile device as Wifi Hotspot / Wifi Access Point. Connection to this Access Point needs to be established before connecting spacedesk.
To configure the Mobile Hotspot option on Windows 10 PC/laptop. Just go to Start → Settings → Network & Internet → Mobile Hotspot, then turn it ON. Try to connect the client device(phone/tablet/laptop) to the wireless network name generated by the Mobile Hotspot. Then run the spacedesk VIEWER and connect to the IP address of server machine, in this case it should be the IP address of the Mobile Hotspot network generated (Microsoft Wi-Fi Direct Virtual Adapter).
Reduce Screen Resolution
The lower the resolution of the networked display screen, the faster the display performance.
Color Depth and Image Compression
spacedesk uses image compression to improve display performance. This mechanism reduces image size before transferring images over the network. The spacedesk image compression algorithm is lossy. It reduces quality and color depth of the image.
On fast networks, color depth and image quality can be kept very high while still achieving good performance.
On slow networks, color depth and image quality need to be reduced to achieve good performance.
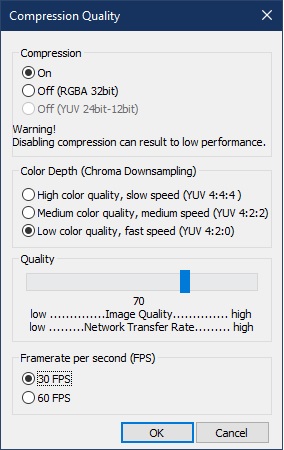
The “Compression Quality” dialog box of the Windows VIEWER Settings allows the user to enable or disable the compression of screen updates. To choose OFF means to use RGBA 32-bit color format of screen image and no image quality reduction will be done. To choose On means that the user allows to reduce color depth by Chroma Downsampling and adjusts the compression quality to find the ideal image quality and performance speed.
YUV 4:4:4 – No reduction of color information. High quality of screen image but, performance intensive. Can only be used on very fast networks
YUV 4:2:2 – Reducing the color information by 1/3 (from 24 bit to 16bit) reducing color quality of screen image and improving performance.
YUV 4:2:0 – Reducing the color information by 50% (from 24 bit to 12bit) to achieve best possible performance.
The color loss caused by the above mechanism typically not very much noticeable for the human eye, especially when there is a lot of motion on the screen (e.g. playing a video). Thus YUV: 4:2:0 is the default setting which can apply to many user Applications.
The Image Quality can be varied between 100 (no compression) and 0 (maximum possible compression). The default value is 70 which still tends to show a clear enough and detailed enough image for many user applications.
Framerate per second
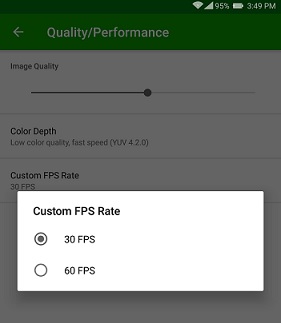
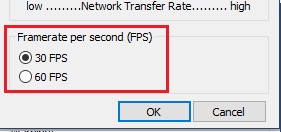
The framerate option allows user to choose the FPS (framerate per second) on the viewer screen.
On Windows viewer just go to Settings → Compression Quality … → Frame rate per second (FPS).
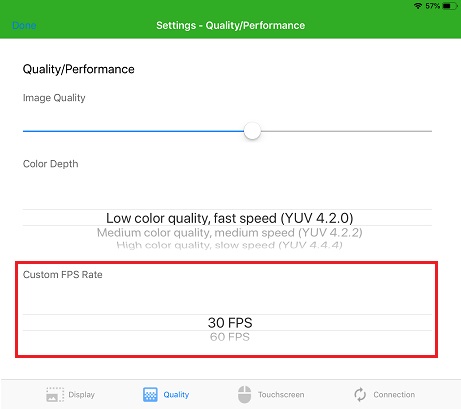
On Android viewer, just go to Settings → Quality / Performance → Custom FPS rate.
On iOS viewer, just go to Settings → Quality → Custom FPS rate
TROUBLESHOOTING
Critical Errors
Windows 10 Crash with BSOD (Blue Screen of Death)
In some cases, when spacedesk is connected over USB tethering connection, the USB driver used by USB tethering network causes a BSOD crash.
Please try to update the Windows USB driver via Windows Update.
Black Screen on Main Monitor
When changing Windows to multimonitor configuration, then sometimes the main display monitor remains detached from the Windows Desktop. Such “Black screen Problems” sometimes happen on all Windows displays. E.g. this also happens sometimes when working with projectors. This situation can usually be solved easily by changing Windows projector settings using “Windows Key + P” (where P stands for projector). Just repeat this key sequence: “Windows Key + P” “Arrow Down” “Enter”.
Known Issues, Problems and Limitations
Incompatible Third Party Products
Incompatible products:
Nvidia ShadowPlay
Wired XDisplay (splashtop)
Windows 11/10 spacedesk only worked once (not working after reboot)
Virtual Desktop App Streamer – spacedesk will not work anymore after reboot if this software is installed in the primary machine. Uninstalling this software will fix the spacedesk Display – Off issue.
Windows 11/10 Desktop Duplication (mirror) option not available
Desktop duplication of primary monitor to other displays is disabled in Windows display settings of Windows 10 with old version of graphics adapter (< WDDM 2.0).
Just download the latest driver version from its website OR if it did not work try to downgrade the graphics driver to Microsoft Basic Display driver via device manager.
Windows 11/10 Known Issues and Unsupported Features
Nvidia ShadowPlay – Current spacedesk version has a known issue with Nvidia ShadowPlay. While Nvidia ShadowPlay (screen record) is active, spacedesk will give an error code 1-2-0 on the viewer side. Just disable it in order to use spacedesk.
Night Light – Windows Night Light settings is currently not supported on spacedesk displays.
HDR – Windows HDR (High Dynamic Range) settings is currently not supported on spacedesk displays.
10-Bit Pixel Format – With 10-bit pixel format enabled in Nvidia or AMD control panel spacedesk display will show a desktop image with discoloration.
Windows 10 old version not supported
Latest spacedesk Windows 10 Driver version now only supports Windows 10 version 1607 and above. Just run “winver ” to check Windows 10 version. If the version is older than version 1607 (Build 14393) just upgrade to Windows 10 version 1607 or above, in order to use the latest spacedesk driver. Use Windows 10 Update Assistant to upgrade Windows 10 to latest version for free, just click here…
Windows 8.1 Limitations and Unsupported Features
Multi-GPU Technology such as Nvidia SLI Technology or AMD Crossfire is currently not supported by spacedesk. In case SLI is enabled, spacedesk will not work properly.
Virtual machines are officially not supported by spacedesk driver for Windows 8.1 Primary Machine. It may work on some cases but some problems may occur such as strange mouse pointer behavior, black screen on client, etc.
Nvidia Control Panel crash may also observed while spacedesk is active on Windows 8.1 Primary Machine.
qWave (Quality Windows Audio/Video Experience) Windows Feature unavailablemessage box during installation may observed on Windows Server 2008/2012 primary machine. To install this feature, Open Server Manager -> Add Roles and Features, just click Next until you are on the Features, then check if the box for Quality Windows Audio Video Experience (qWave) features is checked, and if not please check it and install.Then restart your server machine (if required).
Windows 8.1 Crash upon client connect
In very rare Windows 8.1 environments a BSOD crash (Blue Screen of Death) can happen upon connect. Such a system crash is always recoverable because the driver is not yet active during Windows 8.1 system boot time.
Just reboot the primary machine in safemode then uninstall the spacedesk driver. To boot in safemode, press and hold f8 key upon computer reboot and before the windows logo appeared. Then in advanced boot option screen use the arrow keys to select the safe mode option then press Enter key.
Note: Before uninstalling using the spacedesk msi installer on safemode, run a Command Prompt then type the following commands:
Step 1:
for Safemode: REG ADD “HKLM\SYSTEM\CurrentControlSet\Control\SafeBoot\Minimal\MSIServer” /VE /T REG_SZ /F /D “Service”
for Safemode with Network: REG ADD “HKLM\SYSTEM\CurrentControlSet\Control\SafeBoot\Network\MSIServer” /VE /T REG_SZ /F /D “Service”
Step 2: net start msiserver
Network Connection
Cannot discover Primary Machine
Step 1: Different Network Segments
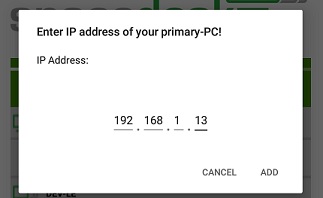
If Primary Machine and Secondary Machine are in different network segments, then they cannot discover each other. However, they may still be able to connect. In that case try to add the IP address to detect the primary machine by clicking the ” + ” button.
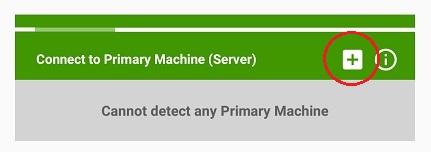
To get the IP address of the Primary machine please check the above chapter Establishing the network connection .
Step 2: third party firewall software
In case the above steps did not help, then a third party firewall software (other than Windows Firewall) could still prevent detection. Please check this chapter’s paragraph ” Firewall Settings ” below.
Step 3: WiFi router’s network isolation active
Ihttps://spacedesk.net/user-manual/#item_492n case all above steps still did not help, and if this is happening on a wireless network, then there might be one other remaining problem: WiFi router’s network isolation feature might be activated. The only solution for this is re-configuring the router.
Step 4: VPN (Virtual Private Network) enabled
Just refer to the VPN topic below.
Step 5: Network profile
In some cases, setting the network profile from “Public” to “Private” solves the spacedesk network discovery issue.
To set, open the Windows Settings -> Network & Internet -> properties of the current network, then select Private underneath Network Profile.
Step 6: Alternative ways to connect
If all above connection attempts failed. Try USB Tethering or Wifi Direct / Hotspot setup to establish a network connection between Primary and Secondary machines.
Connection Error
This shows that the primary machine can be reached over the network but connection fails after the indicated connection time. Possible reasons are the following:
– Unstable network connection
– Error on spacedesk Primary Machine
– Nvidia ShadowPlay (screen record) is running which is a known issue at the moment.
– Virtual Private Network (VPN) enabled
Firewall Settings on Primary Machine
Third party firewall
If there is a third-party firewall software or anti virus (eg Avast, AVG, etc.) with own firewall settings running on Primary Machine, then this can prevent spacedesk discovery and connection.
Please ensure that C: \ Windows \ System32 \ spacedeskService.exe is allowed through the firewall software or the spacedesk TCP / IP network protocol port is opened. spacedesk is using TCP port 28252.
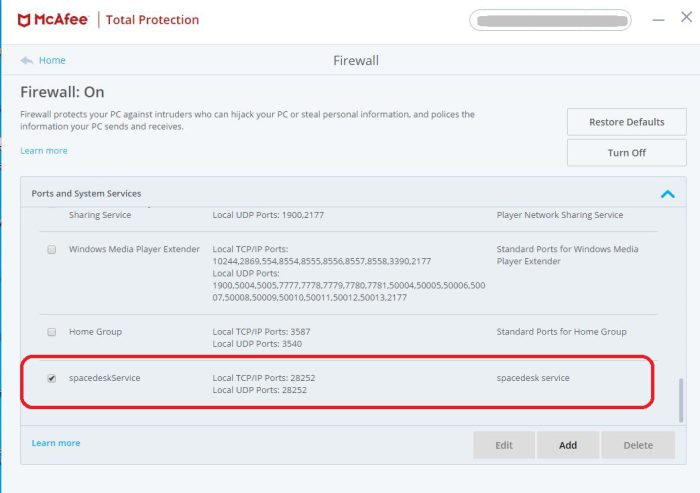
In case there is a McAfee antivirus or firewall software installed, try the settings below or just disable it to check if spacedesk Viewer app can discover the Primary Machine. There is a known connection issue on spacedesk with McAfee software where after a few minutes of connectivity, McAfee on Windows is known to randomly kill and prevent network connections without informing the user.
Try to add spacedeskService in McAfee Firewall settings, click Ports and System Services then click the Add button.
System Service Name: spacedeskService
Local TCP/IP Ports: 28252
Local UDP Ports: 28252
Windows firewall
Please ensure that the Windows Firewall settings is correct. For details please check chapter Setup Primary Machine – Verify if setup was successful .
VPN (Virtual Private Network)
On some situations, having a VPN connection present on either primary or secondary machine prevents the network discovery process between spacedesk server and client, which results to “Cannot Detect Primary Machine” or “Error code 1-0” in spacedesk viewer apps.
There are various workaround that can fix this problem without completely disabling the VPN connection.
1. If VPN app has user interface with configuration settings that will let users select a specific apps to not use VPN, just add the C:\Windows\System32\spacedeskService.exe on this exception list.
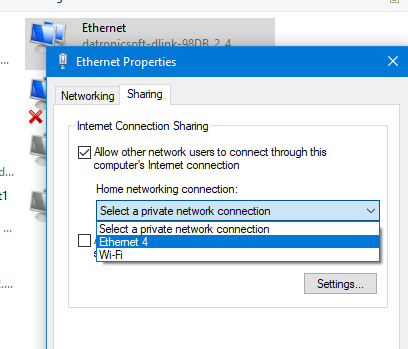
2. Run “ncpa.cpl”, right-click the Ethernet or WiFi network icon then open the Properties window. Click on the Sharing tab and check the “Allow other network users to connect through this computer’s internet connection” box.
Windows Driver (Primary Machine)
spacedesk Server Status
Check if spacedeskService is operating. Make sure that spacedesk service has started and spacedesk System Tray icon (at the bottom right of the screen) is visible in taskbar’s notification area and turned ON. For details, please check chapter above Setup Primary Machine – Verify if Setup was Successful .
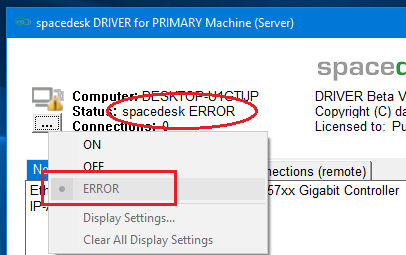
Server OFF or ERROR
spacedesk server can be enabled and disabled via spacedesk server user interface menu. In case viewer app cannot discover / connect to the server, make sure that this menu is ON.
spacedesk server can be in ERROR state if spacedesk Graphics Adapter in device manager has yellow exclamation mark which indicates an error in driver. Check in C: \ Windows \ system32 \ drivers \ UMDF directory if “spacedeskDisplayUmode1_x.dll” is present then try to disable-enable the driver in device manager and try to switch ON in spacedesk server user interface menu.
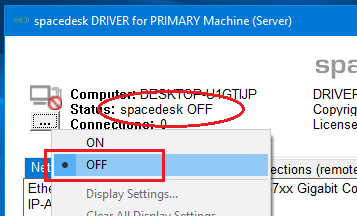
For Windows 8.1 primary machine, check for “spacedeskHookKmode.sys” in C: \ Windows \ system32 \ drivers directory, then reboot.
For Windows 10 (version 1607 – later) primary machine, open Device manager and check below Display Adapters if spacedesk Graphics Adapter is installed correctly and enabled.
Incompatible Display Hook Driver Detected
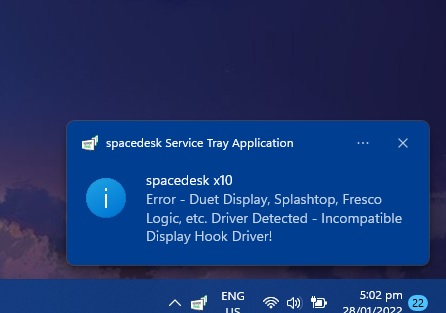
Step 1: Check if system tray bubble reports incompatible display hook driver
This error message indicates that another WDDM filter hook display driver is present on the system.
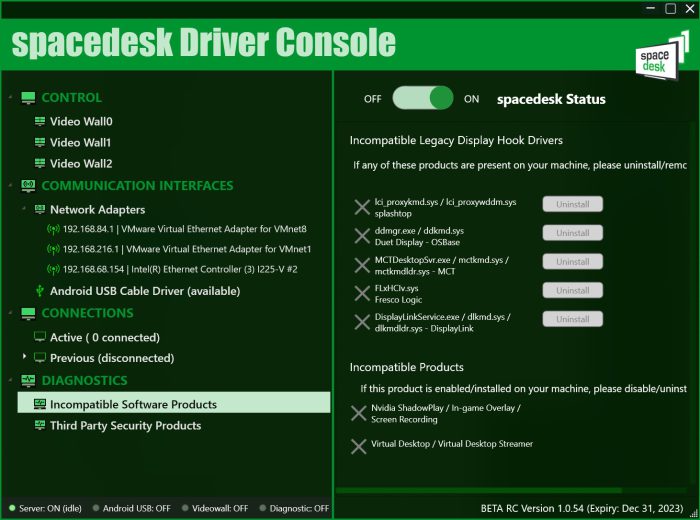
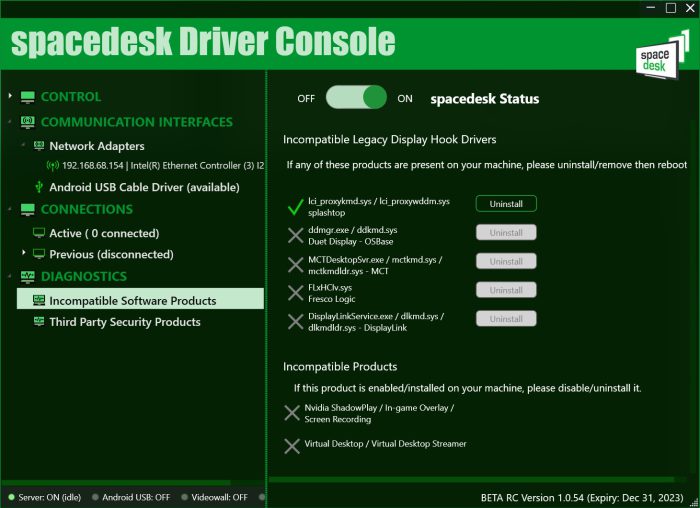
The specific display hook driver can be determine via spacedesk Driver Console app -> DIAGNOSTICS -> Incompatible Software.
Step 2:Uninstall known products using incompatible display hook drivers
This is usually installed by a USB-Display or Zero-Client of the following brands:
Display Link, Duet Display, Fresco Logic, MCT, Microchip/SMSC, OSBase, Splashtop XDisplay and Extended Display HD, etc.
Display hook drivers are not standard Windows drivers. All products relying on such drivers are incompatible with each other. They cannot coexist on the same system. This includes spacedesk.
Use the Uninstall button on the spacedesk Driver Console app to uninstall the other product / hook driver detected, then reboot the spacedesk server machine and try to connect spacedesk client again.
Step 3:Uninstall splashtop wired XDisplay’s virtual display driver
splashtop wired XDisplay’s virtual display driver needs to be uninstalled (it’s an incompatible old legacy WDDM Filter Hook driver which cannot coexist with other similar products like spacedesk even though it doesn’t even seem to use this old driver any more).
On Splashtop Wired XDisplay Agent window -> Advanced, just uninstall the Virtual Display driver.
Step 4:Check if incompatible products did not uninstall OSBase driver
Various products using the OSBase driver do not properly remove it upon uninstall (e.g Duet Display, Fresco Logic, etc.). After uninstalling their product, the leftovers of the OSBase driver still need to be removed manually following the instructions below:
- Go to Control Panel -> “Add Remove Programs “. If you can find OSBase display driver software, uninstall it.
- Check if OSBASE drivers are installed by running the following commands:
- “sc query ddkmd “
- “sc query ddkmdldr “
- “sc query ddmgr”
- If installed, uninstall OSBASE drivers by running the following commands:
- “sc stop ddmgr”
- “sc delete ddmgr”
- “sc delete ddkmdldr”
- “sc delete ddkmd”
- Reboot your PC.
Repair spacedesk Driver Setup
Installation repair can be done by running the same msi installer version then select Repair button. Or just go to Windows Control panel → Programs and Features then search for spacedesk Driver, right-click then repair. This procedure only applies for Windows 10 primary machine only.
Various
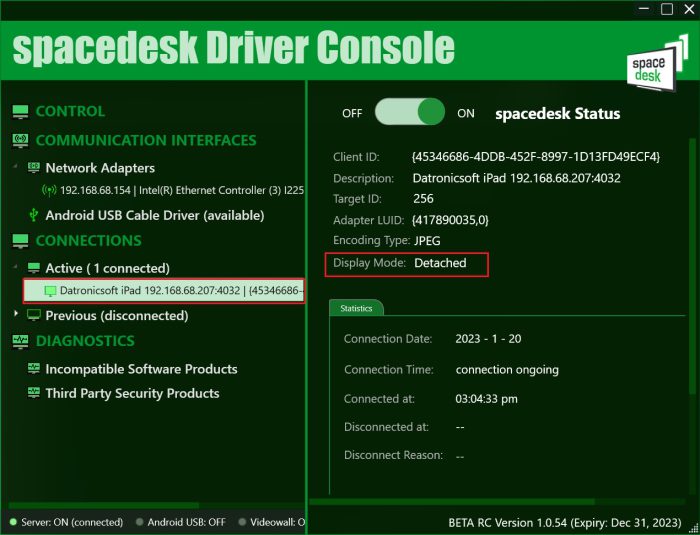
Detached Second Display.
In case of black screen in Windows desktop application or always connecting status on HTML5 VIEWER or “Connected – Display OFF” message showing in Android/iOS VIEWER:
For Windows 11/10 primary machine, open the spacedesk Driver Console and click the connected client to check the Display Mode if it’s detached.
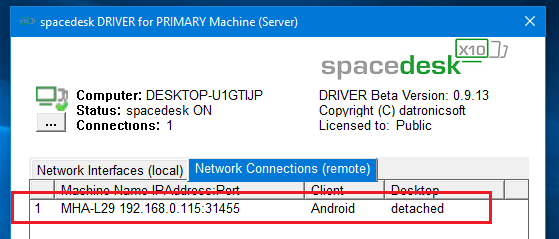
For Windows 8.1 primary machine, click the spacedesk Server window on the task bar and check if status of the device on Network Connections (remote) tab is “detached”.
To attach, open the Windows Display settings of the primary machine, click the detached secondary display and try to attach it by selecting extend or duplicate.
Mirror mode failed.
For Windows 8.1 primary machine, if desktop extension is working but duplication is always failing, make sure that the “Settings → Resolutions → Other Screen Resolution” of Windows VIEWER OR the “Advanced Performance Options → Custom Resolution” of HTML5 VIEWER OR the “Settings → Resolution” of Android VIEWER, OR Settings → Display → Custom Resolutions of iOS VIEWER should matched the native resolution of the primary machine’s monitor.
For Windows 10, if duplicate option is not available in Display settings try to update the graphics adapter by Windows Update or manual download of driver from official website.
If duplication is still not available after driver update, then it’s probably because the driver does not support mirror mode anymore. Please refer to Known issues chapter below for Mirror mode not supported.
Clear All Display Settings.
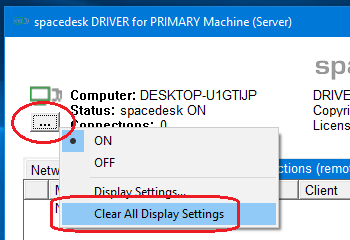
In case display is in wrong settings (orientation, screen resolution, display detached) upon client connect, try the “Clear All display Settings” option in spacedesk System Tray menu.
Viewer (Secondary Device)
Check Viewer App version
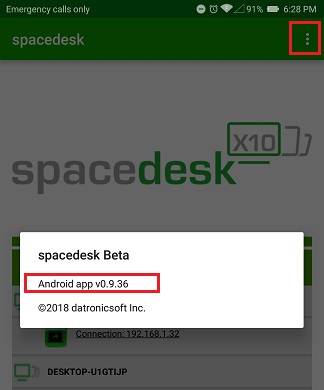
Make sure that the VIEWER version is updated. To check just open the Settings → About of Android / iOS / Windows viewer app. While in HTML5 Viewer page, current version is displayed on the page below. Then compare the version on the viewer to the current version on the spacedesk website.
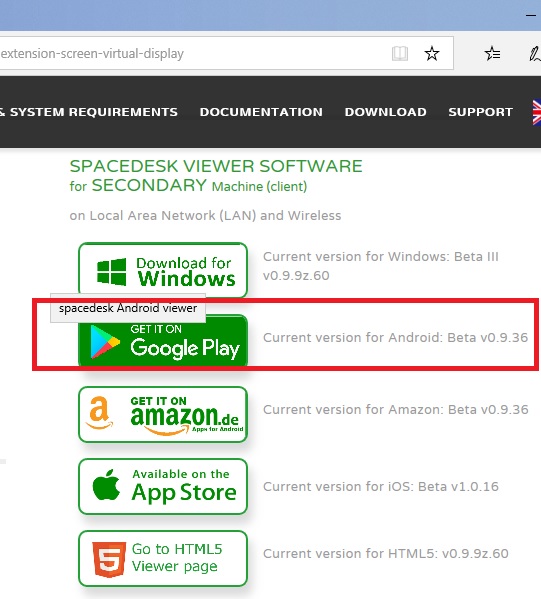
HTML5 VIEWER
Step 1: Delete cached files, images and cookies of web browser.
If spacedesk HTML5 VIEWER web page doesn’t load the latest version 0.9.10, just delete the cached files, images and cookies on browsers settings.
Step 2: check if the web browser supports websockets.
If the spacedesk HTML5 VIEWER is unable to connect, check the version of the web browser and make sure that it is updated. If the secondary machine is a smartphone or tablet device the browser and OS needs to be most recent versions supporting websockets. Just go to https://websocketstest.com/ to verify.
Connection Error
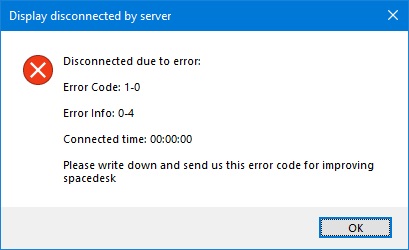
Error Code: 1 & Error Info: 0
This error code and info indicates that the viewer cannot find the Windows server on the network. Mostly, this is caused by Virtual Private Network (VPN) enabled on the primary machine. For more details, kindly refer to the Troubleshooting Network connection – Connection Error chapter above.
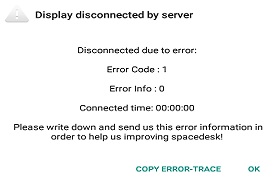
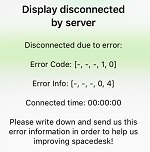
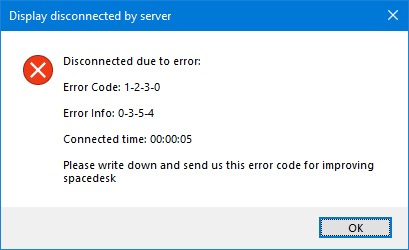
Error Code: 1-2-3 & Error Info: 0-3-5
This error indicates that the primary machine can be reached over the network but connection fails after the indicated connection time. Check the Connection Error chapter discussed above.
(android) (iOS)
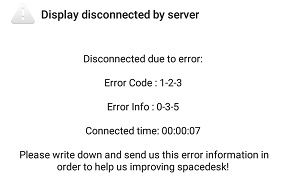
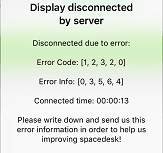
These error message box also shows the connected time, it indicates how long the viewer is connected before it disconnects. And in case procedures did not help, just report this error code sequence to spacedesk support.
Limitations
Custom Screen Resolutions
On iOS and Android viewer, custom screen resolutions available on settings are only those not bigger than the device’s native screen resolution. This is due to the black screen problem observed when switching to higher resolution. On Windows and HTML5 viewer’s Settings → Resolutions… → Other/Custom Screen Resolutions, supported resolutions is up to 4096×2160.
Performance in HTML5 VIEWER
HTML5 VIEWER is much slower than native viewer apps on Android, iOS and Windows. This is due to technical limitation of HTML5/Javascript.
Slow screen update on Windows VIEWER.
There are some cases that the rendering of screen update in Windows VIEWER is very slow. One of the possible reason is that Windows client machine only has a DirectX 9 graphics driver. It is recommended to upgrade to DirectX 10 – above graphics driver to achieve better performance.
Multiple Display
As of now, spacedesk supports simultaneous connection of up to sixteen additional displays.
– Up to sixteen Android, or iOS, or Windows VIEWERs
– One HTML5 VIEWER web browser application for any device and operating system e.g. Mac OS X and Linux
HTML5 VIEWER on Mozilla Firefox and Microsoft Edge not supported.
spacedesk’s HTML5 VIEWER is currently not supported in Mozilla Firefox web browsers due to performance limitations. Please use other web browsers recommended in system requirements chapter.
List of Incompatible Windows Application
This only applies on Windows 8.1 Primary Machine.
Applications conflicting and causing system instability while spacedesk is active
Skype for business
Fortinet security software
Flight Simulator
Applications not working in full screen mode on spacedesk display monitor
Various DirectX games (e.g. Witcher 2, Project Cars, Asseto Corsa, Battlefield, etc.)
Video Wall Configuration
Videowall
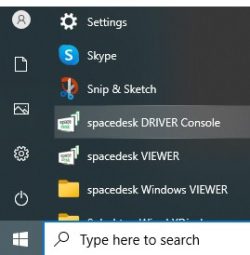
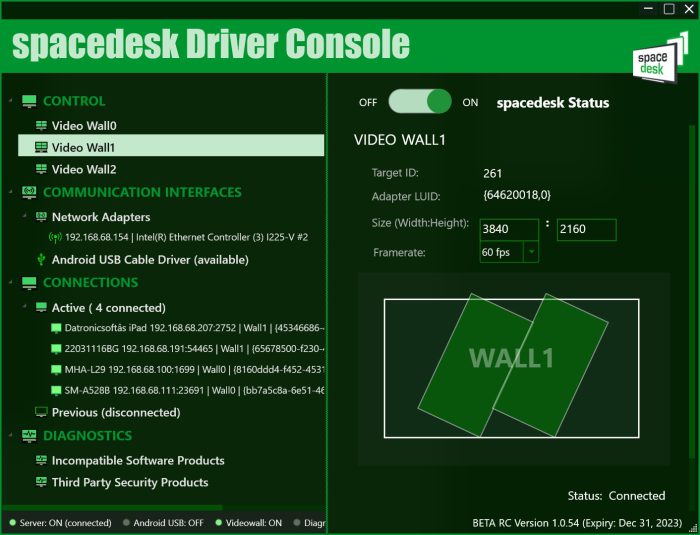
Step 1: Open spacedesk DRIVER Console window by clicking the spacedesk Tray icon or search “spacedesk DRIVER Console” in Windows Start Menu.
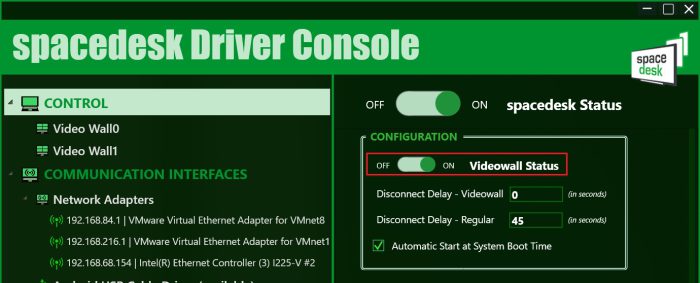
Step 2: Enable/Disable Videowall functionality using the toggle switch in the spacedesk DRIVER Console – CONTROL – Videowall Configuration box.
Settings
Videowall Disconnect Delay
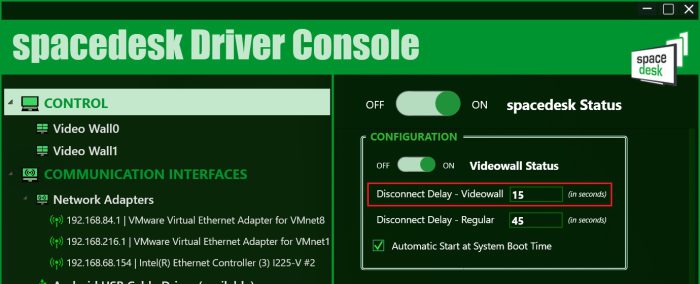
If this settings is set to non zero value, video wall client displays will only disconnect after the specified value in seconds times out.
A -1 value is equivalent to infinite (video wall client displays will not disconnect until the primary machine reboots).
By default this settings is set to 0.
Wall Display Settings
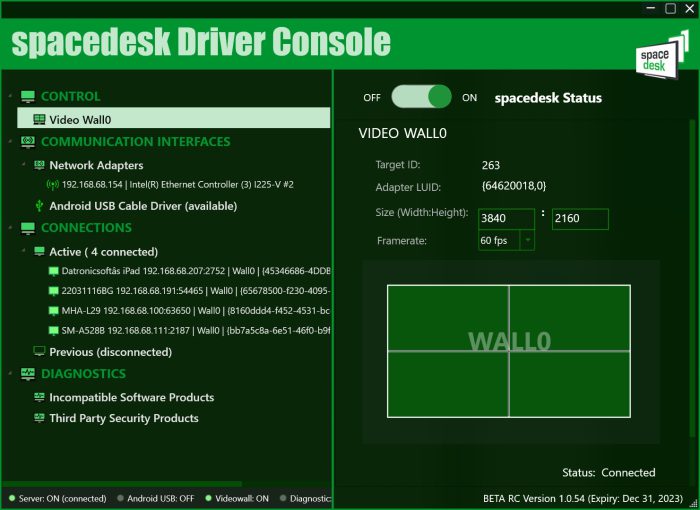
Updating the wall display’s settings will take effect immediately upon pressing the enter on each text box.
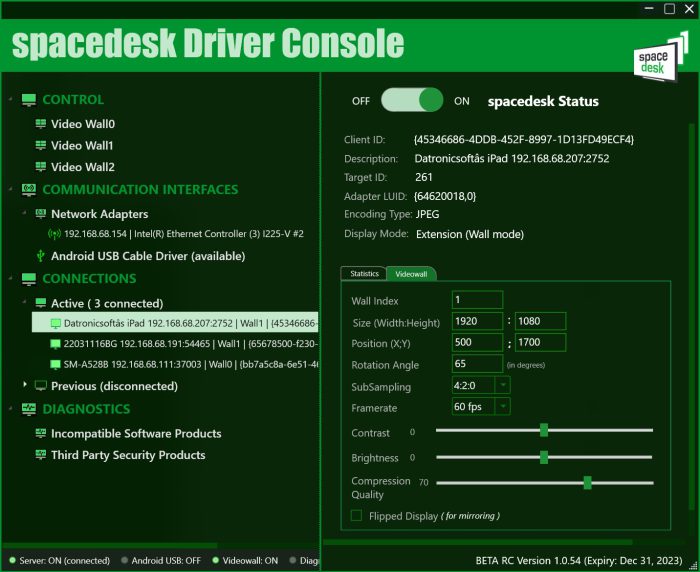
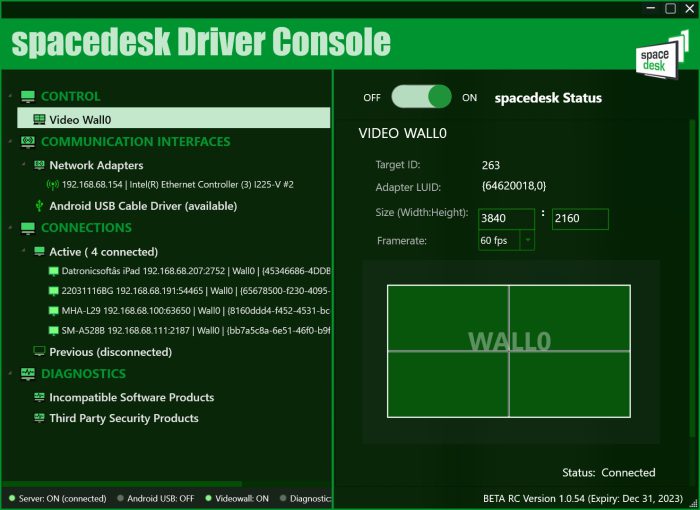
Size (Width:Height) – The (Width x Height) screen resolution of the video wall. By default, Video wall display is set to 4K screen resolution (3840 x 2160).
Client Display Settings
Updating the client display’s settings will take effect immediately upon pressing the enter on each text box.
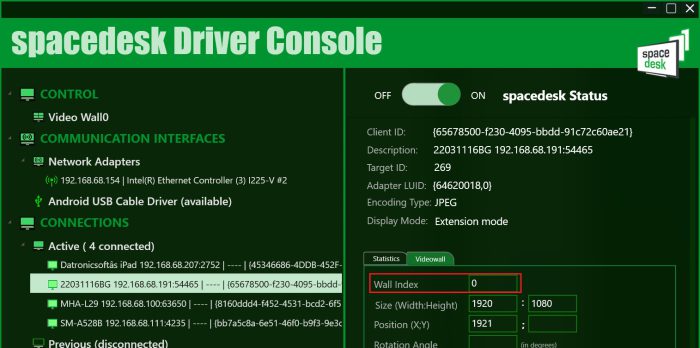
Wall Index – use to create new Video Wall or assign to an existing Video Wall.
Size (Width:Height) – The Width x Height / screen resolution of the client display.
Position (X;Y) – The (X : Y) position/coordinates of the client display. By default, both are set to 0.
This settings is only applied on the client displays assigned in a Wall.
Rotation Angle – Angle in degrees of the client display. By default, it is set to 0.
This settings is only applied on the client displays assigned in a Wall.
SubSampling type – The color depth type of the client display image. By default, it is set to 4:2:0.
For more info please check Color Depth and Image Compression chapter.
Framerate – The frame rate per second (FPS) of the client display. By default, it is set to 30 fps.
Contrast – slider settings to adjust the client display image’s contrast. By default, it is set to 0.
Brightness – slider settings to adjust the client display image’s brightness. By default, it is set to 0.
Compression Quality – slider settings to adjust the client display image’s quality. By default, it is set to 70.
Flipped Display – check box will enabled the inverted/flipped display which usually used for mirroring.
Video Wall Operation
Step 1: Create a Video Wall Display
For first time client connection, the display is set as Extension mode.
To create a Video Wall, just assign a value (e.g. 0) in the Wall Index text box of each client display.
Just press the enter key to update the settings and it will automatically plugged a video wall display (e.g. Wall0).
Step 2: Assign multiple clients to Video Wall
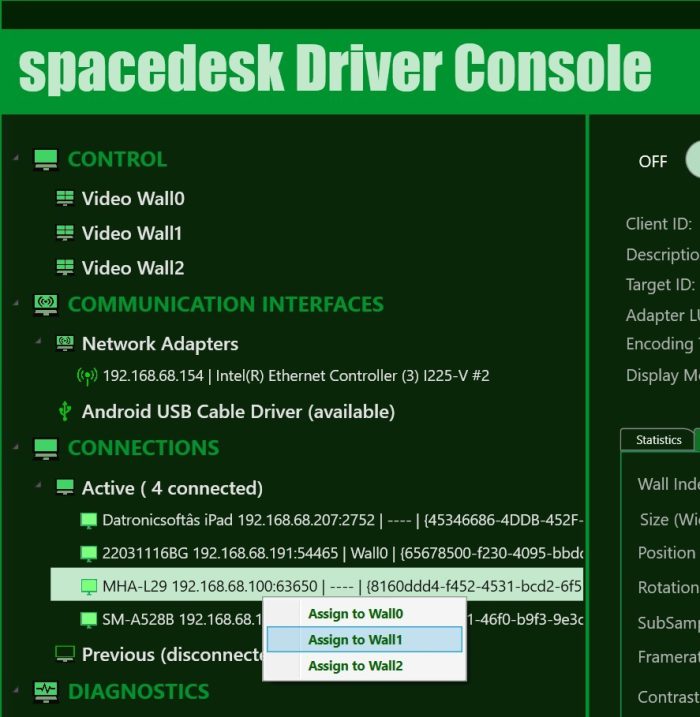
Multiple client display can be assigned to the video wall by assigning it on the Wall Index text box or via right click context menu “Assign to WallX”.
User can also create multiple video walls simultaneously as long as the primary machine’s resources can handle it.
Step 3: Creative Video Wall
Creative video wall involves rotated client displays and/or positioned in a non zero X and Y coordinates.
Below are the sample creative video wall settings.
Sample #1: Video Wall0
Sample #2: Video Wall1
Step 4: Mirroring to multiple client displays
This video wall configuration can also be used to mirror/duplicate a desktop screen into multiple client displays, by assigning multiple clients in one video wall with the same X and Y coordinates and just change the video wall’s dimension to the same dimension of the client displays.
Uninstall on Windows Primary Machine
Uninstall Using Windows Control Panel
Uninstall of spacedesk can be done on Control Panel → Programs and Features.
Uninstall Using .Msi File
An alternative way to uninstall spacedesk is using the spacedesk msi installer file.
Step 1: Run the setup installer
Run the spacedesk setup installer.
spacedesk_driver_Win_10_32_v1067_BETA.msi for x86 platform
spacedesk_driver_Win_10_64_v1067_BETA.msi for x64 platform
Step 2: Click the remove button
After selecting the Remove button, just click Next until it uninstallation completed.
Starting on version 0.9.9.z.25, reboot is not needed anymore in Windows 10 machine.
Step 3: Reboot (Windows 8.1 only)
After the uninstallation has completed, reboot the computer before proceeding with any other task.
Note: Please do not manually delete or remove the C:\Program Files\datronicsoft\ spacedesk folder and its files, to prevent uninstallation problem.
Troubleshooting Uninstall
Step 1: Missing spacedesk program files.
Manually deleting spacedesk program files located in chosen directory folder (e.g. C:\Program Files\datronicsoft\spacedesk) is extremely not advisable, doing so may result to uninstallation failure of spacedesk with an error message below.
To fix the problem, just restore the program files (please check your Recycle bin)to its original location and try to uninstall again using the same msi installer version or by Windows Control Panel → Programs and features.
Step 2:Try Microsoft Fix.
If uninstall problem still persist after restoring spacedesk program files, try the Install/Uninstall troubleshooter program from the Microsoft Fix article. If spacedesk is not on the program list, just select “Not Listed” then paste the product code of current spacedesk version below.
spacedesk_driver_Win_10_32_v1067_BETA.msi:{C77CE9D7-F209-45B9-9DCE-E9A5190D89C5}
spacedesk_driver_Win_10_64_v1067_BETA.msi:{DC71F7EA-DD81-4E02-A1F8-47A4406B7FC0}
spacedesk_driver_Win_8.1_32_v1067_BETA.msi:{B8891AF1-EB52-4952-8B83-C19C6235EF26}
spacedesk_driver_Win_8.1_64_v1067_BETA.msi:{96E770CD-E3DC-43CE-905A-7C627E9AAF7D}
spacedeskWindowsVIEWER_v0941_BETA.msi:{1598F649-B998-45AE-8D83-FC14D3E9D56C}
for previous spacedesk version:
spacedesk_driver_Win_10_32_v1066_BETA.msi:{9A0AFD98-0102-4B7E-BCB7-8F6EDC486A35}
spacedesk_driver_Win_10_64_v1066_BETA.msi:{26EB1A9A-6F23-4AE4-8BD9-B43C3FA07550}
spacedesk_driver_Win_10_32_v1065_BETA.msi:{34F14846-0BB1-48B6-AECC-8095AE1A4A56}
spacedesk_driver_Win_10_64_v1065_BETA.msi:{93A3BAEF-BDE3-44C1-A2C6-4798020092DB}
spacedesk_driver_Win_10_32_v1064_BETA.msi:{C0BBD1B8-BA38-46B5-B72B-920E2E2D8C04}
spacedesk_driver_Win_10_64_v1064_BETA.msi:{8401623F-2D8C-4D78-A063-15425D9136D7}
spacedesk_driver_Win_10_32_v1062_BETA.msi:{AB04A2A6-574A-45DA-941B-7CCAA5D854E7}
spacedesk_driver_Win_10_64_v1062_BETA.msi:{799E173C-91BA-49B3-A7B5-3F3DE8C0B5D9}
spacedesk_driver_Win_10_32_v1060_BETA.msi:{C5721F86-A2E2-4EF8-9AFB-358C248E5951}
spacedesk_driver_Win_10_64_v1060_BETA.msi:{727AC596-D91C-49CD-A1DE-1DE32242764A}
spacedesk_driver_Win_10_32_v1057_BETA.msi:{1DC4315B-572F-4F6C-82C7-054C50587695}
spacedesk_driver_Win_10_64_v1057_BETA.msi:{6D9F8C23-E2D2-4D17-9B21-A076CCEED01D}
spacedesk_driver_Win_10_32_v1056_BETA.msi:{1C3A6671-5A19-4ED1-AFAB-20CF55547204}
spacedesk_driver_Win_10_64_v1056_BETA.msi:{F084E34E-CD12-4039-8449-84A2AA3C2E2E}
spacedesk_driver_Win_10_32_v1055_BETA.msi:{6D941A34-9F1B-4163-BD0C-C9C14E09CDFA}
spacedesk_driver_Win_10_64_v1055_BETA.msi:{675DEFD4-02A3-495A-96B5-E93BFA5CB617}
spacedesk_driver_Win_10_32_v1054_BETA.msi:{C162807D-9ADA-4C1C-95D7-E8D2F8459A36}
spacedesk_driver_Win_10_64_v1054_BETA.msi:{509A65B7-41DC-4B32-A54E-0D035F26F4D4}
spacedesk_driver_Win_10_32_v1050_BETA.msi:{97CE234A-3DAB-4DAF-BA5A-E68952445820}
spacedesk_driver_Win_10_64_v1050_BETA.msi:{F2F9F523-C420-4596-BBA7-987BF40E5583}
spacedesk_driver_Win_10_32_v1049_BETA.msi:{C0C13613-D3A7-41BC-82CA-B788BDF5305A}
spacedesk_driver_Win_10_64_v1049_BETA.msi:{0BD5C03D-5508-4DD4-BC32-FE13A1106A26}
spacedesk_driver_Win_10_32_v1048_BETA.msi:{2EADEA2C-9C46-4B68-AD59-19C1A141CFB6}
spacedesk_driver_Win_10_64_v1048_BETA.msi:{3B105125-FFD5-47A0-BA1A-7A1F69A52680}
spacedesk_driver_Win_10_32_v1047_BETA.msi:{C0B54B07-1A26-4111-B66E-0B3457173395}
spacedesk_driver_Win_10_64_v1047_BETA.msi:{B05A2ED2-AB9E-4A6A-B08E-A2CD04416750}
spacedesk_driver_Win_10_32_v1046_BETA.msi:{EE3377FA-DB1E-4236-8631-89BA26081F9F}
spacedesk_driver_Win_10_64_v1046_BETA.msi:{F75B0686-976F-40B8-B417-8E1D8479353F}
spacedesk_driver_Win_10_32_v1044_BETA.msi:{E85A97FF-95E2-4A29-93D3-7970810B142F}
spacedesk_driver_Win_10_64_v1044_BETA.msi:{D7903B45-1502-4A94-876E-8DF19B97487F}
spacedesk_driver_Win_10_32_v1043_BETA.msi:{A96638B0-AF24-4826-9808-2C9440507B31}
spacedesk_driver_Win_10_64_v1043_BETA.msi:{72C34756-6F21-4637-9A75-98EAE3EAC1DC}
spacedesk_driver_Win_10_32_v1042_BETA.msi:{811FE54D-E0A4-4BA4-9F0E-B7F632B85A2B}
spacedesk_driver_Win_10_64_v1042_BETA.msi:{153DFBF9-8C57-4A35-9CCA-9D01FE0689DA}
spacedesk_driver_Win_10_32_v1041_BETA.msi:{BC808207-9FF0-436F-AA5C-E3BD48105018}
spacedesk_driver_Win_10_64_v1041_BETA.msi:{A26AE12E-F3BA-435A-A600-D0D05597C32C}
spacedesk_driver_Win_10_32_v1040_BETA.msi:{6863B8F6-1229-4AAF-85D7-7278AB1A5D00}
spacedesk_driver_Win_10_64_v1040_BETA.msi:{A7749853-C2A7-4313-B46F-11AECF983D62}
spacedesk_driver_Win_10_32_v1039_BETA.msi:{36A88680-F72C-420D-A7CF-2B6E3BB8C13A}
spacedesk_driver_Win_10_64_v1039_BETA.msi:{D06EA7A6-EBC0-421F-A8B4-4CC648E9219E}
spacedesk_driver_Win_10_32_v1038_BETA.msi:{60556EC1-A62B-42AE-B50D-0B3080B6827D}
spacedesk_driver_Win_10_64_v1038_BETA.msi:{A7D9E65C-8236-4D7A-9AE0-F28DDEF0D583}
spacedesk_driver_Win_10_32_v1037_BETA.msi:{C2DE53FC-DA90-4A04-AE25-880F99D712A0}
spacedesk_driver_Win_10_64_v1037_BETA.msi:{599DEADB-A437-4A08-9187-BB2D3E6A76AC}
spacedesk_driver_Win_10_32_v1036_BETA.msi:{4BF61DED-156D-47A4-91B8-95F7CD26F902}
spacedesk_driver_Win_10_64_v1036_BETA.msi:{F9B74421-732C-417E-AFFF-C840D373D287}
spacedesk_driver_Win_10_32_v1035_BETA.msi:{3A1901EC-6398-4E19-AD56-58390CEE99CB}
spacedesk_driver_Win_10_64_v1035_BETA.msi:{8674C274-85BB-418B-84BC-71AE4D7E5EFE}
spacedesk_driver_Win_8.1_32_v1057_BETA.msi:{5150CB30-709F-45D4-9EF3-0DBD337BE6C8}
spacedesk_driver_Win_8.1_64_v1057_BETA.msi:{9702DF94-CE7E-460F-AB60-7F9931208C9F}
spacedesk_driver_Win_8.1_32_v1050_BETA.msi:{07E2F61E-7012-4BC9-873B-9E36BFA94A1B}
spacedesk_driver_Win_8.1_64_v1050_BETA.msi:{1E026DB0-7343-46F8-8078-ED38FE69C40E}
spacedesk_driver_Win_8.1_32_v1048_BETA.msi:{1F518912-9A06-4CE2-BC39-B2AE371AA34F}
spacedesk_driver_Win_8.1_64_v1048_BETA.msi:{DF5510B8-B313-413D-9F58-D0C92879B8F5}
spacedesk_driver_Win_8.1_32_v1043_BETA.msi:{F281537F-4B81-46A1-A262-1EB6A6CF363C}
spacedesk_driver_Win_8.1_64_v1043_BETA.msi:{8FB18F8A-B7AD-4C26-BDAB-4D7699A1A2C5}
spacedesk_driver_Win_8.1_32_v1036_BETA.msi:{A3FD378F-3846-4E99-A7F0-54FF212E4B34}
spacedesk_driver_Win_8.1_64_v1036_BETA.msi:{D944408D-DD6D-447A-B707-92EB8141EA0F}
spacedesk_driver_Win_8.1_32_v1035_BETA.msi:{C8F03123-AD56-4203-8744-4C9F281128A9}
spacedesk_driver_Win_8.1_64_v1035_BETA.msi:{769FA542-B6E2-41B1-B310-51F74D775CA5}
spacedesk_driver_Win_8.1_32_v1034_BETA.msi:{1FF2B33F-DE6B-4F5A-A7AF-C88AE5A218B9}
spacedesk_driver_Win_8.1_64_v1034_BETA.msi:{284A27A0-97C2-423D-9167-A7FCEAEEE5B3}
spacedesk_driver_Win_8.1_32_v1033_BETA.msi:{B4B0A476-1878-4E6A-A0E8-ECF240E23FDD}
spacedesk_driver_Win_8.1_64_v1033_BETA.msi:{4DC994AB-529A-4899-BAF7-37DB3B911481}
spacedesk_driver_Win_8.1_32_v1032_BETA.msi:{6DD0D79F-5B05-4C8B-AE26-DEBBE50D7CDF}
spacedesk_driver_Win_8.1_64_v1032_BETA.msi:{44417365-2F3A-4B97-8C47-322003A44292}
spacedesk_driver_Win_8.1_32_v1027_BETA.msi:{87A725A9-F83F-48D9-AEAE-08C86569EFF8}
spacedesk_driver_Win_8.1_64_v1027_BETA.msi:{F2ED3BFB-279B-439F-91C0-A316872AB928}
spacedesk_driver_Win_8.1_32_v1020_BETA.msi:{D36AC41F-8329-4899-8CDF-C132FC26FED0}
spacedesk_driver_Win_8.1_64_v1020_BETA.msi:{D51DBA31-4227-45D7-AB1F-BAD397C38F43}
spacedesk_driver_Win_8.1_32_v1018_BETA.msi:{20ACD8D5-FF4D-43CB-A7E8-641E0AE88254}
spacedesk_driver_Win_8.1_64_v1018_BETA.msi:{91103F10-6432-4D27-979C-9CF3D73862E0}
spacedeskWindowsVIEWER_v0940_BETA.msi:{854D64D6-685D-4A59-B5C4-33F106100223}
spacedeskWindowsVIEWER_v0939_BETA.msi:{AB3159A5-5E8D-4B2F-9A56-8034C8B3D272}
spacedeskWindowsVIEWER_v0938_BETA.msi:{ABC715E1-F1D3-4B9E-A693-2208825DC669}
spacedeskWindowsVIEWER_v0937_BETA.msi:{44C237FF-E3B0-42EC-B6BD-E21A4D5A10D0}
Step 3: Manual uninstall of drivers and services
After successfully troubleshooting uninstall, spacedesk should be removed from “Programs and Features”. To make sure that drivers and services are comprehensively removed, all the steps in the next section “Manual uninstall” need to be executed.
Manual Uninstall (Troubleshooting Only)
The steps in this chapter should only be done in exceptional cases if needed and if previously discussed with spacedesk support. The regular way to uninstall spacedesk is using Windows Control Panel or the spacedesk msi installer file as described above.
Step 1: Uninstall services
Run a Command Prompt (cmd.exe) “as administrator” and enter the following commands below:
- sc delete spacedeskHookKmode (for Windows 8.1 only)
- sc stop spacedeskService
- sc delete spacedeskService
Step 2: Uninstall spacedesk Graphics Adapter (for Windows 10 only)
For Windows 10 operating systems, manually uninstall spacedesk Graphics Adapter in Device Manager. This only applies on spacedesk driver version 0.9.9.z.25 – later.
Step 3: Uninstall spacedesk Mouse and Keyboard drivers (for Windows 8.1 only)
Manually uninstall the spacedesk Mouse and Keyboard driver on Device Manager.

Step 4: Uninstall spacedesk virtual HID Device (for Windows 10 only)
On device manager click View -> Devices by Connection, then find the spacedesk virtual HID Device.
Before uninstalling the spacedesk virtual HID Device, the children below should be uninstall first.
Just right-click each child devices underneath the spacedesk virtual HID Device, then click “Uninstall device”.
Step 5: Uninstall spacedesk virtual Bus Device (for Windows 10 only)
On device manager click View -> Devices by Connection, then find the spacedesk virtual Bus Device.
Just right-click, then “Uninstall device”.
Step 6:Reboot
Reboot the system and ensure that the following registry keys below have been removed:
HKEY_LOCAL_MACHINE\SYSTEM\CurrentControlSet\Services\spacedeskService
HKEY_LOCAL_MACHINE\SYSTEM\CurrentControlSet\Services\spacedeskKtmInputKeybd (for Windows 8.1 only)
HKEY_LOCAL_MACHINE\SYSTEM\CurrentControlSet\Services\spacedeskKtmInputMouse
For Windows 8.1
HKEY_LOCAL_MACHINE\SYSTEM\CurrentControlSet\Services\spacedeskHookKmode
For Windows 10
HKEY_LOCAL_MACHINE\SOFTWARE\Microsoft\WindowsNT\CurrentVersion\WUDF\Services\spacedeskDisplayUmode
Step 7:Delete files
Delete all files listed in the appendix of this document underneath “File list” in the Appendix of this document.
Windows Secondary Machine Uninstall
Uninstallation of Windows VIEWER on Secondary Machine can be done on Control Panel → Programs and Features. Another way to uninstall is by using the msi installer.
Note: If these troubleshooting procedures does not solve your problem please contact our spacedesk support, just click here.
Appendix
Release Notes
spacedesk Windows 8.1/10/11 Driver version 1.0.67
– Bug fix for the random disconnect with Windows 10 Viewer and iOS Viewer app.
spacedesk Windows 7 Viewer version 0.9.41
– Refined Audio feature – toggling of Audio option during runtime.
File List
File list (Windows 11/10)
C:\Windows\System32\drivers\UMDF\spacedeskDriverHid.dll
C:\Windows\System32\drivers\UMDF\spacedeskDisplayUmode1_0.dll (for Windows 10 version 1607 – 1703)
C:\Windows\System32\drivers\UMDF\spacedeskDisplayUmode1_2.dll (for Windows 10 version 1709 – above)
C:\Windows\System32\drivers\spacedeskDriverAudio.sys
C:\Windows\System32\drivers\spacedeskKtmInputMouse.sys
C:\Windows\System32\drivers\spacedeskDriverAndroidControl.sys
C:\Windows\System32\drivers\spacedeskDriverAndroidUsb.sys
C:\Windows\System32\drivers\spacedeskDriverBus.sys
C:\Windows\System32\spacedeskService.exe
C:\Windows\System32\spacedeskServiceTray.exe
C:\Windows\System32\spacedeskConsole.exe
File list (Windows 8.1)
C:\Windows\System32\drivers\spacedeskHookKmode.sys
C:\Windows\System32\drivers\spacedeskKtmInputMouse.sys
C:\Windows\System32\drivers\spacedeskDriverBus.sys
C:\Windows\System32\spacedeskHookUmode.dll
C:\Windows\System32\spacedeskService.exe
C:\Windows\System32\spacedeskKtm.dll
C:\Windows\System32\spacedeskSrvLibConnectorUsb.dll
C:\Windows\System32\spacedeskServiceTray.exe
Files on 64 bit systems only (Windows 8.1)
C:\Windows\SysWOW64\spacedeskHookUmode.dll
Привет, друзья. О преимуществах работы с двумя мониторами компьютера точно не надо говорить тем, кто использует таковые, скажем, в своей профессиональной деятельности. Но что делать, если вам для каких-то целей вдруг понадобится второй экран, а у вас к ПК подключён только один монитор, но при этом есть ноутбук, планшет или даже смартфон с большой диагональю экрана? Ребята, экраны этих устройств можно подключить к ПК по локальной сети так, как если бы эти экраны были мониторами, обычно подключёнными к ПК. Знакомьтесь, бесплатное программное обеспечение Spacedesk – программы для Windows, приложения для iPhone, iPad и Android-устройств, веб-приложение, реализующие подключение экранов других устройств к компьютеру в качестве сетевых мониторов. Давайте разбираться, что это за программное обеспечение, и как оно работает.
Итак, друзья, Spacedesk – это, как я уже отметил, программное обеспечение для операционных систем Windows, iOS и Android и веб-приложение, реализующее по локальной сети подключение экранов различных устройств в качестве второго монитора Windows-компьютера. 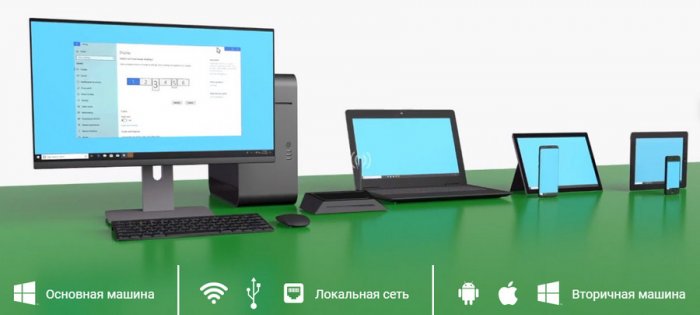
https://spacedesk.net/
Здесь нам надо скачать программу-драйвер для компьютера-сервера и приложения-просмотрщики для клиентских устройств.
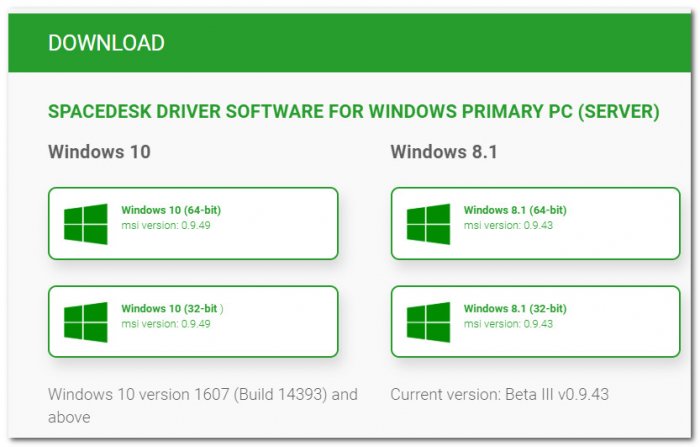
Первым делом настроим компьютер-сервер, изображение которого будет передаваться на сетевой экран. По указанному выше адресу на сайте Spacedesk раскрываем вкладку «Download». Здесь нам нужен драйвер для сервера: выбираем версию Windows 8.1 или 10, выбираем разрядность и качаем.
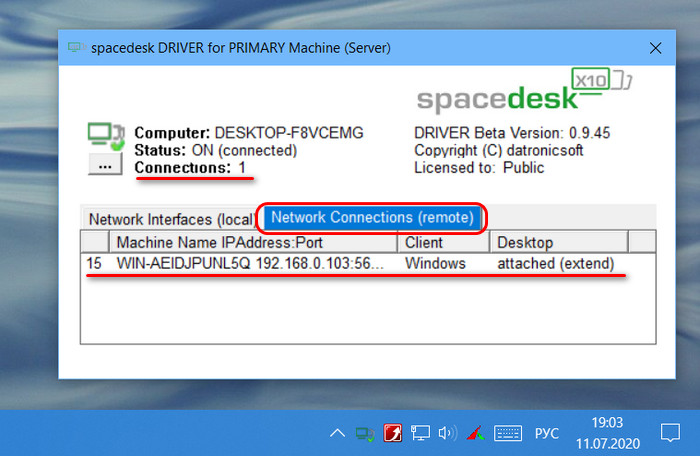
После установки драйвер Spacedesk будет работать в фоне, обеспечивая возможность подключения сетевого монитора. Этот драйвер являет собой небольшую утилиту, в его основной вкладке отображается, в частности, наш сетевой IP, он нам понадобится в отдельных случаях при подключении просмотрщиков на клиентских устройствах. И также в основной вкладке мы видим, что пока что у нас нет никаких подключений. 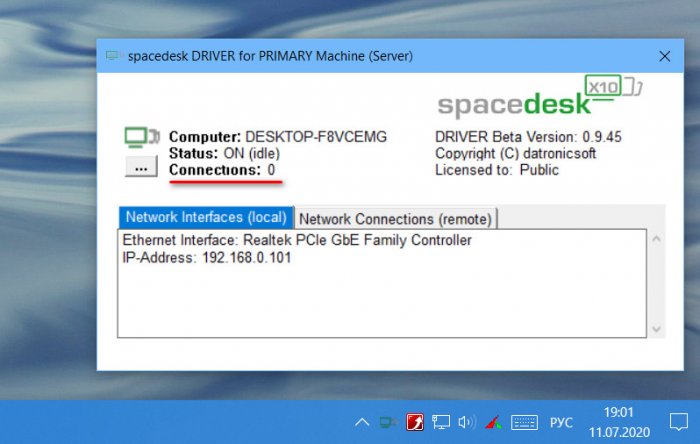
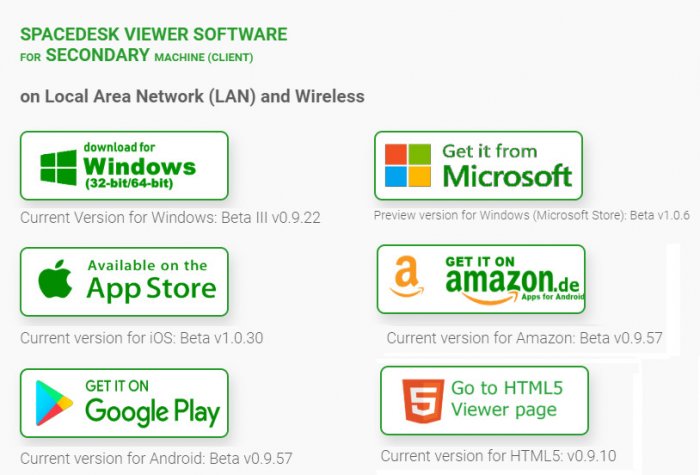
А чтобы подключение было, на сайте Spacedesk мы качаем программу-просмотрщик для клиентских Windows-устройств. Либо идём по ссылкам в магазины мобильных приложений, либо же кликаем ссылку веб-приложения «Go to HTML5». Для Windows 10, кстати, просмотрщик можно как скачать в формате классической программы Win32, так и установить в формате UWP-приложения из магазина Microsoft Store.
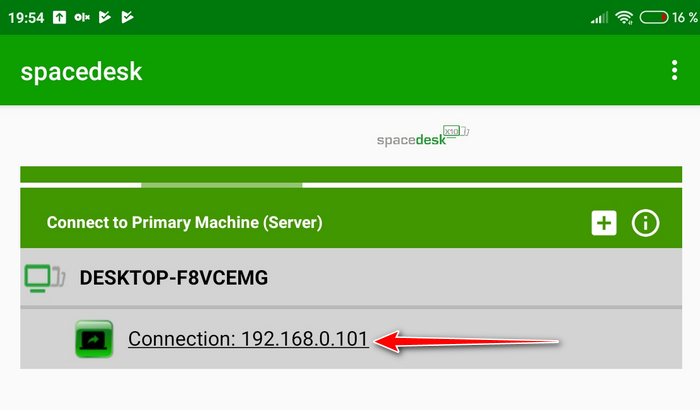
Ну а теперь, друзья, установим соединение. Открываем приложение-просмотрщик на клиентском устройстве, например, Windows-программу на ноутбуке. Видим, что программа автоматически определила адрес сервера, и нам для подключения нужно всего лишь сделать двойной клик по отображению IP сервера. 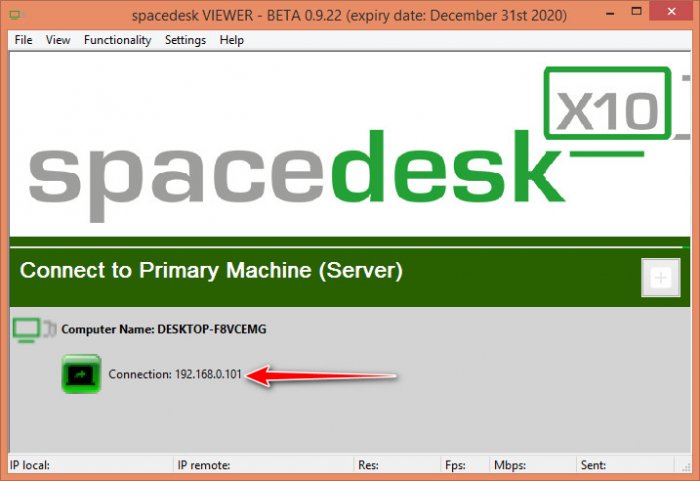
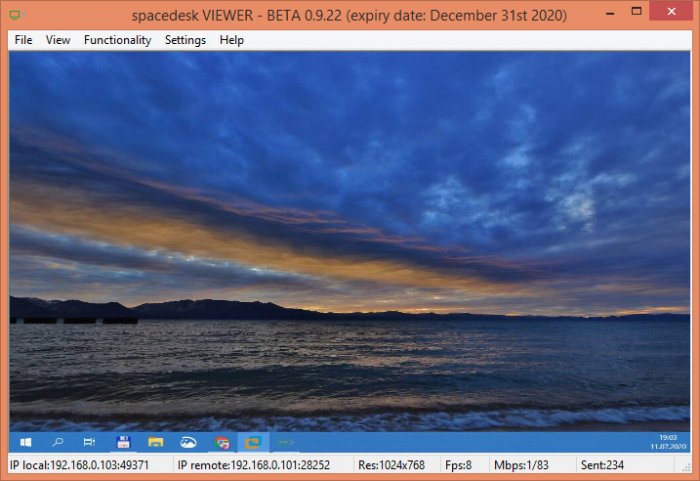
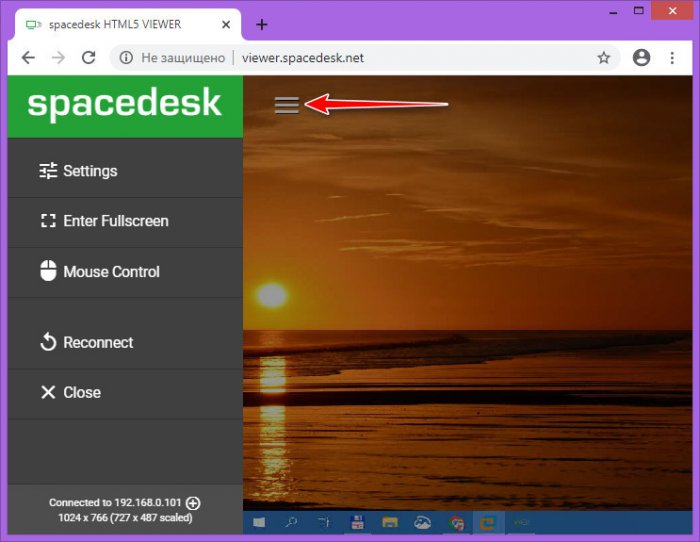
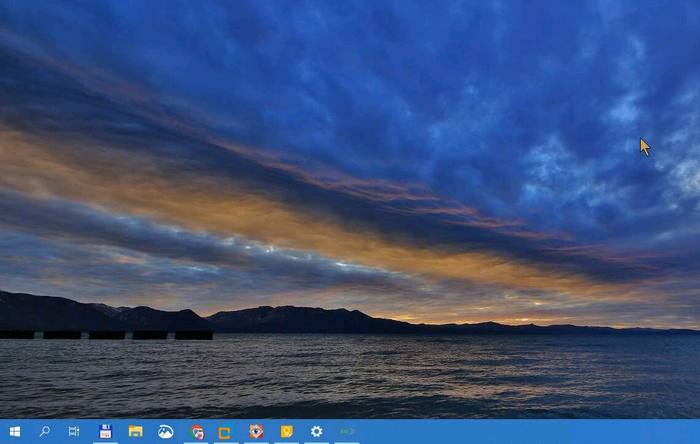
И видим его расширенный экран в полноэкранном режиме.
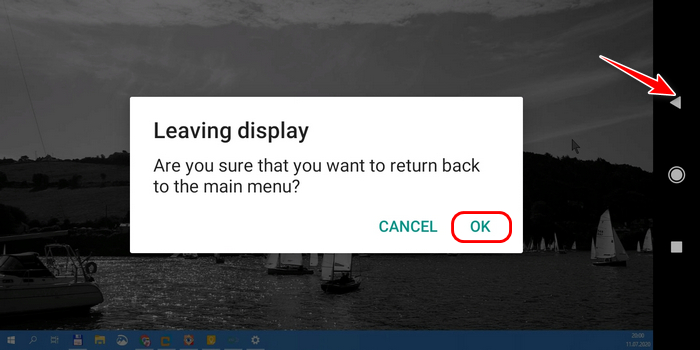
Автоповорот экрана выбирается автоматически в зависимости от положения Android-устройства. Для отключения экрана можем выйти из приложения кнопкой «Назад».
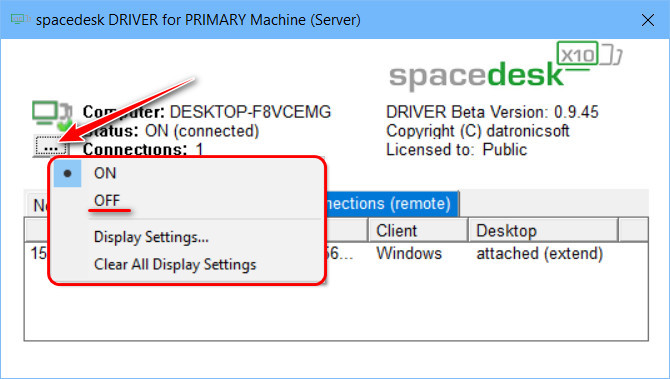
И также отключить второй сетевой экран мы можем в окне драйвера на компьютере-сервере. Нам нужно отключить соединение в меню утилиты пунктом «Off».
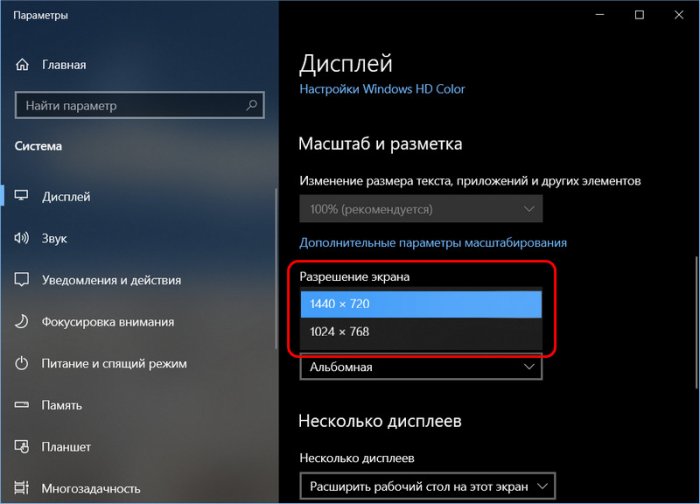
В меню драйвера также можем выбрать пункт «Display Settings», это быстрый путь к настройкам экрана Windows. Впрочем, мы также быстро попадём в них, вызвав на рабочем столе контекстное меню и выбрав в Windows 8.1 пункт «Разрешение экрана», а в Windows 10 – «Параметры экрана». И в системных настройках можем настроить сетевой экран так, как если бы это был обычно подключённый к компьютеру экран. 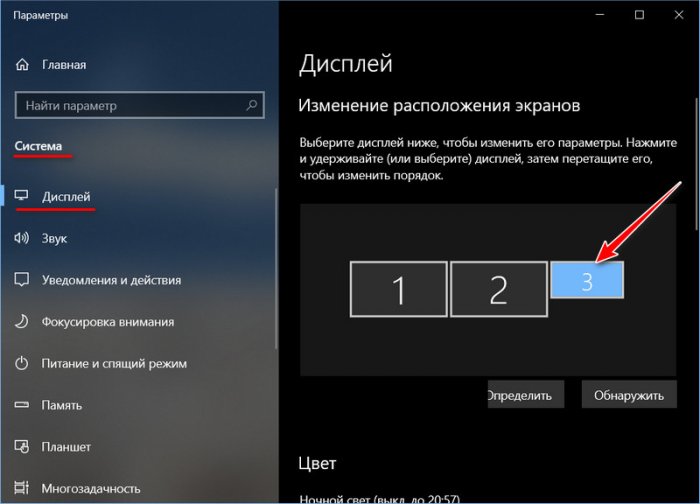
Для реализации ряда задач на компьютере разумно подключать дополнительные мониторы. В качестве них могут выступать смартфоны, планшеты или сторонние ПК и мониторы. Осуществить задуманное способна помочь программа Spacedesk. С ее помощью можно без труда объединить несколько мониторов в единую локальную сеть. Подробная информация о том, как пользоваться Spacedesk, представлена ниже.
Содержание статьи
- Что собой представляет программа
- Возможности серверной части
- Возможности клиентской части
- Как установить программу
- Системные требования
- Как пользоваться Spacedesk
- Как подключиться к компьютеру или ноутбуку
- Подключение к планшету или смартфону
- Возможные проблемы
- Как удалить Spacedesk
- Комментарии пользователей
Что собой представляет программа
Приложение Spacedesk представляет собой утилиту, призванную объединять сразу несколько систем для обеспечения большего удобства работы. Spacedesk позволяет применять сторонние мониторы, дисплеи планшетов, смартфонов и даже телевизоров, функционирующих на базе операционной системы Android TV, в качестве второго экрана.
Важно! Данная функция является невероятно полезной в ситуации, когда требуется одновременно держать перед глазами большой объем информации.
Возможностью одновременного использования сразу нескольких мониторов активно пользуются профессиональные инженеры, дизайнеры, аудиоредакторы и трейдеры.
Возможности серверной части
Утилита Spacedesk, помимо передачи картинки с основного монитора на сторонние дисплеи, предоставляет пользователю возможность ведения трансляции десктопа в браузерах, функционирующих на движке Chromium.
С программой можно также работать на аппарате, функционирующим на базе не только операционной системы Windows, но и Linux, чем могут похвастаться далеко не все утилиты. Данные между устройствами будут передаваться посредством проводов (USB, Ethernet) или при помощи радиоканала (роутера Wi-Fi).
Внимание! К сожалению, взаимодействовать с рабочим столом с помощью браузера Firefox не получится. В программу Spacedesk на данный момент не внедрен данный функционал.
Утилита имеет поддержку сенсорных экранов, что позволяет применять Spacedesk для вывода картинки на сторонний дисплей при показе презентации.
Серверная часть утилиты Spacedesk функционирует как виртуальная видеокарта. Она позволяет:
- получать быстрый доступ к ранее использованным устройствам (утилита запоминает настройки);
- изменять степень сжатия по своему усмотрению;
- изменять глубину передаваемого цвета, а также разрешение транслируемого с главного экрана изображения.
Также Spacedesk предоставляет пользователю необходимую для полноценной работы системную и диагностическую информацию.
Возможности клиентской части
Утилита Spacedesk Viewer применяется для просмотра трансляции на устройствах, работающих под управлением Windows, IOS, Android. В мобильных версиях приложения пользователь может удобно нажимать на нужные кнопки, запуская необходимы приложения.
В остальных аспектах версии Spacedesk для компьютеров и смартфонов практически полностью одинаковы. Можно также получать доступ к сохраненным устройствам.


Важно! Обилие настроек позволяет адаптировать использование приложения под индивидуальные нужды пользователя, учитывая внешние ограничения, например, низкую скорость интернета.
Как установить программу
Для начала, нужно скачать утилиту Spacedesk, перейдя на официальный сайт разработчика.

- Откроется окно установщика. Для продолжения процесса нужно кликнуть по кнопке «Next».
- Далее следует принять условия эксплуатации ПО, поставив соответствующую галочку и вновь кликнув по «Next».
- При необходимости можно поменять папку для распаковки файлов. Также лучше добавить утилиту в исключения защитника Windows, чтобы в будущем он не препятствовал ее работе.
Клиентскую версию требуется загрузить на дополнительное устройство. Ниже представлен перечень полезных ссылок для скачивания с официальных источников.
- Скачать Spacedesk с Microsoft Store.
- Скачать Spacedesk из Google Play.
- Скачать Spacedesk для устройств на базе ОС IOS.
Важно! Настоятельно не рекомендуется для скачивания утилиты пользоваться торрентами, поскольку есть большая вероятность вместе с с ней загрузить и массу вирусов.
Системные требования
Перед рассмотрением вопроса о том, как пользоваться приложением Spacedesk, полезно узнать, какими системными требованиями оно обладает. Согласно информации, размещенной на официальном сайте разработчика программы, та может работать на компьютерах, находящихся под управлением ОС Windows версий 8.1, 10 и 11.
Утилита совместима с видеокартами, произведенными компаниями Intel, Nvidia, AMD. Что касается видеодрайверов, то на компьютере должен быть непременно установлен DirectX (поддерживаются версии с 9 по 12).
Клиентская же часть Spacedesk может беспроблемно функционировать на таких платформах, как:
- Android Viewer, начиная с версии 4.1.
- Windows Viewer (версии ОС с 7 по 11), при этом имеется обязательное условие использования – поддержка видеокартой DirectX версии 10 и выше.
- IOS Viewer версии 9.3 и выше.
- HTML – т.е. браузеры Opera, Chrome, Safari, IE.
При этом для работы программы используется сетевой протокол TCP/IP.
Важно! При несоблюдении минимальных системных требований в большинстве случаев приложение все равно будет запускаться. Однако рассчитывать на его корректную работу не стоит. Возможны частные зависания картинки.
Теперь стоит разобраться с тем, как пользоваться Spacedesk на ПК и каким образом следует выполнять его подключение к смартфону или планшету. Для начала следует запустить приложения на всех устройствах, подключившись к единой локальной сети.
Для смартфонов и планшетов можно использовать Wi-Fi или USB кабели. Для взаимодействия с ноутбуками помимо Wi-Fi можно применять кабель Ethernet (через роутер).
Как подключиться к компьютеру или ноутбуку
Чтобы установить связь, необходимо выполнить запуск Windows Viewer на устройстве-клиенте, после чего также включить приложение Spacedesk Driver Control непосредственно на сервере. После этого следует дважды кликнуть левой кнопкой мыши по нужному устройству из перечня активных.
Подключение к планшету или смартфону
В случае, если подключение гаджета осуществлялось посредством USB кабеля, нужно перейти в раздел Communications Interfaces, открыть ветку функций под названием Android USB Cable Drive, после чего переключить рычажок так, как это показано на скриншоте ниже.
Связь с устройствами будет установлена сразу после подтверждения внесенных изменений.
Возможные проблемы
При возникновении черного экрана вместо Рабочего стола рекомендуется нажать комбинацию клавиш «Win+P», после чего нажать на «стрелочку вниз», кликнув после этого «Enter». Таким образом будет переключен способ проецирования изображения. Если не помогло, следует обновить приложение.
Если же Рабочий стол на смартфоне вдруг включается в вертикальном режиме, требуется убедиться в том, что функция автоматического поворота картинки запущена. Находится она, как правило, в функциональной шторке аппарата.
Как удалить Spacedesk
Чтобы удалить приложение Spacedesk с Android и IOS устройств, достаточно перейти в список установленного софта и отыскать соответствующую программу.
Для ее удаления с ПК на Windows нужно открыть «Приложения и возможности» (их можно найти через внутренний системный поисковик), кликнуть по программе, после чего нажать на кнопку «Удалить».
Программа Spacedesk является прекрасным выбором для пользователей, желающих увеличить визуальную рабочую область своего компьютера. Пользоваться ею несложно. Следуешь лишь четко следовать рекомендациям, размещенным в статье.
Видео по теме:
Человека окружает множество устройств, и иногда в процессе работы приходится переключать внимание с экрана одного гаджета на отображение другого. Когда работа связана с взаимодействием смартфона и компьютера, пользователю необходимо сосредоточиться только на одном устройстве. В такой ситуации на помощь приходит программа Spacedesk для операционной системы Windows 10, стирающая границы между ПК, телефонами, планшетами и другими устройствами.
Spacedesk – это простая утилита, которая объединяет несколько устройств для совместной работы. С помощью этого приложения вы можете использовать свой смартфон, планшет или телевизор на базе Android TV в качестве второго экрана. Эта функция чрезвычайно полезна при работе в сложных программах, таких как профессиональные аудиоредакторы, где представлено большое количество графики, не умещающейся на стандартном мониторе.
Spacedesk отличается от других подобных программ умеренным потреблением ресурсов. Связь между устройствами осуществляется через Wi-Fi, локальную сеть или USB. Однако при настройке проводного USB-соединения необходимо создать точку доступа. Программное обеспечение неприхотливо с точки зрения характеристик компьютера, но перед его настройкой важно проверить соответствие ПК следующим параметрам:
- операционная система: Windows 8.1 / 10;
- архитектура процессора: x64 или x86;
- rAM: 2 ГБ;
- необязательно: DirectX 11.
Заявленные требования актуальны для основной машины. На дополнительном устройстве должна быть установлена только одна из следующих версий операционной системы:
- Windows 7 и новее;
- Android 4.1 и выше;
- iOS 9.3 или новее.
Если вам необходимо подключить устройство на базе другой операционной системы в качестве второго экрана, вам необходимо получить обновленную версию интернет-браузера. Spacedesk поддерживает эти и последние версии: Google Chrome 16, Safari 5.1, Internet Explorer 10, Opera 27.
Где скачать и как установить
Перед использованием приложения необходимо подумать о загрузке дистрибутива. Программное обеспечение требуется для всех устройств, участвующих в подключении. Это серверный компьютер и гаджеты, на экранах которых будет отображаться информация с ПК под управлением Windows 10.
Для начала выясним, как скачать и установить программу на главный компьютер:
- Откройте официальный сайт разработчика в любом браузере.
- Нажмите кнопку «СКАЧАТЬ» (в текущей версии ресурса она отображается в левом нижнем углу главной страницы).
- Скачайте дистрибутив, соответствующий версии вашей операционной системы (32-бит или 64-бит).
- Запустите установщик в виде exe-файла и следуйте инструкциям, которые появятся в диалоговом окне.
В примечании. После установки Spacedesk автоматически запустится в фоновом режиме, и его значок появится на панели задач.
Для дополнительных устройств программное обеспечение необходимо загрузить через официальные магазины приложений. Например, Play Market используется для Android, а App Store – для iOS. Если второе устройство основано на другой операционной системе, вам нужно нажать кнопку «Перейти к HTML5», расположенную внизу страницы веб-сайта Spacedesk.
Настройка программы
Подготовительный этап работы с приложением так же важен, как и его настройка. Во-первых, вам необходимо скачать и установить соответствующее программное обеспечение (подробные инструкции приведены выше). После этого осталось выполнить несколько простых действий для серверного компьютера и клиентского устройства.
Компьютер-сервер
Прежде всего, подключите свой компьютер к Интернету. Если Spacedesk уже установлен, запустите программу, дважды щелкнув значок приложения на панели задач левой кнопкой мыши. Утилита откроется в небольшом окне, где будет отображен сетевой (IP) адрес. При этом следует помнить, так как в некоторых случаях потребуется вводить его вручную для подключения второго экрана.
Всего в программе две вкладки:
- Сетевые интерфейсы (локальные);
- Сетевое подключение (удаленное).
Первый предоставляет информацию об основном устройстве, включая его IP-адрес, а второй отображает список подключенных устройств. Поскольку мы еще не начали настраивать подключение, вкладка «Сетевое подключение» («Удаленное») будет пустой.
Для клиентских устройств
А теперь перейдем к настройке второго и третьего устройств (при необходимости). Им также необходимо загрузить программное обеспечение разработчика, представленное в виде приложения для Windows, iOS или Android. Главное, что нужно сделать на первом этапе, – это подключить клиентское устройство к той же сети Wi-Fi, что и серверный компьютер. Большинство проблем с установлением связи заключается в игнорировании этого совета. Если вы подключите дополнительное устройство к другой сети, ваш компьютер не сможет его обнаружить.
Подключение и настройка сетевого экрана
Наконец, пора перейти к самому интересному: настройке соединения. Рассмотрим общий пример подключения серверного компьютера к клиентскому устройству:
- Откройте приложение для клиентских устройств (обратите внимание, что оно отличается от программы, установленной на серверном компьютере).
- Убедитесь, что утилита правильно определила IP-адрес серверного ПК. На всякий случай откройте Spacedesk на главном компьютере, чтобы сопоставить данные.
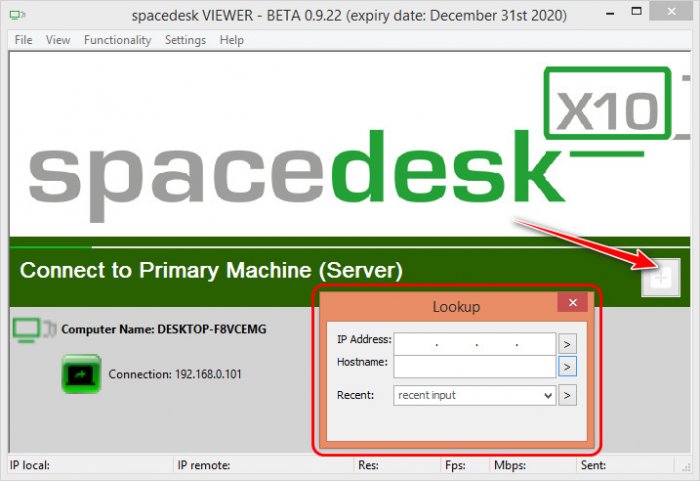
- Если адреса в утилитах двух устройств не совпадают, нажмите кнопку «плюс» на клиентском устройстве. Затем введите информацию, включая IP-адрес главного компьютера.
- Если данные введены правильно, вы увидите изображение с экрана компьютера-сервера в клиентском приложении. Чтобы отключить его, просто закройте утилиту.
В случае устройств на базе операционных систем, для которых нет соответствующего приложения, подключение осуществляется через браузер. После перехода с официального сайта Spacedesk на страницу входа вам будет предложено ввести IP-адрес основного компьютера. Далее вам нужно нажать на кнопку «Подключить» и в окне браузера появится экран.
также вы можете настроить работу дополнительных экранов на сервере. Для этого вам необходимо получить доступ к разделу «Настройки дисплея» утилиты или через «Настройки» Windows 10 по пути «Система / Дисплей». Здесь вам будет предложено выбрать расположение дисплеев, а также установить соответствующее разрешение.
Источник изображения: it-tehnik.ru
На чтение 4 мин Опубликовано Обновлено
Spacedesk — это программное обеспечение, которое позволяет использовать свой смартфон, планшет или другое устройство в качестве второго экрана для компьютера под управлением Windows 10. Это великолепное решение для тех, кто часто работает в двух окнах или хочет увеличить свою производительность.
В этой статье мы расскажем вам, как настроить Spacedesk на вашем компьютере с операционной системой Windows 10. Мы проведем вас через все шаги, начиная от установки программы до настройки параметров и подключения вашего устройства. Также мы поделимся советами и трюками, чтобы помочь вам максимально использовать все возможности Spacedesk.
Примечание: прежде чем начать настройку Spacedesk, убедитесь, что ваш компьютер и устройство, которое вы хотите использовать как второй экран, подключены к одной и той же Wi-Fi сети. Также убедитесь, что вы используете последнюю версию операционной системы Windows 10 и установите все обновления.
Теперь мы готовы начать! Продолжайте чтение, и вы узнаете, как настроить Spacedesk и использовать свое устройство в качестве второго экрана.
Содержание
- Установка Spacedesk на компьютер с ОС Windows 10
- Как настроить соединение между главным и вторичным компьютером?
- Как использовать Spacedesk в режиме расширенного рабочего стола?
Установка Spacedesk на компьютер с ОС Windows 10
Для установки Spacedesk на компьютер с ОС Windows 10 выполните следующие шаги:
- Перейдите на официальный сайт Spacedesk по адресу www.spacedesk.net
- На главной странице сайта найдите раздел «Downloads» и выберите версию Spacedesk для ОС Windows
- Скачайте установочный файл на ваш компьютер
- Откройте скачанный файл и следуйте инструкциям установщика
- После завершения установки перезагрузите компьютер
После установки Spacedesk на компьютер с ОС Windows 10 вы будете готовы использовать его как дополнительный монитор. Для настройки подключения и работы с Spacedesk рекомендуется установить соответствующее приложение на устройство, с которого вы хотите подключиться к компьютеру. Вы можете найти приложение Spacedesk в App Store или Google Play для мобильных устройств, а также загрузить его с официального сайта для компьютеров с ОС Windows или macOS.
Как настроить соединение между главным и вторичным компьютером?
Для настройки соединения между главным и вторичным компьютером при использовании Spacedesk в Windows 10, выполните следующие шаги:
- Установите и запустите Spacedesk на главном компьютере и вторичном компьютере. Скачать и установить приложение можно с официального сайта Spacedesk.
- На главном компьютере, в приложении Spacedesk, выберите опцию «Создание нового сетевого дисплея».
- Затем, введите IP-адрес вторичного компьютера и нажмите «Соединиться». IP-адрес вторичного компьютера можно найти, выполнив команду «ipconfig» в командной строке.
- На вторичном компьютере, в приложении Spacedesk, подтвердите соединение, выбрав опцию «Получить входящий запрос».
- После успешного соединения, вы сможете использовать вторичный компьютер в качестве дополнительного экрана для главного компьютера.
Обратите внимание, что для установки соединения необходимо, чтобы оба компьютера были подключены к одной сети или имели доступ друг к другу через интернет.
Как использовать Spacedesk в режиме расширенного рабочего стола?
Spacedesk обеспечивает возможность использования дополнительного дисплея в качестве расширенного рабочего пространства для вашего ПК или ноутбука. Чтобы использовать Spacedesk в режиме расширенного рабочего стола, следуйте этим шагам:
- Убедитесь, что ваш компьютер и дополнительное устройство (например, телефон или планшет) находятся в одной локальной сети.
- Установите и запустите Spacedesk на вашем компьютере. Вы можете загрузить и установить программу с официального сайта Spacedesk.
- На экране вашего компьютера вы увидите уникальный код, называемый «ID primary machine». Запомните или сохраните этот код.
- На дополнительном устройстве установите и запустите Spacedesk Viewer. Выберите опцию «Extend Primary» для расширения вашего рабочего пространства.
- Подключитесь к вашему компьютеру, введя «ID primary machine» в Spacedesk Viewer на дополнительном устройстве.
- После успешного подключения дополнительное устройство будет использоваться как второй экран в режиме расширенного рабочего стола.
Теперь вы можете перетаскивать окна и приложения с основного экрана на второй экран, расширяя свою рабочую область и увеличивая производительность и комфорт работы с компьютером.


