Зачем и как делать золотой образ Windows 10
Всё довольно очевидно, чтобы не настраивать одно и тоже и не ставить программы и обновления по сто раз, а сделать всё только один раз и потом разлить этот образ на n-ое количество компьютеров, сэкономив приличное количество времени.
Немногие знают про встроенный нативный инструмент для подготовки системы как раз для этой задачи — SYSPREP.
Что делает SYSPREP ?
1. SYSPREP рандомит все возможные айдишники компьютера внутри операционной системы, а именно:
- Хостнейм, SID, GUID, идентификаторы Active Directory
- Машина выводится из домена: это нужно для последующего успешного добавления в домен с новым именем
- Удаляются plug-and-play драйвера, что уменьшает риск возникновения проблем с совместимостью на новом «железе»
- Опционально удаляются Windows Event Logs (параметр ‘reseal’)
- Удаляются точки восстановления
- Удаляется профиль локального администратора и этот аккаунт отключается
- Обеспечивается загрузка целевой машины в режим аудита, позволяющий устанавливать дополнительные приложения и драйверы
- Обеспечивается запуск mini-setup (oobe) при первом запуске для смены имени машины и другой дополнительной конфигурации
- Сбрасывается период активации Windows (сброс возможен до 3 раз)
Таким образом, клонирование/развертывание без использования Sysprep может повлиять (читай «скорее всего, сломает») на функциональность Windows Update, Network Load Balancing, MSDTC, Vista и выше Key Manager Activation (KMS), который завязан на CMID (не путать с Machine SID), также изменяемый Sysprep’ом, и т.д. Подробнее в блоге Acronis на Хабре.
2. SYSPREP даёт выигрыш в скорости установки Windows по сравнению с обычной установкой, учитывая установку программ, обновлений и настройку параметров. Гораздо быстрей установить из образа за 5 минут, чем ждать 4 часа пока установится ОС и 2 часа будут качаться все обновления.
Создание золотого образа Windows 10. SYSPREP в действии
Общий порядок создания золотого образа
- Установили файлы установки ОС
- Запустили ОС в Audit Mode
- Поставили обновы, софт, настроили как нужно
- Запустили SYSPREP, поставили галку Подготовка к использованию
- Перезагрузили ПК и загрузились в программу для снятия образа диска
- Cняли образ
- Вы восхитительны, Золотой образ готов, можно разворачивать 🙂
Рекомендую перед началом, для максимальной производительности, убедиться, что в BIOS выставлены параметры загрузки UEFI (если доступно) и режим работы с SATA — ACHI ! Зачем можно прочитать в этой статье.
Подробный порядок создания золотого образа
1. Подготовка флешки с программой для снятия образа жесткого диска
Заранее нужно подготовить загрузочную флешку с программой для снятия образа HDD, я буду использовать Acronis True Image, а загрузочную флешку с ним делать с помощью Acronis Universal Boot Media Builder.

Acronis Universal Boot Media Builder
2. Подготовка флешки с Windows 10
Создаем установочную флешку с официальной Windows 10 с помощью MediaCreationTool21H1
3. Установка Windows 10 и переход в Audit Mode
Запускаем установку Windows на компьютере, на котором будем делать золотой образ
Когда Windows скопирует файлы установки и перезагрузится, смотрите, чтобы он снова не начал грузиться с флешки.
На экране выбора языка жмем Ctrl + Shift + F3, это стартанет Audit Mode, в котором мы и будем работать.
В Audit Mode мы работаем из под локальной учетной записи Администратор, которая будет заблокирована автоматически, когда мы закончим.
На входе нас встретит окошко SYSPREP:

Окошко SYSPREP
Закрываем его, мы вернемся к нему, когда закончим.
4. Настройка эталонного образа Windows 10
Можно начать кастомизировать систему как нам нужно, ставить обновления, софт и так далее.
Пример того, что я делаю для своего золотого образа, порядок важен
+ All In One Runtimes (содержит: NET Framework 4.8 + Updates, Java Runtime Environment 8, DirectX 9.0c Extra files, General runtime files, Microsoft Visual C++ Runtimes (v2005 – v2019), Microsoft Visual J# 2.0 SE, Microsoft Silverlight 5, Adobe Flash Player (Opera, FireFox, Internet Explorer), Shockwave Player 12 (Internet Explorer Plugin) + Microsoft XNA Framework Redistributable + OpenAL
+ Microsoft Office
+ VLC Player
+ Олдскульный Просмотрщик фотографий Windows (встроенный в 10 просмотрщик очень медленный)
+ Олдскульный Калькулятор
+ Driver Booster (автообновление драйверов)
+ UrBackup Client (для резервных копий)
+ ADATA Toolbox (у меня везде SSD одной модели, оптимизирует систему для максимальной производительности при работе с этими SSD)
+ Установка всех обновлений, для всех продуктов Microsoft, это надо включить в настройках
+ Образ очищен от хлама с помощью TRON -spr
+ С помощью WPD удален весь bloatware софт кроме Photos, Store, Sticky Notes, Camera, Voice Recorder
+ С помощью O&O ShutUp настроена конфиденциальность, телеметрия, безопасность в Windows 10
+ Стандартная очистка диска Windows после всех манипуляций
+ Установка размера файла подкачки 4-8 Гб
По итогу образ весит 9 Гб.

Остальные параметры и софт у меня разливаются с помощью групповых политик.
Перезагружаться можно со спокойной душой, система находится в Audit Mode и пока мы не скажем ей выйти из него, можно делать это сколько угодно раз.
5. Выход из Audit Mode и снятие образа готовой Windows 10
Когда мы закончили настраивать Windows и наша эталонная ОС готова, нам нужно вызвать окошко SYSPREP. Мы можем сделать это либо просто перезагрузившись, либо с помощью Win + R/CMD/PowerShell выполнить:
%windir%\system32\sysprep\sysprep.exe
Теперь нужно поставить чекбокс Подготовка к использованию, оставить остальное как есть и нажать ок
ВАЖНО ПОСЛЕ ЭТОГО НЕ ЗАГРУЗИТЬСЯ В WINDOWS, НАМ НУЖНО ЗАГРУЗИТЬСЯ В ПРОГРАММУ ДЛЯ СНЯТИЯ ОБРАЗА ЖЕСТКОГО ДИСКА !

Также тоже самое можно сделать в Win + R/CMD/PowerShell:
%windir%\system32\sysprep\sysprep.exe /generalize /oobe /rebootКлючи которые можно использовать с SYSPREP
/quiet: This tells Sysprep to run without status messages on the screen.
/generalize: This specifies that Sysprep is to remove all of the unique system information (SID) from the Windows installation, making the final image usable on multiple machines in your network, because each new one spun up from the image will get a new, unique SID.
/audit: This restarts the machine into a special audit mode, where you have the option of adding additional drivers into Windows before the final image gets taken.
/oobe: This tells the machine to launch the mini-setup wizard when Windows next boots.
/reboot: This restarts when Sysprep is finished.
/shutdown: This shuts down the system (not a restart) when Sysprep is finished. This is an important one and is one that I typically use.
/quit: This closes Sysprep after it finishes.
/unattend: There is a special answerfile that you can create that, when specified, will be used in conjunction with the Sysprep process to further configure your new servers as they come online. For example, you can specify in this answerfile that a particular installer or batch file is to be launched upon first Windows boot following Sysprep. This can be useful for any kind of cleanup tasks that you might want to perform, for example, if you had a batch file on your system that you used to flush out the log files following the first boot of new servers.
Рекомендую при использовании Acronis True Image
- Снять образ два раза, один FULL и другой разбитый по частям в 3 Гб, это пригодится если нужно будет скопировать образ на накопитель с файловой системой FAT32
- Выставить метод инкрементного копирования — Полное
- Уровень сжатия — Максимальный
- Проверить архив после его создания
Подводные камни SYSPREP
Важные вещи, об которые можно споткнуться:
- НЕЛЬЗЯ КЛОНИРОВАТЬ МАШИНУ КОТОРАЯ УЖЕ В ДОМЕНЕ !
- Когда запускается установка готового образа Windows нужно отключить интернет, иначе можно уйти в бесконечную перезагрузку
Если Вам было полезно или есть вопросы, оставляйте комментарии, всем удачи 
Причина, побудившая написать статью, крайне проста – потребовалось развернуть две операционные системы Windows 10 на новые рабочие станции. Чтобы не проделывать дважды одни и те же задачи по установке базового софта и обновлений, было решено создать “золотой” образ Windows. Собственно, о процессе его создания пойдет дальнейший разговор.
Для подготовки «золотого» образа Windows 10 потребуется следующее:
- Windows 10 c ролью Hyper-V и установленным Windows ADK;
- ISO образ Windows 10;
- Интернет.
Наличие Windows 10 c ролью Hyper-V является не обязательным, но очень рекомендованным условием. Во-первых, локальный гипервизор ускоряет процесс подготовки образа. Во-вторых, отпадает надобность создания и использования образа WinPE для последующего захвата ОС. В варианте виртуализации, достаточно будет лишь выключить виртуальную машину и примонтировать ее виртуальный диск. После чего произвести захват и получить установочный WIM архив.
В качестве ISO образа может быть любой образ Windows 10. Желательно использовать оригинальные образа ввиду очевидных на то причин.
Кратко опишу дальнейший порядок действий:
- Подготовка рабочей станции;
- Установка и подготовка образа ОС Windows 10;
- Захват образа и последующая его дистрибуция.
Подготовка
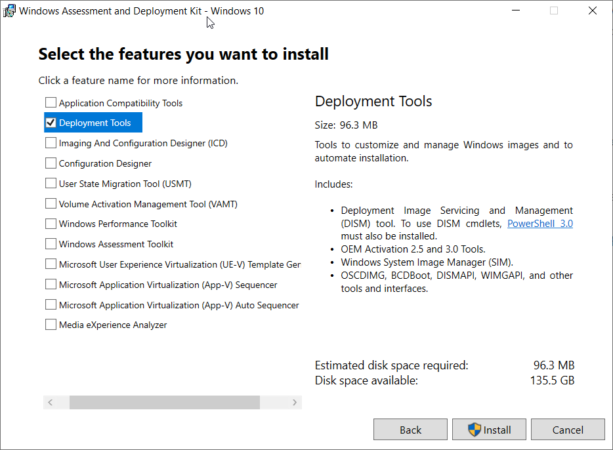
Устанавливаем Windows ADK на хостовую Windows 10 с ролью Hyper-V. Это бесплатный инструмент доступный по следующей ссылке – Windows ADK 1903.
Из всего перечня компонентов будет достаточно установить Developers Tools, как показано на скриншоте:
Далее, создаем виртуальную машину Hyper-V с минимальными параметрами для работы Windows 10. Например:
- 2 CPU
- 4 GB RAM
- 40 GB HDD
Будет это первая или вторая генерация виртуальной машины не имеет никакого значения.
Производим установку ОС по умолчанию и на этапе отработки мастера OOBE нажимаем сочетание клавиш Ctrl+Shift+F3. Сразу после нажатия комбинации произойдет перезагрузка ОС и будет выполнен автоматический вход в систему.

Этот режим называется режимом аудита. В нем вы можете настроить компьютер, добавить приложения, драйвера устройств и т.д. При загрузке в режиме аудита, для входа в систему, используется встроенная учетная запись администратора. Windows автоматически удаляет эту учетную запись на этапе настройки generalize. Система, по умолчанию, будет постоянно загружаться в режиме аудита пока не будет запущен sysprep.
В моем случае были установлены последние обновления, драйвера смарт-карт и базовый набор софта. Как только система готова выполняем sysprep. Это действие подготовит операционную систему к последующему захвату и развертыванию на новом оборудовании.
Выставляем параметры как показано на скриншоте и дожидаемся выключения ОС.
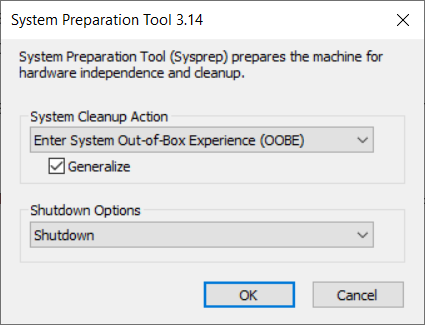
На этом подготовка образа завершена.
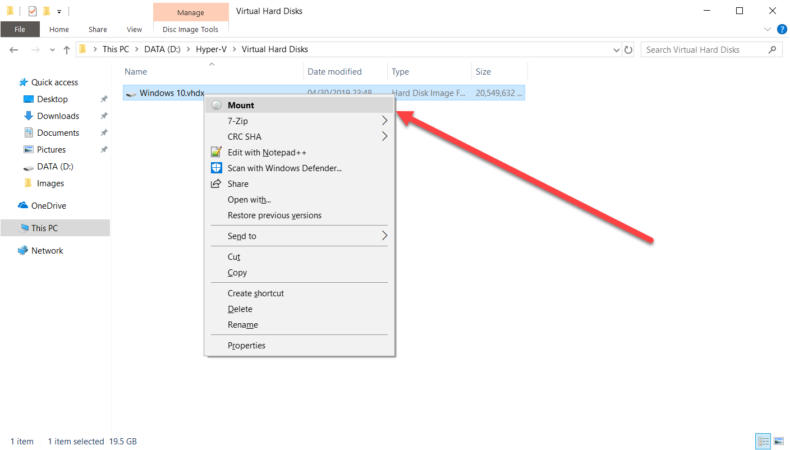
Переходим в каталог, где находится виртуальный диск с ОС и производим его монтирование.
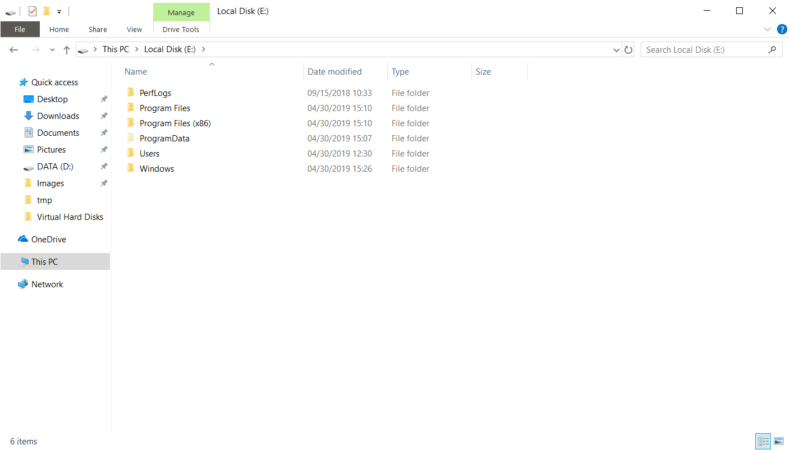
В проводнике должен автоматически появится новый диск с нашей операционной системой:
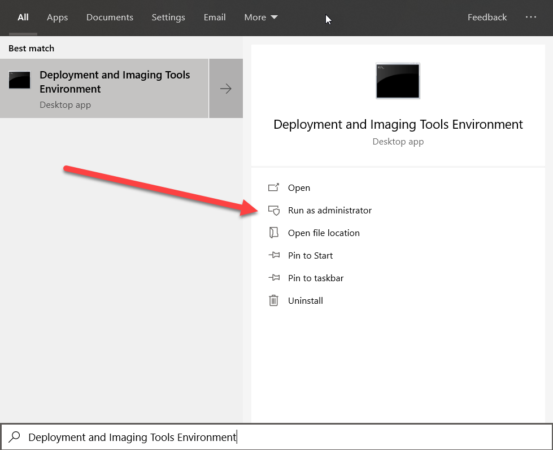
Далее, запускаем Deployment and Imaging Tools Environment от имени администратора:
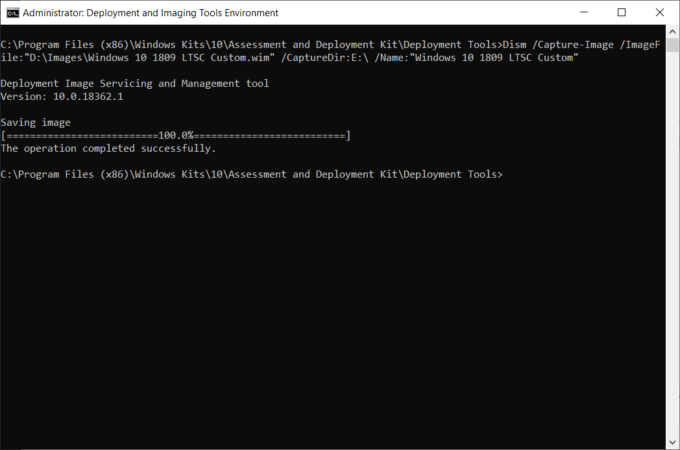
Для захвата образа будет использоваться утилита Dism с такими параметрами:
|
Dism /Capture—Image /ImageFile:«D:\Images\Windows 10 1809 LTSC Custom.wim» /CaptureDir:E:\ /Name:«Windows 10 1809 LTSC Custom» |
Их значения следующие:
D:\Images\Windows 10 1809 LTSC Custom.wim – путь куда будет сохранен WIM образ;
E:\ – буква диска с которой был примонтирован VHDX диск с подготовленной ОС;
/Name:”Windows 10 1809 LTSC Custom” – имя образа, которое будет записано в метаданные WIM образа.
Результат выполнения:
Теперь осталось лишь выбрать способ установки и развернуть подготовленный образ на целевые системы. В число вариантов входит использование флеш-накопителя или служб Windows Deployment Services (WDS). С последними сложностей не должно возникнуть.
Если же установка происходит с флеш-накопителя. Ниже самый быстрый способ его подготовки:
- Развертываем на флеш-накопитель оригинальный ISO образ Windows 10 с помощью Rufus;
- Переименовываем созданный ранее WIM файл в install.wim;
- Копируем с заменой подготовленный WIM файл в директорию sources флеш-накопителя.
На этом процесс создания “золотого” образа Windows можно считать завершенным. Если у вас возникли какие-либо вопросы, пожалуйста, пишите в комментарии.
Создание шаблона виртуального рабочего места
Для создания “золотого” образа необходимо создать виртуальную машину, как описано в разделе Создание виртуальной машины. В данном руководстве рассматривается процесс создания “золотого” образа на базе виртуальной машины под управлением операционной системы Microsoft Windows 10.
Настройки виртуального оборудования
Клоны используют конфигурацию золотого образа, поэтому при создании эталонной машины эти требования должны быть учтены. При создании виртуальной машины рекомендуется руководствоваться следующими рекомендациями:
-
Использовать тип разметки виртуального диска “Thin Provisioning”. При использовании vSAN данная опция задаётся в политике хранения.

-
Использовать контроллер шины типа “SCSI”.
-
Использовать сетевой контроллер типа “VMXNET3”
-
После установки операционной системы отключить загрузочный образ от виртуальной машины, установив режим “Client Device”.


Настройки операционной системы
В данном разделе приведены рекомендации по настройке операционной системы Windows 10 для использования в качестве “золотого” образа виртуальных рабочих столов.
-
Выбрать план управления питанием “Высокая производительность.
-
Отключить спящий режим и отключение экрана при неактивности ОС.


Для автоматизации процесса подготовки виртуальной машины к клонированию рекомендуется использование утилиты производителя “Windows OS Optimization Tool for VMware Horizon”, доступной для скачивания в сети интернет. Полное руководство по использованию утилиты а также ссылка на дистрибутив расположены на веб странице по адресу: https://techzone.vmware.com/resource/windows-os-optimization-tool-vmware-horizon-guide#windows-os-optimization-tool-for-vmware-horizon
Установка агента «VMware Horizon Agent»
Получение дистрибутива агента
Для загрузки дистрибутива необходимо подключиться к сайту VMware Customer Connect, по адресу https://my.vmware.com/group/vmware/home (требуется аутентификация).

Перейти в раздел “Products and Accounts > All products”, выбрать в списке продуктов “VMware Horizon” и нажать ссылку “Download Product”

В зависимости от используемой редакции в списке продуктов выбрать соответствующий пункт и нажать ссылку “Go to downloads” напротив строки “VMware Horizon …”

Нажать кнопку “Download Now” в строке “Horizon Agent”.

Установка дистрибутива
Для запуска установки запустить установочный дистрибутив агента на виртуальной машине “золотого” образа.

Окно приветствия установщика представлено на рисунке.

Ознакомьтесь с лицензионным соглашением. Для продолжения выберите значение “I accept …”

В зависимости от используемой версии протокола IP выберите требуемое значение версии используемой для подключения к агенту. Без дополнительных указаний рекомендуется оставить значение поумолчанию.

Выберите состав функций агента которые необходимо установить.
Основные функции и их описания приведены в списке ниже:
-
“Core” — базовый функционал.
-
“USB redirection” — функционал “проброса” USB устройств внутрь виртуального рабочего стола.
-
“VMware Virtualization Pack for Skype for Business” — оптимизация виртуального рабочего стола для более удобного использования Skype For Bussines.
-
“Real-Time Audio Video” — функционал подключение мультимедийных устройств пользователей, таких как наушники, микрофон и камера, к виртуальному рабочему столу.
-
“VMware Horizon Instant CLone” — функционал создания мгновенных клонов, поддерживается только в версиях гипервизора 6.0 от 2015 года и младше.
-
“Client drive redirection” — функционал передачи файлов между рабочим местом пользователя и виртуальным рабочим столом, необходимо для синхронизации буфера обмена, копирования файлов между виртуальным рабочим столом и машиной пользователя.
-
“Scanner redirection” — функционал подключения сканера пользователя к виртуальному рабочему столу.
-
“VMware Integrated printing” — функционал печати на локальные принтеры пользователя из виртуального рабочего стола.

Следуйте интерфейсу и завершите установку. Процесс установки представлен на рисунке ниже.

По завершению необходимо перезагрузить виртуальную машину. Ответьте “Yes” для немедленной перезагрузки.

Установка ПО виртуального стола
Установите все необходимые обновления операционной системы.

Обновите базы антивируса.

Установите требуемое программное обеспечение через подключение к удалённому рабочему столу. При использовании технологии мгновенных клонов всё установленное ПО будет доступно пользователям машины. Для добавления новых программ необходимо модернизировать “золотой” образ.
После завершения настройки золотого образа переходите к процедуре подготовки образа к клонированию.
Summary:
It is time to create and optimize the golden image that we will use to deploy all our desktops. The primary purpose of this golden image is to run a basic test with the Login VSI benchmark tool, so I will optimize a Windows 10 VM to get the best performance (low latency) and user experience (low applications response times). Only some basic applications and MS office 2016 will be installed. Nevertheless, it could be used as an essential guide for any deployments with Horizon View.
Note for Login VSI testers: To date, I can guarantee that if you follow all the steps in this guide (part), you’ll have no issues when testing any worker with Login VSI 4.1.
Note: This is a massive post (the most extensive post of this series), I want to keep my step-by-step format as much as I can, even though many images are not necessary for an average (IT) user.
Note: This guide will also work with vSphere 6.7, some configurations aren’t needed.
— Advertisement —
This is part 11 out of 12 of the VDI LAB series. Check out the introduction first.
The ultimate VDI deployment guide (from scratch) with VMware vSphere 6.5 and Horizon View 7.3 – 2018. 😉
1. Prerequisites
- Windows Server 2016. Domain Controller server previously created in Part 5 of this series
- Download Windows 10 64-bits and MS office 2016 ISO file and upload it to an accessible datastore.
- Create/upload an ISO with all the programs you will install or, make sure you can obtain them after connecting the VM to the internet.
2. VM configuration
First off is to create and configure this new VM to be used as a template.
@vSphere Client
Note: This is the vSphere Client set in part 7 of this series, due to our desktop infrastructure will be deployed here. If you are interested in only the tune-up of the golden image and you are not following the whole VDI-LAB series, don’t mind this, any ESXi host will do.
— Advertisement —
- Right-click on your host and select New Virtual Machine
- Select: Create a New virtual machine.

- Name your VM. A recommendation is to use an easy VM pattern.

- Select your host (or cluster).

- Select your datastore.

- Leave by default or select ESXi 6.5 and later.

- Select Windows as OS family and Microsoft Windows 10 (64-bit) as the OS version.

- From Virtual Hardware, change:
- CPU to 2
- Memory to 4096 MB
- Check Reserve all guest memory (All locked).
- Note: This is recommended to avoid performance issues in large environments, but this depends on the available resources and isn’t a must for a lab.
- New Hard disk to 50 GB
- Make sure you have the network available and is connected.

- Still on Virtual Hardware…
- Expand the network and change the Adapter Type to VMXNET 3
- Select Datastore ISO File under New CD/DVD Drive, then select your Windows 10 image and make sure that Connect At Power On is checked.
- Remove Floppy Drive

- Still on Virtual Hardware…
- Go to Video card, and change Number of displays to 4 and Total video memory to 64 MB.
- Note: Total video memory is usually configured up to 128 MB, but for my scenario, I do think is not necessary. Also, Number of displays can be set to only 2.
- Do not check Enable 3D Support unless you have Graphics Card support on your ESXi hosts.

- Move to VM Options tab
- From Boot Option, check Force BIOS setup — The next time the virtual machine boots…

- Still on VM Options…
- Go to Advance, and from Settings uncheck Enable logging
- Then go to Edit Configuration…

Note: Steps 13 to 16 are not needed on vSphere 6.7.
- On the new window, Configuration Parameters, add a new parameter:
- Name: devices.hotplug
- Value: false
- Click Add, OK and then Next.

- Finally, review your configuration and click Finish.

- Now power on the VM and open the VM remote console. Wait to get to the BIOS and from the Advanced tab, go to I/O Device Configuration and disable the Floppy drive, also the Serial, Parallel, and Floppy Controllers.

- Now to Exit tab and click Exit Saving Changes (or hit F10 ) to save the settings and reboot.

3. OS installation
After the VM is rebooted, you will reach the first screen of the Windows installer.
- Press Shift-F10 to open a command prompt to create a partition for reserved space compatible with VDI.

- Type and hit Enter in the following order:
- diskpart
- Select Disk 0
- Create Partition Primary
- Exit
- Exit

- You will be returned to the previous screen of windows installer, leave everything by default, we can change this later.

- Click on Install now.

- Select Windows 10 pro, or the available version according to your region/image and click Next.

- Check to accept license terms and Next.

- Select Custom: Install Windows only.

- Select the available partition and Next.

- Wait few minutes for the Windows installation files.

- Wait for windows to start.

- Select your region and click Yes.

- Select a keyboard layout and click Yes.

- Skip adding a second keyboard layout.

- Skip Connect to a network.

- This is an important step, let’s create a “user” to use for the initial configuration, later this user will be deleted. I created an user named “user” (Original…)

- Create and confirm a password and add a hint.


- Turn off all “privacy setting for your device.”

- Wait to windows gets ready.

- Finally, we will get to the Windows 10 desktop.

4. OS customization
It is time to do all necessary tweaks and tunings to boost the performance of this precious golden image.
4.1 Install VMware tools.
- Mount the ISO from VMware Web Client.

- Double-click Drive DVD (D:) VMware Tools

- Follow the installation wizard, select Typical setup, click install and finish, then reboot the OS.

4.2 Enable the Administrator account
- Log in to the desktop using the created “user” and password.
- Enable a local administrator account. Right-click on the start button and go to Computer Management.
- Go to: Local User and Groups / User, Right-click on Administrator / Properties.

- Uncheck Account is disabled. Make sure Password never expires is checked. Click OK. (No password need to be set)

- Sign out the desktop and sign on using the administrator account.

4.3 Delete the “user” profile and account
- Go to: Control Panel — System and Security — System
- Then go to Advanced system settings / Advanced, from User Profiles, select Settings… Select “user” profile — Delete — OK

- Right Click on Start / Computer Management / Local Users and Groups / Users
- Right Click on “user” and choose Delete
- Click OK to the warning messages.

4.4 Change computer name
- Go to Control Panel / System and Security / System
- Then go to Remote settings / Computer Name / Change / Input new computer name (keep it simple) / OK.
- Restart the computer. We will add the machine to the domain later.

- Also, change/adjust date and right (proper) time zone.
4.5 Install .NET Framework 3.5
- Go to: Control Panel – Programs – Programs and Features – Turn Windows Features on or off
- Check .NET Framework 3.5 and click OK
- Download and install the files

4.6 Run Windows update, install all the latest patches
- Click on the Start button – Settings – Update & Security – Check for Updates.
- Install all available Windows updates.
- Reboot the VM and repeat this process until all Windows updates have been installed.
4.7 Run cleanup manager:
- Click Start, and then click Run.
- Type cleanmgr to open Disk Cleanup for (C:)

- Check all items you want to delete
- Click OK

4.8 Set Power Options to high
- GO to: Control Panel – Hardware and Sound – Power Options.
- Click Show Additional Power Plans, Choose High Performance, and Click Create a Power Plan.

- Choose “High Performance,” for a plan name type “VDI” or whatever name you want. Click Next.

- Select Never to: Turn off the display and Put the computer to sleep. Click Create.

4.9 Install and run VMware OS Optimization tool.
- Install and run the VMware OS Optimization tool. As mentioned before, I am optimizing for Login VSI test with Windows 10, so I am using a template provided by them.
- Download VMware OS optimization tool: https://labs.vmware.com/flings/vmware-os-optimization-tool
- Get the template by Login VSI. This is optional. There are pre-configured templates provided by VMware that could be used.
- Run VMware OSOT and open the My Templates tab
- Click Import Template at the right bottom of the window
- Browse to the VDILIKEAPRO / Login VSI tuning template xml file
- Open the Analyze tab and select the My Templates\Windows 10 — Login VSI — VDILIKEAPRO template
- Click analyze to compare your system to the tuning template
- Apply tuning where needed
4.10 Improve login time for floating desktops on Horizon View
- Click on the Start button – type Run.
- Type regedit
- Delete a registry key named StubPath from these directories:
HKLM\SOFTWARE\Microsoft\Active Setup\Installed Components\{2C7339CF-2B09-4501-B3F3-F3508C9228ED}
HKLM\SOFTWARE\Microsoft\Active Setup\Installed Components\{2D46B6DC-2207-486B-B523-A557E6D54B47}
HKLM\SOFTWARE\Microsoft\Active Setup\Installed Components\{44BBA840-CC51-11CF-AAFA-00AA00B6015C}
HKLM\SOFTWARE\Microsoft\Active Setup\Installed Components\{6BF52A52-394A-11d3-B153-00C04F79FAA6}
HKLM\SOFTWARE\Microsoft\Active Setup\Installed Components\{89820200-ECBD-11cf-8B85-00AA005B4340}
HKLM\SOFTWARE\Microsoft\Active Setup\Installed Components\{89820200-ECBD-11cf-8B85-00AA005B4383}
HKLM\SOFTWARE\Microsoft\Active Setup\Installed Components\{89B4C1CD-B018-4511-B0A1-5476DBF70820}
HKLM\SOFTWARE\Microsoft\Active Setup\Installed Components\{22d6f312-b0f6-11d0-94ab-0080c74c7e95}
- In my case, just 4 out of these 8 keys are present, just delete the ones you have

4.11 Join the machine to the domain.
- Follow the same steps as number 7 but now join the machine a domain and restart the VM
Note: This could be done in the corresponding previous step, I consider is better to wait to avoid some permissions issues (Depends on your domain configuration).

4.12 Configure PageFile.
- This varies depending on your configuration and purpose. Visit these links for more information:
- http://myvirtualcloud.net/vdi-windows-pagefile-done-right/
- https://www.simonlong.co.uk/blog/2012/01/25/vdi-paging-files-big-small-or-non-at-all/
- Go to: Control Panel / System and Security / System
- Then go to Advanced system settings / Advanced, and from Performance, select Settings…

- Go to Advanced Tab / Change… Uncheck the first option and check «Custom size«
- Initial size (MB): 2048
- Maximum size (MB): 4096
- Click Set and then OK until all windows are closed.
- Restart the VM

5. Install MS office 2016 and essential apps
5.1 Install Horizon View 7 agent.
- Mount ISO files or download latest version of Horizon View. The version I am using for this series is 7.3.2.
- From the installation wizard, I am leaving as default everything.
- Reboot the VM after installation.

5.2 Install MS office 2016
- Mount MS office 2016 ISO.
- Download office deployment tool for MS office 2016 from this link: https://www.microsoft.com/en-us/download/details.aspx?id=49117

- Open the installer and accept the Microsoft license to continue. Install the files on your desktop.
- Three files will be created: Configuration, EULA, and setup.
- Change the name of the folder to a shorter/easy one, like only “office” and copy this folder to the desktop.
- Right click on Configuration / Open with / Notepad
Note: Depends on what you want to install this must be changed, I will keep a basic configuration without all necessary MS office application that I won’t need for testing.
- For this test, I want to install Office 32-bits with Word, Excel, Powerpoint, and Outlook. Make sure the right source path is selected.
- Replace/Edit the configuration file as following and save it:
<Configuration>
<Add SourcePath=»D:\» OfficeClientEdition=»32″ >
<Product ID=»ProPlusRetail»>
<Language ID=»en-us» />
<ExcludeApp ID=»OneDrive» />
<ExcludeApp ID=»OneNote» />
<ExcludeApp ID=»Groove» />
<ExcludeApp ID=»Lync» />
<ExcludeApp ID=»Access» />
<ExcludeApp ID=»Publisher» />
</Product>
</Add>
<Display Level=»None» AcceptEULA=»TRUE» />
<Property Name=»AUTOACTIVATE» Value=»1″ />
<Updates Enabled=»TRUE» Channel=»Monthly» />
</Configuration>
- Open command prompt as administrator.
- Run:
- cd desktop/office
- setup /configure configuration.xml
- MS Office will start the installation.

- Wait until the installation is completed.

- Click Close to finish the installation.

5.3 Tune up the MS office 2016 installation
Important: To avoid “First-thing-first” and other unwanted messages after cloning this image, copy the following Reg paths in notepad, save it as .bat and the run it.
- Notice that this is configured for Office 2016 32-bits.
- For office 2013 or 365. Use the number 15 instead of 16.
- For office 64-bits versions, delete the “Wow6432Node” path.
reg add «HKLM\SOFTWARE\Wow6432Node\Microsoft\Office\16.0\Registration» /v AcceptAllEulas /t REG_DWORD /d 1 /f >nul
reg add «HKLM\SOFTWARE\Wow6432Node\Microsoft\Office\16.0\User Settings\MyCustomUserSettings» /v Count /t REG_DWORD /d 1 /f >nul
reg add «HKLM\SOFTWARE\Wow6432Node\Microsoft\Office\16.0\User Settings\MyCustomUserSettings\Create\Software\Microsoft\Office\16.0\FirstRun» /v BootedRTM /t REG_DWORD /d 1 /f >nul
reg add «HKLM\SOFTWARE\Wow6432Node\Microsoft\Office\16.0\User Settings\MyCustomUserSettings\Create\Software\Microsoft\Office\16.0\FirstRun» /v disablemovie /t REG_DWORD /d 1 /f >nul
reg add «HKLM\SOFTWARE\Wow6432Node\Microsoft\Office\16.0\User Settings\MyCustomUserSettings\Create\Software\Microsoft\Office\16.0\Registration» /v AcceptAllEulas /t REG_DWORD /d 1 /f >nul
reg add «HKLM\SOFTWARE\Wow6432Node\Microsoft\Office\16.0\User Settings\MyCustomUserSettings\Create\Software\Microsoft\Office\16.0\Common\General» /v shownfirstrunoptin /t REG_DWORD /d 1 /f >nul
reg add «HKLM\SOFTWARE\Wow6432Node\Microsoft\Office\16.0\User Settings\MyCustomUserSettings\Create\Software\Microsoft\Office\16.0\Common\General» /v ShownFileFmtPrompt /t REG_DWORD /d 1 /f >nul
reg add «HKLM\SOFTWARE\Wow6432Node\Microsoft\Office\16.0\User Settings\MyCustomUserSettings\Create\Software\Microsoft\Office\16.0\Common\PTWatson» /v PTWOptIn /t REG_DWORD /d 1 /f >nul
reg add «HKLM\SOFTWARE\Wow6432Node\Microsoft\Office\16.0\User Settings\MyCustomUserSettings\Create\Software\Microsoft\Office\16.0\Common» /v qmenable /t REG_DWORD /d 1 /f >nul
- Test office and check that no welcome message is present at start it.
- After setting above paths, there is no reason to set group policies for this, but for domain joined machines, is better to use it as well, so we can avoid any issue after cloning.
- Download, Install and configure Office 2016 Administrative Template files.

- Open the installer and accept Microsoft license to continue. Install the files on your desktop.
- Go to: C: / Windows / PolicyDefinition
- Two folders and one Excel file will be created: the “admx” folder is the one we need.
- Copy all the files (not folders) from this folder to the PolicyDefinition folder
- Also, copy all the files (not folders) from en-us (or current system language) folder and copy them to the PolicyDefinition\en-US folder

- Click Start, and then click Run, type gpedit.msc, and then click OK.
- @Local Group Policy Editor: User Configuration / Administrative Templates / Microsoft Office 2106 / First Run and enable “Disable First Run Movie”

Note: Go back to step 4 of this section and do the same configuration in your domain controller!
— Advertisement —
5.4 Install additional programs
For Login VSI test purpose, I will install their required apps. You could use these, add or ignore as needed:
- Doro PDF
- Adobe Reader XI
- Adobe Flash
- Java
5.5 Set Adobe PDF as a default app
Note: Windows 10, uses MS Edge as default PDF viewer, we need to force to use Adobe Reader XI. I tried Adobe Reader DC, but it will create some extra initial messages that are difficult to handle when testing with Login VSI, so I decided to move back to Adobe Reader XI
- First off, set the current files as a default from windows setting.
- Go to: Windows Settings / Apps / Default apps / Set defaults by app.

- Go to: Windows Settings / Apps / Default apps / Set defaults by app.
- Click Adobe Reader XI and then click Manage.
- Find and click on the .pdf association file and select Adobe Reader.

- Choose: Switch anyway
- Change all the desired file association. It would look like the image below.

- Now, open the command prompt as administrator. Make sure your system is updated, or you might have issues with these commands.
- Run:
- Dism.exe /online /export-defaultappassociations:C:\CustomFileAssoc.xml
- Dism.exe /online /import-defaultappassociations:C:\CustomFileAssoc.xml

- Go to: C: / Windows / System32 and search for OEMDefaultAssociations
- Right-click and select to open with Notepad
- From a fresh windows installation, it will look something like this:

<?xml version=»1.0″ encoding=»UTF-8″?>
<DefaultAssociations>
<Association Identifier=».acrobatsecuritysettings» ProgId=»Applications\AcroRd32.exe» ApplicationName=»Adobe Reader» />
<Association Identifier=».epub» ProgId=»AppXvepbp3z66accmsd0x877zbbxjctkpr6t» ApplicationName=»Microsoft Edge» />
<Association Identifier=».htm» ProgId=»htmlfile» ApplicationName=»Internet Explorer» />
<Association Identifier=».html» ProgId=»htmlfile» ApplicationName=»Internet Explorer» />
<Association Identifier=».pdf» ProgId=»AcroExch.Document.11″ ApplicationName=»Adobe Reader» />
<Association Identifier=».pdfxml» ProgId=»Applications\AcroRd32.exe» ApplicationName=»Adobe Reader» />
<Association Identifier=».tif» ProgId=»PhotoViewer.FileAssoc.Tiff» ApplicationName=»Windows Photo Viewer» />
<Association Identifier=».tiff» ProgId=»PhotoViewer.FileAssoc.Tiff» ApplicationName=»Windows Photo Viewer» />
<Association Identifier=».txt» ProgId=»txtfile» ApplicationName=»Notepad» />
<Association Identifier=».url» ProgId=»IE.AssocFile.URL» ApplicationName=»Internet Browser» />
<Association Identifier=».website» ProgId=»IE.AssocFile.WEBSITE» ApplicationName=»Internet Explorer» />
<Association Identifier=»bingmaps» ProgId=»AppXp9gkwccvk6fa6yyfq3tmsk8ws2nprk1p» ApplicationName=»Maps» />
<Association Identifier=»http» ProgId=»IE.HTTP» ApplicationName=»Internet Explorer» />
<Association Identifier=»https» ProgId=»IE.HTTPS» ApplicationName=»Internet Explorer» />
<Association Identifier=»mailto» ProgId=»Outlook.URL.mailto.15″ ApplicationName=»Outlook 2016″ />
</DefaultAssociations>
- Reboot the VM and make sure that there is not “An app default was reset” message like the image below:

- If you follow previous steps in the proper order, you still may have the PDF issue.
- Now, to ignore Windows Security Service notification, go to Windows Settings / System / Notifications & actions
- Turn off all notification.

6. Final tweaks
6.1 Run VDI clean-up script
- Run a VDI clean-up script after all updates and configurations.
Note: Credits to https://www.plonius.com/single-post/2017/07/20/VDI-cleanup-script—the-decisive-factor
- Copy this into a Notepad and save it as .bat and run it. This will take about 10 minutes.
REM *********************
REM Force .net Runtime Optimization Service
REM *********************
%windir%\microsoft.net\framework64\v4.0.30319\ngen.exe update /force
REM *********************
REM Delete update tasks Google
REM *********************
SchTasks /Delete /TN «GoogleUpdateTaskMachineCore» /F
SchTasks /Delete /TN «GoogleUpdateTaskMachineUA» /F
REM *********************
REM Stop and disable Windows update service
sc stop wuauserv
sc config wuauserv start= disabled
REM *********************
REM Stop and disable Google update service
REM *********************
sc stop gupdate
sc config gupdate start= disabled
sc stop gupdatem
sc config gupdatem start= disabled
REM *********************
REM Stop and disable Windows Telemetry service
REM *********************
sc stop DiagTrack
sc config DiagTrack start= disabled
sc stop dmwappushservice
sc config dmwappushservice start= disabled
REM *********************
REM Delete any existing shadow copies
REM *********************
vssadmin delete shadows /All /Quiet
REM *********************
REM delete files in c:\Windows\SoftwareDistribution\Download\
REM *********************
del c:\Windows\SoftwareDistribution\Download\*.* /f /s /q
REM *********************
REM delete hidden install files
REM *********************
del %windir%\$NT* /f /s /q /a:h
REM *********************
REM delete prefetch files
REM *********************
del c:\Windows\Prefetch\*.* /f /s /q
REM *********************
REM Run Disk Cleanup to remove temp files, empty recycle bin
REM and remove other unneeded files
REM Note: Makes sure to run c:\windows\system32\cleanmgr /sageset:1 command
REM on your initially created parent image and check all the boxes
REM of items you want to delete
REM *********************
c:\windows\system32\cleanmgr /sagerun:1
REM ********************
REM Defragment the VM disk
REM ********************
sc config defragsvc start= auto
net start defragsvc
defrag c: /U /V
net stop defragsvc
sc config defragsvc start = disabled
REM *********************
REM Clear all event logs
REM *********************
wevtutil el 1>cleaneventlog.txt
for /f %%x in (cleaneventlog.txt) do wevtutil cl %%x
del cleaneventlog.txt
REM *********************
REM release IP address
REM *********************
ipconfig /release
REM *********************
REM Flush DNS
REM *********************
ipconfig /flushdns
REM *********************
REM Shutdown VM
REM *********************
shutdown /s /f /t 0
- The VM will shut down after this (as you can see in the last lines)
- Run this .bat every time the Windows is updated.
6.2 Remove «vmware-viewcomposer-ga» entry
- For Windows 10 Build 1709, creating a desktop pool will get stuck in customizing state. At the moment of writing this post, this hasn’t been solved by Horizon/Window. To solve this, follow the steps below.
- Removed the entry “vmware-viewcomposer-ga” from the value: DependOnService:
- HKEY_LOCAL_MACHINE\SYSTEM\CurrentControlSet\Services\BFE
- Deleted Subkey Security:
- HKEY_LOCAL_MACHINE\SYSTEM\CurrentControlSet\Services\BFE\Security

- After deleting it, should look like the image below.

6.3 Take the snapshot
Note: I want to create linked-clone VMs, if full clones are desired, convert this machine to a template instead of taking the snapshot.
- Make sure the machine is on the domain with a dynamic IP address.
- Make sure you don’t have any ISO file attached to the VM. Change CD/DVD to Client Device or disconnect/remove the device.
- Powered off the VM.
- Finally, take your precious snapshot!
Happy testing… 🙂

Juan Mulford
I have been active in IT for over fourteen years now. I am a solutions architect, working with storage, virtualization, and VDI solutions. For the past ten years, I have been living and working in Taiwan.
microsoft-windows:windows-10:enterprise-deployment-windows-10-with-sccm-2012-r2:sccm-create-gold-os-image
Создание “золотого” образа для развёртывания ОС Windows 10 в SCCM 2012 R2
Для создания «золотого» образа нам потребуется «чистая» система без установленных приложений.
Выполним следующие действия:
-
Включим и установим пустой пароль на учётную запись «Администратор»;
-
Удалим профили лишних учётных записей и их учётные записи;
-
Установим Net.Framework 3.5 с помощью PowerShell:
Enable-WindowsOptionalFeature -Online -FeatureName "NetFX3" -Source "D:\sources\sxs"
-
Вызовем утилиту C:\Windows\system32\Sysprep\sysprep.exe
Укажем параметры:-
Переход в окно приветствия системы (OOBE)
-
Установим галочку «Подготовка к использованию»
-
Параметры завершения работы: «Завершение работы»
-
В SCCM создадим Последовательность задач «Capture Windows», в ней 2 шага:
-
Добавляем шаг «Задать переменную последовательности задач».
Указываем переменную: «OSDTargetSystemRoot» с значением «D:\Windows» -
Добавляем шаг «Записать образ операционной системы».
Указываем сетевой каталог, где будет создаваться образ и учётную запись, которая имеет доступ к этому каталогу.
В SCCM создадим Коллекцию «Windows Capture» и развернём на неё ранее созданную Последовательность задач.
Добавим эталонный компьютер в Коллекцию и включим виртуальную машину.Запустится Последовательность задач, которая создаст WIM-образ для последующих развёртываний ОС.
Полученные образы необходимо добавить в консоли SCCM и распространить по необходимым Точкам распространения.
Образы добавляются на сайт-сервер 1 раз и распространяется для всех.
 Автор первичной редакции:
Виталий Якоб
Время публикации: 28.01.2017 18:00
· Последнее изменение: 24.02.2017 00:11 —
Алексей Максимов