В этом статье мы покажем, как развернуть виртуальную машину и устанавливать на нее Windows 10/11 на гипервизоре Proxmox Virtual Environment.
Сначала вам нужно:
- Скачать Windows Media Creation Tool (https://www.microsoft.com/en-us/software-download/windows10) и создать ISO файл с установочным образом Windows;
- Также скачайте ISO образ с драйверами VirtIO для WIndows (https://fedorapeople.org/groups/virt/virtio-win/direct-downloads/stable-virtio/virtio-win.iso). Это набор паравиртуализированных драйверов для KVM/Linux, который обеспечит более высокую производительность виртуальных устройств, чем встроенные эмулированные драйвера
Загрузите оба iso файла в хранилище PVE.
Теперь нужно создать новую виртуальную машину Proxmox для развертывания гостевой Windows.
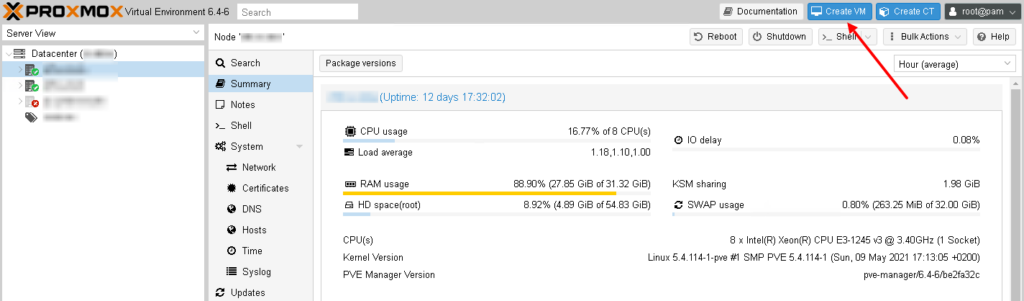
- Откройте веб интерфейс управления Proxmox VE (WAC) и нажмите кнопку Create VM;
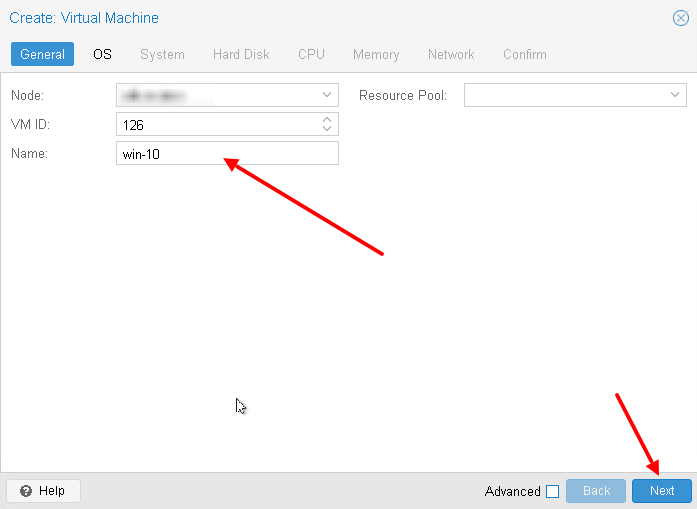
- Укажите имя ВМ;
- Затем перейдите на вкладку OS и ваш установочный ISO образ Windows 10, который вы загрузили ранее. Proxmox должен автоматически определить тип ОС в образе и указать тип гостевой ОС виртуальной машины (Microsoft Windows version 10/2016/2019);

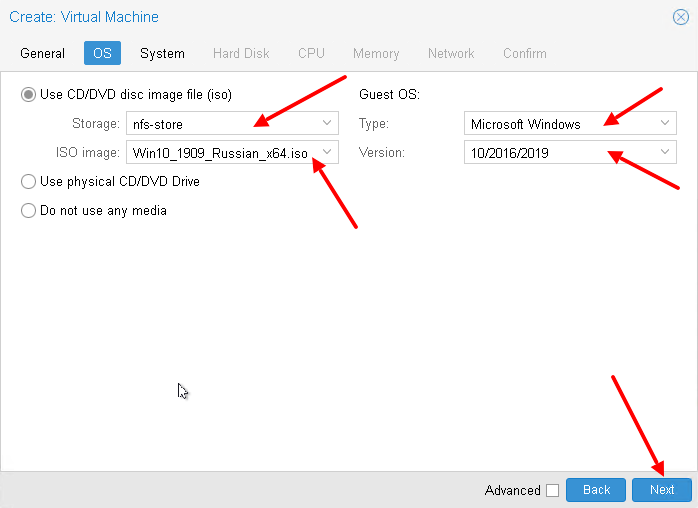
- Перейдите на вкладку System и включите опцию Qemu Agent и выберите тип контроллера дисков VirtIO SCSI;

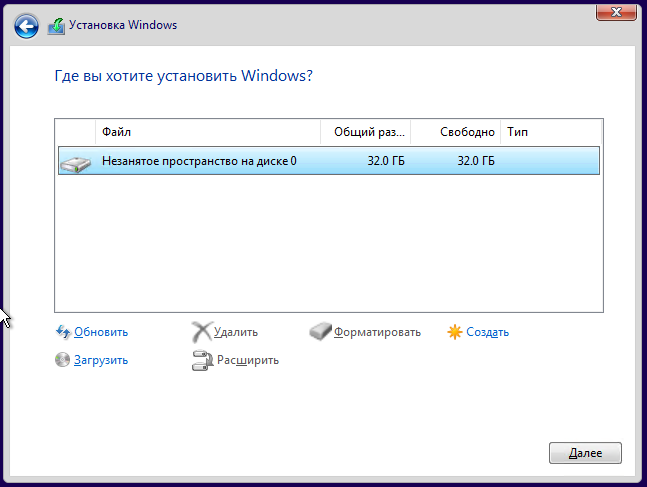
- Затем перейдите на кладку Hard Disk и настройте параметры диска виртуальной машины (Bus/Device: SCSI (по умолчанию используется IDE), Storage: выберите хранилище ProxMox где будет хранится виртуальный диск, укажите размер виртуального диска (не менее 25 Гб). Здесь можно выбрать один из двух типов виртуальный дисков raw (лучшая производительностью) или qcow2 (расширенный функционал и поддержка снапшотов). Также вы можете пробросить физический диск или USB флешку в виртуальную машину Proxmox VE. Здесь можно включить опцию кэширования Write back ->Discard. Это увеличит быстродействие, но есть некоторые риски потери данных;
- На вкладке CPU и Memory укажите количество ядер виртуальной машины вы хотите выделить (не менее 2 vCPu типа kvm64) и размер оперативной памяти (не менее 2Гб);

- Перейдите на вкладку network. Выберите тип виртуальной карты VirtIO (paravirtualized) вместо Intel E1000. Отключите опцию Firewall, если вы будете использовать встроенный Windows Defender Firewall в гостевой ОС;

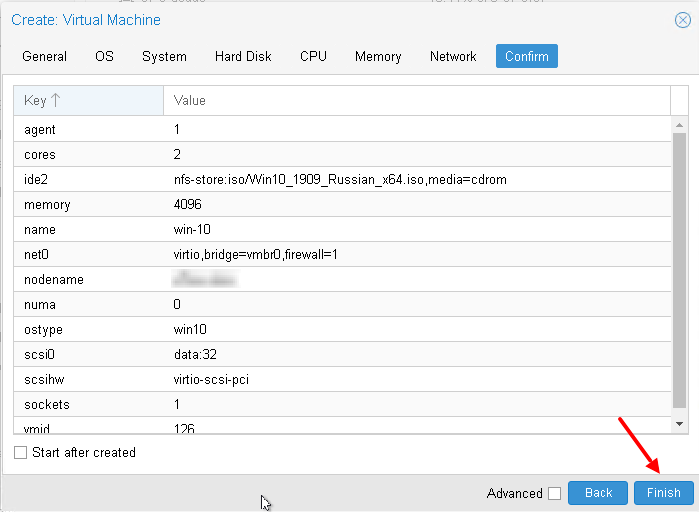
- Проверьте настройки и нажмите Finish чтобы создать ВМ;
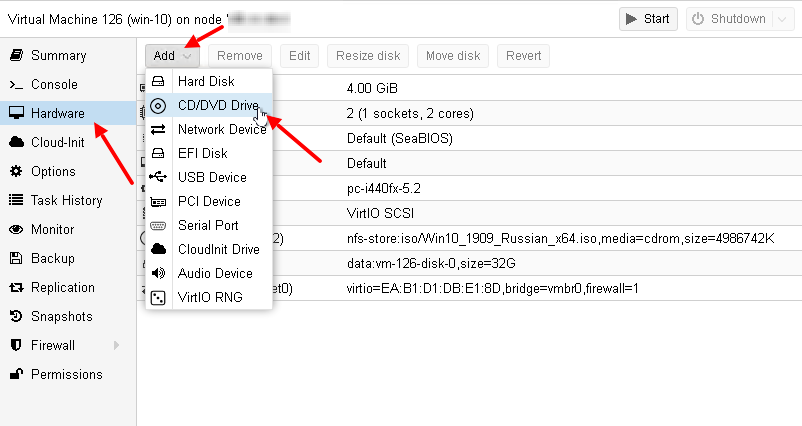
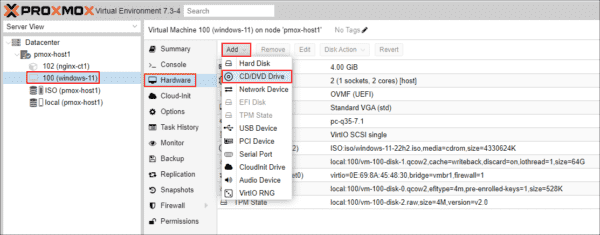
- После того, как вы создали новую виртуальную машину в Proxmox для Windows, откройте ее настройки и добавьте еще один CD/DVD привод. Подключите в него ISO файл с VirtIO драйверами;
- Запустите ВМ, нажав Start. Нажмите кнопку Console чтобы открыть экран виртуальной машины;
- Установка Windows должна запуститься автоматически;
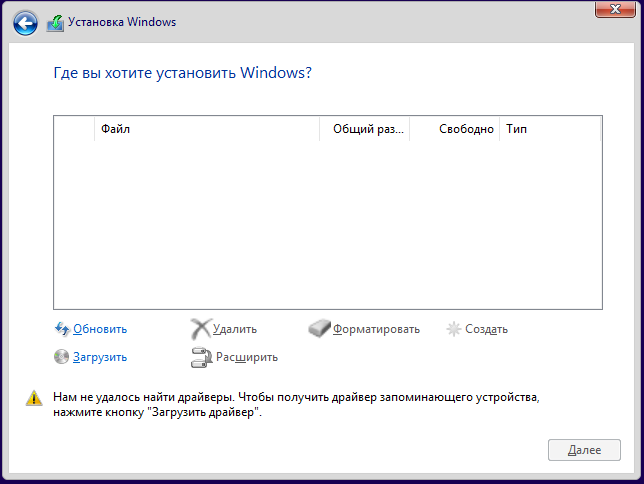
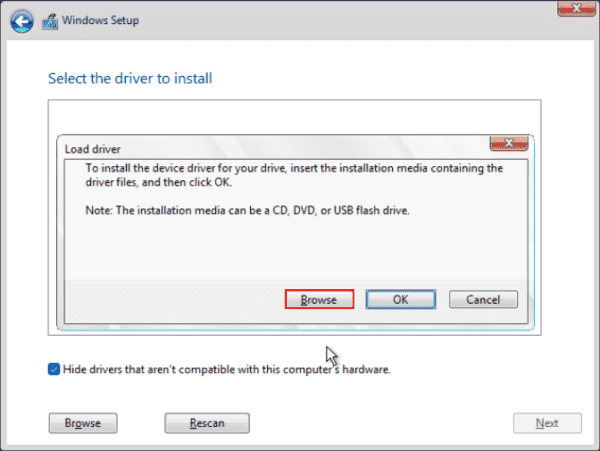
- Windows Setup не сможет найти диски вашей ВМ. Поэтому вам нужно загрузить VirtIO драйвера контроллера;
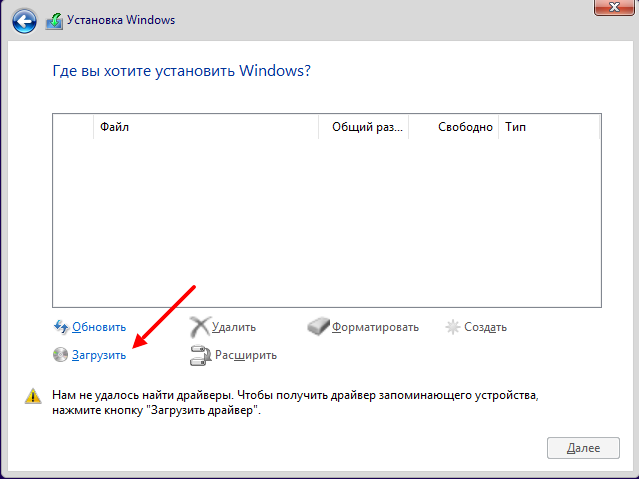
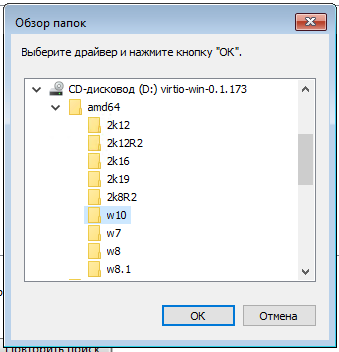
- Нажмите кнопку Load Driver и укажите путь к каталогу \amd64\w10\ на диске с драйверами VirtIO;

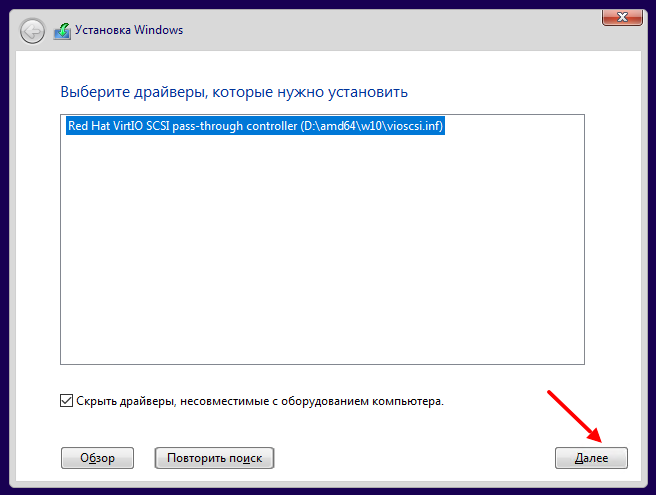
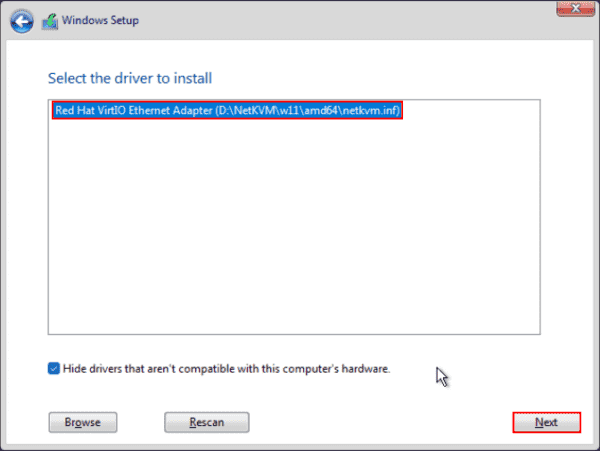
- Установите драйвер Red Hat VirtIO SCSI pass-throught controller (NetKVM\w10\amd6\vioscsi.inf);
- После установки драйвера установщик Windows увидит ваш диск, и вы сможете продолжить установку;
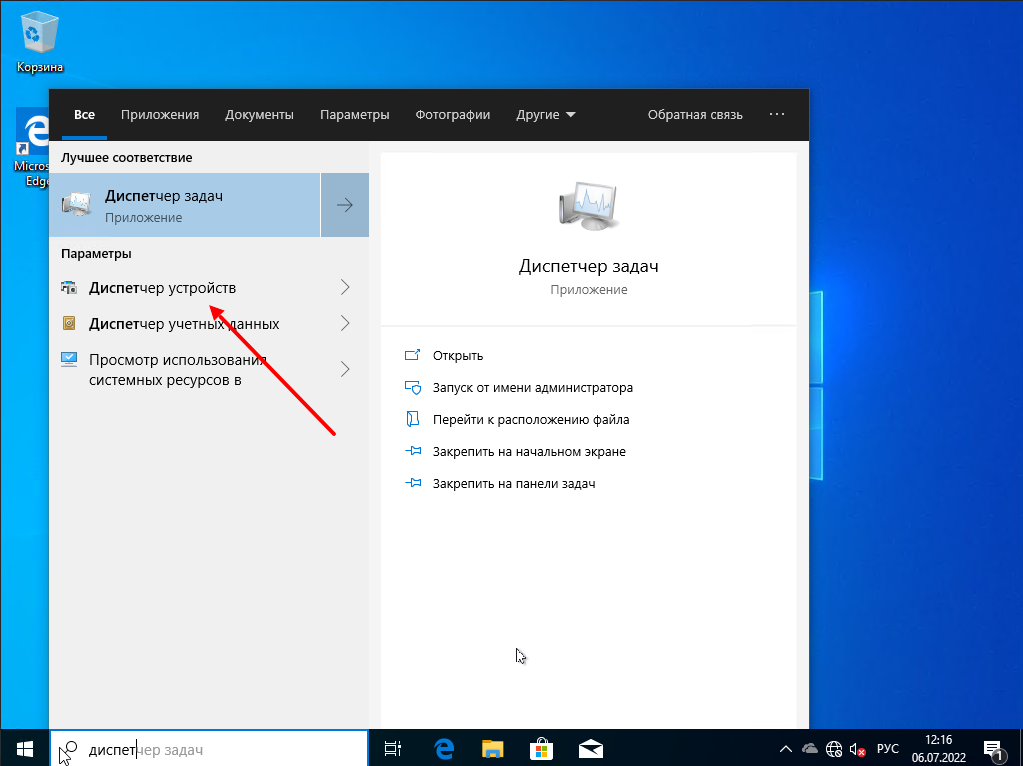
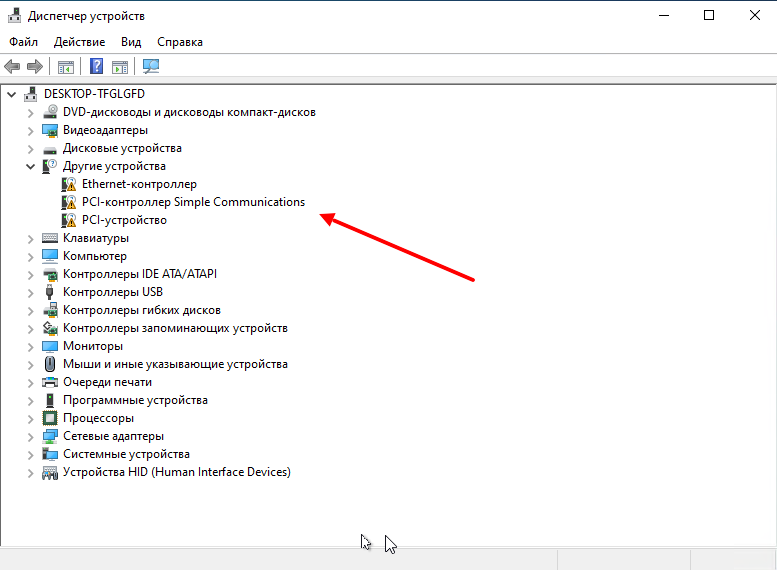
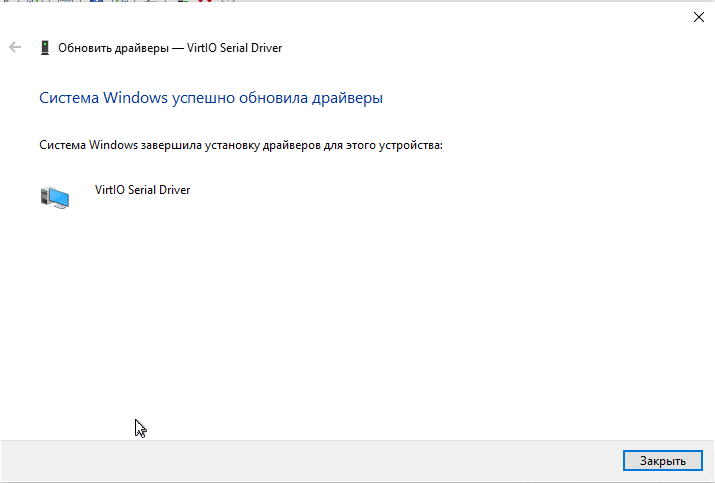
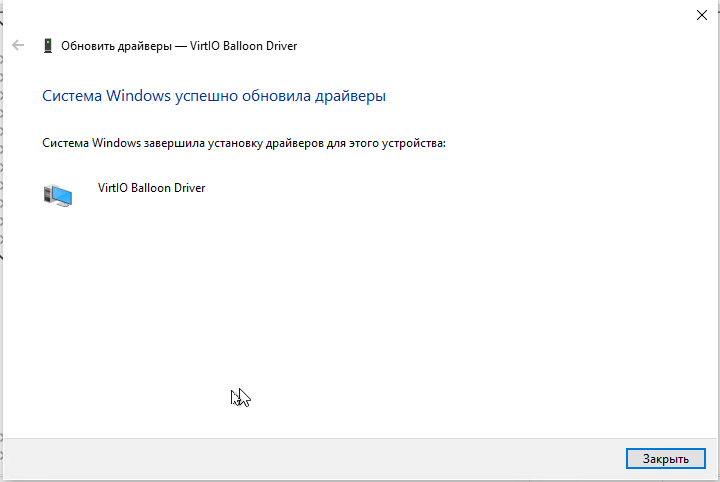
- После окончания установки Windows 10 в виртуальную машину, нужно установить драйвера VirtIO для сетевой карты и других устройств. Для этого откройте диспетчер устройств Windows (devmgmt.msc). Найдите в списке неизвестные устройства. Щелкните по устройству и выберите Update Driver -> Browse my computer for driver software и укажите путь к диску с драйверами VirtIO. Вам нужно установить как минимум следующие драйвера Redhat VirtIO Ethernet Adapter (\NetKVM\w10\amd64), VirtIO Balloon Driver (\Balloon\w10\amd64) Подробнее это описано в статье Установка драйверов KVM VirtIO в виртуальной машине Windows;

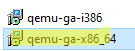
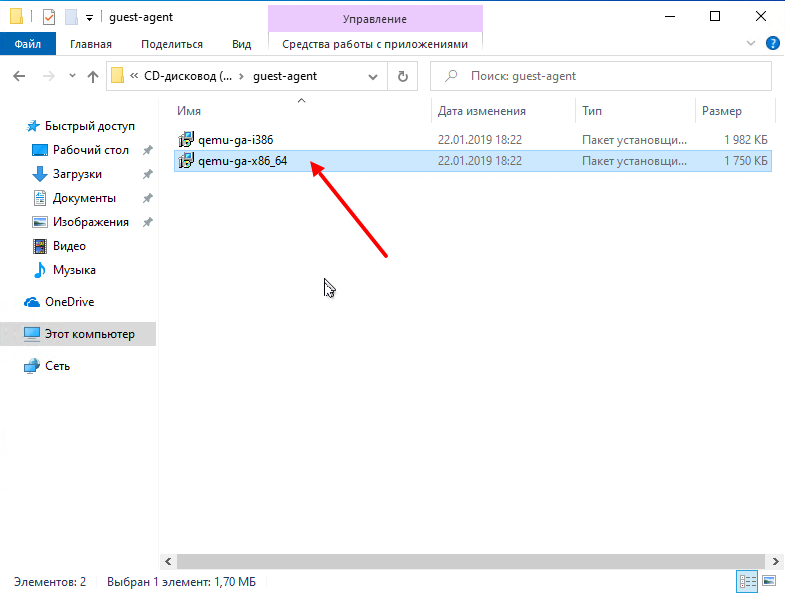
- После установки всех драйверов установите VirtIO Агент (\guest-agent\quemu-ga-x86_64.msi)

- Запустите установку virtio-win-gt-x64.msi из корня диска. Укажите драйвера и службы, которые нужно установить дополнительно.
На этом настройка виртуальной машины Windows 10 на Proxmox закончена. Вы можете продолжить настройку параметров Windows в гостевой ОС (имя компьютера, параметры сетевого подключения, установить необходимые программы, добавить в домен Active Directory и т.д.)
В этой статье я покажу тонкости установки Windows 10 в среде виртуализации от ProxMox. Основное внимание будет уделено Virtio драйверам.
Создание виртуальной машины
Про ProxMox VE я уже писал:
- Что такое Proxmox VE?
- Установка Proxmox VE 6.3
Для того чтобы создать новую виртуальную машины для Windows 10, заходим в Web-интерфейс управления ProxMox VE и нажимаем кнопку «Create VM«:
Во-первых придумаем имя для виртуальной машины:
Выберем хранилище на котором лежит нужный образ (iso). Затем выбираем сам образ. Меняем тип гостевой ОС и её подтип:
Настроим систему, а именно поставим галочку Qemu Agent (дальше нужно будет установить агента в ОС). А для контролера выбирайте VirtIO SCSI, хотя он и так используется по умолчанию:
А потом настроим жёсткий диск для виртуальном машины — я использую SCSI (по умолчанию используется IDE). А также нужно выбрать хранилище для жесткого диска и его размер:
Настроим процессор для виртуальной машины (укажите количество виртуальных ядер):
Выделим необходимое количество оперативной памяти:
Настроим сетевую карту, я снова использую VirtIO устройство:
В итоге, после всех настроек, нажмём кнопку «Finish«:
После того, как мы создали виртуальную машину, добавим ей ещё один привод (CD/DVD Drive). Его будем использовать для того, чтобы подключить ещё один образа с VirtIO драйверами:
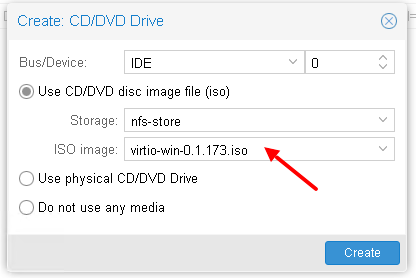
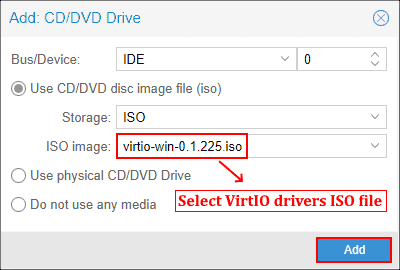
И подключим в новый привод образ с VirtIO драйверами:
Если у вас ещё нет образа с VirtIO драйверами, то вы можете скачать их от сюда.
А также, почитать про VirtIO драйверы можно в wiki от ProxMox — здесь.
Прежде чем двигаться дальше посмотрим ещё раз на виртуальное оборудование нашей виртуальной машины:

Установка гостевой ОС
Чтобы запустить виртуальную машину, нажмите кнопку «Start«. Затем, чтобы открыть консоль, нажмите кнопку «Console«:

Начнётся процесс установки Windows 10:
Весь процесс показывать не буду, покажу лишь те места, которые связаны с виртуализацией. Вначале вам нужно будет выбрать диск для установки системы, но для этого необходимо загрузить VirtIO драйвера:
Нажимаем кнопку «Загрузить«:
На диске с VirtIO драйверами ищем каталог /amd64/w10/:
И устанавливаем найденный драйвер:
После установки диск в системе должен определиться:
Дальше на найденный диск устанавливаем систему как обычно.
После установки, когда система начнет первоначальную настройку, нажимаем кнопку «У меня нет Интернета«. Это необходимо, так как драйвер VirtIO для сетевого интерфейса мы сможем установить только после первоначальной настройки:

Установка дополнительных VirtIO драйверов
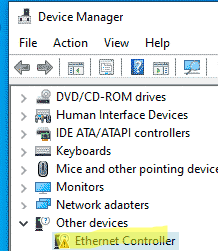
После установки системы, для многих виртуальных устройств не будет найдено драйверов. Чтобы это исправить запускаем «Диспетчер устройств«:
Видим неизвестные устройства:
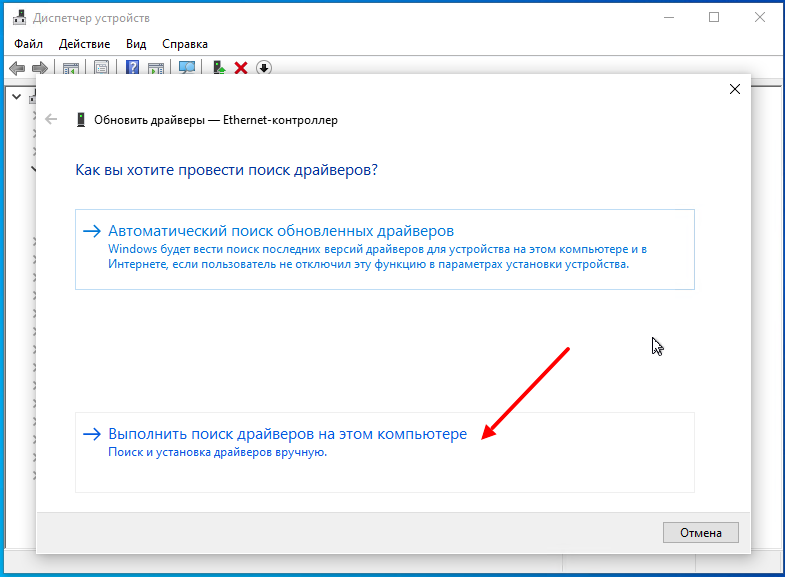
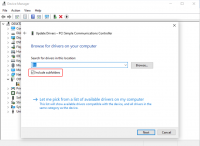
Нужно для каждого такого устройства установить драйвер с образа диска для VirtIO драйверов. Для этого нажимаем правой кнопкой мышки по устройству и выбираем «Обновить драйвер«:
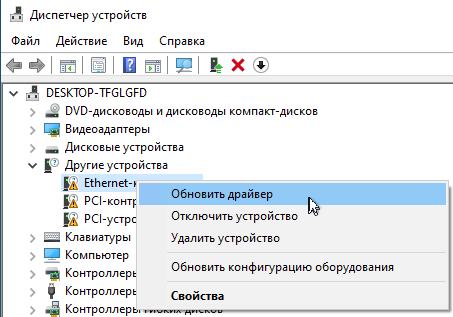
Затем выбираем пункт меню «Выполнить поиск драйверов на этом компьютере«:
Дальше нажимаем кнопку «Обзор«:
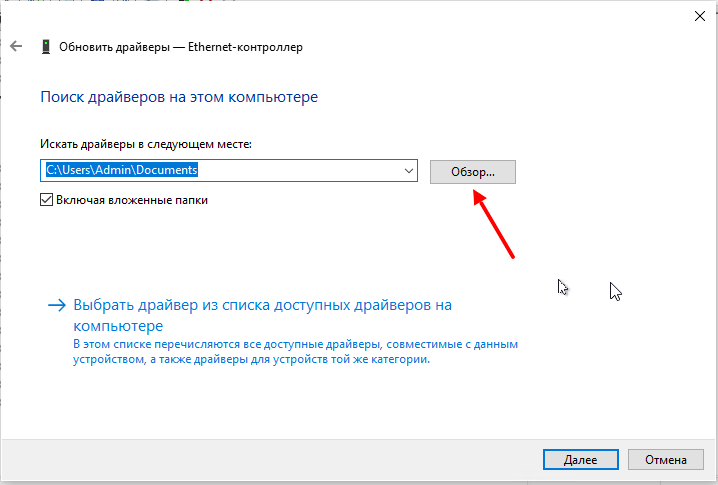
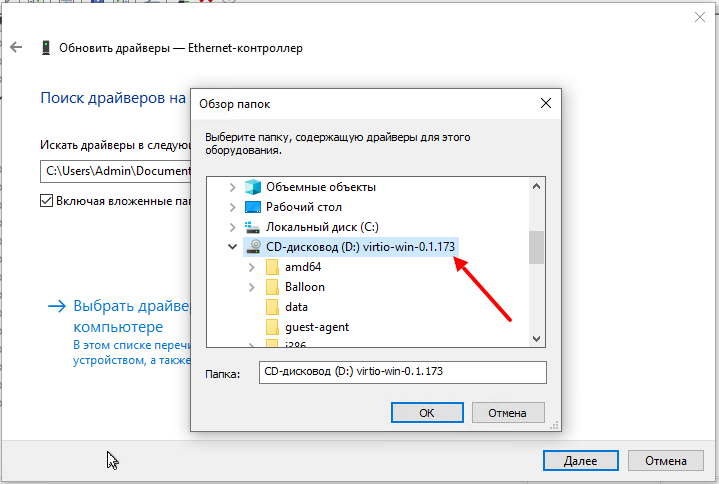
И указываем диск с VirtIO драйверами:
Здесь уже искать драйвера не обязательно, главное указать диск.
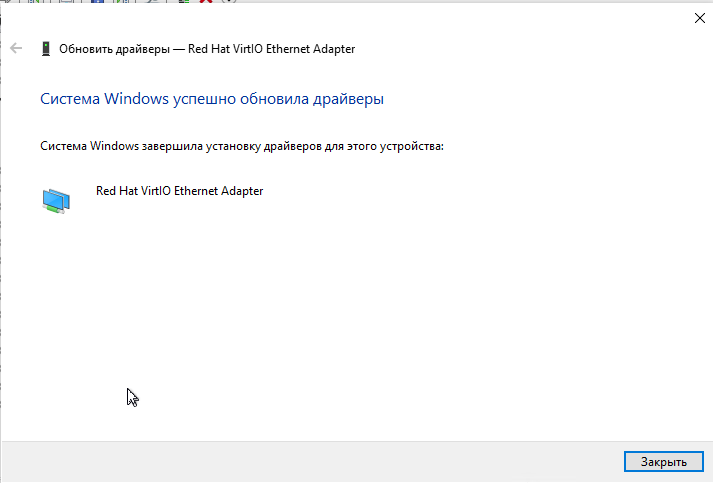
Таким образом устанавливаете все остальные драйвера:
И в самом конце установим VirtIO Агента с этого же образа диска. Для этого на диске ищем каталог guest-agent а в нем запускаем установщик:
После проделанного вы можете выполнять дополнительные настройки, например:
- настроить сеть;
- изменить имя компьютера или ввести систему в домен;
- обновить систему;
- установить дополнительное ПО;
- и другое.
Итог
В этой статье я показал что в среде виртуализации ProxMox используется специальное VirtIO оборудование и для его использования в Windows нужно устанавливать специальные VirtIO драйвера. Дополнительно в систему можно установить агента (Qemu-guest-agent), чтобы гипервизор получал некоторые сведенья о гостевой системе, например ip-адреса.
Ну а в Linux поддержка VirtIO оборудования уже встроена в ядро. Хотя агента всё-таки придется установить, например таким способом:
# apt-get install qemu-guest-agent
Или
#yum install qemu-guest-agent
Спасибо за внимание!
Сводка

Имя статьи
Установка Windows 10 на ProxMox VE 6
Описание
В этой статье я покажу тонкости установки Windows 10 в среде виртуализации от ProxMox. Основное внимание будет уделено Virtio драйверам
In my previous post, you learned how to get started with Proxmox VE as an alternative to VMware and Hyper-V. In that post, I covered how to run your first Linux VM in Proxmox. Today, I will show you how to create a Windows VM in Proxmox. This may sound like a straightforward task, but there are certain settings in Proxmox VE that are worth checking out to make sure you get better performance in Windows. If you install Windows with the default Proxmox settings, you will likely experience poor performance.
- Author
- Recent Posts

Surender Kumar has more than twelve years of experience in server and network administration. His fields of interest are Windows servers, Active directory, PowerShell, web servers, networking, Linux, virtualization, and Kubernetes. He loves writing for his blog.
In this article, I will install Windows 11, but the settings will work for other versions of Windows as well.
Prerequisites
To follow along with this guide, you need the following:
- An ISO file of Windows 11 (or any other Windows version). You can use the media creation tool to download the latest version of Windows directly from Microsoft servers.
- An ISO file of the VirtIO drivers. You can download the ISO file containing the latest stable release. If these drivers do not work, you can browse this page to download a suitable version. For those who don’t know, VirtIO drivers are paravirtualized for KVM to provide direct access to the peripherals and devices of the guest VM. Drivers for emulated devices are way too slow.
Once you have these two ISO files, you are all set to create a new Windows VM in Proxmox.
Create a new VM
- Log on to your Proxmox VE server, and click the Create VM button in the top right corner. This will launch the VM creation wizard.
- On the General tab, enter a name for your new VM, and click Next. If you’re running a Proxmox cluster, you can choose a specific node for your VM.

Proxmox Create Virtual Machine wizard General tab
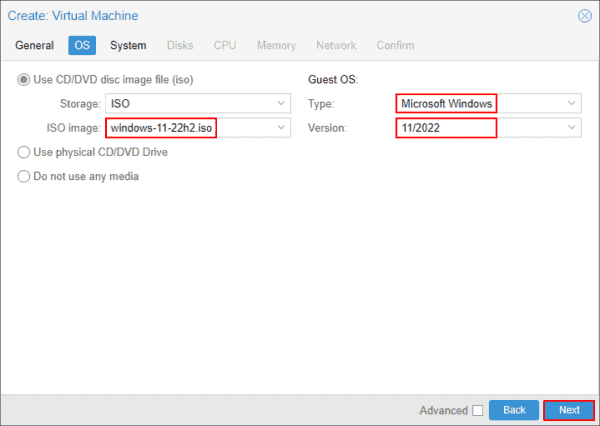
- On the OS tab, select the Windows ISO file under the ISO image field. Also, make sure the Type field is set to Microsoft Windows and the Version field is set to 11/2022. You can change these settings as necessary if you’re running another Windows version.
Proxmox Create Virtual Machine wizard — OS tab
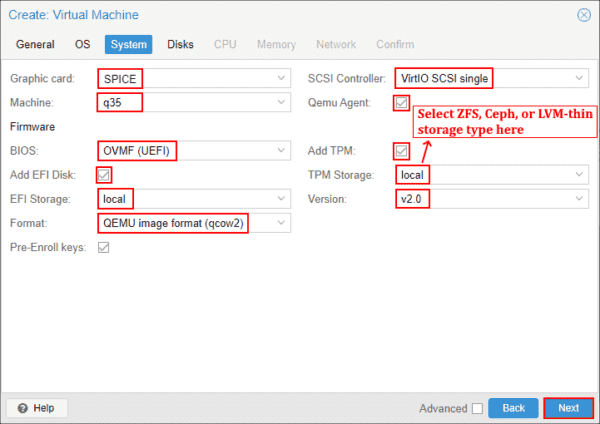
- On the System tab, make sure the settings match the following screenshot to avoid problems with your Windows installation.

Proxmox Create Virtual Machine wizard — System tab
- The SCSI controller is set to VirtIO SCSI single, and the Qemu Agent option is checked.
- Under firmware options, BIOS is set to OVMF (UEFI), add EFI disk is checked, EFI storage is selected, and the EFI storage format is Qemu Image Format (qcow2).
- Check the Add TPM option, and select TPM storage and TPM version 2.0.
- If you need PCIe support for GPU passthrough on your Windows VM, make sure the machine field is set to q35 instead of i440fx.
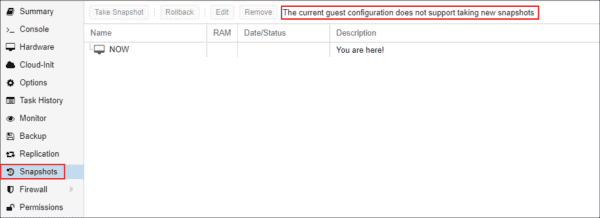
- You can also change the graphics card from Default to SPICE (simple protocol for independent computing environments) for the best desktop experience.Tip: Proxmox uses raw disk format for the TPM disk, since the TPM emulator software does not support the qemu image (qcow2) format. If you set local directory-based storage for the TPM disk, you will not be able to create live snapshots of the VM, and you will see a message stating, «The current guest configuration does not support taking new snapshots,» as shown in the screenshot below:

The current guest configuration does not support taking new snapshots
To get around this problem, you should choose a storage for the TPM disk that allows snapshots of raw disk formats. A few examples of such storage types are ZFS, BTRFS, Ceph, and LVM-thin.
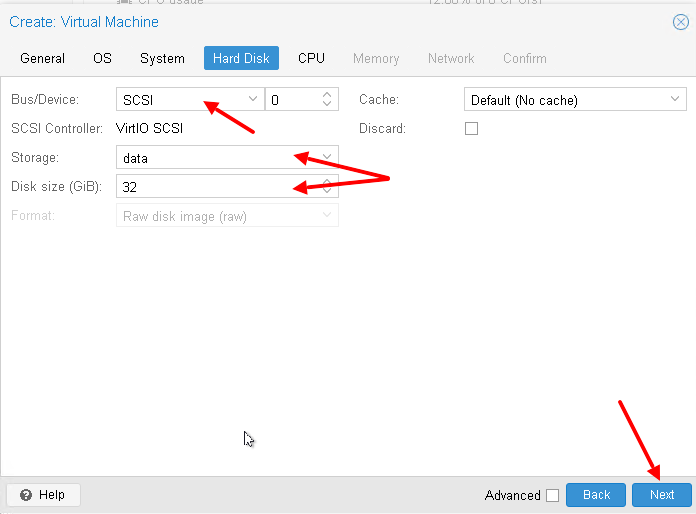
- On the Disks tab, make sure you set the Bus/Device option to SCSI and the Cache to write back to get good performance. You can check the Discard option, which allows the Proxmox node to reclaim free space; this is equivalent to the TRIM option for SSD drives. Enter the disk size as required, and keep the disk format as QEMU image format. Then click Next.

Proxmox Create Virtual Machine wizard — Disks tab
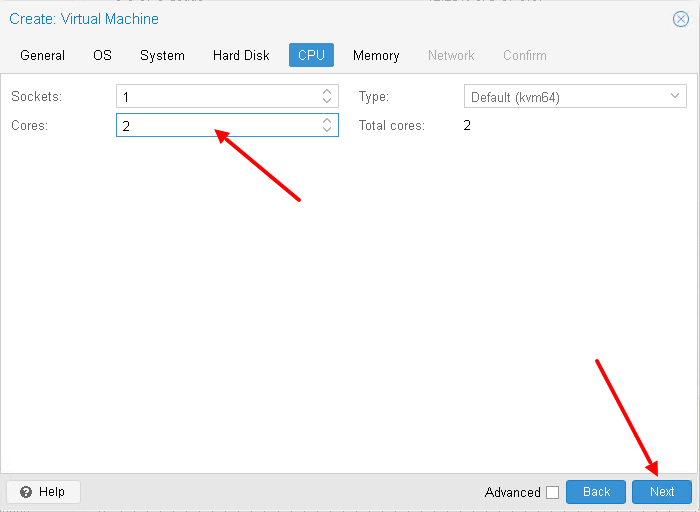
- On the CPU tab, specify the required number of cores, but more importantly, set the CPU type to host. The kvm64 CPU type offers limited instruction sets for your guest OS, which could be slow for some use cases.

Proxmox Create Virtual Machine wizard — CPU tab
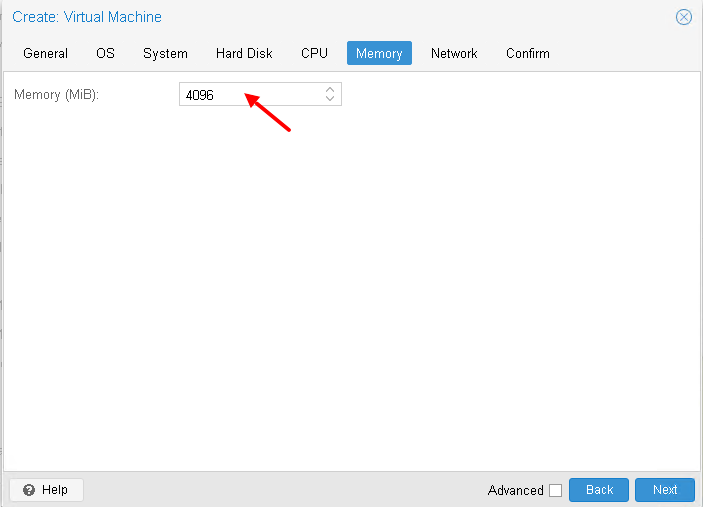
- On the Memory tab, allocate the required memory for the VM, and click Next.
Proxmox Create Virtual Machine wizard — Memory tab
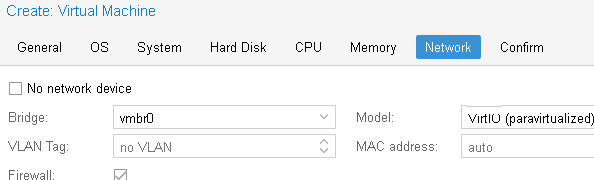
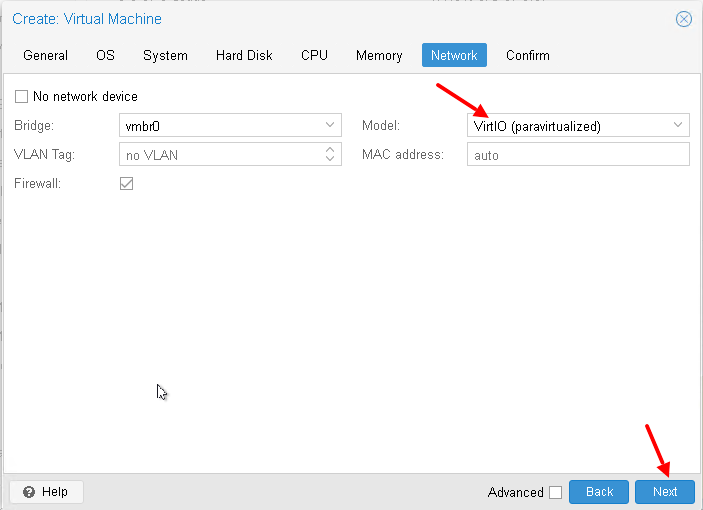
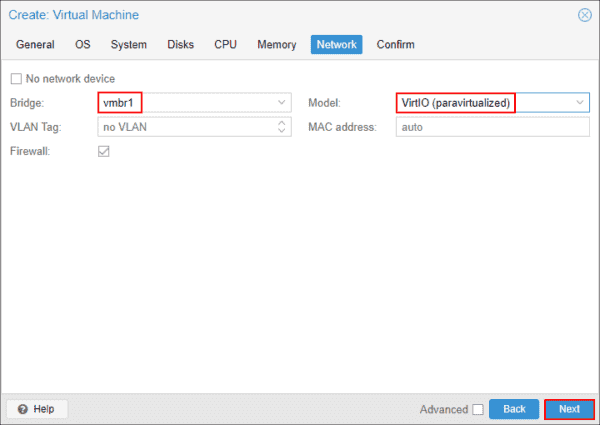
- On the Network tab, select the required bridge for your VM. Make sure you set the model to VirtIO (paravirtualized) to get the best network performance on your Windows VM.
Proxmox Create Virtual Machine wizard Network tab
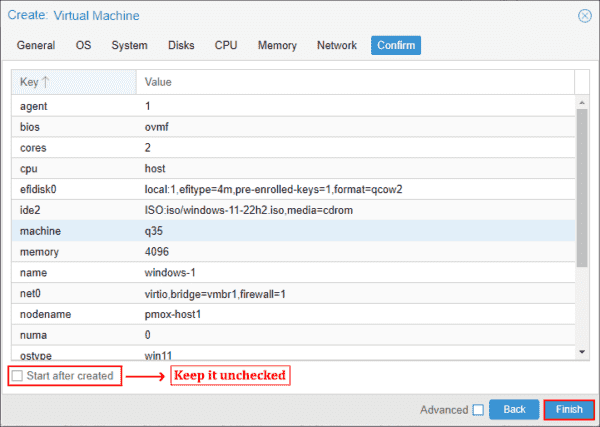
- Now confirm all the settings, but make sure the Start after created option is unchecked. We need to add another DVD drive to our VM to mount an ISO file containing VirtIO drivers before actually starting the VM.
Proxmox Create Virtual Machine wizard Confirm tab
- Now, select your VM under the Proxmox node, click the Hardware tab, and then click Add to open a dropdown menu. Next, select the CD/DVD Drive option, as shown in the screenshot below.

Adding an additional DVD drive to the VM
- Select the ISO file containing the VirtIO drivers to be mounted that you downloaded earlier, and click OK.

Mounting the VirtIO drivers ISO file into the new DVD drive
- Now, start the VM, and initiate the Windows setup.
- Select the language, time and currency, and input method, and click Next.
- Read and accept the Microsoft software license terms, and click Next.
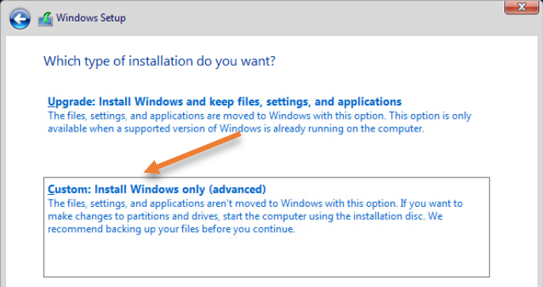
- On the installation type screen, click the Custom: Install Windows only (advanced) option.

Selecting the Custom Install Windows only advanced option
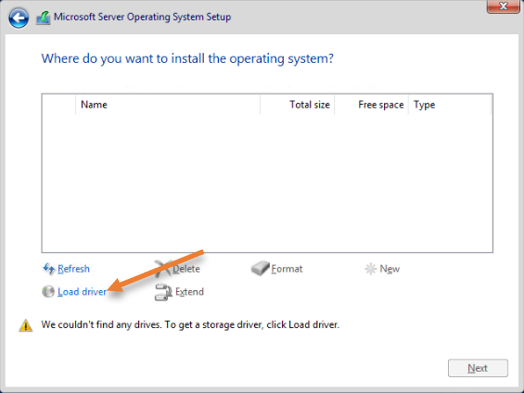
- Now comes the interesting part. You will notice that there is no disk to install Windows. This is because we selected the VirtIO SCSI controller for the VM disk, so Windows could not detect the disk. Click the Load driver option, as shown in the screenshot below.

Selecting the Load driver option
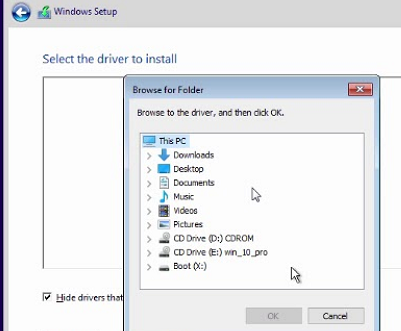
- Now, click the Browse button, and select the DVD drive where you mounted the VirtIO ISO file.
Click Browse to locate the drivers of the VirtIO SCSI pass through controller
- Browse the folders, and select the folder corresponding to your Windows version. I selected the D:\vioscsi\w11\amd64 folder. If you’re installing Windows 10, select the w10 folder. Similarly, select the 2k22 folder if you are installing Windows Server 2022.

Selecting the folder corresponding to your Windows version to locate the VirtIO SCSI pass through controller driver
- The Windows setup automatically picks a suitable driver for an SCSI controller. In our case, it is D:\vioscsi\w11\amd64\vioscsi.inf. Click Next to proceed with the detected driver.
Installing the VirtIO SCSI pass-through controller driver
- You will notice that the disk is now detected. Click Load driver one more time and select the VMNet folder to specify the VirtIO network adapter driver.
Locating the driver of the VirtIO ethernet adapter
- In my case, it is located under D:\NetKVM\w11\amd64\netkvm.inf. You can skip installing a network driver at this stage. However, installing a network driver at this point allows Windows to connect to the internet and pull the necessary updates during the installation.
Installing the VirtIO ethernet adapter driver
- You can now partition your disk and install Windows.

Partitioning the disk and installing Windows
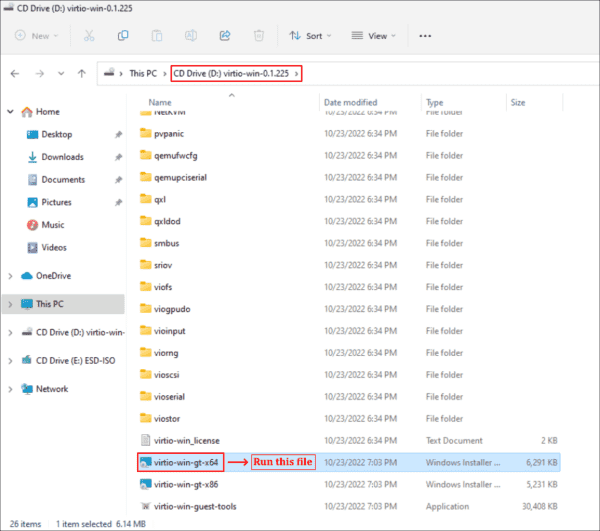
- When the Windows installation is done, complete all the initial configuration, launch File Explorer, and browse the drive on which the VirtIO ISO file is mounted. Locate and run a file named virtio-win-gt-x64.msi (or virtio-win-gt-x86.msi). The name might be different if you use another Windows version.

Installing the remaining VirtIO drivers for Windows VM
This will install all the VirtIO drivers that are needed by your Windows VM, including the ballooning service, for efficient memory management.
- Finally, open the guest agent folder and run the qemu-ga-x86_64.msi file to install the qemu guest agent. This is optional but very useful for information exchange between your Proxmox node and the guest OS. It also allows you to run commands remotely.
Subscribe to 4sysops newsletter!

Installing the qemu guest agent on the VM
- Finally, if you selected the SPICE graphics card, you need to install the spice guest tools on your VM and virt-viewer on the client system from where you will access this VM. If you launch the Device Manager on your Windows VM, there should be no driver missing.

Checking the Device Manager to verify installation of all drivers


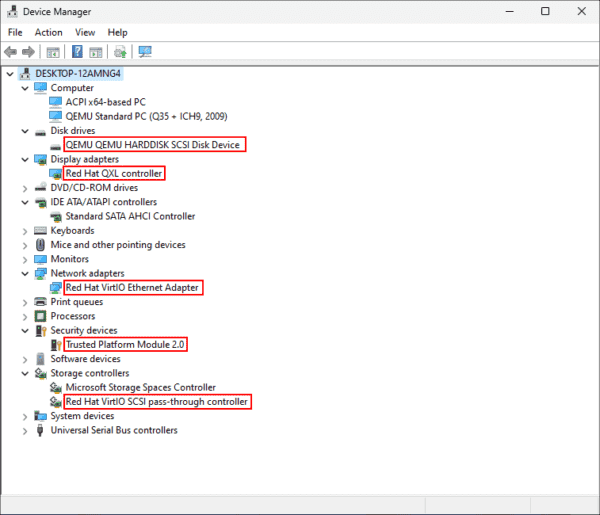
If you see something missing, you can manually install the drivers from the VirtIO ISO file. That’s it; you have successfully created a VM running Windows 11 in Proxmox VE. In the next post of my Proxmox series, I will explain how you can create snapshots.
The windows server 2019 is the popular version of the Windows server operating system used by many enterprise users worldwide, not only in the on-premises network but also in the cloud.
Our previous blog covered how you can install Proxmox VE on a server using a USB drive. We even spun up multiple firewalls virtual machines in it.
In this blog, we will take a look at the installation of the window server on the Proxmox VE server. After the installation.
Is windows server 2019 compatible with Proxmox?
For the windows server 2019 to work well with Proxmox and get a good performance, you need to use VirtIO drivers during the installation. Once the installation is complete, the Windows Server would work fine as you would install them in any other hypervisors, such as ESXi, the popular hypervisor in the enterprise network.
After you deploy the Window server 2019 in production, the cost associated with running the virtual machine will only be the windows licensing and the hardware cost, as the Proxmox hypervisor software is open source, and it is free for anyone to use. For the enterprise setup, it is recommended to have a Proxmox subscription, which will incur some cost, so in case anything goes wrong, you can always reach out to the support providing peace of mind.
Before you begin, you need to have windows server 2019 iso downloaded.
Note: If you use Windows server 2022, you may follow the article here.
- You can click here to download the windows server.
- In the windows server 2019- choose the ISO file. You will be required to fill in a form.
Post filling up the form, you will be asked to choose the Language of your choice, and click on download.
The download will start automatically.
- Proxmox server installed and up and running – follow the article here to learn more about the installation of Proxmox VE on a server.
- VirtIO Drivers -> Click here to download the latest virtio drivers.
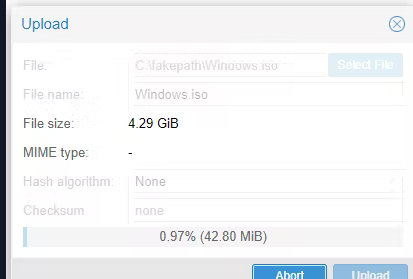
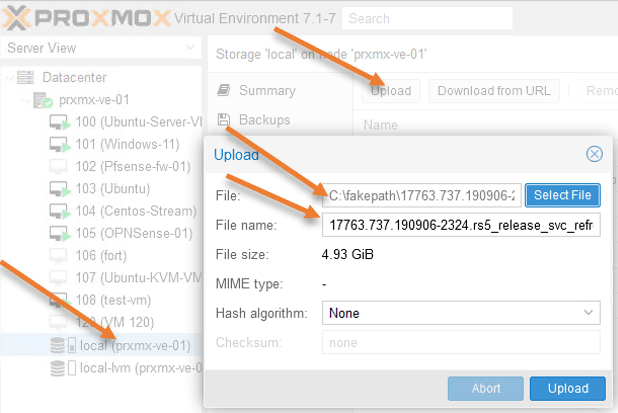
Upload the windows server iso into Proxmox VE.
We already have a windows server iso file. Let’s go ahead and upload it to the Proxmox Server.
Select the Proxmox Server where you are going to install the windows server.
Click on Local file system-> ISO images-> Click upload to upload the windows server iso image.
The upload will take time, depending on the network connectivity between the management system and the Proxmox Server.
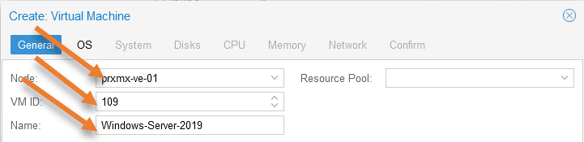
Create a windows server VM.
Login to the Proxmox Server, and click on Create VM on the top right corner.
Node: Choose the Proxmox node where you will install the Windows server operating system.
VM ID: The VM ID will be automatically created by the Proxmox VE server starting from 100, you may leave the default or choose a different ID.
Name: Provide a name for the virtual machine.
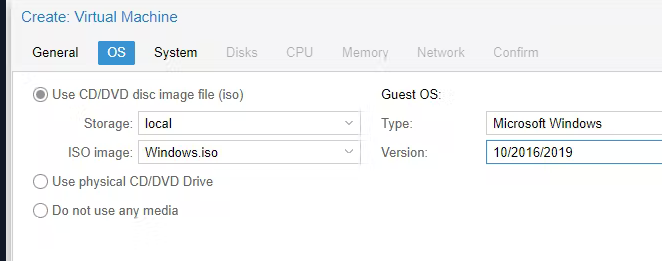
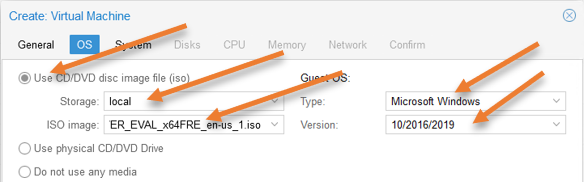
Choose the OS.
In the OS configuration, choose Use CD/DVD image file and select the Windows server disk image file we uploaded in the ISO image.
Guest OS:
Type: Microsoft windows
Version: You can see that Proxmox supports almost all the versions of windows servers. We are going to choose 10/2016/2019 as we will install windows server 2019.
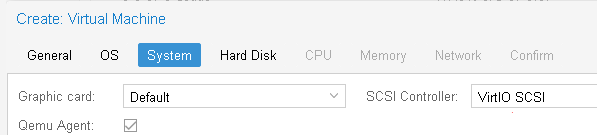
Leave everything default on the System configuration and click on Next.
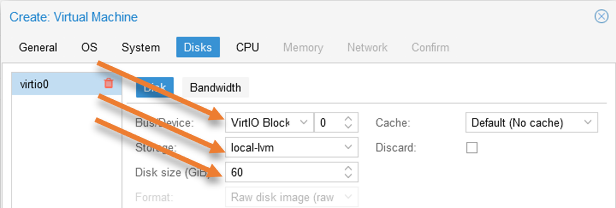
Windows Server virtual disk configuration.
In the disk configuration;
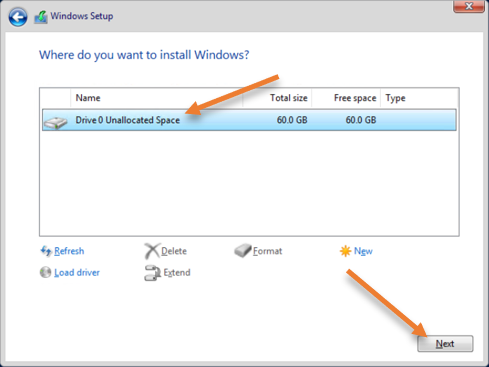
Bus/Device: Choose VirtIO Block.
Disk Size: By default, Proxmox would choose 32GB of storage, the absolute minimum recommendation from Microsoft. So I am choosing 60GB of storage for my Virtual machine.
Click on Next.
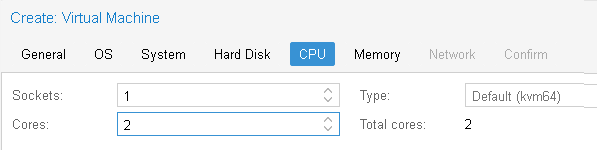
CPU configuration.
I am choosing 2 CPUs for my Windows Server. Hence under cores, pick 2 and click on Next.

Memory configuration.
2GB of default memory is acceptable; however, I am choosing 4GB of Ram based on my requirement. So you may decide based on your need. And click on Next.

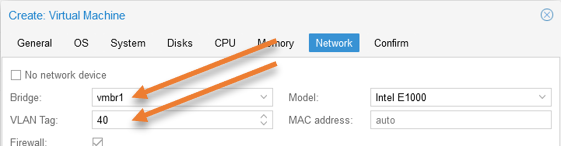
Network configuration.
Every Proxmox network setup would be different. In my setup, vmbr0 is the management network for the Proxmox Server, and the vmbr1 with VLAN 40 is for the VM traffic. The interface that connects to the Proxmox Server is configured as a trunk allowing VLAN 40. You can learn more about the VLAN tagging configuration in Proxmox Server here.
If you are using multiple interfaces and planning to use them as a bond, you may check the article here to learn more.
In your setup, you may not be using VLAN, so based on your configuration, make a choice.
Bridge: Choose the bridge interface for the VM traffic.
VLAN tag: You may specify the VLAN tagging here if you are using VLAN tagging.
Firewall: If you are not using any firewall as a VM in your Proxmox, you may leave the default firewall option checked.
Click on Next.
You will get a summary of the configuration. Ensure the Start after created option is unchecked because we need to add virtio driver iso to the windows server VM.
Click on Finish.
Attach the VirtIO driver.
You can now see the window server virtual machine added into the Proxmox Server, and you may choose the virtual machine and click on Hardware-> Add-> CD/DVD Drive.

In the pop-up, choose Use CD/DVD disk image file.
Storage: Local
ISO image: Choose the iso image we uploaded and click on Create.
Start the windows server installation in Proxmox.
Select the virtual machine-> Console
Click on Start to start the virtual machine.
You will get a message that reads, press any key to boot from cd/DVD
You may press any key.
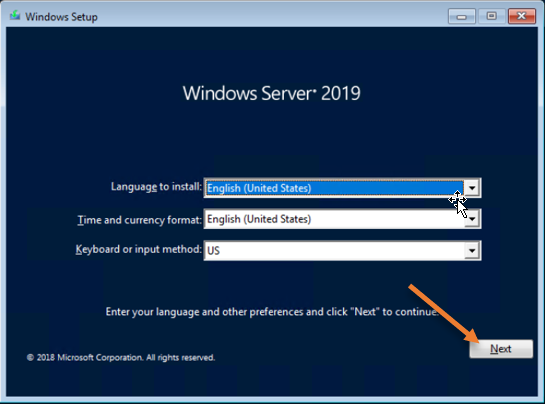
The windows server installation screen appears with loading files. After a few seconds, the windows server installation wizard will appear.
Choose the Language, time, and Keyboard layout and click on Next.
Click on Install Now.
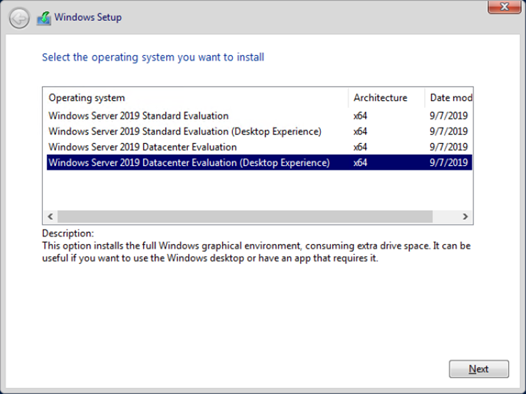
Choose the operating system version and click on Next.
Here you need to choose what version of the Server you would want. Whether it is CLI-based or GUI-based, you may choose the version without Desktop experience if you want only CLI access.
If you want GUI access, you would need to choose Desktop experience.
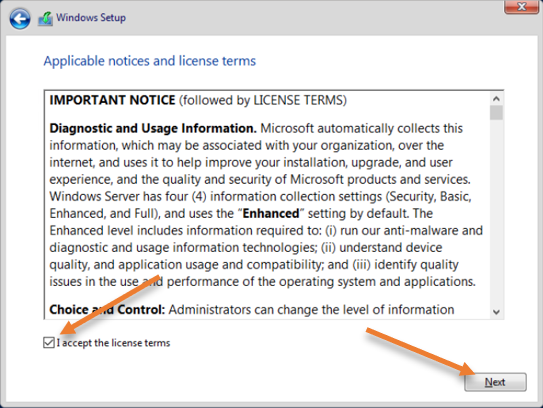
Accept the license agreement.
Choose the Custom install option.
Configure the virtual hard disk in the windows server installation wizard.
As you can see, there is no virtual hard disk for the windows server to install the operating system even though we defined it under Proxmox.
That’s because windows don’t have a driver to detect the virtual hard disk in the Proxmox.
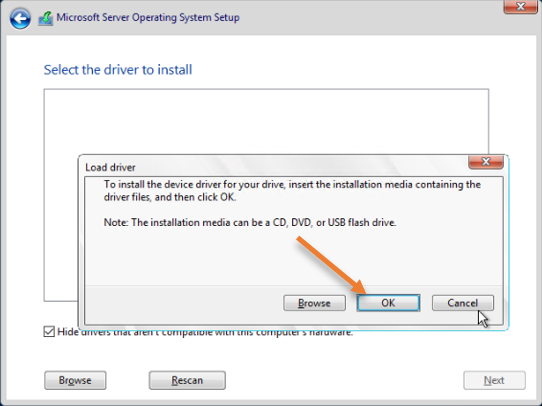
Click on Load driver.
In the pop-up, click on OK.
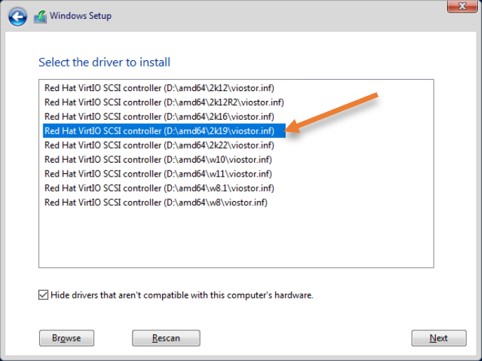
After a few seconds, you will get an option to select the driver to install.
From the list, choose the 2019 windows server driver. If you are using 2016, you may select that version instead and click on Next.
You can now see the hard disk we allocated in the Proxmox Server, choose the hard disk and click on Next.
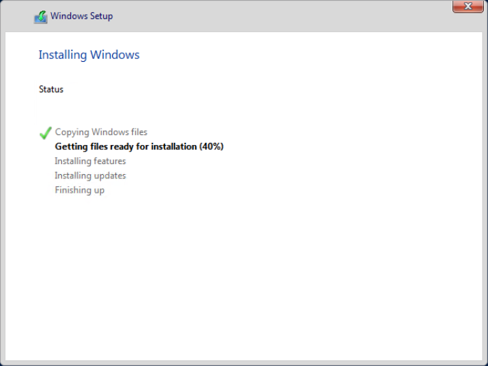
The installation will begin, and the process will take some time to finish.
Set the password for the Administrator.
After the installation is finished, the VM will reboot a couple of times, and once done. It will ask you to set the administrator password.
Once you set the admin password, you may click on finish.
If you have selected the CLI version, you will get a CLI prompt to change the password.

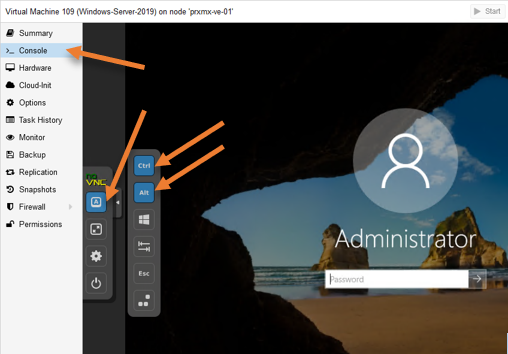
Log in to the windows server.
You will be taken to the windows logon screen, where it will ask you to press ctrl+alt+del, if you are using a Windows PC and when you press that, it will take you to windows PC settings.
So in Console, you may click on the A icon and select Ctrl and Alt from the submenu. While it is selected, you may click on Delete on your keyboard.
You will get a prompt to enter the password now. You cannot enter the password until you unselect Ctrl and Alt buttons in the VLC.
Unselect them and enter the password, and it should let you log in.
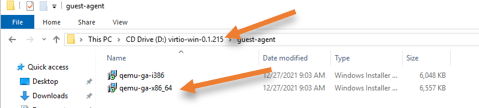
Install the KVM guest agent.
Finally, we need to install the KVM guest agent on the windows machine.
Open windows explorer and virtual CD/DVD drive -> Guest Agent -> Double click on the qemu-ga-x86_64 to install the guest agent driver.
Once the installation of the guest agent is finished, you may go ahead and reboot the Windows Server.
And there you have it. We have now successfully installed windows server 2019 on the Proxmox VE server.
You can now configure an IP address and enable RDP on the VM to access from outside Proxmox network.
Introduction
This is a set of best practices to follow when installing a Windows Server 2022 guest on a Proxmox VE server 7.x.
Install
Prepare
To obtain a good level of performance, we will install the Windows VirtIO Drivers during the Windows installation.
- Create a new VM, select «Microsoft Windows 11/2022» as Guest OS and enable the «Qemu Agent» in the System tab. Continue and mount your Windows Server 2022 ISO in the CDROM drive
- For your virtual hard disk select «SCSI» as bus with «VirtIO SCSI» as controller. Set «Write back» as cache option for best performance (the «No cache» default is safer, but slower) and tick «Discard» to optimally use disk space (TRIM).
- Configure your memory settings as needed, continue and set «VirtIO (paravirtualized)» as network device, finish your VM creation.
- For the VirtIO drivers, upload the driver ISO (use the stable VirtIO ISO, download it from here) to your storage, create a new CDROM drive (use «Add -> CD/DVD drive» in the hardware tab) with Bus «IDE» and number 0. Load the Virtio Drivers ISO in the new virtual CDROM drive.
- Now your ready to start the VM, just follow the Windows installer.
- Note for Older Version of Windows like Windows-2012 (use the stable older version of VirtIO ISO — virtio-win-0.1.189.iso, download it from here)
Launch Windows install
- After starting your VM launch the noVNC console
- Follow the installer steps until you reach the installation type selection where you need to select «Custom (advanced)»
- Now click «Load driver» to install the VirtIO drivers for hard disk and the network.
- Hard disk: Browse to the CD drive where you mounted the VirtIO driver and select folder «vioscsi\2k19\amd64» and confirm. Select the «Red Hat VirtIO SCSI pass-through controller» and click next to install it. Now you should see your drive.
- Network: Repeat the steps from above (click again «Load driver», etc.) and select the folder «NetKVM\2k19\amd64», confirm it and select «Redhat VirtIO Ethernet Adapter» and click next.
- Memory Ballooning: Again, repeat the steps but this time select the «Balloon\2k19\amd64» folder, then the «VirtIO Balloon Driver» and install it by clicking next. With these three drivers you should be good covered to run a fast virtualized Windows Server 2022 system.
- Choose the drive and continue the Windows installer steps.
HINT: There is a video showing the process for a Windows Server 2016 installation which is the same as for Windows Server 2022.
Install Guest Agent and Services
Guest Agent
If you enabled the Qemu Agent option for the VM the mouse pointer will probably be off after the first boot.
To remedy this install the «Qemu Guest Agent». The installer is located on the driver CD under guest-agent\qemu-ga-x86_64.msi.
Drivers and Services
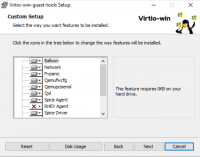
VirtIO guest tools installer
The easiest way to install missing drivers and services is to use the provided MSI installer. It is available on the driver CD since version «virtio-win-0.1.173-2».
Run the «virtio-win-gt-x64.msi» file located directly on the CD. If you do not plan to use SPICE you can deselect the «Qxl» and «Spice» features. Restart the VM after the installer is done.
After all this the RAM usage and IP configuration should be shown correctly in the summary page of the VM.
For more information and configuration about ballooning, see Dynamic Memory Management
Check for missing drivers
- See also: Paravirtualized Block Drivers for Windows
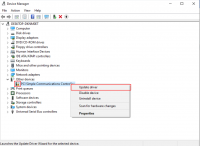
Unknown device in device manager
Make sure to include subfolders
Go to the Device Manager to see if there are any drivers missing.
For any unknown device:
- Right click an select «Update driver».
- Select «Browse my computer for driver software».
- Select the Driver CD. Make sure that «Include subfolders» is checked.
- Once a driver has been found you might be prompted with a security warning asking if you «Would like to install this device software». Click «Install».
Installing WSL(g)
To run WSL (Windows Subsystem for Linux) you need to enable Nested Virtualization. Make sure to set your processor to ‘host’; if you already set up your VM and did not select ‘host’ as processor, you can change it in the ‘Hardware’ section of your VM in the web interface.
Follow the official instructions.
If you are using a GPU via PCI(e) passthrough, you might need to add
args: -cpu host,kvm=off
to your config file at /etc/pve/qemu-server/<vm_id>.conf, see the vfio blog
Further information
Disk-Image Format: raw vs qcow2
Raw file format provides slightly better performance while qcow2 offers advanced features such as copy on write and Live_Snapshots.
Since V2.3, qcow2 is the default format.
VirtIO drivers
Make it really easy: Build your ISO with drivers already included:
Windows guests — build ISOs including VirtIO drivers
Latest iso with VirtIO drivers :
https://fedorapeople.org/groups/virt/virtio-win/direct-downloads/latest-virtio/
See also
Windows 2019 guest best practices
Windows 2016 guest best practices
Windows 10 guest best practices