The Media Creation tool is a useful utility that lets you upgrade or reinstall Windows on your system’s hard disk. But like other apps, it also sometimes behaves weirdly, as it’s behaving for many users. For instance, some users aren’t able to open the Media Creation tool on their PC.
Whereas a set of users are unable to upgrade or clean install Windows using it on their system’s hard disk. If you also find yourself in a similar situation, fret not, as it’s easily fixable. Here in this guide, we’ve shared some ways that can help you fix the Media Creation tool not working issue in Windows 11.
Here are some possible reasons for the Windows Media Creation tool not working issue in Windows 11:
- Lack of Required Privileges
- Interference From Antivirus
- Insufficient Disk Space
- Disabled TLS 1.1 & TLS 1.2
- Enabled VPN
- Conflicting Programs
- The Media Creation Tool’s Executable Is Blocked
Fix the Media Creation Tool Not Working Issue in Windows 11
Here’s a compiled list of all the working solutions that can fix the Media Creation tool not working issue:
Note: Before trying the solutions below, plug the bootable USB drive into your system if you’re trying to clean install Windows.
1. Try Opening the Media Creation Tool as an Administrator
Sometimes programs fail to open because of a lack of administrative privileges, which could be the same in your case. Due to this, we suggest you open the Media Creation tool as an admin to see if it fixes the issue.
You can follow the steps right below to know how to launch the Media Creation tool as an admin:
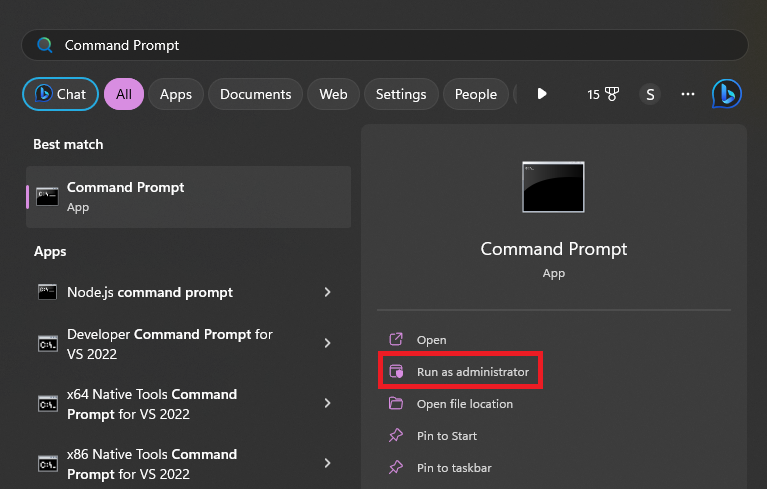
1. Press the Windows key on your keyboard to open the Windows Search Box, and type Media Creation in it.

2. Click on Run as administrator in the search results under the Media Creation tool to open it with admin rights.
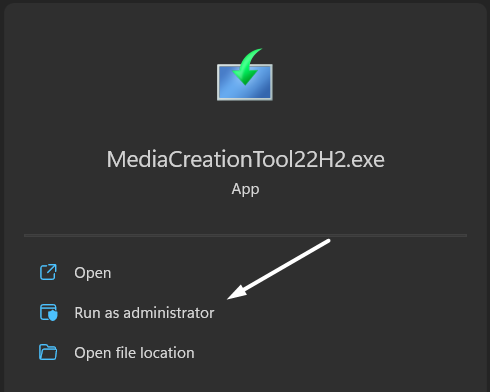
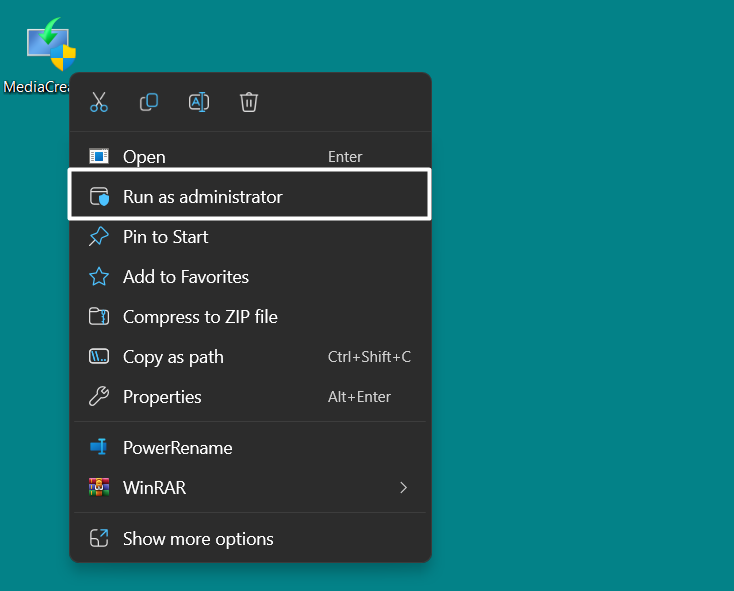
Tip: Another way to do so is by right-clicking on the Media Creation tool’s executable file and selecting the Run as administrator option from the context menu.
2. Unblock the Media Creation Tool
It could be possible that the Media Creation tool’s executable file is blocked on your PC. Due to this, it’s not opening on your system. Thus, we suggest you ensure that the file isn’t blocked on your system, and you can ensure this by following the below-listed steps:
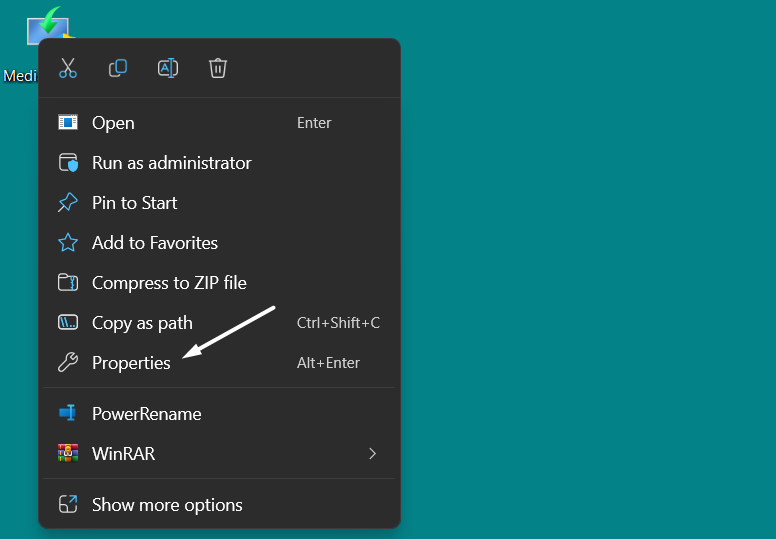
1. Move to the location on your system where you’ve saved the Media Creation tool’s executable file.

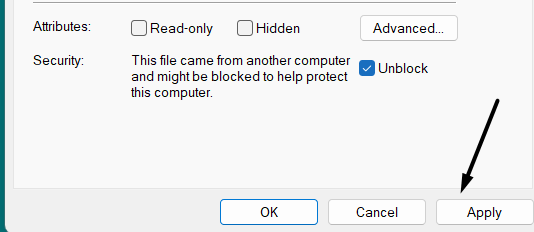
2. Right-click on the executable file and select the Properties option from the contextual menu.
3. Ensure the checkbox next to Unblock under the Security section is unchecked.
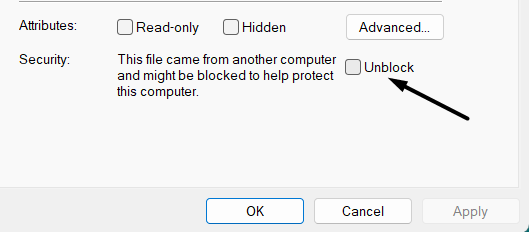
4. Lastly, click the Apply button to save the changes and then click on OK to close the box.
3. Disable VPN Client
An active VPN is one of the most common causes of the ill-functioning of the Media Creation tool. So if you’re using an external or built-in VPN, try disabling it. You can follow the below steps to turn it off:
1. Open the Windows Search Box, type VPN settings in it, and click on it in the search results.

2. Click on the VPN connection that’s active and click on the Diconnect button to deactivate it right now.

3. In the end, switch off the Allow VPN over metered networks and Allow VPN while roaming toggles.

4. Turn Off Your Antivirus
Another common cause of the “There was a problem running this tool” error is the enabled antivirus. Keeping this cause in mind, we suggest you disable your system’s integrated antivirus to check whether it’s causing this issue. You can check the below steps to switch it off:
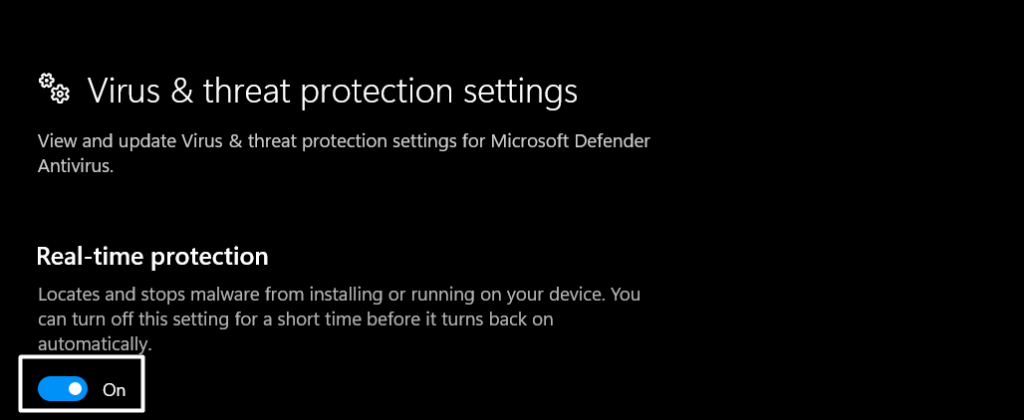
1. Open the Virus & threat protection settings on your Windows PC or laptop using the Windows Search Box.

2. Click on the Manage settings text under the Virus & threat protection settings section.

3. Disable the toggle under the Real-time protection section and then check the issue’s status.
5. Delete Conflicting Programs
In some cases, it’s found that third-party programs conflicted with the Media Creation tool, due to which they got the “There was a problem running this tool” error on their Windows PC.
This could be the same in your case, and to check this try removing potentially conflicted programs from your system.
6. Run Antivirus Scan
You may have mistakenly downloaded infectious files on your system, due to which the Media Creation Tool isn’t working. To check whether malware is causing this issue, we advise you to run a virus scan on your PC. So, here are the steps to do so:
1. Open the Windows Search Box on your PC by pressing the Windows and S keys at the same time.

2. Type Virus & threat protection in the search box, and select it from the Best match section.
3. Click the Quick scan button on the Virus & threat protection window to start the antivirus scan.

4. Once the scan is ended, check if the scan has found any suspicious files on your system. If yes, follow the on-screen instructions to remove them.
7. Enable TLS 1.1 & TLS 1.2
Transport Layer Security (TLS) is simply a security protocol that provides communications protection over a computer network. Some users said that enabling TLS 1.1 & TLS 1.2 in the system could fix the Media Creation Tool not working issue in Windows 11. So, try the same by following the below-mentioned steps and check the issue’s status:
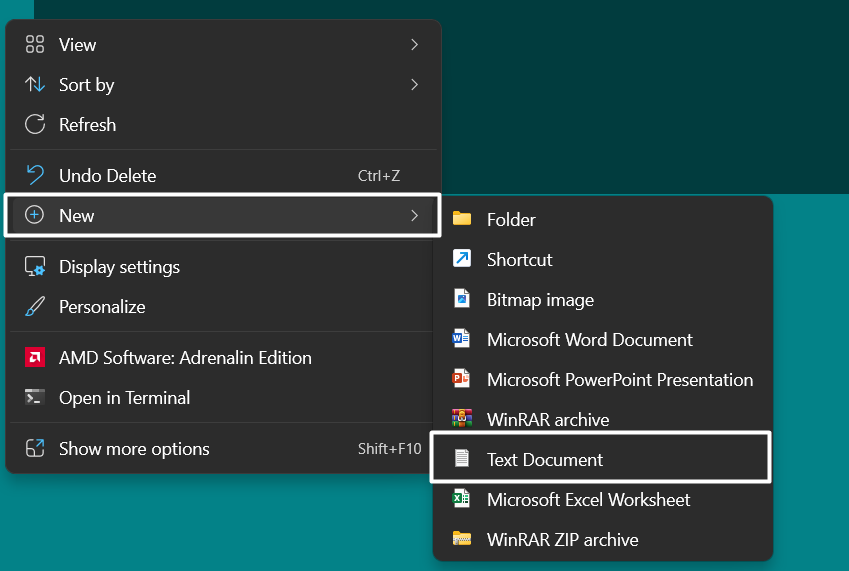
1. Right-click on your desktop’s blank space, and then hover the arrow on the New option.

2. Select the Text Document option from the New dropdown menu to create a new text file.
3. Once the new text document is created, copy-paste the below-mentioned line of codes into it:
Windows Registry Editor Version 5.00[HKEY_LOCAL_MACHINE\SOFTWARE\Microsoft\Windows\CurrentVersion\Internet Settings\WinHttp] “DefaultSecureProtocols”=dword:00000a00[HKEY_LOCAL_MACHINE\SOFTWARE\Wow6432Node\Microsoft\Windows\CurrentVersion\Internet Settings\WinHttp] “DefaultSecureProtocols”=dword:00000a00[HKEY_LOCAL_MACHINE\SYSTEM\CurrentControlSet\Control\SecurityProviders\SCHANNEL\Protocols\TLS 1.1\Client] “DisabledByDefault”=dword:00000000 “Enabled”=dword:00000001[HKEY_LOCAL_MACHINE\SYSTEM\CurrentControlSet\Control\SecurityProviders\SCHANNEL\Protocols\TLS 1.2\Client] “DisabledByDefault”=dword:00000000 “Enabled”=dword:00000001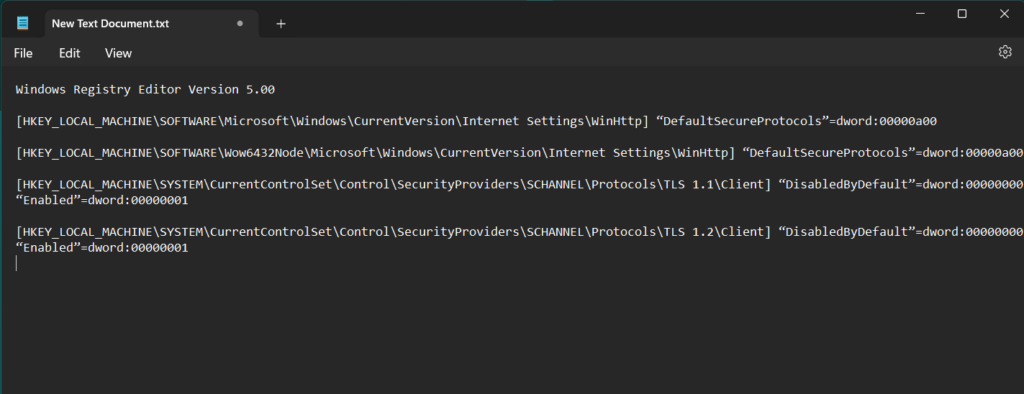
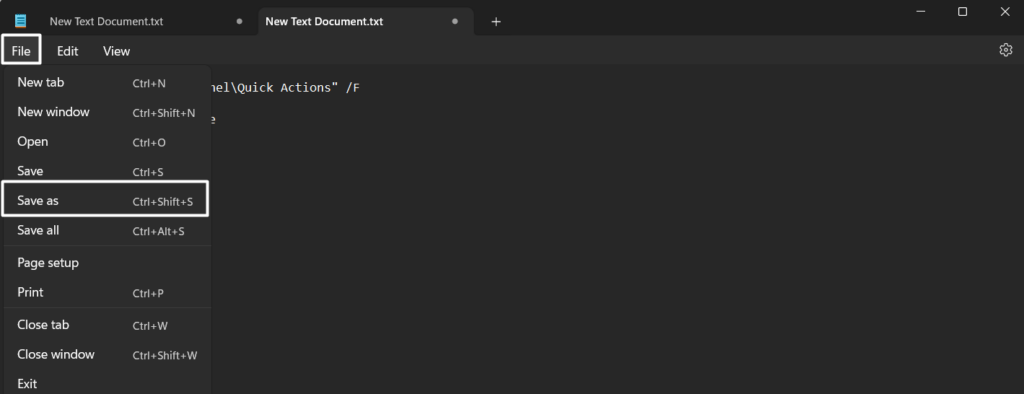
4. Click on File in the top ribbon menu, and then select Save as from the dropdown menu.
5. Type Enable TLS.reg in the File name: field and click on the Save button to save the file with this name.

6. Double-click on the new Enable TLS.reg registry file to apply it and then check the issue’s status.

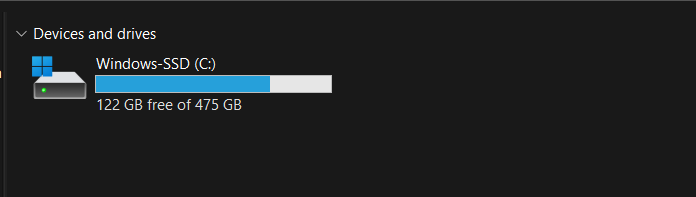
8. Make Sure Enough Space Is Available on Your System Disk
To use the Media Creation tool on your Windows 11 PC, it should have at least 8 GB of free space on your hard disk. So make sure your Windows system’s disk has this much free storage. You can check the same in the This PC section of the Windows File Explorer.
9. Restart All the Important Services
The working of the Media Creation tool also depends on the functioning of a few Windows services. It’s possible that the below-mentioned services aren’t working, which is why this issue is occurring:
- Background Intelligent Transfer Service (BITS)
- Server
- TCP/IP NetBIOS Helper
- Workstation
- IKE and AuthIP IPsec Keying Modules
- Windows Update or Automatic Updates
Due to this reason, we suggest you restart all the stated Windows services and check if doing so fixes the issue. You can check the below-mentioned steps to know how to restart them:
1. Open the Services utility on your Windows 11 PC using the Run utility or any other way.

2. Search for any of the above-mentioned Windows services in the Services tab and right-click on it.
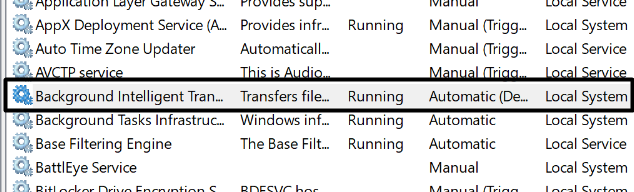
3. Choose the Restart option from the right-click menu to restart the selected Windows service.
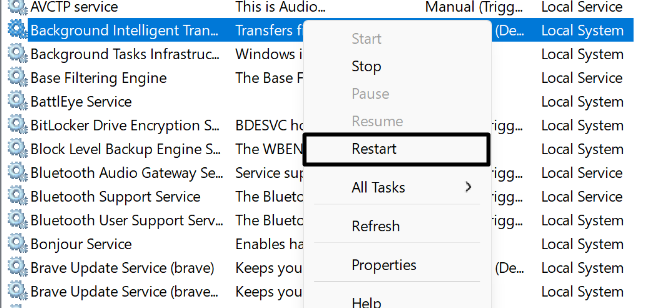
4. Apply the same steps to other mentioned Windows services and check if the issue is gone.
10. Create a New Registry Key
If nothing worked out for you until now, then there’s a higher chance that this solution would work. So, all you need to do is, dig a bit in the Registry Editor and create a new registry key called AllowOSUpgrade.
So, try the same with the below-mentioned instructions:
1. Open the Run utility, type regedit in its search box, and hit Enter to get the UAC prompt.
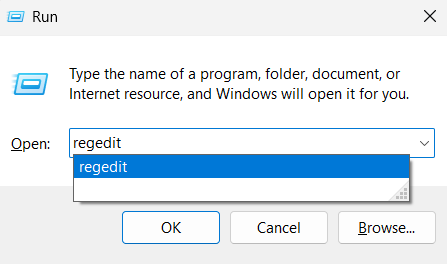
2. Click on Yes on the UAC prompt and go to the below-mentioned path in the Registry Editor:
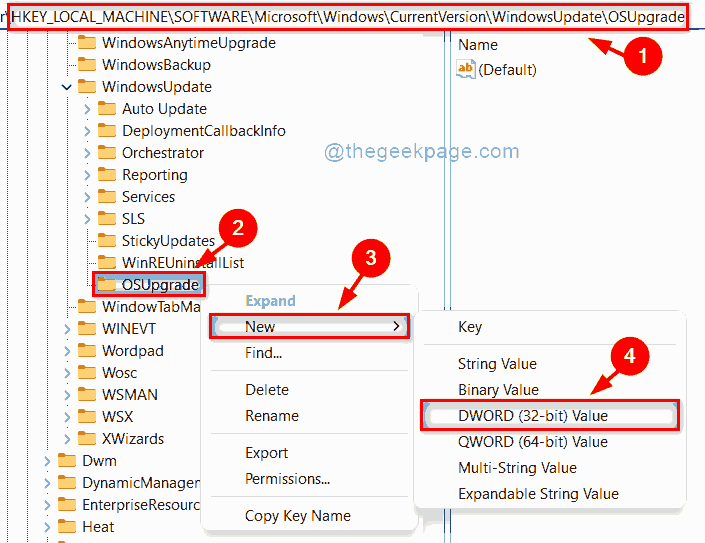
Computer\HKEY_LOCAL_MACHINE\SOFTWARE\Microsoft\Windows\CurrentVersion\WindowsUpdate\OSUpgrade![]()
3. Right-click the OSUpgrade key on the left and choose the New > DWORD (32-bit) Value option.
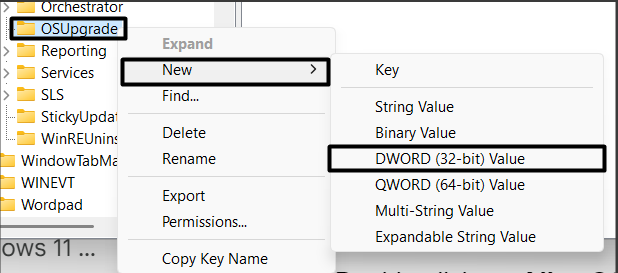
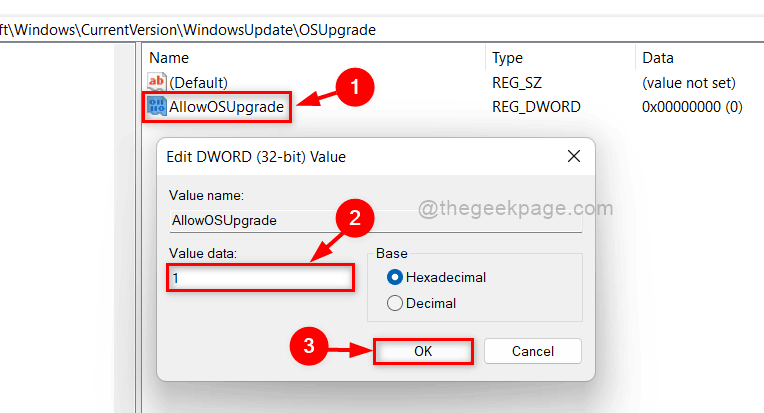
4. Enter AllowOSUpgrade in the Value name: text field and click the OK button to save the name.
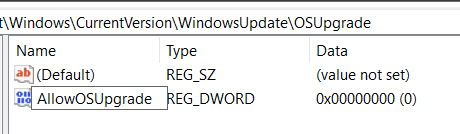
5. Double-click on AllowOSUpgrade in the right pane and enter 1 in the Value data: text field.
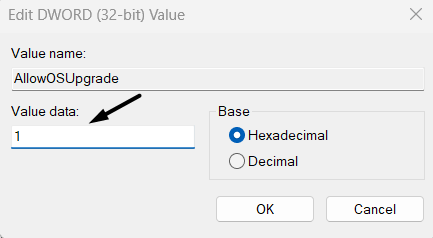
6. Click the OK button on the Edit DWORD(32-Bit) Value prompt and restart your PC to check the issue’s status.

11. Make Sure You’re On the Latest Windows Version
It could be possible that your Windows 11 PC isn’t running on the latest version of Windows. As a result, this problem is appearing. In that case, we suggest you install all pending Windows updates and then check if the Windows 11 Media Creation tool not working issue is fixed.
Try updating your Windows 11 PC by following the below-mentioned steps:
1. Launch the Settings app and click on the Windows Update option at the top right corner.
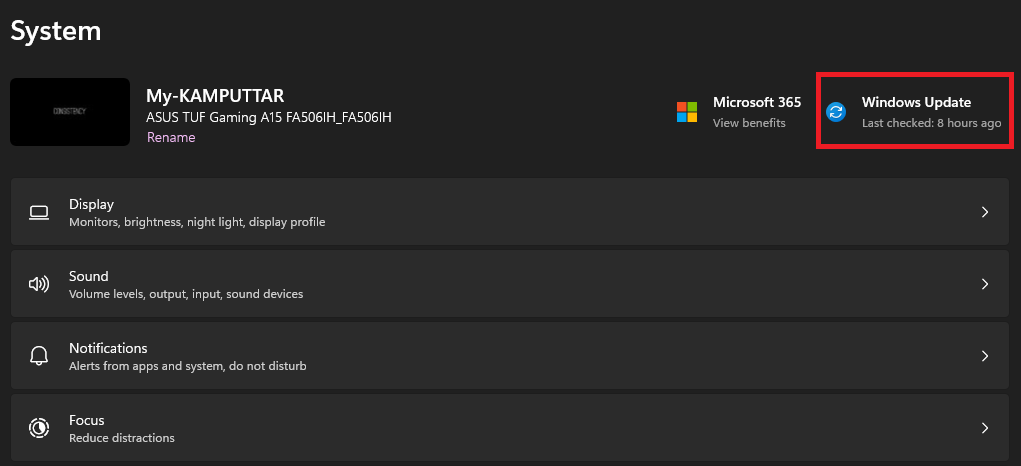
2. Click the Check for updates button in the following window to search for new Windows updates.

3. In case it shows some Windows updates to install, click the respective button to install them.

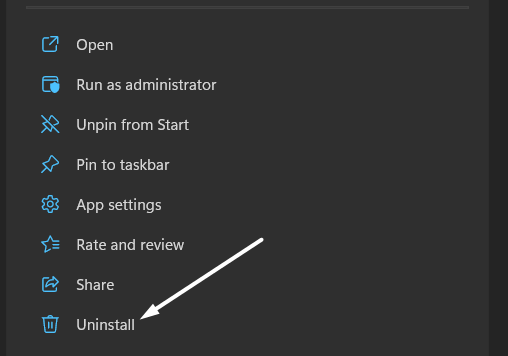
12. Reinstall the Media Creation Tool
One of the easiest ways to resolve all kinds of issues with the Windows Media Creation tool is to reinstall the tool itself. So, uninstall Media Creation from your system and reinstall it by clicking here. Once the tool is downloaded, install it and then check the issue’s status.
13. Clean the Installation Drive
One of Microsoft’s Independent Advisors advised affected users to clean the installation disk before upgrading to Windows’ latest edition.
This is because errors in the disk could also make the Media Creation tool ill. So clean your disk by following the steps right below:
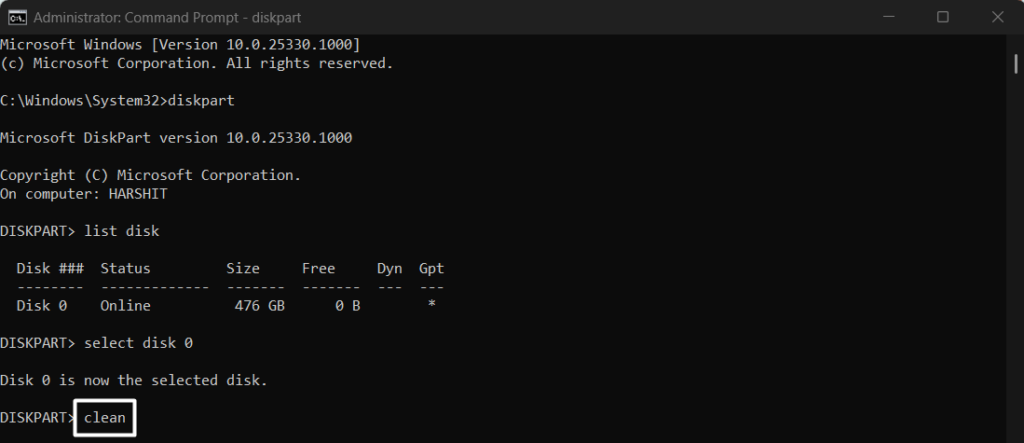
1. Open the Command Prompt program with administrative privileges on your Windows 11 PC.
2. Execute the below-listed command in the console to get a list of all disks with available space:
list disk
3. Run the below command in it but make sure to change “1” with the disk’s number that you want to clean:
select disk 1
4. Lastly, type the clean command in it and press Enter to start cleaning the selected disk.
14. Try An Alternate Way
If you’re still unable to clean install the new Windows 11 on your PC, then try another way. One of the ways to do so is by creating an installation USB drive. For that, you need to use the Rufus software.
You check our guide, as it explains the same in detail. This guide also mentions other ways to upgrade the system to the latest version, so check them too.
15. Clean Install Windows 11 Using ISO File
If the previous method also doesn’t work, then direct download the Windows 11 ISO file on your system and use it to install Windows 11 on your system’s drive. So, click here to download the Windows 11 ISO file on your PC.
Once you’ve downloaded the ISO, check the instructions mentioned in our guide to know how to clean install Windows 11 using it.
FAQs
Why Is Windows Media Creation Tool Not Launching?
You may not have the required permission to open the Windows Media Creation tool on your system. Some other reasons could be viruses, conflicting apps, insufficient disk space, etc.
Why Can’t Windows 11 Media Creation Tool Find USB?
If the Windows 11 Media Creation tool is unable to detect your USB, it could be possible that it isn’t properly connected to the system. Another reason could be problems with the USB port.
How Do I Fix Windows Media Creation Tool Error?
Restarting the system is one of the easiest solutions to resolve all the Windows Media Creation tool’s related errors. You can also try disabling the VPN client to check if it fixes those errors with it.
How Do I Fix Error Code 0x80072F8F 0x20000?
Follow the below-mentioned instructions to fix the 0x80072F8F 0x20000 error in Windows 11:
1. Hit the Windows key and R keys concurrently to open Run and type the below path in it:
C:\Windows\SoftwareDistribution\Download2. Press the Ctrl + A keys at the same time to select all the files and then click on the Bin icon in the top menu.
3. After deleting all the files, open the Command Prompt utility and execute the below command in it:
wuauclt.exe /updatenowHow To Install Windows 11 Without Media Creation Tool?
One of the methods to install Windows 11 without the Media Creation tool is directly downloading the Windows 11 ISO file. Another possible method is using the Rufus software.
Upgrade Windows With Ease
Most of us use the Media Creation tool to upgrade our system to the latest version. But sometimes, it suddenly stops working, due to which it becomes difficult to upgrade or clean install Windows on our system.
If you were also facing issues with the Media Creation tool on your Windows 11 PC, we hope they have gotten fixed now, as we shared some proven ways in this in-depth guide. Also, make sure to share which fix helped you get rid off Media Creation tool not working issue.
Windows 11 — новая операционная система от Microsoft, и многие пользователи стремятся установить ее на свои компьютеры. Однако, при попытке создать установочный носитель для Windows 11, возникают различные проблемы, которые могут помешать успешной установке операционной системы. В этой статье мы рассмотрим несколько возможных решений, которые помогут вам справиться с проблемой, когда создание установочного носителя Windows 11 не запускается.
Первая вещь, которую вы можете сделать, это проверить свои системные требования. Windows 11 имеет более жесткие требования к оборудованию, поэтому убедитесь, что ваш компьютер соответствует этим требованиям. Проверьте, достаточно ли у вас памяти, свободного места на жестком диске и мощности процессора для установки Windows 11. Если системные требования не выполняются, возможно, вам придется обновить компьютер или использовать более старую версию операционной системы.
Если ваши системные требования соответствуют, но проблема все еще не решена, следующим шагом может быть проверка загрузочного носителя. Возможно, ваш установочный носитель поврежден или есть проблемы с самой программой для создания установочного носителя. Попробуйте сделать другой установочный носитель или попытайтесь создать его с помощью другой программы. Также стоит проверить тот носитель, на котором вы пытаетесь создать установочный файл, на наличие ошибок или повреждений.
Если все предыдущие решения не привели к успеху, может понадобиться обратиться за помощью к профессионалам. Если у вас есть возможность, обратитесь в службу поддержки Microsoft или воспользуйтесь ресурсами сообщества пользователей для поиска решения вашей проблемы. Запомните, что вы не одиноки, и многие пользователи сталкиваются с подобными трудностями. Совместная работа и обмен опытом могут быть полезны при поиске решения.
В заключение, проблемы с созданием установочного носителя Windows 11 могут быть вызваны разными факторами, от системных требований до ошибок в программном обеспечении. Важно быть терпеливым и не унывать, пока не будет найдено решение. Помните, что проблема всегда имеет решение, и снаружи всегда есть помощь, если вы обратитесь к нужным источникам. Удачи вам в установке Windows 11!
Содержание
- Возможные решения проблемы создания установочного носителя Windows 11
- Проверка системных требований для установки Windows 11
- Обновление BIOS в случае несовместимости
- Пример таблицы для скачивания BIOS обновления:
- Использование официальной утилиты Microsoft для создания установочного носителя
- Установка с помощью образа ISO через Rufus
Возможные решения проблемы создания установочного носителя Windows 11
Если у вас возникают проблемы при создании установочного носителя для операционной системы Windows 11, есть несколько возможных решений:
- Проверьте системные требования: Убедитесь, что ваше устройство соответствует системным требованиям Windows 11. Проверьте объем свободного пространства на жестком диске, наличие необходимых драйверов и обновлений.
- Используйте официальный инструмент для создания установочного носителя: Скачайте официальный инструмент Media Creation Tool от Microsoft с официального сайта. Установите его и следуйте инструкциям для создания установочного носителя Windows 11.
- Обновите BIOS и драйверы: Проверьте наличие обновлений для BIOS и драйверов вашего устройства. Обновите их до последних версий, так как устаревшие драйверы могут привести к проблемам при создании установочного носителя.
- Отключите антивирусное программное обеспечение: Временно отключите любое антивирусное программное обеспечение на вашем компьютере, так как оно может блокировать создание установочного носителя. После завершения процесса можно снова включить антивирусную защиту.
- Попробуйте альтернативные инструменты: Если официальный Media Creation Tool не работает, попробуйте использовать альтернативные инструменты, такие как Rufus или WinToUSB. Они также позволяют создавать установочные носители для Windows.
Если ни одно из этих решений не помогло, возможно, проблема связана с аппаратными особенностями вашего компьютера или ошибкой в самом процессе создания носителя. В таком случае рекомендуется обратиться в техническую поддержку Microsoft или обратиться к специалисту.
Проверка системных требований для установки Windows 11
Перед созданием установочного носителя Windows 11 необходимо убедиться, что ваш компьютер удовлетворяет системным требованиям операционной системы. Вот основные требования, которые придется проверить:
- Процессор: Windows 11 требует 64-разрядный процессор с двумя и более ядрами и частотой работы не менее 1 ГГц. Проверьте, соответствует ли ваш процессор этим требованиям.
- Оперативная память: Windows 11 требует не менее 4 ГБ оперативной памяти. Убедитесь, что у вас есть достаточно оперативной памяти для установки новой операционной системы.
- Жесткий диск: для установки Windows 11 требуется не менее 64 ГБ свободного места на жестком диске. Проверьте, что на вашем жестком диске имеется достаточно места для установки операционной системы.
- Графический адаптер: Windows 11 требует графический адаптер, совместимый с DirectX 12 или более новой версией. Убедитесь, что ваш графический адаптер соответствует этим требованиям.
- Дисплей: Windows 11 рекомендует разрешение дисплея не менее 720p (1280 x 720 пикселей) и глубину цвета 8 бит на канал. Проверьте разрешение и глубину цвета вашего дисплея.
Если ваш компьютер соответствует всем вышеперечисленным системным требованиям, то вы готовы к созданию установочного носителя Windows 11. В противном случае, вам потребуется обновить или заменить некоторые компоненты вашего компьютера, чтобы он соответствовал требованиям операционной системы.
Обновление BIOS в случае несовместимости
Обновление BIOS может решить проблемы совместимости, так как производители выпускают обновления, чтобы добавить поддержку новых операционных систем или исправить ошибки, связанные с оборудованием. Вот несколько шагов, которые могут помочь вам обновить BIOS и решить проблему с созданием установочного носителя Windows 11:
- Определите модель материнской платы: Чтобы обновить BIOS, вам необходимо знать модель материнской платы вашего компьютера. Обычно модель указана на самой плате или в ее документации. Если не можете найти информацию на материнской плате, вы можете воспользоваться программными утилитами, такими как CPU-Z или Speccy, чтобы получить эту информацию.
- Посетите веб-сайт производителя: После определения модели материнской платы, посетите веб-сайт производителя вашего компьютера или материнской платы. Найдите раздел поддержки или загрузок, где можно скачать обновление BIOS.
- Скачайте и установите обновление BIOS: На странице загрузок найдите последнюю версию обновления BIOS для вашей модели материнской платы и скачайте ее. Обратите внимание на инструкции относительно процесса обновления и следуйте им внимательно, чтобы избежать возможных проблем. Важно помнить, что обновление BIOS может быть рискованным процессом, поэтому важно быть внимательным и следовать инструкциям точно.
- Обновите BIOS: После скачивания обновления BIOS следуйте инструкциям производителя для его установки. Обычно требуется запустить специальную программу, которая обновит микропрограмму BIOS на вашей материнской плате. Во время процесса обновления не выключайте компьютер и не отключайте питание, чтобы избежать повреждения микропрограммы.
После успешного обновления BIOS попробуйте создать установочный носитель Windows 11 снова. Если проблема совместимости была связана с устаревшей версией BIOS, она, скорее всего, будет решена после обновления.
Обратите внимание, что обновление BIOS может быть опасным процессом, поэтому рекомендуется быть осторожным и ознакомиться с дополнительной информацией и рекомендациями производителя. Если у вас возникнут вопросы или сомнения относительно обновления BIOS, лучше обратиться к профессионалу или службе поддержки производителя компьютера.
Пример таблицы для скачивания BIOS обновления:
| Модель материнской платы | Версия текущего BIOS | Доступная версия обновления BIOS | Ссылка для скачивания |
|---|---|---|---|
| ASUS Prime B450M-A | 1002 | 1201 | Ссылка |
| Gigabyte GA-AX370-Gaming | F22 | F40 | Ссылка |
| MSI MPG X570 GAMING EDGE WIFI | 7C37v192 | 7C37v1A3 | Ссылка |
Использование официальной утилиты Microsoft для создания установочного носителя
Для создания установочного носителя операционной системы Windows 11, вам потребуется использовать специальную утилиту, предоставляемую компанией Microsoft. Эта утилита называется «Media Creation Tool» и способна создать загрузочный USB-накопитель или ISO-файл для установки Windows 11 на ваш компьютер.
Чтобы воспользоваться утилитой, вы должны следовать этим шагам:
- Перейдите на официальный сайт Microsoft и найдите страницу загрузки Windows 11.
- На странице загрузки вы увидите ссылку для загрузки Media Creation Tool. Нажмите на эту ссылку, чтобы скачать утилиту.
- После скачивания откройте загруженный файл Media Creation Tool.
- Подтвердите условия лицензионного соглашения и выберите опцию «Создать установочные носители (USB-накопитель, DVD или ISO-файл) для другого компьютера».
- Выберите язык, редакцию и разрядность Windows 11, которую вы хотите загрузить.
- Выберите тип носителя, который вы хотите создать: USB-накопитель или ISO-файл.
- Если вы выбрали USB-накопитель, убедитесь, что вставили флеш-накопитель в компьютер, и выберите его в списке доступных устройств хранения.
- Нажмите кнопку «Далее» и дождитесь завершения процесса создания установочного носителя.
- После завершения процесса вы будете иметь готовый установочный носитель Windows 11, который можно использовать для установки операционной системы на другие компьютеры.
Использование официальной утилиты Microsoft — наиболее надежный и рекомендуемый способ создания установочного носителя для Windows 11. Следуя указанным выше шагам, вы сможете успешно создать загрузочный USB-накопитель или ISO-файл и установить новую операционную систему на ваш компьютер или другие устройства.
Обратите внимание: Перед созданием установочного носителя Windows 11 убедитесь, что ваш компьютер соответствует системным требованиям новой операционной системы, указанным на официальном сайте Microsoft.
Установка с помощью образа ISO через Rufus
Для установки Windows 11 с помощью Rufus вам потребуется следующее:
- ISO-образ Windows 11. Вы можете скачать официальный ISO-файл с образом операционной системы с официального сайта Microsoft или других надежных источников.
- Программа Rufus. Вы можете скачать ее со страницы официального сайта Rufus.
- USB-накопитель с достаточным объемом памяти. Убедитесь, что на накопителе нет важных данных, так как весь его контент будет удален.
После получения всех необходимых компонентов вы можете продолжить установку Windows 11 с помощью Rufus, следуя этим шагам:
- Запустите программу Rufus.
- Выберите свой USB-накопитель в разделе «Устройство».
- В разделе «Схема разделов» выберите «MBR» или «GPT» в зависимости от требований вашей системы.
- В разделе «Файловая система» выберите «NTFS».
- Нажмите на кнопку «Выбор» рядом с полем «Образ», и выберите скачанный ISO-образ Windows 11.
- Нажмите на кнопку «Начать» для начала процесса создания загрузочного носителя.
После завершения процесса создания загрузочного USB-накопителя с помощью Rufus вы можете использовать его для установки Windows 11. При загрузке компьютера с USB-накопителя вам будет предложено выбрать язык, настройки времени и другие параметры установки операционной системы.
Важно: Перед выполнением процесса установки убедитесь, что ваш компьютер соответствует системным требованиям Windows 11.
Теперь, когда вы знаете, как установить Windows 11 с помощью образа ISO через Rufus, вы можете избежать проблем, связанных с созданием установочного носителя с использованием официального инструмента, и успешно установить новую операционную систему на свой компьютер.
Windows Media Creation Tool is a very useful tool that can help you upgrade your Windows system to the latest version or install the latest Windows 10/11 on your device. However, if Windows Media Creation Tool is not working, do you know how to fix it? You can find some easy solutions here.
Windows Media Creation Tool is an official tool from Microsoft. You can use it to upgrade your system to the latest version or install the latest Windows 10/11 on your device. MiniTool Software has talked about Windows 10 Media Creation Tool in this article: A Complete Guide to Windows 10 Media Creation Tool: How to Use.
However, the usage of Windows 10 Media Creation Tool and Windows 11 Media Creation Tool is slightly different.
For example,
You can use Windows 10 Media Creation Tool to:
- Upgrade your PC to the latest version.
- Create a Windows 10 installation USB drive.
- Download a Windows 10 ISO file.
You can use Windows 11 Media Creation Tool to:
- Create a Windows 11 installation USB drive.
- Download a Windows 11 ISO file.
You see the only difference is that you can’t use Windows 11 Media Creation Tool to directly upgrade your PC now. But it is not a big problem. You can use Windows 11 Installation Assistant to update your system. The effect is the same.
Windows 10/11 Media Creation Tool is not preinstalled on your PC. You need to download it from the Microsoft software download site.
- Download Windows 10 Media Creation Tool
- Download Windows 11 Media Creation Tool
After downloading Windows 10/11 Media Creation Tool, you can directly open and run it to do what you want to do. However, some users report that their Windows Media Creation Tool is not working.
There are multiple scenarios for this problem. For example:
- Windows 11 Media Creation Tool not working
- Windows 10 Media Creation Tool not working
- Windows Media Creation Tool won’t run
- Windows Media Creation Tool won’t open
- Windows Media Creation Tool couldn’t run on a PC
- And more….
We propose some solutions to these problems. You can try them to help you out.
If Windows Media Creation Tool is not working or you can’t open it on your PC, you can delete the tool and download it again. This is the quickest way to solve this issue: you need to make sure your downloaded Media Creation Tool is complete.
Your internet connection should be enabled and work smoothly during the download process. This is also to ensure the integrity of the download. On the other hand, it also requires a good network connection when using Windows Media Creation Tool.
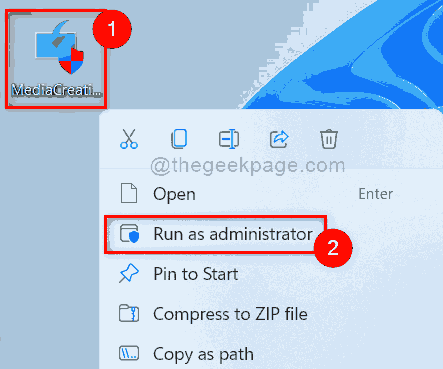
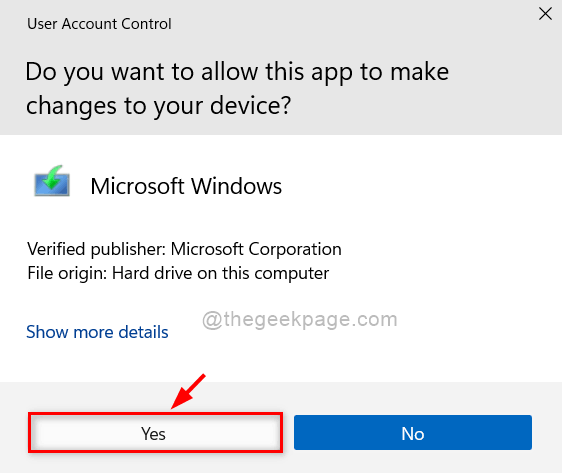
If the above method doesn’t work for you, you can run the tool as administrator to have a try. You can right-click the Media Creation Tool and select Run as administrator. If the User Account Control interface pops up, you need to click the Yes button to continue.

Fix 3: Create an AllowOSUpgrade Registry Key
Windows Registry is an administrative tool that saves information about your installed programs and services on your Windows PC. It contains an OSUpgrade registry key and it is related to your Windows update. You can create an AllowOSUpgrade Registry key to allow Windows Media Creation Tool to run and upgrade your system.
Tips:
You should back up the registry key in advance to protect your system.
Step 1: Click the search icon from the taskbar, then search for Registry Editor. Select Registry Editor to open this tool. If you receive the User Account Control interface, click the Yes button to continue.
Step 2: Go to the following path. You can directly copy and paste this path to the address bar and press Enter to open the path.
Computer\HKEY_LOCAL_MACHINE\SOFTWARE\Microsoft\Windows\CurrentVersion\WindowsUpdate\OSUpgrade
Step 3: Right-click the OSUpgrade key and go to New > DWORD (32-bit) Value to create a new key. Then, rename the new key to AllowOSUpgrade.
Step 4: Double-click the newly created value to open it. Then, change the value data to 1.

Step 5: Click OK to save the change.
Step 6: Restart your computer.
After these steps, you can run Windows Media Creation Tool again and check if it runs normally.
Fix 4: Enable the Relevant Services
If Windows Media Creation Tool is not working on your PC, you also need to check if the Windows update relevant services are enabled.
You may disable one or more of the following services by mistake but you don’t it:
- Background Intelligent Transfer Service (BITS)
- Server
- TCP/IP NetBIOS Helper
- Workstation
- IKE and AuthIP IPsec Keying Modules
- Windows Update
Any service being shut down will affect Windows 10/11 Media Creation Tool. You can open Services to check.
Step 1: Press Windows + R to open Run.
Step 2: Type services.msc in the Run dialog and press Enter to open the Services app.
Step 3: Check if the above services are enabled. If one service is disabled, you can double-click that service and select Automatic for Status type. Then, click Apply and OK to save the change.
Step 4: Close Services.
After these steps, you can run Media Creation Tool again and see if it can run successfully.
Fix 5: Check the Available Space on Your System Disk
You should have at least 8 GB of free space on the C drive to run Media Creation Tool on your PC. You can go to File Explorer to check if the free space is enough. If not, you can delete unimportant files on the C drive to free up more space. You can also run Disk Cleanup to get more available space.
Here are 10 ways to free up disk space on Windows 10/11.
Fix 6: Use another Way to Upgrade Your PC
Using Media Creation Tool is not the only way to upgrade your PC. If you can’t use this tool to perform a Windows 10/11 update, you can use another way to do the job.
For example, you can check for updates in Windows Update, then download and install the available update on your device.
You can also download a Windows 10/11 disk image (ISO), create a Windows 10/11 installation USB drive using Rufus, and then install Windows 10/11 from USB.
Fix 7: Use another Way to Create a Windows 10/11 Installation USB Drive
If you can’t use Windows Media Creation Tool to create an installation USB drive, you can try another tool like Rufus to create a Windows installation USB drive. This method is free: Rufus is free for download, and Windows 10/11 ISO file is free for download. You just need to prepare a USB drive that has at least 8 GB of space.
Fix 8: Use another Way to Download a Windows 10/11 ISO File
If you can’t use Windows Media Creation Tool to download an ISO file due to Media Creation Tool not working or opening, you still have other choices to download a Windows 10/11 ISO file.
Microsoft allows you to directly download a Windows 10 ISO file (all editions) on a non-Windows device from the Windows 10 software download page. You can set a non-Windows agent in Chrome and then download a Windows 10 ISO file.
Windows 11 ISO download is different. You can download the Windows 11 disk image directly from Microsoft’s official site.
So, it is not a big deal if Windows Media Creation Tool is not working on your PC. You see, there are many ways to replace this tool.
Click to Tweet
Recover Your Lost and Deleted Files on Windows 10/11
Usually, Windows 10/11 updates via Media Creation Tool will not delete files on your device. But to protect your files and system, you’d better use MiniTool ShadowMaker to back up your computer to an external hard drive. If a Windows update destroys your system or deletes your files, you can restore them using your backup.
MiniTool ShadowMaker TrialClick to Download100%Clean & Safe
However, if there is no available backup to restore your files, what can you do to save your losses? You can try professional data recovery software like MiniTool Power Data Recovery.
It is a free file recovery tool that is specially designed to recover files from different types of data storage devices. This MiniTool data recovery software can work in different situations. For example:
- When you permanently delete a file from your computer, you can recover it using this software as long as that file is not overwritten by new data.
- When you can’t open a data storage drive, you can use this tool to rescue your files and then fix the inaccessible drive.
- If you want to recover data from an SD card, you can also try this tool.
- When your Windows system corrupts, you can boot your device from the bootable edition of this software and then recover data. After that, you can feel free to reinstall Windows or use other methods to fix the system.
- If you can’t find some of your important files after upgrading Windows 10/11 to the latest version, you can run this software to scan the drive that previously saved the files and recover them.
You can first run the MiniTool Power Data Recovery trail edition to see if it can find your needed files and then decide whether to use this tool to recover data.
MiniTool Power Data Recovery TrialClick to Download100%Clean & Safe
You can follow these steps to recover data using this MiniTool software.
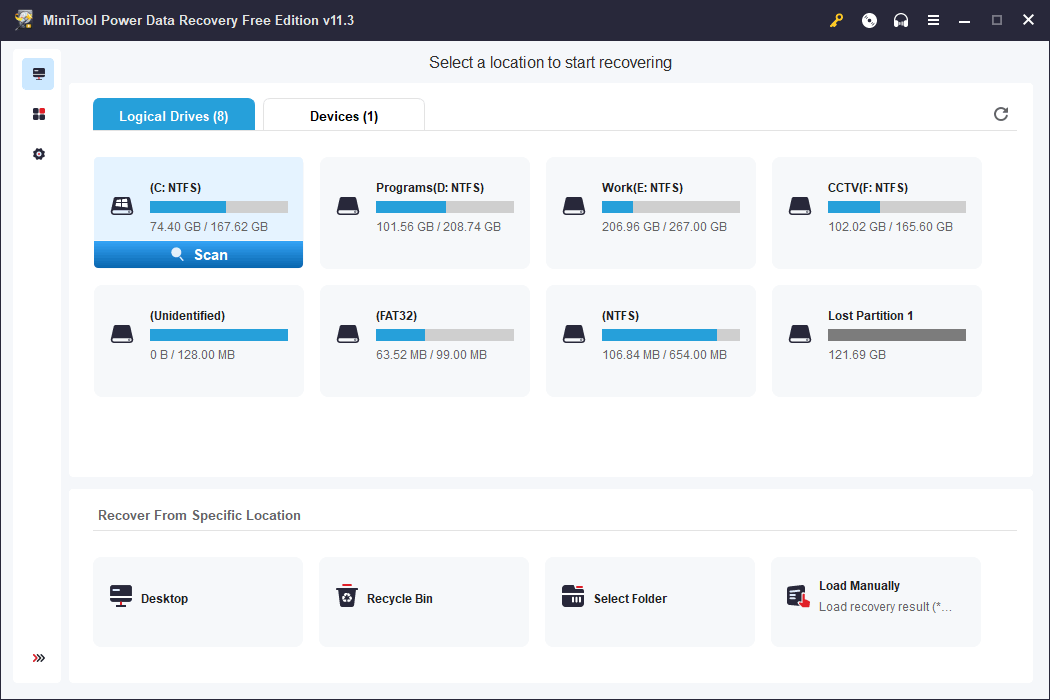
Step 1: Launch MiniTool Power Data Recovery.
Step 2: You need to find the drive where the lost files were previously saved, hover over that drive, and then click the Scan button to start scanning.
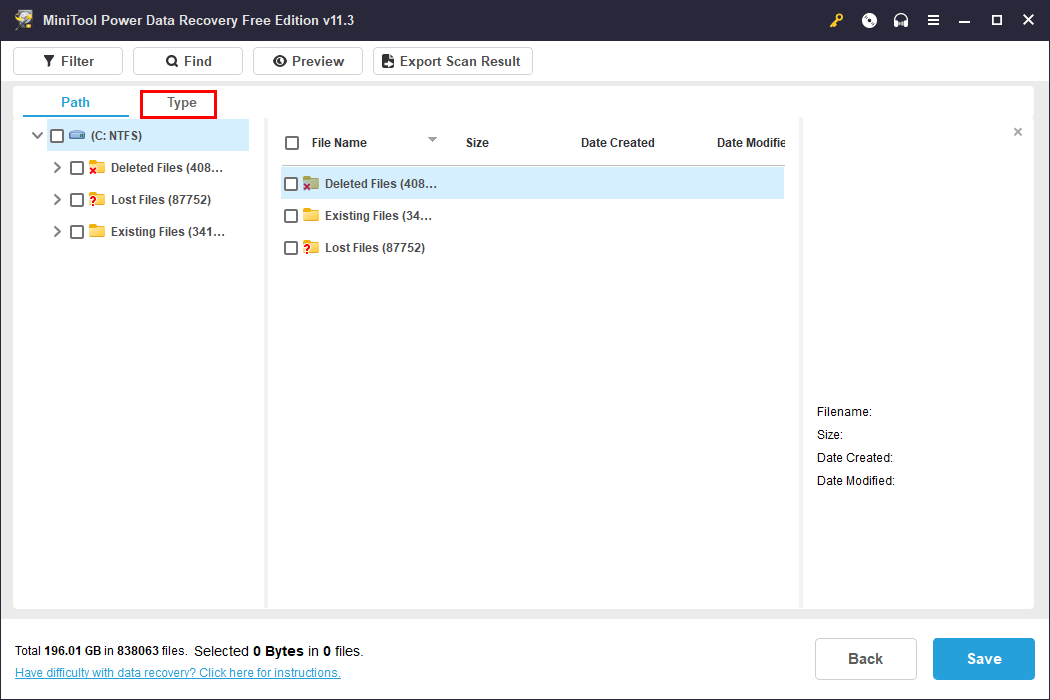
Step 3: After scanning, this software will show you the files it finds. These files are listed by path by default. You can open each path to look for your needed items. If you want to find certain types of files, you can switch to Type to make this software display files by type, then you can find files by type.
To recover data using this software, you need to use a full edition of this software. You can get a license key from the MiniTool official site, then click the key icon from the above ribbon menu, enter the license key, and press Enter to register the software.
After registering the software, you can select all your needed files once, then click the Save button, and select a suitable path to save them. To avoid data from being overwritten, the destination folder should not be the original location of the lost files.
Wrap Things up
By reading this, you should know the things you can do to fix the issue if Windows Media Creation Tool is not working on your PC. You can take steps to resolve the problem. You can also use another way to do the same thing that Media Creation Tool should do for you.
Additionally, if you are looking for a data recovery program to retrieve your files, you can try MiniTool Power Data Recovery.
Should you have other related issues that need to be fixed, you can let us know in the comments. You can also contact us via [email protected].
Download Windows Speedup Tool to fix errors and make PC run faster
Windows 11 Installation Assistant is a tool that helps users to update their Operating System to the latest version. However, some users cannot access the tool as Windows 11 Installation Assistant is not opening. According to reports, Windows 11 Installation Assistant launches but crashes immediately.

If Windows 11 Installation Assistant is not opening, follow the solutions and workarounds mentioned below to resolve your issue.
- Run the assistant as administrator
- Disable Antivirus software
- Run System File Checker
- Update the Graphics Driver as well as the OS
- Install Windows 11 using Media Creation Tool
Let us talk about all the solutions in detail.
1] Run the assistant as administrator
The first thing we would suggest is to run the assistant as an administrator to ensure it has permission to access the necessary files needed for launching. To do the same, right-click on the executable file and select run as administrator and then check whether it’s now opening or not.
Read: Windows 11 Installation Assistant is not working
2] Disable security software temporarily
The Installation assistant may not open due to third-party antivirus software; therefore, we recommend disabling all the antivirus software and then trying to open this utility. If there is no issue opening the Installation assistant is open, antivirus software was the one causing the problem. So, go ahead and disable Windows Defender and third-party antivirus if you have one, and then run the assistant; hopefully, it will do the trick.
3] Run System File Checker
Since Windows Installation assistant is a Windows tool, System File Checker can scan the protected system files, and if any corruption is detected, it will replace the file with cached ones.
Click Win + S to open the search box, type cmd, and run it with administrator rights. Now, to run System File Checker, type the following command and then hit the Enter button.
sfc/scannow
This will take some time, and once the whole process is completed, check whether the Installation assistant is back to its previous state.
4] Update the Graphics Driver as well as the OS
Outdated or corrupted graphics drivers can also be responsible for why you can’t open Installation Assistant on Windows 11. Hence, we recommend updating your device’s Graphics drivers as well as the current Operating system and then checking if the issue gets fixed.
5] Install Windows 11 using Media Creation Tool
If nothing worked for you, your last resort is to install Windows 11 using Media Creation Tool. Media Creation Tool will allow you to download the ISO file of Windows 11 that you can either run from the folder or mount it using an external drive. Either way, you will be able to install Windows 11 pretty easily.
Hopefully, you can resolve the issue using the solutions mentioned in this post.
Read: Windows Update Assistant is stuck at 99%
Why won’t the Windows 11 installer install?
Windows 11 Installer may not install due to missing updates or outdated software. Apart from these basic reasons, using antivirus software other than Windows Defender can also cause upgrade problems. So it’s necessary to deactivate the antivirus software and then try to do the same.
Also Read: Windows 11 Installation Assistant error 0xc0000409
How do I fix error code 0x8007007f on Windows 11 Installation Assistant?
The error code 0x8007007f appears on the screen along with the “Something went wrong” error message when upgrading to the new Windows 11 using Windows 11 Installation Assistant. This error code is generally due to inadequate storage or disk space, administrator rights, and third-party antivirus software, among other things. So to fix this, we suggest disabling antivirus software and making sure that the PC has enough space.
Read: Windows 11 Installation Assistant is slow.
Anand Khanse is the Admin of TheWindowsClub.com, a 10-year Microsoft MVP (2006-16) & a Windows Insider MVP (2016-2022). Please read the entire post & the comments first, create a System Restore Point before making any changes to your system & be careful about any 3rd-party offers while installing freeware.
Microsoft представила лучшую и отличную версию/обновление операционной системы Windows 10 под названием Windows 11 примерно в октябре 2021 года. Обновление или установка Windows 11 на самом деле несложно, а инструмент для создания мультимедиа позволяет пользователям Windows легко обновить его. Но многие пользователи Windows сообщают, что при попытке установить Windows 11 с помощью инструмента для создания мультимедиа они получили сообщение об ошибке. Возникла проблема с запуском этого инструмента и они не могли продолжить установку. Если вы также столкнулись с этой проблемой и не можете установить Windows 11 с помощью инструмента для создания носителя, не паникуйте. Мы собрали несколько возможностей и получили несколько решений, которые могут помочь вам установить Windows 11 в вашей системе.
Оглавление
Исправление 1: откройте Media Creation Tool от имени администратора
Шаг 1: Чтобы загрузить инструмент Media Creation напрямую, просто нажмите на ссылку ниже.
https://go.microsoft.com/fwlink/?linkid=2156295
Шаг 2: После загрузки инструмента для создания мультимедиа в вашей системе поместите его на рабочий стол для вашего удобства.
Шаг 3: Затем щелкните правой кнопкой мыши инструмент создания мультимедиа и выберите Запустить от имени администратора из контекстного меню, как показано ниже.
Шаг 4: Нажмите да в приглашении UAC, чтобы продолжить, как показано ниже.
Шаг 5: Затем следуйте инструкциям на экране и без проблем установите Windows 11 в вашей системе.
Надеюсь, это решило вашу проблему.
Исправление 2: удалите файл Media Creation Tool и загрузите его снова
Иногда из-за отсутствия стабильного подключения к Интернету файл инструмента для создания мультимедиа мог загружаться неправильно. Поэтому этот инструмент работает неправильно и выдает ошибку, и вы не можете установить Windows 11 в своей системе. Так что просто выполните несколько шагов, указанных ниже.
Шаг 1: Убедитесь, что у вас стабильное подключение к Интернету, один раз проверив маршрутизатор Wi-Fi, перезапустив его или проверив кабельное соединение, если вы используете Ethernet.
Шаг 2: Удалите файл Media Creation Tool из вашей системы.
Шаг 3: Затем загрузите новый инструмент для создания мультимедиа, просто нажав на эту ссылку ниже.
Нажмите здесь, чтобы загрузить инструмент для создания мультимедиа
Шаг 4. После загрузки инструмента попробуйте установить Windows 11 в своей системе, следуя инструкциям на экране.
Надеюсь, это должно решить вашу проблему.
Исправление 3: очистить место для хранения в C: диск в вашей системе
- Поскольку операционные системы устанавливаются на диск C: в вашей системе, и если места не так много, действительно необходимо установить и установить операционную систему Windows, есть большая вероятность, что у вас возникнут проблемы такого типа при установке Windows 11.
- Поэтому всегда лучше очистить место для хранения в C: диск, удалив ненужные ненужные файлы, а также переместив другие огромные файлы на другой диск.
- Выделите не менее 20 ГБ места для установки Windows 11 в вашей системе.
- После очистки места на диске C: попробуйте установить Windows 11 с помощью Media Creation Tool в вашей системе.
Надеюсь, это решило вашу проблему.
Исправление 4: внесите изменения в файл реестра с помощью редактора реестра
ПРИМЕЧАНИЕ : Прежде чем приступить к этому исправлению, обязательно сохраните резервная копия файла реестра в вашей системе. Потому что даже незначительные изменения могут повредить всю систему, и если у вас есть резервная копия, вы можете вернуть ее обратно в любое время позже.
Шаг 1: Нажмите Виндовс + Р ключи вместе, чтобы открыть Бегать чат.
Шаг 2: Введите regedit в поле запуска и нажмите Входить ключ, чтобы открыть Редактор реестра в вашей системе.
Шаг 3: Нажмите да в запросе UAC для продолжения.
Шаг 4: Скопируйте и вставьте указанный ниже путь в чистую и пустую адресную строку редактора реестра.
Шаг 5: Затем нажмите Входить клавишу на клавиатуре, чтобы добраться до Обновление ОС ключ реестра.
HKEY_LOCAL_MACHINE\SOFTWARE\Microsoft\Windows\CurrentVersion\WindowsUpdate\OSUpgrade
Шаг 6: После этого щелкните правой кнопкой мыши на Обновление ОС раздел реестра и наведите курсор Новый вариант.
Шаг 7: Выберите DWORD (32-битное) значение из контекстного меню, как показано ниже.
Шаг 8: Переименуйте его в Разрешить обновление ОС и откройте его, дважды щелкнув по нему.
Шаг 9: Введите значение 1 в Значение данных поле и нажмите В ПОРЯДКЕ кнопку для внесения изменений.
Шаг 10: Затем закройте редактор реестра и перезагрузите систему.
Шаг 11: Теперь проверьте, решена ли проблема и можете ли вы установить Windows 11 с помощью инструмента для создания носителя в вашей системе.
Надеюсь, это решило вашу проблему.
Исправление 5: создание загрузочного диска Windows 11 с помощью RUFUS
Шаг 1: Перейдите на страницу загрузки Microsoft Windows 11, нажав на ссылку, указанную ниже.
Кликните сюда перейти на страницу загрузок
Шаг 2. Прокрутите вниз страницу загрузок и нажмите Выберите загрузку выпадающая кнопка под Скачать образ диска Windows 11 (ISO) как показано ниже.
Шаг 3: Затем выберите Windows 11 (многосерийный ISO) из списка.
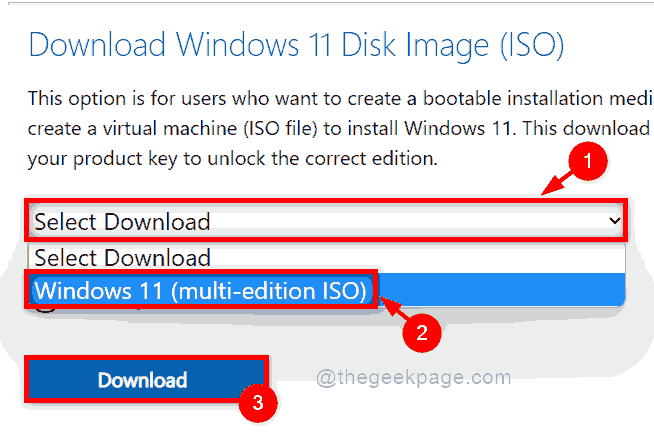
Шаг 4: Далее выберите язык продукта из списка (например: Английский) и нажмите Подтверждать кнопку, как показано на скриншоте ниже.
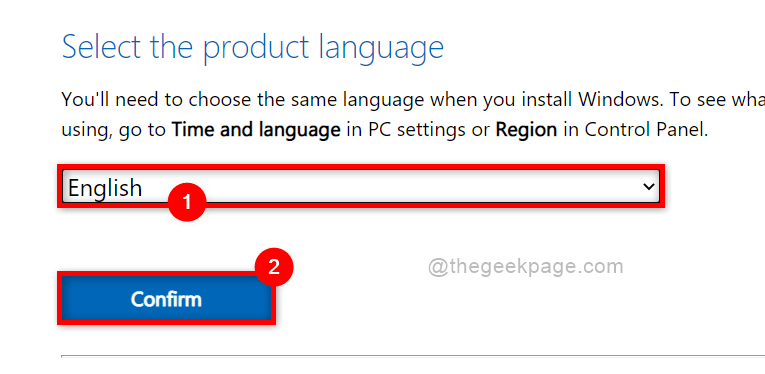
Шаг 5: После выбора языка нажмите 64-битная загрузка кнопку, чтобы начать загрузку ISO-файла Windows 11.
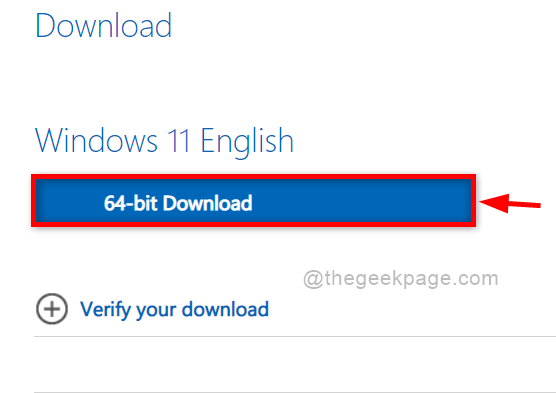
Шаг 6: Начнется загрузка файла ISO, и это займет много времени, так как размер файла составляет около 5,2 ГБ.
Шаг 7. Тем временем загрузите инструмент Rufus от нажмите здесь.
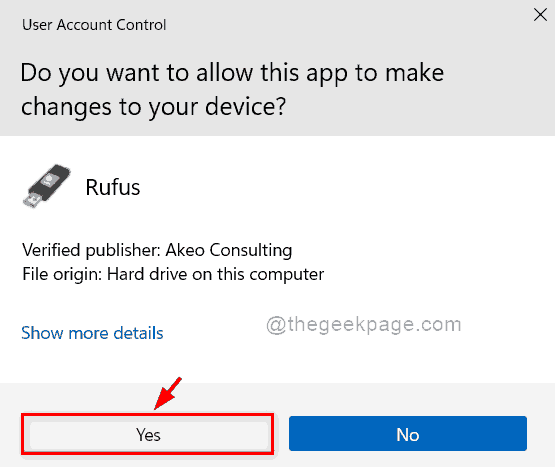
Шаг 8: После загрузки обоих файлов откройте исполняемый файл Rufus напрямую и нажмите да в приглашении UAC открыть.
ПРИМЕЧАНИЕ: Удостовериться Флешка или DVD вставляется в системный порт для создания загрузочного устройства.
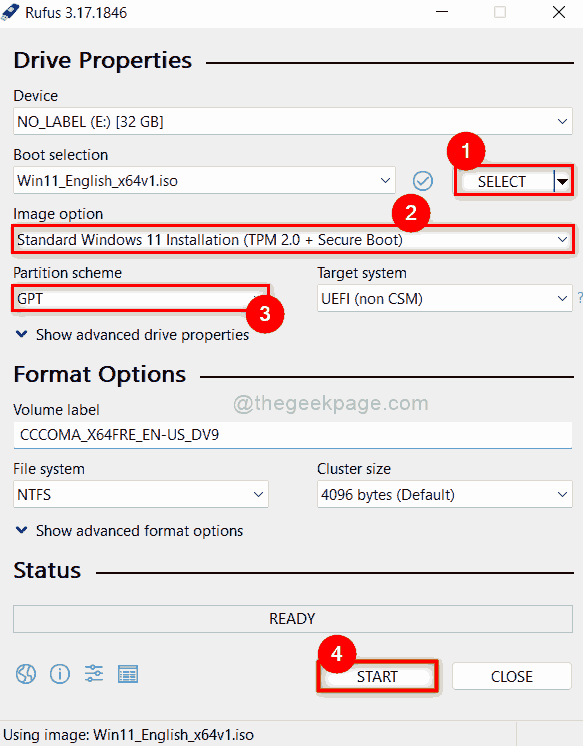
Шаг 9: Нажмите на ВЫБРАТЬ кнопку, чтобы просмотреть систему для выбора файла образа Windows 11, который вы скачали ранее.
Шаг 10: Затем выберите Стандартная установка Windows 11 (TPM 2.0 + безопасная загрузка) от Вариант изображения раскрывающийся список.
Шаг 11: Убедитесь GPT выбран в качестве схемы разделов и нажмите НАЧАЛО кнопку в нижней части инструмента Rufus, как показано на изображении ниже.
Шаг 12: После этого загрузочное устройство готово к установке.
Шаг 13. Попробуйте установить Windows 11 с помощью этого загрузочного устройства в вашей системе.
Надеюсь, это должно решить проблему.
Вот и все, ребята.
Надеюсь, что эта статья была информативной и интересной. Пожалуйста, сообщите нам в разделе комментариев, какое исправление сработало для вас.
Спасибо.