Когда на маршрутизаторе нет порта, подключение к Wi-Fi невозможно. В этом случае вы можете использовать Сетевой мост в Windows 10 для подключения других компьютеров к сетевому подключению.
Сетевой мост уже давно является встроенной функцией Windows. Мост позволяет соединить 2 или более сетевых сегментов вместе, чтобы устройства могли подключаться к сети в случае, если они не могут быть подключены напрямую к маршрутизатору или коммутатору.
1. Некоторые примечания перед началом
Перед тем, как начать настройку Bridge Connection в Windows 10, вам понадобится как минимум 2 сетевых адаптера. Один для использования подключения к Интернету и один для подключения к другому компьютеру.
Также при настройке Connection Bridge в Windows 10 (или в предыдущих версиях Windows) основной сетевой адаптер на сервере теряет подключение к Интернету.
Чтобы восстановить доступ к Интернету, необходимо вручную настроить статический IP-адрес (статический IP-адрес).
Первое, что вам нужно сделать, это сохранить информацию о текущем IP-адресе DHCP-сервера в локальной сети (Local Netwrok).
Чтобы просмотреть информацию о текущем IP-адресе, выполните следующие действия:
1. Нажмите комбинацию клавиш Windows + X, чтобы открыть Меню опытного пользователя и выберите Командная строка.
2. Введите указанную ниже командную строку в окно командной строки и нажмите Enter:
ipconfig / все
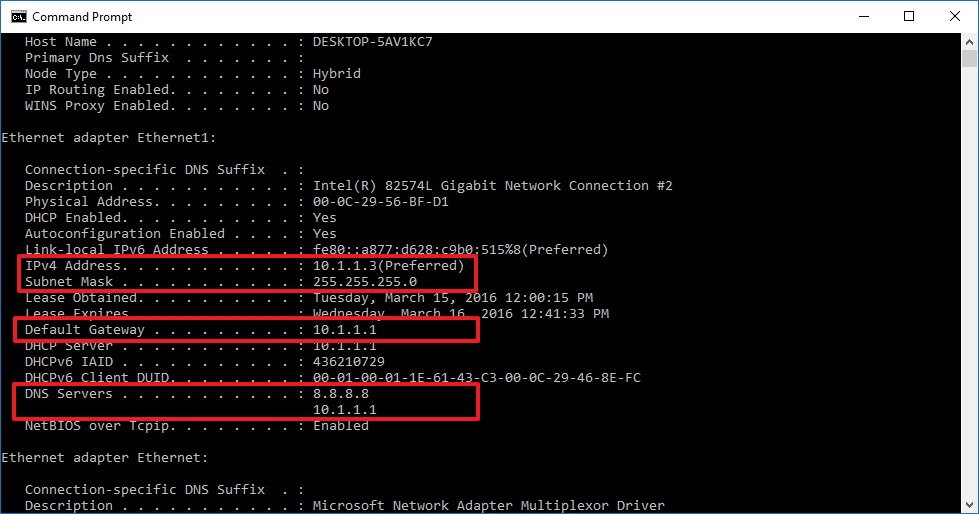
3. Еще раз обратите внимание на настройку IP-адреса, который сетевой адаптер (сетевой адаптер) подключает к Интернету.
Обратите внимание на некоторую информацию, такую как: IPV4, маска подсети, шлюз по умолчанию и адрес DNS-серверов.
1. Нажмите комбинацию клавиш Windows + X, чтобы открыть меню опытного пользователя, затем выберите «Сетевые подключения».
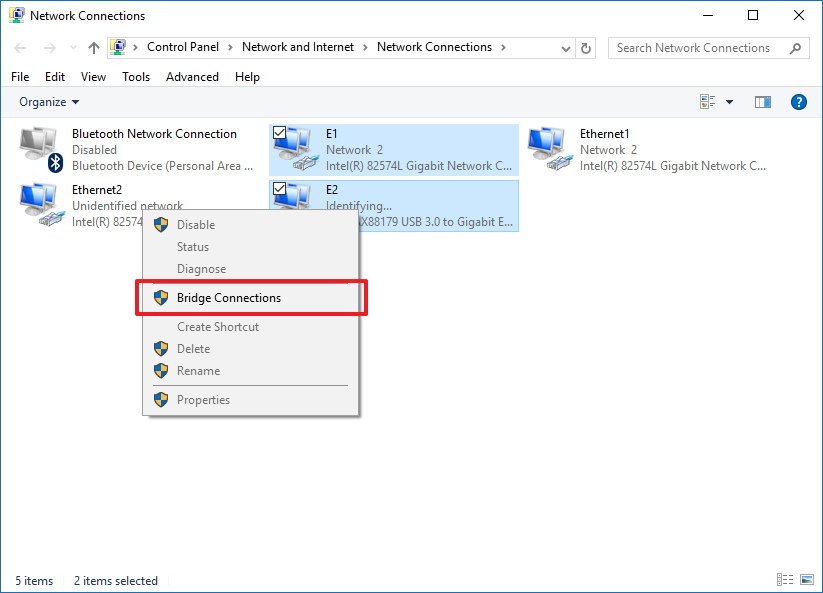
2. Выберите сетевой адаптер (сетевой адаптер), подключенный к Интернету, и сетевой адаптер, который вы хотите использовать для подключения Bridge.
3. Щелкните правой кнопкой мыши и выберите «Мостовые соединения».
На этом этапе устройства, подключенные к порту моста, могут получить доступ к сети и Интернету с информацией об IP-адресе маршрутизатора. Однако хост-компьютер Bridge не может получить доступ к Интернету, если к сети не подключен третий сетевой адаптер или статический IP-адрес.
3. Как восстановить доступ в Интернет после установки моста?
Чтобы получить доступ к Интернет-соединению прямо с сервера, выполните следующие действия:
1. Нажмите комбинацию клавиш Windows + X, чтобы открыть Меню опытного пользователя и выбрать Сетевые подключения.
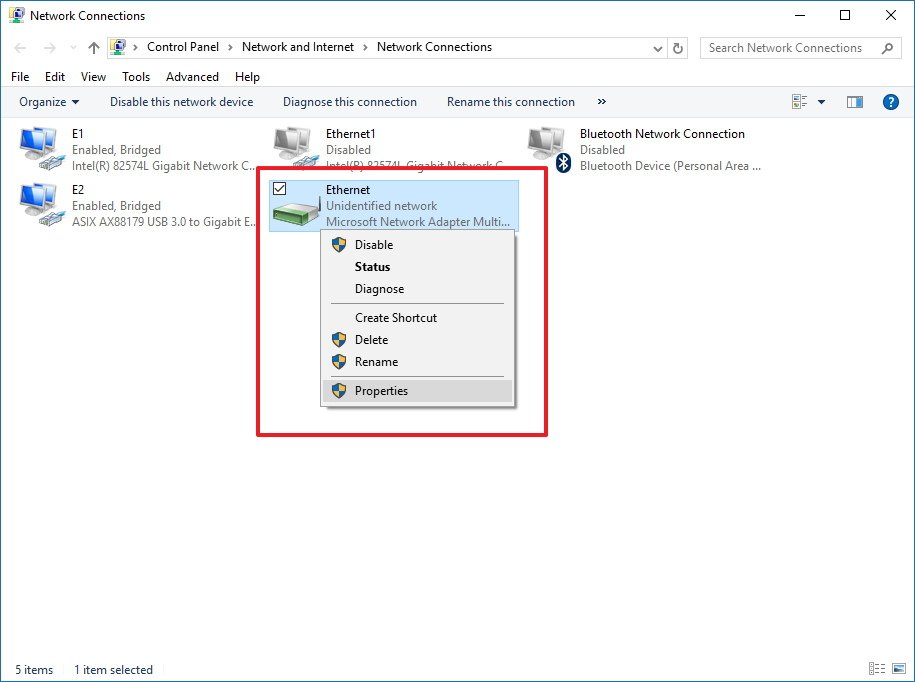
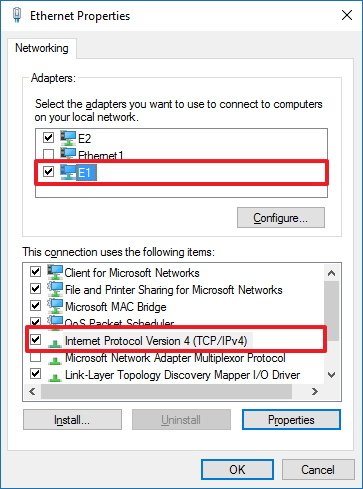
2. Щелкните правой кнопкой мыши мост адаптера и выберите «Свойства».
3. Выберите сетевой адаптер для подключения к Интернету.
4. Выберите Интернет-протокол версии 4 (TCP / IPv4).
5. Щелкните “Свойства”.
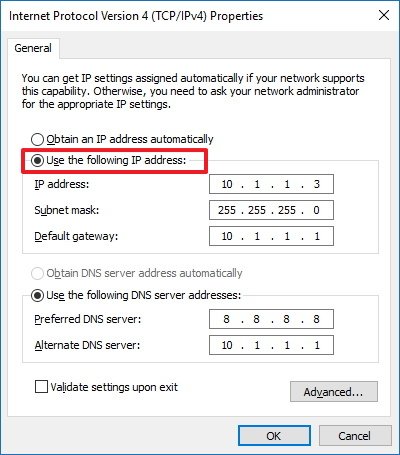
6. Выберите вариант Использовать следующий IP-адрес.
7. Используйте информацию об IP-адресе, указанную в приведенных выше инструкциях, для назначения статическому IP-адресу.
7. Щелкните ОК.
8. Для завершения нажмите «Закрыть».
4. Как добавить к сетевому мосту один или несколько других сетевых адаптеров?
1. Щелкните сетевой адаптер правой кнопкой мыши и выберите Добавить в мост.
2. Подключите игровой контроллер или другой компьютер, устройство будет автоматически настроено с локального маршрутизатора (Local Router).
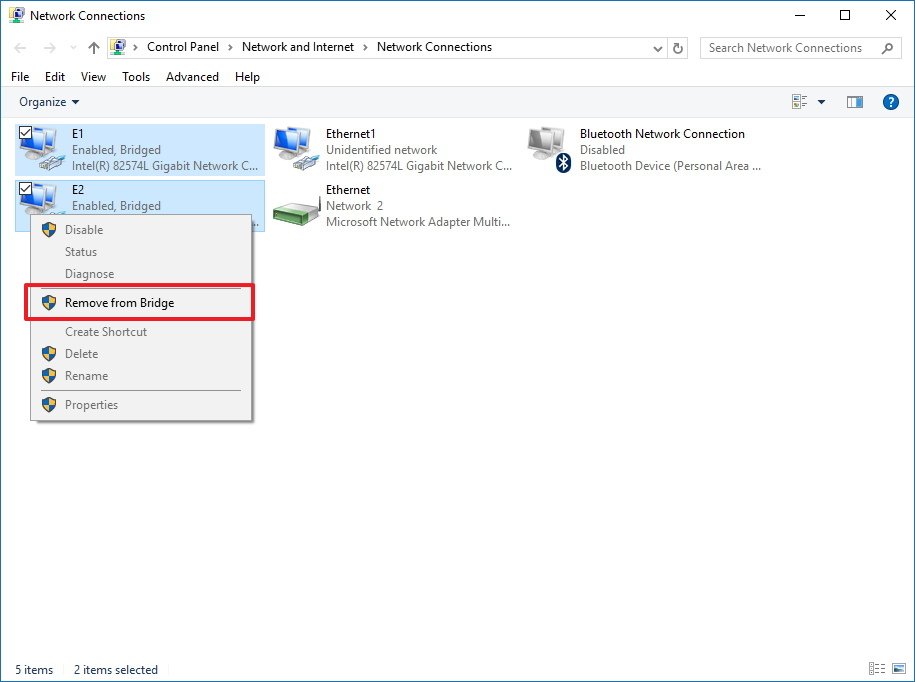
5. Удалите настройку моста с компьютера.
Если вам не нужно использовать мостовое соединение, вы можете выбрать 1 или выбрать все сетевые адаптеры, а затем выбрать «Удалить из моста».
Теперь вы можете видеть, что мост адаптера больше не отображается в сетевых подключениях. Если мост адаптера все еще появляется, вам нужно только перезагрузить компьютер.
Последний шаг – продолжить удаление настройки статического IP-адреса.
1. Щелкните сетевой адаптер правой кнопкой мыши и выберите «Свойства».
2. Выберите Интернет-протокол версии 4 (TCP / IPv4).
3. Щелкните “Свойства”.
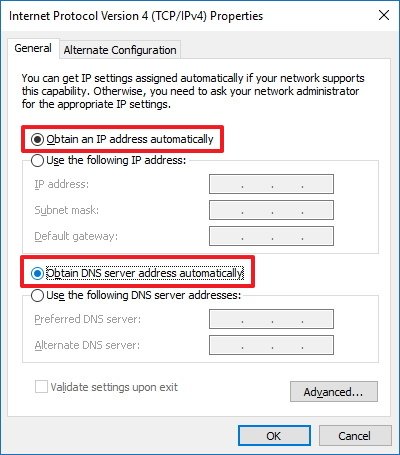
4. Выберите параметр Получить IP-адрес автоматически.
5. Выберите Получить адрес DNS-сервера автоматически.
6. Щелкните ОК.
7. Щелкните Закрыть, чтобы завершить процесс.
См. Некоторые из следующих статей:
-
Инструкция по полному удалению приложения Onedrive в Windows 10
-
Уловка для ускорения компьютеров с Windows 10
-
Уловка для ускорения меню Пуск в Windows 10
Удачи!
Download Windows Speedup Tool to fix errors and make PC run faster
A Network Bridge is a hardware or software that connects two or more networks – maybe one a wired one and the other a wireless one – so that they can communicate with each other. If you have two (or more) networks running, one using a cable and the other, say, a Wi-Fi network, then computers using a wired or wireless network will be able to communicate with only those computers running the same type of network. To make all Windows 11/10/8/7 computers communicate with each other, you will have to create a Network Bridge.
The Windows operating system allows you to create a network Bridge easily, and natively. On any given computer, you can create only one Network Bridge on a computer, but this bridge will be able to handle many connections.
To start, type ncpa.cpl in Run box and hit Enter to open Network Connections. Alternatively, you can via Control Panel open Network and Sharing center and from the left panel select Change Adapter settings.

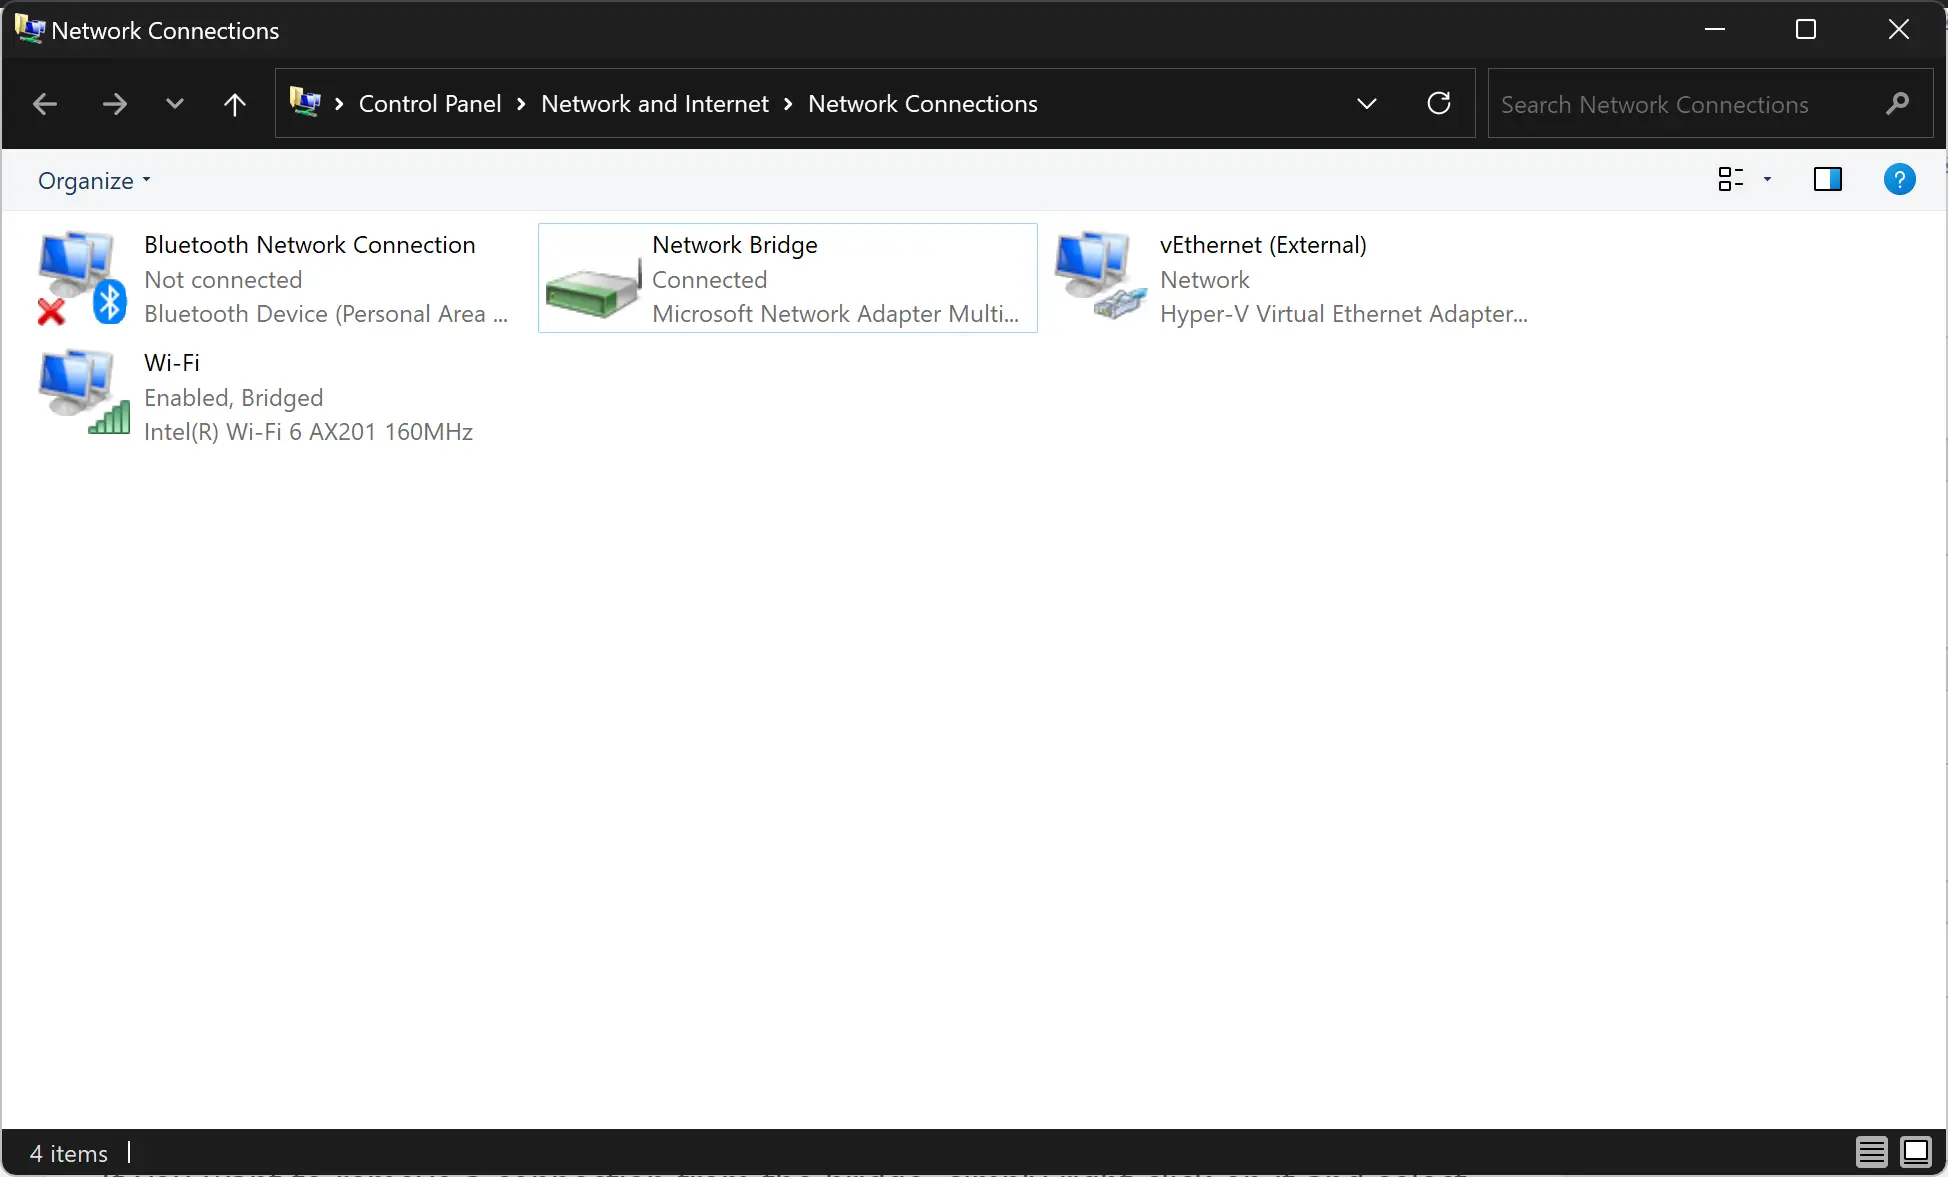
To create a Network Bridge in Windows, you must select at least two LAN or High-Speed Internet connections that are not being used by Internet Connection Sharing. Select two or more network connections you want to add to the bridge. As an example, I have randomly selected any two in the image above.
Right-click on any one of the selected network connections and select Bridge Connections.
You will see a message:
Please wait while Windows bridges the connection.
Once done, the Network Bridge will be created.
Creating a Network bridge connection can help in sharing an internet connection between multiple devices.
You should never create a bridge between an Internet connection and a network connection because it creates an unprotected link between your network and the Internet. This can make your network accessible to anyone on the Internet, which is not good from a security point of view.
I hope this helps!
Read next: How to set up an ad hoc network in Windows.
Anand Khanse is the Admin of TheWindowsClub.com, a 10-year Microsoft MVP (2006-16) & a Windows Insider MVP (2016-2022). Please read the entire post & the comments first, create a System Restore Point before making any changes to your system & be careful about any 3rd-party offers while installing freeware.
If you want to share an internet connection between two or more devices, you can create a network bridge on your Windows 11 or 10 machine. A network bridge is a software tool that allows you to combine multiple network connections, such as Ethernet and Wi-Fi, into a single virtual network. This is especially useful when you have devices that only have Ethernet or Wi-Fi connectivity and need to share the internet connection.
In this guide, we will show you how to create a network bridge on Windows 11 or 10. We will take you through the step-by-step process of setting up a network bridge, from configuring the network connections to testing the connection. With this guide, you can easily create a network bridge on your Windows device and start sharing your internet connection with other devices.
How to Create a Network Bridge on Windows 11 or 10?
Here are the step-by-step instructions for creating a network bridge on Windows 11 or 10:-
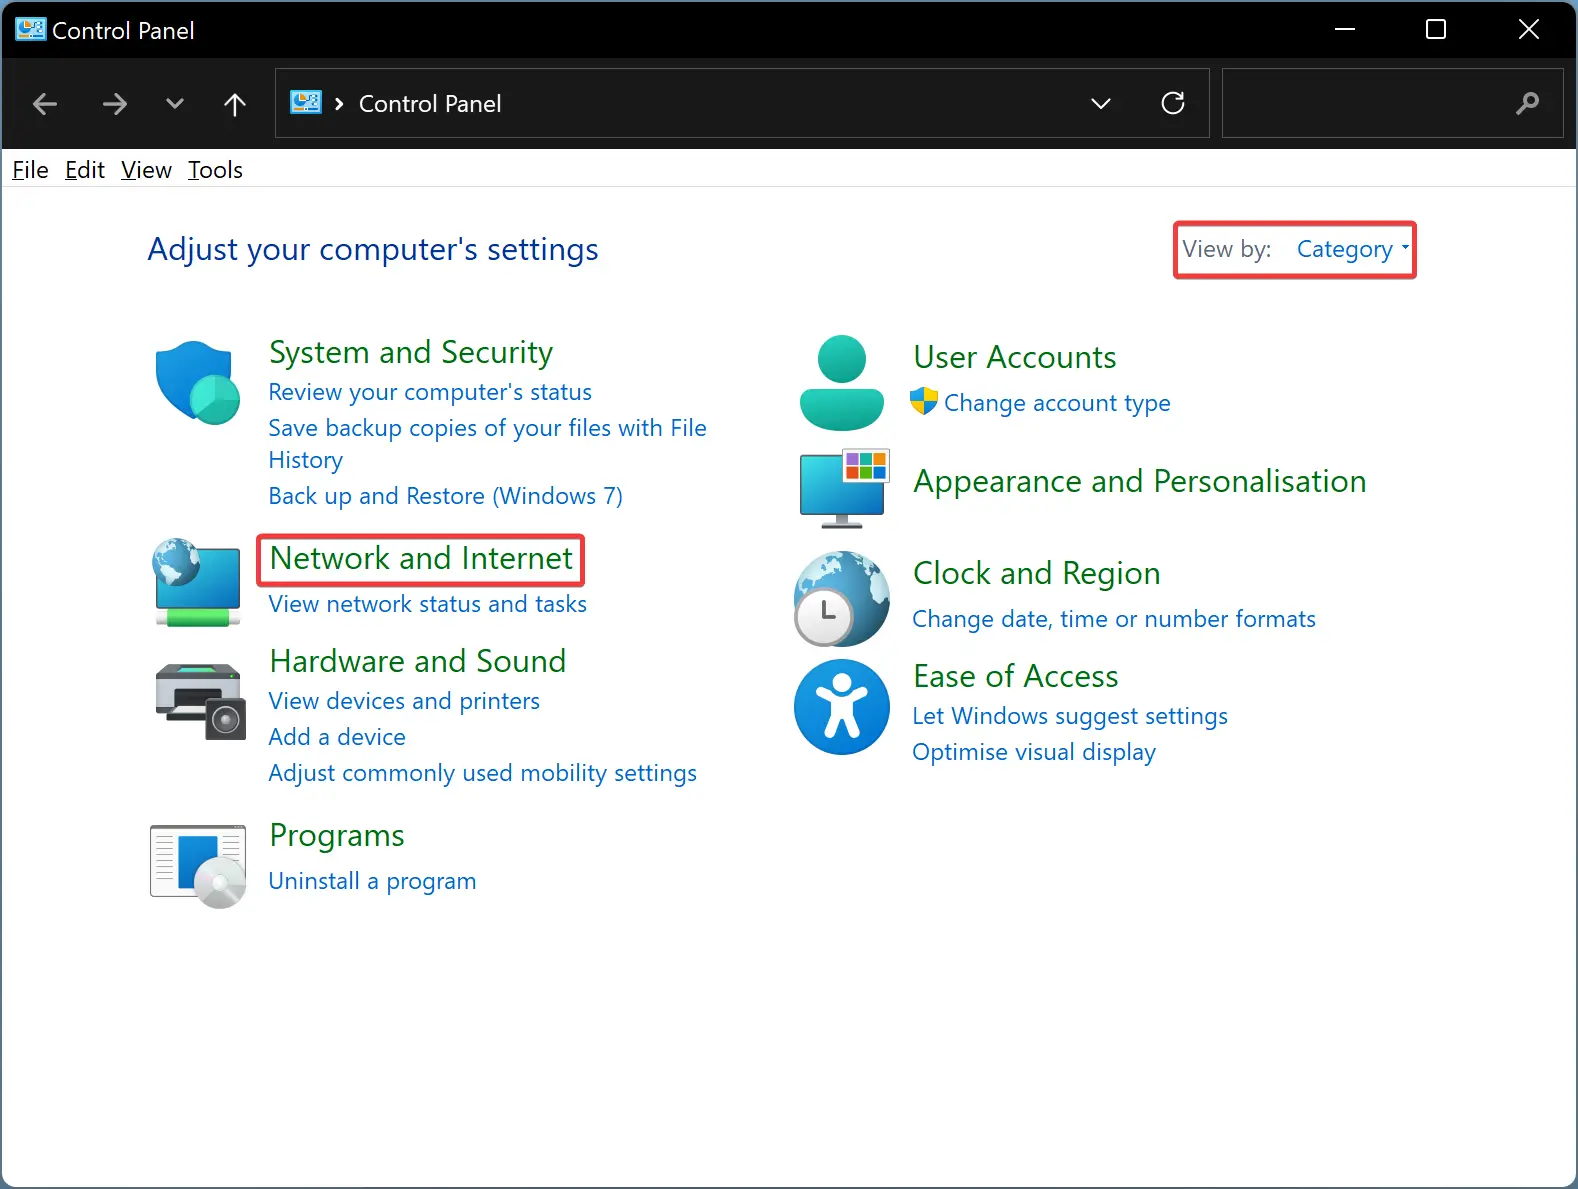
Step 1. Open Control Panel by searching for it in the Start menu.
Step 2. Set “View by” to Category and then click on the Network and Internet.
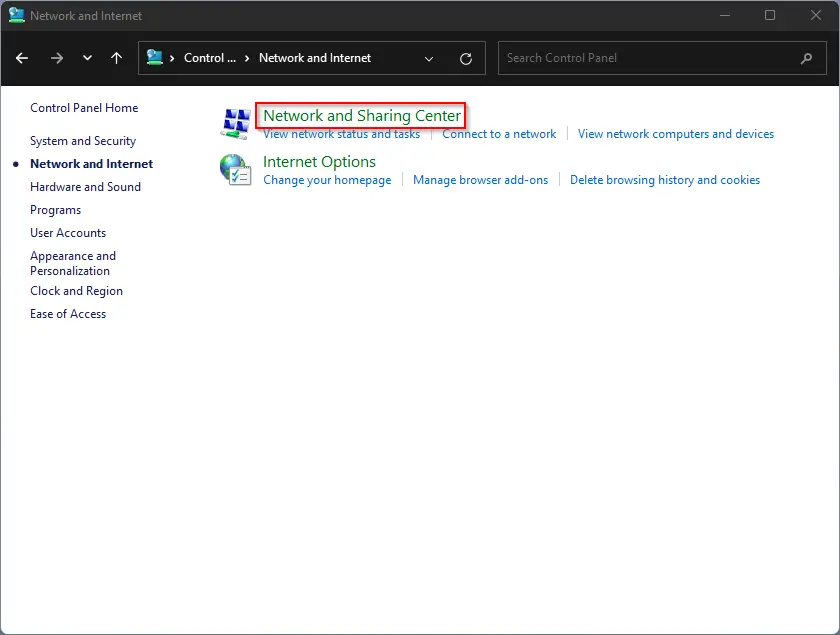
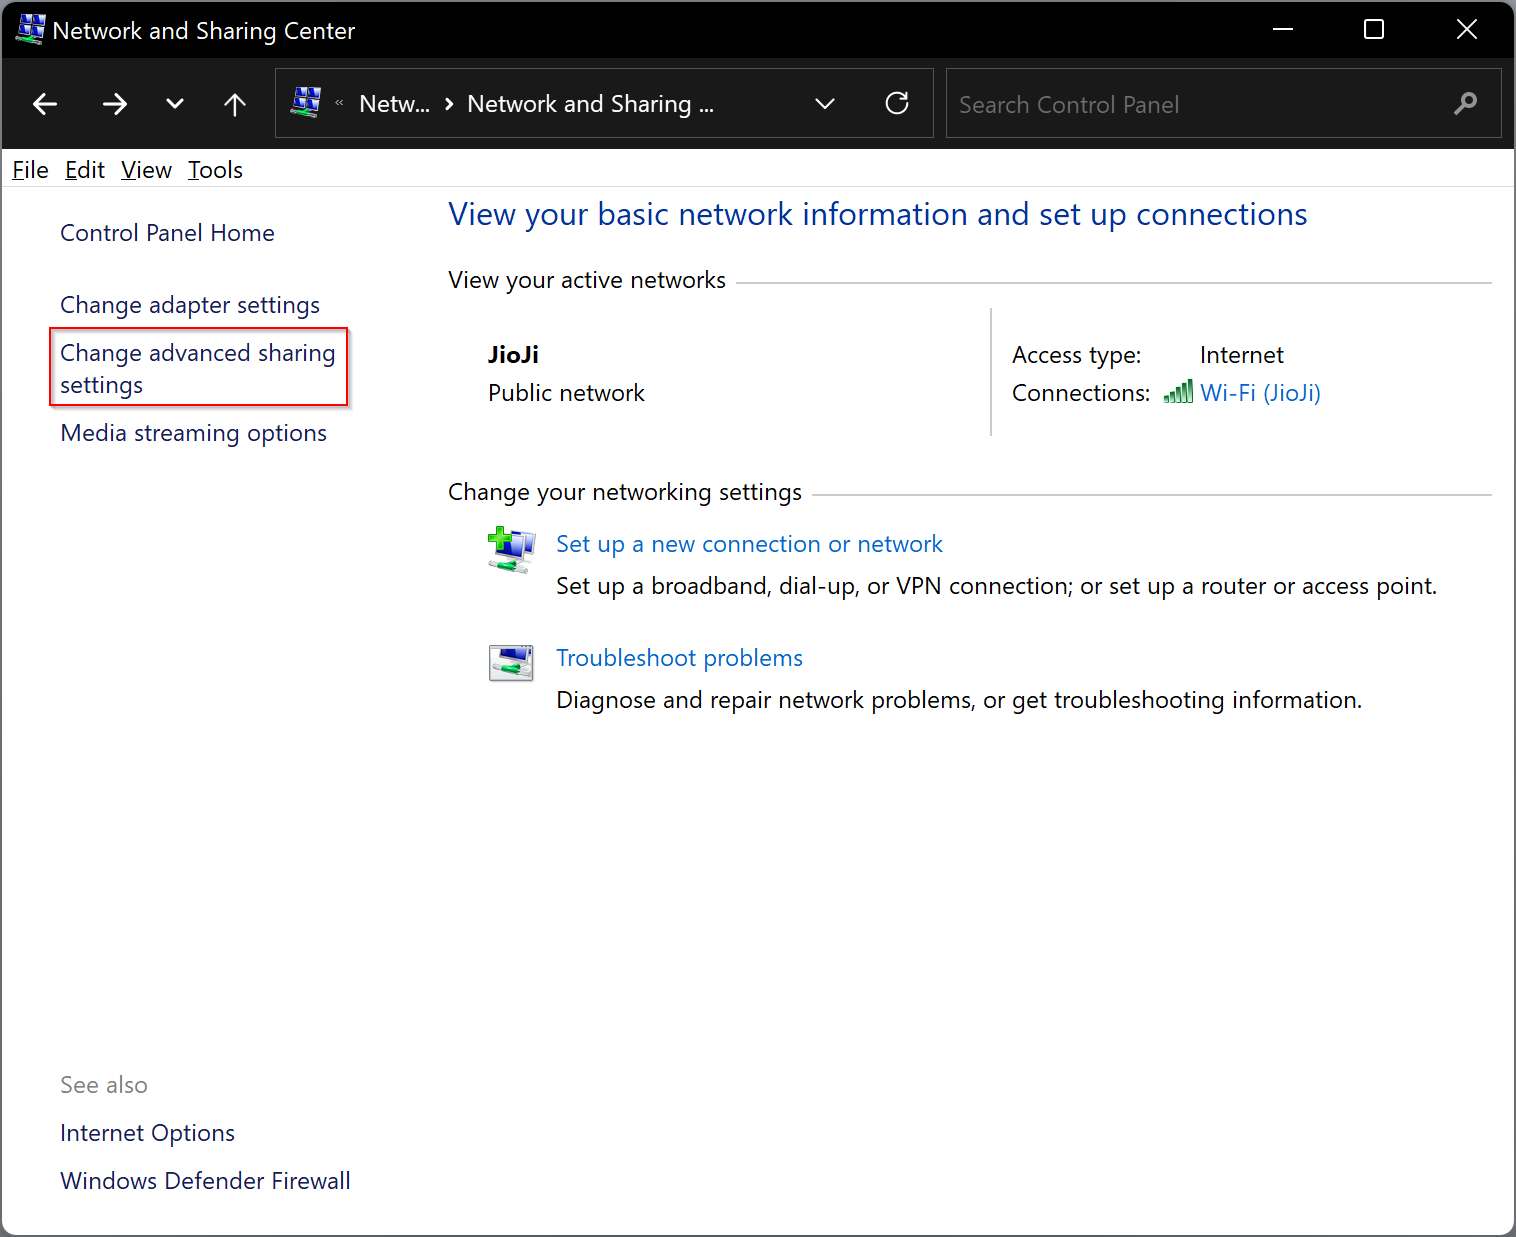
Step 3. Click on “Network and Sharing Center” and then select “Change adapter settings” from the left-hand menu.
Step 4. Select the first network connection that you want to add to the bridge. For example, if you want to combine an Ethernet and Wi-Fi connection, you would select both connections by holding down the Ctrl key and clicking on each connection.
Step 5. Right-click on one of the selected connections and choose “Bridge Connections” from the drop-down menu.
Windows will now create a new network bridge adapter and automatically add the selected network connections to it.
Once the bridge is created, you can rename it by right-clicking on it and selecting “Rename.”
Test the connection by connecting a device to the other end of the bridge, such as a laptop or gaming console. Check that the device has an internet connection and that you can access websites and online services.
If you want to remove a connection from the bridge, simply right-click on it and select “Remove from Bridge.”
Creating a network bridge on Windows 11 or 10 can be a useful tool for sharing an internet connection between multiple devices. By following these steps, you can easily create a network bridge and enjoy the benefits of combining multiple network connections.
Network Bridge is a feature that has been part of Windows for a long time. A bridge allows you to connect two or more network segments together allowing devices to join the network when it’s not possible to connect them directly to a router or switch.
For example, on an Xbox 360 without a wireless adapter, an Xbox One that no longer connects to Wi-Fi, or when a computer is far away from the router, you can use Network Bridge to share your computer’s connection (e.g., Ethernet or Wireless) with these devices to allow access the network. Once devices connect using a bridge, they will appear as if they were physically connected to the router.
In this Windows 10 guide, we’ll walk you through the steps to properly set up a bridge connection on your desktop or laptop to allow other devices to join your local network and to access the internet.
Before you begin
Before you start setting up a bridge connection on Windows 10, you will need at least two network adapters. One that is connected to the internet and a second adapter that will be used to connect another computer.
Additionally, as a result of setting up a bridge on Windows 10 (or on previous versions of the operating system), the primary network adapter on the host computer will lose internet connectivity.
To regain access to the internet, you will need to set a static IP address to your computer manually. The first thing you want to do is to save to a text file the current IP address information assigned by the DHCP server on your local network.
To get the IP address information from your computer follow these steps:
- Use the Windows key + X keyboard shortcut to open the Power User menu and select Command Prompt.
- Type the following command and press Enter:
ipconfig /all - Make note of the IP address configuration of the network adapter connected to the internet. You need to record the following information: IPV4, subnet mask, default gateway, and DNS servers addresses.
Note: You can use an IP address dynamically assigned by the DHCP server as static only as a temporary solution. On best practice you should assign an IP address in the range that doesn’t belong to the DHCP address pool on your router. For more information on how to find the DHCP server configuration make sure to check your router’s manufacturer support website.
How to create a Network Bridge on Windows 10
- Use the Windows key + X to open the Power User menu and select Network Connections.
- Select both, the network adapter that connects to the internet and the adapter you want to use in the bridge connection.
- Right-click the selection and click Bridge Connections.
At this point, the device connected to the bridge port should have access to the network and internet with the IP address information coming from the router, but the computer hosting the bridge won’t be able to access the internet unless you have a third network adapter that is also connected to the network or a static IP address .
How to regain internet access after setting up a bridge connection
To regain access to the internet from the host computer do the following:
- Use the Windows key + X to open the Power User menu and select Network Connections.
- Right-click the bridge adapter and select Properties.
- Select the network adapter that connects to the internet.
- Select Internet Protocol Version 4 (TCP/IPv4).
- Click Properties.
- Select the Use the following IP address option.
- Use the IP address information you collected at the beginning of this guide to assign a static IP address like is shown in the screenshot below.
- Click OK.
- Click Close to complete the task.
How to add more network adapters to a bridge connection
You’re not limited only to offer bridge connectivity to a single network adapter. At any time, you can add multiple adapters.
- Right-click the network adapter and select Add to Bridge.
- Connect a game console or another computer and the device will automatically acquire the network settings from the local router.

How to remove a bridge connection from your computer
When you no longer need a bridge connection, select one or all the participating network adapters, and select Remove from Bridge.
At this point, the bridge adapter should disappear from Network Connections, but if it doesn’t, simply reboot your computer.
The last thing left to do is to remove the IP address static settings and let your PC once again get this information automatically from the router.
- Right-click the network adapter and select Properties.
- Select Internet Protocol Version 4 (TCP/IPv4).
- Click Properties.
- Select the Obtain an IP address automatically option.
- Select the Obtain DNS server address automatically option.
- Click OK.
- Click Close to complete the task.
Network Bridge or Internet Connection Sharing?
It’s important to note that Network Bridge is very similar to the Internet Connection Sharing (ICS) feature, but they’re not the same.
When you use Internet Connection Sharing (ICS), you will convert your computer into a router, which uses a built-in DHCP server to assign IP addresses to computers participating in ICS. It also offers Network Address Translation (NAT) that allows multiple devices to connect to the network using the ICS host as the middle man.
On the other hand, Network Bridge doesn’t turn the host computer into a router and you won’t get Network Address Translation. It only provides a medium (bridge) in which other devices can connect directly to the network and obtain the same IP address scheme every other computer connected to the network is using.
Which feature you should use? The answer to the question is: «depends». Both features offer similar benefits. If your local network already includes a router connected to the internet and you want a seamless network integration where all devices share the same network addressing scheme, then you should consider using Network Bridge.
If you need a router-like feature, and you want to keep the network segments separated while taking advantage of the security benefits of Network Address Translation, then you’ll be better suited using Internet Connection Sharing.
In theory, a bridge connection is more efficient, because the host is only a pass-through, and all the routing process will occur in the local router and not on the host computer.
Remember that Network Bridge and Internet Connection Sharing have been designed only for home and small office networks, and for scenarios, where a wireless connection can’t be established, or a cable run to the main router or switch is not possible. These features are not recommended as networking solutions for businesses. In addition, there can only be one Network Bridge or one Internet Connection Sharing per-computer.
Windows 10 resources
For more tips, coverage, and answers on Windows 10, you can visit the following resources:
- Windows 10 on Windows Central – All you need to know
- Windows 10 help, tips, and tricks
- Windows 10 forums on Windows Central
All the latest news, reviews, and guides for Windows and Xbox diehards.
Mauro Huculak is technical writer for WindowsCentral.com. His primary focus is to write comprehensive how-tos to help users get the most out of Windows 10 and its many related technologies. He has an IT background with professional certifications from Microsoft, Cisco, and CompTIA, and he’s a recognized member of the Microsoft MVP community.
Сетевой мост – это аппаратное или программное обеспечение, которое соединяет две или более сетей – возможно, одну проводную, а другую – беспроводную, чтобы они могли общаться друг с другом. Если у вас есть две (или более) сети, одна из которых использует кабель, а другая, скажем, сеть Wi-Fi, то компьютеры, использующие проводную или беспроводную сеть, смогут обмениваться данными только с теми компьютерами, на которых установлен тот же тип сеть. Чтобы все компьютеры связывались друг с другом, вам нужно создать сетевой мост.
Создайте сетевой мост в Windows 10/8/7
Операционная система Windows позволяет вам легко и просто создавать сетевой мост. На любом компьютере вы можете создать только один сетевой мост на компьютере, но этот мост сможет обрабатывать много соединений.
Чтобы создать сетевой мост, введите ncpa.cpl в поле «Выполнить» и нажмите Enter, чтобы открыть Сетевые подключения . В качестве альтернативы вы можете через панель управления открыть центр Сеть и общий доступ и на левой панели выбрать Изменить настройки адаптера .

Чтобы создать сетевой мост, необходимо выбрать как минимум два подключения к локальной сети или высокоскоростному Интернету, которые не используются общим подключением к Интернету. Выберите два или более сетевых подключения, которые вы хотите добавить к мосту. В качестве примера я выбрал случайным образом любые два на изображении выше.
Нажмите правой кнопкой мыши на любом из выбранных сетевых подключений и выберите Мостовые подключения .
Вы увидите сообщение:
Пожалуйста, подождите, пока Windows соединит соединение.
После этого сетевой мост будет создан.
Никогда не следует создавать мост между подключением к Интернету и сетевым подключением, поскольку это создает незащищенную связь между вашей сетью и Интернетом. Это может сделать вашу сеть доступной для всех в Интернете, что не очень хорошо с точки зрения безопасности.
Надеюсь это поможет!