Since I’m very new to SSL certificates, and the creation and usage of them I figured maybe StackOverflow members can help me out.
I’m from Holland, the common way of online payments is by implementing iDEAL. An online payment protocol supported by the major banks. I have to implement a ‘professional’ version. This includes creating a RSA private key. Based on that key I have to create a certificate and upload it to the webserver.
I’m on a Windows machine and completely confused what to do. I took a look at the OpenSSL website, because the manual forwarded me to that website to get a SSL Toolkit.
The manual provides two commands which have to be executed in order to create a RSA key and a certificate.
The commands are:
openssl genrsa -des3 –out priv.pem -passout pass:myPassword 1024
and
openssl req -x509 -new -key priv.pem -passin pass:myPassword -days 3650 -out cert.cer
Is there a way I can do this by a utility on a windows machine? I’ve downloaded PuTTy KeyGenerator. But I’m not sure what to do, I’ve created a key (SSH-2 RSA, whatever that is..) but how do I create a certificate with that key?
Что такое SSL-сертификат, как его сгенерировать и использовать для локальной разработки и для тестирования на мобильных устройствах.
Что такое SSL-сертификат и как его сгенерировать и использовать для локальной разработки, в том числе — для тестирования на мобильных устройствах, разбирает старший веб-разработчик Noveo Антон.
Немного теории
SSL-сертификат — это цифровой сертификат, позволяющий убедиться в том, что сервер, передавший данные клиенту, не подменен и данные передал именно он.
Сертификат состоит из закрытого ключа, который держится в секрете и с помощью которого данные шифруются сервером, и самого сертификата с открытым ключом, с помощью которого данные расшифровываются клиентом. Не имея закрытого ключа, невозможно зашифровать данные таким образом, чтобы клиент расшифровал их тем же открытым ключом. Главная информация в сертификате — это то, кому он выдан, то есть доменное имя.
Как оценить профессионализм программиста за 5 вопросов — отвечают эксперты
Также в сертификат может кодироваться информация об издателе (сертификате), которым был подписан сертификат сервера. Это информация имеет контрольную подпись, которая может быть сгенерирована только обладателем закрытого ключа сертификата издателя. Таким образом, только издатель может подписать и сгенерировать валидный сертификат.
Клиент считает соединение защищенным, если, проверяя цепочку сертификатов, доходит до корневых доверенных центров сертификации, встроенных в систему или браузер, которые, в свою очередь, являются самоподписанными.
Для чего это нужно?
Приложения, требующие наличие валидного сертификата при локальной разработке:
- PWA-приложения,
- приложения, использующие WebRTC.
Есть два способа выполнить эту задачу:
- Сгенерировать самоподписанный сертификат и добавить его в список доверенных корневых центров сертификации; таким образом устройство будет считать его валидным. Как следует из названия, это сертификат, который подписан закрытым ключом его самого же.
- Сгенерировать корневой сертификат и добавить его в список доверенных корневых центров сертификации, далее сгенерировать сертификат сервера и подписать его ранее созданным корневым сертификатом.
Подготовка
Нам понадобится OpenSSL. Инсталляторы-бинарники для Windows.
Файл конфигурации openssl.cfg
			[ req_distinguished_name ]
countryName         = CO
stateOrProvinceName = ST
localityName        = ST
organizationName    = O

####################################################################
# Extensions for when we sign normal certs (specified as default)
[ usr_cert ]
basicConstraints = CA:false
subjectKeyIdentifier = hash
authorityKeyIdentifier = keyid,issuer
subjectAltName = email:move

####################################################################
# Same as above, but cert req already has SubjectAltName
[ usr_cert_has_san ]
basicConstraints = CA:false
subjectKeyIdentifier = hash
authorityKeyIdentifier = keyid,issuer

####################################################################
# Extensions to use when signing a CA
[ v3_ca ]
subjectKeyIdentifier = hash
authorityKeyIdentifier = keyid:always,issuer:always
basicConstraints = CA:true
subjectAltName=email:move

####################################################################
# Same as above, but CA req already has SubjectAltName
[ v3_ca_has_san ]
subjectKeyIdentifier = hash
authorityKeyIdentifier = keyid:always,issuer:always
basicConstraints = CA:true

[ req ]
prompt             = no
default_bits       = 4096
distinguished_name = req_distinguished_name
req_extensions = req_ext

[ req_ext ]
subjectAltName = @alt_names

[ alt_names ]
DNS.0 = example.com
DNS.1 = *.example.com
Генерируем самоподписанный сертификат
1. Генерируем приватный ключ:
			mkdir example.com
openssl genrsa -out example.com/example.com.key
Результат:
			Generating RSA private key, 2048 bit long modulus (2 primes)
........................+++++
..........................................................+++++
e is 65537 (0x010001)
2. Создаем запрос на сертификат:
			openssl req -new -key example.com/example.com.key -out
example.com/example.com.csr -config openssl.cfg -subj
"/CN=example.com certificate"
3. В файле конфигурации openssl.cfg нужно прописать доменное имя или несколько имен в блоке [alt_names].Раньше поддерживалось только одно имя, которое задавалось в поле CN, но сейчас можно указать несколько имен, а также сделать wildcard-сертификат на все поддомены.
			[ alt_names ]
DNS.0 = example.com
DNS.1 = *.example.com
4. Генерируем сертификат:
			openssl x509 -req -in example.com/example.com.csr -extensions
req_ext -extfile openssl.cfg -signkey
example.com/example.com.key  -out example.com/example.com.crt
-days 1825
5. Проверяем результат:
openssl x509 -in example.com/example.com.crt -text
Результат:
			Certificate:
    Data:
        Version: 3 (0x2)
        Serial Number:
            0f:63:6b:b8:76:27:71:d1:e9:f3:53:01:11:11:7c:52:d6:c7:ea:c6
        Signature Algorithm: sha256WithRSAEncryption
        Issuer: CN = example.com certificate
        Validity
            Not Before: Sep 27 05:08:48 2022 GMT
            Not After : Sep 26 05:08:48 2027 GMT
        Subject: CN = example.com certificate
        Subject Public Key Info:
            Public Key Algorithm: rsaEncryption
                RSA Public-Key: (2048 bit)
                Modulus:
                    00:c9:...:3b:24:
                    26:0f
                Exponent: 65537 (0x10001)
        X509v3 extensions:
            X509v3 Subject Alternative Name:
                DNS:example.com, DNS:*.example.com
    Signature Algorithm: sha256WithRSAEncryption
         20:a9:...:fe:fd:
         5f:30:e8:4a
-----BEGIN CERTIFICATE-----
MIIC+zCCAeO…8w6Eo=
-----END CERTIFICATE-----
Теперь у вас есть сам сертификат example.com.crt и файл ключа example.com.key, которые можно использовать в ваших приложениях.
Генерируем корневой сертификат + сертификат сервера
1. Генерируем приватный ключ корневого сертификата:
			mkdir ca
openssl genrsa -out ca/ca.key
Результат:
			Generating RSA private key, 2048 bit long modulus (2 primes)
...........................................+++++
...................................+++++
e is 65537 (0x010001)
2. Создаем сертификат:
			openssl req -x509 -new -key ca/ca.key -days 1825 -out ca/ca.crt
-extensions v3_ca_has_san -config openssl.cfg -subj "/CN=Root CA
3. Повторяем шаги 1-5 инструкции про самоподписанный сертификат.
4. Генерируем сертификат, подписанный нашим корневым сертификатом:
			openssl x509 -req -in example.com/example.com.csr -CA ca/ca.crt
-CAkey ca/ca.key -CAcreateserial -extensions req_ext -extfile
openssl.cfg -out example.com/example.com.ca.crt -days 1825
5. Проверяем результат:
openssl x509 -in example.com/example.com.ca.crt -text
Результат:
			Certificate:
    Data:
        Version: 3 (0x2)
        Serial Number:
            27:f4:ec:08:a8:36:b8:38:81:53:d9:8f:b5:fe:91:13:79:f0:9e:dc
        Signature Algorithm: sha256WithRSAEncryption
        Issuer: CN = Root CA
        Validity
            Not Before: Sep 27 05:46:19 2022 GMT
            Not After : Sep 26 05:46:19 2027 GMT
        Subject: CN = example.com certificate
        Subject Public Key Info:
            Public Key Algorithm: rsaEncryption
                RSA Public-Key: (2048 bit)
                Modulus:
                    00:c9:...:26:0f
                Exponent: 65537 (0x10001)
        X509v3 extensions:
            X509v3 Subject Alternative Name:
                DNS:example.com, DNS:*.example.com
    Signature Algorithm: sha256WithRSAEncryption
         9e:72:...:57:17
-----BEGIN CERTIFICATE-----
MIIC…JXFw==
-----END CERTIFICATE-----
Теперь у вас есть сертификат сервера example.com.crt в комплекте с ключом example.com.key, а также корневой сертификат ca.crt в комплекте с ключом ca.key. Если добавить корневой сертификат в хранилище корневых сертификатов в вашей системе или браузере, то это сделает валидными все сертификаты, подписанные им.
Добавляем корневой сертификат в Windows
Браузер Chrome использует системное хранилище сертификатов:

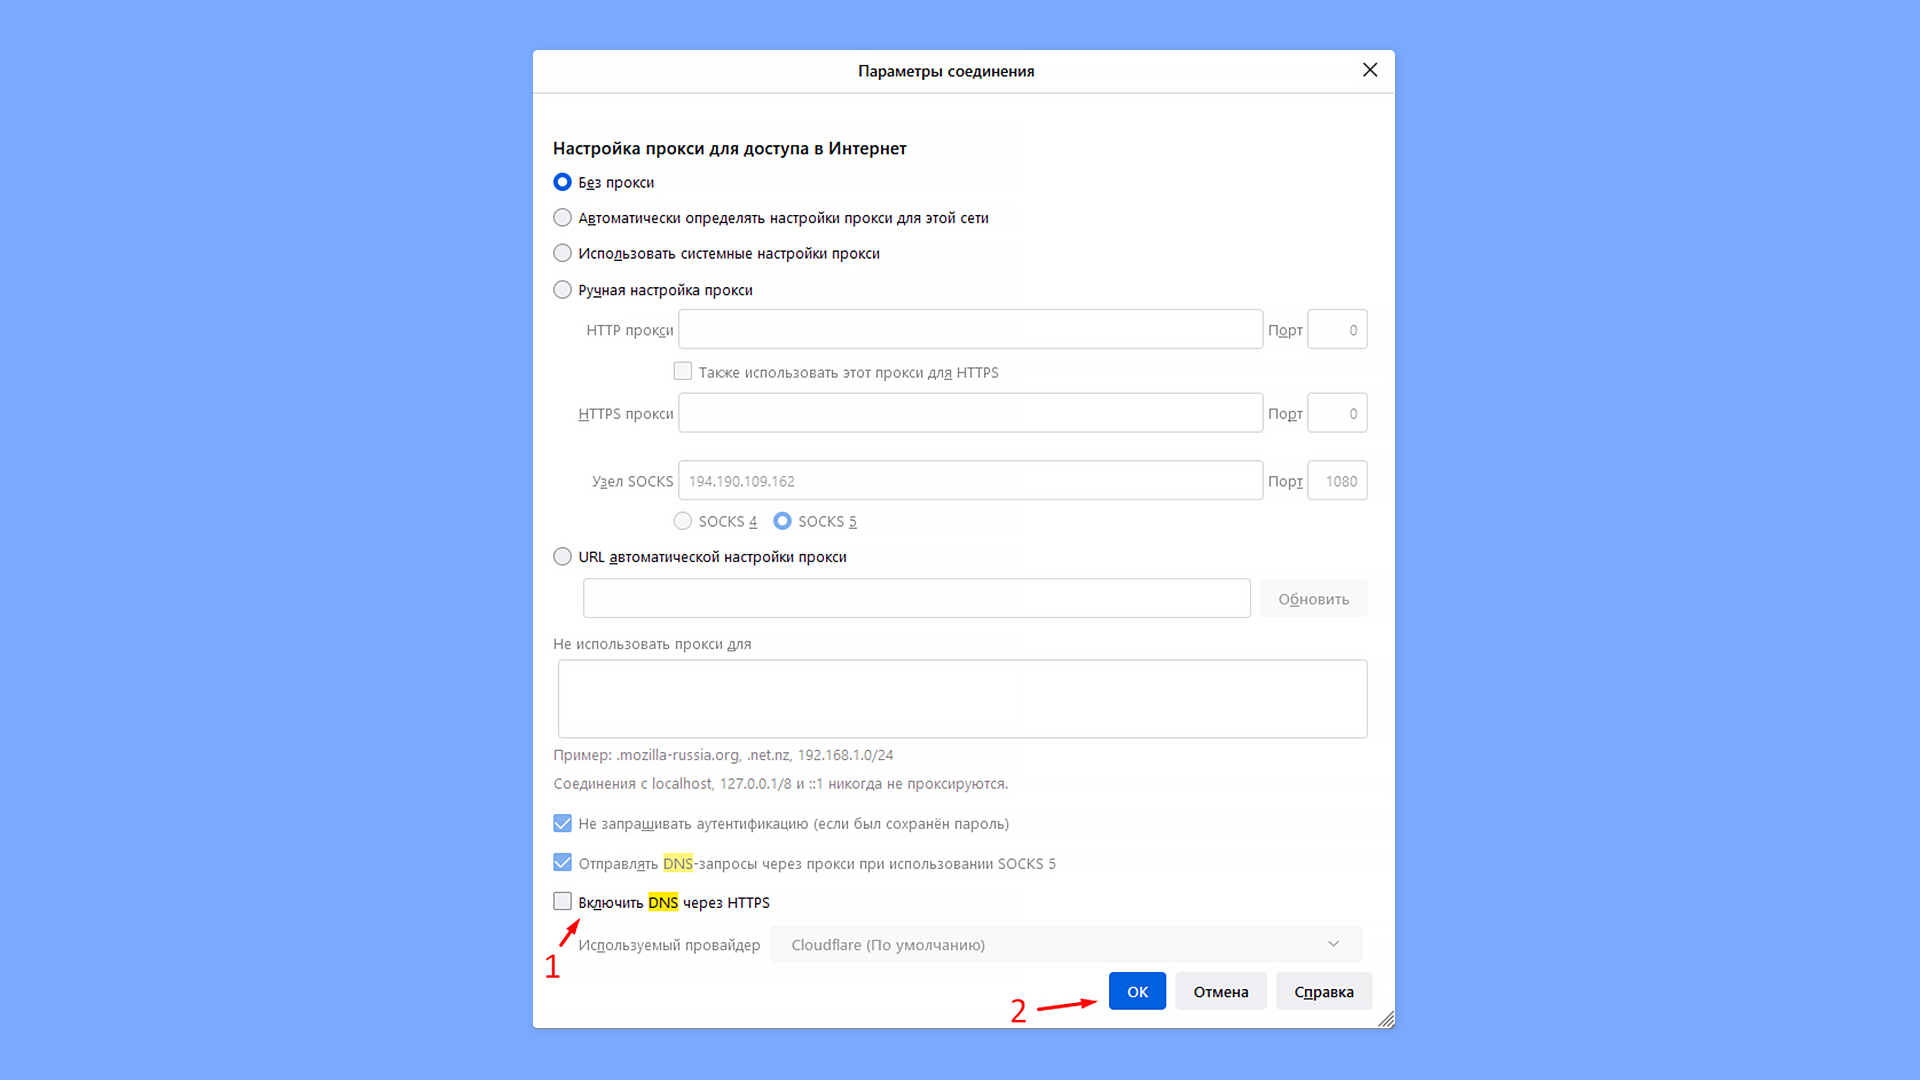
Добавляем корневой сертификат в браузере Mozilla

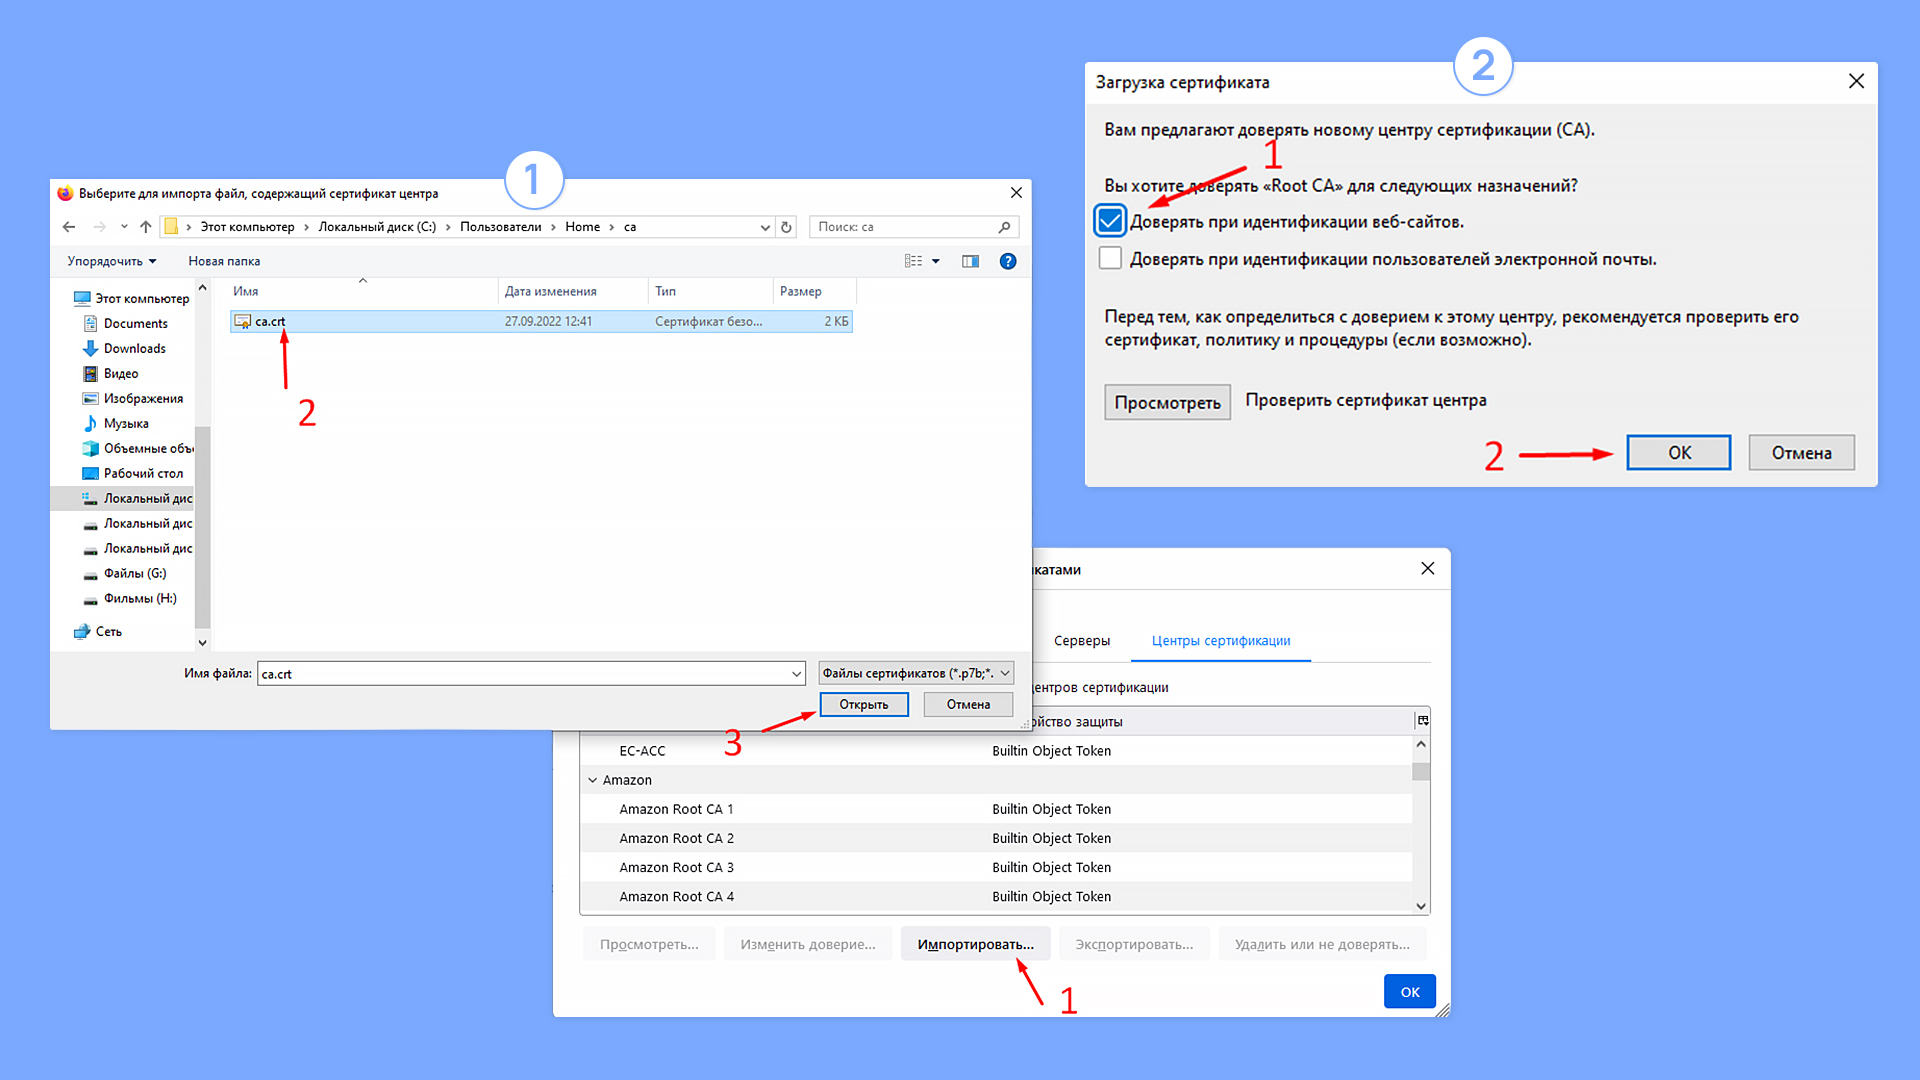
Возможно, придется отключить DNS over HTTPS, чтобы браузер использовал системный DNS, который, в свою очередь, использует файл hosts.

Использование на примере create-react-app
1. Добавляем в .env следующие переменные:
			HTTPS=true
SSL_CRT_FILE=certs/example.com.crt
SSL_KEY_FILE=certs/example.com.key
HOST=example.com
2. Добавляем в файл host (C:WindowsSystem32Driversetchosts для Windows, /etc/hosts для Ubuntu) строку:
192.168.2.116 example.com
чтобы example.com резолвился на локальный адрес компьютера (свой можно посмотреть в свойствах подключения).
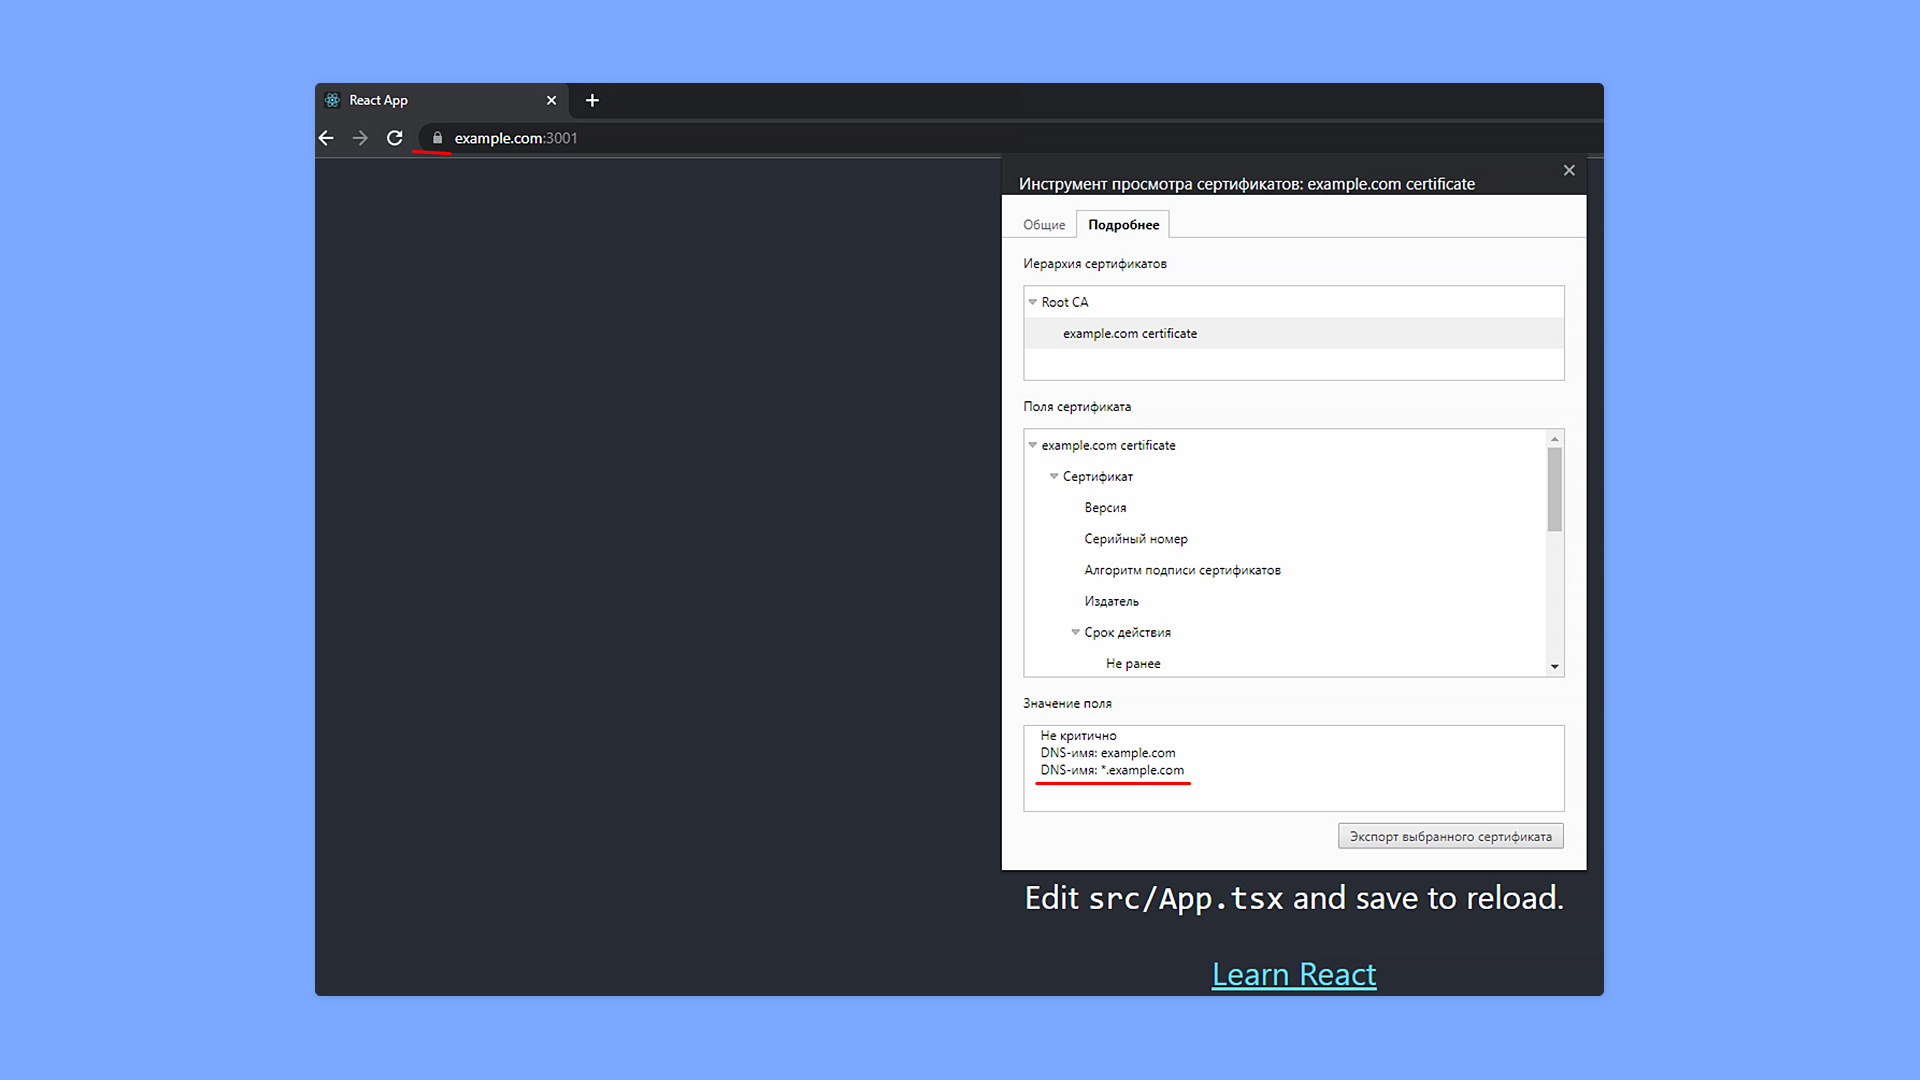
3. Запускаем приложение и видим, что соединение защищено и сертификат валидный:
Как установить сертификат на мобильное устройство Android?
1. Поместить телефон и ПК в одну локальную сеть.
2. Использовать create-react-app.
3. Положить в папку public ca.crt.
4. Прописать в .env адрес компьютера в локальной сети:
5. Запустить create-react-app без https.
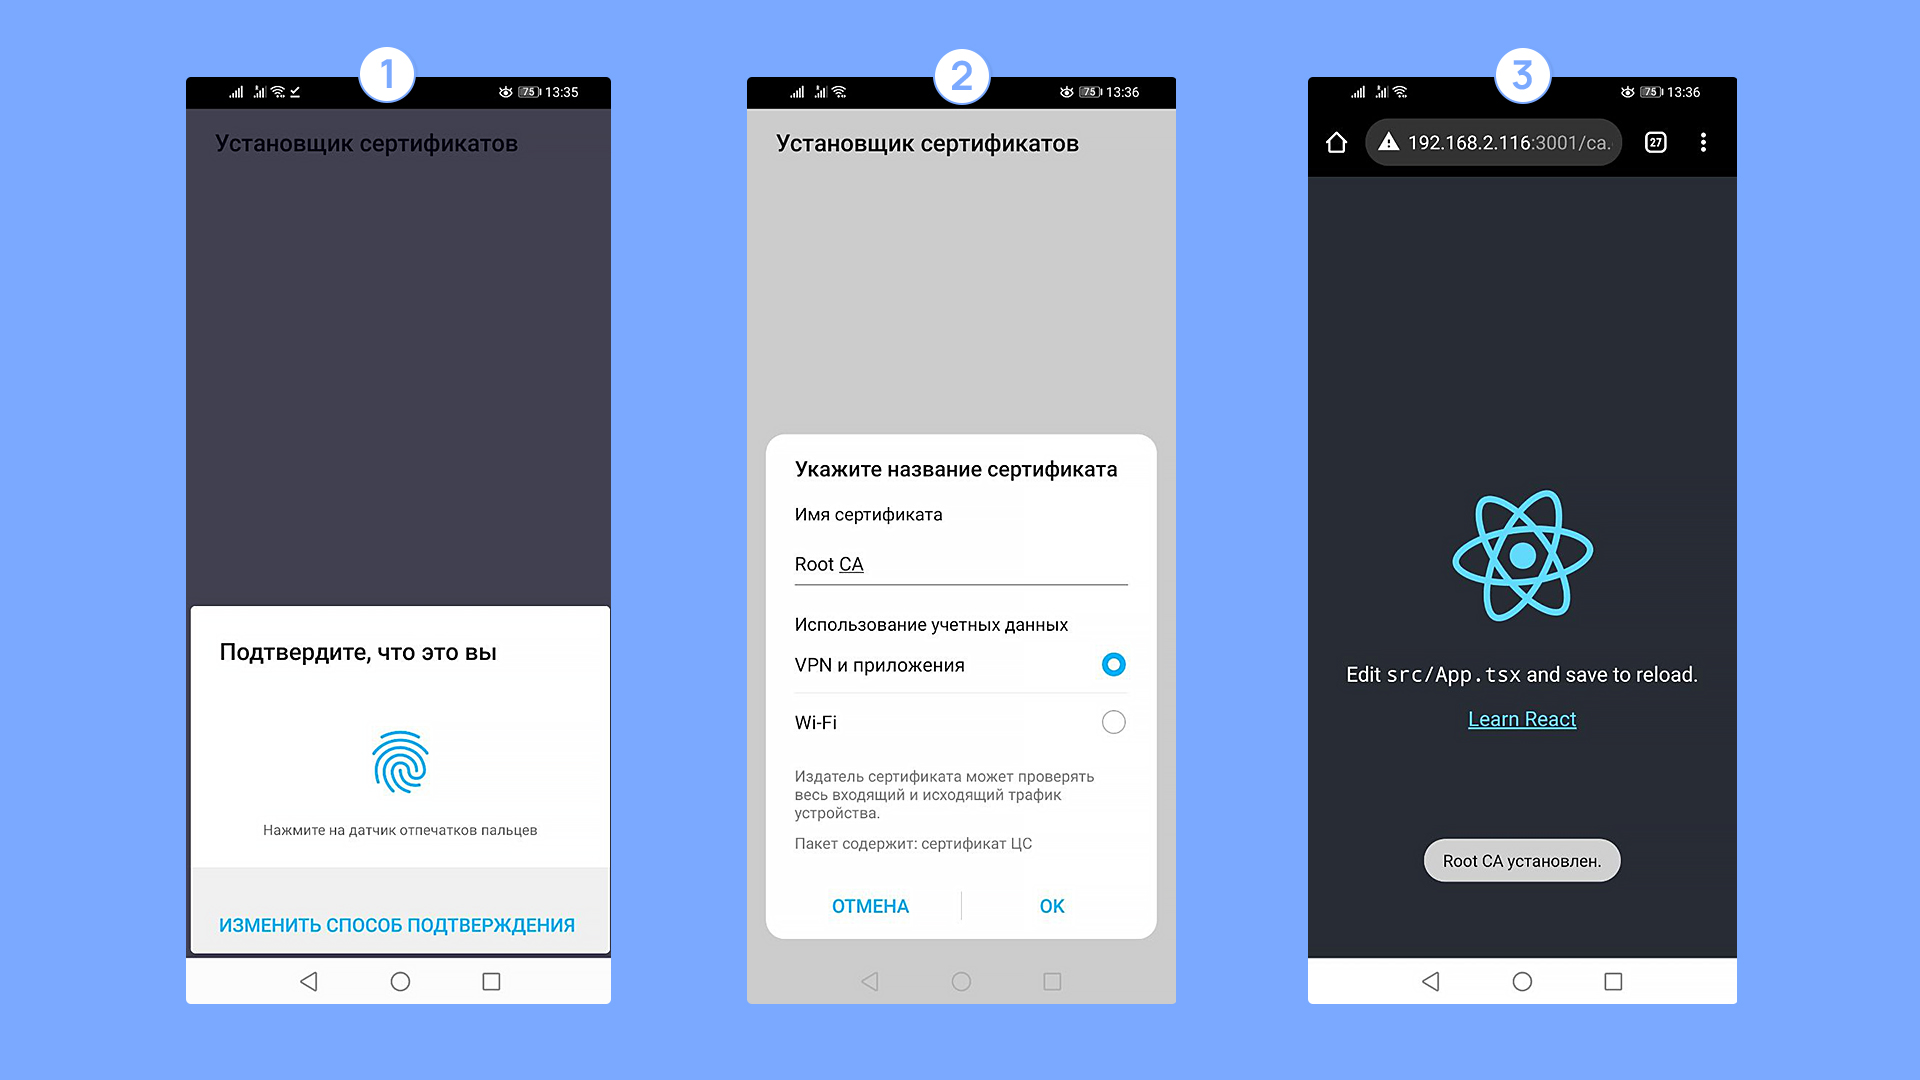
6. Открыть на телефоне http://192.168.2.116:3000/ca.crt и установить сертификат:
Как прописать домен на Android устройстве?
Для того, чтобы тестировать приложения, нужно обеспечить, чтобы ваше доменное имя резолвилось на локальный адрес компьютера. Тут есть два решения:
1. Имея root-доступ на смартфоне, отредактировать файл hosts.
2. Если прав root нет, то есть более элегантное решение — воспользоваться приложением Postern. Это VPN-сервер, запускаемый на вашем устройстве и способный модифицировать трафик, в том числе перехватывать DNS-запросы и отвечать на них. Через него можно установить соответствие доменного имени example.com ip-адресу вашего компьютера в локальной сети, где запущен webpack-dev-server:
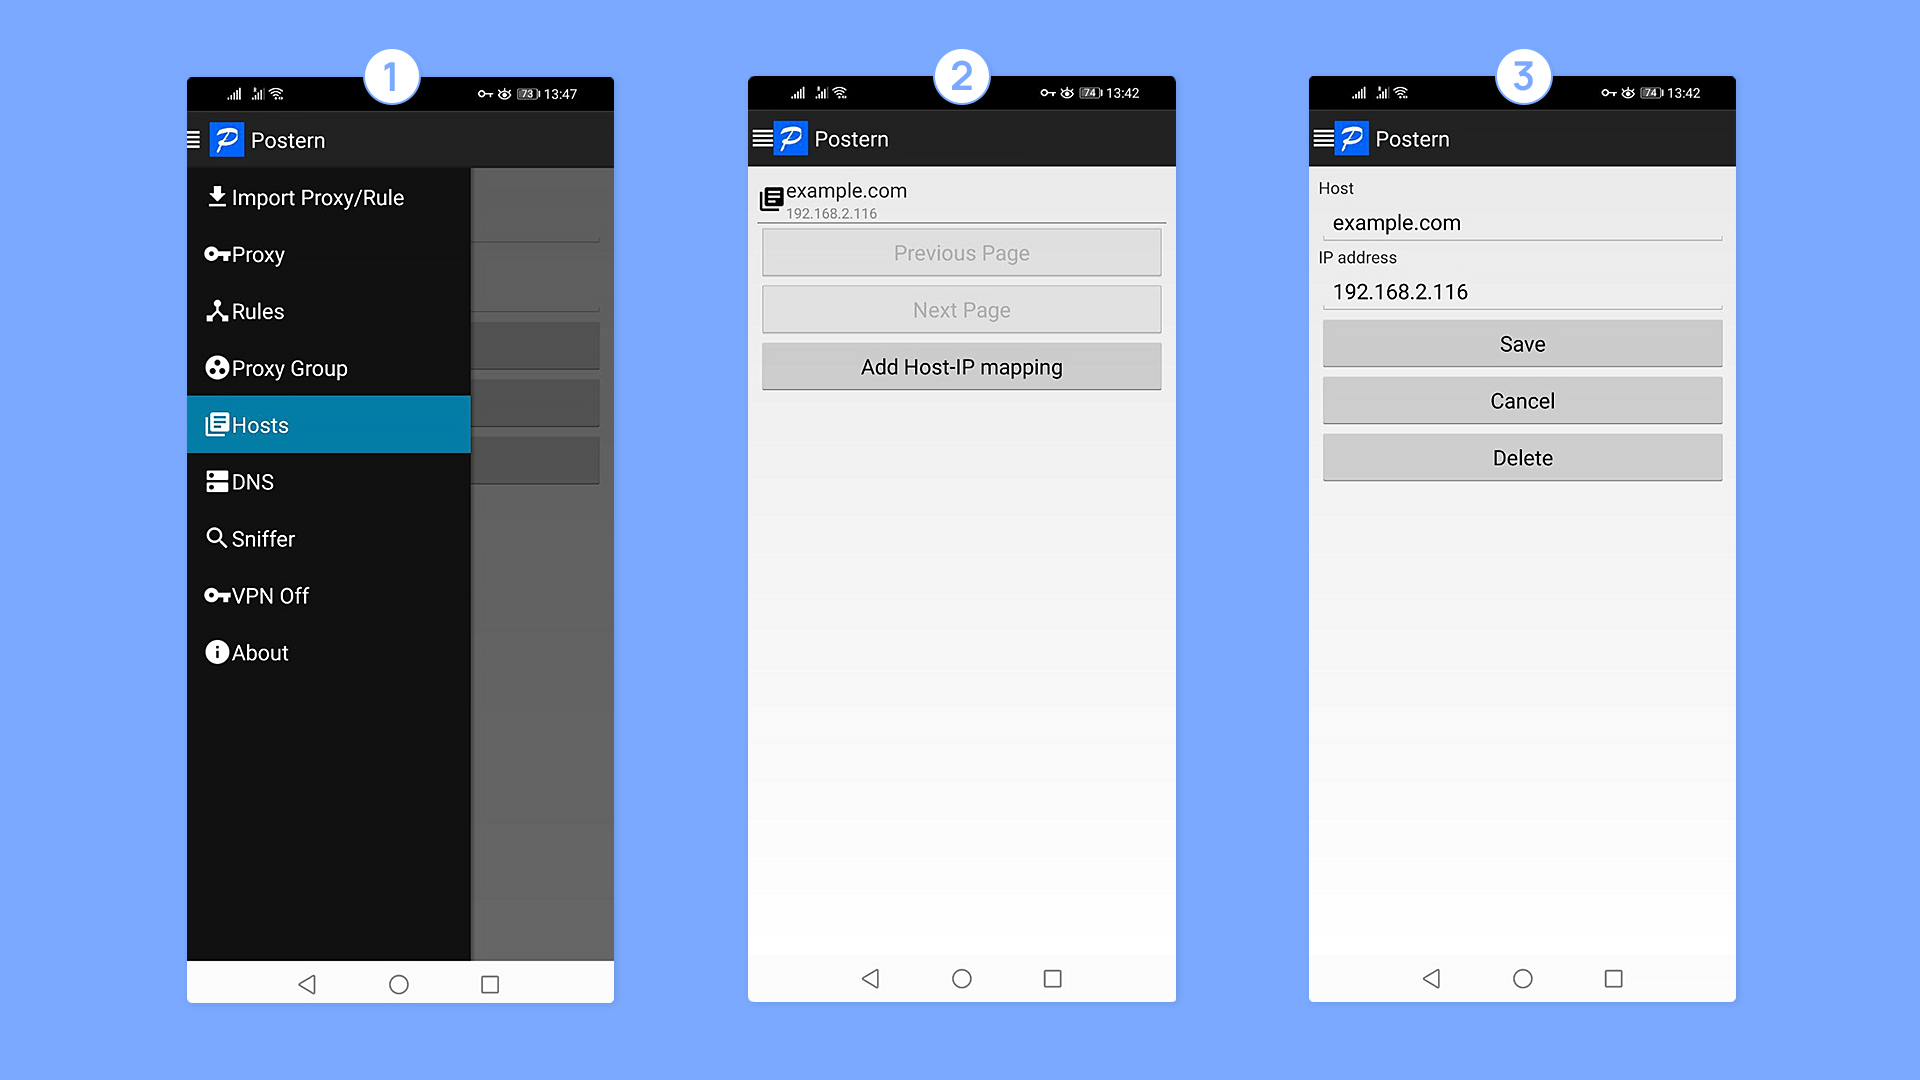
То, что Postern запущен, можно понять по иконке замка в статус-баре (VPN включен, все запросы идут через него).
После того, как все действия проделаны, можно открыть в браузере ваше приложение:

Готово! Теперь вы не только знаете в теории, что такое SSL-сертификат, но и умеете с ним работать на практике.
Since I’m very new to SSL certificates, and the creation and usage of them I figured maybe StackOverflow members can help me out.
I’m from Holland, the common way of online payments is by implementing iDEAL. An online payment protocol supported by the major banks. I have to implement a ‘professional’ version. This includes creating a RSA private key. Based on that key I have to create a certificate and upload it to the webserver.
I’m on a Windows machine and completely confused what to do. I took a look at the OpenSSL website, because the manual forwarded me to that website to get a SSL Toolkit.
The manual provides two commands which have to be executed in order to create a RSA key and a certificate.
The commands are:
openssl genrsa -des3 –out priv.pem -passout pass:myPassword 1024
and
openssl req -x509 -new -key priv.pem -passin pass:myPassword -days 3650 -out cert.cer
Is there a way I can do this by a utility on a windows machine? I’ve downloaded PuTTy KeyGenerator. But I’m not sure what to do, I’ve created a key (SSH-2 RSA, whatever that is..) but how do I create a certificate with that key?
OpenSSL is an open source toolkit that can be used to create test certificates, as well as generate certificate signing requests (CSRs) which are used to obtain certificates from trusted third-party Certificate Authorities.
More Information
Certificates are used to establish a level of trust between servers and clients. There are two types of certificate, those used on the server side, and those which are used by the client to authenticate the session. SocketTools supports both server and client certificates, by setting the CertificateStore and CertificateName properties in the .NET and ActiveX components, or by using the CreateSecurityCredentials function in the libraries.
When establishing a secure connection, the SocketTools components will ask the server for its certificate and validate it. If the certificate cannot be validated, SocketTools treats this as a soft error and the application decides whether the secure session should be established or the connection terminated.
You can either create a self-signed certificate or purchase one from a Certificate Authority (CA) such as Verisign and Thawte. These companies have root certificates that are installed as part of the base operating system and will be recognized on all Windows platforms. Alternatively, you can create your own root and server certificates for testing purposes on your own local network.
Install OpenSSL for Windows
The OpenSSL toolkit can be used to create self-signed test certificates for server applications, as well as generate certificate signing requests (CSRs) to obtain certificates from Certificate Authorities like DigiCert. This article outlines the steps for creating a test certificate using OpenSSL as an alternative to the obsolete MakeCert utility.
You will need to install OpenSSL on your development system to use the commands in this article. You can download an installation package< that we provide or visit the OpenSSL website for more information on how to obtain other binaries for Windows.
» Download OpenSSL
In this article, first we’ll create a self-signed root certificate to be installed into the Trusted Root certificate store. Then we’ll use that certificate to sign a server certificate created for “localhost”, the hostname you can use for testing local connections on your development system.
OpenSSL Configuration File
The first step to create your test certificate using OpenSSL is to create a configuration file. After you’ve installed OpenSSL, create a new, empty folder and create a file named localhost.cnf. Copy all of the following text into the file and save it.
[req]
default_bits = 2048
default_md = sha256
prompt = no
distinguished_name = req_distinguished_name
x509_extensions = v3_ca
req_extensions = v3_req

[req_distinguished_name]
C = US
ST = California
L = Los Angeles
O = Catalyst Development
CN = localhost

[v3_ca]
subjectKeyIdentifier = hash
authorityKeyIdentifier = keyid:always,issuer:always
basicConstraints = critical, CA:true, pathlen:0
keyUsage = critical, digitalSignature, cRLSign, keyCertSign

[v3_req]
subjectKeyIdentifier = hash
basicConstraints = critical, CA:false
nsCertType = server
keyUsage = digitalSignature, nonRepudiation, keyEncipherment
extendedKeyUsage = serverAuth
subjectAltName = @alt_names

[alt_names]
DNS.1 = localhost
IP.1 = 127.0.0.1
IP.2 = ::1
You should change the values in the [req_distinguished_name] section to reflect the name of your own organization and location. The country code should always be the ISO standard two-letter code (e.g.: US for the United States), and the state/province name and locality should be the full name. The common name (CN) for the test certificate will be “localhost” and this is also specified in the [alt_names] section along with the IPv4 and IPv6 localhost addresses.
Creating the Root Certificate
After you have created the OpenSSL configuration file, the next step is to create a self-signed root certificate that will be used to sign your localhost test certificate. Open a command prompt, change the directory to your folder with the configuration file and generate the private key for the certificate:
openssl genrsa -out testCA.key 2048
This will create a file named testCA.key that contains the private key. This will be used with the next command to generate your root certificate:
openssl req -x509 -new -nodes -key testCA.key -sha256 -days 365 -out testCA.crt -config localhost.cnf -extensions v3_ca -subj "/CN=SocketTools Test CA"
This tells OpenSSL to create a self-signed root certificate named “SocketTools Test CA” using the configuration file you created, and the private key that was just generated. The file testCA.crt will be created in the current folder.
This certificate must be imported into your Trusted Root Certification Authorities certificate store. The simplest way to do this is to open File Explorer, right-click on the file and select Install Certificate to open the Certificate Import Wizard.
Make sure you import the certificate into the correct certificate store, and you’ll be given a warning prompt about importing the certificate. After you’ve imported the self-signed root certificate, you’re ready to create your server certificate.
Creating the Server Certificate
Now that you have created your test root certificate, you need to generate a certificate signing request (CSR) and use that to create your server certificate. First, create another private key and then generate the CSR using the following commands:
openssl genrsa -out localhost.key 2048
openssl req -new -key localhost.key -out localhost.csr -config localhost.cnf -extensions v3_req
This will create the files localhost.key and localhost.csr in the current folder, using the information in your configuration file. Your next step is to create the server certificate using the following command:
openssl x509 -req -in localhost.csr -CA testCA.crt -CAkey testCA.key -CAcreateserial -out localhost.crt -days 365 -sha256 -extfile localhost.cnf -extensions v3_req
This will create the file localhost.crt in the current folder, and this is your server certificate. However, to use this test certificate with your server applications, you must combine it with its private key. A server certificate alone cannot be used to create the security context that SocketTools requires to accept a secure connection.
You combine the server certificate localhost.crt and its private key localhost.key to create a PKCS12 certificate, which on Windows commonly uses the PFX file extension. To do this, use the following command:
openssl pkcs12 -export -out localhost.pfx -inkey localhost.key -in localhost.crt -certfile TestCA.crt -password pass:testing
Now you have a localhost.pfx file that you can import into your certificate store. The import process is similar to how you imported the root certificate, however in this case you’ll want to import the certificate into your Personal store. In this example, the PFX certificate was created with the password “testing”, but you can use whatever password you’d prefer.
Your server application can reference the PFX certificate directly by specifying the file as the certificate store (make sure you use an absolute pathname for the PFX file) or you can tell SocketTools to use the certificate store “MY”, which corresponds to your Personal certificate store.
Keep in mind that this certificate is specifically designed for testing on your local system. If you wanted to create a self-signed certificate that would be used by another system, then you’d need to change “localhost” to the hostname for that computer, and include its IP addresses in the configuration file. You would also need to install your TestCA.crt root certificate into the trusted root certificate store for each client that is accessing the server, otherwise the server’s certificate would be considered invalid.
See Also
Download OpenSSL Installation Packages
Testing Secure Connections with OpenSSL
Connections Fail Using Test Certificate
Самостоятельная генерация сертификата
- Скачиваем инсталлятор openssl с сайта openssl.org (для Windows). Устанавливаем openssl, если при установке openssl на Windows он потребует Microsoft Redistributables Package, то предварительно, скачиваем и устанавливаем соответствующий пакет.
Например, на данный момент доступна версия openssl v1.0.1c и соответствующий ему Visual C++ 2008 Redistributables (x86/x64) по следующим ссылкам: openssl и Redistributables
- После установки openssl запускаем командную строку cmd и выполняем следующие команды, предварительно перейдя в каталог bin установленного openssl (по умолчанию c:\OpenSSL-Win32\bin):
- Указываем путь к конфигурации openssl:
set OPENSSL_CONF=C:\OpenSSL-Win32\bin\openssl.cfg ; - Генерируем приватный ключ (в процессе генерации приватного ключа необходимо задать пароль):
openssl genrsa -des3 -out c:\certificate\private.key 2048 ; - Генерируем запрос на сертификат:
openssl req -new -key c:\certificate\private.key -out c:\certificate\csr.csr
В процессе генерации запроса будут запрошены параметры для сертификата, которые необходимо вводить в латинской раскладке.
Достаточными являются:
— Country Name (2 letter code) [AU] — страна регистрации организации, для которой готовим сертификат (для Росcии — RU)
— State or Province Name (full name) [Some-State] — область, регион регистрации организации (Москва — Moscow)
— Locality Name (eg, city) [] — город регистрации организации (Москва — Moscow)
— Organization Name (eg, company) [Internet Widgits Pty Ltd] — наименование организации
— Common Name (e.g. server FQDN or YOUR name) [] — доменное имя, для которого генерируется сертификат (в данном случае может не совпадать с действительным доменным именем) (localhost, companyname.com) - Генерируем сам сертификат сроком на 365 дней (можно больше или меньше):
openssl x509 -req -days 365 -in c:\certificate\csr.csr -signkey c:\certificate\private.key -out c:\certificate\certificate.pem
В результате в каталоге c:\certificate будет создан приватный ключ (private.key) и сертификат (certificate.pem), который, в случае самостоятельно генерируемого сертификата, будет являться и сертификатом центра сертификации.
- Указываем путь к конфигурации openssl:
-
Для того чтобы браузер не выдавал предупреждения по поводу недостоверности сертификата, можно установить сертификат (certificate.pem) в систему (предварительно поменяв его расширение на.crt) или в браузер, если он использует собственное хранилище сертификатов.