on December 26, 2011
We can sort a text file using the windows inbuilt sort command. Below you can find the syntax of sort command.
Sort a text file:
A text file can be sorted using the below simple command.
sort filename
For example, to sort the file data.txt, the command would be
sort data.txt
The above command prints the sorted contents of the file in the console. To save the output into another file, you can use
/o switch as shown below.
sort filename /o outputfile
Example:
sort data.txt /o sorteddata.txt
Alternatively, you can user redirection operator.
sort data.txt > sorteddata.txt
Advanced options for sorting:
Sort the contents in reverse order
sort /R filename /o outputfile
If you are sorting big files, then /M switch will help you to finish the sorting quickly. Be default, sort command uses only 160 KB of space to store the file contents in main memory. Increasing this limit, will increase the performance of the sort operation. To let the sort command use 10MB of memory, we can run the below command.
sort /M 10240 data.txt /o sorteddata.txt
Считывает поступающую информацию и осуществляет её сортировку. Предполагается несколько вариантов выдачи результатов работы команды. Сюда следует отнести загрузку в документ, на экран или отправку на другой компьютер.
Синтаксис
sort [/r] [/+n] [/m кб] [/l язык] [/rec символы] [[диск_компьютера_1:][расположение_1]название_файла_1] [/t [диск_компьютера_2:][расположение_2]] [/o [диск_компьютера_3:][расположение_3]название_файла_3]
Расшифровка значений
/r
Проводится изменение порядка сортировки. Она проводится по алфавиту от буквы Z до A и числам от 9 до 0.
/+n
Задает номер позиции для символа. Именно начиная с него команда будет осуществлять сравнение.
/m кб
Здесь задаются объемы памяти, которая должна быть применена для проведения сортировки. Данное количество измеряется в килобайтах.
/l язык
Переустанавливает порядок выполнения задачи по сортировке символов, который определяется языком системы. Подобные настройки должны обеспечиваться заранее.
/rec символы
В данном параметре необходимо написать число, которое будет означать наибольшее количество символов в записи входного документа. Предусматривается установка от 1 до 65535. Если ничего не прописывать, система задаст число 4096.
[диск_компьютера_1:][расположение_1]название_файла_1
Задает документ, подлежащий процедуре сортировки. Можно не устанавливать название и тогда будет происходить сортировка обычного ввода. Если задать некоторый входной документ, то sort позволит обеспечить более быструю работу.
/t [диск_компьютера_2:][расположение_2]
В качестве данного параметра необходимо прописать каталог, где будет осуществляться хранение сведений sort, когда для данной задачи не применяется основная память. Если ничего не указывать, то будет образован временный системный каталог.
/o [диск_компьютера_3:][путь3]название_файла_3
Устанавливает документ, где будет производиться хранение отсортированных сведений ввода. Без конкретных указаний, предусматривается запись классического вывода.
/?
Появляются справочные сведения по команде.
Настройка
- Microsoft Windows 2000
- Microsoft Windows XP
- Microsoft Windows Servers
- Microsoft Windows Vista
- Microsoft Windows 7
- Microsoft Windows 8
- Microsoft Windows 10
Полезная информация
- Синий экран смерти (BSOD)
- Коды ошибок
- Способы устранения
- Командная строка (CMD)
- Переменные
- Команды
- Примеры bat файлов
- Примеры Rundll32.exe
- Windows Script Host (WSH)
- Объект WshShell
- Объект FileSystemObject
- Объект RegExp
- Объект Dictionary
- Объект Shell
- Константы VBScript
- Функции VBScript
- Объект IE и WebBrowser
- Объект WScript
- Объект WshNetwork
- Basic In/Out System (BIOS)
- AMI bios
- AWARD bios
- Phoenix bios
- UEFI bios
- Реестр Windows
- Хитрости реестра Windows
- Скачать Live CD
- Полезные статьи
- Часто задаваемые вопросы
- Стоит ли переходить на Windows 10?
- Не открывается флешка на компьютере?
- Как разбить жесткий диск на разделы?
- Удалить баннер с рабочего стола
- Лучшие бесплатные антивирусы 2016-2017 года
- Не открывается Вконтакте и другие сайты
- Как убрать всплывающие сайты и рекламу в браузере
- Содержание статьи
- Использование команды more
- Использование команды find
- Использование команды sort
- Добавить комментарий
Фильтр команды используется с символом перенаправления канала команды (|) и является командой внутри команды, которая считывает ввод команды, преобразовывает ввод, а затем записывает выход. Команды-фильтры дают возможность сортировать, просматривать и отбирать часть выходной информации других команд.
Фильтры делят, переупорядочивают или выделяют отдельные части из проходящей через них информации. В приведенной ниже таблице перечислены команды-фильтры, доступные в Microsoft Windows XP и выше.
| Команда | Описание |
|---|---|
| more | Отображает содержимое файла или вывода команды в одном окне командной строки за раз. |
| find | Поиск указанных символов в файлах и выходе команды. |
| sort | Сортировка файлов и выхода команды по алфавиту. |
Для направления данных из файла на вход фильтра используется символ «меньше» (<). Для направления на вход фильтра выхода другой команды используется канал (|).
Использование команды more
Команда more выводит содержимое файла или выхода команды в одном окне командной строки за раз. Например, чтобы отобразить содержимое файла List.txt в одном окне командной строки за раз, введите следующую команду:
more < list.txtОтображается одно окно командной строки со сведениями, а затем в нижней части окна командной строки отображается строка — More —. Для перехода к следующему окну командной строки, нажмите любую клавишу на клавиатуре, кроме клавиши PAUSE. Для остановки просмотра следует ввести комбинацию CTRL+C.
Команда more полезна при работе с командами, создающими выход более одного окна командной строки. Например, при выводе дерева каталогов жесткого диска. Если на диске содержится больше каталогов, чем может быть одновременно выведено в окне командной строки, можно использовать команду tree с каналом (|) и команду more.
tree c:\ | moreНа экран будет выведен первое окно командной строки с выходом команды tree, а затем отобразится строка — More —. Выход будет ожидать нажатия любой клавиши для продолжения (кроме клавиши PAUSE).
Использование команды find
Команда find проводит поиск заданной строки или текста в файлах. Команда Cmd.exe отображает каждую строку, которая совпадает со строкой или текстом, указанным в окне коммандной строки. Команда find может быть использована как команда-фильтр и как обычная команда Microsoft Windows XP. Дополнительные сведения об использовании команды find в качестве стандартной команды см. в разделе Find.
Чтобы использовать команду find в качестве команды-фильтра, необходимо включить символ «меньше» (<) и строку или текст, в котором требуется выполнить поиск. По умолчанию при поиске команда find учитывает регистр. Например, следующая команда будет искать строку «Pacific Rim» в файле Trade.txt:
find "Pacific Rim" < trade.txtВыход не включает вхождение строки «pacific rim». Встречается вхождение строки «Pacific Rim» с прописными буквами.
Для сохранения результатов работы команды find (вместо отображения их в окне командной строки), введите символ «больше» (>) и имя файла, в котором требуется хранить выход. Например, следующая команда ищет строку «Pacific Rim» в файле Trade.txt с сохранением результата в файле Nwtrade.txt:
find "Pacific Rim" < trade.txt > nwtrade.txt Использование команды sort
Команда sort выполняет сортировку по алфавиту текстового файла или выхода команды. Например, следующая команда сортирует содержимое файла List.txt и отображает результаты в окне командной строки:
sort < list.txtВ этом примере команда sort сортирует строки файла List.txt в алфавитном порядке и выводит результат на экран без изменения файла. Для сохранения результатов работы команды sort (вместо их отображения) введите символ «больше» (>) и имя файла. Например, следующую команду можно использовать для алфавитной сортировки строк файла List.txt и сохранения результатов в файле Alphlist.txt:
sort < list.txt > alphlist.txtДля сортировки вывода команды следует ввести команду, затем символ канала (|) и команду sort (команда | sort). Например, следующая команда сортирует в алфавитном порядке строки, которые содержат слово «Jones» (вывод команды find):
find "Jones" maillst.txt | sort Updated: 05/18/2020 by
The sort command is used filter input and then display the results on a computer monitor or writes them to a file.
Availability
Sort is an external command that is available for the following Microsoft operating systems as sort.exe.
- All Versions of MS-DOS
- Windows 95
- Windows 98
- Windows ME
- Windows NT
- Windows 2000
- Windows XP
- Windows Vista
- Windows 7
- Windows 8
- Windows 10
- Windows 11
Sort syntax
- Windows 2000, XP, and later syntax.
- MS-DOS, Windows 95, 98, ME, and NT syntax.
Windows 2000, XP, and later syntax
SORT [/R] [/+n] [/M kilobytes] [/L locale] [/REC recordbytes] [[drive1:][path1]filename1] [/T [drive2:][path2]] [/O [drive3:][path3]filename3]
| /+n | Specifies the character number, n, to begin each comparison. For example, /+3 indicates that each comparison should begin at the 3rd character in each line. Lines with fewer than n characters collate before other lines. Comparisons start at the first character in each line by default. |
| /L[OCALE] locale | Overrides the system default locale with the one specified. The «C» locale yields the fastest collating sequence and is currently the only alternative. The sort is always case insensitive. |
| /M[EMORY] kilobytes | Specifies the amount of main memory to use for the sort, in kilobytes. The memory size is always constrained to be a minimum of 160 kilobytes. If the memory size is specified the exact amount will be used for the sort, regardless of how much main memory is available.
The best performance is usually achieved by not specifying a memory size. By default, sort is done in one pass (no temporary file) if the sort fits in the default maximum memory size. Otherwise, the sort is done in two passes (with the partially sorted data being stored in a temporary file) such that the amounts of memory used for both the sort and merge passes are equal. The default maximum memory size is 90% of available main memory if both the input and output are files, and 45% of main memory otherwise. |
| /REC[ORD_MAXIMUM] characters | Specifies the maximum number of characters in a record (default 4096, maximum 65535). |
| /R[EVERSE] | Reverses the sort order; that is, sorts Z to A, then 9 to 0. |
| [drive1:][path1]filename1 | Specifies the file to be sorted. If not specified, the standard input is sorted. Specifying the input file is faster than redirecting the same file as standard input. |
| /T[EMPORARY] [drive2:][path2] |
Specifies the path of the directory to hold the sort’s working storage, in case the data does not fit in main memory. The default is to use the temporary system directory. |
| /O[UTPUT] [drive3:][path3]filename3 |
Specifies the file where the sorted input is to be stored. If not specified, the data is written to the standard output. Specifying the output file is faster than redirecting standard output to the same file. |
MS-DOS, Windows 95, 98, ME, and NT syntax
Sorts input and writes results to the screen, a file, or another device.
SORT [/R] [/+n] [[drive1:][path1]filename1] [> [drive2:][path2]filename2] [command |] SORT [/R] [/+n] [> [drive2:][path2]filename2]
| /R | Reverses the sort order; that is, sorts Z to A, then 9 to 0. |
| /+n | Sorts the file according to characters in column n. |
| [drive1:][path1]filename1 | Specifies file(s) to be sorted |
| [drive2:][path2]filename2 | Specifies a file where the sorted input is to be stored. |
| command | Specifies a command whose output is to be sorted. |
Sort examples
sort test.txt
This command would display the sorted results of the text in test.txt.
sort test.txt /o output.txt
This next command takes the sorted results and stores them in the output.txt file.
Tip
To sort the listing of the files, you can use the dir command with one of the sorting switches. For example, «dir /on» sorts the files listed in alphabetical order. See the dir command page for further examples and options.
Introduction
The Windows operating system features over 280 commands for CMD (Command Prompt). Some commands are specific to Windows servers, while others are available for desktop versions. In both cases, CMD commands communicate directly with the OS and allow to perform various IT automation tasks.
This guide showcases important Windows CMD commands and provides hands-on examples.
Prerequisites
- Access to the command prompt (CMD).
- Administrator privileges (for some commands).
Commands are built-in programs that run through the Command Prompt program. The main use for commands is to automate various tasks, such as user provisioning and other routine actions.
Below is an overview of some common Windows CMD (Command Prompt) commands. Every command has a brief explanation and an example use case.
Note: All commands were tested on a Windows 10 machine in Command Prompt.
1. arp Command
The arp (address resolution protocol) command shows and modifies entries in the ARP cache. The cache contains one or multiple tables that map IP addresses to resolved physical addresses.
The syntax for the command is:
arp <options> <address>Without any parameters, the arp command shows the help window.
To show the ARP cache table, run the following command:
arp -a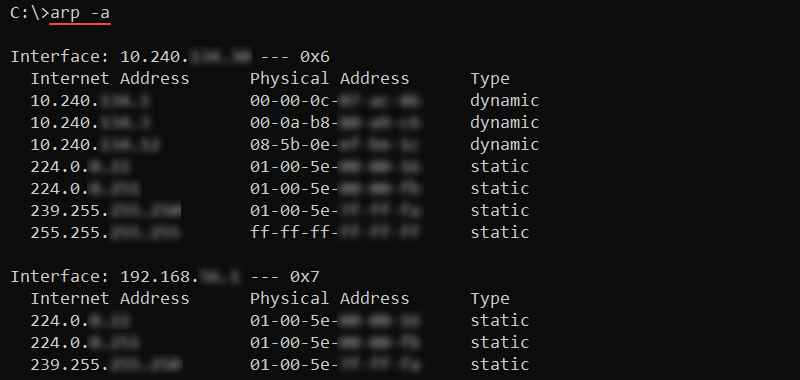
The output lists all the current ARP entries grouped by the interface.
2. assoc Command
The assoc (association) command lists and modifies file extension associations on the system. The syntax for the command is:
assoc .<extension>=<filetype>Without any parameters, the command prints the current file extension associations.
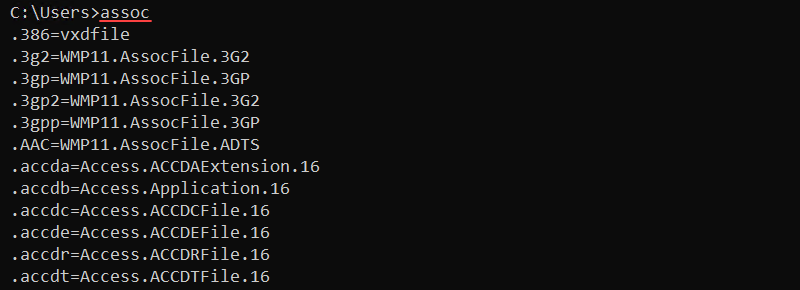
Use the assoc command to view, change, or remove file associations. For example, to view the .log file associations, run:
assoc .log
Change the file association with:
assoc .log=txtfileAlternatively, remove all file associations for files with the .log extension by running:
assoc .log= The command requires adding a space after the equals sign to remove the association.
3. attrib Command
The attrib (attribute) command shows or changes file attributes. The possible attributes are:
- R — Read-only.
- H — Hidden.
- S — System file.
The syntax for the attrib command is:
attrib <+ or -> <attribute>The plus sign (+) sets an attribute, while the minus sign (-) removes an attribute from a file. Without any options, the command shows the file attributes in the current directory.

To set a file to have the read-only (R) and hidden (H) attributes, use the following command:
attrib +R +H sample_file.txt
To make a file visible, remove the hidden (H) attribute:
attrib -H sample_file.txt
The minus removes the attribute from the file and returns the file to the default visible state.
4. bcdboot Command
The bcdboot (boot configuration data boot) command sets up a system partition by copying BCD files into an empty partition.
The syntax for the command is:
bcdboot <path>For example, to copy the BCD files into C:\Windows, use:
bcdboot C:\Windows
The output prints a confirmation message about file creation.
5. cd Command
The cd (change directory) command shows or changes the current location. The syntax for the command is:
cd <directory>The directory parameter is optional, and without it, the command prints the current working directory.
For example, to change the location to a directory named Public, add the directory name after the command:
cd Public
The prompt reflects the change and shows the new location.
To change the location to a different disk, add the /d option before the path. For example, to change to disk S:\ use:
cd /d S:
Without the option, the command prints the path without changing to the provided location.
To change to the parent directory, use the following shortcut:
cd ..
The current directory changes to one directory above the current location.
6. chkdsk Command
The chkdsk command scans the local file system and metadata for errors. The syntax for checking a disk is:
chkdsk <volume> <options>Without additional parameters, the chkdsk command shows the current disk state without fixing any errors.

Additional parameters enable fixing errors on a disk, such as the /f option:
chkdsk <volume> /f
The command attempts to fix errors on the disk. If the disk is in use, run the check on the next system restart. Stopping the command does not affect the system, but ensure to run the scan later to fix any potential data corruption.
7. choice Command
The choice command prompts a user to choose an answer from a list of options. Without any parameters, the command prompts the user to choose between Y and N options.
Additional options control the number of choices and the prompt text. For example, to add a third choice, use the /c parameter and list the three option names:
choice /c ync
Insert additional text to explain the available options with the /m parameter. For example:
choice /c ync /m "Yes, No, Continue"
In all cases, the command returns the choice index and exits.
8. cipher Command
The cipher command shows and modifies the encryption for files or directories. The command syntax is:
cipher <option> <file or directory>Without any options, the cipher command shows the encryption state for all files and directories in the current location. The U represents «unencrypted,» whereas E is «encrypted.»

To encrypt a file in the current directory, use the /e parameter:
cipher /e <file name>The file’s indicator changes from U to E, which marks the file as encrypted.
Note: The encrypting and unencrypting files and directories feature is available for Windows 10 Pro, Enterprise, and Education editions.
9. clip Command
The clip command copies a command output or file contents to the clipboard. The syntax for copying a command’s output in CMD is:
<command> | clipFor example, to copy the current directory path, pipe the cd command to clip:
cd | clipPaste the contents anywhere in the window using CTRL+V (or right-click in CMD).
To copy the contents of a file, use redirection:
clip < <filename>For example, to copy the contents of a sample.txt file to the clipboard, run:
clip < sample.txtThe file’s contents are saved to the clipboard and can you can paste them anywhere.
10. cls Command
The cls command clears the text in a command prompt window and returns a blank surface. Use the command to clear the screen contents.
Note that the previous contents and output do not return to the screen.
11. cmd Command
The cmd command starts a new instance of the command interpreter. Use the following syntax to run the command:
cmd <options> <command>Without additional parameters, the cmd command shows the current cmd.exe program version.
Use cmd to run commands without affecting the current session. For example, to test a command and return to the current command interpreter session, use the /c parameter:
cmd /c cd ..The new interpreter changes the directory. However, the /c tag ensures the interpreter returns to the original session, and the directory stays unchanged.
To run a command and stay in the new session, use the /k parameter:
cmd /k cd ..
The /k parameter switches to the new session and runs the cd command to switch to the parent directory.
12. color Command
The color command changes the default console background and text colors. The command syntax is:
color <background><font>The color attributes are hexadecimal numbers from 0 to f. The help window displays all the possible color options:
help color
For example, to change the background to blue (1) and the font to light aqua (b), run:
color 1b
To return to the default console colors, run the color command without options.
13. comp Command
The comp command compares the contents of two files. The comparator program inspects file bytes and outputs characters where the two files differ.
The syntax for the command is:
comp <file 1> <file 2> <options>Without any options, the comp command starts an interactive prompt to enter file names and additional options.
To demonstrate how the command works, compare two text files with the following contents:
- sample_file_1.txt contains «test»
- sample_file_2.txt contains «text»
Run the comp command and provide the two file names:
comp sample_file_1.txt sample_file_2.txt
The output prints the comparison error as characters in hexadecimal format and asks to compare more files (enter N to exit).
To print the comp results in human-readable format, use the /a parameter:
comp /a sample_file_1.txt sample_file_2.txt
The comparison fails at character «s» in the first file and character «x» in the second file.
14. compact Command
The compact command is a built-in feature for compressing files and folders. The syntax for the command is:
compact <options> <file>Without any options or parameters, the compact command prints the compression state in the current directory.
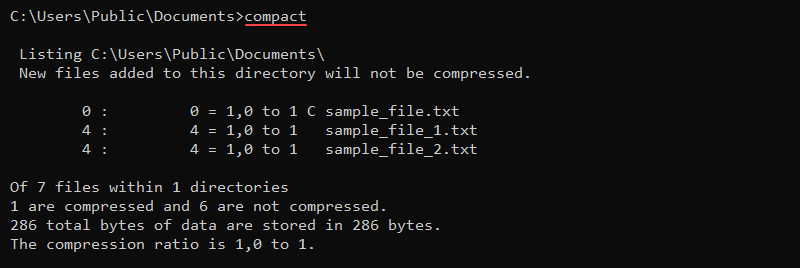
For example, to compress a file, use the /c parameter and provide the file name:
compact /c sample_file.txt
To uncompress a file, use the /u parameter:
compact /u sample_file_1.txt
Use the compact command to save disk space and compress large files and directories.
15. copy Command
The copy command copies one or multiple files from one location to another. The command syntax is:
copy <options> <source> <destination>For example, to copy a file’s contents into a new file in the same location, use:
copy sample_file.txt sample_file_copy.txtThe command creates the new file and copies all the contents from the source file.
16. date Command
The date command shows and modifies the current date on the system. Without any parameters, the command prints the current date and requests to enter a new date:
date
Enter the date as mm-dd-yyyy to change the current date on the system or exit with CTRL+C.
Use the /t parameter to avoid modifying the system state and only print the current date:
date /t
The command shows the day of the week and the current date.
17. defrag Command
The defrag (defragmentation) command finds and aggregates fragmented files on the system. The command reduces unnecessary empty data blocks and improves system performance.
The syntax for the defrag command is:
defrag <volumes> <options>For example, to defragment the C:\ drive, run:
defrag C:\ /u /v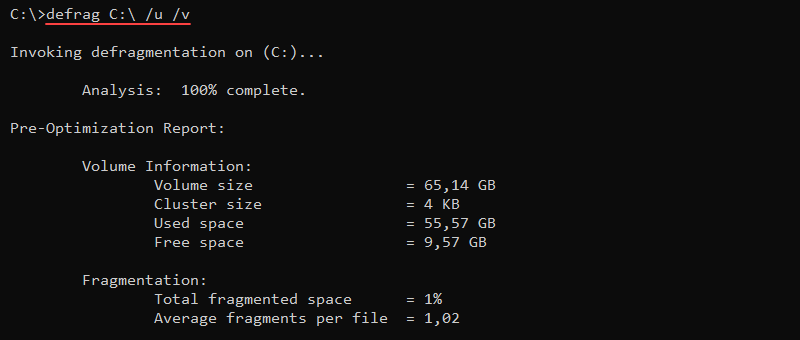
The /u parameter prints the progress, while /v shows a verbose output. These parameters are optional.
18. del and erase Commands
The del and erase commands delete one or more files. The syntax for the commands is:
del <options> <file(s)>erase <options> <files(s)>Both commands permanently delete the specified file or files from a disk and are irretrievable.
For example, to delete a file with the name sample.txt, run:
del sample.txtOr alternatively:
erase sample.txtTo avoid accidental deletion, use the /p parameter:
del /p sample.txt
The output shows a prompt with the file name and requires confirmation before deleting the file.
19. dir Command
The dir (directory) command lists directory contents, including files and subdirectories. The syntax for the command is:
dir <drive><path><filename> <options>The dir command without options shows information for the current directory.
To show the C:\ drive contents, run:
dir C:\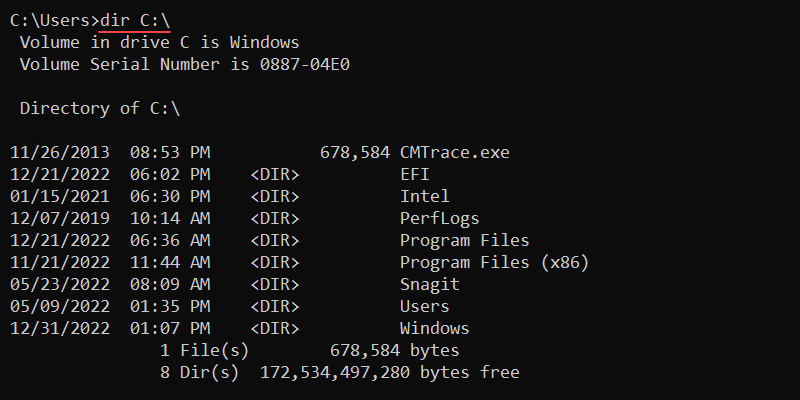
The output shows the following information:
- Volume drive.
- Volume serial number.
- Directory contents with modification time.
- File and directory count.
20. doskey Command
The doskey command starts the Doskey.exe program for the previously entered commands. The command helps recall command history and create macros.
For example, to see the command history from the current command prompt session, run:
doskey /history
The output shows all the commands from the CMD session from oldest to newest.
21. driverquery Command
The driverquery command is a command for admins to display the installed device drivers and their information. The command works for both local and remote access machines.
The syntax for the command is:
driverquery <options>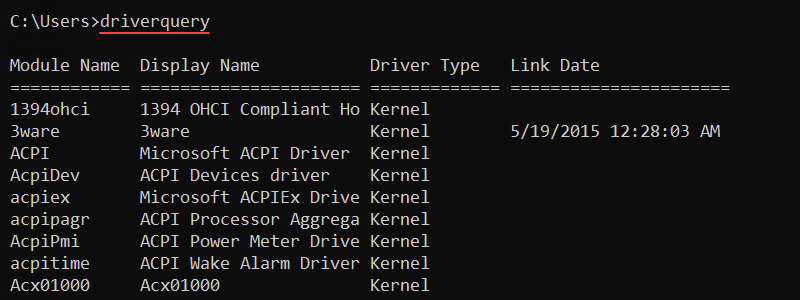
Without any options, the driverquery command shows device drivers on the local machine. Additional options control the output format or allow querying remote machine drivers.
22. echo Command
The echo command prints a message to the console and controls the settings for the command. The syntax for the command is:
echo <message>Without any parameters, the command shows the current settings.
To use the command and show a «Hello, world!» message to the screen, run:
echo "Hello, world!"
The echo command often appears in scripts to print useful information while the script runs.
23. exit Command
The exit command ends the current batch script or the command interpreter session. To exit a batch script, add the /b parameter:
exit /bWithout the /b option, the exit command closes the command interpreter.
24. fc Command
The fc (file compare) command compares two or more files. The output prints the contents to the console if there is a difference between the files.
The syntax for fc is the following:
fc <options> <file 1> <file 2> For example, to compare two sample files, sample_file_1.txt and sample_file_2.txt, run:
fc sample_file_1.txt sample_file_2.txt
The command prints the file contents, indicating there is a difference between the two files.
25. find Command
The find command searches for a string in a file and prints the line of text when there is a result. The command syntax is:
find <string> <file>For example, to search for the string «text» in a file, use:
find "text" <file>
The command looks for an exact match and returns the file name along with the line of text that contains the string. If a file does not contain the text, the command returns the file name without the text.
26. findstr Command
The findstr (find string) command performs a similar task to the find command. The command returns the whole line where the text is located without the file name. This feature makes it more convenient for use in scripts.
The command syntax is:
findstr <string> <file>For example, to find a string «text» in a file, run:
findstr "text" <file>
If the command does not return a result, the string is not in the file.
27. ftype Command
The ftype (file type) command shows and changes a file type and extension association. The command syntax is:
ftype <file type>=<open command>The file type parameter is the file to show or modify (such as txtfile), while the open command option is a string that calls a program to read the file type. The open command string substitutes the file name into the open command to run a file in the provided program.
Without any options, ftype prints all file types and extension associations.
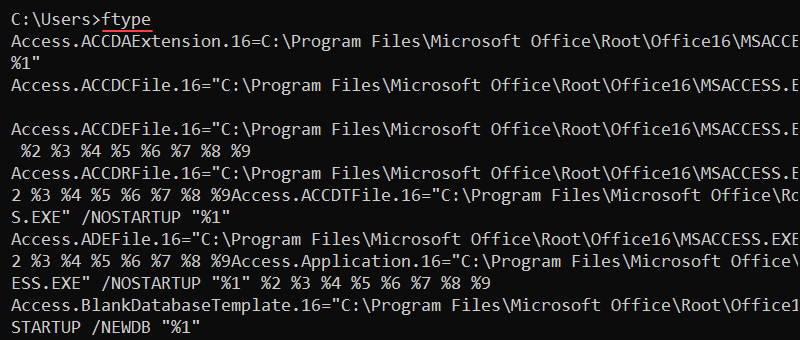
To show the current file type and extension association for text files, enter:
ftype txtfile
To remove file type association, append an (=) sign:
ftype txtfile=The command omits the program for opening files and removes the program association.
28. getmac Command
The getmac command fetches the MAC addresses for all network cards on the computer or in the network. The command also shows the protocols associated with each address.
The syntax is:
getmac <options>Additional options provide detailed information about a remote computer or control the output display. For example, to show the MAC addresses in the CSV format, use:
getmac /fo csv
Use the command to parse the MAC address to a network monitoring tool or to check the protocols on network adapters.
29. help Command
The help command shows detailed information for a specific command. Without any parameters, the help command lists all available system commands.
The syntax for the command is:
help <command>For example, to view the help menu for the cd command, run:
help cd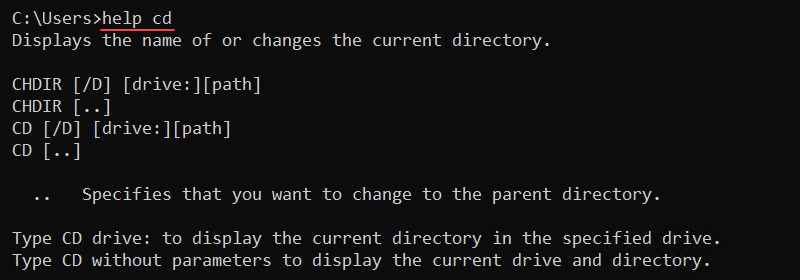
Use any key to go through the pages if the help page is larger than the command line. Alternatively, press CTRL+C to exit.
Note: For non-system commands, use the following format to see the help window:
<command> /?
30. hostname Command
The hostname command is a simple command to display a machine’s host name. Run the command to see the name of the computer:
hostname
The command does not have options, and providing any additional parameters throws an error. The hostname command is available for systems with TCP/IP installed on a network adapter.
31. ipconfig Command
The ipconfig (IP configuration) command is a networking CMD tool that shows all current TCP/IP network configuration information. The command also refreshes DHCP and DNS settings.
The syntax for the command is:
ipconfig <options>Omitting options shows the basic TCP/IP configuration for all adapters:
ipconfig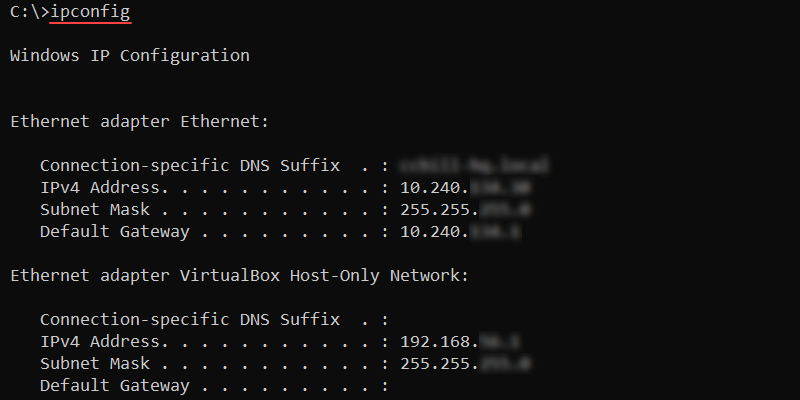
To show the full TCP/IP configuration for all adapters, run:
ipconfig /allRenew the DHCP IP address for the local area connection with:
ipconfig /renew Local Area ConnectionTo flush the DNS cache, use:
ipconfig /flushdnsUse the command when troubleshooting DNS issues.
32. label Command
The label command shows, changes, or removes the volume label (name) of a disk. The command requires administrator privileges to perform any changes.
Without any options, the label command shows the label for the C:\ drive and starts a prompt to change the name:
label
Press Enter to remove the label, or enter a new name to change the current label name. Confirm the change with Y or press N to keep the existing name.
33. makecab Command
The makecab command creates a cabinet (.cab) file. Cabinet files are an archive format specific to Windows systems with support for lossless data compression and archive integrity.
Use the following syntax to create .cab files with the makecab command:
makecab <options> <source> <destination>For example, to create a sample_cab.cab file in the current directory and add a sample_file.txt file to the archive, use:
makecab sample_file.txt sample_cab.cab
The output prints the compression progress and exits when done.
34. md and mkdir Commands
The md and mkdir (make directory) commands create a new directory or subdirectory. The command syntax is:
md <path>mkdir <path>For example, to make a new subdirectory called Subdir in the current location, run:
mkdir SubdirThe command extensions enable md and mkdir to create a directory tree:
md Subdir\Subsubdir
The command immediately creates all intermediate subdirectories.
35. mklink Command
The mklink (make link) command creates a hard or symbolic link to a file or directory. The command requires administrator privileges to run and uses the following syntax:
mklink <options> <link> <target>Without any additional options, the mlink command creates a symbolic link to a file. For example:
mklink my_link sample_file.txt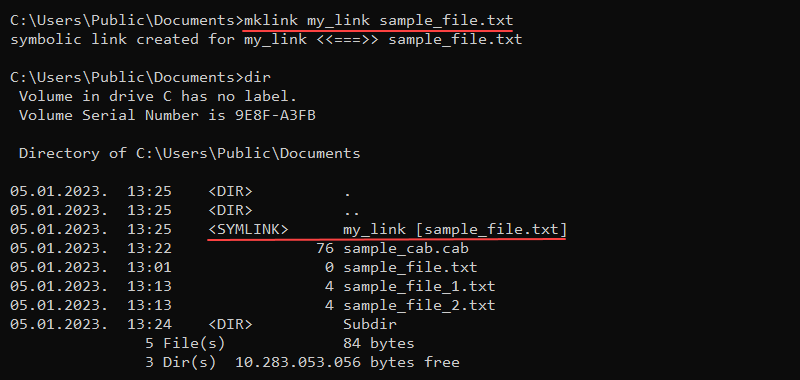
To create a hard link instead of a symbolic link, use the /h parameter:
mklink /h my_link sample_file.txtCreate a directory link with the /d parameter:
mklink /d \Docs \Users\milicad\DocumentsThe dir command shows the links in the directory listing. To enter the directory, use the cd command and treat the link as a regular directory (cd Docs).
36. more Command
The more command is a Windows CMD utility for displaying long documents or outputs one screen at a time. To use more with a command, use the pipe character:
<command> | more <options>Alternatively, use the command to display long files page by page:
more <path>For example, run the help cd command and pipe the more command to truncate the output:
help cd | more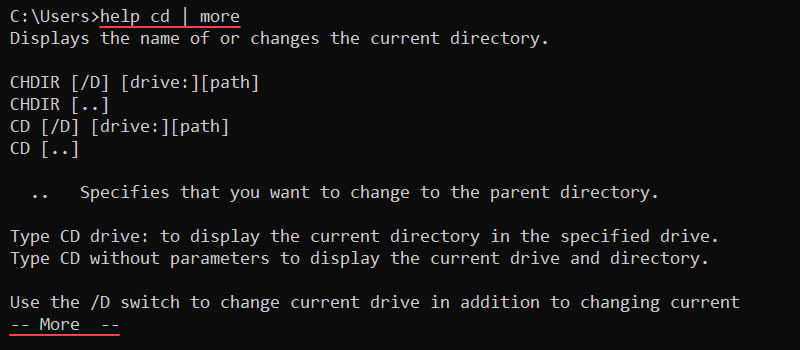
Press Enter to go to the following line and Space to go to the next page. To exit, press q.
37. mountvol Command
The mountvol command creates, removes, or shows a volume mount point. Mounting a volume makes data on a storage device available for local users through the file system.
The command syntax is:
mountvol <path> <volume name>The command does not require a drive letter to link a volume. Without any parameters, the mountvol command shows the help menu, mount points, and possible volume names.
For example, to list the volume name and current mount point for the C:\ drive, run:
mountvol C:\ /l
The output shows the GUID for the volume, which is a unique unchanging identifier.
38. move Command
The move command is a CMD shell command for moving files from one location to another. The syntax for the command is:
move <options> <source> <destination>The source and destination are either a folder or a file. The move command renames a file if the source and destination locations are the same but have different file names.
For example, the following command renames a file named sample_file.txt to file.txt:
move sample_file.txt file.txt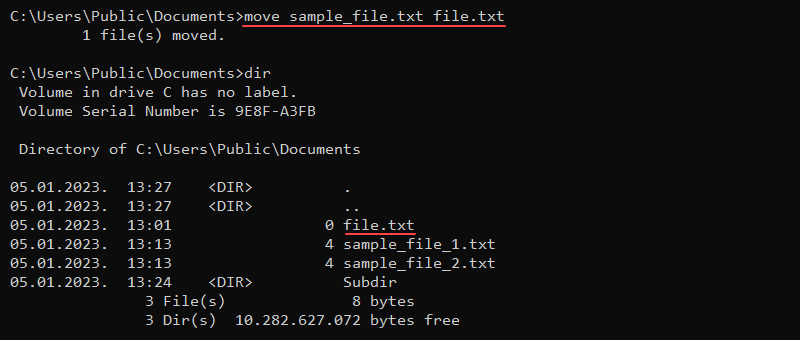
Provide the full path to move a file to another location:
move C:\Users\Public\Downloads\my_file.txt C:\Users\Public\Desktop\my_file.txt If overwriting an existing file, the command prompts to confirm, unless the command runs as part of a batch script.
39. msiexec Command
The msiexec program runs the Windows Installer program for installing, managing, and removing .msi software packages. The command syntax is:
msiexec <options> <path to package>The program features various install, display, update, and repair options. Without any options, the msiexec command opens a window to show the command information.
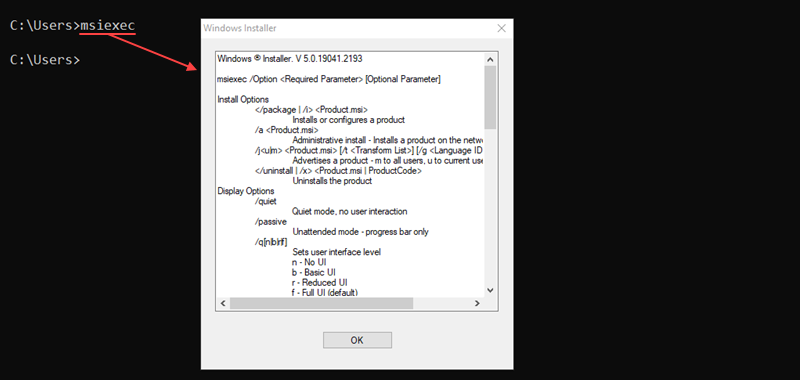
For example, to perform a normal installation of a .msi package, run:
msiexec /i "C:\example.msi"The /i option indicates a normal installation of the .msi package located at the provided path.
40. msinfo32 Command
The msinfo32 command opens the System Information window, which has details about the system.

The command syntax is:
msinfo32 <options>Additional options filter the information or export the data into specific file formats. For example, to export all system information into an.nfo file, use:
msinfo /nfo sysinfo.nfoThe command automatically appends the .nfo extension if omitted.
41. mstsc Command
The mstsc command starts the Remote Desktop Connection (RDC) program to connect to a remote machine. Use the command for remote connection or to alter an existing .rdp file.
The command syntax is:
mstsc <options> <file>For example, to start an RDC session in full-screen mode, use this command:
mstsc /f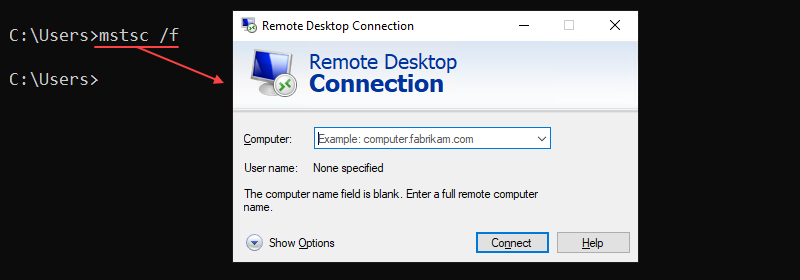
To edit an existing connection, use the /edit parameter and provide the file name:
mstsc /edit example.rdpUser-created .rdp files are in the Documents folder by default.
42. net Commands
net commands are a set of commands for managing various network aspects, such as users and network services.
The command syntax is:
net <subcommand> <options>Without additional parameters, the net command shows all available subcommands with a short description.
Use the net start command to list all running Windows services:
net start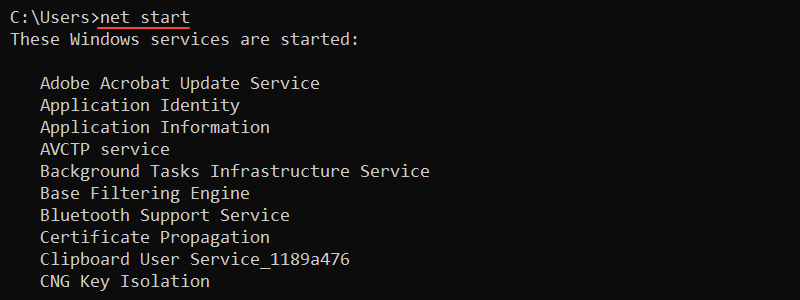
To stop a service, use the following command:
net stop <service>View the login and password requirements for a user with the following:
net accounts
Display additional help for a subcommand using the following syntax:
net help <command>The output shows a detailed help window for any provided command.
43. netstat Command
The netstat (network statistics) command is a crucial command for network administrators. The command lets you view various network statistics.
The basic syntax for the command is:
netstat <options>The command displays active TCP connections when used without options. The output shows the protocol, local and foreign addresses, and the TCP connection state.
Add the -a option to display all active TCP connections and listening TCP and UDP ports:
netstat -a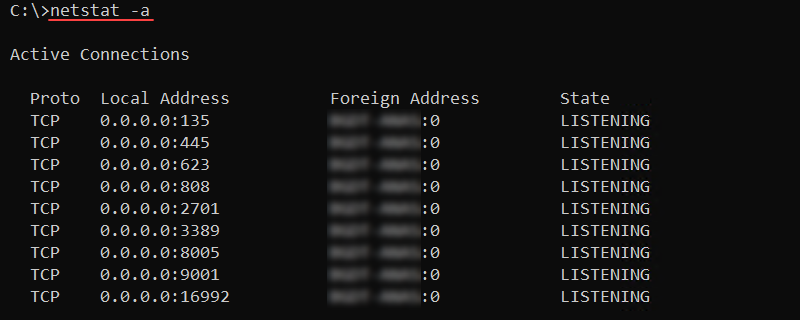
Use the command to scan for open ports or to check the port protocol type.
44. nslookup Command
The nslookup command is a DNS infrastructure diagnostics tool for web servers. The command features a non-interactive mode for looking up a single piece of information and an interactive mode for looking up additional data.
The syntax for nslookup is:
nslookup <host> <command> <options>Without any options, nslookup enters interactive mode. To find DNS records for a specific domain name, use:
nslookup <domain>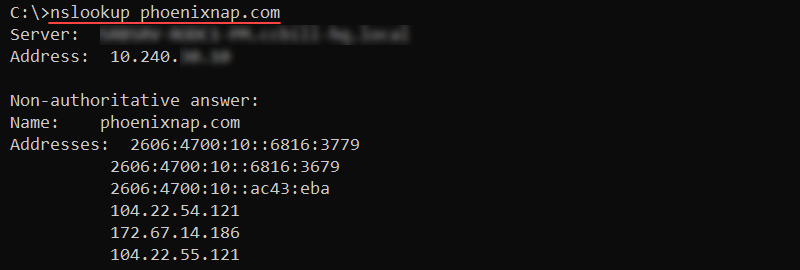
The output prints the A records for the provided domain.
45. path Command
The path command helps add directories to the PATH environment variable. The variable contains a set of directories that point to executable files.
The command syntax looks like the following:
path <location>Without any parameters, path shows the current state of the PATH variable.

To add multiple locations to PATH, separate each location with a semicolon (;) as in the following example:
path <location 1>; <location 2>Both locations append to the variable.
46. ping Command
The ping command is another essential network troubleshooting tool. The command checks the connectivity with another machine by sending ICMP request messages.
The syntax for the command is:
ping <options> <host>For example, to check connectivity to the phoenixNAP website, use:
ping phoenixnap.com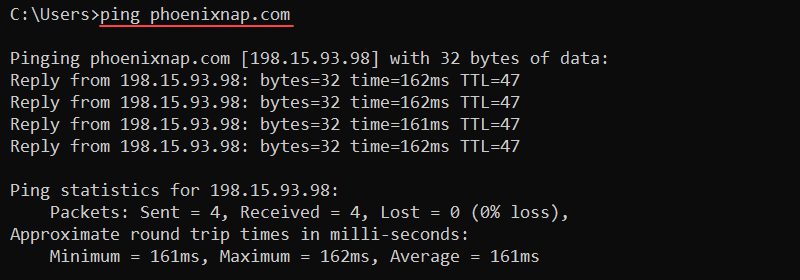
The output prints corresponding reply messages and round-trip times. Use the command to check for connectivity and name resolution issues.
47. powercfg Command
The powercfg (power configure) command runs the powercfg.exe program for controlling the system’s power plans. The monitoring tool also helps troubleshoot battery life and energy efficiency problems on a device.
The command syntax is:
powercfg <options> <arguments>To list the current power plan setup on a device, use:
powercfg /list
The output lists all power schemes on the system. The active power scheme has an asterisk (*).
48. prompt Command
The prompt command allows changing the CMD prompt display to the specified string. By default, the prompt shows the current location and the greater-than sign (>).
The command syntax is:
prompt <string and variables>The prompt command offers various variables to add special characters or additional features to the prompt. For example, to change the prompt to an arrow, use:
prompt --$g
The $g variable represents the greater-than sign (>) and the prompt stays during the command-line session.
49. rd and rmdir Commands
The rd and rmdir commands remove an empty directory from the system. The syntax for the commands is:
rd <path>rmdir <path>Attempting to delete a directory with files results in an error message. Add the /s parameter to delete a directory with subdirectories and files to avoid the error message:
rd /s <path>The command deletes the complete subdirectory tree and all files.
50. ren and rename Commands
The ren and rename commands rename files or directories. The syntax for the two commands is:
ren <path><old name> <new name>rename <path><old name> <new name>The commands do not allow moving the files to a different location. Wildcard characters work for multiple files. For example, to change all .txt files to .c files, use:
ren *.txt *.c
The asterisk (*) character helps discover all file names in the current directory with the .txt extension and renames the files to have the .c extension.
51. robocopy Command
The robocopy command is a robust command for copying files and directories. The syntax for the command is:
robocopy <source> <destination> <file> <options>The main benefit when using robocopy is the /mt parameter for higher-performance multithreading. Additionally, the /z parameter lets you restart a transfer in case of interruptions.
An example transfer looks like the following:
robocopy C:\Users\user\Downloads C:\Users\user\Documents database.db /mt /z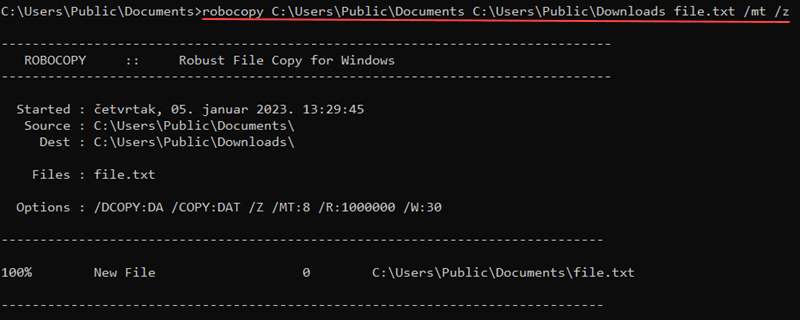
Use the command for large file transfers that are sensitive to interruptions.
52. route Command
The route command shows and alters entries in the local routing table. The command syntax is:
route <options> <command> <value>The different available commands are:
add— Adds a route entry to the table.change— Modifies an entry in the table.delete— Removes a route from the table.print— Displays a route or routes.
For example, to print all routes from the table, use:
route print 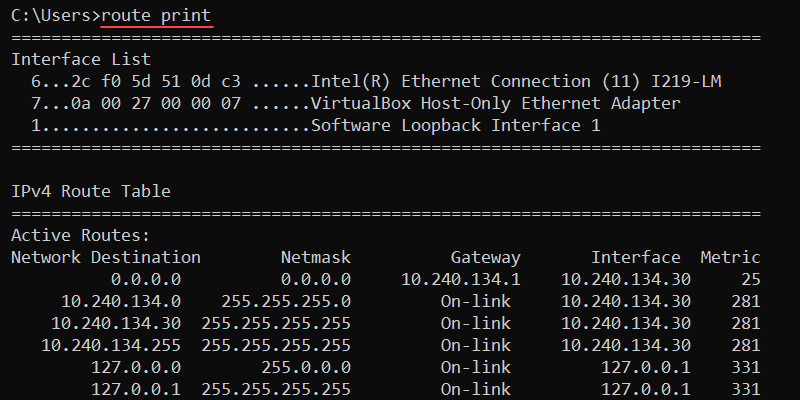
The output prints the interface list, and IPv4 and IPv6 routing tables.
53. schtasks Commands
The schtasks command helps schedule commands or programs to run on the system. The tasks run at specified times or periodically. The syntax for the commands is:
schtasks /<subcommand>The following subcommands are available:
change— Modifies existing properties of a task.create— Creates a new task.delete— Removes a task.end— Stops a program started by a task.query— Prints scheduled tasks on the machine.run— Starts a scheduled task.
For example, to show currently scheduled tasks on the system, use:
schtasks /query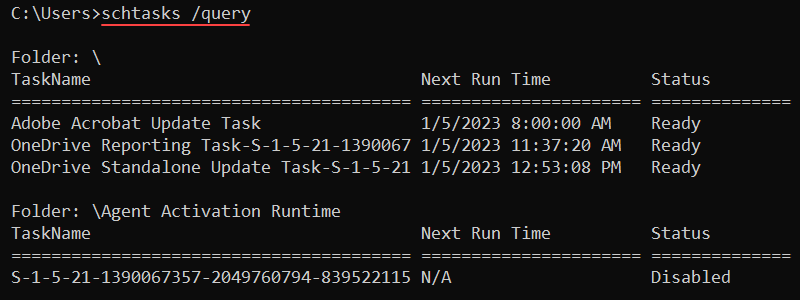
The output displays task names, next run times, and task statuses.
54. set Command
The set command shows, sets, and removes environment variables in the CMD. The syntax for the command is:
set <variable>=<value>Without additional parameters, the set command shows all environment variables.
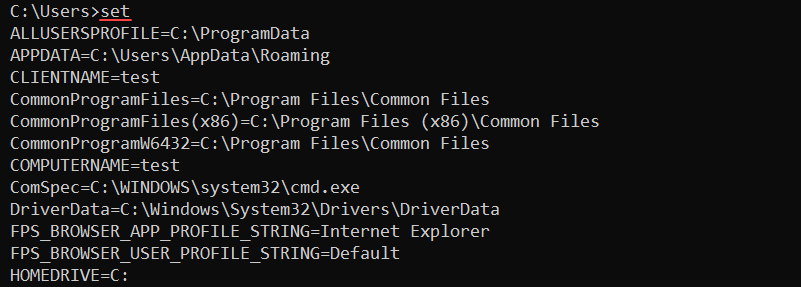
The variables are available to use with any command. For example, to create a new CMD variable called message, use:
set message="Hello, world!"Reference the variable using the following syntax:
echo %message%
Encasing the variable in the percent signs (%) reads the value and outputs it to the screen.
Note: The variables do not persist and are only valid for the current command-prompt session.
55. sfc Command
The sfc (system file checker) is an administrator command for checking protected file version integrity. The command also replaces incorrect overwritten protected files with the correct file version.
The syntax for the command is:
sfc <options> <files or directories>For example, to scan the system and repair all files, use the following command:
sfc /scannow
The command scans all protected system files and repairs problematic files when possible.
56. shutdown Command
The shutdown command restarts or shuts down a local or remote computer. The command syntax is:
shutdown <options>Without any arguments, the shutdown command opens the help menu.
For example, to shut down and restart the computer, use the /r option:
shutdown /r
To shut down without restarting, use the /s argument:
shutdown /sIn both cases, the shutdown is not immediate. To cancel the action, use the /a option:
shutdown /aThe option ensures that a previously executed shutdown command aborts.
57. sort Command
The sort command allows sorting provided data from a file or user input. Additional options control the sorting mechanism and from which point to start sorting.
To use the command interactively, do the following:
1. Run sort without any options.
2. Enter a new word in each line.
3. Press CTRL+Z and Enter at the end of the list to sort the input values alphabetically.

Alternatively, use the sort command on files:
sort sample_file.txt
The command sorts the file contents and prints the result to the console.
58. start Command
The start command opens a new command-prompt window according to the specified options. The command syntax is:
start <title> <options>For example, to load start a new command-prompt session with the title «Hello, world!» and set the path to C:\. enter the following command:
start "Hello, world!" /d C:\
A new CMD window opens with the starting path on the C:\ drive and a custom title.
59. systeminfo Command
The systeminfo command displays detailed system information about the OS and computer, including hardware properties. The command works on both local and remote machines.
Use the command without options to show the local system information:
systeminfo
Additional options allow checking system information for remote computers or controlling the output format. For example, show the output in CSV format with:
systeminfo /fo csvDifferent formats enable parsing the information through scripts effectively.
60. takeown Command
The takeown (take ownership) command allows an administrator account to take ownership of a file. The command provides access to a file for an administrator and makes the administrator the owner.
Add the /f option and specify the file name:
takeown /f <file>
The administrator now has full permissions over the file.
61. taskkill Command
The taskkill command ends a running process or task on the Windows system through the command line. Use the command to forcefully end processes and tasks which did not end correctly.
The syntax for the command is:
taskkill <options> <task or process>A common way to end a task is to find the process ID (PID) with the tasklist command and end the process with:
taskkill /pid <Process ID>
The command finds the process by ID and kills it.
62. tasklist Command
The tasklist command shows all running processes on a local or remote computer and their memory usage. The command helps locate and reference specific processes.
The syntax for tasklist is:
tasklist <options>Without additional options, the command shows all currently running processes.
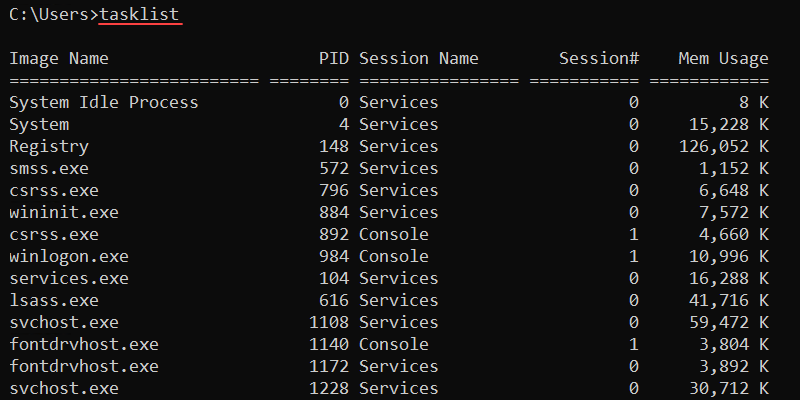
The image name and PID are unique identifiers for a process. The final column shows the memory usage for a process. This is a good indicator for identifying processes that slow down the system.
63. telnet Command
The telnet command is a Windows tool for bidirectional CLI communication. The tool uses the Telnet protocol to send messages and enable an interactive communication channel.
The syntax for the command is:
telnet <command> <options>See our detailed guide for using Telnet on Windows.
64. time Command
The time command manages and displays the current system time. Without any options, the command prints the current time and prompts to enter a new time:
time
Enter a new time to change the system time or exit the prompt using CTRL+C. Use the /t option to avoid making modifications:
time /t
The command prints the current time and returns to the command line.
65. timeout Command
The timeout command pauses the command line for a specified number of seconds. The syntax for the command is:
timeout /t <seconds>For example, to pause the interpreter for ten seconds, run:
timeout /t 10
The output counts down and returns to the command line. Press any key to interrupt the timeout earlier. Use the command in scripts to wait for execution between two commands.
66. title Command
The title command is a simple utility for changing the command prompt’s title. The syntax is:
title <string>For example, to set the title to "Hello, world!", use:
title "Hello, world!"
The CMD window title changes to the provided string. Use the command when running multiple batch scripts to differentiate between different command prompts.
67. tracert Command
The tracert (traceroute) command is a networking tool for determining the path from a local computer to a destination. The command sends ICMP messages with increasing TTL values to map routers along the path.
The syntax for tracert is:
tracert <options> <destination>For example, to trace the path to phoenixnap.com, use:
tracert phoenixnap.comAlternatively, use the IP address of the destination.
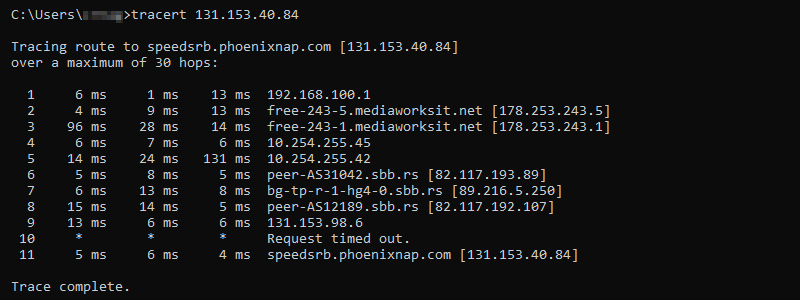
The output shows the hops between the source and destination, providing an IP address and name resolution where applicable. Use the command to discover connectivity issues to a host.
68. tree Command
The tree command displays the contents inside a drive or directory in a tree-like structure. The syntax is:
tree <options> <path>
Without any options, the tree command displays the directory structure of the C:\ drive.
69. type Command
The type command is a built-in command for showing file contents. The command allows viewing a file directly in CMD without modifying the text.
The syntax for the type command is:
type <file path>For example, to show the contents of the file called sample_file.txt, run:
type sample_file.txt
The output prints the file’s contents to the command line. Use this command to preview files directly in the command prompt.
70. tzutil Command
The tzutil (time zone utility) command helps modify and display the currently set time zone on the system. Without any options, the command shows the help window.
Display the current time zone with:
tzutil /g
The output shows the time zone ID. List all available time zone IDs with:
tzutil /l | moreThe more command helps truncate long outputs. Use the /s parameter and provide the time zone ID to change the system time zone.
71. ver Command
The ver command is a simple utility to show the operating system version. Use the command to find the exact version of the operating system:
ver
The version prints to the output and returns to the command line.
72. vol Command
The vol command prints the disk volume and label. The syntax for the command is:
vol <drive>:
Without a specified drive, the vol command shows information for the currently selected drive.
73. where Command
The where command searches for the location of a file using a search pattern and prints the location to the command line. The syntax for the command is:
where <options> <location to search> <file name>Omitting the location searches for the file in the current directory without going through subdirectories. To perform a recursive search, add the /r parameter. For example:
where /r C:\ sample_file.txt
The command searches the C:\ drive and all subdirectories. If the file is found, the command returns the location path.
74. whoami Command
The whoami command shows the current user’s domain and username. The syntax for the command is:
whoami <options>Without options, the command shows the domain and user name.

Add the /all parameter to show detailed information for the current user:
whoami /all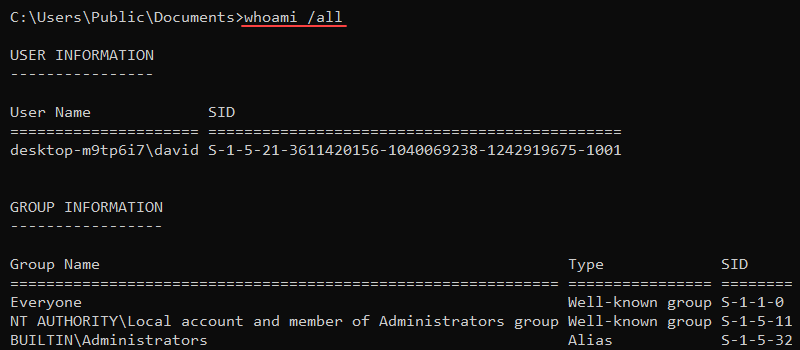
The user’s name, security ID, groups, and privileges print to the console.
75. xcopy Command
The xcopy command copies files, directories, and subdirectories from one location to another. The syntax for the command is:
xcopy <source> <destination> <options>For example, use the following command to copy contents from one location to another, including subdirectories (even if empty):
xcopy <source> <destination> /s /e
The /s parameter enables subdirectory copy, while /e includes empty directories. If any files with the same name exist in the destination, the command prompts before overwriting.
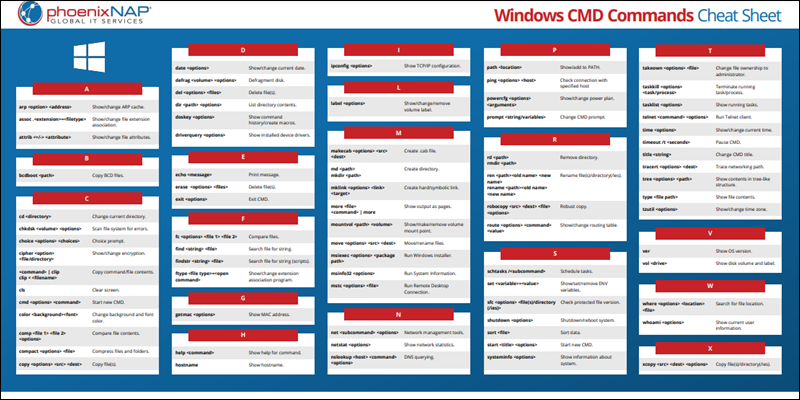
Windows CMD Commands Cheat Sheet
All the listed commands are available in a single-page cheat sheet in PDF format. Save the cheat sheet for future use and reference by clicking the Download Windows CMD Commands Cheat Sheet button below.
Conclusion
After reading and trying out the commands from this guide, you’ve familiarized yourself with the Windows Command Prompt (CMD) tool. Windows allows performing a variety of tasks through the command prompt using just commands.
Continue practicing and researching commands further to master the Command Prompt in Windows.
