You can also be interested in these:
- How to use single jack headset on pc without splitter
- Can you buy a PS5 on layaway?
- Sony X750H 4K Ultra HD TV review
- Corsair HS65 Wireless headset full review
The Sony WH-1000XM4 are not just a pair of ordinary headphones, they are one of the greatest pairs of headphones currently available on the market. With an incredible slew of features, absolutely excellent sound quality, solid build quality and a sleek, comfortable design, it’s no wonder they’ve become so popular among headphone enthusiasts and casual users alike.
They’re also quite easy to use, as the pairing process with your smartphone is pretty simple. Not only is the process as easy as pressing a couple of buttons, but it’s also feature rich, with an accompanying app being available just to adjust the headphone’s settings and profiles. This makes sense, as the Sony WH-1000XM4 were designed to be used with smartphones from the ground up.
On PC, things are slightly different. Instead of the simple, streamlined process on mobile, you instead have many different options and ways to connect the headphones to your computer. For beginners it may seem like a bit of a daunting task. Just how exactly do you connect the Sony WH-1000XM4 to PC? What are the steps that one would need to take in order to get things to work properly?
Worry not though, because we’re here to lend you a helping hand. We’ll be breaking down how to connect your Sony WH-1000XM4 to PC, as well as which ways are the most convenient and what you’ll need to do it. So, let’s get into it!
Connecting Sony WH-1000XM4 to a Windows 10 PC via Bluetooth
This is the official way to connect your pair of Sony WH-1000 XM4 headphones to your PC, and it’s also the method with the most documentation available. It takes several steps to get working, but once everything is set up it’s a relatively painless affair after.
Before you start, you’ll want to make sure your PC supports music playback through Bluetooth. Generally, most PCs with Bluetooth functionality have it, so you don’t need to worry too much. If your PC doesn’t have Bluetooth functionality to begin with, then you’ll want to purchase a Bluetooth dongle before getting into the steps proper. Once everything’s prepared, you can begin.
First off, you need to put the headphones into pairing mode. The first time you turn them on, they’ll go into pairing mode automatically, but in case they didn’t you’ll need to press and hold the pairing button on them for 7 seconds. You’ll know your pair is in pairing mode when the blue indicator light on them repeatedly flashes twice in a row. The headphones will also say “Bluetooth pairing” when this happens.
Once that’s all set up, next you’ll want to turn on Bluetooth functionality on your PC. You can do this from the ‘Devices’ option in your settings menu. Once you’ve turned it on, all that’s left is to find WH-1000 XM4 in the pairing list. Make sure to wait for and select WH-1000 XM4 and not LE_WH-1000 XM4, or it won’t work.
If it asks for a passcode, it’s usually 0000. Once this is done, your headphones should announce “Bluetooth connected,” and from there it’s just a matter of listening to music. In case it’s still not working, you’ll want to go into your audio settings and change the default output device to the WH-1000 XM4. It’s a simple fix, and one many people don’t know.
Connecting Sony WH-1000XM4 to a Windows 8.1 PC via Bluetooth
We’ll knock this one out too while we’re here, since it’s pretty much the same process as with Windows 10 with one minor difference. For your headphones, the process is pretty much the same. The main difference comes from the menu of Windows 8, where you’ll need to navigate to the ‘PC and Devices’ tab and then continue to find the Bluetooth section before carrying on.
Otherwise, both are pretty much the same, so the steps above apply here as well. It may take bit more trying with Windows 8.1 since it’s an older version, but there shouldn’t be too much of an issue getting it working. Now, let’s move on to a different PC system altogether.
Connecting Sony WH-1000XM4 to a Mac PC via Bluetooth
On Mac, the process begins the same. You’ll want to put your headphones into pairing mode by holding down the pairing button for 7 seconds. Once the headphones announce that they are ready to be paired, you’ll want to head to your Mac and begin setting things up.

First of all, make sure you turn on internal speakers, it makes things easier to adjust later. Then, head into the ‘System Preferences’ menu and scroll around until you find the Bluetooth section. Click on it, activate it and then wait until WH-1000 XM4 appears. Once again, wait until WH-1000 XM4 appears, and make sure you don’t select LE_WH-1000 XM4.
Once that’s done, it will ask you for a passcode. Input 0000, and setup should be ready. Now, click on the little speaker icon in the top right of your taskbar, and change the output device to your now fully paired Bluetooth headphones.
Connecting Sony WH-1000XM4 via headphone Cable
If you’re not a huge fan of embracing the wireless life, then don’t worry, Sony has you covered. Inside the box for your headphones, you’ll find a supplied audio cable that you can plug into the headphones. It allows you to physically plug the headphones into any device with an audio jack.
Like any other normal pair of wired headphones, all you really need to do is plug it into your PC, quite basic stuff. It even works when the headphones are turned off, though you’ll want them turned on if you want to take advantage of the active noise cancellation feature.
And that’s about it for methods to connect your Sony WH-1000 XM4 to PC. It’s not all too difficult, and once you get the hang of it, it’s quite painless to get through. We hope this article managed to assist you in getting your headphones to work and stay tuned for more helpful tips in the future.
More stories like this
- How to use single jack headset on pc without splitter
- Can you buy a PS5 on layaway?
- Sony X750H 4K Ultra HD TV review
- Corsair HS65 Wireless headset full review
- Bytech gaming headset review
- Wireless Blackweb headphones review
What does superior sound quality mean to you?
How far would you go to get the perfect audio experience?
What makes listening to audio work best for you?
These are only a few of the most important questions that people who don’t want to cut corners when it comes to optimizing their music listening experience ask. This is why it’s truly quite interesting that the answer to all of these questions is the Sony WH-1000XM4!
This is all the more reason why you simply need to know how to connect Sony WH-1000XM4 to pc as soon as you can!
Introducing the Sony WH-1000XM4
Beautiful build.
Smart design.
The latest technology.
Audio quality at its peak.
For those who aren’t aware, the Sony WH-1000XM4 is redefining what it means to listen to music solo currently. To be completely fair, this device has been making wave after wave from the moment it was launched in 2020.
One of the successors of the XM3 generation, this device has left us with quite a lot to love and so very little to hate. Those who have sampled the wonders of these headphones will tell you one thing; they’re never going back.
With all of the good reviews and hype that follow this device, it’s only natural that more people would want to get the Sony WH-1000XM4 to use with their personal computers. This is nice, for sure. But it does raise the little question of how to connect Sony WH-1000XM4 to pc.
A device that is at the very peak of the latest in tech and innovation, it is only to be expected that this pairing process has been made as simple and as effortless as possible. Yet, for any number of reasons, some users might still face challenges with pairing this device to their laptop or desktop computer.
For us, this is simply unacceptable, which is why we’ll be going all out to extensively detail everything that you need to know to connect your new headphones to virtually any pc without breaking a sweat!
Be sure to stick with us to the end here!
Sony WH-1000XM4 – Is It Still Worth It In 2023?
It is the nature of critics to always find something negative to say about any given thing. This is why the fact that most critics have either been completely mum about the Sony WH-1000XM4 or praised it exhaustively speaks volumes.
Personally, one of the many things that we love and appreciate about the Sony WH-1000XM4 is that it brings the old-fashioned in a new and incredibly attractive way. It essentially offers you everything you would like in a headphone without making the device look mundane or unremarkable.
Case in point, it comes with a different yet far more reliable design, its noise-cancellation feature is second to none and we’re especially big fans of the “Speak-to-Chat” feature of the Sony WH-1000XM4.
When this functionality is activated, users will be able to get the Sony WH-1000XM4 to pause working automatically simply by talking!
This device is just great. There can be no disputing that.
Even now, while these headphones are facing considerably hotter competition, the fact still remains that the Sony WH-1000XM4 is a major class above the rest.
To those who are still asking themselves if getting the Sony WH-1000XM4 at this time would be a smart move, we assure you that it’ll be the best use for your money! If you want a reliable set of headphones that meet and exceed all standards at the moment, you have precious little alternative.
How to Connect Sony WH-1000XM4 to PC – The Complete Walkthrough
If you weren’t sure where to swing before, we hope that you’ve now seen the light and realized that, up to a certain point, the Sony WH-1000XM4 is pretty much as good as it gets for most people.
Now, all that’s left is to find out all you need to know when it comes to learning how to connect Sony WH-1000XM4 to pc in 2023.
Moving forward, we want to promise you that this isn’t going to be one of those techy articles that you’ll have a hard time following. We’ll be breaking down everything you need to know in detail so that you can execute this action as many times as needs might demand without a single worry in mind.
All of that being said, here’s what you need to know about connecting these amazing headsets to your desktop or laptop!
The Best Pro Tips For Pairing and Connecting the Sony WH-1000XM4 to Your Computer Device
If there’s one reason that the entire exercise we’re about to lay out will be as simple as it is, it’s because the Sony WH-1000XM4 is one of the best headsets around at the moment, tech-wise. Thanks to the innovations that have been incorporated into the device, you won’t have to jump through as many hoops to get stuff done here.
But, before we look into how to connect Sony WH-1000XM4 to your pc, there are some important bases that need to be carefully and extensively covered
Basic Requirements For Connecting the Sony WH-1000XM4 to Your PC
The following are essential benchmarks that your laptop or desktop should meet to some degree if you want to have a successful and productive time connecting it to the WH-1000XM4.
So, before we move on to how to connect the Sony WH-1000XM4 to PC, here are a couple of things to check off your list. These include:
The personal computer in question should have Bluetooth capabilities. As an added measure here, you should also be sure that the Bluetooth driver is up to date as this might present issues otherwise;
The positioning of your computer device and the Sony WH-1000XM4 should be just right. Ideally, the two devices should be as close as possible. But, where that can’t happen for any reason, they shouldn’t be more than 1 meter apart;
The Sony WH-1000XM4 should be fully charged. Technically, you don’t need to have a complete charge to get the pairing process done. However, it certainly never hurts to have it;
Have the operating instructions of your computer device close by. Again, this isn’t technically necessary but you never know when you might have to look something up quickly;
Finally, for computer devices that might require it, ensure that you have a built-in Bluetooth adapter in proximity to you throughout the exercise.
The 5-Step Guide to Connecting Your Computer to the Sony WH-1000XM4
For emphasis, connecting your Sony WH-1000XM4 to most computer devices is as easy as it gets. However, the process may differ slightly, depending on the type of operating system that your pc is running.
Here, we’ll be focusing on how to connect these headphones to Windows 10 and 11 OS-based devices. So, to connect your Sony WH-1000XM4 to such laptops you just need to follow the steps detailed below.
Step One – Turn on Your Computer Device
The very first thing that you have to do here is to make sure that your computer device is switched on. No pairing or connecting can be possible if your laptop is powered off. As such, you have to be sure that you’ve turned on your device and it has booted fully.
Step Two – Go to Your Computer Settings
Next, you have to make your way to the settings of your device. There are numerous approaches that you can take to get this done. As an example, you can choose to simply press the dedicated “Windows” key and input the word “Settings” into the search bar. This will display the needed result. Click that and be on your way.
Alternatively, you could use your cursor to make your way to the lower right corner of your screen where there’s a message-like icon. Click on this icon and it will show you the notifications panel. At the base of the notifications panel, you’ll see several features you can access. Click on “All Settings”.
Step Three – Search For the Bluetooth Setting
Once you’ve accessed the “Settings” section, you now have to look for Bluetooth settings specifically. There are a lot of settings here so, if you want to do this fast, you should just use the search bar at the top of the page.
Type in “Devices” and it will show you “Bluetooth and Other Devices Settings”. Click on that. Toggle the Bluetooth button to “On”. Now, move away from your computer to your headphones.
Step Four – Power on the Sony WH-1000XM4
Just like with your computer, nothing happens if you don’t power on the Sony WH-1000XM4. So, locate the power button and turn that on. It will start broadcasting its Bluetooth signal.
Step Five – Find the Sony WH-1000XM4 Signal on Your Computer
Now, you have to go back to your computer. By this time, the list of Bluetooth devices close to the laptop would have been shown. Just find that of the Sony WH-1000XM4 click on it and you’re done!
Bottom Line
That’s about it for learning how to connect Sony WH-1000XM4 to pc. The beauty of it all is that, even though the steps described above were for Windows 10 and 11, you can follow that basic approach for different OS devices and it’ll work just as well too!
What are you still waiting for?
Go have a blast with your new headphones now!
You’ve purchased your Sony WH-1000XM4 headphones, and you’re ready to enjoy the benefits of noise-canceling technology, but what happens next?
You need to register your headphones using your PC. In Windows, click the “Start” button and select Settings. Click “Devices” and select Bluetooth. Ensure that “Bluetooth” is selected “On”, which makes the Bluetooth function available. Select WH-1000XM4 and click pair.
But we’ve all been in the position where we’ve tried to connect using the instructions above, and it just does not work.
There’s nothing more frustrating, especially when you’re looking forward to a weekend gaming session.
Luckily for you, we’ve trawled through pages of manuals and watched countless videos to bring you the best advice, and tips & tricks to get your Bluetooth device purring.
To connect your Sony WH-1000XM4 to your PC should be straightforward.
First off, you need to make your headset discoverable.
H2 How Do I Make My Sony WH 1000XM4 Discoverable?
If you’re pairing your headphones for the first time, then you usually won’t have a problem.
After switching your headset on, it automatically enters pairing mode. This happens when you first get the headset home from the store or after repairing it.
You can follow the instructions given above, and in next to no time, the headphones will be paired.
But the next time you try to pair your device, you will usually run into a problem.
How Do I Reset My Sony WH-1000XM4 Bluetooth Headphones?
You may want to try resetting your Bluetooth connection before trying to connect to more than one device.
Take, for instance, pairing with your PC after first pairing with your cell phone. The cell phone pairing goes fine, with no problems at all.
Next, you try to pair them with your PC, and it just won’t show up in your list of Bluetooth devices available.
Try this if you have a problem pairing with multiple devices:
- With your headphones off, press and hold the power button on the side of the headphones. Continue to hold the button down until the LED indicator starts to blink blue and red. Don’t be fooled though, it takes a little while before the light blinks blue and red to indicate that it is in pairing mode.
- So, keep holding the button down until you are certain that the indicator is alternating between blue and red consistently (we’re talking about 10-15 seconds here but it may take a little while longer or shorter depending on your headset).
- Waiting for the LED to turn from blue, then to red and back again, is what fools people. The alternating blue and red LED rate is quite quick, expect it to be around 4 to 6 blinks per second.
- Only when you’re certain the LED is blinking blue and red must you release the button.
- Next, go to your PC or laptop and click on the Windows Start button at the bottom left of your screen.
- Click the gear icon and select Settings.
You may have to type settings into the search bar depending on which version of Windows you are running, but for this article, I assume you have Windows 10 installed.
The Bluetooth and other devices will appear and you need to ensure that the blue tooth selector is switched on.
- Click on the Add Bluetooth button at the top of the screen.
- On the next screen, click on the Bluetooth icon to search for nearby Bluetooth devices.
- When your Sony headset appears on the list, click on it. It may take a few seconds for the headphones to fully connect but you will see the confirmation on your screen when it does.
- When you see the message, ‘Your device is ready to go!’ your headset is paired and ready for use.
Despite running through all the instructions above, you may still have a problem with pairing your headset.
Why are my Bluetooth Headphones Still Not Connecting?
Bluetooth usually works seamlessly with all your smart devices.
However, some versions of Bluetooth are not backward compatible, so it’s a good idea to ensure that you have the latest version of Bluetooth installed.
You may need to enter your Windows Settings to check whether your Bluetooth drivers are updated.
Soft Reset
This is the classic call center response to any computer glitch. Try switching off your headphones and laptop or PC and then restarting both.
Surprisingly, this sometimes works, but not always.
Delete Bluetooth Devices
Older devices or older versions of Bluetooth may just connect with the latest device that you used.
To avoid this and to clean everything up, delete any Bluetooth devices that are paired with your PC or laptop and try pairing them with your headset again after rebooting everything.
Charge Your Headphones
You may not have sufficient charge in your headset battery and that will sometimes affect its ability to connect. Recharge the headset fully before trying to connect.
USB Interference
The new high-speed USB 3.0 ports can sometimes create interference with nearby devices, so make sure your headphones are not close to the USB ports on your laptop or PC.
Router Interference
In the same way, as USB 3 ports may cause interference, your router can also be the culprit. Move away from the router if possible or, at the very least, don’t position the router right on top of your PC.
Steven is a certified IT professional and gaming enthusiast. He has been working in the tech industry for over 10 years, and specializes in all things Tech-related. When he’s not geeking out over the latest hardware or software release, he can be found testing out the latest video game.
Read Next
August 23, 2023
How to Connect PS5 to Samsung TV: A Step-by-Step Guide
July 28, 2023
Is Vizio Owned by Sony? Uncovering the Truth Behind the Brands
April 8, 2023
Sony’s New Patent Proposes a Shape-Shifting and Temperature-Changing Game Controller
November 8, 2022
Xbox Series x GPU vs PS5 GPU: Which is Better?
October 22, 2022
How Long Are the Previews Before a Movie?
October 21, 2022
What’s the Meaning of AMC Digital?
October 21, 2022
ScreenX vs. IMAX: The Ultimate Guide
October 21, 2022
What is an XD Movie? Here’s What You Need to Know
October 21, 2022
What Are the Best Seats in the IMAX Theater?
October 21, 2022
What is an RPX Movie?
@itsbgt написал (-а):
… Поэтому решил использовать их на ПК через кабель, тот провод что идет в комплекте позволяет использовать только наушники без микрофона… (?


 )
)Добро пожаловать на форум,
… в Вашем случае будут полезны пару опций для беспроводных наушников (в т.ч. моделей WH-серии), подсоединяемых по кабелю  :
:
—  опция с функционалом микрофона реализуется с помощью комплектного TRS-кабеля при выключенных наушниках;
—  опция с функционалом головной гарнитуры также реализуется с помощью кабеля со встроенным микрофоном » 3.5mm TRRS — 3.5mm TRS «, т.е. на одном конце есть 3.5mm TRRS-разъем (4-PIN) для компа/смартфона, затем имеется микрофон на кабеле, и на другом конце — 3.5mm TRS-разъем (3-PIN) для наушников, типа:
Успехов  , и рассказывайте, как зазвучит

 …
…
—————————————
«Правильная постановка задачи важнее даже, чем её решение…» (Альберт Эйнштейн).
Sony WH-1000XM3 or XM4 is one of the best noise cancelling headphones. But the mic not working issue can make users out of ideas as to what to try. If you’re encountering the same issue, the methods listed in this article may help you fix it.
Before getting started
Before moving to the advanced fixes, you need to isolate the problem. You should check if the headphones work on other devices. Simply connect headphones to a different device and check if they are working. If not, the problem lies in the headphones’ end and you should contact the customer service or may consider investing in new headphones.
If your headphones work perfectly in other devices, try these fixes:
- Make sure your microphone is enabled and set as the default device
- Unmute your microphone
- Update your audio driver
- Try Windows 10 Troubleshooter
Fix 1: Make sure your microphone is enabled and set as the default device
Normally, when your microphone is connected, Windows can automatically detect it and set it as the default input device. But sometimes it just fails to do that and you have to set it manually. Also there may be a possibility that it’s disabled. To troubleshoot the issue, you can take these steps:
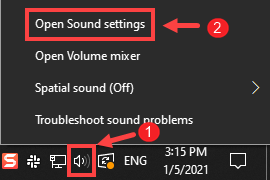
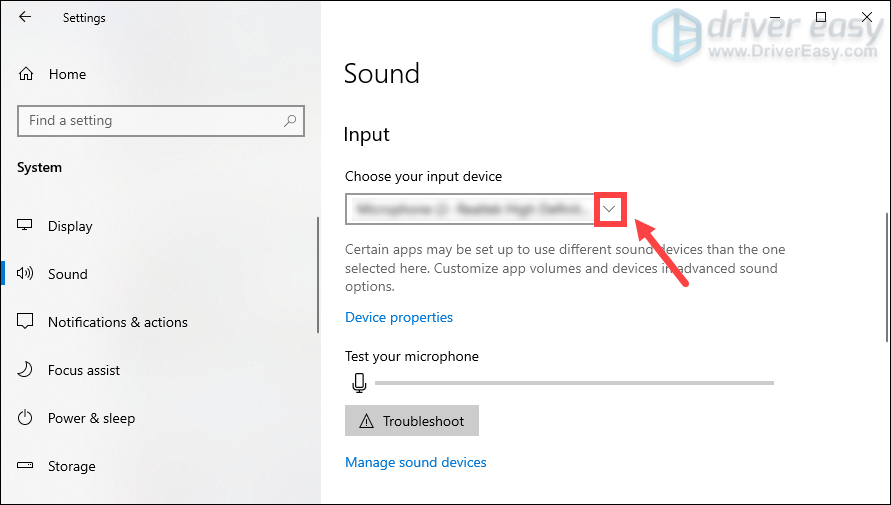
1) Right-click the volume icon in System Tray at the right end of the task bar. Then select Open Sound settings.
2) Under the section of Input, click the drop-down and select your headphones from the list.
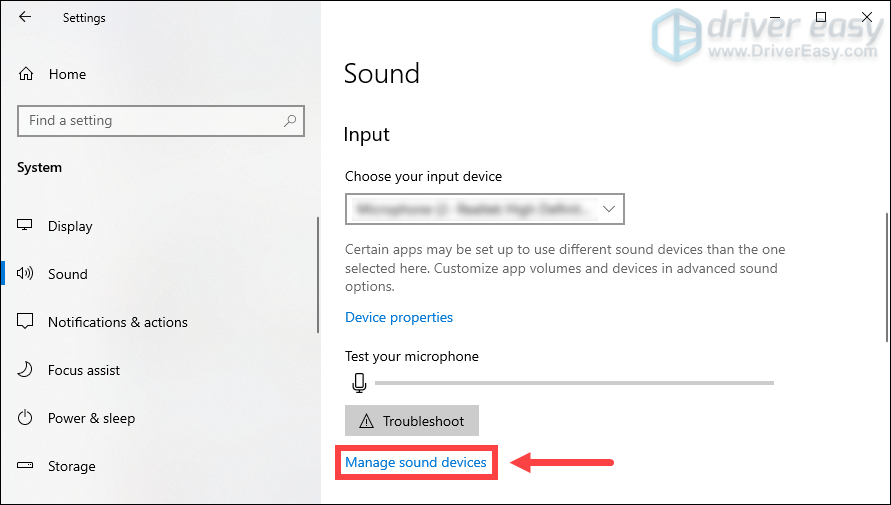
3) Now click Manage sound devices under the Input section.
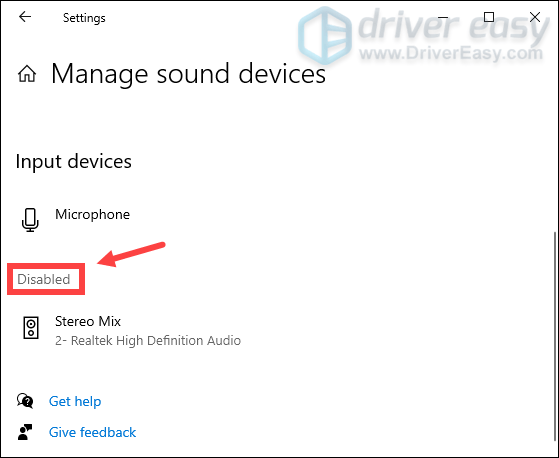
4) If your device is under the Disabled list, click it and click Enable.
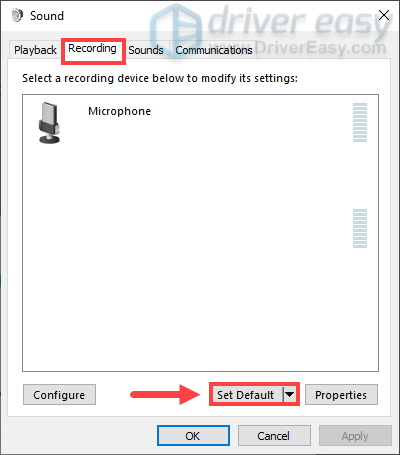
5) Now go back to the Sound window. Scroll down to the section of Related Settings and click Sound Control Panel.
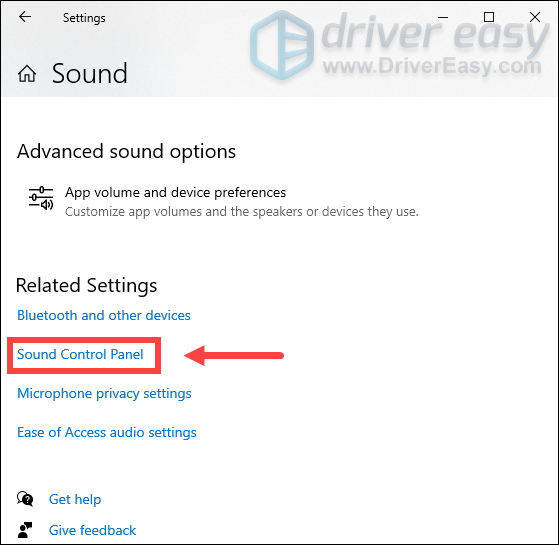
6) Under the tab Recording, select your microphone and click Set Default > OK.
After you’ve done these, test if you can get the microphone to work. If it’s still not working properly, proceed to the next fix.
Fix 2: Unmute your microphone
Sometimes you may not notice that you actually mute your microphone. To check if that’s your case, take these steps:
1) Right-click the volume icon in System Tray at the right end of the task bar. Then select Open Volume mixer.
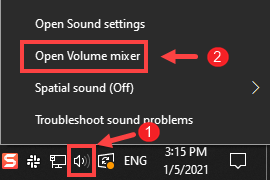
2) In the Windows volume controls, a red circle with a slash through it indicate the device is muted. If that’s your case, select your device and adjust the slider to unmute it.
Fix 3: Update your audio driver
The mic on your headphones won’t work if you’re using an incorrect or outdated audio driver. Outdated drivers can become incompatible with an update to Windows, or you may be lacking a new feature required for the microphone to function properly. In this case, you should update your audio driver.
Methods to update your audio driver
To update your audio driver, you can either do it manually via the Device Manager or head to the manufacturer’s driver download page to download and install the exact driver for your system. This requires a certain level of computer knowledge and can be a headache if you aren’t tech-savvy.
OR
If you don’t have the time or patience to update your drivers manually, you can do it automatically with Driver Easy. It’s a useful tool that helps you detect any outdated drivers, then download and install the latest drivers for your system.
Here’s how to update drivers with Driver Easy:
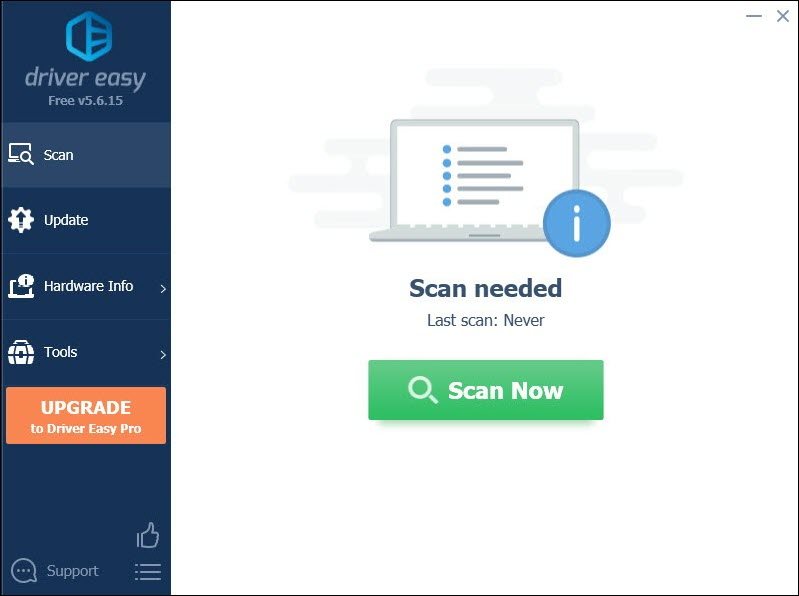
1) Download and install Driver Easy.
2) Run Driver Easy and click the Scan Now button. Driver Easy will then scan your computer and detect any devices with missing or outdated drivers.
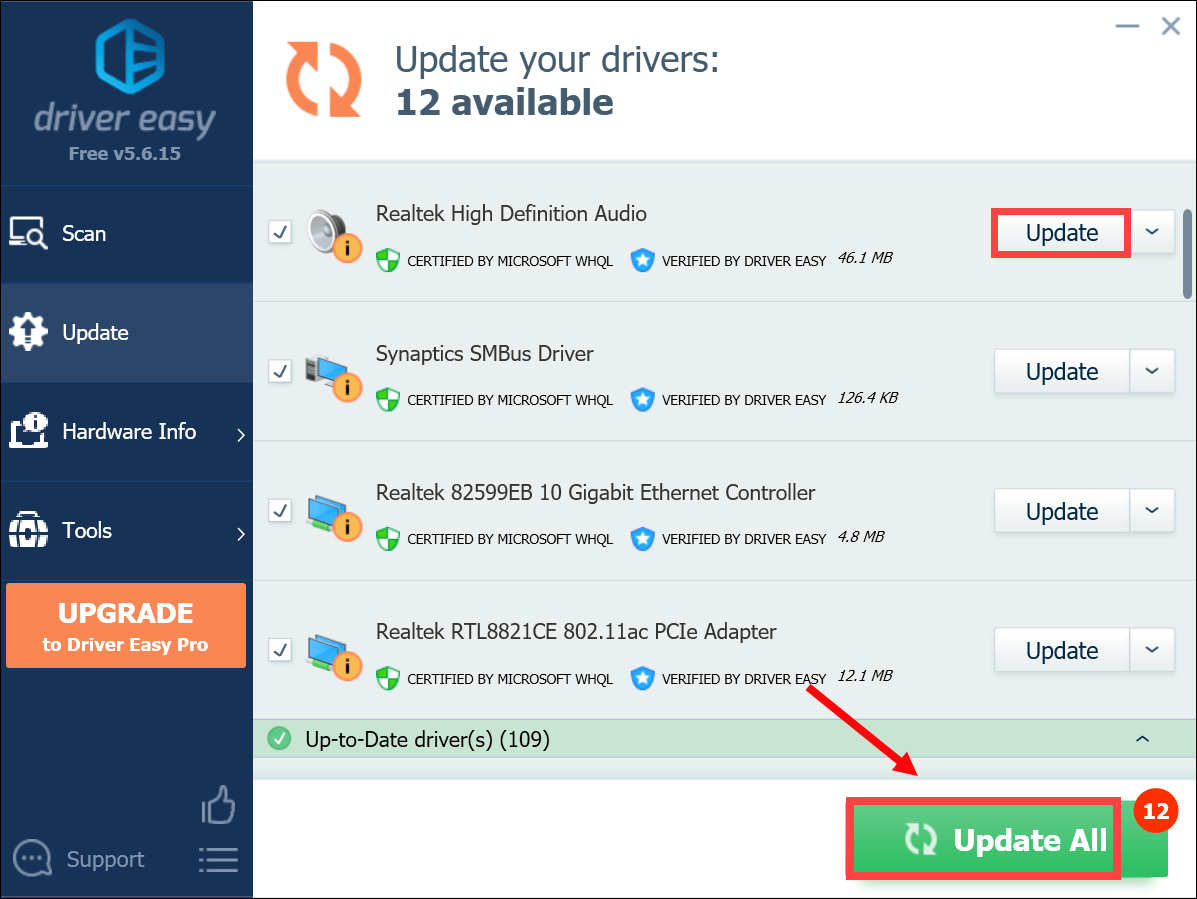
3) Click Update All. Driver Easy will then download and update all your outdated and missing device drivers, giving you the latest version of each, direct from the device manufacturer.
This requires the Pro version which comes with full support and a 30-day money-back guarantee. You’ll be prompted to upgrade when you click Update All. If you don’t want to upgrade to the Pro version, you can also update your drivers with the FREE version. All you need to do is to download them one at a time and manually install them.
The Pro version of Driver Easy comes with full technical support. If you need assistance, please contact Driver Easy’s support team at support@drivereasy.com.
After updating your drivers, restart your computer for the changes to take effects. Then you can test if that fixed your issue.
Fix 4: Use the audio troubleshooter
If nothing else helps, you can use the audio troubleshooter to help your troubleshoot the issue:
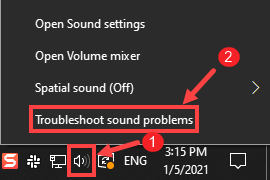
1) Right-click the volume icon in System Tray at the right end of the task bar. Then select Troubleshoot sound problems.
2) If you’re asked which device you want to troubleshoot, choose your headphones and select Next. Then it’ll help you find the problem.
That’s it – the full list of fixes for the Sony WH-1000XM3 or WH-1000XM4 mic not working issue. Hopefully, you can get your microphone back to normal with some tweaks. If you have any ideas or questions, please leave us a comment below.
19
19 people found this helpful