Что такое ошибка «Что-то пошло не так»
«Что-то пошло не так. Попытайтесь повторно открыть параметры позже»- это сообщение ошибки, с которой можно столкнуться при попытке открыть Центр обновления Windows. Из-за нее пользователи не могут открыть настройки с обновлениями для их проверки или установки. Такая ошибка может возникнуть по ряду причин. Чаще всего возникают это происходит из-за проблем с конфигурацией или совместимостью, о которых люди часто не знают. Любое стороннее ПО или внутренние проблемы Windows могут стать причиной неисправности Центра обновлений Windows. Довольно сложно сразу определить, какая причина вызвала проблему, поэтому необходимо протестировать все доступные решения, пока не найдется рабочее. Ниже мы разберем несколько методов, способных решить ошибку «Что-то пошло не так». Следуйте за каждым шагом внимательно, чтобы не пропустить никаких деталей.

Что-то пошло не так ошибка (Центр обновления Windows)

Что-то пошло не так ошибка (установка Windows)

Что-то пошло не так ошибка (изменение PIN-кода)
Скачать средство восстановления Windows

Существуют специальные утилиты для восстановления Windows, которые могут решить проблемы, связанные с повреждением реестра, неисправностью файловой системы, нестабильностью драйверов Windows. Мы рекомендуем вам использовать Advanced System Repair Pro, чтобы исправить ошибку «Что-то пошло не так» в Windows 10.
1. Включите Чистый запуск Windows.
Стоит проверить есть ли на вашем ПК стороннее ПО, которое вызывает несовместимость. Чистая загрузка поможет запустить ваш компьютер только со встроенными приложениями и службами, чтобы узнать, вызывает ли проблему какое-то стороннее приложение. Иногда даже программное обеспечение для защиты от вредоносных программ может конфликтует со службами Windows. Для запуска в режиме чистой загрузки просто выполните следующие действия:
- Нажмите Windows Key + R кнопки одновременно и вставьте
msconfig. - Затем в открывшемся окне перейдите в Услуги сверху.
- Установите флажок рядом с Не отображать службы Майкрософт и нажмите на Отключить все кнопку.
- Теперь перейдите в Общие и выберите Выборочный запуск опцию. Убедитесь, что флажок установлен только рядом с Загружать системные службы.
- Нажмите Применить и OK. Затем перезагрузите компьютер.
Теперь вы можете попытаться открыть Центру обновления еще раз, в режиме чистой загрузки. Если сейчас все работает нормально, это означает, что какая-то сторонняя программа все-таки конфликтует с процессами Windows. Подумайте, что вы установили недавно, и попробуйте удалить это. После загрузки в чистом режиме вам следует вернуть Windows к настройкам нормального запуска. Для этого просто повторите все шаги выше, включив отключенные службы и изменив параметр запуска с Выборочный запуск в нормальная.
2. Сбросьте компоненты Центра обновления Windows.
Еще один хороший метод, который можно попробовать для решения проблем, связанных с обновлением, — это сброс настроек Центра обновления Windows. Как показывает практика, данный способ помогает решить проблему во многих случаях. Вся процедура включает перезапуск служб BITS, Cryptographic, MSI Installer и Windows Update, а также переименование некоторых папок обновлений (SoftwareDistribution и Catroot2). Эти папки содержат временные файлы, необходимые для установки обновлений Windows. Исходя из этого, мы заставим Windows удалить поврежденные элементы и создать компоненты обновления с нуля. Мы будем использовать консоль для выполнения необходимых команд. Это более продвинутый вариант, но для его выполнения не потребуется много времени и знаний. Следуйте шагам ниже:
- Открытые Командная строка , введя
cmdв поле поиска рядом с Меню Пуск кнопку. - Щелкните правой кнопкой мыши по Командная строка , а затем выбрать Запуск от имени администратора.
- Скопируйте и вставьте этот список команд одну за другой, нажимая Enter после каждой. (Это действие отключит службы, ответственные за Обновления Windows)
- Затем мы должны переименовать вышеупомянутые папки. Просто вставьте эти команды, нажимая Enter после каждой.
- Наконец, все, что осталось сделать, это вернуть отключенные службы. Введите эти команды так же, как мы делали ранее.
- Теперь на этом все. Зайдите в Центр обновления Windows и проверьте, изменилось ли что-нибудь.
net stop wuauserv
 net stop cryptSvc
 net stop bits
 net stop msiserver
ren C:\Windows\SoftwareDistribution SoftwareDistribution.bak
 ren C:\Windows\System32\catroot2 Catroot2.bak
net start wuauserv
 net start cryptSvc
 net start bits
 net start msiserver
3. Проверьте целостность системных файлов.
Как мы уже упоминали в начале, проблемы с обновлением могут возникать из-за отсутствия или повреждения файлов. Такие файлы обычно очень важны для правильной работы многих служб Windows. Если некоторые из этих файлов находятся вне своей родной среды, то это может стать причиной ошибок обновления. Ниже мы воспользуемся SFC (Проверка системных файлов) и DISM (Обслуживание образов развертывания и управление ими), которые помогут обнаружить и восстановить отсутствующие компоненты. Вот как:
С помощью SFC
- Открытые Командная строка , введя
cmdв поле поиска рядом с Меню Пуск кнопку. - Щелкните правой кнопкой мыши по Командная строка , а затем выбрать Запуск от имени администратора.
- После открытия консоли введите
sfc /scannowкоманду и нажмите Enter. - Когда процесс восстановления будет завершен, перезагрузите компьютер.
С помощью DISM
- Открытые Командная строка как мы это делали на предыдущем шаге.
- Скопируйте и вставьте эту команду
DISM.exe /Online /Cleanup-image /Restorehealth. - Нажмите Enter и подождите, пока Windows закончит сканирование и исправление.
- После этого перезагрузите компьютер и снова установите обновление.
4. Просканируйте жесткий диск на наличие повреждений.
Перед тем, как переходить к следующим методам, стоит проверить жесткий диск на наличие повреждений и ошибок. Вы можете легко сделать это с помощью следующих шагов:
- Открытые Командная строка так же, как мы сделали выше.
- Затем вам нужно вставить команду
chkdsk /f /r C:команду и нажмите Enter. При необходимости замените «C» на букву вашего жесткого диска. - Система выполнит сканирование на правильность конфигурации и физические ошибки, после чего автоматически исправит их.
Этот метод вряд ли решит проблему, поэтому не беспокойтесь, если он не сработал.
5. Измените параметры запуска для Службы оркестратора обновлений.
Служба оркестратора обновлений (Update Orchestrator Service) считается очень важной служба для правильной работы процессов обновления. По умолчанию эта служба должна быть установлена на автоматический запуск, однако бывают случаи, когда она отключена у пользователей по необоснованным причинам. Итак, давайте проверим, настроена ли Служба оркестратора обновлений правильно:
- Нажмите Windows Key + R, скопируйте и вставьте
services.mscи нажмите Enter. - Затем найдите Служба оркестратора обновлений среди списка.
- Далее дважды щелкните по нейи перейдите в Общие меню.
- Установите Тип запуска на Автоматически.
- Наконец, нажмите Применить, закройте окно, перезагрузите компьютер, и посмотрите решилась ли проблема.
6. Измените значения в Редакторе реестра.
Проблема с Центром обновлений также может быть связана с неправильными значениями в Редакторе реестра. Ниже мы проверим, так ли это.
- Нажмите Windows Key + R, скопируйте и вставьте regedit, и откройте его.
- Затем вам следует перейти по этому пути
HKEY_LOCAL_MACHINE\SYSTEM\CurrentControlSet\Services\UsoSvc. - После нажатия на UsoSvc, найдите и дважды нажмите Start на правой панели.
- Рядом с Значение полем, измените цифру на 2 и нажмите OK в конце.
Теперь все должно работать нормально. То же самое стоит сделать и для этих сервисов:
HKEY_LOCAL_MACHINE\SYSTEM\CurrentControlSet\Services\WaaSMedicSvc
 HKEY_LOCAL_MACHINE\SYSTEM\CurrentControlSet\Services\wuauserv
Как только закончите, перезагрузите компьютер и проверьте, исчезла ли ошибка при открытии Центра обновления Windows.
7. Создайте новую локальную учетную запись.
Если ни один из упомянутых шагов не помог вам решить проблему, тогда стоит попробовать создать новую учетную запись пользователя. Иногда вновь созданные аккаунты могут решить проблемы с настройками и вернуть некоторые службы в нормальный строй. Также обратите внимание, что новые учетные записи не содержат данных, которые хранились ранее, поэтому не забудьте переместить туда свои файлы. Если новая учетная запись помогла вам решить проблему, вы можете оставить или удалить исходную после перемещения всех важных данных. Ниже вы можете найти шаги для создания новой учетной записи:
- Щелкните правой кнопкой мыши по значку Меню Пуск и выберите Настройки. Вы также можете нажать Windows Key + I сочетания клавиш.
- Перейдите на Учетные записи > Семья и другие пользователи.
- На правой панели прокрутите вниз до Другие пользователи раздела и нажмите Добавить пользователя для этого компьютера.
- Теперь выберите У меня нет данных для входа этого человека внизу.
- Выберите Добавить пользователя без учетной записи Майкрософт внизу.
- Затем введите имя пользователя и пароль для нового пользователя и нажмите Следующая.
- Теперь вы можете переключиться на новую учетную запись (щелкнув на значок пользователя в Меню Пуск) и попробуйте снова открыть Центр обновлений.
8. Используйте Media Creation Tool.
Сегодняшняя проблема не позволяет людям отслеживать новые обновления, выпускаемые Microsoft. С этим также возникает проблема обновить вашу систему. Поэтому вы можете воспользоваться Media Creation Tool, чтобы обойти этот недуг. Данная утилиту поможет вам установить свежие обновления, несмотря на проблему. Не исключено, что новые обновления также исправят ошибку с Центром обновления Windows, о которой идет речь в этом руководстве. Эта процедура не коснется ваших личных данных, а просто обновит компьютер. Для этого выполните следующие действия:
- Сначала вам нужно скачать утилиту с веб-сайта Microsoft.
- Затем запустите загруженный файл.
- После того, как вы согласитесь с Условиями использования, вам будет предложено два варианта на выбор. Выберите Обновить этот компьютер сейчас.
- Выберите Сохранить личные файлы чтобы они не пострадали.
- Наконец, запустите процесс и дождитесь его завершения.
- Надеtvcy, этот метод помог вам справиться с возникающей проблемой.
Итоги
Надеемся, вы попробовали все решения и нашли то, которое избавило вас от этой проблемы. Если вы когда-нибудь столкнетесь с какими-то другими проблемами в будущем, можете использовать другие руководства на нашем веб-сайте для их решения.
Symptoms
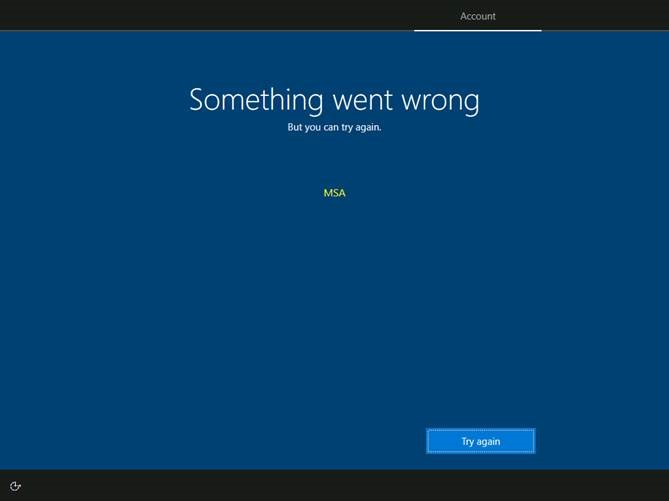
After successfully completing the Out-of-box Experience (OOBE) to setup a new Windows device or after resetting a device, once you reach the Desktop you might see a screen with black bars at the top and bottom with blue in the middle and receive the error, «Something went wrong but you can try again. MSA» with a Try again button.
Cause
The Out-of-box Experience (OOBE) consists of a series of screens that require customers to accept the license agreement, log in with, or sign up for a Microsoft Account and helps you set up your new Windows installation. During OOBE, you have the option to connect to the internet but are not required to do so. You might receive this error the first time you connect to the internet on a new device or new install of Windows that has not previously connected to the internet during the Out-of-box Experience (OOBE).
Workaround
If you do not have any work open, follow these steps:
-
Select Ctrl+Alt+Delete on the keyboard.
-
In the lower right corner of the screen, select the Power button .
-
Select Restart.
If you have work open that you do not want to lose, follow these steps:
-
Select Ctrl+Shift+F10 on the keyboard once.
-
Select Ctrl+Shift+Esc on the keyboard to open Task Manager. If you do not see Task Manager open, repeat step 1.
-
If you do not see the Details tab, select More Details in the lower left.
-
Select the Details tab.
-
Find the wwahost.exe process. Right-click or long press on that process and select End task from the context menu.
Once you have completed all of the steps in either of these methods, you should not receive this error again.
Next steps
Microsoft is working on a resolution and will provide an update in an upcoming release.
Need more help?
Want more options?
Explore subscription benefits, browse training courses, learn how to secure your device, and more.
Communities help you ask and answer questions, give feedback, and hear from experts with rich knowledge.
If you face the error «Something went wrong. Try to reopen settings later», while trying to install the latest updates in Windows 10 or in Windows 11, continue reading below. Keeping Windows 10 up to date is essential, but there are times when the process does not go as seamlessly as expected. One such error that pops up when users are trying to install the latest updates is «Something went wrong. Try to reopen settings later».
Because we’ve encountered this problem several times, we’ve discovered that it can be caused by a number of reasons, including corrupted Windows Update components or system files, or disabled services required for Windows Update to work without errors..
In this guide you’ll find a list of several troubleshooting methods to resolve the Windows 11/10 Update error «Something went wrong. Try to reopen settings later.
How to FIX: Windows Update error «Something went wrong. Try to reopen settings later» in Windows 11/10.
Method 1. Change the Startup Type of UOS Service to Automatic.
Commonly the error «Something went wrong. Try to reopen settings later» in Windows Update appears because the Update Orchestrator Service (UOS) in not started, or disabled. So the first step to fix the problem, is to ensure that the UOS service is started.
1. Simultaneously press the Windows ![]() + R keys to open run command box.
+ R keys to open run command box.
2. In run command box, type: services.msc and press Enter.

3. In the Services window, locate and double-click on Update Orchestrator Service.

4. Expand the drop-down menu against Startup type and select Automatic.

5. Hit Apply and then OK to save the changes.
6. Perform the same steps for the Windows Update service.

6. Reboot your PC and check if the issue is resolved.
Method 2. Delete downloaded Windows Update files.
In several cases Windows Update errors are due to the fact that the files required for the update are corrupted. In such cases the best solution is to delete the already downloaded files required for Windows Update in order to force your system to re-download the updates from the beginning. To do that:
1. In the Search box type: cmd or command prompt
2. Right click on the command prompt (result) and select Run as Administrator.

3. At the command prompt window, type the following commands in order (press Enter after each command):
- net stop bits
- net stop wuauserv
- net stop appidsvc
- net stop cryptsvc
- ren %systemroot%SoftwareDistribution SoftwareDistribution.bak
- ren %systemroot%system32catroot2 catroot2.bak
- net start bits
- net start wuauserv
- net start appidsvc
- net start cryptsvc
![clip_image005[4]](https://www.wintips.org/wp-content/uploads/2021/12/clip_image0054_thumb.jpg "clip_image005[4]")
4. Close the command prompt window and reboot your PC.
5. Navigate to Windows Update and check and install updates.
Method 3. FIX «Something went wrong» error in Windows 10 Update using Registry Editor.
The third method to fix the Windows 10 update problem «Something went wrong. Try to reopen settings later», is to modify registry as instructed below:
1. Simultaneously press the Windows ![]() + R keys to open run command box.
+ R keys to open run command box.
2. In run command box, type: regedit and press Enter.

3a. Inside the Registry Editor, navigate to the location mentioned below.
- HKEY_LOCAL_MACHINE\SYSTEM\CurrentControlSet\Services\UsoSvc
3b. Now locate and double-click on Start in the right pane.
3c. Under Value data, type 2 and hit OK.

4. Now follow the same steps and set the Start value to 2 in the following registry keys:
- HKEY_LOCAL_MACHINE\SYSTEM\CurrentControlSet\Services\WaaSMedicSvc
- HKEY_LOCAL_MACHINE\SYSTEM\CurrentControlSet\Services\wuauserv
5. When done, close Windows Registry Editor and restart your PC.
Method 4. FIX «Something went wrong» in Windows Update by Repairing System Files.
1. Open Command prompt as administrator.
2. At the command prompt window, type the following command & press Enter:
- Dism.exe /Online /Cleanup-Image /Restorehealth

3. Be patient until DISM repairs component store. When the operation is completed, (you should be informed that the component store corruption was repaired), give this command and press Enter:
- SFC /SCANNOW

4. When SFC scan is completed, restart your computer.
5. Try to update your system again.
Method 5. FIX «Something went wrong» by creating a new user account.
Some users reported that the update error «Something went wrong. Try to reopen settings later» in Windows 10, is caused when the user profile is corrupted. So, try creating a new user account and then check if the error has disappeared.
1. Simultaneously press the Windows ![]() + R keys to open the «Run» command box.
+ R keys to open the «Run» command box.
2. Type control userpasswords2 and press OK.
3. Click the Add button to create the new user.

5. Then choose Sign in without a Microsoft account (not recommended).

5. Click Local Account.

6. Type the new user’s credentials (Username and password) and press Next.

7. Click Finish at the last screen.
8. Select the new user from the users list and select Properties.

9. Check the Administrator box and click OK to give the new user admin rights.

10. Now sign out or restart your PC, and log on to Windows with the new account.
11. Navigate to Windows Update and check if the error is gone.
Method 6. Perform an In-Place Upgrade of Windows 10.
In cases where the Windows Update shows errors that cannot be resolved by other ways, one of the most effective solutions is an «in-place» upgrade.
An ‘in-place’ upgrade allows the Windows OS Installer to replace all operating system files without affecting your personal files or previously installed programs. So, head over to our detailed guide on how to perform an in-place upgrade to do so.
That’s it! Which method worked for you?
Let me know if this guide has helped you by leaving your comment about your experience. Please like and share this guide to help others.
If you face the Windows Update error: «Something went wrong. Try to reopen Settings later» in Windows 10, then continue reading below to find out how you can resolve the problem. The error «Something went wrong. Try to reopen Settings later» usually appears when the Windows Update folder is corrupted or when one the needed Windows Update services are disabled.

This tutorial contains instructions, on how to solve the error «Something went wrong. Try to reopen Settings later» in Windows 10 Update.
How to FIX Windows Update problem: Something went wrong. Try to reopen Settings later.
Method 1. Re-Download the Windows Update(s).
The most effective solution to troubleshoot Windows update problems, is to force Windows to download the updates from scratch. To do that:
Step 1: STOP the Windows Update Service.
1. Open Windows Services control panel: To do that:
-
- Press Windows
 + R keys to open the run command box.
 - In the Search box, type: services.msc & click OK.
- Press Windows

2. In Services control panel locate the «Windows Update» service.
3. Right-click on Windows Update service and select «Stop«.

Step 2: Delete the SoftwareDistribution folder.
1. Open Windows Explorer and navigate to: C:\Windows folder.
2. Find and Delete the «SoftwareDistribution» folder (or rename it. e.g. to «SoftwareDistributionOLD») . *
* Note: If you cannot delete the folder, start Windows in Safe Mode.

Step 3: START the Windows Update Service.
1. Open Windows Services control panel.
2. Right-click on Windows Update service and select «Start«.

Step 4. Go to Windows Update options and and click Check for Updates.
Method 2. Enable the Required Windows Update Services by modifying Registry.
In order to turn on Windows 10 updates, you have to enable the below mentioned services from Windows Registry:
- Update Orchestrator Service (UsoSvc)
- Windows Update Medic Service (WaaSMedicSvc)
- Windows Update Service (wuauserv)
1. Press Windows ![]() + R keys to open the run command box.
+ R keys to open the run command box.
2. Type regedit and press Enter.

3. In Windows registry editor locate the following key:
HKEY_LOCAL_MACHINE\SYSTEM\CurrentControlSet\Services\UsoSvc
4. Look at the right pane and double click at Start DWORD value.

5. Change the value data from the default value 4 to 2 and click OK. *
* Service Startup States according the «Start» DWORD Value:
0 = Boot
1 = System
2 = Automatic
3 = Manual
4 = Disabled

6. Perform the same actions and change the value data of Start DWORD value, from 4 to 2 on the following keys:
- HKEY_LOCAL_MACHINE\SYSTEM\CurrentControlSet\Services\WaaSMedicSvc
- HKEY_LOCAL_MACHINE\SYSTEM\CurrentControlSet\Services\wuauserv
7. When done, close registry editor and restart your computer.
8. Navigate to Windows Update and see if the error «Windows Update Something went wrong. Try to reopen Settings later» has been resolved.
Method 3. Restore Windows Update settings to Default with StopUpdates10 utility.
StopUpdates10 is a free program that can block the Windows updates in Windows 10 by modifying the system settings. Instead of that, the program can restore back the required settings and services in order to re-enable the updates in Windows 10.
1. Download and install the StopUpdates10 tool on your PC.
2. At the last step of the installation, keep checked only the Launch StopUpdates10 option and click Finish.

3. Click the Restore Windows Updates button.

4. When the operation is completed, close the StopUpdates10 application and restart your PC.
5. After restart, navigate to Windows Update center and see if the error persists. If everything is OK, uninstall the StopUpdates10 tool and you’re ready.
Method 4. Repair Windows 10.
The next method to resolve the error «Something went wrong. Try to reopen Settings later» in Windows update, is to repair Windows by using the SFC and the DISM commands. To do that:
1. Open Command Prompt as Administrator.
2. In command prompt give the following dism command and press Enter:
- DISM.exe /Online /Cleanup-image /Restorehealth

3. When the DISM operation is completed, type the following command and hit Enter:
- sfc /scannow

4. Now wait until the System File Checker repairs the Windows System Files.
5. When this done, restart your computer and see if the problem is solved.
That’s all folks! Did it work for you?
Please leave a comment in the comment section below or even better: like and share this blog post in the social networks to help spread the word about this solution.
If this article was useful for you, please consider supporting us by making a donation. Even $1 can a make a huge difference for us.

by Aleksandar Ognjanovic
Aleksandar’s main passion is technology. With a solid writing background, he is determined to bring the bleeding edge to the common user. With a keen eye, he always… read more
Updated on

Since the introduction of Windows 8/8.1, Microsoft made a norm of using Microsoft Account as a Profile. Yes, you can use a local profile, but there’s a lot of benefits (including syncing between the devices and Microsoft Store purchases) with the Microsoft Account in play. However, there are also some errors. And strange ones, to say the least. Namely, some users casually bumped into an error bearing the even more casual “Oops, something went wrong” prompt while trying to log in with the Microsoft Account on Windows 10.
Now, depending on the place you tried to log in (welcome screen, Microsoft Store, e-mail, Skype etc.), there are different ways to tackle this. We made sure to enlist them below, so if you’re unable to move past the sign-in screen, make sure to check them out.
How to address “Oops, something went wrong” login error in Windows 10
- Make sure you get it right
- Create the temporary account
- Check the Group Policy Editor
- Create a new account and switch to the old one later on
- Delete Credentials
- Update Windows
- Reset your PC to factory settings
1: Make sure you get it right
You’re probably well-aware of this, but it’s always worth to double or even triple-check the entered password. Make sure the keyboard/language are appropriate and that Caps Lock is off. This is obvious but, we mostly noted this for those users who have issues logging-in into the system with the Microsoft Account. And there’s only so much you can do in those unwanted scenarios.
- READ ALSO: Top 10 tools to recover your lost Windows 10 password
It’s really hard for any kind of system error, including updates or even malware, to change your Microsoft Account’s password. And if you’ve recently changed it online, make sure to enable network on the initial screen to allow PC to refresh. Nonetheless, if you can’t do it after numerous tries and even after resetting the password, move to the second step on the list.
2: Create the temporary account
In order to do so, we’ll need an installation media. You can create the Windows 10 installation media with the Media Creation tool. Once you have a bootable drive or DVD, we’ll need to access the command prompt and create a new user account. That way, you’ll be able to access your system and delete or re-establish the faulty error-provoking account.
- READ ALSO: “We can’t sign into your account” Windows 10 error
These instructions should show you what to do, so make sure to follow them closely and prepare for a lengthy workaround:
How we test, review and rate?
We have worked for the past 6 months on building a new review system on how we produce content. Using it, we have subsequently redone most of our articles to provide actual hands-on expertise on the guides we made.
For more details you can read how we test, review, and rate at WindowsReport.
-
- Plug in the bootable USB flash drive.
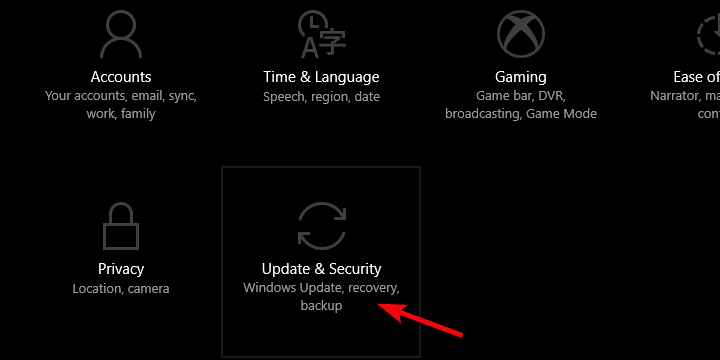
- Press Windows key + I to open Settings and open Update & Security.

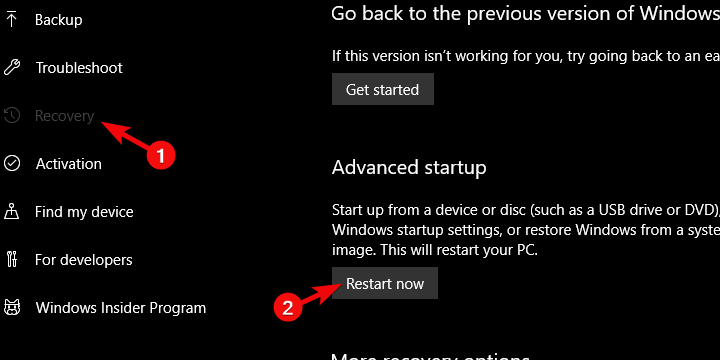
- Choose Recovery from the left pane and click on Restart Now under the Advanced Startup.
- Select Troubleshoot and then Advanced Options.
- Click on Startup settings and then on Restart.
- Press F10, F11, or F9 to summon the Boot menu. This can differ depending on your PC motherboard.
- Boot from USB and wait for it to load the installation files.
- Now, when the installation screen appears, press Shift + F10 to open the elevated Command Prompt.
- In the command line, type the following commands and press Enter after each:
- move d:\windows\system32\utilman.exe d:\windows\system32\utilman.exe.bak
- copy d:\windows\system32\cmd.exe d:\windows\system32\utilman.exe
- wpeutil reboot
- The PC should restart so wait until it reaches the log-in screen and the Command Prompt should launch.
- In the command line, type the following commands and press Enter (don’t forget to replace Username with the username of your choice):
- net user Username /add
- net localgroup administrators Username /add
- Reboot after that and choose the new account.
- From there, you can navigate to Accounts to delete the old account and re-establish it again or just change its password.
3: Check the Group Policy Editor
If you’re, on the other hand, using an alternative log-in protection method (or don’t have any protection), but unable to log into the Microsoft Store or use Microsoft Account for various other things, there are solutions for that as well. And there are so many reasons why this is the case. Firstly, try resetting the password online. If you’re still unable to sign in, make sure to check the Policy Editor.
- READ ALSO: How to Install Group Policy Editor on Windows 10 Home
There’s a policy in the Policy Editor which concerns Accounts. It should be disabled by default, but we’ve seen everything in Windows 10, so just in case check it out.
Here’s where to find it and how to disable it if needed:
-
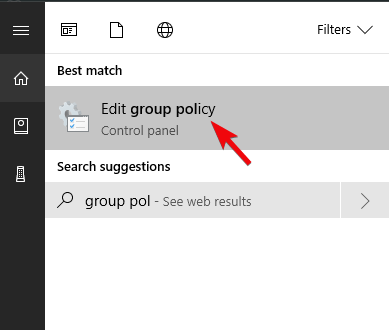
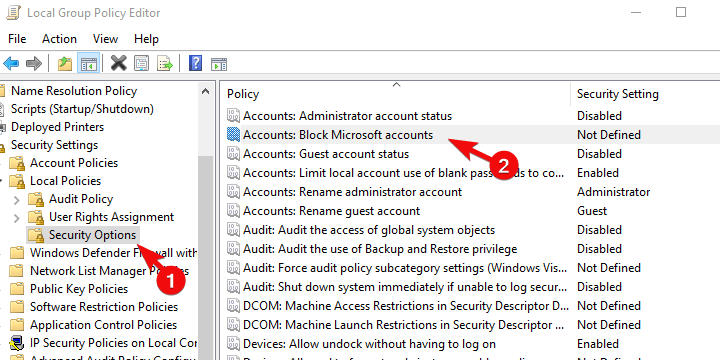
- In the Windows Search bar, type Group Policy and open Edit group policy from the list of the results.

- Go to this path:
- Computer Configuration\Windows Settings\Security Settings\Local Policies\Security Options\Accounts: Block Microsoft Accounts
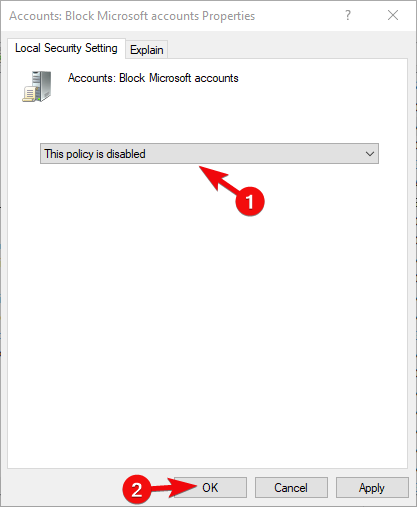
- Right-click on the “Accounts: Block Microsoft Accounts” in the right pane and open Properties.
- Make sure that the policy is disabled and apply changes.

- Restart your PC and try logging in with the same account again.
- In the Windows Search bar, type Group Policy and open Edit group policy from the list of the results.
4: Use a local and switch to the old one later on
Some users managed to resolve the issue at hand and avoid “Oops, something went wrong” error by switching back and forth between the Microsoft Account and local account. Apparently, they were able to sign into the online-based one later on.
- READ ALSO: Microsoft’s new Services Agreement makes users feel uneasy
Using a local account is simple, but have in mind that, if the affected account is the only one with the Administrative permissions, you’ll be limited. This concerns usage of Microsoft Store apps mostly.
In case you are not sure how to sign in with the local account in Windows 10, follow the instructions we provided below:
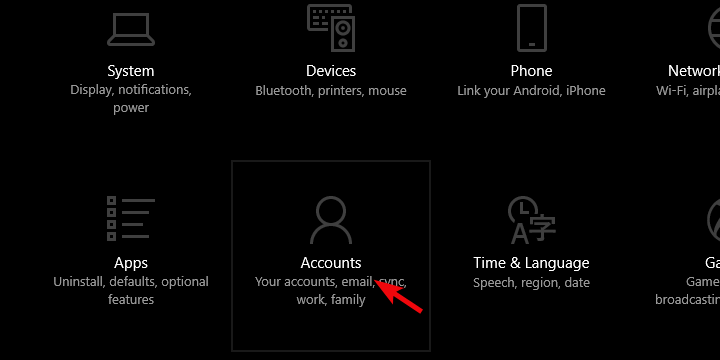
- Press Windows key + I to summon the Settings app.
- Choose Accounts.
- Choose Your info from the left pane.
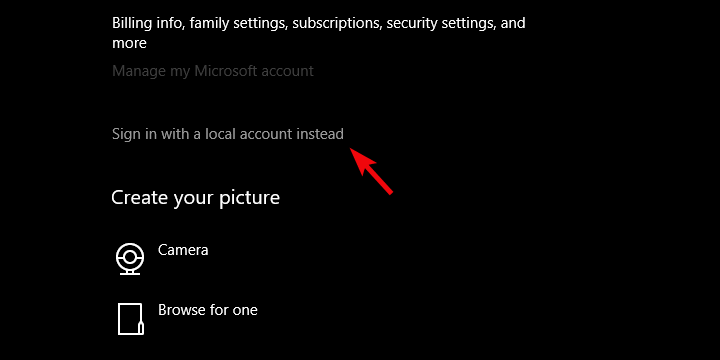
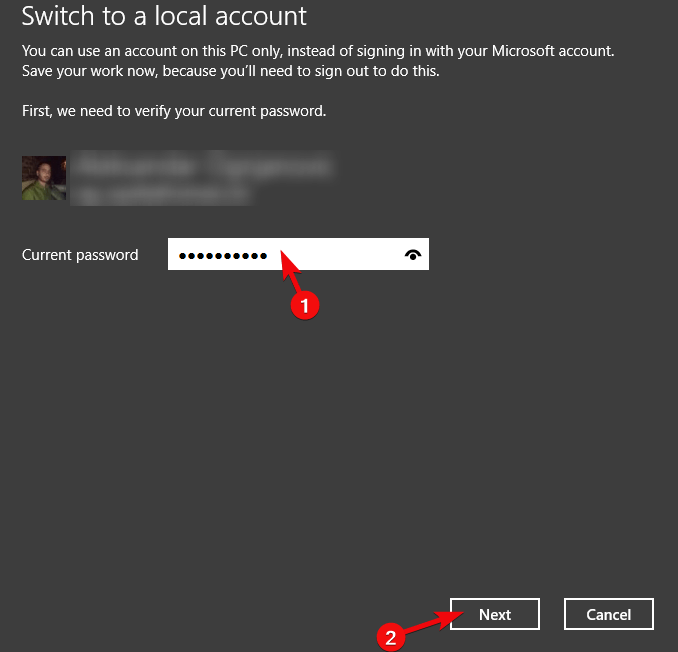
- Click on the “Sign in with the local account instead“.
- Enter the password for the current (troublesome) Microsoft Account.

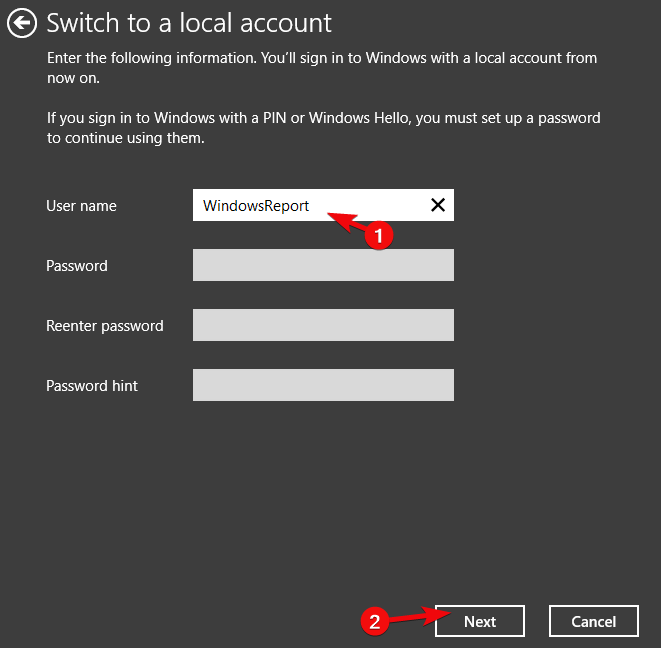
- Name the local account and, optionally, add a password.

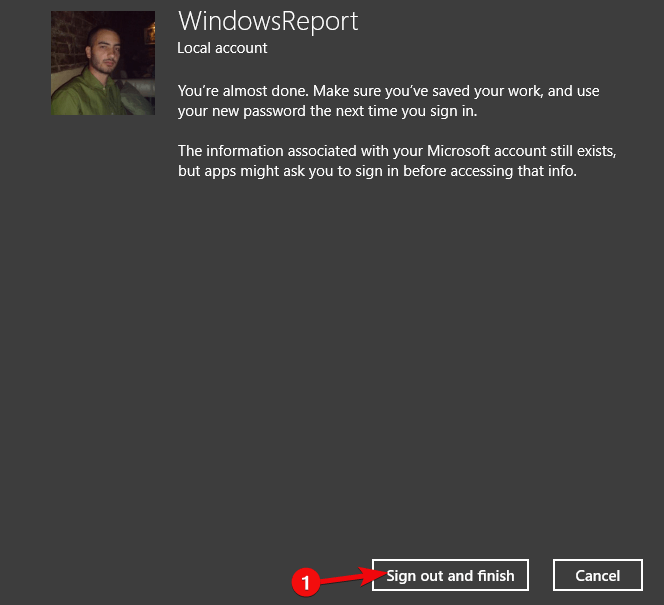
- Confirm changes and sign out.

- Later you can try signing in with the Microsoft Account again. It worked out for some folks.
5: Delete Credentials
Your credentials (and all Windows-stored credentials) are saved in a dedicated folder. As the case has shown so many times, a lot of important system files can get corrupted and thus the issues emerge. What you’ll need to do in order to address this is to delete the content of the Credentials folder. After that, you can re-establish your account.
- READ ALSO: CredentialsFileView allows you to access decrypted Credentials files in Windows
Here’s how to do it in Windows 10:
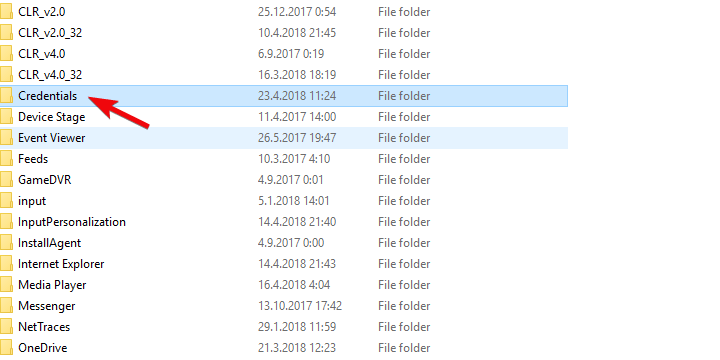
- In the Windows Search bar, type %localappdata% and press Enter.
- Open Microsoft folder and delete the Credentials folder.
- Restart your PC and try logging in again.
6: Update Windows
Windows updates can be the cause of many issues, especially if you’re Microsoft Insider in a Fast Ring. Seemingly, various improvements come at a price and that price is, in this case, not worth paying. However, for every faulty update, we get another which fixes the majority of issues. That’s what you’ll expect from a mandatory update distribution. So, make sure to keep your system up to date, as there’s probably a fix/patch on the way.
- READ ALSO: How to Delete Downloaded Windows Updates Which Failed to Install
The system checks for updates on its own, but it won’t cost you to check for the updates manually. You can do it this way:
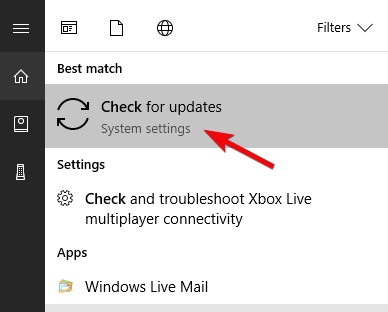
- In Windows Search, type check and choose “Check for updates“.

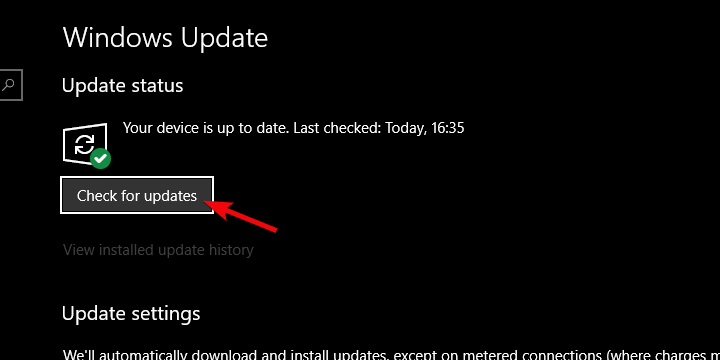
- Click on the “Check for updates” button.
- If there are updates available for download, make sure to get and install them accordingly.
7: Reset your PC to factory settings
Finally, if none of the aforementioned steps haven’t resolved the “Oops, something went wrong” error, we can only recommend resetting your PC to factory settings. Some users tried System restore and it helped them against this persistent error, as well. Nonetheless, by resetting the PC, you get to keep all applications and settings with a, basically, a brand new Windows 10.
- READ ALSO: Top 11 file recovery software for PC
If you’re uncertain how to do so, follow the steps we provided below but don’t forget to back up your data, just in case:
- Press Windows key + I to open Settings.
- Choose Update & Security.
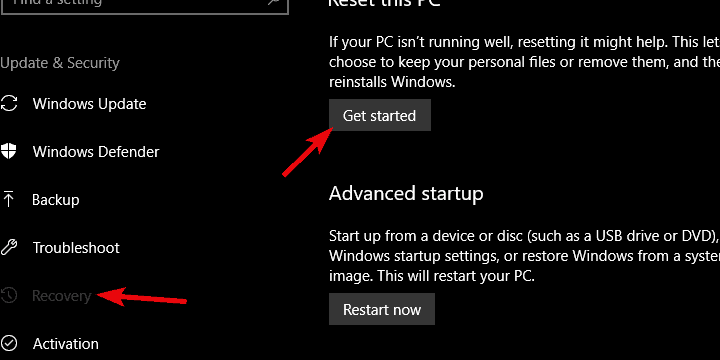
- Select Recovery.
- Click ”Get started” under Reset this PC.
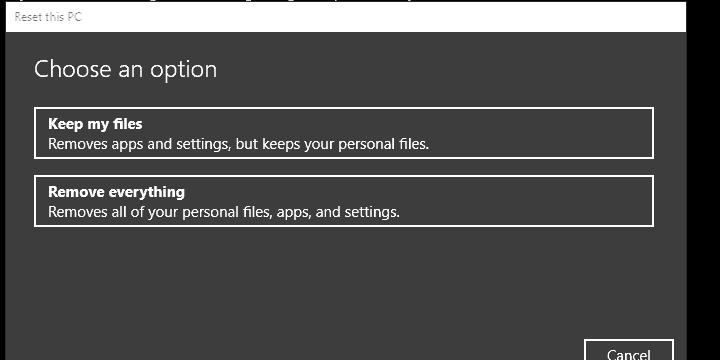
- Choose to keep the files and continue with the resetting procedure.
With that said, we can conclude this article. We hope it was a helpful read and the “Oops, something went wrong” error is addressed properly with one of the solutions. And for the sake of other readers, if you’re aware of an alternative solution, we encourage you to post it in the comments section below.
RELATED STORIES YOU SHOULD CHECK OUT:
- Full Fix: Unable to Login to my Microsoft Account in Windows 10
- “You need to fix your Microsoft account” message on Windows 10 [Fix]
- How to install Windows 10 Creators Update without a Microsoft account
- Fluent Design touches on Microsoft account’s homepage
![]()