In this article, we will examine how to install a TFTP server using SolarWinds TFTP Server to transfer files on a Windows PC.

How to Configure TFTP Server on PC
TFTP (Trivial File Transfer Protocol) performs the file/data transfer operation. However, we can say that it is a non-secure protocol when compared with the FTP protocol.
In our previous article, we gave information about TFTP. In this article, we’ll build a TFTP server to PC with SolarWinds.
As you know, the TFTP protocol structure divides into two as Server and Client. You can run a server by installing the 3rd software on a laptop or desktop computer that you are using.
You do not need a physical server for the server. You can install SolarWinds software on a simple computer and create a file server.
What is TFTP Server?
It listens to the UDP 69 port on the network and provides file-based services to clients. Typically, it is used to install software on Cisco or any branded Router. It is not recommended to use the TFTP in an environment where your security is more important.
FTP or another protocol can be used instead of TFTP. You can also test this protocol by setting up a server temporarily on the local network to better understand this protocol.
How to Setup SolarWinds TFTP Server
First, download the SolarWinds Server by clicking the button below. Then, create a new virtual machine on the VMware or VirtualBox virtualization program and install a clean Windows 10 on it.
After you have completed the necessary steps, follow the steps below to set up the file server.
SolarWinds Download
Step 1
Configure the network settings for the VMware virtual machine as Bridged.

Step 2
You can also configure VMnet0 as a bridge in VMware Virtual Network Editor.

Step 3
Run the Windows 10 virtual machine.

Step 4
Copy the SolarWinds TFTP Server program that you downloaded on your computer to the Win10 virtual machine and run the installation file as an administrator.

Step 5
In the SolarWinds setup window, click the Next button.

Step 6
Accept the SolarWinds license agreement and click on the Next button.

Step 7
Click on the Next button again.

Step 8
Leave the destination location as default and click on Next.

Step 9
Click the Install button to install SolarWinds software.

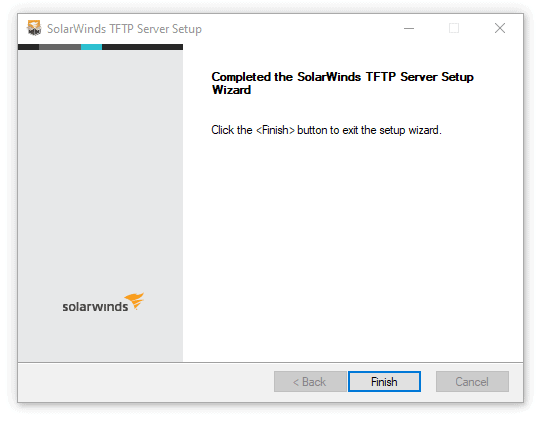
Step 10
Click on the Finish button in the InstallShield window.

Step 11
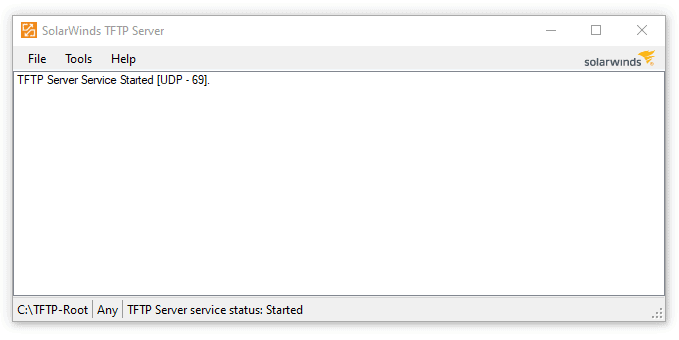
Open the SolarWinds program, and then click on the File menu.

Step 12
As you can see, the service is not working right now. Click the Start button to start the TFTP service.

Step 13
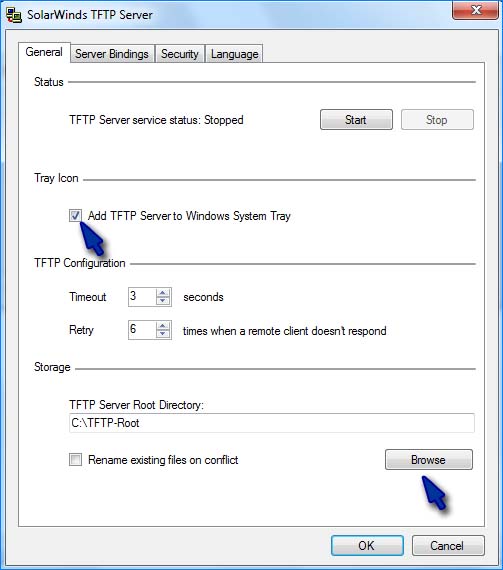
You can change the storage location of the server.

Step 14
After you start the service, the TFTP-Root folder is created on the C:\ drive.

Step 15
Create 2 text documents in the TFTP-Root folder.

Step 16
After installing TFTP Server, you must configure your Host machine as TFTP Client.
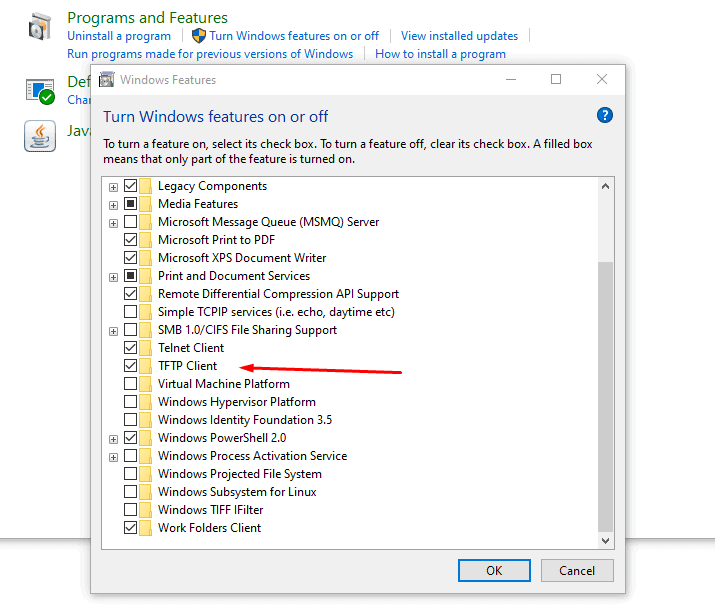
To enable TFTP Client, go to Control Panel / All Control Panel and click “Turn on Windows Features on or off” in the Programs and Features window.

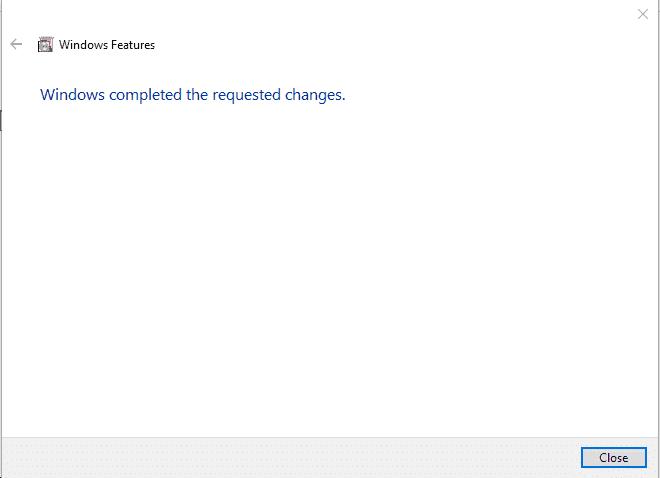
Step 17
There is more than one service in the window that opens. When you scroll down, you will see the TFTP Client service. After activating the TFTP Client service, click OK.

Step 18
Click the Close button in the Windows Features.

Step 19
After you press Windows Key + R on your Host, the Run window will open. In the Windows Run window, type CMD and press the Enter key.
At the CMD command prompt, execute the “TFTP” command. You can review whether the TFTP Client service is running.

Step 20
In this step, use the command “tftp -i 192.168.1.102 get 1.txt” at the CMD command prompt to transfer the text document that you created on the TFTP Server to the desktop location of the Host.
tftp -i 192.168.1.102 get 1.txt

Step 21
You have successfully copied 1.txt from the server!

Step 22
Open the 1.txt text document you transferred and write something inside and save the file. If the text document is Read-Only, you can change it from the file properties.

Step 23
To send the text document that you have edited on your host computer to the server, follow the command “tftp -i 192.168.1.102 put 1.txt” at the CMD command prompt.
tftp -i 192.168.1.102 put 1.txt

Step 24
File transfer completed successfully.

Step 25
Open the file 1.txt in the TFTP-Root folder and check the change.

Step 26
After you have successfully configured the software, you can review the log files of the file transfer you made.

Video
Final Word
In this article, we have installed and configured SolarWinds software, the best program to use TFTP Server in a network structure. And finally, we’ve reviewed how to transfer a file to the server after installing the TFTP Client on the Host computer. Thanks for following us!
Related Articles
♦ How to Disable Windows Defender in Windows 10
♦ How to Use Sysprep in Windows 10
♦ What is FTP Protocol in Networking?
♦ How to Find WiFi Password on Windows PC
♦ How to Use SSH on Windows 10

TolgaBagci
Hello, I’m Tolga! I am a computer specialist who has been specializing in computer technologies for about 20 years. I provide solutions to problems encountered in many areas such as hardware, system, network, virtualization, server systems, and operating systems, and create relevant content on my website by explaining how to solve these problems. My goal is to be a reliable source of expert, quality, and trustworthy solutions for your computer problems. By following innovations and using the latest technologies, I aim to be successful in my job and provide you with the best service. Don’t hesitate to contact me for any questions or curiosity about technology. Have a nice day, stay up to date 
Network admins use TFTP Servers every day to transfer images, configuration files, firmware, etc. to their networking devices. TFTP is simple on its own and does not need any sophisticated messaging to work. Of course, having no overhead is terrific, but there is a downside; it does not provide any encryption and authentication mechanisms.
Although TFTP has no built-in security, network admins use it for simple and fast file transfers within LANs. And best of all, it can be used for remote connections by hardening its security with the right server/client software.
In this step-by-step tutorial, you’ll learn how to set up and configure TFTP on Windows 10, how TFTP works, and how to set it up on the client and server.
Let’s get started!
What is TFTP?
TFTP (Trivial File Transfer Protocol) is a simple file transferring mechanism developed as a “lighter” version of FTP. It attempts to over-simplify and downsize the functionality of FTP. Instead of using the full TCP implementation, TFTP relies on the connectionless and simple UDP transport over port 69.
TFTP only allows unidirectional file transferring. It provides zero control and has low overhead. The original idea of creating TFTP was to provide booting for disk-less computers or workstations that didn’t have enough memory or disk. These disk-less workstations usually do not have access to the full TCP/IP stack, so they need to obtain configuration information such as DHCP or BOOTP from another server.
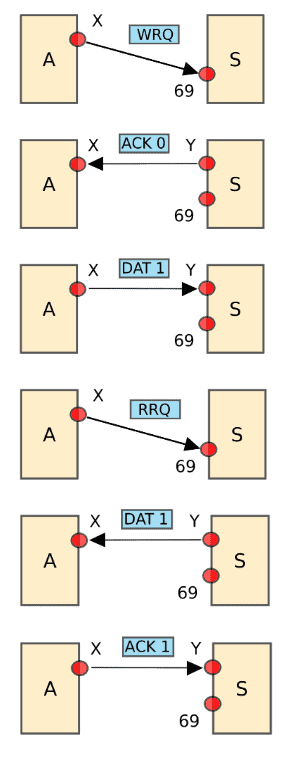
TFTP uses a client/server communication model. As as you can see from the message exchange below, the TFTP server sends a block of data and waits for the acknowledgment before sending the next one.
A host sends a Request to Write (WRQ), the server responds with an Acknowledgement (ACK), so the host sends data. The host can also send a Request to Read (RRQ) then the server sends the data and waits for an acknowledgment.
Today TFTP is commonly used for transferring configuration files and firmware images from and to networking devices. It is also used for network booting by diskless nodes that need booting from the LAN.
TFTP is very easy to implement and use. But it is not a secured transfer method. It does not provide a login or access control mechanism, so it is more common in LANs.
Preparing your TFTP Environment
A TFTP server is a must-have piece of software in every network admin’s toolkit. Cisco, Huawei, Netgear, and many more network appliances use TFTP for upgrading, backing-up, and saving configuration files and firmware.
Fortunately, you can set up and configure a TFTP server on your Windows 10 machine. You’ll need the following post if you’re looking for a TFTP client for Windows 7
SolarWinds Free TFTP Server is lightweight and compatible with Windows 10.
It is a standalone free tool use for fast and easy network file transfers.
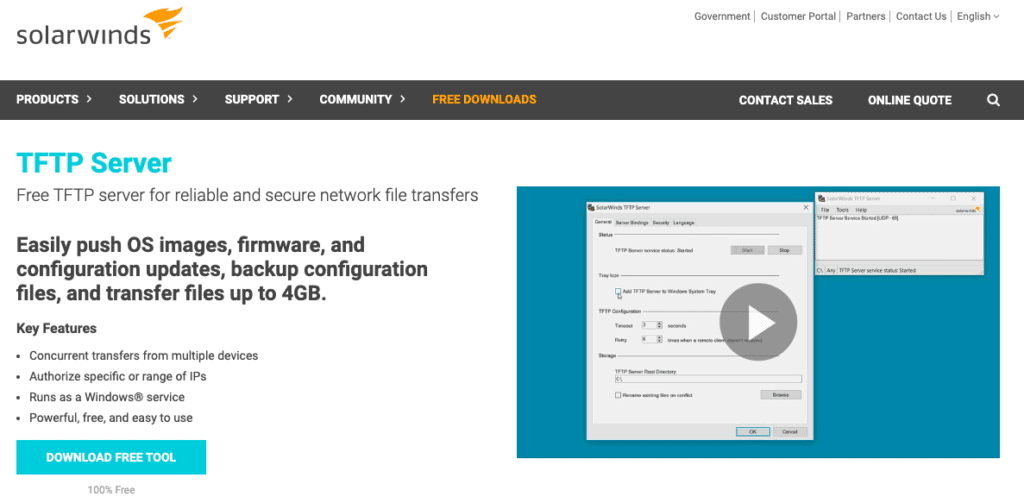
Download TFTP Server Free!
Prerequisites Before We Start
When setting up your TFTP server for the first time, consider the following requirements:
- Download the Free TFTP Server To start, you’ll need to get the software. Download SolarWinds Free TFTP Server from its official site. The software is 100% free.
- Have Admin Rights Setting a TFTP server requires an administrator account.
- Have a Root Folder Ready In the end, the idea of using TFTP is to transfer files. Since you are configuring a TFTP server, you’ll need to have a folder storing all transferable files, such as OS firmware, configuration files, DCHP, etc.
- Port forwarding TFTP clients might be able to access the server within the local network area without any issues, so if you don’t need remote file transfers, skip the port forwarding. But if TFTP clients are located across the WAN, they need their traffic to be forwarded to the correct destination. Port Forwarding is a setting in the local router that redirects requests from IP address and port number from WAN to another service on the LAN. To allow TFTP requests from remote TFTP clients into your LAN, you will need to log into the router and forward the UDP port 69 to the IP address of your server.
- Configuring Port Forwarding This varies from router to router. Generally, most routers have it under Advanced Setup > NAT > Port Forward. Make a new entry on the list as Port (69) > UDP > IP Address (your IP)
- Allow local firewall rules The local firewall might block TFTP file transfers. To allow the TFTP client to successfully request data to the TFTP server, avoid any firewall that might be blocking the connection. If possible, configure the firewall inbound/outbound rules to allow TFTP traffic. In the same way, make sure that there are no local firewalls or routers with ACLs blocking the TFTP connection.
Setting up a TFTP Server on Windows 10 & 11
So, now you have the TFTP environment ready.
You’ve downloaded the TFTP server software, have admin rights on the server, have the root folder with all files, made the right configurations on the local router, and you are sure that nothing is blocking your TFTP connection.
Let’s go ahead and install the TFTP server:
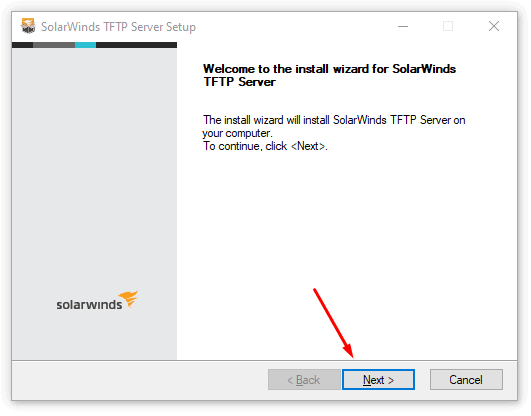
- Unpack the zip drive downloaded from the SolarWinds TFTP Server and open the executable file. The SolarWinds TFTP Wizard will open, click on “Next”.
Download Free!

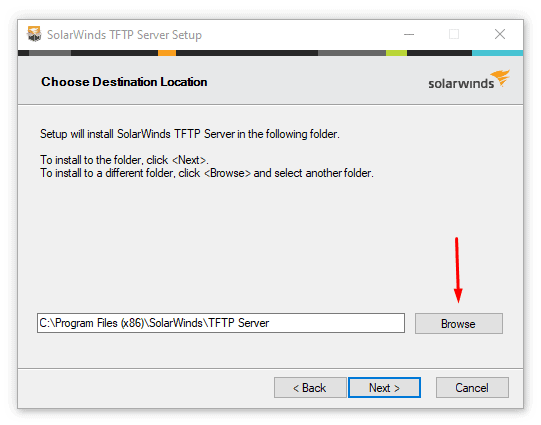
- Click “Browse” to choose a destination location.

- Once the SolarWinds TFTP Server Setup finishes, click “Finish”.

- Open the SolarWinds TFTP Server. The console should look something like this…

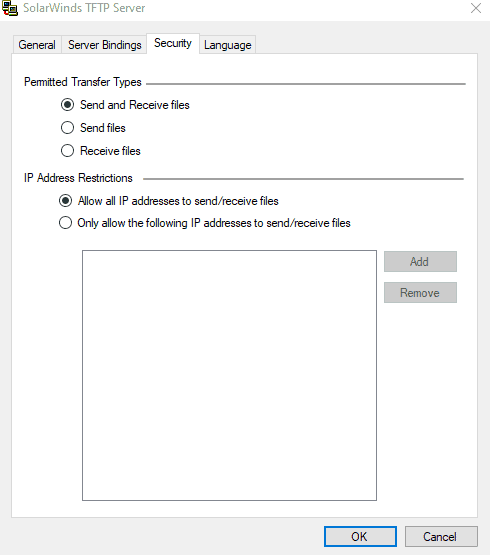
Configuring Security
TFTP is known for its lack of security. It does not have any encryption mechanism and does not support any client/server authentication methods. Without encryption and authentication, a hacker could easily spoof the TFTP server and compromise the authenticity of critical files such as routing configuration and DCHP.
But despite that lack of security, TFTP is still the preferred method for quick and easy file sharing on networking devices. Having no encryption and authentication makes TFTP fast and without much overhead. Still, some TFTP server software can provide some features that guarantee a certain level of security.
For example:
- Restrict the use of the server to a certain range or single IP addresses.
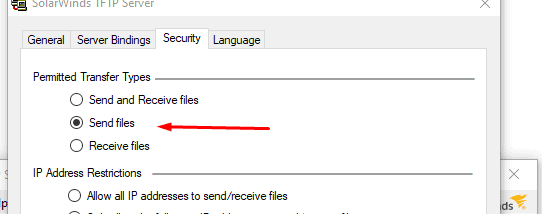
- Permit or restrict certain types of file transfers. For example, only send, receive, or both.
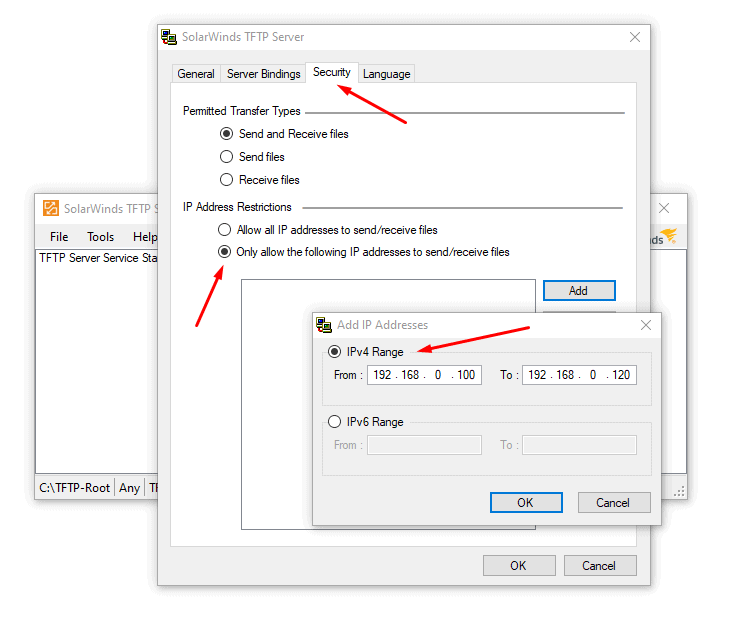
To configure IP address restriction and file transfer types in the SolarWinds TFTP server
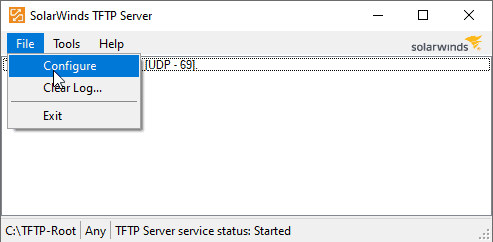
- Go to File > Configure.
- Go to the Security tab.

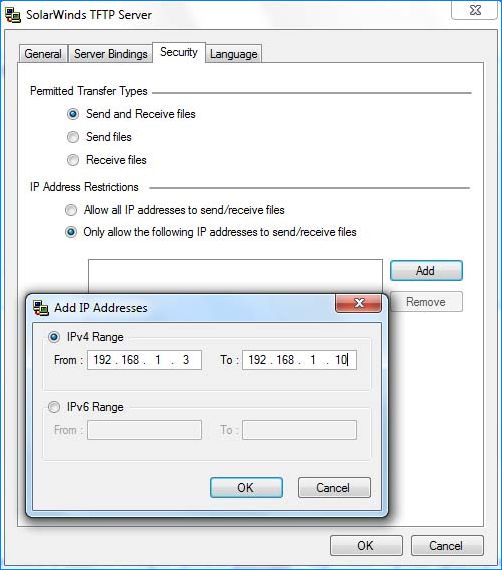
- By default, SolarWinds TFTP Server will allow all IP addresses to send/receive files. But you may also want to restrict the access to the TFTP server to specific IP addresses. If you want to restrict the server to a few networking devices, go ahead and click on “Only allow the following IP addresses to send/receive files,” then click on “Add”.
- In the following screen, you can define the IP address or range of addresses. For example, we are restricting access to sending/receiving files to the devices with IP from 192.68.0.100 to 192.168.0.120.

- In the same Security tab, you can also restrict transfer types. When you restrict IP addresses and transfer types, your security can be dramatically improved. For example, you may only want to allow sending files to a specific router.

- Click OK.

Binding the Server to Specific IP addresses, Subnet, or interfaces
The tool we’re using also comes with “Server Bindings,” which is another fantastic feature that can improve security.
Server Bindings is similar to restricting IP addresses, except that you can customize this restriction based on your local TFTP server network interfaces.
If your server has more than one interface, you can customize its connectivity based on “source IP” or “subnet.” In other words, you can limit the number of available interfaces that the TFTP server is listening to.
By default, the TFTP server will process the requests from clients received from any network interface
- If you want to customize the server’s bindings, for example, allow an entire subnet (from an interface) and allow a single IP on another, go to File > Configure > Server Bindings, and click on “Use custom server binding.”
- You also have the option to bind to all addresses in the list that you provided or go through the list in descending order. Once, you finished, click “OK
Configuring the TFTP Server
First, let’s make sure that the service has started.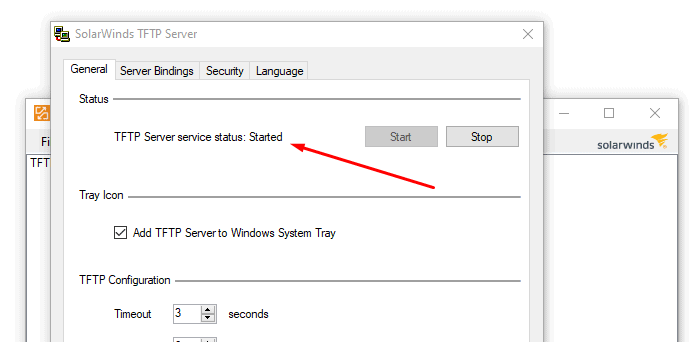
If you find the following message: “TFP Server service status: stopped,” try clicking the “Start” button to start the TFTP service in the server application and wait a couple of seconds.
If it goes “stopped” again, try the following.
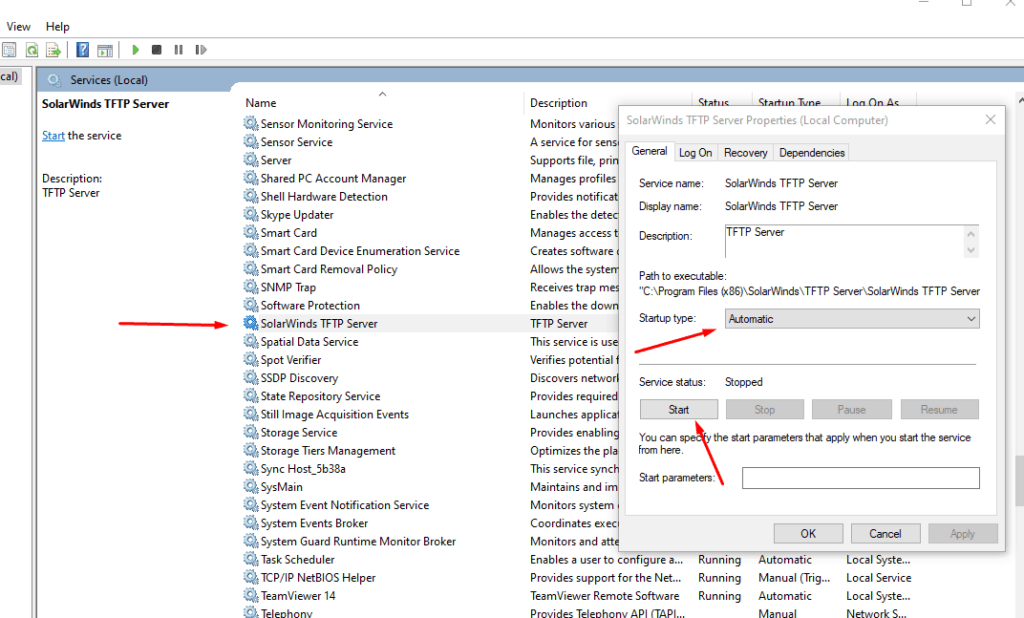
- Go to Windows services. Open Windows search bar and type “services”. Or type the Win+R keys to open the Run application and type “services.msc”. Make sure to run “services.msc” as an administrator.
- Find the service “SolarWinds TFTP Server” and double-click it. Make sure that its Startup Type is “Automatic” and if you see the Service status: Stopped, click the “Start” button.

- If you still see the service “Stopped,” disable any Antivirus or Firewall and test again. One of these applications might be blocking communication through port 69.
Configuring Other Parameters
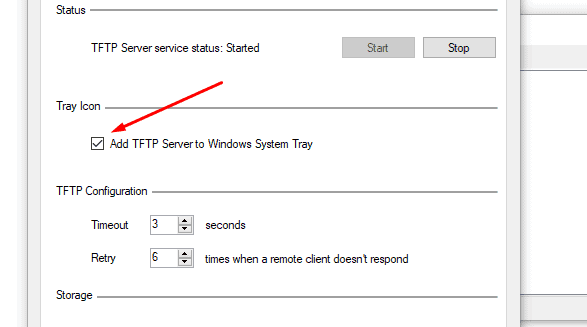
- A useful setting for easier access to the application is to enable “Add TFTP Server to Windows System Tray”.

- You can leave Timeout and Retry options, with their default settings unless you are testing the TFTP environment
- TFTP timeout: This is the TFTP session timeout in seconds.
- Retry: The number of times, the server will retry to transmit a packet when the TFTP client doesn’t respond.
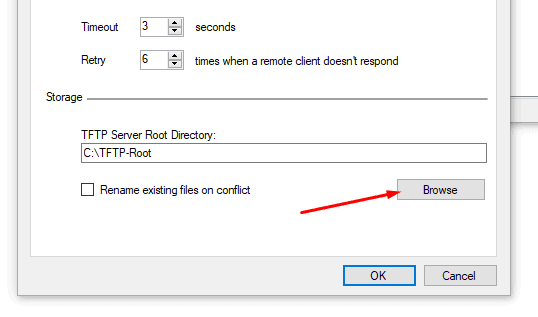
- Finally, let’s set up the “TFTP Server Root Directory”. This is the folder where all your files received from other devices will be stored, or where you will store the files that will be sent to other devices.
- Go to “Storage” > “Browse”. Choose a new folder or leave the “C:\TFTP-Root” folder created by default.
- Click on “Ok”.

Setting up the TFTP Client
The TFTP Client depends on the successful installation and configuration of the TFTP server. The client is probably the one that you will be using the most.
The only task you might need to do with the server is to update the shared files and input/remove some IPs.
When using the TFTP server, don’t forget about the following settings:
- The TFTP server service has to be up and the application is running.
- Configure the right TFTP folder.
- Make sure no Firewall and Antivirus is blocking the application and connection.
- If you are file sharing to a remote location, don’t forget about port forwarding.
- Make sure all your TFTP clients can reach your TFTP server.
From the TFTP client
Most networking devices already have TFTP enabled. For example, to transfer a Cisco Switch image from the server to the device, you would have to specify the IP address of the TFTP server on the client (Cisco Switch).
As you can see from the screenshot below, this switch does not have any configuration or image filename.
It does have a default address and a TFTP address. So to receive these missing files, you can use the IOS command “copy tftp startup-config [ip address of the TFTP server]”.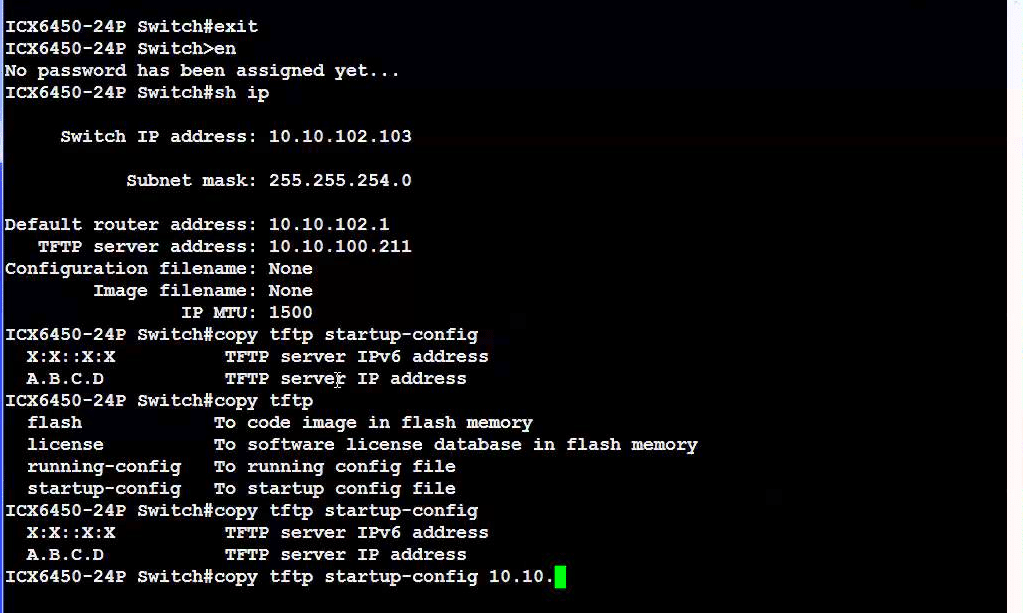
Another example, from a Huawei Switch (screenshot below).
The first line (TFTP get) downloads the files from the TFTP Server (192.168.0.2) to the switch.
The second line (TFTP put) uploads the files from the switch device to the TFTP server.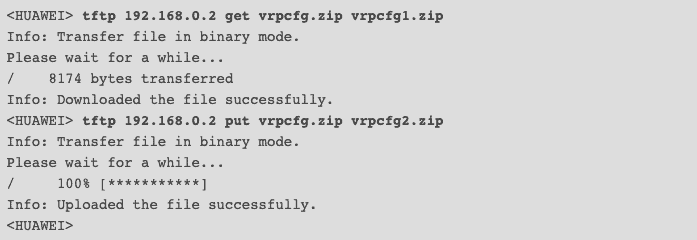
But networking devices are not the only ones that can run TFTP clients. You can also run the client on a Windows system.
Install TFTP Client on Windows 10
Fortunately, most Windows versions (servers and workstations) come with the TFTP client feature built-in, you only have to enable it.
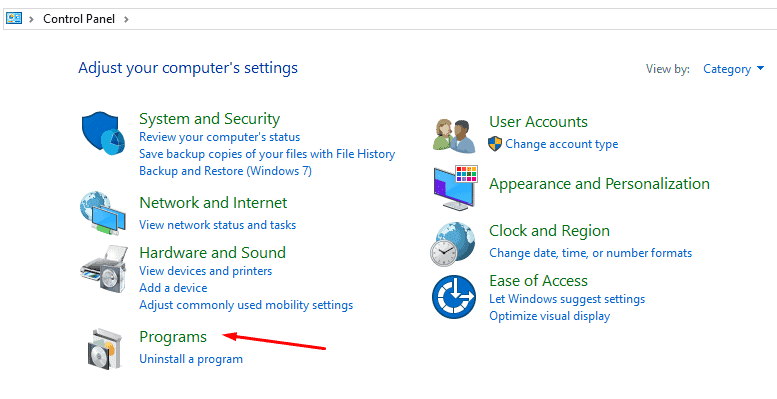
- Go to Windows Start and search for “Control Panel” then click on “Programs”

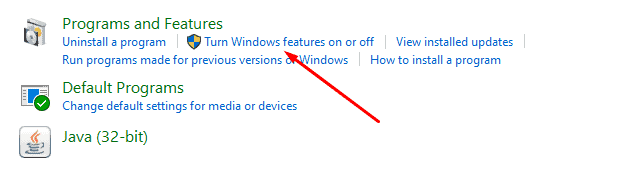
- Open Turn Windows features on or off.

- From the Windows Features list, find the TFTP Client feature and turn it on. Wait for the installation to complete and click “OK”.

TFTP is considered an unsafe protocol, so Windows does not allow it by default. You will have to either turn off the Windows firewall (which is not recommended) or add an exception on the Firewall for the TFTP Client.
Let’s open the Windows Firewall and configure the rules and exceptions to allow TFTP.
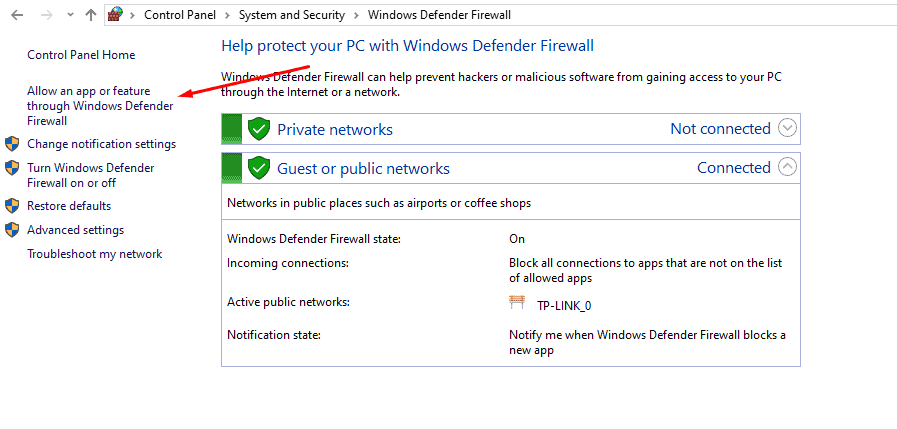
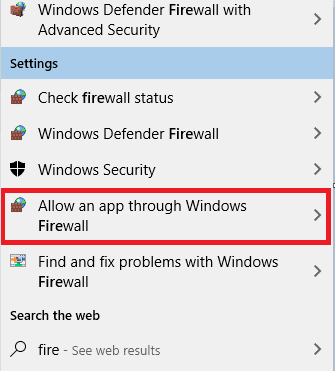
- Open the Windows Start menu and type “Firewall” > open the “Windows Defender Firewall with Advanced Security,” and run it as an Administrator.
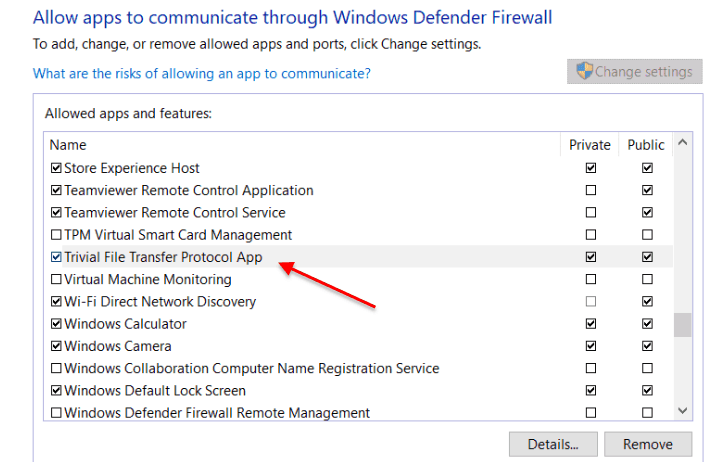
- Make sure that the firewall is enabled, and click on “Allow an app or feature through Windows Defender Firewall”.

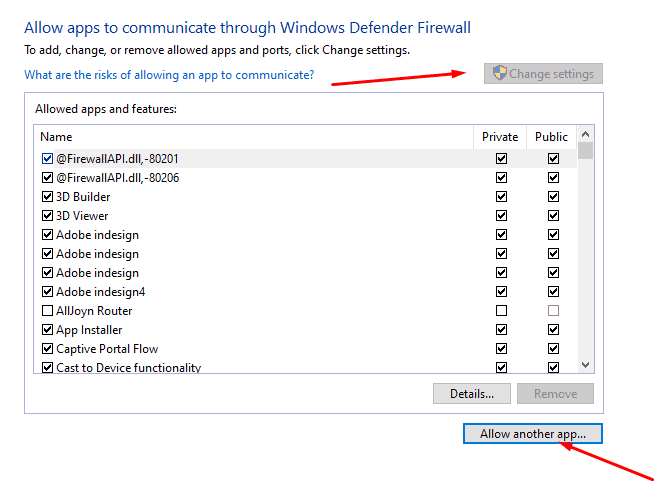
- Click on “Change Settings,” then “Allow another app”.

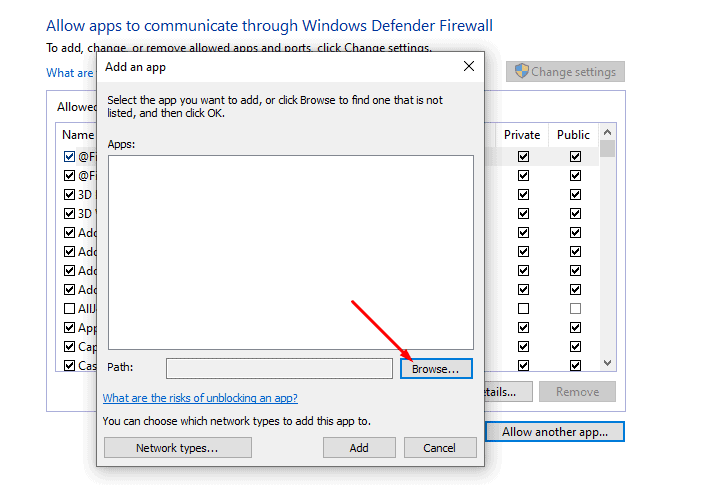
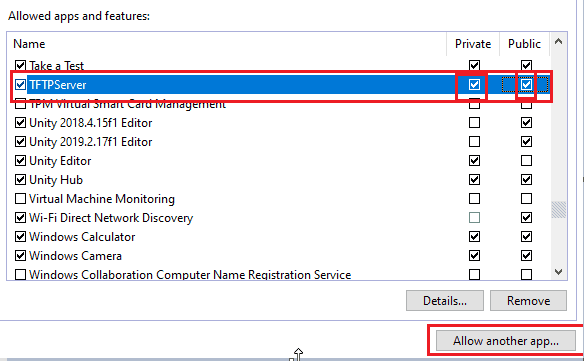
- Click on “Browse” and find the TFTP.exe from the System32 folder and click on Open. Then click on “Add”.

- You can now, find the application on the Windows Defender Firewall, enable both Private and Public.

Transferring Files with TFTP
Now that you enabled the native TFTP client in Windows, you can use it to transfer files between the TFTP server.
As mentioned before, make sure that the files are present in the root folder and that the client and server can reach each other.
The TFTP client runs through the command line interface. The command syntax is:
tftp [-i] [<Host>] [{get | put}] <Source> [<Destination>]
Where:
- – i : Transfer in binary mode [also called octect]. If you don’t specify this parameter, the transfer goes in ASCII mode, which is a regular text file transfer.
- Host: Specifies the local/remote computer (server).
- Put: transfers the source file [on the local computer] to the file on the destination [remote computer]. Use this command to send a file.
- Get: Downloads [transfers] the file from the destination remote computer to the local computer. Use this command to receive a file.
- Source: Specifies the source file [with the path] to transfer.
- Destination: specifies the destination file [with the path] to get.
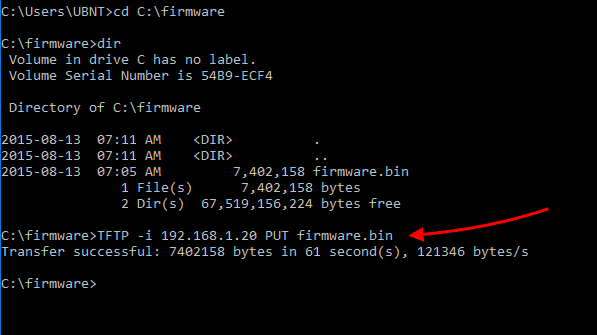
An example of using the TFTP command on Windows 10:
In this example, we will upload a firmware image file [.bin] to the TFTP server [192.168.1.20]. We will use the TFTP client in Windows and transfer the file using binary mode.
- Let’s open the Windows command prompt. Open the Windows search and type “cmd,” or press the Win + R > Open the Run and type “cmd”.
- Go to the directory where the firmware is stored (or specify the entire path).
- Type the command TFTP -i 192.168.1.20 PUT firmware.bin

Final Words
TFTP is a terrific and often misunderstood transferring method. Although it has a bad reputation for its lack of security, it doesn’t have much overhead, making it a reliable, quick, and easy transferring mechanism. You can use it in enclosed LANs or WANs, where speed reigns over security.
Setting up a TFTP server on Windows 10 is straightforward. Just download the SolarWinds Free TFTP Server and configure it, as shown in this tutorial. If your TFTP client is a networking device, it will likely have the TFTP service already enabled. But if you want to transfer files to a Windows 10 workstation, you can enable the TFTP built-in feature.
We hope that this tutorial was informative.
Please comment if you have any questions about the setup and configuration of the TFTP on your Windows 10.
Setup & Configure TFTP On Windows 10 FAQs
What is TFTP?
TFTP stands for Trivial File Transfer Protocol. It is a simple file transfer protocol used for transferring files between devices on a network. It is commonly used in network devices such as routers, switches, and servers.
How do I use TFTP in Windows 10?
To use TFTP in Windows 10, you can use a TFTP client such as SolarWinds TFTP Server or TFTPD32. These programs will allow you to transfer files to and from a device using the TFTP protocol. You can also use the built-in «tftp» command in Command Prompt to transfer files.
Can I use TFTP to transfer files between two Windows 10 computers?
Yes, you can use TFTP to transfer files between two Windows 10 computers by using a TFTP client on both computers. You will need to configure the IP address and directory settings on the TFTP client to ensure that the files are transferred properly.
Is TFTP a secure protocol?
No, TFTP is not a secure protocol as it does not provide any encryption or authentication. It is recommended to use more secure protocols such as SFTP or SCP for transferring sensitive files.
How do I troubleshoot TFTP errors in Windows 10?
To troubleshoot TFTP errors in Windows 10, you can check the TFTP client settings to ensure they are correct. You can also check the firewall settings on the computer to ensure that TFTP traffic is not being blocked. Additionally, you can check the event logs on both computers for any error messages that may indicate the source of the problem.
Are there any alternatives to TFTP for file transfer?
Yes, alternatives to TFTP include FTP (File Transfer Protocol), SFTP (Secure File Transfer Protocol), and SCP (Secure Copy Protocol). These protocols provide more security and advanced features than TFTP.
When transferring files across a network then TFTP is a good solution due to its ease of use and easy configuration.
TFTP, or Trivial File Transport Protocol, is a way of sending and receiving files over the internet. It is especially useful in situations where the remote computer that is receiving the file is unmanned.
This makes sending files very easy and does not require human intervention on the other end if configured correctly. The downside is that the protocol is not secure. (If security is a concern then you should look at transfer methods that use encryption.)
If you do a lot of file transfers over your home or business network, then TFTP is a good way to go.
In order to demonstrate this method of file copying and transferring, we will be using a free TFTP tool provided by SolarWinds TFTP. It is a quick and easy way to get the job done, so we will be downloading it from here.
Best of all is that this app is free, so using it will certainly not break the bank. Let’s get started.
![]()
After you download, install the package on your PC and lets get started with the configure.
Before We Begin:
There are a couple of things that we need to do before we can get started. This is all very easy to do so don’t let these steps scare you off. The whole process should only take a few minutes and is very simple to get done. You will therefore need:
- Access to the Administrator account:
This is easy to do. If you are the only person using your computer then the chances that you are the administrator of your account is pretty high. - Download and Install SolarWinds TFTP Server:
In order to use the SolarWinds TFTP Server we will obviously need to download and install it to the computer. The download link can be found above in the intro section. - You will need Port Forwarding for External Connections:
If you are planning on using remote connections with your TFTP server then you will need to use port forwarding. UDP Port 69 is the port type and port number that you will need to use. It will need to point to the IP address of your server on your network from your router in order to allow users from outside of the network. If you only need internal connections, then don’t worry about this step as it is not needed.
Now we can get started with the rest of the setup!
What Kind of Connection Do You Need to Configure?
For external connections you will need to ensure that you configure the security settings appropriately in the application. You can select which IP addresses can send and receive files to help specify which valid hosts can transfer and receive.
Basic TFTP Server Setup
These steps will guide you through the setup process of SolarWinds TFTP Server. This will help you get the ball rolling and allow you to eventually make transfers across multiple networks possible.
- Open the SolarWinds TFTP application
- Next, click file -> configure.
- Choose the correct settings as highlighted in the following screen capture labelled 1, 2 and 3.
- 1 Shows the status of the TFTP service, 2 allows you to set the icon to appear in the taskbar and 3 is where the files will be stored by default. You can choose a different location if you want. We will be leaving ours as the default location but feel free to make any changes if you need to. A popular choice for example is the Downloads folder.

- The next step is locking down some security items. To do that, we need to go to the, you guessed it, security tab within the SolarWinds TFTP Server.
- This part is pretty self explanatory, but definitely worth looking into. We need to set the actions that we want this computer to be able to complete. If you are setting up permissions for a file server, then you might not want everyone to have access to send files to it, and instead you might only want it to server files and have them downloadable. If that is the case then you will want to choose send files. If you want to do both then select Send and Receive files.
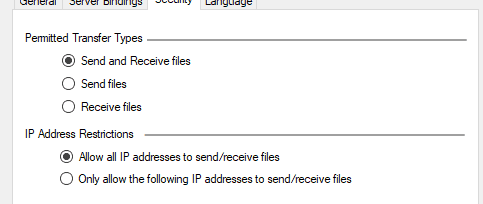
- You can further lock down the security of your TFTP server by specifying which IP addresses are allowed to transfer files. You can do this by selecting a range of both IPv4 and IPv6 IP addresses. Our example uses IPv4 and allows 10 IP addresses to send and receive files across the network.
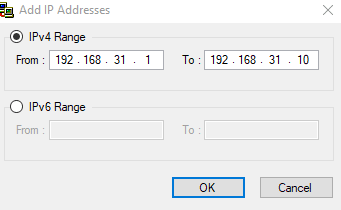
- We enter the range and then set the changes by clicking the OK button. Easy.
We have now configured our TFTP server in just a few simple clicks.
The Fun Part: Actually Utilizing Our New TFTP Server
The setup was pretty straight forward, and using the application is just as easy. Let’s go through the steps to make using our TFTP server a reality.
Port Forwarding Steps
This part is optional because you might not want to access your files from outside the network. This is understandable, especially because TFTP is not designed to be a secure protocol, just a convenient one. However, you can add mappings to port 69 in your router by either finding the NAT or Port Forwarding sections of your router. Each manufacturer is different, so be sure to consult your user manual when attempting to make changes to your router. If in doubt then contact your manufacturer’s support and see if they can assist you with the changes.
For everyone else, lets carry on with our tutorial!
Installing a suitable TFTP Client for Windows
The easiest way to continue is to use the default Windows TFTP that comes with the Operating System. To access it and install it onto our computer we need to do the following:
- Open the start menu and search for the control panel.
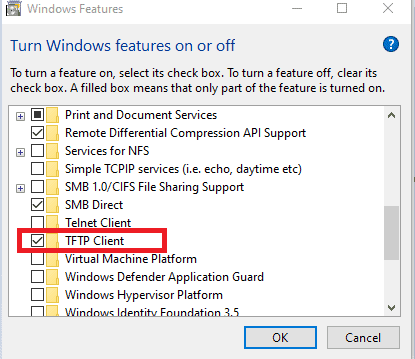
- Find Programs and Features and then click on Turn Windows features on or off.
- Find the TFTP client and click on the tick box so that the tick is visible.

- Next, Click on OK to install the client.

- Once finished, you have installed the client.

Important to note that this is the computer without the TFTP server application running, also known as the client PC.
Allow TFTP with a Firewall Configuration Change
There are 2 approaches to getting this right. The first and easiest way is to disable your Windows Firewall. This might be OK in a home setup where you trust all of your devices on the network, or in a corporate environment where management is conducted by the IT department. If you are not willing to do this, then we can create specific rules in our Windows firewall to allow traffic through.
- Click on the start menu and type in Control Panel, then click on that icon when it appears.
- Click on Windows Defender Firewall.
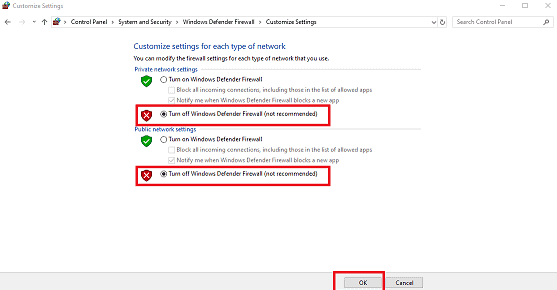
- Next, click on Turn Windows Defender on or off.
- Tick the boxes as seen below and then click ok

- You have now turned off you firewall.
- If you don’t feel comfortable turning off Windows Firewall we create an exception instead. To do this, we must click on Allow an app or feature through Windows Defender Firewall’ in the Windows Firewall settings.

- Click on the Change settings button to add a program.
- Next you must click on Allow another appand then hit Browse.
- Select exein the Windows system32 directory and also TFTPServer in the SolarWinds folder inside Program Files x86.
- Click open and it has been added.
- Tick the boxes called Privateand To finish, click ok.

Transferring Files using TFTP
Let us now do some local tests with the following commands.
- Press the windows key or click on the start menu
- Type cmd and press enter
- You will see a black cmd terminal in front of you. This is where we will type in our commands.
- Change directories to the path where your files are stored for sending and receiving. Let us now send a file. To do this, we use the ‘put’ command.
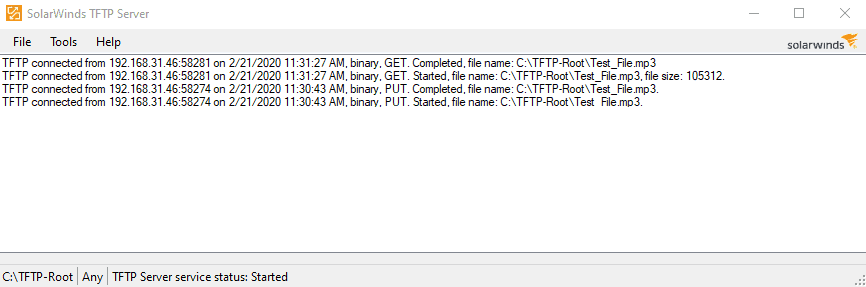
tftp -i 192.168.31.46 put “Test_File”.mp3
![]()
- If you want to receive a file, then the command we will use is called ‘get’.
tftp -i 192.168.31.46 get “Test_File”.mp3
![]()
We can look at our TFTP Server logs that display when we open our server app and we are greeted with the following records:
Conclusion
Transferring files by using TFTP is easy, fun and free. By leveraging the free TFTP server from SolarWinds, we can turn any ordinary PC into a file server with remote access capabilities.
This is useful for many reasons, and we hope that the tutorial will help you to get the correct access levels set for your own specific needs. Be sure to download the app from above so that you can follow along with this tutorial.
Better yet, check out SolarWinds and look at the multitude of monitoring, troubleshooting and control software that they have on offer. You are bound to find the right tool for the job, regardless of what you are trying to achieve!
Happy file transferring, and we’ll see you next time.
TFTP Server FAQs
What is difference between FTP and TFTP?
FTP is the File Transfer Protocol – the original file transfer system for the internet. TFTP is the Trivial File Transfer Protocol. This is a lightweight service that is usually used on private networks for moving small files to devices. Both systems can be used to either send or fetch a file and neither system includes security features, such as data encryption. As such, neither of these systems should be used to send files to remote devices outside a private network – user SFTP or FTPS instead.
Why do we use TFTP?
The Trivial File Transfer Protocol (TFTP) is fast and feature-free. It does not include authentication procedures, which means it can be integrated into task automation scripts without the need to store passwords but that also means that it shouldn’t e used to move sensitive data. The access security of private networks provides sufficient protection to make TFTP safe to use. However, even in this location, the protocol isn’t a good option for data movements. TFTP is good for moving configuration files to devices and for gathering log files from endpoints on a network to a central location.
Does TFTP use UDP or TCP?
The Trivial File Transfer Protocol (TFTP) is a lightweight file transfer system and as such, can be considered to be a stripped-down version of the File Transfer Protocol (FTP). The lack of features in TFTP makes it quick and also easy to deploy from a script. TFTP lacks authentication and session features, which are hallmarks of UDP. TFTP connections are initially made to port 69. However, continued communication for a transfer is switched to a random ephemeral port – some TFTP implementations choose to use the same ephemeral port number for all of their transactions.
![]()

It is an Internet software utility for transferring files between networks or users. It can be run locally and used to share files between different users irrespective of the device. The server is multi-threaded, allowing you to receive or send files to multiple network devices at the same time. It can be configured to run as a Windows service.
You can authorize a certain range of IP addresses. It is good to transfer files and make backups inside a network. For the tool to work as it should, the root server directory has to be specified. Through the advanced security settings, you can set the IP address or all the IP addresses that are allowed to access the network. Also, you can determine the network usage by setting it for either sending, receiving or both.
SolarWinds TFTP Server is licensed as freeware for PC or laptop with Windows 32 bit and 64 bit operating system. It is in other servers category and is available to all software users as a free download.
| Share |
| Give a rating |
|
|
| Author |
|
SolarWinds
|
| Last Updated On |
| July 9, 2018 |
| Runs on |
| Windows 10 / Windows 8 / Windows 7 / Windows Vista / XP |
| Total downloads |
| 4,453 |
| License |
|
Free |
| File size |
| 1,38 MB |
| Filename |
|
SolarWinds-TFTP-Server.zip |

Сервер TFTP предназначен для управления загрузкой бездисковых ПК (рабочих станций), но также эффективен для передачи файлов между удаленными системами. Этот упрощенный протокол передачи файлов очень прост в использовании.
Альтернатива домашней сети
Домашняя группа Windows была удобным инструментом для обмена файлами по сети. Но была исключена с обновлением Windows 10 до версии 1803. Для замены можно использовать TFTP-сервер, который интуитивный в настройке, достаточно надежный и позволяет передавать данные на быстрой скорости.
Перед настройкой сервера TFTP нужно выполнить следующие действия:
- Войдите в систему под учетной записью администратора.
- Загрузите установщик TFTP-сервера компании SolarWinds. После распакуйте загруженный zip архив в любое место на диске и установите программу, следуя инструкциям на экране.
- Чтобы разрешить удаленный доступ к серверу, нужно переадресовать UDP-порт 69 на IP адрес домашней сети. Но, если удаленное подключение не требуется, то переназначать порты не нужно.
Если разрешили доступ к TFTP-серверу за пределами локальной сети дома, офиса и другого места, проверьте, что статический или динамический IP добавлен в диапазон адресов. По умолчанию на сервере разрешены все IP адреса для передачи и получения файлов, а также перенаправление портов. Можно ограничить диапазон IP, чтобы разрешить только несколько адресов.
Для настройки сервера следуйте инструкции:
- После запуска утилиты SolarWinds TFTP Server, перейдите в File — Configure. Для отображения иконки в правом нижнем углу на панели задач отметьте флажком поле «Добавить сервер в системный трей Windows».

- Выберите корневой каталог сервера. В нем будут храниться все отправленные и принятые файлы. Чтобы передать файлы, их нужно будет скопировать в этот каталог.
- Перейдите на вкладку Безопасность, чтобы ввести некоторые ограничения. Здесь можно включить прием или передачу, разрешить определенный диапазон IP или только один адрес.

- После нажмите на ОК, чтобы сохранить настройки, и закрыть окно конфигурации.
Как пользоваться TFTP сетью
Если нужен доступ из устройств за пределами сети, потребуется переадресация порта 69. Поскольку экраны настроек разных моделей маршрутизаторов отличаются, предлагаем вам базовое представление.
- Нужно войти в панель конфигурации роутера с адресной строки браузера и ввести логин и пароль, которые указаны в инструкции к устройству.
- Откройте расширенные настройки и найдите NAT или Port Forward.
- Сделайте новую запись и перенаправьте UDP порт 69 на ipv4-адрес.
Если не собираетесь передавать файлы из компьютеров за пределами вашей домашней сети, процедуру с перенаправлением портов можно пропустить.
Конфигурация клиента TFTP
Перейдем к установке клиента на удаленном или локальном компьютере.
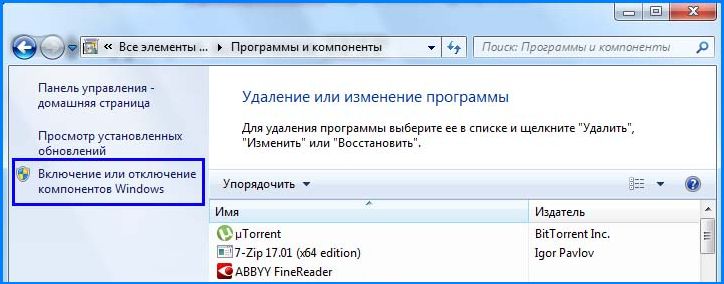
- Откройте панель управления и перейдите в раздел «Программы и компоненты».
- С левой стороны экрана кликните на пункт «Включить или выключить компоненты Windows».

- Найдите в списке клиента TFTP и установите флажок. Подтвердите изменения на ОК.

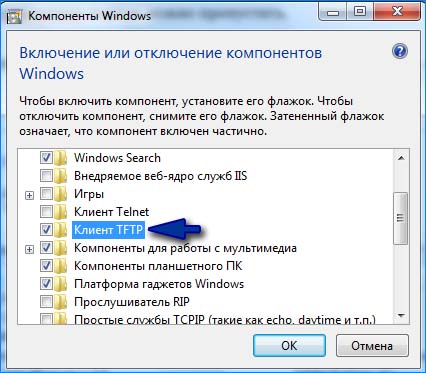
Помните, что установку клиента нужно произвести на компьютере, на котором не запущен сервер TFTP.
Настройка брандмауэра
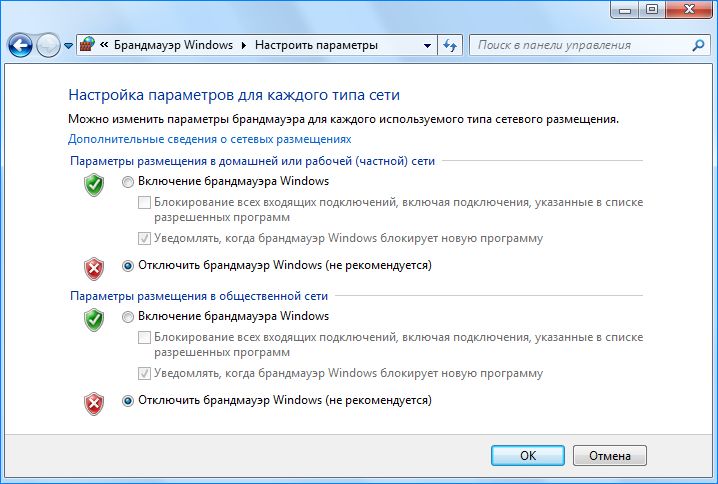
После установки клиента нужно либо отключить Брандмауэр Windows, либо добавить исключение для соединений TFTP.
- Откройте панель управления, измените просмотр на крупные значки и выберите Брандмауэр Windows.
- С левой стороны нажмите на кнопку «Включение или выключение брандмауэра Windows».
Переключите флажки в двух секциях в положение «Отключить».
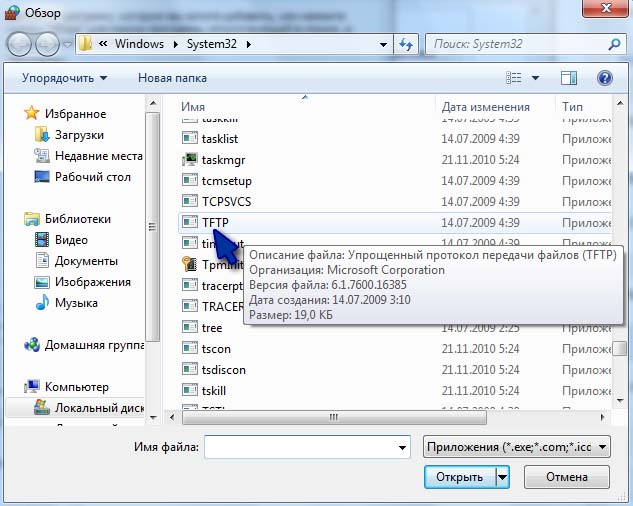
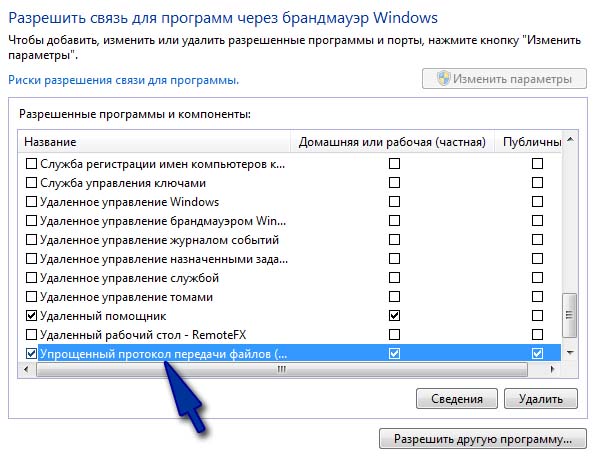
- Если не хотите полностью отключать эту функцию защиты, можно добавить исключение для соединений TFTP. Для этого вернитесь в предыдущее окно и выберите «Разрешить запуск программы или компонента через брандмауэр».
- Нажмите на кнопку «Разрешить другую программу», затем на «Обзор». Найдите и добавьте исполняющий файл TFTP.exe, который находится в каталоге Windows\System32.

- Установите флажки в полях «частная» и «публичные» и нажмите на ОК.

Как передавать файлы в сети TFTP
После установки клиента и перенаправления порта перейдем к передаче файлов. Убедитесь, что сервер запущен, затем следуйте инструкциям:
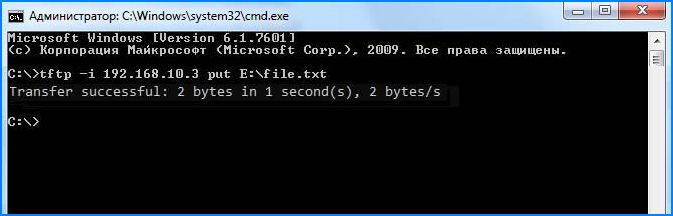
Нажмите Win + R, в диалоговом окне наберите cmd для вызова командной строки. Перенесите или скопируйте файлы, которые хотите передать, в корневой каталог сервера.
Для отправки файлов нужно использовать параметр PUT, при получении GET. Синтаксис команды выглядит следующим образом:
Tftp -i [server IP address] [GET или PUT] [путь к файлу]
Например, для передачи используйте команду:
Tftp -i 192.168.10.3 put E:\file.txt 
Если хотите получить файл, то команда будет выглядеть:
Tftp -i 192.168.10.3 get file.txt
Если хотите переслать на удаленное устройство за пределами сети, нужно указать публичный IP-адрес в командной строке, а затем порт. Примером может быть:
Tftp -i 39.43.126.2:69 put E:\file.txt