В этой статье мы рассмотрим, как централизованно задать настройки прокси на компьютерах с Windows 10 в домене Active Directory с помощью групповых политик. Большинство распространенных браузеров (таких как Microsoft Edge, Google Chrome, Internet Explorer, Opera) и большинство приложений автоматически используют для доступа в интернет параметры прокси сервера, заданные в Windows. Также мы рассмотрим, как задать параметры системного WinHTTP прокси.
Содержание:
- Как задать параметры прокси сервера в Windows через GPO?
- Настройка параметров прокси через реестр и GPO
- Настройка параметров WinHTTP прокси групповыми политиками
В этой статье мы рассмотрим особенности настройки прокси сервера политиками в поддерживаемых версиях Windows (Windows 10, 8.1 и Windows Server 2012/2016/2019). Обратите внимание, что в снятых с поддержки Windows 7/Server 2008R2, Windows XP/Windows Server 2003 параметры прокси сервера задаются по другому.
Как задать параметры прокси сервера в Windows через GPO?
До выхода Windows Server 2012/Windows 8 для настройки параметров Internet Expolrer (и в том числе настроек прокси) использовался раздел Internet Explorer Maintenance (IEM) из пользовательской секции GPO (User configuration –> Policies –> Windows Settings –> Internet Explorer Maintenance). В современных версиях Windows 10 /Windows Server 2016/2019 этот раздел отсутствует. 
В новых версиях Windows для настройки параметров IE и прокси в редакторе GPO нужно использовать предпочтения групповых политик GPP (Group Policy Preferences). Также есть вариант использования специального расширения Internet Explorer Administration Kit 11 (IEAK 11) – но применяется он редко.
Откройте консоль редактора доменных GPO (Group Policy Management Console –
GPMC.msc
), выберите OU с пользователями, для которых нужно назначить параметры прокси-сервера и создайте новую политику Create a GPO in this domain, and Link it here.
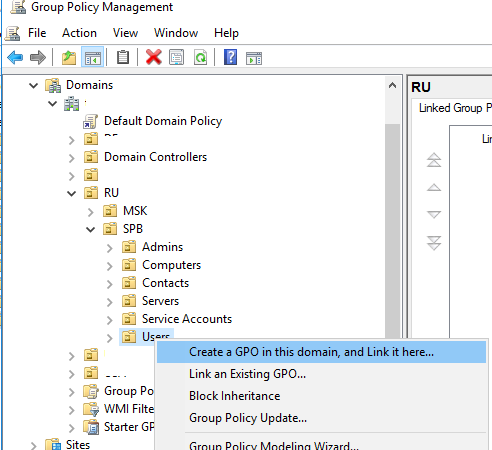
Перейдите в раздел User Configuration -> Preferences -> Control Panel Settings -> Internet Settings. В контекстном меню выберите пункт New -> и выберите Internet Explorer 10.

Для настройки параметров прокси в Windows 10/Windows Server 2016 нужно использовать пункт Internet Explorer 10.
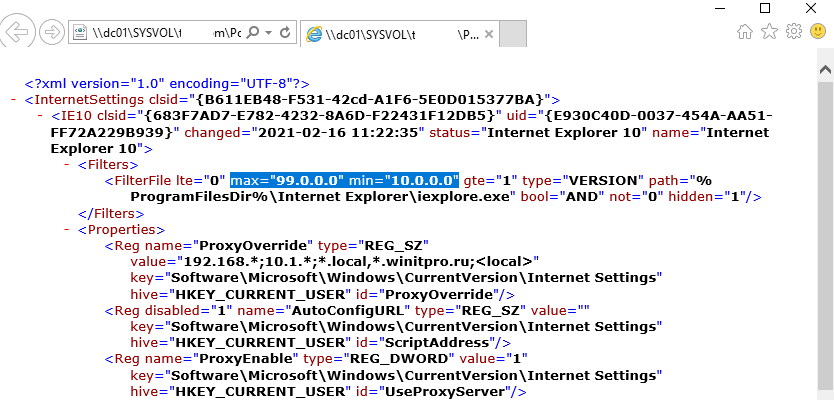
Совет. Несмотря на то, что отдельной настройки для Internet Explorer 11 нет, политика Internet Explorer 10 будет применяться на все версии IE >=10 (в файле политики InternetSettings.xml можно увидеть, что опция действительна для всех версии IE, начиная c 10.0.0.0 и заканчивая 99.0.0.0). Все версии Internet Explorer ниже 11 на данный момент сняты с поддержки Microsoft и более не обновляются.
<FilterFile lte="0" max="99.0.0.0" min="10.0.0.0" gte="1" type="VERSION" path="%ProgramFilesDir%\Internet Explorer\iexplore.exe" bool="AND" not="0" hidden="1"/>
Перед вами появится специальная форма, практически полностью идентичная настройкам параметра обозревателя в панели управления Windows. Например, вы можете указать домашнюю страницу (Вкладка General, поле Home page).
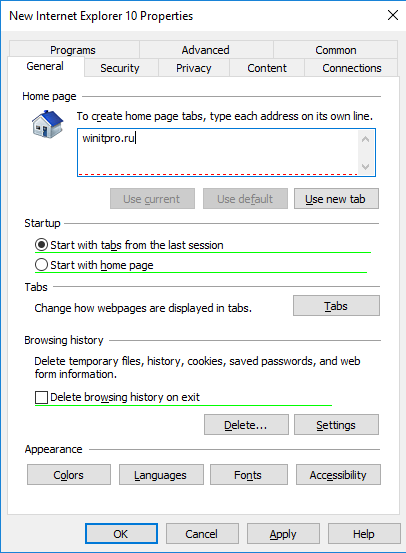
Важно. Не достаточно просто сохранить внесенные изменения в редакторе политики. Обратите внимание на красные и зеленые подчеркивания у настраиваемых параметров Internet Explorer 10. Красное подчеркивание говорит о том, что эта настройка политики не будет применяться. Чтобы применить конкретную настройку, нажмите F5. Зеленое подчеркивание у параметра означает, что этот параметр IE будет применяться через GPP.
Доступные функциональные клавиши
- F5 – Включить все настройки на текущей вкладке
- F6 – Включить выбранный параметр
- F7 – Отключить выбранный параметр
- F8 – Отключить все настройки на текущей вкладке
Чтобы указать параметры прокси-сервера, перейдите на вкладку Connections и нажмите кнопку Lan Settings). Прокси сервер можно настроить одним из следующих способов:
- Automatically detect settings — автоматическое определение настроек прокси с помощью файла wpad.dat;
- Use automatic configuration script — скрипт автоконфигурации (proxy.pac);
- Proxy Server – можно вручную указать IP адрес или DNS имя прокси сервера и порт подключения. Это самый простой способ настроить прокси в Windows, его и будем использовать.
Поставьте галку Use a proxy server for your LAN, а в полях Address и Port соответственно укажите IP/FQDN имя прокси-сервера и порт подключения.
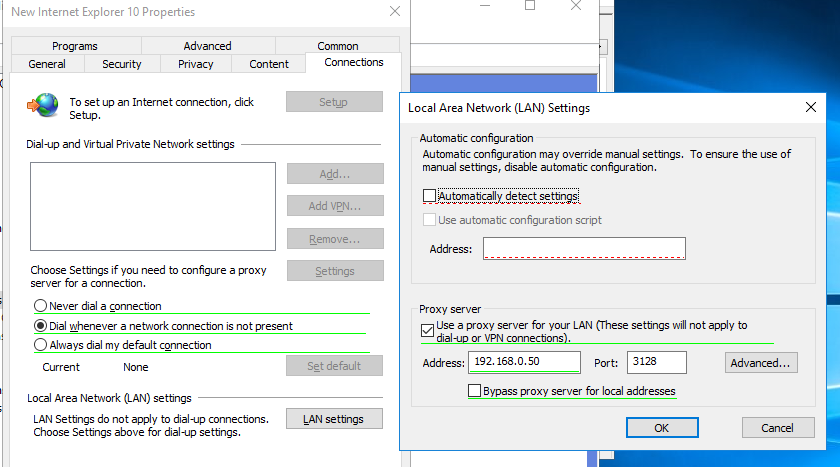
Включив опцию Bypass Proxy Server for Local Addresses можно запретить приложениям (в том числе браузеру) использовать прокси-сервер при доступе к локальным ресурсам (в формате
http://intranet
). Если вы используете адреса ресурсов вида
https://winitpro.ru
или
http://192.168.20.5
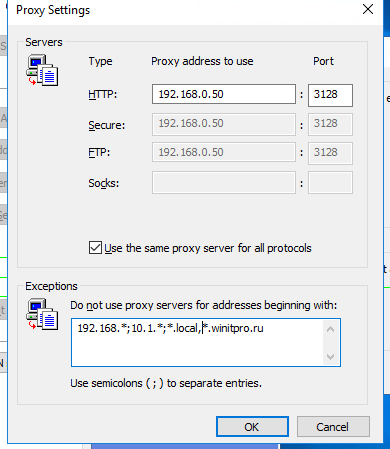
, то эти адреса не распознаются Windows как локальные. Эти адреса и адреса других ресурсов, для доступа к которым не нужно использовать прокси, нужно указать вручную. Нажмите кнопку Advanced и в поле Exceptions введите адреса в формате:
10.*;192.168.*;*.loc;*.contoso.com
Совет. Параметры прокси-сервера в Google Chrome можно задать централизованно через GPO с помощью специальных административных шаблонов. Для Mozilla Firefox можно использовать такое решение.
После сохранения политики вы можете просмотреть XML файл с заданными настройками браузера в каталоге политики на контроллере домена \\DC1\SYSVOL\winitpro.ru\Policies\(PolicyGuiID)\ User\Preferences\InternetSettings\InternetSettings.xml

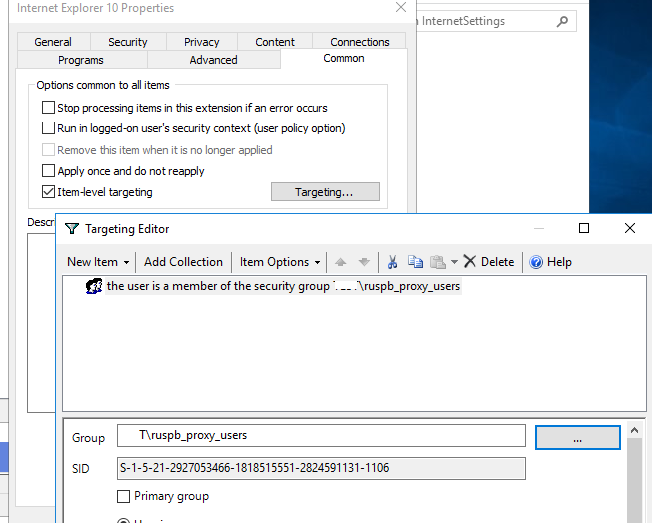
В GPP есть возможность более тонко нацелить политику на клиентов. Для этого используется GPP Item Level Targeting. Перейдите на вкладку Common, включите опцию Item-level targeting -> Targeting.
В открывшейся форме укажите условия применения политики. В качестве примера я указал, что политика настройки прокси будет применена только к пользователям, которые состоят в доменной группе ruspb_proxy_users. Вы можете использовать собственную логику назначения параметров прокси (в зависимости от IP подсети, сайта AD и т.д.).
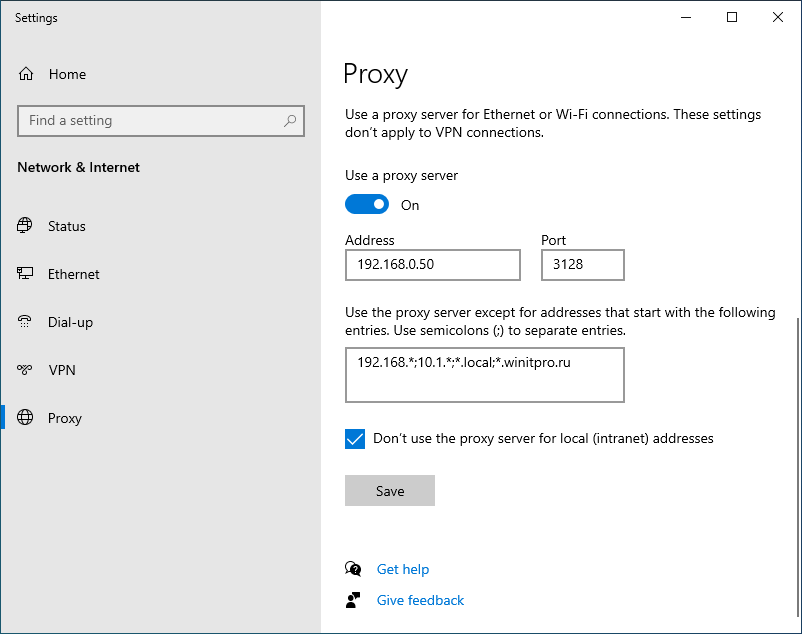
Осталось назначить политику IE на контейнер с пользователями и обновить политики на них. После обновления политики на компьютерах пользователей должны примениться новые настройки прокси в IE. В Windows 10 текущие параметры прокси можно посмотреть в разделе Settings -> Network and Internet -> Proxy. Как вы видите, на компьютере теперь заданы настройки прокси, указанные в доменной политике.
Чтобы запретить пользователям менять настройки прокси-сервера, воспользуйтесь этой статьей.
Настройка параметров прокси через реестр и GPO
Кроме того, настроить параметры IE можно и через реестр, политиками GPP. К примеру, чтобы включить прокси для пользователя нужно настроить следующие параметры реестра в ветке HKEY_CURRENT_USER\Software\Microsoft\ Windows\CurrentVersion\Internet Settings.
Перейдите в редакторе GPO в раздел User Configuration -> Preferences -> Windows Settings -> Registry и создайте три параметра реестра в указанной ветке:
-
ProxyEnable
(REG_DWORD) =
00000001 -
ProxyServer
(REG_SZ) =
192.168.0.50:3128 -
ProxyOverride
(REG_SZ) =
*winitpro.ru;https://*.contoso.com;192.168.*;<local>
Здесь также можно использовать Item level targeting для более тонкого нацеливания политик. 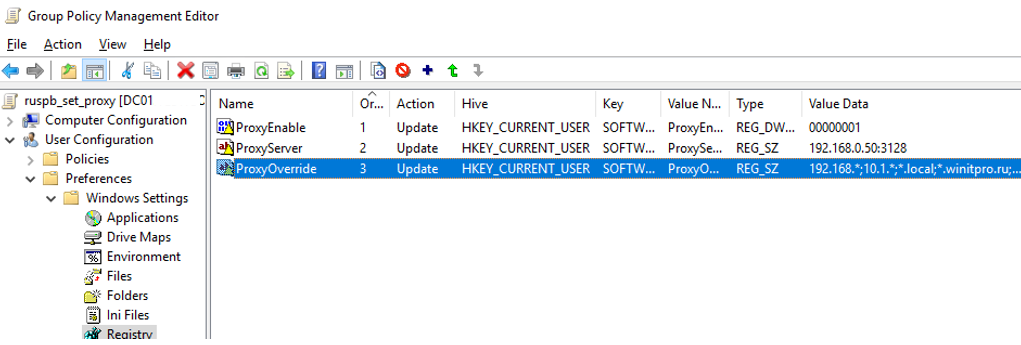
Если вам нужно создать политики не для каждого пользователя (per-user), а для всех пользователей компьютера (per-computer), используйте параметры GPP из раздела GPO Computer Configuration -> Preferences -> Windows Settings -> Registry. Используйте аналогичные параметры реестра в ветке HKEY_LOCAL_MACHINE\Software\Policies\Microsoft\Windows\CurrentVersion\Internet Settings.
Настройка параметров WinHTTP прокси групповыми политиками
Некоторые системные сервисы или приложения (например, служба обновлений Wususerv или PowerShell) по-умолчанию не используют пользовательские настройки прокси сервера из параметров Internet Explorer. Чтобы такие приложения работали корректно и получали доступ в интернет, вам нужно задать в Windows настройки системного прокси WinHTTP.
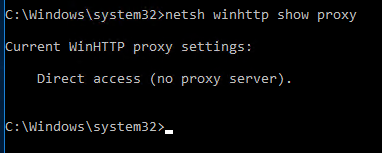
Чтобы проверить, настроен ли на вашем компьютере WinHTTP прокси, выполните команду:
netsh winhttp show proxy
Ответ “
Direct access (no proxy server)
” говорит о том, что прокси не задан, система использует прямой интернет доступ.
Вы можете задать на компьютере прокси для WinHTTP вручную командой:
netsh winhttp set proxy 192.168.0.50:3128 "localhost;192.168.*;*.winitpro.com"
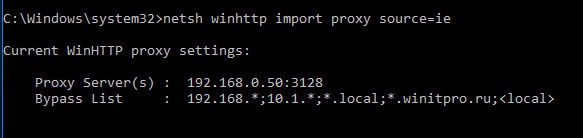
Или импортировать настройки прокси из параметров Internet Explorer теекщего пользователя:
netsh winhttp import proxy source=ie
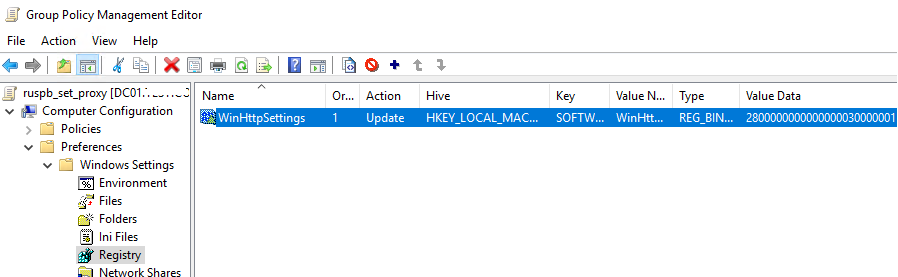
Однако настроить WinHTTP через GPO не получится – в редакторе GPO нет соответствующего параметра, а в реестре параметры хранятся в бинарном виде и не подходят для прямого редактирования.
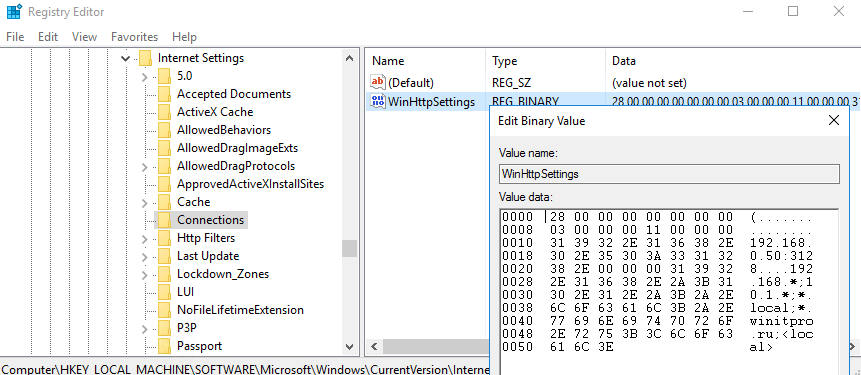
Единственный вариант задать параметры WinHTTP прокси – настроить их на эталонном компьютере, выгрузить значение параметра WinHttpSettings в ветке реестра HKLM\SOFTWARE\Microsoft\Windows\CurrentVersion\Internet Settings\Connections в reg файл и распространить этот параметр на компьютеры в домене через GPP registry.
When browsing the web on the Internet, privacy and Internet security are important issues for users to prevent abuse. Many technologies are used to provide privacy on the Internet and encrypt Internet traffic, such as VPN, proxy, Tor, etc., and the proxy is one of the most common methods in this field. But what is a proxy server and what does it do? A proxy server is a router that provides a gateway between users and the Internet and helps users prevent cyber attackers from entering the private network.
If you use a proxy server, the internet traffic will flow through it (proxy server) on its way to your requested address (the web pages you visit online). Then the request is returned through the same proxy server and the data received from the websites is sent to the user through the proxy server.
The proxy server is a popular solution for organizations and network administrators to control and filter incoming and outgoing traffic from employee systems. In addition to sending web requests, a proxy is also used as a firewall, web filter, and scanner for viruses; Also it speeds up common requests, hides your public IP address, caches data, and provides shared network connections.
Considering the facilities that proxy offers in creating privacy on the Internet, this article will guide you in setting up a proxy server in Windows and macOS. If you are ready, let’s find out how to find the proxy settings for your operating system and how to set up a proxy server.
Procedures for setting up a proxy server in Windows
Buying a Windows VPS to set up a proxy server can be a reasonable choice, don’t worry about how to set up a proxy server in Windows. On Windows, you can consider automatic setup, script setup, and manual setup methods to configure from the proxy server. If you don’t have the information about the type of proxy server and IP address, setting the proxy server automatically can be a reasonable option because Windows or macOS can automatically detect the proxy server in this way. If the automatic settings can not automatically identify the proxy server, a script must be set; you can reach your purpose through the address of the proxy script.
If you are interested in setting up the proxy server manually, you can do so after knowing the proxy server name and IP address or port. In this tutorial, we try to teach the easiest way to set up a proxy server in Windows and macOS.
Note: If you do not know the address of the proxy setup script or the server name or IP address, get help from the information technology department of your organization.
Step 1: Finding proxy settings in Windows
To be able to set up a proxy server, you need access to the information related to the settings of the desired proxy server. So finding the proxy settings on your computer is a prerequisite for setting up a proxy server.
In accessing proxy server settings, settings program (if you use Windows 10 or 8), control panel or registry editor can help you. By following the instructions we provide, you will easily access the proxy server settings in Windows.
Accessing proxy settings through Windows settings
If you want to access the proxy settings using Windows Settings, follow the steps below:
- Select the Start menu and go to Settings (gear icon).
- Select the “Network & Internet” option.
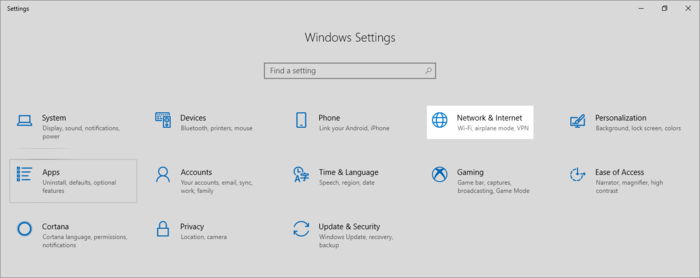
- Click the “Proxy “option in the left panel.
As a result, you will get information related to proxy server settings.
Accessing proxy settings through Windows Control Panel
If you want to set the proxy server through the control panel in Windows, follow the steps below:
Select the start menu and click on “Control Panel“.
- Select the “Internet options“.
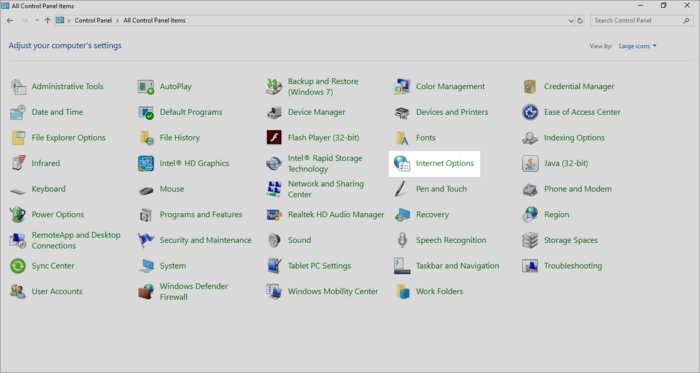
- By choosing Connections > LAN Settings, you can reach the settings related to the proxy server, and configure automatically proxy server.
Accessing proxy settings through the Windows registry editor
Some users find it easier to set up the proxy server in the Windows registry editor, so if you want to access the proxy server settings information through the Registry editor, follow the steps below:
- Press the “start+R” buttons at the same time.
- Type Regedit.
- Select HKEY_CURRENT_USER > Software > Microsoft > Windows > CurrentVersion > Internet Settings.
- Select the proxy entries (ProxyServer or AutoConfigURL) by double-clicking and checking their value.
Accessing proxy settings via the command line
Some users are interested in settings through the command line. You can obtain information about the proxy server through the Netsh command line tool:
netsh.exe winhttp show proxyUsing PowerShell can also help you to obtain proxy server information in Windows:
Get-ItemProperty -Path 'HKCU:\Software\Microsoft\Windows\CurrentVersion\Internet Settings' | findstr ProxyServerOutput:
ProxyServer: proxyname:portStep 2: Configuring the proxy server in Windows
As we explained at the beginning of the article, you can set and configure the proxy server in Windows automatically and manually; we will explain both methods.
Automatic configuration of the proxy server in Windows
After accessing the proxy server settings in Windows (Windows 8 /10) and selecting the Proxy option by following the process of step 1 (Settings > Network & Internet > Proxy), click on “Network Proxy“. To automatically setup the proxy server in Windows, continue the following steps:
- Set “Use a Proxy Server” to On at the bottom of the Manual Setup section and make sure the toggle status of the “Automatically detect settings” option is changed to On.
- By changing the status of the desired options to On, Windows automatically checks the local or business network to see if it is already automatically ready to run and set up the proxy server or not.
- We assume that Windows finds the PAC file, in which case you should change the Use Setup Script option in Automatic Proxy Setup to On. Finding the PAC file at this step means that you have already set up the PAC proxy in the Windows system.
- Find the path of the PAC file from the “Script Address” section and enter the script address in the empty field.
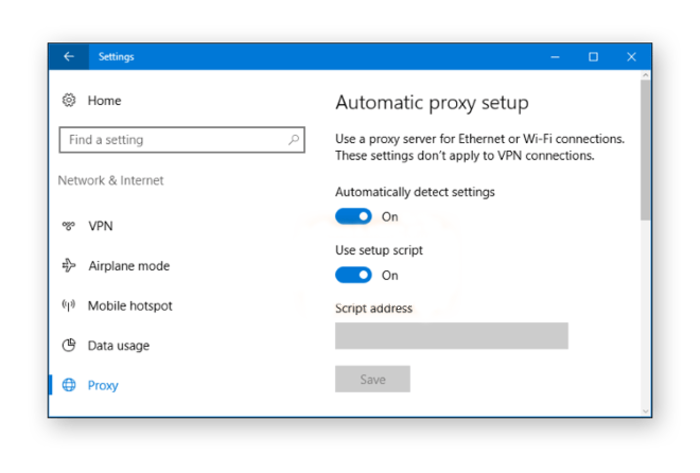
- Click on Save.
As a result, you have successfully configured the proxy server in Windows.
Manual configuration of the proxy server in Windows
If you could not set up the proxy server automatically, we will teach you how to manually configure the proxy server in Windows 8/10.
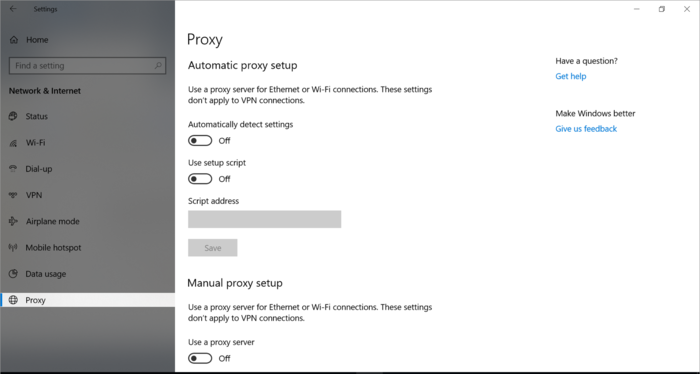
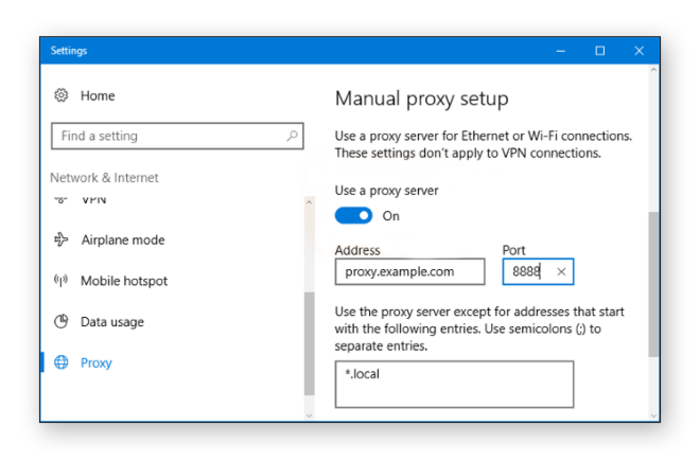
- For accessing Windows settings, select Settings > Network & Internet > Proxy.
- Find the “Manual proxy setup” option by scrolling.
- switch “Use a Proxy Server” to ON.
- Enter the proxy server name and IP address in the address field.
- In the port field, type the port number of the proxy server.
- If a password is set for the security of the proxy server, select “Proxy server requires password“.
- Fill in the username and password
- Click on the “Save“
As a result, when using the Internet, the proxy server is placed as a gateway between your device and the Internet, and you managed to manually configure your Windows system to use a proxy server on your connections to the Internet.
Steps to set up a proxy server on macOS
The easiest way to access proxy settings information in macOS is through System Preferences. Browsers also have a separate settings page for configuring proxy settings, which can be helpful for you in this regard.
Step 1: Finding proxy settings in macOS
To find proxy settings in macOS, follow the steps below:
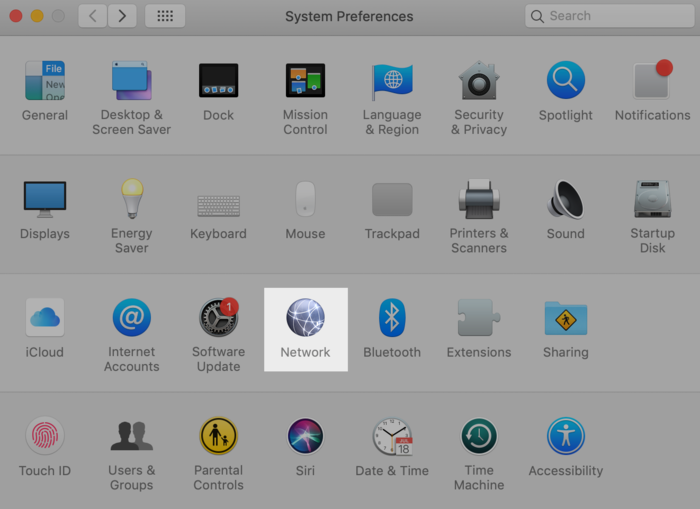
- Select Apple menu > System Preferences.
- Select the “Network” option for “Adjust connectivity settings“.
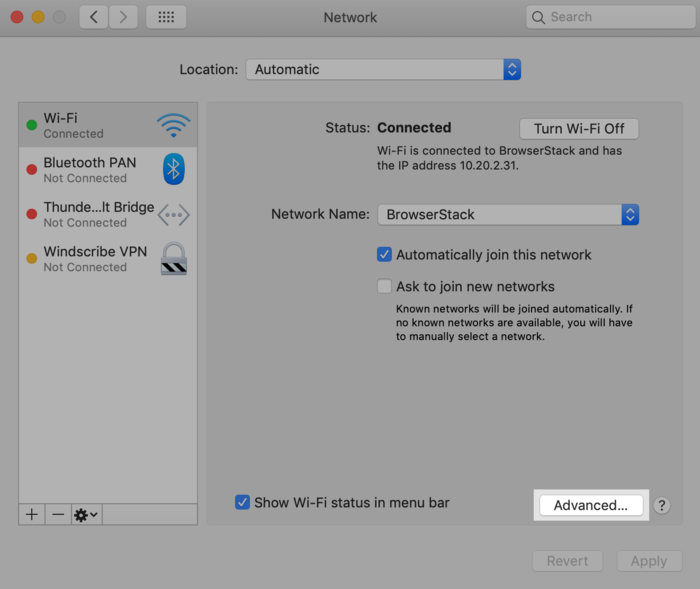
- Find and select an active network connection on the left pane.
- To configure the proxy server for the active network connection, select the “Advanced” option.
- To access the proxy protocols, select the “Proxies” tab.
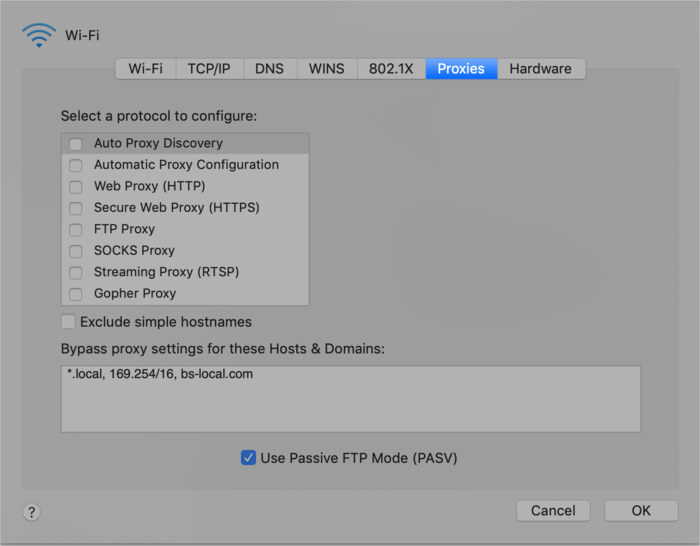
As a result, you can use different proxy protocols available for different network connections.
Step 2: Setting up the proxy server in macOS
By following the instructions in this section, you can configure the proxy server in macOS after accessing the proxy server settings in macOS:
- First access the proxy settings (Apple menu > System Preferences > Network > selecting WiFi > Advanced > Proxies)
- By clicking on the “Auto Proxy Discovery “option, you will configure the proxy server automatically.
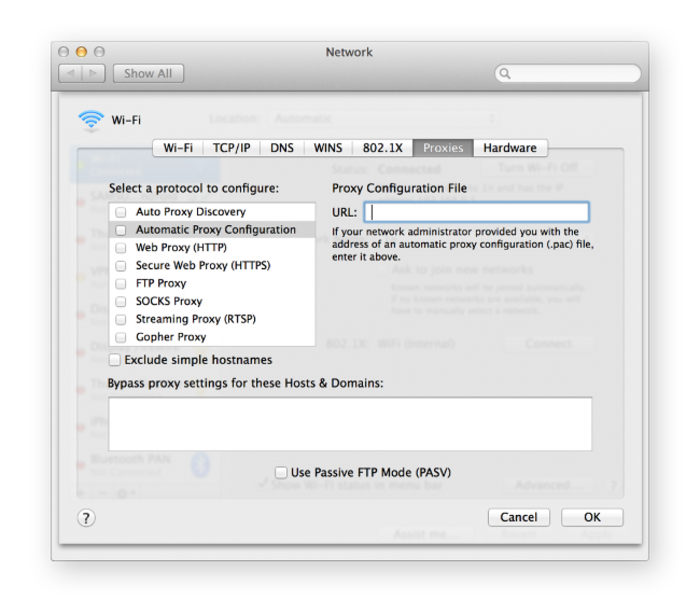
Select the “Secure Web Proxy (HTTPS)” option.
- Enter the address and port of the desired proxy server in the relevant fields.
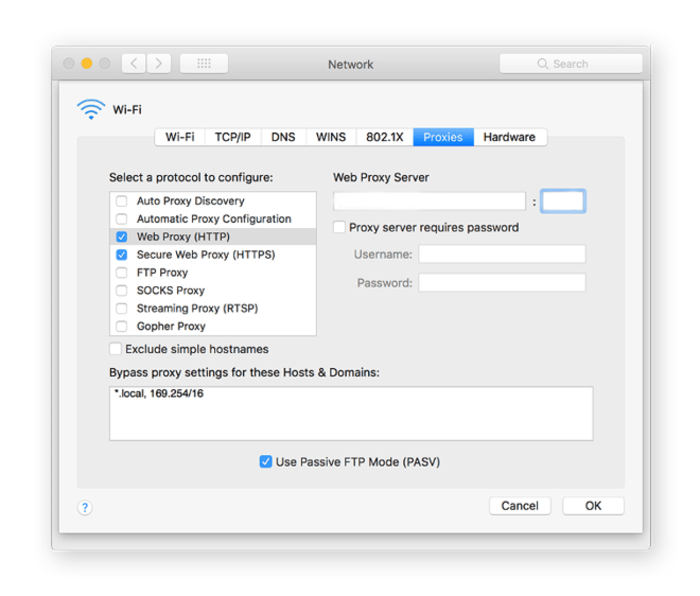
- If you are using the PAC proxy automatic configuration file, check the “Automatic Proxy Configuration“option and type the proxy address in the URL field.
- If a password is specified for the proxy server, select the “Proxy server requires password” option and then type the user account name and password in the Username and password fields.
- Click OK and save the proxy server configuration.
Congratulations, you have successfully configured the proxy server on macOS.
FAQ
Sometimes it is necessary to disable the use of a proxy server for some reason. To do this, follow the steps below:
proxy settings > Network & Internet > Proxy > switch off: Automatically detect settings & Use setup script > switch off: Use a proxy server > save
For proxy servers usually, port 8080 is required.
Go to Settings > Update & Security > Troubleshoot > Additional troubleshooters > Internet Connections option > run the troubleshooter
By going through these steps, Windows will automatically check the problem and identify its cause, and you can fix your problem.
Conclusion
Proxy servers have various uses, but the most common use of them is to protect online activities and the identity of users on the Internet. By using a proxy server, you will have privacy in the insecure world of the Internet, and prevent the tracking of personal information such as bank information, private photos, etc.
Setting up a proxy server is very simple for IT professionals and network administrators, but it will be a bit complicated for novice users. By reading this article, it will be easy even for novice users to set up a proxy server on Windows and macOS because by following the instructions provided in this article, you were able to set up a proxy server on Windows and macOS.
We have already taught how to set up a proxy in Ubuntu Linux, novice users can easily set up a proxy server in their favorite operating system using the tutorial articles and benefit from the proxy server for various purposes.
Thank you for reading this article to the end, if you have any questions at any step of the article, share them with us in the comments section so that we can answer them.
I needed to check the proxy settings on a Windows 8 system that appeared
to have been infected by malware that configured the system to use
a proxy server running on the system that was installed by the malware. If
you wish to view the proxy settings that will be used by Internet
Explorer or by any application that will rely upon the system proxy
settings for its own proxy use, the proxy server settings can be checked
in Internet Explorer 11, and by a similar process in recent versions before
it, by the following steps, either from within Internet Explorer or from
a command prompt:
From within Internet Explorer

-
Click on the gear icon in the upper, right-hand corner of the Internet Explorer
window. - Select Internet options.
-
Click on the Connections tab.

-
Click on LAN settings.

-
If «Use a proxy server for your LAN» has a check in the checkbox, then a proxy
server has been set. Click on the Advanced button to see the details for
the proxy server.

In the example above, I can see that the proxy server in use is running
on the local loopback address for the system, i.e., 127.0.0.1, so the proxy
server software is running on the system itself and is handling both HTTP
and HTTPS connections. It is listening on port 55833.
From a command prompt
Alternatively, you can also view the proxy server settings by querying
the
Windows Registry
from a command prompt as shown below:
C:\>reg query "HKCU\Software\Microsoft\Windows\CurrentVersion\Internet Settings" /v ProxyEnable

HKEY_CURRENT_USER\Software\Microsoft\Windows\CurrentVersion\Internet Settings
    ProxyEnable    REG_DWORD    0x1

C:\>reg query "HKCU\Software\Microsoft\Windows\CurrentVersion\Internet Settings" /v ProxyServer

HKEY_CURRENT_USER\Software\Microsoft\Windows\CurrentVersion\Internet Settings
    ProxyServer    REG_SZ    http=127.0.0.1:55833;https=127.0.0.1:55833
The first reg query command shows that ProxyEnable
is set to 1, since 0x1 indicates that the value
is hexadecimal 1, which is the same as decimal 1, indicating a proxy
server is being used for the currently logged in user under whose
account the command was run. If the value was zero, then no system-wide
proxy server is in use. The second reg query command
shows the IP address for the proxy server. In this case the proxy server
has been set up by malware on the system to route HTTP and HTTPS traffic
through a proxy server it has installed on the system.
On another system configured to use
a SOCKS proxy server set up via a
PuTTY SSH connection, the same reg query command shows the following:
C:\>reg query "HKCU\Software\Microsoft\Windows\CurrentVersion\Internet Settings"
 /v ProxyServer

HKEY_CURRENT_USER\Software\Microsoft\Windows\CurrentVersion\Internet Settings
    ProxyServer    REG_SZ    socks=127.0.0.1:1080
Again, the 127.0.0.1 address indicates the SOCKS proxy server
is running on the system on which the command was issued. In this case
the SOCKS proxy server is listening on port 1080.
If I wanted to change the proxy server settings so that any browser using
the system-side proxy server setting would no longer use the proxy server,
I could change the value of ProxyEnable in the Windows registry
to be zero with the following reg add command:
reg add "HKCU\Software\Microsoft\Windows\CurrentVersion\Internet

Settings" /v ProxyEnable /t REG_DWORD /d 0 /f
The /d followed by a zero specifies that the data to assign to
the registry ValueName, which was specified as ProxyEnable
by the /v, is a zero. The /t specifies that the
data type for the registry value is REG_DWORD and the
/f forces an overwrite of the current value without a prompt
appearing asking if you are sure you want to overwrite it. Without the
/f, a window will open asking for confirmation of the replacement
of the current value in that registry location.
The value for ProxyServer in the registry
remains the same, but browsers will no longer use the proxy.
C:\>reg add "HKCU\Software\Microsoft\Windows\CurrentVersion\Internet Settings" /v ProxyEnable /t REG_DWORD /d 0 /f
The operation completed successfully.

C:\>reg query "HKCU\Software\Microsoft\Windows\CurrentVersion\Internet Settings" /v ProxyServer

HKEY_CURRENT_USER\Software\Microsoft\Windows\CurrentVersion\Internet Settings
    ProxyServer    REG_SZ    socks=127.0.0.1:1080


C:\>reg query "HKCU\Software\Microsoft\Windows\CurrentVersion\Internet Settings" /v ProxyEnable

HKEY_CURRENT_USER\Software\Microsoft\Windows\CurrentVersion\Internet Settings
    ProxyEnable    REG_DWORD    0x0
If you wished to enable the use of the proxy server agin, you could
issue the same reg add command, but with /d 1, instead
of /d 0.
Note: if you change the proxy server setting within Google Chrome and
leave Chrome open when you change the value of ProxyEnable to
zero or one with the reg add command, you will need to get Chrome
to check the setting again by going through the
steps to view the proxy
server setting in Chrome or close and reopen Chrome.
Running
show-firefox-proxy-setting.bat on the system that was configured to
use an HTTP and HTTPS proxy listening on port 55833, as noted in
Finding the
proxy setting for Firefox from a command line, showed the following,
since it was configured to use the system proxy settings:
C:\Users\Public\Documents>show-firefox-proxy-setting.bat

---------- C:\USERS\JDoe\APPDATA\ROAMING\MOZILLA\FIREFOX\PROFILES\L7FNKEJA.DEFAULT\PREFS.JS
I.e., no proxy information was displayed. If it had been configured for
«manual proxy configuration» with 127.0.0.1 for both the HTTP Proxy and
SSL Proxy setting with port 55833 for both, it would have shown the
following:
C:\Users\Public\Documents>show-firefox-proxy-setting.bat

---------- C:\USERS\JDoe\APPDATA\ROAMING\MOZILLA\FIREFOX\PROFILES\L7FNKEJA.DEFAULT\PREFS.JS
user_pref("network.proxy.http", "127.0.0.1");
user_pref("network.proxy.http_port", 55833);
user_pref("network.proxy.ssl", "127.0.0.1");
user_pref("network.proxy.ssl_port", 55833);
user_pref("network.proxy.type", 1);
I.e., the proxy server setting information displayed only applies to a
«manual proxy configuration» for Firefox.
Running the batch file on the system configured to use the SOCKS proxy where
Firefox was configured to use a «manual proxy configuration», showed the
following:
C:\>show-firefox-proxy-settings.bat

---------- C:\USERS\Joan\APPDATA\ROAMING\MOZILLA\FIREFOX\PROFILES\W9XPP5JC.D
EFAULT\PREFS.JS
user_pref("network.proxy.socks", "127.0.0.1");
user_pref("network.proxy.socks_port", 1080);
user_pref("network.proxy.type", 1);
When Firefox is configured for «No proxy», it will show something similar
to the following:
C:\>show-firefox-proxy-settings.bat

---------- C:\USERS\Joan\APPDATA\ROAMING\MOZILLA\FIREFOX\PROFILES\W9XPP5JC.D
EFAULT\PREFS.JS
user_pref("network.proxy.type", 0);
I.e., it will show user_pref("network.proxy.type", 0);.
If you wish to check the proxy server setting for an account on the
system other than the one under which you are currently logged in, you can
specify the Security Identifier (SID) for the account, instead of
HKCU as shown below.
C:\>reg query "HKEY_USERS\S-1-5-21-3084690208-3888753220-1328190815-1115\Software\Microsoft\Windows\CurrentVersion\Internet Settings" /v P
roxyEnable

HKEY_USERS\S-1-5-21-3084690208-3888753220-1328190815-1115\Software\Microsoft\Win
dows\CurrentVersion\Internet Settings
    ProxyEnable    REG_DWORD    0x1
You can determine the SID for an account from the command line by
using the VBScript determine-sid script as shown below:
C:\Users\Public\Documents>cscript /nologo determine-sid.vbs Sue Onda
Userid:               Sue
Computer Name/Domain: Onda
SID:                  S-1-5-21-2441191556-19154564-1365248798-1001
The script must be run from an administrator account. The user account
name and the name of the computer, since the script can also query remote
computers, can be specified on the command line. E.g., in the case above
the username is «Sue» and the computer name is «Onda». If they aren’t specified
on the command line, a window will appear prompting for both.
В этом посте будет показано, как найти настройки прокси-сервера вашего компьютера Windows с помощью PowerShell, CMD, реестра и т. Д. Кроме того, если у вас возникли проблемы с загрузкой обновлений Windows или другие проблемы с сетевым подключением, вы можете выполнить сброс Настройки прокси на вашем компьютере с Windows 10 и посмотрите, поможет ли это вам.
Содержание
- Что такое WinHTTP прокси
- Проверьте настройки прокси-сервера
- Как сбросить настройки прокси WinHTTP в Windows 10
Что такое WinHTTP прокси
Microsoft заявляет, что Windows HTTP Services (WinHTTP) – это технология доступа к HTTP, которая предоставляет разработчикам высокоуровневый интерфейс с поддержкой сервера для интернет-протокола HTTP/1.1. WinHTTP предназначен для использования преимущественно в серверных сценариях серверными приложениями, которые взаимодействуют с HTTP-серверами. WinHTTP также предназначен для использования в системных службах и клиентских приложениях на основе HTTP.
Проверьте настройки прокси-сервера
Я не использую прокси, поэтому некоторые записи могут быть не видны на моих скриншотах.
1] Командная строка

Вы должны использовать встроенный инструмент netsh.exe в вашей операционной системе Windows.
Чтобы просмотреть информацию о прокси-сервере вашего компьютера, откройте командную строку с повышенными привилегиями, введите следующую команду и нажмите клавишу ВВОД:
netsh.exe winhttp show proxy
Есть и другие способы найти настройки прокси вашего ПК.
2] Google Chrome

В браузере Chrome введите следующее в адресную строку и нажмите Enter:
хром: // нетто-Внутренности/# прокси
Вы увидите настройки прокси здесь.
3] Mozilla Firefox

В браузере Firefox введите следующее в адресную строку и нажмите Enter:
о: предпочтения # расширенный
Прокрутите вниз и нажмите кнопку Настройки сетевого прокси, чтобы увидеть их.
4] Редактор реестра

Откройте REGEDIT и перейдите к следующей клавише:
HKEY_CURRENT_USER \ Software \ Microsoft \ Windows \ CurrentVersion \ Internet Settings
Клавиша ProxyEnable контролирует настройки прокси. 0 отключает их, а 1 включает их. Если вы используете прокси, вы получите его значение под ключом ProxyServer .
5] PowerShell

Запустите PowerShell от имени администратора и выполните следующую команду:
Get-ItemProperty -Path 'HKCU: \ Software \ Microsoft \ Windows \ CurrentVersion \ Internet Settings' | findstr ProxyServer
6] Свойства обозревателя

Откройте «Свойства обозревателя»> вкладка «Подключения»> нажмите кнопку «Настройки сети». Там вы увидите настройки прокси-сервера.
7] Настройки Windows

Откройте «Настройки Windows»> «Сеть и Интернет»> «Прокси». Здесь вы увидите настройки прокси-сервера.
Как сбросить настройки прокси WinHTTP в Windows 10
Если ваша система использует прокси-сервер и вы хотите удалить его, откройте командную строку с повышенными привилегиями, введите следующую команду и нажмите клавишу ВВОД:
netsh winhttp reset proxy
Это позволит удалить прокси-сервер и настроить «прямой доступ» к Интернету.
Говоря о сбросе настроек, вот несколько публикаций на этом сайте, которые помогут вам сбросить другие функции:
Сбросить все параметры локальной групповой политики | Сбросить приложения Магазина Windows | Сброс кеша Магазина Windows | Сбросить настройки клавиатуры | Сброс настроек сенсорной панели | Сброс устройства Surface Pro | Сброс настроек браузера Microsoft Edge | Сбросить настройки Internet Explorer | Сбросить корзину | Сброс настроек браузера Chrome | Сброс настроек Firefox | Сброс настроек безопасности Windows | Сбросить настройки брандмауэра Windows | Сброс Winsock | Сбросить TCP/IP | Сброс кеша DNS | Сбросить Центр обновления Windows | Сбросить каждый компонент Центра обновления Windows | Сбросить пароль Windows.

Часто приходится переключаться между интернет-сетями. Одна сеть работает через прокси, другая — без прокси.
Как можно быстро отключать/включать прокси сразу во всех программах, чтобы каждый раз не лазить в настройки Skype, Chrome, FileZilla и т.д.?
-
Вопрос задан
-
26275 просмотров
Сама настройка хранится в параметре ProxyEnabled раздела HKEY_CURRENT_USER\Software\Microsoft\Windows\CurrentVersion\Internet Settings. Значение 1 включает прокси-сервер, а значение 0 отключает. В таких случаях проще создать сценарий командной строки для быстрого включения/отключения прокси-сервера.
Файл iepon. cmd (включение прокси-сервера):
reg add «HKEY_CURRENT_USER\Software\Microsoft\Windows\CurrentVersion\Internet Settings» /v ProxyEnable /t REG_DWORD /d 1 /f
Файл iepoff. cmd (отключение прокси-сервера):
reg add «HKEY_CURRENT_USER\Software\Microsoft\Windows\CurrentVersion\Internet Settings» /v ProxyEnable /t REG_DWORD /d 0 /f
Пригласить эксперта
Есть специальная утилита от Microsoft, но если в программе настроен прокси вручную, то это не поможет.
C:\WINDOWS\system32>proxycfg.exe /?
Инструмент настройки прокси по умолчанию Microsoft (R) WinHTTP
(C) Корпорация Майкрософт. Все права защищены.
Использование:
proxycfg -? : просмотр справки
proxycfg : просмотр текущих параметров прокси WinHTTP
proxycfg [-d] [-p <имя_сервера> [<список_обхода>]]
-d : установка прямого доступа
-p : установка прокси-сервера и дополнительного списка обхода
proxycfg -u : импортирование параметров прокси из текущих параметров
Microsoft Internet Explorer, настроенных вручную (в HKCU)
-
Показать ещё
Загружается…
09 окт. 2023, в 09:40
6000 руб./за проект
08 окт. 2023, в 23:50
5000 руб./за проект
08 окт. 2023, в 21:59
1000 руб./в час