В свете периодических блокировок в РБ и РФ, блокирующих как “недозволенные речи неугодных” так и работу специалистов разных мастей, организации и просто технари перебирают возможности различных VPN решений. SoftEther VPN в моем списке выглядит как бесплатное “чудо-решение”, которое позволяет иметь под рукой внушительный лист протоколов VPN из коробки: L2TP, IPSec, OpenVPN, SSTP, SoftEther VPN.
Цель туториала — упростить его установку, сделав доступным любому специалисту способному подключиться по ssh к серверу и вбить пару команд.
Если вас интересуют все возможности решения — на хабре уже есть обзоры SoftEther VPN: раз два три.
Теоретически
Я не системный администратор и не специалист по безопасности. Могу быть не прав.
Наиболее интересными протоколами для нас выглядят протоколы работающие поверх 443 порта т.к. похожи на https трафик: «SSTP», «SoftEther VPN». Ставим нашей целью настроить оба, остальные протоколы бонусом.
Хотя по опыту, они не спасут в случае применения тяжелой артиллерии.
Нам понадобятся
-
SoftEther VPN Server manager for Windows
-
Ubuntu 20.04 server
-
Docker 19+ на борту
sudo apt-get update sudo apt-get install docker-ce docker -
SoftEther VPN Client под необходимую вам систему. [Опционально, если планируете использовать «SoftEther VPN» протокол]
Приступим
UPD: Шаги 1-6, можно срезать.
Под FreeBSD SoftEther доступен для установки через пакетный менеджер.
su
pkg update
pkg upgrade
pkg install softether

sysrc softether_server_enable=yes
Листаем к пункту 7. Спасибо @i7071270
-
Создадим папку для наших настроек
mkdir /home/softethervpn && cd /home/softethervpn -
Создайте и откройте
docker-compose.yamlфайл используяviилиnanonano docker-compose.yamlВНИМАНИЕ: Замените следующие ключи своими значениями
-
<PSK> — pre-shared key. Используется для IpSec
-
<username>
-
<password>
-
<spassword> — Server management password (супер админ — будьте с ним аккуратны)
-
<hpassword> — hub management password
-
В секции USERS вы можете определить предустановленных юзеров: username:password;user2:pass2;
version: '3'
services:
  softethervpn:
    container_name: 'softethervpn'
    image: siomiz/softethervpn
    cap_add:
      - NET_ADMIN
    environment:
      - PSK=<PSK>
      - "USERS=<username>:<password>"
      - SPW=<spassword>
      - HPW=<hpassword>
    #volumes:
      #- ./vpn_server.config:/opt/vpn_server.config
    ports:
      # L2TP/IPSec
      - "500:500/udp"
      - "4500:4500/udp"
      - "1701:1701/tcp"
      # OpenVPN/SSTP
      - "443:443/tcp"
      - "1194:1194/udp"
      # SoftEther VPN (recommended by vendor)
      - "5555:5555/tcp"
      - "992:992/tcp"
-
-
Стартуем из папки с
docker-compose.yamldocker-compose up -d -
Во время первого запуска контейнера была создана конфигурация. Давайте скопируем ее из контейнера в нашу папку.
docker cp softethervpn:/usr/vpnserver/vpn_server.config ./ -
Теперь нам необходимо раскомментировать строки 13, 14 в файле
docker-compose.yamlИтоговый файл должен выглядеть так
version: '3' services: softethervpn: container_name: 'softethervpn' image: siomiz/softethervpn cap_add: - NET_ADMIN environment: - PSK=<PSK> - "USERS=<username>:<password>" - SPW=<spassword> - HPW=<hpassword> volumes: - ./vpn_server.config:/opt/vpn_server.config ports: # L2TP/IPSec - "500:500/udp" - "4500:4500/udp" - "1701:1701/tcp" # OpenVPN/SSTP - "443:443/tcp" - "1194:1194/udp" # SoftEther VPN (recommended by vendor) - "5555:5555/tcp" - "992:992/tcp" -
Теперь вы не будете терять ваш конфиг после каждого перезапуска контейнера. Для обновления конфигурации контейнера вызываем.
docker-compose up -d -
Запускаем SoftEther VPN Server manager for Windows с локальной машины и подключаемся к созданному серверу:

Если вам удалось подключиться — вам уже доступны протоколы L2TP, IPSec, SoftEther VPN. (при условии, что у вас установлены соответствующие клиенты)
-
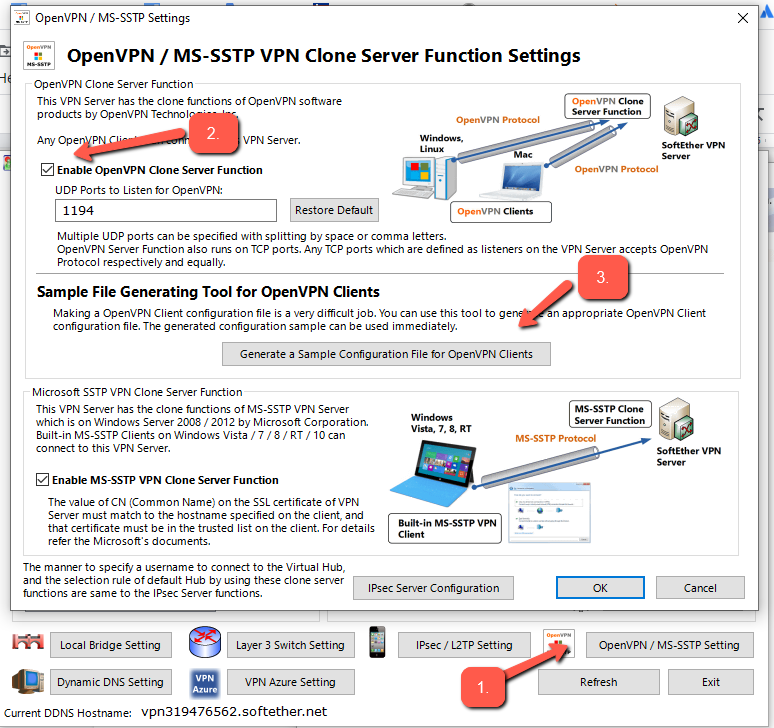
Пора настроить OpenVPN
-
Активируем протокол в настройках

-
Кнопка «Generate a Sample Configuration File for OpenVPN Clients» отдаст вам файл который вы можете скормить типовому OpenVPN клиенту.
-
-
Пришло время настроить SSTP
-
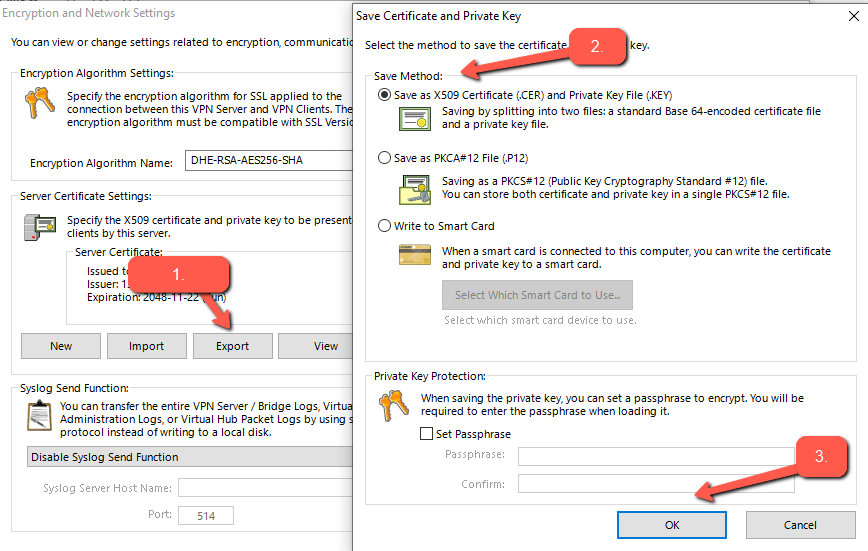
Первое, что нужно сделать — сгенерировать self-signed сертификат для сервера:

-
Экспортируем сертификат в формате
.cer
-
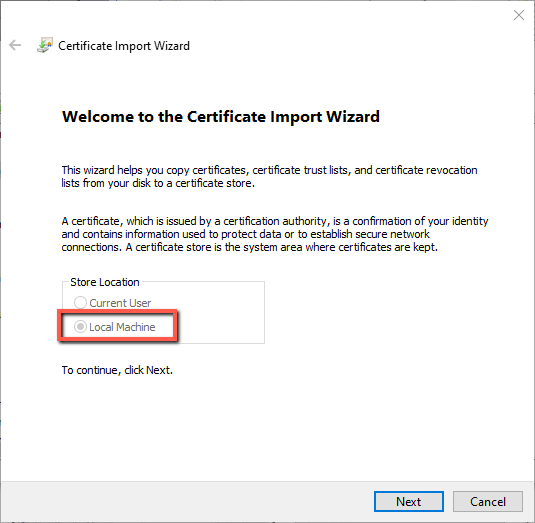
Этот сертификат необходимо импортировать в Trusted Root Certificate Authorities вашей системы. Для этого
-
Открываем утилиту «Manage Computer Certificates»
-
Импортируем сертификат в «Trusted Root Certificate Authorities»

Важно: Store location должен быть установлен в Local:

После импорта, в ветке Certificates вы увидите сертификат с IP адресом вашего сервера.
-
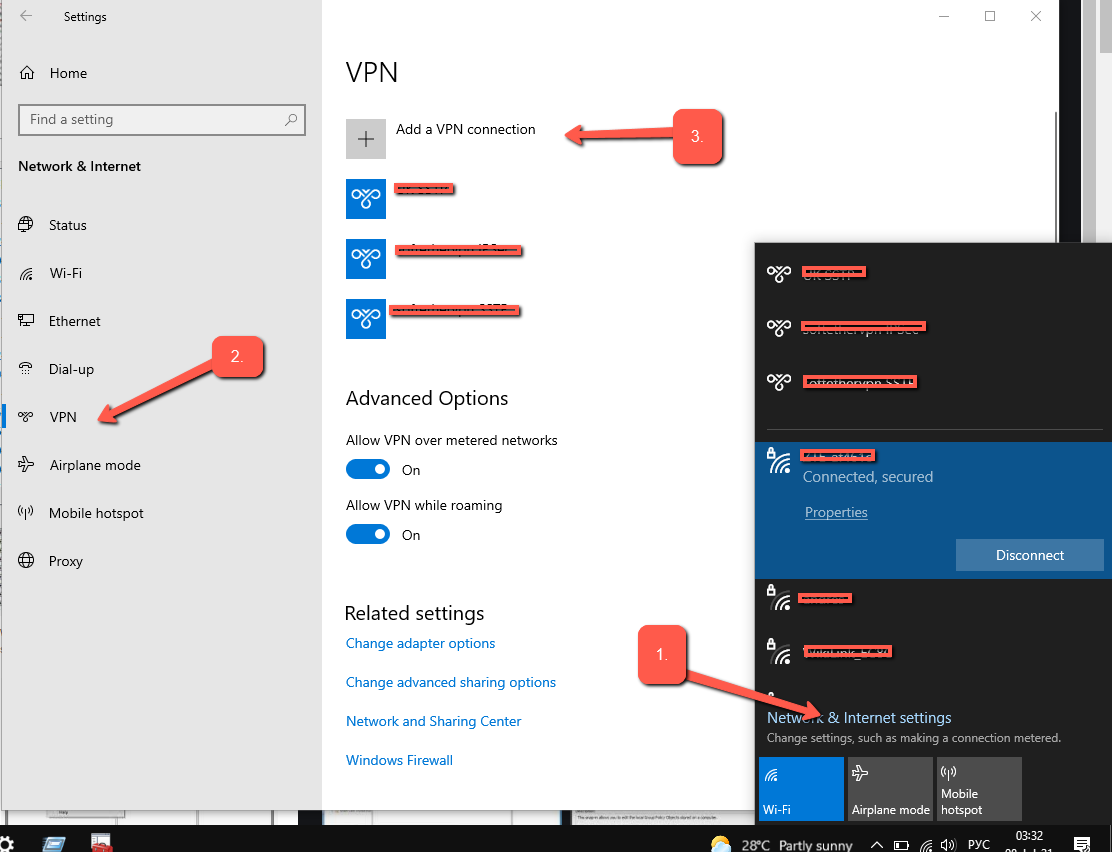
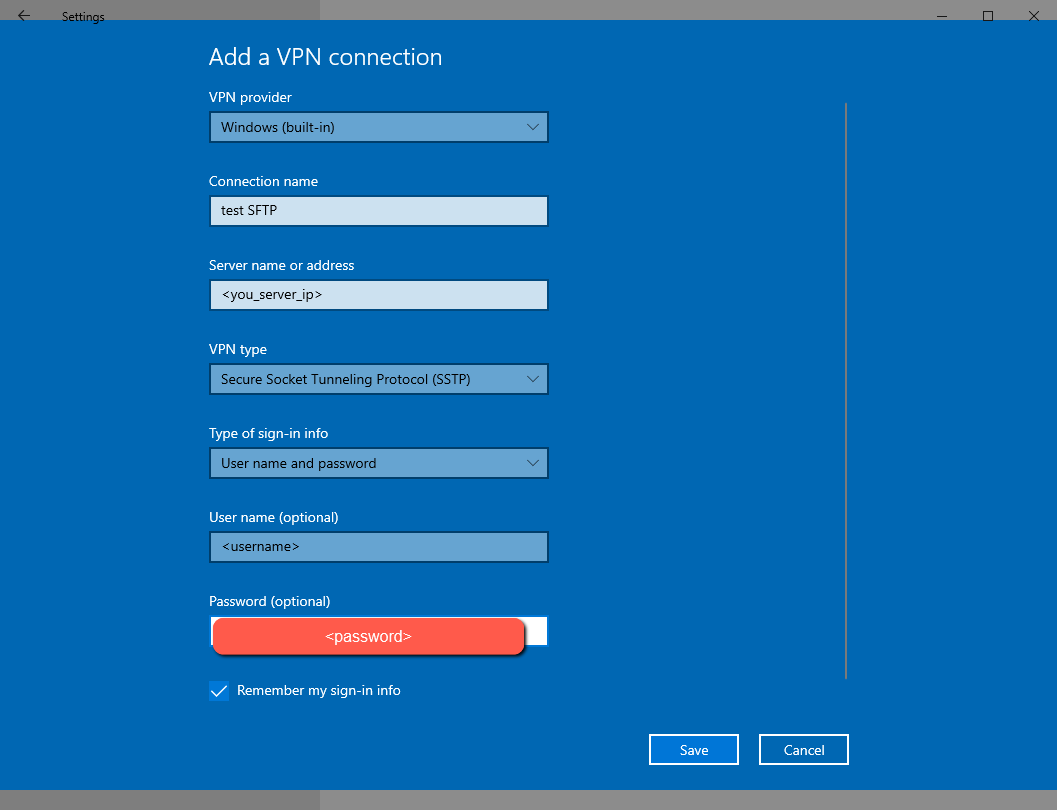
Попробуем установить подключение, для этого идем в настройки VPN:

-
Добавляем новое VPN соединение

-
Готово! Если все настройки были выполнены верно, соединение должно было успешно установиться.
-
-


Дополнительно
-
По адресу https://<your_ip_address> доступна страница приветствия SoftEther VPN. Чтобы лишний раз не афишировать факт, что это VPN сервер, давайте ее отключим.
-
Откроем на редактирование файл
vpn_server.confignano vpn_server.config -
Заменим флаг
bool DisableJsonRpcWebApi falseнаbool DisableJsonRpcWebApi true -
Перезапустим контейнер:
docker restart softethervpn
-
-
Имеет смысл скрыть все неиспользуемые нами порты. В моем случае все кроме 443. Для этого комментируем в файле
docker-compose.yamlстроки с лишними портамиports: # L2TP/IPSec #- "500:500/udp" #- "4500:4500/udp" #- "1701:1701/tcp" # OpenVPN/SSTP - "443:443/tcp" #- "1194:1194/udp" # SoftEther VPN (recommended by vendor) #- "5555:5555/tcp" #- "992:992/tcp"
Готово
Теперь у нас под рукой есть многопользовательский VPN Server с набором протоколов которые можно перебирать в надежде достучаться до рабочего варианта в случае известных форс-мажоров. Всем спасибо!
Только зарегистрированные пользователи могут участвовать в опросе. Войдите, пожалуйста.
Как вы считаете, имеет ли это смысл
37.14%
Да, должно помочь от примитивных блокировок
26
2.86%
Нет, бесполезная трата времени
2
18.57%
VPN не для обхода блокировок придумали
13
14.29%
Могло бы помочь, но этог конфиг не полный
10
27.14%
Не знаю, но хочется верить
19
Проголосовали 70 пользователей.
Воздержались 34 пользователя.
This section describes how to install SoftEther VPN Server to an operating system with Windows 2000 or later. This assumes that in the Windows operating system, no extra application software is installed after performing a clean install of the system. This also assumes that the Windows function for blocking communication to TCP/IP ports from the outside (firewall function) is disabled.
7.2.1 Selecting the Installation Mode
As described in 3.2 Operating Modes, SoftEther VPN Server can be operated in either service mode or user mode. When configuring VPN Server for use as part of an everyday operation system, we recommend installing SoftEther VPN Server in service mode. The installer for the Windows version of VPN Server installs the VPN Server program to the system in service mode.
7.2.2 Installation Procedure Using the Installer
Preparing the Installer File
The installation of the Windows version of SoftEther VPN Server is very easy as it is almost completely performed automatically. To install VPN Server, you can download the latest VPN Server installer file from the SoftEther VPN Project website (http://www.softether.org/).
The VPN Server Windows version installer file is an executable file with the name vpnserver-build-number-win32-x86.exe.
VPN Server Installer
Starting the Installer
Start the installer by double-clicking the VPN Server installer file. The Windows Installer-based installer starts automatically. Using the installation wizard, you can select the name of the installation directory. (By default, the program is installed to Program Files\SoftEther VPN Server on the system drive.) The VPN Server process writes large log files to the installation directory, so we recommend selecting an area on the hard drive that has high transfer rate and a large amount of unused space.

Specifying the VPN Server Installation Directory.
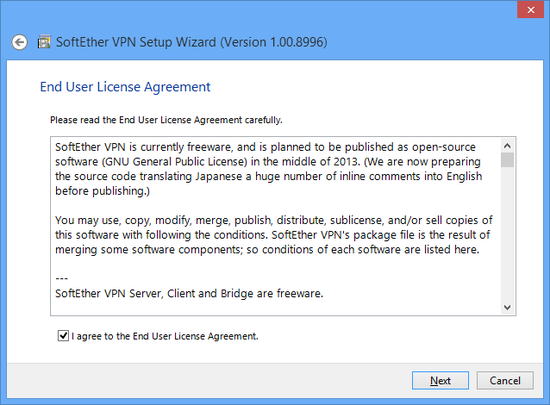
During the installation, the end-user license agreement may be displayed. Please thoroughly read the agreement. If you agree to the terms and conditions, the installation continues.
VPN Server End-User License Agreement.
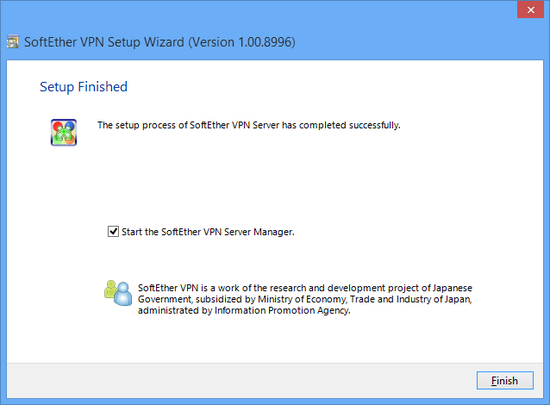
The installer automatically registers the SoftEther VPN Server system service and sets the program to automatically start in background mode at Windows startup.
7.2.3 Precautions After Installation
When installation of the Windows version of VPN Server is completed, the SoftEther VPN Server service is already running in the background on the Windows system. Normally, the computer does not have to be restarted after installation of the program. However, if you expect to use the local bridge function while using a network adapter that supports hardware offloading, as described in 3.6 Local Bridges, we recommend that you restart the computer.
To check whether the VPN Server installer properly installed the SoftEther VPN Server service to the Windows system, click [Control Panel] > [Administrative Tools] > [Services], and check that [SoftEther VPN Server] is displayed on the list of services.
VPN Server Install Finished.
7.2.4 Managing VPN Server with VPN Server Manager
VPN Server Manager
After VPN Server is installed, the program can be properly configured and the VPN client computers can be provided with the function that allows the program to operate as a VPN server.
SoftEther VPN Server Manager can be used on Windows to manage VPN Server. For information about the detailed management method, please refer to 3. SoftEther VPN Server Manual.
Start VPN Server Manager, which is installed at the same time as the Windows version of VPN Server, connect to [localhost] (the host itself) on the server window, and configure the default settings.
To configure or manage the Linux or other Unix version of VPN Server, you can also use the Windows version of VPN Server Manager from a remote computer. For information about manually installing VPN Server Manager on a computer without VPN Server installed, please refer to 2.4 VPN Server Manager.
Default Settings of VPN Server Manager
When VPN Server Manager is started for first time, nothing is registered to the [SoftEther VPN Server Connection Settings] list on the startup window.
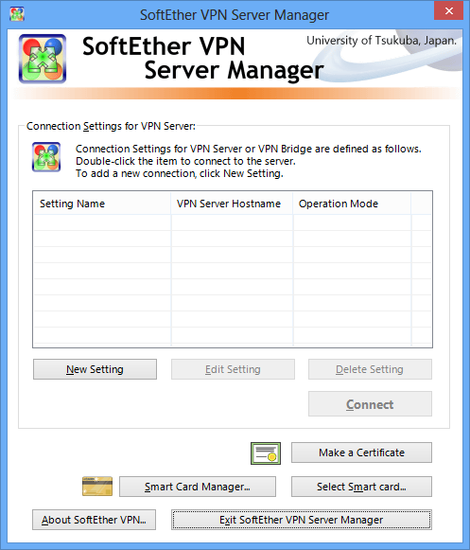
VPN Server Manager.
To create a connection setting, click [Create New Setting] and specify the host name, port number, and other information of VPN Server to which to establish a management connection. Once a connection setting is registered, it is displayed the next time VPN Server Manager is started.

Window for Creating a Connection Setting.
After creating a connection setting, double-click that connection setting to try to connect to VPN Server.
7.2.5 Managing with vpncmd
You can also use the command line-based vpncmd software to configure and manage VPN Server. This is helpful in cases where VPN Server is installed to a Linux or other Unix operating system and a separate Windows computer is not available locally, therefore VPN Server Manager cannot be used. In this case, you can use vpncmd to configure the default settings. You can also use vpncmd to configure the settings on the Windows version of VPN Server. For information about detailed vpncmd operations, please refer to 6. Command Line Management Utility Manual.
SoftEther VPN Project recommends using VPN Server Manager on a Windows computer to configure and manage VPN Server and using vpncmd as a supplemental management utility for automating simple repetitive tasks.
7.2.6 Starting and Stopping Service
The installer for the Windows version of VPN Server automatically installs the SoftEther VPN Server service. This service continually operates while Windows is running, and it automatically shuts down when Windows shuts down.
If the service must be restarted for management reasons or because VPN Server operations become unstable, you can click [Control Panel] > [Administrative Tools] > [Services], and start or stop the service. An easier and more reliable method is to call the net command at the command prompt and start or stop the service.
To stop the service, type the following command.
To start the service, type the following command.
If, in the unlikely event, the VPN Server process hangs and cannot be controlled using the net command, you can use Task Manager in Windows to forcibly terminate the vpnserver.exe process.
7.2.7 Adding and Deleting the Service
You can add or delete the service for the vpnserver.exe process using the method described in the description of the service mode of the Windows SoftEther VPN Server in 3.2 Operating Modes. You can use this method, for example, to move all setting files in the VPN Server installation directory to a different directory or hard drive, and then re-register the process as a service. (However, we cannot recommend using this method as the uninstaller may not be able to properly uninstall the program.)
7.2.8 Limitations When Starting in User-mode
We recommend operating the Windows version of VPN Server as a service mode program, but you can also start VPN Server in the user mode by using the method described in 3.2 Operating Modes. When VPN Server is started in user mode, critical security holes, such as buffer overruns, exist temporarily on the VPN Server, but because only user accounts starting VPN Server in user mode would be affected if an attack were to occur, VPN Server can be used relatively securely and safely. However, SoftEther VPN Project does not recommend actually operating VPN Server in user mode for the following reasons.
- The local bridge function cannot be used. (For details, please refer to 3.6 Local Bridges.)
- Some features of the disaster recovery function, such as automatic recovery when an error occurs in a self process, cannot be used. (For details, please refer to 3.3 VPN Server Administration.)
- To start the VPN Server process in user mode, the user must remained logged on to the server. The user cannot operate VPN Server when the user logs off or when no users are logged on to the server after Windows starts. For these reasons, user mode is not suited for actual operation of VPN Server.
Версия SoftEther VPN Server 4.20.9608 (стабильный релиз, т.е. не beta) — softether-vpnserver_vpnbridge-v4.20-9608-rtm-2016.04.17-windows-x86_x64-intel.exe.
Версия ОС – Windows 7 Professional x64 SP1.
Программный продукт SoftEther VPN Server позволяет легко и быстро получить VPN сервер на Windows. Это позволяет объединить различные устройства, сервера и компьютеры в одну сеть (виртуальную). При этом все эти устройства могут физически находиться где угодно в мире. В статье рассмотрена установка и настройка SoftEther VPN Server на Windows. SoftEther VPN Server является freeware продуктом.
Обычно VPN сервер используют для организации удалённого доступа в сеть предприятия из дома или других удалённых сетей (офисов) организации. Так же в эту сеть могут подключаться любые другие устройства которым разрешен доступ, например мобильный телефон. Т.е. можно с мобильного телефона войти на рабочий стол своего рабочего компьютера. Поэтому, часто, VPN сервер – это центральный узел, к которому подключаются клиенты, чтобы получить доступ во внутреннюю сеть предприятия.
Установка SoftEther VPN Server на Windows
Дистрибутив можно взять отсюда — SoftEther Download Center. Обратите внимание, что на странице загрузок сначала отображаются бета (beta) версии продукта.

Скачать и запустить — softether-vpnserver_vpnbridge-v4.20-9608-rtm-2016.04.17-windows-x86_x64-intel.exe

Здесь выбрать — SoftEther VPN Server.
SoftEther VPN Server Manager (Admin Tools Only) – можно установить не сам сервер, а только средства его администрирования, например на рабочую станцию администратора.
SoftEther VPN Bridge — SoftEther VPN Server может работать в режиме моста между сетями (в этой статье не рассматривается).

Согласиться с лицензией

Здесь описаны все самые ключевые технические детали – можно почитать.

Здесь можно выбрать папку куда будет установлен SoftEther VPN Server и выбрать для конкретного пользователя он будет установлен или для всех пользователей на компьютере.

Далее идёт установка. После чего будет предложено запустить SoftEther VPN Server Manager для того что произвести настройку VPN.

Настройка SoftEther VPN Server
SoftEther VPN Server Manager всегда можно запустить Start – All Programs — SoftEther VPN Server — SoftEther VPN Server Manager.
При старте у вас отобразиться список соединений с SoftEther VPN Server серверами. Здесь можно создавать новые соединения или менять параметры уже существующих соединений. Для этого нужно выбрать конкретное соединение (в данном примере оно одно) и нажать Edit Setting.

Здесь можно задать настройки для конкретного соединения.
1. Название соединения
2. Имя сервера где установлен SoftEther VPN Server или его ip-адрес + порт.
3. Прямое соединение с сервером или через прокси.
4. Это соединение с сервером или хабом. В этой статье рассматривается одиночный сервер, поэтому – Server Admin Mode.
5. Можно сохранить пароль чтобы его не задавать каждый раз. Это пароль для администрирования сервера.

Соединиться с сервером. Для этого на основном экране SoftEther VPN Server Manager нажать Connect. При первом соединении, запуститься мастер, который поможет настроить сервер VPN.
Выбрать Remote Access VPN Server.

Далее запрашивается подтверждение нашего выбора. Нажать – Yes.

Здесь вводиться имя виртуального хаба (это как-будто железка к которой все присоединяются). Оставить всё как есть.

Можно настроить соединение с Azure Cloud. В этой статье это не рассматривается, поэтому выбрать Disable VPN Azure.

Далее появляется еще одни мастер VPN Easy Setup Tasks.
Выбрать в пункте 3 сетевую карту на сервере, которая смотрит в интернет.
Также необходимо создать пользователя под которым все будут соединяться с VPN сервером. Можно одного на всех или для каждого своего.

Для создания пользователя нажать Create User. На рисунке выделены поля для создания пользователя с аутентификацией по паролю.
1. Ввести имя пользователя
2. Можно установить группу для пользователя и дату истечения этой учётной записи (т.е. доступ кому-то можно предоставлять на некоторое время).
3. Выбрать тип аутентификации – Password Authentication.
4. Для пользователя можно регулировать конкретные разрешения.
5. Задать пароль пользователю.
6. Можно управлять индивидуальным сертификатом для аутентификации для конкретного пользователя.
7. Настройки для подписанного сертификата.

Далее появиться форма Manage Users где можно создать еще пользователей. Если это не нужно – нажать Exit.

Выйти из формы VPN Easy Setup Tasks — нажать Close.
Если вы устанавливаете SoftEther VPN Server на виртуальный сервер, может появиться следующее окно. В котором предупреждается что нужно убедиться что для этой виртуальной машины Promiscuous Mode включен и не запрещён. Если это не так – его нужно включить и разрешить.

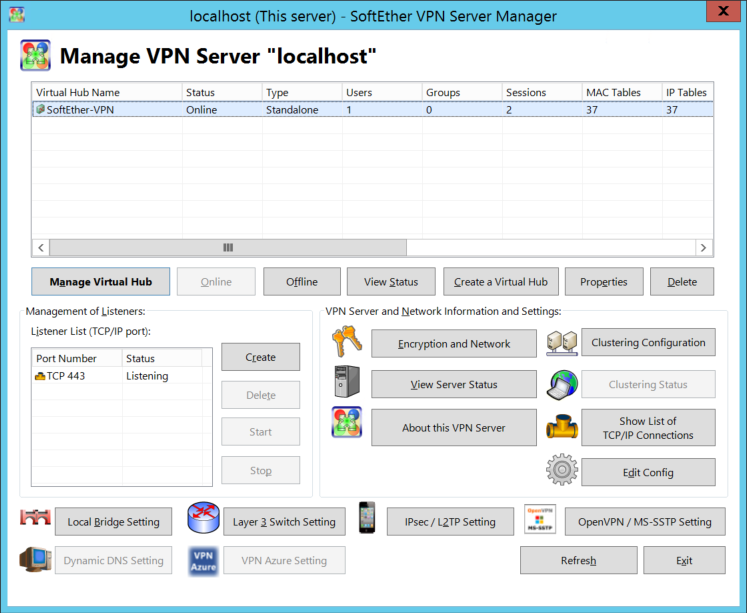
Всё сервер готов к работе и теперь при соединений с сервером через SoftEther VPN Server Manager вы будете видеть вот такое окно.
Если вы меняете порты через которые соединяться пользователи – откройте эти порты в любом firewall которые у вас есть между клиентом и сервером. В firewall операционной системы Windows при установке SoftEther VPN Server Manager автоматически создаётся правило для C:\Program Files\SoftEther VPN Server\vpnserver_x64.exe.

Соединение клиентов с SoftEther VPN Server
Для соединения клиентов с SoftEther VPN Server можно использовать как встроенные средства ОС использующие подключение по протоколу L2TP/IPsec с общим ключом так и собственного клиента SoftEther VPN Client. Который как заявляют разработчики, работает быстрее и шифрует трафик с помощью SSL. Т.е. VPN может работать даже в сетях где протоколы отличные от HTTPS запрещены.
20:03, 10.03.2016
Рассмотрим установку и настройку VPN сервера SoftEther VPN на Windows. SoftEther VPN позволяет объединить в сеть различные устройства, так как поддерживает практически все популярные протоколы сетей.
Настройка SoftEther VPN топология клиент-сервер.
VPN сервер здесь будет центральным узлом, к которому будут подключаться клиенты для получения доступа во внутреннюю сеть. Скачиваем последнюю RTM версию и запускаем установку. Выбираем строчку SoftEther VPN Server и жмем далее.

Тут ставим галочку Remote Access VPN Server.

Затем вводим имя виртуального хаба.

Далее идет настройка функции динамического DNS, ее можно отключить позже.

Затем, если необходимо, то настраиваем подключение по L2TP, указываем общий ключ IPsec.

Далее идет настройка Azure VPN — это бесплатный облачный сервис, который позволяет устанавливать VPN соединение с сервером при отсутствии внешнего ip адреса и открытых портов. Для соединения через него, необходимо указывать доменный идентификатор Azure VPN и 443 порт.

На последнем шаге нужно указать физический сетевой интерфейс, который подключен к локальной сети.

Теперь можно настроить учетные записи и прослушиваемые TCP порты в виртуальном хабе . Порт 5555 удалять нельзя, т.к. через него подключается локальный клиент управления сервером. О том как открыть нужные порты в роутере можно прочитать в статье.


Для того что бы настроить учетные записи нажимаем Manage Virtual Hub, затем Manage Users, создаем нового пользователя. Вводим имя, а также задаем тип аутентификации. Поддерживаются следующие виды аутентификации: анонимный, пароль, индивидуальный сертификат, подписанный сертификат, аутентификация через сервер RADIUS и контроллер домена Windows NT. Для примера, создадим пользователя Test с парольной защитой.

Настройка VPN клиентов.
На клиентском компьютере настроим подключение по протоколу L2TP/IPsec с общим ключом.

По умолчанию клиентам присваиваются IP адреса того же диапазона DHCP сервера, к которому подключен VPN сервер.

Нельзя не отметить, что у SoftEther VPN имеется собственный VPN клиент, который по заявлению разработчика работает быстрее и шифрует трафик с помощью SSL. Таким образом, его трудно отличить от HTTPS, следовательно, VPN будет работать даже в сетях где другие протоколы заблокированы.
Установка и настройка собственного клиента довольно проста. После стандартной инсталляции клиента нажимаем пункт Add VPN Connection и соглашаемся создать виртуальный сетевой адаптер.

Далее пишем имя адаптера.

Затем появится окно создания нового VPN подключения, указываем здесь адрес сервера, порт, имя виртуального хаба на сервере и учетные данные пользователя.

Если вдруг, при подключении VPN соединения локальная сеть становится неопознанной, то необходимо нажать Advanced Settings (см. картинку выше) и поставить галочку No Adjustments of Route Table. Также можно изменить приоритеты сетевых подключений, подробнее в статье.

На этом всё, спасибо за внимание.
by: ,
published: Feb 18, 2019,
in
Contents
- Our Setup and Requirements
- HTTPS Certificate
- Caveat: Unreachable CRL
- Requesting the Certificate
- Importing the Certificate in SoftEther
- Gateway VM Configuration
- SoftEther Configuration
- Virtual Hub
- Network Bridge
- Protocols and Ports
- Miscellaneous
- Client Settings
- Split Tunneling
- Resources
This post describes a real-world configuration of the free VPN server SoftEther. It shows how to set up a VPN for macOS and Windows clients on a Hyper-V Windows guest VM.
Our Setup and Requirements
Our situation was as follows:
- Multiple Hyper-V hosts with VMs on an internal network.
- One VM is the VPN gateway. It is configured with two NICs. One is connected to the internal network, the other to the internet.
- The VPN should provide remote access via SSTP for Windows and L2TP for macOS clients.
- It should be possible to connect to the VPN with the clients that come with each operating system. Installing additional client software should not be necessary.
- The VPN should be bridged to the local network so that VPN clients get IP addresses from the internal network’s DHCP server.
- Authentication should be performed against a RADIUS server (we use Duo Authentication Proxy).
HTTPS Certificate
SSTP is based on HTTPS. The good thing about that is that most firewalls and hotel networks should let it through. The bad thing is that we need to deal with certificates. I used a TLS certificate from our internal Active Directory root CA.
Caveat: Unreachable CRL
We are using an internal certificate authority that is not accessible from the internet. As a consequence, the CA’s certificate revocation list (CRL) is not accessible from the internet either.
The Windows SSTP client refuses to connect when it cannot contact the CRL specified in a server certificate. There are two ways around that:
- Set the following registry values on your VPN clients:
HKLM\SYSTEM\CurrentControlSet\Services\SstpSvc\Parameters\NoCertRevocationCheck=1[REG_DWORD] - On the CA, configure a certificate template to not include revocation information in issued certificates.
Requesting the Certificate
Run the following openssl commands on any Windows or Linux machine that has OpenSSL installed. OpenSSL is part of any Splunk installation, for example (even on Windows).
Create a private key:
openssl genrsa -des3 -out c:\temp\vpn\vpn.key 4096
Create a certificate request with the private key:
openssl req -new -key c:\temp\vpn\vpn.key -out c:\temp\vpn\vpn.csr
- Submit the CSR to your CA
- Important: if you want to incorporate multiple server namens in the certificate, specify them in the additional attributes field as follows:
san:dns=server1.domain.com&dns=server2.domain.com.com - You get a P7B file, but SoftEther expects a CER. To convert, double-click the P7B file to open it in the certificates MMC. Locate your certificate, right-click and select All Tasks – Export. Choose the format “Base-64 encoded X.509 (CER)”.
Importing the Certificate in SoftEther
- Open SoftEther VPN Server Manager
- Click “Encryption and Network Settings”
- Click “Import” and specify the location of the CER file
- Specify the location of the certificate’s KEY file
- Enter the key’s passphrase
- While you are in that dialog:
- Disable “Use Keep Alive Internet Connection”
- Switch the encryption algorithm name to ECDHE-RSA-AES256-GCM-SHA384
- Copy your CA’s root certificate to the directory
C:\Program Files\SoftEther VPN Server\chain_certs
Gateway VM Configuration
On the Hyper-V host, go to the gateway VM settings and click “Enable MAC address spoofing” in the “Advanced Features” of the VM’s internal NIC.
SoftEther Configuration
Virtual Hub
Creating a Virtual Hub
- Open SoftEther VPN Server Manager
- Create a virtual hub
User and RADIUS Config
- Open SoftEther VPN Server Manager
- Click “Manage Virtual Hub”
- Click “Manage Users”
- We are managing users in RADIUS, but we need a wildcard entry here to not block everybody
- Add a single user with “User Name” set to an asterisk (*) and “Auth Type” set to “RADIUS Authentication”
- Go back to the “Management of Virtual Hub” dialog
- Click “Authentication Server Setting”
- Enable “Use RADIUS Authentication” and provide the necessary information
- Go back to the main page of SoftEther VPN Server Manager and make sure the virtual hub is online
Blocking Internet Access
In a split tunnel configuration you want your VPN clients to connect directly to the internet, not via the VPN. Split tunneling is a client configuration (see below), but you may want to enforce it by blocking all internet connections originating from VPN clients:
- Open SoftEther VPN Server Manager
- Click “Manage Virtual Hub”
- Click “Manage Access Lists”
- Add the following rules:
- Pass, Priority=10, Memo=Enable LAN access, Contents=(ipv4) DstIPv4=10.1.0.0/16
- Pass, Priority=11, Memo=Enable LAN access (reverse), Contents=(ipv4) SrcIPv4=10.1.0.0/16, DstIPv4=10.1.0.0/16
- Pass, Priority=12, Memo=Allow DHCP requests, Contents=(ipv4) SrcIPv4=0.0.0.0/32, DstIPv4=255.255.255.255/32, Protocol=UDP, DstPort=67-68
- Pass, Priority=13, Memo=Allow DHCP responses, Contents=(ipv4) SrcIPv4=10.1.0.0/16, DstIPv4=255.255.255.255/32, Protocol=UDP, SrcPort=67-68
- Discard, Priority=1000, Memo=Block everything (else), Contents=(ether) \*
Network Bridge
- Open SoftEther VPN Server Manager
- Click “Local Bridge Setting”
- Select your virtual hub
- Select the LAN adatapter connected to your internal network
- Click “Create Local Bridge”
- Exit all dialogs and reboot the SoftEther VM
Protocols and Ports
L2TP
- Open SoftEther VPN Server Manager
- Click “IPsec / L2TP Setting”
- Check “Enable L2TP Server Function (L2TP over IPsec)”
- Uncheck all other options
- Specify an IPsec pre-shared key (PSK)
SSTP
- Open SoftEther VPN Server Manager
- Click “OpenVPN / MS-SSTP Setting”
- Check “Enable MS-SSTP VPN Clone Server Function”
- Uncheck the OpenVPN checkbox (unless you want to use it, of course)
Ports
- Open SoftEther VPN Server Manager
- In the listener list, delete ports 992 (function unknown), 1194 (OpenVPN), and 5555 (SoftEther remote management)
Note: when you connect to SoftEther Server Manager next make sure so specify 443 (the only remaining one) instead of 5555
Firewall
In your firewall, create rules to enable the following ports:
- SSTP: TCP 443
- L2TP over IPSec: UDP 500 and 4500
In the Windows firewall disable or delete the following rules added by SoftEther:
- SoftEther VPN Server
- SoftEther VPN Server Manager
- SoftEther VPN Command-Line Admin Tool
Miscellaneous
Disable DDNS registration of your VPN. In unnecessarily “calls home”.
- Stop the SoftEther VPN Server service and edit the configuration file “vpn_server.config”
- In the DDnsClient section, set Disabled to true
- In the ServerConfiguration section, set DisableNatTraversal to true
- Start the SoftEther VPN Server service
Client Settings
Split Tunneling
Split tunneling refers to a configuration where only those packets are sent from a client to the VPN, that are destined for the VPN’s subnet. Everything else (including internet connections) go through the client’s regular default gateway.
On Windows VPN clients:
- Open the properties of your VPN adapter in classic control panel
- Go to the advanced properties of IPv4 (and IPv6)
- Uncheck “Use default gateway on remote network”
- See Split tunneling option for MS Windows VPN connections
Resources
- SoftEther VPN with a VPN Address Pool
About the Author
Helge Klein (ex CTP, MVP and vExpert) worked as a consultant and developer before founding vast limits, the uberAgent company. Helge applied his extensive knowledge in IT infrastructure projects and architected the user profile management product whose successor is now available as Citrix Profile Management. Helge is the author of the popular tools Delprof2 and SetACL. He has presented at Citrix Synergy, BriForum, E2EVC, Splunk .conf and many other events. Helge is very active in the IT community and has co-founded Virtualization Community NRW (VCNRW).
Read more