This app can do more than the Windows Snipping Tool
Updated on November 8, 2021
What to Know
- Open Snip & Sketch and select New, then choose a mode: Window Snip, Fullscreen Snip, Rectangular Snip, or Freeform.
- The snip appears in the Snip & Sketch window. You can choose to Copy it or Share it.
- You can edit a snip after taking one. Use the Pencil or Ballpoint Pen to add text, use Crop to adjust the size, and more.
Snip & Sketch is the Windows 10 answer to the Windows Snipping Tool. It provides the same screenshot capabilities, but with even greater functionality. Learn how to use it to take a screenshot on Windows 10.
How to Take a Screenshot
Taking a screenshot with Snip and Sketch is fast and easy. The quickest way to screenshot Window 10 with Snip & Sketch is by pressing the keyboard shortcut Windows Key+Shift+S. This opens the Snipping Bar, allowing you to select a mode and snip without opening the Snip & Sketch app.
To open Snip & Sketch, take a screenshot, and edit or manage it, follow these steps.
-
Open Snip & Sketch. You can do so by typing snip into the Windows Search box near the Start button and selecting Open under Snip & Sketch in the list of apps that appears.
-
Select the arrow next to New to open the Delay drop-down menu and select a delay time, if desired. Otherwise, choose New. The Snipping Bar will open.
-
Select a mode. If you select Window Snip or Fullscreen Snip, select any area on the screen to take a snip. If you select Rectangular Snip or Freeform Snip, click and drag the area of the screen you want to snip.
-
Your snip will appear in the Snip & Sketch window.
-
Select the Copy icon to create a copy of the snip, which might be helpful if you want to edit the screenshot but also keep the original.
-
Select the Share button to share the snip with others. Your options will vary based on your apps and settings but might include email contacts, Bluetooth or Wi-Fi sharing, instant messaging, and social media platforms.
-
Close the window when you are finished.
How to Edit in Snip & Sketch
Once you take a snip, the editing tools let you annotate and customize your screenshots.
Although the tools work best with a pen device, selecting the Touch Writing button enables you to use the Annotating tools with a mouse or touch.
-
Select the Ballpoint Pen or Pencil to write or draw on the snip. Select either tool twice to open the color palette and select a different color or size.
-
Select the Eraser tool and drag it on the snip to remove specific strokes. Click it twice and select Erase All Ink to erase any annotations you have made.
-
Select the ruler or protractor tools to make it easier to draw straight lines or arches. Select the button again to hide the tool.
Two-finger touch gestures will resize or rotate the tools if touch is activated.
-
Select the Crop button and use the dragging handles to crop the image.
Select the crop tool again and select Cancel to undo a crop before applying it.
-
Select the Save icon to save the screenshot.
Although the default file name for screenshots in the Windows Snipping Tool was Capture.jpg, each snip in Snip & Sketch is saved as Annotation followed by the date and a sequential number.
Snip & Sketch vs. Windows Snipping Tool
The Snip & Sketch tool is available on Windows 10 systems running October 2018 build and above. However, if you don’t find it on your computer, you have the ability to download it from the Microsoft Store.
If you are well-versed in the features of the Snipping Tool, you will be pleased to discover the same features are available in Snip & Sketch, albeit with some modifications.
Delay
The Delay option in the Snipping Tool offered delays from 1 — 5 seconds. In Snip & Sketch, the Delay option is on the New drop-down menu with options to snip Now, In 3 Seconds, or In 10 Seconds.
Mode
The Mode option that appears on the Snipping Tool toolbar is not immediately evident, but it does exist. When you select New on the Snip & Sketch window, the «Snipping Bar» will appear at the top of your screen. This bar includes four mode options:
- Rectangular Snip
- Freeform Snip
- Window Snip
- Fullscreen Snip
Other Options
The Save, Copy, and Share options all live in the Snip & Sketch toolbar just as they did in the Snipping Tool. In addition, there is a Pen, a Highlighter, and an Eraser just like the Snipping Tool made popular.
But, unlike the Snipping Tool, there is no option to edit your snip in Paint. Instead, Snip & Sketch offers its own, richer editing capabilities.
Thanks for letting us know!
Get the Latest Tech News Delivered Every Day
Subscribe
 В осеннем обновлении Windows 10 версии 1809 появился новый инструмент для создания скриншотов экрана или его области и простого редактирования созданного снимка экрана. В разных местах системы этот инструмент называется слегка по-разному: Фрагмент экрана, Фрагмент и набросок, Набросок на фрагменте экрана, но имеется в виду одна и та же утилита.
В этой простой инструкции о том, как сделать скриншот Windows 10 с помощью новой функции, которая в будущем должна будет заменить собой встроенную утилиту «Ножницы». Остальные способы для создания снимков экрана продолжают работать так же, как и раньше: Как создать скриншот Windows 10.
Как запустить «Фрагмент и набросок»
Я нашел 5 способов запустить создание скриншотов с помощью «Фрагмент экрана», не уверен, что все они пригодятся вам, но поделюсь:
- Использовать горячие клавиши Win + Shift + S (Win — это клавиша с эмблемой Windows).
- В меню пуск или в поиске на панели задач найти приложение «Фрагмент и набросок» и запустить его.

- Запустить пункт «Фрагмент экрана» в области уведомлений Windows (может отсутствовать там по умолчанию).

- Запустить стандартное приложение «Ножницы», а уже из него — «Набросок на фрагменте экрана».

Также есть возможность назначить запуск утилиты на клавишу Print Screen: для этого зайдите в Параметры — Специальные возможности — Клавиатура.
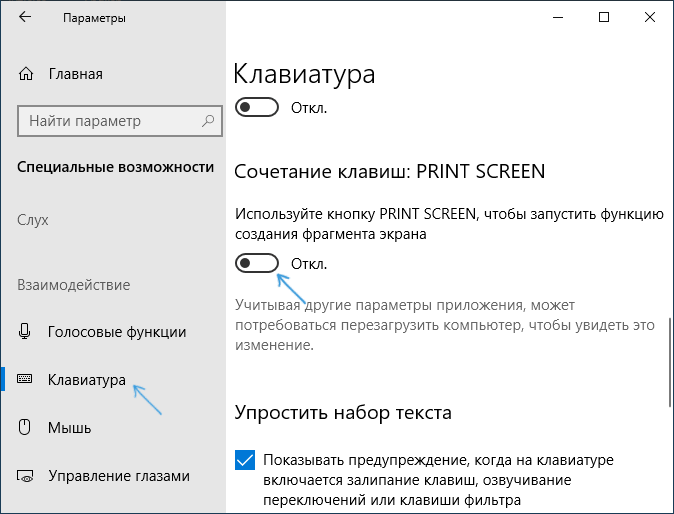
Включите пункт «Используйте кнопку Print Screen, чтобы запустить функцию создания фрагмента экрана».
Создание снимка экрана
Если запускать утилиту из меню Пуск, поиска или из «Ножницы», откроется редактор созданных скриншотов (где нужно нажать «Создать» для того, чтобы сделать снимок экрана), если же использовать остальные способы — сразу откроется создание скриншотов, работают они слегка отличающимся образом (будет отличаться второй шаг):
- Вверху экрана вы увидите три кнопки: для создания снимка прямоугольной области экрана, фрагмента экрана произвольной формы или скриншота всего экрана Windows 10 (четвертая кнопка — для выхода из инструмента). Нажмите по нужной кнопке и, если требуется выберите нужную область экрана.

- Если вы запускали создание скриншота в уже запущенном приложении «Фрагмент и набросок», вновь созданный снимок откроется в нём. Если с помощью горячих клавиш или из области уведомлений, скриншот будет помещен в буфер обмена с возможностью вставить в любую программу, а также появится уведомление, по нажатию на которых откроется «Фрагмент экрана» с этим изображением.


В приложении «Фрагмент и набросок» вы можете добавить надписи на созданный скриншот, удалить что-то с изображения, обрезать его, сохранить его на компьютер.
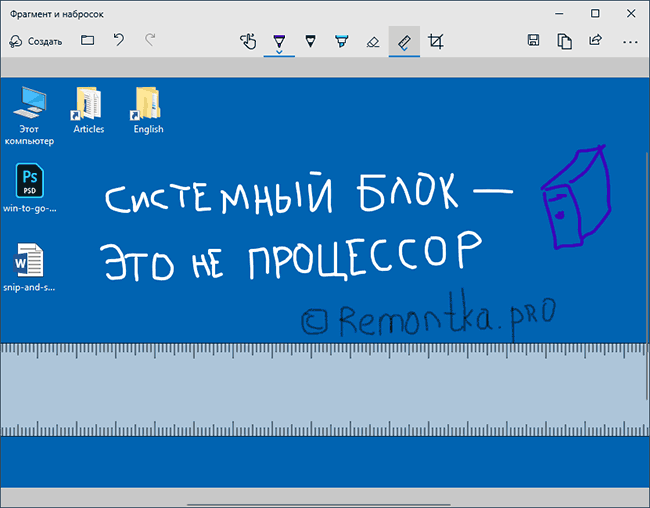
Здесь же присутствуют возможности для копирования отредактированного изображения в буфер обмена и стандартная для приложений Windows 10 кнопка «Поделиться», позволяющая отправить его через поддерживаемые приложения на компьютере.
Не берусь оценить, насколько новая возможность удобна, но, думаю, для начинающего пользователя будет полезна: большинство функций, которые могут потребоваться, присутствуют (кроме, разве что создания скриншота по таймеру, эту возможность вы можете найти в утилите «Ножницы»).
Инструмент Windows Snipping Tool был частью операционной системы Windows со времен Vista. Хотя Microsoft еще не объявила об окончании срока службы инструмента, вы могли видеть уведомление, когда открываете его, о том, что Snipping Tool будет перемещаться.
Так что же дальше? Snip & Sketch.
Snip & Sketch — это ответ Windows 10 на инструмент Windows Snipping Tool. Он обеспечивает те же возможности снимков экрана, что и знакомый Snipping Tool, но с еще большей функциональностью. Узнайте обо всех функциях новой утилиты и о том, как ими пользоваться.
Инструкции в этой статье относятся к Windows 10.
Snip & Sketch против Windows Snipping Tool
Инструмент Snip & Sketch доступен в системах Windows 10 со сборкой октября 2018 г. и выше. Однако, если вы не найдете его на своем компьютере, у вас есть возможность загрузить его из Microsoft Store.
Если вы хорошо разбираетесь в функциях Snipping Tool, вам будет приятно узнать, что те же функции доступны в Snip & Sketch, хотя и с некоторыми изменениями.
Это задержка Опция Snipping Tool предлагает задержки от 1 до 5 секунд. В Snip & Sketch значок задержка вариант находится на Новинки раскрывающееся меню с параметрами для обрезки Теперь, За 3 секунды или За 10 секунды.
:max_bytes(150000):strip_icc()/Capture-bd9c17af77044b9aa7b0aafc3b1ca557.JPG)
Это режим Параметр, который появляется на панели инструментов Snipping Tool, не сразу бросается в глаза, но он существует. Когда вы выбираете Новинки в окне «Snip & Sketch» в верхней части экрана появится панель «Snipping Bar». Эта панель включает четыре варианта режима:
- Прямоугольный нож
- Фрагмент произвольной формы
- Window Snip
- Полноэкранный снимок
:max_bytes(150000):strip_icc()/Capture-afb45d1fd18c465ea7f12f0eee88859c.JPG)
Это скидка, копироватьи Поделиться все параметры находятся на панели инструментов Snip & Sketch так же, как и в Snipping Tool. Кроме того, есть Пен, чтобы HighlighterИ ластик точно так же, как популярный инструмент Snipping Tool.
Но, в отличие от Snipping Tool, в Paint нет возможности редактировать фрагмент. Вместо этого Snip & Sketch предлагает собственные расширенные возможности редактирования.
Как сделать снимок экрана
Сделать снимок экрана с помощью Snip and Sketch можно быстро и легко. Самый быстрый способ сделать снимок экрана 10 с помощью Snip & Sketch — нажать сочетание клавиш Клавиша Windows + Shift + S. Это откроет панель Snipping Bar, позволяющую вам выбрать режим и вырезать, не открывая приложение Snip & Sketch.
Чтобы открыть Snip & Sketch, сделать снимок экрана и отредактировать его или управлять им, выполните следующие действия.
-
Откройте Snip & Sketch. Вы можете сделать это, набрав «надрез«в поле поиска Windows рядом с кнопкой» Пуск «и выбрав Депозит под Snip & Sketch в появившемся списке приложений.

-
Щелкните стрелку рядом с Новинки для открытия задержка раскрывающееся меню и при желании выберите время задержки. В противном случае выберите Новинки. Панель ножниц откроется.
-
Выберите режим. Если вы выберете Window Snip or Полноэкранный снимок, выберите любую область на экране, чтобы сделать снимок. Если вы выберете Прямоугольный нож or Фрагмент произвольной формы, щелкните и перетащите область экрана, которую хотите обрезать.
-
Ваш фрагмент появится в окне Snip & Sketch.
-
Выберите копировать значок, чтобы создать копию фрагмента, что может быть полезно, если вы хотите отредактировать снимок экрана, но при этом сохранить оригинал.
-
Выберите Поделиться кнопку, чтобы поделиться фрагментом с другими. Ваши варианты будут различаться в зависимости от ваших приложений и настроек, но могут включать контакты электронной почты, совместное использование Bluetooth или Wi-Fi, обмен мгновенными сообщениями и платформы социальных сетей.
-
Закройте окно, когда закончите.
:max_bytes(150000):strip_icc()/Capture-f959b40e21e747e7947c107067e306a9.JPG)
:max_bytes(150000):strip_icc()/Capture-d5c5cd553b1049f9b6d494838fa1ccac.JPG)
:max_bytes(150000):strip_icc()/Capture-a41639332b8d4f60a57db26568bb914e.JPG)
:max_bytes(150000):strip_icc()/Capture-3bc25218669849cc9327df4d4a24d79e.JPG)
После того, как вы сделаете снимок, инструменты редактирования позволят вам комментировать и настраивать снимки экрана.
Хотя инструменты лучше всего работают с перьевым устройством, выбор кнопки «Сенсорное письмо» позволяет использовать инструменты аннотирования с помощью мыши или касания.
-
Выберите Шариковая ручка or Карандаш написать или нарисовать фрагмент. Дважды выберите любой инструмент, чтобы открыть цветовую палитру и выбрать другой цвет или размер.
-
Выберите инструмент «Ластик» и перетащите его на фрагмент, чтобы удалить определенные штрихи. Дважды щелкните по нему и выберите Стереть все чернила чтобы стереть любые сделанные вами аннотации.
-
Выберите инструменты линейки или транспортира, чтобы упростить рисование прямых линий или арок. Нажмите кнопку еще раз, чтобы скрыть инструмент.
Сенсорные жесты двумя пальцами изменяют размер или поворачивают инструменты, если сенсорный ввод активирован.
-
Выберите урожай и используйте ручки перетаскивания, чтобы обрезать изображение.
Снова выберите инструмент кадрирования и выберите Отмена чтобы отменить урожай перед его применением.
-
Выберите скидка значок, чтобы сохранить снимок экрана.
Хотя имя файла по умолчанию для снимков экрана в Windows Snipping Tool было Capture.jpg, каждый фрагмент в Snip & Sketch сохраняется в виде аннотации, за которой следует дата и порядковый номер.
:max_bytes(150000):strip_icc()/Capture-8b683130f29d480981ada7f347755e00.JPG)
:max_bytes(150000):strip_icc()/Capture-745eae9c5d3049379ec08363d651099b.JPG)
:max_bytes(150000):strip_icc()/Capture-f3313f0907104211943e1fc543c36464.JPG)
:max_bytes(150000):strip_icc()/Capture-5b07209939164dfdab60a6a96391174d.JPG)
:max_bytes(150000):strip_icc()/Capture-4233a20a5f234fc99b05c6415b978d38.JPG)
Table of Contents
1
Snip and Sketch is a built-in tool in Windows 10 that allows users to capture and annotate screenshots. It provides a streamlined way to capture, edit, and share screenshots easily. Here are the steps to use Snip and Sketch:
1. Launch Snip and Sketch: Press the Windows key on your keyboard and type «Snip and Sketch.» Click on the app that appears in the search results.
2. Capture a screenshot: Once Snip and Sketch opens, you can select the «New» button in the top-left corner of the app or press the «New» button in the top-right corner of the window. This allows you to capture a screenshot of the entire screen, a specific window, or a customized rectangular area.
3. Annotate and edit the screenshot: After capturing the screenshot, a small toolbar will appear at the top of the screen. It provides various tools for annotating and editing the screenshot. You can use tools like a pen, highlighter, ruler, and eraser to add markings, draw shapes, or highlight specific areas. Additionally, you can use the cropping tool to remove any unwanted parts of the screenshot.
4. Save and share the screenshot: Once you’re done annotating and editing the screenshot, you can save it by clicking on the floppy disk icon in the top-right corner of the app. You can choose a desired file name and save location for the screenshot. Furthermore, Snip and Sketch also offers immediate sharing options, allowing you to send the screenshot directly via email, social media, or other compatible apps.
Snip and Sketch is a useful tool for quickly capturing and editing screenshots on Windows 10. It eliminates the need for third-party software and simplifies the process of capturing and sharing visual information.
Video Tutorial:Does Snip and Sketch save images?
What is the purpose of Snip and Sketch?
Snip and Sketch is a convenient and versatile tool integrated into the Windows 10 operating system. Its primary purpose is to allow users to capture, edit, and share screenshots easily. Here’s what you need to know:
1. Capturing Screenshots: Snip and Sketch provides users with various options to capture screenshots. You can use the tool to capture the entire screen, a specific window, or draw a custom selection to capture a specific region on your display.
2. Annotating and Editing: Snip and Sketch offers a range of annotation and editing tools to enhance your captured screenshots. Users can use a pen, highlighter, or eraser to mark up the image, add text, arrows, or other shapes to emphasize specific areas, and crop the screenshot to remove unnecessary content.
3. Sharing Screenshots: Once you have captured and edited your screenshot, Snip and Sketch allows you to easily share it with others. You can directly copy the screenshot to the clipboard, save it as an image file, or use the built-in sharing options to send it via email, messaging apps, or social media platforms.
4. Integration with Windows Ink: Snip and Sketch seamlessly integrates with Windows Ink, enabling users to take advantage of stylus input to accurately draw and annotate screenshots. This feature is particularly useful for touch-enabled devices like tablets or convertible laptops.
5. System Integration and Keyboard Shortcuts: Snip and Sketch is designed to be easily accessible. It can be accessed via a system tray icon, the Windows Ink Workspace, or by using the keyboard shortcut Win + Shift + S. This quick accessibility makes it handy and efficient for users to capture and edit screenshots on the go.
Overall, Snip and Sketch is a valuable tool for Windows 10 users, providing them with the ability to capture, edit, and share screenshots quickly and effectively, making it a useful addition to the operating system’s built-in functionalities.
How do I activate Snip and Sketch?
To activate Snip and Sketch, follow these steps:
1. Open the Start menu on your Windows computer.
2. Type «Snip and Sketch» in the search bar and click on the app when it appears in the search results.
3. Alternatively, you can press the Windows key + Shift + S to activate Snip and Sketch directly.
Once you have opened the Snip and Sketch app, you can utilize its functionalities to capture and edit screenshots:
1. Select the type of screenshot you want to capture, such as a rectangular snip, a freeform snip, or a full-screen snip.
2. After capturing the snip, the Snip and Sketch app will open with the captured image.
3. You can use the available editing tools to crop, annotate, highlight, or draw on the captured screenshot as per your requirements.
4. Once you have finished editing, you can save the snip to your preferred location on your computer, copy it to the clipboard, or share it directly from the app.
Note: The steps above are based on the assumption that you are using Windows 10 or a more recent version. If you are using an older version of Windows, the steps may vary slightly.
Does snip mean screenshot?
Yes, «snip» can refer to taking a screenshot or capturing a portion of the screen. However, the term «snip» is typically associated with the Snipping Tool or Snip & Sketch feature available on Windows operating systems. These tools allow users to capture screenshots or snippets of the screen and make annotations or edits before saving or sharing the snip.
To take a snip using the Snipping Tool on Windows, you can follow these steps:
1. Press the Windows key on your keyboard or click on the Windows Start button and search for «Snipping Tool.«
2. Open the Snipping Tool application.
3. Click on «New» in the Snipping Tool window.
4. The screen will fade, and you can use your mouse to select the area you want to capture.
5. Once you release the mouse button, the snip will open in the Snipping Tool window.
6. You can make annotations or edits to the snip if needed.
7. Finally, save the snip or share it directly from the Snipping Tool window.
Alternatively, if you have Snip & Sketch available on your Windows system, you can use it by pressing the Windows key + Shift + S. With Snip & Sketch, you can capture screenshots and annotate them directly without the need for opening a separate application. The snip will automatically be copied to your clipboard, and you can paste it in an image editing tool or any other application.
To summarize, «snip» can mean capturing a screenshot or capturing a portion of the screen using tools like the Snipping Tool or Snip & Sketch on Windows. These tools allow users to take and edit snips before saving or sharing them.
How do I use Snip and Sketch in Windows 10?
Snip and Sketch is a built-in screen capture tool in Windows 10 that allows you to capture, annotate, and share screenshots easily. Here’s how you can use Snip and Sketch:
1. Open the Snip and Sketch app: You can launch the app in a few ways. One way is by clicking on the «Start» button, searching for «Snip and Sketch» in the search bar, and clicking on the app when it appears in the search results. Another way is by pressing the «Windows key + Shift + S» keyboard shortcut.
2. Capture a screenshot: Once the Snip and Sketch app is open, you can take a screenshot in multiple ways. You can choose from four different capturing options available in the app’s toolbar: «Rectangular snip» (captures a rectangular area), «Freeform snip» (captures a freehand shape), «Window snip» (captures a window or app), and «Fullscreen snip» (captures the entire screen). Select the desired option, and the screen will dim, indicating that you can now select the area you want to capture.
3. Annotate the screenshot: After capturing a screenshot, Snip and Sketch opens the captured image in an editing interface. Here, you can use various annotation tools to enhance your screenshot. These tools include a pen for drawing, a highlighter for emphasizing certain areas, a text tool for adding text, and a cropping tool for adjusting the size. You can access these tools from the toolbar at the top of the window.
4. Save or share the screenshot: Once you are satisfied with your annotated screenshot, you can choose to save it or share it directly. To save the screenshot, click on the floppy disk icon in the top left corner and choose the desired location on your computer. To share the screenshot, click on the share icon (a square with an arrow pointing outwards) in the top right corner. This will allow you to send the screenshot via various apps and platforms.
Remember that the steps provided might vary slightly based on different Windows 10 updates, but the general process remains the same. Snip and Sketch is a versatile tool that makes capturing and editing screenshots effortless, enabling you to effectively communicate and share visual information.
Is Snipping Tool the same as screenshot?
As a tech blogger, it’s important to clarify the difference between Snipping Tool and screenshots. While they both serve the purpose of capturing content from your screen, there are some key distinctions between the two.
1. Functionality:
– Snipping Tool: Snipping Tool is a built-in screenshot utility in Windows operating systems. It allows users to take screenshots of any specific portion of the screen, such as a selected area, a window, or even a free-form shape. With Snipping Tool, you can also annotate, highlight, and save the captured snips in various formats.
– Screenshots: Screenshots, on the other hand, refer to capturing the entire visible area of the screen or a specific window. It essentially takes a snapshot of what you see on your screen, replicating it as an image file. Screenshots are typically taken using specific keyboard shortcuts or dedicated software.
2. Customization Options:
– Snipping Tool: With Snipping Tool, users can choose between different snip types, including free-form, rectangular, window, and full-screen snips. This provides a higher level of flexibility when it comes to capturing specific content on the screen. Additionally, Snipping Tool offers basic annotation features like highlighting, pen tools, and text boxes.
– Screenshots: Screenshots are limited to capturing either the entire screen or a specific window. While some third-party software or operating system features may offer additional options, the overall customization available for screenshots is generally more limited compared to Snipping Tool.
3. Accessibility:
– Snipping Tool: Snipping Tool is a Windows-specific screenshot tool and is readily available on Windows systems. Users can typically find it in the Start menu or by searching for it using the Windows search function.
– Screenshots: Screenshots are not limited to any particular operating system and can be captured on various platforms including Windows, macOS, Linux, iOS, and Android. The specific method for taking a screenshot may vary depending on the device and operating system being used.
In conclusion, while Snipping Tool and screenshots are related to capturing content on your screen, they have key differences in functionality, customization options, and accessibility. Snipping Tool provides more flexibility and annotation tools for capturing specific portions of the screen, whereas screenshots capture the entire visible screen or specific windows with more limited customization options.
Is snipping same as screenshot?
Snipping and screenshot are similar in that they both capture a visual representation of what is displayed on a screen. However, there are some differences between the two:
1. Definition: A screenshot is a snapshot of the entire visible portion of the screen, including all open windows and applications. It captures everything on the screen at a particular moment. On the other hand, snipping refers to the act of selecting and capturing a specific part or section of the screen.
2. Selective Capture: Snipping tools allow you to manually select a particular area of the screen that you want to capture. This can be a rectangular section, a freehand drawing, or even an entire window. Screenshots, on the other hand, capture the entire screen without the ability to select a specific area.
3. Editing and Annotations: Snipping tools often come equipped with basic editing features that enable users to mark up the captured image, add text, highlight specific elements, or draw shapes. Screenshots typically require separate image editing software for such modifications.
4. Workflow and Convenience: Snipping tools are generally more convenient and efficient for capturing specific sections of the screen. They streamline the workflow by allowing users to capture only the necessary content without the need to crop or edit a full screenshot later.
Overall, while both snipping and screenshots capture visual content, snipping provides greater flexibility and precision in capturing specific areas and offers convenient on-screen editing options. Screenshots, on the other hand, capture the entire screen as it appears at the moment and may require additional image editing steps for customization.
Начиная с Windows 10 1809, Microsoft представила новое приложение Snip & Sketch >, которое заменяет популярный инструмент Snipping. Этот инструмент предлагает аналогичную функциональность и может использоваться для создания снимков экрана, использования таких инструментов, как ручка или карандаш, чтобы рисовать на нем, и делиться им где угодно. В этом руководстве я расскажу, как использовать приложение Snip and Sketch для захвата и аннотирования скриншотов в Windows 10.
Содержание
- Приложение Snip & Sketch в Windows 10
- Сделайте снимок экрана с помощью Snip & Sketch
- Изменить скриншот, используя Snip & Sketch
- Запустите приложение Snip & Sketch с клавишей Print Screen
- Запустите Snip & Sketch через CMD или Run
- Создать ярлык для Snip & Sketch
Приложение Snip & Sketch в Windows 10

Приложение доступно в списке приложений, или вы можете найти Snip & Sketch в поле поиска Cortana. Нажмите на приложение Snip and Sketch, как только оно появится. Как только оно появится, вас приветствует сообщение «Захватывайте, делайте пометки и делитесь любым изображением».
Сделайте снимок экрана с помощью Snip & Sketch
Нажмите кнопку Новый в левом верхнем углу.
Это сведет к минимуму интерфейс и предложит вам плавающий набор инструментов, в котором вы можете использовать прямоугольный клип или клип свободной формы или полноэкранный клип .

Выберите любой из них, и если вы используете что-либо, кроме полноэкранного клипа, вы можете выбрать область, из которой вы хотите сделать снимок экрана. Держите левую клавишу, делая это. После завершения отпустите левую клавишу.
Отмеченная область теперь появится на холсте приложения Snip and Sketch.
Изображения могут быть сохранены в формате .png.
Изменить скриншот, используя Snip & Sketch
Когда у вас есть скриншот, у вас есть набор инструментов разметки, которые вы можете использовать. Обратите внимание, что как только редактор откроется, вы получите PEN для записи. Однако, если вы переместите мышь с нажатой левой кнопкой, он начнет рисовать.

1] В середине сверху у вас есть такие инструменты, как сенсорный ввод, шариковая ручка, карандаш, маркер, линейка/транспортир и инструмент кадрирования.
2] . Нажмите на нижнюю часть любого из этих инструментов, кроме Touch Writing и Crop Tool, и вы получите дополнительные опции. Здесь вы можете изменить цвет и размер пера. Когда вы нажимаете на инструмент Линейка, вы можете переключиться на Protector.

3] В левом верхнем углу вы можете сохранить, скопировать и поделиться снимком экрана.
4] . Вы также можете редактировать любые другие изображения, нажав на значок папки рядом с новой кнопкой в левом верхнем углу.
Как только вы включите линейку или инструмент транспортира, он не исчезнет, если вы не закроете и не запустите приложение снова.
Запустите приложение Snip & Sketch с клавишей Print Screen
Такие инструменты, как Snip и Sketch без скриншота, бесполезны, если их нельзя запустить с помощью аппаратного ключа. Хотя Print Screen захватывает снимок экрана в буфер обмена или сохраняет его в OneDrive или Dropbox при настройке, имеет смысл, если вы вместо этого сможете запустить это приложение.
Перейдите в Настройки> Удобство доступа> Клавиатура. Включите переключатель под ярлыком Print Screen, который гласит em Используйте PrtScn ‘, чтобы открыть снимок экрана.

Тем не менее, вам придется отключить настройку Print Screen с другими приложениями и перезагрузить компьютер с Windows 10, чтобы он заработал.
Запустите Snip & Sketch через CMD или Run
Введите следующую команду и нажмите Enter, чтобы открыть Snip & Sketch:
мс-screenclip: источник = QuickActionsСоздать ярлык для Snip & Sketch
Чтобы создать ярлык на рабочем столе, щелкните правой кнопкой мыши пустое место на экране рабочего стола и выберите в меню пункт «Новый». Затем выберите «Ярлык», чтобы открыть «Мастер создания ярлыков».
Когда видно, скопируйте и вставьте следующий адрес в поле его местоположения.
% windir% \ explorer.exe ms-screenclip:После этого нажмите кнопку «Далее» и введите подходящее имя для ярлыка. Когда закончите, нажмите кнопку Готово, чтобы создать ярлык на экране рабочего стола.
Если вы хотите добавить значок в ярлык, щелкните правой кнопкой мыши ярлык на рабочем столе и выберите «Свойства».
Затем на экране «Свойства» выберите кнопку «Изменить значок», затем в разделе «Поиск значков в этом файле» скопируйте и вставьте следующий адрес и нажмите клавишу «Ввод».
% WINDIR% \ system32 \ SnippingTool.exeВыберите соответствующий значок, как показано на рисунке выше. Нажмите кнопку «ОК», когда закончите, и в конце нажмите кнопку «Применить», чтобы изменить значок.
Сообщите нам, как вам нравится использовать этот новый инструмент для создания снимков экрана.