Легко получайте доступ ко всем необходимым приложениям и пользуйтесь возможностями многозадачности с помощью таких инструментов, как макеты закрепления с новым, более интуитивным интерфейсом.
Snap Layout — одна из интереснейших функций Windows 11. Когда вы открываете несколько окон с приложениями, Windows 11 позволяет вам организовать их все на экране используя макеты прикрепления, которые изменят размер окон и расположат их в определенном порядке. Таким образом вы получаете больше свободного места на экране, чтобы максимально использовать возможности многозадачности.
Для тех, кто хочет ближе познакомится с функцией автоматического изменения размера и расположения окон на экране Windows 11, здесь мы рассмотрим различные способы достижения этой цели.
Автоматическое изменение размера и расположение окон на экране Windows 11 с помощью макетов
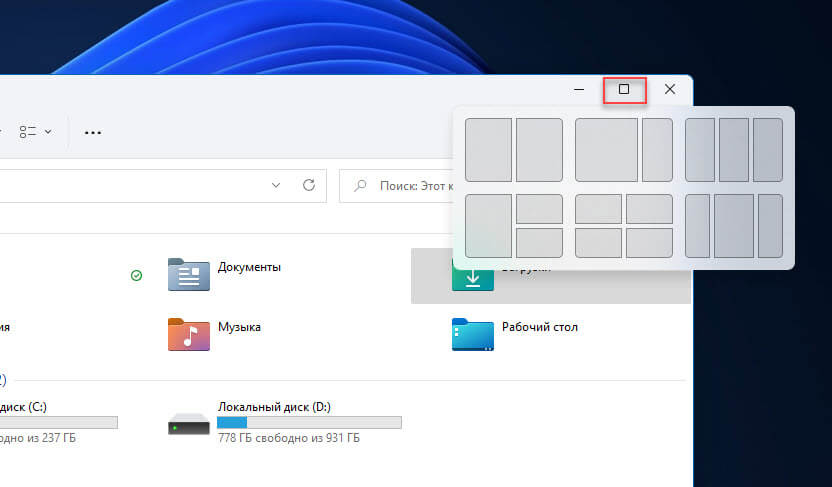
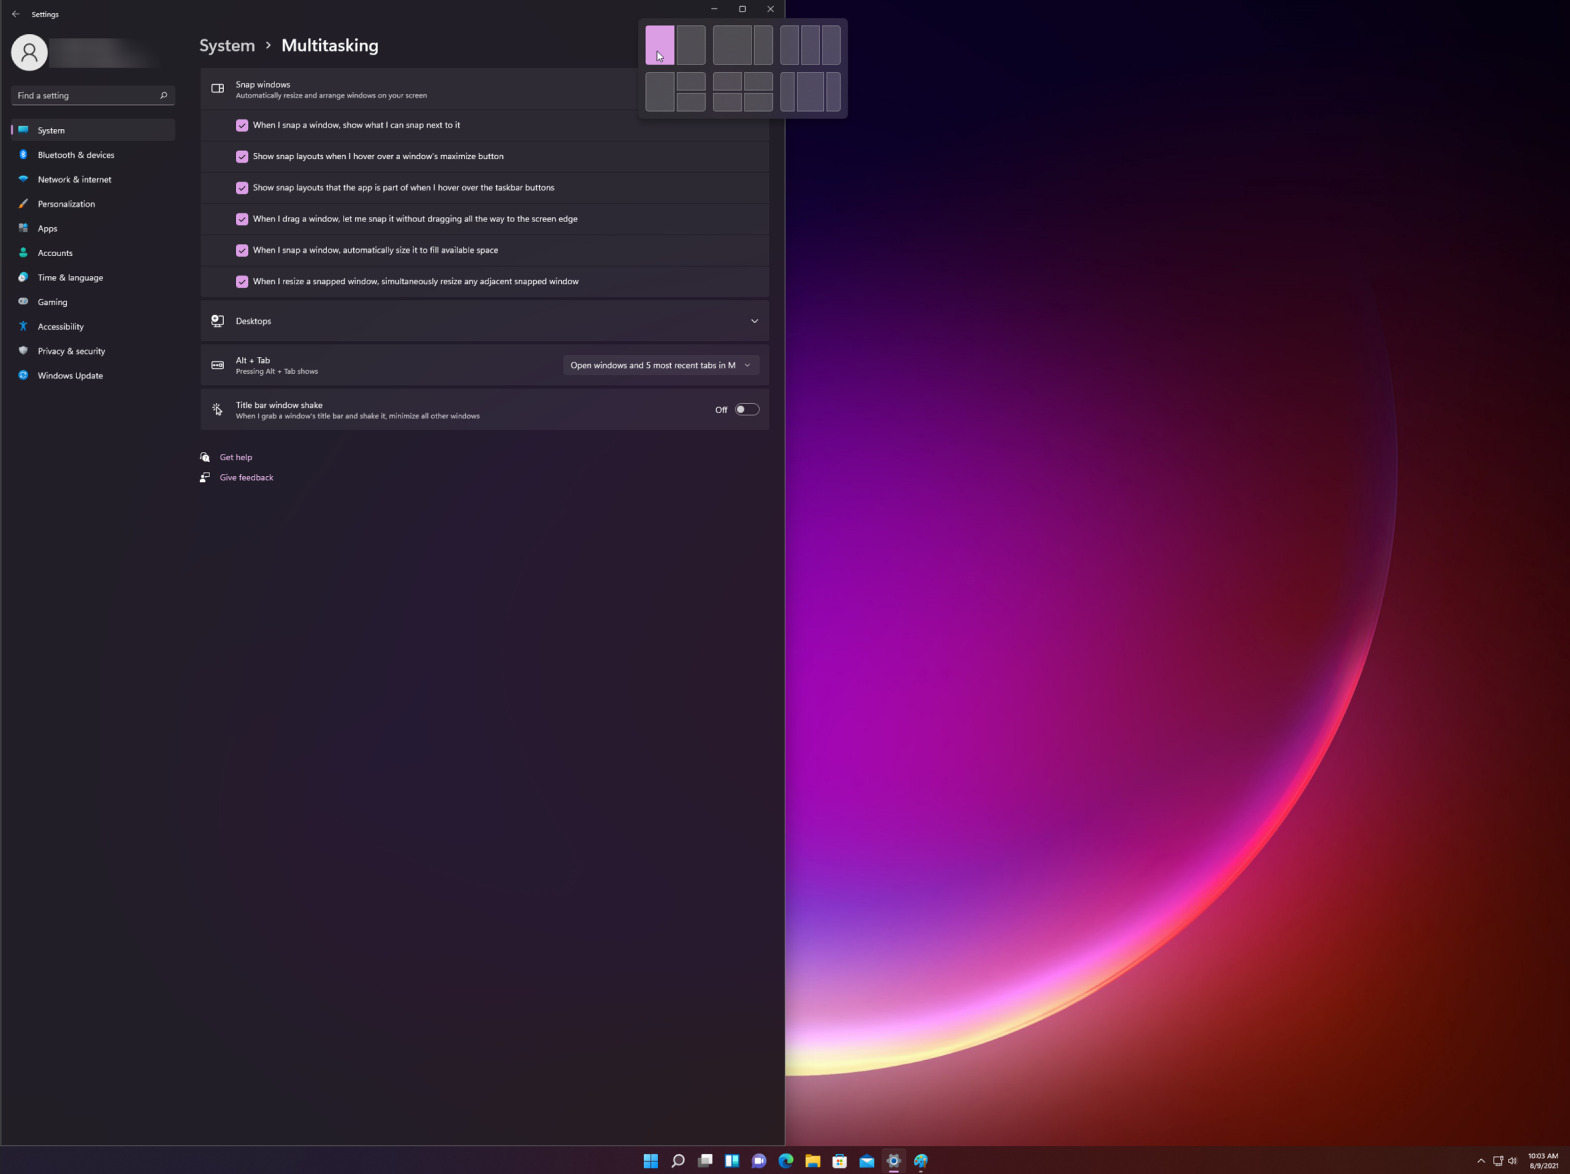
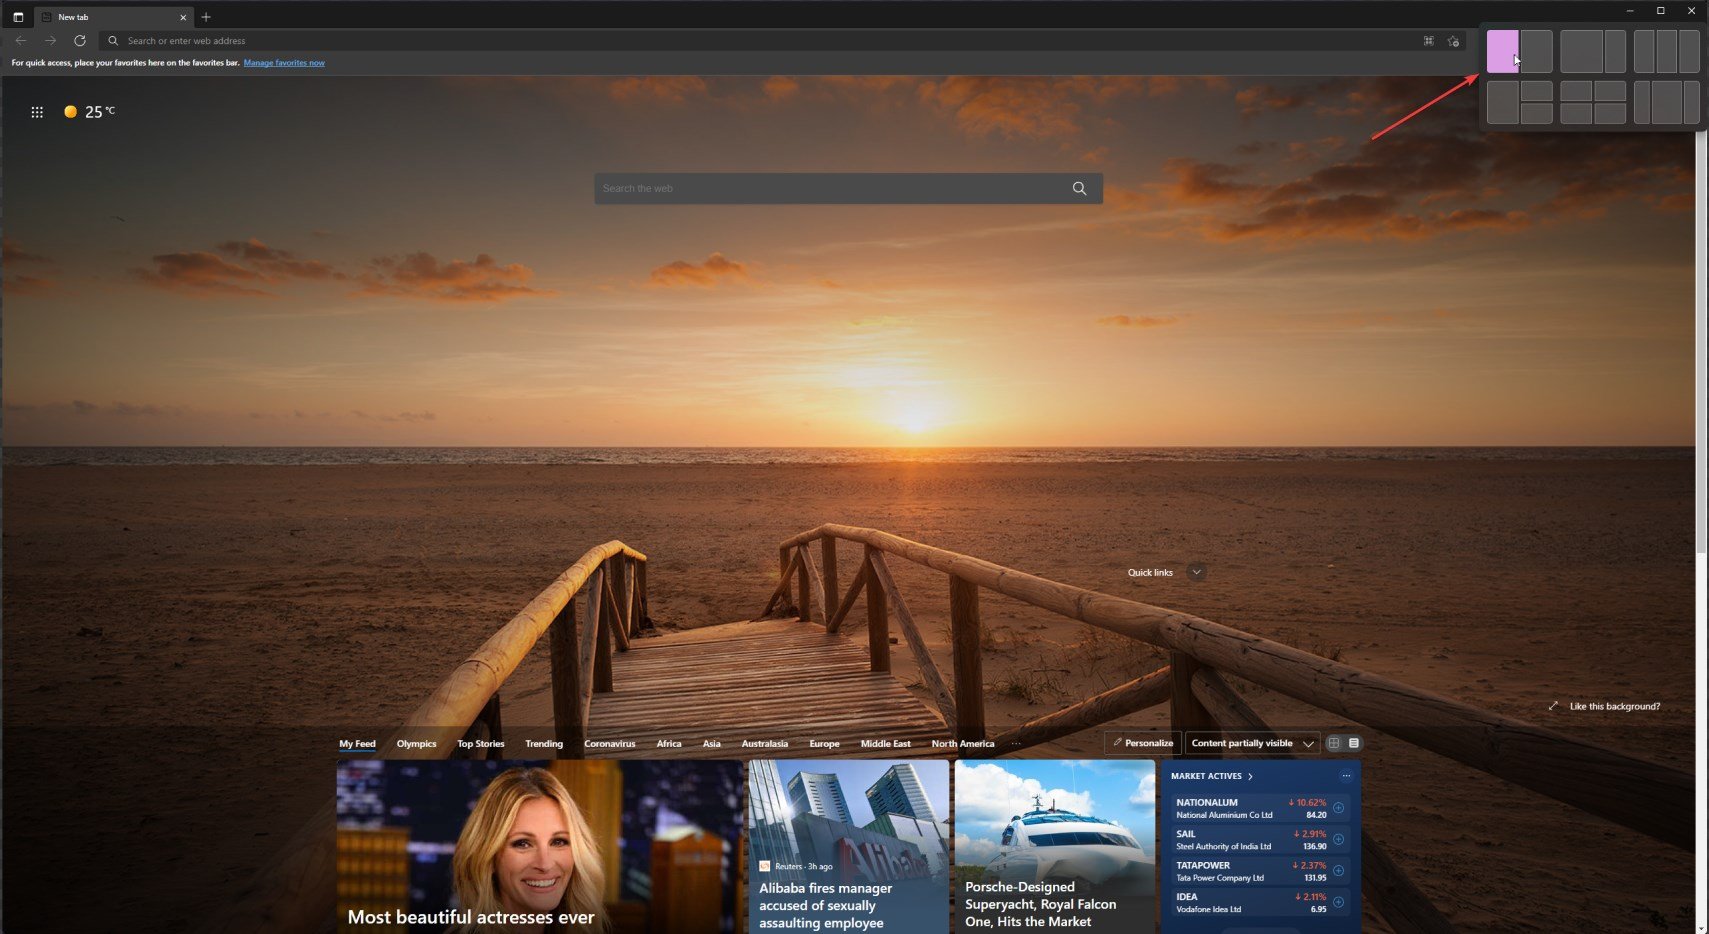
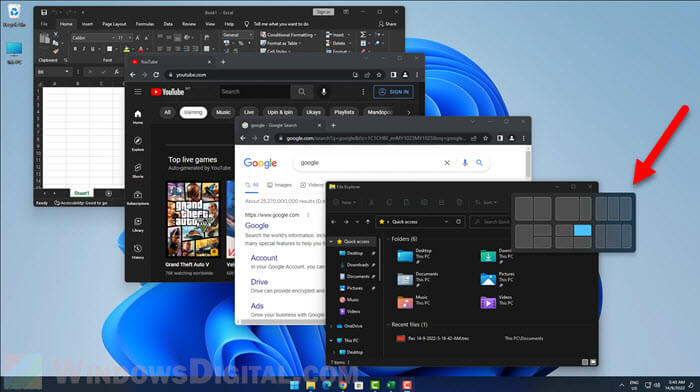
Режим многозадачности Snap layouts Windows 11 — это набор предопределенных шаблонов (макеты прикрепления), которые упорядочивают окна открытых приложений на экране на основе шаблона. Вы увидите функцию сразу же, как только наведете указатель мыши на кнопку «Развернуть» (Увеличение окна).
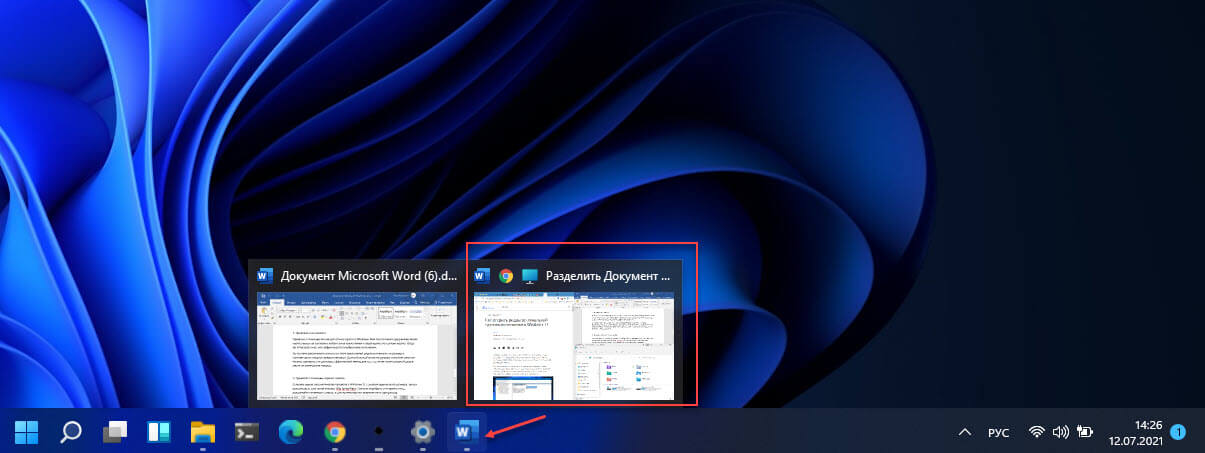
Кроме того, выбранный вами макет расположение окон можно свернуть на панель задач или развернуть как группу.
Макеты Snap Assist в Windows11
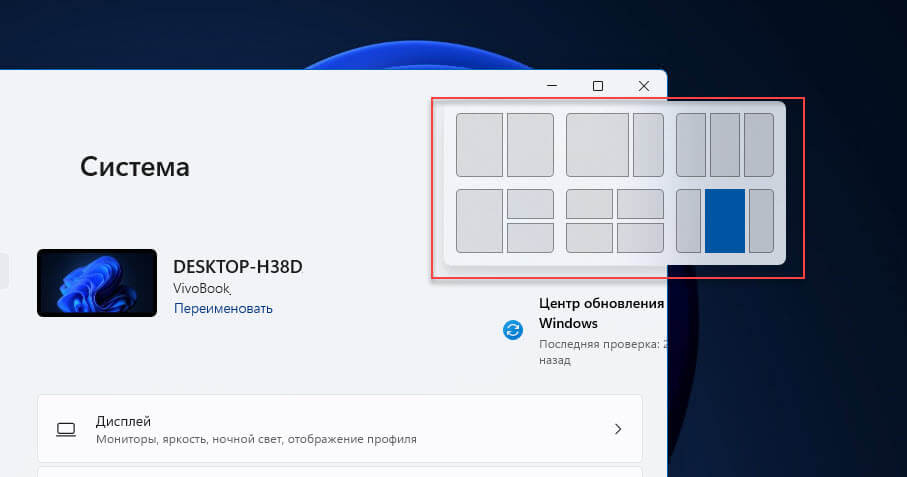
В настоящее время существует шесть типов макетов, с помощью которых вы можете группировать окна на экране:
- Макет 50:50 два окна одинакового размера
- Макет 80:20 включает в себя главное и второстепенное окно экрана
- Равномерный макет с тремя столбцами, требуется экран ноутбука / компьютера, совместимый с HD с разрешением 1080p (1920 × 1080).
- Макет для трех окон 50:25:25
- Макет 25:25:25:25 удобен для многозадачности с четырьмя открытыми окнами.
- Трех колоночный неравномерный макет 20:60:20.
В приложении «Параметры» Windows 11 есть страница настроек «Многозадачность», на которой вы можете настроить, что поведение ОС при привязке двух или более окон.
Как использовать Snap Layout в Windows 11
Функция Windows 11 Snap Layout, проста и интуитивно понятна. Есть три способа добиться привязки окон в Windows 11: с помощью мыши, сочетаний клавиш и Snap Assist.
-
С помощью макетов при наведении указателя мыши на кнопку увеличения окна
Просто наведите указатель мыши на кнопку развертывания окна, чтобы увидеть доступные макеты привязки, затем выберите нужный макет, чтобы привязать окно в нужной части экрана. Вы также можете вызвать всплывающее окно макетов привязки с помощью сочетания клавиш WIN Z.
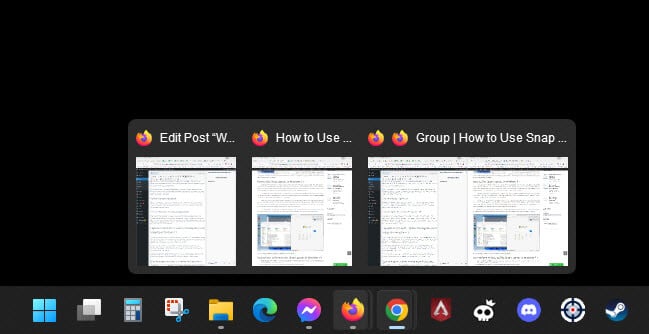
Группы привязки: Прикрепите как минимум 2 окна приложений на экране. Наведите указатель мыши на одно из этих открытых приложений на панели задач, чтобы найти группу привязок, кликните на ней, чтобы быстро переключиться на выбранную группу.
-
Привязка окон с помощью перетаскивания
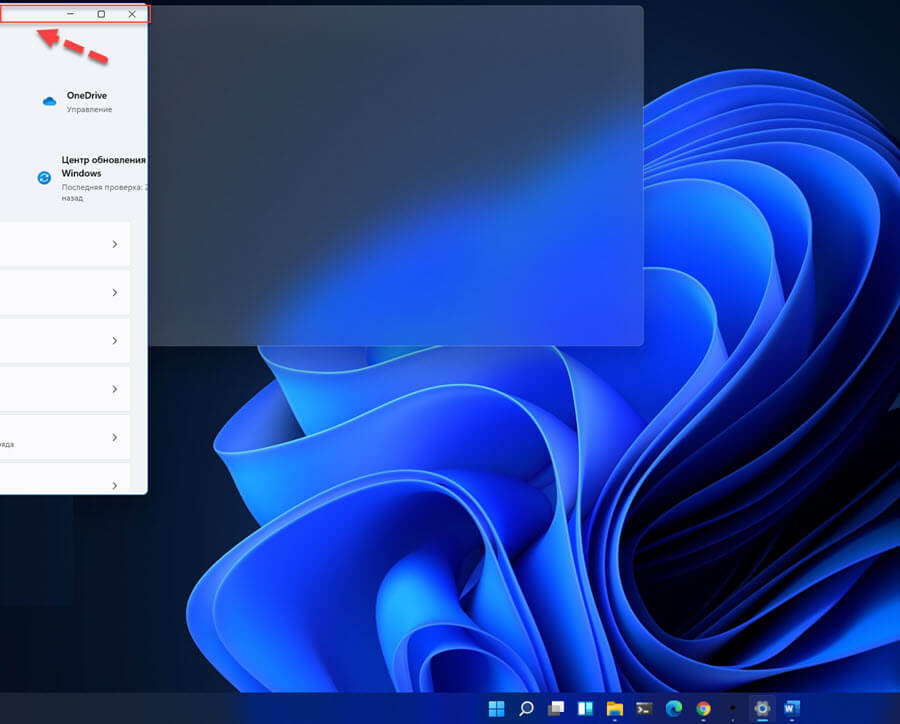
Привязка с помощью мыши достаточно проста в Windows. Вам просто нужно удерживая левую кнопку мыши на заголовке любого окна приложения и перетащить его к углам экрана. Когда вы отпустите окно, оно зафиксируется в выбранном положении.
Вы можете расположить несколько окон приложений рядом и изменить их размер в соответствии с вашими предпочтениями. Данный способ является ручным и требует немного больше времени, это довольно эффективный метод для тех, кто хочет использовать больше места на имеющихся экранах.
-
Привязка с помощью сочетания клавиш
Если вам нужна автоматическая привязка в Windows 11 с окнами одинакового размера, лучше использовать сочетания клавиш: Win Вверх, Вниз, Влево, Вправо. Сначала переместите фокус в открытое окно, используйте сочетание клавиш, и оно автоматически будет прикреплено к выбранной стороне экрана.
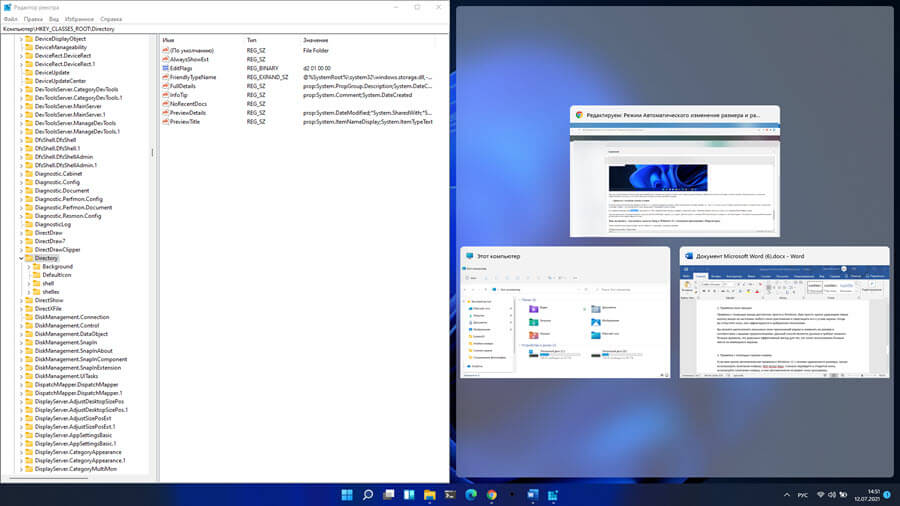
В следующем примере окно редактора реестра после сочетания клавиш Win ← со стрелкой «влево». Окно приложения оказалось в левом углу, занимая половину экрана.
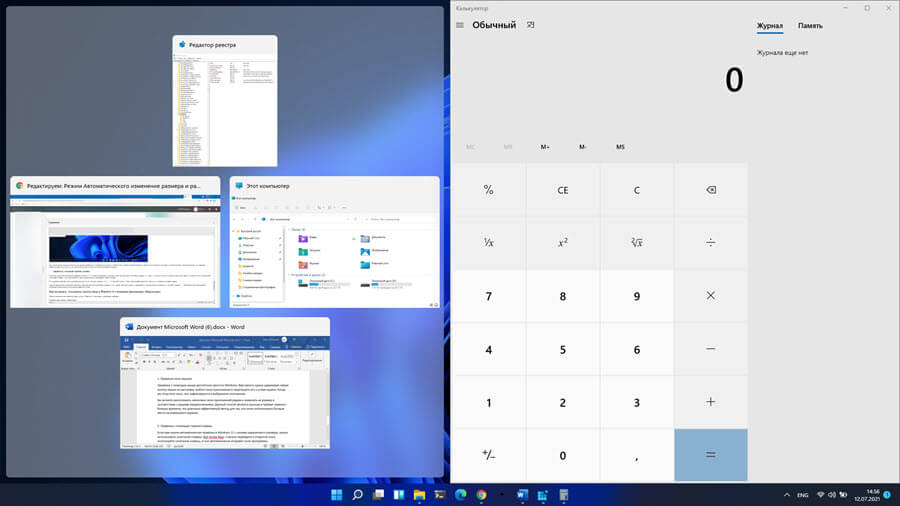
Другой пример ниже показывает привязку приложения «Калькулятор» к правому углу экрана. Для этого вместе с клавишей Win использовалась клавиша со стрелкой «вправо» → . Остальные окна приложений аккуратно расположены в виде прокручиваемой сетки.
Как включить / отключить макеты Snap в Windows 11 с помощью приложения «Параметры»
Чтобы отключить или включить Snap Layout в Windows 11, выполните следующие действия:
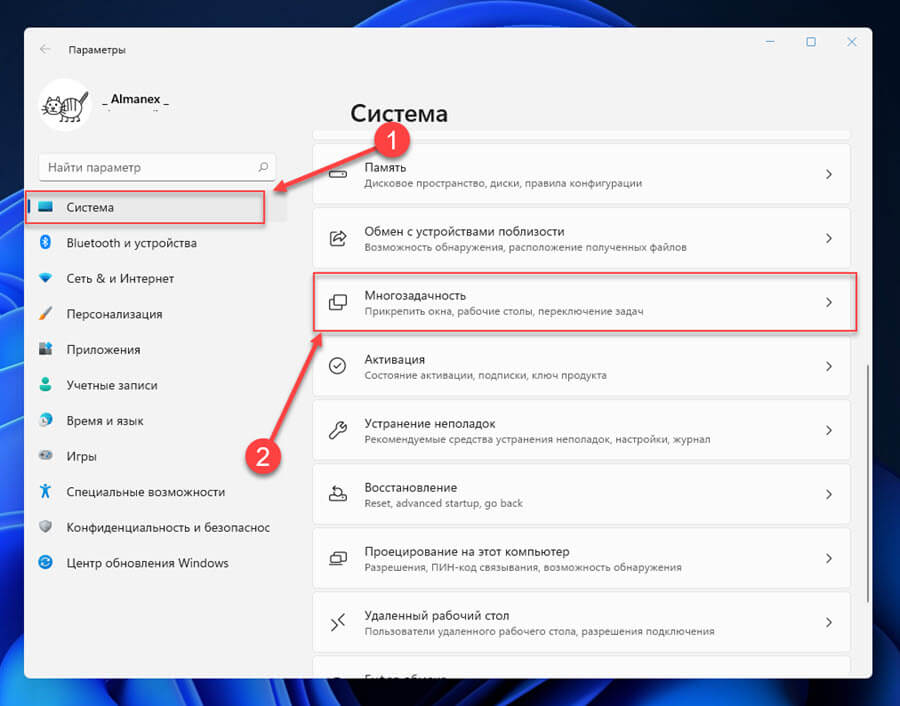
- Откройте приложение «Параметры».
- Перейдите в раздел «Система»
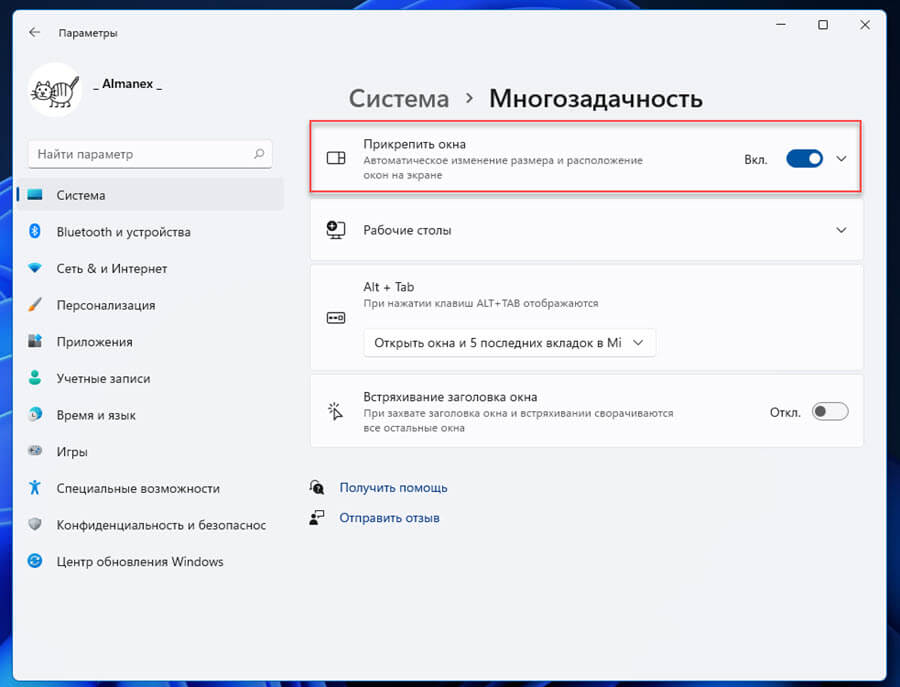
- Выберите вкладку «Многозадачность»
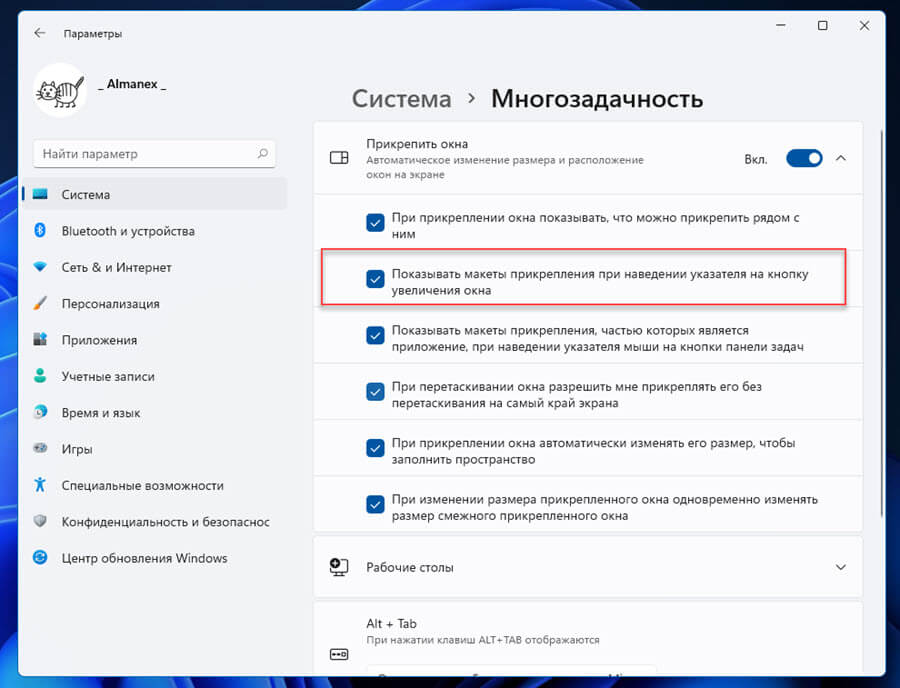
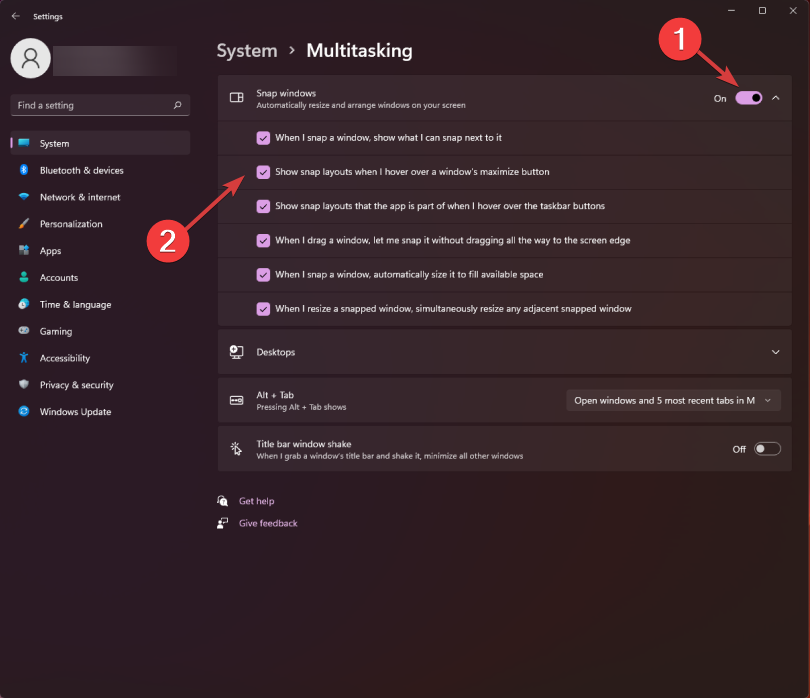
- В разделе «Прикрепить окна» передвиньте ползунок переключателя в положение «Откл.» чтобы выключить функцию привязки окна или в положение «Вкл.» чтобы включить.
Если вы хотите отключить только отображение макетов, разверните вкладку «Прикрепить окна» и снимите флажок для опции «Показывать макеты прикрепления при наведении указателя на кнопку увеличения окна»
Отключить или включить функцию макетов Snap Assist с помощью реестра
Вы также можете использовать реестр Windows для отключения макетов.
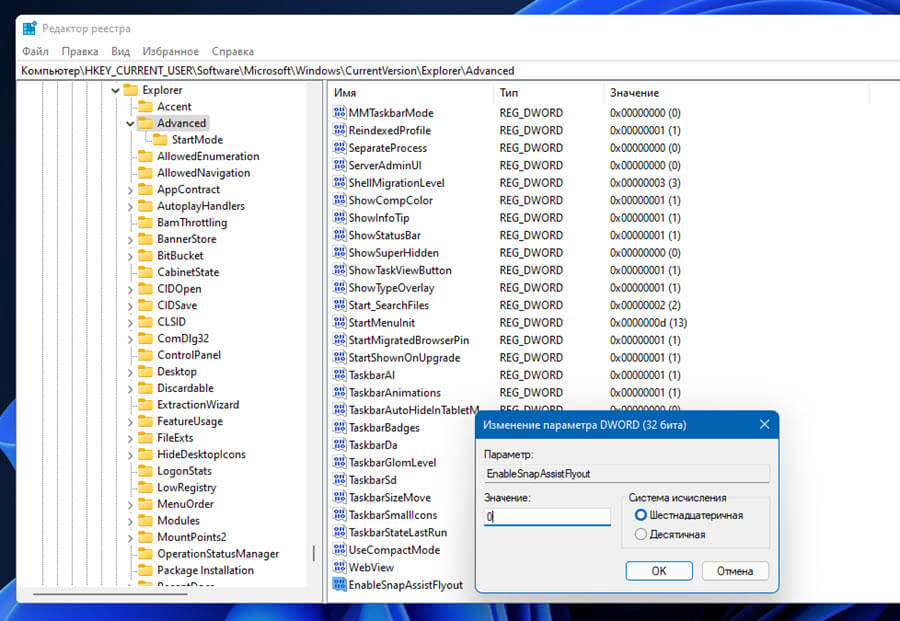
- Откройте редактор реестра и перейдите к следующему разделу:
HKEY_CURRENT_USER\Software\Microsoft\Windows\CurrentVersion\Explorer\Advanced
- Найдите параметр с именем EnableSnapAssistFlyout. Если он существует, переходите к следующему шагу. Если вам не удалось его найти, кликните правой кнопкой мыши папку «Advanced», выберите в контекстном меню «Создать» «Параметр DWORD (32-бита)» и назовите его «EnableSnapAssistFlyout».
- Измените значение для созданного параметра «EnableSnapAssistFlyout»:
- Включить всплывающее меню Snap Assist — 1
- Отключить всплывающее меню Snap Assist — 0
- Теперь закройте «Редактор реестра» и перезагрузите компьютер или проводник, чтобы изменения вступили в силу.
Таким образом, вы можете включать и отключать макеты ассистента Snap Layouts в Windows 11.
Все!
The Snap Layouts feature is built-in on all devices
by Radu Tyrsina
Radu Tyrsina has been a Windows fan ever since he got his first PC, a Pentium III (a monster at that time). For most of the kids of… read more
Updated on
- With the new Snap layouts feature, Windows 11 allows users to easily multitask by splitting the screen into multiple areas.
- This productivity feature helps you better organize and streamline your work.
- Discover which monitors can support this type of layout and how to access it by using a certain keyboard shortcut.
Microsoft’s Windows 11’s Snap layouts feature and others as well, capture everyone’s attention these days. Since it is designed to improve your PC experience and the way you communicate with others.
The OS comes with dynamic and powerful elements that support your work. Windows 11 packs some interesting features that will make all the difference and a new design that. Among other elements, introduces a taskbar with the Start menu in the center.
In this regard, you’ll benefit from a multitasking feature called Snap layouts. Whereby users who have larger monitors will be able to split them in various ways and organize them as they please.
Moreover, to take your capability to deal with multiple tasks at the same time to the next level, another good idea is to invest in a mouse that was designed with multitasking in mind.
What is the Snap layouts feature?
Firstly, Snap layouts is a feature that helps you arrange the windows on your screen in the best possible way, to help you multitask.
Basically, after you activate the function by using our guide below, when you hover over the maximize icon of any window, you will see multiple options to position it in your layout.
Moreover, the term snap refers to the fact that the window will immediately position itself in the designated spot.
Once you have created these window arrangements with Snap layouts, you can save them in Snap groups. Which will be accessible on the taskbar and which you can access later.
How to use Snap layouts on my Windows 11 PC?
1. Enable Snap Layouts using a keyboard shortcut
1. Press the Windows key on your keyboard or the Start button on the taskbar.
How we test, review and rate?
We have worked for the past 6 months on building a new review system on how we produce content. Using it, we have subsequently redone most of our articles to provide actual hands-on expertise on the guides we made.
For more details you can read how we test, review, and rate at WindowsReport.
2. Type settings in the search box that opens and click on the result to open the Settings app.
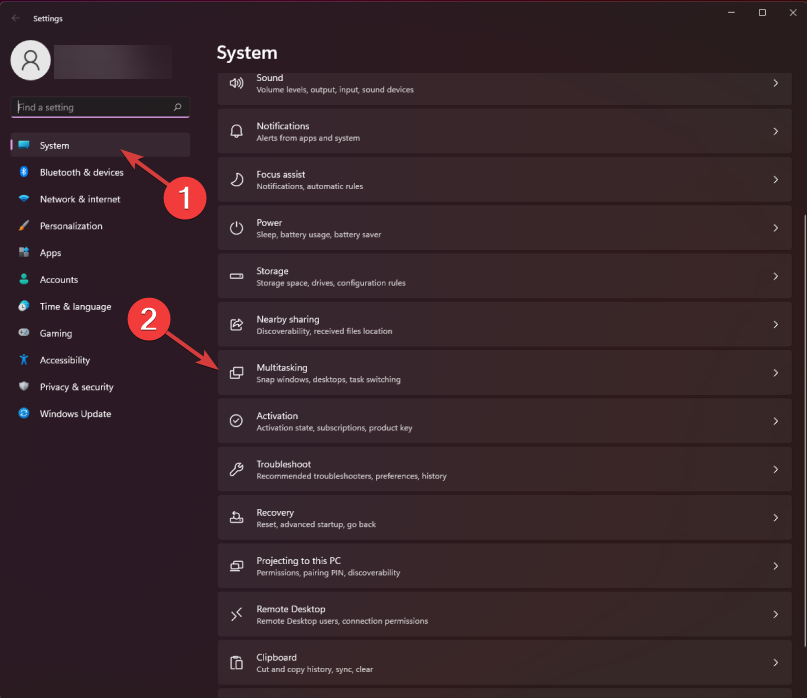
3. Select the System category, and click on the Multitasking tab.
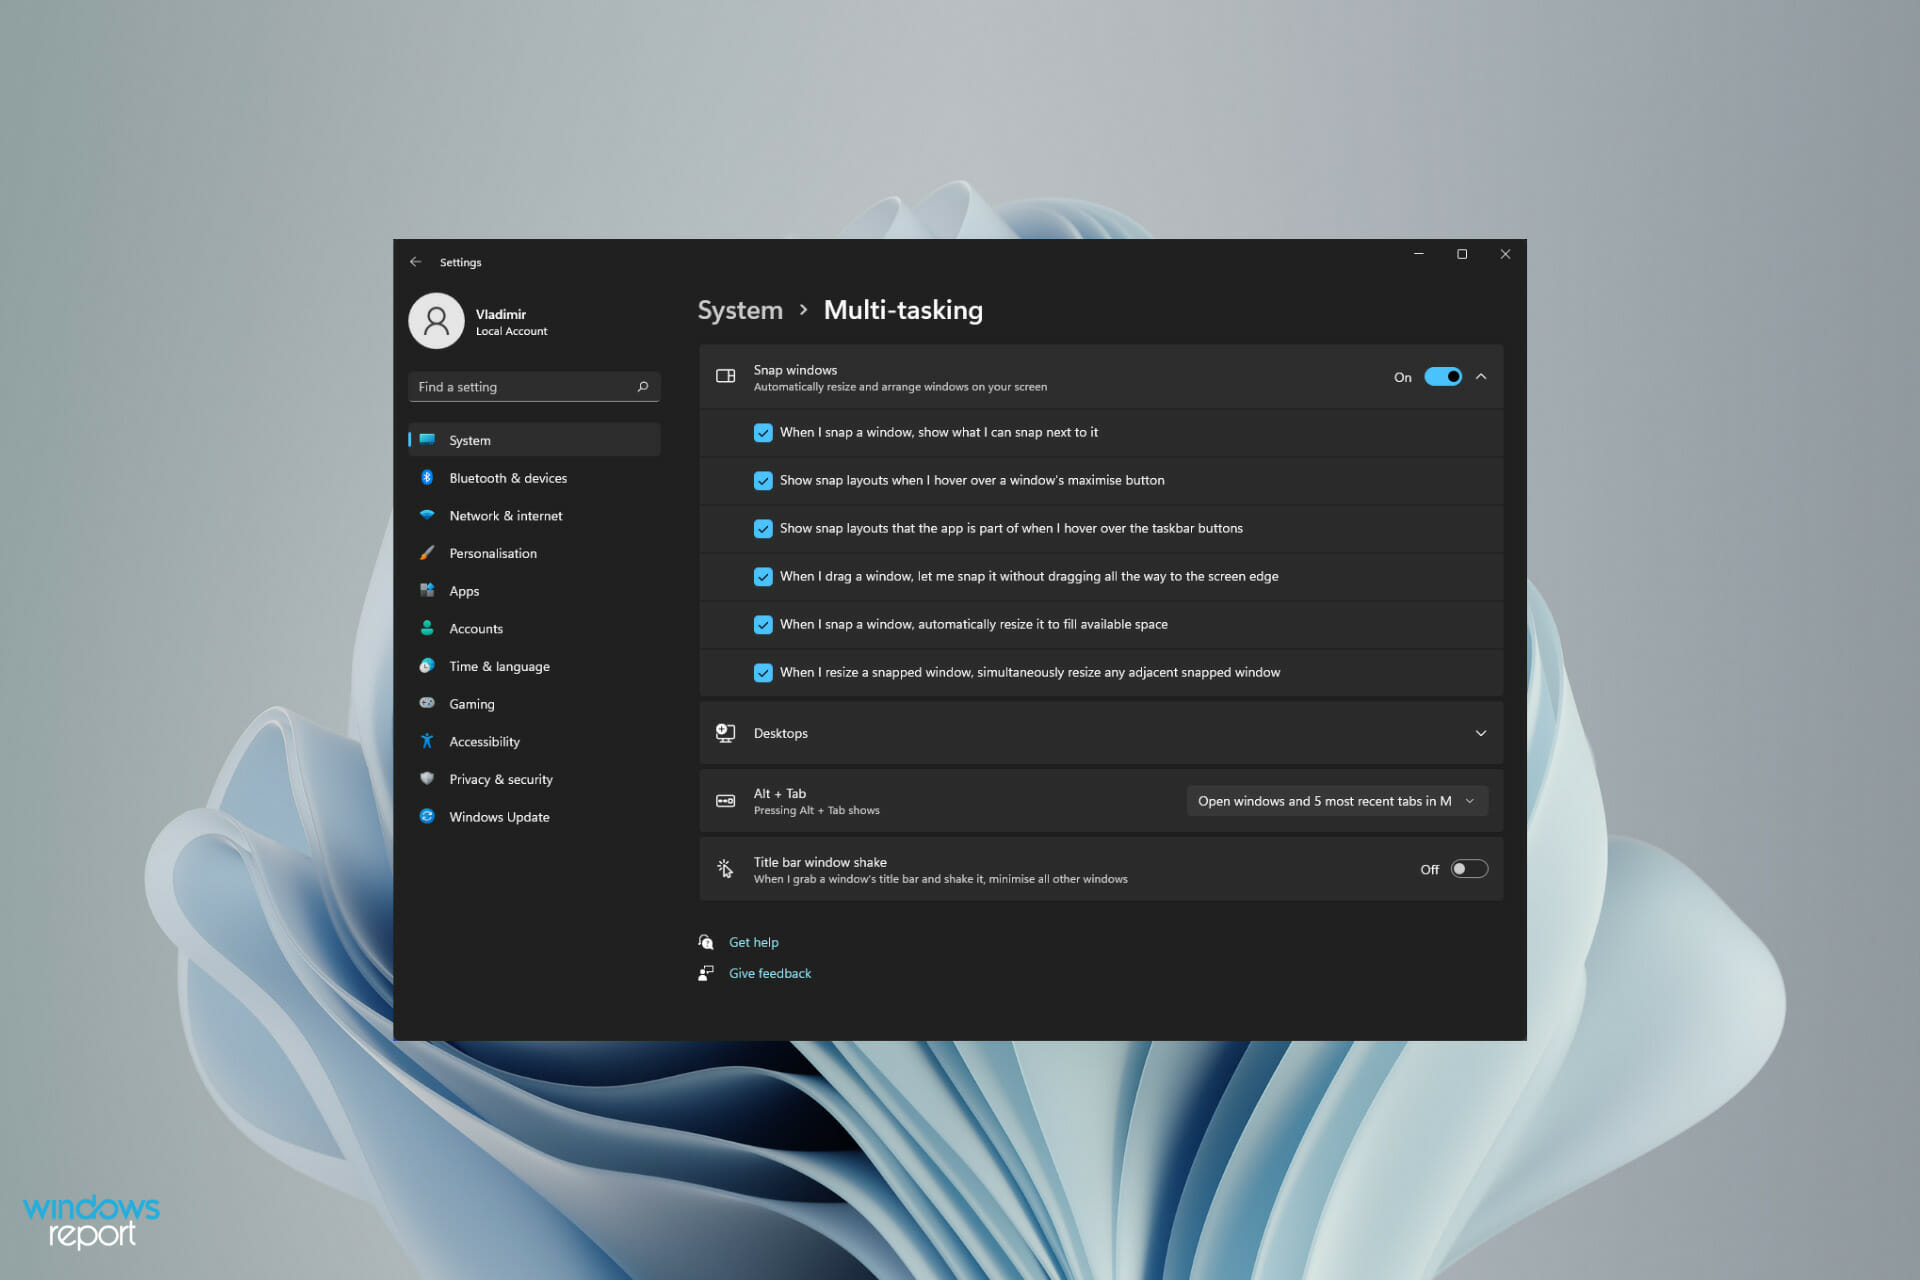
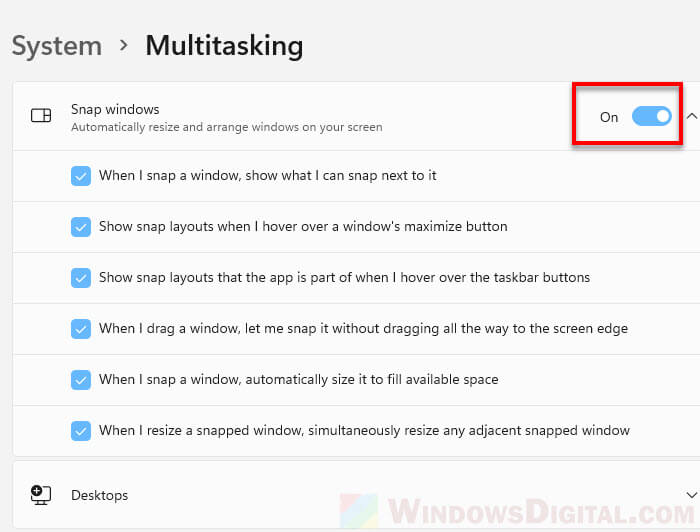
4. Toggle the Snap windows button to On. Then check the box next to the Show snap layouts when I hover over a window’s maximize button option.
5. Open the app or program you want to use the tool on and use the shortcut: Windows key + Z. It will trigger the Snap Layouts option for the current window.
Another method to open the tool is to hover over the maximize button of any window, and the snapping option will show up in the corner.
6. Choose from different layout options to arrange your current page with other apps.
The fastest way to use Snap layouts on your Windows 11 is to use a keyboard shortcut. Snap layouts should be enabled by default on most computers, but on some you need to manually enable it.
NOTE
You can choose the layout depending on the width of your display. For a 16:9, 16:10, and 3:2 display you will see a set of 4 layout options, and for wider displays, you will see a set of 6 layout options.
It’s also worth mentioning that Microsoft has announced to users that older monitors with a resolution lower than 1920 pixels cannot fully benefit from this powerful feature.
Furthermore, given the system requirements and specifications of the new Windows 11, we find that a 1080p HD widescreen resolution is required. In order to enjoy the standard look offered by the Snap layouts feature.
- Microsoft Paint Cocreator: A complete guide on the new AI tool
- Windows 11 adds more apps to the share links feature
- How to Make a Program Available to All Users on Windows 11
- How to Download & Install Microsoft LifeCam Drivers on Windows 11
- How to Quickly Turn Off Accents on Keyboard in Windows 11
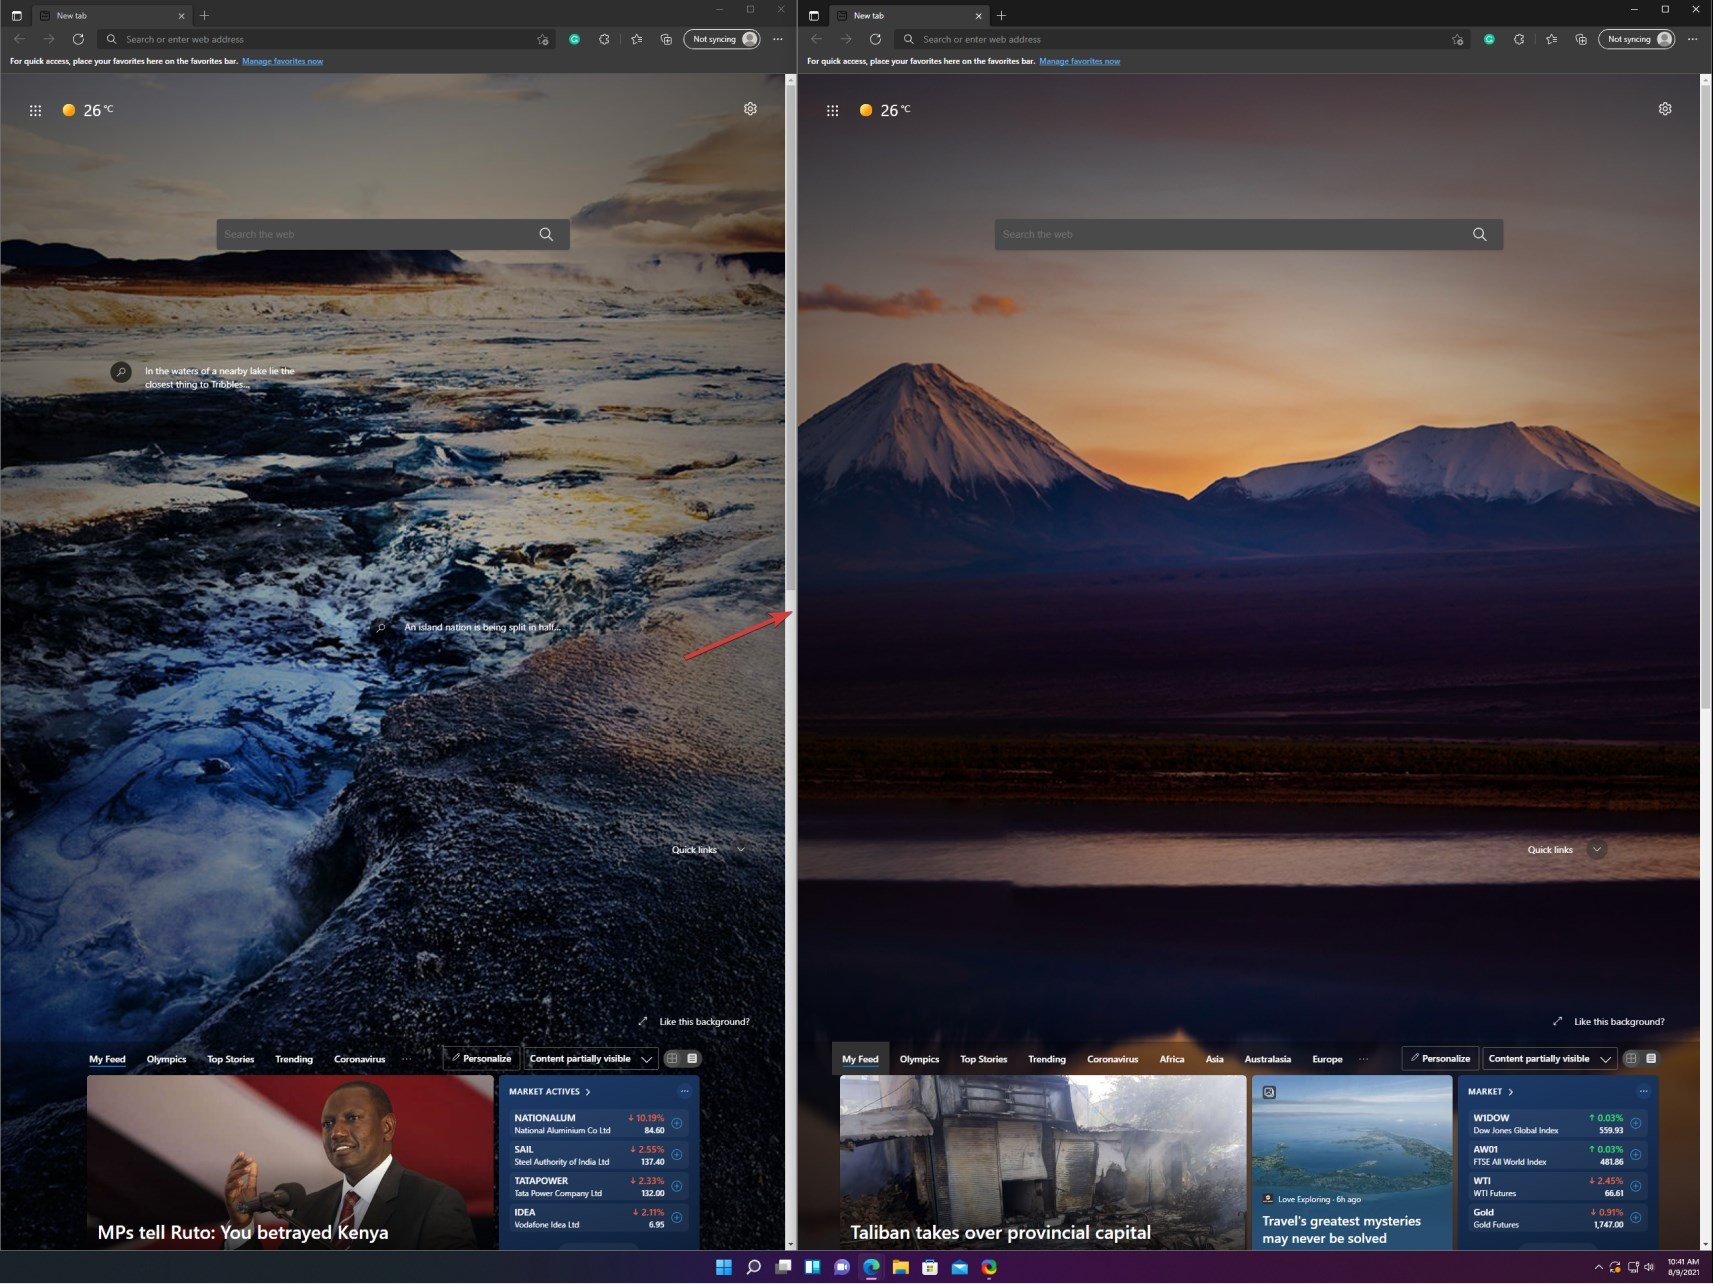
2. Vertically snap in Windows 11
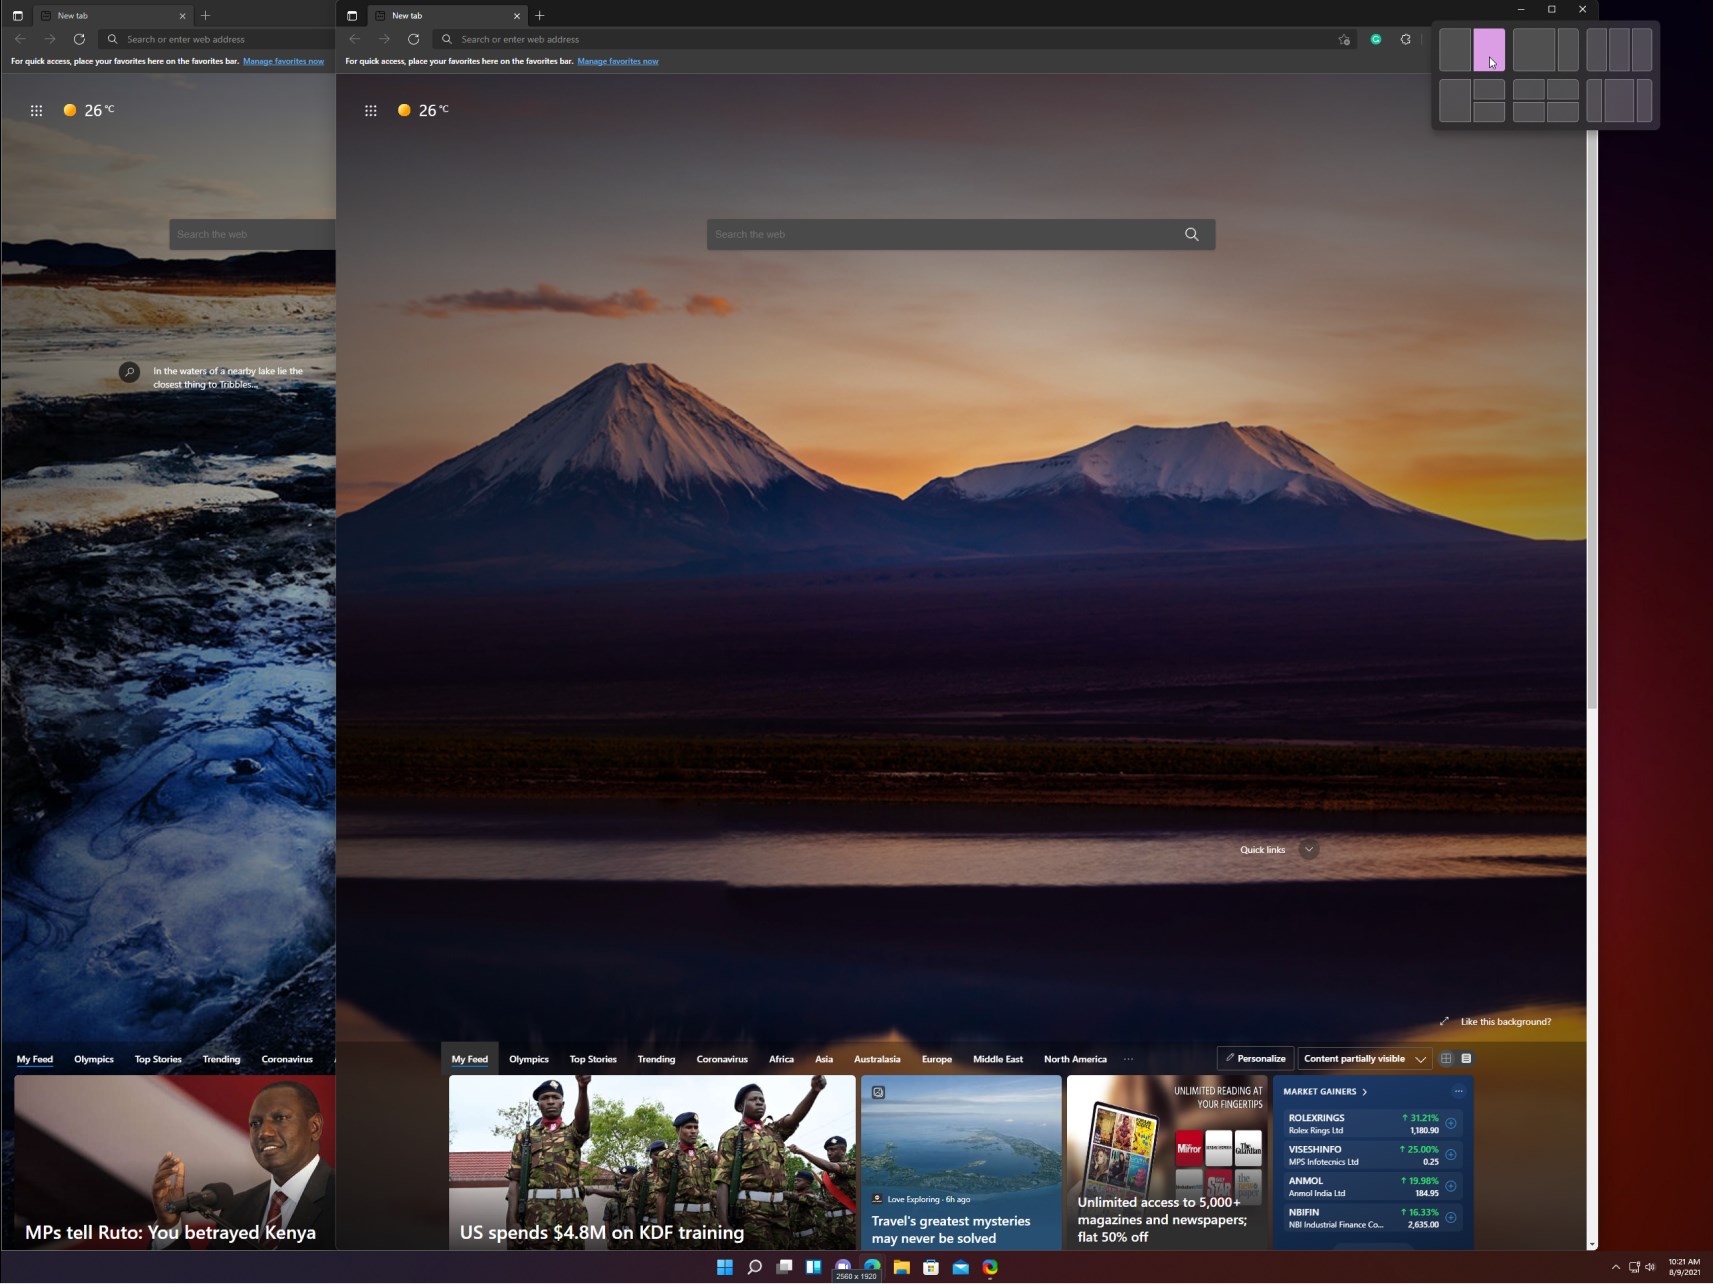
- First, hover over the maximize icon on the window you want to have to the left and choose the left column in the graphical options that appear (there are 3 custom Windows 11 Snap layouts options for vertical snapping: 2 columns, 3 identical columns, and 3 asymmetrical columns).
- Now hover over to the maximize icon of the second window and select the second column from the right.
- The two windows will snap vertically. And you will be able to change their width by dragging your mouse from the window’s edge from the middle to each side.
If you choose any of the other vertical layouts, you will just need to select the proper setting for each of the windows in your arrangement. But, as you can see, it’s very simple to do so.
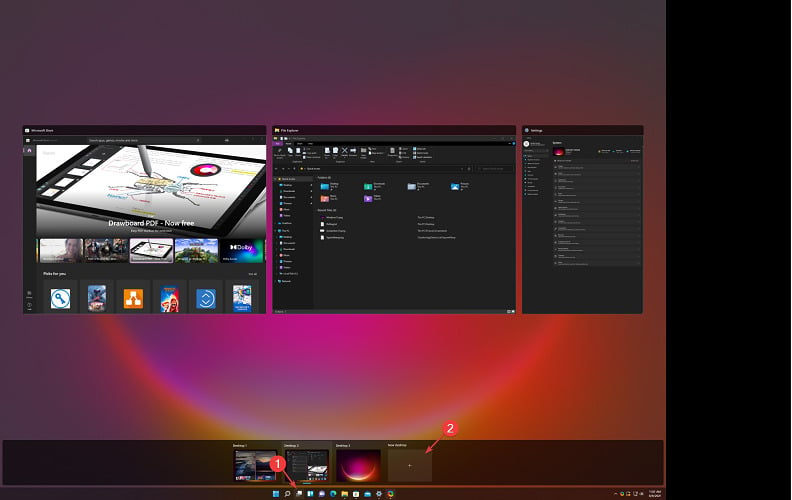
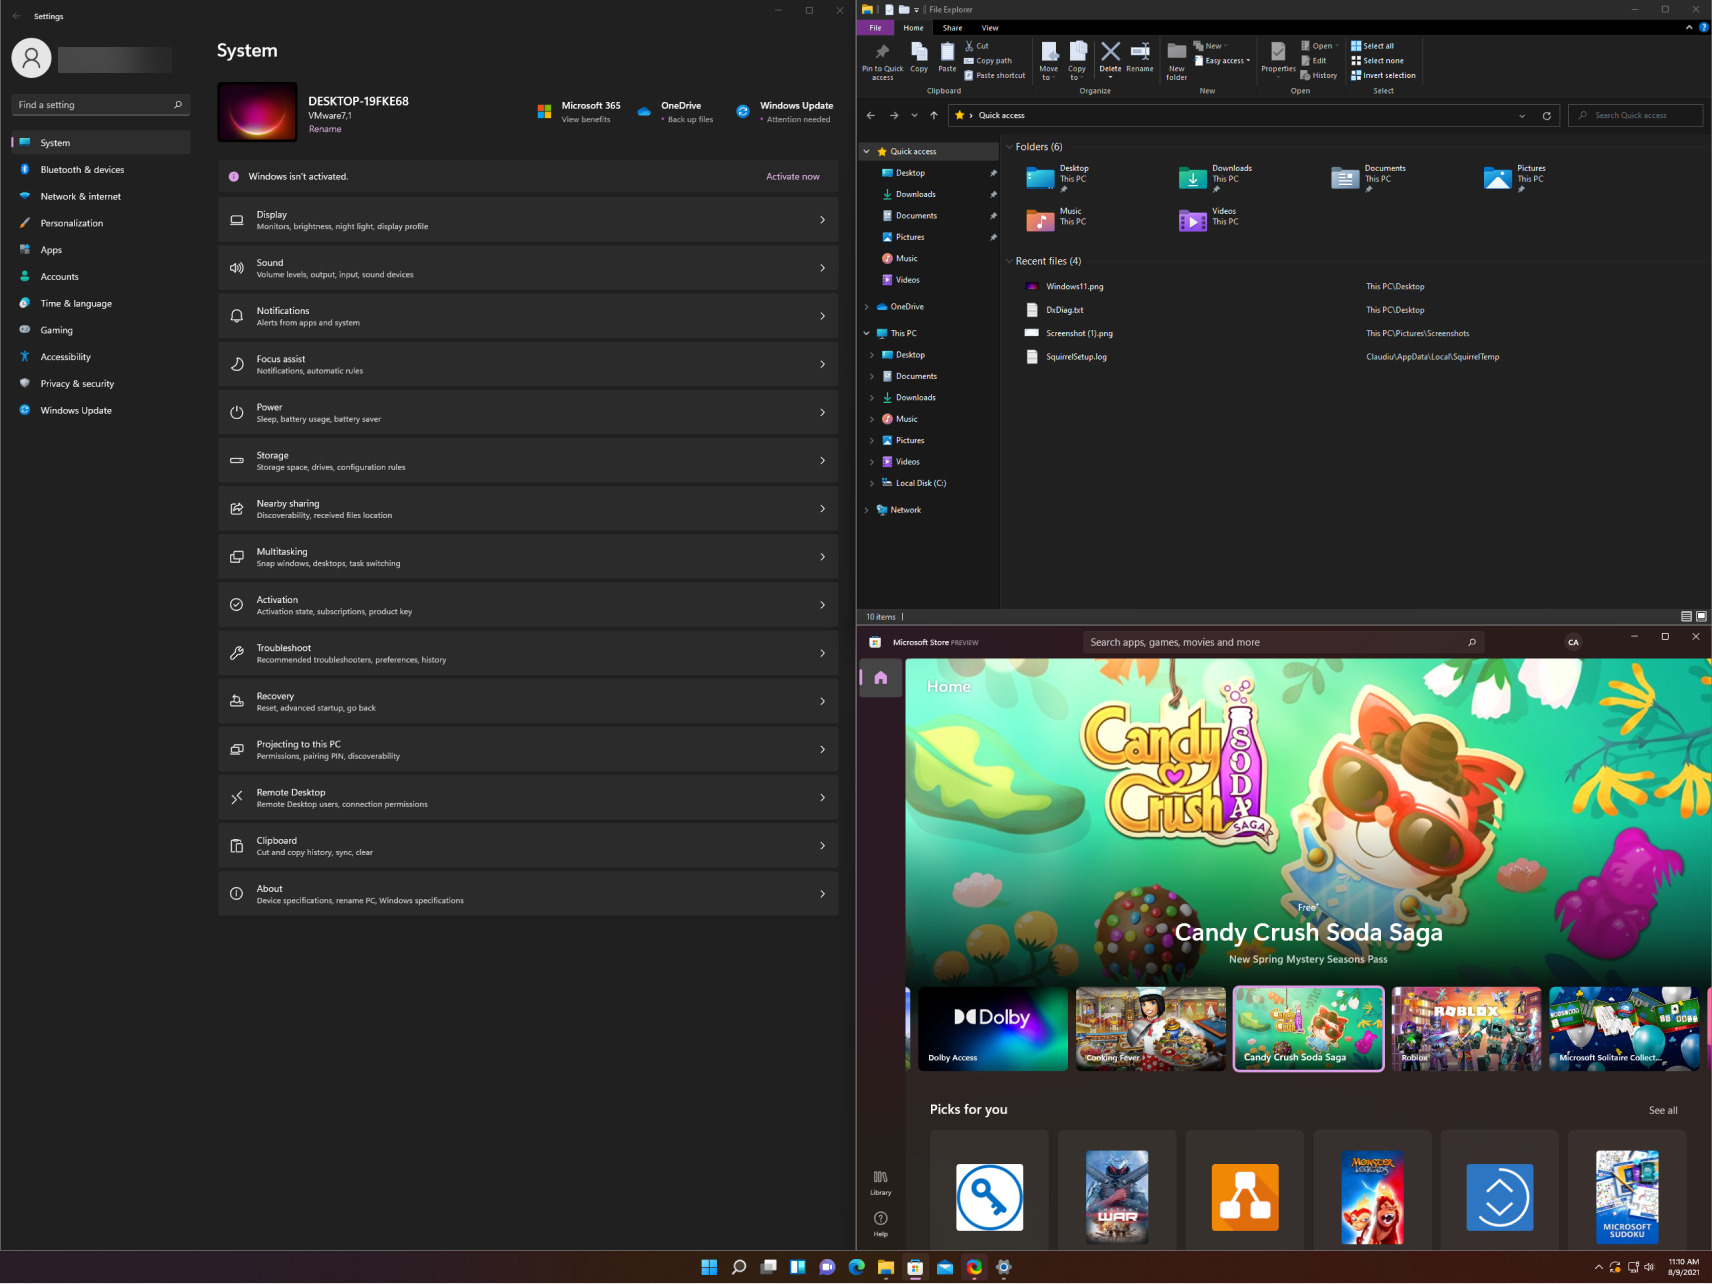
3. Use Snap layouts with virtual desktops
- Click on the virtual desktops icon on the taskbar and select the New desktop tab.
- Now you can select the new desktop by clicking again on the virtual desktops icon and selecting the new desktop you just created.
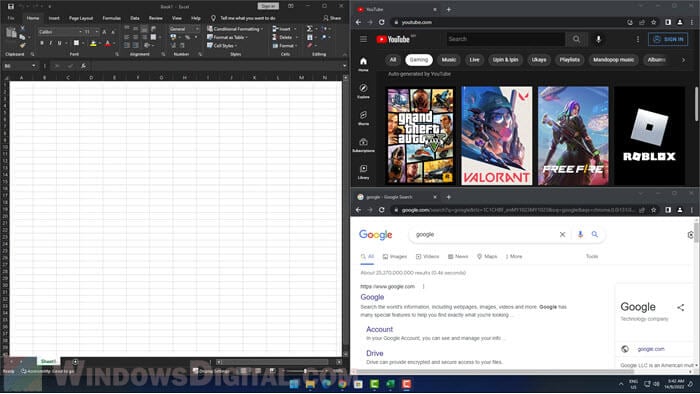
- Now you can just create a new snap layout just like you’ve seen on the previous solution. We’ve created a random one for you, just so you can see the possibilities.
- If you want, now you can toggle between the desktops you’ve created by either clicking on the virtual desktops icon and selecting the one you need or by pressing the Ctrl + Windows + Left or Right.
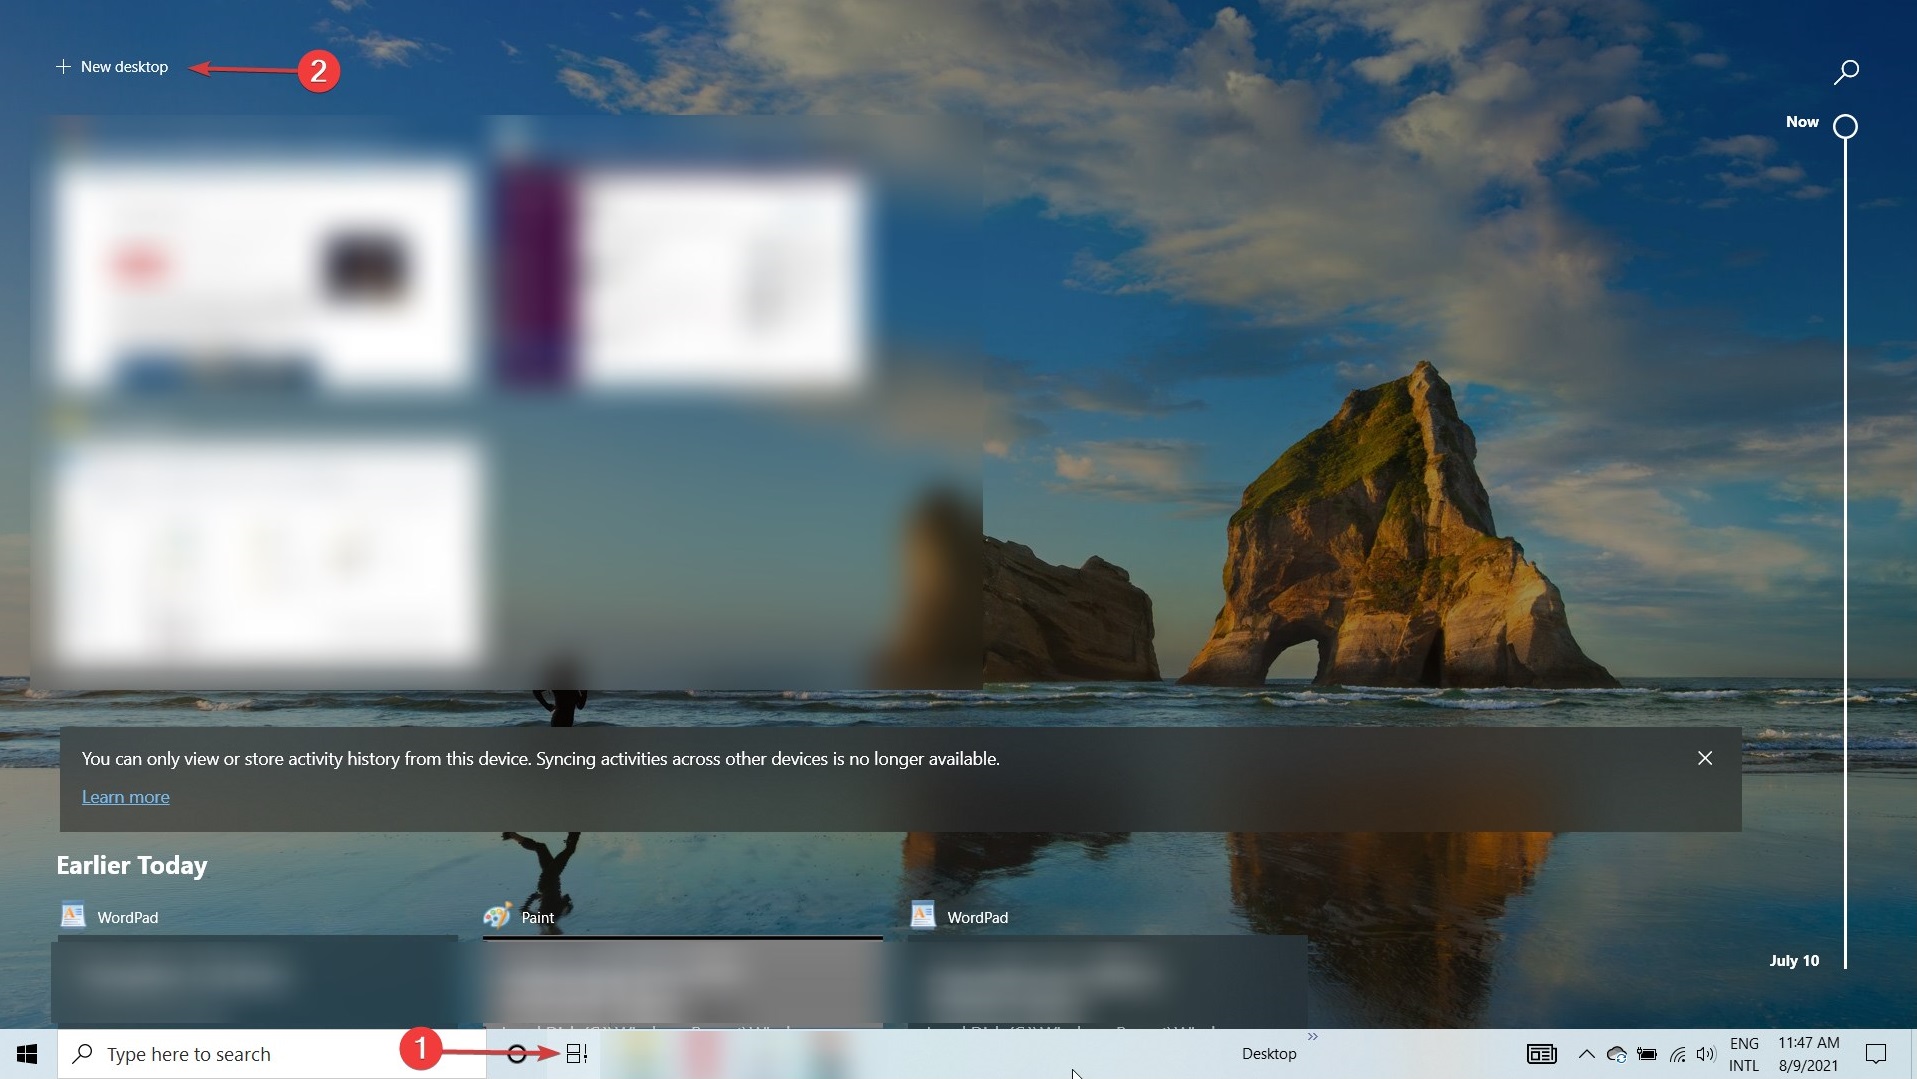
How to use Snap layouts in Windows 10?
Snapping windows in Windows 10 is not as elegant and straightforward as it is in Windows 11. But you can still do the job with a few additional moves.
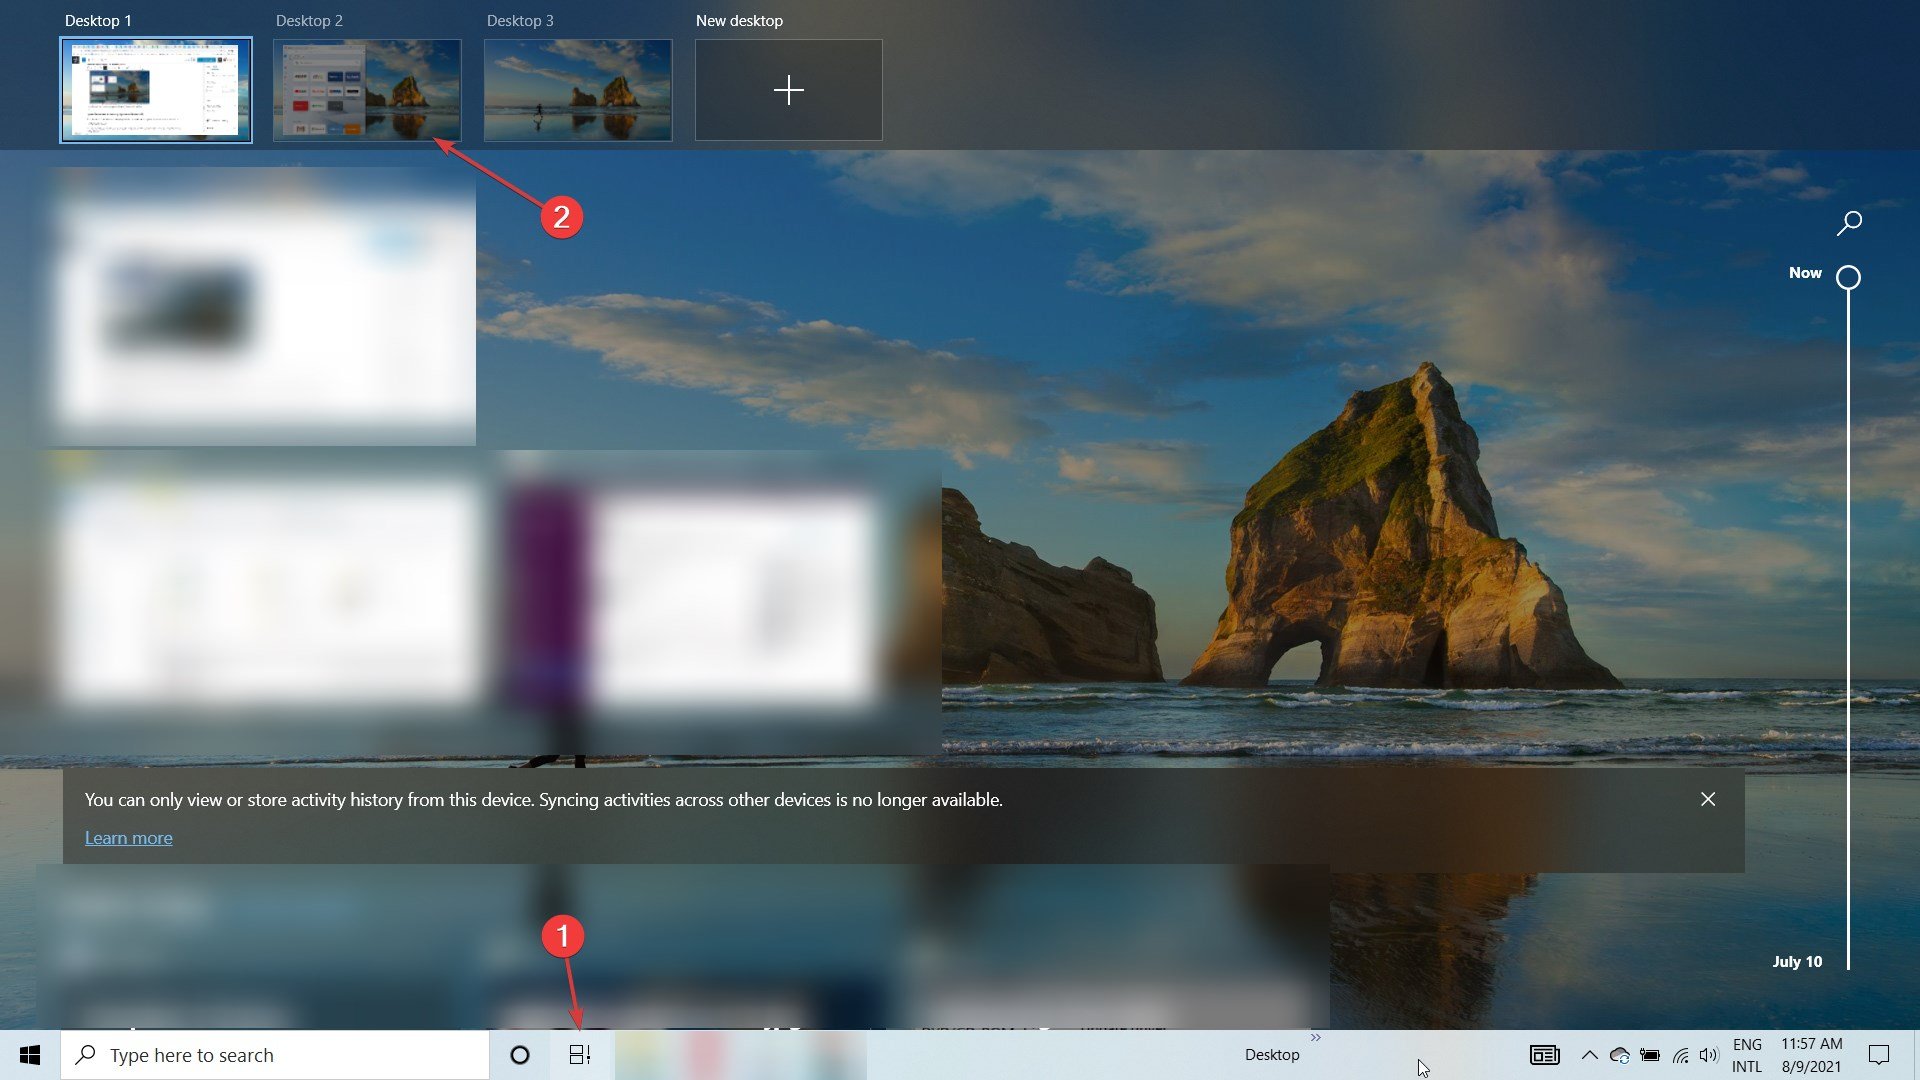
- Click the Task view option from the taskbar and select New desktop.
- Select the Task view icon again and select the second desktop.
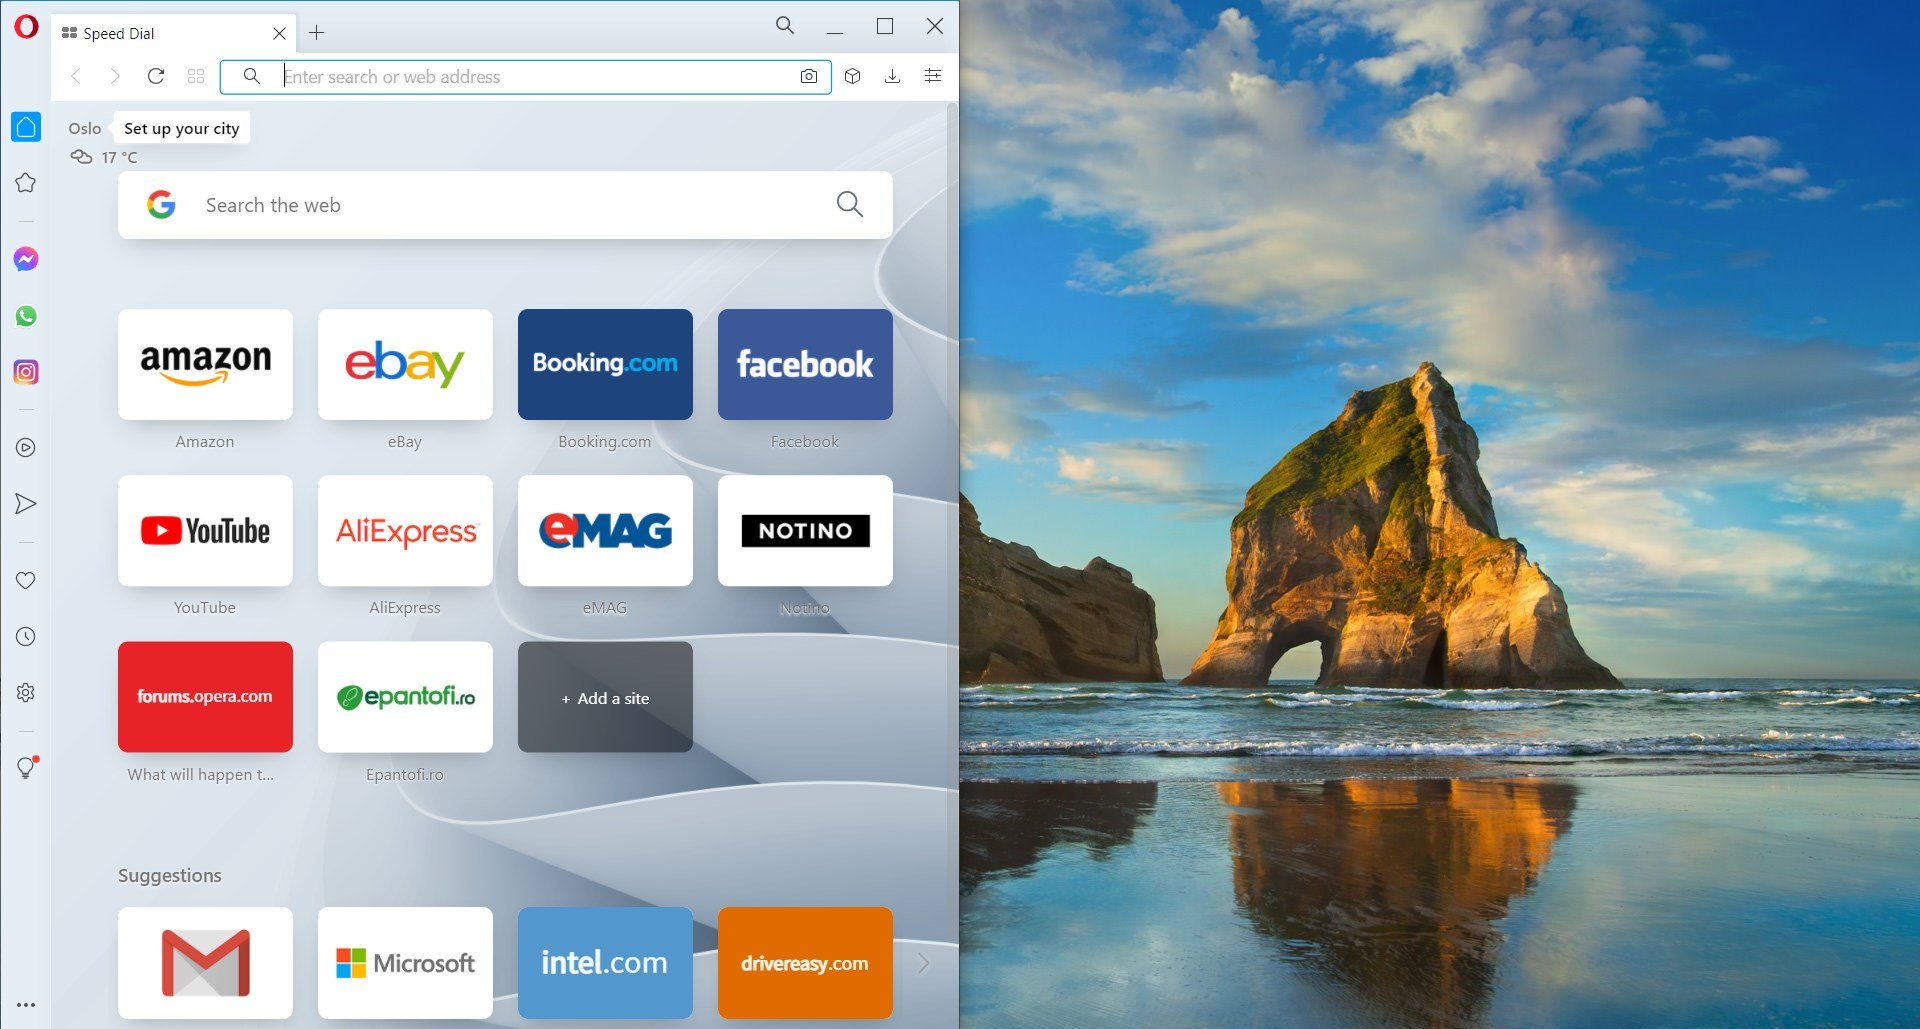
- Now open a window that you want to snap and press the Windows + Left or Windows + Right to snap the window vertically to the left or right. As you can see from our screenshot, it perfectly snapped to the left, covering half of the desktop.
- You can also take the window with your mouse from its title bar and release it close to one edge and it will snap automatically to that edge.
- Of course, you can adjust the window dimensions manually, with your mouse, by grabbing an edge with your mouse.
Quick tips on using Snap layouts in Windows 11
Here are some of the most interesting ways of using Snap layouts and groups to improve your multitasking:
➡ Divide work and fun
Note that it’s very important to separate the work-related apps and tabs from the non-work-related ones. And the motive is pretty obvious.
Snap layouts and groups can help you easily do that by grouping the apps and windows in a specific layout. And this is especially useful if you also use the multiple desktop feature from Windows 11.
➡ Looking for flights
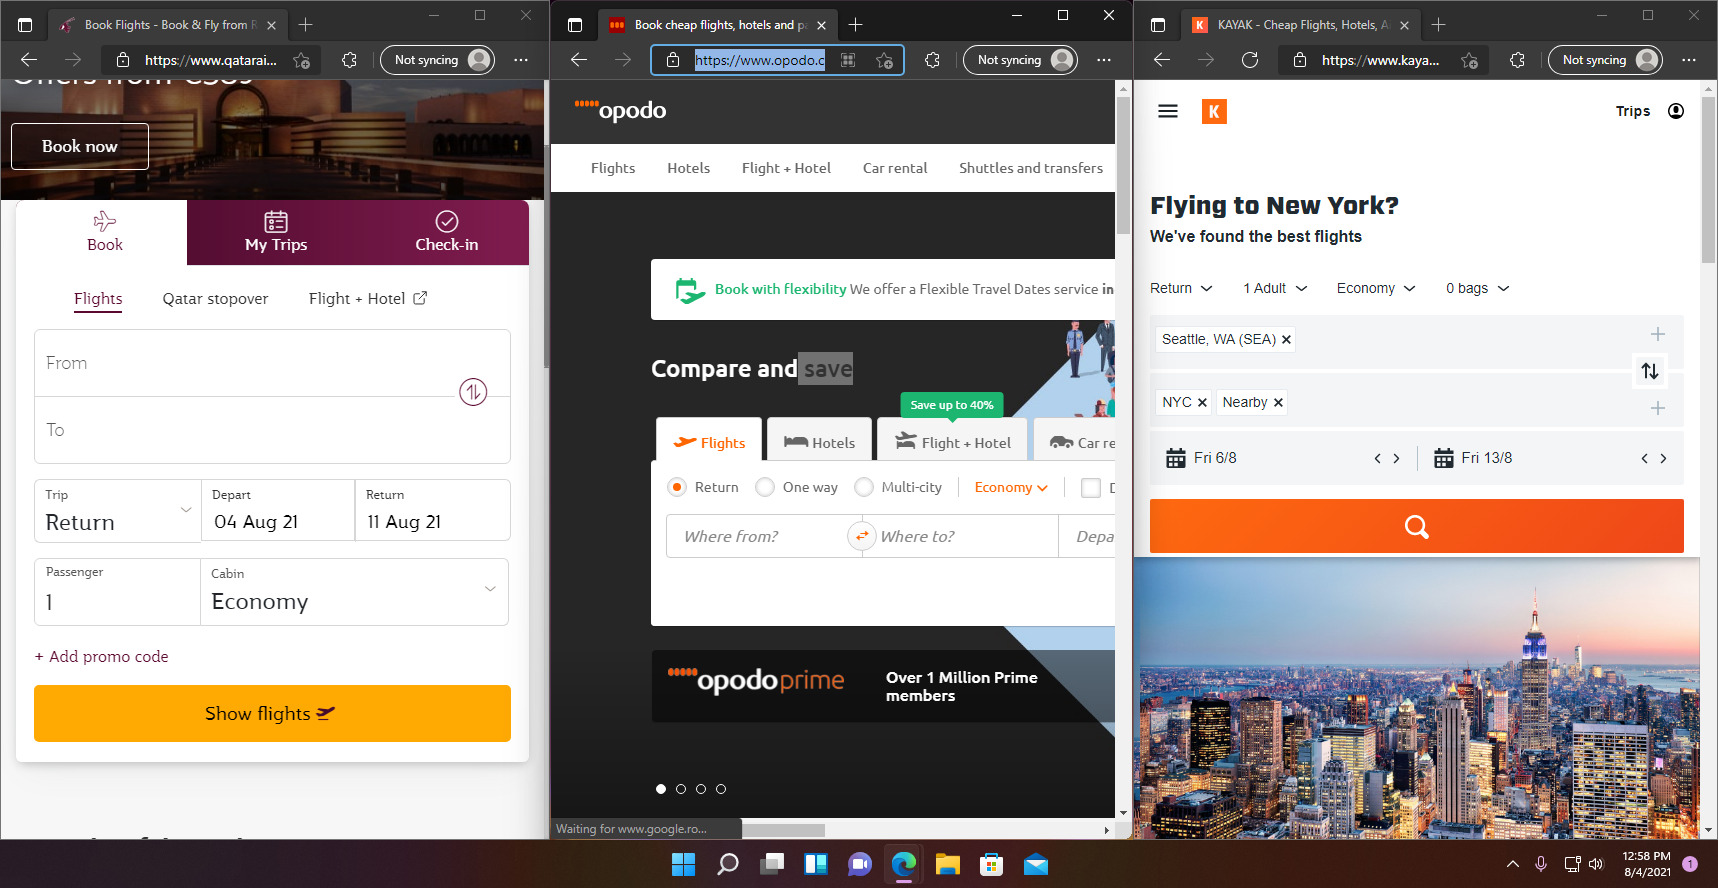
We all know how difficult it is to look for more convenient flights and routes looking on multiple websites and apps. Going from one to another can be painstaking.
With Snap layouts, you could just snap up to 4 of them in a window. Then check them easily, without going back and forth to each one.
➡ Confronting technical specifications
If you’re planning to buy a product, let’s say, the right Windows 11 compatible laptop, you’re going to check out all the technical specifications for each one, right?
With Snap layouts, you can start 3 browser windows. Snap them in the three-column layout and scroll them down on the same website to spot the differences immediately.
We hope our guide helped you enable the Snap layouts feature. And that our tips gave you some ideas on how to use it. You can finally start creating layouts to your liking, save and access them later in Snap groups.
And if you happen to change your mind, let us remind you that it’s incredibly simple to disable Snap layouts on Windows 11.
Whether you’re not used to the new format or it’s a matter of aesthetics, the choice is always yours. If you have any questions or suggestions, please visit the comments section below and drop us a line.
Snap assist is a feature in Windows 11 that lets you arrange app horizontally or vertically alongside other apps on the desktop. Learn more about how to use snap layouts in Windows 11 (including keyboard shortcuts) in this guide here.
Also see: How to Center a Window in Windows 11
What is Snap Layouts?
Snap layouts in Windows 11 help users manage multiple apps’ windows on a single desktop screen. With the snapping feature, you can arrange windows side-by-side, fill the remaining space with another window, or both. You can snap up to 4 windows on a single screen with snap layouts.
Unlike older versions of Windows where you need to manually resize, move and position the windows when you have to work with multiple applications or several instances of file explorer or web browser on one screen, with the new snap layouts in Windows 11, you can directly choose a layout and immediately snap multiple windows perfectly depending on the layout you choose.
How to enable or disable Snap Layouts in Windows 11
Although the snap assist feature and snap layouts are enabled by default in Windows 11, if you can’t snap any window when you move it to the edge of the screen, or you don’t see the snap layout when you mouse over the maximize icon, it likely indicates one or more snap assist features were disabled.
Follow the steps below to enable snap layouts in Windows 11
- Go to the Start menu and open Settings.
- In the Settings window, select System from the left pane.
- Next, select Multitasking on the right pane.
- Turn on the “Snap windows” option.
- Click the arrow icon next to the toggle button to expand more options. From there, you can enable any snap assist feature that is not yet enabled.
If you don’t like to use the snap assist feature or snap layouts, you can disable them by simply unchecking any option that you want to disable.
Related issue: How to Move a Window That is Off-Screen in Windows 11
How to use Snap Layouts in Windows 11
Other than manually moving an app or window to the edge of the screen to snap it, you can choose a snap layout instead to quickly snap multiple windows (up to 4) on one screen.
To use a snap layout in Windows 11, you need to first open all the apps and windows you want to snap. While the apps are open and ready to be snapped, move your mouse cursor over the window’s maximize button on any active app, and then choose any layout you want from the snap layouts menu.
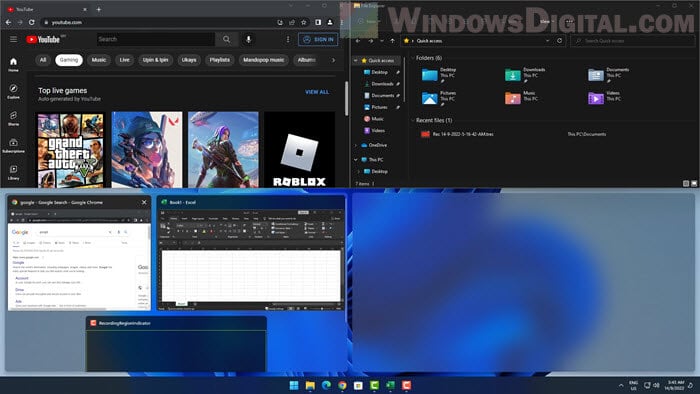
Once a snap layout is chosen, the first window you select will automatically be snap to the side you chose. You can then select the windows you want to snap on the remaining spaces according to the layout.
Recommended Guide: How to Minimize All Windows on Windows 11 (Shortcut Key)
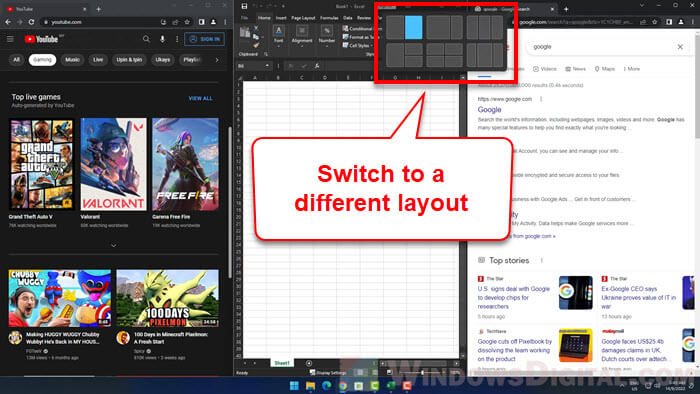
How to change snap layout
When you are already using a snap layout and if you would like to switch to a different layout, simply hover your mouse over the maximize icon of any window on the screen, and then select another layout.
How do Windows 11 Snap Groups work?
After snapping multiple apps to a snap layout, when you mouse over any app in the layout on the taskbar, it will show you the snap group – a group of apps in a snap layout. When you click the snap group on the taskbar, Windows will bring all the apps in the snap group to the foreground.
Keyboard shortcuts for window management and snapping in Windows 11
The main keyboard shortcuts to control snapping in Windows 11 is the Windows + Arrow keys. You can quickly move and snap a window by simply pressing Win + any Arrow keys depending on the direction you want to snap the window to.
For example, if you want to snap a window to the left side of the screen, select the window and press Win + Left Arrow key. If you want to snap an app to the top of the screen, press Win + Up Arrow.
To snap a window to a quarter of the screen, for example, to the bottom right side of the screen, press Win + Right Arrow first, and then press Win + Down Arrow.
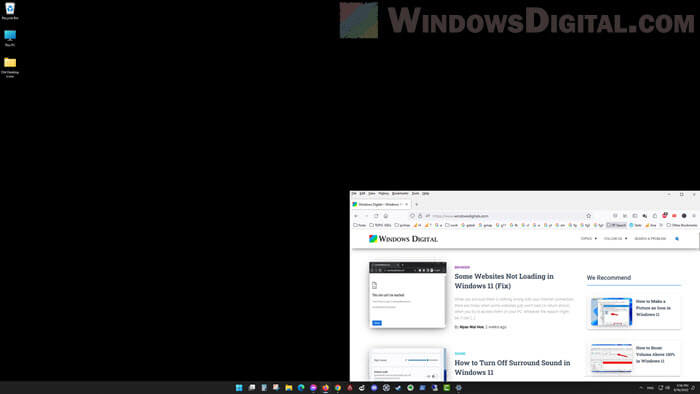
How to snap a window to maximize if you have multiple monitor screens
Previously in Windows 10, when you have multiple monitor screens and you need to quickly snap or maximize a window on an edge in between two screens, if you move the window slow enough, the window will stop and not go over to the other screen, and will offer you a maximize or a snap option.
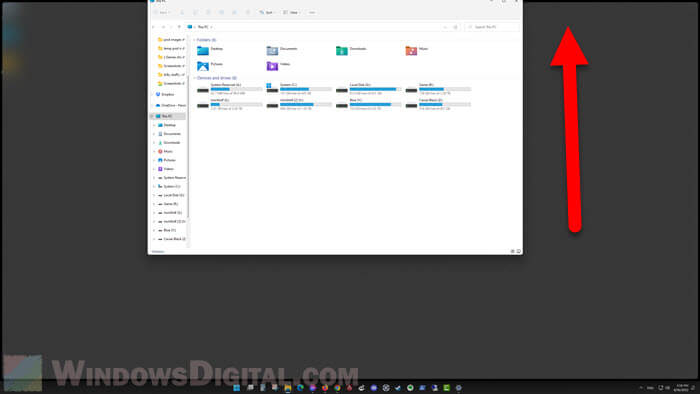
However, in Windows 11, no matter how slow you move a window to an edge in between two monitors, the window will still go through to the other screen. To maximize or snap a window this way, you will need to stop right on the edge of the screen while moving the window. If you stop at the right place, you will see the maximize or snap option.
In the example screenshot above, my second monitor screen is right above the main screen. When I need to maximize a window and not pushing it to the other screen, I will need to stop right at the top edge of the screen while moving the window. When the maximize preview appears, simply release left click to maximize the window.
Windows offers the ability to arrange the opened apps, files, and browsers on your screen based on various layouts of your choice to take avantage of all the available space. Such an action is called “snapping” the windows. In Windows 10, snapping is done manually, through keyboard shortcuts and a dedicated menu option called Snap Assist. With Windows 11, it’s been made much easier using a visual aid feature called “Snap Layouts.” This tutorial will show you how to get snappin’!
Also read: Here’s How to Center Windows 10 Taskbar Icons Like Windows 11
Introducing Snap Layouts in Windows 11
While you can snap windows in Windows 10, you don’t get much variety toward the final appearance of the windows. However, with the Windows 11 Snap Layouts feature, you can snap windows covering wider screens and many more possibilities. There is simply no need to drag or resize the windows.
Windows 11 Snap Layouts are a set of predefined templates that arrange the application windows on the screen based on your choice from a “Snap Navigator.” This navigation feature immediately springs into view while you’ hover the mouse around the Maximize button.

Currently, there are six types of layouts for snapping:
- 50:50 — two equally sized windows
- 80:20 — includes a major and minor window screen
- Three-column equal layout — requires a laptop/computer screen which is fully HD-compliant at 1080p (1920×1080)
- 50:25:25 — for three window screens
- 25:25:25:25 — useful for multitasking with four open windows
- Three-column unequal layout
The actual availability of Snap Layouts displays will depend on the size of the display, so you may see more or fewer layouts. In the following screenshot of a Edge browser window, the three-column layout options are missing because it’s not a very wide screen.

How to Use Snap Layouts in Windows 11
Unlike Windows 10, snapping the windows is extremely easy with Windows 11, as it doesn’t require any dragging or resizing of the windows. You only need to move the pointer to the Maximize button of any File Explorer, browser, or other application. The Snap Layouts option will be automatically activated. Select the tiling layout you need.

In the above example of a File Explorer window, the 25:25:25:25 equal layout was chosen. This ensures the File Explorer window occupies exactly a quarter of the screen on the left. If there were other application windows open at the same time, they would also self-arrange into one of the quarters.

For managing the Snap Layouts menu in Windows 11, go to «System -> Multitasking -> Snap Windows.» Check all the available options for the best results.

According to Microsoft, there are three ways to snap the open windows in Windows 10: using your mouse, keyboard shortcut keys, and Snap Assist.
1. Snap with Your Mouse
To snap with the mouse, just select the title bar of any application window and drag it all the way to the corners of your screen. When you release the pointer, it will be snapped to that position. The mouse-snapping method is quite time consuming, as it involves dragging and resizing the windows.

2. Snap with Shortcut Keys
If you want an automatic snapping feel in Windows 10 with equally-sized windows, it’s better to use the keyboard shortcut keys: Win + Arrow keys. Go to the open window first, use the keyboard shortcut, and it will automatically fix the program windows.
In the example below, the “left” arrow key was used along with the Win key. This got the Command prompt into the left corner.

Another example shows the snapping of the Microsoft Edge browser window into the right corner of the screen. For this, the Right Arrow key was used along with the Win key. The other application windows are neatly arranged in a scrollable grid layout.

3. Snap with Snap Assist
Windows 10 has a dedicated “Snap Assist” feature, which controls how you want the windows to be split. It can be accessed from the “Snap settings” system settings in the Search box.

Turn the “Snap windows” on for enabling the snapping functionality in Windows 10. Also enable the other options, such as the automatic sizing of available space and the simultaneous resizing of adjacent snapped windows.

Now you just have to click the thumbnail of the window you want snapped using Snap Assist. It will be fixed in a corner. The other windows will be neatly resized beside the first one so that there is no empty space remaining.

Using Snap Layouts in Windows
1. Snap Groups
When you snap windows together, the Windows 11 taskbar will automatically display what is called a «Snap Group.» It consists of a range of apps that have been snapped together as one unit. You can further choose any of the Snap Groups in the taskbar to keep track of what you’ve been using in association with the main app.
2. Optimize Screen Real Estate
Snapping the windows makes a perfect grid out of every available pixel on your screen. This gives you a direct glimpse into many of the open windows. Whether you are working on complex CAD models, coding programs, or high resolution video editing, your ability to visualize things just got better.
3. Instant and Precise Fingertip Control Over the Apps
With Snap Layouts, you no longer waste time minimizing and maximizing the windows. Everything you need is right there on the screen. This does feel counterintuitive at first, as maximizing and minimizing the windows is so integral to the mouse-display interaction. But now with fast and accurate fingertip control, you can interact with the apps more naturally.
Frequently Asked Questions
1. Can I use the Maximize button along with Snap Layouts in Windows 11?
Yes, you may continue to click the Maximize button in Windows 11 to resize the current window, just like in previous Windows versions. However, to use the Snap Layouts feature, you only need to hover near the Maximize button.
2. How do I disable the Snap Layouts feature in Windows 11?
The Snap Layouts feature in Windows 11 feels very natural and does not force itself upon the user. You can still completely disable it from «System -> Multitasking -> Snap Windows» by unchecking all the options.
3. How do I split my screen into three or more customized windows?
Splitting the screen into three parts natively in Windows requires a wider screen resolution (at least 1920×1080), and when you hover near the Maximize button, you will see the options. However, if you want a more customized layout with three or more resizable screens, use a Windows functionality called PowerToys with FancyZones.
Read on to learn how to customize the way you split your screen in Windows — it’s especially useful in gaming. Also learn how to use the multiple desktops feature for different configurations.
Sayak Boral is a technology writer with over eleven years of experience working in different industries including semiconductors, IoT, enterprise IT, telecommunications OSS/BSS, and network security. He has been writing for MakeTechEasier on a wide range of technical topics including Windows, Android, Internet, Hardware Guides, Browsers, Software Tools, and Product Reviews.
Subscribe to our newsletter!
Our latest tutorials delivered straight to your inbox
Windows 11 may be better known for its centered taskbar and rounded window borders, but you may find that the new Snap Layouts feature (sometimes also called Snap Assist) is a more useful UI innovation. Windows, as its name implies, has long been excellent at managing and rearranging program windows, but Snap Layouts elevate the OS to the next level. Using them is simple, as we’ll explain.
How Do Snap Layouts Work?
To get started with this new productivity tool, you simply hover the mouse over the Maximize icon in a program window’s upper-right corner. When you do so, you’ll see a choice of layouts, like this:
Note that not every application supports this feature. In my testing, the Firefox and Spotify programs just showed the old Maximize option. However, you can still position them within a Snap Layout after starting the process with an app that supports the feature.
The available options will depend on your screen dimensions; on my test 15-inch Surface Laptop 3 running Windows 11 Insider Preview Build 22000.176 with the display scale set to the recommended 150%, I only got the four choices shown above, with arrangements of two, three and four windows. Microsoft recently announced a new layout option, three equal windows side-by-side or stacked, but that didn’t appear on my laptop, since it’s only designed for large screens of over 24 inches.
You then hover the mouse cursor over the layout diagram onto the shape you want to fit your current application into. The spot will highlight with a color. Here it’s the default blue, but it uses whatever color you chose in Settings > Personalization for your Accent color.
After you tap on the spot where you want the current window to live, you see the full layout on-screen with the other available spots shown using Fluent design Acrylic effects that blur the background. All other running apps are shown as options for filling the placeholders.
Tap on the app you want in each box in succession, or simply return to your resized window to leave the desktop as it was. Note that, as with Windows 10, you can resize snapped windows and the neighboring window will shrink or fill the resulting area to keep everything neat. You can’t drag the thumbnails to another spot. Instead, Windows has you fill each spot one at a time. After you populate all the spots, your screen will something look like this (below):
An alternative way to use Snap Layouts is via the keyboard. Use Windows Key–Right Arrow (or whichever direction you want to snap the window towards) to move and resize a window in half. If you don’t want a half-screen snap, you can use the Windows Key–Arrow combination on the next screen. For example, to get a window to fit exactly in the top right quadrant of the screen, use Windows Key–Right Arrow followed by Windows Key–Up Arrow. This actually already works in Windows 10, but in Windows 11 you get the new Snap Layout look and the feature mentioned next.
Also as in Windows 10, you can drag a window title bar to a corner or edge of the display to take up exactly a half or a quarter of the screen real estate, but with Windows 11 you don’t need to drag it all the way to the edge or corner: An Acrylic outline of the snap position appears well before you get all the way to an edge or corner.
After you create a Snap Layout, you can see an app’s position within that arrangement (as long as the app supports Snap Layouts) via its Taskbar thumbnail, along with icons for the other apps in that Group:
How Do You Turn Off Snap Layouts?
If you can’t stand Snap Layouts, head to Settings > System Multitasking. Here, you can configure settings for Snap Layouts, including completely disabling them and going back to the windowing conventions of Windows 10. Note that you don’t get the ability to snap windows to the sides or corners with Windows key keyboard shortcuts.
You can also turn off all the individual features mentioned above via a series of checkboxes (below), such as the “When I drag a window, let me snap it without dragging all the way to the screen edge” option.
One drawback is that there’s no way to use Snap Layouts via a touch screen. I like simply tapping something on the screen rather than moving a mouse or trackpad to aim it on a button. Since Microsoft is also big on touch screens, including them on all Surface devices, I’d hope that they’d address this issue at some point.
Recommended by Our Editors
More Windowing Features
A related update in Windows 11 is that when you arrange windows the old way, by dragging a window title bar to the side or corner of the screen, it has a new, more helpful look, too. As you can see below, when you drag a window title bar onto a corner of the screen, you see the four-up layout complete with a Fluid design acrylic effect:
A final windowing side note on the plus side: I’m thrilled that Microsoft is offering users the ability to enable Title Bar Window Shake—a feature formerly known as Aero Shake, and one I use several times a day. It was seeming like Microsoft was abandoning this capability with Windows 11, but you can see the option to turn in on in the Settings screenshot above.
For the Advanced Tinkerers
If Snap Layouts don’t offer enough customization for you, or you want similar functionality in Windows 10, check out Microsoft PowerToys. This experimental suite of utilities offers a tool called FancyZones, which pretty much duplicates the Snap Layout with even more customization.
After installing PowerToys, FancyZones is enabled by default, and you can just hold down Shift while dragging a window to get the layout choices (you can customize the keyboard or mouse actions that trigger FancyZones). You can even create custom layouts:
For more coverage of Microsoft’s latest desktop operating system, head to PCMag’s Windows 11 home page.

Like What You’re Reading?
Sign up for Tips & Tricks newsletter for expert advice to get the most out of your technology.
This newsletter may contain advertising, deals, or affiliate links. Subscribing to a newsletter indicates your consent to our Terms of Use and Privacy Policy. You may unsubscribe from the newsletters at any time.
