Вы можете установить SMTP сервер с помощью встроенных средств во всех версиях Windows Server. Такой SMTP сервер внутри организации может работать в качестве почтового релея, который должен принимать и пересылать через себя SMTP сообщения от различных устройств (к примеру, сендеров, сканеров, устройств СКД и пр.) и приложений (веб приложения, SQL Reporting Services, SharePoint), которым необходимо иметь возможность отправлять почту через SMTP сервер. Такой релей может пересылать сообщения на полноценные Exchange сервер или на публичные почтовые сервисы в Интернет типа Gmail, Mail.ru, Office 365 и т.д (ведь не всегда целесообразно разворачивать полноценную внутреннюю почтовую инфраструктуру на базе Microsoft Exchange Server или других почтовых служб).
В этой статье мы покажем, как установить, настроить и протестировать работу SMTP сервера на Windows Server 2012 R2, 2016 и 2019, который будет функционировать в качестве mail релея. Такой SMTP сервер не хранит почтовые сообщения и на нем отсутствуют почтовые ящики, он сможет только отправлять или пересылать почту.
Содержание:
- Установка службы SMTP на Windows Server 2016/2012 R2
- Настройка SMTP сервера на Windows Server
- Автозапуск службы SMTPSVC
- Проверка работы SMTP сервера на Windows Server
Установка службы SMTP на Windows Server 2016/2012 R2
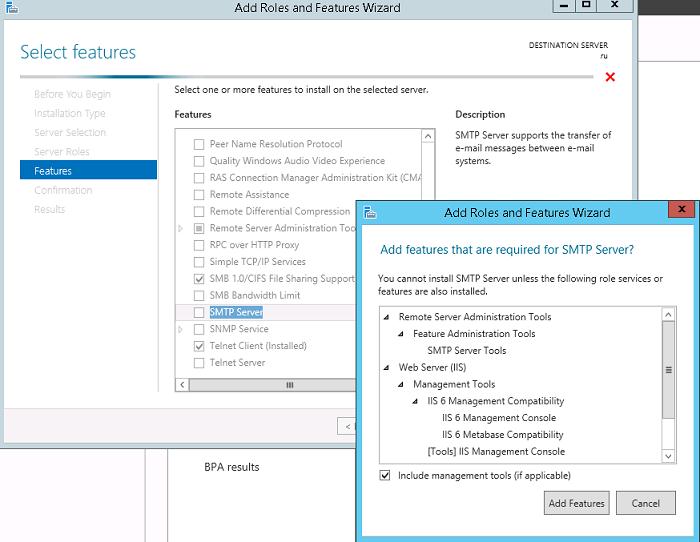
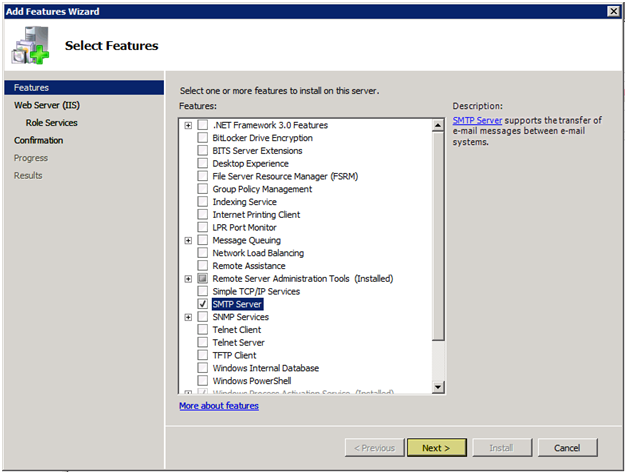
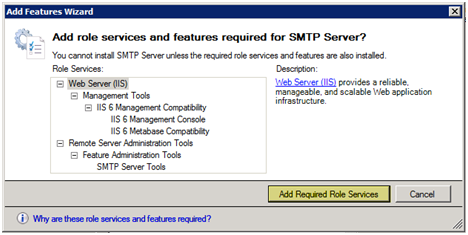
SMTP сервер – это один из компонентов Windows Server, который можно установить через Server Manager. Для этого откройте консоль Server Manager Dashboard (servermanager.exe), перейдите в режим Add roles and features и на этапе выбора функций отметьте чекбокс у пункта SMTP Server. Для управления службой SMTP нужно установить консоли управления, которые входят в комплект роли Web Server IIS (вам будет предложено установить IIS Management Tools).
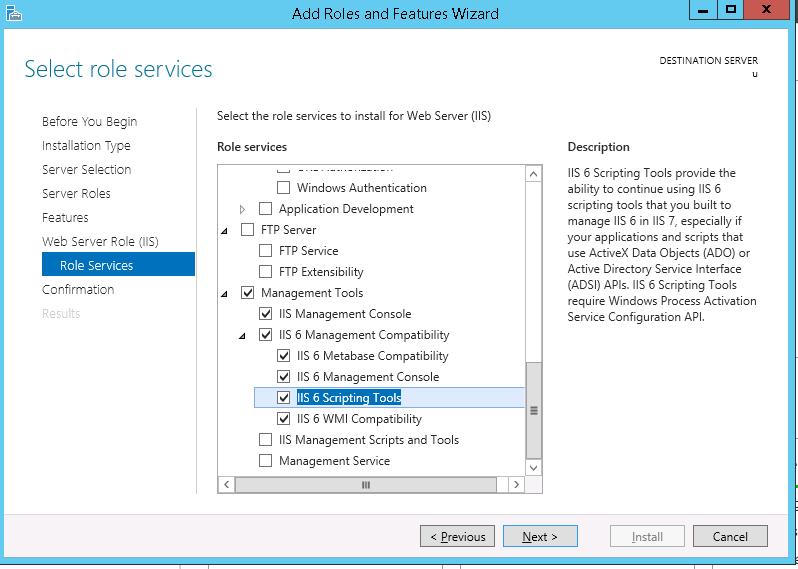
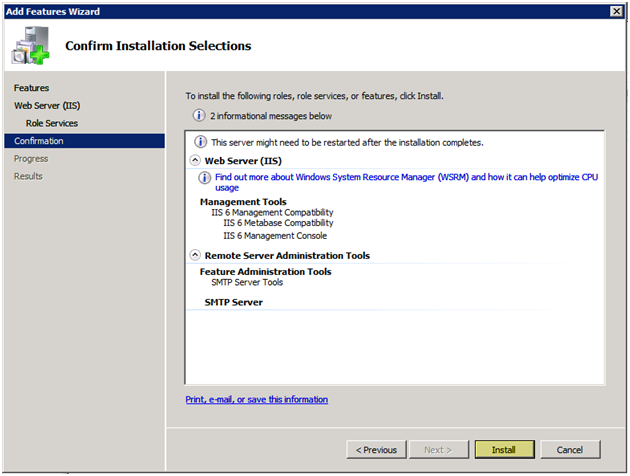
Оставьте все предлагаемые опции роли Web Server (IIS) и запустите установку.
Также вы можете установить компонент SMTP сервера с помощью одной команды PowerShell:
Install-WindowsFeature smtp-server
После окончания установки компонентов может потребоваться перезагрузка системы.
Настройка SMTP сервера на Windows Server
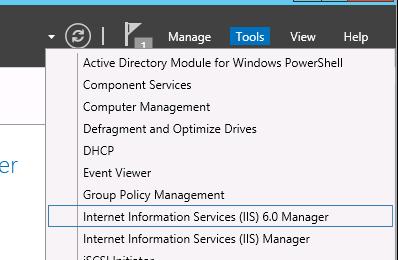
Управляется SMTP сервер консоль управления Internet Information Services (IIS) Manager 6. Открыть эту консоль можно через Server Manager: Tools-> Internet Information Services (IIS) 6.0 Manager или командой inetmgr6.exe.
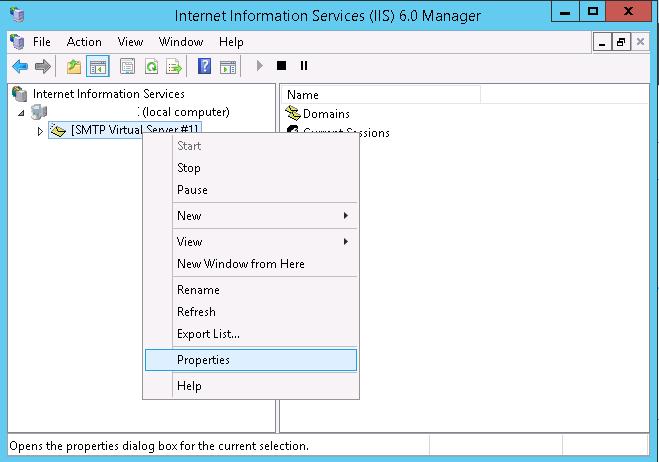
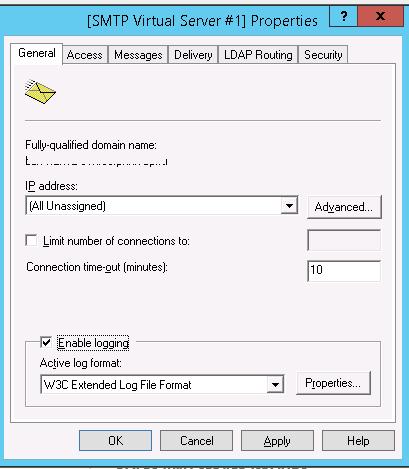
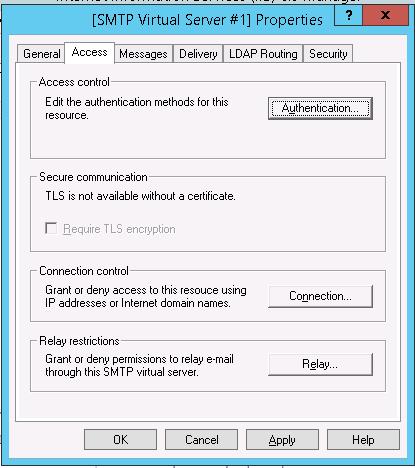
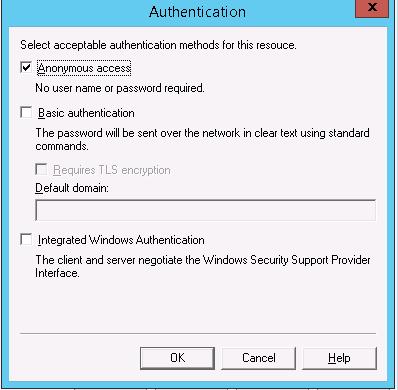
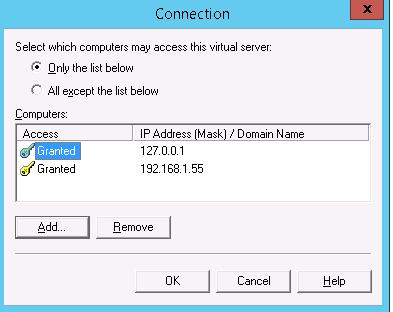
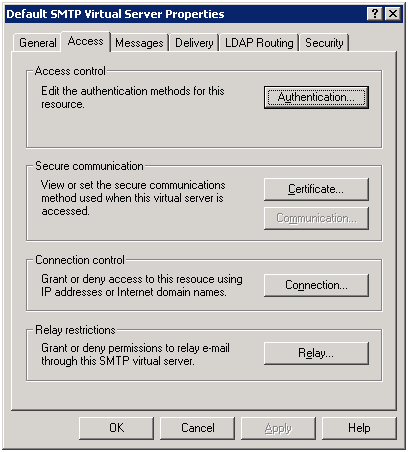
Вернитесь на вкладку Access и нажмите кнопку Connection. Здесь вы можете указать IP адреса устройств, которым разрешено отправлять почту через наш SMTP релей. Нужно выбрать опцию Only the list below и указать список IP адресов, не забыв самого себя (127.0.0.1).
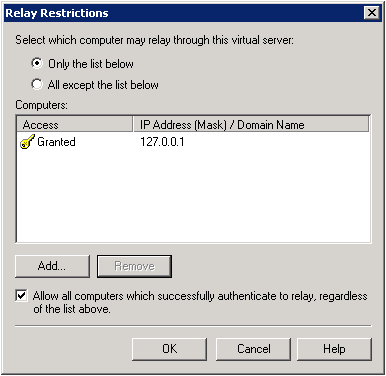
Аналогичным образом настройте список разрешенных IP в настройках Relay (нажмите соответствующую кнопку). В этой секции указано каким IP адресам (или подсетям) можно пересылать почту через ваш SMTP сервер.
Примечание. Как правило, обязательно стоит включать эту опцию, как минимум ограничив список обслуживаемых устройств диапазоном IP адресов. В противном случае ваш SMTP сервер может использоваться спамерами и другими злоумышленниками как открытый релей для массовых почтовых рассылок.
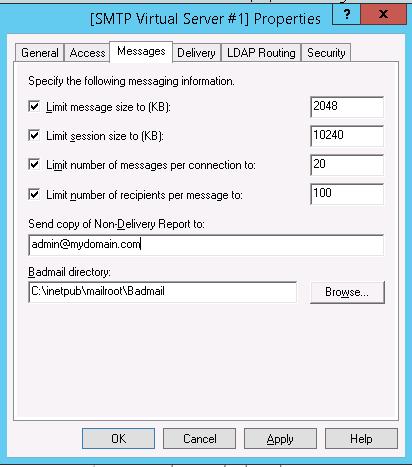
Перейдите на вкладку Messages. Здесь указывается email, на который будут отправляться копии всех NDR отчетов (Send copy of Non-Delivery Report to:). Также здесь можно указать ограничения на максимальный размер писем (Limit message size KB) и количество получателей (Limit number of recepients per message).
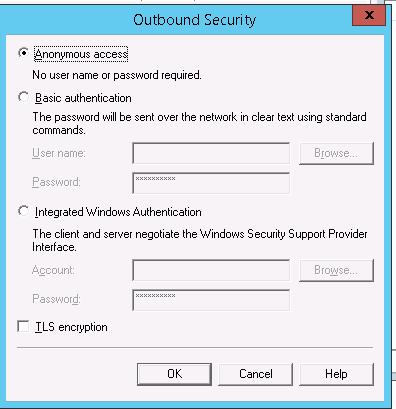
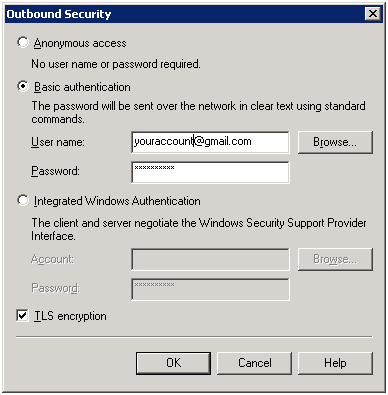
Затем нажмите на кнопку Outbound Security. Здесь указывается, как нужно авторизоваться на почтовом сервере, на который ваш SMTP-сервере будет пересылать (relay) всю почту. К примеру, если вся почта будет отправляться на почтовый сервер Gmail и уже с него пересылаться адресатам, вам нужно выбрать тип аутентификации Basic authentication, указав в качестве пользователя и пароля данные для доступа к почтовому ящику на сервисе Gmail (в настройках аккаунта Google нужно разрешить отправку через smtp сервера gmail).
Затем нажмите на кнопку Advanced.
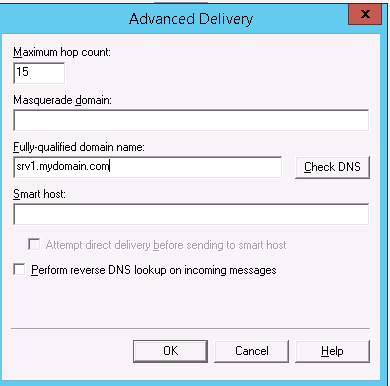
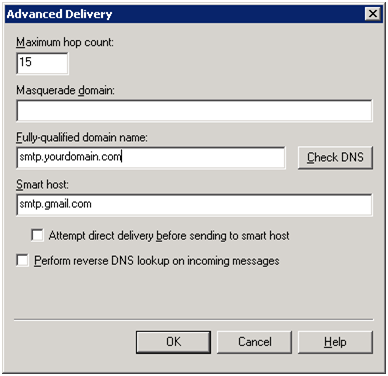
Если сервер должен пересылать почту внешнему smtp серверу, нужно указать его имя в поле Smart host (к примеру smtp.gmail.com или smtp.office365.com).
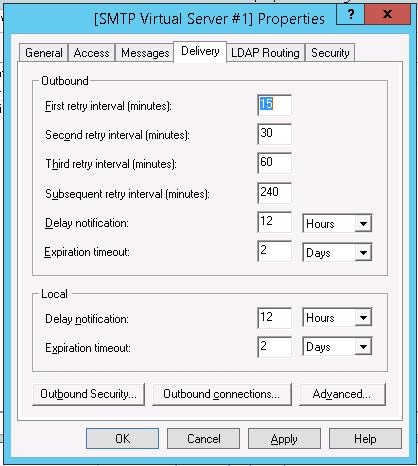
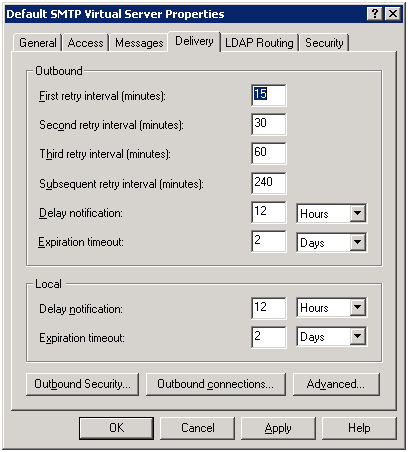
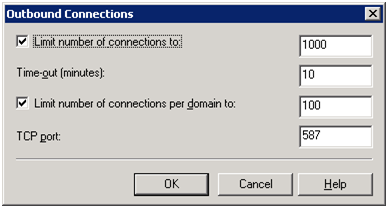
Некоторые внешние почтовые сервера принимает почту только при использовании защищенного SMTP соединения с помощью TLS Encryption (используется порт TCP 587). Это настраивается в разделе Delivery-> Outbound Security и Outbound Connections. Ознакомитесь с документацией вашего почтового провайдера.
Сохраните настройки SMTP сервера и перезапустите ваш виртуальный SMTP сервер для применения изменений.
Примечание.
- Настройки DNS критичны с точки зрения работоспособности почтовой системы. Если ваш SMTP сервер не может корректно разрешить DNS имена доменов, на которые он пытается отправить письма, доставка не удастся.
- Если ваш сервер сам будет отправлять почту в другие домены, важно, чтобы для вашего адреса была сформирована правильная PTR запись для разрешения обратных DNS запросов. PTR запись для белого IP адреса должна указывать на FQDN имя. В противном случае большинство внешних smtp серверов не будут принимать от вас почту, считая ваш сервер спамерским.
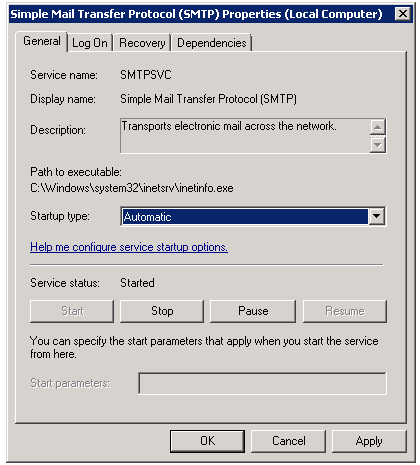
Автозапуск службы SMTPSVC
Осталось настроить автозапуск службы SMTP сервера. Быстрее всего это сделать из командной строки PowerShell:
set-service smtpsvc -StartupType Automatic
Запустим службу:
start-service smtpsvc
Проверим, что запущена служба SMTPSVC :
get-service smtpsvc
Status Name DisplayName
—— —- ————
Running smtpsvc Simple Mail Transfer Protocol (SMTP)
Проверка работы SMTP сервера на Windows Server
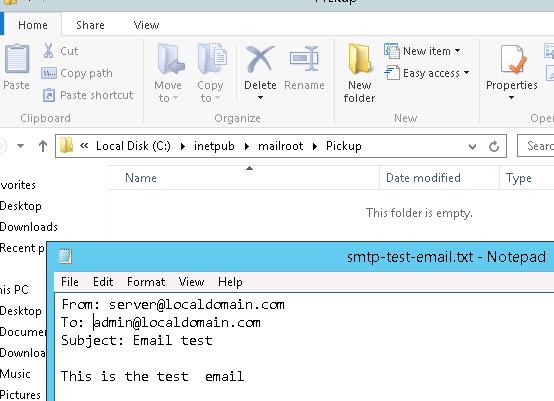
Ну и последнее, что осталось сделать, проверить работу созданного SMTP сервера. Проще всего это сделать, создав на рабочем столе текстовый файл smtp-test-email.txt и скопировав в него следующий текст, заменив имя отправителя и получателя на ваши.
From: [email protected]
To: [email protected]
Subject: Email test
This is the test email
Скопируйте файл smtp-test-email.txt в каталог C:\inetpub\mailroot\Pickup. SMTP сервер следит за появлением файлов в этой каталоге и при обнаружении файла прочтет его содержимое и попытается отправить письмо с данной темой и текстом адресату, указанному в разделе To:.
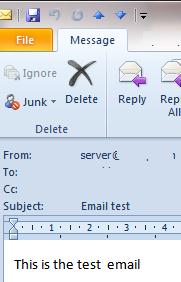
Проверьте ящик получателя, в него должно прийти такое письмо.
Совет. Протестировать работу SMTP сервера можно и из командой строки telnet, скрипта vbs или PowerShell:
Send-MailMessage -SMTPServer localhost -To [email protected] -From [email protected] -Subject "Email test" -Body "This is the test email sent via PowerShell"
Если вы хотите, чтобы вы включили Basic Authentication (Обычная проверка подлинности) для авторизации всех ваших SMTP клиентов (вместо анонимной аутентификации), вы можете отправить письмо с smtp-аутентификацией через telnet следующим образом.
Также убедитесь, что на вашем SMTP сервере не блокируется порт TCP 25 при удаленном подключении (локальным файерволом, антивирусом или межсетевым экраном). Проще всего это сделать с компьютера Windows, IP адрес которого добавлен в разрешенные. Проверку доступности порта можно выполнить с помощью командлета Test-NetConnection:
Test-NetConnection smtpsrv1.name.local –port 25
Если 25 порт блокируется, проверьте настройки Windows Firewall, антивируса и аппаратных межсетевых экранов.
Итак, вы настроили собственный почтовый SMTP релей на Windows Server 2016/2012 R2 и протестировали отправку писем через него.
Microsoft IIS can serve the role of an SMTP quite nicely but requires quite a few steps to get set up. Lucky for you, I’ve set up an IIS SMTP relay server and documented all of the steps!
In this article, we will cover all of the steps needed to successfully set up an SMTP relay server to send an outgoing email with Office 365. Technically, we will use this SMTP relay to relay email to Office 365; it can just as quickly work for any general SMTP relay mail delivery purposes.
Prerequisites
To get IIS set up and follow along with me, be sure you have a Windows Server 2016 machine available. I’ll also be assuming you are logged into the server as an administrator.
Install the IIS SMTP Server Windows Feature
The first task you’ll need to do to get an IIS SMTP relay set up is to install the IIS SMTP Server. You’ll need to install the SMTP Server Windows feature.
Using Server Manager
If you’re unfamiliar with installing Windows features via Server Manager, check out this article entitled Install or Uninstall Roles, Role Services or Features.
Using PowerShell
Installing the SMTP Server feature removes a lot of point and clicking. Open up a PowerShell console as administrator and run the line below:
PS51> Install-WindowsFeature -Name SMTP-Server -IncludeAllSubFeature -IncludeManagementTools -RestartWait for the installation to finish. You should see an output similar to this.

Import a certificate (for TLS only)
If you’ll be sending e-mail via TLS (Office 365), you need to import an SSL certificate in the server’s local machine personal certificate store before you configure the IIS SMTP Server. You can skip this step if your Office 365 SMTP relay is non-TLS.
If you don’t have a certificate, you can get one via your internal PKI (if you have that) or a public certificate using services like LetsEncrypt, Digicert, etc.
Once you have the certificate, you’ll need to import it into the local machine personal certificate store. If you’re unfamiliar with how to import certificates using the Certificates MMC, check out Import and Export Certificate – Microsoft Windows.
When successful, you should get a confirmation window like this. Click OK (1) to confirm.

Back in the main console window, refresh the Personal > Certificates folder and you should be able to see the imported certificate.
Validate the Certificate
Once imported, be sure to verify that the certificate chain is complete and that there are no errors. If all is well, you should be able to open the certificate and see the Valid From field is current and there is a private key associated with the certificate. An example is shown below.

On the Certification Path tab, you should also see a Certificate status stating that the certificate is OK as shown below.

Configure the IIS SMTP Server
You have successfully installed the SMTP server at this point. But before you can use it, the server settings must be configured first.
The SMTP server is running on IIS6 Compatibility mode and it does not come with built-in PowerShell support. This means that you will configure the settings manually using the IIS6 Management Console.
Go to Start –> Run and type in inetmgr6 and hit Enter. This will open the IIS 6 console.
Once the console is open, right-click on [SMTP Virtual Server #1] (1), then select Properties (2).

In the Properties window, check Enable logging (1), then click Properties (2).

Go to the Advanced tab, and check all the boxes in the list (1), then click OK (2).

Back in the Properties window, go to the Delivery tab and click on Advanced (1).

In the Advanced Delivery window, type in the Fully-qualified domain name (1) you’d like to use for the destination SMTP mail server. It does not have to be the same as the FQDN of the computer itself. If you’re configuring this SMTP server to use with Office 365, in the Smart host (2) field, define your Office 365 MX endpoint. and click OK (3).

Add Allowed IPs in the IIS SMTP Server
Now if you have a device that you want to test, you must add its IP address to the relay restrictions first. For this example, the IP address 192.168.0.3 will be added to the relay restrictions. This IP address belongs to a computer that is within the same network as the server.
To add an allowed IP in the relay restrictions, go to the Access tab and click on Relay (1).

Inside the Relay Restrictions window, click Add (1).

Then type in the IP address (1) you’d like to allow then click OK (2).

Back in the Relay Restrictions window, confirm that the IP address is added to the list, then click OK (1) and OK out of the properties window.

Confirm Certificate is Detected by the SMTP Server and Enable TLS Encryption
If your relay server will be sending outbound email via TLS, you’ll need to confirm the certificate is seen by the IIS SMTP Server and enable TLS encryption.
On the Access tab of the SMTP Server properties, you should see a message stating “A TLS certificate is found with expiration date: XXXXXX”. If so, you’re good to go.

Next, click on the Delivery tab, click on Outbound Security (1), check the TLS encryption (2) box, click OK (3).

This concludes the IIS SMTP Server configuration steps.
Test the IIS SMTP Mail Relay Server
At this point, your SMTP Server should be configured and ready to begin relaying mail. The next step is to test it. You should now test sending email through the SMTP relay to confirm the receiving SMTP server gets the message.
Test with the Pickup Directory
When IIS SMTP Server is installed, it will create a folder on the server at C:\inetpub\mailroot\Pickup. This directory is where the SMTP service picks up newly submitted emails for processing before moving them to the Queue directory.
To test using this method, create a plain text file with content similar to this:
Do not forget to change the From and To values to your own.
Now save this file somewhere other than the pickup directory as mail.txt.
Once you’ve saved the file, copy and paste the file into the C:\inetpub\mailroot\Pickup folder. If successful, the file should quickly disappear. This means that the SMTP service has picked it up and has started processing the message.
After a few seconds to a minute, you should receive the email sent to the specified recipient email address defined in mail.txt.
Test with PowerShell
In this test, you will use PowerShell from the computer whose IP address you added in the Add Allowed IPs in the IIS SMTP Server section.
Open up a PowerShell console and copy/paste the code below. Be sure to edit the values for the From, To and SmtpServer parameters. Depending on how you configured the relay server above, you can use either example below to test a non-TLS or TLS setup.
## Build the message parameters
$mailParams = @{
    SmtpServer                 = 'smtp.server.here'
    Port                       = 25
    #UseSSL = $true
    From                       = '[email protected]'
    To                         = '[email protected]', '[email protected]'
    Subject                    = ('ON-PREM SMTP Relay - ' + (Get-Date -Format g))
    Body                       = 'This is a test email using ON-PREM SMTP Relay'
    DeliveryNotificationOption = 'OnFailure', 'OnSuccess'
}
<# Send the message #>
Send-MailMessage @mailParams
Summary
In this article, you’ve learned how to set up an IIS SMTP relay server for recipient email delivery from Office 365. We covered setting up both a non-TLS and TLS SMTP server using a combination of the GUI and PowerShell. We then tested our setup using PowerShell to confirm all is well.
Further Reading
- Send-MailMessage: The PowerShell Way to Send Email
- Automating IIS SSL Certificate Installation with PowerShell
A local SMTP Relay Server is an SMTP server that allows you to send e-mail messages. SMTP Relay Server is a Windows SMTP server program that allows you to convert any Windows PC to SMTP servers. You can use it as a dedicated server or personal computer in the background.
It can be used in conjunction with any mail or email program that runs on the same computer or on a separate computer connected to the SMTP Relay Server using the TCP / IP protocol.
Portable PCs of users by means of various Internet services (ISP) can use possibilities of program SMTP Relay Server as a gateway of SMTP-server which sends messages directly when it is possible and redirects them on mail boxes if direct sending on protocol SMTP at the current provider is blocked.
SMTP Relay Server enables secure, efficient, and direct email sending and receiving, even if SMTP is blocked by your ISP.
You can easily use the email program to send and receive messages. You only need to use the server with the IP address «127.0.0.1». Your current SMTP host. SMTP Relay Server allows you to protect your computer from hacker attacks with a variety of security options, as well as to filter spam.
Requires Windows operating system
Requires a stable internet connection
Must have TCP/IP protocol support
Requires security measures to counter hacker attacks
Ensures reliable and efficient delivery of bulk emails.
Offers robust security safeguards against spam and phishing attacks.
Supports multiple concurrent connections for increased send rates.
Relay server might be used for spamming, affecting reputation.
Requires technical knowledge for proper configuration and management.
Vulnerability to phishing attacks if not properly secured.
USER REVIEWS AND COMMENTS
image/svg+xmlBotttsPablo Stanleyhttps://bottts.com/Florian Körner
Angus
The product description reads like it was translated to English, it is not understandable or clear as to what this product does. It is just an email server? Why do I need this? The badly written description gives no persuasive idea of what it does or why it would be useful.
image/svg+xmlBotttsPablo Stanleyhttps://bottts.com/Florian Körner
Christopher
The best way that I can describe this is that if you need to send messages to people, and if you are blocked, then you can use this SMTP Relay Server to get your message through. I can use it daily with my emails.
image/svg+xmlBotttsPablo Stanleyhttps://bottts.com/Florian Körner
Daniel
SMTP Relay server software is the process of transferring an email from one server to another for delivery. It is an inbuilt feature of the server. Organization might have network devices which send emails to servers that do not support encryption protocol required by email provider. SMTP Relay server software, guarantee the delivery of email to the recipients. Additionally it has the protection for the sending reputation and secured email deliver. It protected against malware.
image/svg+xmlBotttsPablo Stanleyhttps://bottts.com/Florian Körner
John Y.
SMTP Relay Server is a server that processes outgoing emails and relays them to the appropriate mail server. It can be used to ensure that emails are sent securely and reliably. It also includes features such as authentication, encryption, and virus scanning.
image/svg+xmlBotttsPablo Stanleyhttps://bottts.com/Florian Körner
Ben Lajara
SMTP Relay Server software is a great solution for sending emails in large volumes. It’s easy to configure and set up with a wide range of options. I found the customer service to be very helpful when I experienced issues setting up the software. The software also provides detailed logs for tracking email delivery and capacity for multiple virtual domains. It also has an efficient spam filter and virus scanner. The software runs smoothly and I have not experienced any disruption in service. The web interface is also intuitive and easy to use. All in all a great product, with great features and customer service.
image/svg+xmlBotttsPablo Stanleyhttps://bottts.com/Florian Körner
David G******x
I’ve been using SMTP Relay Server software for a few months and it’s been working well. I like how it’s easy to set up and configure. It’s been reliable, and I haven’t had any issues with it so far. I’m happy with the performance and the features it provides.
image/svg+xmlBotttsPablo Stanleyhttps://bottts.com/Florian Körner
Harrison P*****r
SMTP Relay Server software is a tool that enables the transmission of emails through a server to a recipient’s email server. It acts as a gateway between the sender and receiver’s email systems, allowing for efficient email delivery. The software typically includes features such as email filtering, security protocols, and authentication mechanisms to ensure secure and reliable email transmission. It can be configured to work with multiple email clients and can handle high volumes of email traffic. The software is commonly used by businesses and organizations to manage their email communication.
image/svg+xmlBotttsPablo Stanleyhttps://bottts.com/Florian Körner
Jamie Coupal
SMTP Relay Server software is a tool used to forward emails from one email server to another, improving the reliability and efficiency of email communication.
image/svg+xmlBotttsPablo Stanleyhttps://bottts.com/Florian Körner
Andrew
SMTP Relay Server is a robust software that handles the delivery of emails over a network. The software’s most prominent feature is its ability to enable routing emails through third-party servers, ensuring secure and efficient email delivery. It also supports load balancing and failover capabilities, thus providing a reliable solution for businesses.
image/svg+xmlBotttsPablo Stanleyhttps://bottts.com/Florian Körner
Mason
Reliable for sending bulk emails, yet configuration can be a bit tricky and requires technical knowledge.
image/svg+xmlBotttsPablo Stanleyhttps://bottts.com/Florian Körner
Liam
Reliable, quick, efficient email delivery. User-friendly interface. Reduced spam emails. Effective tracking features. Essential for bulk emailing.
image/svg+xmlBotttsPablo Stanleyhttps://bottts.com/Florian Körner
Sam
Efficient, reliable, seamless email transmission.
Posted on
This tutorial with show how Windows SMTP Server relay mails through Gmail or any other mail server. This is useful if your server is located on a network with dynamic IP address.
I had this issue when a monitoring software needed to send notification mails but there was no option of authenticating to the SMTP server. I installed Windows SMTP server but all my mails ware blocked by the SPAM filters. The solution was to relay all mails through a mail server.
If you are sending small number of mail this is good solution, but if your system sends a lots of mails you can be blocked by Gmail’s limits. In this case use your own mail server.
Install Windows SMTP Server
Open the Windows Server 2008 Server Manager and under Features, select Add Features
You need to check box next to SMTP Server and click Next
If you don’t have IIS 6 Management Console installed Windows 2008 will install the missing Roles for the SMTP Server to work, just click the Add Required Role Services button, and click Next on the previous screen.
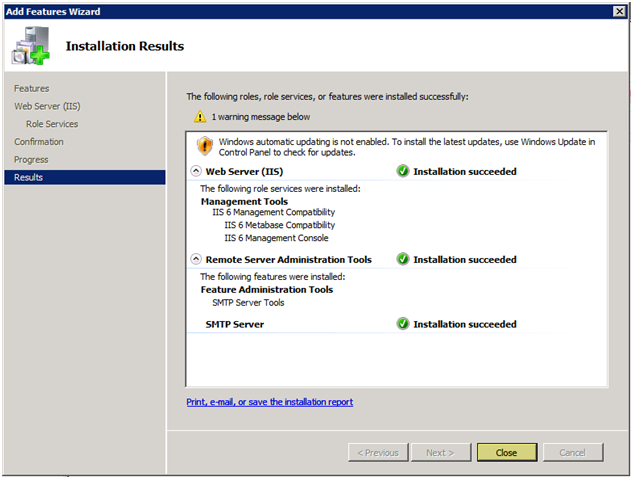
As you can see now it will install the IIS 6 Management Compatibility, IIS 6 Management Console and the SMTP Server. Press Install as shown on the screen.
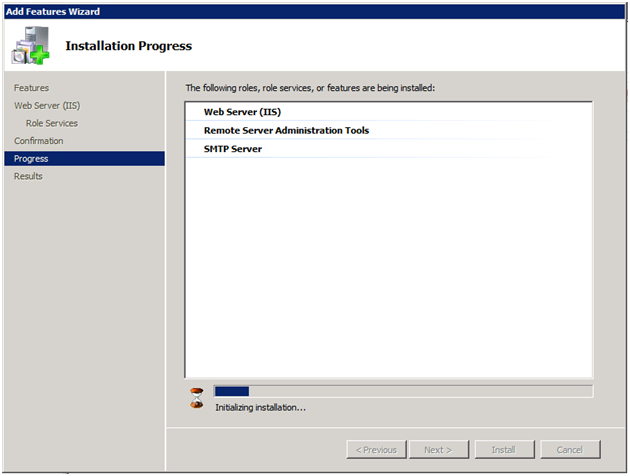
Now the installation will begin and it will can take several minutes for this process to finish.
As you can see the Installation succeeded on the screen the installation of the Windows SMTP Server is complete. Press Close and we can start the configuration.
Configure Windows SMTP Relay
Open Internet Information Services (IIS) 6.0 Manager, right click SMTP Virtual server, select Properties, select the Access tab and click Relay
You can add here list of servers that will send mails trough this server. Click on Add to add all the servers you need, and click OK
Select the Delivery tab and click Outbound Security…
Select Basic Authentication, enter your Gmail account (i.e. [email protected]), enter your Gmail password, check TLS encryption and press OK
Select the Delivery tab and click Outbound connections…
Set TCP port to 587 and click OK
Select the Delivery tab and click Advanced…
Enter the Full-quailified domain name – this should be what you want this SMTP server to be called. If your server name is SMTP and your domain is YOURDOMAIN.COM then the entry should be smtp.yourdomain.com
Enter smtp.gmail.com as the Smart host and click OK
Now you can configure your servers to use smtp.yourdomain.com as SMTP server and it will relay the mails trough your Gmail account.
One final note: Don’t forget to set the Simple Mail Transfer Protocol (SMTP) service to start automatically. Start your Services console, right click Simple Mail Transfer Protocol (SMTP), select Properties and change Startup type: Automatic
You need to have Gmail Account or create one at: http://www.gmail.com
Enable the Gmail account for POP3 in Gmail, you can follow the instructions on how to do this here: http://mail.google.com/support/bin/answer.py?answer=13273&cbid=wl8yzeug2lob&src=cb&lev=topic
Локальный SMTP Relay Server — это SMTP-сервер, который позволяет отправлять сообщения электронной почты. SMTP Relay Server является программой SMTP сервера для Windows, которая позволяет преобразовывать любые Windows ПК в SMTP-сервера. Вы можете использовать ее как на выделенном сервере или на персональном компьютере в фоновом режиме.
Она может использоваться вместе с любой почтовой или электронной почтовой программе, которая работает на одном компьютере или на отдельном компьютере подключенному к SMTP Relay Server с использованием протокола TCP / IP.
Портативные ПК пользователей с помощью различных Интернет-услуг (ISP) могут использовать возможности программы SMTP Relay Server в качестве шлюза SMTP-сервера, которая отправляет сообщения непосредственно, когда это возможно и перенаправляет их на почтовые ящики, если прямая отправка по протоколу SMTP у текущего провайдера блокируется.
Вы можете легко использовать почтовую программу для отправки и получения сообщений. При этом вам необходимо использовать сервер только с помощью IP-адреса «127.0.0.1». Ваш текущий хост SMTP. SMTP Relay Server позволяет Вам с помощью множества вариантов по безопасности защитить компьютер от хакерских атак, а также фильтровать спам.
