После установки домена в Windows server 2019 для безопасности и удобства использования рекомендуется изменить стандартное имя администратора домена «Администратор«, на другое имя. Также рекомендуется изменить формат выводимого имени пользователя домена с «Имя-Отчество-Фамилия» на «Фамилия-Имя-Отчество«. Сделать это несложно, времени много не занимает.
Как переименовать администратора домена и изменить формат выводимого имени пользователя
- Переименование администратора домена
- Изменение формата выводимого имени пользователя
Переименование администратора домена
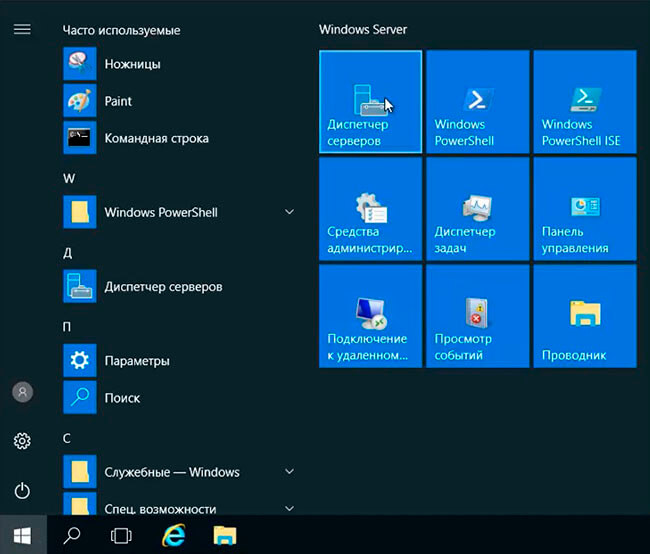
1. Нажимаем «Пуск» — «Диспетчер серверов«.
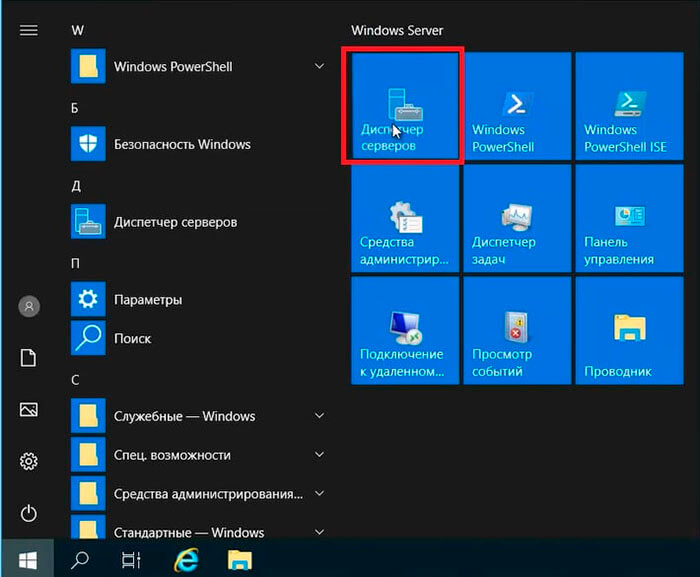
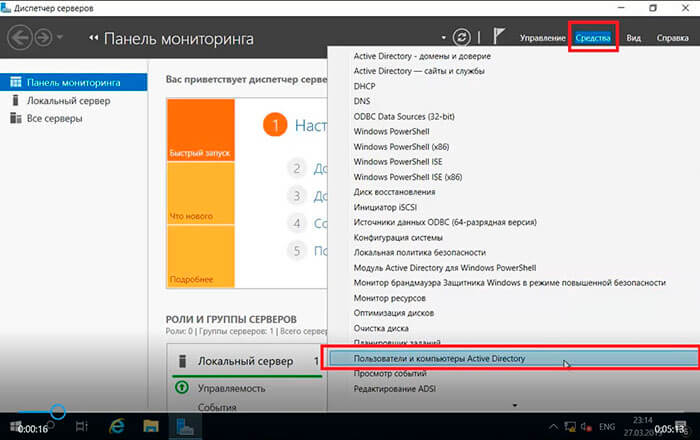
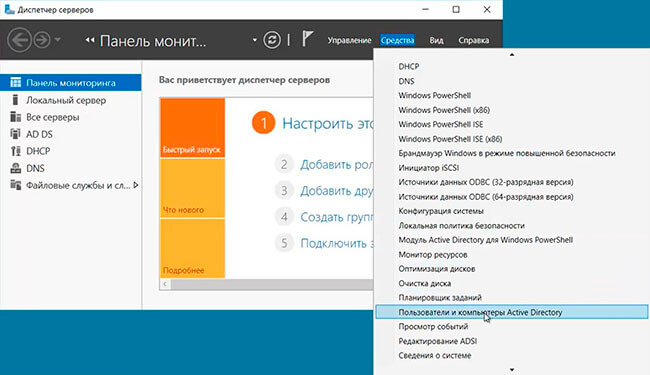
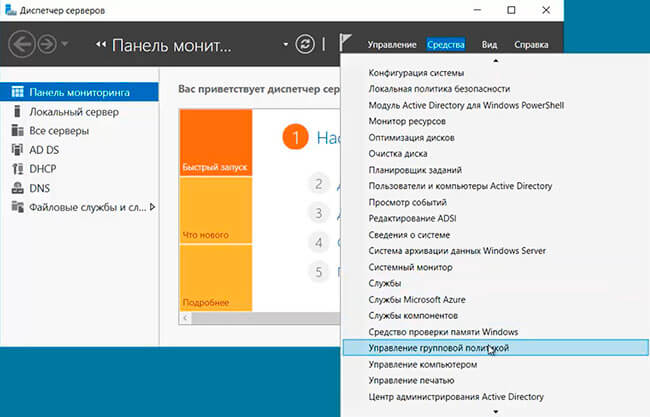
2. В следующем окне выбираем «Средства«, далее «Пользователи и компьютеры Active Directory«.
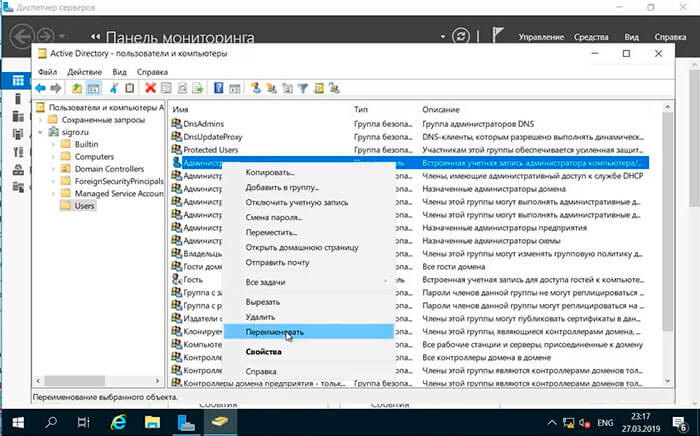
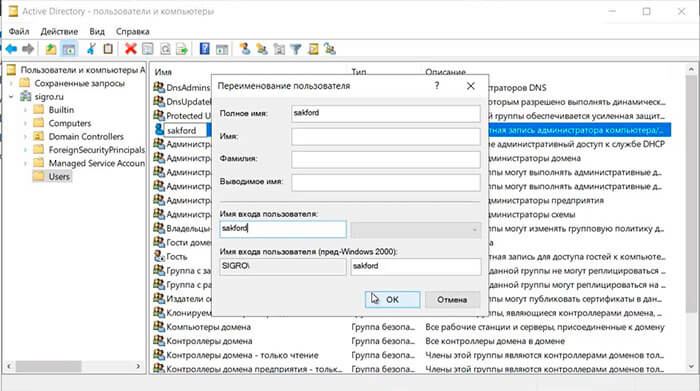
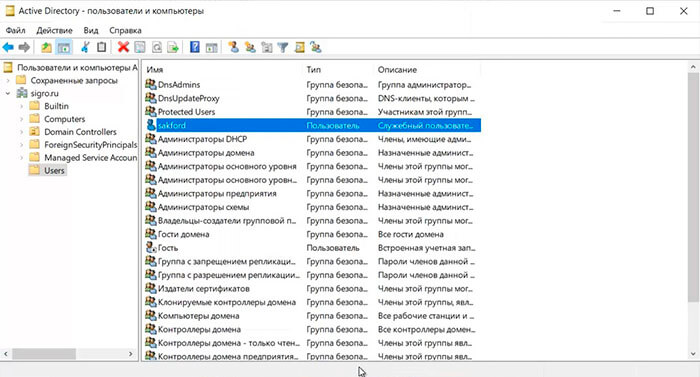
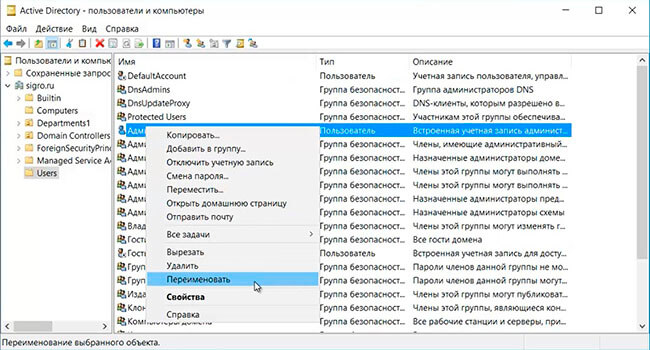
3. Выбираем пользователя «Администратор«, правой клавишей мыши — «Переименовать«.
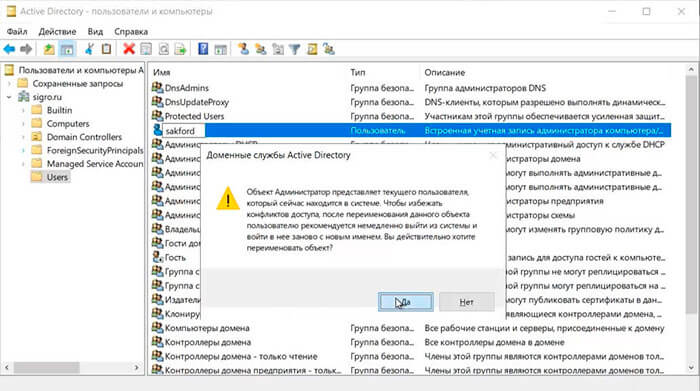
4. Переименовываем администратора домена, далее читаем предупреждение о том, что объект Администратор представляет текущего пользователя, который сейчас находится в системе. Для того, чтобы избежать различных конфликтов доступа, после переименования данного объекта необходимо выйти из системы и войти в нее заново с новым именем. Нажимаем «Да«.
5. В новом окне задаем «Имя входа пользователя«, далее «ОК«.
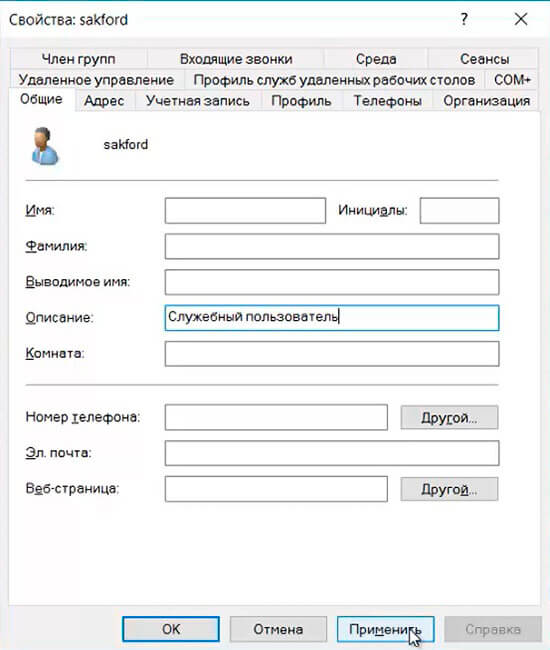
6. После переименования администратора домена изменим описание этого пользователя. Для этого нажимаем правой клавишей мыши на переименованного администратора домена, далее «Свойства«.
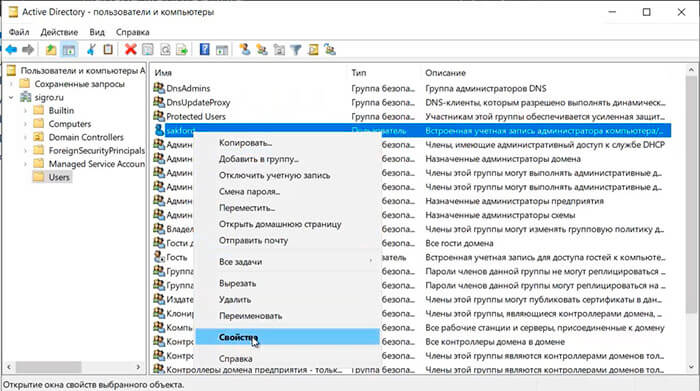
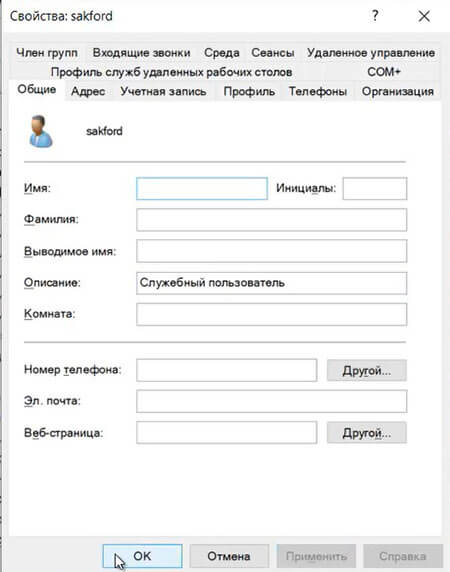
7. На вкладке «Общие» в «Описание» удаляем старое описание, добавляем новое, например «Служебный пользователь«. Далее «ОК«.
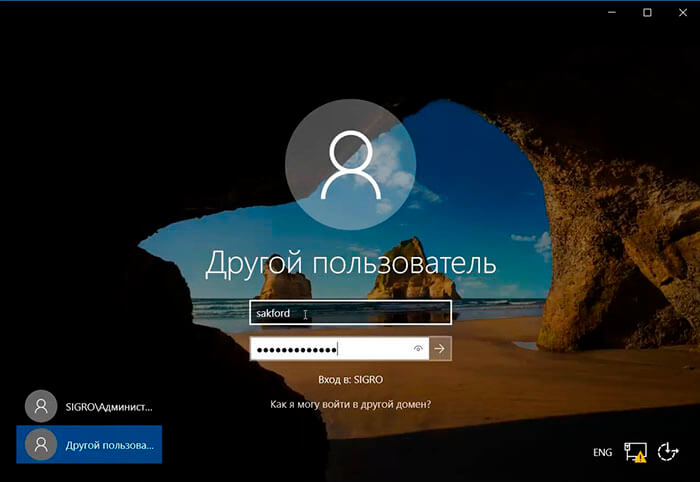
8. Далее выходим из системы или перезагружаем сервер. Производим вход под новым именем администратора домена.
9. В «Active Directory — пользователи и компьютеры» проверяем переименованного администратора.
Изменение формата выводимого имени пользователя
При добавлении нового пользователя в домене «Полное имя» добавляется и выводится в формате «Имя-Отчество-Фамилия«. Это неудобно, но возможно изменить.

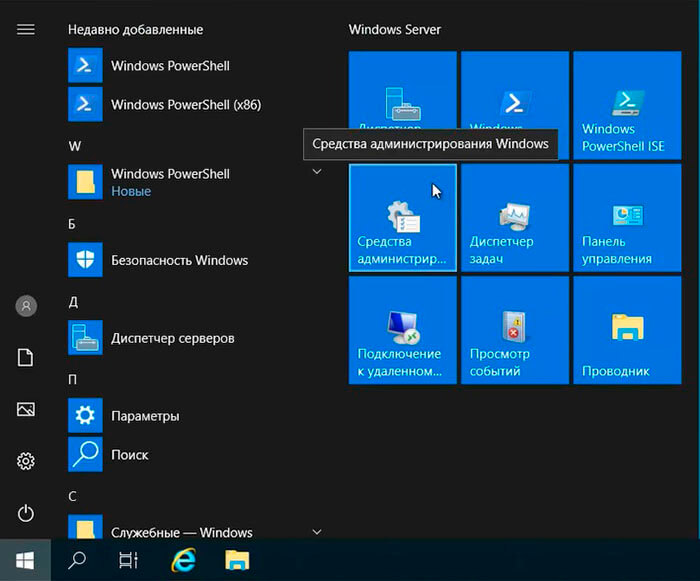
1. Нажимаем «Пуск» — «Средства администрирования Windows«.
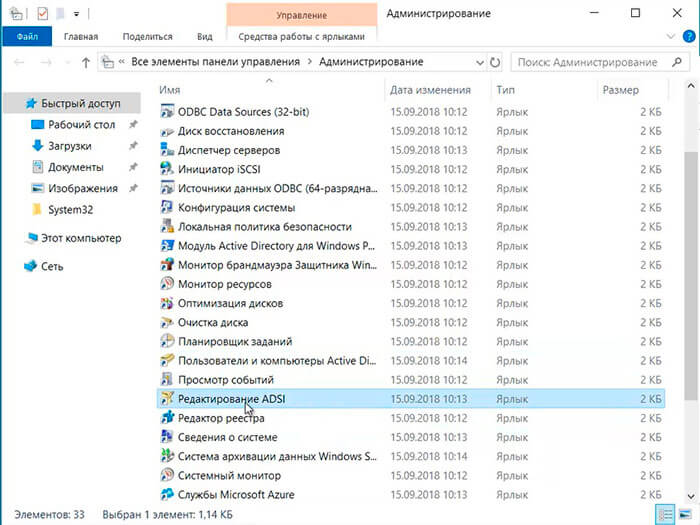
2. В новом окне выбираем «Редактирование ADSI«.
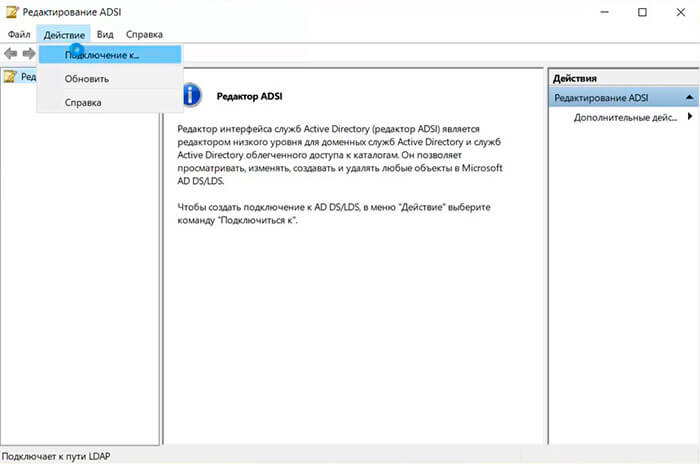
3. В следующем окне — «Действие» — «Подключение к…«
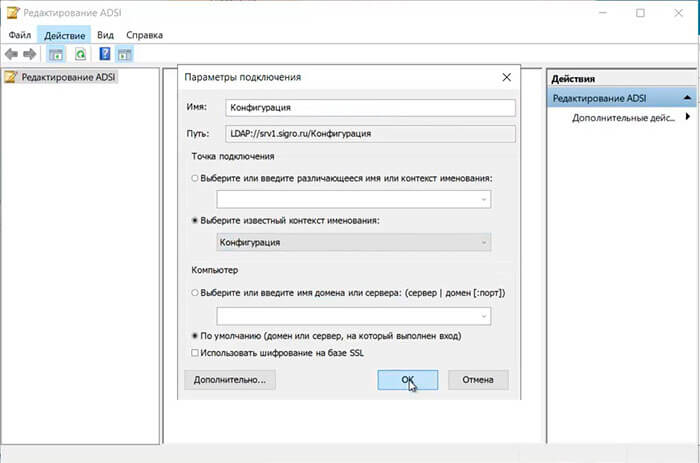
4. Изменяем «Выберите известный контекст именования:» на «Конфигурация«. Далее «ОК«.
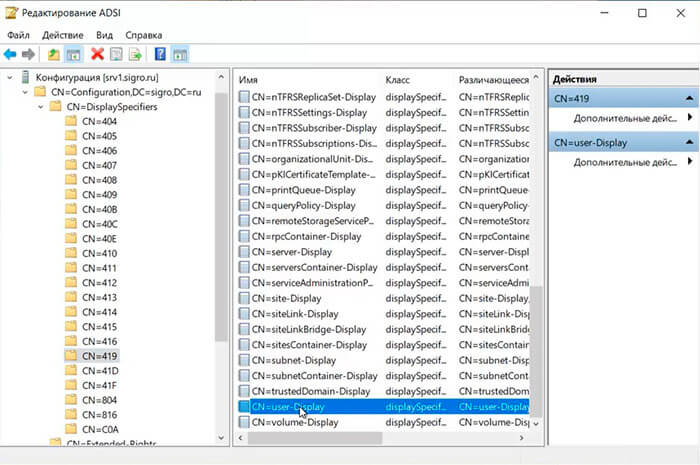
5. Открываем конфигурацию сервера — «CN=DisplaySpecifiers» — «CN=419«. В правом окне выбираем «CN=user-Display«.
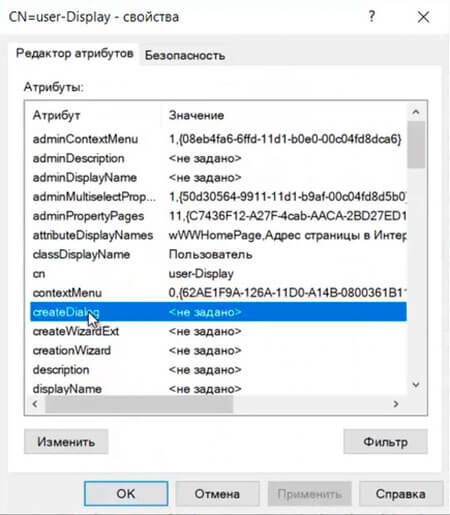
6. В новом окне выбираем «createDialog«.
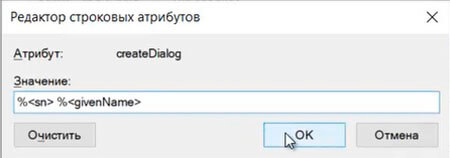
7. Задаем значение: «%<sn> %<givenName>«. Далее «ОК«.
8. После несложных манипуляций при добавлении нового пользователя формат выводимого имени будет удобным — «Фамилия-Имя-Отчество«.
Посмотреть видео, как переименовать администратора домена, изменить формат выводимого имени, можно здесь:
- Windows server 2019 — установка и настройка WSUS, создание и настройка GPO
- Windows server 2019 — добавление и удаление компьютера в домене
- Windows server 2019 — установка и настройка Active Directory, DNS, DHCP
- Windows server 2019 — создание и удаление пользователя, группы, подразделения в домене
- Windows server 2019 — установка и настройка сервера печати, разворачивание МФУ с помощью GPO
- Windows server 2019 — GPO изменение экранной заставки, отключение монитора, изменение политики паролей

Как Вам возможно известно, Windows создаёт аккаунт администратора с соответствующим именем «Администратор». Этот административный аккаунт имеет привилегии на другими пользовательскими в вашей копии ОС Windows, и используя его, Вы можете делать почти всё что угодно без каких-либо ограничений. Потенциальная опасность этого аккаунта в том, что он является целью хакеров, завладев которым можно получить широкие возможности на компьютере жертвы. Одним из решений является переименование аккаунта администратора во что-либо другое.
Использование «Командной строки» Windows
Для того, чтобы переименовать аккаунт администратора, используйте командную строку с правами администратора. Если Вы используете Windows Vista, Windows 7, Windows Server 2008 или Windows Server 2008 R2, то нажмите на меню «Пуск», наберите в строке поиска “cmd”, и щёлкнув по найденному значению правой кнопкой выберете пункт меню «Запуск от имени администратора». И наконец, если у Вас Windows 8, просто нажмите сочетание клавиш “Win+X”, и выберете пункт меню «Командная строка (администратор)».

После того, как «Командная строка» будет открыта, просто вставьте команду ниже, чтобы переименовать учетную запись администратора. Не забудьте заменить ‘newUserName’ на имя, которое Вы хотите использовать.
wmic useraccount where name=’Администратор’ call rename name=’newUserName’

После того, как команда будет выполнена, Вы увидите подтверждающее сообщение, наподобие того, как показано выше. Этого достаточно, чтобы переименовать аккаунт администратора.
Используем «Редактор локальной групповой политики»
Вторым способом изменить имя администратора компьютера является использование «Редактора локальной групповой политики». Вам понадобится версия Windows не ниже Pro (Pro или Enterprise), и в зависимости от Ваших потребностей, можно применить это правило к целой сети. Для начала нажмите сочетание клавиш “Win+R”, чтобы запустить диалоговое окно «Выполнить» и введите команду “gpedit.msc” для запуска «Редактора локальной групповой политики».

После того, как редактор будет запущен, Перейдите в области навигации по следующему пути: «Конфигурация компьютера -> Конфигурация Windows -> Параметры безопасности -> Локальные политики -> Параметры безопасности». В открывшемся списке найдите и дважды кликните мышкой на политику «Учётные записи: Переименование учётной записи администратора».

Сделанные действия откроют окно настройки выбранной политики. Просто введите новое имя администратора и нажмите «ОК» для того, чтобы сохранить изменения.

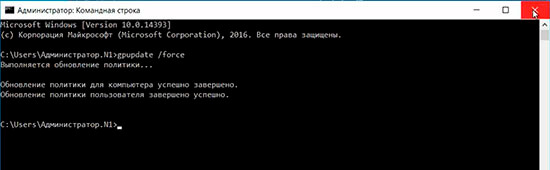
Этого достаточно, чтобы переименовать администратора через «Редактор локальной групповой политики». Чтобы изменения вступили в силу, необходимо перезагрузить компьютер или выйти из системы и войти заново. Альтернативным способом применения политик является использование команд, представленной ниже в «Командной строке» с правами администратора.
gpupdate /force
Использование утилиты «Управление компьютером»
Переименовать аккаунт администратора можно и с использованием утилиты «Управление компьютером». Для того, чтобы сделать это, запустите утилиту «Управление компьютером». Запустить её можно разными способами: «Панель управления» -> «Администрирование» -> «Управление компьютером», Нажав сочетание клавиш “Win+X” и выбрав «Управление компьютером» или с помощью диалогового окна «Выполнить».

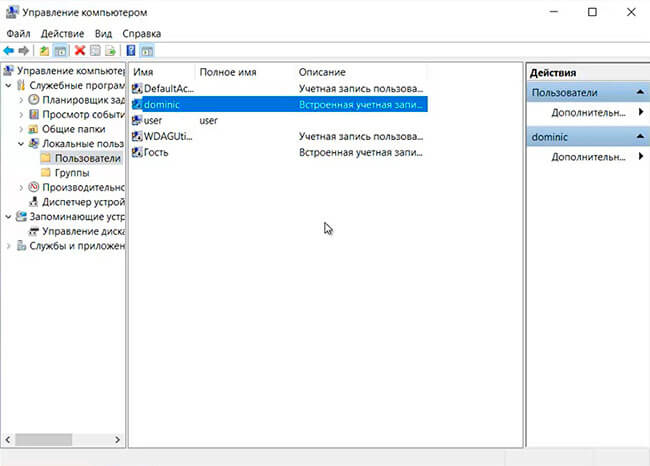
Теперь перейдите по следующему пути: «Служебные программы -> Локальные пользователи и группы -> Пользователи». Здесь Вы сможете найти аккаунт администратора с именем «Администратор».

Кликните правой кнопкой мыши на аккаунте «Администратор» и выберете опцию «Переименовать», затем введите новое имя администратора и подтвердите изменения.

Вот и всё, что нужно сделать.
Здесь мы рассмотрели 3 способа переименования аккаунта администратора. Надеюсь данная статья будет Вам полезна. Оставляйте комментарии, делитесь советами и опытом использования. До скорого.
Переименование администратора домена является одной из первых задач, которую необходимо сделать в домене. Связано прежде всего с безопасностью домена. Переименовать администратора домена легче всего вручную, не используя GPO. Также можно переименовать локального администратора компьютеров и серверов, входящих в состав домена. Такое переименование легче всего сделать с помощью групповых политик.
Переименование администратора домена
1. Открываем «Диспетчер серверов».
2. Далее «Средства» — «Пользователи и компьютеры Active Directory».
3. Выбираем пользователя «Администратор», правый клик мыши, в открывшемся меню «Переименовать».
4. Появится предупреждение, что объект Администратор представляет текущего пользователя, который сейчас находится в системе. Нажимаем «Да».

5. Переименовываем пользователя. Для этого в «Имя входа пользователя» пишем другое имя вместо учетной записи Администратор, далее «ОК».

6. В свойствах переименованной учетной записи, на вкладке «Общие», меняем «Описание», например пишем «Служебный пользователь».
Далее необходимо выйти из текущей учетной записи и снова зайти в операционную систему под новой учетной записью. Если имеется второй контроллер домена, то заходим также под новой учетной записью на другой контроллер домена и проверяем синхронизацию учетных записей в «Пользователи и компьютеры Active Directory».
Переименование учётной записи локального администратора компьютеров в домене
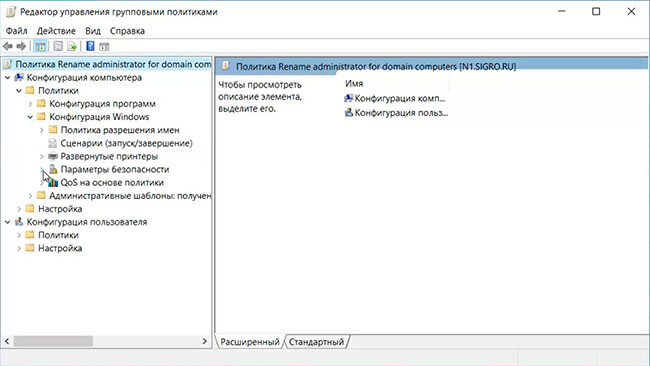
7. Для изменения имени локального администратора компьютера или сервера, который входит в состав домена, открываем «Диспетчер серверов», далее «Средства», «Управление групповой политикой».
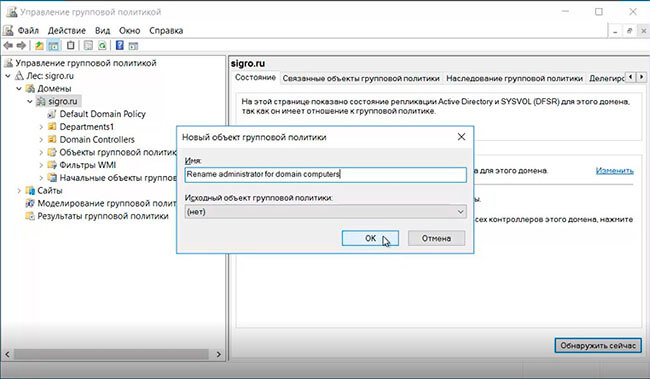
8. В «Управление групповой политикой» правый клик на домене, далее «Создать объект групповой политики в этом домене и связать его…». В появившемся окне пишем имя нового объекта групповой политики. Например, Rename administrator for domain computers, далее «ОК».
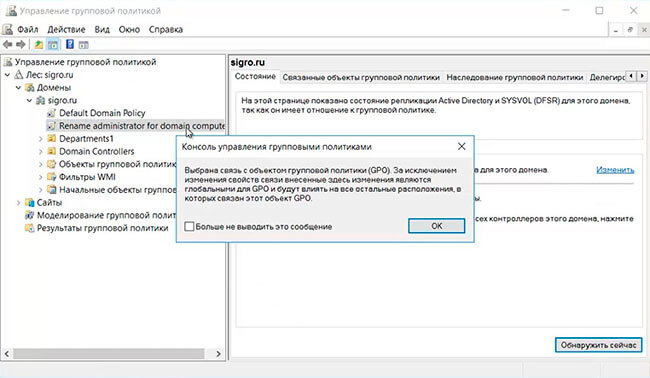
9. Далее выбираем вновь созданный объект групповой политики, нажимаем «ОК» в появившемся окне, затем правый клик на политике — «Изменить…».
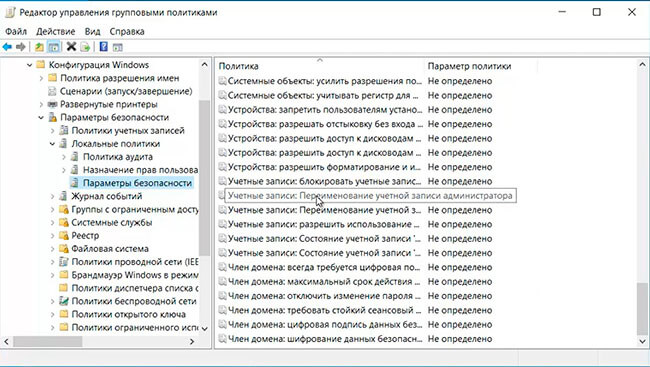
10. Открываем «Конфигурация компьютера» — «Политики» — «Конфигурация Windows» — «Параметры безопасности».
11. Затем открываем «Локальные политики» — «Параметры безопасности», в правой части выбираем вкладку «Учётные записи: Переименование учетной записи администратора».
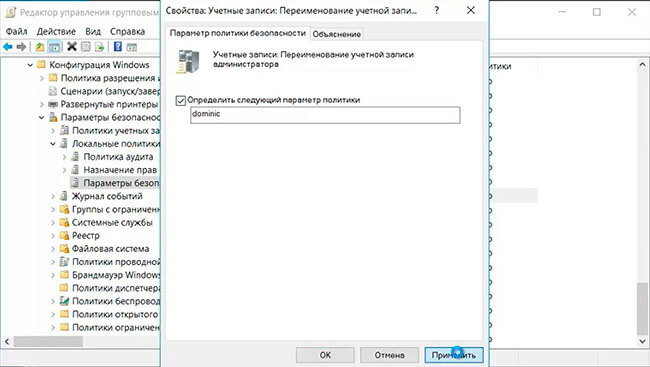
12. В окне «Свойства: Учетные записи. Переименование учетной записи администратора» ставим чекбокс «Определить следующий параметр политики». Затем вписываем новое имя администратора домена, далее «ОК».
13. Переходим в окно «Управление групповой политикой», напротив вновь созданной политики, в правой части выбираем вкладку «Делегирование». Затем нажимаем «Дополнительно».
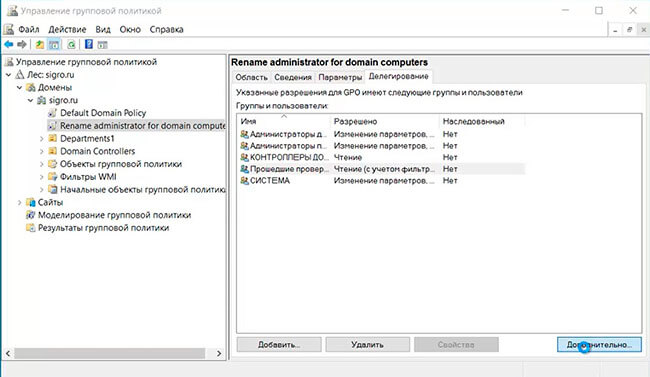
14. В параметрах безопасности для всех групп или пользователей снимаем чекбокс «Применить групповую политику». Затем наживаем «Добавить».
15. В новом окне оставляем «Типы объектов» — «Группы», нажимаем «Дополнительно». Затем выбираем «Поиск».
16. Находим компьютеры домена (все рабочие станции и серверы, присоединенные к домену).
17. Нажимаем «ОК». Затем устанавливаем чекбокс «Применить групповую политику».
18. Для того, чтобы GPO применилась, открываем групповую политику и пишем: gpupdate /force.
19. Для проверки того, что политика применилась, перезагружаем клиентский компьютер и входим в систему. Открываем «Управление компьютером» — «Локальные пользователи» — «Пользователи». В правой части встроенная учетная запись администратора будет иметь имя, которое мы задали в GPO.
Посмотреть, что и как делать, можно здесь:
Читайте также:
- Установка DNS и Active Directory — Windows Server 2016
- Установка и настройка DHCP — Windows Server 2016
- Второй контроллер домена — Windows Server 2016
- Создание и удаление пользователя, восстановление из корзины — Windows Server 2016
- Ввод компьютера в домен — Windows Server 2016
- Windows server 2019 — установка и настройка Active Directory, DNS, DHCP
 Если текущее имя пользователя Windows, отображаемое при входе или в меню Пуск вам не по душе, его сравнительно легко можно изменить как для локальной учетной записи, так и для локальной учетной записи Майкрософт. Если вы также хотите поменять имя папки пользователя — здесь сложнее, но и эту тему мы также затронем.
В этой пошаговой инструкции подробно о том, как переименовать пользователя Windows 11 или Windows 10 с локальной учетной записью или учетной записью Майкрософт, а также кратко об изменении имени папки пользователя.
Как переименовать локального пользователя
Если требуется переименование локальной учетной записи пользователя, сделать это можно одним из следующих способов.
Управление учетными записями пользователей
Первый вариант — использование утилиты управления учетными записями пользователей, порядок действий будет следующим:
- Нажмите правой кнопкой мыши по кнопке «Пуск», выберите пункт «Выполнить» (или нажмите клавиши Win+R на клавиатуре), введите
netplwiz
или
control userpasswords2
и нажмите Enter.
- В открывшемся окне выберите нужного пользователя и нажмите кнопку «Свойства».

- Задайте новое имя пользователя и нажмите «Ок», затем — «Ок» в окне управления учетными записями.
- Выйдите из системы и снова зайдите — имя вашего пользователя будет изменено.


Учитывайте, что несмотря на то, что имя пользователя изменится, название его папки останется прежним.
Локальные пользователи и группы
Второй способ подойдет только для Pro (Профессиональная) и Enterprise (Корпоративная) версий Windows 11/10. Необходимые шаги:
- Нажмите клавиши Win+R на клавиатуре, введите
lusrmgr.msc
и нажмите Enter.
- В окне «Локальные пользователи и группы» перейдите в раздел «Пользователи», нажмите правой кнопкой мыши по имени пользователя, которое нужно изменить и выберите пункт «Переименовать».

- Укажите новое имя пользователя, закройте окно, выйдите из системы и снова зайдите.

Командная строка
Ещё одна возможность — изменение имени пользователя в командной строке Windows:
- Запустите командную строку от имени администратора.
- Введите команду
wmic useraccount where name='старое_имя' rename новое_имя
и нажмите Enter.

- Закройте командную строку, выйдите из системы и вновь зайдите, уже под новым именем.

Изменение имени пользователя для учетной записи Майкрософт
Если вы используете учетную запись Майкрософт, изменение имени выполняется на соответствующем сайте:
- Зайдите на страницу вашей учетной записи Майкрософт https://account.microsoft.com/ с вашими учетными данными.
- Нажмите по вашему имени или перейдите на вкладку «Сведения».

- Нажмите «Изменить имя» и укажите новые имя и фамилию (необязательно).


После применения сделанных настроек они, через некоторое время (не сразу и, возможно, после перезагрузки) будут синхронизированы с вашим устройством, и вы увидите, что имя пользователя в Windows также изменилось.
Изменение имени папки пользователя
Изменить имя папки пользователя, если оно вам не нравится, в принципе, возможно, но часто приводит к неожиданным результатам: от неработоспособности некоторых программ, для которых были прописаны абсолютные пути, до невозможности зайти в Windows из-за ошибок профиля пользователя.
Простой и безопасный способ
Если вам нужен простой и безопасный способ, рекомендую использовать следующий подход:
- Создайте новую локальную учетную запись с нужным именем (рекомендую использовать латиницу), для нее будет создана папка с тем же именем, сделайте нового пользователя администратором. Подробно о том, как это сделать в статьях: Как создать пользователя Windows 11, Как создать пользователя Windows 10.
- Зайдите под вновь созданным пользователем, и, если нужно, прикрепите учетную запись Майкрософт (это можно сделать в Параметрах).
- Убедившись, что всё работает как нужно и перенеся все данные из старого профиля (например, хранящиеся в папках Документы, Изображения, Рабочий стол), удалите старого пользователя и работайте с новой учетной записью и новым именем папки.
Рискованный метод
Способ переименования папки текущего пользователя без создания нового выглядит иначе (и, ещё раз предупреждаю, небезопасный):
- Выйдите из текущей учетной записи и зайдите в систему с другой учетной записью Администратора (не с той, для которой мы изменяем имя папки), можно включить скрытую учетную запись Администратор.
- При желании измените имя пользователя, для которого меняется имя папки одним из способов, описанным ранее.
- Перейдите в папку C:Пользователи (C:Users) и переименуйте папку нужного пользователя тем же способом, которым вы переименовываете другие папки.
- Запустите редактор реестра и перейдите в раздел
HKEY_LOCAL_MACHINESOFTWAREMicrosoftWindows NTCurrentVersionProfileList
- В подразделах этого раздела найдите такой, где для параметра с именем ProfileImagePath задан путь к изменяемой папке, дважды нажмите по этому параметру и измените путь на нужный.

- Закройте редактор реестра, перезагрузите компьютер и попробуйте вновь зайти в учетную запись, для которой менялся путь к папке.

Несмотря на то, что этот метод описан на официальном сайте Майкрософт , он остается крайне ненадежным и, если на почти чистой системе обычно работает, на ОС с множеством установленных программ зачастую вызывает неожиданные проблемы.
Иногда бывает достаточным изменить старые пути на новые в реестре, выполнив поиск по старому имени папки, а иногда даже это не позволяет избежать проблем: от необходимости повторно настраивать OneDrive и проблем с WinGet до, уже упоминавшихся проблем с профилем пользователя. О случаях неудачных попыток вы можете прочесть, например, в комментариях к статье Как изменить имя папки пользователя в Windows 10.
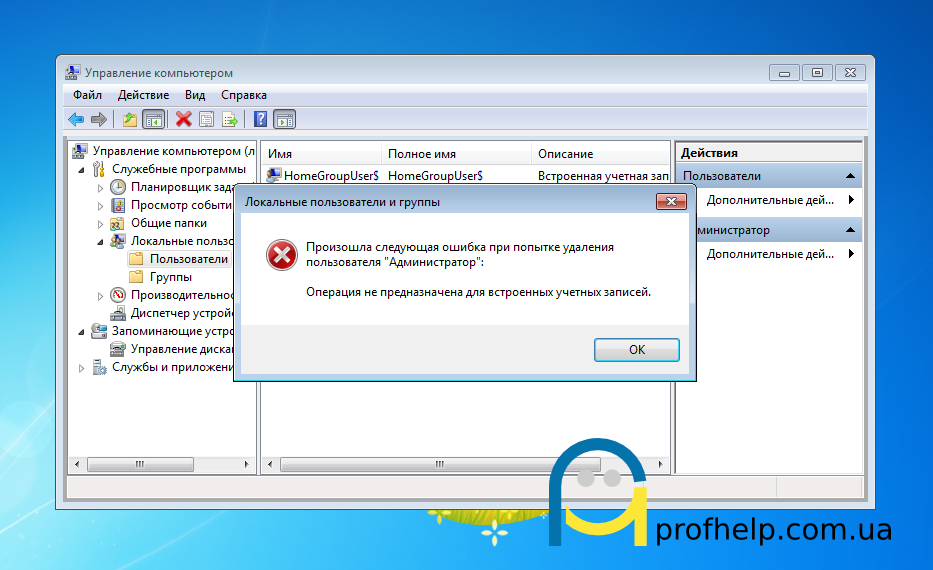
Если при установке Windows попробовать создать учетную запись Администратор, или Гость, система сделать этого не даст, так как уже имеются встроенные учетные записи Windows имеющие такое же имя.
Учетная запись Администратор не предназначена для постоянной работы с системой, а только для случаев, когда нужно установить программу, или настроить другие критические для работы системы компоненты. Вы конечно в дальнейшем можете включить и использовать учетную запись Администратор, но делать это я категорически не рекомендую, так как это создает огромную проблему в системе безопасности Windows — стоит только подцепить какой-либо вирус и он сможет расползтись не только по вашему профилю, но и по всей системе, со всеми вытекающими из этого печальными последствиями.
Зачем менять имя учетной записи Администратор
Зачем менять имя учетной записи Администратор? Ничего тут секретного нет — для того, чтоб повысить безопасность системы. Предположим, что вы попали в поле зрения злостных хакеров. Для того, чтоб получить доступ к вашей системе, не важно, по сети, или локально, им потребуется знать две вещи, а именно: имя пользователя и пароль. Все версии Windows имеют встроенную учетную запись Администратор, которая и является заветной целью хакера. Для того, чтоб усложнить его жизнь и не дать возможности завладеть доступом к вашей системе, можно дать пользователю Администратор другое имя, например Одменестрад0р — хакеру придется сперва угадать имя пользователя, а затем его пароль. При этом, если вы в настройках локальных политик зададите жёсткие параметры блокировки учетных записей Account lockout threshold и Account lockout duration, вы сделаете практически нереальным подбор пароля для входа в систему.
Как переименовать встроенную учетную запись Администратор
Итак, Windows по умолчанию имеет две встроенные учетные записи, Администратор и Гость. Эти учетные записи удалить нельзя — их можно только отключить, или переименовать.
Переименовать встроенную учетную запись можно несколькими путями:
- В консоли настройка Локальных политик безопасности Windows
- Через оснастку Управление учетными записями Windows. Изменив имя пользователя в Редакторе групповых политик, результат будет виден и в оснастке Управление учетными записями Windows. Тот же эффект будет, если сделать наоборот — в конечном итоге, все изменения что редактора групповых политики, что оснастки локальные пользователи и группы сохраняются в реестре Windows.
- Самый лучший вариант — это переименовать локального Админитстратора через PowerShell
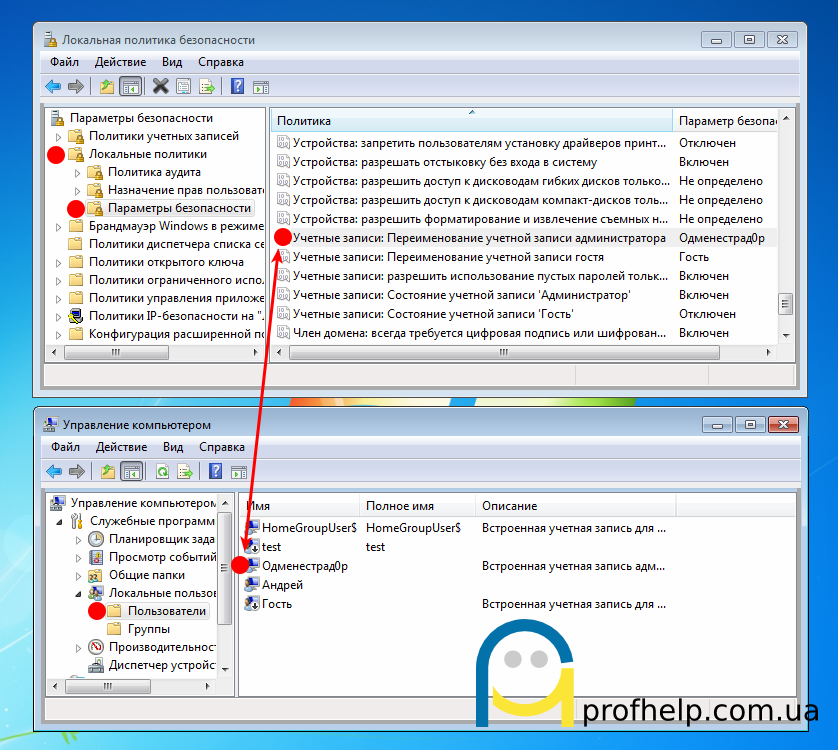
Переименование Пользователя Администратор с помощью Редактора групповых политик
- Откройте меню Пуск, в строке поиска введите Локальная политика безопасности (secpol.msc), нажмите Энтер
- В открывшемся окне разверните Параметры безопасности — Локальные политики — Параметры безопасности
- В правой области со списком политик прокрутите вниз и выберите политику Учетные записи: Переименование учетной записи администратора. Откройте ее двойным нажатием мыши
- Во вкладке Параметр локальной безопасности, в единствнное текстовое поле ведите новое имя для пользователя Администратор.
- Сохраните изменения нажав кнопку ОК.
Переименование Пользователя Администратор через оснастку Локальные пользователи и группы
- Откройте меню Пуск, в строке поиска введите Управление Компьютером(compmgmt.msc), нажмите Энтер
- В открывшемся окне разверните Управление компьютером — Служебные программы — Локальные пользователи и группы — Пользователи
- Выберите пользователя Администратор, нажмите клавишу F2, или правой кнопкой мыши и в контекстном меню Переименовать.
- Введите новое имя, сохраните изменения нажав клавишу Энтер.
Переименование локального Админитстратора через PowerShell
Еще один способ переименования локального Админитстратора — это использовать PowerShell. В PowerShell переименовать локального админа крайне просто, для этого имеется Коммандлет Rename-LocalUser. Для того, чтоб посмотреть список локальных пользователей, воспользуйтесь командлетом Get-LocalUser.
PS C:Windowssystem32> Get-LocalUser

Name               Enabled Description
----               ------- -----------
Administrator      False   Built-in account for administering the computer/domain
DefaultAccount     False   A user account managed by the system.
Guest              False   Built-in account for guest access to the computer/domain
Oleksandr          True
WDAGUtilityAccount False   A user account managed and used by the system for Windows Defender Application Guard scen...


PS C:Windowssystem32> Rename-LocalUser -Name Administrator -NewName Admin
PS C:Windowssystem32> Get-LocalUser

Name               Enabled Description
----               ------- -----------
Admin              False   Built-in account for administering the computer/domain
DefaultAccount     False   A user account managed by the system.
Guest              False   Built-in account for guest access to the computer/domain
Oleksandr          True
WDAGUtilityAccount False   A user account managed and used by the system for Windows Defender Application Guard scen...
Таким же образом вы можете изменить имя встроенной учетной записи Гость, хотя переименование данной учетной записи не столь критично, как переименование учетной записи Администратор.
Ну и на последок, раз уж вы открыли для редактирования редактор локальных групповых политик, и задались целью повысить безопасность своего компьютера, настройте и другие политики, такие как Политика паролей и Политика блокировки учетной записи.
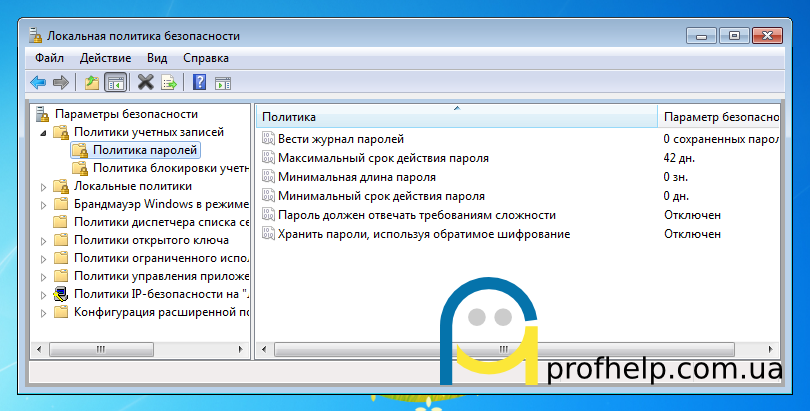
Например, в Политиках блокировки учетной записи можно задать пороговое значение блокировки учетной записи, что позволит задать пороговое значение попыток входа в систему, после которой учетная запись будет заблокирована на время, указанное в параметре Продолжительность блокировки учетной записи.
Содержание
- Как переименовать пользователя в windows server 2019
- Как переименовать администратора домена и изменить формат выводимого имени пользователя
- Переименование администратора домена
- Изменение формата выводимого имени пользователя
- Как создать и удалить пользователя, группу и объект в домене
- Создание пользователя в домене.
- Создание группы в домене
- Добавление подразделения в домене
- Удаление пользователя
- Удаление группы
- Удаление подразделения
- Смена имени компьютера [Hostname] в Windows [GUI/CMD/PowerShell]
- Смена имени компьютера через графический интерфейс Windows [GUI]
- Смена имени компьютера через командную строку [CMD]
- Смена имени компьютера через командную строку [PowerShell]
- Как изменить отображаемое имя для учетной записи Майкрософт
- Изменение отображаемого имени
- Изменение имени администратора
- Другие изменения
- Переименование учетной записи пользователя не меняет автоматически путь профиля
- Сводка
- Статус
- Обходной путь
Как переименовать пользователя в windows server 2019

После установки домена в Windows server 2019 для безопасности и удобства использования рекомендуется изменить стандартное имя администратора домена «Администратор«, на другое имя. Также рекомендуется изменить формат выводимого имени пользователя домена с «Имя-Отчество-Фамилия» на «Фамилия-Имя-Отчество«. Сделать это несложно, времени много не занимает.
Как переименовать администратора домена и изменить формат выводимого имени пользователя
Переименование администратора домена
2. В следующем окне выбираем «Средства«, далее «Пользователи и компьютеры Active Directory«.
4. Переименовываем администратора домена, далее читаем предупреждение о том, что объект Администратор представляет текущего пользователя, который сейчас находится в системе. Для того, чтобы избежать различных конфликтов доступа, после переименования данного объекта необходимо выйти из системы и войти в нее заново с новым именем. Нажимаем «Да«.
5. В новом окне задаем «Имя входа пользователя«, далее «ОК«.
6. После переименования администратора домена изменим описание этого пользователя. Для этого нажимаем правой клавишей мыши на переименованного администратора домена, далее «Свойства«.
7. На вкладке «Общие» в «Описание» удаляем старое описание, добавляем новое, например «Служебный пользователь«. Далее «ОК«.
8. Далее выходим из системы или перезагружаем сервер. Производим вход под новым именем администратора домена.
Изменение формата выводимого имени пользователя
При добавлении нового пользователя в домене «Полное имя» добавляется и выводится в формате «Имя-Отчество-Фамилия«. Это неудобно, но возможно изменить.
2. В новом окне выбираем «Редактирование ADSI«.
4. Изменяем «Выберите известный контекст именования:» на «Конфигурация«. Далее «ОК«.
6. В новом окне выбираем «createDialog«.
7. Задаем значение: «% % «. Далее «ОК«.
Посмотреть видео, как переименовать администратора домена, изменить формат выводимого имени, можно здесь:
Источник
Как создать и удалить пользователя, группу и объект в домене
Создание пользователя в домене.
1. Нажимаем «Пуск«, далее выбираем «Диспетчер серверов«.

2. В новом окне нажимаем «Средства«, в открывшемся списке выбираем «Пользователи и компьютеры Active Directory«.


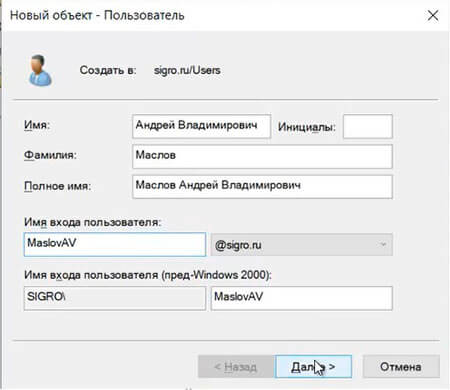
4. Заполняем необходимые поля для создания пользователя (Имя, Фамилия, Имя входа пользователя). «Полное имя» заполнится автоматически. Затем нажимаем «Далее«.

5. В следующем окне дважды набираем пароль для пользователя. Затем устанавливаем чекбокс на «Требовать смены пароля при следующем входе в систему«. Тогда при входе в систему пользователю будет предложено заменить текущий пароль. Нажимаем «Далее«.

6. В новом окне смотрим сводную информацию по вновь созданному пользователю и нажимаем «Готово«. Будет создан новый пользователь.

Создание группы в домене

2. Задаем «Имя группы«, «Область действия группы» и «Тип группы«, далее нажимаем «ОК«. Будет создана группа.

3. Для добавления пользователей в группу, открываем пользователя, выбираем вкладку «Член групп«, нажимаем кнопку «Добавить«.

4. В новом окне вводим имя группы, в которую будет добавлен пользователь. Проверяем нажав кнопку «Проверить имена«, далее «ОК«.

5. Также возможно добавить пользователя в группу, открыв нужную группу. Далее выбираем вкладку «Члены группы«. Нажимаем «Добавить«.

6. В новом окне вводим имена пользователей, которые будут добавлены в группу. Проверяем нажав клавишу «Проверить имена«, далее «ОК«.

Добавление подразделения в домене

2. Задаём имя подразделения, далее «ОК«.

3. Если необходимо, в созданном подразделении создаём вложенные подразделения. Далее в созданные подразделения можно перенести или создать различные объекты (пользователи, компьютеры, группы).

Удаление пользователя


3. Появится предупреждение о том, что «Вы действительно хотите удалить Пользователь с именем. «. Нажимаем «Да» и выбранный пользователь будет удален из домена.

Удаление группы

2. Появится предупреждение о том, что «Вы действительно хотите удалить Группу безопасности. «. Нажимаем «Да«. Выбранная группа будет удалена из домена.

Удаление подразделения

2. Для снятия защиты в меню «Вид» выбираем «Дополнительные компоненты«.


4. Выбираем вкладку «Объект«. Убираем чекбокс «Защитить объект от случайного удаления«, далее «ОК«.


6. Появится предупреждение о том, что «Вы действительно хотите удалить Подразделение с именем. «. Нажимаем «Да«. Если в выбранном объекте не будет других вложенных объектов, то подразделение будет удалено.

7. Если объект содержит другие объекты, то появится предупреждение «Объект Department1 содержит другие объекты. Вы действительно хотите удалить объект Department1 и все содержащиеся в нем объекты?«. Нажимаем «Да» и выбранный объект будет удален с вложенными объектами.


Посмотреть видео о том, как создать или удалить пользователя, группу, объект в домене можно здесь:
Источник
Смена имени компьютера [Hostname] в Windows [GUI/CMD/PowerShell]
В этой статье мы рассмотрим три способа изменения имени компьютера в Windows. Через графический интерфейс[GUI], через командную строку[CMD] и через командную строку[PowerShell].
Лично я считаю, что от такого имени компьютера нужно сразу избавляться. Два раза запустите ping, ещё разок пропишете в подключении к удалённому рабочему столу и сойдёте с ума. Конечно, вместо имени можно везде использовать IP-адрес, но это не всегда удобно.
Представленные в статье способы подойдут для смены имени ПК в Windows 7, 8, 8.1, 10, Server 2008, 2012, 2016.
Смена имени компьютера через графический интерфейс Windows [GUI]
И так заходим в «Панель управления«(Рис.1) -> «Система«.(Рис.2)
У меня ничего стороннего не запущено, и в сохранении ничего не нуждается. Короче перезагружаемся.
После перезагрузки проверяйте «Панель управления«(Рис.1) -> «Система«(Рис.2) Имя компьютера должно поменяться.
Смена имени компьютера через командную строку [CMD]
Для смены имени компьютера воспользуйтесь командой:
Смена имени компьютера через командную строку [PowerShell]
Для смены имени компьютера воспользуйтесь командой:
После перезагрузки проверьте имя ПК:
Источник
Как изменить отображаемое имя для учетной записи Майкрософт
Изменение отображаемого имени
При входе в учетную запись вы используете свое отображаемое имя. Это также то имя, которое вы видите на ваших устройствах с Windows 10, а также то имя, которое видят пользователи, когда вы им отправляете сообщений электронной почты. Это имя может отличаться от вашего отображаемого имени локальной учетной записи.
Вот как можно изменить отображаемое имя, если вы выполнили вход в учетную запись Майкрософт.
Под вашим именем пользователя выберите Изменить имя. Если имени еще нет в списке, выберите Добавить имя.
Введите нужное имя, введите защитный код CAPTCHA, а затем нажмите кнопку Сохранить. Некоторые из имен могут быть запрещены, если они содержат запрещенные слова или фразы. Если при вводе имени возникает ошибка, попробуйте использовать псевдоним.
Если отображаемое имя не изменится сразу или если старое имя по-прежнему отображается в сообщениях электронной почты, ваши данные могут быть кэшированы. Чтобы быстро обновить имя, можно переключиться на локальную учетную запись, а затем снова войти в учетную запись Майкрософт.
При изменении отображаемого имени ваш тег игрока не меняется. Если вы хотите использовать новый теги игрока, изучите раздел Изменение тега игрока Xbox.
Изменение имени администратора
Чтобы изменить имя администратора, выполните следующие действия.
В поле поиска на панели задач введите Управление компьютером, а затем выберите его в списке.
Нажмите стрелку рядом с разделом Локальные пользователи и группы, чтобы развернуть его.
Выберите раздел Пользователи.
Щелкните правой кнопкой мыши Администратор и выберите пункт Переименовать.
Введите новое имя. Обратите внимание, что для изменения этого имени необходимо быть администратором.
Другие изменения
Вот некоторые полезные параметры, которые можно изменить в учетной записи Майкрософт.
Какие адреса электронной почты можно использовать для отправки электронной почты (путем добавления псевдонимов в учетную запись Майкрософт и управления ими)
Источник
Переименование учетной записи пользователя не меняет автоматически путь профиля
В этой статье содержится решение проблемы, при которой переименование учетной записи пользователя не меняет автоматически путь профиля.
Применяется к: Windows 7 Пакет обновления 1, Windows 2008 R2 Пакет обновления 1
Исходный номер КБ: 2454362
Сводка
При переименовании учетной записи пользователя на компьютере с Windows 7 или Windows Server 2008 R2 путь профиля пользователя не меняется автоматически. Это может вызвать некоторое замешательство при просмотре %SystemDrive%users папки
Статус
Корпорация Майкрософт подтвердила, что она будет по дизайну в Windows.
Обходной путь
Чтобы решить эту проблему, используйте ниже шаги, чтобы вручную переименовать путь профиля.
Войдите с помощью другой административной учетной записи.
Сначала может потребоваться создать новую административную учетную запись.
Переименуй папку с исходным именем пользователя в C:users новое имя пользователя.
Перейдите в реестр и измените значение реестра ProfileImagePath на новое имя пути.
Точно следуйте всем указаниям из этого раздела. Внесение неправильных изменений в реестр может привести к возникновению серьезных проблем. Прежде чем приступить к изменениям, создайте резервную копию реестра для восстановления на случай возникновения проблем.
Замените с помощью SID учетной записи пользователя.
Войдите и войдите снова с помощью пользователя, имя которого изменено, и пользователь должен использовать провительный профиль с новым именем пути.
Источник
| title | description | ms.date | ms.topic | ms.assetid | author | ms.author | manager |
|---|---|---|---|---|---|---|---|
|
Manage User Accounts in Windows Server Essentials |
Learn about the Users page of the Windows Server Essentials Dashboard and how it centralizes information and tasks that help you manage the user accounts. |
10/03/2016 |
article |
0d115697-532b-48c2-a659-9f889e235326 |
nnamuhcs |
wscontent |
mtillman |
Manage User Accounts in Windows Server Essentials
Applies To: Windows Server 2016 Essentials, Windows Server 2012 R2 Essentials, Windows Server 2012 Essentials
The Users page of the Windows Server Essentials Dashboard centralizes information and tasks that help you manage the user accounts on your small business network. For an overview of the Users Dashboard, see Dashboard Overview.
Managing user accounts
The following topics provide information about how to use the Windows Server Essentials Dashboard to manage the user accounts on the server:
-
Add a user account
-
Remove a user account
-
View user accounts
-
Change the display name for the user account
-
Activate a user account
-
Deactivate a user account
-
Understand user accounts
-
Manage user accounts using the Dashboard
Add a user account
When you add a user account, the assigned user can log on to the network, and you can give the user permission to access network resources such as shared folders and the Remote Web Access site. Windows Server Essentials includes the Add a User Account Wizard that helps you:
-
Provide a name and password for the user account.
-
Define the account as either an administrator or as a standard user.
-
Select which shared folders the user account can access.
-
Specify if the user account has remote access to the network.
-
Select email options if applicable.
-
Assign a Microsoft Online Services account (referred to as a Microsoft 365 account in Windows Server Essentials) if applicable.
-
Assign user groups ( Windows Server Essentials only).
[!NOTE]
- Non-ASCII characters are not supported in Microsoft Azure Active Directory (Azure AD). Do not use any non-ASCII characters in your password, if your server is integrated with Azure AD.
- The email options are only available if you install an add-in that provides email service.
To add a user account
-
Open the Windows Server Essentials Dashboard.
-
On the navigation bar, click Users.
-
In the Users Tasks pane, click Add a user account. The Add a User Account Wizard appears.
-
Follow the instructions to complete the wizard.
Remove a user account
When you choose to remove a user account from the server, a wizard deletes the selected account. Because of this, you can no longer use the account to log on to the network or to access any of the network resources. As an option, you can also delete the files for the user account at the same time that you remove the account. If you do not want to permanently remove the user account, you can deactivate the user account instead to suspend access to network resources.
[!IMPORTANT]
If a user account has a Microsoft online account assigned, when you remove the user account, the online account also is removed from Microsoft Online Services, and the user’s data, including email, is subject to data retention policies in Microsoft Online Services. If you want to retain user data for the online account, deactivate the user account instead of removing it. For more information, see Manage Online Accounts for Users.
To remove a user account
-
Open the Windows Server Essentials Dashboard.
-
On the navigation bar, click Users.
-
In the list of user accounts, select the user account that you want to remove.
-
In the <User Account> Tasks pane, click Remove the user account. The Delete a User Account Wizard appears.
-
On the Do you want to keep the files? page of the wizard, you can choose to delete the user’s files, including File History backups and the redirected folder for the user account. To keep the user’s files, leave the check box empty. After making your selection, click Next.
-
Click Delete account.
[!NOTE]
After you remove a user account, the account no longer appears in the list of user accounts. If you chose to delete the files, the server permanently deletes the user’s folder from the Users server folder and from the File History Backups server folder.If you have an integrated email provider, the email account assigned to the user account will also be removed.
View user accounts
The Users section of the Windows Server Essentials Dashboard displays a list of network user accounts. The list also provides additional information about each account.
To view a list of user accounts
-
Open the Windows Server Essentials Dashboard.
-
On the main navigation bar, click Users.
-
The Dashboard displays a current list of user accounts.
To view or change properties for a user account
-
In the list of user accounts, select the account for which you want to view or change properties.
-
In the <User Account> Tasks pane, click View the account properties. The Properties page for the user account appears.
-
Click a tab to display the properties for that account feature.
-
To save any changes that you make to the user account properties, click Apply.
Change the display name for the user account
The display name is the name that appears in the Name column on the Users page of the Dashboard. Changing the display name does not change the logon or sign-in name for a user account.
To change the display name for a user account
-
Open the Windows Server Essentials Dashboard.
-
On the navigation bar, click Users.
-
In the list of user accounts, select the user account that you want to change.
-
In the <User Account> Tasks pane, click View the account properties. The Properties page for the user account appears.
-
On the General tab, type a new First name and Last name for the user account, and then click OK.
The new display name appears in the list of user accounts.
Activate a user account
When you activate a user account, the assigned user can log on to the network and access network resources to which the account has permission, such as shared folders and the Remote Web Access site.
[!NOTE]
You can only activate a user account that is deactivated. You cannot activate a user account after you remove it from the server.
To activate a user account
-
Open the Windows Server Essentials Dashboard.
-
On the navigation bar, click Users.
-
In the list view, select the user account that you want to activate.
-
In the <User Account> Tasks pane, click Activate the user account.
-
In the confirmation window, click Yes to confirm your action.
[!NOTE]
After you activate a user account, the status for the account displays Active. The user account regains the same access rights that were assigned prior to account deactivation.If you have an integrated email provider, the email account assigned to the user account will also be activated.
Deactivate a user account
When you deactivate a user account, account access to the server is temporarily suspended. Because of this, the assigned user cannot use the account to access network resources such as shared folders or the Remote Web Access site until you activate the account.
If the user account has a Microsoft online account assigned, the online account is also deactivated. The user cannot use resources in Microsoft 365 and other online services that you subscribe to, but the user’s data, including email, is retained in Microsoft Online Services.
[!NOTE]
You can only deactivate a user account that is currently active.
To deactivate a user account
-
Open the Windows Server Essentials Dashboard.
-
On the navigation bar, click Users.
-
In the list view, select the user account that you want to deactivate.
-
In the <User Account> Tasks pane, click Deactivate the user account.
-
In the confirmation window, click Yes to confirm your action.
[!NOTE]
After you deactivate a user account, the status for the account displays Inactive.If you have an integrated email provider, the email account assigned to the user account will also be deactivated.
Understand user accounts
A user account provides important information to Windows Server Essentials, which enables individuals to access information that is stored on the server, and makes it possible for individual users to create and manage their files and settings. Users can log on to any computer on the network if they have a Windows Server Essentials user account and they have permissions to access a computer. Users access their user accounts with their user name and password.
There are two main types of user accounts. Each type gives users a different level of control over the computer:
-
Standard accounts are for everyday computing. The standard account helps protect your network by preventing users from making changes that affect other users, such as deleting files or changing network settings.
-
Administrator accounts provide the most control over a computer network. You should assign the administrator account type only when necessary.
Manage user accounts using the Dashboard
Windows Server Essentials makes it possible to perform common administrative tasks by using the Windows Server Essentials Dashboard. By default, the Users page of the Dashboard includes two tabs: Users and Users Groups.
[!NOTE]
- If you integrate your server that is running Windows Server Essentials with Microsoft 365, a new tab called Distribution Groups is also added within the Users page of the Dashboard.
- In Windows Server Essentials, the Users page of the Dashboard includes only a single tab — Users.
The Users tab includes the following:
-
A list of user accounts, which displays:
-
The name of the user.
-
The Logon name for the user account.
-
Whether the user account has Anywhere Access permission. Anywhere Access permission for a user account is either Allowed or Not allowed.
-
Whether the File History for this user account is managed by the server running Windows Server Essentials. The File History status for a user account is either Managed or Not managed.
-
The level of access that is assigned to the user account. You can assign either Standard user access or Administrator access for a user account.
-
The user account status. A user account can be Active, Inactive, or Incomplete.
-
In Windows Server Essentials, if the server is integrated with Microsoft 365 or Windows Intune, the Microsoft online account is displayed.
-
In Windows Server Essentials, if the server is integrated with Microsoft 365, the status of the account (known in Windows Server Essentials as the Microsoft online account) for the user account is displayed.
-
-
A details pane with additional information about a selected user account.
-
A tasks pane that includes:
-
A set of user account administrative tasks such as viewing and removing user accounts, and changing passwords.
-
Tasks that allow you to globally set or change settings for all user accounts in the network.
The following table describes the various user account tasks that are available from the Users tab. Some of the tasks are user account-specific, and they are only visible when you select a user account in the list.
-
[!NOTE]
If you integrate Microsoft 365 with Windows Server Essentials, additional tasks will become available. For more information, see Manage Online Accounts for Users.
User account tasks in the Dashboard
| Task name | Description |
|---|---|
| View the account properties | Enables you to view and change the properties of the selected user account, and to specify folder access permissions for the account. |
| Deactivate the user account | A user account that is deactivated cannot log on to the network or access network resources such as shared folders or printers. |
| Activate the user account | A user account that is activated can log on to the network and can access network resources as defined by the account permissions. |
| Remove the user account | Enables you to remove the selected user account. |
| Change the user account password | Enables you to reset the network password for the selected user account. |
| Add a user account | Starts the Add a User Account Wizard, which enables you to create a single new user account that has either standard user access or administrator access. |
| Assign a Microsoft online account | Adds a Microsoft online account to the local network user account that is selected.
This task is displayed when your server is integrated with Microsoft online services, such as Microsoft 365. |
| Add Microsoft online accounts | Adds Microsoft online accounts and associates them to local network user accounts.
This task is displayed when your server is integrated with Microsoft online services, such as Microsoft 365. |
| Set the password policy | Enables you to change the values of the password polices for your network. |
| Import Microsoft online accounts | Performs a bulk import of accounts from Microsoft online services into the local network.
This task is displayed when your server is integrated with Microsoft online services, such as Microsoft 365. |
| Refresh | Refreshes the Users tab.
This task is applicable to Windows Server Essentials. |
| Change File History settings | Enables you to change File History settings, such as backup frequency, or backup duration.
This task is applicable to Windows Server Essentials. |
| Export all remote connections | Creates a .CSV-format file of all remote connections to the server that have occurred over the past 30 days. |
Managing passwords and access
The following topics provide information about how to use the Windows Server Essentials Dashboard to manage user account passwords and user access to the shared folders on the server:
-
Change or reset the password for a user account
-
What you should know about password policies
-
Change the password policy
-
Level of access to shared folders
-
Retain and manage access to files for removed user accounts
-
Synchronize the DSRM password with the network administrator password
-
Give user accounts remote desktop permission
-
Enable users to access resources on the server
-
Change remote access permissions for a user account
-
Change virtual private network permissions for a user account
-
Change access to internal shared folders for a user account
-
Allow user accounts to establish a remote desktop session to their computer
Change or reset the password for a user account
To change or reset a user account password, follow these steps.
To reset the password for a user account
-
Open the Windows Server Essentials Dashboard.
-
On the navigation bar, click Users.
-
In the list of user accounts, select the user account that you want to reset.
-
In the <User Account> Tasks pane, click Change the user account password. The Change User Account Password Wizard appears.
-
Type a new password for the user account, and then type the password again to confirm it.
-
Click Change password.
-
Provide the new password to the user.
[!IMPORTANT]
- You may not be able to change your password if the password policy for your account has been set to Passwords never expire.
- Non-ASCII characters are not supported in Azure AD. Therefore, if your server is integrated with Azure AD, do not use any non-ASCII characters in your password.
- If a Microsoft online account (known in Windows Server Essentials as a Microsoft 365 account) is assigned to the user, the password is synchronized with the online account password. The user will use the new password to sign in on the server or sign in to Microsoft 365. For more information, see Manage Online Accounts for Users.
- You may not be able to change your password if the password policy for your account has been set to Passwords never expire.
What you should know about password policies
The password policy is a set of rules that define how users create and use passwords. The policy helps to prevent unauthorized access to user data and other information that is stored on the server. The password policy is applied to all user accounts that access the network.
The Windows Server Essentials password policy consists of three primary elements as follows:
-
Password length. The longer a password is, the more secure it is. Blank passwords are not secure.
-
Password complexity. Complex passwords contain a mixture of uppercase and lowercase letters (a-z, A-Z), base numbers (0-9), and non-alphabetic symbols (such as; !,@,#,_,-). Complex passwords are much less susceptible to unauthorized access. Passwords that contain user names, birthdates, or other personal information do not provide adequate security.
-
Password age. Windows Server Essentials requires that users change their password at least once every 180 days. As an option, you can choose to have passwords never expire.
To make it easier to implement a password policy on your computer network, Windows Server Essentials provides a simple tool that allows you to set or change the password policy to any of the following four pre-defined policy profiles:
-
Weak. Users can specify any password that is not blank.
-
Medium. These passwords must contain at least 5 characters. A complex password is not required.
-
Medium Strong. These passwords must contain at least 5 characters, and must include letters, numbers, and symbols.
-
Strong. These passwords must contain at least 7 characters, and must include letters, numbers, and symbols. These passwords are more secure, but may be more difficult for users to remember.
[!NOTE]
Passwords cannot contain the user name or email address.If you integrate with Microsoft 365, the integration enforces the Strong password policy, and updates the policy to include the following requirements:
- Passwords must contain 8 �16 characters.
- Passwords cannot contain a space or the Microsoft 365 email name.
By default, server installation sets the default password policy to the Strong option.
- Passwords must contain 8 �16 characters.
Change the password policy
Use the following procedure to set or change the password policy to any of four pre-defined policy profiles.
To change the password policy
-
Open the Windows Server Essentials Dashboard, and then click Users.
-
In the Users Tasks pane, click Set the password policy.
-
On the Change the Password Policy screen, set the level of password strength by moving the slider.
Microsoft recommends that you set the password strength to Strong.
[!NOTE]
As an option, you can also select Passwords never expire. This setting is less secure, and so it is not recommended. -
Click Change policy.
Level of access to shared folders
As a best practice, you should assign the most restrictive permissions available that still allow users to perform required tasks.
You have three access settings available for the shared folders on the server:
-
Read/Write. Choose this setting if you want to allow the user account permission to create, change, and delete any files in the shared folder.
-
Read only. Choose this setting if you want to allow the user account permission to only read the files in the shared folder. User accounts with read-only access cannot create, change, or delete any files in the shared folder.
-
No access. Choose this setting if you do not want the user account to access any files in the shared folder.
Retain and manage access to files for removed user accounts
The network administrator can remove a user account and choose to keep the user’s files for future use. In this scenario, the removed user account can no longer be used to sign in to the network; however, the files for this user will be saved in a shared folder, which can be shared with another user.
[!IMPORTANT]
Be aware that if you remove a user account that has a Microsoft online account assigned, the online account is also removed, and the user data, including email, is subject to data retention policies in Microsoft Online Services. To retain the user data for the online account, deactivate the user account instead of removing it. For more information, see Manage Online Accounts for Users.
To remove a user account but retain access to the user’s files
-
Open the Windows Server Essentials Dashboard.
-
On the navigation bar, click Users.
-
In the list of user accounts, select the user account that you want to remove.
-
In the <User Account> Tasks pane, click Remove the user account. The Delete a User Account Wizard appears.
-
On the Do you want to keep the files? page, make sure that the Delete the files including File History backups and redirected folder for this user account check box is clear, and then click Next.
A confirmation page appears warning you that are deleting the account but keeping the files.
-
Click Delete account to remove the user account.
After the user account is removed, the administrator can give another user account access to the shared folder.
To give a user account permission to access a shared folder
-
Open the Windows Server Essentials Dashboard.
-
On the navigation bar, click Storage, and then click the Server Folders tab.
-
In the list of folders, select the Users folder.
-
In the Users Tasks pane, click Open the folder. Windows Explorer opens and displays the contents of the Users folder.
-
Right-click the folder for the user account that you want to share, and then click Properties.
-
In <User Account> Properties, click the Sharing tab, and then click Share.
-
In the File Sharing window, type or select the user account name with whom you want to share the folder, and then click Add.
-
Choose the Permission Level that you want the user account to have, and then click Share.
Synchronize the DSRM password with the network administrator password
Directory Services Restore Mode (DSRM) is a special boot mode for repairing or recovering Active Directory. The operating system uses DSRM to log on to the computer if Active Directory fails or needs to be restored. If your network administrator password and the DSRM password are different, DSRM will not load.
During a clean, first-time installation of Windows Server Essentials, the program sets the DSRM password to the network administrator account password that you specify during setup or in the migration answer file. When you change your network administrator password (as recommended typically every 60 days for increased server security), the password change is not forwarded to DSRM. This results in a password mismatch. If this occurs, you can use the following solutions to manually or automatically synchronize your network administrator’s password with the DSRM password.
To manually synchronize the DSRM password to a network administrator account
-
At a command prompt, run
ntdsutil.exeto open the ntdsutil tool. -
To reset the DSRM password, type set dsrm password.
-
To synchronize the DSRM password on a domain controller with the current network administrator’s account, type:
sync from domain account <current_network_administrator_account>, and then press Enter.
Because you will periodically change the password for the network administrator account, to ensure that the DSRM password is always the same as the current password of the network administrator, we recommend that you create a schedule task to automatically synchronize the DSRM password to the network administrator password daily.
To automatically synchronize the DSRM password to a network administrator account
-
From the server, open Administrative Tools, and then double-click Task Scheduler.
-
In the Task Scheduler Actions pane, click Create Task.
-
In the Name text box, type a name for the task such as AutoSync DSRM Password, and then select the Run with highest privileges option.
-
Define when the task should run:
-
In the Create Task dialog box, click the Triggers tab, and then click New.
-
In the New Trigger dialog box, select your recurrence option, specify the recurrence interval, and choose a start time.
[!NOTE]
As a best practice, you should set the task to run daily during non-business hours. -
Click OK to save your changes and return to the Create Task dialog box.
-
-
Define the task actions:
-
Click the Actions tab, and then click New. The New Action dialog box appears.
-
In the Action list, click Start a program, and then browse to C:WINDOWSSYSTEM32ntdsutil.exe.
-
In the Add arguments(optional) text box, type the following (you must include the quotation marks): set dsrm password sync from domain account SBS_network_administrator_account q q where SBS_network_administrator_account is the current network administrator’s account name.
-
-
Click OK twice to save the task and close the Create Task dialog box. The new task appears in the Active Tasks section of Task Schedule.
Give user accounts remote desktop permission
In the default installation of Windows Server Essentials, network users do not have permission to establish a remote connection to computers or other resources on the network.
Before network users can establish a remote connection to network resources, you must first set up Anywhere Access. After you set up Anywhere Access, users can access files, applications, and computers in your office network from a device in any location with an Internet connection.
The Set up Anywhere Access Wizard allows you to enable two methods of remote access:
-
Virtual private network (VPN)
-
Remote Web Access
When you run the wizard, you can also choose to allow Anywhere Access for all current and newly added user accounts.
To set up Anywhere Access, open the Dashboard Home page, click SETUP, and then click Set up Anywhere Access.
For more information about Anywhere Access, see Manage Anywhere Access.
Enable users to access resources on the server
This section applies to a server running Windows Server Essentials or Windows Server Essentials, or to a server running Windows Server 2012 R2 Standard or Windows Server 2012 R2 Datacenter with the Windows Server Essentials Experience role installed.
If you want users to use remote access, and/or have individual user accounts, after you finish connecting a computer to the server, you can create new network user accounts for the users of the networked computer on the server by using the Dashboard. For more information about creating a user account, see Add a user account. After creating the user accounts, you must provide the network user name and password information to the users of the client computer so that they can access resources on the server by using the Launchpad.
For each user account that you create you can set access for the following through the user account properties:
-
Shared folders. By default, network administrators have Read/Write permission to all the shared folders, and standard user accounts have Read-only permissions to the Company folder. If media streaming is enabled, you can assign folder access permissions for individual standard user accounts for the following shared folders: Music, Pictures, Recorded TV, and Videos. You can set permissions for user accounts to access shared folders on the Shared folders tab of the user account properties.
-
Anywhere Access. By default, network administrators can use either VPN or Remote Web Access to access server resources. For standard user accounts, you must set user account permissions on the Anywhere Access tab.
-
Computer access. By default, network administrators can access all the computers in the network. However, for standard user accounts you can set individual user account permissions for accessing computers on the network on the Computer access tab of the user account properties.
To edit user account properties in Windows Server Essentials 2012 R2
-
Open the Windows Server Essentials Dashboard.
-
On the navigation bar, click USERS.
-
In the list of user accounts, select the user account that you want to edit.
-
In the <User Account> Tasks pane, click View the account properties.
-
In the <User Account> Properties, do the following:
-
On the Shared folders tab, set the appropriate folder permissions for each shared folder as needed.
-
On the Anywhere Access tab:
-
To allow a user to connect to the server by using VPN, select the Allow Virtual Private Network (VPN) check box.
-
To allow a user to connect to the server by using Remote Web Access, select the Allow Remote Web Access and access to web services applications check box.
-
-
On the Computer access tab, select the network computers that you would like the user to have access to.
-
To edit user account properties in Windows Server Essentials 2012
-
Open the Windows Server Essentials Dashboard.
-
On the navigation bar, click USERS.
-
In the list of user accounts, select the user account that you want to edit.
-
In the <User Account> Tasks pane, click Properties.
-
In the <User Account> Properties, do the following:
-
On the General tab, select User can view network health alerts if the user account needs to access network health reports.
-
On the Shared folders tab, set the appropriate folder permissions for each shared folder as needed.
-
On the Anywhere Access tab:
-
To allow a user to connect to the server by using VPN, select the Allow Virtual Private Network (VPN) check box.
-
To allow a user to connect to the server by using Remote Web Access, select the Allow Remote Web Access and access to web services applications check box.
-
-
On the Computer access tab, select the network computers that you would like the user to have access to.
-
Change remote access permissions for a user account
A user can access resources located on the server from a remote location by using a virtual private network (VPN), Remote Web Access, or other web services applications. By default, remote access permissions are turned on for network users when you configure Anywhere Access in Windows Server Essentials by using the Dashboard.
To change remote access permissions for a user account
-
Open the Windows Server Essentials Dashboard.
-
On the navigation bar, click Users.
-
In the list of user accounts, select the user account that you want to change.
-
In the <User Account> Tasks pane, click View the account properties. The Properties page for the user account appears.
-
On the Anywhere Access tab, do the following:
-
Select the Allow Virtual Private Network (VPN) check box to allow a user to connect to the server by using VPN.
-
Select the Allow Remote Web Access and access to web services applications check box to allow a user to connect to the server by using Remote Web Access.
-
-
Click Apply, and then click OK.
Change virtual private network permissions for a user account
You can use a virtual private network (VPN) to connect to Windows Server Essentials and access all your resources that are stored on the server. This is especially useful if you have a client computer that is set up with network accounts that can be used to connect to a hosted Windows Server Essentials server through a VPN connection. All the newly created user accounts on the hosted Windows Server Essentials server must use VPN to log on to the client computer for the first time.
To change VPN permissions for network users
-
Open the Windows Server Essentials Dashboard.
-
On the navigation bar, click USERS.
-
In the list of user accounts, select the user account to which you want to grant permissions to access the desktop remotely.
-
In the <User Account> Tasks pane, click Properties.
-
In the <User Account> Properties, click the Anywhere Access tab.
-
On the Anywhere Access tab, to allow a user to connect to the server by using VPN, select the Allow Virtual Private Network (VPN) check box.
-
Click Apply, and then click OK.
Change access to internal shared folders for a user account
You can manage access to any shared folders on the server by using the tasks on the Server Folders tab of the Dashboard. By default, the following server folders are created when you install Windows Server Essentials:
-
Client Computer Backups. Used to store client computer backups created by Windows Server backup. This server folder is not shared.
-
Company. Used to store and access documents related to your organization by network users.
-
File History Backups. By default, Windows Server Essentials stores file backups created by using File History. This server folder is not shared.
-
Folder Redirection. Used to store and access folders that are set up for folder redirection by network users. This server folder is not shared.
-
Music. Used to store and access music files by network users. This folder is created when you turn on media sharing.
-
Pictures. Used to store and access pictures by network users. This folder is created when you turn on media sharing.
-
Recorded TV. Used to store and access recorded TV programs by network users. This folder is created when you turn on media sharing.
-
Videos. Used to store and access videos by network users. This folder is created when you turn on media sharing.
-
Users. Used to store and access files by network users. A user-specific folder is automatically generated in the Users server folder for every network user account that you create.
To change access to a shared folder for a user account
-
Open the Windows Server Essentials Dashboard.
-
Click STORAGE, and then click Server Folders.
-
Navigate to and select the server folder for which you want to modify permissions.
-
In the task pane, click View the folder properties.
-
In <FolderName> Properties, click Sharing, and select the appropriate user access level for the listed user accounts, and then click Apply.
[!NOTE]
You cannot modify the sharing permissions for File History Backups, Folder Redirection, and Users server folders. Hence, the folder properties of these server folders do not include a Sharing tab.
Allow user accounts to establish a remote desktop session to their computer
This section applies to a server running Windows Server Essentials or Windows Server Essentials, or to a server running Windows Server 2012 R2 Standard or Windows Server 2012 R2 Datacenter with the Windows Server Essentials Experience role installed.
The network administrator can grant permissions to network users that allow them to access their network computers from a remote location.
To enable users to access their network computers from a remote location
-
Open the Windows Server Essentials Dashboard.
-
On the navigation bar, click USERS.
-
In the list of user accounts, select the user account that you want to grant permissions for accessing the desktop remotely.
-
In the <User Account> Tasks pane, click Properties.
-
In the <User Account> Properties, click the Computer Access tab.
-
Select the computers that you want this user account to be able to access remotely, and then click OK.
Additional References
-
Manage Online Accounts for Users
-
Get Connected
-
Use Windows Server Essentials
-
Manage Windows Server Essentials
Как Вам возможно известно, Windows создаёт аккаунт администратора с соответствующим именем «Администратор». Этот административный аккаунт имеет привилегии на другими пользовательскими в вашей копии ОС Windows, и используя его, Вы можете делать почти всё что угодно без каких-либо ограничений. Потенциальная опасность этого аккаунта в том, что он является целью хакеров, завладев которым можно получить широкие возможности на компьютере жертвы. Одним из решений является переименование аккаунта администратора во что-либо другое.
Использование «Командной строки» Windows
Для того, чтобы переименовать аккаунт администратора, используйте командную строку с правами администратора. Если Вы используете Windows Vista, Windows 7, Windows Server 2008 или Windows Server 2008 R2, то нажмите на меню «Пуск», наберите в строке поиска “cmd”, и щёлкнув по найденному значению правой кнопкой выберете пункт меню «Запуск от имени администратора». И наконец, если у Вас Windows 8, просто нажмите сочетание клавиш “Win+X”, и выберете пункт меню «Командная строка (администратор)».
После того, как «Командная строка» будет открыта, просто вставьте команду ниже, чтобы переименовать учетную запись администратора. Не забудьте заменить ‘newUserName’ на имя, которое Вы хотите использовать.
wmic useraccount where name=’Администратор’ call rename name=’newUserName’
После того, как команда будет выполнена, Вы увидите подтверждающее сообщение, наподобие того, как показано выше. Этого достаточно, чтобы переименовать аккаунт администратора.
Используем «Редактор локальной групповой политики»
Вторым способом изменить имя администратора компьютера является использование «Редактора локальной групповой политики». Вам понадобится версия Windows не ниже Pro (Pro или Enterprise), и в зависимости от Ваших потребностей, можно применить это правило к целой сети. Для начала нажмите сочетание клавиш “Win+R”, чтобы запустить диалоговое окно «Выполнить» и введите команду “gpedit.msc” для запуска «Редактора локальной групповой политики».
После того, как редактор будет запущен, Перейдите в области навигации по следующему пути: «Конфигурация компьютера -> Конфигурация Windows -> Параметры безопасности -> Локальные политики -> Параметры безопасности». В открывшемся списке найдите и дважды кликните мышкой на политику «Учётные записи: Переименование учётной записи администратора».
Сделанные действия откроют окно настройки выбранной политики. Просто введите новое имя администратора и нажмите «ОК» для того, чтобы сохранить изменения.
Этого достаточно, чтобы переименовать администратора через «Редактор локальной групповой политики». Чтобы изменения вступили в силу, необходимо перезагрузить компьютер или выйти из системы и войти заново. Альтернативным способом применения политик является использование команд, представленной ниже в «Командной строке» с правами администратора.
gpupdate /force
Использование утилиты «Управление компьютером»
Переименовать аккаунт администратора можно и с использованием утилиты «Управление компьютером». Для того, чтобы сделать это, запустите утилиту «Управление компьютером». Запустить её можно разными способами: «Панель управления» -> «Администрирование» -> «Управление компьютером», Нажав сочетание клавиш “Win+X” и выбрав «Управление компьютером» или с помощью диалогового окна «Выполнить».
Теперь перейдите по следующему пути: «Служебные программы -> Локальные пользователи и группы -> Пользователи». Здесь Вы сможете найти аккаунт администратора с именем «Администратор».
Кликните правой кнопкой мыши на аккаунте «Администратор» и выберете опцию «Переименовать», затем введите новое имя администратора и подтвердите изменения.
Вот и всё, что нужно сделать.
Здесь мы рассмотрели 3 способа переименования аккаунта администратора. Надеюсь данная статья будет Вам полезна. Оставляйте комментарии, делитесь советами и опытом использования. До скорого.
- Remove From My Forums

Переименование учетной записи Администратор в командной строке
-
Вопрос
-
Здравствуйте!
Подскажите пожалуйста, как используя встроенные средства Windows Server 2008 R2 Core переименовать учетную запись Administrator?
-
Перемещено
29 мая 2013 г. 13:52
-
Перемещено
Ответы
-
Или из
командной строкиwmic UserAccount where Name="Administrator" call Rename Name="new-name"
-
Предложено в качестве ответа
Dmitry Nikitin
30 мая 2013 г. 7:02 -
Помечено в качестве ответа
Petko KrushevMicrosoft contingent staff
31 мая 2013 г. 7:36
-
Предложено в качестве ответа
-
Удалось переименовать локальную учетную запись такой командой:
wmic useraccount where name='Администратор' rename Administrator
Проблема решена! Всем спасибо за участие!
-
Помечено в качестве ответа
Petko KrushevMicrosoft contingent staff
31 мая 2013 г. 7:36
-
Помечено в качестве ответа
If it domain user install Active Directory Administration module for PowerShell.
command line:
powershell Import-module ActiveDirectory
rename domain user —
Powershell:
Get-ADUser -Identity 'Administrator' | Rename-ADObject -NewName 'Partisan'
command line:
powershell Get-ADUser -Identity 'Administrator' ^| Rename-ADObject -NewName 'Partisan'
var 2:
dsquery user -name Administrator | dsmove -newname "Partisan"
local administrator —
Powershell:
Rename-LocalUser -UserName 'Administrator' -NewUserName 'Partisan'
command line:
powershell Rename-LocalUser -UserName 'Administrator' -NewUserName 'Partisan'
var2:
wmic UserAccount where Name="Administrator" call Rename Name="Partisan"