Secure Socket Tunneling Protocol (SSTP) is a Windows service that provides a secure connection between two computers over the Internet. It is used to securely tunnel data between two computers, allowing for a secure connection even when the underlying network is not secure. SSTP is a secure protocol that is used to create a virtual private network (VPN) connection between two computers. It is designed to provide a secure connection over an unsecured network, such as the Internet.
Secure Socket Tunneling Protocol (SSTP) is a Windows service that provides a secure connection between two computers over the Internet. It is used to securely tunnel data between two computers, allowing for a secure connection even when the underlying network is not secure. SSTP is a secure protocol that is used to create a virtual private network (VPN) connection between two computers. It is designed to provide a secure connection over an unsecured network, such as the Internet.
SSTP is a secure protocol that is based on the Point-to-Point Tunneling Protocol (PPTP) and uses the Secure Sockets Layer (SSL) protocol for authentication and encryption. It is a secure protocol that is used to create a secure connection between two computers over the Internet. It is used to securely tunnel data between two computers, allowing for a secure connection even when the underlying network is not secure.
Why is Secure Socket Tunneling Protocol (SSTP) Needed?
Secure Socket Tunneling Protocol (SSTP) is needed to securely tunnel data between two computers, allowing for a secure connection even when the underlying network is not secure. It is used to create a secure connection over an unsecured network, such as the Internet. It is a secure protocol that is used to create a virtual private network (VPN) connection between two computers.
SSTP is a secure protocol that is based on the Point-to-Point Tunneling Protocol (PPTP) and uses the Secure Sockets Layer (SSL) protocol for authentication and encryption. It is a secure protocol that is used to create a secure connection between two computers over the Internet. It is used to securely tunnel data between two computers, allowing for a secure connection even when the underlying network is not secure.
Is Secure Socket Tunneling Protocol (SSTP) Safe?
Yes, Secure Socket Tunneling Protocol (SSTP) is a secure protocol that is used to create a secure connection between two computers over the Internet. It is based on the Point-to-Point Tunneling Protocol (PPTP) and uses the Secure Sockets Layer (SSL) protocol for authentication and encryption. This ensures that all data sent over the connection is encrypted and secure.
Secure Socket Tunneling Protocol (SSTP) Service Related Errors
Secure Socket Tunneling Protocol (SSTP) service related errors can occur if the service is not running properly or if there is an issue with the configuration of the service. Common errors include:
- The SSTP service is not running.
- The SSTP service is not responding.
- The SSTP service is not configured correctly.
- The SSTP service is not responding to requests.
- The SSTP service is not accepting connections.
Troubleshooting Secure Socket Tunneling Protocol (SSTP) Service Errors
If you are experiencing Secure Socket Tunneling Protocol (SSTP) service related errors, there are a few steps you can take to troubleshoot the issue. These steps include:
- Check the SSTP service is running. If it is not, start the service.
- Check the SSTP service is configured correctly. If it is not, reconfigure the service.
- Check the SSTP service is responding to requests. If it is not, restart the service.
- Check the SSTP service is accepting connections. If it is not, check the firewall settings.
- Check the SSTP service is not being blocked by any other services or applications. If it is, disable the service or application that is blocking it.
Can Secure Socket Tunneling Protocol (SSTP) be Disabled?
Yes, Secure Socket Tunneling Protocol (SSTP) can be disabled. To disable the SSTP service, open the Windows Services Manager and locate the SSTP service. Right-click on the service and select the “Stop” option. Once the service is stopped, you can then disable it by right-clicking on the service and selecting the “Disable” option.
How to Fix Secure Socket Tunneling Protocol (SSTP) Service Errors?
If you are experiencing Secure Socket Tunneling Protocol (SSTP) service related errors, there are a few steps you can take to troubleshoot the issue. These steps include:
- Check the SSTP service is running. If it is not, start the service.
- Check the SSTP service is configured correctly. If it is not, reconfigure the service.
- Check the SSTP service is responding to requests. If it is not, restart the service.
- Check the SSTP service is accepting connections. If it is not, check the firewall settings.
- Check the SSTP service is not being blocked by any other services or applications. If it is, disable the service or application that is blocking it.
If the above steps do not resolve the issue, you may need to reinstall the SSTP service. To do this, open the Windows Services Manager and locate the SSTP service. Right-click on the service and select the “Uninstall” option. Once the service is uninstalled, you can then reinstall it by downloading the latest version from the Microsoft website.
Secure Socket Tunneling Protocol (SSTP) is a secure protocol that is used to create a secure connection between two computers over the Internet. It is used to securely tunnel data between two computers, allowing for a secure connection even when the underlying network is not secure. SSTP is a secure protocol that is based on the Point-to-Point Tunneling Protocol (PPTP) and uses the Secure Sockets Layer (SSL) protocol for authentication and encryption. It is a secure protocol that is used to create a secure connection between two computers over the Internet.
Provides support for the Secure Socket Tunneling Protocol (SSTP) to connect to remote computers using VPN. If this service is disabled, users will not be able to use SSTP to access remote servers.
This service also exists in Windows 7, 8 and Vista.
Startup Type
| Windows 10 version | Home | Pro | Education | Enterprise |
|---|---|---|---|---|
| 1507 | Manual | Manual | Manual | Manual |
| 1511 | Manual | Manual | Manual | Manual |
| 1607 | Manual | Manual | Manual | Manual |
| 1703 | Manual | Manual | Manual | Manual |
| 1709 | Manual | Manual | Manual | Manual |
| 1803 | Manual | Manual | Manual | Manual |
| 1809 | Manual | Manual | Manual | Manual |
| 1903 | Manual | Manual | Manual | Manual |
| 1909 | Manual | Manual | Manual | Manual |
| 2004 | Manual | Manual | Manual | Manual |
| 20H2 | Manual | Manual | Manual | Manual |
| 21H1 | Manual | Manual | Manual | Manual |
| 21H2 | Manual | Manual | Manual | Manual |
| 22H2 | Manual | Manual | Manual | Manual |
Default Properties
| Display name: | Secure Socket Tunneling Protocol Service |
| Service name: | SstpSvc |
| Type: | share |
| Path: | %WinDir%\system32\svchost.exe -k LocalService -p |
| File: | %WinDir%\system32\sstpsvc.dll |
| Error control: | normal |
| Object: | NT Authority\LocalService |
| Privileges: |
|
Default Behavior
The Secure Socket Tunneling Protocol Service is running as NT Authority\LocalService in a shared process of svchost.exe. Other services might run in the same process. If Secure Socket Tunneling Protocol Service fails to start, the error is logged. Windows 10 startup proceeds, but a message box is displayed informing you that the SstpSvc service has failed to start.
Dependencies
If Secure Socket Tunneling Protocol Service is stopped, the Remote Access Connection Manager service fails to start and initialize.
Restore Default Startup Type of Secure Socket Tunneling Protocol Service
Automated Restore
1. Select your Windows 10 edition and release, and then click on the Download button below.
2. Save the RestoreSecureSocketTunnelingProtocolServiceWindows10.bat file to any folder on your hard drive.
3. Right-click the downloaded batch file and select Run as administrator.
4. Restart the computer to save changes.
Note. Make sure that the sstpsvc.dll file exists in the %WinDir%\system32 folder. If this file is missing you can try to restore it from your Windows 10 installation media.
Yea, though I walk through the valley of the shadow of death, I will fear no evil: for thou art with me; thy rod and thy staff they comfort me.
DataProt is supported by its audience. When you buy through links on our site, we may earn a commission. This, however, does not influence the evaluations in our reviews. Learn More.
×
Affiliate Disclosure
DataProt is an independent review site dedicated to providing accurate information about various cybersecurity products.
DataProt remains financially sustainable by participating in a series of affiliate partnerships — it is visitors’ clicks on links that cover the expenses of running this site. Our website also includes reviews of products or services for which we do not receive monetary compensation.
DataProt’s in-house writing team writes all the site’s content after in-depth research, and advertisers have no control over the personal opinions expressed by team members, whose job is to stay faithful to the truth and remain objective.
Some pages may include user-generated content in the comment section. The opinions expressed in the comment section do not reflect those of DataProt.
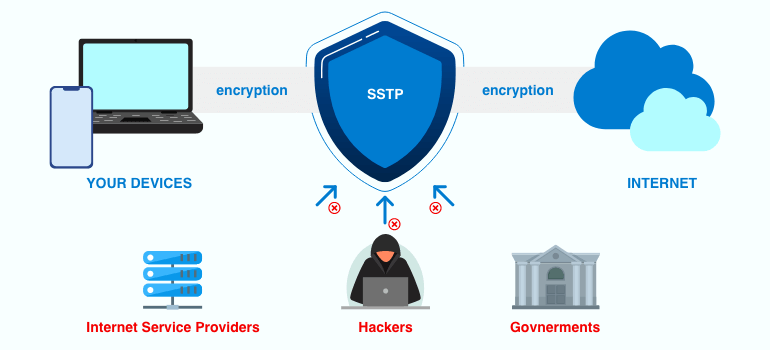
One can’t have enough security when browsing the internet these days. You’ll want several safety layers, so you’ll use IP masking through a VPN. This is where tunneling comes into play. Many different protocols are available today for data tunneling through a VPN, with SSTP standing out as one of the most secure choices.
But what is it, and how does it work? Do you even need it for regular VPN use, or is it a mandatory protocol? Read on to find out.
About SSTP
The Secure Socket Tunneling Protocol, or SSTP for short, is a protocol created and developed by Microsoft. The tech giant from Redmond launched this protocol alongside its Windows Vista operating system as a replacement for the PPTP protocol. While pretty powerful, PPTP’s encryption is still hackable and also detectable by content providers. For example, if your VPN provider uses PPTP, services like Netflix could easily block you from accessing content available outside of your region.
Since it has replaced PPTP in Microsoft products, the SSTP VPN protocol has been present in all versions of the Windows OS, including the recently launched Windows 11. You can see it in your OS’s process manager as an SstpSvc.dll file. The technology is based on SSL/TLS certificates, encrypted data, and secure keys. It uses the same port (port 443) as SSL/TLS and can surpass the limitations of traditional firewalls, like problematic port forwarding.
How Does SSTP Work?
Your VPN app needs to pass the bandwidth through some tunnels to properly encrypt it, thus ensuring your security when you’re online. This is why it needs a tunneling protocol to create a secure connection between the client app and VPN server.
In the case of SSTP, a VPN app will transport traffic under a Point-to-Point Protocol (PPP) with an added layer of SSL/TLS protection. This ensures data integrity and encryption for all the traffic that occurs while the VPN connection remains active. Additionally, this protocol requires server authentication whenever establishing a connection and, optionally, going through the same process on the client side.
SSTP Security
This VPN protocol has proven to be one of the more secure ones. As previously mentioned, the SSTP port is 443, which also matches HTTPS, meaning they share the same level of security and encryption. To ensure this, the network will use so-called certificates: Encryption requests that travel between two endpoints.
The reason SSTP is so secure lies in its SSL-reliant protocol. Specifically, its latest 3.0 version, which offers the highest level of security thanks to 256-bit AES encryption. Cryptography experts hold AES-256 in high regard; despite some speed issues, it doesn’t hinder protocol performance in a significant way.
Another critical piece of the puzzle is the aforementioned port 443. The traffic going through it will always show up as HTTPS. This makes it nigh-impossible to detect, and in turn, your connection won’t get blocked. Perfect for bypassing geoblocking, local censorship, and regaining access to the global internet.
Lastly, Microsoft owning this protocol means more than just having it backed by a large tech company. Every new Windows installation is equipped with this technology, and setting up SSTP ports is quick and easy. Microsoft keeps the protocol fresh with regular system updates and support, improving the security tenfold. Unfortunately, this means it’s kind of complicated to set up on Linux and macOS, but not impossible.
Disadvantages of the SSTP VPN Protocol
So far, we’ve talked about all the advantages of using this protocol over others. While it is an excellent piece of tech, like any protocol, it’s not without flaws. Here are some of the things you need to be aware of if you decide to employ SSTP encryption on your internet connection:
To reiterate, this is Microsoft’s proprietary protocol. While the corporation keeps the protocol up to date and secure, many people simply don’t trust Microsoft or are wary of Microsoft’s previous collaborations with the NSA. The tech giant was very open to providing access to encrypted messages during various investigations and is even a member of the PRISM surveillance program. As cyber security experts would say, if you trust Microsoft hasn’t tampered with SSTP, you can trust the protocol itself.
Enabling an SSTP VPN Connection
This protocol isn’t enabled by default, even if your VPN provider offers it. Now, if the VPN client has more detailed settings than just selecting where to connect, you’ll probably find the option of choosing between encryption types. Just find the protocol on that list, confirm the selection, and you’ll be ready to go.
In case there’s no such option, or you’d like to use the SSTP VPN client integrated into your Windows installation, you’ll have to tinker a bit. First up, open the Windows Settings menu, either by clicking through the Start menu, or pressing the “Windows + I” shortcut on your keyboard.
From there, select Network & Internet, then choose VPN from the sidebar. Finally, click on the Add VPN connection button.

Here, you can set things up according to the settings your SSTP VPN provider gave you. Make sure to check the “Remember my sign-in info” box, so you won’t have to reconfigure the connection after reboot, and then hit Save for the settings to take effect. It’s highly recommended to enable these settings if you’re on a laptop and whenever you’re connecting to a public Wi-Fi network.
SSTP vs. PPTP
This is probably the most common comparison of protocols since PPTP was supposed to go out of fashion when Microsoft introduced its new network protocol. However, point-to-point tunneling is still needed, and it’s part of pretty much every VPN ever made. The previously spotty security of the protocol has seen improvements in recent years, although it still can’t match the level SSTP VPN providers provide. That being said, PPTP is significantly more open and easier to implement, so you can use it on all operating systems, desktop or smartphone alike.
SSTP vs. OpenVPN
OpenVPN is another popular standard when it comes to data-tunnel options. It’s slightly newer than other protocols used by VPN providers, but at the same time, it’s highly regarded as one of the most secure protocols around. Just like the secure socket tunneling protocol service, OpenVPN employs SSL 3.0 to encrypt data, masks traffic to look like an HTTPS connection, and uses AES encryption, albeit 128-bit instead of 256-bit. Most importantly, it’s completely open-source, meaning everyone can implement it without having to pay for a license. This also makes OpenVPN platform-agnostic. Its only downside is that it’s more complicated to set up than SSTP and PPTP.
SSTP vs. L2TP/IPSec
Layer 2 Tunneling Protocol over IPSec, or L2TP/IPSec for short, is encryption technology that combines the best parts of PPTP and Layer 2 Forwarding. Developed and published by Cisco in 2000, this technology uses PPP at its base and then wraps additional layers of data protection around it. For encryption, it uses powerful AES, and users can choose between 128-bit, 192-bit, and 256-bit blocks. It then sends data over UDP port 500, one of the most common VPN ports that both firewalls and various services block. Comparing SSTP vs. IPSec, it’s clear that the former is the better choice for anonymity, while the latter is a good option for multi-platform solutions that require data authentication. They’re equal when it comes to security, though.
Top 3 VPNs with SSTP Protocol
ExpressVPN
There’s a reason ExpressVPN has been one of our favorites for years: It’s affordable, fast, and very reliable. It also offers quite a set of features on almost every platform imaginable. Whether you’re on a PC, Mac, laptop, or smartphone, ExpressVPN will work its magic and can even be installed on the router. It’s also one of the best SSTP providers, with over 3,000 global servers – ideal for accessing geo-restricted content.
IPVanish
The name says it all: With IPVanish, you’ll be able to set up a secure connection to hide your IP in seconds. This provider offers several protocols and a vast network of servers in 75 locations. The SSTP VPN speed is great, as well as all of its security features, including (but not limited to) DNS leak protection, a kill switch, and traffic scrambling. Since it also comes with a zero-log policy, IPVanish is easy to recommend.
PureVPN
When it comes to sheer server network size, nobody does it like PureVPN. This SSTP provider offers all popular protocols across over 140 countries with its 6,500-strong server network. It’s also one of the most affordable services, starting at just under $3 a month – a massive bargain in the competitive VPN world. Granted, it’s a bit more advanced, so you’ll need to know a thing or two about setting up a VPN to use this service.
Conclusion
This brings us to the end of the story about this great, although not yet super-popular, protocol. Hopefully, we’ve answered “What is SSTP VPN?” noted its benefits and disadvantages, and offered a few examples of excellent services that support this protocol. If you’re a Windows user, this is the protocol you’ll want to use for your network and home PC.
SSTP is a proprietary VPN protocol, developed by Microsoft. In this post, we explain how SSTP works and show you how to create a connection in Windows and Linux.
UPDATED: September 19, 2023
SSTP stands for Secure Socket Tunneling Protocol. It’s a VPN protocol developed by Microsoft, which was made available from Windows Vista SP1 onwards. SSTP is a fairly commonly used VPN protocol—at least among Windows users. SSTP is also supported in Linux, Android, and on many routers. In this post, we’re going to look at what SSTP is and how it works. We’ll also show you how to use it in Windows 11 and in Linux.
What is SSTP?
SSTP is a VPN protocol. What it does, in a nutshell, is establish an encrypted connection between your device (smartphone, tablet, laptop) and a VPN server. The VPN server then forwards your traffic, decrypted, to the website you requested, substituting your IP address for its own in the process.
Like the PPTP VPN protocol, also developed by Microsoft, SSTP supports the Point-to-Point protocol (PPP). PPP is a direct connection (layer 2) between two routers without any intermediaries. PPP supports authentication, encryption, and data compression.
PPTP is deemed insecure today and has been for many years now. Even Microsoft itself recommends switching to a more secure protocol. Microsoft developed SSTP as an updated and more secure successor to PPTP.
SSTP pros and cons
Pros:
- Uses well-known and trusted ciphers
- Easy to set up and configure
- Using TCP over port 443 makes SSTP difficult to block
- Provides decent speeds if you have good bandwidth despite using TCP
Cons:
- The SSTP VPN protocol is closed-source and owned by Microsoft
- Limited platform support
- Only supports non-authenticated proxies, which can reveal the fact you’re using SSTP
- Susceptible to the TCP Meltdown problem on high latency or congested networks
How does SSTP work?
SSTP relies on the Secure Socket Layer protocol (SSL) for encryption. SSL is an open-source protocol and is considered very secure. It’s what you use when you log into your online banking site or make purchases over the internet. The SSL library typically uses the AES cipher, which is commonly used in other VPN protocols like OpenVPN and IKEv2.
In fact, SSTP is often compared to OpenVPN because both protocols use SSL, and both can run on port 443 (HTTPS). SSTP only runs over port 443. OpenVPN can run on arbitrary ports, including port 443. Port 443 is associated with the HTTPS protocol and is used to facilitate secure and encrypted communication between web clients (such as browsers) and web servers.
While most VPN protocols default to using the UDP protocol, SSTP exclusively uses the TCP protocol.
What is UDP?
UDP stands for User Datagram Protocol. UDP tends to be much faster than TCP. This is because UDP does not establish a dedicated internet connection before sending data. Instead, it simply sends data packets to the recipient without any guarantee of delivery or order.
UDP does not provide error-checking or error-correction mechanisms either. If a UDP packet is corrupted or lost in transit, there is no automatic mechanism for recovery. Applications using UDP must handle error detection and correction themselves if necessary. For this reason, UDP is sometimes referred to as “Unreliable Datagram Protocol”. Nevertheless, UDP is usually the default with most other VPN protocols as it has much less overhead than TCP.
What is TCP?
TCP, for its part, stands for Transmission Control Protocol. TCP establishes a connection — using a three-way handshake — before data exchange begins. When data is sent, the receiver acknowledges its receipt. If the sender doesn’t receive an acknowledgment within a specified time, it will retransmit the data, ensuring that no data is lost in transit.
TCP allows the sender to regulate the rate at which data is sent based on the receiver’s ability to process it. It also includes the ability to detect packet errors and will request retransmission if necessary. TCP’s corrective mechanism adds significant overhead to TCP connections, which are slower and can lead to what is referred to as a TCP Meltdown.
TCP meltdown
When TCP is used in a VPN connection over a spotty network, it becomes quite likely that packets will be either dropped or arrive out of order. When that happens, TCP’s corrective mechanism will request packets to be retransmitted. And if that happens often enough, your VPN connection will slow to a crawl as your packets are retransmitted and reverified. That, specifically, is the TCP Meltdown problem. And SSTP is vulnerable to it.
Even if you don’t get to the “meltdown” point, SSTP will always be slower than VPN protocols that run over UDP. Still, in my experience, SSTP still provides decent speeds—just not something that will blow you out of the water.
Port 443
On the plus side, because it runs over port 443, SSTP is quite good at bypassing restrictive firewalls. In fact, when OpenVPN users are dealing with restrictive firewalls, one of the most common practices is to use the TCP protocol over port 443, which helps because your traffic appears to be just regular HTTPS, making it harder to distinguish VPN traffic from normal website traffic.
No authenticated proxy server support
However, SSTP does have a weakness in this regard compared to OpenVPN. Whereas OpenVPN supports both authenticated and non-authenticated proxy servers (post VPN), SSTP doesn’t support authenticated proxy servers. This is a problem because if one uses a non-authenticated proxy over SSTP, the network administrator could detect the SSTP headers and could drop that traffic if they wanted to.
An authenticated proxy server is a proxy server that requires authentication to access—typically a username and a password. A non-authenticated proxy is one that does not require any kind of authentication for access. When using a non-authenticated proxy server over SSTP, the SSTP version appears in the HTTP headers, like so:
Method: CONNECT
Protocol Version: HTTP/1.1
URI:  <Server Name>:443
Host  <Server Name>:443
SSTPVERSION: 1.0
So a network administrator could easily block SSTP connections that go through a non-authenticated proxy server.
When using an authenticated proxy, this doesn’t happen. Unfortunately, SSTP hasn’t supported authenticated proxies since 2011. If you want to use a proxy server over SSTP, it’ll have to be a non-authenticated proxy, which will reveal that you’re using SSTP, despite using SSL over port 443. Not the best thing for bypassing restrictive networks or for privacy.
Closed source
One thing that makes some people uneasy about using SSTP is the fact that it’s a closed-source VPN protocol developed and owned by Microsoft. In general, for a VPN protocol to be considered secure, it needs to be open-source. This is the case with the two most popular VPN protocols: OpenVPN and WireGuard.
If it’s not, that means that it will not have been publicly reviewed, and nobody can audit the code. You’re left crossing your fingers that the developers got it right. Also, as many have pointed out, Microsoft has been known to collaborate with intelligence agencies, like the NSA, in harvesting and sharing user data—not exactly what you’re looking for when sending traffic through a VPN tunnel.
How to create an SSTP VPN connection in Windows 11
Creating an SSTP VPN connection in Windows 11 is pretty straightforward. Nonetheless, we’ll take you through all the steps.
1. Press the Windows key and then click the Gear icon (Settings). The Windows Settings page is displayed.
 2. Click Network & Internet.
3. Select VPN.
4. Click the Add VPN button. The Add a VPN Connection page is displayed. 5. Under VPN Provider, select Windows (built-in).
6. Under Connection name, give your connection a descriptive name.
7. Under Server name or address, enter either the IP address or the domain name of the SSTP server to which you want to connect. Check your SSTP VPN provider’s server list for the domain names or IP addresses of its SSTP servers.
8. Under VPN type, select Secure Socket Tunneling Protocol (SSTP).
9. Under Type of sign-in info, select User name and password.
10. Enter your username and password in the appropriate fields.
11. Click Save. You’re taken back to the VPN page.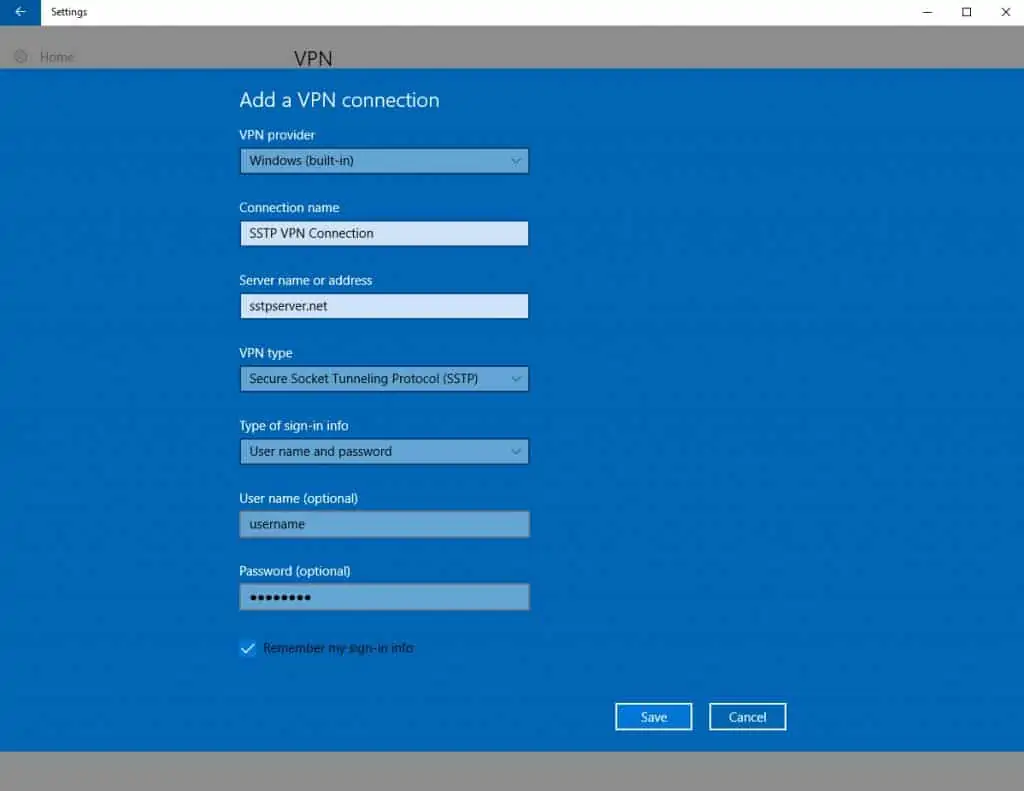
12. To connect to the SSTP server, click Connect.
13. Your SSTP VPN is now connected.
14. You can verify that your IP address has been changed by using the Comparitech IP Address Check Tool.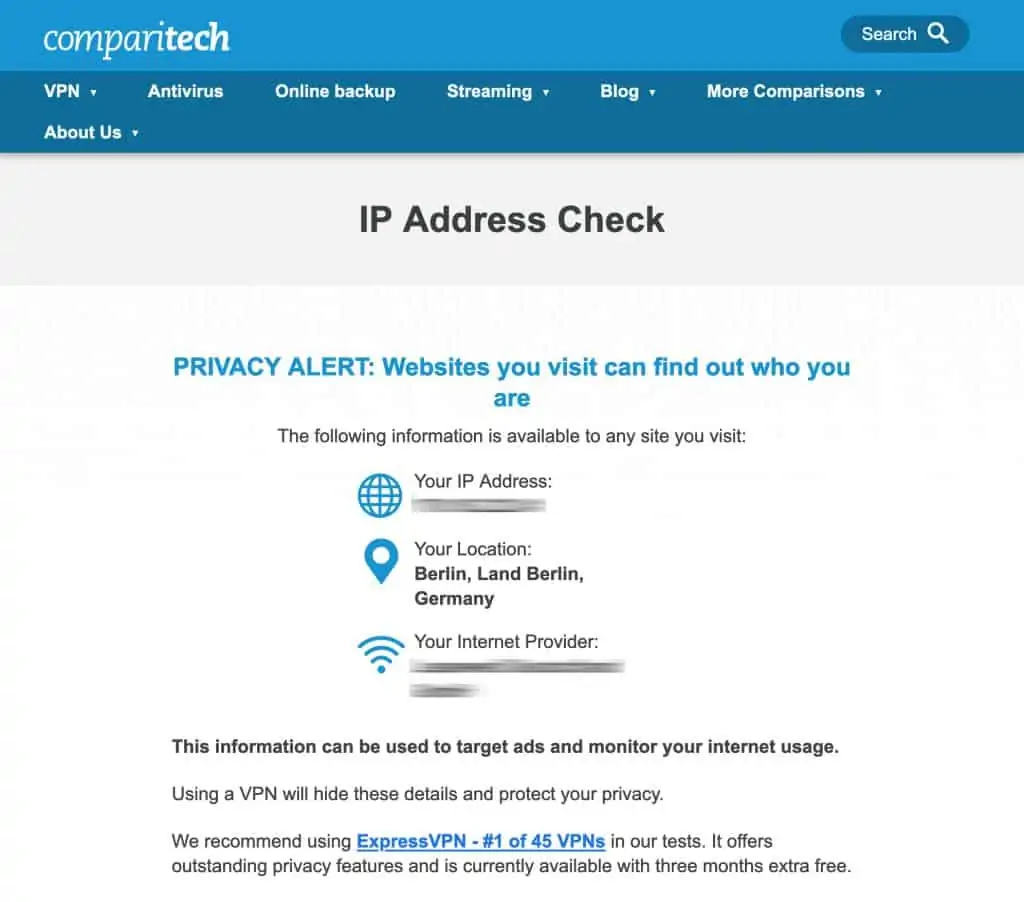
How to create an SSTP VPN connection in Linux Mint
Depending on your version of Linux Mint, you may or may not already have the ability to add SSTP VPN connections. Either way, you’ll still be able to configure an SSTP connection; you may need to install some additional packages.
To check whether or not you need to install additional packages to configure an SSTP connection, follow the instructions below.
Checking if additional packages are required to create an SSTP connection:
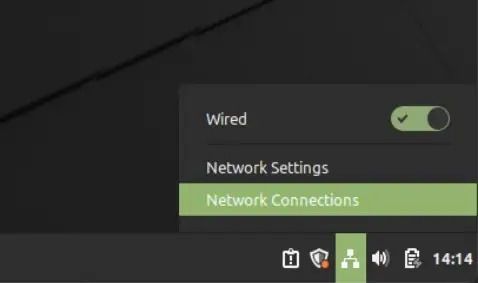
- From the Desktop, click the Network Manager icon at the bottom right of the screen. The Network Connections window appears.

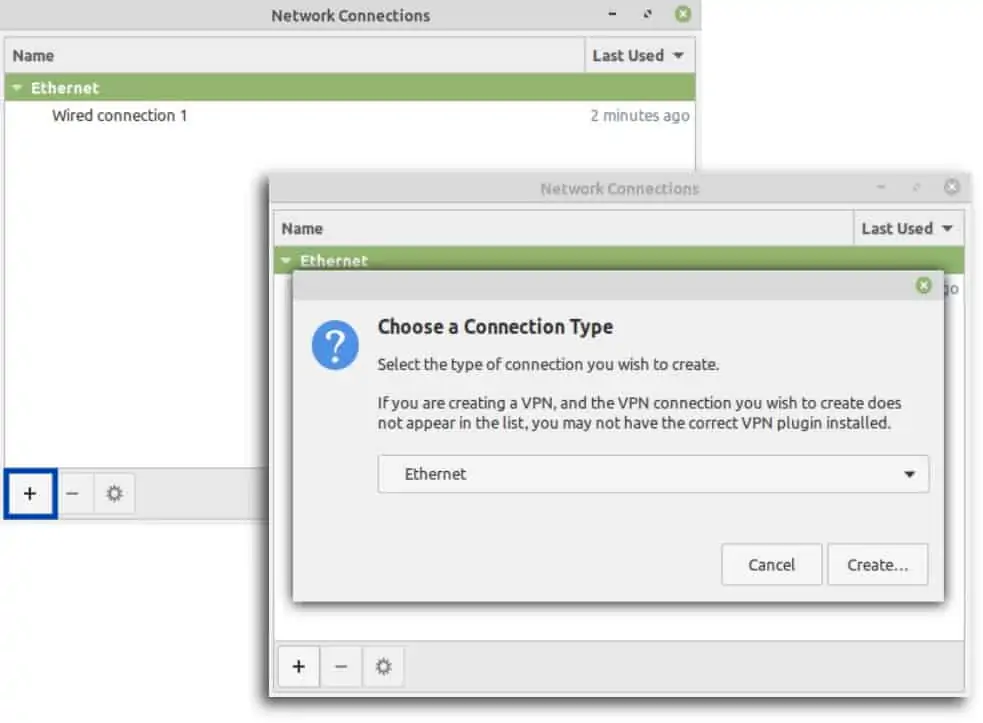
- Click the + at the bottom left of the window. The Connection Type window is displayed.

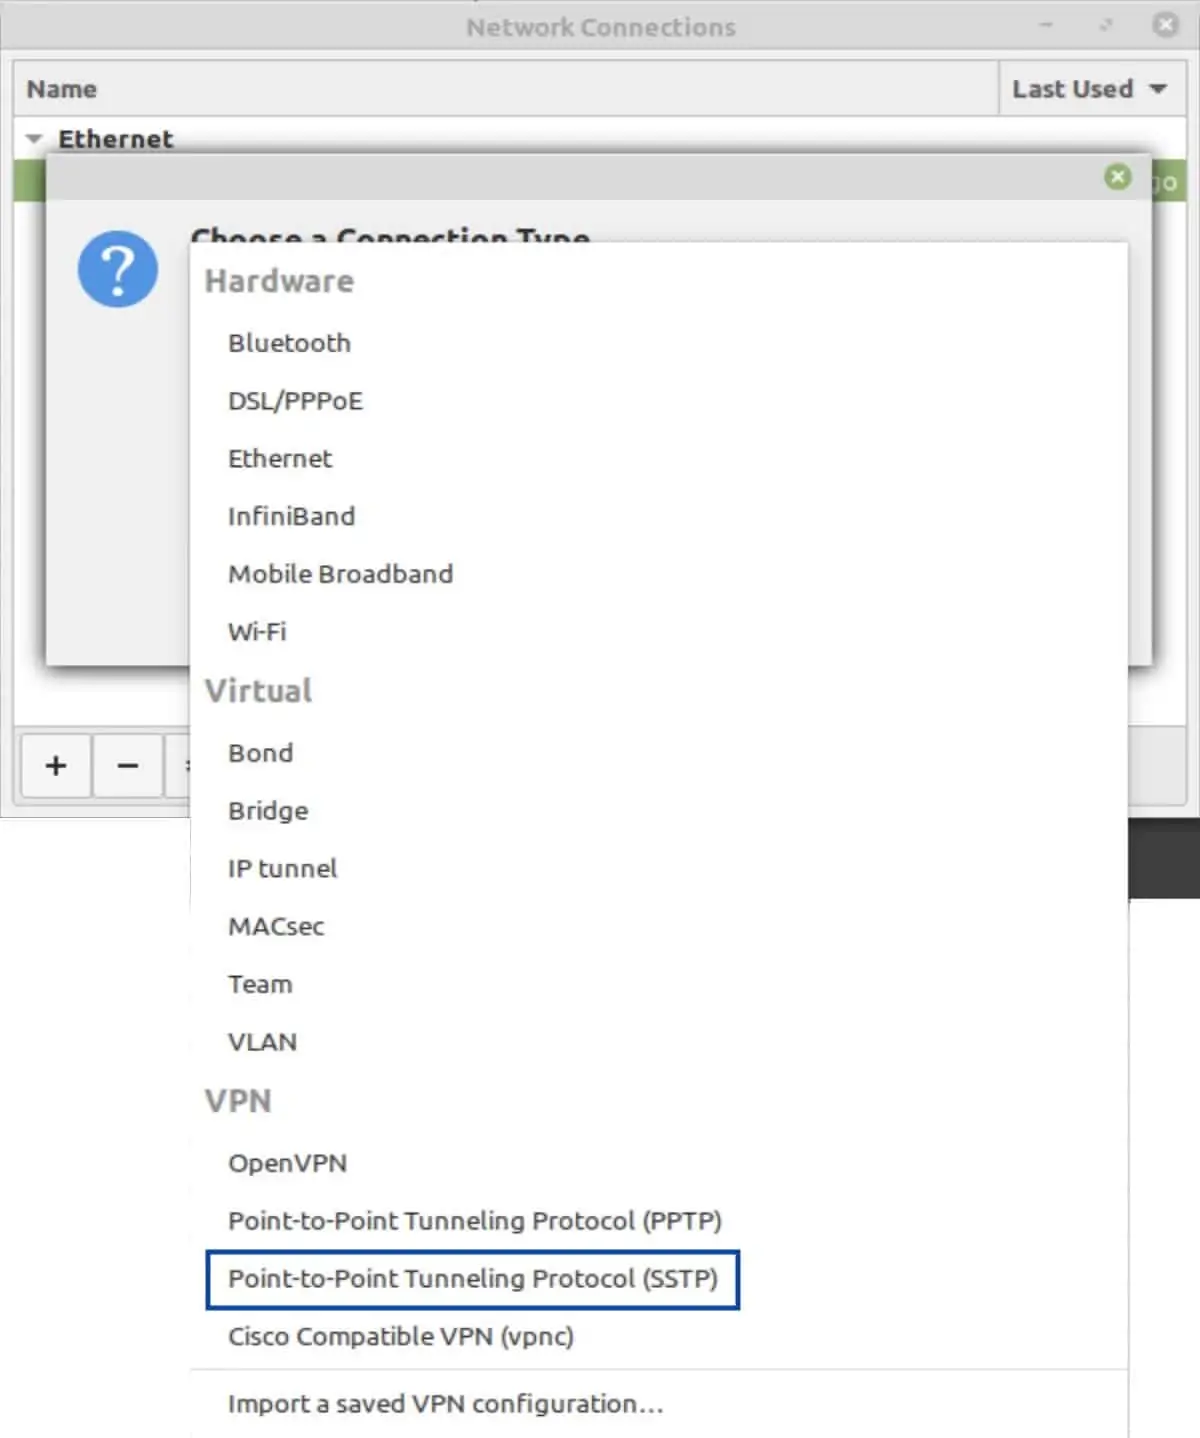
- Click the drop-down list and look for Point-to-Point Tunneling Protocol (SSTP). If it’s there, no additional packages are required. If it’s not, follow the steps below.

Installing SSTP packages
- From a terminal window, type the following commands, one after the other. Enter your password whenever prompted.
sudo add-apt-repository ppa:eivnaes/network-manager-sstp
sudo apt update
sudo apt install network-manager-sstp
sudo apt install sstp-client
Once the above packages are installed, you have everything you need to configure an SSTP VPN connection in Linux Mint. While the following instructions are for Linux Mint specifically, they are similar enough in most Debian-based Linux distributions that you should be able to follow them in another Linux distribution, as long as it’s Debian based.
- From the Desktop, click the Network Manager icon at the bottom right of the screen. The Network Connections window appears.
- Click the + at the bottom left of the window. The Connection Type window is displayed.
- From the drop-down list, select Point-to-Point Tunneling Protocol (SSTP).
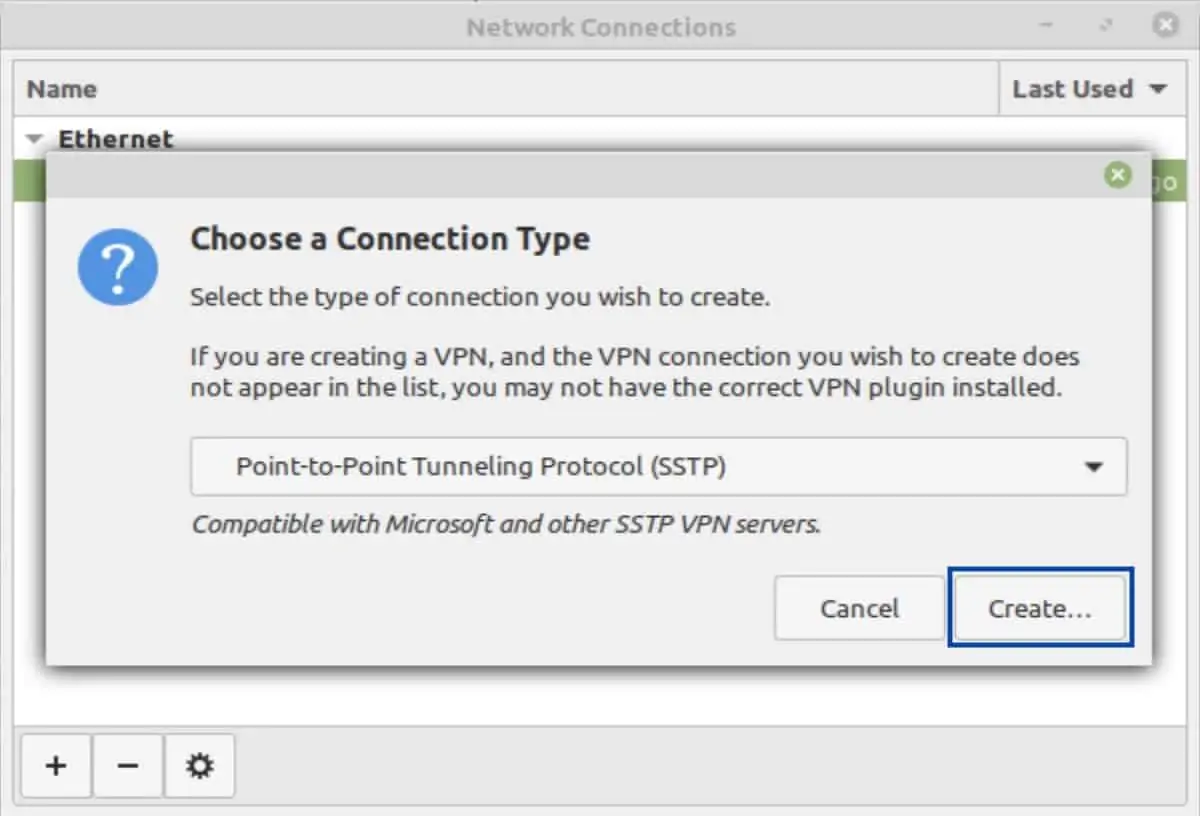
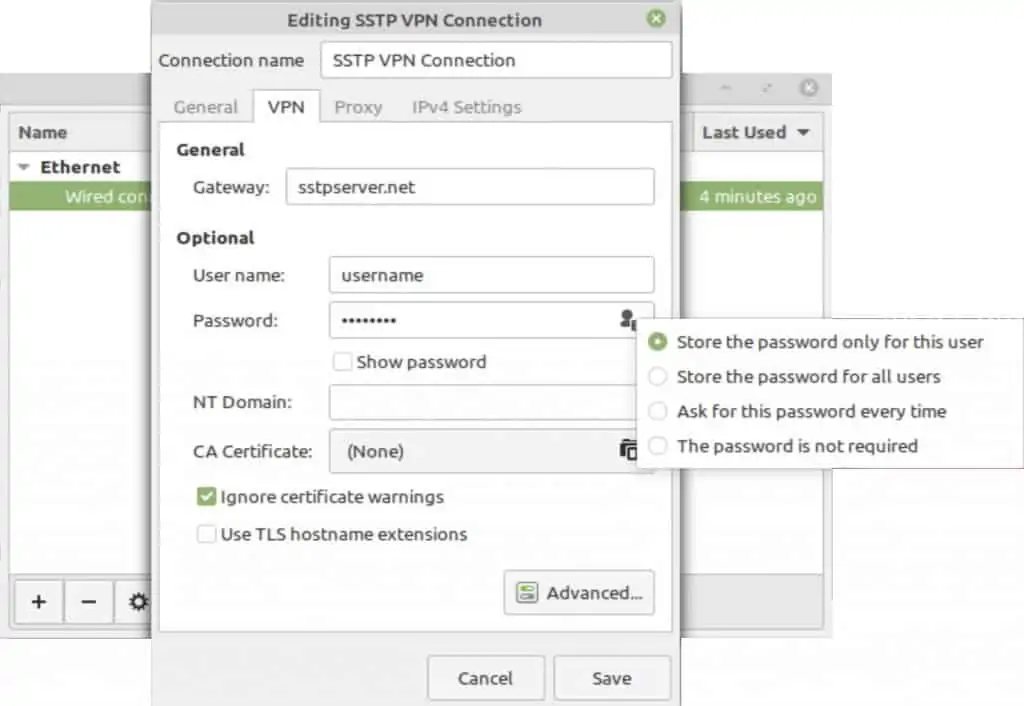
- You’re taken back to the Connection Type window. Click Create. The VPN Editing window is displayed.

- Next to Connection name, give your connection a descriptive name.
- Next to User name, enter your user name.
- Click the keyhole icon in the Password field and select Store the password for only this user, and enter your password in the Password field.
- Check the Ignore TLS certificate warnings box.
- Click Save. Your SSTP connection is now configured. Close the Connection Type window.

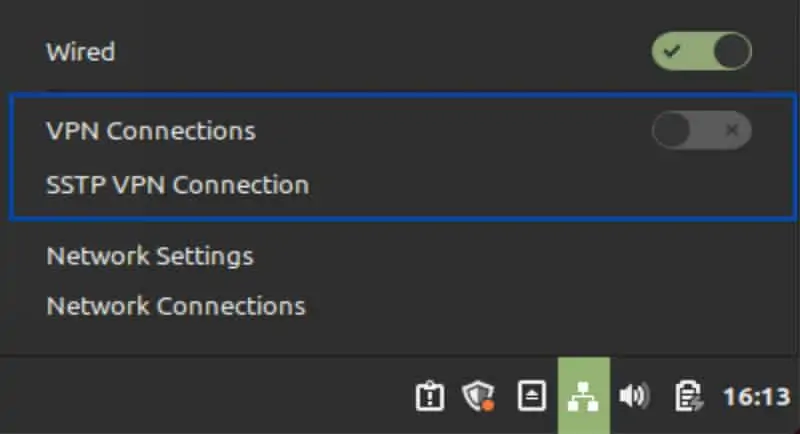
- To enable your VPN connection, from the Desktop, click the Network Manager icon at the bottom right of the screen and toggle your VPN connection on.

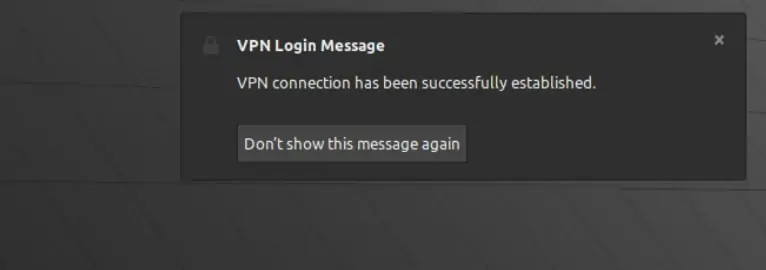
- Upon successful connection, you’ll see a notification appear stating that you’re now connected to the VPN.

- You can verify that your IP address has been changed by using the Comparitech IP Address Check Tool.

Conclusion
We looked at what SSTP is and how it works. We also showed how to create an SSTP connection in Windows 11 and in Linux. And while SSTP does have some things going for it, like robust ciphers and the ability to bypass restrictive firewalls, I would still recommend using OpenVPN, IPsec, or WireGuard. The main reason is that SSTP is closed-source and owned by Microsoft, which isn’t particularly privacy-friendly.
However, if you need to bypass restrictive firewalls, I would specifically recommend using OpenVPN in TCP mode and over port 443. This will get you to the same place as if you were using SSTP, but you’ll be using a tried and tested, open-source VPN protocol, and you won’t have to wonder what Microsoft or other third parties may be doing with your data.
Здравствуйте дорогие читатели, сегодня я хотел бы поговорить:
1. О службах Windows, что это, для чего нужны и какие за что отвечают.
2. И как же повысить быстродействия компьютера?
И так что это за службы Windows?
Службы — приложения, автоматически или вручную запускаемые системой при запуске Windows и выполняющиеся вне зависимости от статуса пользователя различные задачи.
Открыть список служб можно несколькими способами:
1. Удерживая кнопку windows нажимаем R, откроется окно выполнить, там введите services.msc
2. Пуск > Панель управления > Администрирование > Службы
3. Пуск > правой кнопкой мыши по моему компьютеру > Управление > Службы и приложения > Службы
Как видите в Windows их достаточно много и скачав справочник служб, Вы можете ознакомиться какие службы существуют и за что каждая из них отвечает.
Так как службы это приложения, следовательно они работают и используют часть ресурсов компьютера. Отключив не нужные можно повысить его быстродействие. Посмотрим что можно отключить.

Какие службы можно отключить в Windows 7, 8
Я не стал составлять список тех служб которые можно отключить, т.к. многие службы индивидуальны. Я просто постарался описать каждую службу и в каких ситуациях их можно отключить. Если вам нужно что-нибудь отключить бездумно, то просто воспользуйтесь программой для автоматического отключения служб.
* BranchCache — Служба кэширует сетевое содержимое. Если не пользуетесь домашней сетью, то вообще можете отключить.
* DHCP-клиент — Если пользуетесь интернетом не трогайте ни в коем случае. Именно эта служба присваивает вам ip адрес.
* DNS-клиент — Так же необходимая служба для использования интернета. Работает с вашими DNS (служит для правильных направлений).
* KtmRm для координатора распределенных транзакций — системная функция транзакций. Её так же оставляем.
* Microsoft .NET Framework — Все такие службы оставляем как есть. Они служат для нормальной работы большинства приложений.
* Parental Controls — Служба для родительского контроля. Если не используете, можно отключить.
* Plug-and-Play — служит для автоматического распознавания изменений в системе. Например когда вы подключаете флешку, просыпается эта служба… Так что оставляем как есть.
* Quality Windows Audio Video Experience — передача аудио и видео по сети в режиме реального времени. Не нужна только если нет сети (или интернета) в остальных случаях оставляем.
* Remote Desktop Configuration — Для удаленного рабочего стола. Если не пользуетесь удаленными подключениями, отключаем.
* Superfetch — Полезная функция, работает с кэшем. Ускоряет работу Windows, так что оставляем.
* Windows Audio — Управляет звуком. Если не нужен звук отключаем. В остальных случаях оставляем.
* Windows CardSpace — ненужная и небезопасная служба. По этому отключаем.
* Windows Driver Foundation — User-mode Driver Framework — для нормальной работы драйверов, не трогайте. Пусть остается как есть.
* Windows Search — Индексирование файлов для поиска. Если не пользуетесь и есть время подождать пока найдется файл, то отключаем. На ssd обязательно отключаем!
* WMI Performance Adapter — нужна для служб требующие wmi, ставим вручную. Если каким-то приложениям понадобятся, те сами запустят)
* Автонастройка WWAN — служба для использования мобильного интернета. Если пользуетесь usb модемом, сим картой в ноуте, то не отключайте.
* Автономные файлы — помогает работать, автономно с недоступными файлами, которые загрузились до этого. Ставим вручную.
* Агент защиты сетевого доступа — Ставим вручную, т.к. при необходимости служба запустится, если какая-то программа запросит необходимую информацию.
* Агент политики IPsec — Нужна при наличии сети и интернета.
* Адаптивная регулировка яркости — Оставляем если есть датчик освещения.
* Архивация Windows — Если не пользуетесь отключайте. Но лучше почитайте про архивацию в windows мало ли, будете пользоваться.
* Биометрическая служба Windows — нужна лишь при использовании биометрических устройств. В остальных случаях отключаем.
* Брандмауэр Windows — Я если честно всегда отключаю, т.к. воровать у меня нечего) А если и зашифруют данные, то восстановлю) Но вам посоветую обзавестись например касперским интернет секьюрити, которого есть и антивирус и брандмауэр. А этот отключите нафиг, т.к. он иногда блокирует что не нужно) Вообщем он следит за безопасностью вашего компьютера и закрывает порты, чтобы ворюги не смогли залезть к вам в компьютер)
* Браузер компьютера — В домашней сети не нужна. Вручную.
* Веб-клиент — Нудна если нет интернета. Служит для работы с файлами в интернете. Оставляем.
* Виртуальный диск — Служба для работы с запоминающими устройствами. Ставим вручную.
* Вспомогательная служба IP — Работает с протоколом версии 6. Я всегда отключаю его самого, так что и службу можно вообще отключить.
* Вторичный вход в систему — Ставьте вручную, т.к. некоторые игры или программы включат её по необходимости.
* Группировка сетевых участников — Нужна для домашней группы. Ставьте вручную, мало ли понадобится…
* Дефрагментация диска — В принципе она не мешает. Можете оставить или отключить. Если отключите, то рекомендую делать раз в месяц. А для ssd дисков, вообще отключаем!
* Диспетчер автоматических подключений удаленного доступа — Ставим вручную. Нужна для удаленных подключений.
* Диспетчер печати — Нужна если есть с чего печатать. В остальных случаях отключаем.
* Диспетчер подключений удаленного доступа — вручную. Один раз вообще отключил и не смог создать подключение. Так что лучше вручную.
* Диспетчер сеансов диспетчера окон рабочего стола — Если не используете прозрачность от Aero, то можно отключить, даст большой прирост.
* Диспетчер удостоверения сетевых участников — Ставим лучше вручную.
* Диспетчер учетных данных — Лучше вручную. Хранит ваши данные, например логины и пароли.
* Диспетчер учетных записей безопасности — Лучше оставить как есть. Если отключить данную службу, то все изменения в локально политике безопасности пропадут.
* Доступ к HID-устройствам — Доступ к быстрым клавишам. Отключите, если какие-то комбинации перестанут работать, то поставьте обратно.
* Журнал событий Windows — записывает все события. Полезный инструмент для опытного пользователя. Отключить невозможно.
* Журналы и оповещения производительности — системная служба, оставляем как есть.
* Защита программного обеспечения — так же системная служба, оставляем как есть.
* Защитник Windows — Защита от шпионских и вредных программ. Установите нормальный антивирус, а эту службу отключите.
* Изоляция ключей CNG — Вручную.
* Инструментарий управления Windows — Системная служба, без неё, некоторые приложения могут работать некорректно, так что лучше оставить.
* Информация о совместимости приложений — Полезная штука, помогает запустится приложениям, которые отказываются работать на вашей ос. Ставим вручную.
* Клиент групповой политики — Оставляем. Отвечает за настройками политики безопасности.
* Клиент отслеживания изменившихся связей — Отслеживание файлов ntfs, не нужно. Отключаем.
* Координатор распределенных транзакций — Ставим вручную.
* Кэш шрифтов Windows Presentation Foundation — Ставим вручную. При необходимости её запустят приложения.
* Ловушка SNMP — Некоторые программы будут собирать о вас информацию. Так что отключайте.
* Локатор удаленного вызова процедур (RPC) — Вручную, при необходимости приложения её запустят.
* Маршрутизация и удаленный доступ — Не нужна. Отключаем.
* Модули ключей IPsec для обмена ключами в Интернете и протокола IP с проверкой подлинности — Не нужна, но лучше вручную.
* Модуль запуска процессов DCOM-сервера — Системная служба, оставляем как есть.
* Модуль поддержки NetBIOS через TCP/IP — Если нет других компьютеров в сети, то вручную.
* Немедленные подключения Windows — регистратор настройки — Вручную.
* Обнаружение SSDP — Оставьте как есть. Необходима для новых устройств.
* Обнаружение интерактивных служб — Вручную.
* Общий доступ к подключению к Интернету (ICS) — Не нужна, если вы не расшариваете ваш интернет в сетевых подключениях.
* Определение оборудования оболочки — необходима для диалогового окна автозапуска диска или флешки. Кому как удобно, большинству это нужно. Я оставил.
* Основные службы доверенного платформенного модуля — Нужно только для использования чипов ТМР и/или BitLocker.
* Перенаправитель портов пользовательского режима служб удаленных рабочих столов — Если не используете удаленные соединения, то не нужно. Лучше поставьте вручную.
* Перечислитель IP-шин PnP-X — Лучше поставить вручную.
* Питание — Не отключается. Оставляем.
* Планировщик заданий — Желательно оставить как есть, т.к. сейчас много программ его использует.
* Планировщик классов мультимедиа — Оставляем, для кого важен звук.
* Поддержка элемента панели управления «Отчеты о проблемах и их решениях» — Вручную.
* Политика удаления смарт-карт — для пользователей смарт-карт, лучше вручную.
* Поставщик домашней группы — Для использования домашних групп. Лучше вручную.
* Проводная автонастройка — Вручную.
* Программный поставщик теневого копирования (Microsoft) — Вручную.
* Прослушиватель домашней группы — Вручную.
* Протокол PNRP — Тоже оставляем вручную. Некоторые приложения могут использовать службу.
* Публикация ресурсов обнаружения функции — Нужна если вы хотите показывать свои файлы другим компьютерам по сети. Если не хотите, то вручную или отключить.
* Рабочая станция — лучше оставить, т.к. некоторые приложения задействуют данную службу.
* Распространение сертификата — Лучше вручную.
* Расширяемый протокол проверки подлинности (EAP) — Вручную.
* Сборщик событий Windows — Вручную.
* Сведения о приложении — Вручную.
* Сервер — Если компьютер не используется как сервер или не использует общий доступ к файлам и принтерам, то отключайте.
* Сервер упорядочения потоков — Отключаем если нет домашней группы.
* Сетевой вход в систему — Вручную.
* Сетевые подключения — Оставьте как есть. Если нет сети или интернета, то можете отключить.
* Система событий COM+ — ставим вручную. Приложения зависящие от это службы сами её запустят при необходимости.
* Системное приложение COM+ — Так же вручную.
* Служба SSTP — Оставляем как есть, нужна служба если есть интернет на компьютере.
* Служба автоматического обнаружения веб-прокси WinHTTP — Если нужен интернет, то оставьте как есть.
* Служба автонастройки WLAN — служба для беспроводных сетей. Соответственно если их нет, она не нужна.
* Служба базовой фильтрации — с одной стороны, она не нужна (если не нужна безопасность), но с другой, некоторые программы, могут выдавать ошибки. Так что оставляем.
* Служба ввода планшетного ПК — если экран не сенсорный, то не нужна.
* Служба времени Windows — нужна для синхронизации времени с интернетом.
* Служба загрузки изображений Windows (WIA) — Нужна служба, только если есть сканер. Она отвечает за получение изображений со сканеров и камер.
* Служба инициатора Майкрософт iSCSI — Ставим вручную, если программам понадобится, они сами её запустят.
* Служба интерфейса сохранения сети — Нужна для нормальной работы сети.
* Служба кэша шрифтов Windows — служит для повышения производительности, кэширует шрифты и не тратит время на загрузку.
* Служба медиаприставки Media Center — Если не используете никаких приставок, она не нужна.
* Служба модуля архивации на уровне блоков — Ставим вручную. Если понадобится архивация или восстановление, то служба сама запуститься.
* Служба общего доступа к портам Net.Tcp — По умолчанию выключена. Нужна если только понадобится протокол Net.Tcp.
* Служба общих сетевых ресурсов проигрывателя Windows Media — Вручную. Понадобится, включится.
* Служба перечислителя переносных устройств — Служит для синхронизации музыки, видео и т.д. со съемными носителями. Я бы поставил вручную. Не всегда это нужно.
* Служба планировщика Windows Media Center — Нужна если только смотрите передачи в Windows Media Player.
* Служба поддержки Bluetooth — Нужна если есть Bluetooth.
* Служба политики диагностики — Нужна для диагностики неполадок… Она если честно помогает редко. По этому можете по-экспериментировать, отключив её. Если понадобится — включите.
* Служба помощника по совместимости программ — служба нужна для запуска программ, несовместимый с вашей ОС. Если нет таковых поставьте вручную.
* Служба профилей пользователей — Лучше оставить. Она работает с профилями пользователей компьютера.
* Служба публикации имен компьютеров PNRP — Нужна для домашних групп.
* Служба регистрации ошибок Windows — Регистрирует ошибки. Лучше поставить вручную.
* Служба ресивера Windows Media Center — для просмотра телерадио передач в плеере.
* Служба сведений о подключенных сетях — Лучше оставить как есть, для нормальной работы сети.
* Служба списка сетей — Так же лучше оставить.
* Служба уведомления SPP — Для лицензирования. Оставьте вручную.
* Служба уведомления о системных событиях — Если не собираетесь смотреть сообщения Windows, то она вам не нужна.
* Служба удаленного управления Windows (WS-Management) — Поставьте вручную.
* Служба шифрования дисков BitLocker — Шифрует диски. Если не пользуетесь, то лучше отключите.
* Служба шлюза уровня приложения — Служба нужна только для работы с брандмауэром. Вручную.
* Службы криптографии — Для установки новых программ, лучше оставьте как есть.
* Службы удаленных рабочих столов — Если не пользуетесь удаленными рабочими столами, то отключайте.
* Смарт-карта — Если ими не пользуетесь, то она вам не нужна.
* Сопоставитель конечных точек RPC — Служба нужна для входящего трафика. С ней ничего нельзя сделать. По этому оставляем.
* Средство построения конечных точек Windows Audio — Если нужен звук, оставьте.
* Телефония — Оставьте вручную. Если понадобится, запустится.
* Темы — Едят много ресурсов памяти. Если не нужны, отключайте.
* Теневое копирование тома — Создает точки восстановления, архивация в фоновом режиме. Поставьте вручную. Если нужно будет запустится.
* Тополог канального уровня — Тоже вручную. Если понадобится, запустится.
* Удаленный вызов процедур (RPC) — Системная служба. Оставьте как есть.
* Удаленный реестр — Позволяет удаленным пользователям, манипулировать вашим реестром. Отключайте.
* Удостоверение приложения — Вручную.
* Узел системы диагностики — Диагностика проблем. Поставьте вручную.
* Узел службы диагностики — Так же вручную.
* Узел универсальных PNP-устройств — Ставьте вручную. Не все устройства PnP.
* Управление приложениями — Ставьте вручную. Служба позволяет настроить политики для приложений.
* Управление сертификатами и ключом работоспособности — Ставьте вручную, понадобится, запустится сама.
* Установщик ActiveX — Так же вручную. Понадобится установить такой объект, она сама запустится.
* Установщик Windows — Установка программ .msi. Вручную.
* Установщик модулей Windows — Устанавливает и удаляет компоненты и обновления. Вручную.
* Факс — Нужна если только есть факс.
* Фоновая интеллектуальная служба передачи (BITS) — Оставляем вручную. Служба полезная.
* Хост поставщика функции обнаружения — Оставляем вручную. Нужно будет запустится.
* Цветовая система Windows (WCS) — Вручную. Нужна будет устройствам, запустят.
* Центр обеспечения безопасности — Следит за безопасностью Windows. Меня она бесит со своими уведомлениями. Так что отключать или нет, выбирать вам.
* Центр обновления Windows — С одной стороны полезная функция. Заделывает дыры в системе, обновляет драйвера, но с другой стороны, активно использует интернет, ресурсы памяти и если при обновлении выключить компьютер, может рухнуть ОС. Так что так же вам выбирать что важнее, безопасность или быстродействие.
* Шифрованная файловая система (EFS) — Для безопасности файлов. Лучше оставьте как есть вручную.
Я постарался представить весь список служб. Отключив некоторые, вы повысите быстродействие компьютера. Можно так же по своему усмотрению решить какие нужны, а какие нет. Например если нет интернета, то тут половину смело рубить можно, если нет принтера, то тоже можно много выключить. Таким образом в зависимости от ваших потребностей, можно существенно взбодрить старый компьютер.
Помогло? Отблагодари автора