In this article, we are going to learn ‘Step by Step Configure WDS Server (Windows Deployment Services) On Windows Server 2016’. Due to the increase in information technology (IT) solutions in organizations, the number of actual and virtual server images has also increased. Due to this situation, the deployment of operating systems takes longer to complete and requires valuable institutional resources. As a result, companies are looking for new ways to automate the service delivery process. Virtual machine environments have become ubiquitous in a datacenter and having the ability to deploy virtual server roles and workloads while deploying an operating system is an important part of the application process.
 On Windows Server 2016")
Windows Deployment Services (WDS) is a service role that allows you to deploy the Windows operating system to a PXE-enabled client. You can install a Windows operating system on a PXE-capable client without the need for physical media. Besides, it allows you to deploy a Windows operating system to multiple clients at the same time. In this way, reducing the entire installation time. WDS makes your life easier. You do not have to go to another room in the same room to deploy the operating system with the necessary software and drivers. Administrators can schedule schedules for deployment. The next day when you come in and log in to your computer, you will be installing a new operating system. In addition, drivers and software have been installed.
WDS Functions:
• Allows you to install a network-based operating system.
• Facilitate the process of deployment.
• Supports deployment of computers without any installed operating system.
• Provide end-to-end deployment solutions for clients and server computers.
• Use existing technologies like Windows PE, Windows Image File (.wim) and virtual hard disk (.vhd and .vhdx) image files, and image-based deployment.
Hardware Requirements:
- RAM: minimum of 4GB
- Processor: 64-bit processor
- Hard Drive Space: At least 10GB Or Depend On OS ISO and Software’s Size.
Prerequisites to Configure WDS Server:
Before configuring the WDS server, your server must be sure that the following requirements are met.
1)Changed Windows Server Hostname.
2)Turn off Windows Server Firewall.
3)Set Static IP on Windows Server.
 On Windows Server 2016")
4)Install and Configure DHCP Role.
You have learned in the previous article that ‘How To Configure DHCP Server Role on Windows Server 2016‘ Now let’s configure the DHCP Scope for this. Now go to Server Manager and right-click on the DHCP server and click on DHCP Manager.
 On Windows Server 2016")
Also Read – How To Configure DHCP Server Role on Windows Server 2016.
Now firstly expand the domain, then right-click on IPV4 and create a new scope.
 On Windows Server 2016")
The new scope window will open, then click on Next for further process.
 On Windows Server 2016")
Enter a scope name to identify which is the scope, and then click on Next.
 On Windows Server 2016")
Set the IP address range as the snapshot below. As you set up the IP address range, the IP address will be assigned to the client in the same range. Also, give the Length and Subnet mask and click on Next.
 On Windows Server 2016")
If you want to exclude the IP address set in the DHCP server, you can add it to the IP address ‘Exclusions and Delay‘. I’m not adding the IP address, if you want to, you can add the IP address.
 On Windows Server 2016")
The default 8 days in lease duration is set, which means that the client can use an IP address for 8 days. If you want to change the lease duration, you can change it.
 On Windows Server 2016")
If you want to have options like DNS servers and WiNS, click the yes button. Then click Next.
 On Windows Server 2016")
Set the IP address of these routers or default gateways, then click on the add button.
 On Windows Server 2016")
Enter the DNS server IP addresses that you would like your client to use
 On Windows Server 2016")
If you do not have a DNS server in the network, use the WINS server.
 On Windows Server 2016")
You can see that all the steps are done, now just click yes to activate the created scope.
 On Windows Server 2016")
The created new scope has been completed. Now click Finish.
 On Windows Server 2016")
Now you can see in the following snap New Scope has been activated.
 On Windows Server 2016")
Also Read – Configuration Of DHCP Reservation On Windows Server 2016.
Follow the below Steps To Install and Configure WDS Server (Windows Deployment Services) On Windows Server 2016:
Installation of WDS:
Step 1. Open Server Manager.
Step 2. Click Add Role and Features.
Step 3. Read the important requirements and try to meet them (this includes a strong password for the administrator account, stable IP configuration, and installation of the latest security updates). Click next to continue.
Step 4. Choose Roll-based or Feature-based installation and click Next.
Step 5. Select the destination server for WDS from the server pool and click Next.
 On Windows Server 2016")
Step 6. Select Windows Deployment Services from the server role. When you check that option, a new window will pop up. Click Add Features.
Step 7. Click Next two times.
 On Windows Server 2016")
Step 8. Click Next (Leave default selection of both deployment and transport server)
 On Windows Server 2016")
Step 9. Click Install
Step 10. Wait for the installation to complete. It may take several minutes to close.
 On Windows Server 2016")
Configuration of WDS:
Step 1. Open Server Manager Dashboard. Tools -> click Windows Deployment Services.
Step 2. Right-click on your WDS server and then click Configure Server.
 On Windows Server 2016")
Step 3. Read the pre-requisites and click next.
Step 4. Choose “Integrate with Active Directory“, If you have configured AD on my network. If you do not have AD configured and you are configuring WDS in standalone mode, select the standalone server. Click Next
 On Windows Server 2016")
Step 5. Provide a route to your NTFS drive where you want to store a boot image, install images, PXE boot files and WDS management tools. Click Next.
 On Windows Server 2016")
Step 6. I have configured DHCP on the same WDS server. So check both boxes and click next.
 On Windows Server 2016")
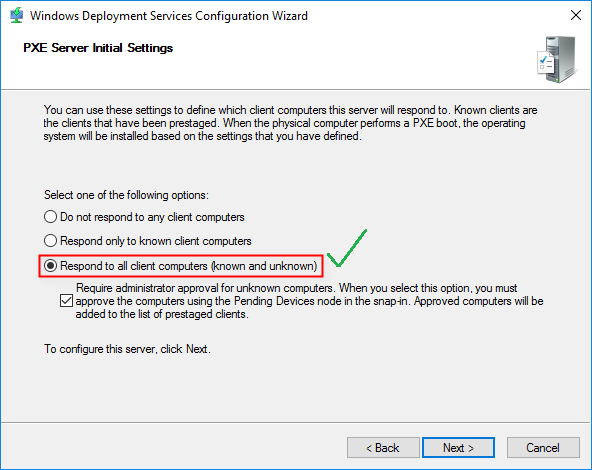
Step 7. Choose ‘Respond to all client computers‘ (known and unknown).
 On Windows Server 2016")
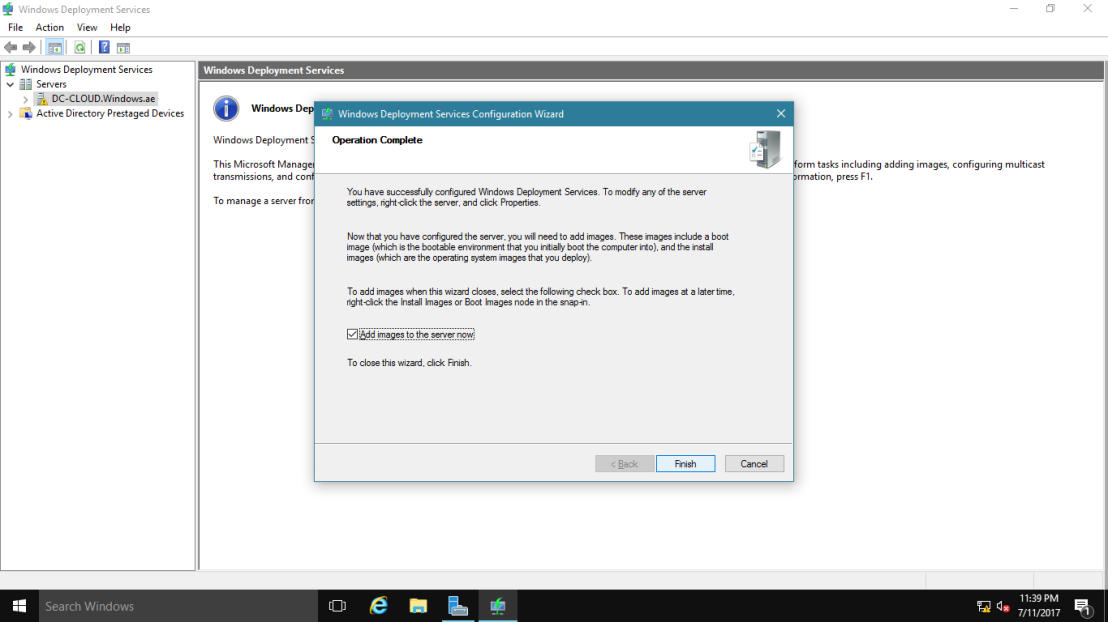
Step 8. Wait for the wizard to finish (this may take a few minutes to complete).
Step 9. Click Finish.
 On Windows Server 2016")
Add Install Images to WDS:
When you configure Windows Deployment Services on your server, the next step is to add an image to your WDS to the client machine. There are two types of images that you need to add. There is an install.wim (actual Windows installation files) and the other is boot.wim (used to boot client machines).
Step 1. Open windows deployment services console.
Step 2. Expand your server.
Step 3. Right-click on Install Images and then click Add Install Image.
 On Windows Server 2016")
Step 4. Provide the image group name and then click Next.
 On Windows Server 2016")
Step 5. Browse to the source folder (located on your Windows installation CD/DVD or local hard drive).
 On Windows Server 2016")
Step 6. Choose the install.wim file and click Next.
 On Windows Server 2016")
Step 7. Click Next.
 On Windows Server 2016")
Step 8. Select Image and Click Next.
 On Windows Server 2016")
Step 9. Check Summary and Click Next.
 On Windows Server 2016")
Step 10. Wait for the file to be copied. (This can take several minutes to complete).
Steps 11. Click On Finish.
 On Windows Server 2016")
Steps 12. As you can see on the output above we have successfully added the install.wim Image File.
 On Windows Server 2016")
Add Boot Image to WDS:
Step 1. In the Windows deployment services console, right-click boot image.
Step 2. Click on the Add boot image.
 On Windows Server 2016")
Step 3. Browse to the source folder of your CD/DVD and locate boot.wim.
 On Windows Server 2016")
Step 4. Click Next.
 On Windows Server 2016")
Step 5. Rename Image File and Click Next.
 On Windows Server 2016")
Step 6. Check Summary and Click Next.
 On Windows Server 2016")
Step 7. Wait for the file to be copied. (This can take several minutes to complete).
Steps 8. Click On Finish.
 On Windows Server 2016")
Steps 9. As you can see on the output above we have successfully added the boot.wim Image File.
 On Windows Server 2016")
Configure DHCP Scope Options:
Enabling bare-metal client systems on Windows Deployment Services (WDS) PXE-boot to kickstart the process of deploying Windows PE on a client system and running the Windows system. In some WDS environments, you might want to configure the following DHCP options to direct your PXE clients to the correct network boot file.
Steps 1. Now go to Server Manager and right-click on the DHCP server and click on DHCP Manager.
Steps 2. Right, click on Scope Options and click Configure Options.
 On Windows Server 2016")
Steps 3. Add Boot Server Hostname or IP in cope Options.
66 = DNS name of the WDS server
 On Windows Server 2016")
Steps 4. Option 67 Where can you get the boot file name to configure? This name will be something similar to boot\x64\wdsnbp.com where this route corresponds to the Remount folder on the WDS server.
67 = boot file name
 On Windows Server 2016")
Steps 5. Finally, we can start the WDS server. The WWS server has not been configured only. Right-click on the WDS server. hover your mouse over all the tasks, then click Start. Soon after the WDS server starts.
Note – Connect LAN with WDS server to switch or the client computer and start WDS server.
 On Windows Server 2016")
As you can see on the output above we have successfully started the WDS server.
 On Windows Server 2016")
Also Read – Step by Step Configure MDT Server (Microsoft Deployment Toolkit) on windows server 2016
Deploy Windows with WDS:
Steps 1. The client will want to install the Windows os of the system. First of all, connect the first WDS server to the client computer with a LAN cable. To confirm the same you can use the DHCP Address Lease.
 On Windows Server 2016")
Steps 2. Boot Client System With Network.
 On Windows Server 2016")
Steps 3. Check WDS IP and Hostname and press F12 to Deploy Windows.
 On Windows Server 2016")
The machine is booting via network and windows os files loading starts.
 On Windows Server 2016")
Steps 4. Select your location and Keyboard Language.
 On Windows Server 2016")
Steps 5. Enter WDS Credentials and connect WDS.
 On Windows Server 2016")
Now you can install windows on a client computer with a normal windows installation process.
Also Read – System Requirement and Installation Windows Server 2016.
That’s all, In this article, we have explained step by Step Configure WDS Server (Windows Deployment Services) On Windows Server 2016. I hope you enjoy this article. If you like this article, then just share it. If you have any questions about this article, please comment.

В этом руководстве мы увидим, как использовать пару MDT (Microsoft Deployment Toolkit) и WDS (службы развертывания Windows) для развертывания образов Windows.
Пара WDS и MDT для развертывания образов, начиная с сети (PXE) с WDS и MDT, позволяет настраивать и автоматизировать установку операционных систем в организации.
Цель руководства — использовать WDS для предоставления среды PXE и развертывания образов Windows и MDT для персонализации.
Разница между WDS и MDT
Службы развертывания Windows (WDS) — это серверная технология от Microsoft для выполнения сетевой установки операционных систем Windows (ОС). WDS — это переработанная версия служб удаленной установки (RIS), которая позволяет развертывать операционные системы Windows. Вы можете использовать WDS для настройки новых клиентов через сетевую установку.
Microsoft Deployment Toolkit (MDT): MDT, ранее известный как Business Desktop Deployment, — это бесплатный инструмент для автоматизации развертывания операционных систем Windows и Windows Server, использующий комплект для оценки и развертывания Windows (ADK) для Windows 10. MDT — это унифицированный набор инструменты, процессы и рекомендации по автоматизации развертывания настольных компьютеров и серверов. Вы можете использовать его для создания эталонных образов или в качестве полного решения для развертывания.
MDT использует два способа подключения к серверу по сети: USB-ключ или PXE. Среда предварительного выполнения (PXE) требует использования сервера Windows, настроенного с ролью служб развертывания Windows (WDS).
MDT работает вместе с WDS, предоставляя возможности PXE-сервера в сети и управляя подключением к общему ресурсу MDT с помощью предварительно созданного загрузочного файла MDT. Если вы хотите, чтобы ваши клиенты использовали образы ОС из WDS, вам потребуется импортировать эти загрузочные образы в WDS. WDS также может помочь захватывать образы вашего эталонного устройства и развертывать эти образы с поддержкой драйверов на различных устройствах в вашей среде с помощью PXE. Хотя MDT — это скорее инструмент проектирования, MDT создает загрузочные образы с различными пошаговыми последовательностями развертывания.
Установка роли Windows Deployment Services WDS


Загружаем дополнительные компоненты
Комплект для оценки и развертывания Windows (Windows ADK) и надстройка Windows PE содержат инструменты, необходимые для настройки образов Windows для крупномасштабного развертывания, а также для проверки качества и производительности вашей системы.
С официального сайта скачиваем :
1) Download the ADK for Windows Server 2022
2) Download the Windows PE add-on for the ADK for Windows Server 2022
Также скачиваем Microsoft Deployment Toolkit (MDT)
Установка windows ADK
- После того как скачали ADK for Windows Server 2022 монтируем скаченный iso файл 20348.1.210507-1500.fe_release_amd64fre_ADK


- Установка надстройки Windows PE для сервера MDT , мы его скачивали по ссылке Windows PE add-on for the ADK for Windows Server 2022. Монтируем образ 20348.1.210507-1500.fe_release_amd64fre_ADKWINPEADDONS


- Загружаем и устанавливаем Microsoft Deployment Toolkit (MDT)


Настраиваем WDS сервер(Роль Windows Server 2016)
Открываем консоль WDS

Запускаем конфигурирование.

В мастере настройки выбираем интеграцию с доменом.

Задаем служебную папку WDS.

На следующем шаге можно выбрать каким компьютерам будет отвечать сервер WDS:
- Никому не отвечать — можно отключить работу сервера на время настройки или тестирования, например, чтобы пользователи не получали возможные конфликты при установке.
- Отвечать только известным компьютерам — список составляется в консоли и если записи адреса компьютера нет, то он не получит возможность работать с сервером.
- Отвечать всем клиентам — ответ получат все компьютеры. Если установить галку ниже, то при обращении неизвестных устройств (не записанных ранее) в консоли появится запись, что некий компьютер с определенным адресом запрашивает подключение. Можно отклонить или принять и процесс продолжится. Позже эти настройки можно изменить в консоли WDS.


Снимаем галочку — add images to the server now , и жмем Finish.


WDS нам понадобится только для подключения и передачи образов, поэтому без подробного объяснения:
Install Images — установочные образы (не используем);
Boot Images — загрузочные образы (добавим созданные в MDT);
Pending Devices — появляются устройства запрашивающие соединение если включена опция «требуется подтверждение администратора».
Настройка Microsoft Deployment Toolkit (MDT)
запустим Deployment Workbench , как показано ниже

После запуска приложения Microsoft Deployment Toolkit (MDT)
щелкните правой кнопкой мыши Deployment Shares в левой панели навигации и
выберите New Deployment Share .

Откроется мастер создания общего ресурса для развертывания, как показано ниже.
– Если вы хотите изменить путь к общему ресурсу развертывания, используйте кнопку обзора, как показано ниже.

В мастере общего доступа введите имя общего ресурса.
– Убедитесь, что имя общего ресурса совпадает с именем, указанным в указанном выше пути. (По умолчанию имя — DeploymentShare$), я оставлю его таким же
— Затем нажмите «Далее ».

Измените описание общего ресурса развертывания или оставьте значение по умолчанию. Я оставлю этот путь, так как это лабораторная среда.
– Нажмите «Далее».

В окне «Параметры» я выбераю все пункты.
Примечание. Если для вашей среды требуются другие входные данные, отметьте их.
Нажмите «Далее» .

В окнах сводки просмотрите это и нажмите «Далее».

Далее будут созданы общие ресурсы, как показано ниже.

В окне подтверждения нажмите «Готово».
– Общий ресурс развертывания успешно завершен, и MDT успешно настроен.
— Теперь нажмите «Готово».

Прежде чем перейти к следующим шагам, убедитесь, что вы примонтировали образ ISO для дальнейшей его модернизации.
Добавляем образ операционной системы в MDT

В консоли Deployment Workbench щелкните правой кнопкой мыши папку операционной системы и
выберите «Импорт операционной системы» .
Общая папка E:\DeploymentShare$ может переноситься на другие сервера простым копированием. Отключение и подключение осуществляется в консоли MDT.
Applications — приложения которые устанавливаются на операционную систему;
Operating Systems — операционные системы доступные для загрузочного образа;
Out-of-Box Drivers — драйвера (.inf);
Packages — пакеты обновлений безопасности, сервисные, языковые и т.д. (.cab и .msu);
Task Sequences — последовательность задач установки;
Selection Profiles — логические группы объединения контента;
Linked Deployment Shares — другие подключенные DeploymentShare с других серверов;
Monitoring — при включенной опции отображается ход выполнения установки на клиентах.

В мастере типов ОС
— нажмите «Полный набор исходных файлов», а затем — нажмите «Далее ».


Введите имя каталога( К примеру операционную систему и название билда) назначения и нажмите «Далее» .

Просмотрите сводную страницу и нажмите «Далее» .

Это продолжит импорт файлов ОС. – На странице подтверждения нажмите «Готово», как показано ниже.


На приведенном ниже снимке экрана видно, что операционная система успешно импортирована.
Можно создавать папки, сортировать разные версии Windows , удалять не нужные редакции.

Добавляем приложения в MDT
– Щелкните правой кнопкой мыши узел приложения.

– В Типе приложения выберите приложение с исходными файлами

На странице сведений вам будет предложено ввести информацию о добавляемом приложении. Другие поля занимают важную информацию только тогда, когда требуется название приложения, что может быть полезно, когда установлены приложения для устранения неполадок в пути.

Теперь просмотрите местоположение, чтобы указать исходную папку для импорта в папку MDT.
– Я выбрал путь загрузки в качестве места для хранения этих файлов.

Укажите имя каталога, который необходимо создать. Пожалуйста, измените имя в соответствии с вашими потребностями.

Введите ключ для тихой установки. я подглядывал тут

А вот еще пример

Просмотрите сводную страницу, как показано ниже, чтобы узнать, что будет импортировано в MDT, и нажмите «Далее».

На странице подтверждения нажмите «Готово», как показано ниже.

На снимке экрана ниже видно, что приложение успешно импортировано.

Файл ответов MDT
Давайте создадим последовательность задач — в консоли Deployment Workbench —
щелкните правой кнопкой мыши Task Sequences , а затем — нажмите New Task Sequences

На странице «Общие настройки» введите следующую информацию ниже.

В мастере выбора шаблона — выберите стандартную последовательность клиентских задач и
— нажмите «Далее» .

Выберите из списка операционную систему, которую вы импортируете, и
нажмите «Далее».

В окне «Укажите ключ продукта» выберите «Не указывать ключ продукта в данный момент» и
нажмите «Далее ».

На странице настроек ОС введите следующую информацию
: если у вас есть домашняя страница в Интернете, введите ее здесь, а затем
— нажмите «Далее» .

В окне «Пароль администратора» укажите пароль и нажмите « Далее ».

Проверьте сводку и нажмите «Далее».

В окне подтверждения нажмите «Готово».

Как мы видим ниже, последовательность задач была успешно создана.

Настройка правил MDT
Настройка правил MDT, среды предустановки Windows и мониторинга
. Этот шаг очень важен, если вы не хотите выполнять большую ручную настройку позже.
– Щелкните правой кнопкой мыши общий ресурс развертывания MDT , а затем
– щелкните Свойства.


Примечание: Если вы оставите правило общего доступа к развертыванию MDT по умолчанию, вам придется много вводить вручную.
Если вы не хотите этого делать. Ниже приведен пример файла правил, используйте этот файл для ускорения процесса.
Файл Rules для ответов при установке операционной системы

[Settings]
Priority=Default
Properties=MyCustomProperty
[Default]
OSInstall=Y
SkipTaskSequence=YES
TaskSequenceID=Server_2016
OSDComputerName=W10RUMSC01#Right("%SerialNumber%",5)#
JoinDomain=pentagon.loc
DomainAdmin=alukashin
DomainAdminDomain=pentagon.loc
DomainAdminPassword=mypassworddomainaccount
MachineObjectOU=OU=Servers,OU=Moscow-CTD,OU=RU,OU=Europe,OU=BV,DC=eua,DC=bvcorp,DC=corp
AdminPassword=mynewpasswordserveraccount
HideShell=YES
SkipUserData=YES
TimeZoneName=N. Central Asia Standard Time
SkipTimeZone=YES
UILanguage=ru-RU
UserLocale=ru-RU
SkipLocaleSelection=YES
SystemLocale=ru-RU
SkipCapture=YES
SkipComputerName=YES
SkipDomainMembership=YES
SkipAdminPassword=YES
SkipProductKey=YES
SkipComputerBackup=YES
SkipBitLocker=YES
SkipSummary=YES
Мини описание
OSInstall=Y //установить операционную систему
JoinDomain=alx*.com //ввести в этот домен
DomainAdmin=alx - имя пользователя используемого для присоединения
DomainAdminDomain=alx*.com //домен пользователя
DomainAdminPassword= //пароль пользователя
AdminPassword= //пароль локального администратора на новой машине
HideShell=YES //скрыть Shell
SkipUserData=NO //пропустить шаг о решении сохранности пользовательских данных (если установка производится поверх существующей системы)
TimeZoneName=N. Central Asia Standard Time //временная зона
SkipTimeZone=YES //пропустить выбор временной зоны
UILanguage=ru-RU //выбор языка интерфейса
UserLocale=ru-RU //выбор местоположения
SkipLocaleSelection=YES //пропустить выбор месторасположения
SystemLocale=ru-RU //выбор языка для non-Unicode программ
SkipCapture=YES //пропустить захват установленной операционной системы
SkipComputerName=NO //пропустить ввод имени компьютера
SkipDomainMembership=YES //пропустить членство в домене
SkipAdminPassword=YES //пропустить пароль администратора
SkipProductKey=YES //пропустить ввод лицензионного ключа
SkipComputerBackup=YES //пропустить выполнение резервного копирования
SkipBitLocker=YES //пропустить настройку шифрования BitLocker
SkipSummary=YES //пропустить страницу с выводом результирующих настроек
EventService=http://server1:9800 //установить сервер назначения для логов
Файл BootStrap.ini для доступа к файловой шаре


[Settings]
Priority=Default
[Default]
DeployRoot=\SERVER1\DeploymentShare$
UserID=alukashin
UserDomain=pentagon.loc
UserPassword=mydomainpassword
KeyboardLocale=en-US
SkipBDDWelcome=YES
Мини описание
[Settings]
Priority=Default
[Default]
DeployRoot=\\SRV04\DeploymentShare$
UserID=alx //имя пользователя для доступа к папкам Deployment Share
UserDomain=alx*.com //домен пользователя
UserPassword= //пароль пользователя
KeyboardLocale=en-US //выбор языка
SkipBDDWelcome=YES //пропустить начальную страницу установщика
Если вы после настройки файлов ответа меняете их снова, то вам при Update Deployment Share нужно выбирать Optimize the boot image updating process
Нажмите Apply
Обновите общий ресурс развертывания. Чтобы обновить общий ресурс развертывания, выполните следующие действия.
– Щелкните правой кнопкой мыши общий ресурс развертывания MDT, а затем
– нажмите «Update Deployment Share », чтобы создать файл Windows 10 LiteTouchPE_x64.wim.

В окне «Параметры»
— нажмите «Оптимизировать процесс обновления загрузочного образа», а затем
— нажмите «Далее» .


Как мы видим, шаг процесса обновления настроек общего доступа будет продолжен
. Примечание. Этот процесс займет некоторое время.


После обновления папки Deployment Share будет создан WIM-файл LiteTouch .
– Эти файлы будут расположены в загрузочной папке (C:\DeploymentShare\Boot ) созданного вами общего ресурса развертывания.
Добавляем Lite-Touch образ на WDS
Чтобы добавить образы Lite-Touch в WDS, выполните следующие действия. На WDS откройте службы развертывания Windows (WDS),щелкните правой кнопкой мыши загрузочные образы, а затем щелкните Добавить загрузочный образ

Откроется мастер добавления изображений, как показано ниже.
– Нажмите «Обзор», затем выберите файл LiteTouch в папке загрузочных файлов на общем ресурсе развертывания, как показано ниже.


Конфигурация DHCP для PXE

Tips
При загрузке по PXE , идет загрузка образа с mdt , появляется окно Microsoft Deployment Toolkit , через некоторое время , не идет считывание ответов , а просто появляется окно cmd
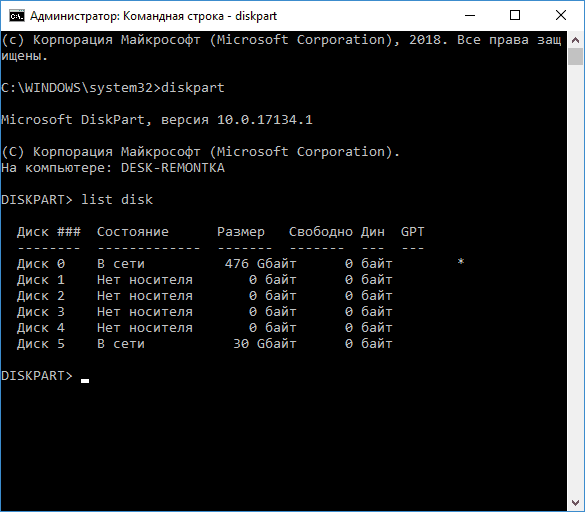
Это из за того , что у вас уже установлена система и вам нужно форматировать жесткий диск через diskpart
- diskpart
- list disk (вы увидите список подключенных физических дисков, вам нужен номер диска, который будет форматироваться, у меня это 5, у вас будет свой).

- select disk 5
- clean
what is Windows Deployment Services?
With the increase in the number of information technology (IT) solutions in organizations, the number of physical and virtual server images have also increased. Due to this situation, operating system deployments take longer to complete and require valuable organizational resources. As a result, companies are looking for new ways to automate the server deployment process.
Virtual machine environments have become ubiquitous in the datacenter, and having the ability to deploy virtual server roles and workloads while deploying operating systems is an important part of the deployment process.
It provides the following functions:
• Allows you to perform network-based operating system installations.
• Simplifies the deployment process.
• Supports deployment to computers that have no installed operating system.
• Provides end-to-end deployment solutions for both client and server computers.
• Uses existing technologies, such as Windows PE, Windows image file (.wim) and virtual hard disk (.vhd and .vhdx) image files, and image-based deployment.
Infrastructure Requirement :
- 1 DC SERVER (DC-CLOUD) ADDS, DNS, DHCP, WDS.
- 1 NewhelpTech Server PC No Operating System
1 – Open Server Manager and then on the Dashboard click Add Roles and Features.
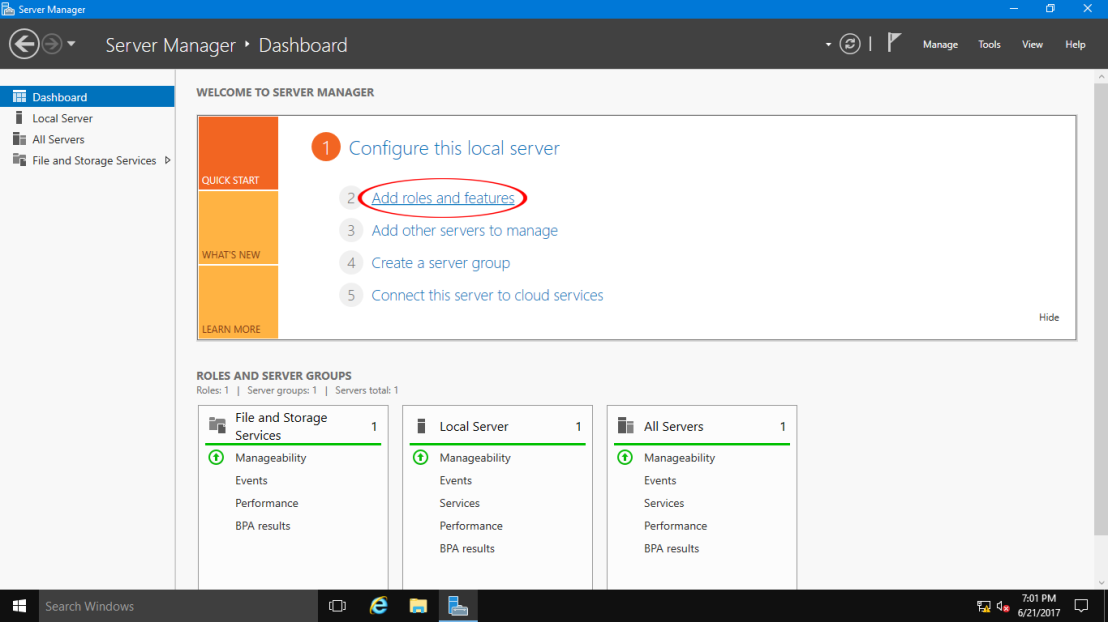
2 – Next, In the Add Roles and Features Wizard box, click Next.

3 – On the Select installation type page, verify that you choose Role-Based or feature-based installation then click Next.

4 – Now select desired server you’d like to install Windows Deployment Services on.

5 – On the Select server roles page, select the Windows Deployment Services Click Add Features in the popup window then click Next.


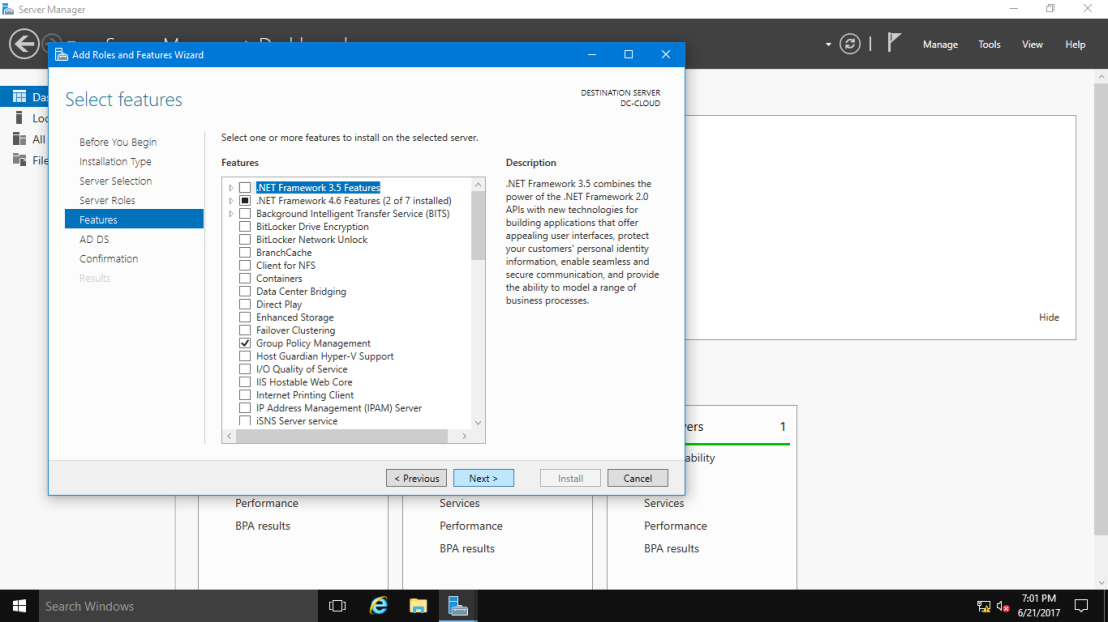
6 – On the Select features box, click Next.
7 – On the WDS box, review the information presented, and then proceed with Next.

8- On the Select role services box, click Next.

9 – On the Confirm installation selections box, click Install.

10 – Once installation of WDS successful, just click Close.

11 – Next step, we need to configure Windows Deployment Services, open your Server Manager, click Tools, and then click Windows Deployment Services.

12 – on the Windows Deployment Services console, double click Servers, then right-click DC-CLOUD.Windows.ae, and then click Configure Server.

13 – On the Before You Begin box, click Next to proceed.

14 – On the Install Options page, verify that you choose Integrated with Active Directory and then click Next.

15 – On the Remote Installation Folder Location page, you can accept the default location which is C:\RemoteInstall and then click Next.

16 – on the System Volume Warning dialog box, click Yes.

17 – Next, on the PXE Server Initial Settings box, click Respond to all client computers (known and unknown), and then click Next, please wait for few second for the process to complete.


18 – Next, on the Operation Complete box, please clear the Add images to the server now check box, and then click Finish. (I will manually add the Server in the next step).
19 – Before we proceed, please make sure that you already insert your Windows Server 2016, either DVD and ISO format if you are using Hyper-V.

20 – Our next step is to add a boot image into WDS console, so in Windows Deployment Services console, double click DC-CLOUD.Windows.ae and then right-click Boot Images, and then click Add Boot Image.

21 – On the Add Image Wizard, on the Image File page, click Browse, then in Select Windows Image File box, double-click DVD Drive (D:), double-click sources folder, and then double-click boot.wim.

22 – On the Image File box, verify the File Location which is D:\sources\boot.wimand then click Next.

23 – On the Image Metadata box, click Next.

24 – On the Summary box, click Next.

25 – On the Task Progress page, click Finish.

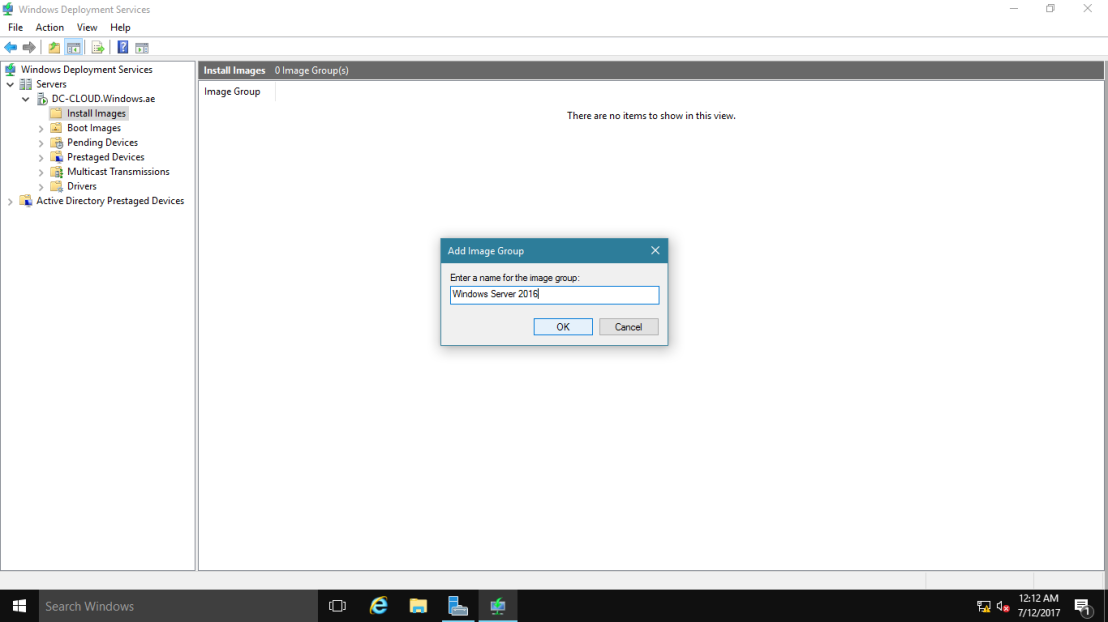
26 – Once you successfully completed add a boot image into WDS, next you need to add an install image into WDS, so in the WDS console, right-click Install Images, and then click Add Image Group.

27 – In the Add Image Group box, type Windows Server 2016, and then click OK.
28 – Next, on the WDS console, right-click Windows Server 2016, and then click Add Install Image.

29 – In the Add Image Wizard box, browse to D:\sources\install.wim then click Next.

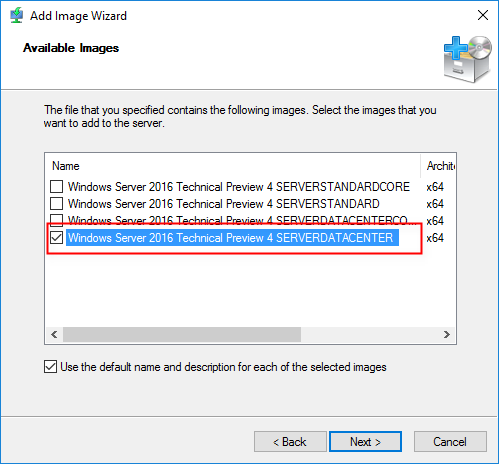
30 – On the Available Images box, select Windows Server 2016 SERVERDATACENTER only, and then click Next to proceed.

31 – On the Summary box, click Next and wait for few minutes for the process to be completed.

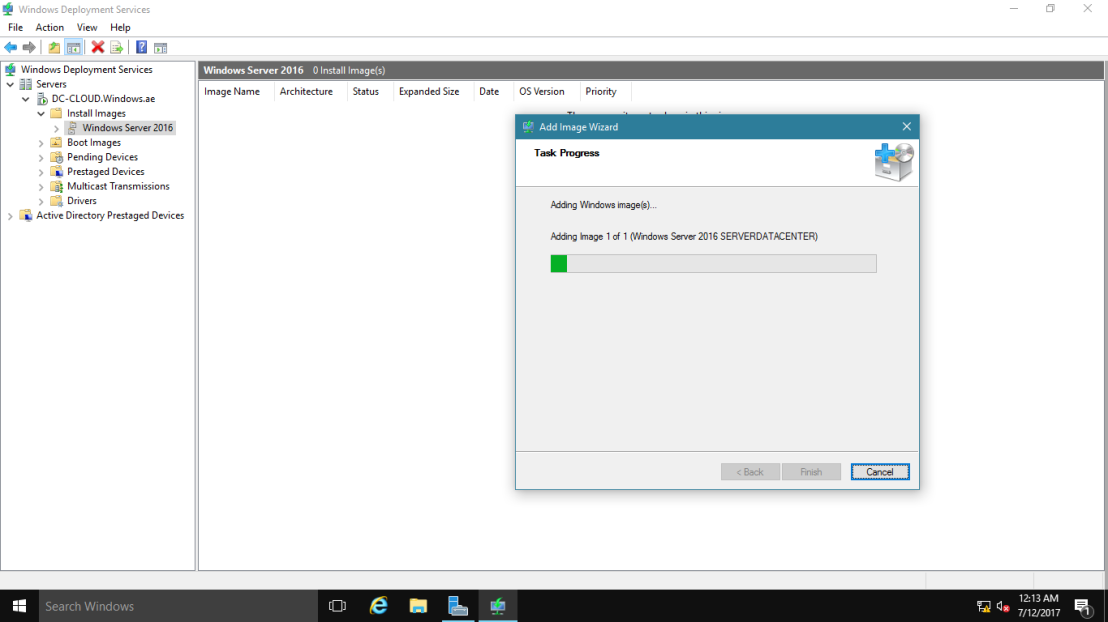
32 – On the Task Progress box, click Finish.

33 – In WDS, right-click DC-CLOUD.Windows.ae, and then click Properties.

we need configure Administrator approval for this deployment to proceed, meaning is I only wants my Sifad NewHelpTech Administrator to deploy this server.
34 – Click the PXE Response tab, and then Select the Require administrator approval for unknown computers check box. On the PXE Response Delay, I choose 3 seconds, and then click OK.

35 – Next, open Windows PowerShell, and type this command :
WDSUTIL /Set-Server /AutoAddPolicy /Message:”Sifad NewhelpTech Server Admin is authorizing this request. Please wait.”


Next, return to our WDS server, what we will do now is to configure a WDS server for multicast transmission (Multi-casting enables you to deploy an image to a large number of client computers without consuming excessive network bandwidth).
36 – In WDS, right-click Multicast Transmissions, and then click Create Multicast Transmission.

37 – Next, on the Transmission Name box, in the Type a name for this transmission field, type NewHelptech Blog Server 2016, and then click Next.

38 – On the Image Selection page, in the Select the image group that contains the image list, click Windows Server 2016, then in the Name list, click Windows Server 2016 SERVERDATACENTER, and then click Next.

39 – On the Multicast Type box, verify that Auto-Cast is selected, and then click Next then Click Finish.


40 – Next, if you using VM as a demo, make sure that you configure the VM for Pre-Boot EXecution Environment (PXE) Booting in your Hyper-V, for example here is my own settings.

41 – Next, turn on the new Server that you want to install the Server 2016 using WDS, in my demo my server will be NewHelpTech Server, when the server turn on, review the Client MAC ADDR, Client IP and Gateway IP, When prompted, press F12 for Network Service Boot.

42 – now you should see the admin approval message.

43 – Now, return to WDS Server, In WDS, click Pending Devices, right-click the pending request, and then click Approve.
 In the Pending Device dialog box, click OK.
44 – Next, go to the NewHelpTech Server 2016 and you should see now our NewHelpTech Server 2016 is loading files from the WDS server.

45 – If the loading files successful, WDS Windows Setup box will appear and you can proceed by clicking Next.

46 – Type a User Name and Password on DC-CLOUD Server.

47 – Next, on the Select the operating system you want to install, you should notice that Windows Server 2016 SERVERDATACENTER is listed, then click Next to proceed with installation.


 Startup your Server System.
that’s all for now.., any Doubts type a commend.. 🙂
Windows Deployment Services(WDS) is the key of deploying automated-based installations of standard or custom images to servers in a network. WDS server store the installation files and help you to manage the boot and operating system files used in the network installations. Like capturing image firstly, then deploying them on client computers with all drivers and applications you need for your network. Update operating system, drivers and applications then take an image of the template computer. The computer you take capture image from is called template computer. Sysprep is the tool that you can image through from a template computer and store the image on WDS server to deploy on WDS clients.
WDS makes your life easy. You don’t need to move from one room to another room deploying operating system with needed softwares and drivers. Administrators can make schedule for deployment. Next day when you come and login to your computer, you see the new operating system installed. In addition, drivers and softwares have been installed.
These are some other methods of deploying operating system on client computers:
- DVD: You can go to computers one by one with a shiny disk in hand and install operating system on. For an enterprise network you need lots of disks and it takes a long time. This method can be implemented on
- Bootable Flash memory: You can install operating system using bootable flash memory. When the flash memory is bootable, you copy all operating system files in, and plug the flash to computers. For the process you need lots of flash memories.
Topics covered in this post:
- WDS Advantages
- WDS Images
- Hardware Requirements
- Prerequisites
- Install WDS role Graphically
- Installation WDS role through PowerShell
- WDS Basic Configuration
- Add Install Image
- Add Boot Image
- Conclusion
WDS Advantages:
- Install Windows 7, 8, 8.1 or 10 remotely.
- You can install Windows with needed softwares and drivers simultaneously.
- Install Windows on large number of computers at one time.
WDS Images
WDS uses four image: Install image, Boot image, Discover image and Capture image. The minimum of requirement is boot and install images.
- Install Image: It is the actual operating system. It is found in the operating system media\sources\install.wim.
- Boot Image: It is Windows PE image. You can find it the operating system media\sources\boot.wim.
- Discover Image: This image is used by WDS clients which don’t support PXE boot. You create the image using boot.wim image from media file and Windows Assessment Tool Kit (ADK) to create a discover image.
- Capture Image: This image is custom install image. You capture the image from a template computer using Sysprep, and deploy the image on client computes.
Hardware Requirements
- RAM: minimum of 2GB
- Processor: 64-bit processor
- Hard Drive Space: At least 6GB
Prerequisites
- AD DS: The deployment server must be either member server (joined to a domain) or a domain controller. If you want to install (AD DS), read this article: Install Active Directory Domain Services (AD DS) on Windows Server 2016
- DNS: An active DNS (Domain Name Services) is required for Preboot eXecution Environment (PXE). Refer to this link for completely step by step guide. Install DNS Server on Windows Server 2016 fully step by step
- DHCP: It is needed for supporting PXE boot. Refer to this link for completely step by step guide. Install DHCP Server on Windows Server 2016 step by step
- NTFS volume: The volume which contains images must be NTFS format.
- Credentials: Make sure that you have logged on with an account that have permissions to do this tasks.
Install Graphically
Undoubtedly the easiest way of installing a role is graphical interface.
1. First of all press the Start Menu button. Then select the Server Manager.

2. Click on Add roles and features for installing WDS role.

2. Skip the Before you begin page. Leave the Select a server from the server pool checked. From Server Pool select the server which you want to install the role on. Click on Next button.

3. In the Select server roles page, select Windows Deployment Services. A windows pops up and asks you to add some features for management. Click on Add Features button then click on Next button.

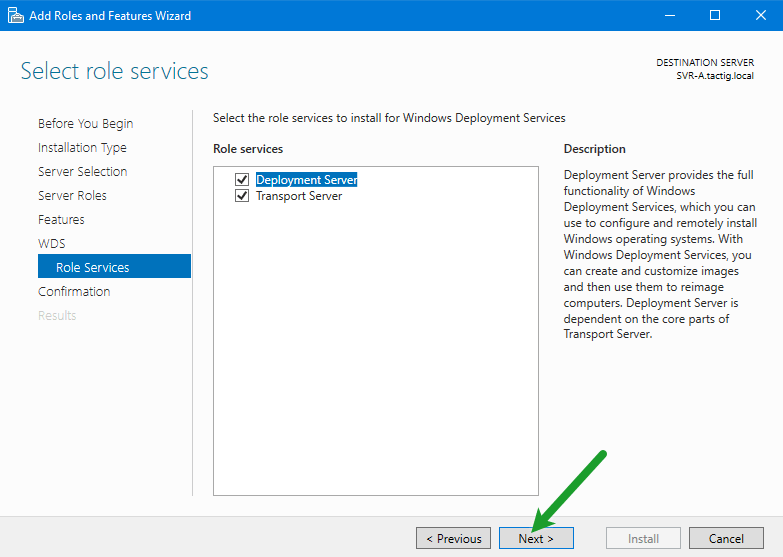
4. You have got nothing to do in Features page. In the WDS page, some essential information is written. In Role Services page you got two options:
- Deployment Server: It is the deployment server with management tools.
- Transport Server: It is WDS core service, but doesn’t include management tools. You need to use scripts for every task that you want to do. Therefor you need to select both of them.
Click on Next button.
5. In the Confirm installation selections page, click on Install button. No reboot is needed after the installation.

Installation through PowerShell
PowerShell is a powerful tool in Windows Server 2016. You need to know how to use it.
1. Press Windows button and select Windows PowerShell. Make sure you run PowerShell as an administrator. Right-click on and click Run as administrator. Also you can run PowerShell as an administrator with command. Open PowerShell as standard user and type this command to run it as an administrator: Start-Processs PowerShell.exe -Verb RunAS. Then press the Enter button.

2. Install-WindowsFeature is a command for installing roles on server. You need to run this command: Install-WindowsFeature -Name WDS -ComputerName <Server_Name> -IncludeManagementTools
After -ComputerName parameter, type your server’s name. In my case it is SVR-A. Then press the Enter button. While WDS installed successfully on your server, the summary would be shown to you. Saying that role installed successfully and no reboot is needed.
The -IncludeMnagementTools parameter installs the management tools. If you don’t type the parameter you won’t have the management tools. It means you just have installed the core services.

WDS Basic Configuration
Finally role was installed. We need to configure WDS server and use it across the network.
1. In Server Manger console, in the menu bar, click on the Tools. Then click on Windows Deployment Service. In addition, you can open it through Run. In the Run just type wdsmgmt.msc and press Enter button.

2. Windows Deployment Services console is opened. But the WDS server is not configured yet. For the purpose, right-click WDS server below the Servers. Select Configure Server.

3. In Install Options page two options are visible. Select the Integrated with Active Directory option if your WDS server is a member of a domain. If it is standalone server, select the Standalone server option. Click on Next button.

4. Select the folder in which you want to store WDS server files, like images and drivers. Click on Browse button and specify the path. Click on Next button.

5. In the Proxy DHCP Server page, leave both Do not listen on DHCP and IPv6 ports and Configure DHCP options for Proxy DHCP options selected. Click on Next button.

6. In PXE Server Initial Settings page, select Respond to known-client computers. This option is secure. Click on Next button.

7. Finally we are done. Below the green line we got a message which says that this serve still can’t respond WDS clients. Finish the wizard.

8. At the very end we can start the WDS server. WDS server is just configured not started. Right-click on WDS server which in my case is SVR-A, hover your mouse point on All Tasks, then click on Start. Soon after the WDS server would be started.

Add Install Image
1. Before you add install image, create some groups for different operating system install images. Before you add an install image, you need to an image group. You can easily manage your image in groups. Right-click on Install image. Click on Add Image group. A small windows opens, type name of the group inside and click on Ok button.

2. Now which groups are created, right-click on the group which you want to add install image in. Select Add Install Image option.

3. Specify the path. The path is simple: Whatever is your file media letter:\sources\install.wim. In my case path is E:\sources\install.wim. Click on Next button.

4. In the Available page of the wizard, select the install images that you need for your network. I need Windows 10 Pro for my network. While done, click on Next button.

5. It takes a while, when WDS server copies install.wim image from media file. At the end click on Finish button to close the wizard.

Windows 10 Pro Install image was added to WDS server.

Add Boot Image
1. Right-click on Boot Images and click on Add Boot Image.

2. Specify path of the file which contains the image. Install and boot images located in the same folder with Install image. Boot image path: media file:\sources\boot.wim. In my case path is E:\sources\install.wim.

3. Name the image. Select a friendly name for the image you can recognize. Click on Next button.

4. Image was added to the server. Finish the wizard by clicking on Finish button.

Microsoft Windows Setup (x64) Boot Image was added to WDS server.

Conclusion
Finally we are done with WDS basic configurations. For any kind of question feel free end leave a comment below the post. Thank you for reading the post.
This article will guide you through the steps to install and configure Windows Deployment Services on Windows Server 2016. Windows Deployment Services is a service role that allows you to deploy Windows operating systems to the PXE supported clients. You can install Windows operating systems on the PXE-enabled clients without the need of physical media. Further, it allows you to deploy Windows operating systems on multiple clients simultaneously. Thus, reducing the overall installation time. In this post, we will explain how to install and configure WDS in Windows Server 2016.
Installing Windows Deployment Services (WDS)
To install Windows Deployment Services (WDS) server role, you need to perform the following steps:
- On the Server Manager tool, click Manage, and then click Add Roles and Features.
- Accept the default selections and click Next until you get the Select server roles page.
- On the Select server roles page, as shown in the following figure, select the Windows Deployment Services check box.

- On the Add Roles and Features Wizard window, click Add Features.
- Accept the default selections and click Next, until you get the Confirm installation selections page.
- Click Install and complete the installation process.
Configure WDS Server
After installing WDS server role, next you need to configure WDS server. To do so, you need to perform the following steps:
- On the Server Manager tool, click Tools and then click Windows Deployment Services.
- On the Windows Deployment Services console, expand Servers.
- Select and right-click your WDS server name and select Configure Server.

- Navigate to the Install Options page, ensure that the Integrated with Active Directory radio button is selected and then click Next.

- On the Remote Installation Folder Location page, select the shared folder or click Next to accept the default value. This folder will hold the WDS images.
- On the DHCP Server page, if your WDS server also hosts the DHCP server role, select the Do not listen on DHCP and DHCPv6 option. If your DHCP server is running on a different server, remove this check box.

On the PXE Server Initial Settings page, there are three options: All the options are self-explanatory. Select the Respond to all client computers (known and unknown) radio button and then click Next. This option will allow all the PXE-enabled clients to start the installation process. Further, the Admin Approval check box allows an administrator to manually approve each client before they can start the installation process.
On the Operation Complete page, clear the Add images to the server now check box and click Finish. If you get “The service did not respond to the start or control request in a timely fashion” error, right-click WDS server and then start the WDS service manually to troubleshoot it.

If the WDS service still failed to start, check the WDS server properties and ensure that the Do not listen on DHCP port option is selected.
Adding Install Image to WDS Server
Now, you have installed and configured WDS in Windows Server 2016. The next step is to add the WDS images that you want to deploy on your network. To add the WDS images, you need to add the Boot images and Install images files for the supported Windows operating systems. To add an install.wim image file to WDS server, you need to perform the following steps:
- Select and right-click Install Images and then click Add Install Image.
- On the Image Group page, select an existing image group name or type a name to create a new one.

On the Image File page, click Browse and navigate to the Sources directory of the installation media and select the Install.wim file.

On the available images page, select the editions that you intend to deploy for your network.
Accept the default selections through the rest of the pages and click Finish to complete the task.
Note: The process may take several minutes.
Adding Boot Image to WDS Server
Along with the install.wim file that contains the Windows OS files you also need to add a boot image. The boot image is used to initiate the boot process for a Windows OS. To add a boot image file (boot.wim) to WDS server, you need to perform the following steps:
- Select and right-click Boot Images and then click Add Boot Image.
- Click Browse and navigate to installation media and select the boot.wim file.

Accept the default selections through the rest of the pages to complete the task.
Installing Windows Using PXE LAN Boot
Now, your WDS server is ready to be used. To test your WDS configuration, perform the following steps:
- On the client machine that has the PXE–enabled LAN adapter, reboot the system and select the Network Boot option.
- When the system reboots, press F12 for network service boot.

After a few minutes, the Windows Setup screen will display. Follow the on-screen instructions and complete the installation process.