Функцией поиска в Windows 10 и 11 приходится пользоваться намного чаще, чем в предыдущих версиях ОС: с помочью поиска можно быстро найти нужное приложение, файл, элемент настройки в новом меню Settings (Параметры), функцию системы или даже выполнить поиск в Интернете через меню Пуск. Однако в некоторых случаях встроенные поиск Windows перестает работать. При попытке найти любое приложение или файл, поиск Windows возвращает пустой список. В этой статье мы собрали основные советы, которые должны помочь, если у вас в Windows 10 или 11 не работает поиск в меню Пуск, панели задач и других элементах интерфейса Windows.
Содержание:
- Перезапустите службы поиска в Windows
- Не работает поиск в стартовом меню Windows
- Проверьте состояние и настройки службы индексирования Windows
- Утилита устранения неполадок службы индексирования и поиска Windows
- Сброс универсальных приложений Microsoft Store
- Не работает поиск Windows при включенной интеграции с Bing
- Не работает поиск в Параметрах Windows
- PowerShell скрипт для сброса Windows Search

Перезапустите службы поиска в Windows
За поиск из панели задач отвечает один из исполняемых файлов Cortana — SearchUI.exe. Если у вас не работает поиск в панели задач Windows 10, попробуйте перезапустить этот процесс:
- Запустите Диспетчер задач (Ctrl+Alt+Del);
- Перейдите на вкладку Подробности;
- Найдите в списке процессов SearchUI.exe, щелкните по нему ПКМ и выберите Снять задачу;

- Аналогично завершите процесс SearchApp.exe и SerchIndexer.exe;
- Когда вы в следующий раз попробуете выполнить поиск в Windows 10, это процесс автоматически перезапуститься.

Не работает поиск в стартовом меню Windows
Если у вас в Windows 10/11 поиск не работает только в стартовом меню Пуск, попробуйте следующее решение:
- Завершите процесс Проводника (Explorer.exe) с помочью щелчка ПКМ по пустому месту в панели задач с зажатыми клавишами
правыми Ctrl+Shift
(выберите Выход из проводника), либо с помощью диспетчера задач (
Ctrl+Shift+Esc
);
- Запустите редактор реестра из Task Manager (Файл -> Запустить новую задачу -> regedit.exe);
- Удалите следующий ключ реестра
HKLM\SOFTWARE\Microsoft\Windows\CurrentVersion\Explorer\FolderTypes\{ef87b4cb-f2ce-4785-8658-4ca6c63e38c6}\TopView\{00000000-0000-0000-0000-000000000000}
. В 64 битной версии Windows 10 нужно удалить ключ реестра
HKLM\SOFTWARE\Wow6432Node\Microsoft\Windows\CurrentVersion\ Explorer\FolderTypes\ {ef87b4cb-f2ce-4785-8658-4ca6c63e38c6}\TopViews\{00000000-0000-0000-0000-000000000000}; - Запустите Explorer.exe через диспетчер задач (Файл -> Запустить новую задачу -> explorer.exe).


В Windows 10 Creator Update (1703) и более новых версиях есть еще одна частая проблема, из-за которой может не работать поиск. В разделе Параметры -> Конфиденциальность -> Фоновые приложения (Settings -> Privacy -> Background apps), включите опцию «Разрешить приложениям работать в фоновом режиме» (Let apps run in the background). При отключении данной опции может не работает поиск среди только что установленных приложений.

Если вы не нашли эту опцию, можно включить ее через реестр:
- Для этого перейдите в ветку реестра HKEY_CURRENT_USER\Software\Microsoft\ Windows\CurrentVersion\ BackgroundAccessApplications;
- Создайте новый параметр типа DWORD (32-бит) с именем GlobalUserDisabled и значением 0;
- Затем измените значение параметра BackgroundAppGlobalToggle на 1 в ветке реестра HKCU\Software\Microsoft\Windows\CurrentVersion\Search;
Либо вы можете изменить эти параметры из командой строки:
REG ADD HKCU\Software\Microsoft\Windows\CurrentVersion\BackgroundAccessApplications /v GlobalUserDisabled /t REG_DWORD /d 0 /f
REG ADD HKCU\Software\Microsoft\Windows\CurrentVersion\Search /v BackgroundAppGlobalToggle /t REG_DWORD /d 1 /f
- Перезагрузите компьютер.
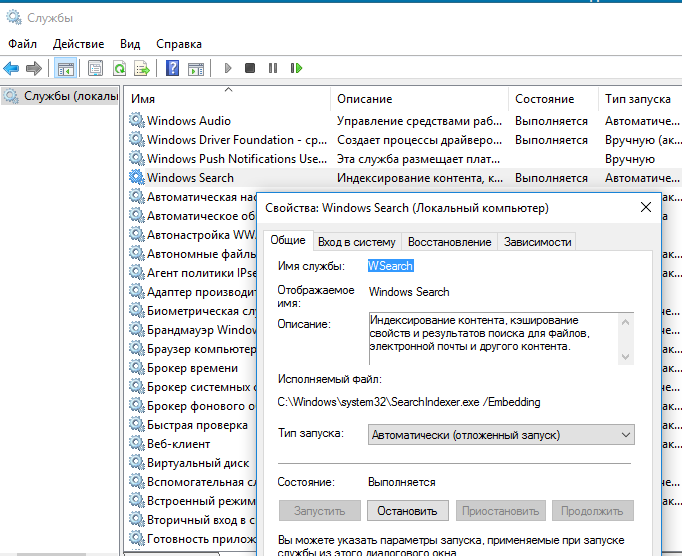
Проверьте состояние и настройки службы индексирования Windows
Проверьте, запущена ли служба индексирования Windows. Для этого:
- Откройте консоль
services.msc
; - В списке служб найдите Windows Search;
- Проверьте, что служба запущена, а тип ее запуска – автоматический (Automatic — Delayed Start);

- Запустите / перезапустите службу WSearch;
- Теперь откройте классическую панель управления и откройте элемент Параметры индексирования (Control Panel\All Control Panel Items\Indexing Options);
- Убедитесь, что выбрано индексирование всех нужных расположений (как минимум должно быть включено индексирование Start Menu, Users, можете добавить ваши локальные диски и Outlook);

- Нажмите кнопку Дополнительно и в разделе Устранение неполадок нажмите кнопку Перестроить;

- Процесс переиндексации может занять довольно длительное время. Дождитесь его окончания.

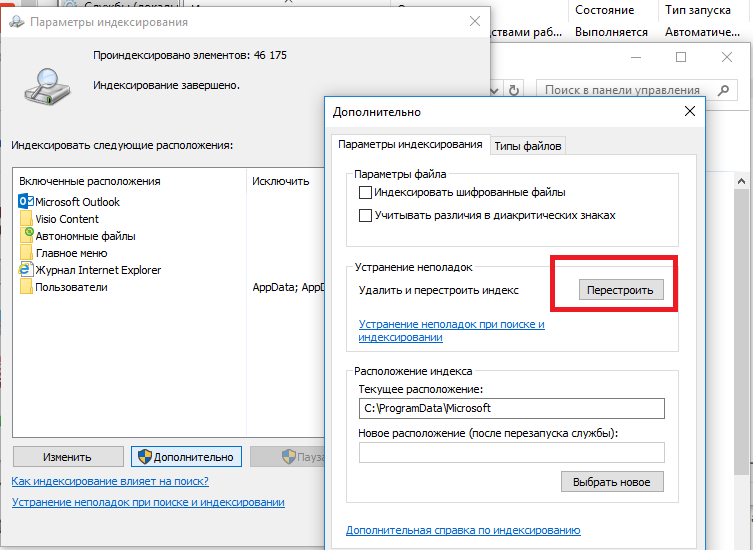
Примечание. Проверьте, что на системном диске достаточно свободного места. В некоторых случаях размер индексного файла службы Windows Search (Windows.edb) может быть довольно большим.
Утилита устранения неполадок службы индексирования и поиска Windows
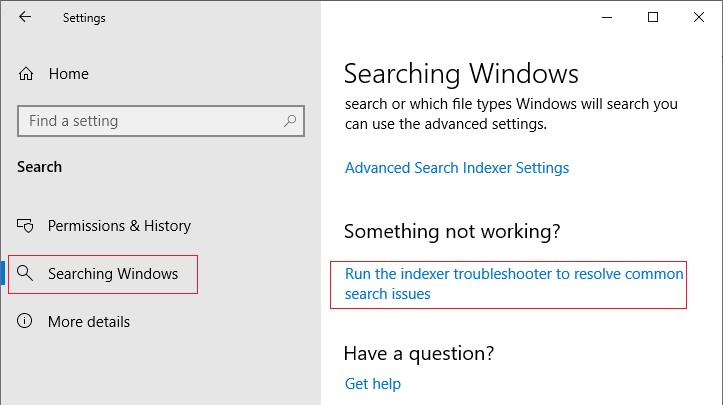
Попробуйте воспользоваться встроенной утилитой исправления неполадок Indexer Diagnostics (Troubleshooter) для исправления типовых проблем с поиском Windows. Для этого:
- Перейдите в меню Settings -> Search -> Searching Windows. Промотайте список вниз и нажмите на ссылку “Run the indexer troubleshooter to resolve common search issues”;
Можно запустить мастер исправления ошибок поиска из командой строки:
msdt.exe -ep WindowsHelp id SearchDiagnostic
- Запустится мастер исправления неполадок в службах поиска и индексирования;
- Выберите вашу проблему (скорее всего это будет “Файлы не отображаются в результатах поиска” / “Files don’t appear in search results”) и нажмите Next;
- Дождитесь, пока “Search and Indexing troubleshooter” просканирует ваш компьютер и попробует исправить ошибку, после этого перезагрузите компьютер и проверьте работу поиска.
Сброс универсальных приложений Microsoft Store
Если у вас на компьютере установлен голосовой помощник Cortana (напомню, что русской версии Cortana все еще нет), исправить проблему неработающего поиска Windows может перерегистрация в системе всех универсальных UWP приложений Windows Store. Для этого в командной строке PowerShell, запущенной с правами администратора, выполните команду:
Get-AppXPackage -AllUsers | Foreach {Add-AppxPackage -DisableDevelopmentMode -Register "$($_.InstallLocation)\AppXManifest.xml"}
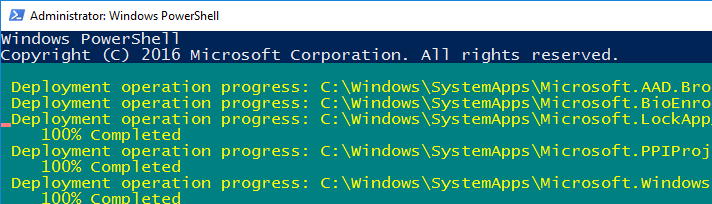
После окончания выполнения команды, перезагрузите компьютер.
Если это не исправило проблема с поиском, нужно полностью удалить и переустановить универсальное приложение Microsoft.Windows.Search (
Microsoft.Windows.Search_cw5n1h2txyewy
).
- Запустите консоль PowerShell.exe с правами администратора;
- Остановите службу Windows Search. Сначала нужно изменить тип запуска на Disabled, а потом остановить ее:
Get-Service WSearch| Set-Service –startuptype disabled –passthru| Stop-Service –Force - Перезагрузите Windows;
- Удалите универсальное приложениеSearch:
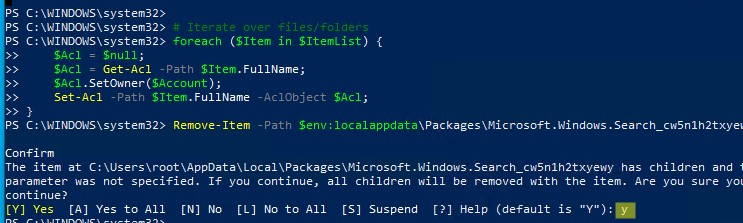
Get-AppxPackage -Name *Search* | Remove-AppxPackage -Verbose -ErrorAction SilentlyContinue -WarningAction SilentlyContinue
Get-AppxPackage -AllUsers -Name *Search* | Remove-AppxPackage -Verbose -ErrorAction SilentlyContinue -WarningAction SilentlyContinue - Теперь нужно удалить папку приложения
%LOCALAPPDATA%\Packages\Microsoft.Windows.Search_cw5n1h2txyewy
. Но для этого нужно сначала назначить локальную группу Administrators владельцем папки. Это можно сделать вручную в проводнике Windows (вкладка Безопасность в свойствах папки) или с помощью такого PowerShell скрипта:
$searchapp_path ="$env:localappdata\Packages\Microsoft.Windows.Search_cw5n1h2txyewy"
$Account = New-Object -TypeName System.Security.Principal.NTAccount -ArgumentList 'BUILTIN\Administrators';
$ItemList = Get-ChildItem -Path %searchapp_path -Recurse;
foreach ($Item in $ItemList) {
$Acl = $null;
$Acl = Get-Acl -Path $Item.FullName;
$Acl.SetOwner($Account);
Set-Acl -Path $Item.FullName -AclObject $Acl;
} - Теперь можно удалить папку Windows.Search_cw5n1h2txyewy:
Remove-Item -Path $env:localappdata\Packages\Microsoft.Windows.Search_cw5n1h2txyewy –force

- Сейчас поиск в Windows полностью отключен;
- Переустановите приложение Search App:
Get-AppxPackage -AllUsers -Name *Search* | % {Add-AppxPackage -Path ($_.InstallLocation + "\Appxmanifest.xml") -Register -DisableDevelopmentMode -ForceApplicationShutdown -Verbose}

- Включите автозапуск для службы WSearch:
Set-Service WSearch –startuptype automatic - Перезагрузите Windows, войдите под своей учетной записью и проверьте, что поиск теперь работает.

Не работает поиск Windows при включенной интеграции с Bing
5 февраля 2020 года у пользователей Windows 10 массового перестал работать поиск из панели задач. Окно поиска в панели задач открывается, но при вводе любого запроса поиск выдает пустые результаты.

Данная проблема была признана Microsoft и вызывалась недоступностью облачных сервисов поиска Bing. Дело в том, что по-умолчанию Windows 10 отправляет на свои сервера все, что вы вводите в поиске Start Menu, которыt возвращают вам результаты поиска из Bing.
Для исправления этой проблемы проще всего отключить интеграцию поиска Windows 10 с поисковой системой Microsoft Bing.
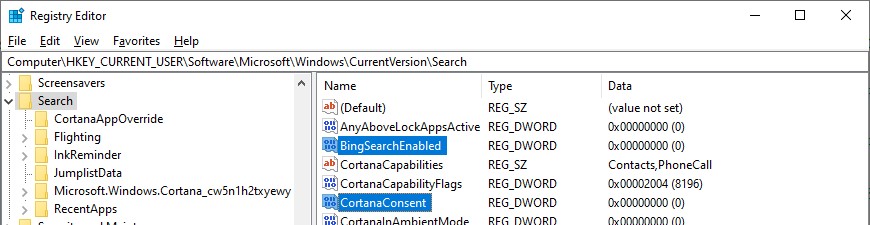
- Запустите редактор реестра (Win+R -> regedit.exe);
- Перейдите в раздел реестра HKEY_CURRENT_USER\SOFTWARE\Microsoft\Windows\CurrentVersion\Search\;
- Измените значение параметров BingSearchEnabled и CortanaConsent на 0;

Если эти параметры реестра отсутствуют, создайте их вручную (тип REG_DWORD 32 bit). Можно создать и изменить эти параметры следующими командами:
REG ADD HKCU\Software\Microsoft\Windows\CurrentVersion\Search /v BingSearchEnabled /t REG_DWORD /d 0 /f
REG ADD HKCU\Software\Microsoft\Windows\CurrentVersion\Search /v CortanaConsent /t REG_DWORD /d 0 /f
- Перезапустите Explorer.exe или перезагружайте компьютер.
Данное решение поможет, если у вас открывается окно поиска, но при вводе текста для поиска не ничего появляется. На момент написания статьи инженеры Microsoft уже исправили проблему с Bing, и службы поиска Windows стали работать нормально. Хотя на мой взгляд интеграцию поиска Windows с Bing нужно отключать сразу после установки операционной системы.
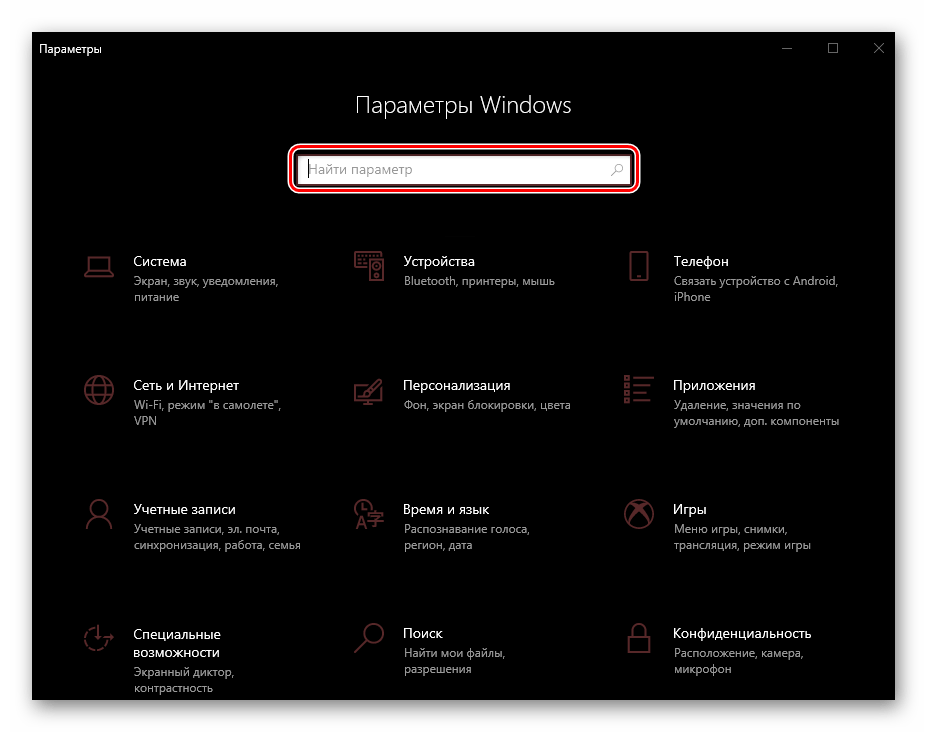
Не работает поиск в Параметрах Windows
В приложении “Параметры” (Settings) Windows 10/11 есть собственной окно поиска для быстрого перехода к элементам настройки системы. Если у вас перестал работать поиск в Параметрах:
- Запустите File Explorer и перейдите в каталог
%LocalAppData%\Packages\windows.immersivecontrolpanel_cw5n1h2txyewy\LocalState
; - Откройте свойства папки Indexed, нажмите кнопку “Другие”, и проверьте что включена опция включена опция “Разрешить индексировать содержимое файлов в этой папке в дополнении к свойствам файла”;

- Если опция уже включена, отключите ее, нажмите Ок, а затем включите снова.

PowerShell скрипт для сброса Windows Search
Если рассмотренные выше способы не помогли восстановить работу поиска в Windows 10, Microsoft рекомендует воспользоваться скриптом PowerShell для сброса всех настроек службы Windows Search (скрипт предназначен для Windows 10 1903 и выше).
[Для запуска этого скрипта нужно
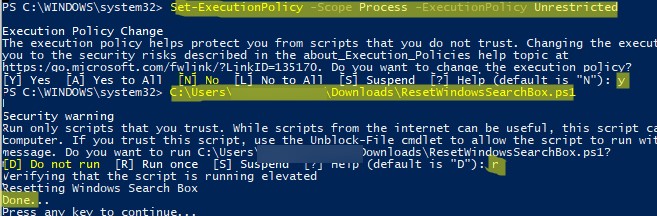
- Скачайте скрипт ResetWindowsSearchBox.ps1 по ссылке;
- Запустите консоль PowerShell с правами администратора;
- Измените настройки политики запуска скриптов PowerShell, выполнив команду (команда разрешает запуск скриптов в текущей сессии powershell.exe):
Set-ExecutionPolicy -Scope Process –ExecutionPolicy Unrestricted - Запустите скрипт;

- Скрипт сбросит настройки поиска Windows на значения по-умолчанию;
- Перезагрузите компьютер и проверьте, исправлена ли проблема поиска в Windows.
Другие варианты исправления проблем поиска в Windows, которые могут помочь, если предыдущие варианты не помогли вам:

The search pane in Windows 11 showing suggested/recent files on the left and Bing search on the right. |
|
| Developer(s) | Microsoft |
|---|---|
| Initial release | January 30, 2007; 16 years ago |
| Operating system | Microsoft Windows |
| Predecessor | Indexing Service, Windows Desktop Search |
| Service name | Windows Search (WSearch) |
| Type | Desktop search |
| Website | https://support.microsoft.com/en-us/help/17190/windows-10-search-for-anything |
Windows Search (also known as Instant Search) is a content index desktop search platform by Microsoft introduced in Windows Vista as a replacement for both the previous Indexing Service of Windows 2000 and the optional MSN Desktop Search for Windows XP and Windows Server 2003, designed to facilitate local and remote queries for files and non-file items in compatible applications including Windows Explorer. It was developed after the postponement of WinFS and introduced to Windows constituents originally touted as benefits of that platform.
Windows Search creates a locally managed Index of files — documents, emails, folders, programs, photos, tracks, and videos — and file contents, as well as of non-file items including those of Microsoft Outlook for which users can perform incremental searches based on details such as authors, contents, dates, file names, file types, people, and sizes; the Index stores actual prose from inside documents and metadata properties from other content. Control Panel and Settings can also be searched.
Windows Search was introduced in Windows Vista as a replacement for the previous Indexing Service to facilitate data discovery and management, promote greater rapidity of search results, and to unify desktop search platforms across Microsoft Windows; it was also available as an optional download for Windows XP. There have been several updates to its functionality since its introduction, and it is also included in Windows 7, Windows 8, Windows 8.1, Windows 10, and Windows 11.
History[edit]
Windows Search is the successor of the Indexing Service, a remnant of the Object File System feature of the Cairo project which never materialized. Microsoft began development of Windows Search after the postponement of WinFS; it introduces features originally touted as benefits of that platform, such as content indexing, incremental searching, and property stacking.
Overview[edit]
Windows Search creates a locally stored index of files and non-file items stored on a computer.
The time required for the initial creation of this index depends on the amount and type of data to be indexed, and can take up to several hours, but this is a one-time event.[1] Once a file’s contents have been added to this index, Windows Search is able to use the index to search results more rapidly than it would take to search through all the files on the computer. Searches are performed not only on file names, but also on the contents of the file (provided a proper handler for the file type is installed such as a PDF reader) as well as the keywords, comments and all other forms of metadata that Windows Search recognizes. For instance, searching the computer for «The Beatles» returns a list of music files on the computer which have «The Beatles» in their song titles, artists or album names, as well as any e-mails and documents that include the phrase «The Beatles» in their titles or contents.
Windows Search features incremental search (also known as «search as you type»). It begins searching as soon as characters are entered in the search box, and keeps on refining and filtering the search results as more characters are typed in. This results in finding the required files even before the full search text is entered.
Windows Search supports IFilters, components that enable search programs to scan files for their contents and metadata. Once an appropriate IFilter has been installed for a particular file format, the IFilter is used to extract the text from files which were saved in that format.[2]
By default, Windows Search includes IFilters for common filetypes, including Word documents, Excel spreadsheets, PowerPoint presentations, HTML files, text files, MP3 and WMA music files, WMV, ASF and AVI video files and JPEG, BMP and PNG images.[3]
Windows Search uses property handlers to handle metadata from file formats. A property handler needs a property description and a schema for the property for Windows Search to index the metadata.[4] Protocol handlers are used for indexing specific data stores. For example, files are accessed using File System Protocol Handler, Microsoft Office Outlook data stores using the Outlook Protocol Handler and Internet Explorer cache using the IE History/Cache Protocol Handler.[5]
Architecture[edit]
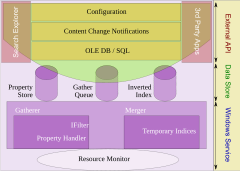
Windows Search is implemented as a Windows Service. The search service implements the Windows Search configuration and query APIs and also controls, as well as all indexing and query components. The most important component of Windows Search is the Indexer, which crawls the file system on initial setup, and then listens for file system notifications to pick up changed files in order to create and maintain the index of data. It achieves this using three processes:[6]
- SearchIndexer.exe, which hosts the indexes and the list of URIs that require indexing, as well as exposes the external configuration and query APIs that other applications use to leverage the Windows Search features.
- SearchProtocolHost.exe, which hosts the protocol handlers. It runs with the least permission required for the protocol handler. For example, when accessing filesystem, it runs with the credentials of the system account, but on accessing network shares, it runs with the credentials of the user.
- SearchFilterHost.exe, which hosts the IFilters and property handlers to extract metadata and textual content. It is a low integrity process, which means that it does not have any permission to change the system settings, so even if it encounters files with malicious content, and by any chance if they manage to take over the process, they will not be able to change any system settings.
The search service consists of several components, including the Gatherer, the Merger,[7] the Backoff Controller, and the Query Processor, among others. The Gatherer retrieves the list of URIs that need to be crawled and invokes proper protocol handler to access the store that hosts the URI, and then the proper property-handler (to extract metadata) and IFilter to extract the document text. Different indices are created during different runs; it is the job of the Merger to periodically merge the indices.[7] While indexing, the indices are generally maintained in-memory and then flushed to disk after a merge to reduce disk I/O. The metadata is stored in property store, which is a database maintained by the ESE database engine.[7] The text is tokenized and the tokens are stored in a custom database built using Inverted Indices.[7] Apart from the indices and property store, another persistent data structure is maintained: the Gather Queue.[7] The Gather Queue maintains a prioritized queue of URIs that needs indexing. The Backoff Controller mentioned above monitors the available system resources, and controls the rate at which the indexer runs. It has three states:[7]
- Running: In this state, the indexer runs without any restrictions. The indexer runs in this state only when there is no contention for resources.
- Throttled: In this state, the crawling of URIs and extraction of text and metadata is deliberately throttled, so that the number of operations per minute is kept under tight control. The indexer is in this state when there is contention for resources, for example, when other applications are running. By throttling the operations, it is ensured that the other operations are not starved of resources they might need.
- Backed off: In this state, no indexing is done. Only the Gather Queues are kept active so that items do not go unindexed. This state is activated on extreme resource shortage (less than 5 MB of RAM or 200 MB of disk space), or if indexing is configured to be disabled when the computer is on battery power, or if the indexer is manually paused by the user.
Advanced Query Syntax[edit]
Windows Search queries are specified in Advanced Query Syntax (AQS) which supports not only simple text searches but provides advanced property-based query operations as well.[8] AQS defines certain keywords which can be used to refine the search query, such as specifying boolean operations on searched terms (AND, OR, NOT) as well as to specify further filters based on file metadata or file type. It can also be used to limit results from specific information stores like regular files, offline files cache, or email stores. File type specific operators are available as well.[9] Windows Desktop Search also supports wildcard prefix matching searches.[10] It also includes several SQL-like operators like GROUP BY. AQS is locale dependent and uses different keywords in international versions of Windows 7.
Programmability[edit]
Users can access the Windows Search index programmatically using managed as well as native code.[11] Native code connects to the index catalog by using a Data Source Object retrieved from the Indexing Service OLE DB provider. Managed code use the MSIDXS ADO.NET provider. One can query a catalog on a remote machine by specifying a UNC path. Programmers specify the criteria for searches using SQL-like syntax. The SQL query can either be created by hand, or by using an implementation of the ISearchQueryHelper interface. Windows Search provides implementations of the interface to convert an AQS or NQS queries to their SQL counterpart.[12][13]
The OLE DB/SQL API implements the functionality for searching and querying across the indices and property stores. It uses a variant of SQL in which to represent the query (regular SQL with certain restrictions) and returns results as OLE DB Rowsets.[7] Whenever a query executes, the parts of the index it used are temporarily cached so that further searches filtering the result set need not access the disk again, in order to improve performance. Windows Search stores its index in an Extensible Storage Engine file named Windows.edb that exists, by default, in the \ProgramData\Microsoft\Search\Data\Applications\Windows\ folder at the root of the system drive in Windows Vista or in later versions of Windows. (The corresponding location in Windows XP is \All Users\Application Data\Microsoft\Search\Data\Applications\Windows\ inside the Documents and Settings folder.)
The index store, called SystemIndex, contains all retrievable Windows IPropertyStore values for indexed items.
Within the SystemIndex folder lurk SystemIndex.*.Crwl and SystemIndex.*.gthr files.[14]
The names and locations of documents in the system are exposed as a table with the column names System. ItemName and System. ItemURL respectively.[15] A SQL query can directly reference these tables and index catalogues and use the MSIDXS provider to run queries against them. The search index can also be used via OLE DB, using the CollatorDSO provider.[16] However, the OLE DB provider is read-only, supporting only SELECT and GROUP ON SQL statements.
Windows Search also registers a search-ms application protocol, which can be used to represent searches as URIs.[17] The search parameters and filters are encoded in the URI using AQS or its natural language counterpart, NQS. When Explorer invokes the URI, Windows Search (which is the default registered handler for the protocol) launches the Search Explorer with the results of the search. In Windows Vista SP1 or later, third-party handlers can also register themselves as the application protocol handler, so that searches can be performed using any search engine which the user has set as default, and not just Windows Search.
The Windows Search service provides the Notifications API component to allow applications to «push» changed items that need indexing to the Windows Search indexer.[7] Applications use the component to supply the URIs of the items that need to be indexed, and the URIs are written to the Gather Queue, where they are read off by the indexer. Microsoft Outlook and Microsoft OneNote use this ability to index the items managed by them and use Windows Search queries to provide the in-application searching features. The internal USN Journal Notifier component of Windows Search also uses the Notifications API, monitoring the Change Journal in an NTFS volume to keep track of files that have changed on the volume.[18] If the file is in a location indexed by Windows Search and does not have the FANCI (File Attribute Not Content Indexed) attribute set,[7] the Windows Search service is notified of its path via the Notification API.
Windows Search Configuration APIs are used to specify the configuration settings, such as the root of the URIs that needs to be monitored, setting the frequency of crawling or viewing status information like number of items indexed or length of the gather queue or the reason for throttling the indexer.[7][19]
It[clarification needed] also exposes APIs to register protocol handlers (via the ISearchProtocol() interface, property handlers (via the IPropertyStore() interface) or IFilter implementations (via the IFilter() interface). IFilter implementations allow only read-only extraction of text and properties, whereas IPropertyStore allows writing properties as well.[7]
Windows Desktop Search[edit]

Windows Desktop Search running in Windows XP, with preview pane showing thumbnails of search results. |
|
| Developer(s) | Microsoft |
|---|---|
| Stable release |
4.0 |
| Written in | C++[20] |
| Operating system | Windows 2000 Windows XP Windows Server 2003 |
| Type | Desktop search |
| License | Freeware |
| Website | www |
Windows Desktop Search, a standalone add-on made available as freeware, is the implementation of Windows Search for Windows 2000, Windows XP and Windows Server 2003.
Windows Desktop Search and Windows Search share a common architecture and indexing technology and use a compatible application programming interface (API).
Searches are specified using the Advanced Query Syntax and are executed while the user types (incremental find). By default, it comes with a number of IFilters for the most common file types—documents, audio, video as well as protocol handlers for Microsoft Outlook e-mails. Other protocol handlers and IFilters can be installed as needed.
Windows Desktop Search allows network shares to be added to the index.[21][22]
User interface[edit]
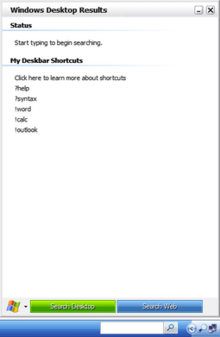
The Windows Desktop Search functionality is exposed via a Windows Taskbar mounted deskbar, accessible via a ⊞ Win+⇧ Shift+F keyboard shortcut. It provides a text field to type the query and the results are presented in a flyout pane. It also integrates as a Windows Explorer window. On selecting a file in the Explorer window, a preview of the file is shown in the right hand side of the window, without opening the application which created the file. Web searches can be initiated from both interfaces, but that will open the browser to search the terms using the default search engine.
The deskbar also has the capability to create application aliases, which are short strings which can be set to open different applications. This functionality is accessed by prefixing the ! character to the predefined string. For example, «!calc» opens the Windows Calculator. The help documentation includes syntax for creating application aliases out of any text string, regardless of prefix. This feature can also be used to create shortcut for URLs, which when entered, will open the specified URL in browser. It can also be used to send parametrized information over the URL, which are used to create search aliases. For example, «w text» can be configured to search «text» in Wikipedia.
Releases[edit]
Windows Desktop Search was initially released as MSN Desktop Search, as a part of the MSN Toolbar suite. It was re-introduced as Windows Desktop Search with version 2, while still being distributed with MSN Toolbar Suite.
For Windows 2000, Windows XP and Windows Server 2003, it came in two flavors, one for home users and the other for enterprise use. The only difference between the two was that the latter could be configured via group policy. The home edition was bundled with MSN Toolbar, while the other was available as a standalone application. Later, when MSN Toolbar was discontinued in favor of Windows Live Toolbar, the home edition of Windows Desktop Search was discontinued as well. The last version available for Windows 2000 is Windows Desktop Search 2.66.
For Windows XP and Windows Server 2003, version 3.0 of Windows Desktop Search was provided as a standalone release – separate from Windows Live Toolbar. One of the significant new features is Windows Desktop Search 3.0 also installs the Property System on Windows XP introduced in Windows Vista.[23] Windows Desktop Search 3.0 is geared for pre-Windows Vista users, hence the indexer was implemented as a Windows Service, rather than as a per-user application, so that the same index as well as a single instance of the service can be shared across all users – thereby improving performance. Windows Desktop Search found itself in the midst of a controversy on October 25, 2007, when Windows Desktop Search 3.01 was automatically pushed out and installed on Windows when updated via Windows Server Update Services (WSUS). Microsoft responded with two posts on the WSUS Product Team Blog.[24][25]
Windows Vista[edit]
Windows Vista and Windows Server 2008 introduced Instant Search in the Start menu and in Windows Explorer.
It offers a superset of the features provided by Windows Desktop Search (WDS), while being API compatible with it. Unlike WDS, it can seamlessly search indexed as well as non-indexed locations – for indexed locations the index is used and for non-indexed locations, the property handlers and IFilters are invoked on the fly as the search is being performed. This allows for more consistent results, though at the cost of searching speed over non-indexed locations. Windows Search uses Group Policy for centralized management.[26] Windows Search also supports queries against a remote index.
Windows Search indexes offline caches of network shares, in addition to the local file systems. This means if the file server, on which a network file share is hosted, is running either Windows Vista or a later version of Windows or Windows Search 4.0 on Windows XP, any searches against the share will be queried against the server’s index and present the results to the client system, filtering out the files the user does not have access to. This procedure is transparent to the user.
Microsoft Outlook e-mail stores starting with Outlook 2007, though Outlook 2002 and Outlook 2003 and Microsoft OneNote stores are also indexed if installed alongside Windows Search.[27]
Unlike Windows Desktop Search on Windows XP, the Windows Search indexer performs the I/O operations with low priority, the process also runs with low CPU priority. As a result, whenever other processes require the I/O bandwidth or processor time, it is able to pre-empt the indexer, thereby significantly reducing the performance hit associated with the indexer running in the background.
Windows Search supports natural language searches; so the user can search for things like «photo taken last week» or «email sent from Dave». However, this is disabled by default.[28] Natural language search expresses the queries in Natural Query Syntax (NQS), which is the natural language equivalent of AQS.
User interface[edit]

The search functionality is exposed using the search bars in the Start menu and the upper right hand corner of Windows Explorer windows, as well as Open/Save dialog boxes. When searching from the Start menu, the results are shown in the Start menu itself, overlapping the recently used programs. From the Start menu, it is also possible to launch an application by searching for its executable image name or display name. Searching from the search bars in Explorer windows replaces the content of the current folder with the search results. The Explorer windows can also render thumbnails in the search results if a Thumbnail Handler is registered for a particular file type. It can also render enhanced previews of items in a Preview Pane without launching the default application, if the application has registered a Preview Handler. This can provide functionality such as file type-specific navigation (such a browsing a presentation using next/previous controls, or seeking inside a media file).[29] Preview handlers can also allow certain kind of selections (such as highlighting a text snippet) to be performed from the preview pane itself. In the Control Panel, the search bar in the window can also search for Control Panel options. However, unlike WDS, Windows Search does not support creating aliases.

There is also a Search Explorer, which is an integrated Windows Explorer window that is used for searches. It presents the user interface to specify the search parameters, including locations and file types that should be searched, and certain operators, without crafting the AQS queries by hand. With Windows Vista SP1, third-party applications will be able to override the Search Explorer as the default search interface so that the registered third-party application will be launched, instead of bringing up the Search Explorer, when invoked by any means.[30]
It is also possible to save a search query as a Virtual Folder, called a Saved Search or Search Folder which, when accessed, runs the search with the saved query and returns the results as a folder listing. Physically, a search folder is just an XML file (with a .search-ms extension) which stores the search query (in either AQS or NQS), including the search operators as well. Windows Vista also supports query composition, where a saved search (called a scope) can be nested within the query string of another search.[31][32] Search Folders are also distributable via RSS. By default, Windows references the profile of the user who originally created a Search Folder as part of the query’s scope.[33] This design choice does not prevent saved searches from being shared with other users, but it prevents them from operating on different user profiles. While users can manually modify the contents of a saved search so that the scope references the %USERPROFILE% environment variable, which will enable it to operate on other machines or profiles regardless of the original author, Microsoft has released a SearchMelt Creator utility that automates this process for the user.[33]
Windows Search 4.0[edit]
Windows Search 4.0 (also previously referred to as Windows Live Search, codenamed Casino or OneView) is the successor to the Windows Search platform for both Windows Desktop Search 3.0 on Windows XP as well as Instant Search on Windows Vista. It is mainly an update to the indexing components, with few changes to the Windows XP user interface and none on Windows Vista. It added remote query support to Windows XP and Windows Server 2003 based systems, which used to be a Vista-only feature. This allows a user with a Vista client (or an XP client with Windows Search 4.0) to search the index of networked machines which are also running a supported operating system.

Windows Search 4.0 was originally proposed by Microsoft’s Windows Live division as an application that would unify local and remote indexed search[34] in a new interface. Early screenshots of the program featured the new «flair» interface design seen in other Windows Live client applications of the time such as Windows Live Messenger and Windows Live Mail.
Windows Live Search Center could search web services which used the OpenSearch specification to make search results available as web feeds.[35] It could aggregate searches from various indexes including the Windows Desktop Search index, Windows RSS Platform common feed store, and Microsoft Exchange and Microsoft SharePoint indexes, among others.[36]
The first beta of Windows Search 4.0 was released on March 27, 2008.[37] It included numerous performance improvements to the indexer and brought new features, including previously Vista-exclusive ones, to XP, including Group Policy integration, federation of searches to remote indexes, support for EFS-encrypted files and Vista-style preview handlers that allow document-type specific browsing of documents in the preview pane.[38][39]
Windows Search 4.0 was released on June 3, 2008, and is supported on XP, Windows Server 2003, Vista, Windows Server 2008 and Windows Home Server.[39][40]
Windows 10[edit]

In Windows 10, Windows Search was added to the taskbar in place of the Start menu in earlier versions of Windows.
A new landing page was added showing users their top apps and recent activities on their computer.[41][42]
The landing page also provides quick searches provided from Bing for the weather, top news stories, today in history and new movies.
The landing page also serves as a space that Microsoft can advertise in, such as with the new Chromium-based version of Microsoft Edge.
A preview pane from within the Search UI was added that supports apps and documents. When searching for a program, the taskbar jumplists for each program are shown in the preview pane and when searching for documents, file metadata such as file location, date last modified and the document author was also added.
The landing page allows the user to filter searches depending on whether the user looking for documents, pictures or settings.
Spell-correction was also added to Windows Search when searching for Apps & Settings to ensure a wider range of results were shown.
The search box in File Explorer now opens as soon as you click in the box and provides a dropdown of recent searches. Microsoft OneDrive content is also now integrated in addition to the indexed results.[43] When clicking on the search result, the file will open immediately. Each search result also has a right click menu allowing the user to open the file’s location.
Privacy Concerns[edit]
The Windows Search index is built locally on the PC and no information is sent to Microsoft.[44]
See also[edit]
- Enterprise search
- List of desktop search engines
- Microsoft Outlook
- Microsoft Search Server
References[edit]
- ^ «Technical FAQ: How long does it take for Windows Search to finish indexing a computer?». Microsoft Corporation. Archived from the original on 24 September 2011. Retrieved 28 May 2014.
- ^ «IFilter Interface». MSDN. Microsoft Corporation. Retrieved 2012-01-02.
- ^ «List of searchable file types». Microsoft. Archived from the original on September 26, 2011.
- ^ «Developing Property Handlers for Windows Search». MSDN. Microsoft Corporation. 2011-09-07. Retrieved 2012-01-02.
- ^ Paddock, Brandon (2007-06-20). «FAQ: How does indexing work? What are IFilters and Protocol Handlers?». BrandonLive.com. Retrieved 2007-06-23.
- ^ Brandon Paddock (21 June 2007). «FAQ: Why does WDS / Windows Vista use so many processes?». Retrieved 2007-06-23.
- ^ a b c d e f g h i j k «Good Citizenship When Developing Background Services That Run on Windows Vista». Microsoft. Retrieved 2007-07-14.
- ^ «Advanced Query Syntax». MSDN TechNet. Retrieved 2007-06-23.
- ^ Nick White. «Advanced search techniques». Archived from the original on 2007-06-13. Retrieved 2007-06-23.
- ^ «Seek and Ye Shall Find». Microsoft. Archived from the original on 2007-07-09. Retrieved 2007-07-05.
- ^ «Searching data». 2 November 2006. Retrieved 2007-03-17.
- ^ «Development Platform Overview». MSDN. Retrieved 2007-10-12.
- ^ «Querying the Index programmatically». MSDN. Retrieved 2007-10-12.
- ^
Tulloch, Mitch; Northrup, Tony; Honeycutt, Jerry; Wilson, Ed (2009). Windows 7 Resource Kit. Resource Kit. Pearson Education. ISBN 9780735642775. Retrieved 2014-09-08.The SystemIndex subfolder contains a number of SystemIndex.*.Crwl and SystemIndex.*.gthr files.
- ^ Catherine Heller (2006-11-10). «Windows Vista Search: Syntax Update».
- ^ «Querying the Index Programmatically». MSDN. Retrieved 2007-06-23.
- ^ «Using the search-ms Protocol». Retrieved 2007-09-24.
- ^ «Change Journals (Windows)». Retrieved 2007-07-14.
- ^
«Managing the Index». MSDN. Retrieved 2007-10-12. - ^
- ^ «Windows Desktop Search: Add-in for Files on Microsoft Networks». Microsoft Download Center. Microsoft Corporation. 2008-06-30. Retrieved 2007-07-14.
- ^ «Availability of the Windows Desktop Search add-in for Files on Microsoft Networks (Revision: 5.0)». Microsoft Support. Microsoft Corporation. 2008-12-10. Retrieved 2012-01-02.
- ^ «Windows Search as a Development Platform». 20 June 2022.
- ^ «WDS revision update, expanded applicability rules, auto-approve revisions». Retrieved 2010-02-01.
- ^ «WDS update revision follow – up». Retrieved 2010-02-01.
- ^ «Windows Search». Retrieved 2019-11-04.
- ^ Posey, Brian (April 21, 2009). «How Windows Desktop Search works in Microsoft Outlook 2007». SearchExchange. TechTarget. Archived from the original on September 27, 2010. Retrieved January 3, 2017.
- ^ «Natural Language Search in Windows Vista». Retrieved 2007-06-22.
- ^ «Windows Search 3.x». MSDN. Retrieved 2007-10-12.
- ^ «Overview of the Windows Vista desktop search changes in Windows Vista Service Pack 1». Retrieved 2007-07-14.
- ^ Bentz, Ben (October 31, 2006). «Query Composition: Building a search upon another search». Shell: Revealed Blog. Microsoft. Archived from the original on December 15, 2006. Retrieved October 20, 2015.
- ^ Shultz, Greg (December 11, 2007). «Narrow a saved search with Vista’s Query Composition feature». TechRepublic. CBS Interactive. Archived from the original on March 11, 2017. Retrieved November 11, 2015.
- ^ a b White, Nick (May 14, 2007). «Searcing, part III: Do you know what a SearchMelt is?». Windows Vista Team Blog. Microsoft. Archived from the original on May 16, 2007. Retrieved October 20, 2015.
- ^ Brandon Paddock. «The fate of codename «Casino»«. Archived from the original on 2008-10-21. Retrieved 2007-06-14.
- ^ Brandon Paddock. «Open Search». Retrieved 2007-06-14.[permanent dead link]
- ^ Brandon Paddock. «Where is YOUR stuff?». Retrieved 2007-06-14.[permanent dead link]
- ^ Mary Jo Foley. «Microsoft releases first public test build of Windows Search 4.0». Archived from the original on 2008-03-30. Retrieved 2008-03-28.
- ^ Brandon Paddock (28 March 2008). «Windows Search 4.0 Preview Release». Retrieved 2008-03-28.
- ^ a b «Description of Windows Search 4.0 and Multilingual User Interface Pack for Windows Search 4.0». Microsoft. Retrieved 2008-06-06.
- ^ LeBlanc, Brandon (3 June 2008). «Windows Search 4.0 Released to Web». Windows Experience Blog. Microsoft Corporation. Retrieved 6 January 2012.
- ^ «What’s new in Windows 10 version 1903». Archived from the original on 2020-05-22. Retrieved 2020-05-08.
- ^ «What’s new in Windows 10 version 20H1». Archived from the original on 2020-05-16. Retrieved 2020-05-08.
- ^ «What’s new in Windows 10 version 1909». Archived from the original on 2020-05-10. Retrieved 2020-05-08.
- ^ «Search indexing in Windows 10: FAQ». support.microsoft.com. Retrieved 2020-05-08.
Further reading[edit]
- Protalinski, Emil (27 March 2010). «Mastering Windows Search using Advanced Query Syntax». Ars Technica. Condé Nast Digital. Retrieved 1 February 2011.
- «Description of Windows Search 4.0 and the Multilingual User Interface Pack for Windows Search 4.0 (Revision: 8.2)». Microsoft Support. Microsoft Corporation. 13 August 2008. Retrieved 1 February 2011.
- «Windows Desktop Search: Feature comparison by version». Microsoft.com. Microsoft Corporation. Retrieved 1 February 2011.
External links[edit]
- iFilter.org
Содержание
- Добавление кнопки поиска Виндовс 10
- Восстановление работоспособности функции поиска
- Вызов поиска в Виндовс 10
- Вариант 1: Поиск на панели задач
- Вариант 2: Поиск в системных приложениях
- Использование функции поиска
- Заключение
- Вопросы и ответы

Возможность поиска данных, в той или иной степени, в операционных системах семейства Windows появилась довольно давно, но именно в десятой Microsoft ее полностью переработали и улучшили, превратив в полноценный рабочий инструмент, благодаря которому можно найти практически все что угодно не только на компьютере, но и в сети. При этом далеко не все пользователи «десятки» знают, как вызвать столь полезную функцию, и сегодня мы расскажем именно об этом.
Открыть поиск на ПК или ноутбуке с Windows 10 несложно, однако иногда эта функция может не работать или попросту быть скрытой (значок или поле для ввода отсутствует). Решение первой проблемы будет рассмотрено в следующей части статьи, а пока что расскажем, как активировать встроенную поисковую систему.
- Правой кнопкой мышки (ПКМ) кликните по панели задач.
- Наведите указатель курсора на пункт «Поиск».
- Выберите второй или третий вариант из доступных:

На скриншотах выше можно увидеть, как выглядит каждый из них. При этом стоит отметить, что поиск в виде поля для ввода запроса может быть активирован только в том случае, если на панели задач используются большие значки.
Читайте также: Как уменьшить панель задач в Windows 10
Восстановление работоспособности функции поиска
Если же функция поиска изначально была представлена на панели задач, но не работала, это говорит о наличии серьезных проблем в операционной системе, особенно если стартовое меню «Пуск» тоже не реагирует на обращение. Причин у такого поведения может быть несколько, но к основным стоит причислить остановку ответственной за работу поиска службы, повреждение системных файлов, некорректные записи в реестре, а также возможные ошибки и сбои в ОС Windows, с которыми, к сожалению, время от времени приходится сталкиваться большинству. Узнать подробно о том, что могло вызвать неработоспособность поиска конкретно в вашем случае, и как это исправить, поможет представленная по ссылке ниже статья.
Подробнее: Что делать, если не работает функция поиска в Виндовс 10
Вызов поиска в Виндовс 10
Открыть поиск, представленный на панели задач, можно всего лишь двумя способами, однако эта функция доступна и в других системных компонентах и приложениях, о чем мы тоже расскажем далее.
Вариант 1: Поиск на панели задач
Самый простой и очевидный способ вызова поиска заключается в нажатии по его значку или полю левой кнопкой мышки (ЛКМ), в зависимости от того, какой из вариантов отображения вы выбрали сами. Дополнительно пояснять здесь ничего не нужно – все видно на изображении ниже.
Читайте также: Настройка панели задач в Windows 10
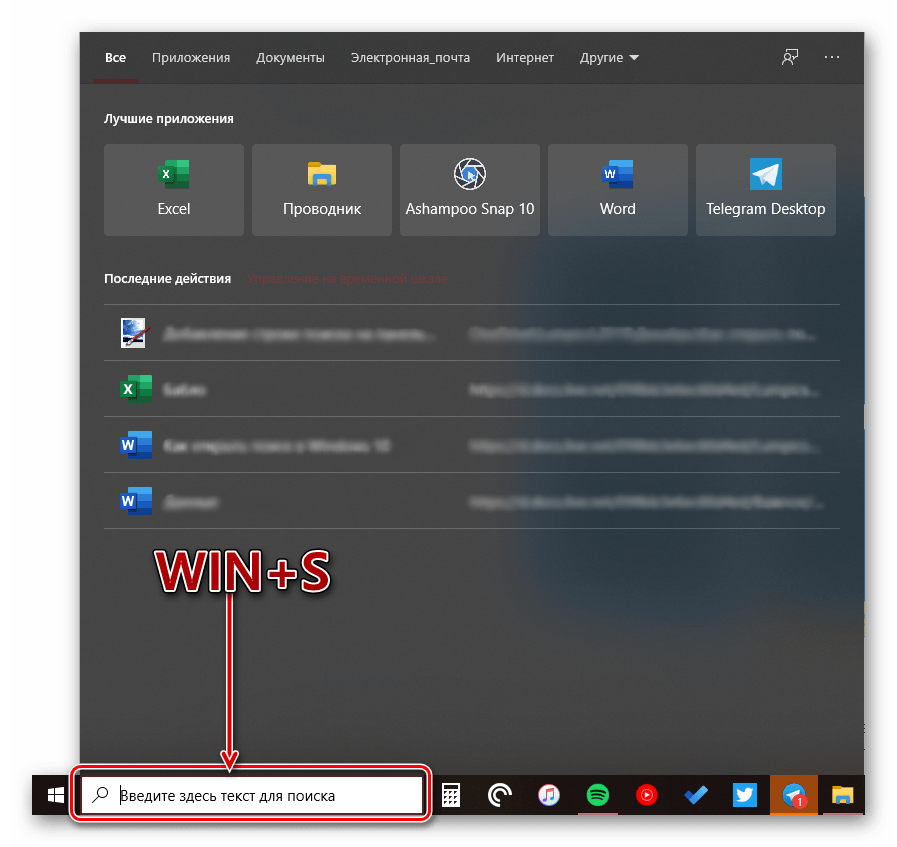
Если же вы не хотите постоянно перемещать указатель курсора в левый нижний угол экрана (или любой другой, смотря где располагается панель задач), можно воспользоваться горячими клавишами – нажатие «WIN+S» мгновенно активирует функцию.
Читайте также: Горячие клавиши в Виндовс 10
Вариант 2: Поиск в системных приложениях
Встроенный в Windows 10 поиск доступен не только на панели задач, но и в других разделах этой операционной системы, например, в «Проводнике», «Панели управления», «Параметрах». В первых двух случаях он выглядит одинаково и работает по тому же принципу, только ищет уже в непосредственном месте обращения (конкретной директории или оснастке). В третьем же с помощью рассматриваемой функции можно быстро перейти к интересующему разделу настроек.
Примечание: В «Параметрах» ОС Windows имеется возможность более тонкой настройки функции поиска — для этого предусмотрен отдельный раздел с недвусмысленным названием.
Для того чтобы воспользоваться поиском, необходимо просто кликнуть по обозначенной на каждом из изображений выше строке и начать вводить свой запрос. Имеется также сочетание клавиш для более быстрого обращения – «CTRL+F». К слову, последнее работает не только в стандартных для Виндовс приложениях, но и в ряде других программ (браузеры, компоненты офисных пакетов, мессенджеры и т.д.).

Использование функции поиска
Интегрированный в операционную систему поиск работает довольно хорошо, и с его помощью можно находить не только файлы, документы и папки, но и приложения (как стандартные, так и сторонние), письма в электронной почте, информацию в интернете и многие другие данные. На нашем сайте есть отдельные статьи, в которых рассмотрены особенности работы и использования данной функции, предлагаем с ними ознакомиться.
Подробнее:
Поиск файлов на компьютере с Виндовс 10
Поиск файлов по содержимому в Виндовс 10
Заключение
Теперь вы знаете обо всех способах запуска поиска в Windows 10, потенциальных местах его применения и том, что делать, если в работе данной функции возникают проблемы.
В данной статье показаны действия, с помощью которых можно отключить или включить индексирование поиска (службу поиска Windows Search) в операционной системе Windows.
По умолчанию Windows использует индекс при поиске, чтобы ускорить результаты поиска. Индекс поиска выполняет индексирование контента, кэширование свойств и результатов поиска для файлов, электронной почты и другого контента.
Индекс использует службу поиска Windows Search и выполняется в фоновом режиме как процесс SearchIndexer.exe. Индекс автоматически перестраивается и обновляется при изменении, внесенных с момента последнего перестроения индекса, чтобы повысить точность результатов поиска.
Если вы предпочитаете выполнять поиск без использования индекса, можно полностью отключить индексирование поиска (службу поиска Windows Search). Если отключить индексацию поиска, то поиск займет немного больше времени, но результаты поиска всегда будут актуальными и точными.
- Чтобы отключить или включить индексирование поиска (службу поиска Windows Search), необходимо войти в систему с правами администратора
- Если отключить индексирование поиска, пользователи больше не смогут выполнять поиск в библиотеках.
- Функция Временная шкала (Timeline) требует, чтобы служба поиска Windows была включена, запущена и настроена на автоматический (отложенный запуск).
Содержание
- Как отключить индексирование
- Включение индексирования поиска
- Управление через командную строку
Как отключить индексирование
Чтобы отключить индексирование поиска (службу поиска Windows Search), откройте консоль «Службы», для этого нажмите сочетание клавиш ![]() + R, в открывшемся окне Выполнить введите services.msc и нажмите клавишу Enter↵.
+ R, в открывшемся окне Выполнить введите services.msc и нажмите клавишу Enter↵.

В окне Службы дважды щёлкните левой кнопкой мыши службу Windows Search.

В открывшемся окне Свойства: Windows Search (локальный компьютер) остановите службу нажав кнопку Остановить.

Затем в выпадающем списке Тип запуска: выберите пункт Отключена и нажмите кнопку OK.

Включение индексирования поиска
Чтобы включить индексирование поиска (службу поиска Windows Search), откройте консоль «Службы», для этого нажмите сочетание клавиш ![]() + R, в открывшемся окне Выполнить введите services.msc и нажмите клавишу Enter↵.
+ R, в открывшемся окне Выполнить введите services.msc и нажмите клавишу Enter↵.

В окне Службы дважды щёлкните левой кнопкой мыши службу Windows Search.

В открывшемся окне Свойства: Windows Search (локальный компьютер) в выпадающем списке Тип запуска: выберите пункт Автоматически (отложенный запуск) и нажмите кнопку Применить.

Затем запустите службу нажав кнопку Запустить.

Управление через командную строку
Также отключить или включить индексирование поиска (службу поиска Windows Search) можно используя командную строку.
Чтобы отключить индексирование поиска (службу поиска Windows Search), запустите командную строку от имени администратора и выполните следующую команду:
sc stop «wsearch» && sc config «wsearch» start=disabled

Чтобы включить индексирование поиска (службу поиска Windows Search), запустите командную строку от имени администратора и выполните следующую команду:
sc config «wsearch» start=delayed-auto && sc start «wsearch»

В операционной системе Windows 10 предусмотрена очень удобная функция поиска, которую можно вызвать через панель задач или же из меню «Пуск». Но далеко не всем пользователям очевидно, как она работает. А в некоторых случаях на компьютере попросту отсутствует соответствующий элемент, или при обращении к нему ничего не происходит. В рамках данной статьи мы объясним, как можно открыть поиск в Windows 10 и как исправить проблемы с его использованием.
Содержание
- Как включить поиск в Windows 10
- 2 способа как открыть поисковую строку в Windows 10
- Способ 1: Открыть поиск через значок на панели задач
- Способ 2: Открыть поиск в проводнике
- Что делать, если не работает поиск в Пуске Windows 10
- Решение 1: Перезапустить службу поиска
- Решение 2: Сканировать диск на ошибки
- Решение 3: Правки в редакторе реестра
- Видео – другие способы восстановить поиск в Windows 10
Как включить поиск в Windows 10
По умолчанию данная функция вызывается с помощью элемента на панели задач, расположенного рядом с кнопкой «Пуск». Выглядит он следующим образом:
Вместо нее также может быть целая строка поиска, работающая аналогичным образом. Достаточно кликнуть по соответствующему элементу, ввести текстовый запрос и ознакомиться с кратким списком результатов.
Но как поступить, если он попросту отсутствует? Его можно без каких-либо проблем добавить своими силами. Для этого:
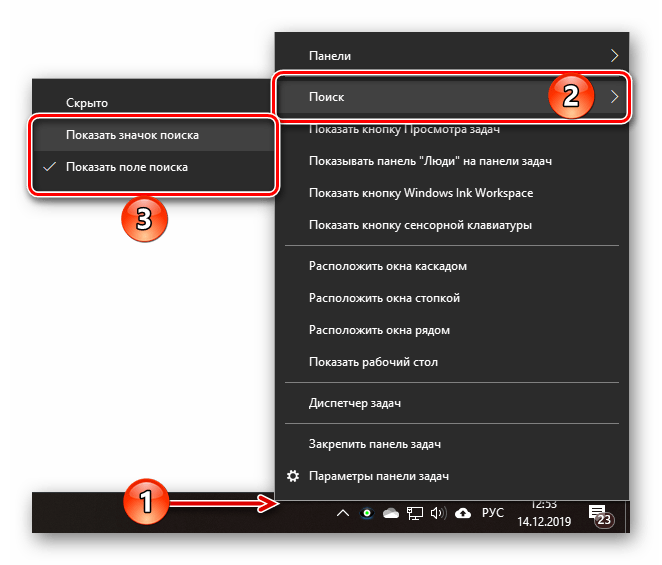
- Наведите курсор мыши по пустому месту на панели задач Windows. Это нижняя полоска экрана, где находится меню «Пуск» и список запущенных программ.
- Кликните правой клавишей мыши (ПКМ) по этому месту.
- В отобразившемся контекстном меню переведите курсор на пункт «Поиск».
- Активируйте один из режимов: «Показать значок поиска» (компактный) или «Показать поле поиска» (развернутый).


Мы разобрались с добавлением иконки поиска в Windows 10 для панели задач. Теперь перейдем к важным нюансам использования данной функции.
2 способа как открыть поисковую строку в Windows 10
Вызвать поиск в Виндовс 10 можно несколькими способами. Удобнее всего это делается через иконку на панели задач, о которой мы рассказывали в начале статьи, и через специальную область в окне проводника и других системных программах и приложениях. Остановимся на каждом из способов более детально.
Способ 1: Открыть поиск через значок на панели задач
В начале статьи мы упоминали о специальной иконке, необходимой для вызова данной функции.
Она располагается прямо рядом с кнопкой «Пуск», в левом нижнем углу экрана. А если ее там нет, то для добавления следует воспользоваться контекстным меню, действуя по предложенной ранее инструкции.
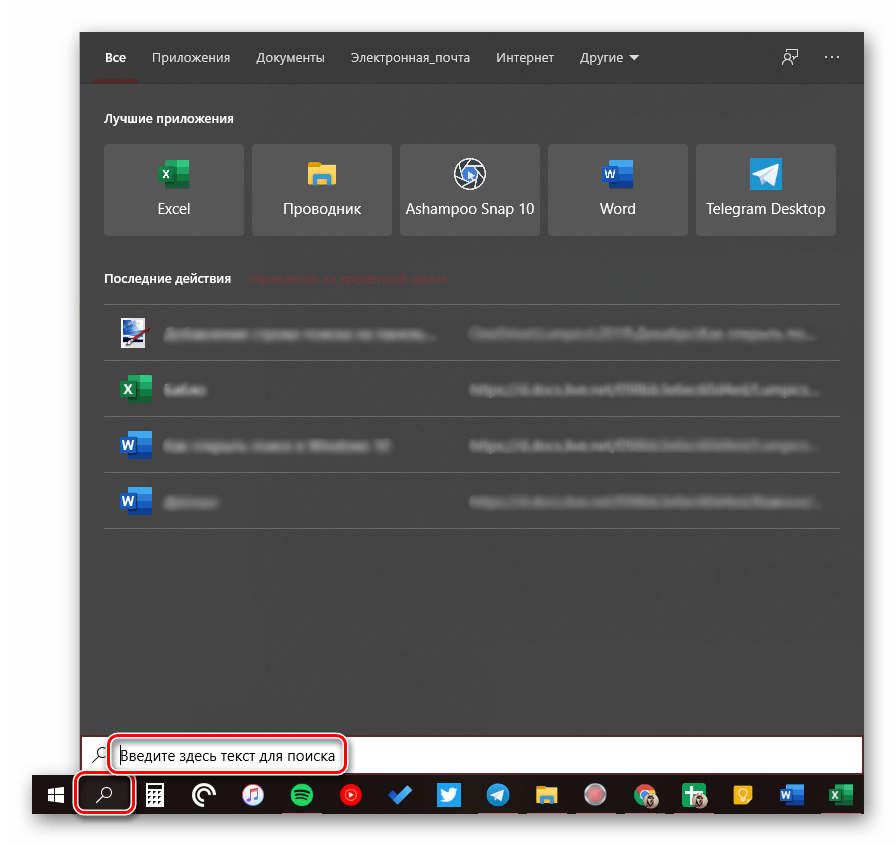
Стоит также отметить, что можно запустить поиск в меню «Пуск». Для этого откройте его любым удобным образом, и не нажимая никаких кнопок, сразу же начните вводить на клавиатуре запрос. Текстовое поле отобразится автоматически. Это еще один удобный вариант.
Отдельно хотелось бы упомянуть горячие клавиши, предназначенные для вызова данной функции. По умолчанию в операционной системе используется комбинация Win + Q, которая работает в окне практически любой программы. Также актуальна комбинация Win + S, выполняющая аналогичное действие.
Способ 2: Открыть поиск в проводнике
В системных программах по типу проводника всегда есть отдельная область, отвечающая за вызов поисковой процедуры. Выглядит она следующим образом:
Что делать, если не работает поиск в Пуске Windows 10
Довольно неприятная ситуация, когда функция поиска попросту не открывается или по каким-либо причинам отказывается работать. Зачастую неполадки связаны с тремя причинами:
- Сбой соответствующей службы в системе.
- Наличие ошибок на диске.
- Неправильные записи в реестре.
В каждой из ситуаций есть свое решение для настройки и восстановления работоспособности поиска Windows. Пройдемся по всем пунктам по отдельности. Начните с первого решения. А если оно не помогло, то двигайтесь к следующему.
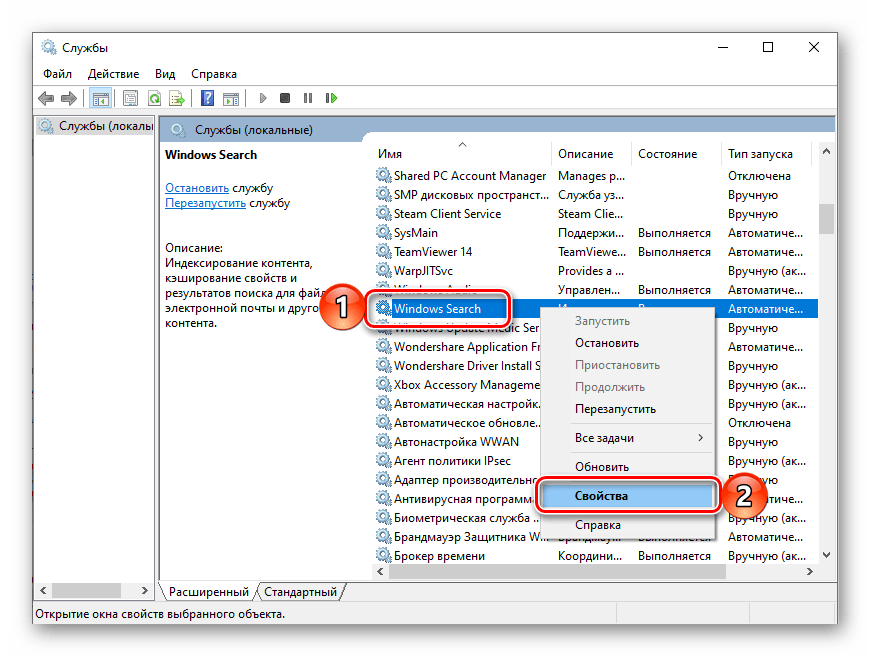
Решение 1: Перезапустить службу поиска
Зачастую проблема связана с тем, что специальная служба системы перестала корректно работать. А значит, ее следует вручную перезапустить. Делается это следующим образом:
- Нажмите Win + R на клавиатуре и в новом окне выполните команду services.msc.

- Пользуясь сортировкой по алфавиту, наведите курсор мыши на графу Windows Search.
- Раскройте контекстное меню, кликнув по ней правой кнопкой.
- В появившемся списке выберите пункт «Перезапустить».

- Снова кликните ПКМ по этой графе и выберите «Свойства».
- В пункте «Тип запуска» установите вариант «Автоматически».
- Поочередно нажмите на кнопки «Применить» и «ОК».


Остается только перезагрузить компьютер или ноутбук, чтобы восстановить работоспособность службы поиска.
Решение 2: Сканировать диск на ошибки
Если предыдущее решение не дало нужного результата, то имеет смысл провести сканирование диска на наличие ошибок. Делается это из командной строки:
- Откройте окно проводника и в адресную строку вставьте C:\Windows\system32.
- Нажмите Enter для быстрого перехода к этому каталогу.

- Найдите в нем файл cmd.exe и кликните по нему ПКМ.
- В контекстном меню активируйте функцию для открытия с правами админа.

- Скопируйте команду sfc /scannow.
- Кликните ПКМ по окну командной строки для вставки.
- А с помощью кнопки Enter запустите ее.

- Дождитесь окончания проверки и перезапустите ПК.


Решение 3: Правки в редакторе реестра
Если все равно в Windows 10 не работает поиск, то имеет смысл обратиться к редактору реестра и внести изменения в один параметр. Для этого:
- Нажмите Win + R и выполните команду regedit.

- Кликните по стрелочке рядом с каталогом HKEY_LOCAL_MACHINE, чтобы просмотреть его содержимое.

- Таким же образом пройдите по пути SOFTWARE–Microsoft и откройте каталог Windows Search.
- Кликните ПКМ по параметру поиска SetupCompletedSuccesfuly и выберите «Изменить…» в контекстном меню.
- Установите для него значение 1, если стоит 0, и нажмите «ОК».

- Теперь кликните ПКМ по графе FileChangeClientConfigs и выберите пункт «Переименовать».

- Введите для него новое имя FileChangeClientConfigsBak и нажмите Enter.
- Перезагрузите компьютер.


Это очень действенный способ, как восстановить работоспособность поиска для Windows 10.