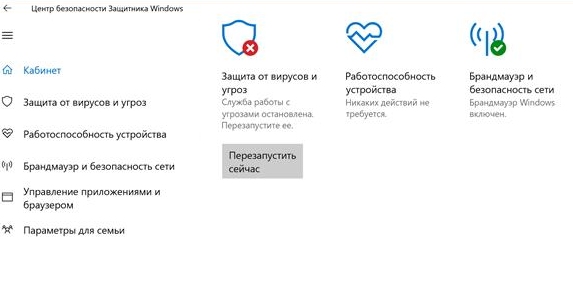
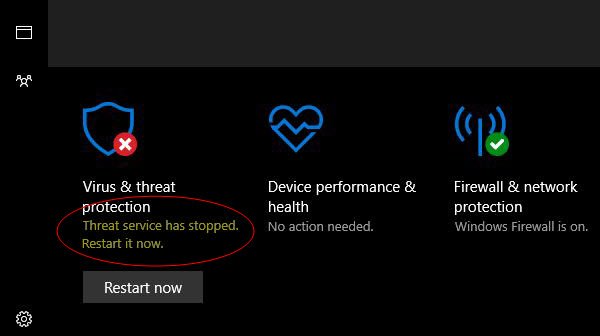
Привет, админ! Пытаюсь в Windows 10 включить Windows Defender, но в Центре безопасности Защитника Windows у компонента Зашита от вирусов и угроз висит надпись: «Служба работы с угрозами остановлена. Перезапустите ее». При попытке перезапустить Защитника Windows с помощью соответствующей кнопки появляется надпись: “
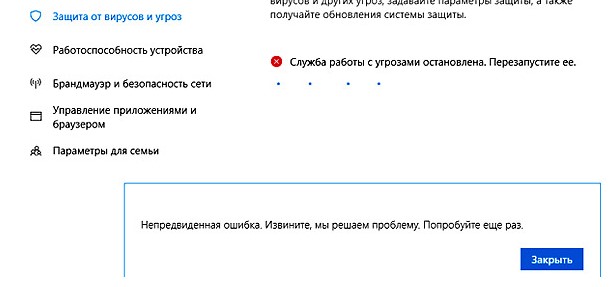
Непредвиденная ошибка. Извините, мы решаем проблему. Попробуйте еще раз
”. Как мне починить Windows Defender? Заранее спасибо!
Ответ
Давайте разберем типовые причины, из-за которых в Windows 10 может не работать функция зашиты от вирусов и угроз (встроенный антивирус Windows Defender). Последовательно проверьте все пункты.
Обратите внимание, что начиная с билда Windows 10 2004, Windows Defender Antivirus был переименован в Microsoft Defender Antivirus.
Содержание:
- На компьютере установлен сторонний антивирус
- Проверьте и включите службы Защитника Windows
- Включение Защитника Windows 10 в реестре
- Проверьте, что Защитник Windows включен в групповых политиках
- Перерегистрация библиотек Microsoft Defender
- Проверьте и установите обновления Windows
На компьютере установлен сторонний антивирус
Проверьте, возможно у вас на компьютере установлен сторонний антивирус, который препятствует работе Microsoft Defender. Антивирус Microsoft Defender автоматически отключается, если на компьютере установлена сторонняя антивирусной программа.
Решите, какой антивирус вы хотите использовать – сторонний или Microsoft Defender.
Если сторонний антивирус вам не нужен, отключите или удалите его.
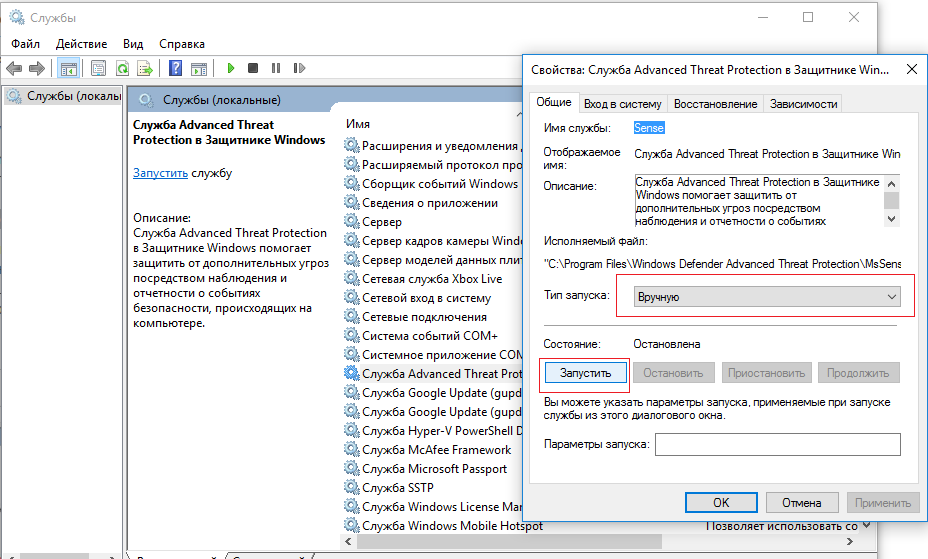
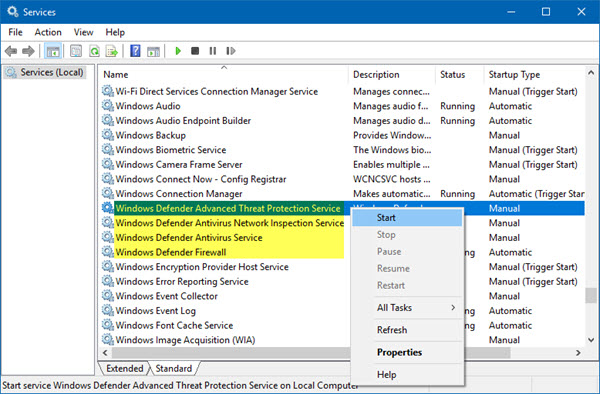
Проверьте и включите службы Защитника Windows
Для корректной работы Microsoft Defender в Windows 10 нужно проверить нескольких служб. Откройте консоль управления службами (services.msc) и проверьте, есть ли в списке служб следующие элементы:
- Служба Advanced Threat Protection в Защитнике Windows (Windows Defender Advanced Threat Protection Service) —
Sense
; - Служба проверки сети Защитника Windows (Microsoft Defender Antivirus Network Inspection Service) —
WdNisSvc
; - Служба Защитника Windows (Microsoft Defender Antivirus Service)
WinDefend
; - Служба Центра безопасности Защитника Windows (Security Center) —
WSCSVC
(Windows Security Center).
Состояние служб можно проверить с помощью PowerShell:
get-service Sense, WdNisSvc, WinDefend, wscsvc | select name,status,starttype

Для служб Sense и WdNisSvc тип запуска должен быть Manual.
Службы Security Center (WinDefend) и Microsoft Defender Antivirus (wscsvc) должны быть обязательно запущены. Если эти службы отключены, вы не сможете использовать Microsoft Defender.
Проверьте, что тип запуска у служб – Автоматический. Если какая-то служба остановлена, запустите ее вручную. Если все службы запущены, перезапустите их.
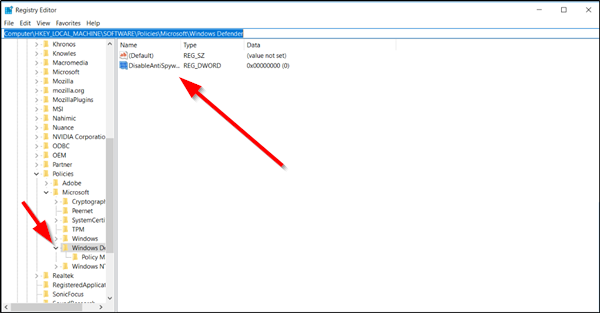
Включение Защитника Windows 10 в реестре
В версиях Windows 10 до билда 2004 можно было отключить защитник Windows через реестр. Для этого использовался параметр реестра DisableAntiSpyware. Этот параметр обычно включался OEM производителями или системными администраторами, когда на устройстве предполагалось использовать стороннее антивирусное приложение.
Запустите редактор реестра (regedit.exe) и перейдите в ветку HKEY_LOCAL_MACHINE\SOFTWARE\Policies\Microsoft\Windows Defender. Если в этой ветке есть параметры DisableAntiVirus и DisableAntiSpyware (хотя бы один), удалите их или измените значение на 0.

После этого, попробуйте перезапустить службу Защита от вирусов и угроз.
Затем перейдите в Settings -> Windows Security и нажмите на кнопку Virus & threat protection -> Turn on.

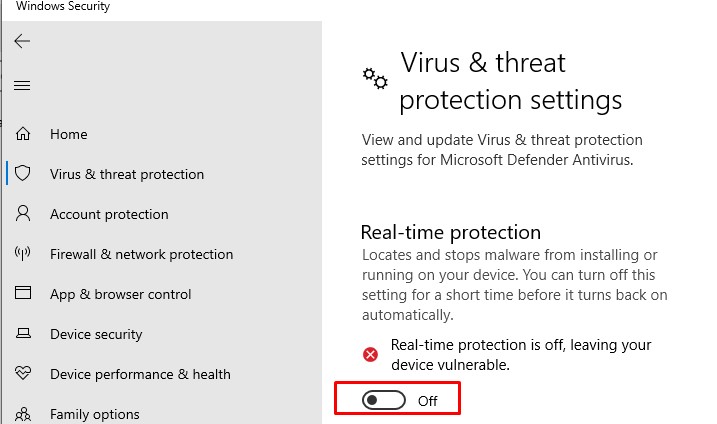
Также проверьте, что включена опция Real-time protection в Windows Security -> Virus & threat protection -> Manage settings.
В современных билдах Windows 10 нельзя отключить Microsoft Defender через параметр реестра
DisableAntiSpyware
(этой лазейкой пользовались многие вредоносы).
Microsoft Defender теперь автоматически отключается Windows 10, если он обнаруживает на компьютере сторонний антивирус. Если у вас не установлен сторонний антивирус и вам нужно отключить Microsoft Defender, сначала вам нужно отключить функцию защиты Microsoft Defender Tamper Protection. Данная защита от изменений в системе безопасности Windows помогает предотвратить изменение вредоносными приложениями важных параметров антивируса Microsoft Defender, включая защиту в реальном времени и облачную защиту. Отключить Tamper Protection можно только через приложение Windows Security, и для подтверждения отключения появится запрос User Account Control (UAC).
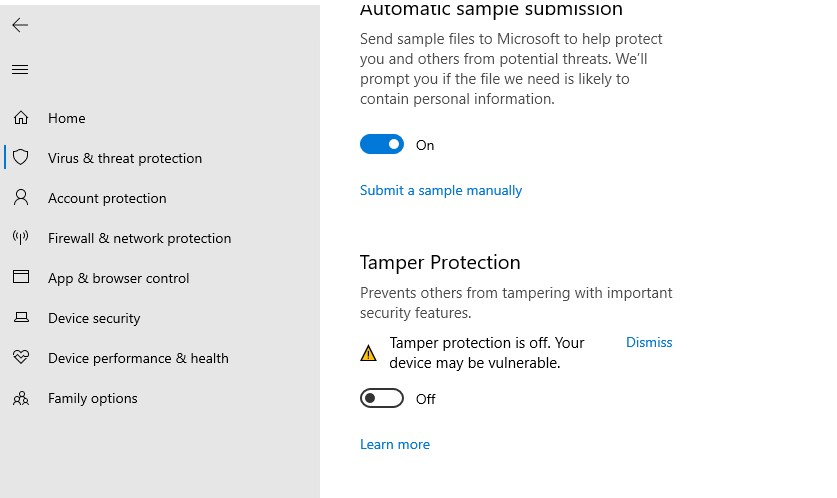
Отключить Tamper Protection можно и через реестр. Для этого в ветке HKEY_LOCAL_MACHINE\SOFTWARE\Microsoft\Windows Defender\Features нужно создать параметр типа DWORD с именем TamperProtection и со значением 0. Но перед этим сначала придется предоставить своей учетной записи права владельца на ветку Features.
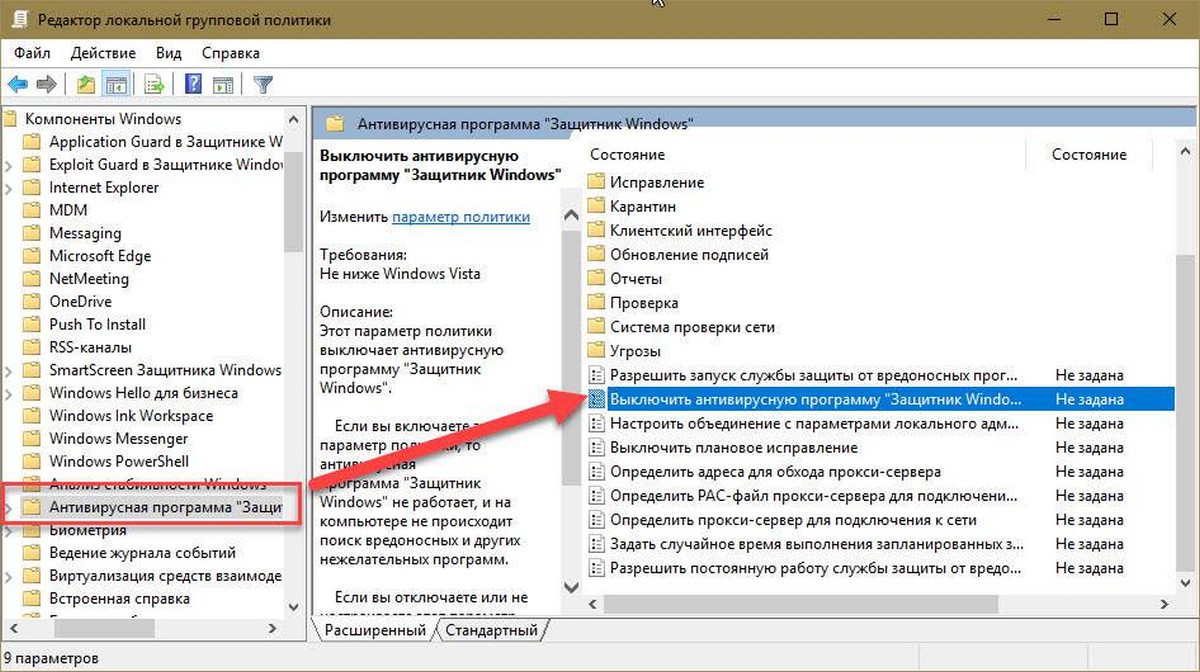
Проверьте, что Защитник Windows включен в групповых политиках
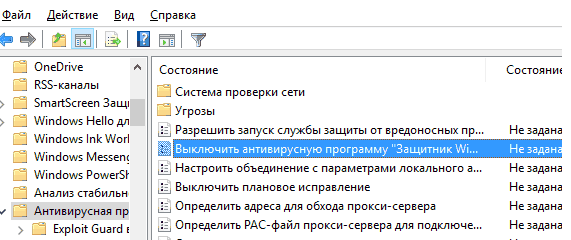
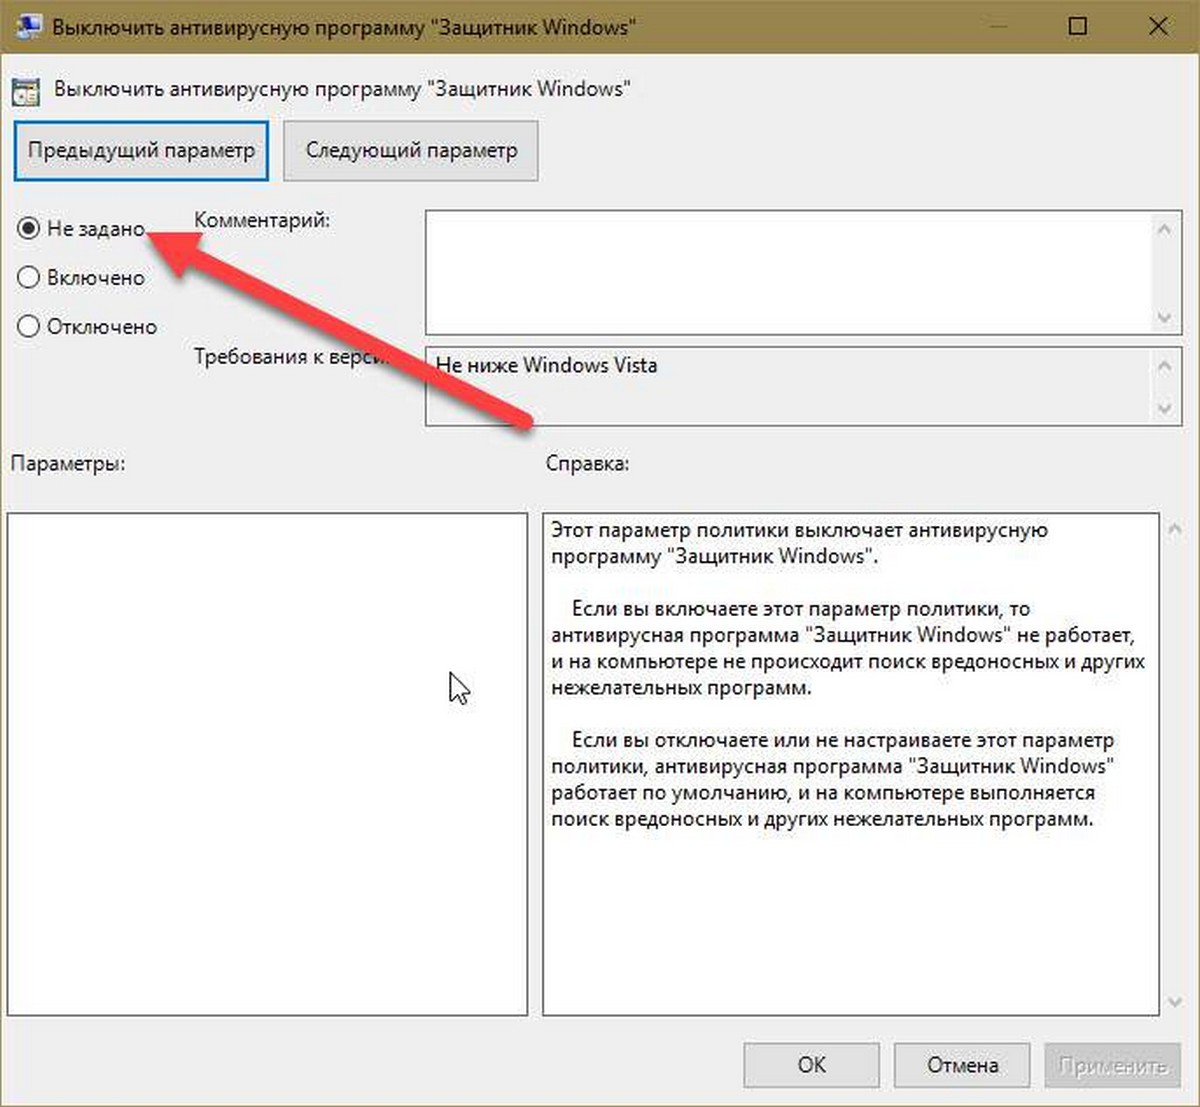
Откройте редактор локальной групповой политики (gpedit.msc) и проверьте, не отключен ли Windows Defender через GPO. Для этого, перейдите в раздел Computer Configuration -> Administrator Templates -> Windows Components -> Windows Defender Antivirus (Конфигурация компьютера -> Административные Шаблоны -> Компоненты Windows -> Антивирусная программа Защитник Windows). Проверьте, что политика Выключить антивирусную программу Защитник Windows (Turn off Windows Defender Antivirus) находится в состоянии Не задано или Отключена.
В Windows 10 2004 и выше ветка GPO с настройками Defender называется Microsoft Defender Antivirus.
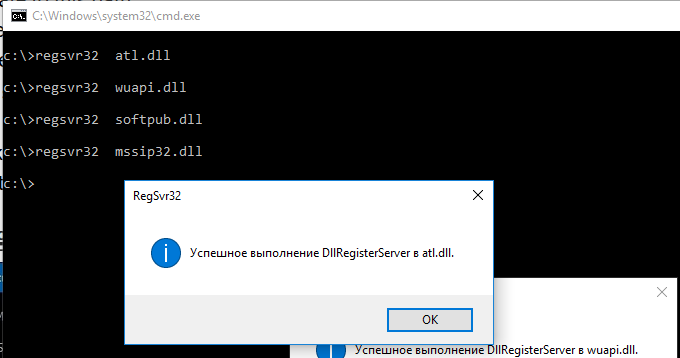
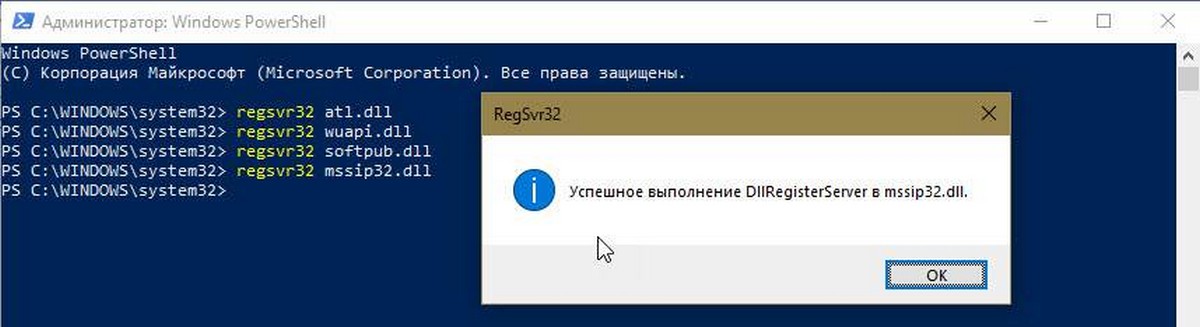
Перерегистрация библиотек Microsoft Defender
Попробуйте выполнить перерегистрацию библиотек Защитника Windows. Для этого, откройте командную строку с правами администратора и выполните команды
regsvr32  atl.dll
regsvr32  wuapi.dll
regsvr32  softpub.dll
regsvr32  mssip32.dll
Перезапустите Windows Defender и проверьте, исправлена ли проблема.
Проверьте и установите обновления Windows
В редких случаях после установки ежемесячных обновлений Windows может перестать антивирус защитника Windows 10. Проверьте наличие новых обновлений и установите их через Settings -> Update & Security -> Windows Update -> Check for updates или с помощью PowerShell. Скорее всего, они исправят ситуацию.
Если ничего не помогло, проверьте целостность системных файлов и образа Windows командами:
sfc /scannow
и
DISM /Online /Cleanup-Image /RestoreHealth
Надеюсь, эта краткая инструкция помогла вам решить проблему с невозможностью запуска (остановкой) службы работы с угрозами.
Download Windows Speedup Tool to fix errors and make PC run faster
Sometimes, when trying to run Windows Defender, you may see this message The Threat Service has stopped, Restart it now. If you click on the Restart now button, and the Service starts, and the message disappears, well and good! But if it does not and you instead see a message Unexpected error, Sorry, we ran into a problem displayed, then here’s what you can try to fix the issue on your Windows 11/10.
If Windows Defender Threat Service has stopped working, follow these suggestions to fix the issue on Windows 11/10.
1] Ensure that Windows Defender Services are started
The Windows Defender Advanced Threat Protection service helps protect against advanced threats by monitoring and reporting security events that happen on the computer. You need to ensure that this and other required Services are set to their default values and started.
Open Windows Services Manager and locate the following Services and ensure that their Startup type is set to their default values:
- Windows Defender Advanced Threat Protection Service – Manual
- Windows Defender Antivirus Network Inspection Service – Manual
- Windows Defender Antivirus Service – Manual
- Windows Defender Firewall Service – Automatic.
You may right-click on each of them and select Start to start the Service.
To change the Staup types, you have to double-click on the Services and select the correct option from the drop-down menu of Startup type, in its Properties box.
When found, double-click on each of the services and set up their Startup type to Automatic and click on the Start if the services are not already running.
Click on the Apply and then OK and see if this has helped.
2] Edit the Registry
If the above method did not help, try this.
Run regedit to open the Registry Editor and go to the following path –
HKLM\Software\Policies\Microsoft\Windows Defender
If the DisableAntiVirus and DisableAntiSpyware DWORDs are present in the right pane, change the value to 0.
If they are not present, then create the two DWORDs and give them a value of 0 each. To do this, in the right pane, right-click on an empty spot, select New > DWORD, name them as mentioned above. Then double-click on them and give them each a value of 0.
3] Check if the required services are missing
Open Registry and check navigate to the following locations to determine if either of the Services is actually missing in your OS:
HKey_Local_Machine\System\CurrentControlSet\Services
- For Security Center, scroll down to SecurityHealthService
- For Windows Defender Antivirus Service scroll down to WinDefend
If either is missing in your Registry, you need to repair Windows using installation media.
Is it OK to stop Windows Defender?
Windows Defender is a free antivirus from Microsoft that comes pre-installed on Windows computers. It protects your system from threats. You can also run an antivirus scan manually using Windows Defender. Sometimes, antivirus software conflicts with other applications or blocks the installation of new software on your system. In such cases, you can disable Windows Defender temporarily. But it is not recommended to permanently disable Windows Defender.
How long does Windows Defender take to remove threats?
Windows Defender offers different types of scans, like Quick Scan, Custom Scan, Full Scan, etc. When you run a Quick Scan, it scans all the installed programs and the locations where viruses and malware are most likely to be hidden. Hence, Quick Scan is completed in a short time. But if you run Full Scan, Windows Defender will scan your entire system. This scan will take a lot of time depending on the number of files stored on your system.
This should help!
Anand Khanse is the Admin of TheWindowsClub.com, a 10-year Microsoft MVP (2006-16) & a Windows Insider MVP (2016-2022). Please read the entire post & the comments first, create a System Restore Point before making any changes to your system & be careful about any 3rd-party offers while installing freeware.
Если вы используете Windows 10/8/7, и вы недавно получили сообщение об ошибке при запуске Защитника Windows — служба этой программы остановлена, вам необходимо как можно скорее решить эту проблему, так как ваш компьютер находится в уязвимом состоянии. Полное сообщение:
Защитник Windows:
Служба этой программы остановлена. Вы можете запустить сервис вручную или перезагрузить компьютер, чтобы выполнить запуск автоматически. (Код ошибки: 0x800106ba)
Если вы используете более старую версию Windows, вы можете увидеть другую формулировку, но проблема та же.
Эта программа отключена. Если вы используете другую программу, которая проверяет наличие вредоносного или нежелательного программного обеспечения, используйте Центр действий, чтобы проверить статус этой программы.
Вам может быть предложено включить Защитник. Однако в большинстве случаев проблема сохраняется даже после включения Защитника Windows вручную или перезапуска компьютера.
Служба этой программы остановлена, Код ошибки 0x800106ba
Вы можете попробовать эти рекомендации по поиску и устранению неисправностей:
Отключите сторонние антивирусные программы
Эта проблема возникает, главным образом, при установке на компьютер другого антивирусного программного обеспечения. Хотя Защитник Windows должен останавливается после получения сигнала от других антивирусных программ, иногда эта проблема может возникнуть из-за некоторой внутренней ошибки. В этом случае вы должны отключить стороннее приложение и проверить, сохраняется или нет эта проблема. Если проблема решена, вам может потребоваться переустановить стороннее антивирусное ПО.
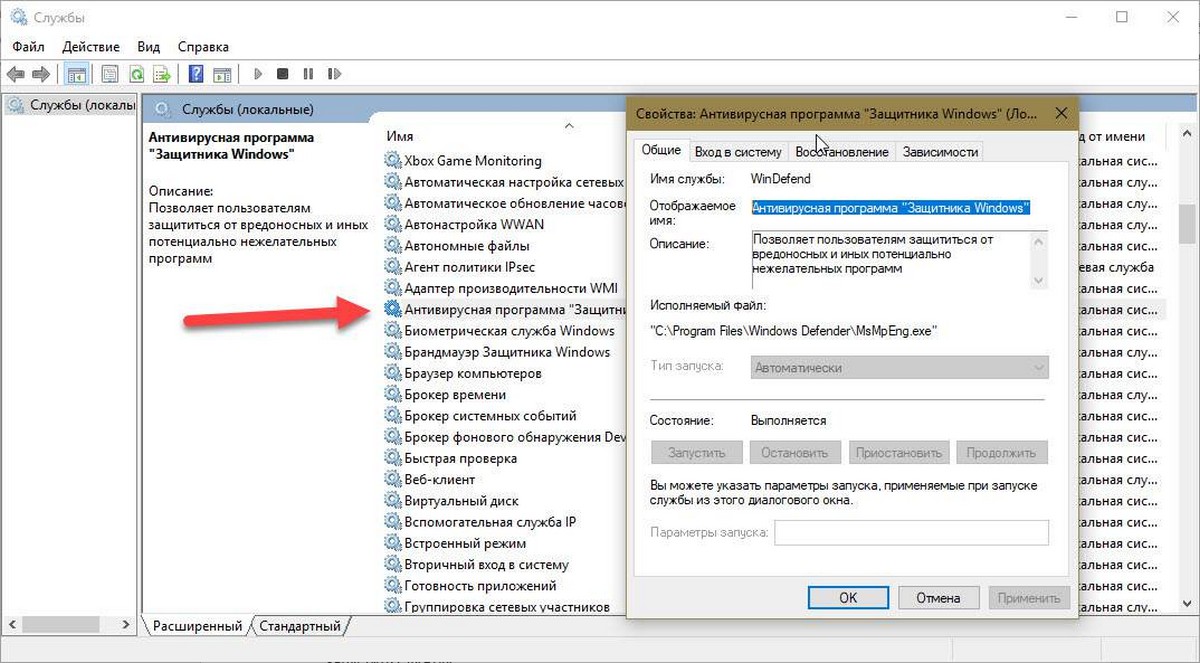
Включите службу Windows Defender
Согласно сообщению об ошибке, служба Защитника Windows была остановлена. Поэтому вам нужно включить ее с помощью диспетчера служб Windows. Для этого введите «services.msc» в поле поиска панели задач или в строку команды «Выполнить» и нажмите Enter, чтобы открыть его.
Теперь посмотрите статус следующих служб:
- Служба Advanced Threat Protection в Защитнике Windows
- Служба проверки сети Windows Defender Antivirus
- Антивирусная программа «Защитника Windows»
- Служба Центра безопасности Защитника Windows
Проверьте и при необходимости исправьте, «Тип запуска» для всех этих служб должен быть установлен как «Автоматически», и она должна Выполнятся. Если это не так, вам нужно включить эту службу. Для этого дважды кликните соответствующую службу и выберите «Автоматически» в качестве типа запуска. Затем нажмите кнопку «Запустить» в разделе «Состояние». Наконец, нажмите «Применить».
Перерегистрируйте DLL-файлы Защитника Windows
Иногда повторная регистрация соответствующих DLL-файлов может помочь решить эту проблему. Чтобы начать работу, откройте PowerShell с правами администратора и выполните следующие команды одну за другой:
regsvr32 atl.dll
regsvr32 wuapi.dll
regsvr32 softpub.dll
regsvr32 mssip32.dll
После этого откройте Защитник Windows и проверьте, устранена проблема или нет.
Проверьте параметры редактора групповых политик.
Убедитесь, что вы ошибочно не отключили Защитник Windows с помощью редактора групповой политики. Некоторые вредоносные программы также могут изменить эту функцию безопасности. Чтобы убедиться в этом, введите gpedit.msc в меню «поиск» и нажмите Enter, чтобы открыть редактор локальных групповых политик.
Затем перейдите по этому пути:
Конфигурация компьютера → Административные Шаблоны → Компоненты Windows → Антивирусная программа Защитник Windows
С правой стороны найдите опцию «Выключить антивирусную программу Защитник Windows». Дважды кликните на ней и проверьте, что установлен параметр «Не задано». Если для этого параметра установлено значение «Включено», вам необходимо изменить его на «Не задано».
Проверьте настройку редактора реестра
Если есть подозрение что какое-либо вредоносное ПО внесло изменения ключи реестра Защитника, вам необходимо, чтобы устранить эту проблему.
Откройте редактор реестра и перейдите к этому местоположению:
Компьютер\HKEY_LOCAL_MACHINE\SOFTWARE\Policies\Microsoft\Windows Defender
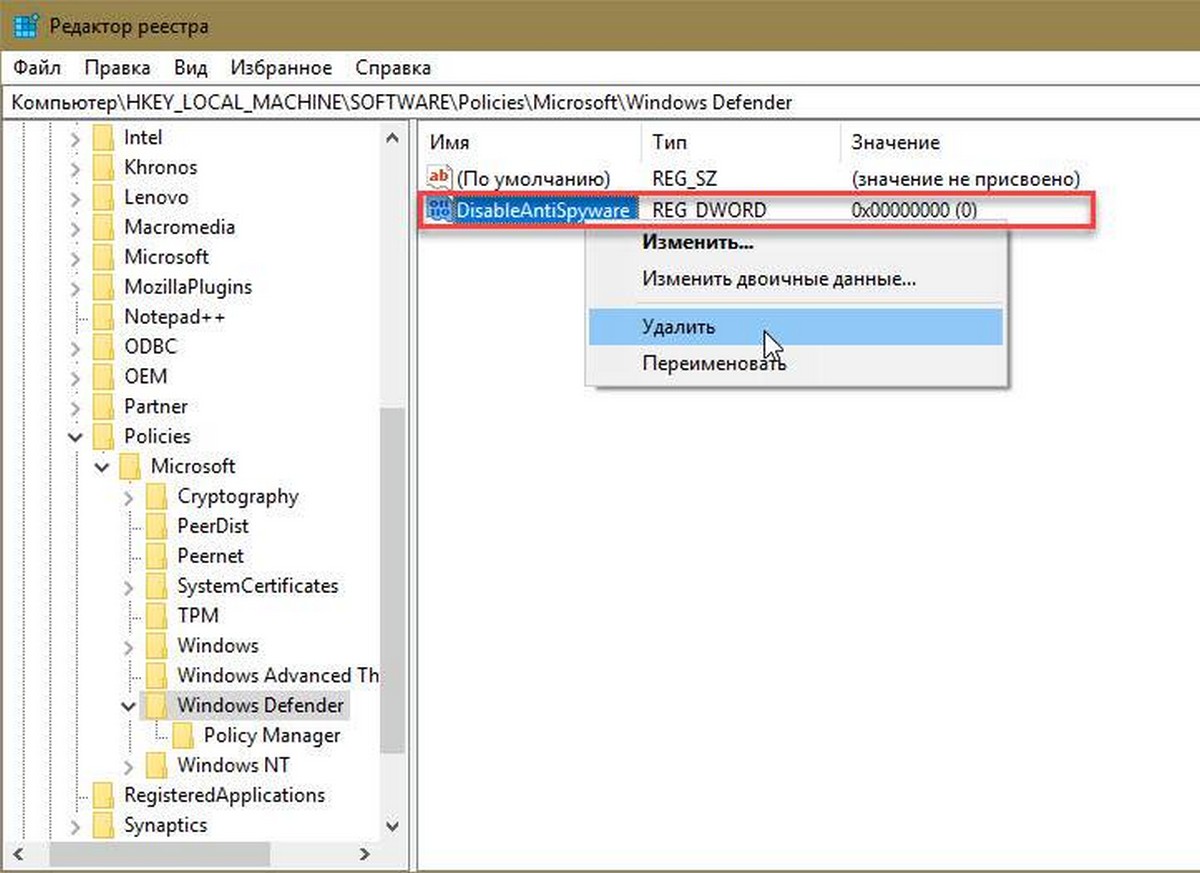
С правой стороны, посмотрите есть ли какой-либо параметр с именем DisableAntiSpyware. Вы можете удалить его, либо установить его значение равным 0 (ноль).
Надеюсь, что это поможет вам.
Рекомендуем:
Защитник Windows: Некоторыми параметрами управляет ваша организация.
Как отключить иконку Защитника Windows, в Windows 10?
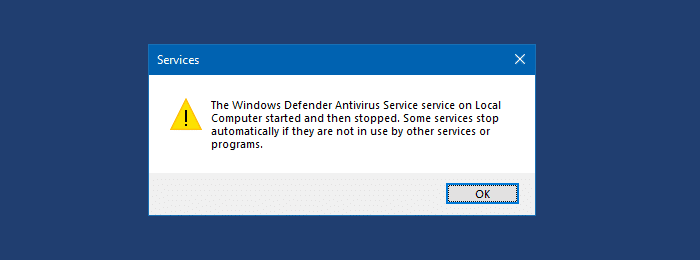
После установки 14-дневной пробной версии Malwarebytes Premium или лицензионного продукта ваше антивирусное программное обеспечение (например, Защитник Windows в Windows 8 или Windows 10) может автоматически отключиться. В этом случае при попытке запустить антивирусную службу Защитника Windows (WinDefend) через консоль служб, отображается следующая ошибка, и служба не запускается.if(typeof __ez_fad_position!=’undefined’){__ez_fad_position(‘div-gpt-ad-winhelponline_com-medrectangle-3-0′)};if(typeof __ez_fad_position!=’undefined’){__ez_fad_position(‘div-gpt-ad-winhelponline_com-box-3-0’)};Служба антивирусной службы Защитника Windows на локальном компьютере была запущена, а затем остановлена. Некоторые службы останавливаются автоматически, если они не используются другими службами или программами.
Результат точно такой же, когда вы пытаетесь запустить эти службы:
- Служба Advanced Threat Protection в Защитнике Windows
- Служба проверки антивирусной сети Защитника Windows
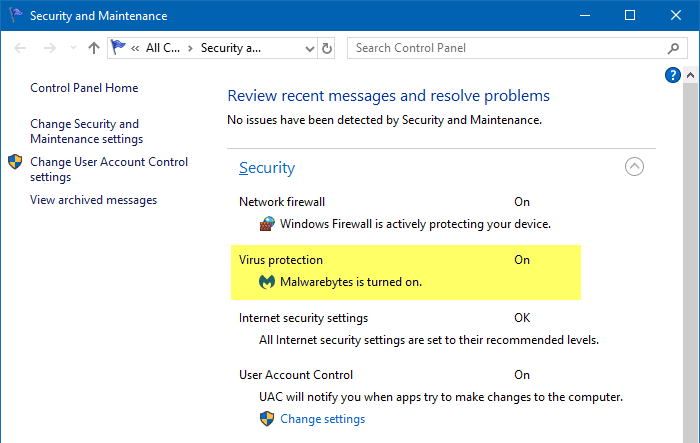
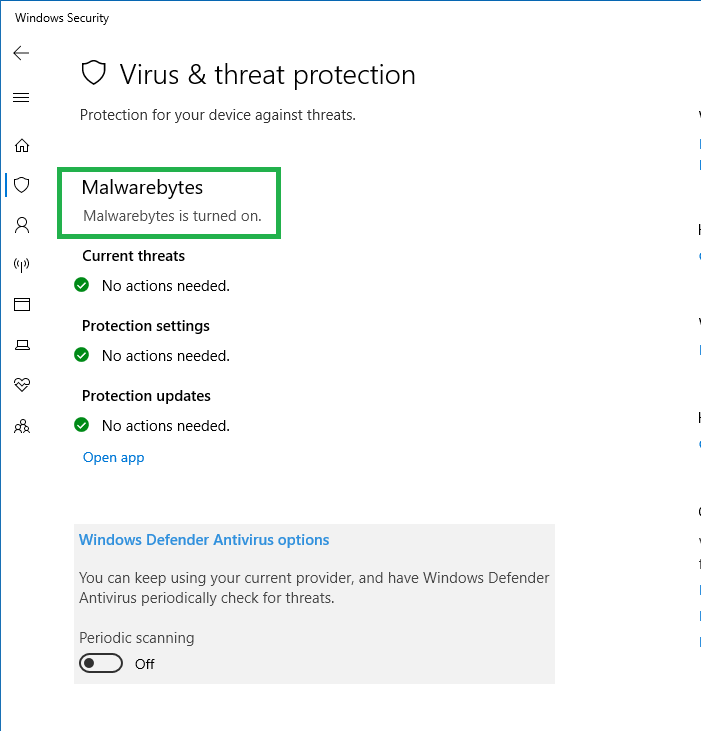
Апплет «Безопасность и обслуживание» в классической панели управления и в Центре безопасности Защитника Windows сообщит, что Malwarebytes в настоящее время является вашей «антивирусной» программой. Если Windows обнаруживает стороннее антивирусное ПО, она автоматически отключает встроенный антивирусный модуль Защитник Windows.
 if(typeof __ez_fad_position!=’undefined’){__ez_fad_position(‘div-gpt-ad-winhelponline_com-box-4-0’)};
if(typeof __ez_fad_position!=’undefined’){__ez_fad_position(‘div-gpt-ad-winhelponline_com-medrectangle-4-0’)};
Как вы можете видеть выше, все параметры защиты от вирусов и угроз отсутствуют, поскольку Windows предполагает, что установлено стороннее антивирусное решение. В этом случае вам предлагается использовать функцию ограниченного периодического сканирования. Если Защитник Windows не запущен, ни одна из его функций, таких как «блокировка с первого взгляда» (облачная защита), контролируемый доступ к папкам, работать не будет.
Хотя компания Malwarebytes заявляет в своей рекламе, что «Malwarebytes для Windows делает антивирус устаревшим», многие эксперты не согласны с этим утверждением.
Цитата Дэвида Х. Липмана, исследователя / аналитика вредоносных программ.
MBAM не является антивирусным приложением и не заменяет антивирусное приложение. MBAM — это дополнительное бесплатное приложение для защиты от вредоносных программ.
В своей роли дополнительного, дополнительного приложения для защиты от вредоносных программ он имеет ограничения в аспектах, которые антивирусное приложение выполняет в своей роли.
MBAM не предназначен для файлов сценариев. Это означает, что MBAM не будет нацеливаться; JS, JSE, PY, HTML, HTA, VBS, VBE, .CLASS, SWF, SQL, BAT, CMD, PDF, PHP, WSF и т. Д. Он также не нацелен на файлы документов, такие как; PDF, DOC, DOCx, DOCm, XLS, XLSx, PPT, PPS, ODF, RTF и т. Д. Он также не предназначен для файлов мультимедиа; MP3, WMV, JPG, GIF и т. Д.
Итак, Malwarebytes не заменяет антивирусный продукт. Тем не менее, вам необходимо включить / запустить антивирусный продукт вместе с Malwarebytes Anti-Malware для большей безопасности.СВЯЗАННЫЕ: Как отключить Защитник Windows одним щелчком мыши без перезагрузки
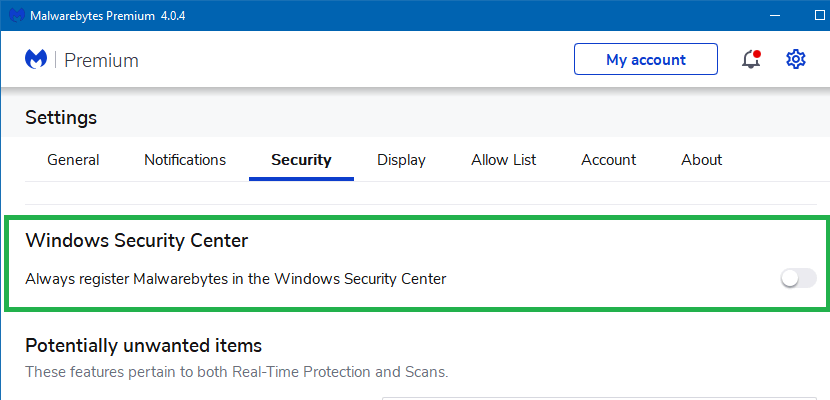
Остановить Malwarebytes от отключения Защитника Windows
Если установка Malwarebytes Premium отключает Защитник Windows или стороннее антивирусное программное обеспечение, вам необходимо изменить настройку в Malwarebytes. Следуй этим шагам:
- Откройте Malwarebytes и нажмите «Настройки».
- На вкладке «Безопасность» прокрутите вниз до раздела Центр обеспечения безопасности Windows.
- Отключите параметр Всегда регистрировать Malwarebytes в Центре безопасности Windows.
 Если у вас установлено другое антивирусное программное обеспечение, рекомендуется отключить параметр Malwarebytes «Всегда регистрировать Malwarebytes в Центре безопасности Windows». После этого Malwarebytes будет работать вместе с вашим сторонним антивирусом.
 Если у вас установлено другое антивирусное программное обеспечение, рекомендуется отключить параметр Malwarebytes «Всегда регистрировать Malwarebytes в Центре безопасности Windows». После этого Malwarebytes будет работать вместе с вашим сторонним антивирусом.
Примечание. Включение вышеуказанного параметра приводит к тому, что Malwarebytes регистрируется в качестве приложения безопасности в Центре действий Windows независимо от состояния (и существования) антивирусной программы.if(typeof __ez_fad_position!=’undefined’){__ez_fad_position(‘div-gpt-ad-winhelponline_com-banner-1-0’)};
There are times when you see a message in Windows Defender saying, “The Threat Services has stopped, Restart it now” when you try to use it. This kind of error is usually fixed by simply clicking on the Restart now button. However, if the error still appears even after you restart your computer and you see another message that says, “Unexpected error, Sorry, we ran into a problem”, then continue reading as this post will guide you in resolving this issue in Windows Defender.
Before you proceed with the given fixes below, you have to create a System Restore point first. This way, you can always undo any changes you’ve made in case something goes wrong.
Option 1 – Make sure that the Windows Defender Services are started
The Windows Defender Advanced Threat Protection service is the one that protects your computer from advanced threats by monitoring and reporting security events that happen on your computer. This is why you have to make sure that this, as well as other required services in Windows Defender, are set to their default values and are started. To do so, follow these steps:
- In the Cortana search box, type “services” and click on the Services icon to open the Services Manager. Alternatively, you can also tap the Win + R keys to launch the Run prompt and then type “services.msc” in the field and hit Enter to open the Services Manager
- After opening the Services Manager, look for the following services and make sure that their Startup type is set to their default values:
- Windows Defender Advanced Threat Protection Service – Manual
- Windows Defender Antivirus Network Inspection Service – Manual
- Windows Defender Antivirus Service – Manual
- Windows Defender Firewall Service – Automatic
- You can right-click on each one of the listed services and then select Start to start them.
- And if some of the services don’t have their default values, just double-click on the Services to change the Startup types and select the correct option from the drop-down menu of the Startup type under the Properties box.
- Next, set up the Startup type of these services to Automatic and then click on the Start button if the services are not running yet.
- Now click on the Apply and OK buttons to save the changes made and then see if it fixed the problem or not.
Option 2 – Try modifying some entries in the Windows Registry
If the first option didn’t work in fixing the problem, you can try to alter some entries in the Windows Registry using the Registry Editor.
- First, tap Win + R keys to open the Run dialog box.
- Then type “Regedit” in the field and hit Enter to open the Registry Editor.
- Next, navigate to this registry path: HKLMSoftwarePoliciesMicrosoftWindows Defender
- From there, look for the “DisabledAntivirus” and “DisableAntiSpyware” DWORDS from the right pane and change each one of their values to “0”. On the other hand, if you don’t see any of these DWORDS, you can create them instead and give each one of them a 0 value.
- To create a DWORD, simply right-click on any empty space and select New > DWORD. Then name them both as “DisabledAntivirus” and “DisableAntiSpyware”.
- Afterward, set the value of the newly-created DWORDS to 0.
- Now exit the Registry Editor and reboot your PC to apply the changes made and then check if it has fixed the error in Windows Defender or not.
Do You Need Help with Your Device?
Our Team of Experts May Help

Troubleshoot.Tech Experts are There for You!
GET HELP
Troubleshoot.Tech experts work with all versions of Microsoft Windows including Windows 11, with Android, Mac, and more.
Share this article:
You might also like
Having any kind of hardware malfunction is not a pleasant place to be. Even a minor malfunction like a broken key on a keyword can introduce certain bad feelings, frustration, and difficulty in working.
So, what are your options when the dreaded key on the keyboard breaks? From my point of view, there are three options that could be accomplished in order to continue working.
-
Replace broken keyboard with the new one
Yes, the best and most expensive solution, just bite the bullet and buy a new working one.
-
Replace key with another key
So you broke some key, if you can replace it with another key which you do not use, this option will work only tho if the broken key is not Space bar, enter or similar with specific shape and size.
-
Remap key
use Windows power tools to remap key function to another working key
There you go, three options to continue working with a broken key on the keyboard.
Read More
If a program tried and failed to use the Graphics rendering capabilities of a computer, Windows 10 will most likely throw a Blue Screen error that says, “ THREAD_STUCK_IN_DEVICE_DRIVER ”. 0x000000EA is the Stop code for this particular Blue Screen error and could be caused by a bad display driver or bad video card. Whatever the cause is, here are some suggestions you need to check out to resolve this Blue Screen error.
Option 1 – Try to rollback, update, or disable the Graphics card drivers
Since the THREAD_STUCK_IN_DEVICE_DRIVER Blue Screen error has something to do with Graphics card drivers, you can either roll back, update or disable them depending on your preference in order to resolve the error.
- First, boot your computer into Safe Mode.
- After that, tap the Win + R keys to launch Run.
- Type in devmgmt.msc into the box and tap Enter or click OK to open the Device Manager.
- After that, a list of device drivers will be displayed. From there, look for the Display Adapters and click on them.
- After that, right-click on each entry under the Display Adapters and select the “Uninstall Device” option from the menu.
- Now restart your computer.
- After restarting your computer, go to the Settings app and Check for Updates in the Windows Update section.
Note: You also have the option to go directly to the website of your graphics card manufacturers like NVIDIA, Intel, or AMD and go to the section called Drivers then check if there’s a new available update – if there is, download and install it.
Option 2 – Try removing hardware or drivers that you’ve installed recently
If you have recently installed some hardware or drivers, you might want to disable or remove them since external devices are proven to be one of the factors that trigger Blue Screen errors like THREAD_STUCK_IN_DEVICE_DRIVER. All you have to do is physically disconnect any external devices that are connected to your computer and then check if it fixes the BSOD error or not.
Option 3 – Run System File Checker at boot time
- Once you get to the Welcome Screen part, click on Next.
- Afterward, click on the Repair your computer option located on the bottom-left part of the window.
- Then click on Troubleshoot.
- Next, select the Advanced Options and then Command Prompt.
- After opening Command Prompt, type the “sfc /scannow” command and hit Enter to run the System File Checker scan.
- Wait until the process is completed and type “exit” to close Command Prompt and then restart your computer to successfully apply the changes made.
Option 4 – Try to run the Blue Screen Troubleshooter
As you know, the Blue Screen troubleshooter is a built-in tool in Windows 10 that helps users in fixing BSOD errors like the THREAD_STUCK_IN_DEVICE_DRIVER error. It can be found in the Settings Troubleshooters page. To use it, refer to these steps:
- Tap the Win + I keys to open the Settings panel.
- Then go to Update & Security > Troubleshoot.
- After that, look for the option called “Blue Screen” on your right-hand side and then click the “Run the troubleshooter” button to run the Blue Screen Troubleshooter and then follow the next on-screen options. Note that you might have to boot your PC into Safe Mode.
Option 5 – Try to manually check the Graphics Card hardware
You might also want to check the physical status of your Graphics card and you can do this by disconnecting the Graphics card or any other external device connected to your computer. Once you’ve removed the external device, check it for any damages. If there’s none, connect it back to your computer and check if the THREAD_STUCK_IN_DEVICE_DRIVER Blue Screen error is fixed or not.
Option 6 – Uninstall any faulty drivers
You can also uninstall any faulty drivers via Device Manager. How? Refer to these steps:
- Tap the Win + R keys to launch the Run dialog box.
- Then type “devmgmt.msc” in the field and tap Enter to open the Device Manager.
- From there, look for any faulty drivers. You can identify them easily as they will be marked with a yellow exclamation point. And then check which entries would not affect the normal functioning of your PC.
- Now click on the entries of every faulty driver and click on the Uninstall option.
- Once you’ve uninstalled them, restart your computer to allow your computer to reinstall the faulty drivers you’ve just removed.
Read More
Recently, some users reported that they were unable to access a website and only got the Error 1005 Access Denied instead. Specifically, users experience this issue when trying to open the Crunchyroll website – one of the largest anime and manga websites. This particular error is encountered not just on Crunchyroll but on a variety of websites like blogs, video streaming, forums, and so on.
Here’s the full context of the error message:
“Error 1005 Access Denied – The owner of this website has banned the autonomous system number (ASN) your IP address from accessing this website.”
Usually, this error occurs when the website administrator decides to block an IP address or IP range. To fix this error, here are some suggestions you can try:
Option 1 – Uninstall the VPN service you are using or use a different provider
If you are using a VPN service, you might want to uninstall it. As mentioned, website administrator blocks IP ranges if they notice any malicious activities and because of this, your IP address might fall into the banned range even if you didn’t do anything at all. To uninstall the VPN service, follow the steps below.
- Tap the Win + R keys to open the Run dialog box
- Then type “appwiz.cpl” in the field and hit Enter to open the Programs and Features in Control Panel.
- From there, look for the VPN service you are using, select it and then click on Uninstall to remove it.
- After that, restart your computer and try to install the latest version of the program again. It should work now. If not, proceed to the next available option below.
Option 2 – Try disabling the Proxy server
There are some users who reported that they’ve fixed the problem after they’ve disabled the use of a proxy server using the built-in way. Follow the steps below to disable proxy server.
- Tap the Win + R keys to open the Run dialog box.
- Then type “inetcpl.cpl” in the field and hit Enter to pull up the Internet Properties.
- After that, go to the Connections tab and select the LAN settings.
- From there. Uncheck the “Use a Proxy Server” option for your LAN and then make sure that the “Automatically detect settings” option is checked.
- Now click the OK and the Apply buttons.
- Restart your PC.
Note: If you are using a third-party proxy service, you have to disable it.
Option 3 – Use the Google Public DNS
You might want to change your DNS to Google Public DNS as it could also help you in fixing the ERR_CERT_COMMON_NAME_INVALID error in Chrome. To do so, follow the steps below.
- The first thing you have to do is right-click on the network icon in the Taskbar and select Network and Sharing Center.
- Next, click on the “Change Adapter Settings” option.
- After that, search for the network connection that you are using to connect to the internet. Note that the option might be “Wireless Connection” or “Local Area Connection”.
- Right-click on your network connection and click on Properties.
- Then select the new window to choose the “Internet Protocol 4 (TCP/IPv4)” option.
- After that, click on the Properties button and click the checkbox in the new window for the option “Use the following DNS server addresses”.
- Type in “8.8.8.8” and “8.8.4.4” and click OK and exit.
Option 4 – Try contacting the website administrator
If the first three given options didn’t work, you might want to consider contacting the website administrator especially if you’ve already determined that the issue does not occur due to a VPN or proxy server that you’re using. This option can be quite tricky since you won’t be able to submit a contact form since you’re banned from accessing the website but you can contact the admin via the form section if available.
Read More
The issue with the abrupt system reboots to force Windows 10 updates on a computer has been lessened with Active Hours. This feature keeps a record of the hours during which a system remains active and prevents the installation of updates during such hours. For example, when a system restart is needed to complete the installation of an update, Active Hours delays the update and allows you to finish what you’re doing on your computer. Thus, if you haven’t heard of this feature, then now is the time you do, read this post to configure and use Active Hours in your Windows 10 computer.
There are three ways you can configure Active Hours. The first one is for general users, whereas the rest of the two methods are for users who knows their way about the Windows Registry and Group Policy. To get started, refer to every given option below.
Option 1 – Configure Active Hours via Windows 10 Settings
- Go to Settings > Update & Security. From there, click on the “Change active hours” option under the Windows Update section.
- Next, you can select a time (“Start time” and “End time”) during which the restart can occur.
- After that, click on the Save button and exit.
Note: Keep in mind that the values you’ve entered indicate the hours during which your system is in use, namely, ACTIVE. It is important for your active hour’s interval period and it can be anything between 1 and 18 hours since you can’t go beyond 18 hours. In addition, there is no option to configure different active hours on different days and you can’t specify different active hours for weekends and weekdays as well.
On the other hand, Windows 10 also offer users an option to override Active Hours. All you have to do is go to Settings > Update & Security > Windows Update > Restart Options. From there, you can choose a custom restart time when your computer will restart to install the updates but this is only a one-time setting.
Option 2 – Configure Active Hours via Registry Editor
- Tap the Win + R keys to open the Run utility and type “Regedit” in the field and tap Enter or click OK to open the Registry Editor.
- Next, navigate to this registry path: HKEY_LOCAL_MACHINESOFTWAREMicrosoftWindowsUpdateUXSettings
- In the given registry path, you can choose to change “ActiveHoursStart” and “ActiveHoursEnd”.
Note: There are no extra settings available in the Registry Editor but you can change the remote computer’s Active hours settings using the Registry Editor.
Option 3 – Configure Active Hours via Group Policy
Note that this option is available for the Windows 10 Pro and Educational or Enterprise versions. It is mostly used by computers in Business or through remote access. To get started, follow these steps:
- Tap the Win + R keys to launch Run and type “gpedit.msc” in the field and tap Enter or click OK to open the Group Policy Editor.
- Next, navigate to this group policy setting: Local Computer Policy > Computer Configuration > Administrative Templates > Windows Components > Windows Updates.
- From there, look for a policy labeled “Turn off auto-restart for updates during active hours” and double click on it. This will open a new window.
- Click on the Enabled radio button to enable Active Hours. You also have the option to choose active hours just like in the first given option above. It works just fine except when the following policies don’t override:
- No Auto-restart with logged-on users for scheduled automatic updates installations.
- Always automatically restart at the scheduled time.
- Since Group Policy allows you to reduce the range of active hours, you can configure it if you want it to be less than 18 hours. Just find the policy setting labeled “Specify Active hours range for auto -restarts. The minimum is 8 hours”.
- After you set the Active Hours, click the Apply and OK buttons to save the changes made.
Read More
The Windows Subsystem for Linus, also known as WSL, is a useful and excellent tool for developers. However, it isn’t without flaws as users can still encounter some errors when using it. One of these errors is the error code WslRegisterDistribution, 0x8007019e,0x8000000d. Although it seems like the error is have something to do with the installation of WSL, it could be a false positive since some users who’ve installed WSL still encountered the same problem. Here’s the context of the error:
“Installing, this may take a few minutes…
WslRegisterDistribution failed with error: 0x8007019e/0x8000000d
Error: 0x8007019e/0x8000000d The parameter is incorrect.
Press any key to continue.”
Error code 0x8007019e or 0x8000000d could be due to the absence of supporting Windows 10 features since the error does not even let one use the WSL-based command line. If you are one of the users facing this problem, then you’ve come to the right place as this post will provide you with a couple of suggestions to fix it.
There are two options you can check out to fix the problem, but before you do that, you need to make sure that the Windows Subsystem for Linux feature is enabled. The two options include enabling WSL using the “Turn Windows features on or off” option and using the Windows PowerShell.
Option 1 – Try to enable the WSL using the “Turn Windows features on or off” option
- To get started, search for “Turn Windows Features on or off” in the Start Search and click on the appropriate result to open a dialog box.
- After that, you will see a populated list in the dialog box and from there, look for the “Windows Subsystem for Linux” option.
- Once you find it, select OK. This will search and install the system files needed and ask you to restart your computer.
- Restart your computer. The Linux distro should now work without any trouble.
Option 2 – Try to use Windows PowerShell
The next thing you can do to fix the error code 0x8007019e or 0x8000000d is to use Windows PowerShell.
- Tap the Win + X keys and click on the “Windows PowerShell (Admin)” option to open Windows PowerShell as admin.
- After that, execute this command to enable the Windows Subsystem for Linux feature: Enable-WindowsOptionalFeature -Online -FeatureName Microsoft-Windows-Subsystem-Linux
- The command you entered will start to search for the required system files and install them.
- If prompted, type “Y” to restart your computer. This should fix the problem.
Read More
When it comes to downloading and installing games in the Windows operating system, Steam is one of the well-known sources. You can find many big titles in Streams such as PUBG, Heaven Vaults, and a whole lot more. It is undeniably a great source of getting games in the Windows operating systems. However, just like other software, Steam is not immune to errors as you could encounter errors while using it. This isn’t caused by a bad code but also due to reliance on various factors in both respects to the software and hardware. One of these errors is the Application Load Error 5:0000065434. This kind of error can appear when you launch numerous game titles on your Windows 10 computer like Skyrim, Oblivion, Bully, Morrowind, Vortex, and many more.
To fix this application error in Steam, you can try to copy the Steam executable file or use the Command Prompt. You could also try to verify the integrity of the game files feature or delete any conflicting files on your computer.
Option 1 – Try copying the Steam executable file
The first thing you can do to fix the error is to copy the executable file of Steam.
- First, right-click on the desktop shortcut of steam located on your Desktop and click on the “Open file location” option.
- After that, copy the executable file for Steam and navigate to the folder of the library of the games which is usually located in SteamSteamAppsCommon
- Now paste the Steam executable file you just copied inside the folder of the game and see if it fixes the error or not.
Option 2 – Try to use the Command Prompt
- In the Start Search, type “command prompt” and right-click on Command Prompt from the search results and then select the “Run as administrator” option.
- After opening Command Prompt as administrator, execute the following command:
cd «C:Program Files (x86)Steamsteamappscommon»
mklink «steam.exe» «C:Program Files (x86)Steamsteam.exe»
- The command you entered will create a link between the executable file of Steam to the operating system. Once you see a message that states, “Operation completed successfully”, restart your computer.
Option 3 – Try to use the “Verify integrity of the game files” feature
The next thing you can do to get rid of the error is to use the “Verify integrity of the game files” feature. How? Refer to these steps:
- Open Steam and right-click on the entry of the game where you encountered the error in the Library and then select Properties.
- After that, navigate to the LOCAL FILES tab and click the “VERIFY INTEGRITY OF GAME FILES” button.
- Wait for the process to be completed and see if the feature has helped in fixing the error or not.
Option 4 – Try to delete any conflicting files
The error might be caused by some conflicting files on your computer which is why you have to delete them. To do that, follow these steps:
- Open the Documents folder and look for the folder created by the game that’s throwing the error. For instance, it could be stored in the “My Games” folder.
- Next, delete the folder and then try to launch the game again and see if the error is now fixed.
Read More
For three decades, Wolfram Mathematica has defined the state of the art in technical computing and provided the principal computation environment for millions of innovators, educators, students, and others around the world.
Widely admired for both its technical prowess and elegant ease of use, Mathematica provides a single integrated, continually expanding system that covers the breadth and depth of technical computing—and seamlessly available in the cloud through any web browser, as well as natively on all modern desktop systems.
With energetic development and consistent vision for three decades, Mathematica stands alone in a huge range of dimensions, unique in its support for today’s technical computing environments and workflows.
A Vast System, All Integrated
Mathematica has nearly 5,000 built-in functions covering all areas of technical computing—all carefully integrated so they work perfectly together, and all included in the fully integrated Mathematica system.
Not Just Numbers, Not Just Mathematica But Everything
Building on three decades of development, Mathematica excels across all areas of technical computing—including neural networks, machine learning, image processing, geometry, data science, visualizations, and much more.
Unimaginable Algorithm Power
Mathematica builds in unprecedentedly powerful algorithms across all areas—many of them created at Wolfram using unique development methodologies and the unique capabilities of the Wolfram Language.
Higher Level Than Ever Before
Superfunctions, meta-algorithms… Mathematica provides a progressively higher-level environment in which as much as possible is automated—so you can work as efficiently as possible.
Everything Is Industrial Strength
Mathematica is built to provide industrial-strength capabilities—with robust, efficient algorithms across all areas, capable of handling large-scale problems, with parallelism, GPU computing, and more.
Powerful Ease of Use
Mathematica draws on its algorithmic power—as well as the careful design of the Wolfram Language—to create a system that’s uniquely easy to use, with predictive suggestions, natural language input, and more.
Documents As Well As Code
Mathematica uses the Wolfram Notebook Interface, which allows you to organize everything you do in rich documents that include text, runnable code, dynamic graphics, user interfaces, and more.
The Code Makes Sense
With its intuitive English-like function names and coherent design, the Wolfram Language is uniquely easy to read, write, and learn.
Make Your Results Look Their Best
With sophisticated computational aesthetics and award-winning design, Mathematica presents your results beautifully—instantly creating top-of-the-line interactive visualizations and publication-quality documents.
150,000+ Examples
Get started with almost any project with help from 150,000+ examples in the Documentation Center, over 10,000 open-code Demonstrations in the Wolfram Demonstrations Project—and a host of other resources.
Instant Real-World Data
Mathematica has access to the vast Wolfram Knowledgebase, which includes up-to-the-minute real-world data across thousands of domains.
Seamless Cloud Integration
Mathematica is now seamlessly integrated with the cloud—allowing sharing, cloud computing, and more in a unique and powerful hybrid cloud/desktop environment
Connected to Everything
Mathematica is built to be connected to everything: file formats (180+), other languages, Wolfram Data Drop, APIs, databases, programs, the Internet of Things, devices—and even distributed instances of itself.
If you would like to read more helpful articles and tips about various software and hardware visit errortools.com daily.
Read More
Support for Bluetooth hardware has always been included in the Windows 10 operating system for a long time now. And it just keeps getting better especially now with the support for the latest version of Bluetooth 5.0 LE. However, there are still times when Bluetooth experiences a couple of issues one of which is users were not able to turn on or off Bluetooth on their Windows 10 Pc since the option to turn Bluetooth off or on is missing in the Windows 10 settings app and even in the Action Center. So if you are one of the users who experience the same problem, read on as this post will guide you in resolving the issue.
To resolve this Bluetooth issue, here are some suggestions that could help:
Option 1 – Try running the Bluetooth Troubleshooter
As you know, Windows 10 has various troubleshooters with user-friendly interfaces where you can utilize them to fix issues in your PC. And since you’re dealing with some Bluetooth problem, you have to run the Bluetooth Troubleshooter.
- Open the Windows 10 Settings.
- Then go to Update & Security > Troubleshoot.
- You should find the option for Bluetooth on your right-hand side – click on it then click on the “Run the troubleshooter” option.
- Now follow the next screen options.
Option 2 – Try to reinstall or update the Bluetooth driver
The issue might have something to do with the Bluetooth drivers. It could be that it is outdated and needs to be updated or that you recently updated it and since then you have trouble removing the Bluetooth devices and so to fix the issue, you can update, roll back or uninstall the Bluetooth drivers. How? Follow the steps below.
- Tap the Win + X keys to open the Device Manager.
- Next, look for the Bluetooth device and right-click on it.
- Select the option “Update driver”.
- After that, a new popup window will appear. In there, select the option, “Search automatically for updated driver software”.
Note: Checking the update may take a few minutes so you’ll have to wait until it finishes. If it is able to find an update, you must install it. And if you want to reinstall the Bluetooth driver, just select the “Uninstall driver” option and follow the next on-screen instructions that follow.
Option 3 – Configure the Bluetooth Services
If the first two options didn’t work, the next thing you can do is configure Bluetooth Services. How? Simply follow these steps:
- Tap the Win + R key combination to open the Run dialog box.
- After that, type “services.msc” in the field and hit Enter to open the Windows Services Manager.
- You will then see a list of services and from there, look for the following services and make sure that their default values are set as follows:
- Bluetooth Handsfree Service – Manual (Triggered)
- Bluetooth Audio Gateway Service – Manual (Triggered)
- Bluetooth Support Service – Manual (Triggered)
- Bluetooth User Support Service – Manual (Triggered)
- Now click on the Start button to start all the aforementioned services and then check if you can now see the option to turn Bluetooth on or on.
Read More
This post will guide you on how you can fix the Error 0x80070079. This kind of error mostly occurs during the transfer of files across the networks. It could be caused by several factors which include the incorrect configuration of drivers or the network, as well as deadlock state or the server is loaded with a lot of tasks and if any location is not available. This error could also appear when you try to create a System Image or copy or move files on your computer. Here’s the full context of the error message:
“Error 0x80070079: The semaphore timeout period has expired.”
To fix this error, you can try to run the three built-in Network-related troubleshooters or update or reinstall the network adapter drivers or perform a network reset. For more details, follow the options laid out below.
Option 1 – Try to run the three built-in Network-related troubleshooters
The first thing you could do to fix the problem is to run any of the three built-in troubleshooters related to Networks such as Incoming Connections, Network Adapter, and Shared Folders troubleshooters. To access them, just open the Windows Settings app, and go to Update & security > Troubleshoot. From there, run any or each one of the aforementioned troubleshooters.
Option 2 – Update the Network Adapter drivers
You might also want to update the Network Adapter drivers by following these steps:
- Tap the Win + R keys to launch the Run window and then type in the “MSC” command and hit Enter to open the Device Manager window.
- Under the Device Manager, you will see a list of drivers. From there, look for the Network Adapters and expand them.
- Then right-click on each one of the Network drivers and update them all.
- Restart your PC and see if it helped in fixing the BSOD error.
Note: If updating the network drivers didn’t help in fixing the “Windows could not find a driver for your network adapter” error, you can also try to uninstall the very same drivers and restart your Windows 10 PC. After that, the system itself will reinstall the drivers you just uninstalled. Alternatively, you can also download and install the drivers from the manufacturer’s website directly.
To reinstall the network adapter driver, refer to these steps:
- Open the Devices Manager from the Win X Menu.
- Then locate the device drivers and right-click on them to open the Properties.
- After that, switch to the Driver tab and click on the Uninstall Device button.
- Follow the screen option to completely uninstall it.
- Finally, restart your computer. It will just reinstall the device drivers automatically.
Option 3 – Perform a Network Reset
Network Reset is a feature in Windows 10 that will help you reinstall the Network adapters as well as reset the Networking Components back to their original settings.
- Open the Start Menu and click on the Settings icon.
- Next, click on the Status link on the left side where you should see the status of your Network. Aside from that, you should also see a link that will let you open the Network Troubleshooter – click on that link to expand Network Troubleshooter.
- Under Network Troubleshooter, select the link for “Network reset”.
- After you click on Network reset, it should redirect you to the following page. From there, click on the Reset now button.
Read More
Recently, a number of users reported not being able to use the Restore, Minimize and Close buttons on their Windows 10 computers. This kind of issue can be quite annoying as you won’t be able to use your computer properly, especially when you navigate between programs and windows. In such cases, the buttons on the right side of the title bar won’t respond to any inputs which could be caused by a number of factors such as different input modes, corrupted system files, and many more. If you are one of the users who are currently facing this problem, worry not for this post will guide you on what you can do to resolve it.
There are several potential fixes you can check out to fix the issue. You can try to check if Tablet Mode is enabled and if it is, you have to disable it. You could also boot your computer in a Clean Boot State to check if a third-party program is the one that’s causing the problem. In addition, you could also reinstall the program where you experience the problem or run built-in utilities like System File Checker and DISM tool.
Option 1 – Make sure that you are not in Tablet Mode
Since Windows 10 is designed to work on both desktop and mobile devices, it could be that your computer has slipped into Tablet Mode which explains why you’re not seeing the Taskbar. To check if your computer is really in Tablet Mode, follow these steps:
- Go to the Start menu and select Settings.
- Next, select the System setting and from the left pane select the Tablet Mode.
- From there, make sure that the buttons next to the options given below are set to the off position:
- Hide app icons on the taskbar in tablet mode
- Automatically hide the taskbar in tablet mode
Option 2 – Put your computer in a Clean Boot State
As pointed out, it is possible that some third-party program or service is the one that’s behind the problem. To isolate this possibility and to identify the culprit, you have to put your computer into a Clean Boot State. To do so, follow the steps below.
- Log onto your PC as an administrator.
- Type in MSConfig in the Start Search to open the System Configuration utility.
- From there, go to the General tab and click “Selective startup”.
- Clear the “Load Startup items” check box and make sure that the “Load System Services” and “Use Original boot configuration” options are checked.
- Next, click the Services tab and select the “Hide All Microsoft Services” check box.
- Click Disable all.
- Click on Apply/OK and restart your PC. (This will put your PC into a Clean Boot State. And configure Windows to use the usual startup, just simply undo the changes.)
- Once your computer is in a Clean Boot State, try to open the program where the problem occurred.
Option 3 – Try reinstalling the program
If the first two options didn’t work, then you might want to consider uninstalling the program and then install it back with its latest version. This should resolve the problem.
Option 4 – Try to run System File Checker
System File Checker or SFC is a built-in command utility that helps in restoring corrupted files as well as missing files. It replaces bad and corrupted system files to good system files that might be the cause why the Restore, Minimize and Close buttons don’t work. To run the SFC command, follow the steps given below.
- Type “cmd” in the Start search and then right-click on the appropriate search result.
- Next, select “Run as administrator” to open Command Prompt with admin privileges.
- After opening Command Prompt, type in sfc /scannow
The command will start a system scan which will take a few whiles before it finishes. Once it’s done, you could get the following results:
- Windows Resource Protection did not find any integrity violations.
- Windows Resource Protection found corrupt files and successfully repaired them.
- Windows Resource Protection found corrupt files but was unable to fix some of them.
- Now restart your computer and see if the problem is fixed or not.
Option 5 – Run the DISM tool
You can try running the Deployment Imaging and Servicing Management or DISM tool to fix the problem. Using this built-in tool, you have various options such as the “/ScanHealth”, “/CheckHealth”, and “/RestoreHealth”.
- Open the Command Prompt with admin privileges.
- Then type in the following commands and make sure to hit Enter right after you type each one of them:
- Dism /Online /Cleanup-Image /CheckHealth
- Dism /Online /Cleanup-Image /ScanHealth
- exe /Online /Cleanup-image /Restorehealth
- Do not close the window if the process takes a while as it will probably take a few minutes to finish. Once it’s done, restart your computer.
Read More
![]()
Copyright © 2023, ErrorTools. All Rights Reserved
Trademark: Microsoft Windows logos are registered trademarks of Microsoft. Disclaimer: ErrorTools.com is not affiliated with Microsoft, nor claims direct affiliation.
The information on this page is provided for information purposes only.
![]()