Первый способ
Для того чтобы добавить скрипт в автозагрузку в Windows 10 необходимо:
1) Сделать ярлык к файлу скрипту
2) В проводнике прописать shell:startup и добавить в этой папке ярлык нашего скрипта на автозапуск.
3) Смотрим в автозапуске, есть ли наш скрипт там или нет.
4) Перезагружаемся и проверяем работу.
Второй способ
Если для запуска скрипта требуется права администратора, то необходимо сделать автозапуск через планировщик задач:
1) через поиск открывает планировщик задач
2) создаем новую простую задачу

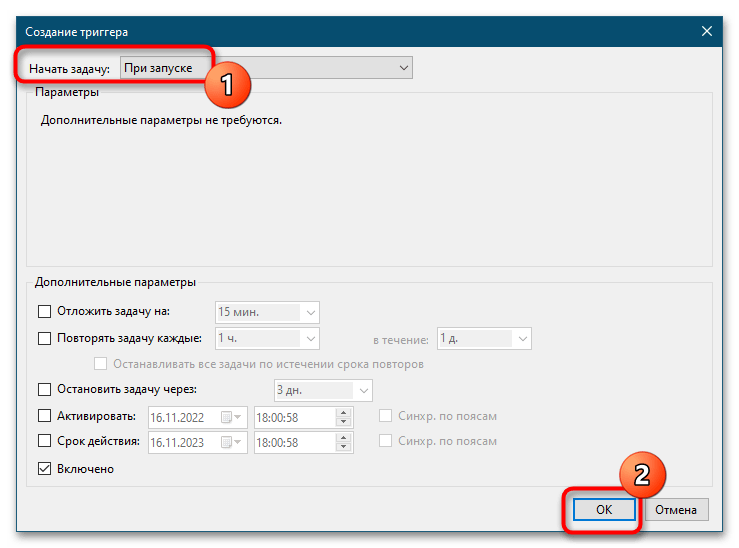
3) называем задачу и в траггере ставим «При входе в Windows»:

4) отмечаем, что запуск программы:

5) выбираем программу:

6) завершаем создание задачи
7) правой кнопкой мыши кликаем по задаче и выбираем свойства. Во вкладке «Общее» ставим галочку «Выполнить с наивысшими правами» и применяем изменения

 перезагружаем компьютер и проверяем работу скрипта.
Категории: Windows
Метки: windows
Содержание
- Способ 1: Папка автозапуска
- Способ 2: «Редактор реестра»
- Способ 3: Планировщик заданий
- Способ 4: Локальные групповые политики
- Вопросы и ответы

Способ 1: Папка автозапуска
Методы добавления в автозагрузку скрипта BAT ничем не отличаются от методов добавления в автозагрузку ярлыков и других файлов. Самым простым и очевидным является копирование файла батника в папку автозапуска.
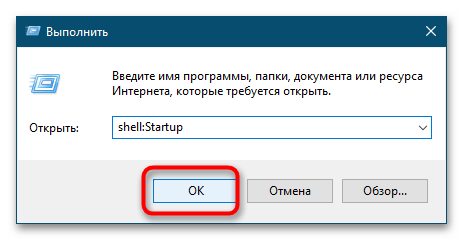
- Откройте папку автозапуска, для чего выполните в вызванном клавишами Win + R окошке команду
shell:Startup. - Скопируйте в открывшийся каталог файл BAT.
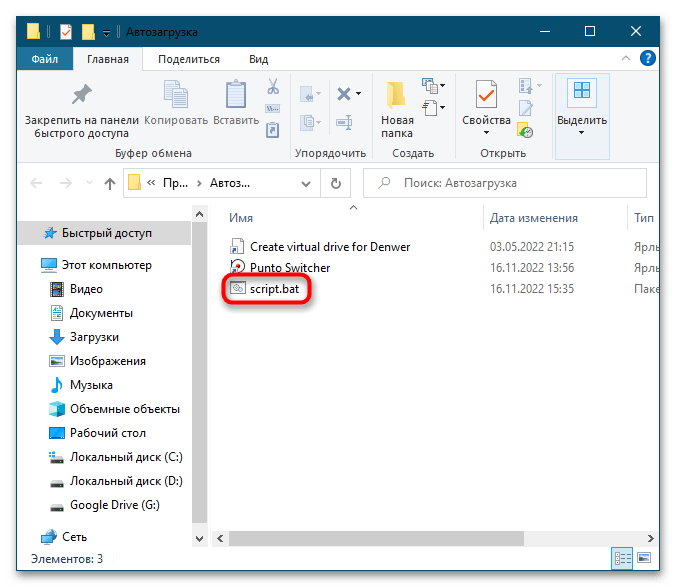
Это добавит командный файл в автозагрузку текущего пользователя. Если необходимо, чтобы скрипт выполнялся при входе в систему всех пользователей, скопируйте его в системную папку C:\ProgramData\Microsoft\Windows\Start Menu\Programs\Startup.
Способ 2: «Редактор реестра»
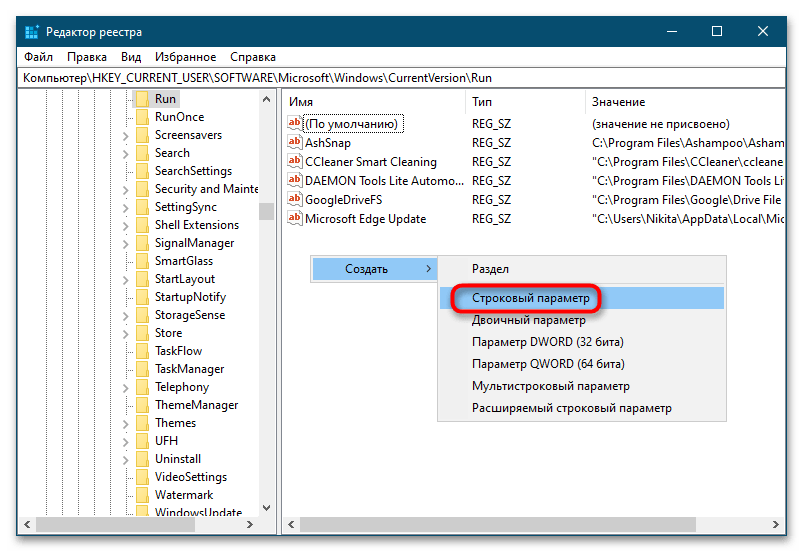
Добавить батник в автозагрузку можно также путем применения несложного твика реестра, прописав во встроенном «Редакторе реестра» путь к командному файлу.
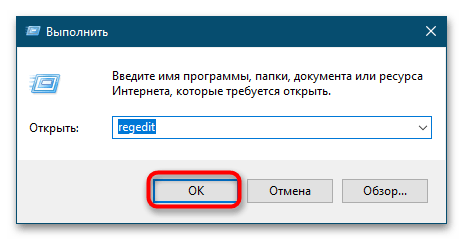
- Запустите «Редактор реестра» командой
regedit, выполненной в диалоговом окошке Win + R. - Разверните ветку
HKEY_CURRENT_USER\SOFTWARE\Microsoft\Windows\CurrentVersion\RunилиHKEY_LOCAL_MACHINE\SOFTWARE\Microsoft\Windows\CurrentVersion\Run, если хотите, чтобы добавленный в автозапуск батник запускался для всех пользователей. - Создайте в правой колонке новый строковый параметр с именем файла BAT или произвольным названием.
- Откройте двойным кликом по созданному параметру окошко редактирования его значения и вставьте в поле «Значение» полный путь к BAT-файлу. Если в пути присутствуют пробелы, заключите путь в двойные прямые кавычки.

Скопировать полный путь к файлу можно в его «Свойствах» либо из его контекстного меню, вызванного с зажатой клавишей Shift.
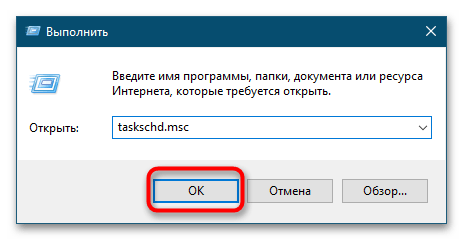
Способ 3: Планировщик заданий
Следующий метод добавления командного файла в автозагрузку Windows 10 заключается в создании задачи в системном «Планировщике заданий».
- Запустите «Планировщик заданий» командой
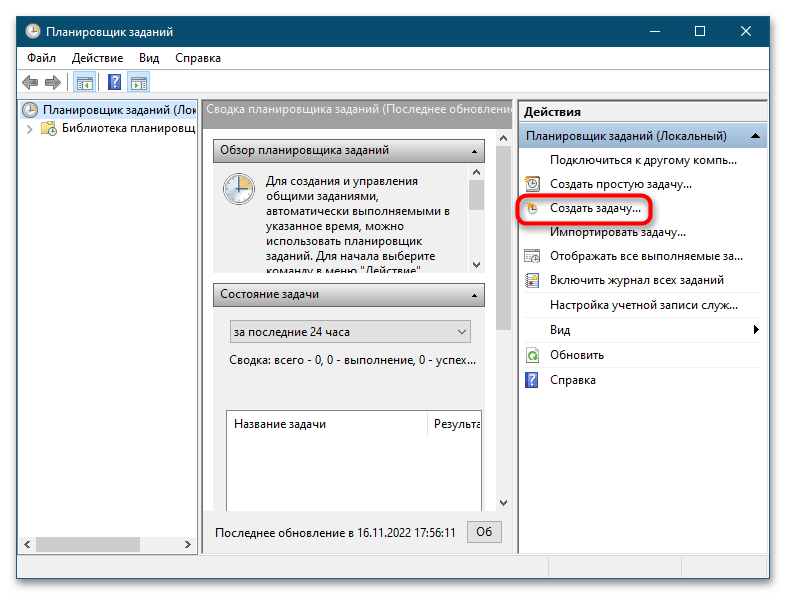
taskschd.msc, выполненной в диалоговом окошке Win + R. - Нажмите в правой колонке по «Создать задачу».
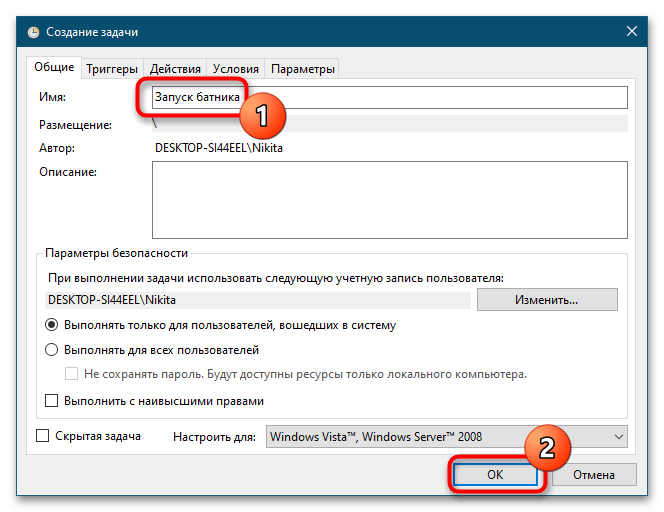
- В окне мастера создания задачи дайте новому заданию произвольное имя, активируйте, если нужно, запуск скрипта с наивысшими правами.
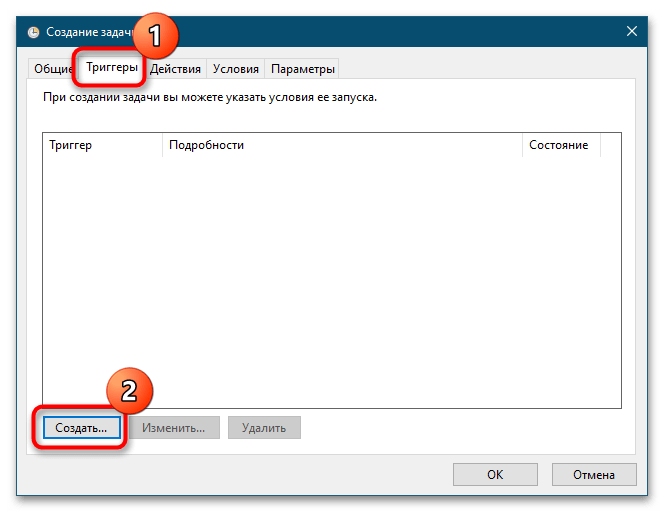
- Перейдите на вкладку «Триггеры» и нажмите кнопку «Создать».
- В выпадающем списке «Начать задачу» выберите «При запуске» или «При входе в систему». Нажмите «OK».
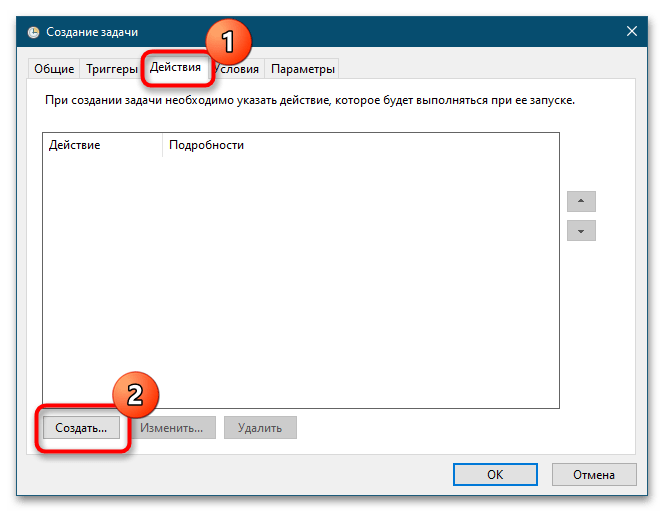
- Перейдите на вкладку «Действия» и нажмите «Создать».
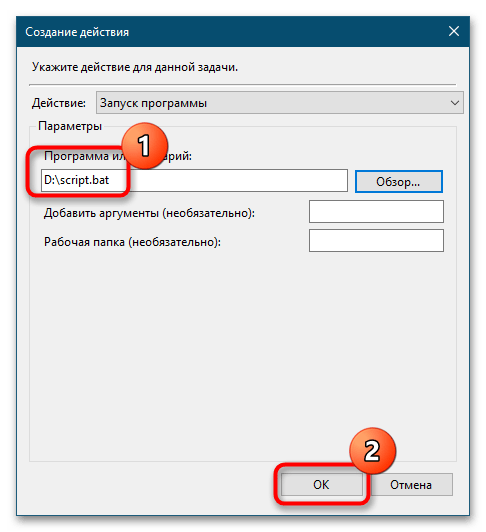
- Нажав кнопку «Обзор», выберите добавляемый в автозапуск файл BAT. Остальные настройки можно не менять, убедитесь только, что в качестве действия выбран «Запуск программы» и последовательно сохраните настройки.
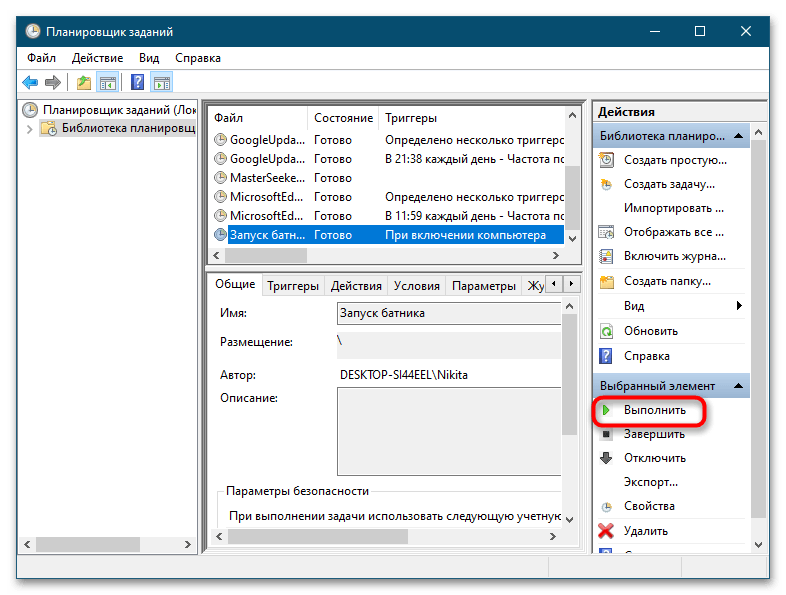
Созданная задача появится в разделе «Библиотека планировщика заданий». При желании ее можно будет испытать, выделив мышкой и нажав ссылку «Выполнить» в правой колонке «Планировщика заданий».
Способ 4: Локальные групповые политики
Этот способ добавления батника в автозагрузку подходит только для Windows 10 редакции Pro и выше.
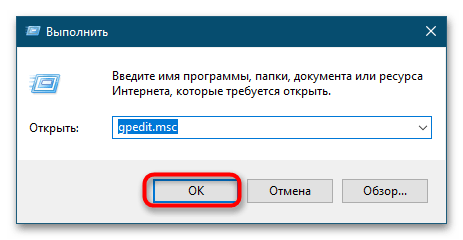
- Запустите «Редактор локальных групповых политик» командой
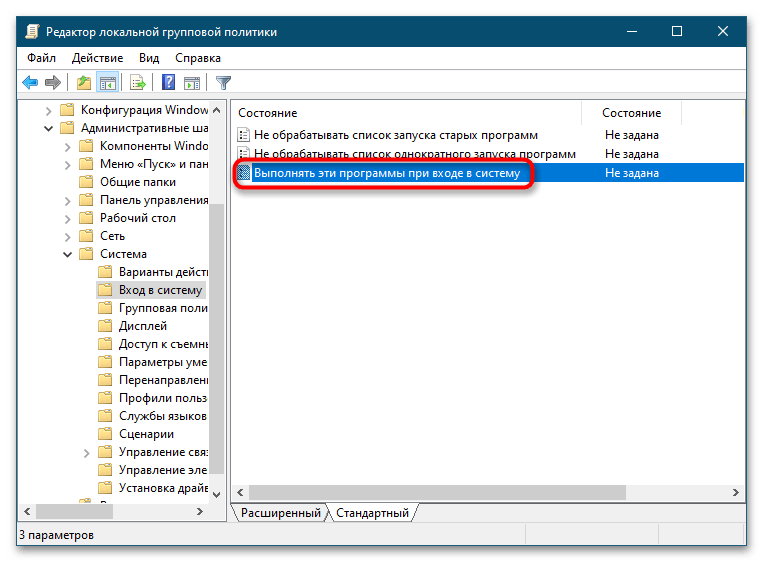
gpedit.mscчерез диалоговое окошко «Выполнить» (Win + R). - Разверните ветку «Конфигурация пользователя» → «Административные шаблоны» → «Система» → «Вход в систему» и откройте двойным кликом настройки политики «Выполнять эти программы при входе в систему».
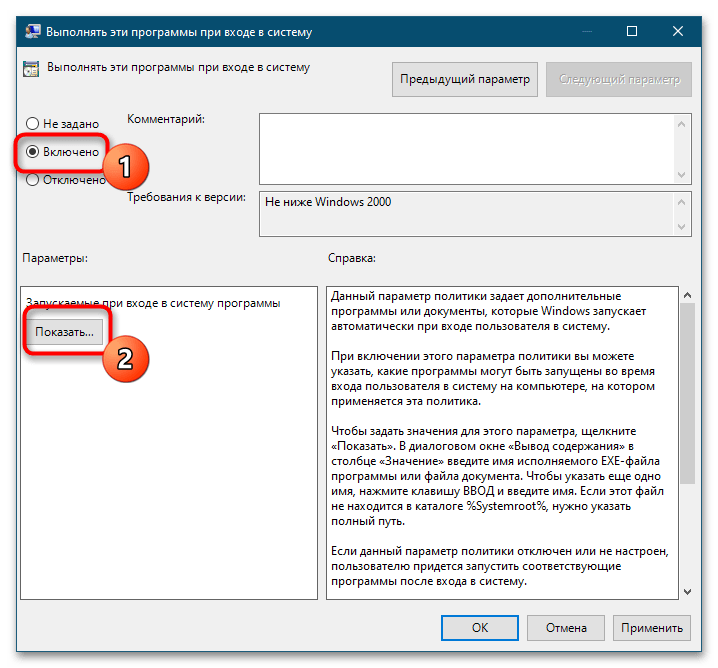
- Активируйте радиокнопку «Включено» и нажмите кнопку «Показать».
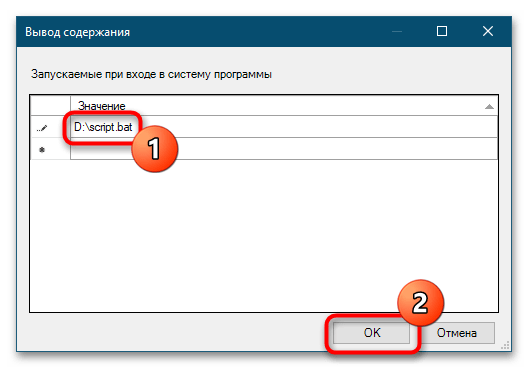
- В поле «Значение» открывшегося диалогового окошка вставьте полный путь к файлу-батнику, нажмите «OK» и сохраните настройки.
Если необходимо, чтобы батник запускался при входе в систему всех пользователей, нужно изменить одноименную политику в разделе «Конфигурация компьютера», а не «Конфигурация пользователя».
Еще статьи по данной теме:
Помогла ли Вам статья?
Adding a Python script to windows start-up basically means the python script will run as the windows boots up. This can be done by two step process –
Step #1: Adding script to windows Startup folder
After the windows boots up it runs (equivalent to double-clicking) all the application present in its startup directory.
Address:
C:\Users\current_user\AppData\Roaming\Microsoft\Windows\Start Menu\Programs\Startup\
By default the AppData folder under the current_user is hidden so enable hidden files to get it and paste the shortcut of the script in the given address or the script itself. Also the .PY files default must be set to python IDE else the script may end up opening as a text instead of executing.
Step #2: Adding script to windows Registry
This process can be risky if not done properly, it involves editing the windows registry key HKEY_CURRENT_USER from the python script itself. This registry contains the list of programs that must run once the user Login. just like few application which pops up when windows starts because the cause change in registry and add their application path to it.
Registry Path:
HKEY_CURRENT_USER\Software\Microsoft\Windows\CurrentVersion\Run
Below is the Python code :
Python3
import winreg as reg
import os
def AddToRegistry():
pth = os.path.dirname(os.path.realpath(__file__))
s_name="mYscript.py"
address=os.join(pth,s_name)
key = HKEY_CURRENT_USER
key_value = "Software\Microsoft\Windows\CurrentVersion\Run"
open = reg.OpenKey(key,key_value,0,reg.KEY_ALL_ACCESS)
reg.SetValueEx(open,"any_name",0,reg.REG_SZ,address)
reg.CloseKey(open)
if __name__=="__main__":
AddToRegistry()
Note: Further codes can be added to this script for the task to be performed at every startup and the script must be run as Administrator for the first time.
Last Updated :
14 Sep, 2021
Like Article
Save Article
On previous versions of Windows I have used the below technique to run a batch file on Windows startup.
- Create a shortcut to the batch file.
- Once the shortcut is created, right-click the shortcut file and select Cut.
- Click Start, then Programs or All Programs. Find the Startup folder and right-click that folder, then select Open.
- Once the Startup folder is opened, click Edit in the menu bar, then Paste to paste the shortcut file into the Startup folder. If you do not see the menu bar, press the Alt key to make the menu bar visible.
Any shortcuts in the Startup folder will automatically run each time the user logs in to Windows.
I have been unsuccessful in finding how to do something similar on Windows 10.
Any ideas?
asked Aug 10, 2015 at 20:20
![]()
baynezybaynezy
1,3712 gold badges10 silver badges9 bronze badges
2
The startup folder is still there and functions as normal.
To access it, press Windows+R, then type shell:startup.
You should be able to do what you were previously doing in Windows 7 from there.
answered Aug 10, 2015 at 20:43
7
You can use scheduled tasks and set it to run at startup.
Go to Manage → Scheduled Tasks → Create a Basic Task.
Once at the dialog box, set a name, click Next and select at startup, Next again and select the program you want to run and next to finish. Done!
![]()
answered Aug 10, 2015 at 20:59
![]()
sarakustasarakusta
5133 silver badges4 bronze badges
1
To add to user314352’s answer:
The startup folder is still there and functions as normal.
To access it, press Windows+R, then type shell:startup.
You should be able to do what you were previously doing in Windows 7 from there.
You can also type shell:common startup to access the startup folder for all users.
![]()
answered Dec 26, 2020 at 11:05
![]()
Azeezah MAzeezah M
1011 silver badge2 bronze badges
If you don’t have access to Windows+X functionality, you can navigate manually to the two startup folders:
- User:
C:\Users\USER\AppData\Roaming\Microsoft\Windows\Start Menu\Programs\Startup - All users:
C:\ProgramData\Microsoft\Windows\Start Menu\Programs\StartUp
Here’s a useful batch file to open either or both of these folders:
rem Load the current user Start folder
%SystemRoot%\explorer.exe "%APPDATA%\Microsoft\Windows\Start Menu\Programs\Startup"

rem Load the "All Users" Start folder
%SystemRoot%\explorer.exe "%ALLUSERSPROFILE%\Microsoft\Windows\Start Menu\Programs\StartUp"
Note: Above applies to Windows 8.1 and Windows 10 (and maybe earlier versions).
answered Jan 20, 2020 at 13:00
![]()
AlainDAlainD
4,48715 gold badges50 silver badges96 bronze badges
3
I have an MSI motherboard that is not playing nice with my beloved Gateway Anykey keyboard. Num Lock won’t turn off at boot.
I added a «NumLock Off» utility to the shell:startup folder. No help. I added it to Scheduled Tasks and that worked. BTW, I couldn’t schedule a shortcut to the utility. I could only schedule a batch file with the numlock.exe file and the «off» parameter on the command line.
![]()
answered Nov 20, 2016 at 3:40
![]()
1
Alternative through Group Policy
gpedit: Local Computer Policy > Computer Configuration > Windows Settings > Script (Startup/Shutdown)
answered Jun 2, 2021 at 9:04
![]()
user.dzuser.dz
6687 silver badges19 bronze badges
You must log in to answer this question.
Not the answer you’re looking for? Browse other questions tagged
.
Not the answer you’re looking for? Browse other questions tagged
.
With a simple trick, you can run an AutoHotKey script on startup in Windows. It is pretty easy to do.
AutoHotKey is one of my favorite software. In fact, I use it daily and have a fair number of custom shortcuts, macros, and text expansions that make my Windows experience that much more pleasant. The best thing is that, depending on your use case, creating an AutoHotKey script is easy and fast.
To get the most out of an AutoHotKey script, running it on startup is essential. That way, the script runs automatically and gives you instant access from the get-go.
There are two ways to run an AutoHotKey script on startup in Windows. The first method is quite easy to follow, and the second is useful if you want more control over how and when the AutoHotKey script runs on startup.
Table of contents:
- Add AutoHotKey script to the startup folder
- Schedule AutoHotKey script with Task Scheduler
Note: I assume that you already have an AutoHotKey script ready.
The steps below work the same in Windows 10 and 11.
Add AutoHotKey script to the startup folder
You can add the AutoHotKey script shortcut to the Windows Startup folder to run it on system startup. In fact, you can add any application shortcut to this folder to run it on startup. Let me show you how.
- Open the File Explorer.
- Go to the folder where the script is saved.
- Right-click on the AutoHotKey script.
- Choose the “Send to -> Desktop” option.
- It will create a shortcut for the script on the desktop.
- Go to the desktop and copy the shortcut.
- Press “Win + R” to open Run.
- Type “shell:startup” in the blank field.
- Press “Ok.”
- Paste the copied AutoHotKey script shortcut.
- Close File Explorer.
- With that, the AutoHotKey script now runs on startup in Windows.
Steps with more details:
First, we can only add shortcuts to the startup folder; we need to create a shortcut for the AutoHotKey script. To do that, open the File Explorer with the “Win + E” shortcut and go to where the AutoHotKey script is saved. Next, select the AutoHotKey script, hold the “Alt” key on your keyboard, and drag and drop it into the same folder.
The above action will instantly create a shortcut of the script file in the same folder. It is optional, but you can remove the “.ahk – shortcut” suffix from the shortcut name.
Note: You can also create a shortcut by right-clicking the script file and selecting the “Send to -> Desktop” option. The shortcut will be created on the desktop.

After creating the shortcut, copy it. You can select the shortcut file and press the “Ctrl + C” shortcut. We are going to paste it into the startup folder.
Now, we need to open the Startup folder. So, press the “Win + R” to open the Run dialog box. Type the shell command shell:startup in the blank field and click the “Ok” button.

The run dialog box immediately opens the Windows Startup folder. Press the “Ctrl + V” shortcut to paste the copied shortcut file in the Startup folder. You can also drag and drop the shortcut file into the startup folder.

That is all. From now on, the AutoHotKey script will automatically start with Windows. You no longer have to launch the script manually.
Schedule AutoHotKey script with Task Scheduler
You can use the Task Scheduler if you want more control over how a program starts with Windows. For example, this method is useful to delay start a program. Let me show you how to schedule and run an AutoHotKey script on startup in Windows.
- Press the “Start” key.
- Search and open “Task Scheduler.”
- Click “Create Basic Task.”
- Type a name in the “Name” field.
- Click “Next.”
- Select “When I log on.”
- Press “Next.”
- Choose “Start a program.”
- Click “Next.”
- Type the below path in the “Program/Script” field.
"C:\Program Files\AutoHotkey\AutoHotkey.exe" - Type the AHK script file path in the “Arguments” field.
- Press the “Finish” button.
- Close the Task Scheduler.
- With that, you’ve scheduled an AutoHotKey script to run on startup.
Steps with more details:
First, open the start menu, search for “Task Scheduler,” and click on the result to open it.
After opening the Task Scheduler, select the “Create Basic Task” option on the right sidebar.

Give the new task a name using the “Name” field and press the “Next” button to continue.

Since we want to run the AutoHotKey script on startup, select the “When I log on” radio option and click “Next.”

Select the “Start a program” radio option and press “Next.”

Type the following file path in the “Program/script” field. After that, enter the AutoHotKey script file (.ahk) path in the “Arguments” field. Press the “Next” button.
Note: If you’ve installed AutoHotKey in another location, modify the path below accordingly. You can also click the “Browse” button next to the “Program/script” field and select the “AutoHotKey.exe” file.
"C:\Program Files\AutoHotkey\AutoHotkey.exe"
Review your settings and click the “Finish” button to complete the task creation process.

Finally, find the newly created task in the main window, right-click, select “Run,” and see if the job runs successfully. If it did not run as expected, review the steps.

That is all. From now on, the AutoHotKey script will run on startup in Windows.
Wrapping Up
As you can see, running an AutoHotKey script at Windows startup is pretty easy.
I hope this simple and easy Windows how-to guide helped you.
If you are stuck or need help, send an email, and I will try to help as much as possible.
If you like this article, check out how to create a right-hand alt-tab shortcut and how to run portable apps at system startup.