Попробуйте наш инструмент устранения неполадок
Выберите операционную систему
Выберите язык програмирования (опционально)
‘>
Если вы видите сообщение «Работаем над обновлениями, готово на 100%. Не выключайте компьютер » при обновлении Windows не беспокойтесь!
Хотя это очень неприятно, но вы определенно не единственный, кто столкнулся с этой проблемой. Тысячи пользователей Windows недавно сообщили о той же проблеме. Что еще более важно, вы сможете легко это исправить …
Попробуйте эти исправления
Вот список исправлений, которые решили эту проблему для других пользователей Windows. Необязательно пробовать их все. Просто пролистайте список, пока не найдете тот, который подойдет вам.
- Удалите все периферийные USB-устройства и дождитесь завершения процесса обновления.
- Принудительно перезагрузите компьютер
- Запустите средство устранения неполадок Центра обновления Windows.
- Сбросить компоненты Центра обновления Windows
- Загрузить обновления из каталога Центра обновления Майкрософт вручную
- Совет: хотите, чтобы мы решили проблему за вас?
Исправление 1. Удалите все периферийные USB-устройства и дождитесь завершения процесса обновления.
Если вы редко проверяете наличие обновлений Windows, для завершения процесса обновления Windows может потребоваться много времени. Возможно, ваш компьютер не «застрял» на обновлении Windows, а Windows просто настраивает и устанавливает пакеты обновлений.
Если вам временно не нужно использовать компьютер, просто подождите 2–3 часа, чтобы проверить, завершится ли процесс обновления. Если к вашему ПК подключены какие-либо USB-устройства (например, принтеры, USB-накопители и т. Д.), Вы можете попробовать удалить их с вашего ПК. Некоторые пользователи Windows сообщили, что после отключения всех периферийных USB-устройств от своих компьютеров процесс обновления завершается быстро.
Посмотрите, сохраняется ли эта проблема после того, как вы подождете 2–3 часа. Если проблема не исчезнет, попробуйте следующее исправление, указанное ниже, чтобы принудительно перезагрузить компьютер.
Исправление 2: принудительно перезагрузите компьютер
Если ваш компьютер завис на 100%, когда вы выполняете обновление Windows, вам нужно сначала принудительно перезагрузить компьютер. Если вы не знаете, как это сделать, следуйте инструкциям ниже:
- Пресса и Продолжай держаться кнопка питания на корпусе вашего компьютера пока ваш компьютер не выключится .
- Отключить любой внешний источник питания или извлеките аккумулятор из ноутбука.
- Удерживать кнопка питания примерно пятнадцать секунд.
- Подожди несколько минут а затем подключите компьютер или подключите аккумулятор к ноутбуку.
- Снова нажмите кнопку питания, чтобы перезагрузить систему.
- Выберите вариант обычной загрузки если вы получили уведомление о том, что компьютер выключился неправильно.
Если вы по-прежнему не можете получить доступ к рабочему столу, вы можете попробовать запуск вашего ПК в безопасном режиме с сетью . Когда вы вошли в свою систему Windows в безопасном режиме с сетью, попробуйте следующее исправление ниже, чтобы запустить средство устранения неполадок Центра обновления Windows.
Исправление 3. Запустите средство устранения неполадок Центра обновления Windows.
Средство устранения неполадок Центра обновления Windows — это встроенный инструмент, который может помочь вам проанализировать и решить проблемы, связанные с обновлением Windows. Попробуйте запустить средство устранения неполадок Центра обновления Windows, чтобы узнать, можно ли решить эту проблему. Вот как это сделать:
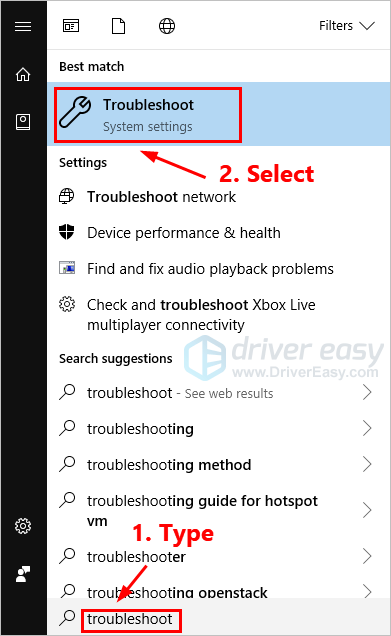
- На клавиатуре нажмите клавиша с логотипом Windows и введите устранять неполадки . В списке результатов поиска выберите Устранение неполадок .

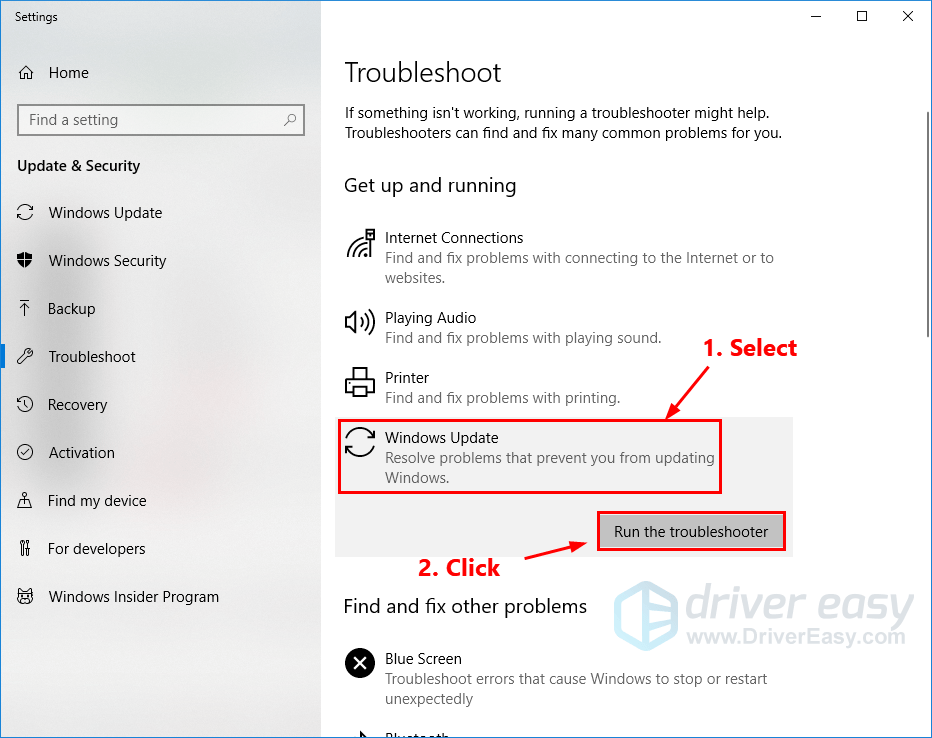
- Во всплывающем окне выберите Центр обновления Windows и нажмите Запустите средство устранения неполадок . Вам будет предложено разрешение. Нажмите да для запуска средства устранения неполадок Центра обновления Windows.
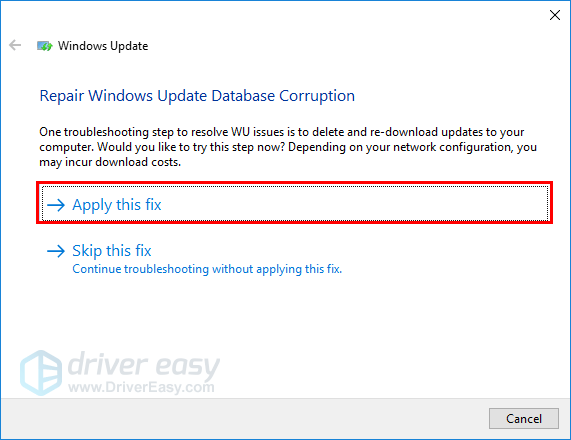
- Нажмите Применить это исправление продолжать.
- Следуйте инструкциям на экране, чтобы устранить эту проблему.
Выполните обновление Windows еще раз, чтобы проверить, сможете ли вы установить обновление. Если эта проблема появляется снова, попробуйте следующее исправление, указанное ниже.
Исправление 4: сбросить компоненты Центра обновления Windows
Если компоненты Центра обновления Windows повреждены, Центр обновления Windows может работать неправильно. Может быть, это причина этой проблемы. Чтобы решить эту проблему, попробуйте сбросить компоненты Центра обновления Windows. Вот как это сделать:
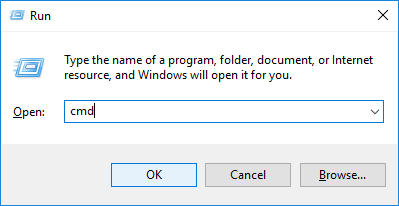
- На клавиатуре нажмите клавиша с логотипом Windows и р в то же время, чтобы вызвать диалоговое окно «Выполнить». Тип cmd и нажмите Ctrl , сдвиг и Войти в то же время запустить командную строку от имени администратора . Вам будет предложено разрешение. Нажмите да , чтобы открыть командную строку.
- В командной строке введите приведенные ниже командные строки и нажмите Войти на твоей клавиатуре после ввода каждого :
чистые стоповые биты
чистая остановка wuauserv
чистая остановка appidsvc
чистая остановка cryptsvcЗаметка: Системные службы, связанные с Центром обновления Windows, будут остановлены после выполнения указанных выше командных строк.
- В командной строке введите следующие командные строки и нажмите Войти после ввода каждого:
ren% systemroot% SoftwareDistribution SoftwareDistribution.old
ren% systemroot% system32 catroot2 catroot2.oldЗаметка: Вы будете переименовать папку SoftwareDistribution и catroot2 как SoftwareDistribution.old и catroot2.old после запуска этих двух командных строк. Эти две папки используются Центром обновления Windows для сохранения временных файлов обновлений.
При переименовании этих двух папок Windows будет думать, что эти две папки отсутствуют, и Windows создаст новые для хранения файлов обновлений Windows. Таким образом вы сможете избежать многих проблем с Центром обновления Windows, вызванных старыми поврежденными временными файлами в этих двух папках.
- В командной строке введите следующие командные строки и нажмите Войти после каждого:
чистые стартовые биты
чистый старт wuauserv
чистый старт appidsvc
чистый старт cryptsvcЗаметка: После выполнения приведенных выше командных строк вы запускаете системные службы, связанные с Центром обновления Windows.
Проверьте, решило ли это вашу проблему с Центром обновления Windows. Надеюсь, это так. Но если нет, попробуйте следующее исправление, указанное ниже.
Исправление 5. Загрузите обновления из каталога Центра обновления Майкрософт вручную.
Каталог Центра обновления Майкрософт предлагает обновления для Windows 2000 SP3 и более поздних версий операционной системы Windows. Вы можете попробовать загрузить обновления, которые вам не удалось установить, из каталога Центра обновления Майкрософт и установить их вручную, чтобы посмотреть, сможете ли вы решить эту проблему.
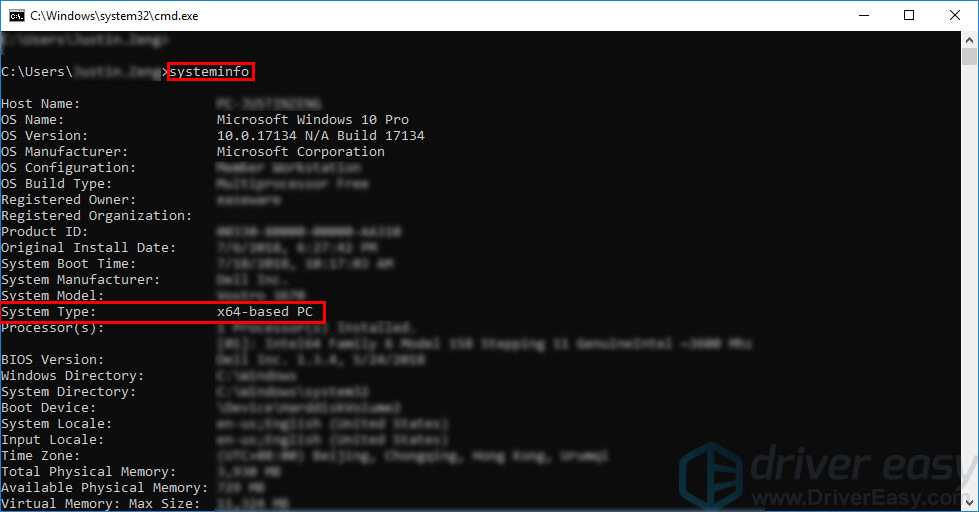
Перед тем, как скачивать обновления, вам необходимо проверьте тип системы вашей ОС Windows. Если вы не знаете, как это сделать, следуйте инструкциям ниже, чтобы узнать тип вашей системы:
- На клавиатуре нажмите клавиша с логотипом Windows и р в то же время, чтобы открыть диалоговое окно «Выполнить». Тип cmd и нажмите Войти , чтобы открыть командную строку.
- Введите командную строку системная информация и нажмите Войти чтобы просмотреть тип вашей системы.
Запись: ‘ ПК на базе X64 »Означает, что ваша ОС Windows 64-битный ; ‘ ПК на базе X86 »Означает, что ваша ОС Windows 32-битный .
Теперь вы можете выполнить следующие действия, чтобы загрузить обновления Windows вручную:
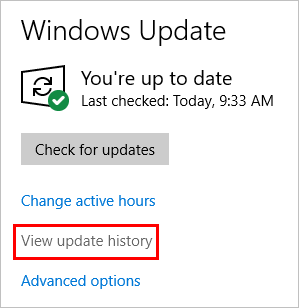
- На клавиатуре нажмите клавиша с логотипом Windows и введите Центр обновления Windows , затем нажмите Войти открыть Центр обновления Windows .
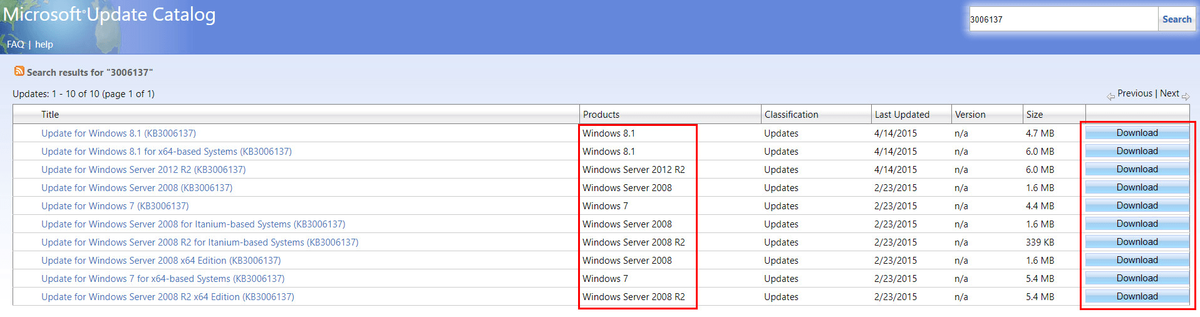
- Нажмите Посмотреть историю обновлений чтобы проверить обновления, которые вам не удалось установить. Например, если вам не удалось установить обновление KB3006137, вы можете загрузить это обновление и установить его вручную.
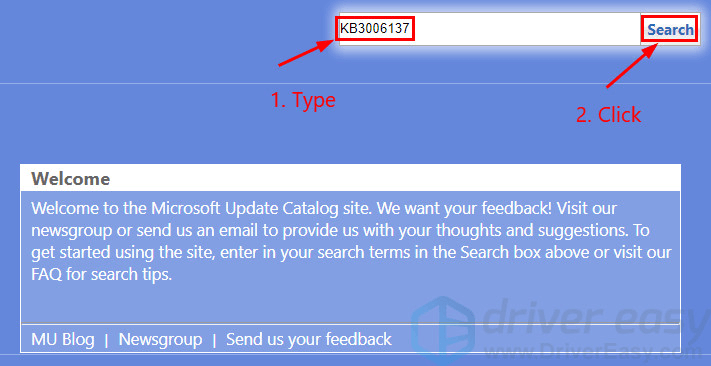
- Визит Каталог Центра обновления Майкрософт .
- Введите номер обновления, которое вы хотите загрузить. В этом примере введите KB3006137 и затем щелкните Поиск .
- В списке результатов поиска выберите правильное обновление для вашей операционной системы и нажмите Скачать .
Примечание. Если ваш ОС Windows 64-битная , вам следует скачать обновление, в названии которого содержится « x64 на базе ».
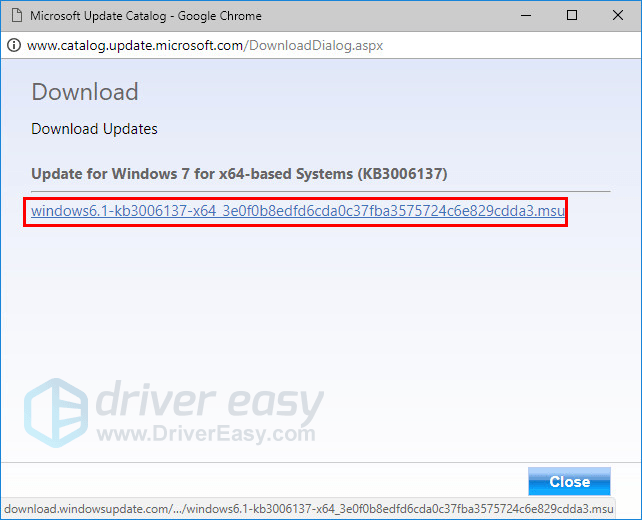
- Во всплывающем окне щелкните ссылку, чтобы начать загрузку обновлений.
- Двойной щелчок загруженный файл и следуйте инструкциям на экране, чтобы установить обновление.
Перезагрузите компьютер, чтобы проверить, сохраняется ли эта проблема. Если нет, поздравляю! Вы решили эту досадную проблему! Но если эта проблема появится снова, вы можете попробовать последнее исправление, указанное ниже.
Совет: хотите, чтобы мы решили проблему за вас?
Если ни одно из вышеперечисленных исправлений не помогло или у вас просто нет времени или уверенности, чтобы устранить проблему самостоятельно, попросите нас исправить ее за вас. Все, что вам нужно сделать, это Pro версия (всего 29,95 долларов США), и вы получаете бесплатную техническую поддержку в рамках покупки. Это означает, что вы можете напрямую связаться с нашими компьютерными специалистами и объяснить свою проблему, и они расследуют ее, чтобы узнать, могут ли они решить ее удаленно.
ВАЖНЫЙ: Пожалуйста прикрепите URL этой статьи когда вы свяжетесь с нами, чтобы мы могли помочь вам решить проблему как можно скорее. Вы можете ожидать от нас ответа в течение двух рабочих дней.
Вы можете легко связаться с нами через Инструмент быстрой обратной связи с драйверами . Чтобы узнать, как использовать этот инструмент, перейдите по этой ссылке:
https://www.drivereasy.com/help55/feedback/ .
Thanks to its user-friendly design and extensive functionality, Windows 10 is a popular operating system all over the globe. However, users often find problems while updating the operating system. One of the most typical issues encountered by Windows 10 users is the Windows 10 update stuck at 100%. This is inconvenient since it prohibits users from accessing their systems and performing their tasks.
This article will explore several practical solutions for fixing Windows 10 Update Stuck at 100. We will also suggest software that helps you recover lost data when dealing with this problem. Let’s get started!
| Workable Solutions | Step-by-step Troubleshooting |
|---|---|
| 1. Ensure Windows 10 Update | Before attempting to resolve the Windows 10 update stopped at 100% problem…Full steps |
| 2. Remove USB Peripherals | When a USB peripheral is attached to a computer, the system recognizes…Full steps |
| 3. Run Windows Troubleshooter | The Windows Update troubleshooter is an in-built utility designed to…Full step |
| 4. Relaunch Windows Update | The Windows Update Service ensures that your machine is operating…Full steps |
| More Fixes | The existence of viruses or malware on your computer might cause…Full steps |
The Windows 10 update stuck at 100% is a typical problem many Windows 10 users have when upgrading; other errors like Windows update error code 0x80080005 also puzzle many users in upgrading their computers. When a user boosts their operating system, the process might get stuck at 100%, preventing the user from finishing the update and accessing their machine. This problem can be caused by various factors, including faulty system files, obsolete drivers, or competing apps operating in the background.
The update procedure is critical for keeping your system updated with the most recent security patches, bug fixes, and new features. As a result, it is essential to address the Windows 10 update stuck at 100% problem as soon as possible to guarantee the proper functioning of your system.
How to Solve Windows 10 Update Stuck at 100 [8 Methods]
Fortunately, various efficient methods are available to help you resolve the Windows 10 update stopped at 100% problem. These solutions vary from simple troubleshooting actions to more complex approaches. In this section, we have outlined some of the best solutions. We have tried and tested these methods to ensure they work for you. Let’s look at them in detail here:
1. Make Sure the Windows 10 Update Is Stuck
Before attempting to resolve the Windows 10 update stopped at 100% problem, ensure the update process is stalled. The update process can take longer than usual to finish, and it can seem stuck at 100% when it is not. As a result, it is critical to wait some time to determine whether the updating process continues. Depending on the update size and your machine’s speed, the update process should take around 20-30 minutes.
Inspect your system’s challenging disk activity to see whether the Windows 10 update is stalled. If the hard drive LED is flickering, the update procedure is still in progress, and you should wait for it to finish. If the hard drive LED is not flashing, it might mean that the update process has been stalled. For example, when you use the Windows Update option to upgrade from Windows 10 to 11, the hard drive LED stops flickering; it refers to the Windows 11 installation being stuck.
2. Remove Any USB Peripherals on the Computer
When a USB peripheral is attached to a computer, the system recognizes it as a new device and attempts to install the required drivers. This operation can sometimes interfere with the Windows 10 update process, leading it to get stuck at 100%.
External hard drives, USB flash drives, printers, scanners, and other USB-connected devices are examples of USB peripherals. By eliminating these peripherals, you avoid any conflicts that can develop during the upgrade process, enabling it to run smoothly. As a result, before upgrading your system, you should unplug any USB devices attached to your computer.
3. Fix the Problem with Windows Update Troubleshooter
The Windows Update Troubleshooter is an in-built utility designed to investigate and fix update-related problems. Try running it to test whether the Windows Update Troubleshooter can fix the problem. The procedure is as follows:
Step 1. Press the Windows key and then type Troubleshoot into the search bar that appears.
Step 2. Select «Troubleshoot» from the list of search results.
Step 3. Click the «Other Troubleshoot» button, then pick «Windows Update» in the following box.
Step 4. Once done, click the «Run» tab.
Step 5. Click «Apply» once done.
Step 6. Please refer to the on-screen prompts to resolve this problem.
Note: To test whether the update can be installed, run Windows Update once again.
What to do if Windows Update is not working? The following passage will fix it for you.
![]()
4. Relaunch the Windows Update Service on Computer
The Windows Update Service ensures that your machine is operating the most current version of the Windows operating system. This is the responsibility of the user. If you turn off the Windows Update Service on your computer, the machine cannot automatically search for and download the most current operating system update. Therefore, you should attempt to restart the Windows Update Service to prevent the Windows update from being stalled. Here are the steps to do so:
Step 1. Open «Run» by pressing Win + R.
Step 2. Enter services.msc when prompted in Run.
Step 3. Find the Windows Update Service with a right-click on the next window.
Step 4. From the menu that appears, choose «Properties». The «Stop» button can be found in the Properties dialogue. Click it.
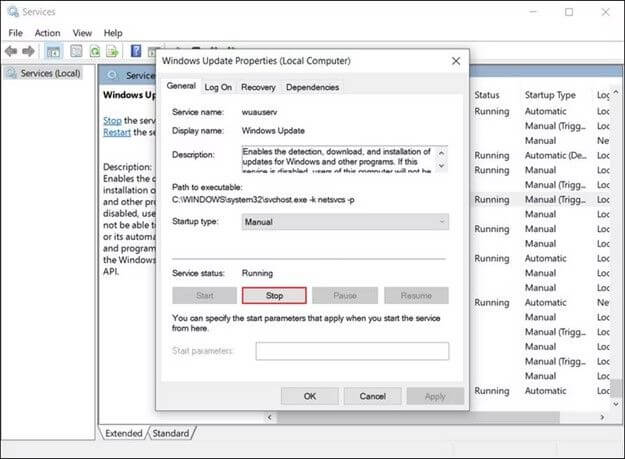
Note: Don’t press the Start button again for a few seconds.
Step 5. Expand the corresponding dropdown menu to choose «Automatic as the Startup type».
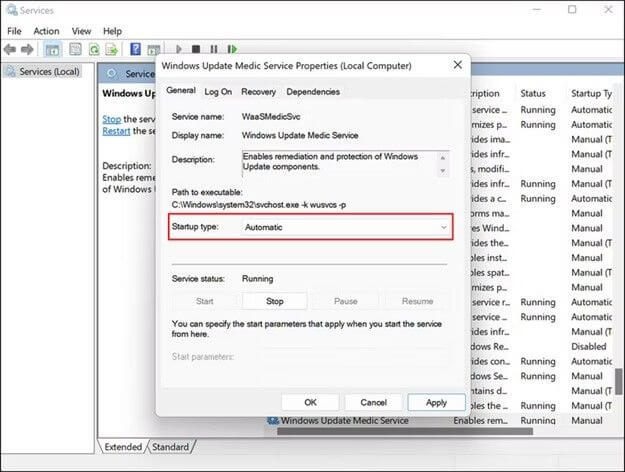
Step 6. To commit your changes, choose «Apply» > «OK».
5. Remove Computer Viruses or Malware
The existence of viruses or malware on your computer might cause the Windows 10 upgrade to get stuck at the 100 percent mark. These malicious applications can potentially interrupt the update process, among other things, and interfere with the system’s regular functioning. As a result, before updating to Windows 10, you should clean your PC of any viruses or malware.
To see whether this is the case, you can use the security software on your computer to do a scan. If you do not have an external security application installed, you can boot the Command Prompt to launch built-in repair tools such as SFC, DISM command, and CHKDSK. If you remove them beforehand, your Windows 10 upgrade will go more efficiently, and your machine will be safer from malware and viruses.
6. Perform a Clean Boot on Windows
A clean boot can start Windows with a bare minimum of drivers and starting apps to minimize software incompatibilities while installing Windows updates. A clean boot requires you to complete the following:
Step 1. In the Run window, type msconfig and hit Enter.
Step 2. Then, click the «Services menu» item. To conceal all Microsoft services, choose this check box.
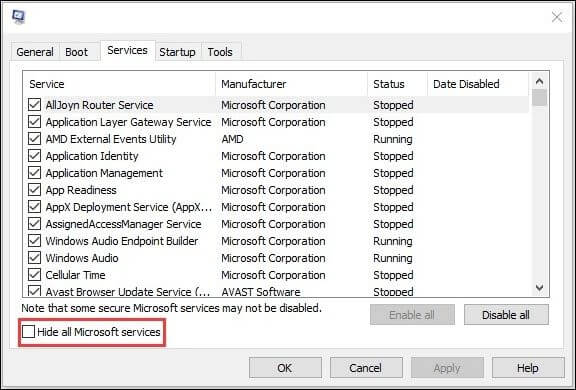
Step 3. To finish, select «Disable all» and «Apply».
Step 4. To access the Task Manager, choose the «Startup» menu item and click «Open».
Step 5. Select the first running program in the Task Manager window, then click «Disable».
Note: Here, you must manually shut down each running program.
Step 6. Click «OK» to exit Task Manager once you’ve disabled all unwanted software.
After that, you can restart your machine and attempt to upgrade to Windows again. If the «working on updates 100% complete» issue does not appear after a clean boot, it was caused by an application.
Suppose you find the solutions above work to fix your problems. In that case, sharing this article with all your friends or colleagues on various social platforms such as Twitter and Instagram is appreciated.
7. Run DISM Command in Safe Mode
Another option is using the DISM command in Safe Mode to repair corrupted files. Here are the steps you should take:
Step 1. In the search bar, enter «CMD,» right-click the first result and choose «Run as administrator.»
Step 2. Enter each of the following instructions after typing it:
Dism /Online /Cleanup-Image /CheckHealth Dism /Online /Cleanup-Image /ScanHealth Dism /Online /Cleanup-Image /RestoreHealth
Step 3. Allow the DISM command to run through to completion. Try the following commands if the ones above don’t work:
Dism /Image:C:\offline /Cleanup-Image /RestoreHealth /Source:c:\test\mount\windows Dism /Online /Cleanup-Image /RestoreHealth /Source:c:\test\mount\windows /LimitAccess
Restarting your computer should resolve the «Windows is stuck on updating» problem.
8. Run System Restore in Windows Recovery Environment
System restores can generate restore points automatically whenever you install a new program, driver, or Windows update or manually create a restore point. However, any software, drivers, or updates updated after the restore point was made will be deleted. Follow the steps below:
Step 1. To access the Control Panel (Desktop app), press the Start button, then enter the Control Panel into the search box next to the Start button on the taskbar.
Step 2. Find System Restore in the Control Panel, click on it, and then choose «Recovery», «Open System Restore», and Next.
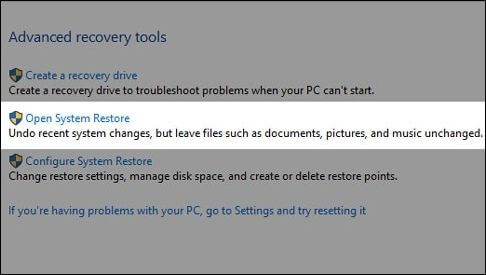
Step 3. Select the backup before installing the faulty software, driver, or update, and then hit «Next» > «Finish».
How to Restore Lost Data When Windows 10 Update Stuck/Failed
Users can be frustrated if they lose data because of a botched or stopped Windows 10 upgrade. Fortunately, data recovery software programs are available to assist you in recovering deleted files on Windows 10 and restoring lost data in various situations. EaseUS Data Recovery Wizard is one such application, a strong and dependable data recovery program that can recover lost data due to failed or blocked Windows 10 updates.
EaseUS Data Recovery Wizard is a user-friendly software that even novices can use. It offers an easy-to-use interface that walks you through the recovery procedure. The program can recover many contents, including images, movies, and documents, from various storage media, including hard disks, USB drives, SD cards, and more.
Sometimes, problems may occur after the update. For example, desktop file folders disappear after Windows 10 upgrade. What’s more, data loss is another problem usually discussed after upgrading. EaseUS software also can help you recover lost files after Windows 10 update.
EaseUS Data Recovery Wizard
- Recover deleted files or lost files, documents, photos, audio, music, and emails effectively.
- Support Windows 11/10/8/7 and Windows Server 2022/2019/2016/2012/2008/2003.
- Support data recovery for system crashes and various scenarios, including sudden deletion, formatting, hard drive corruption, and virus attack.
Also, EaseUS software is easy to operate; only three steps to recover the lost data.
Step 1. Select a location and start scanning
Launch EaseUS Data Recovery Wizard and choose the partition where you lost data. Then, click «Scan».

Step 2. Filter and preview files
Use the file format filter on the left or upper right corner to find the files you need. Then, you can click the «Preview» button or double-click a file to preview its content.

Step 3. Recover lost data or files
Click the checkbox next to the file and click «Recover» to restore the lost data to a secure place.

Conclusion
It’s frustrating when the Windows 10 update gets stuck or fails, but there are ways to fix the problem and retrieve any data that has been lost. If you’ve lost files or data due to a Windows 10 upgrade that didn’t go smoothly or got stuck, EaseUS Data Recovery Wizard will help you get it back. EaseUS is an excellent program for recovering deleted files on a computer due to its intuitive design and robust recovery features. You can use EaseUS to recover lost information after a system crash, formatting, or accidental deletion of files.
2
Windows 10 Update Stuck at 100 FAQs
Some frequently asked questions related to Windows updating:
1. How to fix the Windows update not working?
Try restarting your computer, running the Windows Update Troubleshooter, deleting the Windows Update cache, verifying your internet connection, turning off your antivirus software, or manually downloading and installing updates to see if it fixes the Windows update not working. If none of these suggestions work, contact Microsoft support or a professional for more help.
2. Why is Windows 10 update takes forever?
The Windows 10 update may take a while for various reasons, including a sluggish internet connection, obsolete technology, a lack of available storage, incompatible applications, or a corrupted update file. The size and complexity of the update may also be a factor that will lengthen the installation time.
3. How long will Windows 10 21H2 update take?
The speed of your internet connection, the functionality of your machine, and the size of the update are just a few of the variables that might affect how long it takes to install the Windows 10 21H2 update. However, the installation procedure might take 20 minutes to many hours to finish.
4. How to update Windows from 20H2 to 21H2?
To upgrade your Windows 10 from version 20H2 to version 21H2, utilize the Windows Update function or manually download the update from the Microsoft website. To utilize Windows Update:
- 1. Go to «Settings» > «Update & Security» > «Windows Update».
- 2. Click on «Check» for updates. If an update is available, click the «Download and Install» button.
Many people have recently reported the very same issue — Windows update stuck at 100. If you are one of them and trying to find some efficient methods to get rid of this issue, then this post written by MiniTool can help you.
Windows Updates Stuck at 100
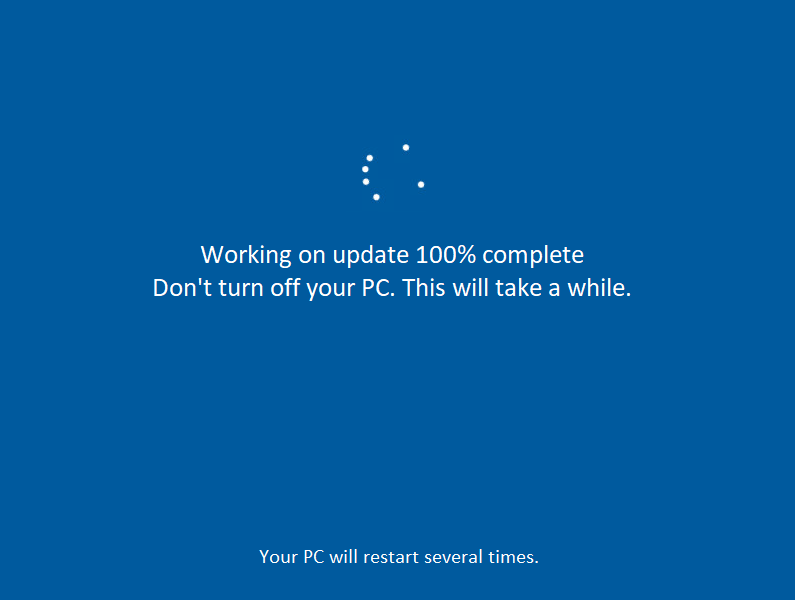
Windows Update is a key part of the system to ensure smooth system performance. Windows 11/10 automatically downloads and installs important updates from Microsoft Server, but sometimes update installations get stuck or freeze when processing updates on Startup.
You may see the following message: “Working on update 100% complete. Don’t turn off your PC. This will take a while.” and you will be stuck on the Windows update screen. There are many reasons for the issue, but most of the time it caused by the conflicts with software or drivers.
Now, it’s time to see how to actually fix the “Windows update stuck at 100” issue with the below-listed troubleshooting guide.
How to Fix the “Windows Updates Stuck at 100” Issue
- Remove any USB peripherals
- Run Windows Update Troubleshooter
- Rename SoftwareDistribution Folder
- Perform a Clean Boot
- Uninstall the Particular Update
- Run DISM in Safe Mode
- Run Automatic Repair
- Perform System Restore in WinRE
It’s frustrating to encounter the “Windows stuck on update” error frustrating, but you should notice that your update probably isn’t stuck, and you’ll just have to wait for a while to complete the installation. If it is still stuck at the interface, you can try the methods below.
Method 1: Remove Any USB Peripherals
If your Windows update stuck at 100, the first thing you can try is to remove any external device connected to PC and make sure you also disconnect any device connected via USB like pen drives, mouse or keyboard, portable hard disk, etc.
Once you have successfully removed any USB peripherals, try to update the Windows again and check if the issue has been fixed or not.
Method 2: Run Windows Update Troubleshooter
If you are still stuck on the screen, then you should restart your computer in Safe Mode before you do any operations. You can use Windows 11/10 recovery bootable media like a DVD/USB bootable drive to enter WinRE to enter into Safe Mode. Here are the steps:
Step 1: Insert your Windows installation CD/DVD or USB bootable drive to your computer, and start the computer.
Step 2: Enter the BIOS.
Step 3: Choose the DVD or USB flash drive as the first boot device and boot the Windows 11/10 PC from the device.
Step 4: Click Repair your computer to enter into WinRE successfully.
Now, you can continue to enter Safe Mode.
Step 1: From the Choose an option screen, click the Troubleshoot option. Next, click Advanced options.
Step 2: Click the Startup Settings option.
Step 3: Click the Restart button.
Step 4: Then you will see multiple options for startup. Press the F4 key to enable Safe Mode.
Tip: You should try Method 2 to 6 in Safe Mode. Try 7 to 8 in WinRE (Windows Recovery Environment ).
Now your PC will restart in Safe Mode. Then running Windows Update Troubleshooter is the easiest and fastest method to fix the “Windows update stuck at 100” error. Windows Update Troubleshooter is a built-in feature designed to fix Windows update errors.
Now you can follow the instructions step by step below to run Windows Update Troubleshooter:
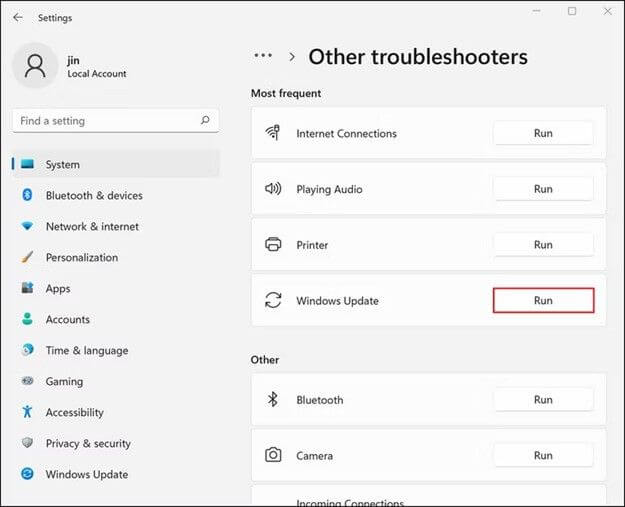
Step 1: Type Settings in the Search box to open it.
Step 2: Choose Update & Security and then select Troubleshoot in the left panel.
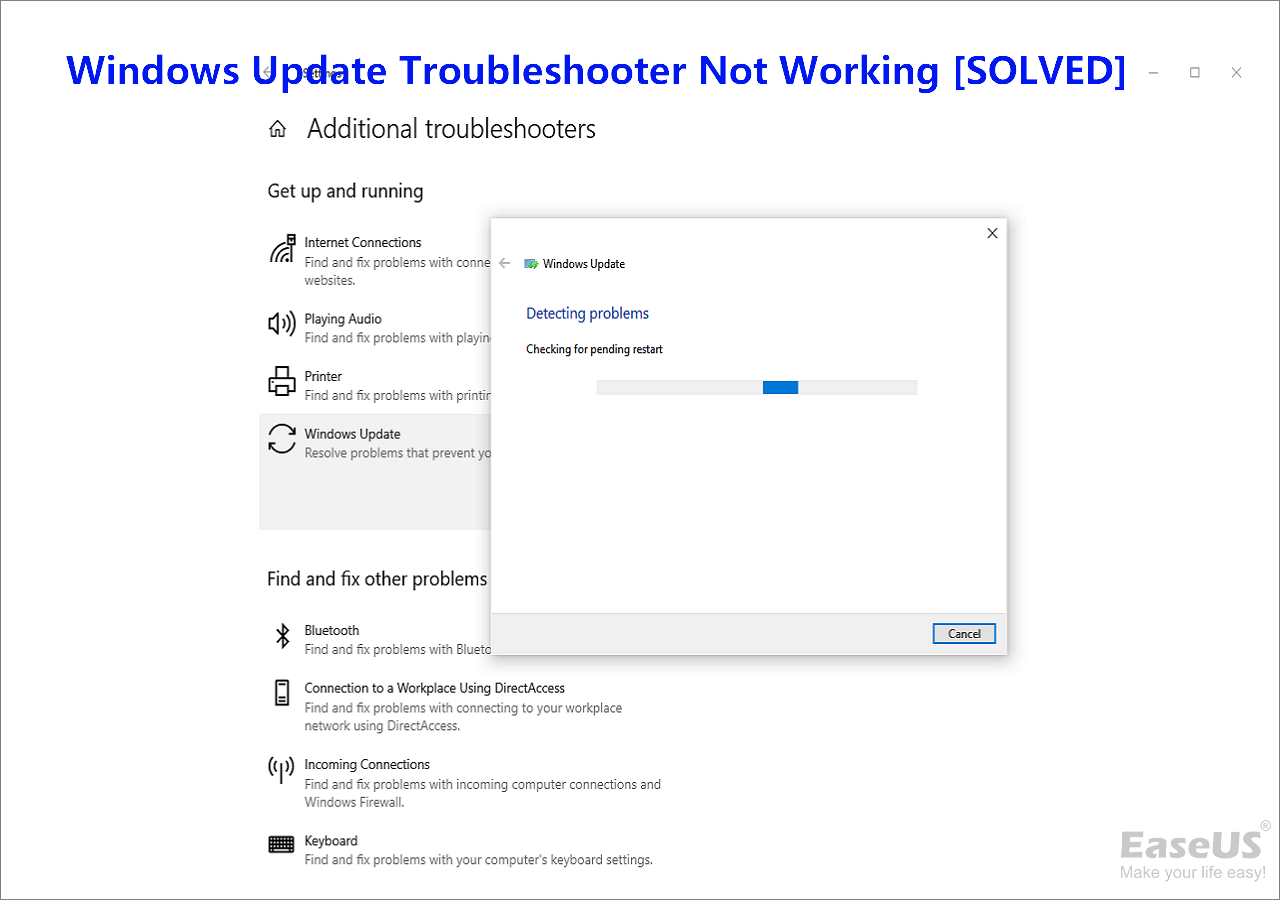
Step 3: Click Windows Update under the Get up and running section in the right panel and then click Run the troubleshooter.

Step 4: It will start to detect the existing problems and you just need to wait for the process finished. Then click Apply this fix.
Step 5: Follow the on-screen instructions to finish the repair process.
Restart your computer and then check if the “working on updates 100 complete” issue still exists. If this method cannot fix the error, try the next methods.
Method 3: Rename SoftwareDistribution Folder
The next method for you is to rename the SoftwareDistribution folder. Here is how to do that:
Step 1: Type Command Prompt in the Search box, then right-click the first result to choose Run as administrator.
Step 2: Now type the following commands to stop Windows Update Services and then press Enter after each one:
net stop wuauserv
net stop cryptSvc
net stop bits
net stop msiserver

Step 3: Next, type the following command to rename SoftwareDistribution Folder and then press Enter:
ren C:\Windows\SoftwareDistribution SoftwareDistribution.old
Step 4: Finally, type the following commands to start Windows Update Services and press Enter after each one:
net start wuauserv
net start cryptSvc
net start bits
net start msiserver
Reboot your PC and check if the “working on updates 100” issue has gone.
Tip: To learn more information about renaming or deleting SoftwareDistribution Folder, this post – How to Rename or Delete Software Distribution Folder on Windows is what you need.
Method 4: Perform a Clean Boot
Performing a clean boot can help you start Windows through a minimal set of drivers and startup programs, which can avoid software conflicts while installing Windows updates. In order to perform a clean boot, you need to do:
Step 1: Type msconfig in the Run box(pressing the Windows +R keys), and press Enter.
Step 2: Then go to the Services tab. Check the Hide All Microsoft Services box.
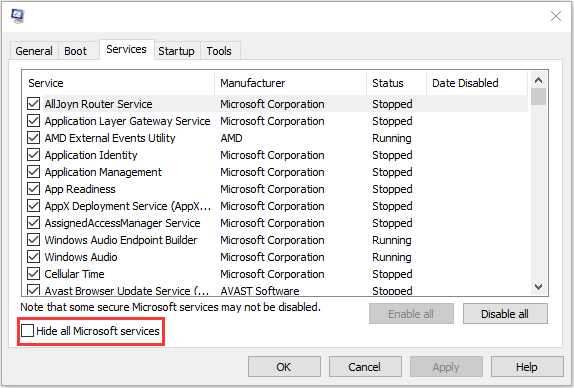
Step 3: Now, click the Disable all button, and click Apply to save the change.
Step 4: Navigate to the Startup tab and click Open Task Manager.
Step 5: In the Task Manager tab, select the first enabled application and click Disable. Here you need to disable all enabled applications one by one. After disabling all programs, close Task Manager and click OK.
Afterward, you can restart the computer to update Windows again. If the “working on updates 100% complete” error doesn’t occur when in a clean boot state, then it indicates that one of the programs was causing the error.
Method 5: Uninstall the Particular Update Causing the Issue
If the error still occurs, you can also try uninstalling the particular update that causes the issue. The steps are as follows:
Step 1: Open Control Panel. Click the Programs and Features section.
Step 2: From the left-hand menu, click View installed updates.

Step 3: Now right-click the particular update which is causing this problem and select Uninstall.
Restart your PC and the “Windows update stuck at 100” issue should be fixed.
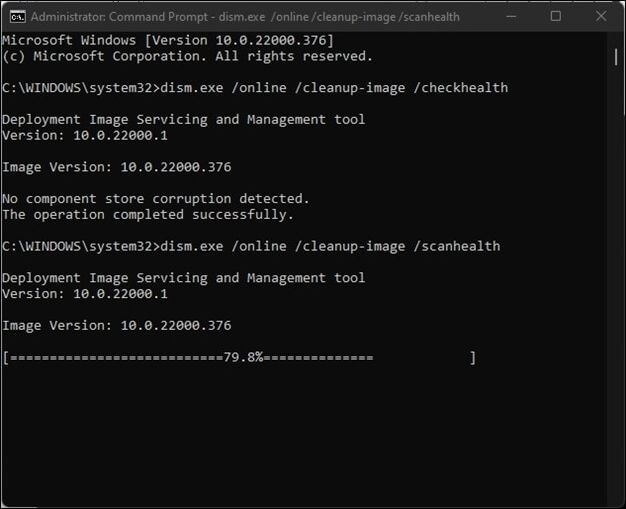
Method 6: Run DISM in Safe Mode
You can also try running DISM, which allows you to repair corrupted system files. Please refer to the following steps:
Step 1: Type cmd in the Search box, then right-click the first result to choose Run as administrator.
Step 2: Type the following commands and press Enter after each one:
Dism /Online /Cleanup-Image /CheckHealth
Dism /Online /Cleanup-Image /ScanHealth
Dism /Online /Cleanup-Image /RestoreHealth
Step 3: Let the DISM command run and wait for it to finish. If the above commands won’t work, then try the commands below:
Dism /Image:C:\offline /Cleanup-Image /RestoreHealth /Source:c:\test\mount\windows
Dism /Online /Cleanup-Image /RestoreHealth /Source:c:\test\mount\windows /LimitAccess
Reboot your PC and this should fix the “Windows stuck on update“ issue.
Method 7: Run Automatic Repair
If the working on updates 100 complete issue still occurs, you have to run Automatic Repair. I will show you how to run it step by step.
Step 1: Click Repair your computer in the bottom-left corner to enter WinRE.

Step 2: You need to click Troubleshoot in the popup window to continue.
Step 3: Click Advanced options to go to the next page.
Step 4: Choose the Startup Repair in the Advanced options screen and wait for the process to be completed.
Now, when the process is finished, you can restart your computer and run Windows update to check whether the working on updates 100 is solved.
Tip: If you find that Windows Automatic Repair is not working, this post – How To Fix “Windows Automatic Repair Not Working” can help you fix this issue.
Method 8: Perform System Restore in WinRE
If the previous methods don’t work, you should perform a system restore via WinRE. Here is how to do that:
Tip: Only if you have created a restore point in advance, you can try this method.
Step 1: Enter WinRE.
Step 2: You should click Troubleshoot in Choose an option, and then choose Advanced options.
Step 3: Choose System Restore in Advanced options.

Step 4: Follow the on-screen instructions to complete the restore.
Now, try to run Windows update and the issue should be fixed.
More useful solutions you can find by watching this video:
My Windows update was stuck at 100 and I didn’t know how to fix it. Thanks to this post, it helped me solve the issue. I’d like to share it with more friends.Click to Tweet
What to Do After Solving Windows Update Stuck at 100?
After solving the problem of Windows update stuck at 100%, you had better create a system image to restore your system when it crashes.
Referring to create a system image, it is highly recommended you to use MiniTool ShadowMaker – a piece of fantastic and professional backup software. It is pretty easy and safe to back up and restore your system.
In addition to backing up your operating system, you can also use MiniTool ShadowMaker to back up files and folders, disks and partitions. What’s better, you can use it for free within 30 days, so just download it and have a try.
MiniTool ShadowMaker TrialClick to Download100%Clean & Safe
Here are the instructions to create a system image with MiniTool ShadowMaker:
Step 1: Launch MiniTool ShadowMaker, then click Keep Trial.
Step 2: MiniTool ShadowMaker selects the source by default. Thus, you just need to choose the backup destination.
Step 3: Go to the Backup page. Click Back Up Now to start creating a system image.
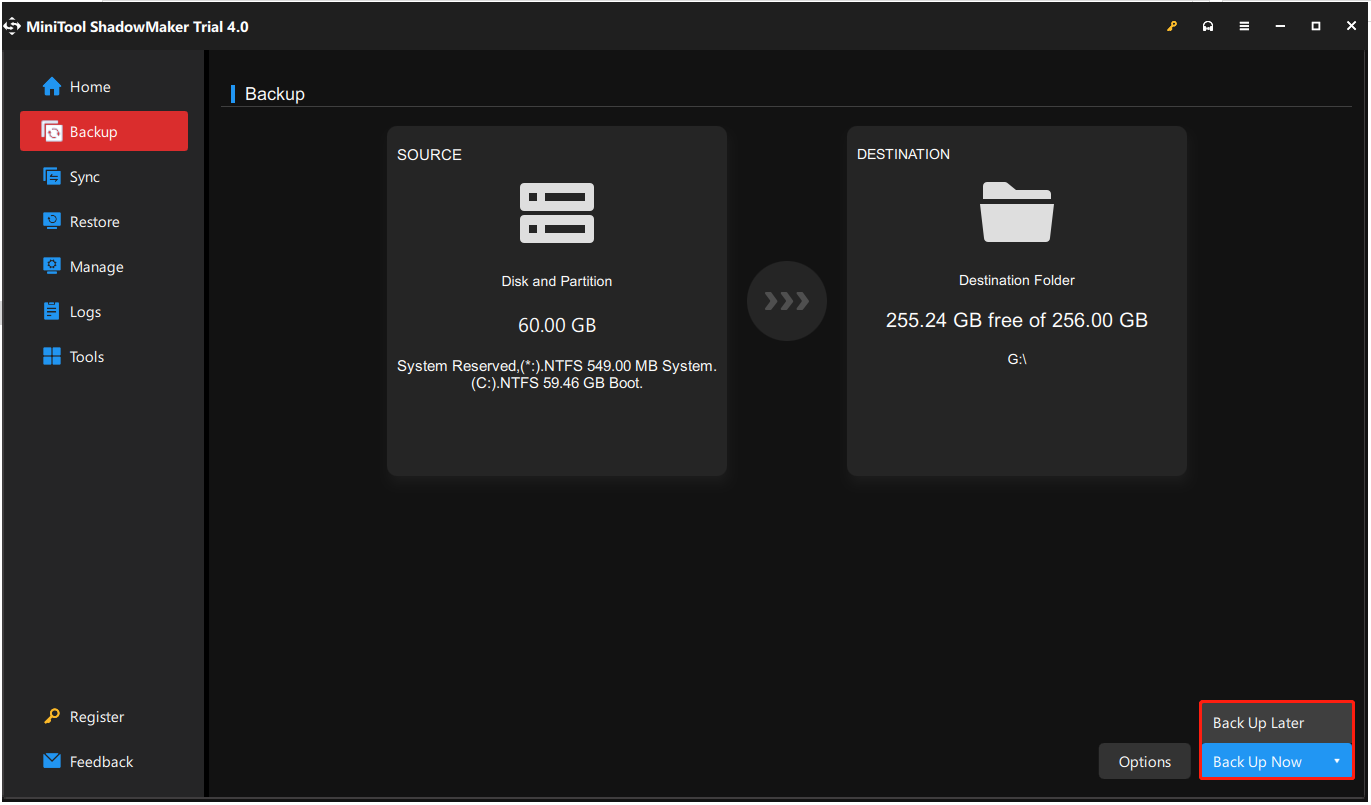
Tip: If you click Back Up Later, then you can click Back up Now to begin the backup task on the Manage page.
Step 4: Wait for MiniTool ShadowMaker to finish backing up the operating system.
In order to keep my system safe, I make a backup of it successfully with MiniTool ShadowMaker. It helps me a lot!Click to Tweet
Final Words
To sum up, this post has introduced what causes the error of Windows update stuck at 100 and shown 8 solutions to fix it. If you come across the same issue, try these solutions. If you have any better solution to fix the issue, you can share it in the comment zone.
After fixing this problem, it is recommended you create a system image. If you have any problem when using MiniTool program, please feel free to contact us via the email [email protected] and we will reply to you as soon as possible.
Windows Updates Stuck at 100 FAQ
How long should Windows update take?
In general, the update should be between 10 and 30 minutes on a computer. However, if you install your Windows on a conventional hard drive, the process will take a while. You can schedule the installation within the next five days, but you cannot delay it indefinitely.
Can I stop a Windows update in progress?
- Search for Control Panel in the Windows 10 Search box and select the relevant result.
- Select Security and Maintainance from the list of menu options.
- Click Maintenance, select Stop Maintenance.
What happens if I shut down during the Windows update?
Your PC will be seriously damaged if you shut down in the middle of the update installation. If the PC shuts down because of power failure, you need to wait for some time and then restart the computer to install the updates one more time. Your computer is likely to become bricked.
Can you fix a bricked computer?
Bricked devices cannot be powered on and function properly. Bricked devices cannot be fixed by conventional methods. For example, if Windows fails to start on your computer, your computer is not “bricked” because another operating system can be installed on it.
 Одна из распространенных проблем пользователей Windows 10 — остановка или невозможность загрузки обновлений через центр обновлений или их установки. При этом в центре обновлений, как правило, отображаются те или иные коды ошибок, которые могут отличаться в зависимости от конкретной ситуации.
В этом материале — о том, что делать и как исправить ситуацию, когда обновления не скачиваются в Windows 10, либо загрузка останавливается на определенном проценте, о возможных причинах проблемы и об альтернативных способах загрузки в обход центра обновлений. Если предложенные ниже способы не сработают, настоятельно рекомендую ознакомиться с дополнительными методами в инструкции Как исправить ошибки Центра обновлений Windows 10, 8.1 и Windows 7.
Утилита устранения неполадок центра обновления Windows
Первое из действий, которое имеет смысл попробовать — использовать официальную утилиту для устранения неполадок при загрузке обновлений Windows 10, к тому же, судя по всему, она стала более эффективной, чем в предыдущих версиях ОС.
Шаги будут следующими:
- Найти необходимое средство устранения неполадок можно в «Панель управления» — «Устранение неполадок» (или «Поиск и исправление проблем», если вы просматриваете панель управления в виде категорий).
- Внизу окна в разделе «Система и безопасность» выберите «Устранение неполадок с помощью Центра обновления Windows».

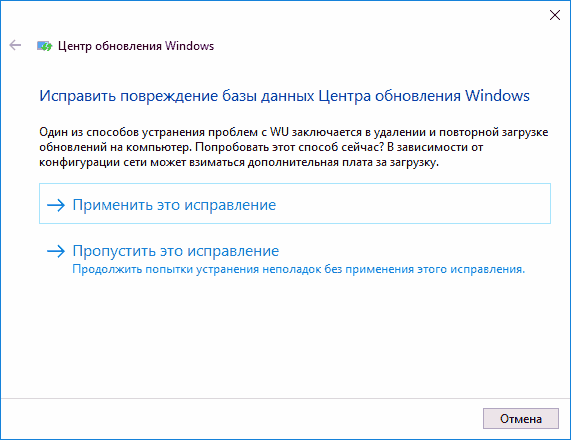
- Запустится утилита для поиска и устранения проблем, мешающих скачиванию и установке обновлений, вам останется лишь нажать кнопку «Далее». Часть исправлений будут применены автоматически, некоторые потребуют подтверждения «Применить это исправление», как на скриншоте ниже.

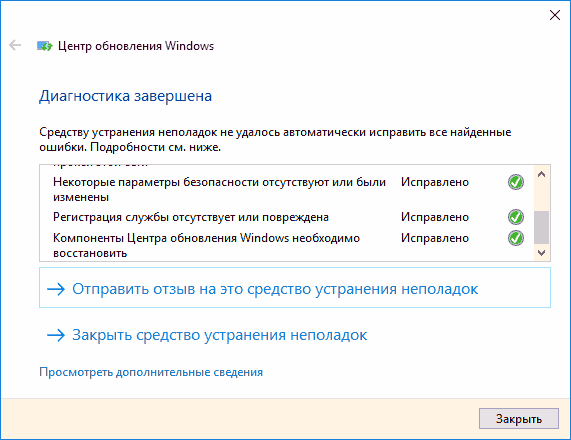
- После окончания проверки, вы увидите отчет о том, какие проблемы были найдены, что было исправлено, а что исправить не удалось. Закройте окно утилиты, перезагрузите компьютер и проверьте, стали ли загружаться обновления.
- Дополнительно: в разделе «Устранение неполадок» в пункте «Все категории» есть также утилита для устранения неполадок «Фоновая интеллектуальная служба передачи BITS». Попробуйте также запустить и её, так как при сбоях указанной службы также возможны проблемы со скачиванием обновлений.

В Windows 10 устранение неполадок можно найти не только в панели управления, но и в Параметры — Обновление и безопасность — Устранение неполадок.
Ручная очистка кэша обновлений Windows 10
Несмотря на то, что действия, которые будут описаны далее, утилита устранения неполадок также пытается выполнить, у нее не всегда это получается. В этом случае можно попробовать очистить кэш обновления самостоятельно.
- Отключитесь от Интернета.
- Запустите командную строку от имени администратора (можно начать набирать в поиске на панели задач «Командная строка», затем нажать по результату правой кнопкой мыши по найденному результату и выбрать «Запустить от имени администратора»). И по порядку введите следующие команды.
- net stop wuauserv (если вы видите сообщение о том, что не удалось остановить службу, попробуйте перезагрузить компьютер и выполнить команду снова)
- net stop bits
- После этого, зайдите в папку C:\Windows\SoftwareDistribution\ и очистите ее содержимое. Затем вернитесь к командной строке и по порядку введите следующие две команды.
- net start bits
- net start wuauserv
Закройте командную строку и попробуйте снова загрузить обновления (не забыв вновь подключиться к Интернету), используя Центр обновлений Windows 10. Примечание: после этих действий выключение компьютера или перезагрузка могут затянуться на более продолжительное, чем обычно, время.
Как скачать автономные обновления Windows 10 для установки
Существует также возможность загрузить обновления не с помощью центра обновлений, а вручную — из каталога обновлений на сайте Microsoft или с помощью сторонних утилит, таких как Windows Update Minitool.
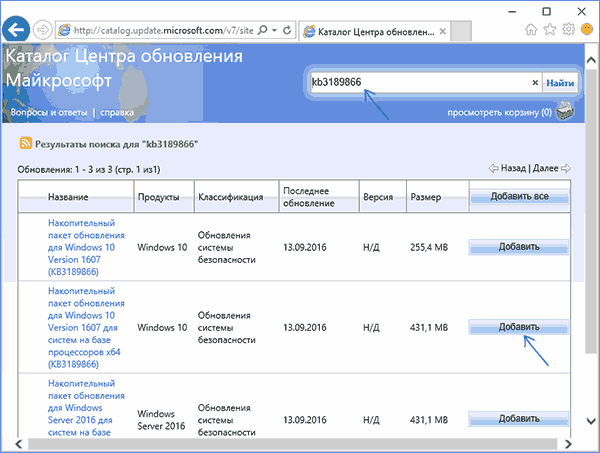
Для того, чтобы зайти в каталог обновлений Windows, откройте страницу https://catalog.update.microsoft.com/ в Internet Explorer (запустить Internet Explorer вы можете, используя поиск в панели задач Windows 10). При первом входе браузер также предложит установить необходимый для работы с каталогом компонент, согласитесь.
После этого всё, что останется — ввести в поисковую строку номер обновления, которое требуется скачать, нажать «Добавить» (обновления без указания x64 предназначены для x86 систем). После этого нажать «Посмотреть корзину» (в которую можно добавить несколько обновлений).
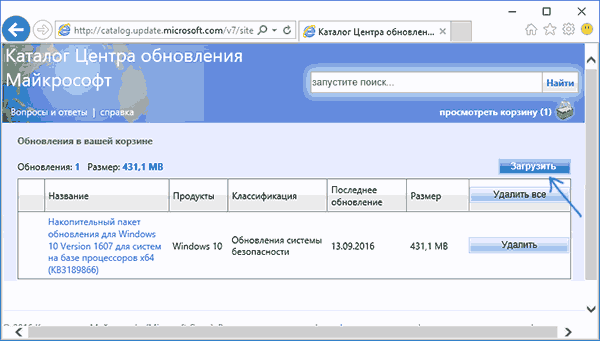
И в завершение останется лишь нажать «Загрузить» и указать папку для загрузки обновлений, которые после этого можно будет установить из этой папки.
Еще одна возможность загрузки обновлений Windows 10 — сторонняя программа Windows Update Minitool или другие программы управления обновлениями Windows 10. Программа не требует установки и при работе использует центр обновлений Windows, предлагая, однако, более широкие возможности.
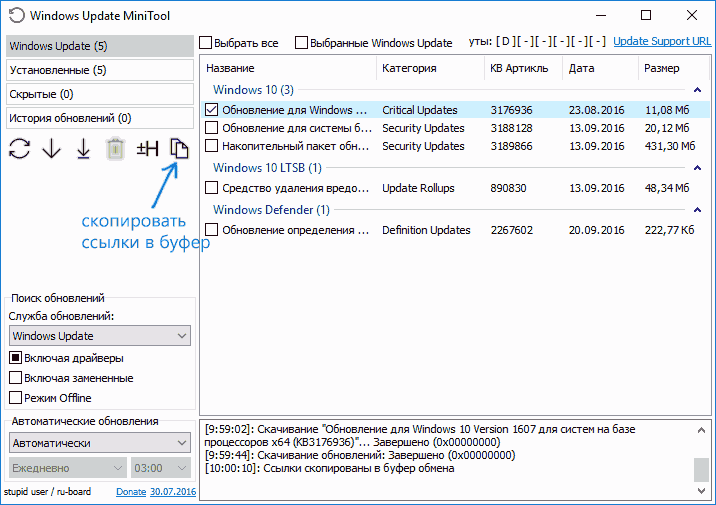
После запуска программы, нажмите кнопку «Обновить» для загрузки информации об установленных и доступных обновлениях.
Далее вы можете:
- Установить выбранные обновления
- Скачать обновления
- И, что интересно, скопировать в буфер обмена прямые ссылки на обновления для последующей простой загрузки .cab файлов обновлений с помощью браузера (в буфер копируется сразу набор ссылок, так что перед вводом его в адресную строку браузера, стоит вставить адреса куда-то в текстовый документ).
Таким образом, даже если загрузка обновлений невозможна с помощью механизмов Центра Обновлений Windows 10, сделать это все равно возможно. Более того, скаченные таким образом автономные установщики обновлений можно также использовать для установки на компьютерах без доступа к Интернету (или с ограниченным доступом).
Дополнительная информация
Помимо вышеописанных моментов, связанных с обновлениями, обратите внимание на следующие нюансы:
- Если у вас установлено «Лимитное подключение» Wi-Fi (в параметрах беспроводной сети) или используется 3G/LTE модем, это может вызывать проблемы с загрузкой обновлений.
- Если вы отключали «шпионские» функции Windows 10, то это могло стать причиной проблем со скачиванием обновлений вследствие блокировки адресов, с которых производится загрузка, например, в файле hosts Windows 10.
- Если вы используете сторонний антивирус или файрволл, попробуйте временно отключить их и проверить, не решилась ли проблема.
Ну и наконец, в теории вы ранее могли выполнить какие-то действия из статьи Как отключить обновления Windows 10, например, сторонние утилиты для отключения, что и привело к ситуации с невозможностью их скачивания. Если использовались сторонние программы, чтобы отключить обновления, попробуйте снова включить их с помощью той же программы.
Обновление операционной системы Windows 10 может быть достаточно долгим и сложным процессом. Иногда пользователи сталкиваются с ситуацией, когда обновление зависает на 100 процентах и никак не продвигается дальше. Это может вызывать раздражение и ощущение бесконечного ожидания. В этой статье мы рассмотрим несколько способов, как решить проблему, если обновление Windows 10 зависло на 100 процентах.
В первую очередь, необходимо сохранить спокойствие и не паниковать. Зависание обновления на 100 процентах не является необратимой ситуацией, и часто можно найти простое решение. Перезагрузка компьютера может быть первым шагом, который поможет разрешить проблему. Просто нажмите и удерживайте кнопку питания на вашем компьютере, пока он полностью не выключится, затем снова включите его и проверьте, продолжается ли обновление.
Если перезагрузка не дала результата, можно попробовать запустить обновление в безопасном режиме. Для этого нажмите и удерживайте клавишу Shift при нажатии на кнопку включения компьютера, затем выберите опцию «Перезагрузить». Когда компьютер загрузится в безопасном режиме, запустите обновление Windows 10 и проверьте, продвигается ли оно дальше отметки в 100 процентов.
Если ни перезагрузка, ни запуск в безопасном режиме не помогли, можно попробовать отключить временно все внешние устройства, подключенные к компьютеру. Отключите все USB-устройства, включая принтеры, сканеры, флэш-накопители и т.д. Также отсоедините внешние мониторы и любые другие устройства, которые не являются необходимыми для работы компьютера. После отключения всех устройств перезапустите обновление Windows 10 и проверьте, устраняется ли проблема зависания на 100 процентах.
Не забывайте, что перед выполнением любых манипуляций с компьютером необходимо сохранить все важные данные. Сделайте резервную копию своих файлов на внешнем накопителе или в облачном хранилище, чтобы избежать потерю информации в случае возникновения непредвиденных ситуаций.
Если ни одно из вышеперечисленных решений не помогло, возможно, необходимо обратиться к специалисту по поддержке или воспользоваться официальной помощью Microsoft. Эксперты в сфере информационных технологий смогут оказать квалифицированную помощь и предложить более специализированные решения проблемы зависания обновления на 100 процентах.
Проблема обновления Windows 10 на 100 процентах
Обновление Windows 10 может иногда вызывать проблемы и зависать на 100 процентах, что может быть очень раздражающим для пользователей. Эта проблема может произойти по разным причинам, включая проблемы с оборудованием, программными ошибками или некорректными настройками системы.
Если ваше обновление зависло на 100 процентах, есть несколько методов, которые могут помочь вам решить эту проблему:
- Перезагрузите компьютер. Иногда простая перезагрузка может решить проблему и позволить завершить обновление.
- Отключите антивирусное программное обеспечение. Временное отключение антивирусного ПО может помочь избежать конфликтов с обновлением.
- Удалите ненужные программы и файлы. Освободите место на жестком диске, чтобы у обновления было достаточно пространства для установки.
- Проверьте наличие обновлений драйверов. Установка последних версий драйверов для вашего оборудования может помочь избежать проблем с обновлением.
- Используйте инструменты устранения неполадок Windows. Windows 10 предоставляет ряд инструментов, которые могут помочь вам идентифицировать и исправить проблемы с обновлением.
Если ни один из этих методов не помог решить проблему, вы также можете обратиться в службу поддержки Windows или посетить официальный форум сообщества Windows 10, где другие пользователи могут предложить дополнительные решения.
Важно помнить, что перед выполнением любых действий, связанных с обновлением Windows 10, важно создать резервную копию вашей системы и данных, чтобы избежать потери информации в случае непредвиденных ситуаций.
Перезагрузка компьютера при зависшем обновлении
Для перезапуска компьютера при зависшем обновлении нужно следовать следующим шагам:
- Нажмите и удерживайте кнопку питания на компьютере до полной его выключенности. Это может занять несколько секунд.
- После полного выключения компьютера отсоедините его от источника питания. Для этого можно отключить блок питания от розетки или вытащить штекер из компьютера.
- Подождите несколько минут, чтобы компьютер полностью разрядился.
- Подключите компьютер к источнику питания и включите его.
После перезагрузки компьютера процесс обновления Windows 10 должен запуститься заново или продолжиться с того места, где он завис.
Если перезагрузка компьютера не помогла решить проблему с зависшим обновлением, можно попробовать использовать другие методы, такие как выполнение специальных команд или проверка на наличие вирусов. В случае необходимости обратитесь к специалисту или в службу поддержки Microsoft для получения дополнительной помощи.
Не забывайте регулярно обновлять операционную систему, чтобы использовать все новые функции и исправления ошибок, предлагаемые Microsoft.