Has
Windows XP Pro SP3
VM Tools
All Updates And Security Patches
- Addeddate
- 2019-10-01 21:01:42
- Identifier
- windowsxpprofessionalvmware.7z
- Scanner
- Internet Archive HTML5 Uploader 1.6.4
- Year
- 2019
comment
Reviews
Reviewer:
Nabil Hassani
—
favoritefavoritefavoritefavoritefavorite —
February 14, 2023
Subject:
Works — what is the user’s password?
RagdollFan2005 is the user, but we don’t have the account password…
Please provide.
Thanks.
PS Actually he didn’t restrict it as I could set a user, & setup administrative accounts.
I needed it because an old Vmware XP was not working too well.
21,400
Views
8
Favorites
1
Review
DOWNLOAD OPTIONS
Uploaded by
TASF05
on
Я сегодня подготовил для вас тяжёлый, большой, но очень полезный материал! Я собрал и настроил готовый образ виртуальной машины windows XP на базе Vmware Player.
Бывает ещё виртуальная среда Oracle VM VirtualBox, и вы также можете скачать данный образ на нашем сайте и для VirtualBox, и другие среды, но принципиальной разницы между ними нет.
В этой публикации вы сможете скачать по сути готовую виртуальную машину windows XP SP3, со встроенными, уже установленными в неё некоторыми программами. Там даже работает звук и интернет! Я делал упор на то, чтобы пользователь смог скачать Vmware Player 6, (это сама программа запуска образов виртуальных машин), и сам готовый образ (архив, если быть точным). После чего ему будет достаточно в 1 клик запустить и пользоваться виртуальной машиной:

Вот так будет выглядеть давно забытая windows XP, когда запустите её в Vmware Player 6.
Для чего нужны виртуальные машины?
Виртуальная машина — это целый симулятор компьютера, завёрнутый в окно программы Vmware Player/Virtual box. Т.е. под управлением одного компьютера, в 1 клик запускается ещё один, с совершенно другой операционной системой. Это даёт невероятные и безопасные возможности для тестирования, запуска каких-то скриптов, старых программ, даёт возможность в рамках одного единственного ПК содержать целый парк других ПК, различных по своим параметрам.
Как вы понимаете, чтобы осуществить запуск «компьютера в компьютере» нужны приличные ресурсы. Т.е. слабый компьютер может не потянуть запуск сразу двух компьютеров. Попросту не хватит ресурсов. Но… что касается именно виртуальной Windows XP, то тут как раз исключение из правил, и ресурсов вашей host-машины должно по любому хватить. 🙂 А вот если бы вы захотели запускать виртуальную машину Windows 10 или не дай Бог Windows 11, то это потребовало значительных ресурсов вашего ПК (хост — машины). И не на каждом железе такое возможно было бы осуществить.
Скачать Vmware Player 6
Как вы уже догадались, для того чтобы иметь возможность запускать образы любых виртуальных машин, вы должны скачать и установить так называемую утилиту, программу управления виртуальными машинами, в данном случае, это Vmware Player 6. Почему именно Vmware Player 6, когда на официальном сайте vmware.com есть уже 16-ая версия??
Отвечу. Во-первых, для указанной задачи хватит и Vmware Player 6, которая весит всего 83 Мб. В то время как Vmware Player 16 только один дистрибутив весит более 580 Мб.! В установленном виде намного больше. Кроме того, 16-ая версия куда прожорливее с точки зрения системных ресурсов. Она будет запускаться в 2-3 раза медленнее, и на не очень сильных машинах, таких как intel core i3, будет банально тормозить.
Кроме того, образ самой виртуальной машины в 16-ой версии Vmware Player тут же потребует обновлений и донастроек! Оно вам надо? Впрочем, любители «скачать только самое свежее» всегда есть, и выбор в любом случае за вами. Убедил я вас?) Тогда вот:
Скачать Vmware Player 6
Для тех, у кого по какой-то причине не видна/не работает кнопка, вот прямая ссылка на скачивание: ⏩Скачать vmware Player
Итак, первое действие — это скачивание и установка Vmware Player — программы управления виртуальными машинами на ПК. И оно выполнено! Теперь перейдём с скачиванию самого образа виртуальной машины.
Образ — громко сказано, конечно. 🙂 Это архив .rar, содержащий подготовленные и настроенные файлы, необходимые для запуска и работы виртуальной машины Windows XP. Его необходимо скачать, распаковать в какую-либо папку на вашем ПК, и затем с помощью Vmware Player указать на эту папку один раз, и в дальнейшем программа уже будет «помнить» параметры и пути, и вам останется только пользоваться, впрочем, обо всём по порядку! Поехали:
Скачать готовый образ WindowsXP [4GB]
Зеркало
Скачиваем, распаковываем, не торопимся. Если кнопочка не видна, а такое бывает, то даю прямую ссылку: ⏩ СКАЧАТЬ
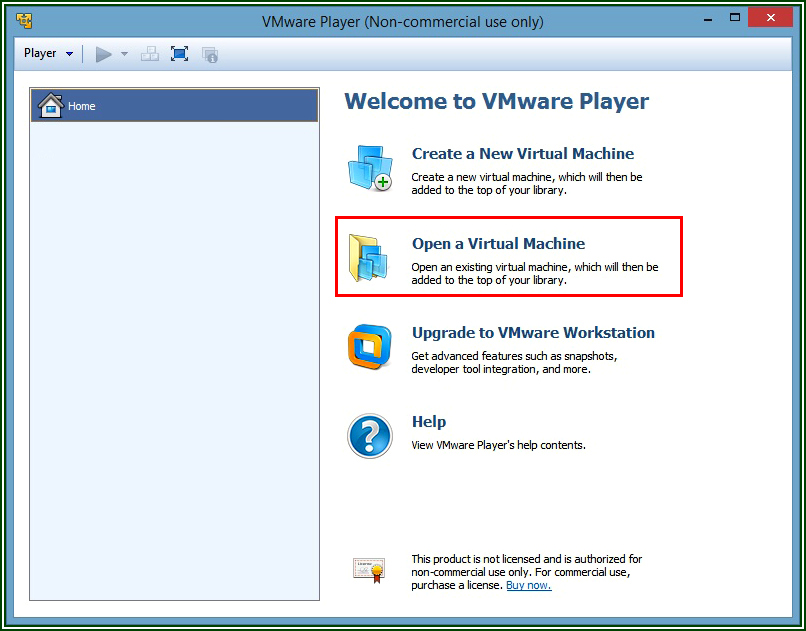
После этого запускаем Vmware Player, и там нажимаем на кпоночку «Open a Virtual Machine». Что можно перевести как «открыть существующую виртуальную машину». Пусть вас не смущает английский интерфейс, букв в принципе в программе не много:
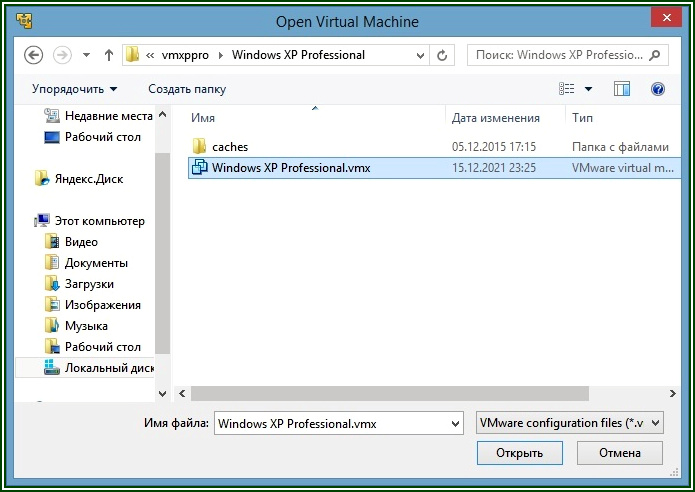
Откроется окно, в котором вы должны будете указать путь до конфигурационного файла скачанной виртуальной машины, смотрим иллюстрацию:
В результате чего в окне Vmware Player тут же появится скачанная вами, подготовленная мной виртуальная машина Windows XP Professional:
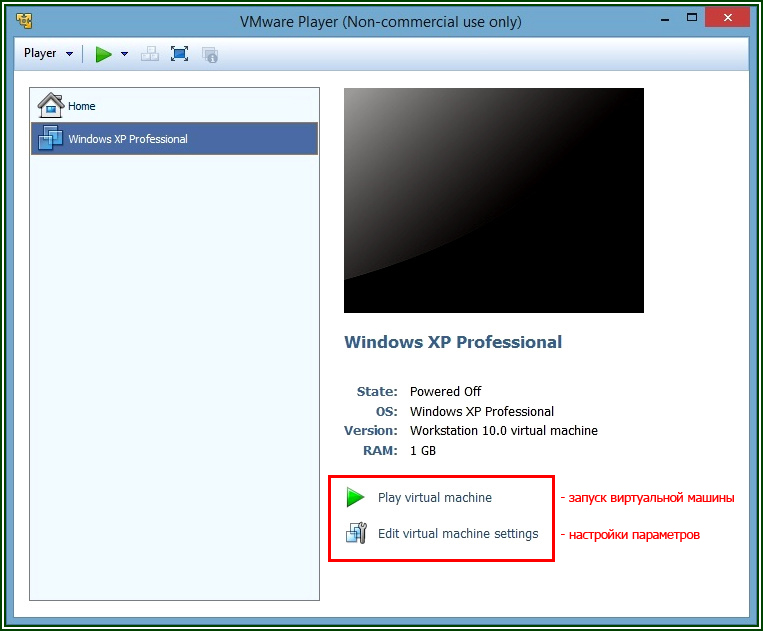
Как видите, всё довольно просто! Теперь Вы можете сделать первый запуск образа, он должен загрузиться довольно быстро. Или же, нажав на «edit virtual machine settings», донастроить под свои нужды параметры данного образа:

Я подчеркнул красным слово NAT на этом скрине не с проста. Это настройка поведения сетевого адаптера внутри образа windows XP. Который подразумевает, что если на машине подключен интернет, то и виртуальная машина сразу же получит доступ в интернет. Впрочем, любые настройки вы можете на этой закладке изменять. Короче, пора поговорить о «начинке» этого образа. 🙂
Настройки образа моей виртуальной машины windows XP SP3
1) Настройка железа:
- Количество оперативной памяти 1 Гб — вполне хватает для работы windows XP;
- Размер дискового пространства 10 Гб;
- CD/DVD — ДА;
- Сетевой адаптер включен в режиме NAT;
- Звуковая карта — авто настройка;
- Принтер — поддерживается;
- Разрешение экрана 1024х768, легко меняется внутри гостевой машины.
2) Установленное в образ программное обеспечение:
- Winrar;
- Microsoft office 2003 + File Format converter, позволяющий открывать .docx;
- Faststone image viewer — для просмотра изображений;
- Notepad ++
- Mozilla firefox ESR.
Обратите внимание, что копировать файлы в гостевую машину можно простым перетаскиванием мышки!
Надеюсь, этот материал кому-то, да пригодится! Удачи!
Download Windows XP SP3 ISO file- Microsoft Windows XP is one of the most popular and loved Windows OS. The OS was released back in 2001 as a successor to Windows ME. Even though it has been more than 20 years since the release of Windows XP, still there are many who uses the OS even today. In 2001, Microsoft released two versions of Windows XP; named Windows XP Home and Windows XP Professional for users.

Windows XP brought tons of new features, games, and a brand-new interface. As compared to Windows ME or Windows 2000 (which was basically for business purposes only), Windows XP is totally new.
Since we (you and I) both have used Windows XP at least once. Then I am not going to bore you by going in-depth with details of the OS. I have provided the links to download Windows XP for free. You can use the setup file for installing it on your system or to use it on a virtualization platform such as VMware or VirtualBox.
Users who want to use the setup as their OS will need to create a bootable USB. For this purpose, they will need to burn the ISO file of Windows XP to a USB drive with at least 4 GB of storage.
Here you can use this one “Easiest Way to Burn ISO to USB on Windows 10?”, as you can use the same method with Windows XP too. You can know more about the process in the next section, where I have provided the entire procedure to perform the task.
Download Windows XP SP3 ISO Image
You are going to use the download button given to download Windows XP ISO Image. Since the provider of Windows XP is Microsoft, then you can use the OS without any concern. Again, I assure you that the setup is free from malware or virus that can harm your system.
Windows XP edition Professional is provided from the link given, as you are probably going to use it on a modern system. For modern systems, Professional is preferred; as Windows XP Home supports x86 system while Windows XP Professional supports x86 and x64.
On other hand, you will find more tools and features on Professional as compared to the Home edition. So instead, I have provided a link to download Windows XP Professional (x64) ISO file.
Download Windows XP ISO

File: Windows_XP_Pro_x86_x64.ISO
Size: 475 MB
Language: English
Developer: Microsoft
Thanks for downloading Windows XP Professional, (x64) Edition ISO – 9660 CD Image File. If you got any issues with the link or, you can’t download the file then comment down. Users who want to download Win XP Home can comment down, I will provide the link for them too.
Requirements to run Windows XP
Win XP can be used on any modern PC. Since there is a need for a negligible number of specs to run the OS, you won’t even need to know the details. Still, there are many who are interested to know about it, here it is:
- Processor: Pentium III or better
- RAM: 4 GB RAM or more
- Storage: 4 GB of free storage or more
- Graphics: Super VGA (800×600) or better
To wrap up the entire requirement section, any system that has 4 GB of RAM memory can run Windows XP.
Installation of Windows XP on PC
What if you want to install Win XP on a PC? I have covered that for you. You are going to n burn the ISO file of Win XP to a USB drive. For this task, you are going to take a backup of files on your USB as you will lose them (by formatting your USB). Then you will download Rufus and then use the application to create a bootable USB of Windows XP.
Once created then you will change the boot sequence in the BIOS of your machine and then boot the USB. Now you will perform the installation on a PC. When the installation got completed then you will use the Windows OS.
If you are not convinced with this then you can click on “How to Install Windows XP From ISO Image?” to check the full guide on the installation of Win XP.
Install Windows XP on VMware or VirtualBox with ISO
You have used the link above to download Win XP Professional (x64) CD Image file. Now you want to use it on VMware or VirtualBox, so what is the procedure?
Like any other process of virtualization, you are going to run the application. It doesn’t matter, whether you are going to use VMware or VirtualBox.
Run the application, and create a new Virtual Machine (VM). Here you will name the VM, configure the settings as RAM, Storage, Processor, Graphics, and Location where to create. Then you will select the ISO file of Windows XP for the installation. This will be the same ISO you downloaded above (Download Windows XP SP3 ISO)
Begin the installation by running the VM. You will experience the same Windows XP installation but inside an app. Continue the installation phases, one by one.
During the installation, your VM will restart many times. Before the installation completes, you will be asked to create a User with a password.

Once the installation got completed, then you are going to use Windows XP on your VMware or VirtualBox. From downloading Win XP ISO to installation, all the tasks are quite easy. The process might be long and take some time, but rest assured that it is all worth it, as Windows XP is still loved by many.
How to factory reset Windows XP without CD?
To factory reset your Windows XP without any CD or bootable USB (which can be created by downloading the Windows XP SP3 ISO file from the direct link above), you will need to follow these steps:
1- First, you are going to start your computer.
2- Then you will hold the F8 key on your keyboard.
3- Now, you are going to select Windows Advanced Options.

4- Here you are going to select Safe mode with a Command prompt option.
5- Once the options are now highlighted, you are going to press Enter.
6- In this step, you are going to log in as an Administrator. You will need the password of your Admin user here.
7- And the last thing that you are going to do is to paste the command below in CMD (command prompt).
%systemroot%\system32\restore\rstrui.exeThere you go! This is the easiest way to factory reset Windows XP without any CD or bootable USB.
Play Windows XP startup sound
Click on the YouTube link to play the startup sound of Windows XP. Since all editions of Windows XP have the same startup sound, this one will cover all the Windows XP editions that include OEM, Professional, and Home.
Question: When did Windows XP come out?
The development of Windows XP began back in 1990 with the codename “Neptune”. The OS was the successor of Windows 2000 and Windows ME which was released on August 24, 2001. However; the OS was publicly available by October 25, 2001.
The OS was supported by the officials for almost 18 years. Even though, many Windows OS was released after Windows XP as the successor still, it was one of the most loved ones.
Question: When was Windows XP released?
Windows XP was released back on August 24 of 2001. The OS was not publicly available for the users until October 25, 2001. It was developed with the codename “Neptune” but was later changed to “Whistler”. Microsoft changed the code name due to a change in its marketing approach.
At the start, Windows XP was built-on Windows 95 Kernel. However; later, Microsoft changed its mind and created an OS that can be served on both consumer and business platforms. Instead of using Windows 95 Kernel or MS-DOS, Microsoft created a single OS. On the release the OS got quite a critic, however, the feeling got changed totally, once the users started to use the OS.
Question: Is Windows XP discontinued? Can’t I use Windows XP anymore?
After Windows XP many legendary Windows OS or Server like Windows 7 were released. Windows XP’s mainstream support ended way back on April 14, 2009. Since users were not ready to leave the OS, Microsoft extended the support till April 8, 2014. However; Microsoft soon got fed up with users sticking to Windows XP, as they were unable to make users use Windows Vista or 8.
Even though support for Windows Embedded POSReady was ended in 2009, there was a security update released by Microsoft that could support the OS till April of 2019. As for now the OS is no longer supported by Microsoft and has reached the end of its life.
While on the topic, of using Windows XP now. Even now you can use Microsoft Windows XP. However; nor Microsoft nor I encourage you to use the OS. As it has reached the end of its life and now there are many security risks to using the OS. Instead, I would recommend you to use the latest version of Windows OS like Windows 11 as your OS.
So, this is all on “Download Windows XP SP3 ISO File”. If you got any further questions, then comment down, and don’t forget to share with users who want to download Windows XP ISO Image File.
Windows XP – одна из самых популярных операционных систем компании Microsoft. Несмотря на то, что она была выпущена уже более 20 лет назад, многие пользователи по-прежнему используют данную версию из-за ее стабильности и продуманности.
Если вам необходимо запустить Windows XP на вашем современном компьютере, одним из самых удобных вариантов является использование виртуальной машины. VMware – один из самых популярных программных продуктов для создания виртуальных машин. Он позволяет запускать различные операционные системы внутри вашей основной системы, создавая идеальное окружение для тестирования программ или использования устаревших программ.
Если вы ищете готовую виртуальную машину Windows XP для VMware, вы можете обратить внимание на множество ресурсов, где можно бесплатно скачать это готовое решение. Готовая виртуальная машина уже содержит установленную копию Windows XP, что позволяет вам не тратить время на установку операционной системы и сразу начать использовать ее.
Содержание
- Почему стоит скачать готовую виртуальную машину Windows XP для VMware?
- Как скачать готовую виртуальную машину Windows XP для VMware бесплатно?
- Как использовать готовую виртуальную машину Windows XP для VMware?
Почему стоит скачать готовую виртуальную машину Windows XP для VMware?
Есть несколько причин, почему стоит скачать готовую виртуальную машину Windows XP для VMware:
- Совместимость: Виртуальные машины VMware позволяют запускать операционные системы на компьютере без необходимости установки их напрямую. Это означает, что вы можете запустить Windows XP на любом компьютере, без влияния на вашу основную операционную систему.
- Безопасность: Виртуальные машины помогают изолировать операционные системы друг от друга. Это значит, что даже если ваша виртуальная машина Windows XP заражена вирусом или другим вредоносным ПО, ваша основная операционная система и данные останутся в безопасности.
- Тестирование и разработка: Виртуальная машина Windows XP может быть полезна для разработчиков и тестировщиков, которым требуется доступ к старой версии Windows для проверки совместимости или для отладки программного обеспечения. Вместо того, чтобы искать и устанавливать старые компьютеры с Windows XP, можно просто запустить виртуальную машину и начать работу.
- Поддержка устаревших приложений: В случае, если у вас есть устаревшие программы или приложения, которые работают только на Windows XP, виртуальная машина предоставляет простой и безопасный способ запустить их без необходимости в наличии старого аппаратного обеспечения.
Скачайте готовую виртуальную машину Windows XP для VMware и наслаждайтесь работой с этой классической операционной системой, не беспокоясь о возможных проблемах совместимости или безопасности.
Как скачать готовую виртуальную машину Windows XP для VMware бесплатно?
Шаг 1: Найти надежный и надежный источник загрузки виртуальной машины Windows XP для VMware. Множество веб-сайтов предлагают подобные загрузки, но не все из них являются безопасными и надежными. Рекомендуется выбирать проверенные сайты, такие как официальные ресурсы VMware или ресурсы с хорошей репутацией в сообществе.
Шаг 2: После нахождения надежного источника, откройте веб-страницу загрузки Virtual Machine Windows XP для VMware.
Шаг 3: На странице загрузки, найдите ссылку для скачивания виртуальной машины Windows XP. Нажмите на эту ссылку, чтобы начать загрузку.
Шаг 4: После завершения загрузки, откройте VMware и запустите процесс импорта виртуальной машины.
Шаг 5: Выберите файл, который был загружен, и следуйте инструкциям на экране для завершения процесса импорта.
После завершения процесса импорта виртуальной машины Windows XP, вы сможете легко запустить ее в VMware и использовать все функции Windows XP.
Важно знать, что использование Windows XP может быть небезопасным, так как операционная система больше не получает обновлений безопасности от Microsoft. Поэтому, если вы планируете использовать Windows XP в сети Интернет, необходимо принимать все меры предосторожности и использовать дополнительные меры безопасности.
Как использовать готовую виртуальную машину Windows XP для VMware?
Виртуальные машины Windows XP для VMware предоставляют возможность использовать старые версии операционной системы Windows XP без необходимости установки ее на физическом компьютере. Если у вас уже есть готовая виртуальная машина Windows XP для VMware, следуйте этим шагам для ее использования:
-
Установите VMware Player или VMware Workstation на ваш компьютер, если он еще не установлен. Загрузите и установите программу с официального сайта VMware.
-
Откройте программу VMware Player или VMware Workstation. В главном меню выберите опцию «Открыть виртуальную машину».
-
Укажите путь к файлу виртуальной машины Windows XP, выбрав его в окне проводника. Нажмите «Открыть».
-
При необходимости настройте параметры виртуальной машины. Вы можете указать количество выделенной памяти, объем жесткого диска и другие параметры. Нажмите «Запустить», чтобы запустить виртуальную машину.
-
Виртуальная машина Windows XP загрузится и вы сможете использовать ее внутри программы VMware Player или VMware Workstation.
-
Для удобства работы с виртуальной машиной вы можете настроить разрешение экрана, включить режим полноэкранного отображения или использовать редактор настроек виртуальной машины.
-
После завершения работы с виртуальной машиной вы можете сохранить ее состояние и возобновить работу с ним в любой момент.
Теперь вы знаете, как использовать готовую виртуальную машину Windows XP для VMware. Наслаждайтесь использованием старой версии Windows XP на своем компьютере без необходимости устанавливать ее на физическую машину.
In this article, we will examine how to set up and run Windows XP on a new virtual machine using the VMware Workstation 17 Pro virtualization software on the Windows 10 operating system.
How to Set Up Windows XP Professional 64 Bit SP1 on Windows 10 using VMware Workstation 17
As you know, Windows XP was a popular operating system at the time. Microsoft ended its support for XP completely in 2014. Therefore, it would be a logical choice to use an up-to-date operating system such as Windows 10 on your host computer.
However, since automation machines used in some institutions or organizations were produced in an old date, they need Windows XP or an older operating system to be managed. In case of such need, it is recommended to run systems such as XP on desktop or laptop computers with old hardware.
If you do not have an old computer, of course, you can use old operating systems on virtual machines by using virtualization software such as VMware on your current computer.
Or if you still want to use Windows XP even though it is an old system, as we mentioned, after installing a virtualization program such as VMware, VirtualBox, or Hyper-V on your Windows 10 computer, you can build this system on the virtual machine.
How to Create a New Virtual Machine for Windows XP
Before proceeding with the installation steps, you need to install the VMware virtualization program on your computer. After installation, download the XP ISO file to your host computer by clicking the button below and create a new VM by following the steps below.
Windows XP Pro x86/x64 SP1 ISO + SP2 Installer
Step 1
After installing VMware Workstation 17 Pro on your computer, run the program and click Create a New Virtual Machine on the homepage to set up a new virtual machine, and when the VM wizard opens, tick Custom (Advanced) and click the Next button.

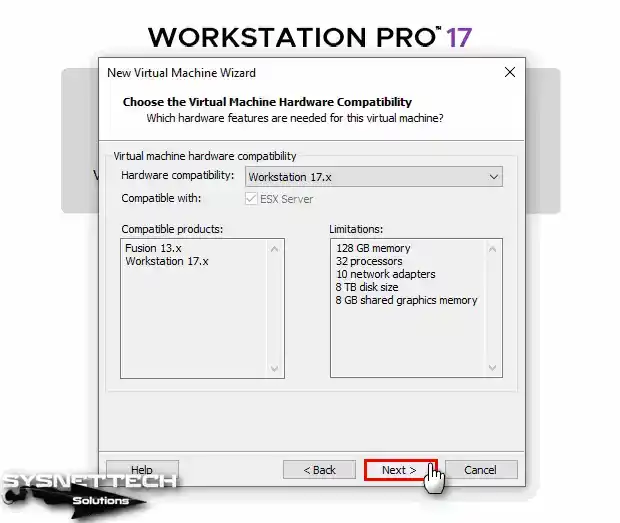
Step 2
In the Choose the Virtual Machine Hardware Compatibility window, select the latest version of the Workstation program you are using. In this window, you will see the version of Workstation Pro currently installed on your computer.
If you are installing on an older version, you will not be able to select 17.x, so update Workstation Pro. Next, select Workstation 17.x for VMware virtual machine compatibility, and then click the Next button.
Step 3
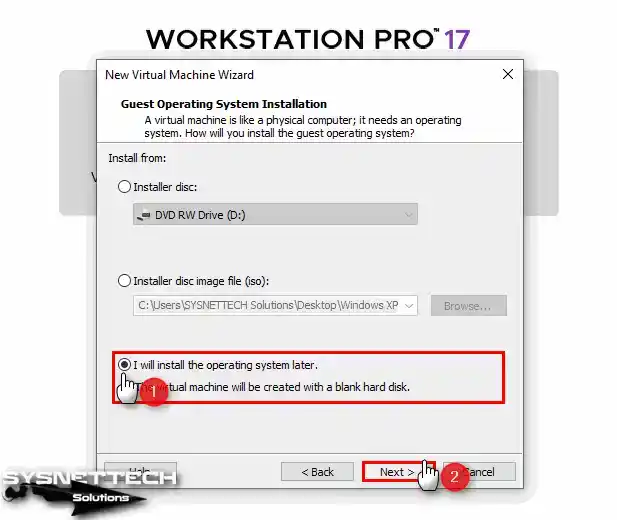
Select I will install the operating system later and click Next as it would be better to create a new virtual machine with advanced settings for the operating system in this step.
Step 4
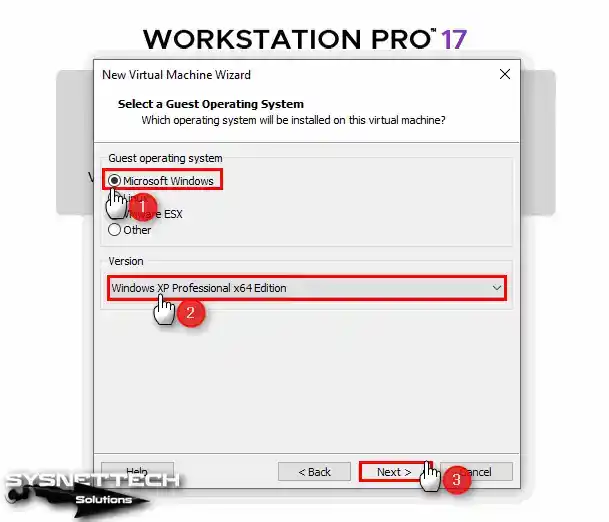
Since you will install XP on the VM in the Select a Guest Operating System window, first select Microsoft Windows, then select Windows XP Professional from the Version section and click Next.
Step 5
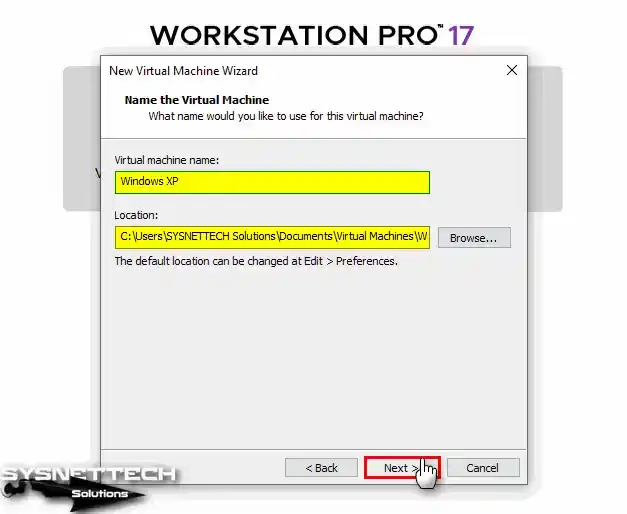
In the Name the Virtual Machine section, type the name of the operating system you will install. In the Location section, if you want to store the virtual machine on a USB 3.0 or 3.1 external disks, configure the relevant location.
To change the installation location of the VM, click the Browse button in this window and select the relevant location in the window that opens.
Step 6
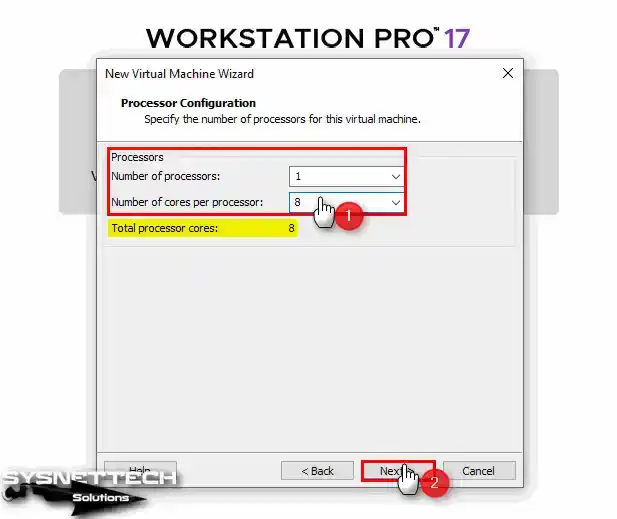
In the Processor Configuration window, configure the number of processors and cores for XP depending on the hardware features of your computer.
If you have a fast PC and for faster installation, you can configure 1 processor and 8 core values to the virtual machine.
Step 7
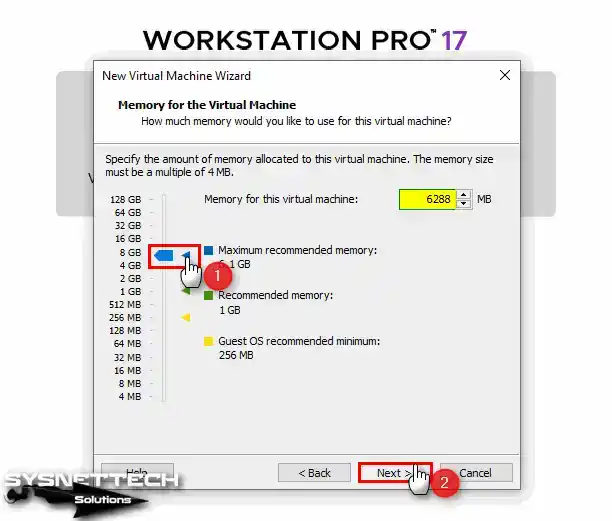
Likewise, you can assign a 4 GB RAM size to the virtual computer or choose the maximum memory size according to the RAM capacity of your physical computer.
Step 8
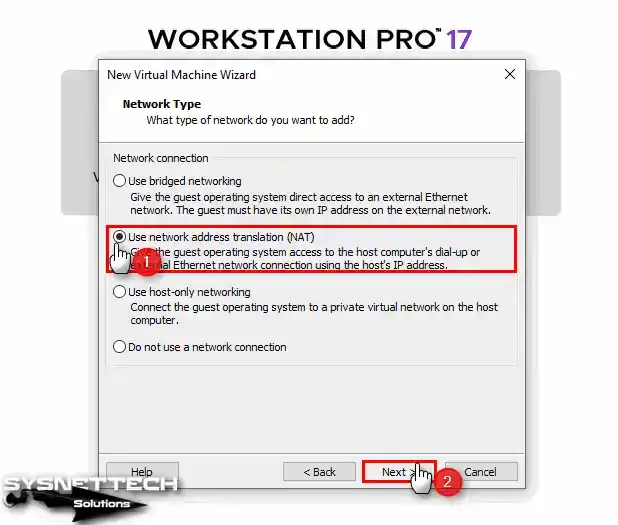
If you want to connect to the Internet after installing the virtual operating system, select Bridged or NAT in the Network Type window and click Next.
Step 9
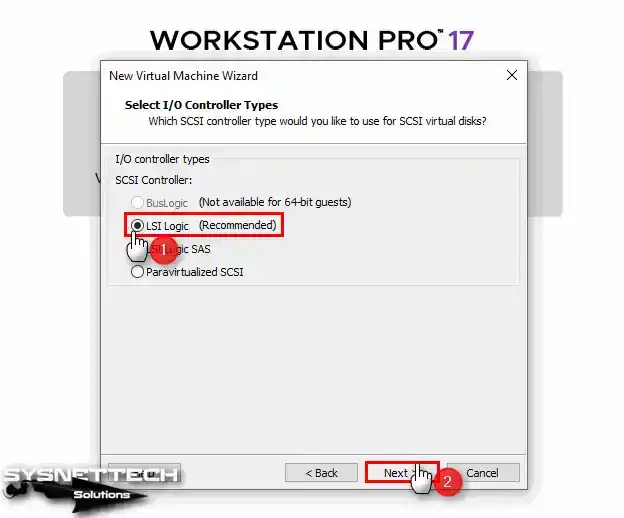
Click the Next button to continue with the LSI Logic option selected by default in the I/O Controller window.
Step 10
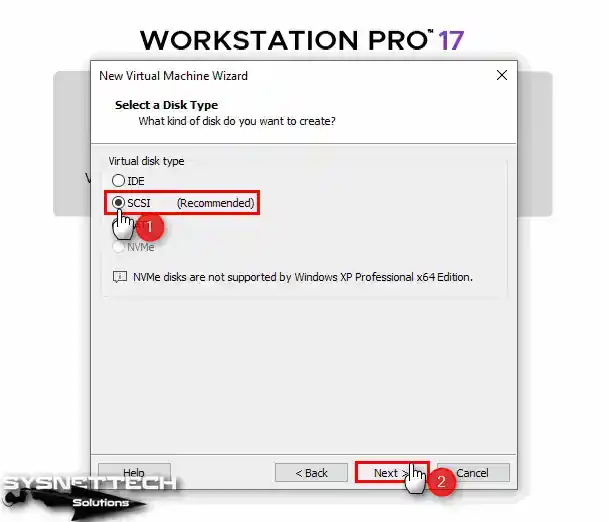
In the Select a Disk Type window, select which disk controller you want to install the virtual system with. Here you need to select the SCSI disk type that is selected by default. Because Microsoft has ended its support for XP, SATA disk structure is not supported, but some hosts provide SATA type and USB 3.0 support.
You may also see the warning that XP cannot be installed on the NVMe disk. NVMe is supported by current operating systems as it is a new disk controller.
Step 11
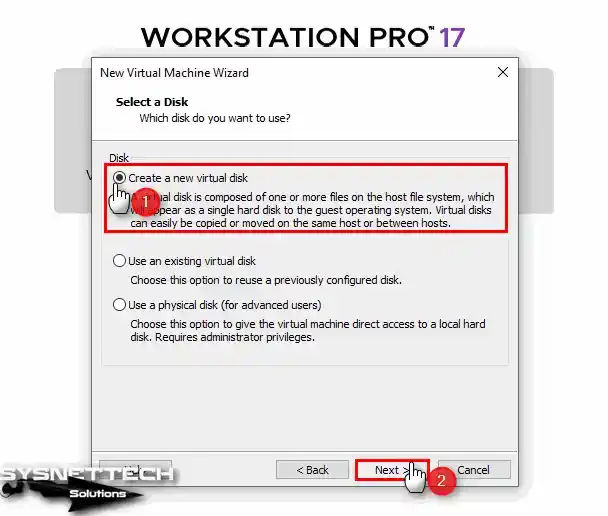
In the Select a Disk window, you can add the system disk you installed earlier or create a new virtual disk here. Additionally, you can use a physical disk in the VM.
For a clean system installation, select Create a new virtual disk and click Next.
Step 12
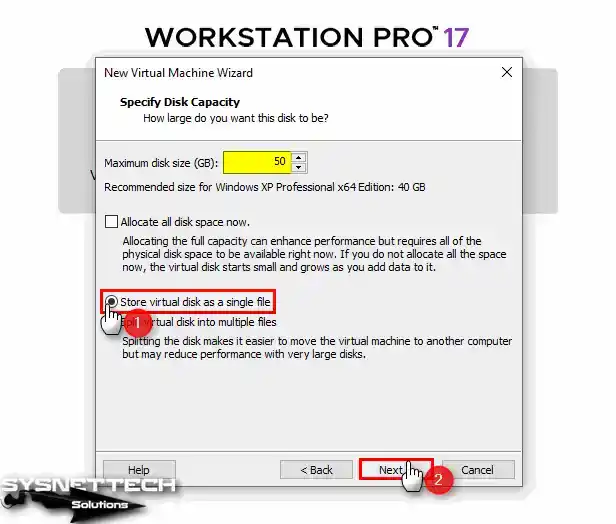
The recommended virtual disk size for Windows XP Professional is 40 GB. However, if you are only going to use the virtual machine for simple purposes or professional work, it is recommended to configure a disk size of 20 GB or 50 GB.
Also, to back up the virtual machine disk file as a single file type, select Store virtual disk as a single file and click Next.
Step 13
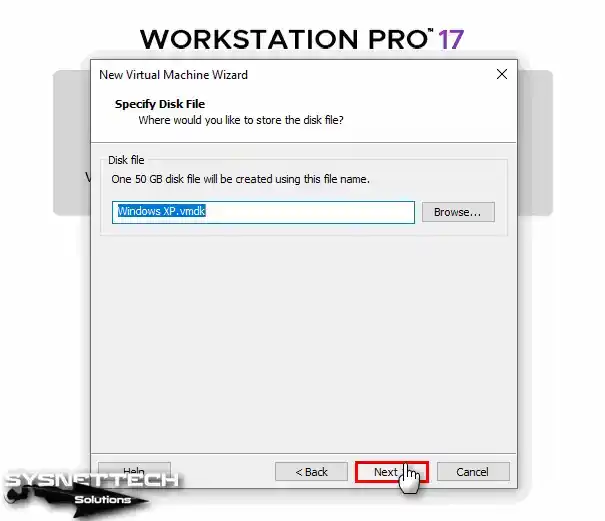
You can change the name and location of the WinXP virtual machine disk file in the Specify Disk File window. However, since you will be installing to an external disk, the disk name refers to the name that will be stored in the installation location.
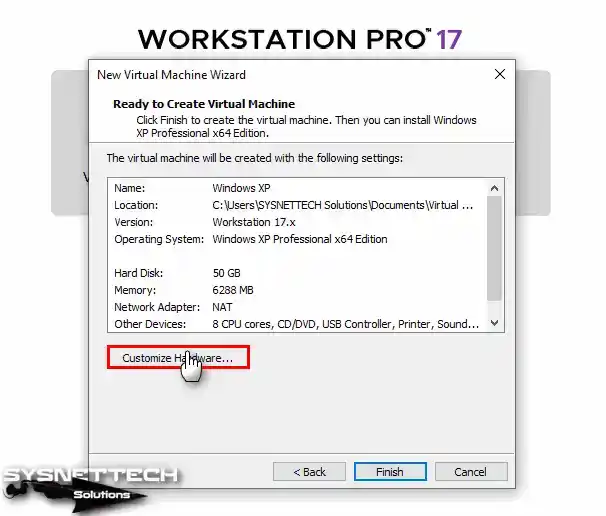
Step 14
At the final stage of the virtual machine setup, click the Customize Hardware button to add the ISO to the VM and enable virtualization.
Step 15
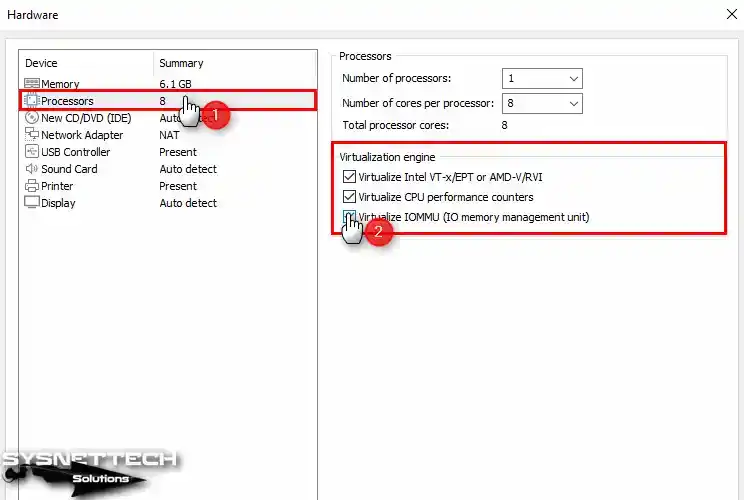
In the Hardware settings window, click Processors and tick all the options in the Virtualization Engine section.
- Virtualize Intel VT-x/EPT or AMD-V/RVI
- Virtualize CPU Performance Counters
- Virtualize IOMMU (IO Memory Management Unit)
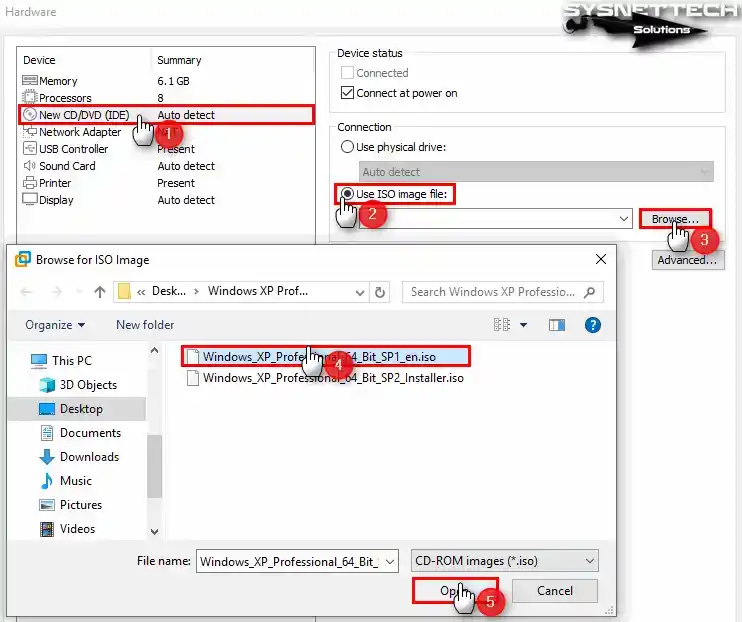
Step 16
Click on the CD/DVD device to add the ISO file to the virtual computer, and then select the Use ISO image file option and click the Browse button.
Select the Windows XP SP1 ISO file you downloaded to your computer and click the Open button.
Step 17
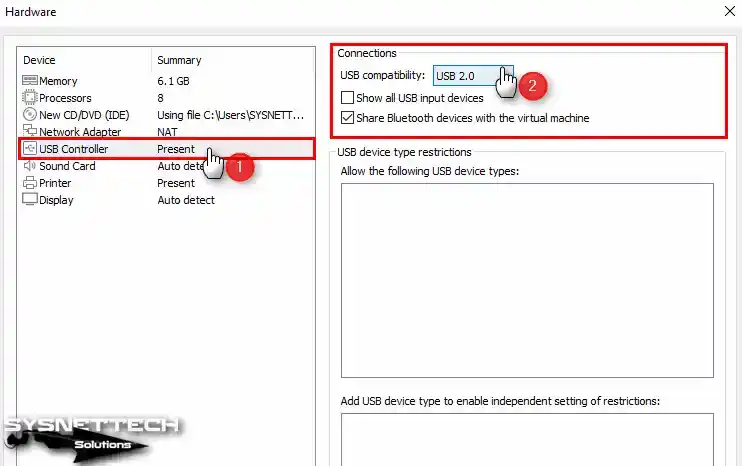
Select USB 2.0 compatibility from the USB Controller device settings.
Step 18
After clicking on the Display device, enable 3D graphics acceleration and configure the Graphics Memory size to a value that your host can support.
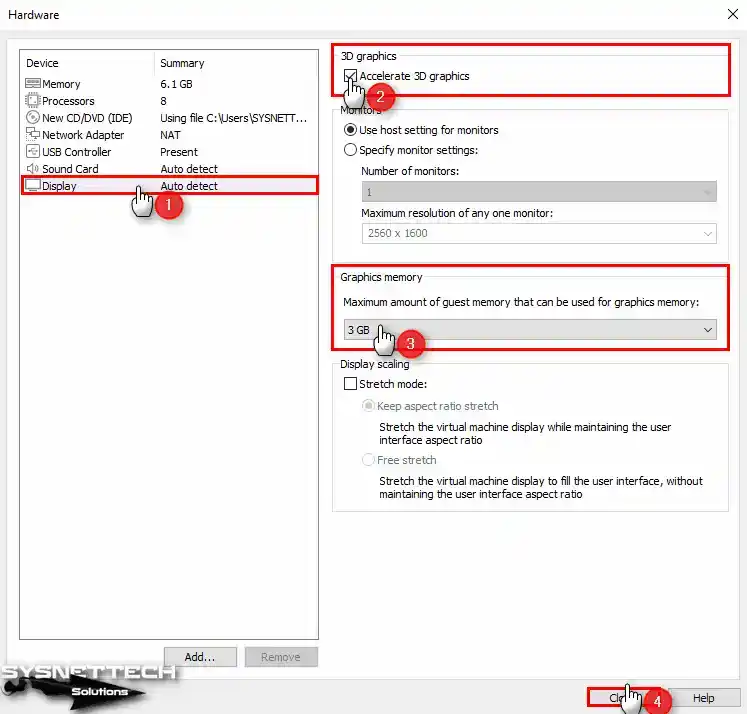
Step 19
After completing the necessary preparations, click the Close button to close the hardware settings of the virtual computer.
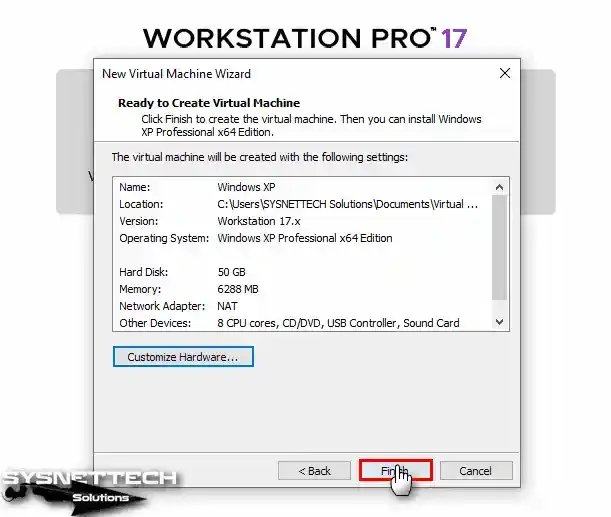
Step 20
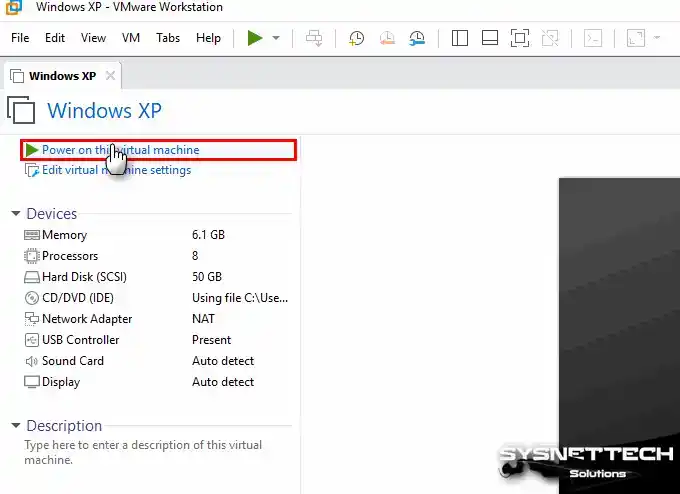
You can now click the Power on this virtual machine button to begin the installation of the virtual XP system.
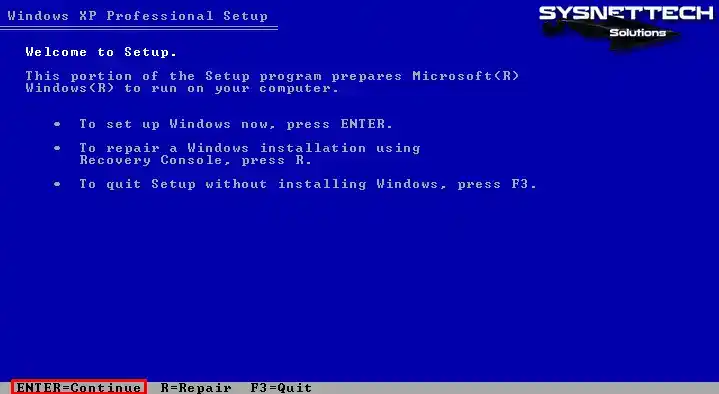
How to Install Windows XP
After creating and preparing a new VM for Windows XP, the setup wizard will start when you run the VM. You can also install it on a physical computer by following these steps.
Step 1
If you do not have an ISO file with SATA drivers integrated when the Windows Setup wizard opens, you can press the F6 key to install the relevant drivers in this step.
If you have a computer with Windows XP installed, you can Repair your system on this screen. Otherwise, press Enter to install from scratch.
Step 2
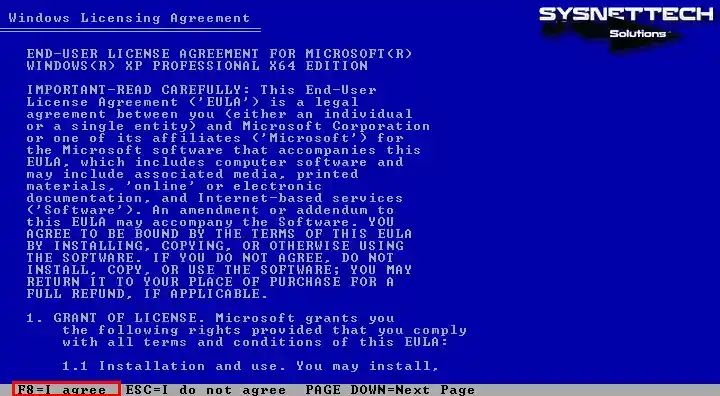
After reading the license agreement of the Windows XP Professional system, press the F8 key to accept it.
Step 3
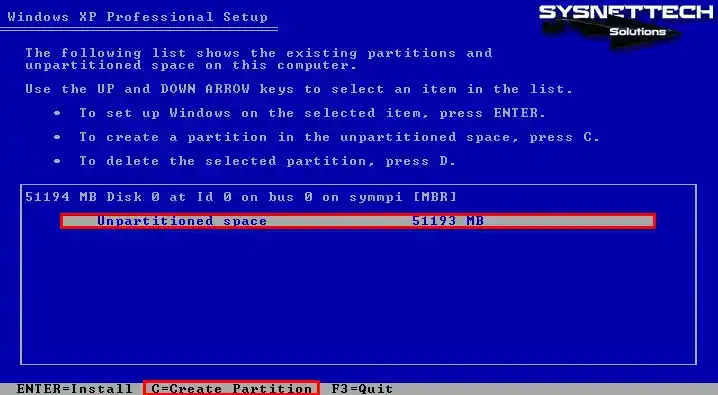
Press the C key to partition the virtual disk. Here you can start the installation directly by pressing the ENTER key.
Step 4
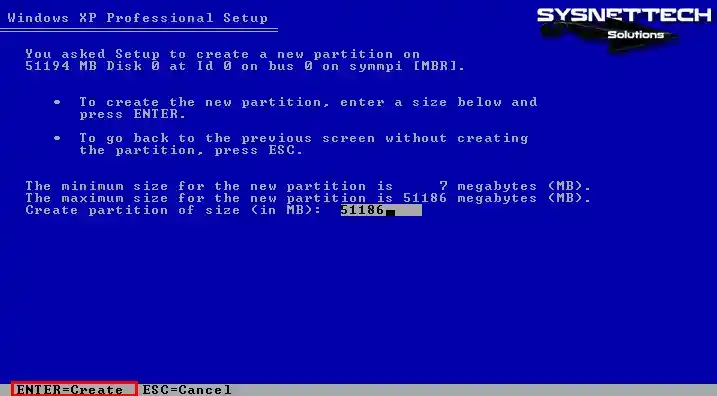
Press Enter to create the entire HDD size you have assigned for the Virtual PC.
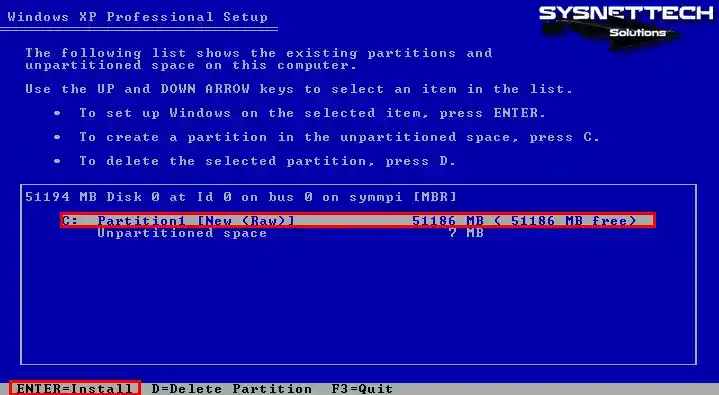
Step 5
Press Enter to install XP on the C Partition you created.
Step 6
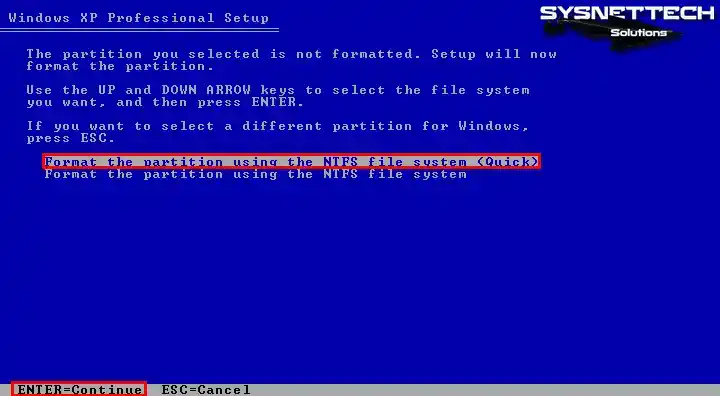
Format the virtual disk using the NTFS file format. For example, if your physical computer has a hard disk that you have used for a long time, you will extend the health of your disk by doing the formatting process as normal.
Step 7
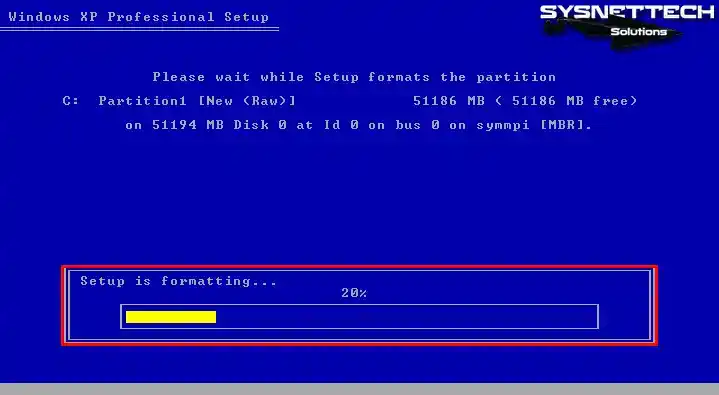
Wait while Setup formats the virtual disk.
Step 8
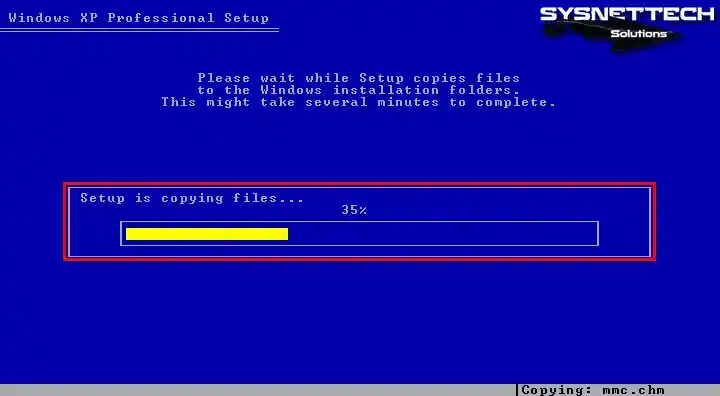
Wait while Setup is copying the necessary files for the XP system.
Step 9
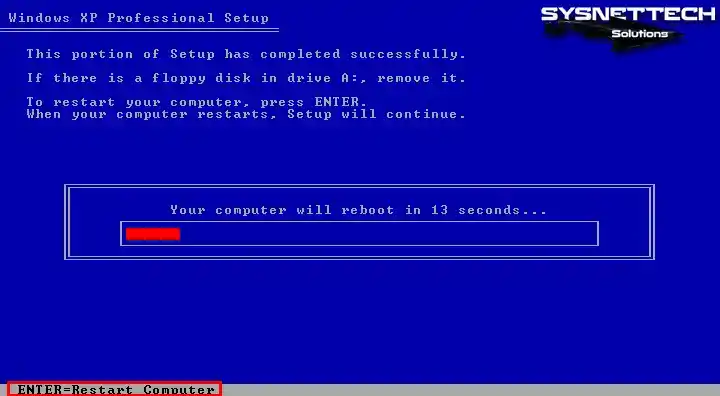
After the first stage of the installation wizard is completed successfully, press Enter to restart the virtual system or wait for the timer to expire.
Step 10
Setup will continue when Windows XP restarts.

Step 11
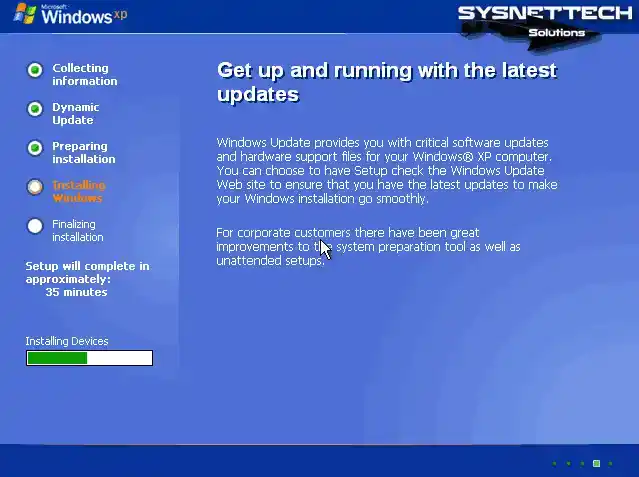
Wait while Setup installs and prepares the necessary devices for installation.
Step 12
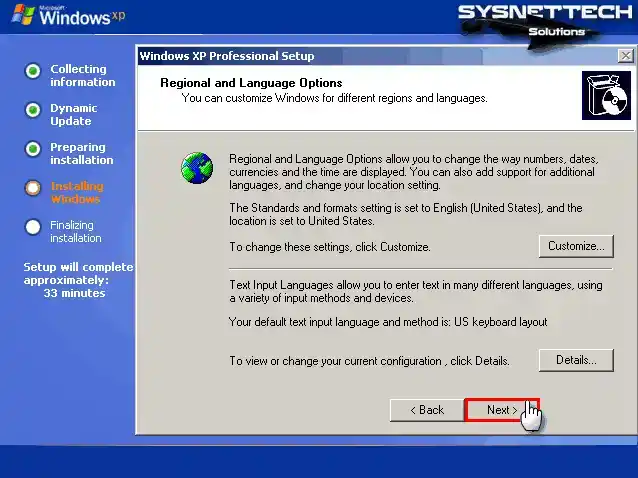
When the Regional and Language Options window opens, you can configure the country and time zone you live in by clicking the Customize button. You can also choose your keyboard layout after clicking the Details button.
Step 13
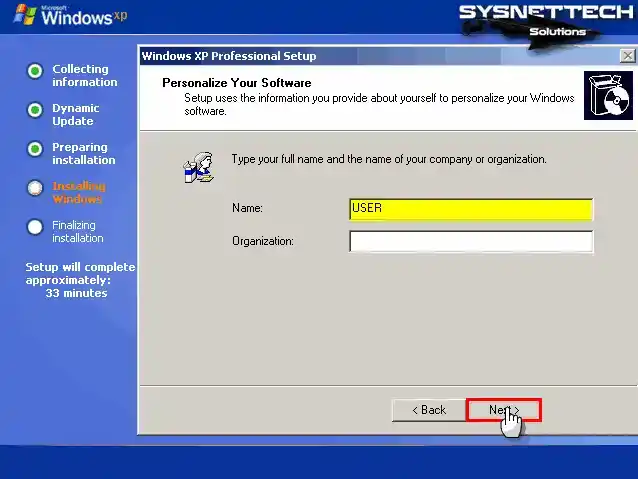
In the Personalize Your Software window, type a name for the user account to be created on your system, and if there is an additional organization you are in, type its name and click Next.
Step 14
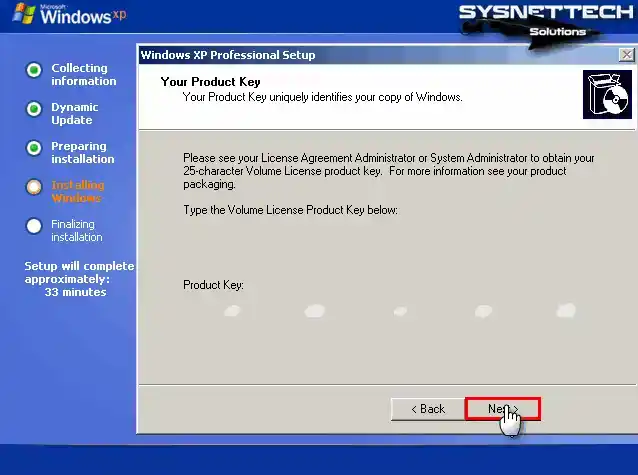
In the Your Product Key window, enter the installation key for Windows XP Pro 64 Bit Service Pack 1 and continue.
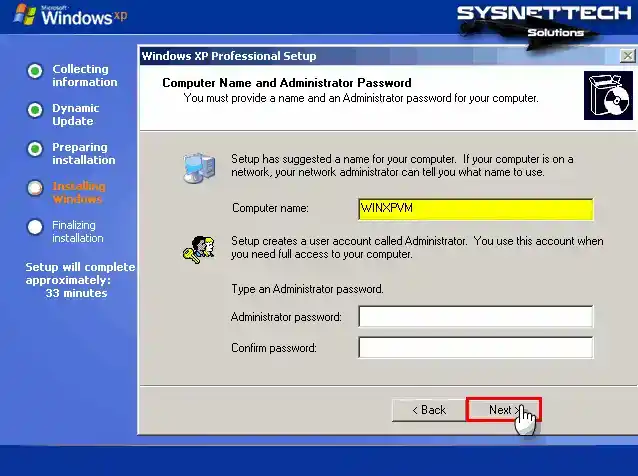
Step 15
In the Computer Name and Administrator Password window, type a name for your virtual computer and if you want to set a password for the admin account, type your password and click Next.
Step 16
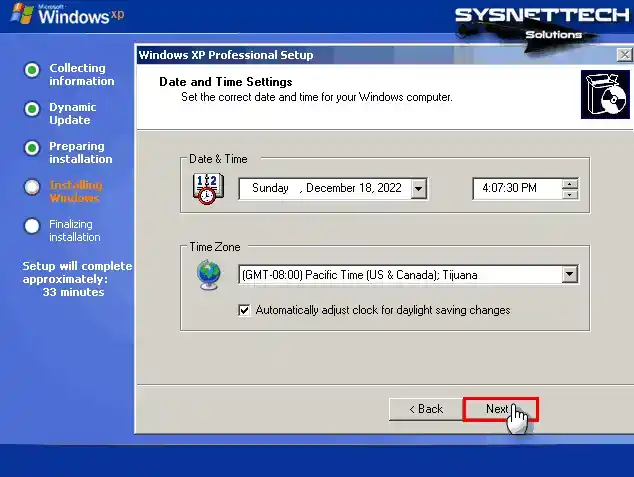
In the Data and Time Settings window, configure the relevant time zone and the date of the installation day according to your location and click Next.
Step 17
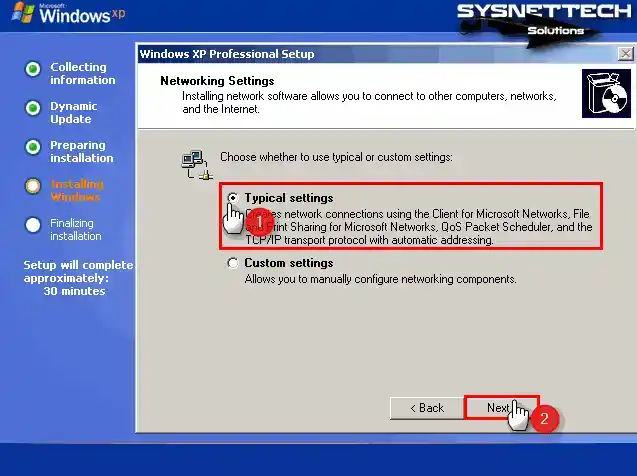
In the Networking Settings window, if you are not going to use the VM in a domain environment, check the Typical Settings option which is selected by default, and click Next.
Step 18
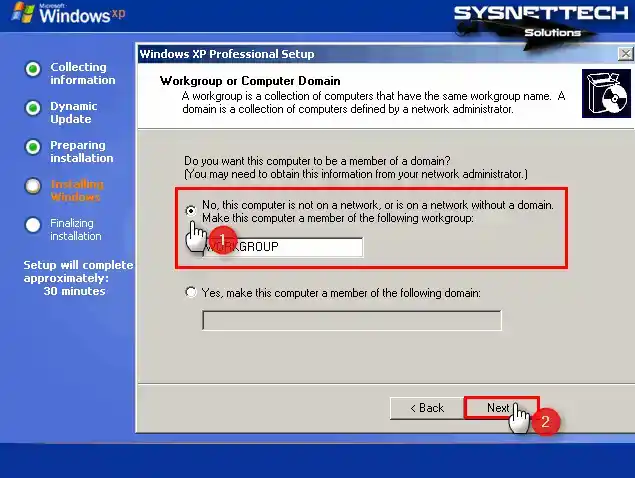
In the Workgroup or Computer Domain window, if you are not going to use the VM in a domain environment, select Workgroup and click Next.
Step 19
Wait while the setup wizard configures the remaining settings.
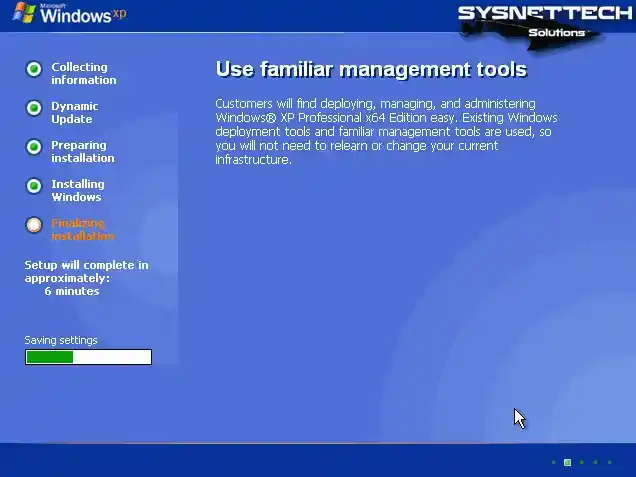
Step 20
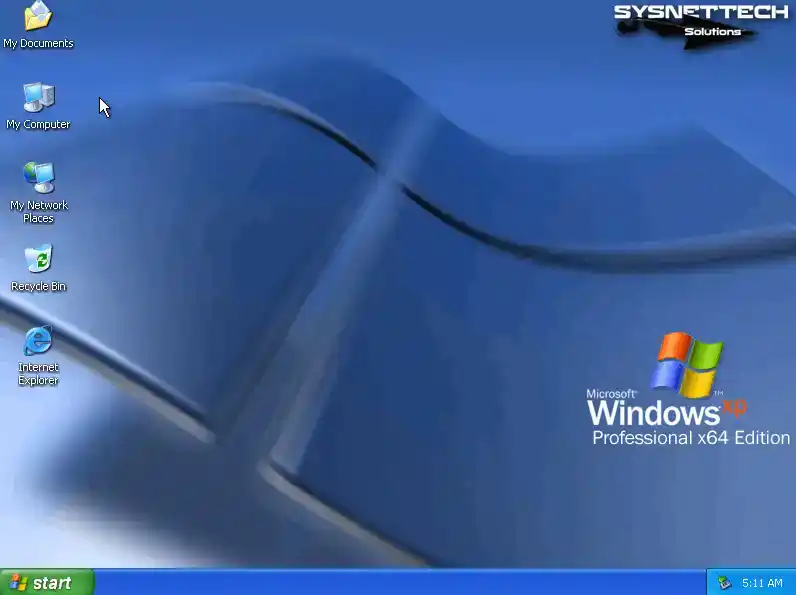
After the installation is complete, your Windows XP desktop screen is now ready.
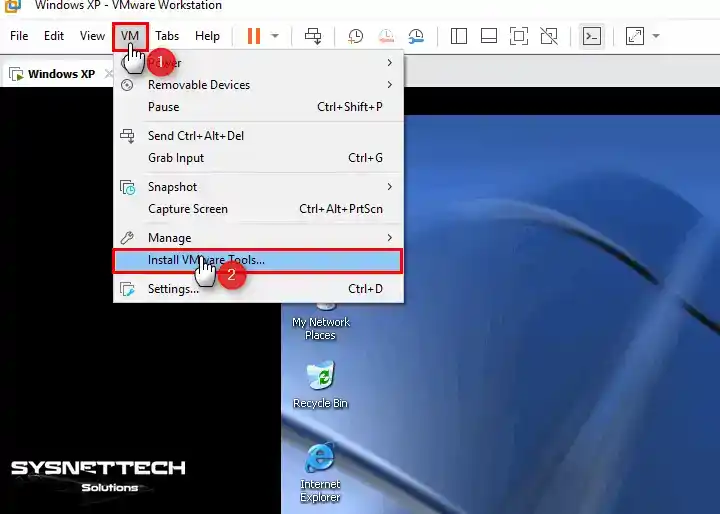
How to Install VMware Tools
After installing Windows XP with VMware, you can build the drivers for devices that are not installed in your virtual system by installing VM Tools on the virtual machine. You can also use the Shared Folder feature, transfer files between the host and the VM, and use the screen resolution as full screen.
Step 1
First, right-click on My Computer, then click Manage, then click Device Manager as in the image below and check the drivers that are not installed in the right section.

Step 2
Click VM / Install VMware Tools from the tool menu to install the drivers for the virtual PC.
Step 3
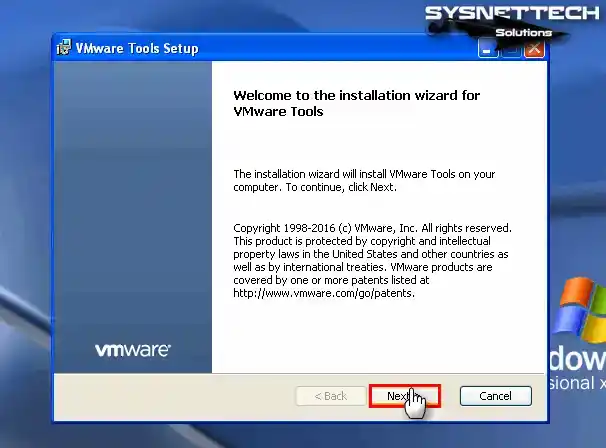
Wait while VMware Tools prepares for installation on the virtual PC. When the installation wizard opens, click Next to go to the next step.
Step 4
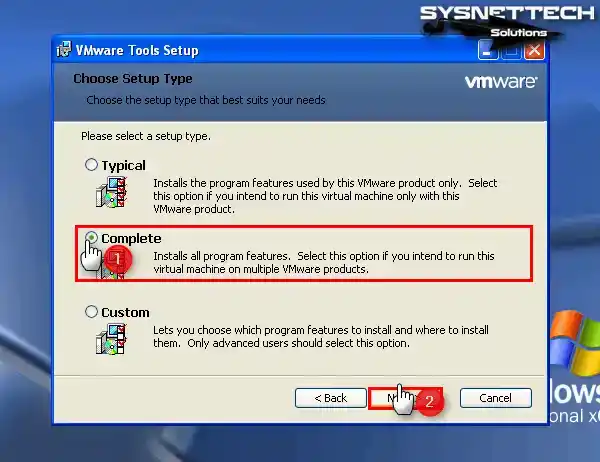
In the Choose Setup Type window, if you want to use the virtual machine on other VMware products later, select Complete and click Next.
Step 5
Click the Install button to start installing all the features of the virtual machine utility.

Step 6
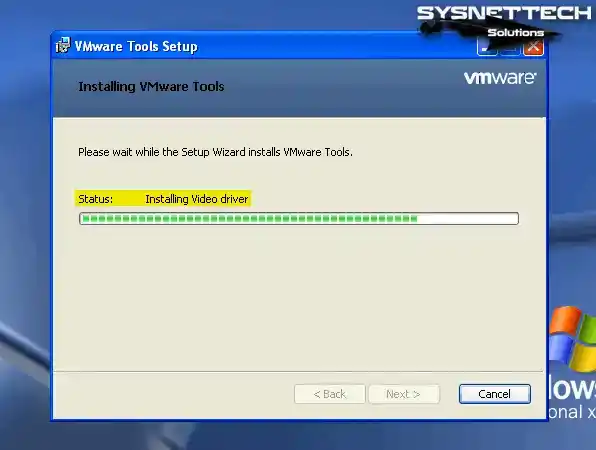
Wait while the video and other hardware drivers of your virtual system are installed.
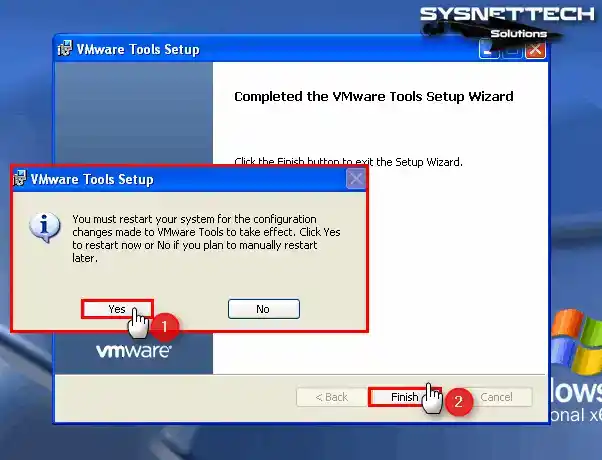
Step 7
Click Yes to restart your virtual computer and check if the drivers are installed. When you view the Device Manager again, you can now see that drivers such as VMware SVGA II are installed in your virtual system.
Step 8
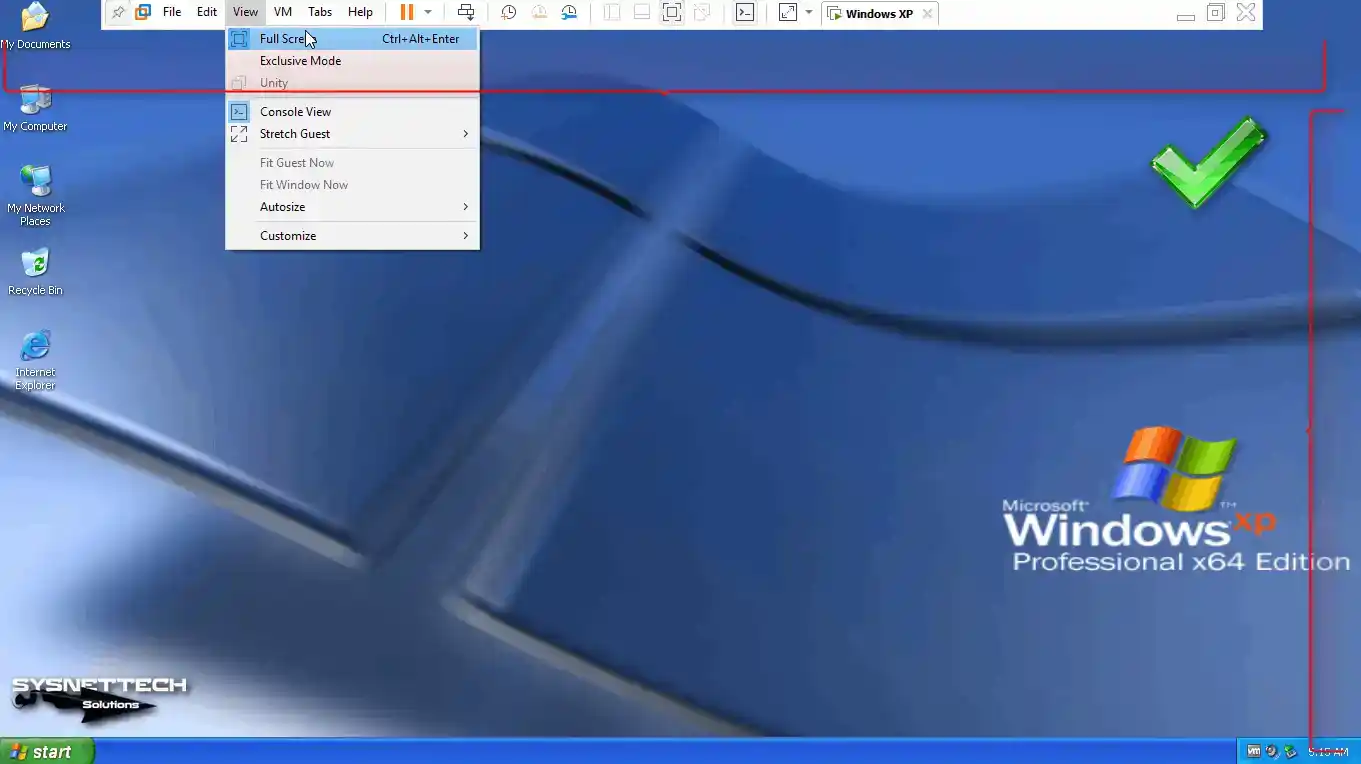
Click View / Full Screen from the Workstation tool menu and check that your virtual PC is adapted to full screen mode.
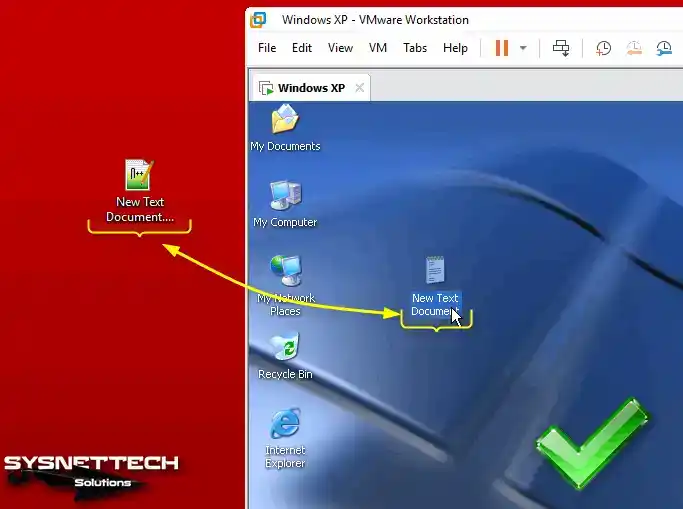
Step 9
Create a new text document on your host and when you try to copy it to the virtual machine with drag and drop, you can see that the file transfer was successful.
Also, open the Internet Explorer browser and visit Google, and you can see that the Internet connection is working fine.
How to Configure Shared Folder
The biggest advantage of creating a Shared Folder in virtual machines is to facilitate file transfer between the host and the VM. When you copy a file with the Drag and Drop method, this process may take some time, but the process will be faster when you copy a file of the same size using the Shared Folder feature.
Step 1
Click VM / Settings from the menu of Workstation Pro to open the properties of the virtual machine you have installed.
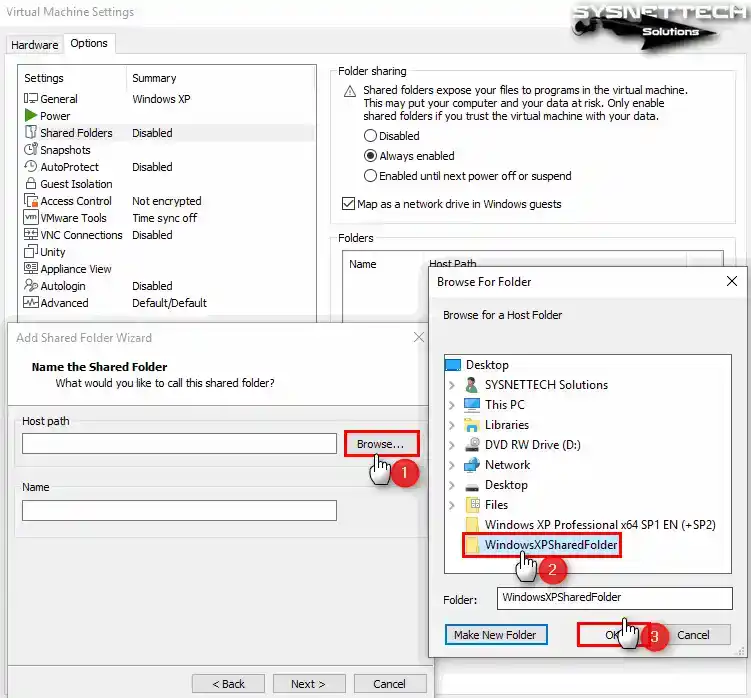
When the Virtual Machine Settings window opens, click the Options tab and then click Shared Folders. In the Folder Sharing section, check Always Enabled to enable this feature, and also select “Map as a network drive in Windows Guests” to configure it as a network drive, and then click the Add button.
When the Shared Folder Wizard opens, click Next directly.

Step 2
In this window, select the folder you want to share, type a name and click Next.
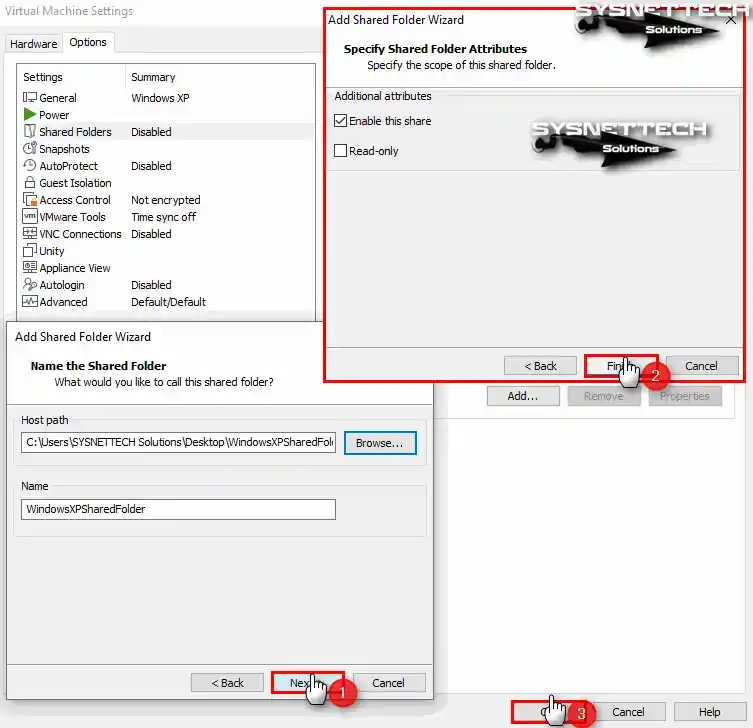
Step 3
In order to make the folder you added available for sharing in the folder properties window, enable sharing by ticking “Enable this share” and click Finish.
After editing the path of the shared folder, close the VM settings.
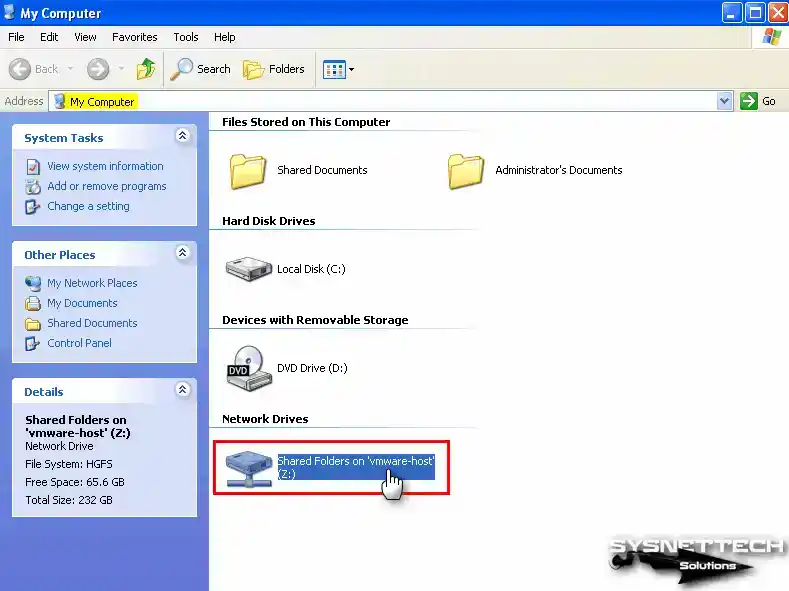
Step 4
When you check the Shared Folder on my computer, check that it is active in the Network Drives section.
Step 5
When you open the folder added as a network drive, you can see that you can access the related files.
Additionally, click Add a network place from the options under Network Tasks to add the shared folder to My Network Places. Click Next when the add network location wizard opens.
Double-click on Choose another network location or click Next when the relevant option is selected. Open the vmware-host content by clicking the Browse button in the Internet or Network Address section, select Shared Folders and click OK.
To access Shared Folders over the network, click Next after selecting the location and click Finish to close The Add Network Place Wizard.
Click My Network Places and check the location you added in the Local Network window. You can see that you can access the files when you view the Shared Folder content over the network.
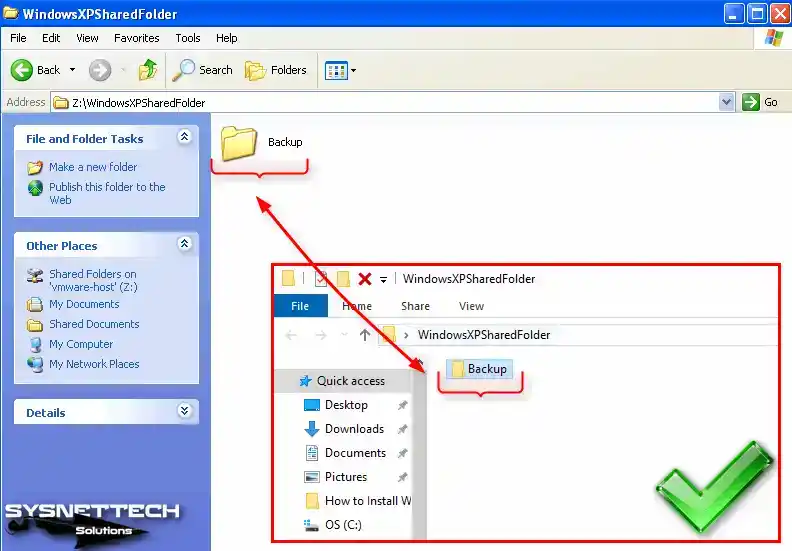
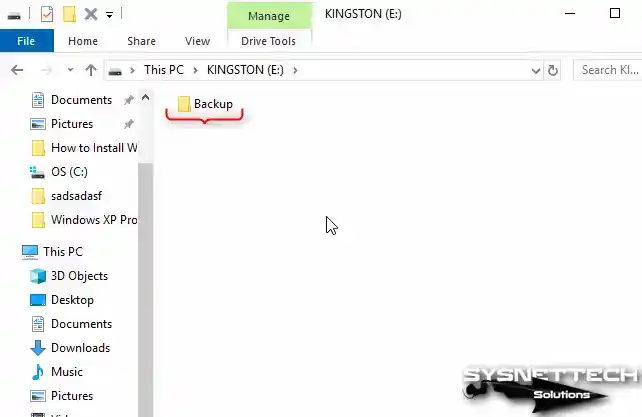
How to Use USB Flash Memory
Instead of using the Shared Folder feature to transfer files, a faster solution is the use of USB flash memory.
Step 1
Insert a flash memory into one of the free USB ports of your host computer and create a folder named Backup, for example.
Step 2
To connect the USB disk to the virtual machine, click VM / Removable Devices / Name of your USB / Connect from the tool menu.
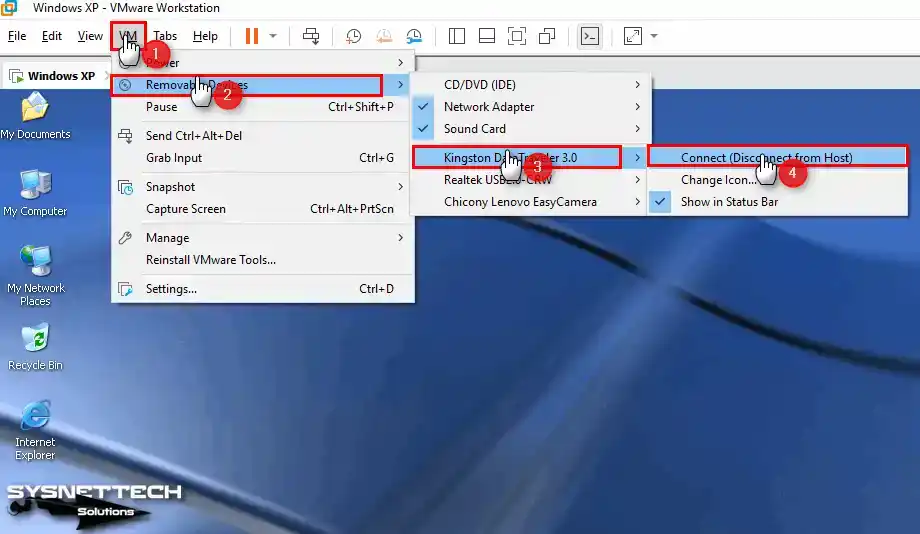
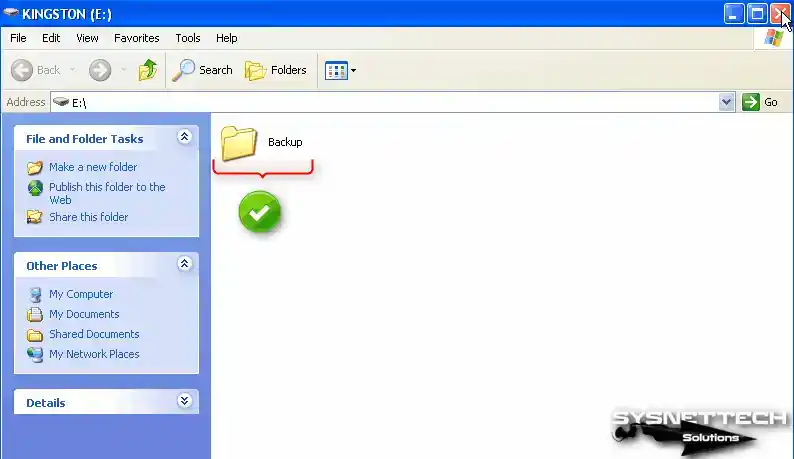
Step 3
When USB drivers are automatically installed in your virtual system, you can access your USB and see the folders and files you have created in it.
How to Install Windows XP SP2 Software Package (Upgrade SP1 to SP2)
To upgrade Windows XP 64 Bit SP1 to SP2, you can both install from scratch with an ISO file with SP2 files integrated, and install only the SP2 software package.
Step 1
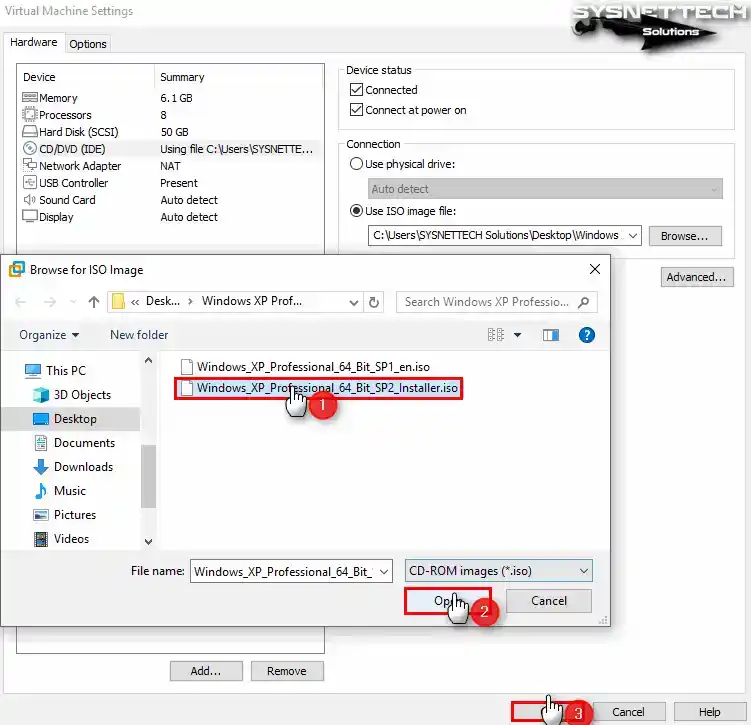
To add the Windows XP SP2 ISO image to the virtual machine, right-click on the DVD device and click Settings. With the CD/DVD device selected, click the Browse button to add the SP2 ISO location to the Use ISO Image File section.
Select the Windows XP SP2 Installer.iso file and click the Open button. To enable the DVD device, check the Device Status option and click the OK button to close the window.
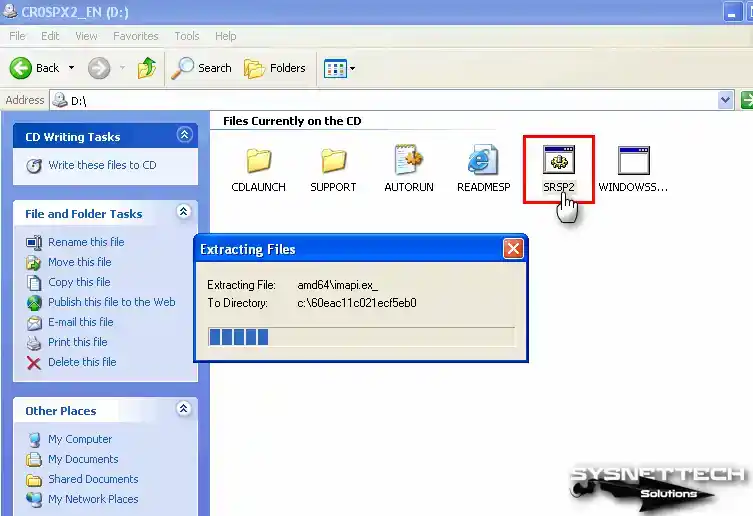
Step 2
When the Service Pack 2 ISO image is automatically mounted to the system, you will automatically see the Readme page. Close the Readme.HTM webpage and open My Computer. To view the contents of the ISO image mounted in the Removable Storage section, click the right button and then click Open.
Right-click / Open the SRSP2 file in the CD/DVD media to start the installation.
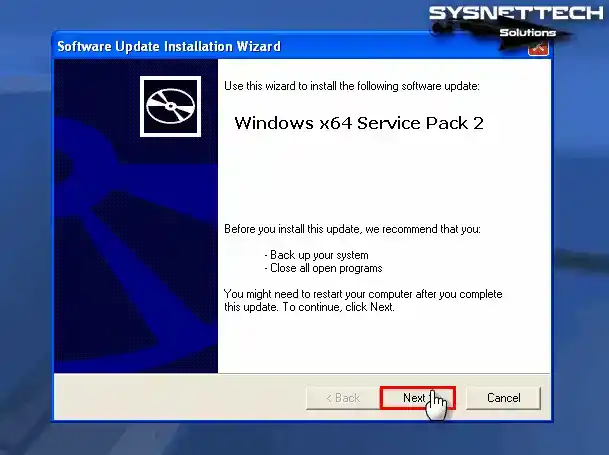
Step 3
Click Next in the Windows x64 Service Pack 2 wizard.
Step 4
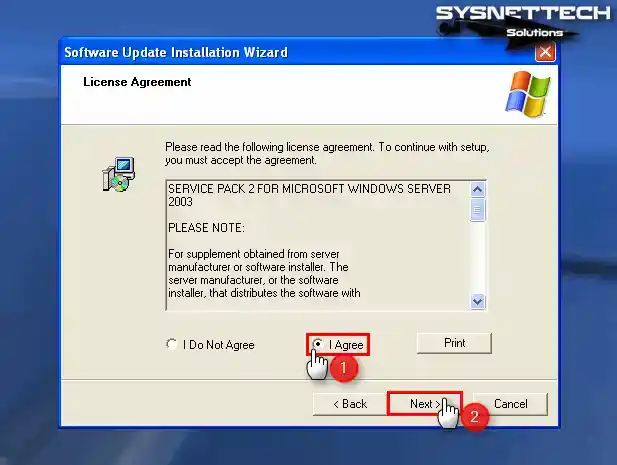
Check “I Agree” to accept the Service Pack 2 license agreement and click Next.
Step 5
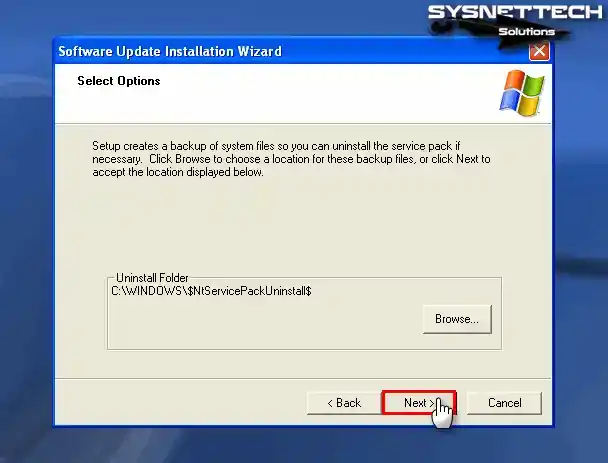
Click Next in the Select Options window without changing the Uninstall Folder location.
Step 6
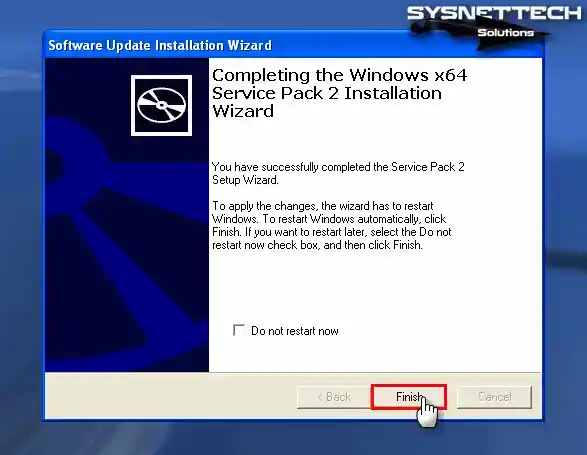
Wait while Windows XP Service Pack 2 is being installed. The system update period may take some time, so do not do anything on your system.
After installing Service Pack 2, restart your virtual system by clicking the Finish button.
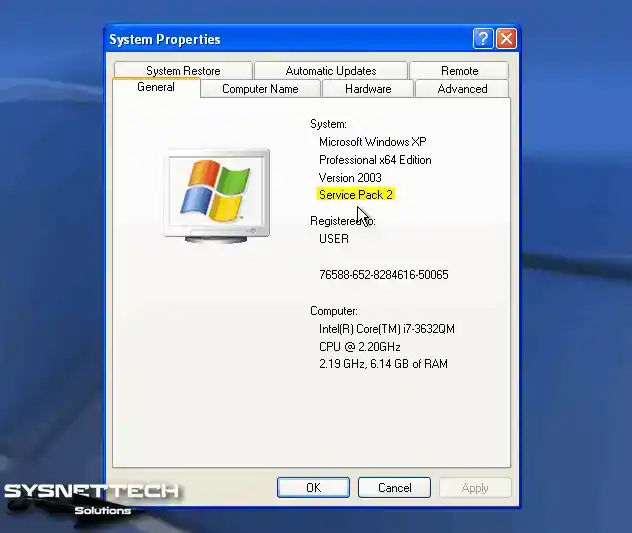
Step 7
After right-clicking on my computer, click System Properties and you can check the Service Pack version in the System: section of the window that opens.
How to Delete the Virtual Machine
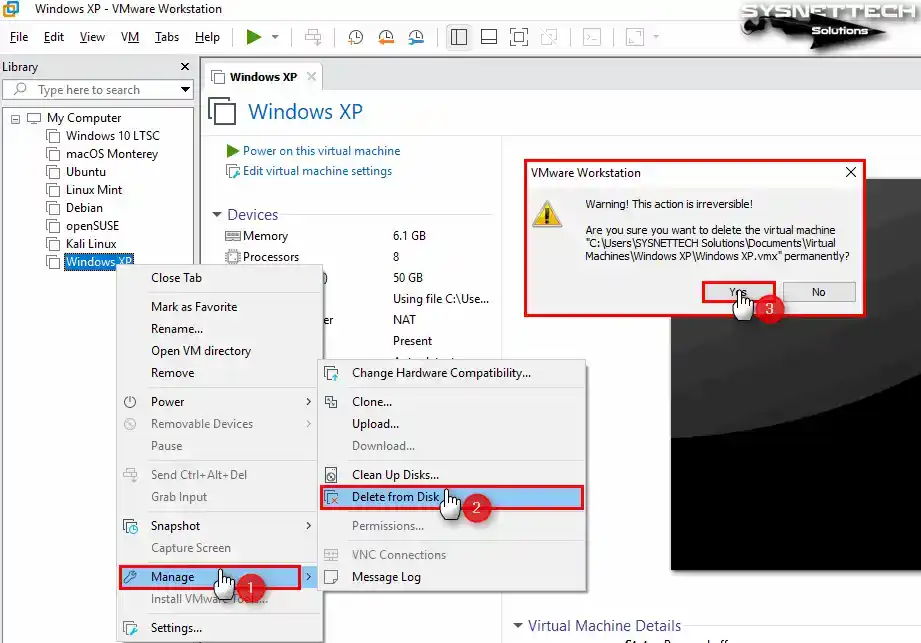
If you decide not to use the guest machines that you have prepared with VMware on your physical computer, we recommend that you completely delete the VM files from your host disk.
Right-click on your guest system from the left panel of Workstation Pro, then click Manage / Delete From Disk, and as soon as you click Yes in the warning window that opens, all VM files will be completely deleted from your host disk.
Video
Installing Old Versions
You can easily install and use Windows XP operating system on 12, 14, 15, or 16 versions of Workstation Pro.
Workstation Pro
YouTube Video
Slide
Related Articles
♦ How to Install Windows 7 with VMware
♦ How to Install Windows 10 with VMware
♦ How to Install Windows 8 with VMware
♦ How to Install Windows Vista with VMware
♦ How to Install Windows 98 with VMware