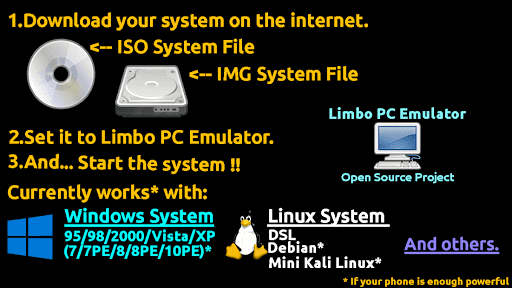
Android is the most popular operating system which runs on Linux environment. As it is a Linux based system, You can easily root your device and install the Linux terminal for using ‘sudo‘ commands. Linux provides you a very smooth flexibity by which you can easily boot any boot img or iso file on your device.
You can also install windows 7 operating system with win img or iso file in just a couple of steps. And here in this guide, I am going to show how to boot windows 7 iso file on your android device without root.
Let’s see the step by step guide:
How to install Windows 7 on android using Limbo
-
- The very first thing which you need to do is that download and install the below-required files:
- Download Windows 7 ISO free, click here
- Download Limbo PC emulator free full version
- Once you have downloaded win 7 iso for Limbo then install Limbo emulator in your device as usual.
- Open Limbo emulator.
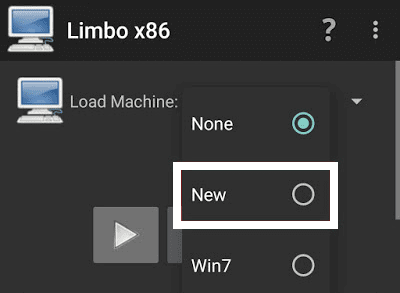
- Now at your Limbo App dashboard, You will find a drop-down menu for loading machine. You need to tap the drop-down menu and then select “New.” see below picture.

- Now, a pop-up window will appear. You need to enter the name of your new virtual machine and then click on ‘Create’. see below picture
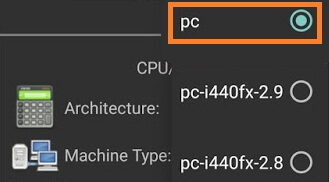
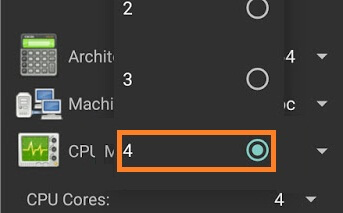
- Architecture option: Here you need to select PC.

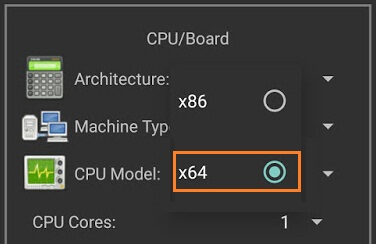
- Machine Type option: Here you need to select the x64 option.

- CPU Model option: Here you need to select the SandyBridge option.

- CPU cores option: Here you need to select 4 Cores.

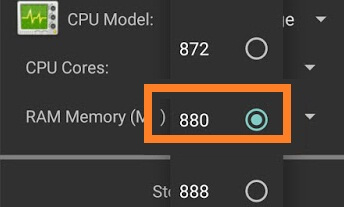
- RAM memory option: Here you need to select 880 MB RAM. You can select more RAM if your device has more than enough RAM.

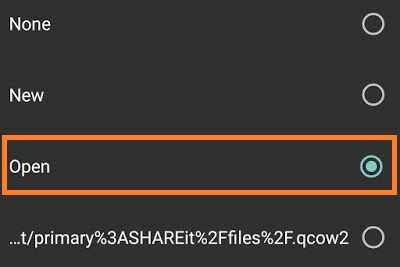
- Hard disk option: Here you need to select the “OPEN” option. After that, you will be redirected to your SD card. Now you need to locate the downloaded Windows 7 img/iso file and then select the file.

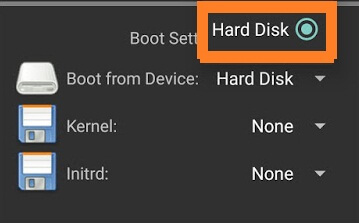
- Device option: Here you need to select Hard Disk in the boot settings.

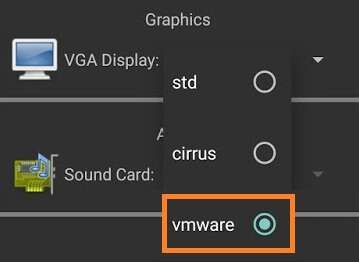
- VGA Display option: Here you need to select Vmware.

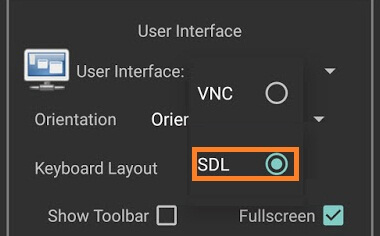
- User Interface option: Here you need to select SDL.

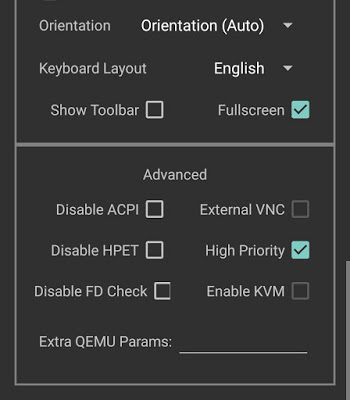
- Now you need to match all the settings as shown in the below picture one by one.

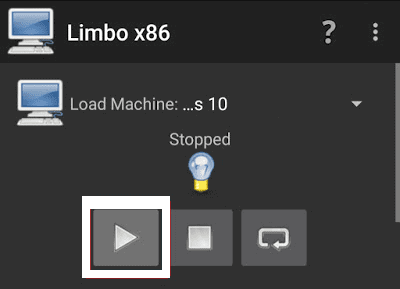
- Now you need to click on ‘Play Option‘. It will start booting process of Windows 7.

- While booting being in the process. Your device screen will look something like below picture.

- When the booting process will be 100% completed. Your Windows 7 home screen will look something like below picture.

- That’s it.
- The very first thing which you need to do is that download and install the below-required files:


I hope that the above step by step guide has helped you for installing Windows 7 iso on your android device (tablet or mobile) without root using limbo emulator.
Also Read: Windows 10 on Android limbo
Limbo PC Emulator — это мощное и универсальное приложение для Android, которое позволяет пользователям эмулировать широкий спектр компьютерных систем на своих мобильных устройствах. С помощью Limbo PC Emulator пользователи могут с легкостью запускать операционные системы Windows, Linux и даже Android-x86, открывая совершенно новый мир возможностей для производительности, игр и многого другого.
Одной из отличительных особенностей Limbo PC Emulator является его широкая совместимость с широким спектром компьютерных архитектур, включая системы x86, ARM и MIPS. Это означает, что пользователи могут эмулировать системы от старых машин с Windows XP до современных смартфонов Android, и все это в рамках одного приложения.
Другие примечательные особенности Limbo PC Emulator включают поддержку широкого спектра виртуальных аппаратных компонентов, таких как жесткие диски, CD-ROM, сетевые адаптеры и многое другое. Приложение также включает в себя множество опций настройки, позволяя пользователям изменять такие параметры, как скорость процессора, распределение памяти и разрешение дисплея для достижения оптимального баланса производительности и функциональности.
В целом, эмулятор ПК Limbo — это мощный инструмент для тех, кто хочет запустить устаревшее программное обеспечение или поэкспериментировать с различными операционными системами на своем Android-устройстве. Благодаря широкой совместимости и богатому набору функций, это приложение является обязательным для всех, кто интересуется эмуляцией мобильных устройств.
Функции:
- Эмуляция различных компьютерных систем, включая Windows, Linux и Android-x86.
- Широкая совместимость с архитектурами x86, ARM и MIPS
- Поддержка виртуальных аппаратных компонентов, таких как жесткие диски, CD-ROM и сетевые адаптеры.
- Настраиваемые параметры скорости процессора, распределения памяти и разрешения дисплея
- Встроенная поддержка популярных форматов файлов, таких как ISO, IMG и ZIP.
Limbo — это эмулятор, который позволяет запускать операционные системы, такие как Windows, на различных устройствах. Это может быть полезно, если у вас есть устройство, которое не поддерживает установку Windows, или если вы хотите просто попробовать операционную систему без необходимости установки.
Установка Windows при помощи эмулятора Limbo не является сложной задачей, но требует некоторых технических знаний. В первую очередь, вам понадобится образ операционной системы Windows, который можно найти на официальном сайте Microsoft или других надежных источниках. Затем вам нужно будет установить эмулятор Limbo на ваше устройство.
После установки эмулятора Limbo вы сможете запустить его и выбрать опцию «Создать новую виртуальную машину». Вам потребуется указать название виртуальной машины и выбрать образ операционной системы Windows, который вы загрузили ранее. После этого вам потребуется настроить параметры виртуальной машины, такие как количество оперативной памяти и объем жесткого диска.
Примечание: Установка Windows при помощи эмулятора Limbo может потребовать некоторого времени и ресурсов, поэтому убедитесь, что у вас достаточно мощного устройства и надежного источника питания.
После настройки параметров виртуальной машины вы сможете запустить установку Windows. Ваше устройство будет работать как виртуальная машина, и вы сможете установить Windows так же, как на обычном компьютере. После завершения установки вы сможете использовать Windows на вашем устройстве, работая в эмуляторе Limbo.
Установка Windows при помощи эмулятора Limbo может быть полезным способом запустить операционную систему Windows на устройстве, которое обычно не поддерживает ее установку. Однако, имейте в виду, что использование эмулятора может привести к потере производительности и некоторым ограничениям. Также не рекомендуется использовать эмулятор для запуска Windows на главном устройстве, поскольку это может вызвать сбои и проблемы с работой других приложений.
Содержание
- Установка Windows с помощью эмулятора Limbo
- Выбор правильного эмулятора
- Загрузка образа Windows
- Установка Windows в эмуляторе Limbo
Установка Windows с помощью эмулятора Limbo
Следуйте этим шагам, чтобы установить Windows с помощью эмулятора Limbo:
- Скачайте и установите эмулятор Limbo с официального сайта разработчика.
- Скачайте образ операционной системы Windows, который вы хотите установить. Образ должен быть в формате ISO.
- Откройте приложение Limbo и нажмите на кнопку «Load Machine».
- В настройках эмулятора выберите тип операционной системы и архитектуру процессора.
- Нажмите на кнопку «Load CD/DVD/BD…» и выберите загружаемый образ операционной системы Windows.
- Настройте другие параметры, такие как количество оперативной памяти и объем виртуального диска.
- Нажмите на кнопку «Start», чтобы запустить эмулятор и начать установку Windows.
- В процессе установки следуйте инструкциям, которые появятся на экране.
- После завершения установки Windows, настройте операционную систему по вашим требованиям.
Теперь вы можете использовать Windows на своем устройстве, используя эмулятор Limbo. Обратите внимание, что производительность может зависеть от мощности вашего устройства и настроек эмулятора.
Выбор правильного эмулятора
Один из популярных эмуляторов, который подходит для установки Windows, — это Limbo. Этот эмулятор позволяет эмулировать различные аппаратные платформы, включая x86 и ARM. Кроме того, Limbo поддерживает множество операционных систем, включая Windows.
Однако перед выбором Limbo стоит провести некоторые исследования и убедиться, что эмулятор будет подходить для вашего устройства и требований. Важно учесть такие факторы, как процессор, объем оперативной памяти, доступное пространство на диске и поддерживаемая версия Windows.
Также стоит обратить внимание на отзывы других пользователей о Limbo и его производительности. Это поможет оценить стабильность и эффективность эмулятора.
Помимо Limbo, на рынке представлено множество других эмуляторов, таких как QEMU, VMWare Player и VirtualBox. Они также могут быть подходящими вариантами для установки Windows на мобильное устройство.
Итак, правильный выбор эмулятора является важной частью процесса установки Windows на устройство. Проведите исследование, учитывайте характеристики вашего устройства и рассмотрите отзывы пользователей, чтобы выбрать наиболее подходящий эмулятор.
Загрузка образа Windows
Перед установкой Windows в эмуляторе Limbo необходимо загрузить образ операционной системы. Образ может быть предоставлен разработчиком Limbo или скачан с официального сайта Microsoft.
Если вы хотите использовать образ Windows, предоставленный разработчиком Limbo, то следуйте указаниям в инструкции программы для скачивания и установки файла.
Если вы хотите использовать официальный образ Windows от Microsoft, то нужно выполнить следующие шаги:
- Откройте официальный сайт Microsoft и перейдите на страницу загрузки Windows. Убедитесь, что выбрана версия операционной системы, которую вы хотите установить в эмуляторе.
- Выберите язык и нажмите кнопку «Продолжить».
- Выберите архитектуру системы (32-бит или 64-бит) и нажмите кнопку «Скачать».
- Сохраните загруженный файл на вашем компьютере.
После загрузки образа Windows вы будете готовы приступить к установке операционной системы в эмуляторе Limbo. Следуйте дальнейшим инструкциям по установке Windows, которые будут описаны в следующем разделе.
Установка Windows в эмуляторе Limbo
Эмулятор Limbo позволяет запускать операционную систему Windows на устройствах под управлением различных платформ, в том числе Android и Linux. Установка Windows в эмуляторе Limbo несложна, но требует выполнения нескольких шагов.
Перед началом установки убедитесь, что на вашем устройстве установлен эмулятор Limbo. Если эмулятор еще не установлен, загрузите его из официального источника и установите на устройство.
Для установки Windows в эмуляторе Limbo выполните следующие шаги:
- Подготовьте образ операционной системы Windows. Вы можете использовать оригинальный дистрибутив Windows или образ ISO-файла операционной системы.
- Откройте эмулятор Limbo на вашем устройстве.
- В разделе «Machine» (Машина) выберите тип архитектуры вашего устройства (например, x86 или x86_64).
- В разделе «CDROM» (CD-ROM) выберите образ операционной системы Windows, который вы подготовили на первом шаге. Если у вас есть ISO-файл, выберите его через вкладку «ISO». Если у вас есть физический диск или USB-флешка с образом Windows, выберите их через вкладку «Storage».
- Настройте остальные параметры эмулятора, если необходимо (например, количество выделенной оперативной памяти или размер жесткого диска).
- Нажмите кнопку «Start» (Запуск), чтобы начать процесс установки Windows в эмуляторе Limbo.
- После запуска эмулятора будет открыто окно с виртуальной машиной, в которой будет происходить установка Windows. Следуйте инструкциям на экране для завершения установки операционной системы.
После завершения установки Windows в эмуляторе Limbo вы сможете запускать и использовать операционную систему Windows на своем устройстве. Обратите внимание, что производительность работы Windows в эмуляторе может быть ниже, чем при непосредственной установке на физическое устройство.
How To Run Windows 7 on Android Phone: Hello friends, if you want to run windows 7 on android, you are at the right place. This post will provide you a complete guide on how to run windows 7 on android phone.
To do so, we need a Limbo emulator for android and also a windows 7 image or iso file. Don’t worry; all the links are provided for every file.
how to run windows 7 on android using limbo pc emulator
Contents
- 1 how to run windows 7 on android using limbo pc emulator
- 2 Windows 7 setup and First Boot:
- 3 What you can do on windows 7 emulator on Limbo:
- 3.1 How to check windows version
- 3.2 Watch YouTube video for better understanding:
- 3.3 Related
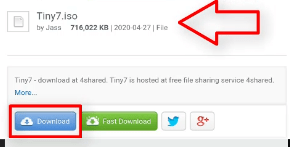
Step 1. Friends, first you have to download the Limbo pc emulator, So click on this link and you will be redirected to another website (4shared).
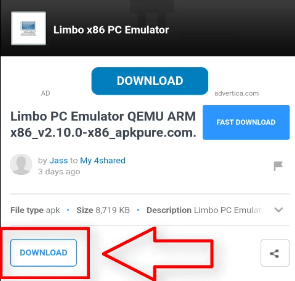
Step 2. Now you will see a download button under limbo pc emulator apk, but if you are unable to see the download button, sign in using your Google account. Then the button will appear. So, download the apk file.

Note: if the x86 version of limbo apk crashes on your android device, you can also try the x64 version of the limbo application. Both the versions of this app are added to the download folder.
Step 3. After download, click on the install button to start the installation; if you see the application installation blocked message, click on the got button.
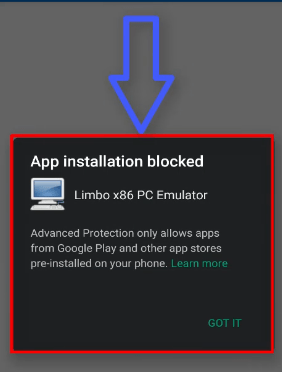
Now go to system settings>application manager>Google Play Store> now disable it, but you can enable it after this installation.
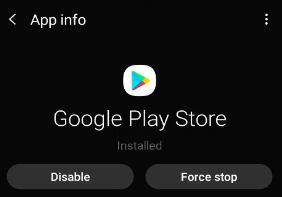
After that again try to install limbo apk and it will be installed successfully but don’t open it yet.
Step 4. Now you need a iso or img file of windows 7 to run windows 7 on android.
Click on this link to download that file. It will be sized around 1 to 1.8 GB in size.
Step 5. After downloading iso file, it’s time to open limbo pc emulator.
Open it and allow all permissions such as storage, etc.
Step 6. Now we have to setup all settings to run windows 7 on android.
Let’ start:
Name of the Machine:
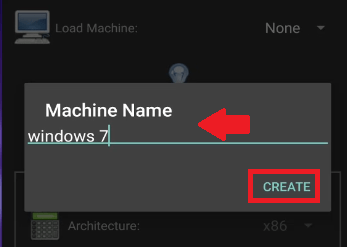
- First, click on None button at the top right side of the screen and select New
- Name it as Windows 7
CPU/BOARD:
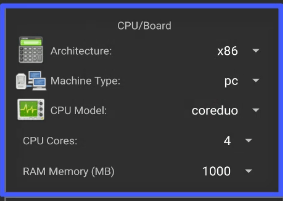
- Architecture: select x86 bit
- Machine Type: PC
- CPU Model: Core Duo
- CPU Cores: 4
- RAM Memory: 1000 MB
Note: if your phone has low ram like 1-1.5 gb, you have to select low size of ram like 512 or lower size.
Storage:
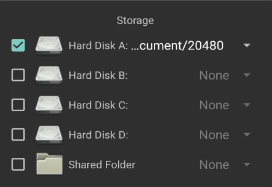
- Select Hard Disk A: Click on None and it will open your file manager. Now select the iso or img file of windows 7, that you have just downloaded.
Removable Storage:
No need to setup Removable Storage settings.
Misc:
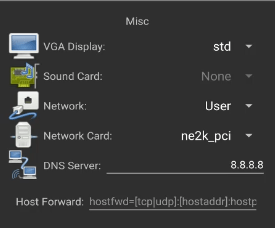
- VGA Display: here you have to select std option but if you are unable to see the running windows on emulator, you can try other settings as well like VMware.
- Sound Card: None
- Network: User
- Network Card: ne2k_pci
Boot Settings:
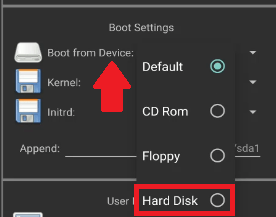
- Boot from Device: select Hard Disk option
- Kernel: None
- Initrd: None
User Interface:
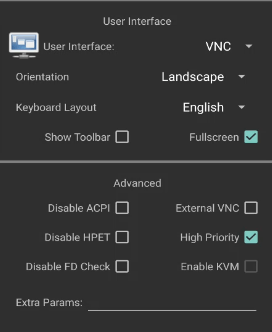
- User Interface: select VNC and you can also try other settings if the emulator failed to run.
- Orientation: select Landscape
- Keyboard Layout: English
- Fullscreen: you have to tick mark the fullscreen option
Advance:
- High Priority: you have to tick mark high priority setting, but this uses high ram and cpu. If your phone heats up, disable this option.
Now Limbo PC Emulator settings are done. Scroll up and now it’s time to start the emulator.
You will see a Play button, click on it and it will start windows 7.
Note: If the emulator crashed, just lower the ram and it will run properly.
Windows 7 setup and First Boot:
Step 7. Now you will see windows starting setup.
Here you have to select Start Windows Normally option.
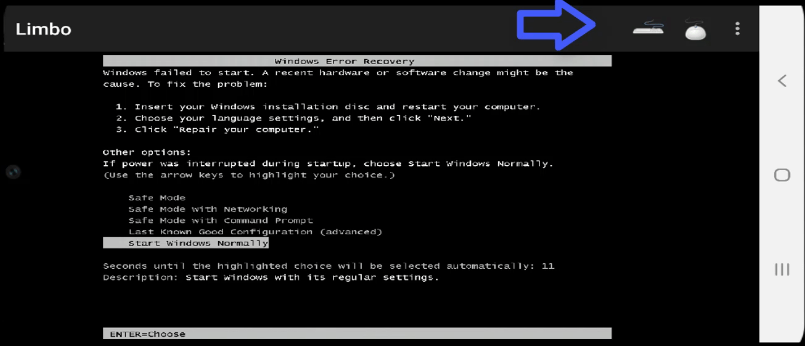
To select it:
- Press back key on your android phone.
- A new menu will pop-up above the screen
- Select the keyboard option
- Now press the enter key on keyboard
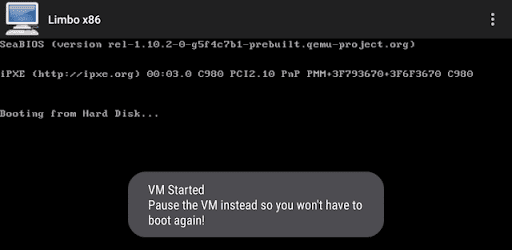
Step 8. Now wait until you see a booting screen and after that a user icon.
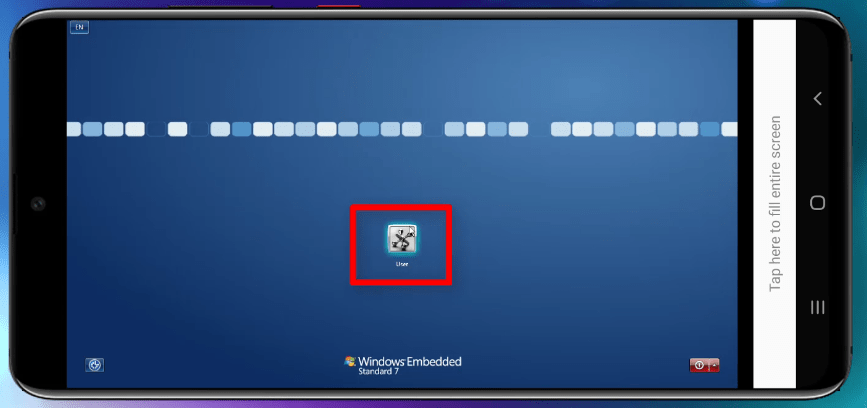
When you see a user icon, click on it.
Now you are successfully logged in to windows 7 on android emulator.
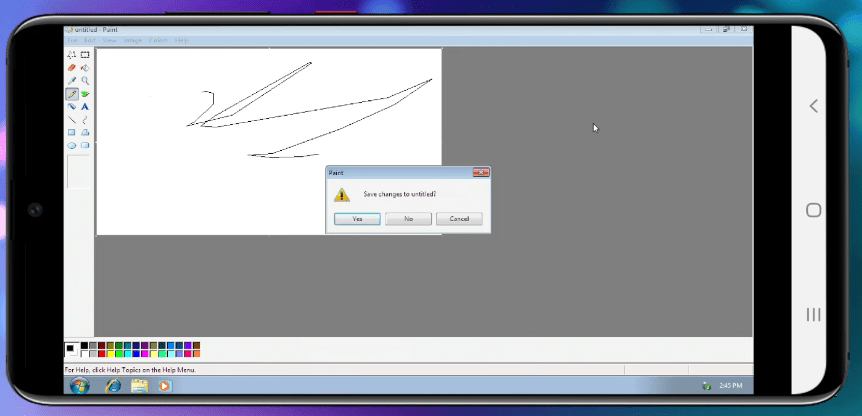
What you can do on windows 7 emulator on Limbo:
This is a light version of windows 7 and you will see less programs as compared to original windows for pc.
- You can connect a USB mouse via OTG cable.
- You can open and manage My Computer on it.
- You can open and access the control panel.
- You can Paint in it.
- You can access the internet in it.
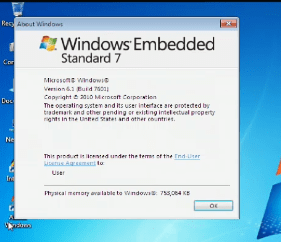
How to check windows version
You can check windows version on this emulator easily. You will see a shortcut on the desktop names as About Windows, click on it.
Now you will see the version of this windows 7, as shown in the image below its Windows Embedded Standard 7.
So, Friends, I hope now you are able to run windows 7 on android. If not feel free to comment below, I will do my best to help you.
Watch YouTube video for better understanding:
Summary
Article Name
How To Run Windows 7 on Android Phone
Description
How To Run Windows 7 on Android Phone using Limbo PC Emulator very easily, download windows 7 img or iso link is also provided
Author
Jaspreet Singh
Publisher Name
Jaspreet Singh
Publisher Logo
![]()
In today’s post I will tell you how you can actually run REAL Windows 11 on your android phones using Limbo Emulator for mobile.
What Is Limbo Emulator?
Limbo Emulator is an open-source emulator which let’s you emulate many operating systems on android in real-time. Features many amazing features which help run any operating system, without a hassle!
This emulator is a QEMU-based emulator for android devices. It supports emulation for these architectures: x86/x86_64 ARM/ARM64 PowerPC/PowerPC64.
Minimum Device Requirements To Run Windows 11 On Android:
You will need the following device specifications if you want to run windows 11 on android:
1. Snapdragon 660 processor or above for good experience, and Snapdragon 855 or above for best experience.
2. 4GB Ram as your device will also have to provide independent ram for the operating system in limbo emulator.
3. A Genuine copy of Windows 11 which you can get here:
Download Windows 11 For Limbo Emulator
How To Install:
Once you have downloaded a genuine windows 11 copy that works on the emulator, now you will have to download the emulator itself.
To do that first download the emulator from the given link below and install the apk file on your android device.
Download Limbo Emulator
Once that’s installed you will have to go ahead and extract the windows 11 copy. You will get windows11.vhd file. Now you just have to go ahead and paste the vhd file into a separate folder.
Now we are all set to the next state!
How To Setup The Emulator:
Once you have installed it and pasted the windows 11vhd file, just open the emulator.
Now do the following settings:
• Click on the load machine option and create a new machine. You can name it Windows11.

• It will ask you if you want to search for downloadable OS, click on cancel.
• Now click on CPU/Board and set the following settings. (Follow the image below)

• After this, you have to go to disks and tick the Hard Disk A and choose your windows 11vhd file.

• Now do the following settings:
Graphics > select vmware
Audio > soundcard-adlib.
Network – user > network card – pcnet.
Go to advanced and tick on high priority.

Now we are all set! Just scroll up and click on the play button. And enjoy!

Conclusion:
With this method, you will be able to run windows 11 on android. All thanks to Limbo Pc Emulator.