Internet Explorer was retired on June 15, 2022
IE 11 is no longer accessible. You can reload Internet Explorer sites with IE mode in Microsoft Edge.

This is the core OS image that powers Windows IoT platform on Raspberry Pi 2 & 3. Windows 10 IoT Core is the smallest version of the Windows 10 editions that leverages the Windows 10 common core architecture. This edition enables building low-cost devices with fewer resources.
Important! Selecting a language below will dynamically change the complete page content to that language.
-
File Name:
14393.0.160715-1616.rs1_release_amd64fre_IOTCORE_RPi.iso
This is the core OS image that powers Windows IoT platform on Raspberry Pi 2 / 3. Windows 10 IoT Core is the smallest version of the Windows 10 editions that leverages the Windows 10 common core architecture. This edition enables building low-cost devices with fewer resources. Development for Windows 10 IoT Core leverages the Universal Windows Platform.
Learn more about Windows 10 IoT Core here.
-
Supported Operating Systems
Windows 10
Operating system
• Windows 10 (Build 10240 or higher) -
- Click the Download button on this page to start the download.
- Click Save to save this program to disk.
- Follow the rest of the instructions on the Setup Raspberry Pi page.

The Raspberry Pi is usually associated with Linux operating systems like Raspberry Pi OS (formerly known as Raspbian), Ubuntu, etc. But what about running Windows 10 on your Raspberry Pi? Well, it would be great for sure. However, Windows 10 is still not officially supported for Raspberry Pi. Microsoft’s only OS for Pi is the old Windows 10 IoT Core that just lets you execute Visual Studio codes but cannot work as a standalone OS with its GUI.
Though it is so, it didn’t stop some passionate developers to find a way to run a full desktop version of Windows 10 on Raspberry Pi. They have made it possible with the WoR project. With that, they developed a tool to flash an ARM image of Windows 10 on an SD Card (or an SDD), that can boot on a Raspberry Pi.
In this guide, I’ll walk you through the exact steps to install Raspberry Pi Windows 10.
Contents
- Requirements
- Steps to Install Windows 10 on Raspberry Pi 4/3/2
- Step 1: Download the Required Files
- Step 2: Update Raspberry Pi Firmware
- Step 3: Build Windows 10 ISO File on your PC
- Step 4: Flash the ISO File with WoR Tool
- The First Boot
- Overclock the Raspberry Pi
- How Does Raspberry Pi Windows 10 Perform?
- Now it’s your turn..
Requirements
- Raspberry Pi 4/3/2
- MicroSD Card (Faster is better, so a class A2 card is recommended)
- Ethernet Cable or Wi-Fi dongle
- Keyboard, Mouse, and Monitor
Step 1: Download the Required Files
In order to get started with the installation, you have 2 things to download.
1. The WoR Tool [https://www.worproject.ml/downloads]
When you download this you will get a zip file with everything inside it. Keep it for now. We’ll use it later.
2. UUP file for Windows 10 ARM
For downloading a UUP file you can use any one of the following websites. Each of them works a bit differently. On these websites, you only have to choose a Windows version, build number, language, and edition like Pro, Home, Ultimate, etc.
- https://uupdump.net/ (for Linux or Mac PC)
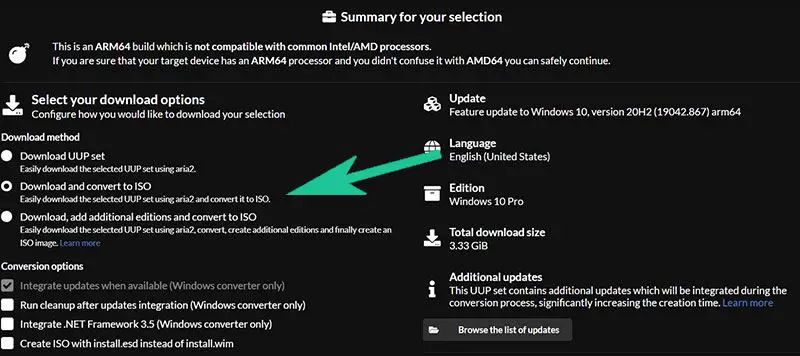
Download the file from this website only if your computer is not running on Windows OS. While on the website, I recommend selecting only one edition to keep the file size smaller and make the installation faster. Only check the required edition and leave others unchecked. Now choose the Download and convert to ISO option.
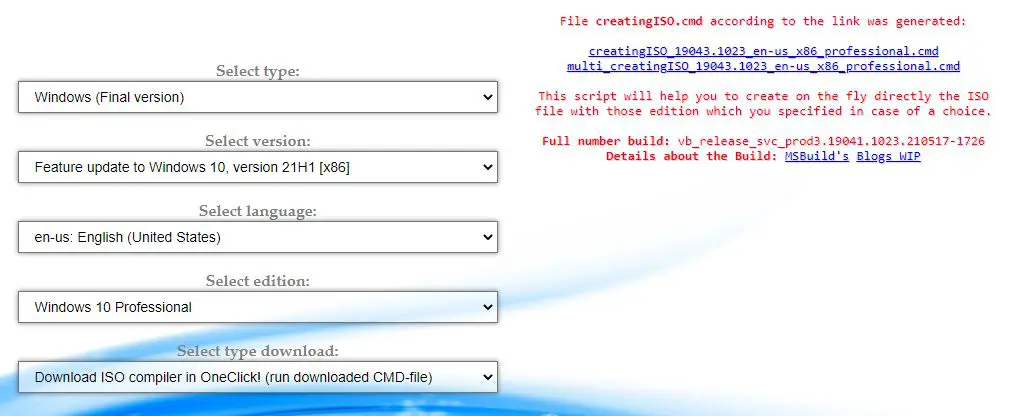
- https://uup.rg-adguard.net/ (for Windows PC only)
This site has got a much more intuitive interface where you can easily download the file. Use the drop-down arrows to choose the required version number, edition, build number, etc. Then click on the Download ISO compiler in One click! option in the download type. Download the cmd file by clicking on the link appearing on the right side. This will look something like this:
Step 2: Update Raspberry Pi Firmware
As usual, before doing something big, we have to update the firmware of our Raspberry Pi. To do the same, open a terminal and type the following command.
sudo apt update
sudo apt full-upgrade
Once done with that, stop your device and you don’t need the Raspberry Pi OS (Raspbian) anymore.
Step 3: Build Windows 10 ISO File on your PC
The next step is to build the Windows 10 ISO image file using the cmd file that we’ve download in step 1. If you downloaded the file from the second website you will get the direct cmd file whereas if you have downloaded it from the first website (uupdump.net) then you need to extract the zip file to see a file named “uudp_download_windows.cmd“.
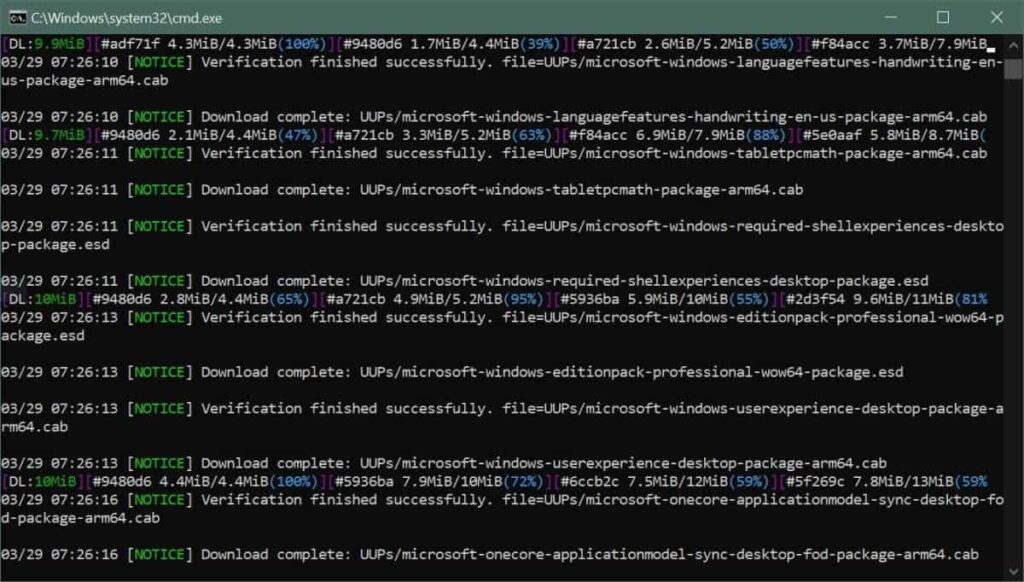
- Double click on the cmd file and you will see a terminal window. Press 0 when asked. It will immediately start to download some files for the process. This will be of a few gigabytes and take a lot of time if your internet connection is slow.

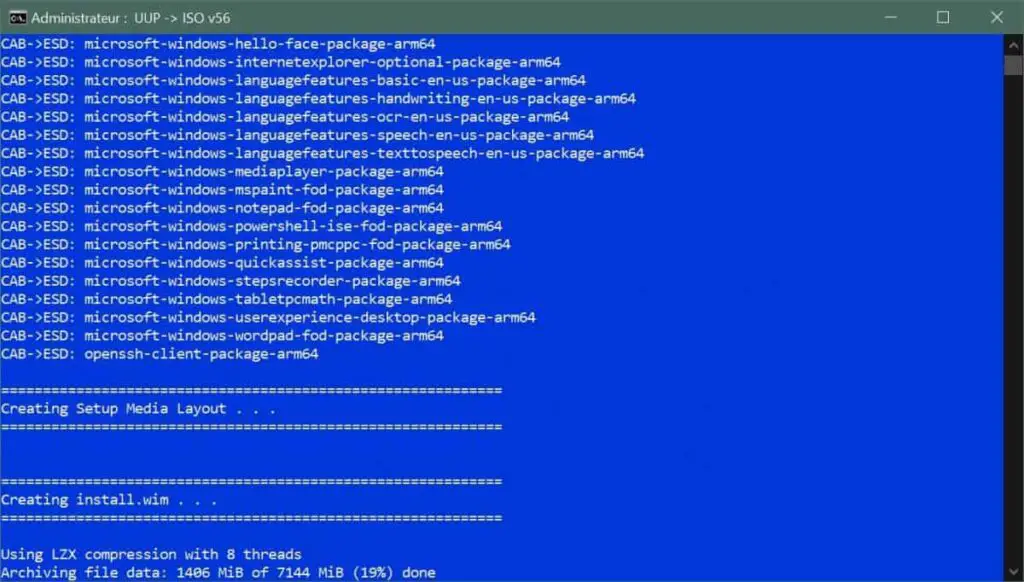
- Once the downloads are complete it will automatically start to build the ISO image file.
- This also will take some time. If you encounter any stuck somewhere in the process just press the Enter.


Step 4: Flash the ISO File with WoR Tool
Now it’s time to flash the ISO file that we build just now. Here comes the use of the WoR tool. It is a simple and easy-to-use flashing tool. To flash the ISO, follow the below steps.
- Firstly, extract the WoR_Release_….zip archive to a new folder on your computer.
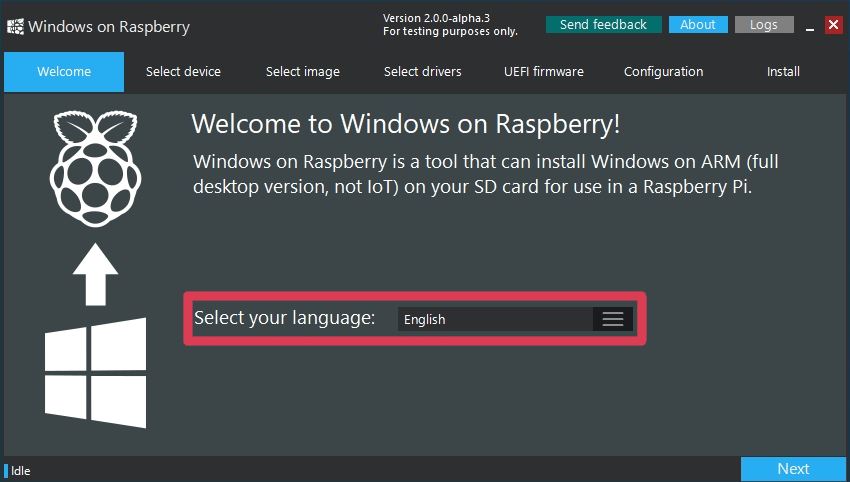
- Find the wor.exe file and double-click on it.
- Select your preferred language from the drop-down list.
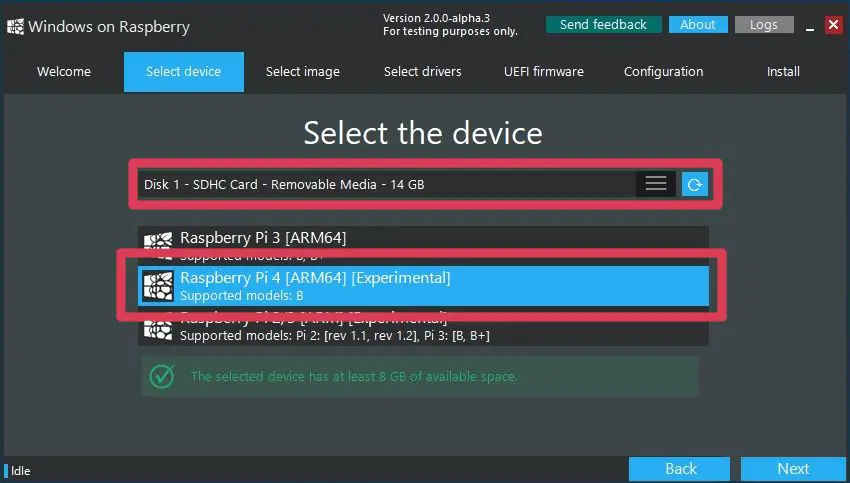
- Choose the target drive (your SD Card or SSD drive) and the model of your Raspberry Pi board.
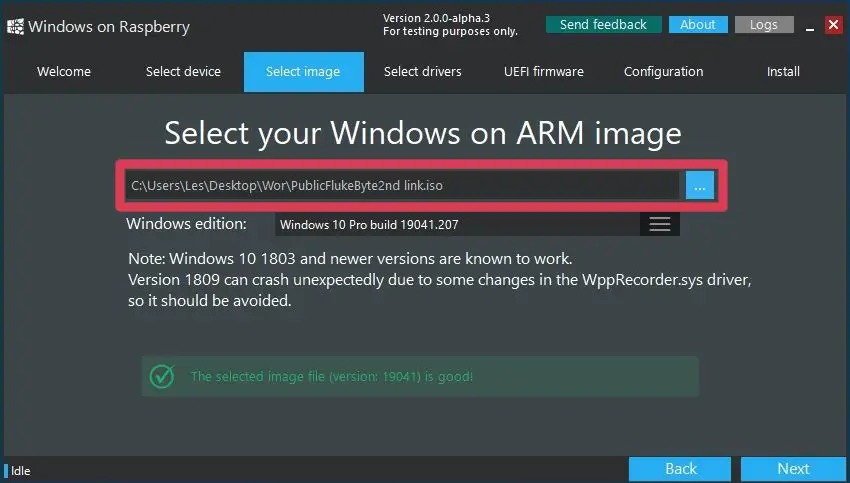
- Once all those selected, now navigate and choose the ISO file that we’ve built.
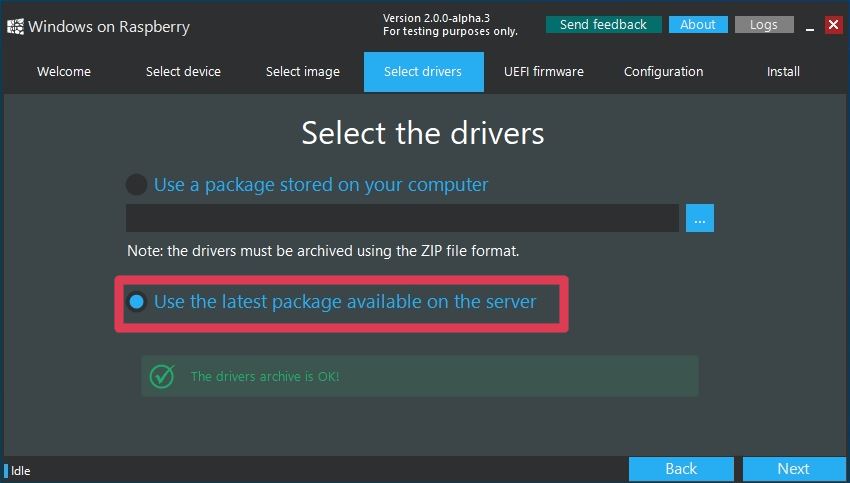
- The next step is to select the driver package from the server. Simply select the latest package.
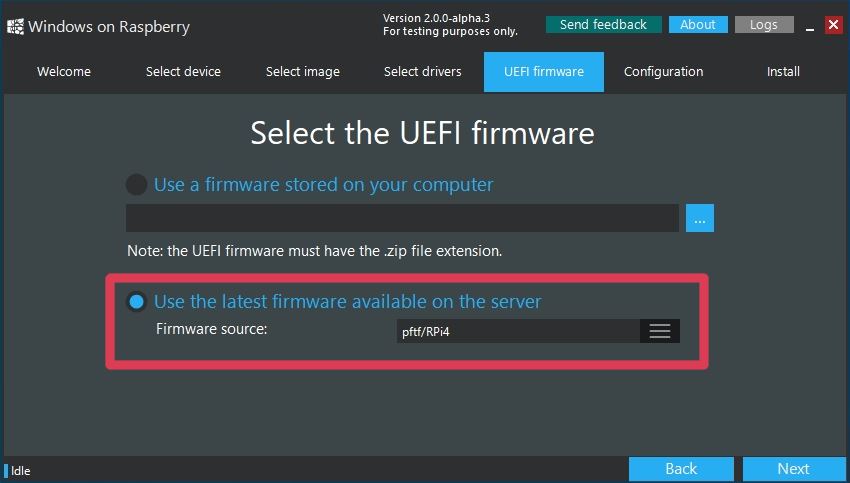
- Then select the UEFI firmware to flash. Here also select the latest version available.
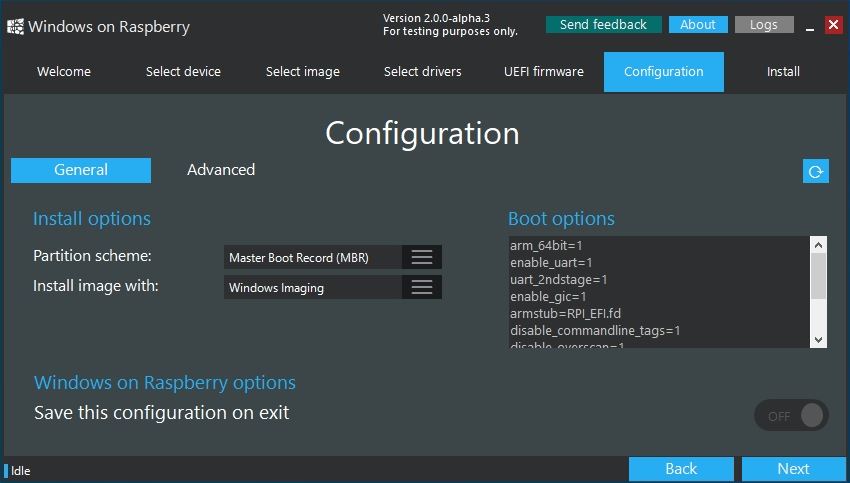
- Check the configuration and click Next.
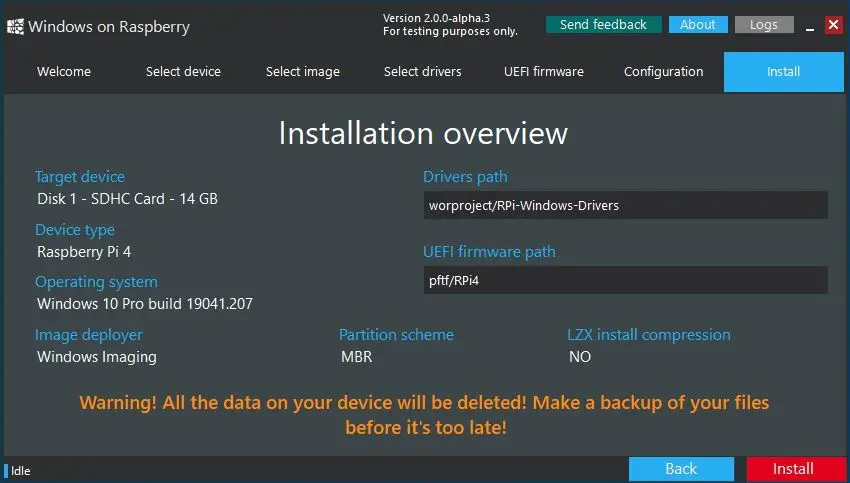
- So you have selected all the things to get started with the install. Just double-check everything and click Install.
The installation may take as long as 1.5 to 2 hours, depending on the write speed of your SD Card. This is why I recommend getting an A1 or A2 class SD Card or else an SSD drive to get the job done much faster. On an SSD drive, it may take only about 15 minutes or so.
The First Boot
And now once the Raspberry Pi Windows 10 installation is completed and your device is ready, you can directly plug it (if you have an SSD) into the Pi or insert it if you have an SD card. Then boot it up.
Since it is the first boot, it will take some time to completely initialize and configure things according to your device and boot up. However, from the second boot onwards everything will be fine and will work as normal. If you are a beginner and don’t know how to set up a remote desktop on your Raspberry Pi, just relax – I’ve got that covered for you. Head over to this link: How to Setup Raspberry Pi Remote Desktop on Windows/ Linux/ Mac (5 Methods)
As usual with a typical Windows installation, you will need to configure some things manually: for example Cortana and the privacy policies that Windows normally tries to disable for you.
Once done with that, you will enter into a full-fledged Windows 10 on your cute little Raspberry Pi.
Overclock the Raspberry Pi
Now that you have successfully completed the Raspberry Pi Windows 10 installation, and thinking to boost the performance?
Well. That’s indeed a right thought. Overclocking a Raspberry Pi will help you get the most out of your SBC and take your projects to the next level. For this purpose, I have written a comprehensive article on how to overclock Raspberry Pi board. You can click on the link and refer to the article.
How Does Raspberry Pi Windows 10 Perform?
In my testing, the overall performance is pretty much decent and it’s smoothly usable. However, it has the following limitations.
- Resource limits will be reached quickly with some usage.
- CPU usage is almost 100% while streaming YouTube in Google Chrome.
- Bluetooth support is also limited as the RTS/CTS lines are not exposed.
- Problems with HDMI audio out.
Though it is having some limitations, you will get a nice Windows 10 experience on your tiny computer. You can get partially get rid of the resource exhausting problem by providing an A2 class 32/64 GB SD card or a super-fast SSD drive.
Now it’s your turn..
It’s now your turn to try the Raspberry Pi Windows 10 installation and share your experience. I’ve tried to make this tutorial as simple as possible and still if you have any queries just drop them in the comment section below.
Found an issue with this article? Report it here, so that I can resolve it.
- About
- Blog
- Projects
- Help
-
Donate
Donate icon
An illustration of a heart shape - Contact
- Jobs
- Volunteer
- People
Item Preview
There Is No Preview Available For This Item
This item does not appear to have any files that can be experienced on Archive.org.
Please download files in this item to interact with them on your computer.
Show all files
software
Full Windows 10 on Raspberry Pi 3 (Core files)
- Topics
- microsoft, windows, 10, desktop, arm, arm64, raspberry, pi, pi 3, woa, wor, efi, uefi, woa64, win10, drivers, source, code
- Language
- English
Collection of core files necessary to get full Windows 10 Desktop ARM (not IoT) running on the Raspberry Pi 3:
- WoR_Release1.5.2.zip: WoR (Windows on Raspberry) SD card flashing software, needs a working Windows 10 PC to work.
- RPI_EFI.fd: Raspberry Pi 3 (U)EFI Firmware image, necessary to boot into Windows 10.
- WoA64_Drivers_12FEB19.zip: Miscellaneous drivers for Raspberry Pi board default components.
Additional files needed (not included for size reasons):
- Windows 10 OS flashable image. You can get it from https://uup.rg-adguard.net/. I suggest getting Win10_Pro_17134.191_OOBE_RPi3.ffu.
Credits and sources:
- Addeddate
- 2020-10-16 08:05:57
- Identifier
- win10rpi3
- Scanner
- Internet Archive HTML5 Uploader 1.6.4
comment
Reviews
There are no reviews yet. Be the first one to
write a review.
127
Views
3
Favorites
DOWNLOAD OPTIONS
Uploaded by
andrigamerita
on
SIMILAR ITEMS (based on metadata)
Before you proceed to download the software below, see our official installation guide.
Chances are that you’re coming from an outdated tutorial, so it’s recommended to follow the guide above to prevent any issues with the installation.
Windows on Raspberry imager
Download version 2.3.1
See the changelog
Customization options
Requirements:
- a computer with Windows 10 version 1703 or later. (Wine is not supported — see the PE-based installer for other OSes)
- a Raspberry Pi 2 rev 1.2, 3, 4 or 400. (minimum RAM requirement is 1 GB, but it will generally result in poor performance, especially on boards older than Raspberry Pi 4)
-
a good/reliable drive that has at least 8 GB of available space. It can be:
- an SD card (A1 rating is highly recommended; non-A1 rated cards may be too slow)
- an USB device (preferably SSD, or any drive that has decent random I/O speeds).
A slow drive can also cause other issues, besides being a bottleneck.
- a Windows 10 ARM64 build 19041 or newer image (up to Windows 11 version 2022 / build 22621): WIM/ESD, ISO or FFU
Windows on Raspberry PE-based installer
This is not a straightforward wizard tool like the Windows-only imager, so please follow the appropriate guide for it: How to install from other OSes.
Download package version 1.1.0
See the changelog
Customization options
Requirements:
Same as for the Windows-only version, with some exceptions:
- no specific OS required, as long as the tools needed to create the PE-based installer are available or can be compiled for it.
- the Windows ARM64 image can only have the ISO format. The reason for this is that some required files from the ISO cannot be found in the WIM/ESD.
- storage-wise, you need either:
- a drive that has at least 32 GB, for self-installation
- a drive that has at least 8 GB for the installation media, and another destination drive that has at least 16 GB for the OS (e.g.: an USB drive and an SD card)
Boot partition mount utility
Easily mount the boot partition of your Windows on Raspberry installation. Works directly on the Raspberry Pi or another computer.
Download version 1.1.0
PiMon
A simple hardware monitor for your Raspberry Pi running Windows. (https://github.com/driver1998/PiMon)
Download the latest version
See the changelog
Windows images
See the Getting Windows Images guide.
What about FFU images?
FFU images can speed up the deployment process significantly, especially on slow devices. They are not available for download due to legal reasons, but you can safely generate them yourself: How to generate FFU images?
Windows 10 on Raspberry Pi 3
Build: 17134.1 for arm64
Note: I am not responsible for anything that happens to your Raspberry Pi. The steps listed have not been tested and may not work.
**You can follow Davindra’s tutorial, however this tutorial is step-by-step and may be clearer. In Davindra’s tutorial, the ISO was compiled, however you don’t have to compile the ISO if you use this tutorial. https://www.youtube.com/watch?v=c0VqVm8X_zQ
Note: I am not Davindra
There are two methods, however it is recommended that you follow Method 1.
Method 1 (not easy, but recommended)
You may try method 2 if you want to. It is easier, but it is not recommended.
Don’t download «install.wim — Extract.7z». If you want to use «install.wim — Extract.7z», follow Method 2.
Prerequisties
- Some time (a few hours)
- An SD card (16GB is fine, but you can use an SD card that is bigger than 16GB)
- MiniTool Partition Wizard
- Win10-on-64-bit-Pi3 Zip file
Steps:
- Download MiniTool Partition Wizard https://www.partitionwizard.com/free-partition-manager.html
- Download this repository and extract the files into a folder. Rename the folder to WinRpi.
- Open MiniTool Partition Wizard.
- Plug in your SD card into your computer.
- Locate your SD card in the Partition Wizard and delete all partitions. Note: This will remove all data.
- Create a partition that is more than 100MB and name it BOOT.
- Select Primary and set the file system as FAT32.
- Click OK.
- Create a partition with the remaining storage on the SD card and name it Windows.
- Select Primary and set the file system as NTFS.
- Click OK.
- Click Apply.
- Navigate to the folder where you extracted the files from this repository to and open up the UEFI files folder.
- Copy all the files in the UEFI folder and paste it in the BOOT drive of the SD card.
- Go to https://uup.rg-adguard.net/ and download Build 17134.1 [arm64] of Windows Insider build. Select your language and select Windows 10 Professional and choose Download ISO compiler in OneClick! (unZIP -> RUN creatingISO.cmd) and download the file.
- Extract the ZIP file that you downloaded from the UUP.
- Run creatingISO.cmd. The ISO will be created, however, it may take a long time.
- In the WinRpi folder, create a folder called «m».
- Right-click the ISO, Open With, Windows Explorer.
- Copy the install.wim to the WinRpi folder.
- Extract the Win10-on-64-bit-Pi3 Zip file.
- Eject the ISO by right-clicking on it and choosing Eject.
- Open a command prompt as administrator.
- cd into the WinRpi folder.
- Run the command
dism /mount-image /imagefile:install.wim /Index:1 /MountDir:m
- Run the command
dism /image:m /add-driver /driver:system32 /recurse /forceunsigned
- Run the command
dism /unmount-wim /mountdir:m /commit
- Run the command
dism /apply-image /imagefile:install.wim /index:1 /applydir:<**the drive letter of the Windows partition on the SD card**>:\
- Run the command
bcdboot <**the drive letter of the Windows partition on the SD card**>:\Windows /s <**the drive letter of the BOOT partition on the SD card**> /f UEFI
- Run the command
bcdedit /store <**the drive letter of the BOOT partition on the SD card**>:\EFI\Microsoft\Boot\bcd /set {default} testsigning on
- Run the command
bcdedit /store <**the drive letter of the BOOT partition on the SD card**>:\EFI\Microsoft\Boot\bcd /set {default} nointegritychecks on
- In the WinRpi folder, copy the finish.reg file to the main folder of the Windows partition on the SD card.
- Eject the SD card.
- Insert the SD card into your Raspberry Pi.
- Turn on your Raspberry Pi 3. It may take a couple of minutes (or longer) to boot.
- When you see the error «Windows installation cannot proceed», press SHIFT+F10. The command prompt will open.
- In the command prompt, enter
- In mmc, click File, Add/Remove Snap-ins.
- Double-click Computer Management.
- Click Finish.
- Click Ok on the dialog box that says Event Viewer.
- Click Ok on the Add/Remove Snap-ins menu.
- In mmc, click Computer Management (Local), Local Users and Groups, Users.
- Double-click on the Administrator account.
- Uncheck Account is disabled.
- Right-click on the Administrator account and click Set Password.
- Click Proceed.
- Enter your password. You may leave the password blank.
- Click Ok on the Set Password dialog box.
- Click Ok on the Local Users and Groups dialog box.
- Close mmc.
- Click No.
- In the command prompt, navigate to the folder you copied the finish.reg to.
- In the command prompt, enter
- Restart the Raspberry Pi or enter
in the command prompt to restart it.
Note: If entering the command does not restart Windows, restart it manually.
Method 2
Method 2 is faster than Method 1, but it is not recommended. Method 1 is recommended.
Prerequisties
- Some time (a few hours)
- An SD card (16GB is fine, but you can use an SD card that is bigger than 16GB)
- MiniTool Partition Wizard
- «install.wim — Extract.7z»
Steps:
- Download MiniTool Partition Wizard https://www.partitionwizard.com/free-partition-manager.html
- Download this repository and extract the files into a folder
- Extract «install.wim — Extract.7z»
- Open MiniTool Partition Wizard.
- Plug in your SD card into your computer.
- Locate your SD card in the Partition Wizard and delete all partitions. Note: This will remove all data.
- Create a partition that is more than 100MB and name it BOOT.
- Select Primary and set the file system as FAT32.
- Click OK.
- Create a partition with the remaining storage on the SD card and name it Windows.
- Select Primary and set the file system as NTFS.
- Click OK.
- Click Apply.
- Copy the UEFI files to the drive of the BOOT partition on the SD card.
- Open a command prompt as administrator.
- In the command prompt, navigate to the folder you extracted the «install.wim — Extract.7z» file to.
- Run the command
dism /apply-image /imagefile:install.wim /index:1 /applydir:<**the drive letter of the Windows partition on the SD card**>:\
- Run the command
bcdboot <**the drive letter of the Windows partition on the SD card**>:\Windows /s <**the drive letter of the BOOT partition on the SD card**>: /f UEFI
- Run the command
bcdedit /store <**the drive letter of the BOOT partition on the SD card**>:\EFI\Microsoft\Boot\bcd /set {default} testsigning on
- Run the command
bcdedit /store <**the drive letter of the BOOT partition on the SD card**>:\EFI\Microsoft\Boot\bcd /set {default} nointegritychecks on
- Copy the finish.reg to the drive of the Windows partition on the SD card.
- Eject your SD card and insert it into your Raspberry Pi 3.
- Turn on your Raspberry Pi 3. It may take a couple of minutes (or longer) to boot.
- When you see the error «Windows installation cannot proceed», press SHIFT+F10. The command prompt will open.
- In the command prompt, enter
- In mmc, click File, Add/Remove Snap-ins.
- Double-click Computer Management.
- Click Finish.
- Click Ok on the dialog box that says Event Viewer.
- Click Ok on the Add/Remove Snap-ins menu.
- In mmc, click Computer Management (Local), Local Users and Groups, Users.
- Double-click on the Administrator account.
- Uncheck Account is disabled.
- Right-click on the Administrator account and click Set Password.
- Click Proceed.
- Enter your password. You may leave the password blank.
- Click Ok on the Set Password dialog box.
- Click Ok on the Local Users and Groups dialog box.
- Close mmc.
- Click No.
- In the command prompt, navigate to the folder you copied the finish.reg to.
- In the command prompt, enter
- Restart the Raspberry Pi or enter
in the command prompt to restart it.
Errors:
Note: If you have any errors, please make a issue in this GitHub.
| Issue | Solution |
|---|---|
| Windows setup could not configure to run on this computer’s hardware | Compile the ISO and try again |
| The specified domain either does not exist or could not be contacted | Compile the ISO and try again |
| BSOD — DRIVER_POWER_STATE_FAILURE | Remove all USB devices and restart Raspberry Pi |
| BSOD — INACCESSIBLE_BOOT_DEVICE | Compile the ISo and try again |
Credits to:
https://github.com/andreiw/RaspberryPiPkg
https://github.com/andreiw/rpi3winstuff
https://uup.rg-adguard.net/
https://sourceforge.net/p/windows-10-lite/wiki/Finish%20setup%20immediately/
https://www.youtube.com/watch?v=c0VqVm8X_zQ