
Для использования с Rails рекомендуется Ruby версии 2.0 или 1.9.3. Для новых приложений лучше использовать версию Ruby 2.0.
Из исходников:
«Сделай сам»
Инсталлятор для Windows:
Ruby, популярные расширения, редактор
OS X Leopard и выше:
Поставляется
в комплекте
с Ruby, RubyGems и Ruby on Rails! Установка не требуется.
OS X Tiger:
Поставляется
с неработоспособным
Ruby,
см. это руководство.
RubyGems

RubyGems
—
стандартный менеджер пакетов для Ruby.
Он похож на apt-get, yum, emerge, и другие менеджеры пакетов ОС *nix.
Загрузить:
с RubyForge
(распакуйте и запустите «ruby setup.rb»).
Rails
Если RubyGems уже установлен, вы можете установить Rails со всеми зависимостями одной командой:
gem install rails —include-dependencies
Новые версии Rails устанавливаются таким же образом.
Компоненты Rails также можно
загрузить и установить отдельно.
Создайте ваше приложение
Создайте скелет вашего приложения и запустите веб-сервер:
rails new path/to/your/new/application
cd path/to/your/new/application
rails server
И вот, ваше приложение на Ruby on Rails работает! Следуйте инструкциям по адресу http://localhost:3000/.
Готовые пакеты
Ruby on Rails
Если у вас не хватает терпения на самостоятельную настройку Ruby on Rails,
можно попробовать один из готовых установочных пакетов.
Для Windows воспользуйтесь
Rails Installer.
Расширение Rails
с помощью плагинов
Существует большое количество расширений к Ruby on Rails, поставляющихся как плагины.
С их помощью в ваше приложение можно добавить функционал,
который может быть не нужен для большинства приложений,
но пригодится в вашем.
Редакторы
TextMate для OS X долгое время был предпочтительным редактором для работы с Rails,
но «классические» текстовые редакторы все так же популярны.
Посмотрите на поддержку Rails в vim или Rails в Emacs.
Предпочитаете IDE? Посмотрите на RadRails, RubyMine, 3rd Rail, или Netbeans for Ruby.
Ruby on Rails был создан
David Heinemeier Hansson
в партнерстве с
37signals,
расширен и усовершенствован усилиями команды разработчиков ядра Rails и сотнями open source разработчиков.
Rails распространяется под лицензией
MIT.
Ruby распространяется под лицензией
Ruby License.
«Rails», «Ruby on Rails» и логотип Rails являются зарегистрированными торговыми знаками David Heinemeier Hansson. Все права защищены.
Поддержка сайта —
Evil Martians.
Вопросы, предложения?
Свяжитесь с нами.
4.0.1
I’m excited to announce the release of RailsInstaller version 4.0.1. This version includes the latest updates to Rails and Ruby, as well working SQLite.
Key updates in this release include:
- Ruby 3.1.3
- Rails 7.0.4
- Devkit MSYS64
- SQLite
Please note that this release is only available in a 64-bit version, and you will need to download and install git, node, and yarn before installing RailsInstaller.
If you encounter any issues, please feel free to open an issue on GitHub.
4.0.0-alpha
The rails installer fully updated to the latest version of Rails, Ruby & working SQLite.
- Ruby 3.1.2
- Rails 7.0.4
- devkit msys64
- pre-configure SQLite
NOTE: 64bit version only & you will need to download and install git, node, yarn before installing this version of railsinstaller.
Any issues please open issue
3.2.0
3.1.1
- Ruby 2.1.8
- Rails 4.2.5.1
- activerecord-sqlserver-adapter 4.2.6
- coffee-rails 4.1.1
- jquery-rails 4.1.0
- sass-rails 5.0.4
Alternate Download
3.1.0
- Ruby 2.1.5
3.0.0
- Ruby 2.0.0-p598
- Rails 4.1.8
- activerecord-sqlserver-adapter 4.1.0
- coffee-rails 4.1.0
- jquery-rails 3.1.2
- sass-rails 4.0.5
- SQLite 3.8.7.2
- MySQL 5.6.21
2.2.5
- Ruby 1.9.3-p551
2.2.4
- DevKit now pulled from RailsInstaller S3 bucket
- Git 1.9.4
- Postgres 9.3.5-1
- MySQL 5.6.20
- Rails 3.x will be properly installed (Issue #30)
2.2.3
- Ruby 1.9.3-p545
- Git 1.9.2
- Postgres 9.3.4-3
- MySQL 5.6.17
- Updated README
3.0.0-alpha.2
- Ruby 2.0.0-p195
- Rails 3.2.14
![]()
![]()
![]()
![]()
![]()
![]()
![]()
![]()
14.5 k скачиваний
![]()
Приложения, рекомендуемые для вас
![]()
Браузер, ориентированный на игроков
![]()
Инструмент редактирования с богатыми возможностями
![]()
Автоматизация нажатий мышкой на компьютере
![]()
Надежный, универсальный и настраиваемый браузер
![]()
Используйте WhatsApp на своем компьютере
![]()
Общайтесь со всеми контактами в Telegram с рабочего стола своего компьютера
![]()
Создавайте и редактируйте свои видео для социальных сетей
![]()
Создавайте собственную анимацию очень простым способом
Больше информации
| Лицензия | GNU | |
| ОС | Windows | |
| Раздел | Общие | |
| Язык | Pусский | |
| Автор | David Heinemeier Hansson | |
| Размер | 4.53 MB | |
| Загрузки | 14,549 | |
| Дата | 29 июл 2014 | |
| Тип файла | ZIP | |
| SHA256 | 43d054b395a60f4ee529d1ffd2a5a1455256020621cb0e50222b9d3b1402b43a | |
| Почему это приложение опубликовано на Uptodown? |
(Больше информации) |
Похожие на Ruby on Rails
![]()
Объектно-ориентированный динамический язык программирования
![]()
Полнофункциональный текстовый редактор для программистов от GitHub
![]()
Многоплатформенный редактор кода для Microsoft
![]()
Динамическая среда для веб-разработки
![]()
Новая среда программирования для Android
![]()
Среда для программирования под Android
![]()
Среда IDE, адаптированная для программирования на динамических языках
![]()
Самая популярная среда разработки
![]()
Управляйте несколькими базами данных с помощью одного единственного инструмента
![]()
Создавайте собственные игры для любых платформ
![]()
Комплексный движок с открытым исходным кодом для разработки игр
![]()
Многоплатформенный редактор кода для Microsoft
![]()
Caphyon
![]()
Универсальный инструмент для создания видеоигр
![]()
Создавайте видеоигры в HTML5 даже без знаний программирования
![]()
Postman, Inc.
This will take about 30 minutes.
In this guide, we will be installing Ruby on Rails on Windows 10.
We’re going to use the Windows Subsystem for Linux (WSL) to accomplish this. This allows you to install a Linux distribution natively on Windows without a virtual machine.
Ruby on Rails will always be deployed to a Linux server, so it’s best for us to use the same for development.
Windows allows you to run various Linux operating systems inside of Windows similar to a virtual machine, but natively implemented. We’ll use this to install Ruby and run our Rails apps.
You must be running Windows 10 version 2004 and higher (Build 19041 and higher) or Windows 11.
Open Powershell and run:
wsl --install -d Ubuntu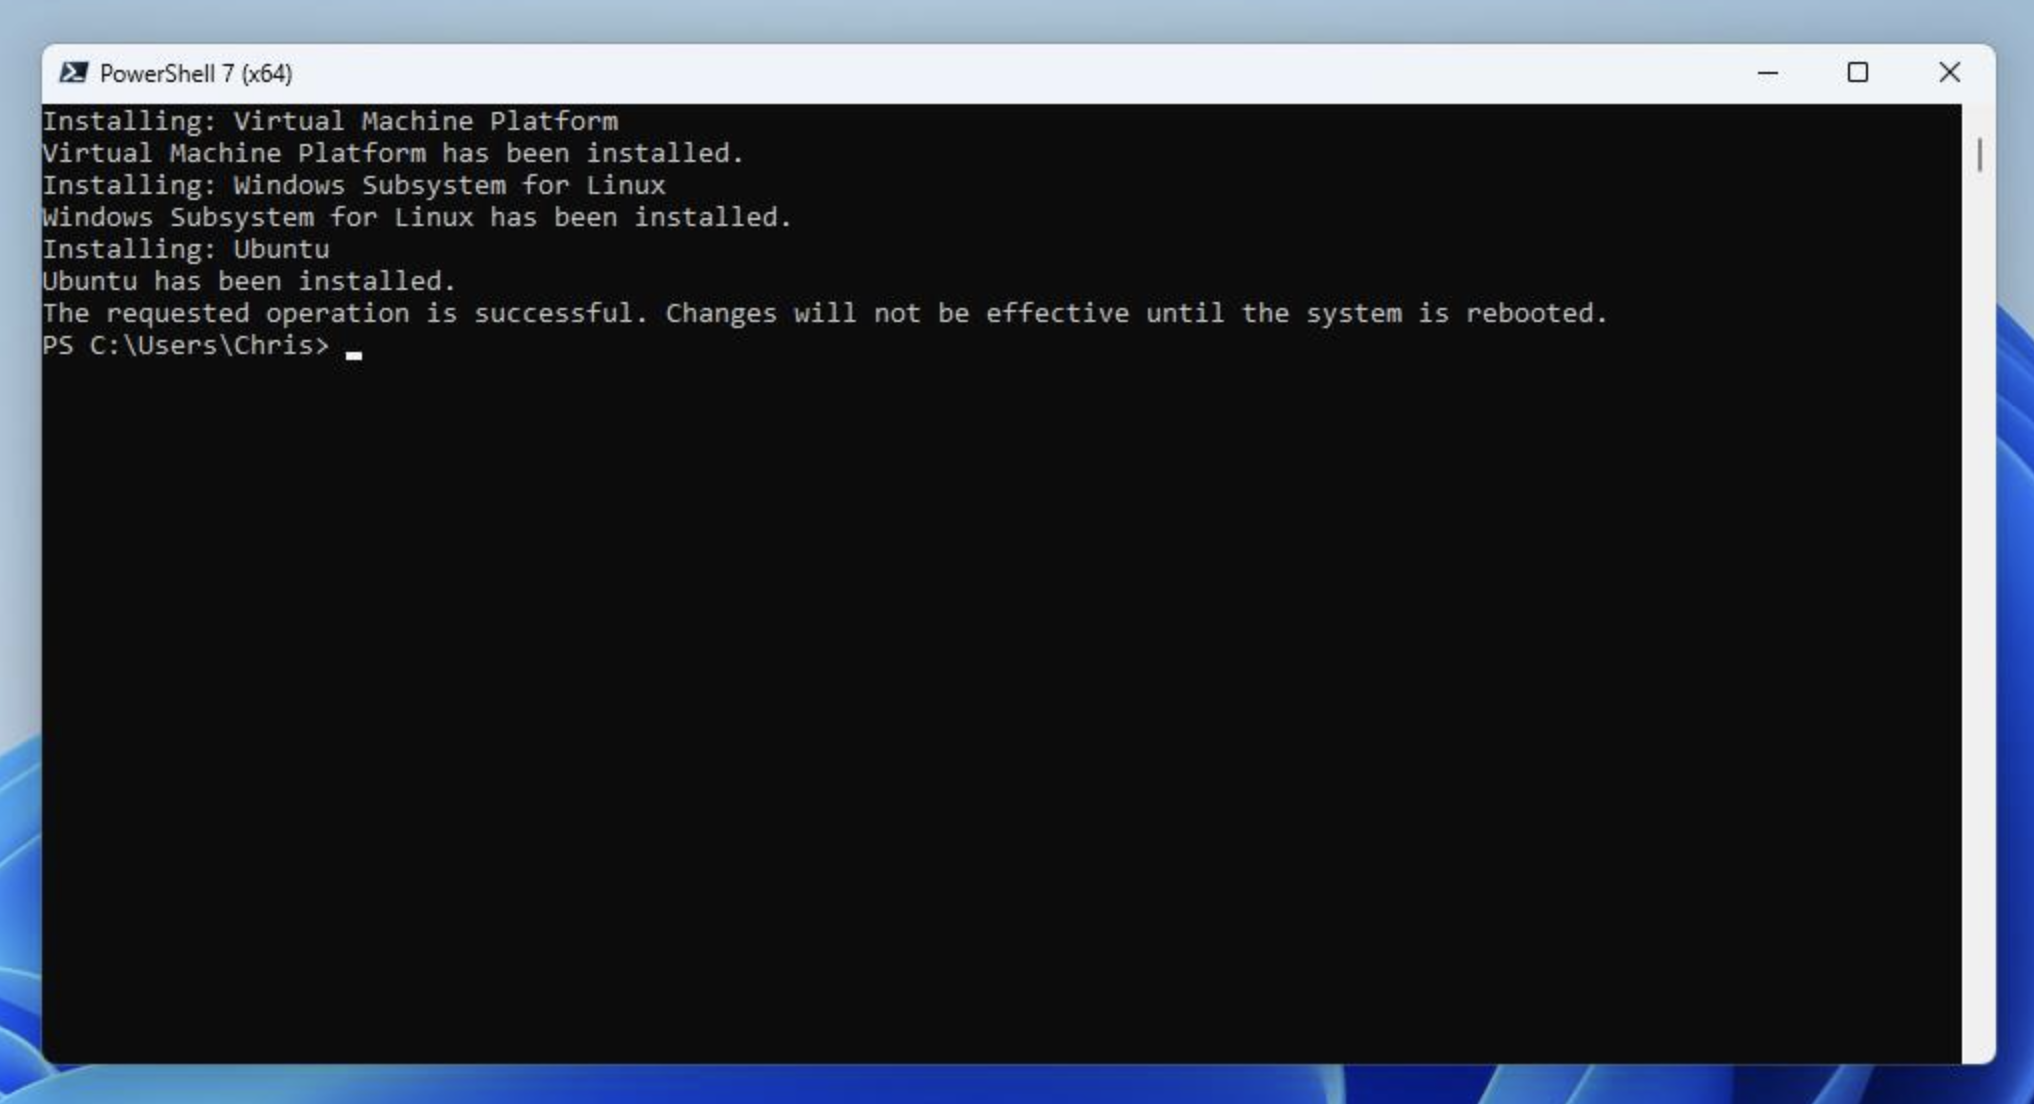
Reboot your computer to finish the installation.
Once initial setup is finished, you will be prompted to create a username and password for your Ubuntu install.
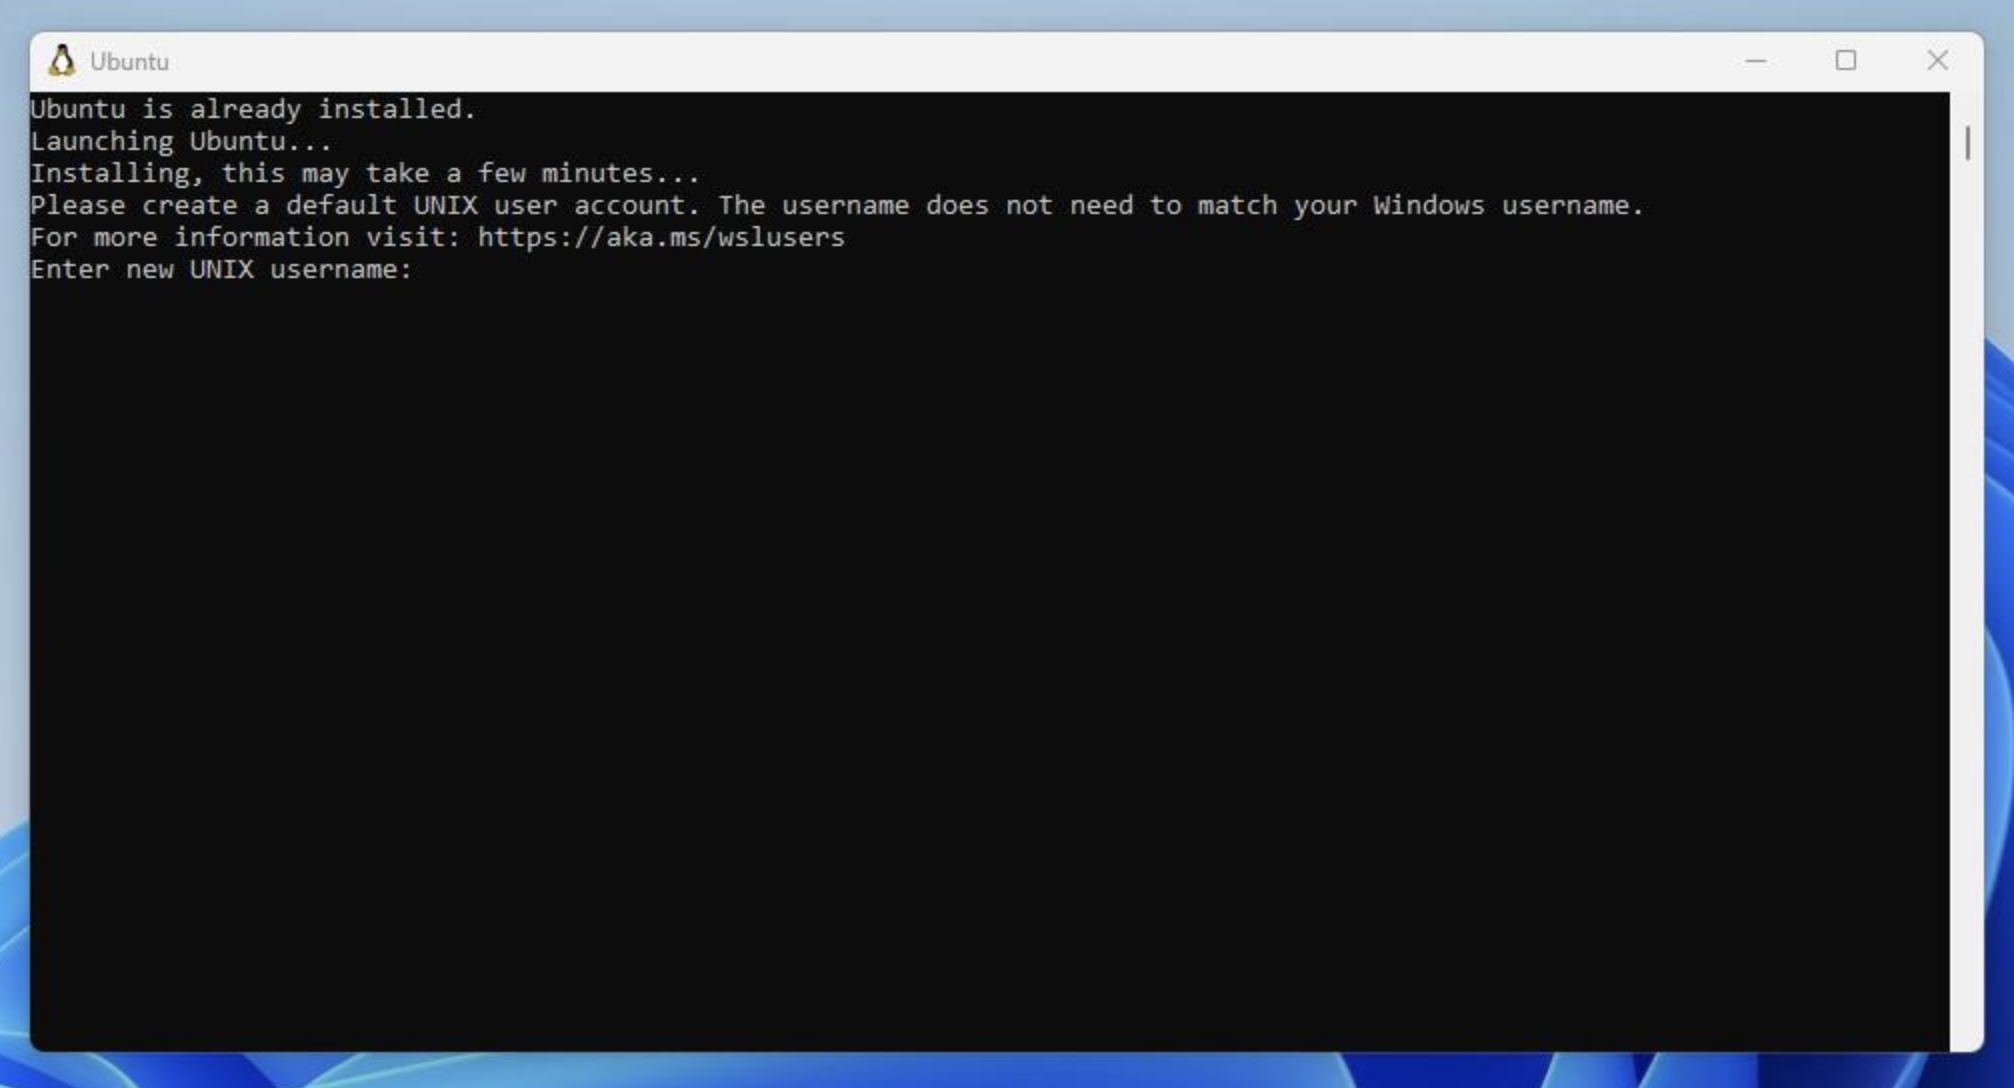
You can search for «Ubuntu» in the Windows Start Menu anytime to open the Ubuntu terminal.
Congrats! You now have Ubuntu installed on Windows with WSL. You’ll use this to run your Rails server and other processes for development.
The first step is to install dependencies for compiling Ruby. Open your Terminal and run the following commands to install them.
sudo apt-get update
sudo apt-get install git-core zlib1g-dev build-essential libssl-dev libreadline-dev libyaml-dev libsqlite3-dev sqlite3 libxml2-dev libxslt1-dev libcurl4-openssl-dev software-properties-common libffi-dev
Next we’re going to be installing Ruby using a version manager called ASDF.
The reason we use ASDF over rbenv, rvm or others is that ASDF can manage other languages like Node.js too.
Installing asdf is a simple two step process. First you install asdf, and then add it to your shell:
cd
git clone https://github.com/excid3/asdf.git ~/.asdf
echo '. "$HOME/.asdf/asdf.sh"' >> ~/.bashrc
echo '. "$HOME/.asdf/completions/asdf.bash"' >> ~/.bashrc
echo 'legacy_version_file = yes' >> ~/.asdfrc
echo 'export EDITOR="code --wait"' >> ~/.bashrc
exec $SHELL
Then we can install ASDF plugins for each language we want to use. For Rails, we can install Ruby and Node.js for our frontend Javascript.
asdf plugin add ruby
asdf plugin add nodejs
Choose the version of Ruby you want to install:
To install Ruby and set the default version, we’ll run the following commands:
asdf install ruby 3.2.2
asdf global ruby 3.2.2

# Update to the latest Rubygems version
gem update --system
Confirm the default Ruby version matches the version you just installed.
which ruby
#=> /home/username/.asdf/shims/ruby
ruby -v
#=> 3.2.2
Then we can install the latest Node.js for handling Javascript in our Rails apps:
asdf install nodejs 18.16.1
asdf global nodejs 18.16.1

which node
#=> /home/username/.asdf/shims/node
node -v
#=> 18.16.1

# Install yarn for Rails jsbundling/cssbundling or webpacker
npm install -g yarn
Configuring Git
We’ll be using Git for our version control system so we’re going to set it up to match our Github account. If you don’t already have a Github account, make sure to register. It will come in handy for the future.
Replace my name and email address in the following steps with the ones you used for your Github account.
git config --global color.ui true
git config --global user.name "YOUR NAME"
git config --global user.email "YOUR@EMAIL.com"
ssh-keygen -t ed25519 -C "YOUR@EMAIL.com"
The next step is to take the newly generated SSH key and add it to your Github account. You want to copy and paste the output of the following command and paste it here.
cat ~/.ssh/id_ed25519.pubOnce you’ve done this, you can check and see if it worked:
ssh -T git@github.comYou should get a message like this:
Hi excid3! You've successfully authenticated, but GitHub does not provide shell access.Choose the version of Rails you want to install:
gem install rails -v 7.0.6Now that you’ve installed Rails, you can run the rails -v command to make sure you have everything installed correctly:
rails -v
# Rails 7.0.6
If you get a different result for some reason, it means your environment may not be setup properly.
For PostgreSQL, we’re going to add a new repository to easily install a recent version of Postgres.
sudo apt install postgresql libpq-dev
sudo service postgresql start
You’ll need to start postgresql each time you load your WSL environment.
The postgres installation doesn’t setup a user for you, so you’ll need to follow these steps to create a user with permission to create databases. Feel free to replace chris with your username.
sudo -u postgres createuser chris -s
# If you would like to set a password for the user, you can do the following
sudo -u postgres psql
postgres=# \password chris
Let’s create your first Rails application on Windows!
rails new myapp -d postgresql

#### Or if you want to use MySQL
rails new myapp -d mysql

# Then, move into the application directory
cd myapp

# If you setup MySQL or Postgres with a username/password, modify the
# config/database.yml file to contain the username/password that you specified

# Create the database
rake db:create

rails server
You can now visit http://localhost:3000 to view your new website!
Getting an «Access Denied» error?
If you received an error that said Access denied for user 'root'@'localhost' (using password: NO) then you need to edit the config/database.yml file to match the database username and password.
Editing Code
Install VS Code on Windows and install the WSL extension. This will allow you to edit code in Windows but run commands and extensions in WSL. Read more about Developing in WSL.
That’s it! Let us know in the comments below if you run into any issues or have any other protips to share!
Most users, who are into web development and development, has surely heard of Ruby on Rails, which is a server-side web application framework, and make the task of the developers, a lot easier by offering a number of features. If you have started learning Ruby, or want to develop server-side web applications, you must install it on your computer, either on Windows or Linux, in order to get started. The installation process is not that complicated, and I will be discussing here, the way to install Ruby on Rails both on Windows. The process given in this step by step tutorial cum article for the installation of Ruby on Rails is same for Windows 10, Windows 7 and Windows 8.1.
Check Ruby Version
For Windows installation, the first task would be to ensure, Ruby is not installed on your system, or else, and order to check that just open Command prompt, and type ‘ruby –v’. If you get some error, Ruby is not installed on your system. But, if you can find the version, and the versions is something above 2.2.2, just type ‘get –version’. In case you get an error, you will have to install Ruby, and the process is given here.
Downloading Ruby
Just visit the official website of Ruby here, and download the latest Ruby installer.

I will recommend you to go for the version with development kit or DEVKIT, or the one saying ‘Ruby+Devkit 2.5.1-1 (x64)’. If you are having a 32-bit version of Windows, you can go for the version saying x86. You can directly download the ruby windows 64-bit version from here, or ruby windows 32-bit version here.
*If you are already having the Development kit, go for the one, without Development kit, so save some space on your hard drive.
Installing Ruby
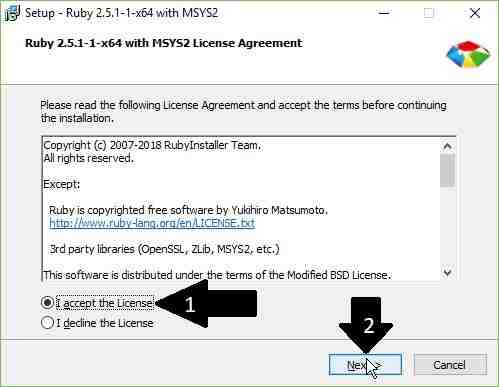
Open the installer. You will be asked to accept the license agreement. Click on ‘I accept the License’, and click on ‘Next’.
Ruby Install Location
Now, you will have to choose the location, where you want to install ‘Ruby’. I will recommend you to install it in the default location, i.e. ‘C:\Ruby25-x64’. Keep the other settings, as it is, and click on ‘Install’.

Ruby Installation Components
Now, you will have to choose the elements to install, and the Ruby base files installation cannot be stopped. But if you do not want the development kit, you might uncheck that, and click on ‘Next’ to start the process of installation.

Launch the development kit
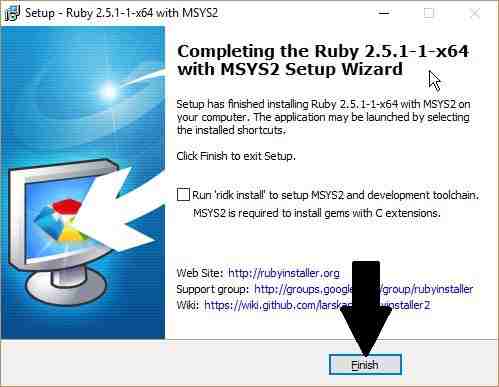
Now, uncheck the option to launch the development kit after installation, and click on ‘Finish’. Now running of ruby on windows is possible.
Installing Rails
- The installation of Ruby is complete, and now, it is the time to install Rails.
- Just open ‘Command Prompt’, and type ‘gem install rails’. Hit the enter key.
- Now navigate to ‘C:\Ruby25-x64\bin\’ within ‘Command Prompt’, and type ‘gem install rails’, followed by hitting the enter key.

- Now the installation will start. You might get a message from Windows Firewall. Click on ‘Allow Access’ to carry on with the installation process. The installation will take a lot of time, and you will have to be connected to the internet, as long as the process continues.
- Once the installation is complete, you will get the following screen on ’Command Prompt’.


The Rails installation on Windows is complete. In order to ensure, everything has been installed, just type ‘rails –v’ and hit the enter key to find the version of Rails installed. You can also use the previous commands to check the version of the Ruby and Gem, to ensure, they are properly installed.
If everything is installed properly, the commands will return the version of Ruby and Rails, without any problems.
Hope the small tutorial on how to install Ruby on Rails on Windows, was helpful for you! Do you have any additional queries in your mind? Feel free to comment it down below.