Windows Sonic — это система пространственного звука в Windows 10, которая позволяет улучшить восприятие видео и игр.
-
Вот как ее включить.
-
Выберите Пуск > Параметры > Система > Звук > Связанные параметры > Панель управления звуком, выберите устройство воспроизведения, а затем Свойства.
-
В открывшемся диалоговом окне выберите Пространственный звук.
-
В разделе Формат пространственного звука выберите Windows Sonic для наушников, а затем выберите Применить.
-
-
Чтобы получить доступ к другим параметрам пространственного звука, скачайте Dolby Access или DTS Sound Unbound из Microsoft Store.
Нужна дополнительная помощь?
Нужны дополнительные параметры?
Изучите преимущества подписки, просмотрите учебные курсы, узнайте, как защитить свое устройство и т. д.
В сообществах можно задавать вопросы и отвечать на них, отправлять отзывы и консультироваться с экспертами разных профилей.
DTS Sound Unbound — программа для улучшения звука в компьютерных играх и в воспроизводимом на компьютере видеоконтенте. Это условно-бесплатно приложение с пробным периодом использования в течение 14 дней (для последующего использования программы потребуется оформить платную подписку).
DTS Sound Unbound предназначена для установки на ПК под управлением Windows 10 и 11 (32 и 64 бит). Интерфейс выполнен на английском языке.
Программа DTS Sound Unbound обеспечивает поддержку операционной системой технологий пространственного (3D) звука DTS Headphone:X и DTS:X. Данные технологии обеспечивают пользователя иммерсивным трехмерным звуком при использовании встроенного в Windows 10 и 11 функционала пространственного звука от Microsoft, воспроизводя чистый, насыщенный и динамичный 3D-звук для наиболее увлекательного прослушивания как через динамики, так и через наушники.
Технология DTS Headphone:X разработана, в т.ч., для геймеров, чтобы обеспечить их конкурентным преимуществом в играх за счет создания точного, правдоподобного и захватывающего звукового ландшафта при использовании любой пары наушников.
Чтобы обеспечить непревзойденное качество звука, DTS Headphone:X включает в себя базу данных с настройками для более чем 500 моделей наушников, предоставляя передовое аудиорешение, которое имитирует воспроизведение звука над пользователем, вокруг него и рядом с ним, выводя игровой процесс на новый уровень.
Технология DTS:X позволяет воспроизводить мультимедийный контент в формате DTS (семейство систем цифровой многоканальной звукозаписи, созданное компанией Digital Theater System), создавая реалистичный многомерный звук для ПК. DTS:X усилит впечатления от просмотра фильмов, обеспечит эффектом погружения и реализмом, перенеся зрителя в самый центр происходящих на экране событий. И что самое главное — все это при использовании самых обычных наушников или динамиков.
Установка программы DTS Sound Unbound
Программу DTS Sound Unbound можно скачать из магазина приложений Microsoft Store либо установить вручную, запустив файл DTSInc.DTSSoundUnbound 2023.2.3.0.appxbundle. Вот более подробная инструкция.
Как пользоваться программой DTS Sound Unbound?
Сразу после установки программы DTS Sound Unbound в разделе Пространственный звук контекстного меню, вызываемого правым кликом в трее по значку с изображением динамика, появится новый пункт — Наушники DTS:X. Пользователю достаточно выбрать этот пункт меню, после чего весь звук будет проходить обработку в программе DTS Sound Unbound.
Настроек у приложения немного. Перейдя в раздел Configure во вкладке DTS Headphone:X, можно выбрать модель наушников, для которой будут подгружены оптимальные настройки пространственного звука. Если нужная модель отсутствует, пользователь может просто выбрать их тип — вакуумные или накладные, кликнув по одной из соответствующих кнопок. В этом же разделе осуществляется выбор режима 3D-звука — Spacious (просторный) или Balanced (сбалансированный).
Для оценки функциональных возможностей программы DTS Sound Unbound следует перейти в раздел Explore вкладки DTS Headphone:X. Пользователю предлагается перемещать виртуальный источник звука в виртуальном 3D-пространстве для моментального прослушивания 3D-звука. Источник можно перемещать не только по X и Y координатам, определяющим его местоположение в соответствующих плоскостях, но и по Z-координате, определяющей высоту источника звука по отношению к слушателю.
Рассказываем о том, что такое «Пространственный звук» и как его включить.
Что такое пространственный звук?
Это усовершенствованная версия стандартного стерео. Сейчас наушники неплохо передают направление звука, но только в двух плоскостях. Пространственный звук позволяет отказаться от этих рамок и слышать направление звука в объемном пространстве. Что-то подобное можно испытать, посмотрев фильм с домашним кинотеатром. Пространственный звук в Windows 10 также помогает глубже погрузиться в фильм или видеоигру.
Эта технология лучше всего работает с наушниками, хоть ее и используют с другими стереосистемами. В полноразмерных наушниках эффект пространственного (объемного) звука ощущается значительно сильнее.
Как включить пространственный звук?
Поддержка пространственного звука обеспечивается с помощью специальных программ-драйверов. Именно их алгоритмы позволяют обрабатывать звук в реальном времени и менять его «расположение». Так как эти алгоритмы работают по-разному, стоит опробовать несколько вариантов драйверов.
Стандартный драйвер
Для начала попробуем активировать бесплатный звуковой драйвер от Microsoft. Он работает по тому же принципу, что и платные аналоги, но уступает им из-за менее развитых программных алгоритмов обработки звуков.
Чтобы включить пространственный звук от Microsoft:
- Одновременно нажимаем клавиши Win + R.
- Вводим туда слово control и нажимаем на клавишу Enter.

Это короткий путь к панели управления. Вы можете попасть туда другим удобным путем
- Оказавшись в панели управления, кликаем по блоку настроек «Оборудование и звук».

Если вы используете оформление в виде значков, то сразу переходите к следующему пункту
- Затем переходим в подменю «Звук».
- В открывшемся окошке ищем пункт «Динамики» и выделяем его, кликнув левой кнопкой мыши.
- Затем нажимаем на кнопку «Свойства» в правом нижнем углу.

Переходим в свойства используемых динамиков
- После этого ищем вкладку «Пространственный звук» и переходим на нее.

Ищем нужную вкладку. Обычно она крайняя справа
- Оказавшись в окне настроек объемного звука, кликаем по выпадающему списку в блоке «Формат пространственного звука».

По умолчанию пространственный звук отключен
- Появится список доступных драйверов для работы с объемным звуком. Выбираем «Windows Sonic для наушников».

Почти готово…
- Потом сохраняем настройки.

Ну и все
Драйвер Dolby Atmos и другие
Есть несколько платных вариаций. Многие пользователи считают, что они работают лучше и обеспечивают более заметный и интересный эффект. Так что вы тоже попробуйте. Тот же драйвер Dolby Atmos можно скачать бесплатно и попробовать в течение 30 дней.
Для этого:
- Правой кнопкой мыши кликаем по иконке в виде динамика на панели задач Windows.

Вот как выглядит нужный значок. Он находится в правом нижнем углу экрана
- В появившемся контекстном меню сначала наводим курсор на меню «Пространственный звук…», а затем выбираем одну из доступных опций. Например, Dolby Access.

Все доступные вариации пространственного звука
- Откроется магазин приложений Windows Store. Кликаем там на кнопку «Получить» и загружаем драйвер.

Для загрузки приложения придется завести учетную запись Microsoft
- После этого активируем пробный период работы с Dolby Access.
Post Views: 4 657
Check our list for the best surround sound software on the market
by Milan Stanojevic
Milan has been enthusiastic about technology ever since his childhood days, and this led him to take interest in all PC-related technologies. He’s a PC enthusiast and he… read more
Updated on
- Virtual surround systems can be good alternatives for expensive high-end equipment.
- Below you’ll find a list of recommended software that can help you emulate realistic surround effects seamlessly.
- The software presented provide various features like auto-calibration, custom preset settings, fully configurable crossfeed, and more. Keep reading to find your best option.

In the past, the only way to get an immersive audio experience was to buy big speaker systems with 5 or 7 satellites and try and place them around the room. Today, the same effect can be obtained with software.
There are apps out there that will allow you to create a virtual surround sound without having to invest in big and complex sound systems.
The software tools listed in this article are the best options on the market when it comes to virtual surround sound software. Some of the software presented here will tackle games specifically but all of them will offer you a more personalized surround sound experience.
What is virtual surround sound software?
Before diving into the software itself let’s first take a look at what is virtual surround sound, how it works, and why we want it.
A virtual surround sound system work by creating the perception that there are more sound sources than they actually are. A surround sound can be created even by using one, two, or three speakers. Using technology based on studies of psychoacoustic this software can trick listeners.
What are the best virtual surround sound software?
Boom 3D – Best Overall
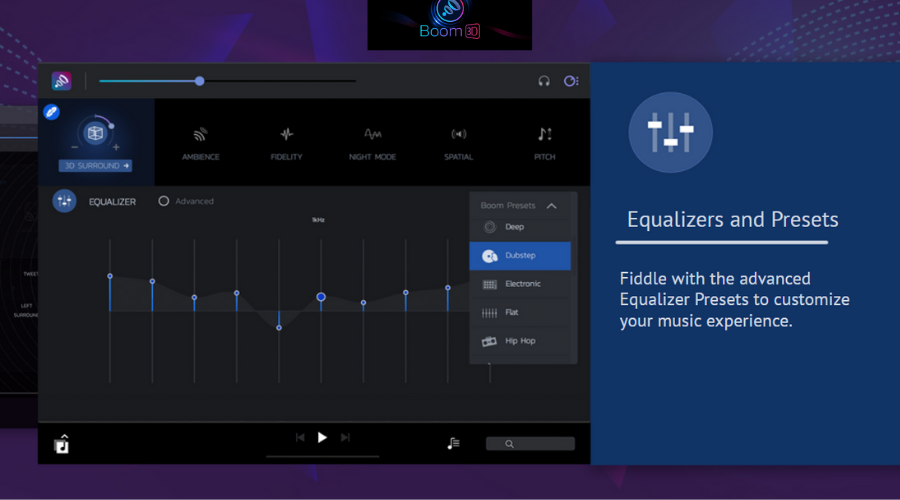
Boom 3D is by far one of the best options presented in this article. This software has the capability to automatically calibrate itself based on the type of sound card and audio system you have.
The Boom audio engine offers a 3D Surround Sound and customizable equalizer presets allowing you to easily tweak your audio output to your liking.
The 3D Surround Sound technology in Boom 3D provides you with an immersive virtual surround sound experience through any kind of headset. You have the ability to adjust the intensity of every surround sound channel. You can also toggle individual virtual surround sound speakers on/off, adjust the bass level, and scale the intensity of the 3D Surround Sound effect.
Boom 3D has a built-in equalizer with presets for movies, vocals, and different music genres but you can always dive-in and create your own presets.
Key features include:
- Select audio Output device – system speakers, on/over-ear headphones, in-ear headphones, external speakers, Bluetooth, and USB speakers
- Volume booster
- Volume controller – adjust specific application volumes
- Audio effects – ambiance, fidelity, night mode, spatial, pitch
- Quick controls – quickly change common settings without opening the full app

Boom 3D
Enjoy an immersive virtual surround sound experience with this adaptable software!
Razer Surround – Personal calibration
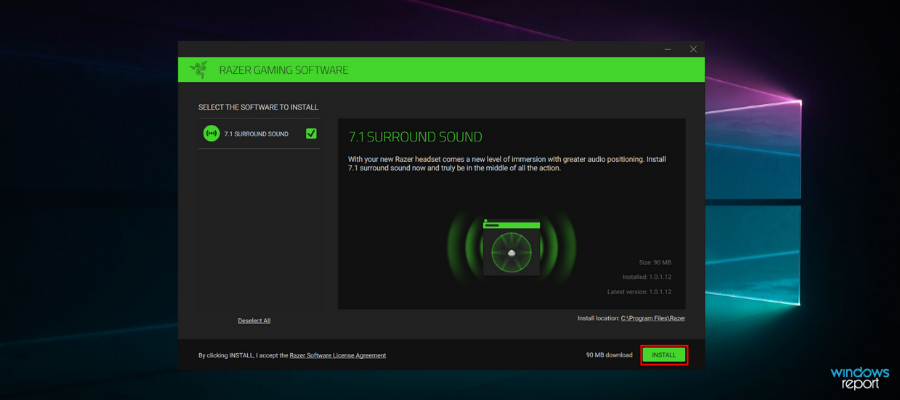
Razer Surround is an advanced 7.1 virtual surround sound engine that manages to immerse you deeper into your listening experience and it is also compatible with any stereo headphones.
Created specifically for gaming with headphones, the surround sound algorithms powering Razer Surround create an accurate surround sound environment that allows a gamer to calibrate positional sound.
Many virtual surround sound solutions use a one-size-fits-all approach. This means that they rely on algorithms created based on statistics. The only problem with this approach is that everything is ‘average’. You can’t fully customize your audio experience to your needs and preferences.
Razer Surround allows you to personally calibrate the sound to fit your ears, and that allows you to experience a greater sense of involvement in the game and even gives you an audio advantage over other players who don’t use technology like this.
Razer Surround gives you the chance to go through a series of simple listening tests that will allow you to intuitively map the way you listen to your games.
How we test, review and rate?
We have worked for the past 6 months on building a new review system on how we produce content. Using it, we have subsequently redone most of our articles to provide actual hands-on expertise on the guides we made.
For more details you can read how we test, review, and rate at WindowsReport.
The gaming audio algorithms that can be found in Razer take into account the time delay, audio interference, amplitude, and other complex factors making the process of customization very easy.
More than this, your custom settings will be saved in the cloud so that you will immediately be ready to play games no matter if you’re at a friend’s house or a local LAN Cafe.
Key features include:
- Bass Boost
- Sound normalization
- Voice clarity
- Voice level
- Custom & 11 pre-set equalizer settings
- Ability to calibrate your individual preferences

Razer Surround
Razer Surround will blow your mind with its awesome 7.1 virtual surround sound engine for full immersion
SBX Pro Studio – Seamless control
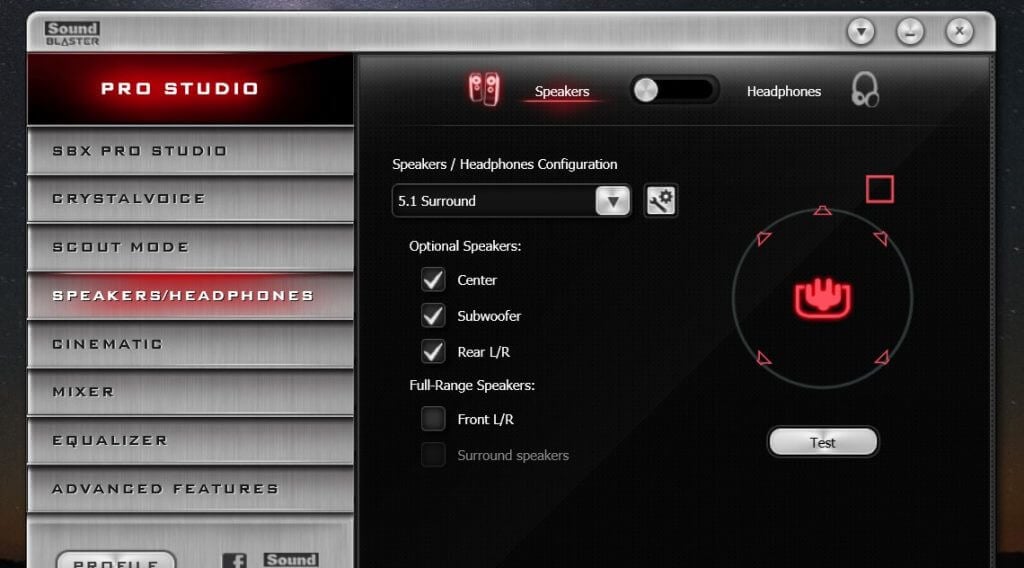
SBX Pro Studio is a suite of audio enhancement technologies that was created to bring out the absolute best in your gaming audio. This tool has seamless controls and a very user-friendly interface. You can take full control of how you want your audio to sound.
Today’s high-end gaming rigs focus mainly on the display and for a good reason. Most gamers rely on multiple monitor setups and ultra-high-resolution graphics are a must for them. However, your gaming experience is not complete without a truly immersive audio experience. This is offered by a 5.1 or 7.1 surround sound speaker setup which successfully completes your immersive gaming experience – and no, stereo headphones do not cut it.
Even though in this article we will focus on the surrounding capabilities of the software, SBX Pro Studio offers a wide range of professional tools :
- Crystalizer – enhances the dynamic range of compressed audio, restoring the highs and lows that are often lost during the compression process
- Bass – extends the low-end frequencies of your audio input to enhance and deepen the bass
- Smart Volume – automatically measures volume across different programs and compensates for changes
- Dialog Plus – intelligently raises the volume of vocals and spoken dialogue
- SBX Surround
The SBX Surround feature of SBX Pro Studio processes the audio through optimized algorithms to recreate a virtualized surround sound even if you’re using a 2.0 speaker setup or headphones. This technology allows you to be fully immersed in the audio experience without missing any audio clues.
The algorithms used by SBX Surround provide audio enhancement to any audio by optimizing the listening experience for both two-channel and multi-channel sources. This feature will automatically adapt and provide the best surround sound experience to fit any of your listening experiences.
SBX Surround consists of two core tech components:
- Upmix – It processes both stereo and multi-channel sounds and matches them to the active output configuration.
- Virtualizer – It takes the audio that has been processed by Upmix and splits the signal to every speaker connected using head-related transfer function (HRTF) filters.
⇒ Get SBX Pro Studio
Equalizer APO – Multiple devices on one sound card
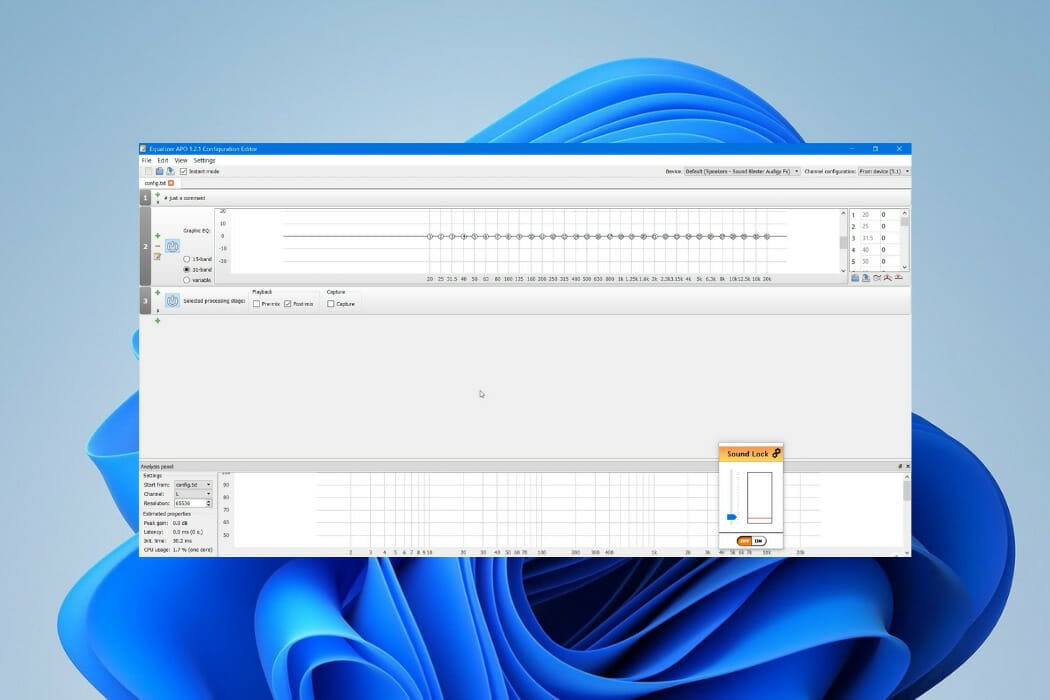
Equalizer APO is one of the best equalizers for tweaking your audio experience to the smallest detail and works especially well (compared to other EQ software) because it can be used in conjunction with Room EQ Wizard that allows you to easily read its filtered text file format.
Equalizer APO can enhance and improve the surround sound quality of your media, and once it’s installed, it can be configured by accessing its configuration TXT file found in the installation folder on your Windows 10 PC.
Equalizer APO also offers you the possibility to transform its looking by installing Peace GUI, which makes it even easier to use and adds audio mixing tools to your PC.
Equalizer APO has a wide range of useful features :
- Effects panel – balance, crossfading, delay
- Graph window
- Save configurations and activating them by a simple click/hotkey or desktop shortcut
- Up to 31 gain dB Equalizer sliders per channel/speaker
- 9 speakers support (all, stereo, 5.1 and 7.1)
- Filter frequencies, dB gains, filter qualities can all be changed per slider
- Filters: peak, low/high pass and shelf, bend, notch, and all pass
- Pre amplifying dB values for volume control (per channel/speaker)
Some users have had some problems using Equalizer APO. The most common mistake people make is that they do not restart their Windows 10 PC after installation. They also forget to activate their playback device in EQ APO. These two actions alone should solve the problem and get the program running in no time.
Another great third-party tool that you need to try with Equalizer APO is HeSuVi. This app imitates the 7.1 binaural sound effect by using the Equalizer APO’s convolution filter.
Key features include:
- Powerful graphic equalizer
- Over 1000 popular headphones
- Ability to use multiple devices on one sound card
- Separate control over different volume levels
- Fully configurable crossfeed
If you want to know more about how HeSuVi works go to this support page.
⇒ Get Equalizer Apo
Dolby Atmos – Layers of sound
Atmos was developed in 2012 and the new version expands the previous 5.1 and 7.1 setups to include a large number of speakers that you can place around the room. In this way, you’ll create that amazing 3D sound experience.
One of the most important features of Atmos is the concept of audio objects. Before this, sounds were constrained to specific portions of the audio.
With Dolby Atmos, sound designers don’t need to limit a sound to a channel, they can specify where an individual sound originates and moves to. The result is sound that feels like it’s coming from the room you’re sitting in offering an incredibly immersive audio experience.
Atmos uses a channel-based approach to mix sounds. Think of this approach as ‘layers of sound’. On top of that layer, the ‘audio objects’ are placed along with their specific settings. Thanks to this approach, the fact that this tool supports 128 audio channels is pretty impressive.
This technology is incredibly adaptable, it will give you the same experience no matter if you use it in a cinema setting, or at home with a normal set of speakers.
Home Atmos systems with as little as seven speakers are capable of 128 audio objects but it supports up to 34 speakers.
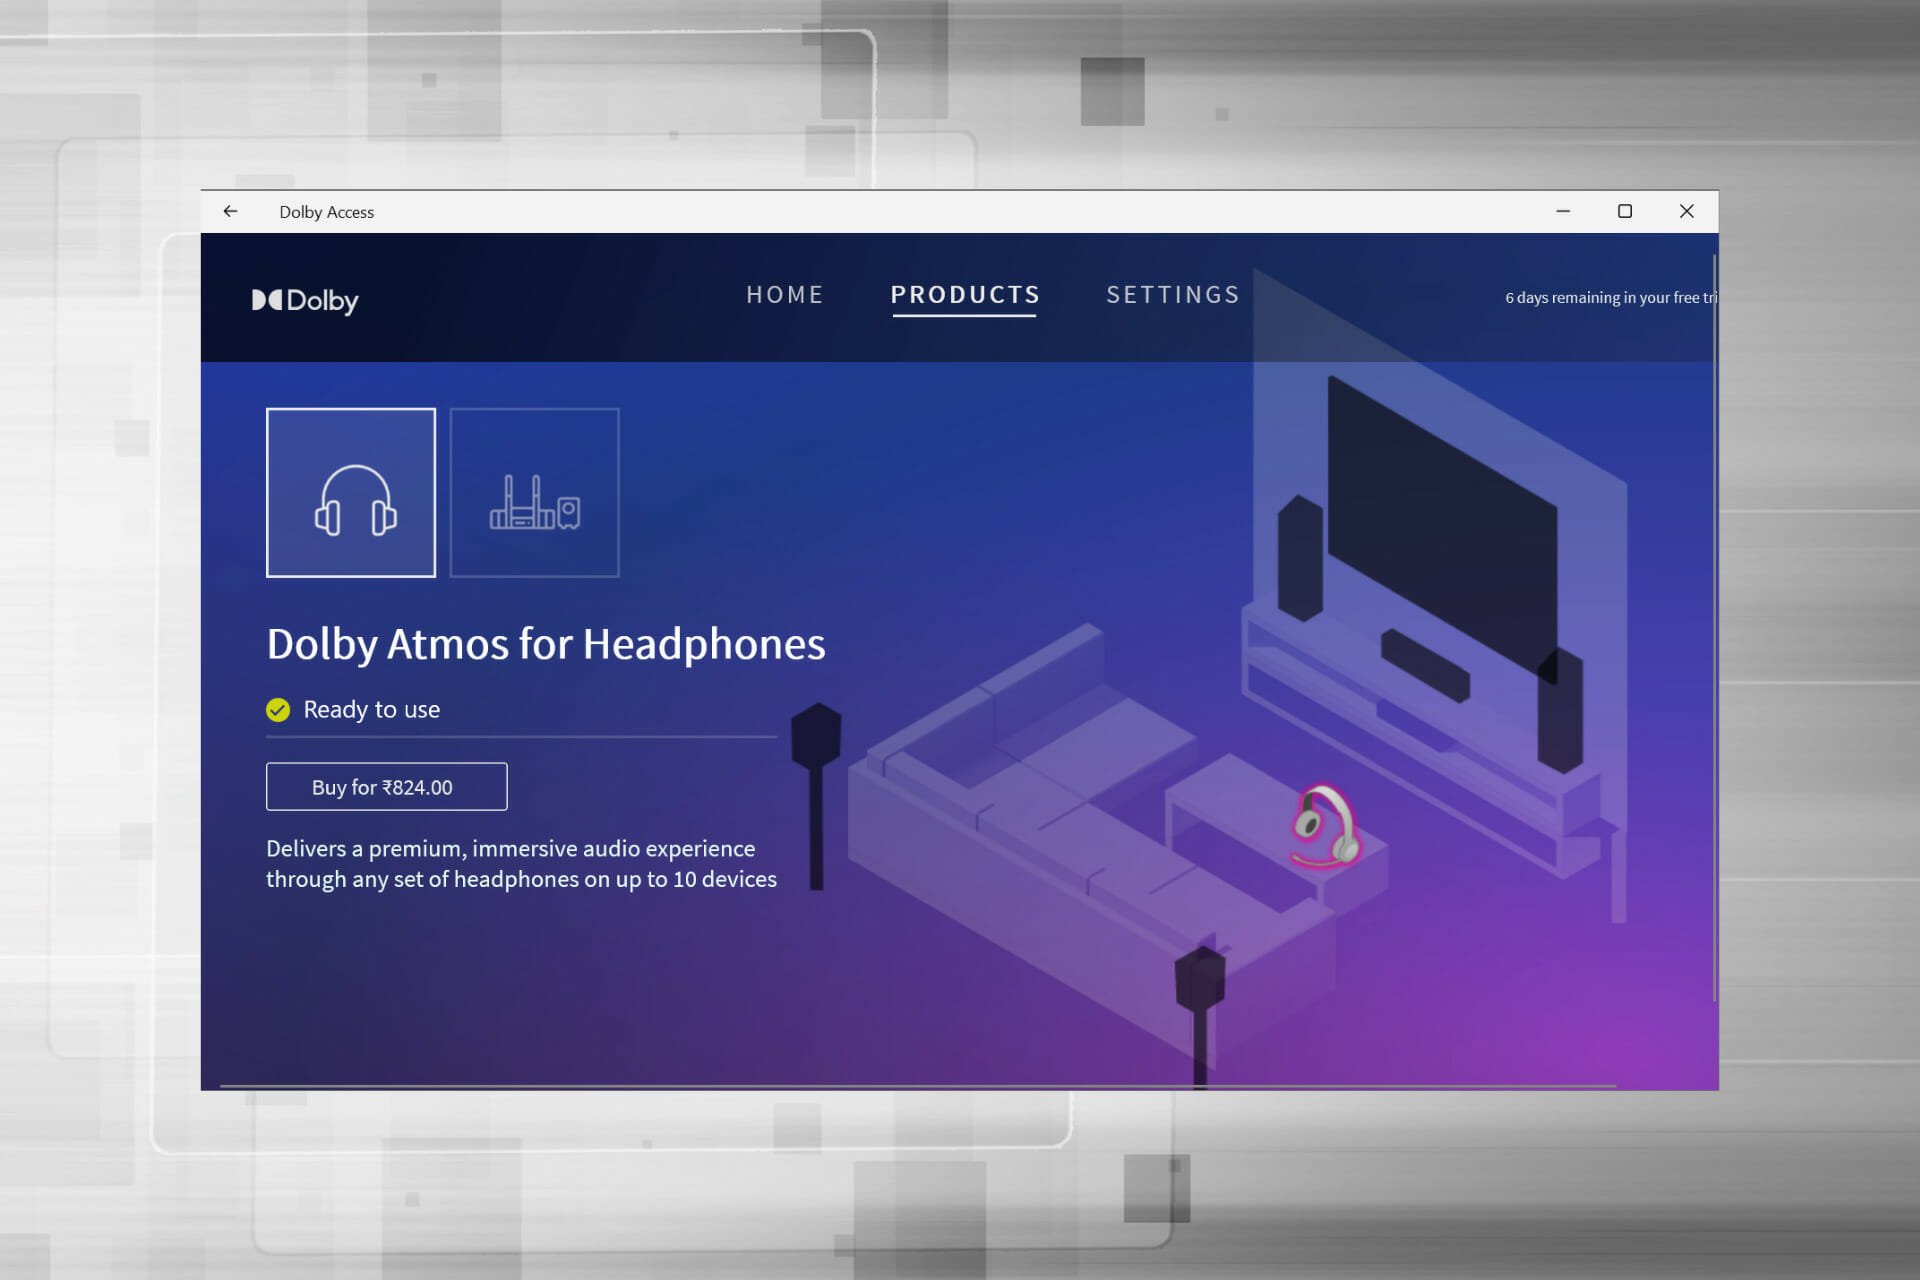
⇒ Get Dolby Atmos
Steelseries Sonar – Very intuitive interface
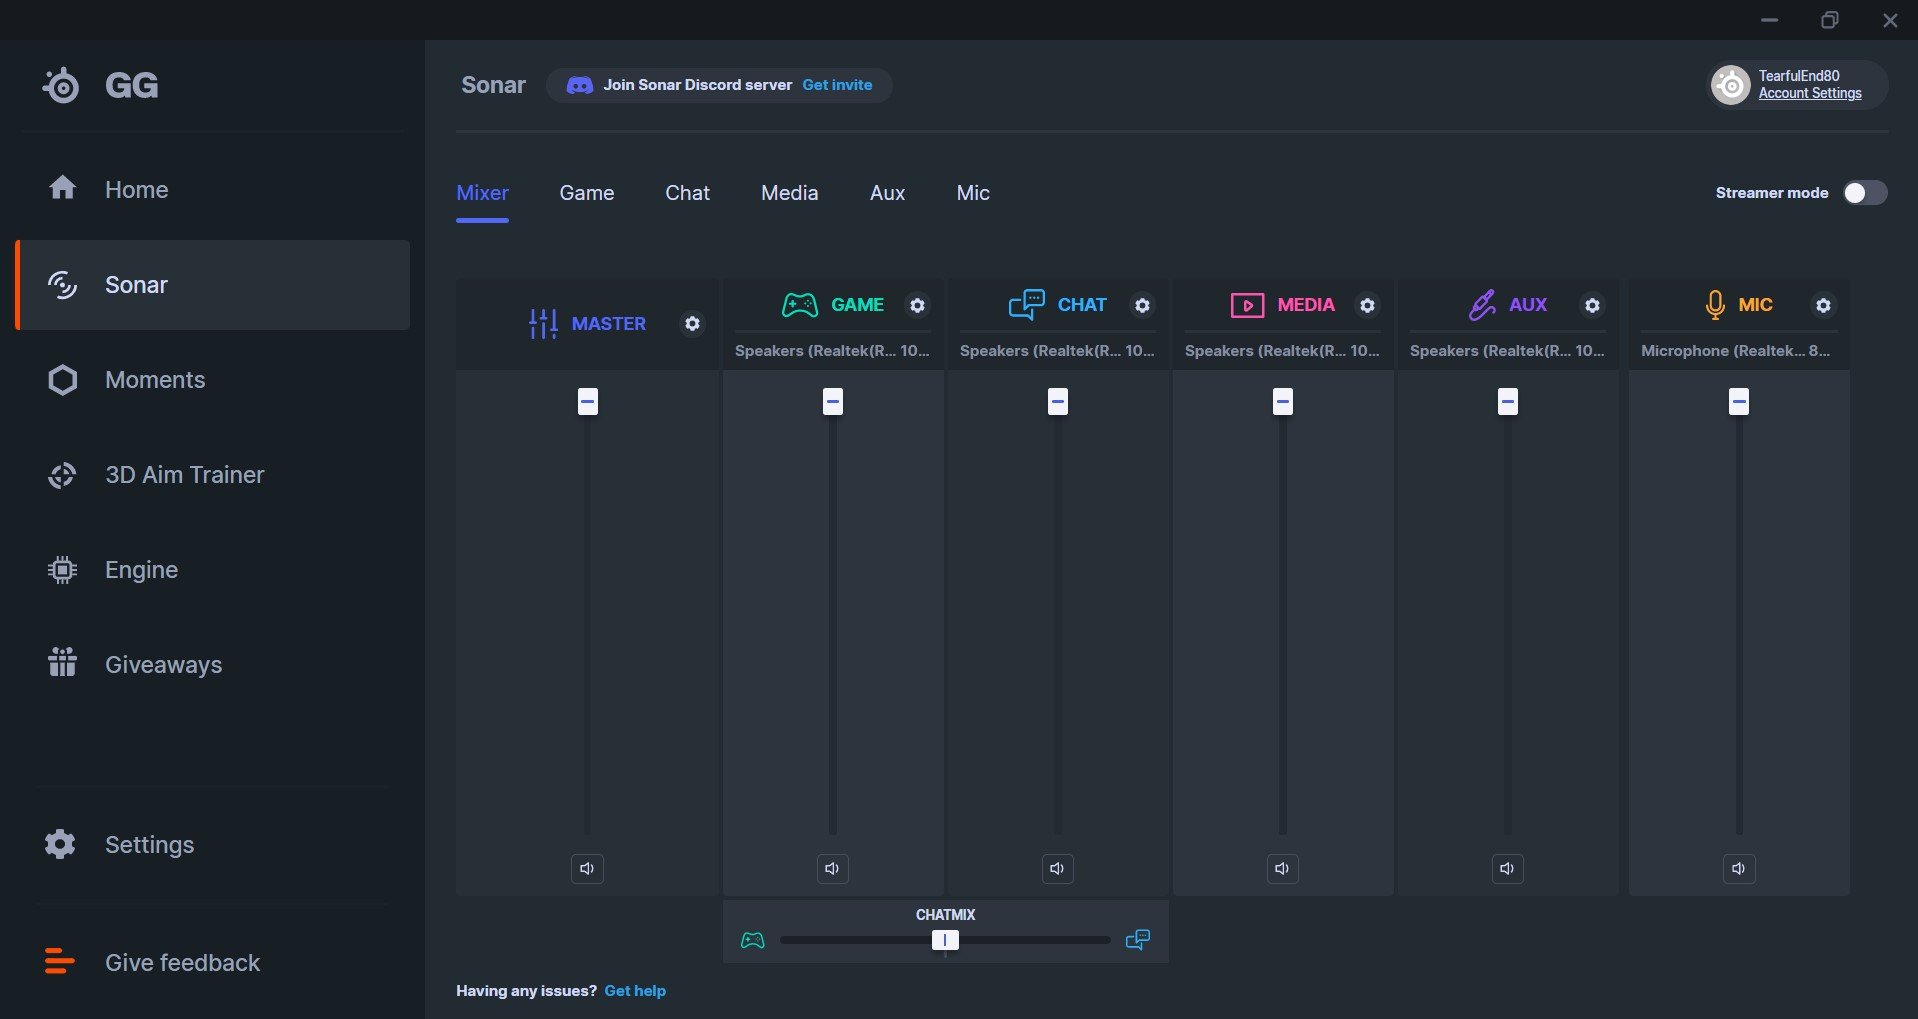
Steelseries Sonar is a free app that comes within the bundle offered by the company as support for their peripherals.
The app has a very easy-to-use interface and is highly intuitive. You’ll instantly get access to controls for specific activities, such as gaming, media, and chat. You can easily set up preferences for each of these so the audio system will act differently based on the type of activity.
As with the other apps Sonar allows you to boost the volume and also has a feature of smart volume that doesn’t let get too loud or become inaudible.
The surround effect it’s very easy to activate and you can also create a different setting based on what type of activity you are doing. The app comes with several premade configurations but of course, you can create your own if you feel like none of them suits you.
Sonar can be easily used to enhance your chat over the microphone. It comes with features such as noise cancelation powered by AI, volume stabilizer, and noise gate.
Key features include:
- Intuitive, easy-to-use interface
- Volume boost
- Smart volume
- Noise cancelation
- Premade configurations
- Customizable virtual surround
- 10 band equalizer
Overall Steelseeries Sonar it’s a quite capable and easy to use app when setting up a virtual surround sound on your system. Might not have as many functions as some other apps but it’s definitively worth checking out, especially since you don’t need a Steelseries peripherical to access it.
Also worth mentioning is that some users might have already built-in on their devices another Steelseries app called Nahimic, which has similar functions.
⇒ Get Steelseries Sonar
Windows Sonic – Built-in for Windows
As an answer to Dolby Atmos, Microsoft created Windows Sonic. This app can be found as a default app in Windows 10 that has the Creators Update installed.
Sonic simulates a 3D environment using the audio that comes from your device. It doesn’t work extremely well for movies but it makes up for it in games.
Some motherboards and sound cards may require device software to use the hardware. This type of software usually works in the background without the knowledge of the user. For example, if you are using an MSI motherboard then you may have Realtek HD Audio Manager software installed.
Before you use Windows Sonic, it is recommended that you disable any audio effects previously applied.
Follow these steps to activate and use Windows Sonic:
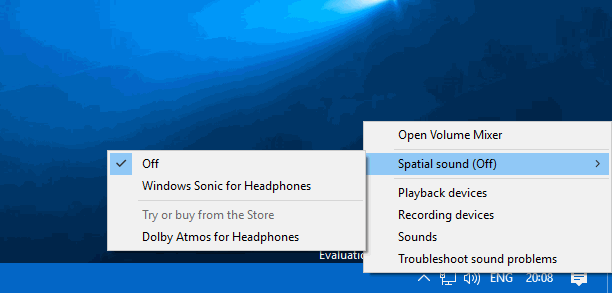
- After you’ve deactivated any sound effects, locate the sound icon on your taskbar, right-click on it and then select Spatial sound.
- You then want to select Open Volume Mixer, click the Speakers icon to open Speakers Properties and switch to the Spatial sound tab.
- Under the Spatial sound format, click on the drop-down menu and select Windows Sonic for Headphones. Ensure you checked the Turn on 7.1 virtual surround sound option.

- Select Apply, and then OK.
That’s it! Now you’re ready to experience the effects of Windows Sonic on your audio.
These are some of the best surround sound software to use on your computer. If you already used some of these tools, do tell us more about your experience in the comments below.
![]()
Современные наушники предоставляют виртуальное пространственное звучание. Чтобы почувствовать реальное погружение в игру, необходимо установить программное обеспечение. Пользователи получили возможность включить пространственный звук прямо в Windows 10.
Эта статья расскажет, что такое пространственный звук Windows 10. Можно выбрать формат Windows Sonic или Dolby Atmos для наушников. Забегая наперёд, второй на практике значительно продуктивней. Даже на бюджетных наушниках появляется ощущение объёмности.
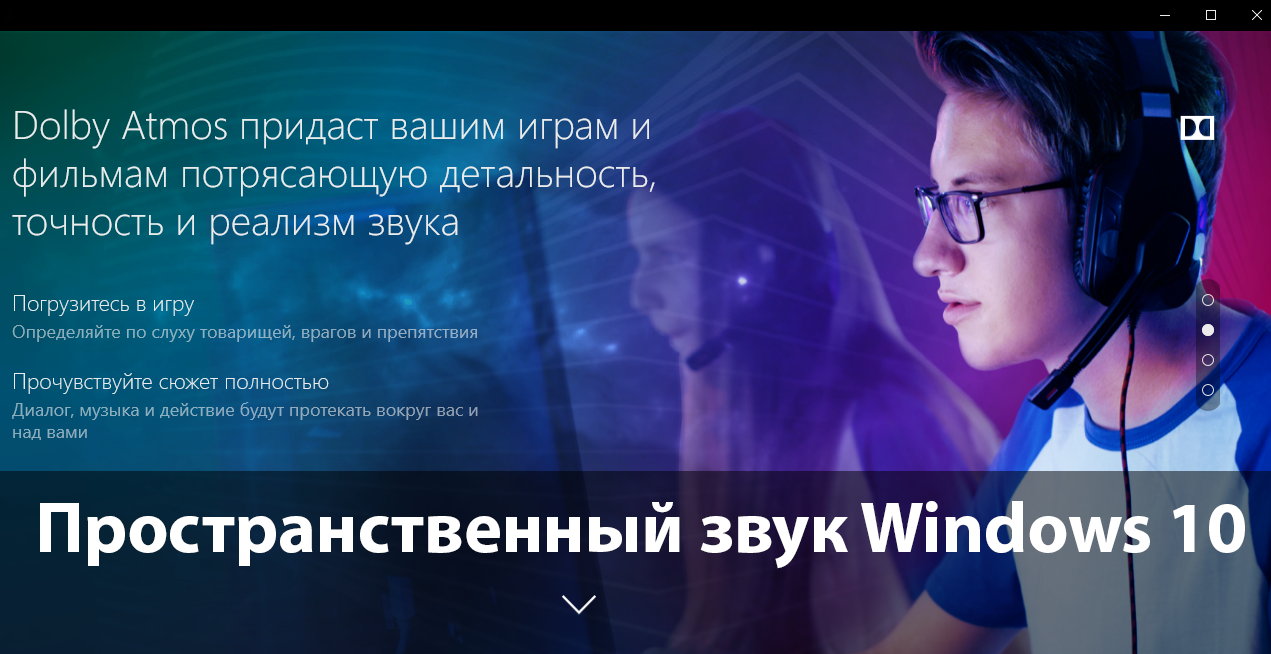
Технология придаст Вашим играм и фильмам потрясающую дальность, точность и реализм звука. Определять по слуху товарищей, врагов и препятствия становиться значительно легче. А диалоги, музыка и действия будут протекать не только по сторонам, а и вокруг Вас и над Вами.
Реалистичность в играх или фильмах значительно увеличивается после включения объёмного звучания. Если Windows Sonic можно задействовать с наушниками, то Dolby Atmos работает с другими акустическими системами. Остаточное определение лидера оставим пользователям.
| Dolby Atmos | Придётся дополнительно устанавливать Доступна бесплатная 30-дневная версия В итоге необходимо купить полную версию |
| Windows Sonic | Бесплатная альтернатива от Майкрософт Технически делает примерно то же самое Уже предустановлено и можно активировать |
Как включить объёмный звук в Windows 10
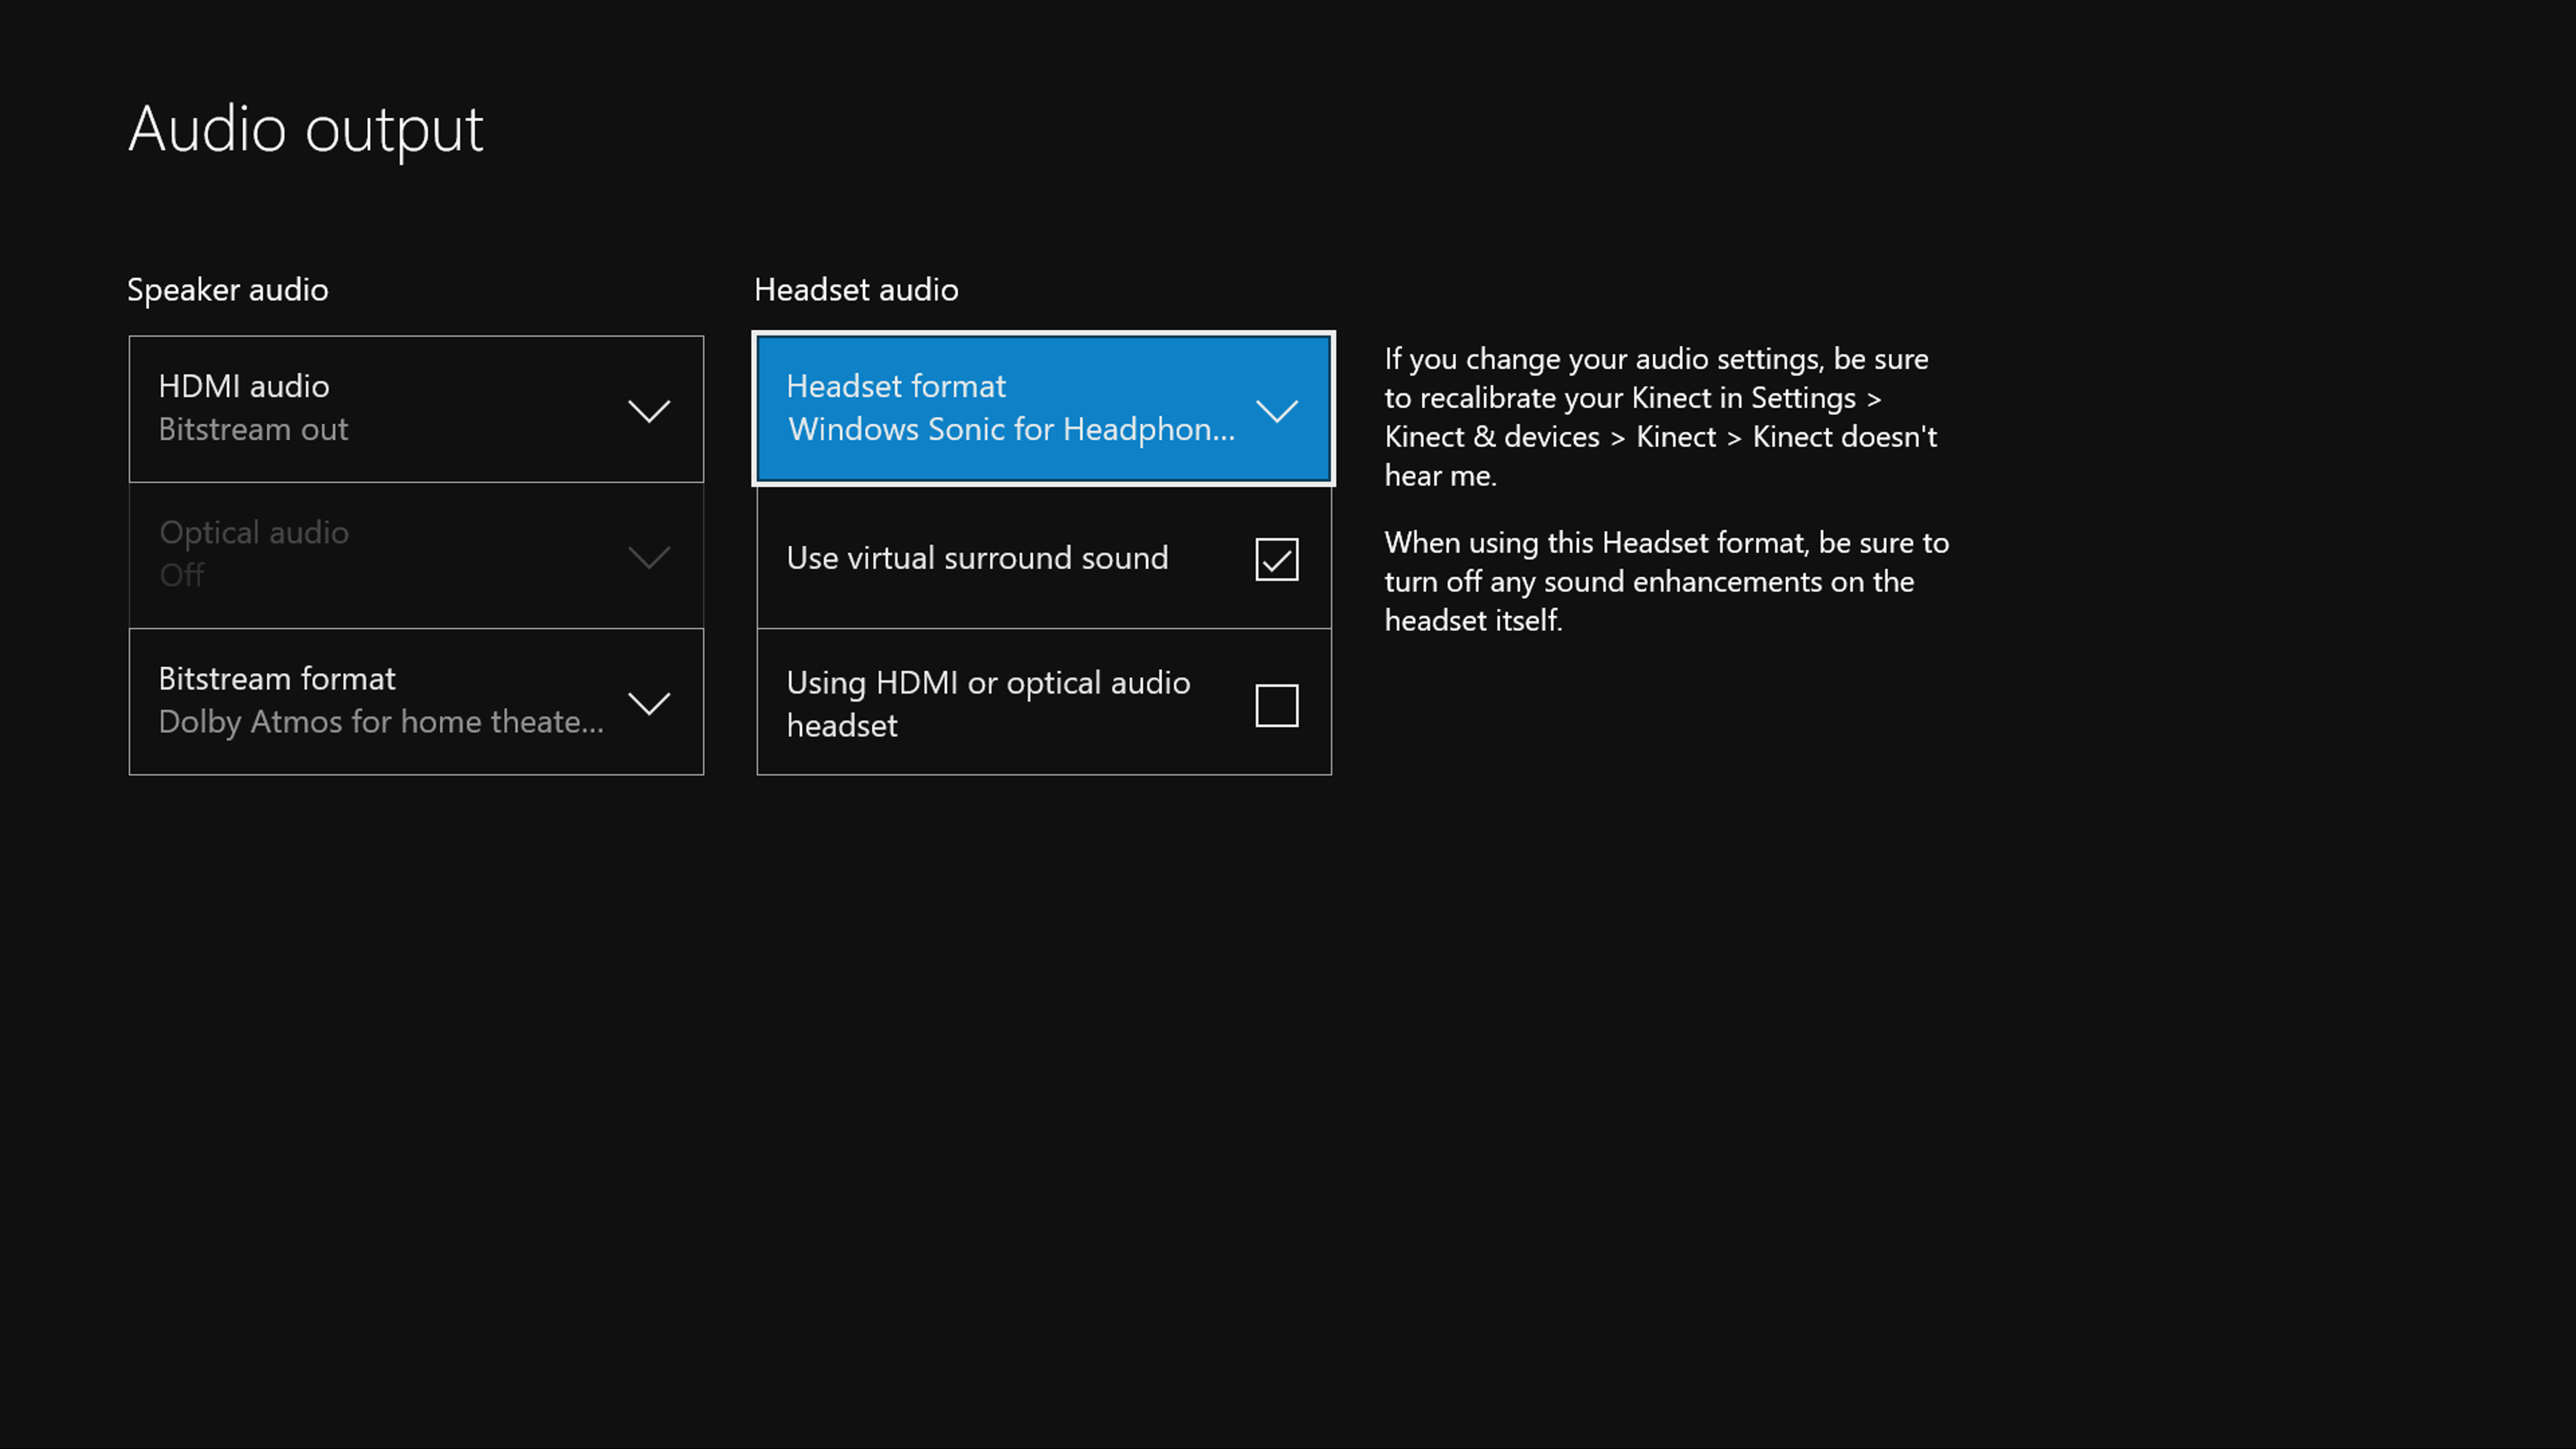
В классической панели управления раскройте раздел Оборудование и звук > Звук. Здесь во вкладке Воспроизведение выделите Динамики и выберите Свойства. Теперь в подразделе Пространственный звук выберите формат звука, который планируете протестировать.
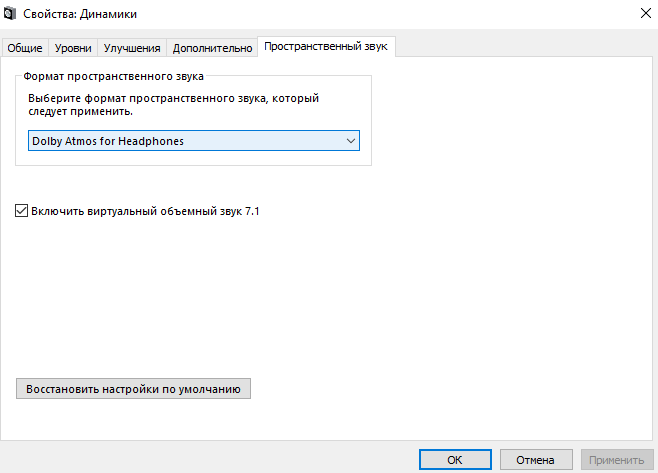
Дополнительно присутствует отметка Включить виртуальный объёмный звук 7.1. Теоретически разница будет заметна на дорогих наушниках и устройствах среднего бюджетного сегмента… Или в подразделе Параметры > Система > Звук выберите Свойства устройства вывода.
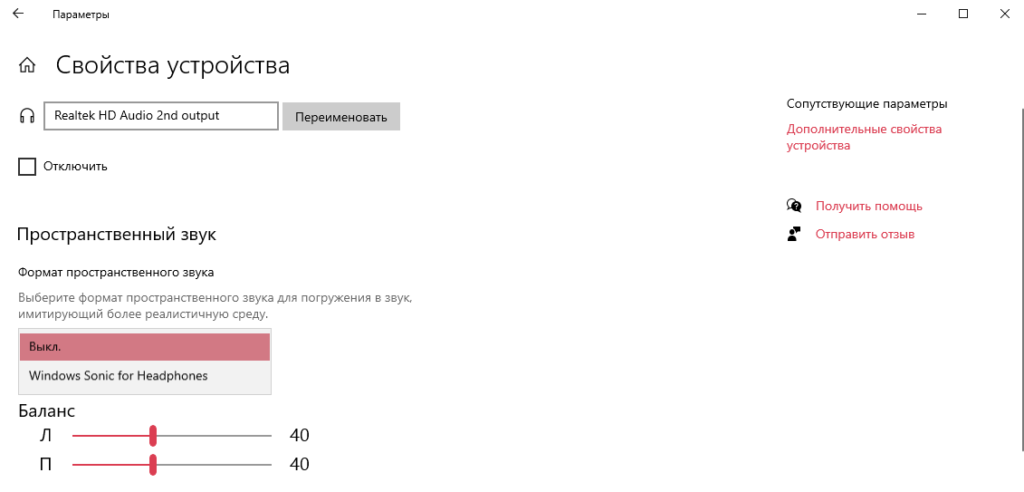
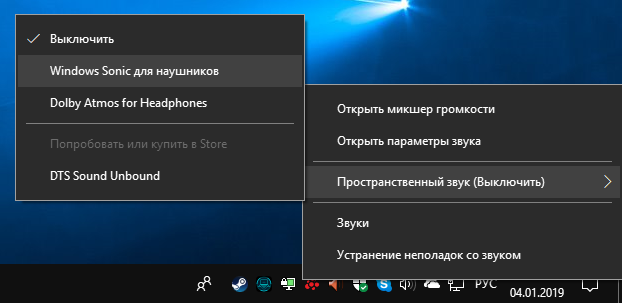
Windows Sonic для наушников Windows 10
В контекстном меню звука на панели задач разверните Пространственный звук (который по умолчанию выключен) и выберите Windows Sonic для наушников. Ну или как показано выше.
Dolby Atmos for Headphones Windows 10
Если же Windows Sonic для наушников уже установлен, то приложение Dolby Atmos for Headphones придётся доустановить. Найдите в Microsoft Store приложение Dolby Access или же перейдите по ссылке ниже.
[appbox windowsstore 9n0866fs04w8]
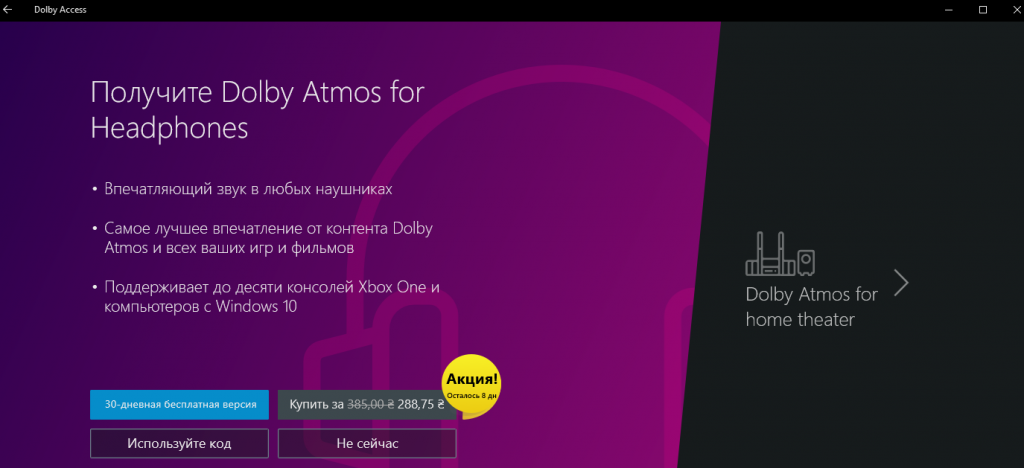
- Запустите Dolby Access и нажмите кнопку 30-дневная бесплатная версия. Нажмите кнопку Получить, если Вы принимаете условия продажи в Store.

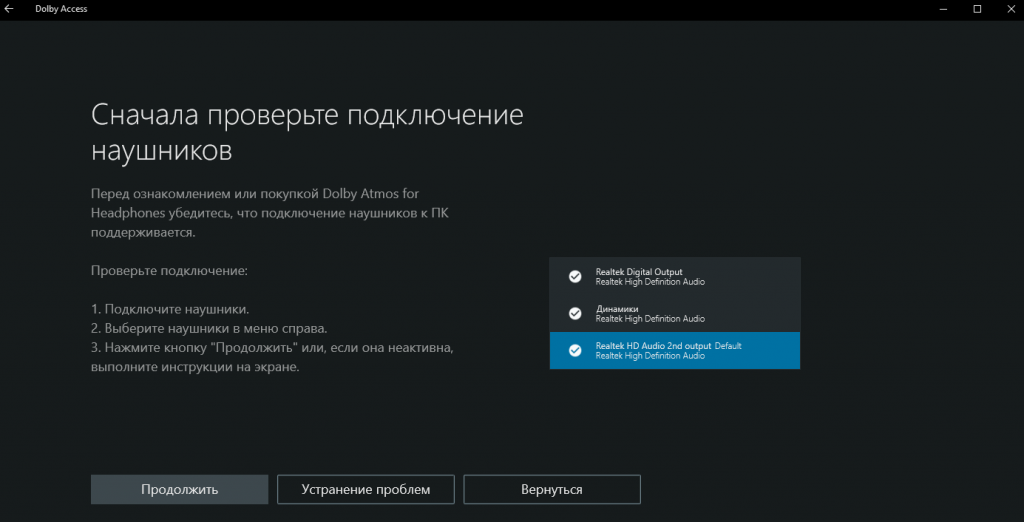
- Дальше подключите наушники, выберите устройство воспроизведения справа и нажмите кнопку Продолжить.

После настройки Dolby Access появится возможность быстро включить и отключить Dolby Atmos for Headphones прямо в свойствах устройства. Как включить объёмный звук смотрите выше.
Заключение
Технология пространственного звука действительно заслуживает Вашего внимания. Попробуйте установить приложение Dolby Access с Microsoft Store и почувствовать разницу звучания. Пробный период Dolby Atmos на месяц бесплатно или используйте альтернативу Windows Sonic.
(2 оценок, среднее: 5,00 из 5)
Администратор и основатель проекта Windd.pro. Интересуюсь всеми новыми технологиями. Знаю толк в правильной сборке ПК. Участник программы предварительной оценки Windows Insider Preview. Могу с лёгкостью подобрать комплектующие с учётом соотношения цены — качества. Мой Компьютер: AMD Ryzen 5 3600 | MSI B450 Gaming Plus MAX | ASUS STRIX RX580 8GB GAMING | V-COLOR 16GB Skywalker PRISM RGB (2х8GB).