Apache Maven

Apache Maven is a software project management and comprehension tool. Based on
the concept of a project object model (POM), Maven can manage a project’s
build, reporting and documentation from a central piece of information.
If you think you have found a bug, please file an issue in the Maven Issue Tracker.
Documentation
More information can be found on Apache Maven Homepage.
Questions related to the usage of Maven should be posted on
the Maven User List.
Where can I get the latest release?
You can download the release source from our download page.
Contributing
If you are interested in the development of Maven, please consult the
documentation first and afterward you are welcome to join the developers
mailing list to ask questions or discuss new ideas/features/bugs etc.
Take a look into the contribution guidelines.
License
This code is under the Apache License, Version 2.0, January 2004.
See the NOTICE file for required notices and attributions.
Donations
Do you like Apache Maven? Then donate back to the ASF to support the development.
Quick Build
If you want to bootstrap Maven, you’ll need:
- Java 8+
- Maven 3.2.5 or later
- Run Maven, specifying a location into which the completed Maven distro should be installed:
mvn -DdistributionTargetDir="$HOME/app/maven/apache-maven-4.0.x-SNAPSHOT" clean package
Maven is distributed in several formats for your convenience. Use a source archive if you intend to build Maven
yourself. Otherwise, simply pick a ready-made binary distribution and follow the installation instructions given
at the end of this document.
You will be prompted for a mirror — if the file is not found on yours, please be patient, as it may take 24
hours to reach all mirrors.
In order to guard against corrupted downloads/installations, it is highly recommended to
verify the signature
of the release bundles against the public KEYS used by the Apache Maven
developers.
Maven is distributed under the Apache License, version 2.0.
We strongly encourage our users to configure a Maven repository mirror closer to their location, please read How to Use Mirrors for Repositories.
If you’re upgrading from Maven 2.x, be sure to check the
Maven 3.x compatibility notes
before using this version to avoid surprises: while Maven 3 aims to be backward-compatible with Maven 2.x to the
extent possible, there are still a few significant changes.
Mirror
[if-any logo]
[end]
The currently selected mirror is
[preferred].
If you encounter a problem with this mirror,
please select another mirror.
If all mirrors are failing, there are
backup
mirrors
(at the end of the mirrors list) that should be available.
You may also consult the
complete list of
mirrors.
You can also download the current documentation, i.e. this website.
Maven Documentation
You can download the current documentation, i.e. this website, as:
- a single jar file
Previous Releases
All previous releases of Maven can be found in the archives
(or legacy archives for versions before 3.0.4).
System Requirements
| JDK | Maven 3.3 requires JDK 1.7 or above, Maven 3.2 requires JDK 1.6 or above, while Maven 3.0/3.1 requires JDK 1.5 or above (this is to execute Maven — it still allows you to build against 1.3 and prior JDK’s: see our Guide to Using Toolchains) |
| Memory | No minimum requirement |
| Disk | Approximately 10MB is required for the Maven installation itself. In addition to that, additional disk space will be used for your local Maven repository. The size of your local repository will vary depending on usage but expect at least 500MB. |
| Operating System | No minimum requirement. Start up scripts are included as shell scripts and Windows batch files. |
Installation Instructions
Maven is a Java tool, so you must have Java installed in order to proceed. More precisely,
you need a Java Development Kit (JDK), the Java Runtime Environment (JRE) is not sufficient.
Additional optional installation steps are listed after the platform specific instructions.
Windows
- Unzip the distribution archive, i.e. apache-maven-3.3.1-bin.zip to the directory you wish to install Maven 3.3.1.
These instructions assume you chose C:\Program Files\Apache Software Foundation.
The subdirectory apache-maven-3.3.1 will be created from the archive. - Add the unpacked distribution’s bin directory
to your user PATH environment variable by opening up the system properties (WinKey + Pause),
selecting the «Advanced» tab, and the «Environment Variables» button, then adding or selecting the PATH
variable in the user variables with the value
C:\Program Files\Apache Software Foundation\apache-maven-3.3.1\bin. - Optional: In the same dialog, add the MAVEN_OPTS environment variable in the user variables to specify JVM properties, e.g. the value
-Xms256m -Xmx512m. This environment variable can be used to supply extra options to Maven. - In the same dialog, make sure that JAVA_HOME exists in your user variables or in the system variables and it is set to the location of your JDK,
e.g. C:\Program Files\Java\jdk1.7.0_51. - Open a new command prompt (Winkey + R then type cmd) and run mvn —version to verify that it is correctly installed.
Unix-based Operating Systems (Linux, Solaris and Mac OS X)
- Extract the distribution archive, i.e. apache-maven-3.3.1-bin.tar.gz to the directory you wish to install Maven 3.3.1.
These instructions assume you chose /usr/local/apache-maven. The subdirectory apache-maven-3.3.1 will
be created from the archive. - In a command terminal, add unpacked distribution’s bin to your PATH environment variable,
e.g. export PATH=$PATH:/usr/local/apache-maven/apache-maven-3.3.1/bin. - Optional: Add the MAVEN_OPTS environment variable to specify JVM properties, e.g. export MAVEN_OPTS=»-Xms256m -Xmx512m».
This environment variable can be used to supply extra options to Maven. - Make sure that JAVA_HOME is set to the location of your JDK, e.g.
export JAVA_HOME=/usr/java/jdk1.7.0_51 . - Run mvn —version to verify that it is correctly installed.
Optional configuration
Maven will work for most tasks with the above configuration, however if you have any environmental specific configuration outside of individual
projects then you will need to configure settings. The following sections refer to what is available.
Settings
Maven has a settings file located in the Maven installation and/or user home directory that configure environmental specifics such as:
- HTTP proxy server
- repository manager location
- server authentication and passwords
- other configuration properties
For information on this file, see the Settings reference
Security
As of Maven 2.1.0+, you can encrypt passwords in your settings file, however you must first configure a master password. For more information on
both server passwords and the master password, see the Guide to Password Encryption.
Toolchains
As of Maven 2.0.9+, you can build a project using a specific version of JDK independent from the one Maven is running with.
For more information, see the Guide to Using Toolchains.
- Details
- Written by
- Last Updated on 31 July 2022 | Print Email
You know, Maven is a very popular Java build tool. It is actually a software project management and comprehension tool. Developers love using Maven as it greatly simplifies dependency management and build process of any Java projects.
In this quick post, I’d like to show you how to get started with Maven by downloading, installing Apache Maven on Windows operating system. Then you’ll learn how to create and build a simple Java project using Maven.
NOTE: you must have JDK pre-installed in order to run Maven command line tool. If not, kindly follow this guide.
Click this link to visit the official download page of Maven. Then click the link next to “Binary zip archive”:

This will download the binary distribution of Maven in Zip format. Then extract the zip file to a directory, say G:\apache-maven-3.8.6.
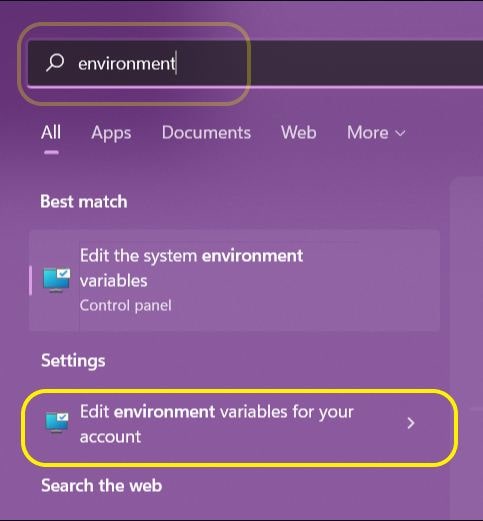
Next, you need to update system environment variable so you can use Maven command line tool everywhere in the command line.
Open the Environment Variables dialog and create a new system variable named MAVEN_HOME with value is the absolute path to the directory where Maven zip file is extracted:

Then update the PATH system variable, adding an entry as shown below:

Click OK to apply the change.
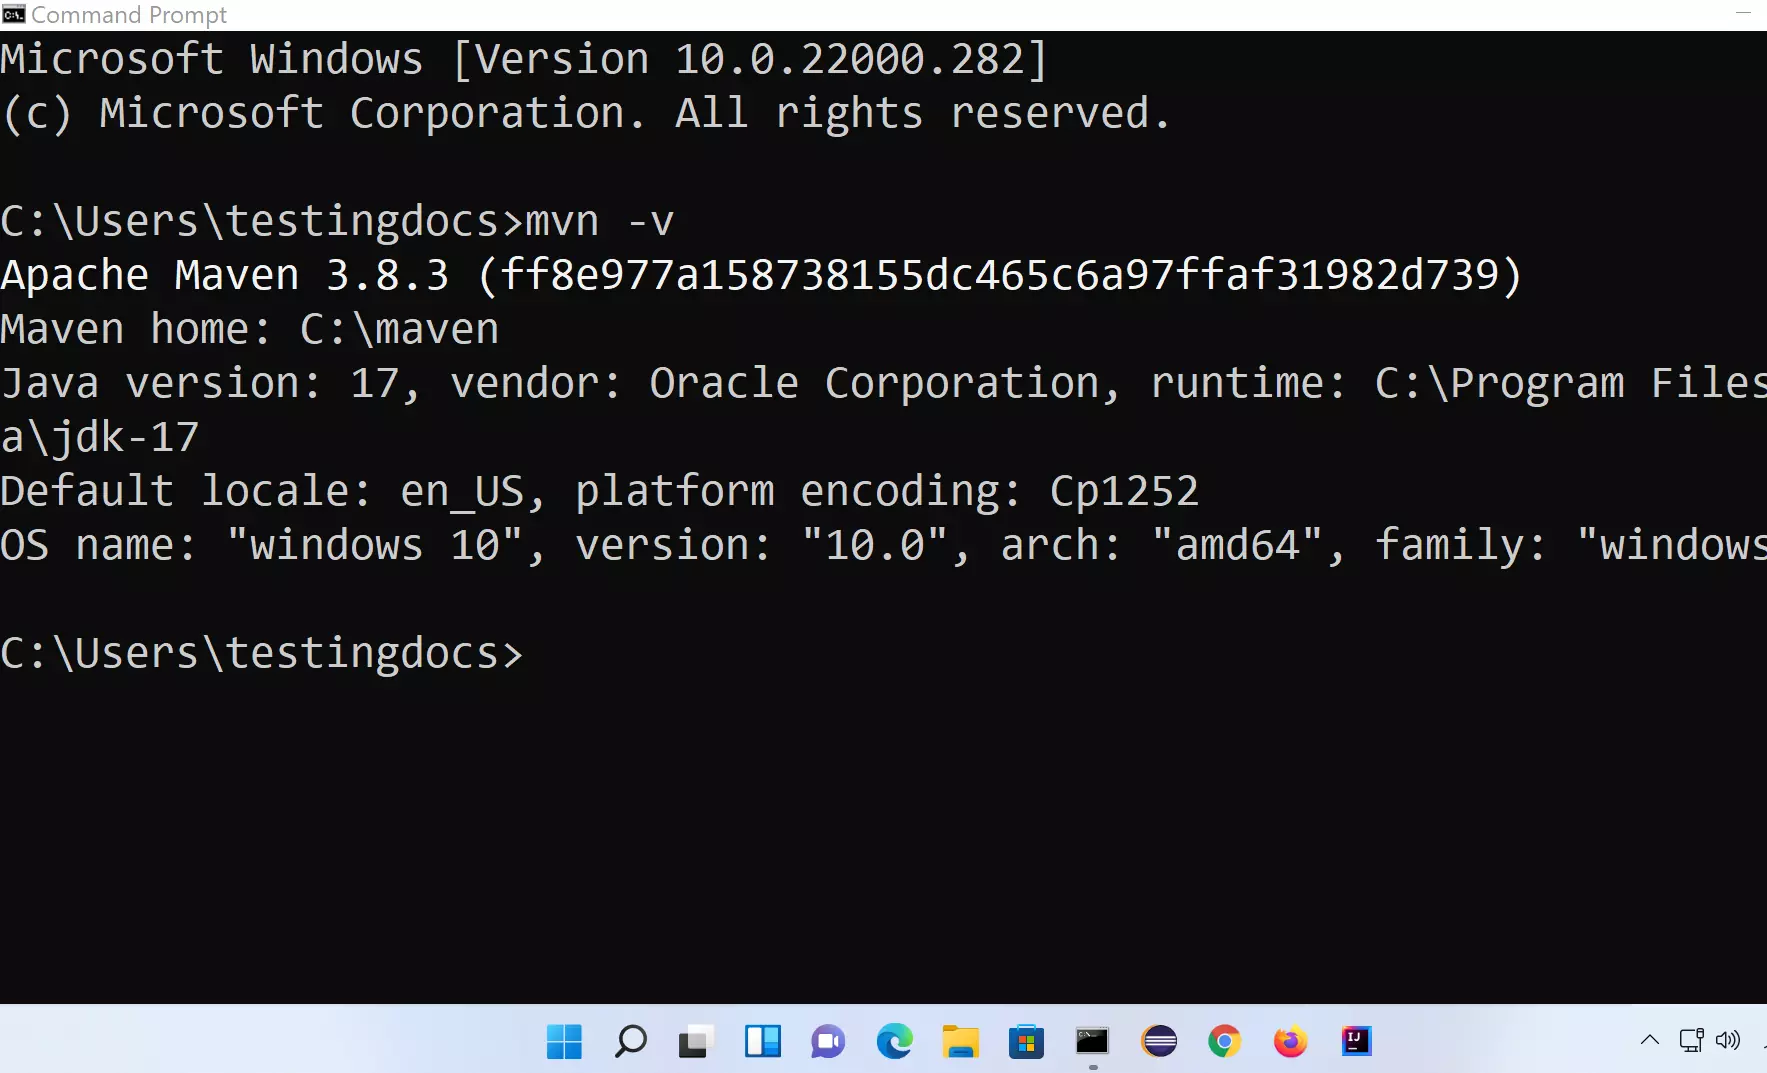
Now, open a new command prompt and type mvn -v in the command line. You will see the following output:

It shows the version of Apache Maven, Java and operating system — as you can see. Congratulations! You have successfully got Maven up and running. The next step is creating your first Java project using Maven command line tool.
2. Create and Build a simple Java Project using Maven
Let me show you how to get started with Maven by creating and building a simple Java project. In Windows command prompt, type the following command:
mvn archetype:generate -DarchetypeArtifactId=maven-archetype-quickstart -DarchetypeVersion=1.4
You will see the following output:

You see, Maven is creating a new Java project in interactive mode, so provide the information about groupId, artifactId, version and package name for your project — as shown in the screenshot above. Then type Y to confirm.
If you see the following output, that means Maven has created the project successfully:

Then you can see Maven generated the project under MyJavaApp directory. Explore this directory to see what was generated (pom.xml, App.java and AppTest.java).
Next, change the current directory to the project one using cd MyJavaApp command. And type tree /f to see the project directory structure, as shown below:

Now, type mvn packagecommand to build and package the project to a Java Archive (JAR) file. You will see the following output:

The result is a JAR file named MyJavaApp-1.0.jar created in the target directory. Then you can type the following command to run it:
java -cp target\MyJavaApp-1.0.jar net.codejava.App
That’s my guide to download, install Maven on Windows. You also learned how to create your first Java project with Maven command line tool. I hope you find this article helpful to get started with Maven.
To see the steps in action, watch the following video:
Video:
Other Maven Articles:
- Maven — how to exclude tests from build
- How to change Java version for Maven project
- Fix Maven Build Error invalid target release
About the Author:
 Nam Ha Minh is certified Java programmer (SCJP and SCWCD). He started programming with Java in the time of Java 1.4 and has been falling in love with Java since then. Make friend with him on Facebook and watch his Java videos you YouTube.
Add comment
Apache Maven
Overview
In this tutorial, we will Download Maven on Windows 11 operating system. We will also install and set up the Maven tool on Windows 11. Windows 11 is the latest operating system from Microsoft.
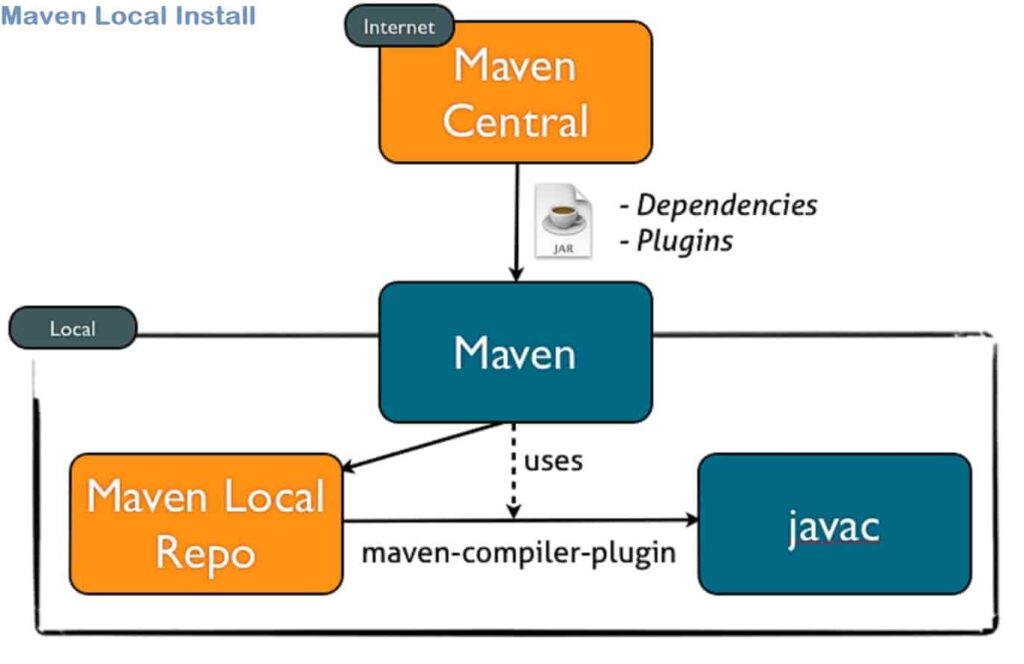
Apache Maven is an open-source build automation tool. Java should be installed on the machine and the JAVA_HOME environment variable set to the JDK home directory.
Environment
This post uses the below environment
- Windows 11 Operating System
- JDK 17
- Any web browser( Chrome browser / Firefox / Edge browser)
- Maven 3.8.x
Download Maven
Open the Web browser and navigate to Maven’s official website.
https://maven.apache.org/
Click on the Download link. Download the .zip compressed archive file.
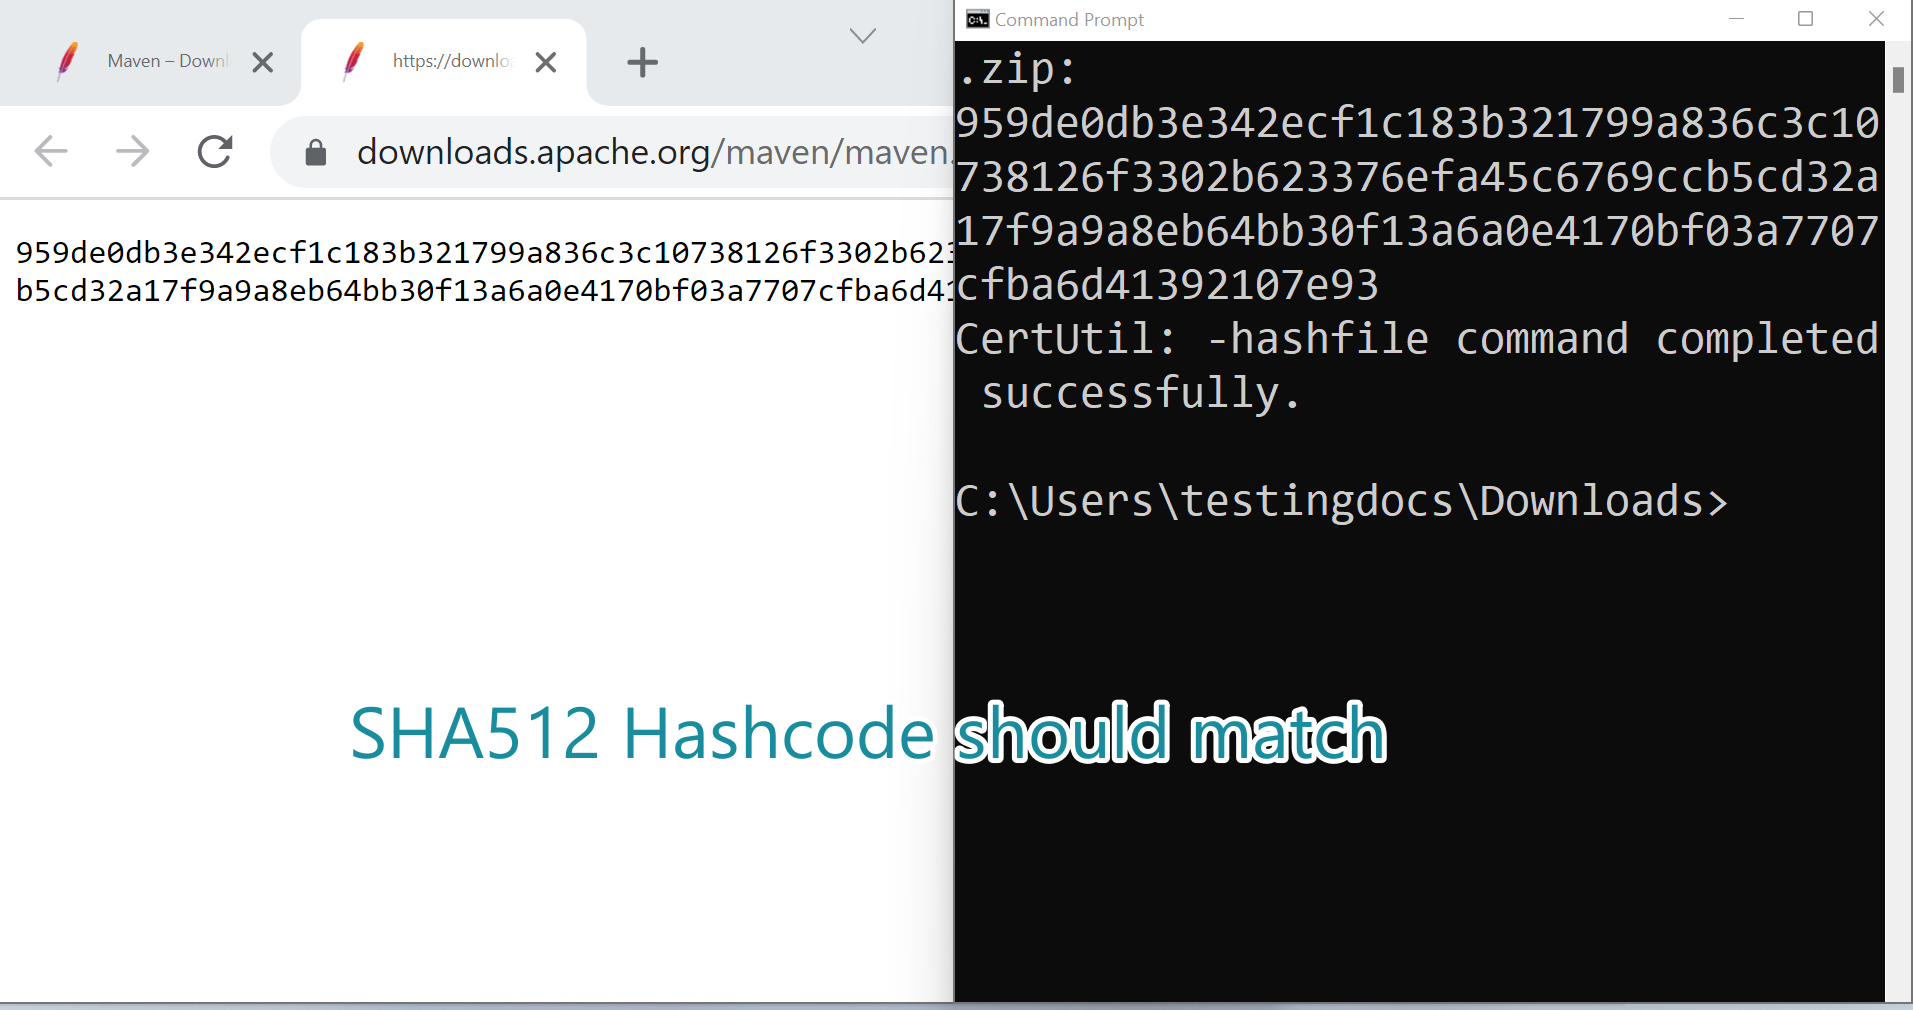
Verify the Maven Download
C:\Users\testingdocs\Downloads>certutil -hashfile apache-maven-3.8.3-bin.zip SHA512
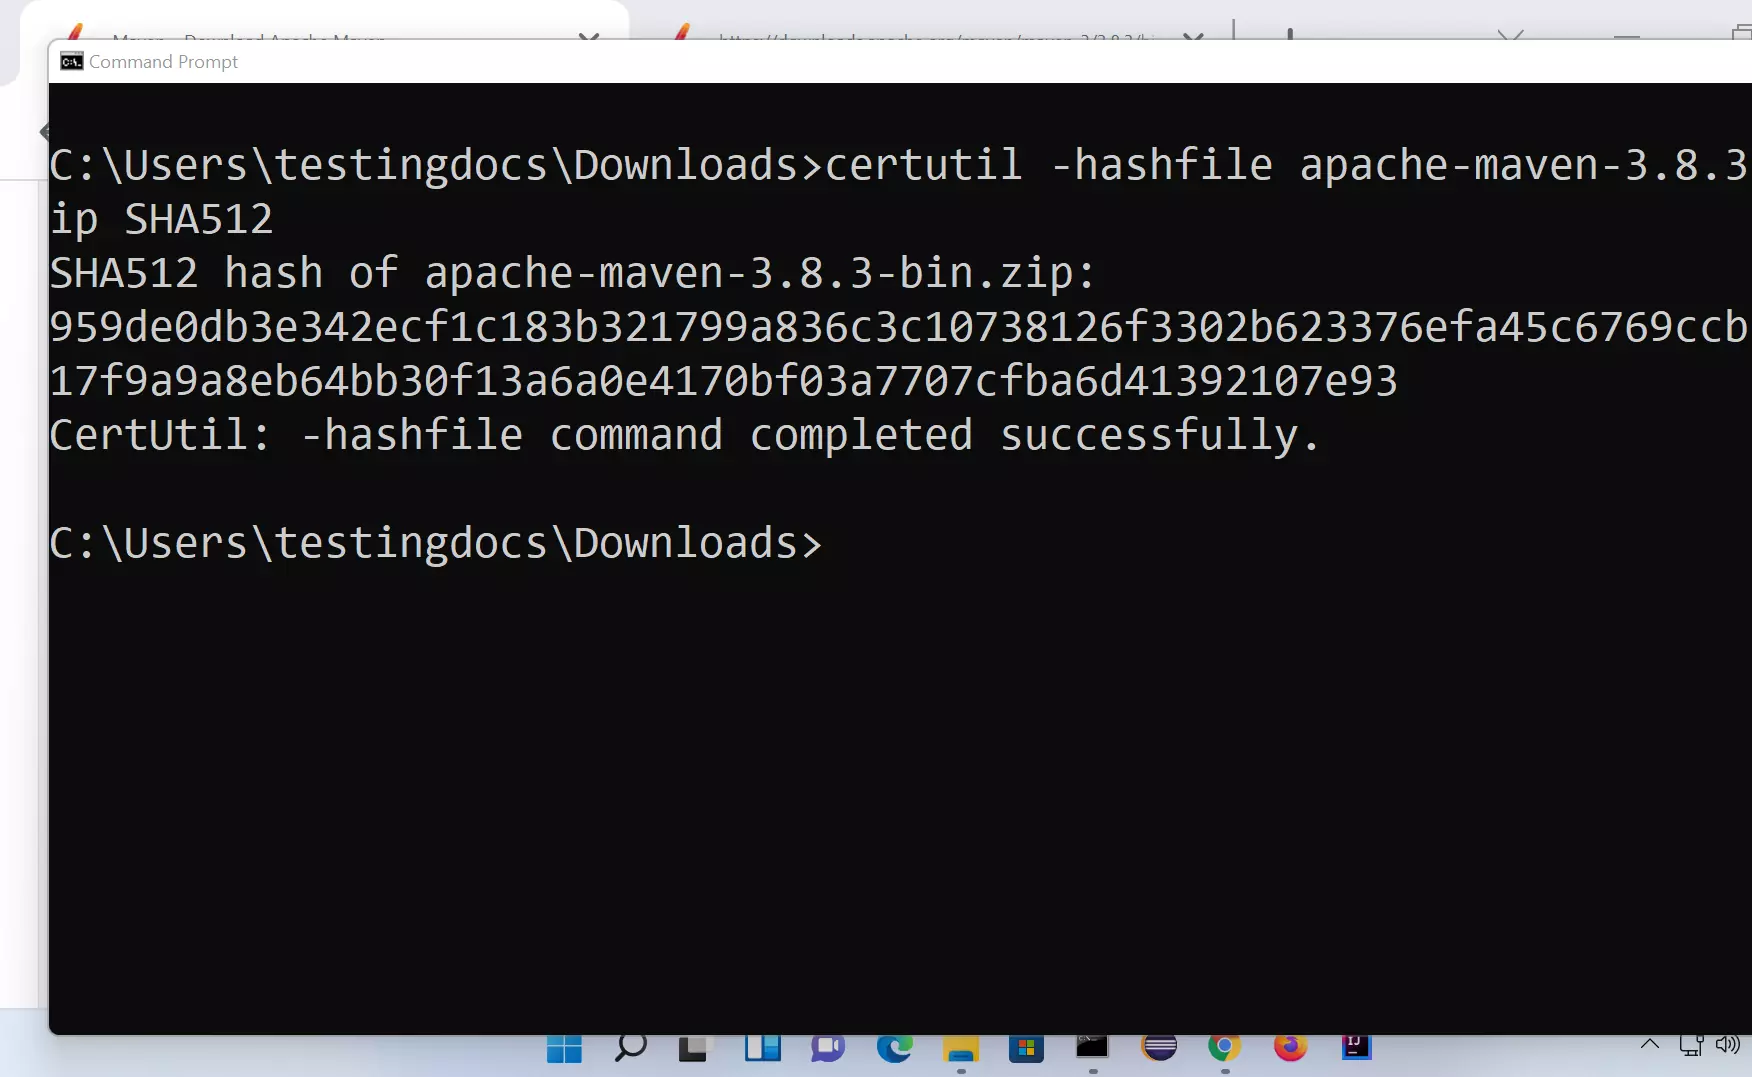
The generated SHA512 hashcode should match the hash listed on the Maven website.
This step is to verify the integrity of the download. On production systems verification of the checksums is recommended.
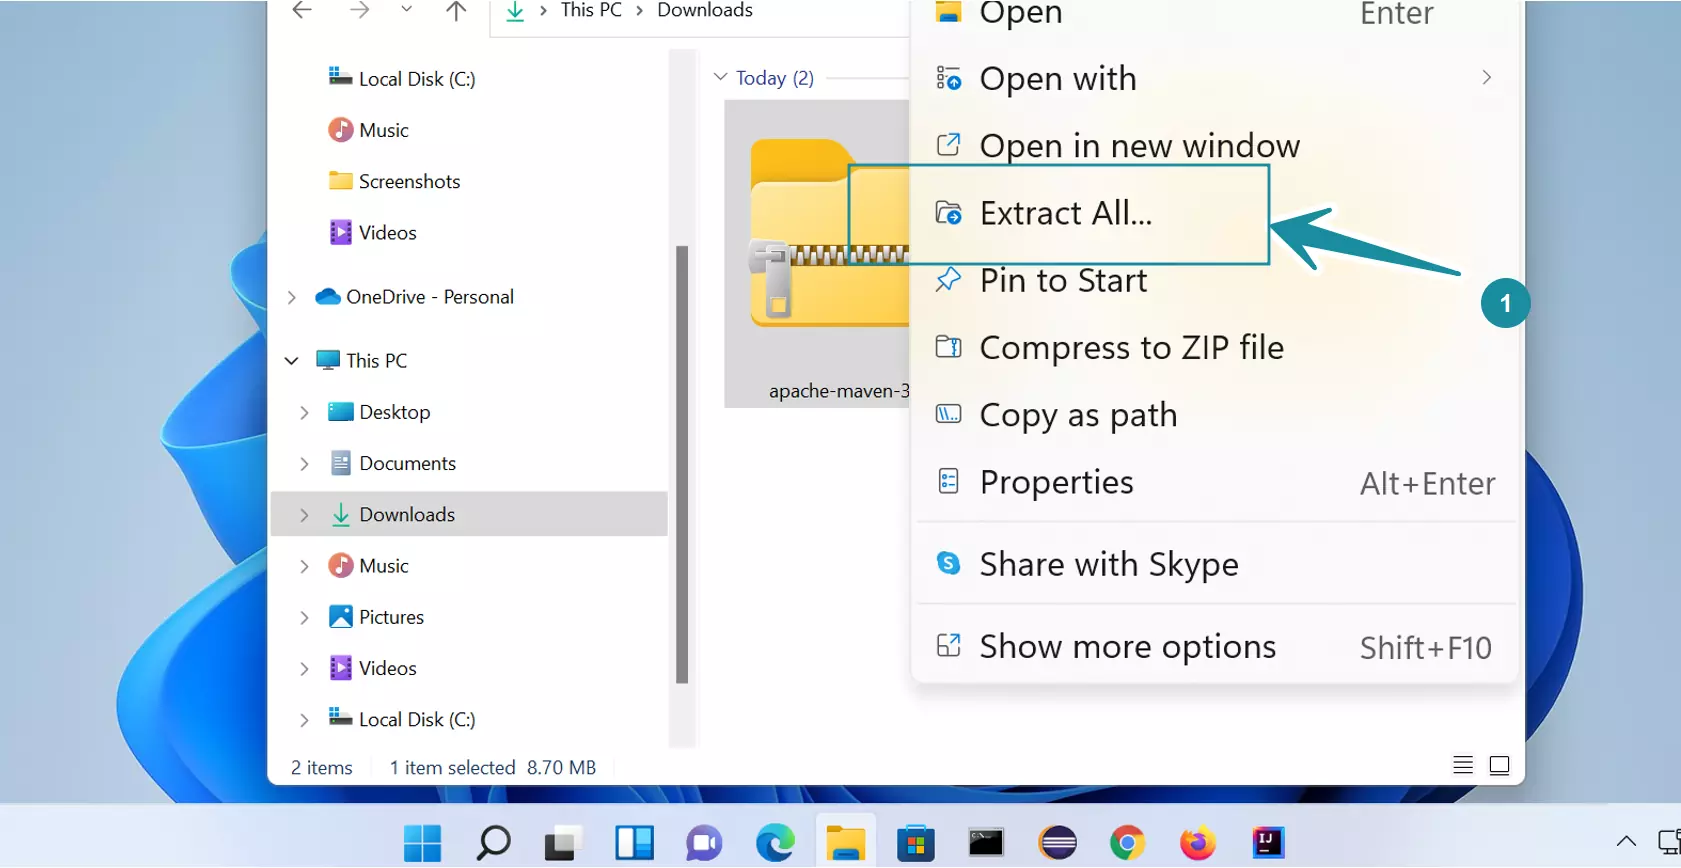
Extract Contents
Extract the contents. Right-click on the maven zip file and choose the Extract All… menu option.
This will extract the .zip file contents.
Set System Variables
Copy the maven folder to a suitable path on the computer. For example to C:\maven
Set the MAVEN_HOME environment variable that points to the maven install directory on the machine.
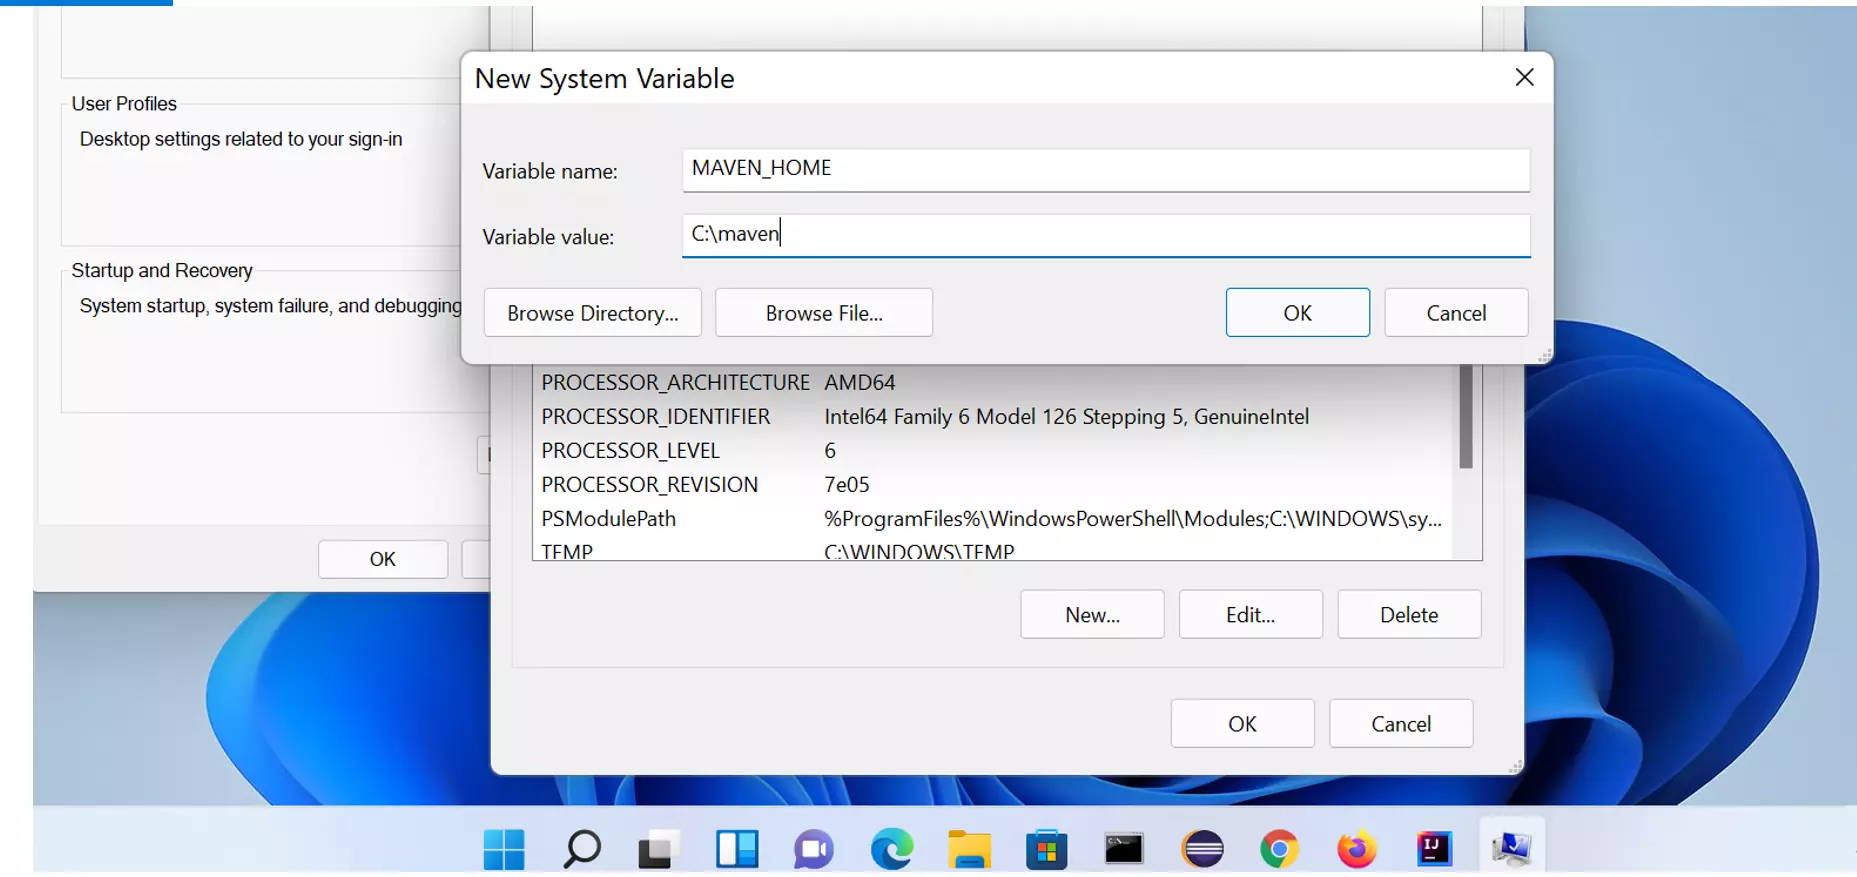
Add the %MAVEN_HOME%\bin to the PATH environment variable.
Verify the setup.
Launch a command prompt and issue the following command:
\> mvn -v
This should display the version of the Maven tool.
That’s it. We have successfully downloaded and installed the Maven tool on Windows 11 machine.
—
Windows 11 Tutorials
More Information on Windows 11
https://www.microsoft.com/en-us/windows

Maven is an automation and management tool that was developed by Apache Software Foundation and released in 2004. It is a project management and compression tool which provides users with a complete build life-cycle framework. This step-by-step tutorial shows you how to Install Maven on Windows 11 64-bit. If you are a systems administrator or a support engineer looking to make the installation quicker, we have also outlined the steps required to do so using CMD.
With Maven you can automate a project’s build infrastructure in no time as Maven uses a standard directory layout along with a default build life-cycle. It is quite a powerful tool that is based on Project Object Model.
It is able to simplify the build process such as ANT, keep in mind that it is too much more advanced than ANT. It includes information about the project and configuration information for Maven like the construction directory and source directory locations.
About Apache Mavin Features and Functions
Power to create profiles and set custom configurations
It is able to build profiles and a set of configuration values through which you can build your project by using different configurations. You might need to build a project for your local system for development and testing. To enable different builds you can add different build profiles to your POM files by using its elements of profiles which get triggered in different ways.
Official Plugin support
These help to perform a certain goal. What you can do is add a plug-in to the POM file. If we talk about Maven then it comes with certain standard plug-ins which you can use as well as implement in Java.
Create useful Life-Cycles from scratch
It carries a sequence of build phases in which each comes with a sequence of goal. Maven command is the name of the build life-cycle, phase or even goal. Now, whenever a life-cycle is requested executed by the given command then all the build phases in that particular life cycle get executed. When a build phase is requested executed then all the build phases before it there in the defined sequence are executed as well.
All data in a Project Object Model (XML) file
These files are XML which carries information related to the project and configuration information like dependencies, goals, and plug-ins. Source directories and much more are used by this to build a project. Now, whenever you execute a Maven command you give it a POM file in order to execute commands. It reads pom.xml file in order to accomplish both its operations and configuration.
Works great with Java, Ruby and C# projects
Maven is specifically much better for programming-based projects that are written in C# projects. You should not confuse Maven with code editors or compilers as those are different, an example is Dev-C++ which is an IDE built to write and compile code.
Locally stored dependencies
For those who do not know, dependencies are external Java Libraries that are needed for projects and repositories which are directories of packaged JAR files. If we talk about the local repository then it is just a directory present on the machine hardware. If in any case the dependencies are not found there in the local Maven repository, then it downloads them from the central Maven repository and then puts them in the local repository.
SEE ALSO: How To Create Your Own Web Server with Python.
Well, Windows 11 doesn’t come with any project management software installed by default. You only have Sticky Notes or Microsoft To Do. I am sure you will not be using either of those two because they are simple note-taking and task apps. Hence when Maven is a much better choice and the one you should be using, below are some reasons why you should use and install Maven on Windows:
- Add jars and other project dependencies easily.
- Various documentation and guides are available online if a problem occurs if you have a problem.
- It provides project information such as log documents, unit test reports, dependency lists, and much more.
- It is helpful to project while updating the central repository of JAR’s and other dependencies.
- Integrate projects with source control systems like Subversion of Git.
- Build any number of projects into output types such as JAR without doing any scripting.
How To Download and Install Apache Maven on Windows 11
Important to know: What do the different configuration/setting folders do in Apache Maven?
- C: Folder is where Maven installs itself by default under a folder called “maven”.
- Bin folder carries batch files and shell scripts in order to run it on different platforms.
- Boot folder carries “jars” which are needed for Maven to begin.
- Conf folder carries the default “settings.xml” file which it uses.
- Lib folder carries the libraries which are used by Maven. Moreover, it also carries ext folder in which the third-party extension can extend override default maven implementation, which can be placed.
Step 1: Download Apache Maven for Windows 11 (64-bit)
Follow the steps below to download Maven for Windows 11, it is available in various formats including zip and tar.
- Visit the official Maven download page.
- Download the latest version, which is currently 3.8.6.
- Launch the installer and wait for it to finish.
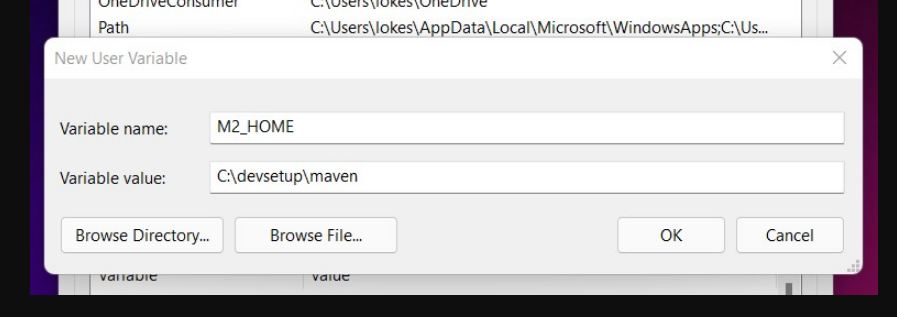
Step 2: Add Maven Windows 11 environment variables and paths (JAVA_HOME and M2_Home)
As Maven is a build and dependency management tool which is for Java app development. Like other Java development tools, this is not installed as a windows service rather it gets configured using windows environmental variables.
First things first, you need to have Java installed on your system and JAVA_HOME as a must-be set in the environment variables.
You need to add M2_Home to Windows environment variables, the value shall be the installation location on your system.
Keep in mind that this is an optional step but it is highly suggested, many external IDEs and programming languages such as Python 3, as well as tools, rely on the M2_HOME variable in order to work with it.
If you want to run its commands from the console then windows need to be able to locate maven batch files. Simply update it with the “%M2_HOME%\bin” directory.
Step 3: Install Java JDK
- To install Java all you need to do is install “JDK Installer Setup”.
2. Now add the JAVA_HOME variable to “JDK installation”
On our system, it is pointing to the “JDK 18” installation folder.
Step 4: Test if Maven is working as expected from CMD
The process of installation has now been completed, now let’s test it from the windows command prompt.
- You need to go to the “start menu” and type in “Command prompt” there in the application search box.
- Hit “enter”, new command prompt shall open.
- Here you need to type mvn –version and hit enter, example below:
C:\Users\Paul> mvn –-version
This command runs this batch file “mvn.bat” from the bin folder of the Maven installation location. This is the reason why we have added a location to a PATH environment variable.
Now, after checking JAVA_HOME and optional arguments (Maven_OPTS).
This will show you information on the maven version, the path to the maven bin folder as well as installed Java Version.
Install Maven using CMD (Alternative Method)
If you want a quicker way to install Maven, then you have to do it via CMD. An example would be you have to install it on over 10 corporate computers. Follow the steps below:
- Install Chocolatey Package Manager by running the individual installation command mentioned here.
- Now, install Java if you haven’t already.
- Now simply enter “choco” and the name of any major software and it will install it for you, in our case its Maven so:
Paul@ninja-ide:~# C:\Users\Paul> choco install maven
4. Done.
FAQs on Mavin Installation
How to check if Maven is already installed on Windows 11?
The quickest way to check if Maven is installed is from CMD. Open CMD and type maven —version and it will show you if Maven is installed and what version is available. If it says command not recognized, then it is not installed.
Can I Install Maven from CMD in Windows 11?
Yes, you can Install Maven on Windows 11 from CMD but you shouldn’t due to the straight forward process to be able to do it via the GUI setup.
Maven is not working after installation, how can I fix it?
Most of the times when Maven is not launching on Windows 11, it is due to the environment variable being added incorrectly. Please check all of your environment variables and paths and re-add them followed by a reboot will fix your problem.
Other installation tutorials and guides for Windows 11:
- How To Install NumPy in Visual Studio Code on Windows 11.
- Guide: Install PyCharm IDE on Windows 11.
- How To Fix uTorrent not working (2023).
Conclusion
In this tutorial, you learned how to Install Maven on Windows 11. Most importantly we also covered an alternative way allowing you to Install Maven on using CMD with the help of Chocolatey. In the installation process, most of the errors happen where users miss the additions of environment variables and paths that need to be added which we also added in this guide to make it easy for you.