В этой статье мы расскажем, как проходит установка macOS на компьютер через VMware Workstation Player. Для работы вам понадобится готовый ISO-образ операционной системы. На VMware mac OS устанавливается в 4 этапа:
- Установка патча для разблокировки возможностей работы VMware с macOS.
- Создание виртуальной машины.
- Редактирование конфигурационного файла для запуска на процессорах Intel или AMD.
- Установка macOS на виртуальную машину.
Обратите внимание
Официально VMware Workstation не поддерживает MacOS в качестве гостевой ОС. Поэтому производительность системы будет гораздо ниже, чем на устройствах от компании Apple. Повысить производительность можно при помощи VMware Tools. Это набор ПО, который оптимизирует взаимодействие между основной и гостевой ОС. Поздние версии macOS могут не поддерживать VMware Tools.
Как разблокировать VMware для macOS
Поскольку VMware Workstation официально не поддерживает MacOS в качестве гостевой ОС, для запуска macOS нужно установить неофициальный патч. Он подойдет как для Workstation Player, так и для Workstation Pro.
Чтобы установить патч для разблокировки macOS:
-
1.
Закройте Workstation Player.
-
2.
Скачайте архив «Unlocker-x64.zip».
-
3.
Распакуйте архив и запустите файл «Unlocker.exe». Дождитесь окончания установки.
Готово, при создании виртуальной машины в списке поддерживаемых гостевых ОС появится Apple Mac OS X:
Список поддерживаемых ОС в VMware после установки патча
Как создать виртуальную машину для macOS
После установки патча можно приступить к установке macOS. Для работы вам понадобится готовый ISO-образ операционной системы.
-
1.
Запустите VMware Workstation Player.
-
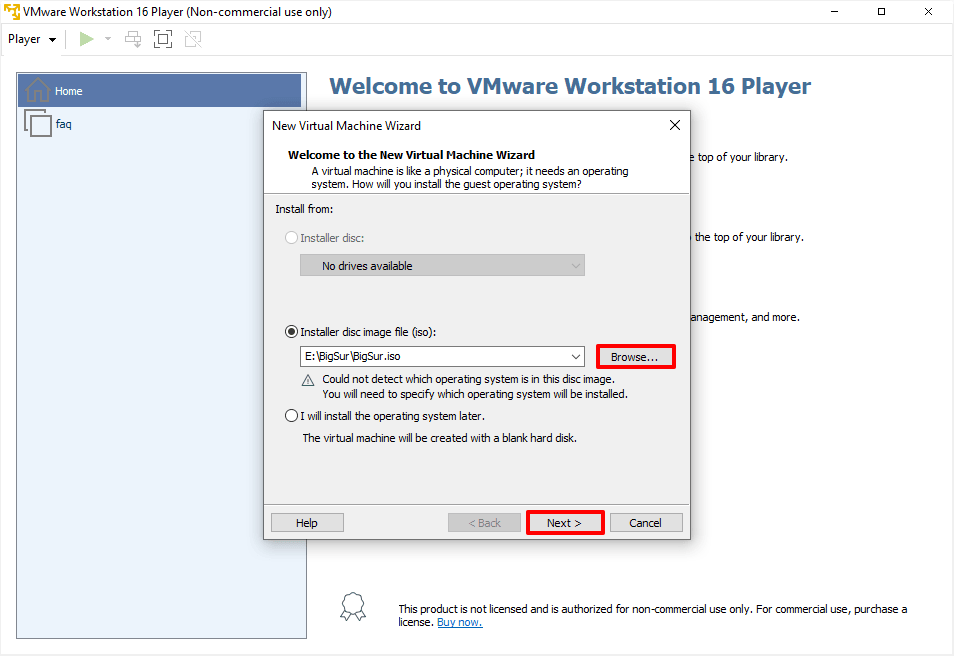
2.
Нажмите Create a New Virtual Machine, чтобы создать новую виртуальную машину:

Главное меню VMware -
3.
Нажмите Browse и в локальной папке компьютера выберите ISO-образ Mac OS. После этого кликните Next:
Меню выбора образа ОС для установки на виртуальную машину в VMware -
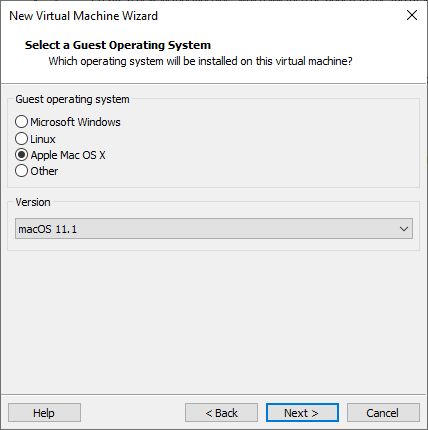
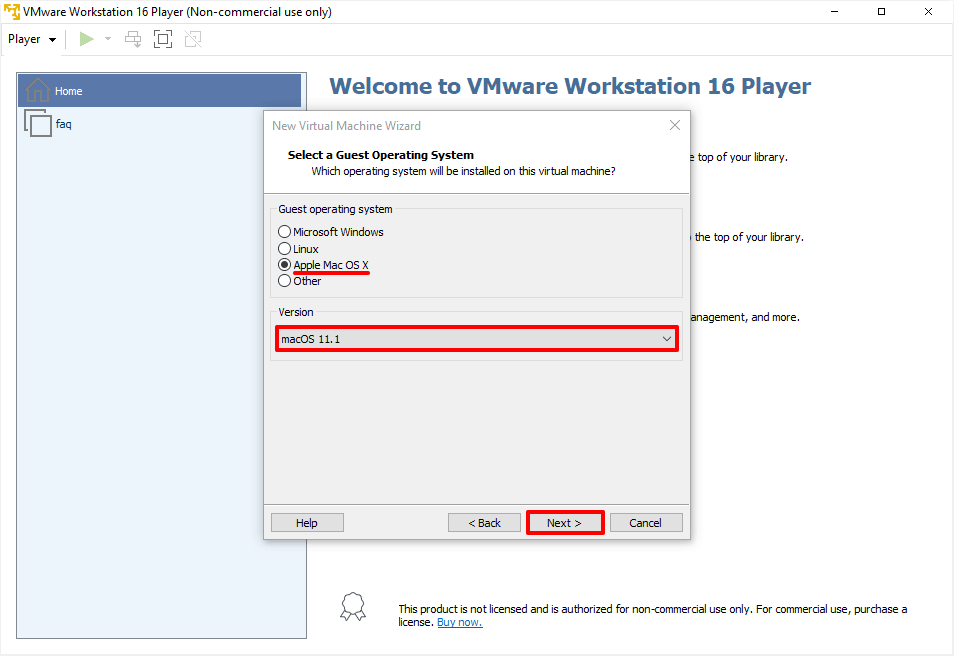
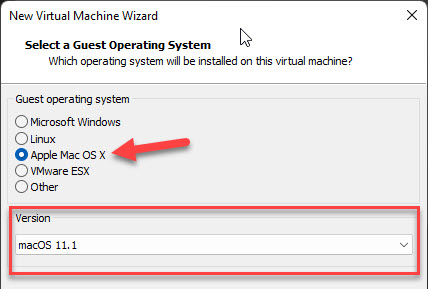
4.
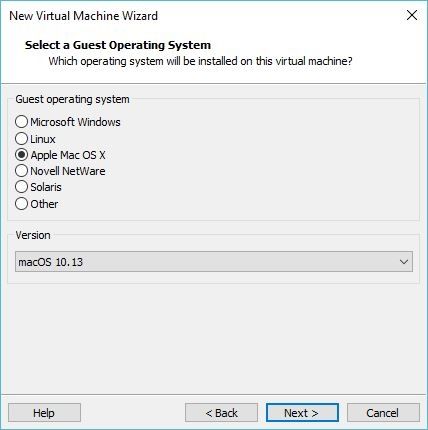
Выберите «Apple Mac OS X». Выбор версии зависит от того, какую ОС вы хотите установить:
- Big Sur — macOS 11.1,
- Catalina — macOS 10.15,
- Mojave — macOS 10.14.
Затем нажмите Next:
Меню выбора версии ОС для установки на виртуальную машину в VMware -
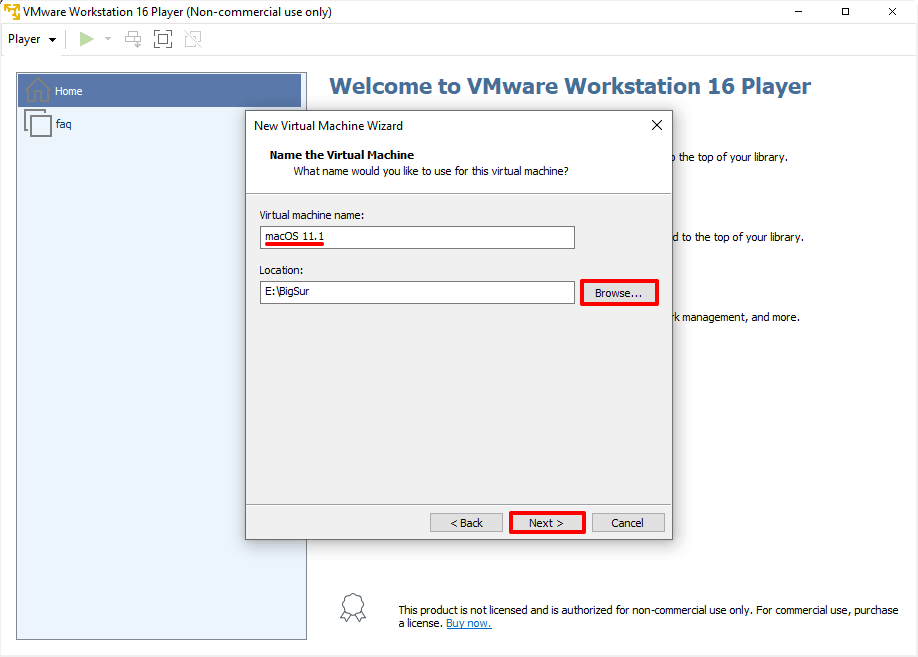
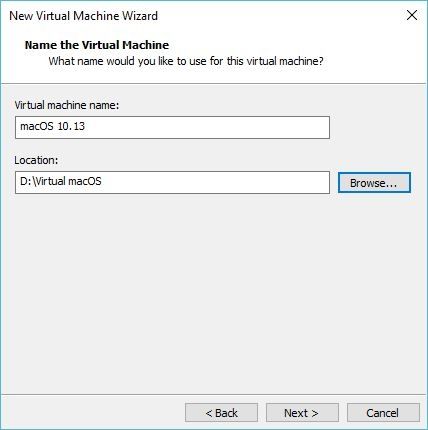
5.
Если вы хотите оставить название и директорию по умолчанию, нажмите Next. Если вы хотите изменить их, в поле «Virtual machine name» введите имя новой виртуальной машины. Затем нажмите Browse, чтобы выбрать папку, в которой будет храниться виртуальная машина. После этого нажмите Next:
Меню выбора директории для установки ОС на виртуальную машину в VMware -
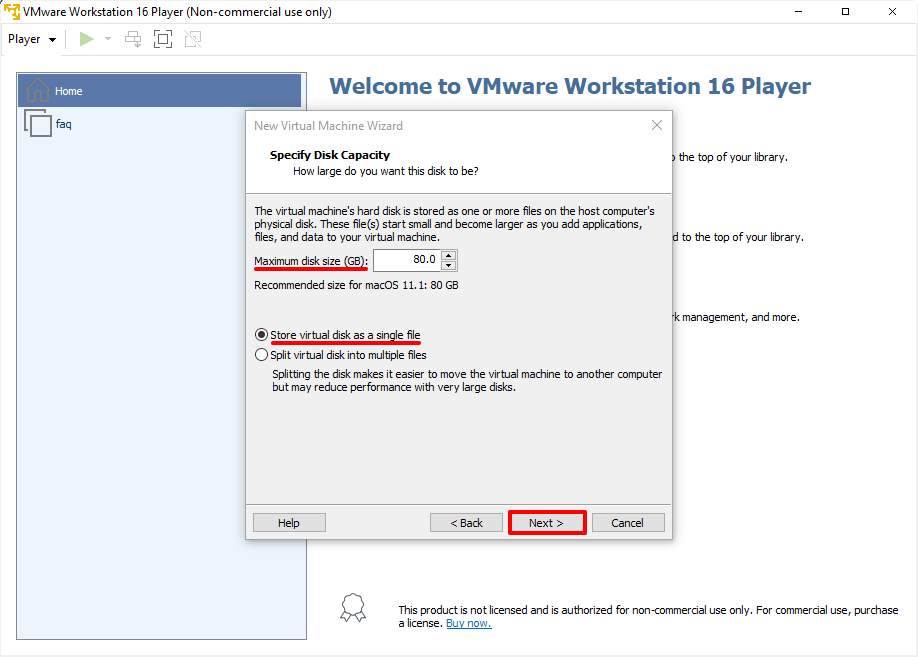
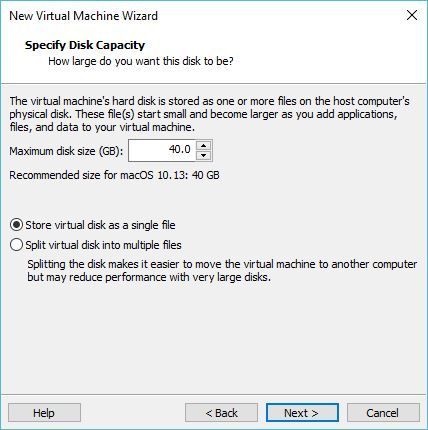
6.
«Maximum disk size» — это максимальный размер дискового пространства, которое будет выделено для гостевой операционной системы. Мы рекомендуем выбрать объем — 80 ГБ.
Если хотите, чтобы виртуальный диск хранился в одном файле, выберите Store virtual disk as a single file. Это не повлияет на производительность операционной системы.
Нажмите Next:
Меню выбора дискового пространства для установки ОС на виртуальную машину в VMware -
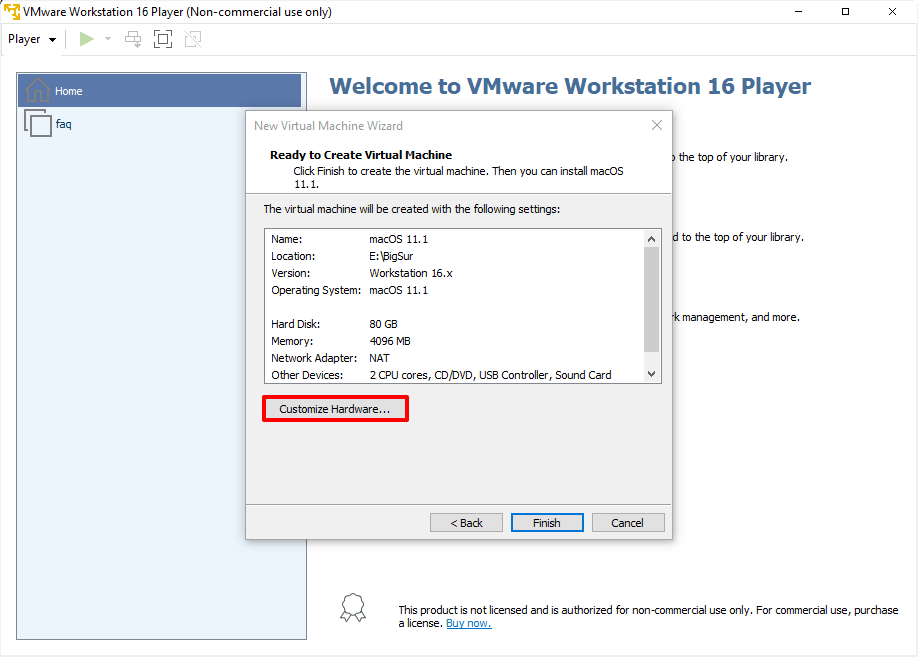
7.
Проверьте количество выделенных ресурсов. Для этого нажмите Customize hardware:
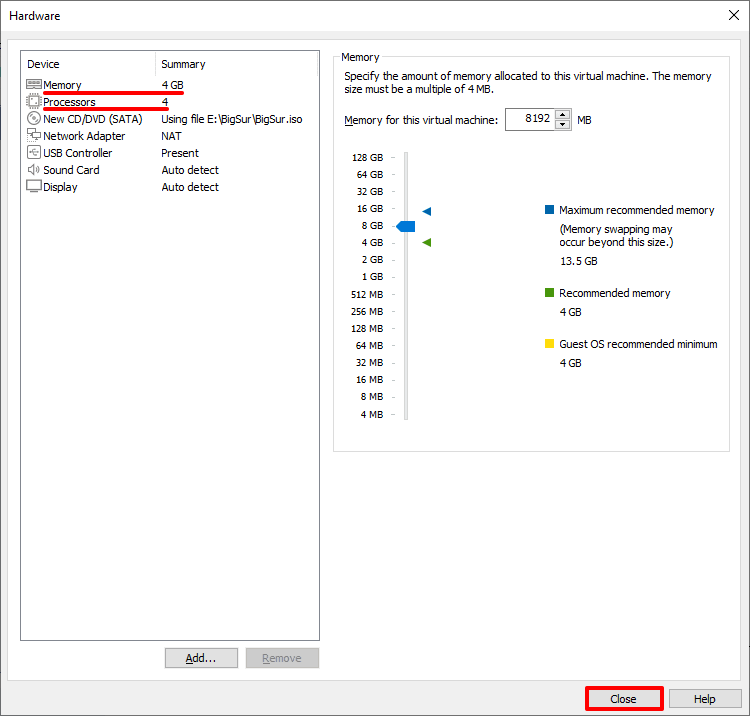
Переход к управлению выделяемыми ресурсами для виртуальной машины в VMwareНазначьте параметры:
- Memory (оперативная память) — рекомендуемый объем составляет 4 ГБ. Если у вашего компьютера установлено 16 ГБ оперативной памяти, выделите 8 ГБ.
- Number of processor cores (количество ядер процессора) — минимальное рекомендуемое количество — 2. Если процессор вашего компьютера имеет 8 и более ядер, выделите минимум 4 ядра.
Управление выделяемыми ресурсами для виртуальной машины в VMwareКроме оперативной памяти и ядер процессора необходимо включить виртуализацию. Для этого нажмите Processors, отметьте галочкой пункт «Virtualize Intel VT-x/EPT or AMD-V/RVI» и кликните Close:
Включить дополнительную виртуализацию для ОС в VMware -
8.
Нажмите Finish:
Завершение процедуры создания виртуальной машины в VMware

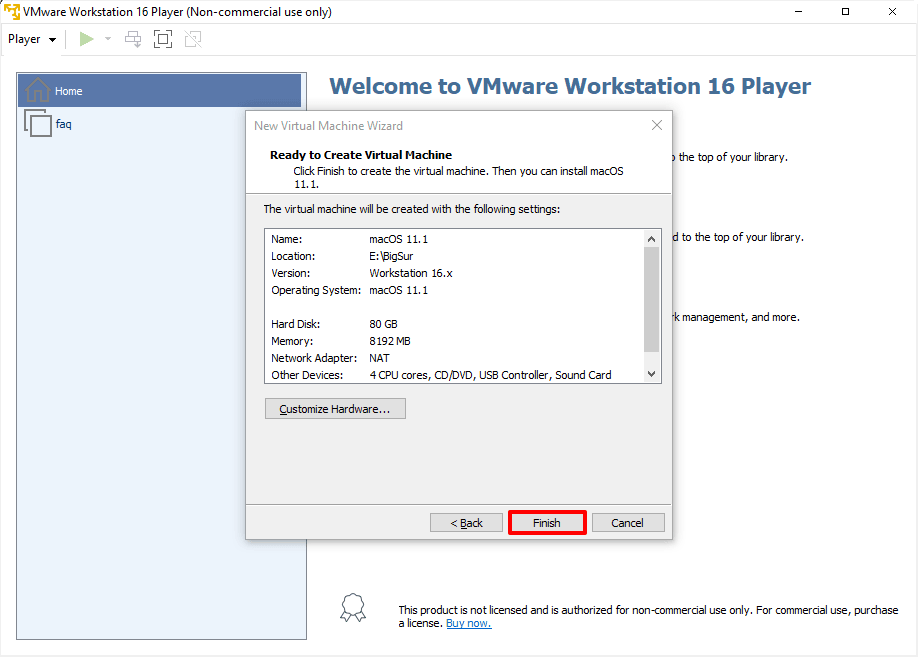
Готово, виртуальная машина создана.
Как отредактировать файл .VMX
Перед запуском гостевой ОС нужно внести изменения в файл с расширением .VMX.
Важно
Не запускайте гостевую систему MacOS, пока не внесёте изменения в файл .VMX.
-
1.
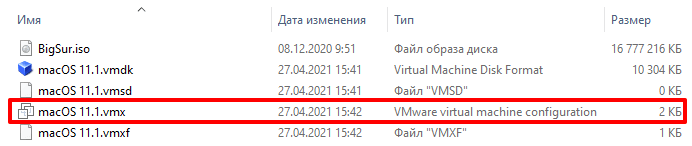
Откройте директорию, в которой хранятся файлы виртуальной машины. Это директория, которую вы выбирали на 5 шаге. Если вы выбрали директорию по умолчанию, перейдите в Документы — Virtual Machine. Вам нужен файл с расширением .VMX:
Список файлов виртуальной машины VMware -
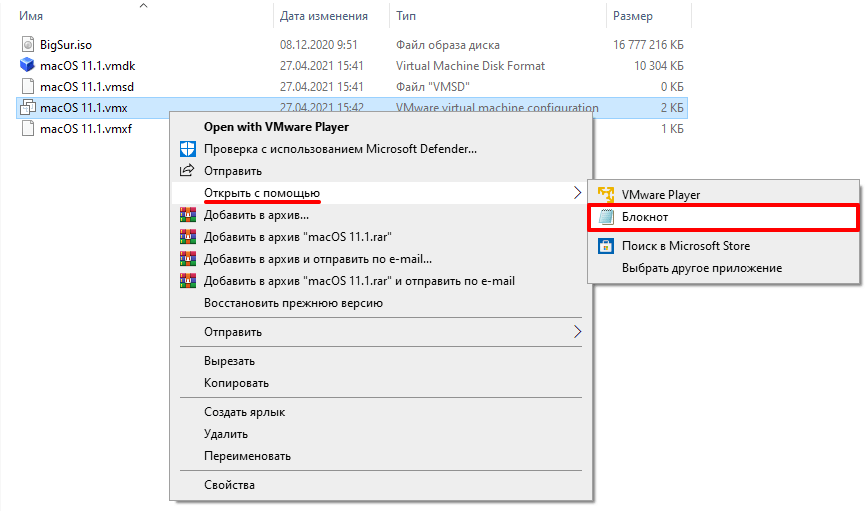
2.
Кликните по файлу правой кнопкой мыши и выберите Открыть с помощью — Блокнот.
-
3.
В зависимости от процессора вашего компьютера вставьте в конец файла нужный текст:
- для Intel:
smc.version = "0" smbios.reflectHost = "TRUE" hw.model = "MacBookPro14,3" board-id = "Mac-551B86E5744E2388"- для AMD:
smc.version = "0"
cpuid.0.eax = "0000:0000:0000:0000:0000:0000:0000:1011"
cpuid.0.ebx = "0111:0101:0110:1110:0110:0101:0100:0111"
cpuid.0.ecx = "0110:1100:0110:0101:0111:0100:0110:1110"
cpuid.0.edx = "0100:1001:0110:0101:0110:1110:0110:1001"
cpuid.1.eax = "0000:0000:0000:0001:0000:0110:0111:0001"
cpuid.1.ebx = "0000:0010:0000:0001:0000:1000:0000:0000"
cpuid.1.ecx = "1000:0010:1001:1000:0010:0010:0000:0011"
cpuid.1.edx = "0000:0111:1000:1011:1111:1011:1111:1111"
smbios.reflectHost = "TRUE"
hw.model = "MacBookPro14,3"
board-id = "Mac-551B86E5744E2388"
4
Сохраните файл.
Готово, виртуальная машина готова к запуску.
Теперь запустим виртуальную машину и установим операционную систему macOS.
Как установить macOS на VMware Workstation
В инструкции мы устанавливаем версию macOS Big Sur. Процедура установки версий macOS Mojave и Catalina практически не отличается.
Чтобы установить macOS на VMware Workstation:
-
1.
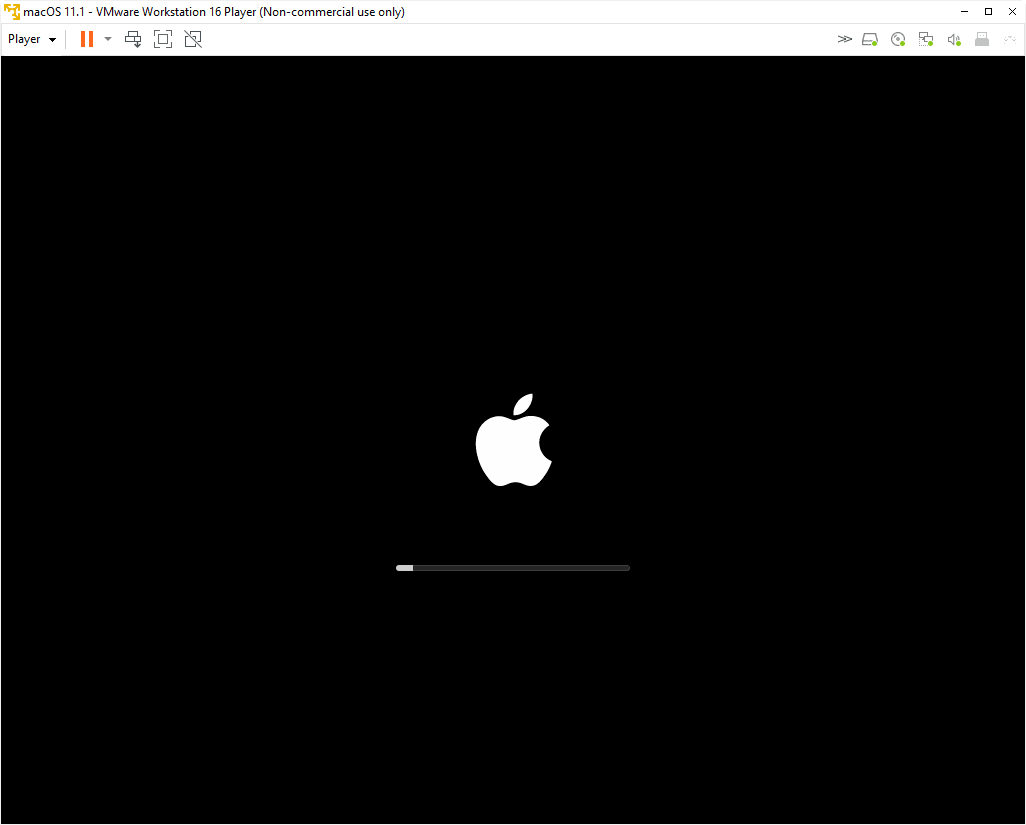
Запустите созданную ранее виртуальную машину:
Запуск виртуальной машины из главного меню VMware Workstation -
2.
Дождитесь загрузки операционной системы с установочного диска:
Загрузочный экран macOS -
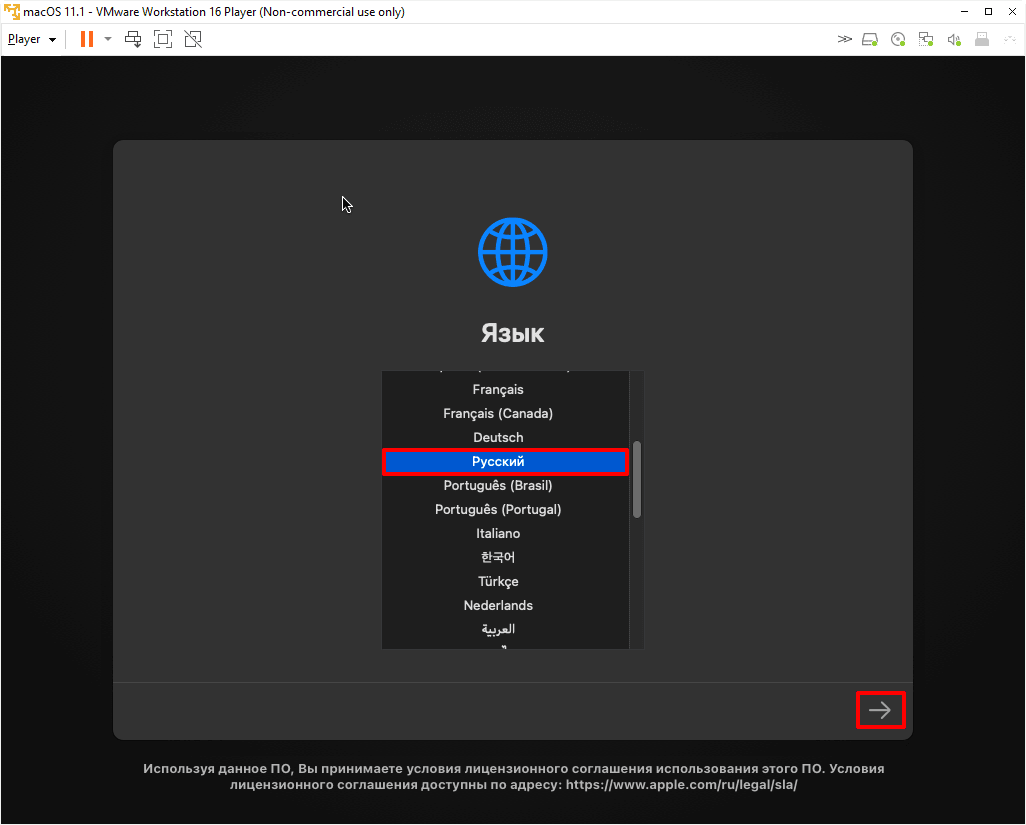
3.
Выберите язык и нажмите на стрелку в правом нижнем углу:
Выбор языка macOS -
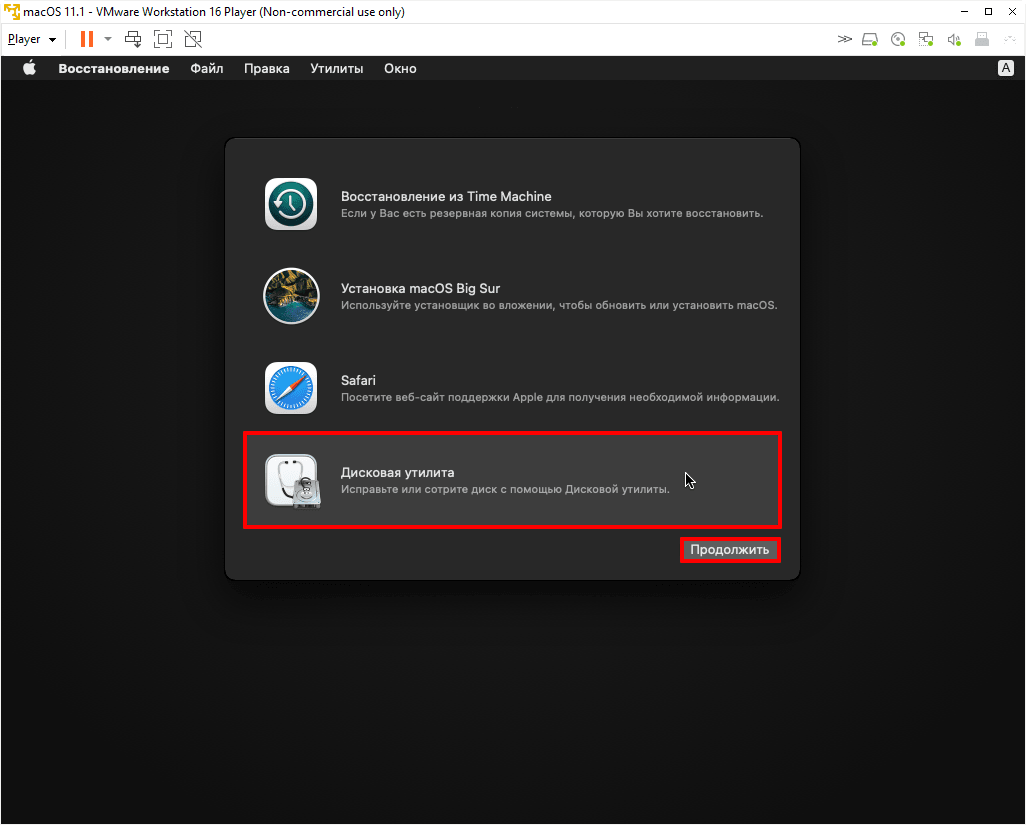
4.
Отформатируйте виртуальный диск. Для этого выберите Дисковая утилита и нажмите Продолжить:
Дисковая утилита для форматирования диска macOS -
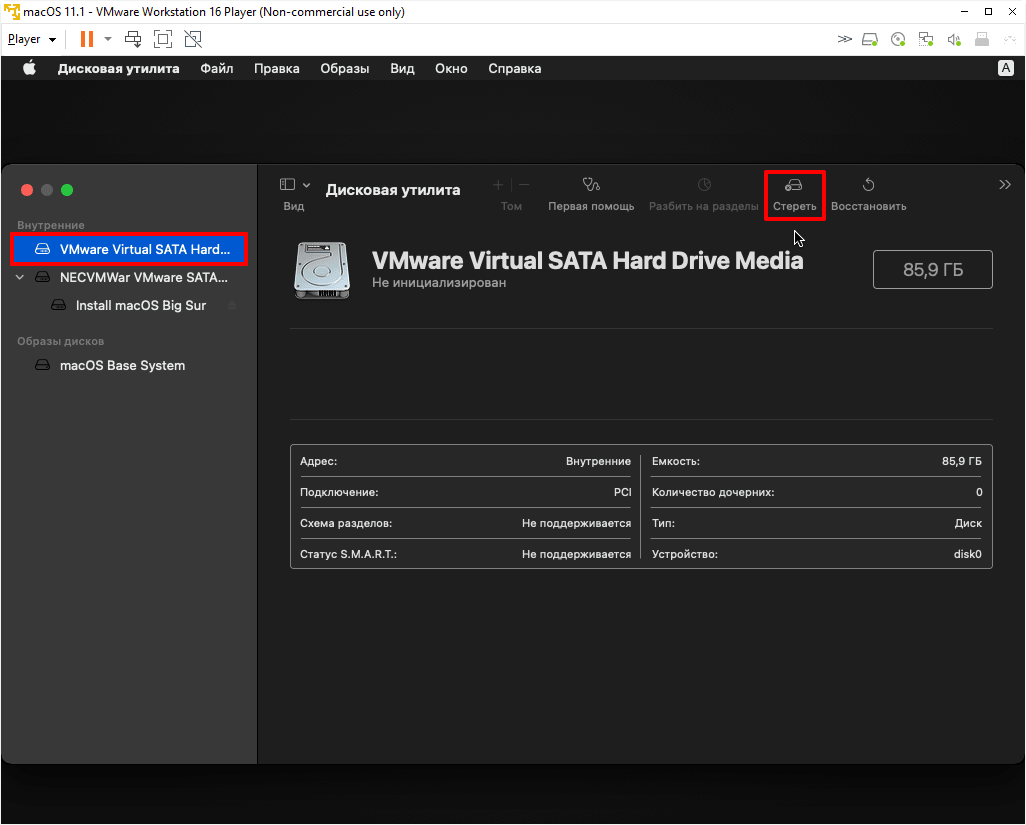
5.
Выберите виртуальный жесткий диск VMware Virtual SATA Hard Drive Media и нажмите Стереть:
-
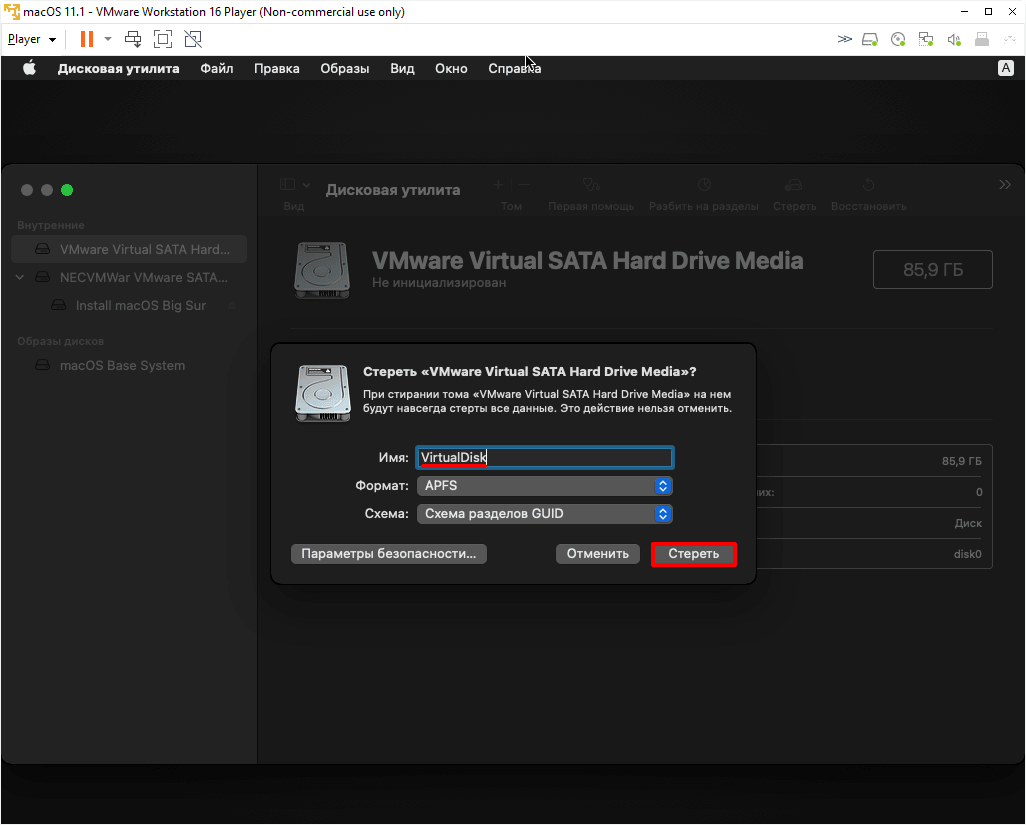
6.
Введите название диска и нажмите Стереть:
Запуск форматирования дискаДождитесь завершения процедуры и нажмите Готово.
-
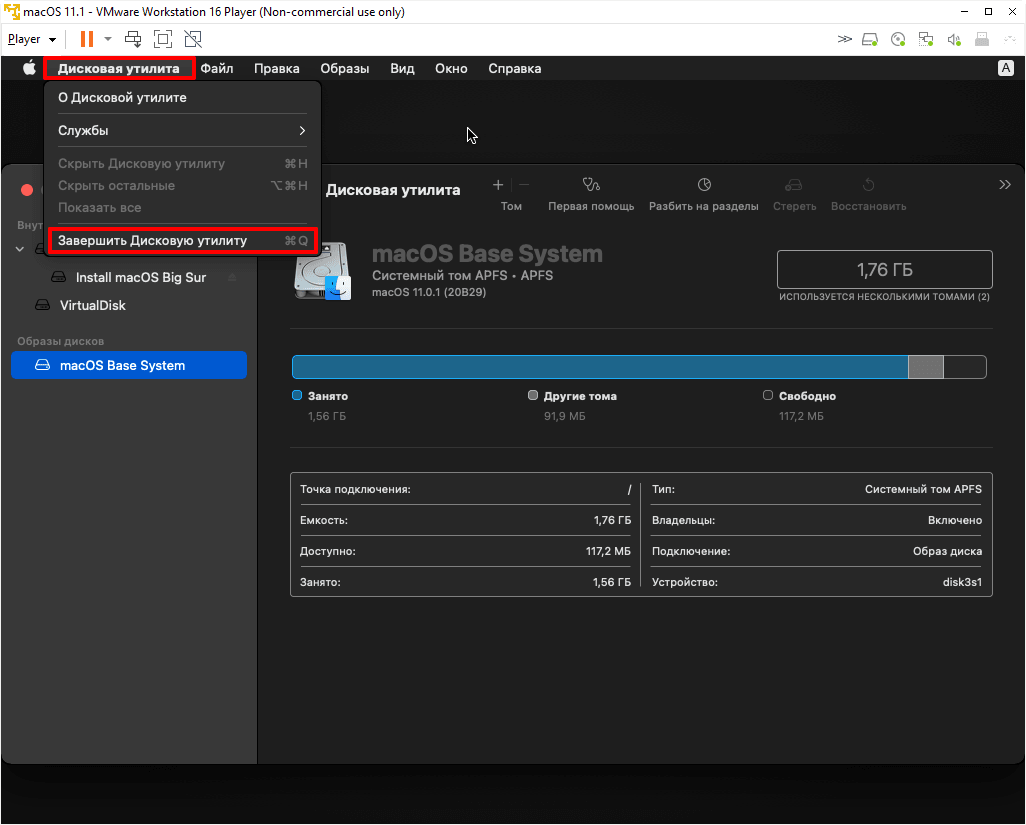
7.
После этого вверху страницы нажмите Дисковая утилита — Завершить дисковую утилиту:
-
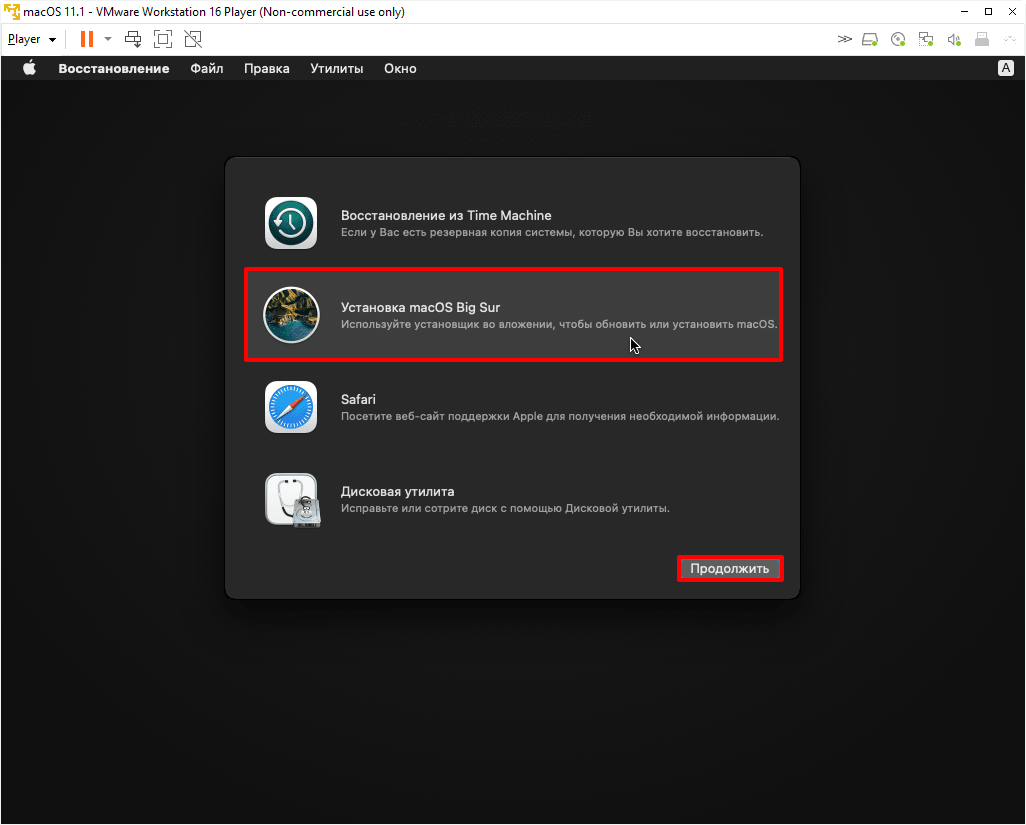
8.
Выберите Установка macOS Big Sur и кликните Продолжить:
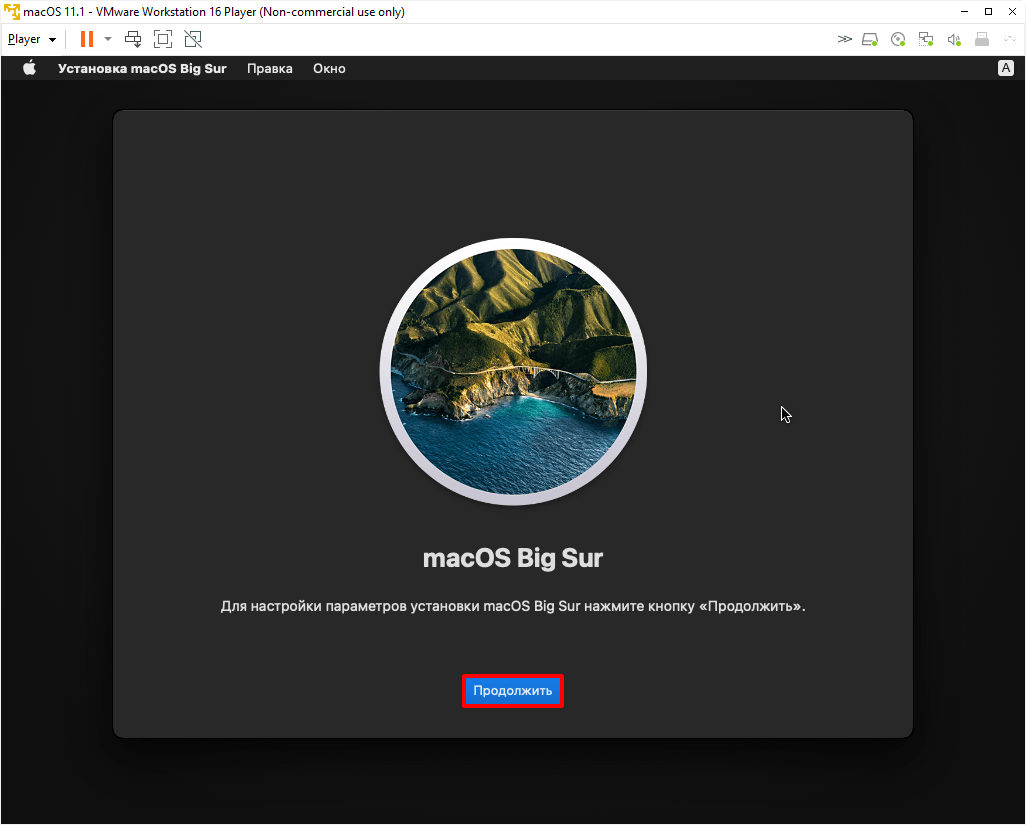
-
9.
Нажмите Продолжить:
-
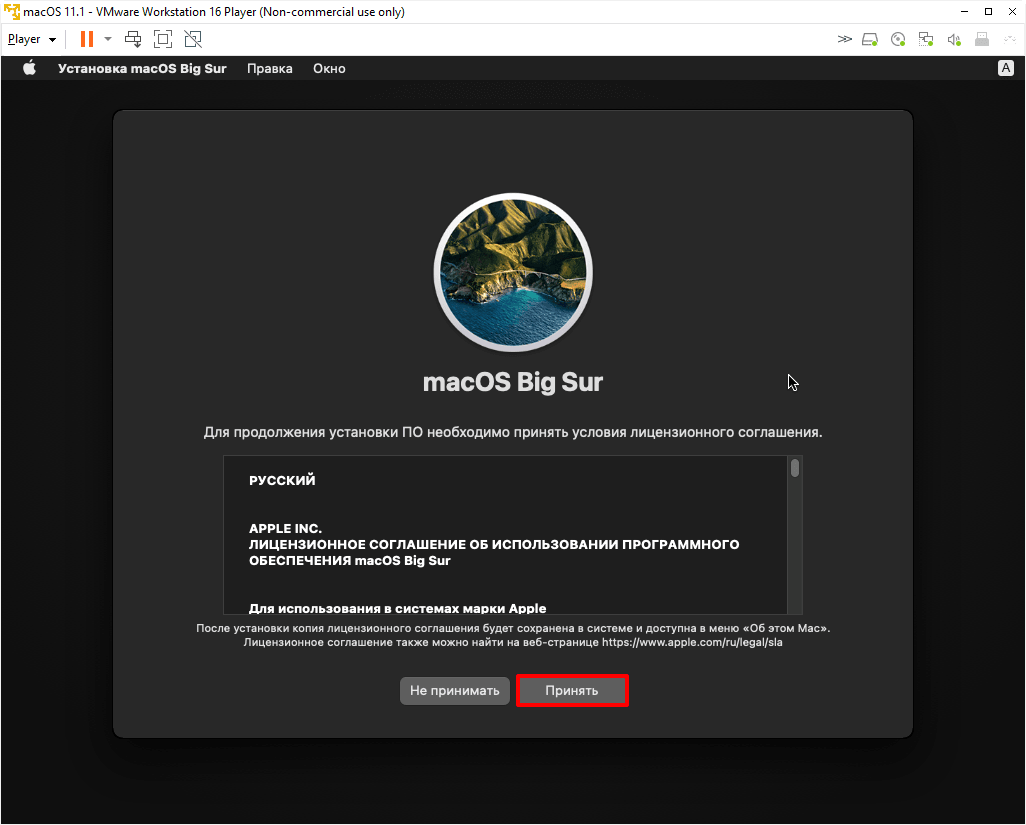
10.
Примите условия лицензионного соглашения:
Условия лицензионного соглашения macOS -
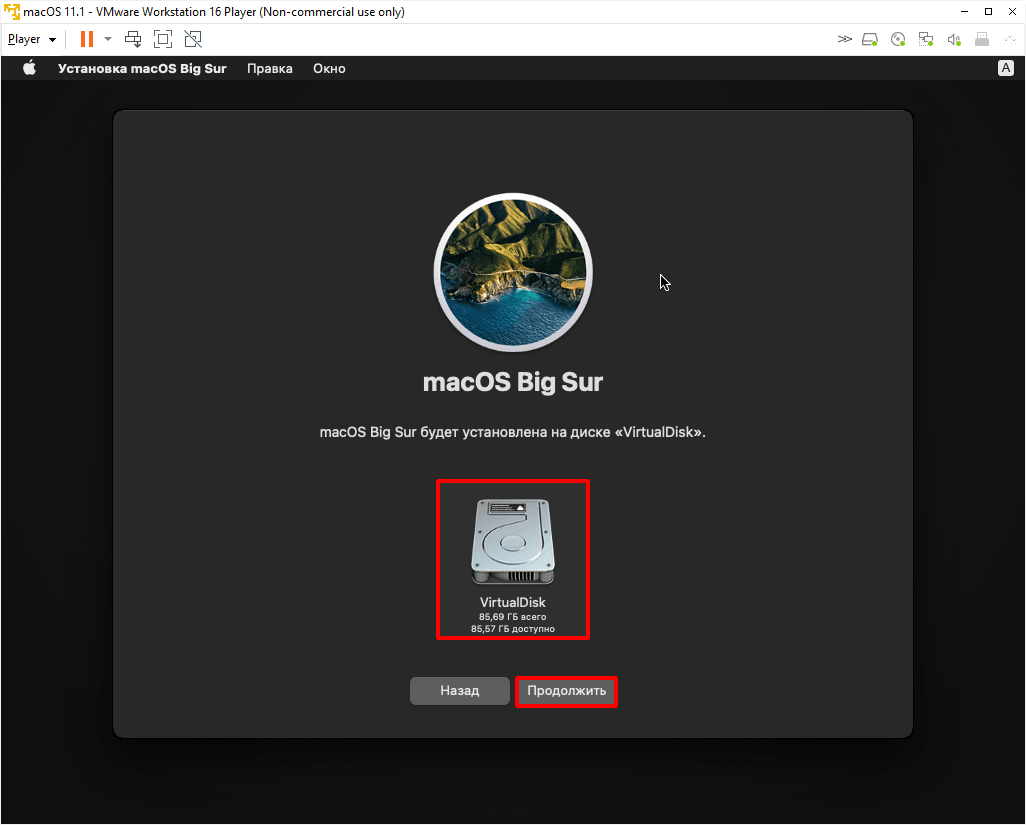
11.
Выберите диск, название которого вы указывали на 6 шаге, и нажмите Продолжить. На этот диск будет установлена ОС.
Выбор диска для установки macOS -
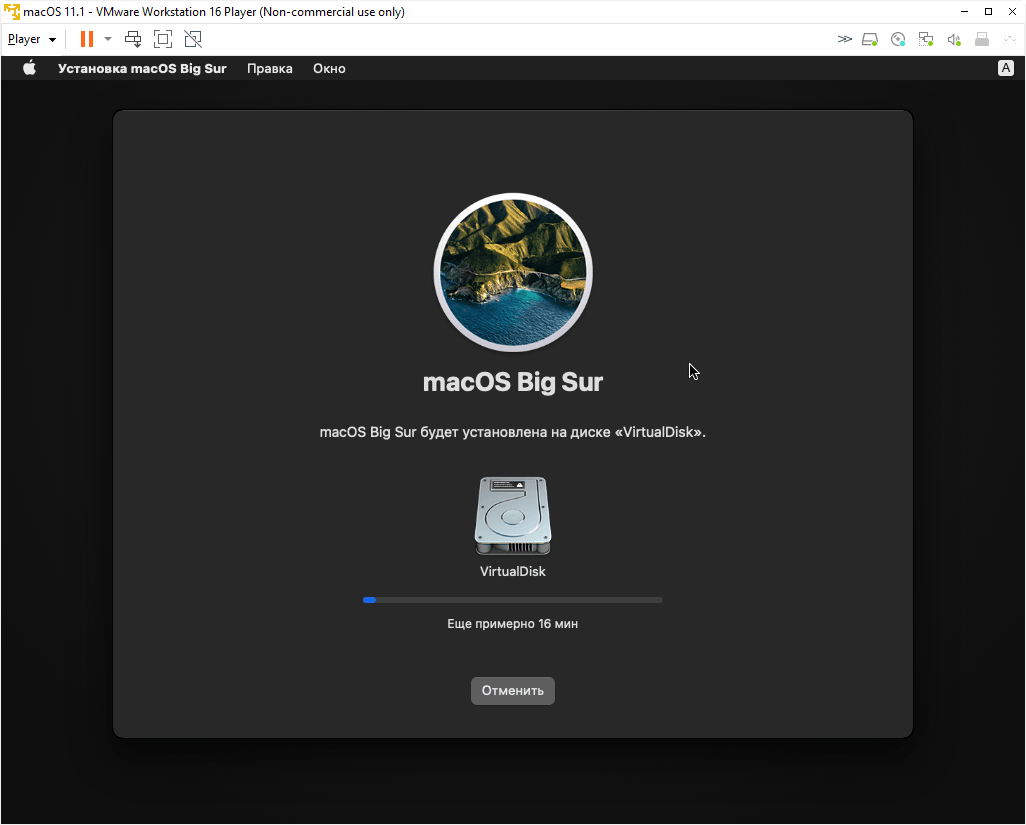
12.
Дождитесь окончания установки. Гостевая операционная система перезагрузится несколько раз:
-
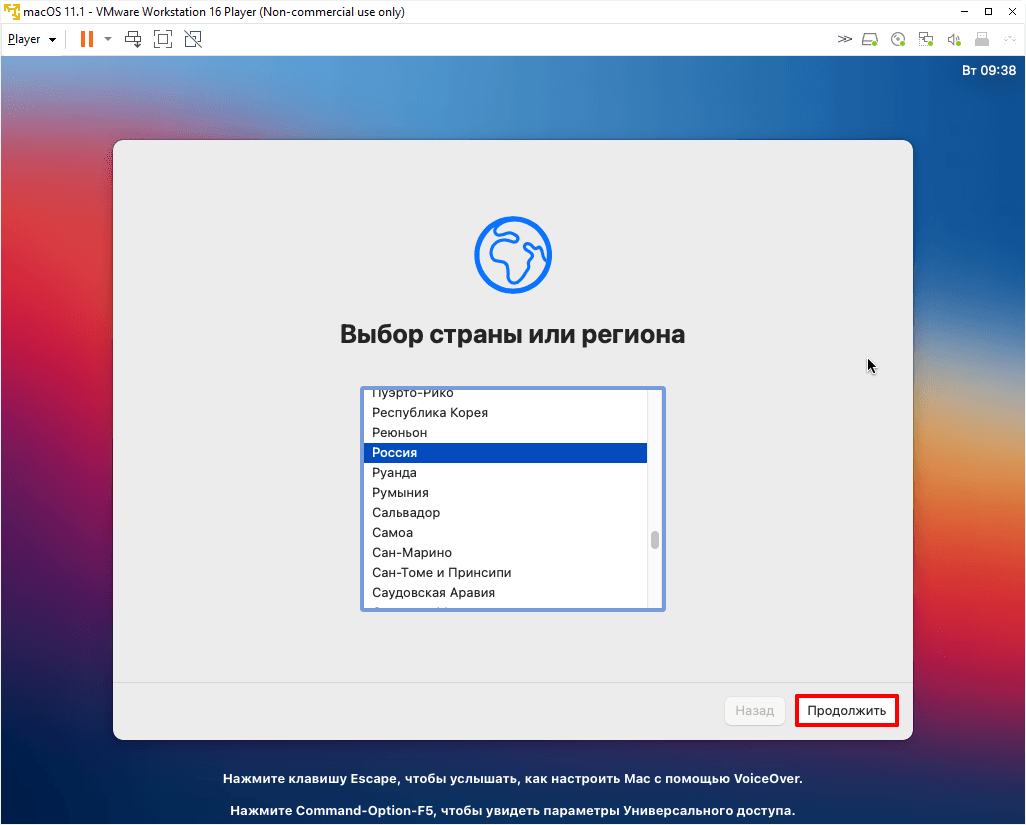
13.
Выберите регион и продолжите установку. Следуйте подсказкам системы:
-
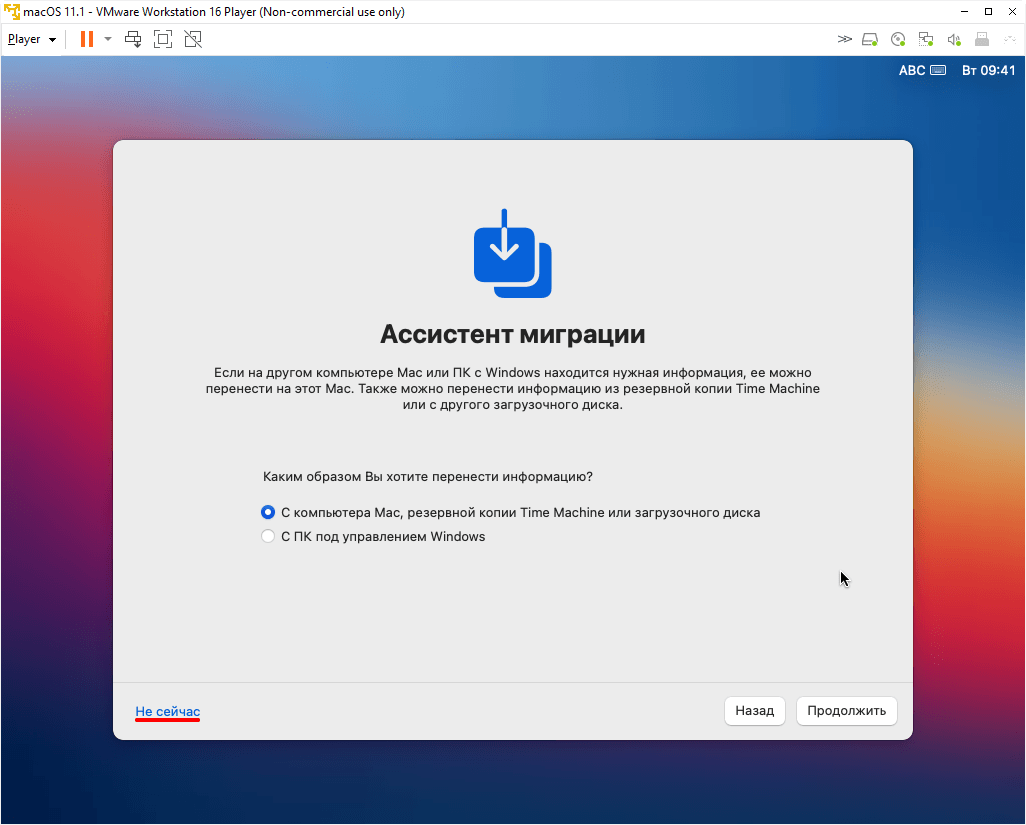
14.
На этапе «Ассистент миграции» в левом нижнем углу нажмите Не сейчас:
-
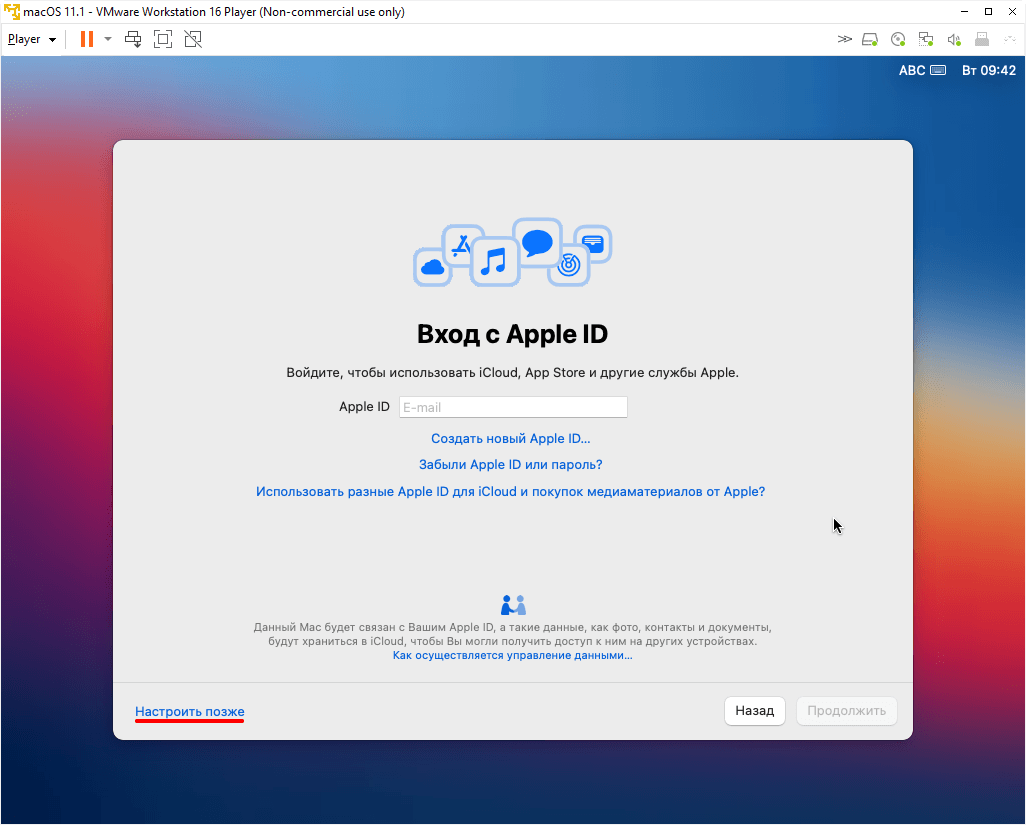
15.
Чтобы пропустить «Вход с Apple ID» нажмите Настроить позже в левом нижнем углу:
-
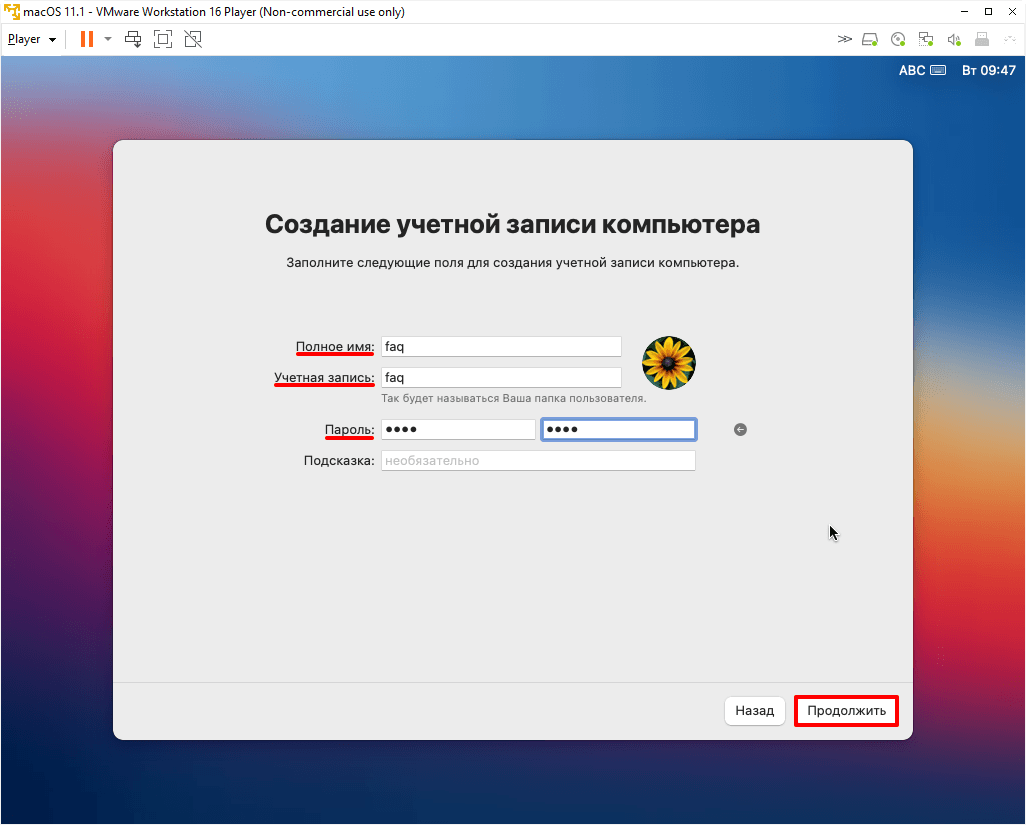
16.
Заполните поля, задайте пароль и нажмите Продолжить:
-
17.
Завершите настройку macOS, следуя указаниям на экране.

Готово, вы установили macOS на виртуальную машину VMware Workstation Player.
Помогла ли вам статья?
Спасибо за оценку. Рады помочь 😊
👍
§Введение
Запустить операционную систему macOS Mojave «поверх» Windows на ПК или ноутбуке можно с помощью виртуальных машин — программ, которые эмулируют работу одной операционной системы в среде другой. На этой странице содержится инструкция по установке полностью бесплатной версии одной из таких программ — VMWare Workstation Player. Работающая на виртуальной машине (далее — ВМ) macOS Mojave отображается как обычная программа для Windows — в окне или режиме полного экрана.
MacOS в качестве виртуальной ОС не предложит всех своих возможностей по техническим причинам и будет работать медленней, в следствие чего не способна оставить полноценные впечатления от своей работы. Но для поверхностного ознакомления с ОС от Apple такой способ установки вполне сгодится.
§Требования
- ПК/ноутбук на базе процессора Intel;
- более 40 Гб свободного места на жестком диске;
- программа Workstation Player Free: www.vmware.com/products;
- архиватор WinRAR (нестарый, чтоб не ругался на битый архив);
- образ macOS для ВМ: Catalina (Google Drive, пароль: Geekrar.com) / Mojave (Яндекс Диск);
- патч VMWare Unlocker: Github (unlocker.zip, 6.44 MB) / Google Drive (v2.0.8);
- базовый уровень английского языка и владения компьютером.
§Инструкция
- Установите VMWare Workstation Player (далее — VMWare).
- Распакуйте архив c Unlocker и запустите win-install.cmd от имени администратора. Таким образом в VMWare добавляется поддержка macOS.
- Откройте VMWare и нажмите “Create a new Virtual Machine”.
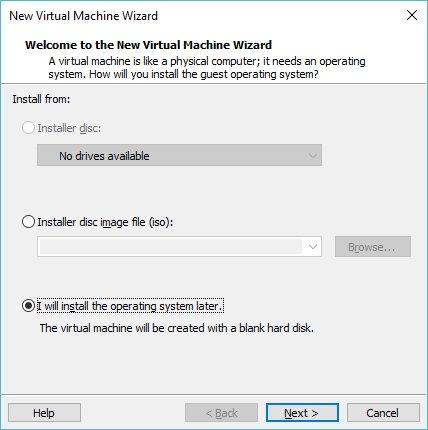
- Выберите “I will install the operating system later”.
- Выберите Apple Mac OS X версии 10.14 или просто нажмите Next
- Укажите папку, в которую будет установлена виртуальная ОС. Запомните ее путь.
- Откройте настройки созданной ВМ из начального экрана и удалите Hard Disk.
- Добавьте виртуальный жесткий диск: Add > Hard Disk > SATA.
- После выберите “Use an Existing Virtual Disk” и укажите путь к образу с macOS Mojave (большой файл с расширением vmdk).
- В параметрах диска советую выбрать “Store virtual disk as a single file”, как наиболее производительный вариант.
- Не забудьте выделить достаточное количество памяти для ВМ (>=50% от общей суммы ОЗУ компьютера и желательно не менее 4Гб).
- Нажмите OK и закройте VMWare, иначе при старте ВМ появится сообщение об ошибке. ⚠️
- Перейдите в папку ВМ и откройте файл macOS 10.14 с помощью блокнота. Это небольшой файл размером ~2 Кб. Вставьте туда последней строкою код:
smc.version = "0". Сохраните изменения. - Все, теперь можно запустить VMWare и начать установку macOS Mojave!
- Для того чтобы отказаться от входа в учетную запись Apple, нажмите на Set Up Later.
- По окончании установки, подключите VMWare Tools: Player > Manage > Install VMWare Tools. Через некоторое время на Рабочем столе должен появиться образ патча с установщиком.
- Установите VMWare Tools.
- Система безопасности macOS Mojave заблокирует VMWare Tools как неизвестное расширение. Зайдите в настройки ОС (значок шестеренки), далее в раздел “Security and Privacy” и разблокируйте патч кнопкой Allow.
- Перезагрузите ВМ. Возможно, потребуется сделать это несколько раз.
Готово! Теперь macOS Mojave должна работать на Windows как виртуальная ОС! 😊

§Советы
- если интерфейс macOS Mojave будет слишком крупным, в режиме работающей ВМ зайдите в настройки VMWare: Player > Manage > Virtual Machine Settings > Display и уберите галку с Display Scaling.
- для локализации интерфейса откройте System Preferences > Language & Region, затем добавьте язык в Prefered Languages и сделайте его первым в списке.
Table of Contents
In this post, we’ll install macOS Mojave on VMware on Windows PC. Also, in our previous article: Install macOS Mojave on VirtualBox on Windows PC. If you are looking for an alternative to VMWare, you can check the above guide out.
Installing Mojave isn’t tricky but requires VMware Unlocker Patch Tool or macOS Unlocker for VMware. This VMware Unlocker Patch Tool for macOS Mojave will Patch VMware for making the macOS Mojave installation work. So we’ve provided the macOS VMware Patch Tool and installed it here.
Although Apple may not support manual installation, it is still feasible to use virtualization applications such as VMware. By utilizing this software, you can operate the entire system within Windows without the need to purchase an additional device or restart every time you want to run it, unlike with dual-booting. The procedure for installation is relatively simple with VMware. If you are familiar with or have prior experience using it, there is no need to be concerned. Just download the Mojave Image and VMware, install both, and you are good to go. As a result, you can generate a virtual machine (VM) and run Mojave after it has been installed. With that, you can enjoy installing and exploring Mac apps like Xcode.
- Related: How to Install Xcode on macOS Mojave on Windows
Upon installation, you will have access to essential tools, including the internet adapter, USB controller, drag & drop functionality, and more. Additionally, you may have several inquiries, which will be addressed during the installation process. This article will guide you through the steps required to install macOS Mojave on VMware on your Windows PC. The process is well-documented with clear instructions and visuals to ensure that you are not alone. Let us begin by breaking down the steps for installing macOS Mojave on VMware on your Windows PC.

Install macOS Mojave on VMware on Windows PC
Apple has a long-standing practice of restricting new software or updates to older Apple devices. This has been the case for Macs for many years, and it remains so. However, when it comes to installing on a Windows PC, there are no such restrictions. This means that regardless of whether you have an old or new PC with any version and edition of Windows, you can download and install macOS Mojave on VMware on your Windows PC.
Let’s proceed with the installation of macOS Mojave on VMware on a Windows PC.
Download Necessary Files to Install macOS Mojave on VMware
- Download macOS Mojave VMDK.
- VMware Workstation/VMware Player
- macOS VMware Unlocker Patch Tool
Now, use this guide to to install macOS Unlocker For Vmware Patch Tool
Before you start, you’ll need to look for a few settings in your computer’s BIOS. When you boot into your computer BIOS, watch out if you’ve enabled Virtualization options (VTx). If you haven’t, go ahead and enable it. You can see this video tutorial:
Watch out if the Intel VT-x hardware acceleration options are enabled from the BIOS.
Related: Download macOS Mojave ISO For VMware & VirtualBox
Step 1: Install VMware Workstation on Windows
After downloading VMware Workstation/Player, it’s time to install it. From the VMware files, click setup.exe to launch the installation wizard. Proceed with ordinary installation steps, and you’re good to go.

When you finish the installation, click Finish on the wizard to close up. When installed, don’t launch it (Otherwise the next step won’t work).

Step 2: Install VMware Unlocker Patch Tool
Normally, there is no provision for selecting macOS during installation due to the fact that VMware does not support it, and it is prohibited. This is where the macOS Unlocker, also known as the VMware Unlocker Patch Tool, comes in handy. The VMware Unlocker Patch Tool has been designed to eliminate the restriction on macOS X (Server) and patch files to enable macOS to function on VMware Workstation or Player with ease.
Download VMware Unlocker Patch Tool for macOS
- Close VMware if it’s open and run the VMware Unlocker Patch Tool.
- Navigate to the VMware Unlocker Patch Tool files and right-click on win-install and Run as administrator. It will simply run commands in the command prompt to patch relevant files in VMware.

Step 3: Create a New Virtual Machine
Now it’s time to do a little configuration.
Open VMware Workstation Player. When you see the home page, click create a new virtual machine or press Ctrl + N.

Select the Custom (advanced) option on the wizard creation and click Next.
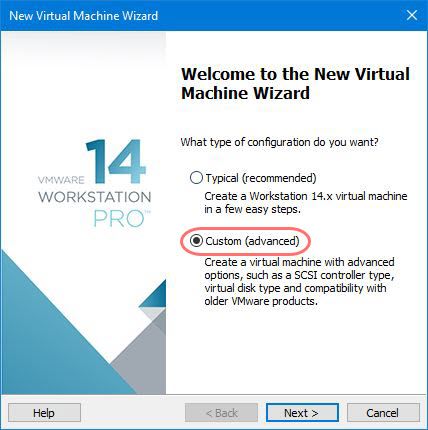
Here you’ll see hardware compatibility and limitations for the virtual machine simply Next to it.

Now select I will install the operating system later and click Next.

For the operating system, choose Apple Mac OS X from OS selection, and for version, select the latest version (10.14) if available. If not, select the previous version (10.13). It will work too, then click Next.

Name the virtual machine whatever you would like to and specify the location where to store the virtual machine files, then Next.

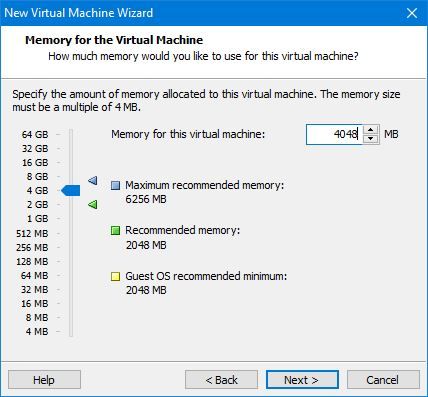
The processors are a significant part of a virtual machine, set up 50% – 75% of your system’s CPU.
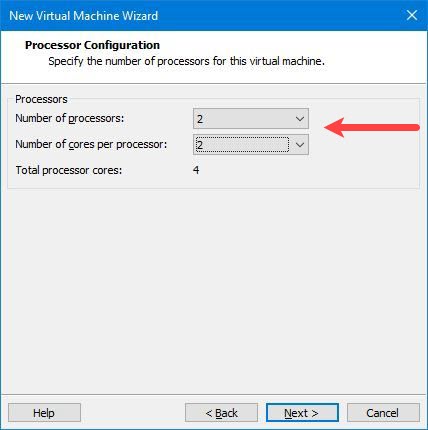
For memory, I’d like to set 4GB RAM for the virtual machine. That’s about 50% of my laptop memory. Make sure you set 50% – 65% of your system’s memory for the VM. I have 8GB of RAM in total, so I have used 4GB for the virtual machine.
By default, NAT will be selected. That’s okay, just Next.

On this page, you don’t have to make any changes, simply click Next.

Continue through the process and click Next.

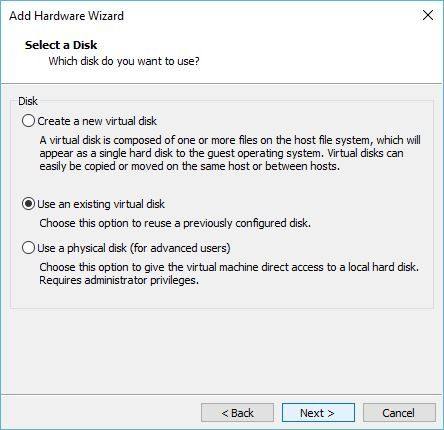
In the disk selection, select Use an existing virtual hard disk and follow Next.

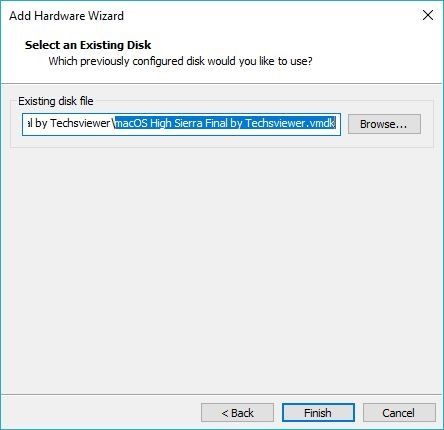
Next, browse the macOS Mojave Image (VMDK) that you downloaded, then click Next.

At last, you’ll have the summary of the virtual machine creation, if you wish to make changes, customize hardware to change one, and if everything seems ok, hit Finish.

Step 4: Insert VMware Code in the Virtual Machine file
When the virtual machine is configured, you must tweak this to insert code into the macOS VMX file. Now, navigate to macOS virtual machine files and open (macOS Mojave).vmx file with Notepad.

At this window, copy the code from below and paste it at the end then save it.
Smc.version = 0

Step 5: Install macOS Mojave on VMware Workstation
And you’re done with the configuration, and you’re ready to install macOS Mojave on VMware.
Navigate to the VMware Workstation and start the virtual machine with Power on this virtual machine.

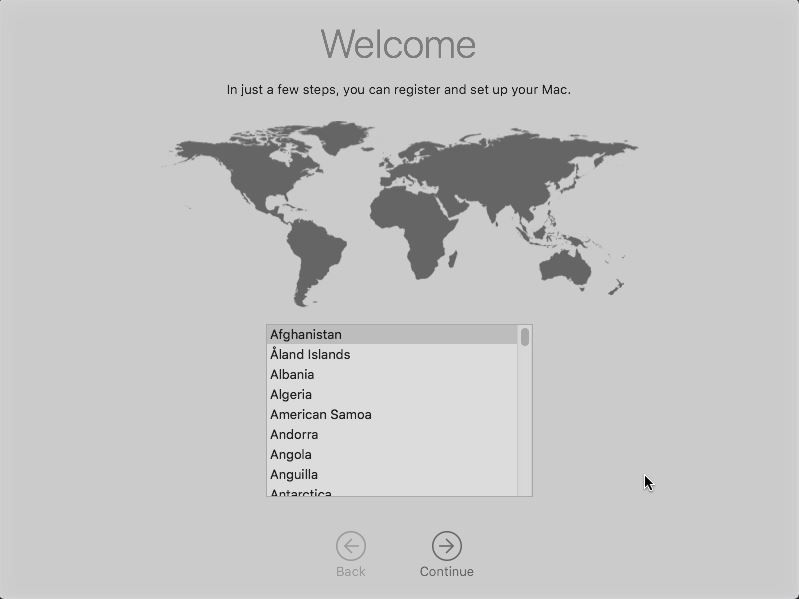
As it starts up, the Welcome screen will appear (It’ll take some time to boot, depending on your configuration). Select your location and Continue.
If you encounter some error that shows,” This virtual machine requires AVX2, but AVX is not present. This virtual machine cannot be powered on.” Here’s how to fix it in a moment: How to Fix This virtual machine requires AVX2 but AVX is not present
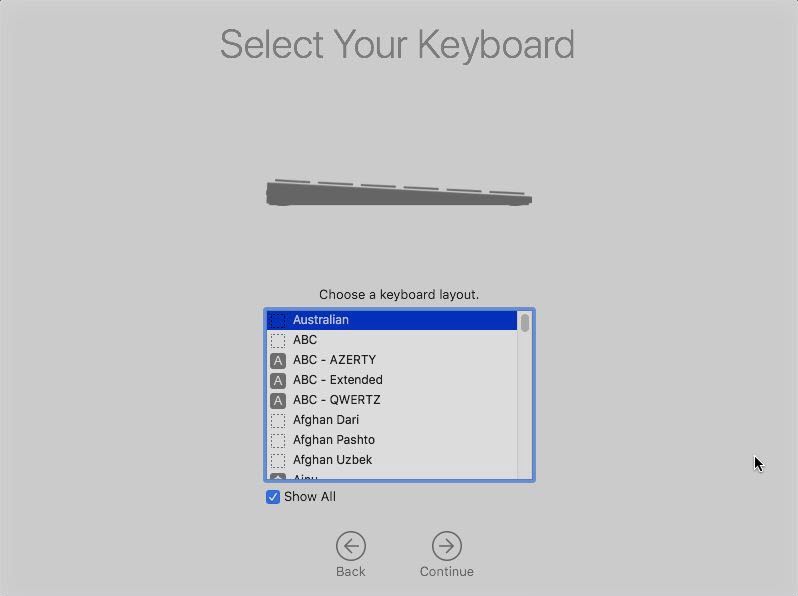
Next, select your keyboard. If it’s not there, click Show All to choose your keyboard from the list. When you’re done, click Continue.
Click Continue.

Yes, you have the option to transfer information from your Windows PC, but that’s not recommended since you’re not going to use this as your primary computer, don’t do that. When selected, click Continue.

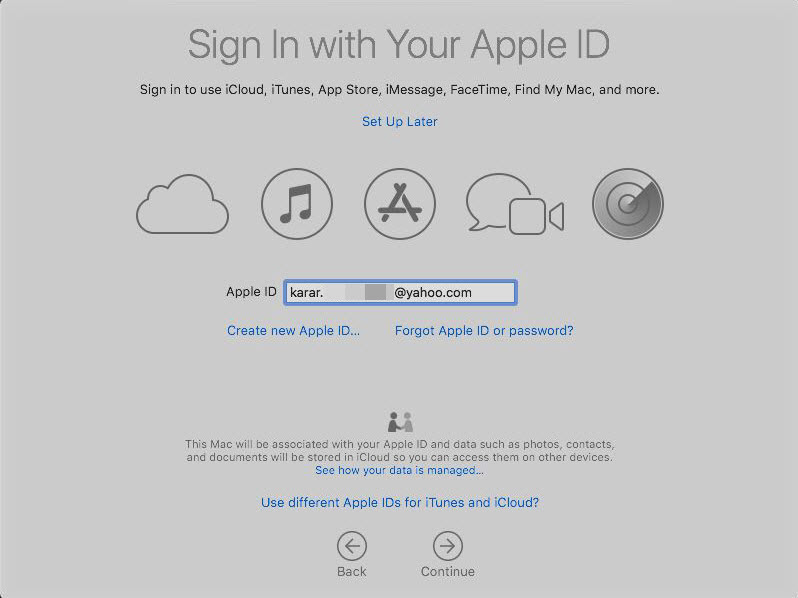
Sign in with your Apple ID if you have one. If you’re a newbie, click on the Create New Apple ID to create one. Alternatively, you can sign in later any way you want. Whatever you choose, Continue it when finished.
To make things work, the virtual machine is automatically connected to the internet as you configured.
To Agree to the Terms & Conditions, tap on Agree.

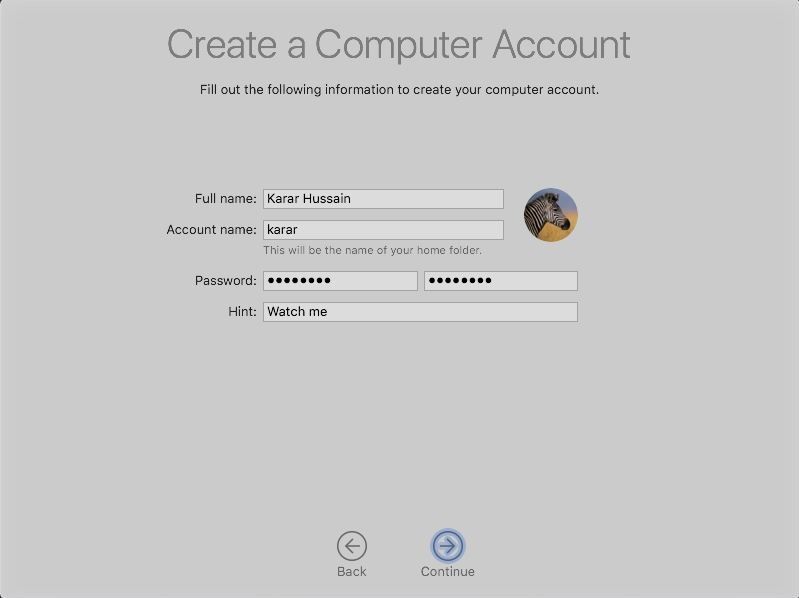
Apparently, you’ll need to create a local computer account, simply enter your details into the blanks and Continue.
The express setup will enable Maps – Location – Find my Mac and more. If you wish to customize and enable only those you want, you can do that. Just hit Customize settings to allow the services you want.

If you chose to customize settings, you’d be asked for every single service for enabling — At the first screen, you’ll be asked to enable location services, as here I don’t allow location services. Simply Continue.

Similarly, you’ll be asked for some essential services. You can easily choose to enable or disable it.
After you continue, you’ll witness the favorite part you were definitely waiting for. I guess you’d probably want to try the new look — Dark Mode. Otherwise, you could change it later. Just Continue.

Yay! Eventually, you’ve done it — You’re into macOS Mojave.
If you want, you can follow this guide: How to share folders on VirtualBox & Vmware? (Windows-MAC) Step by Step Guide

Install VMware Tools on Virtual Machine (VM)
When you’re done with the installation, you probably wanted a full screen instead of the black screen at your edges. Luckily, there’s a perfect tool for that — That will exceptionally provide extra valuable features such as full-screen resolution, sound, drag & drop, and more. The steps are here on how to do it.
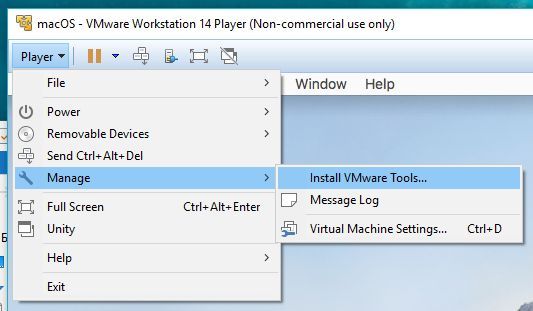
Go to VM > Install VMware Tools and wait to pop up on the screen.
When you’re prompted to Install VMware tools, double-click on it.

On the Introduction page, click Continue. On the next screen, Continue to install for all users of this computer.
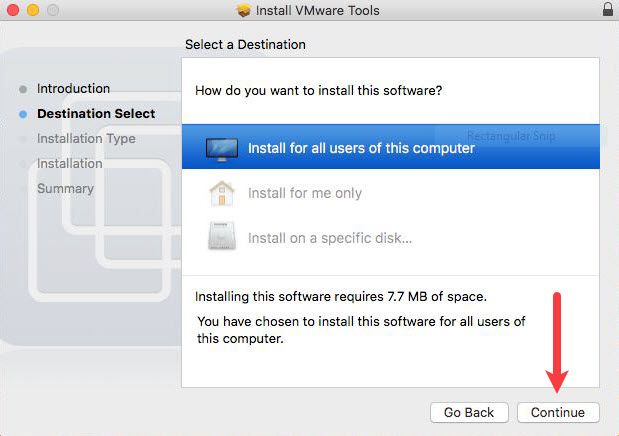
Hit Install to perform the installation on the currently available disk for all users.

In meantime, you may be asked for your account credentials; enter them correctly, and click Install.
When the installation is finished, click Restart to complete the installation.

When the macOS reboots completely, you should have perfect resolution covering the entire screen. Here is a glimpse.

If you see a System Extension Blocked error, you can fix this.

Navigate to Settings > Security & Privacy > On this page, watch out for “ System software from the developer was blocked….“ at the end and click Allow. This will let you install VMware Tools when you run.
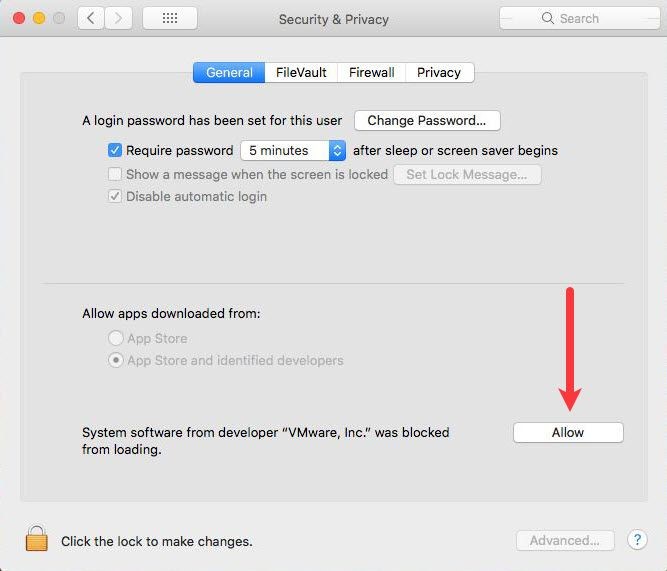
Once you allow, there won’t be any restrictions, repeat the VMware tools installation, and this time, it’ll likely work.
Finally, you’ll have macOS Mojave running perfectly on your Windows PC. Everything should work fine with sound, display, internet, and everything else.
If you want to update macOS, however, you can. Since the Mac is already enrolled in the Apple developer program, it will receive the newest updates. To update, head to Settings > Software Update > Click Update to begin downloading the update.

When the download is completed, you’ll be asked for a restart, click Restart, and the update will be installed once restarted.

And congrats! You have the latest macOS Mojave 10.14 beta three on your PC with its superb features.

Create a Snapshot of macOS Mojave (Optional)
Regarding backup in VMware, a snapshot is a tool you’d prefer. Bad times can come anytime, but you’ll be in big trouble if you aren’t ready for them. What’s a better idea than performing a backup before something happens wrong? That’s where snapshot comes in handy. Simply put, a snapshot is a useful VMware tool that creates a copy of the virtual machine files to back up and protect everything.
- Related: How to Take Snapshot of macOS Mojave on VMware
Perhaps the trick is simple if you would like to create a snapshot.
In VMware, go to VM > Snapshot > Take Snapshot.

Next, name the snapshot and add a description if you’d like to, then click Take Snapshot to begin the process.

It will create a snapshot of the virtual machine within a minute, wait!

Once the snapshot is created, you can find it in VM > Snapshot > “Snapshot Name” like I saved the snapshot by the name of New Snapshot, and for restore click on it.

By this snapshot, you’ve, just like the shield, doubled the life of your sweet macOS. This potential recovery option will be when the machine fails to boot or any other issues. Now you’re completely safe and guaranteed.

That’s pretty much all there is to it. So, you’re free to install apps or do whatever you’ve in mind. If you experience slow performance or wanted to boost, reserve 50 – 60% of your PC’s memory and CPU (Processors) for the virtual machine.
If you have problems and errors out here, you can check for solutions we’ve listed and answered.
- Fix macOS Mojave Problems on Virtual Machine
Want to create a bootable installer, here’s how to do it quickly.
- Create Bootable USB Installer for macOS Mojave
Well, that’s all about how you install macOS Mojave on VMware on your Windows PC. I hope your questions have been answered. If not, let me know in the comments.
As part of the macOS on Windows series, we provide the download link of the macOS 13 Venture VMware pre-installed VMDK image in this guide. We installed the public beta version of macOS 13 (as of Aug 2022), updated the software on the VMware workstation 16 with Windows 11 host and uploaded the image for you.
It is difficult to download the beta or the final version of macOS from Apple’s official site in DMG format and install it on VMware or VirtualBox with Windows Operating Systems.
Many steps are involved in installing a vanilla version of macOS on a Windows PC. You can eliminate extra complex steps by downloading this pre-installed VMware disk image file (VMDK). By the way, this installation is from the original macOS DMG file, a vanilla version that can be upgraded in the future.
Things you Need to Have:
The requirements for macOS 13 are slightly higher. Even the requirements for Apple hardware increased. Your MacBook laptops and iMac model should be from 2017 or later. So, it is highly recommended to have a powerful Windows computer with SSD to make this image usable.
- i5 or i7 processor
- More than 4GB RAM for guest VM.
- SSD or NVME disk
- Decent display card
- Latest VMware workstation or Player
- VMware unlocker
- The pre-installed image (Download link below)
- Install the latest VMware Workstation Pro or VMware workstation Player on your Windows 11/10 computer.
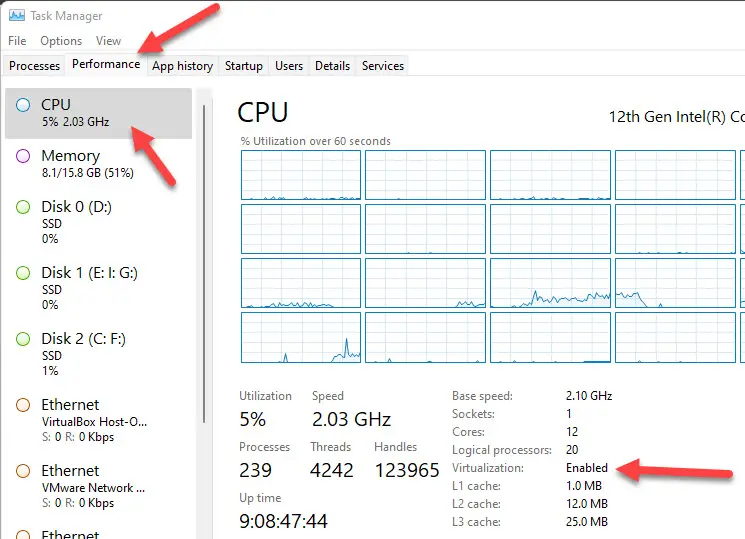
- Enable and verify the VT-x (Virtualization Technology) on your computer. You can find more information about enabling VT-x on an Intel PC here.
Open the task manager and click on the ‘CPU’ section under the Performance tab. You must see ‘Virtualization: Enabled’ to confirm that VT-x is enabled and detected on your computer.
- Download the unlocker and patch the VMware workstation. This step unlocks the support of macOS VMs as guest virtual machines on Windows host computers. You can find more information about VMware unlocker here.
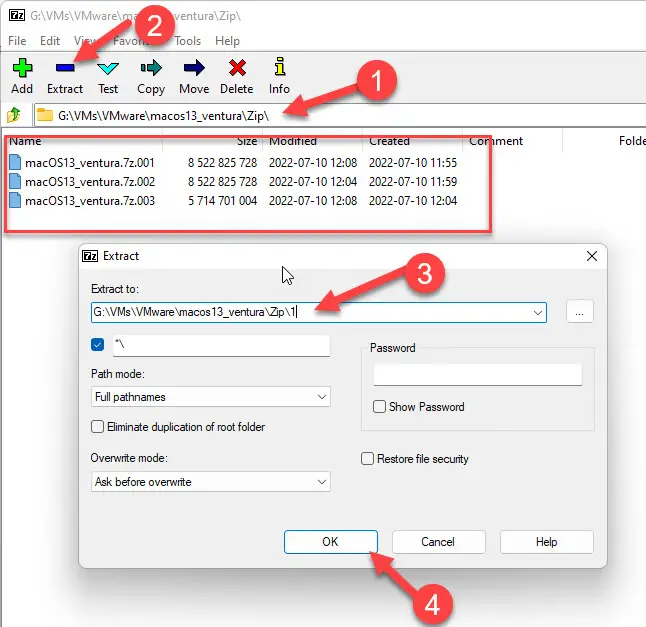
- Download the macOS 13 pre-installed VMware VMDK file. Since the actual VMDK file is around 29 GB. We split and zipped the file to distribute efficiently.
Download the below 3 parts of the files:
File 1: macOS 13 VMware image
File 2
File 3
You must have the 7Zip program to unzip and recombine the files.
- Make sure you downloaded all 3 files and kept them in the same folder.
- Open the 7Zip program and browse the folder with all 3 files.
- Click ‘Extract’. It will ask for the output folder. You can extract it inside the same folder or a new folder. Click OK to begin the process. Highly recommend extracting the files to SSD or NVME disk.
- Successful extraction and reassembling of 3 7z files will give an output of a VMDK file.
Configure the macOS Virtual Machine on VMware Workstation
I assume you have the latest VMware workstation or Player on your computer. Also, you already know how to install VMware products and create a virtual machine on it. Not every step in creating and modifying VMs are not mentioned below.
- Create a new VM now. If the VMware unlocker is patched successfully in earlier steps, you should be able to select macOS 13 as a guest VM on your Windows 11 computer. If macOS13 is unavailable, you can select the latest version, like macOS 11.1.
- Allocate a minimum size and the ‘Split virtual disk’ option in the new disk creation option. Even though we will not use this new virtual disk, we must proceed with this step.
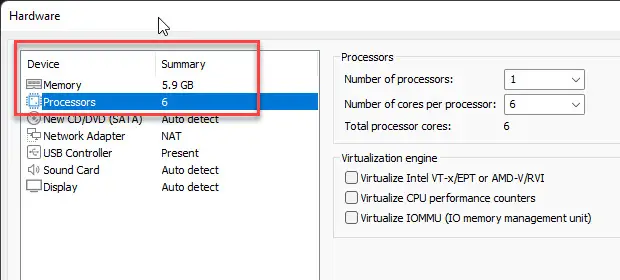
- Click on the ‘Customize Hardware’ option at end.
- Change a few settings, like increasing the processor cores and RAM size. I configured 6 cores and 6GB RAM.
- Click OK and finish the VM creation steps.
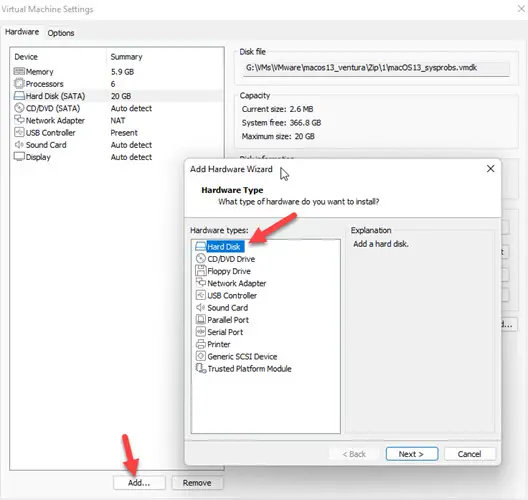
- From the VMware workstation home screen, open the virtual machine settings.
- We must remove the newly created VMDK file and attach our pre-installed macOS 13 VMDK file.
Click on Add, then select the ‘Hard Disk’. Select the ‘Use an existing virtual disk’ option and browse the VMDK file we extracted
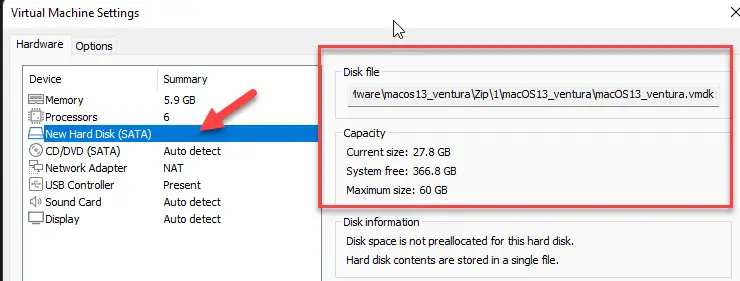
- Once the disk is added successfully, delete the new blank disk created while setting up this new virtual machine. So, the hard disk option should look like the one below.
Modify the VMX File
There is another critical step to do before powering on the virtual machine. We need to do these steps for proper network/internet and fix some booting issues inside the macOS 13 virtual machine.
- Close the VMware workstation completely and locate the virtual machine’s VMX file you created. It will be available in the folder you selected while creating the VM.
- Right click on the file and open it from any text editor like notepad.
- Add the following key at the end of the file.
smc.version = “0”
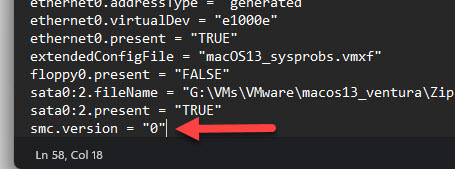
Also, search for this entry: ethernet0.virtualDev
Modify it to vmxnet3
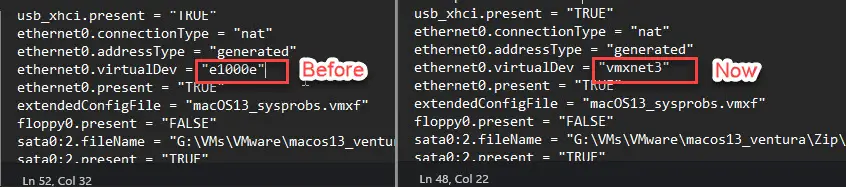
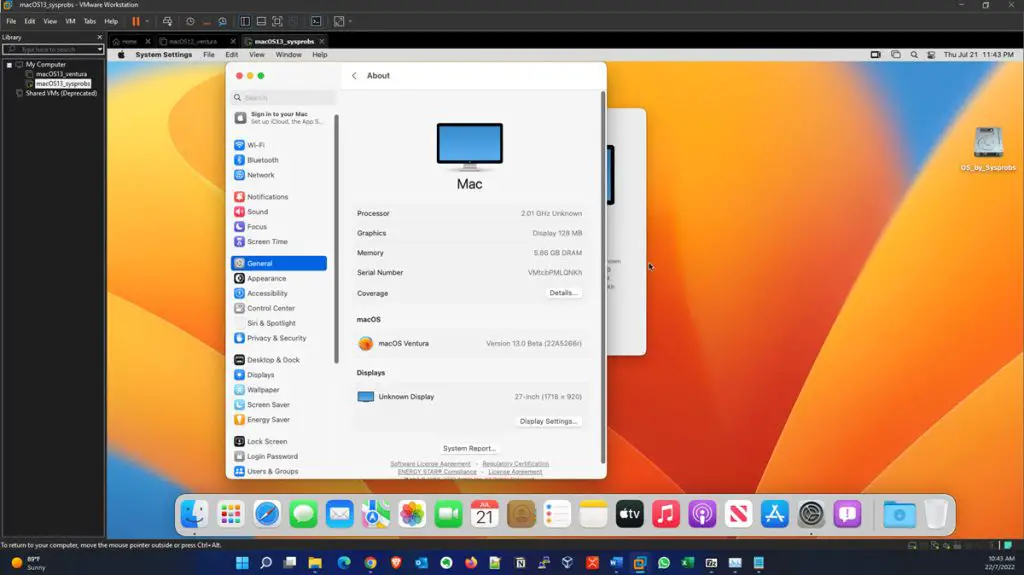
- Save the file and close it. Open the VMware and power on the macOS 13 Ventura VM now.
- The virtual machine will boot without any issues. Since we already installed the VMware tools for macOS 13 Ventura in this pre-installed image, you will get the maximum screen resolution with a good display experience.
- The password for the Sysprobs user account is: sysprobs123
- You should land on the macOS Ventura desktop smoothly. The performance inside the VM will not disappoint you if you have provided enough RAM and processor cores. It is pretty enough to navigate the new macOS and its new features. It is worth trying this method for learning and experimenting on a Windows computer without buying the real Apple hardware.
It is recommended to take a snapshot before you make any changes.
Can I update macOS on VMware?
Yes, you can update the macOS on VMware running on the Windows OS platform. The macOS version should be with a vanilla kernel without heavy Hackintosh modification. This will allow the macOS virtual machine to get updates from Apple’s site online. Also, you can do the manual update.
How to Change the Beta MacOS to the Final Public version?
You can do the online update when the final public version of the macOS is available. Also, refer to this guide to switch the beta to the final version in system settings.
Can I update the Big Sur (macOS 11) to Ventura (macOs 13) in VMware?
You can update Big Sur to Ventura online or manual update inside the VMware workstation. Make sure your physical computer has enough resources for this upgrade. It is also advisable to run the latest VMware unlocker and tools to make this upgrade perfect.
Can I run macOS 13 on Windows 7?
You can run macOS 13 on Windows 7 by using a VMware workstation on a VMware player as a virtual machine mentioned in this guide. Ensure your Windows 7 has the latest and most powerful PC configuration that meets the system requirements of macOS 13.
The above methods apply to Linux host operating systems also. As long as you have exemplary hardware configuration and the latest VMware Workstation 16 (or later), you can use macOS 13 on Linux like Ubuntu, Fedora, Mint etc.
- 1
- 2
- 3
- 4
- 5
- Категории: Apple Хакинтош
- Рейтинг материала: 1.8
- Количество голосов: 5
- Добавил материал: барбос
- Дата добавления материала: 19.02.2023 — 18:08
- Количество просмотров: 1839
- Количество загрузок: 316
- Комментариев к материалу: 3
- Общий размер файла: 36.86 GB
Скачать macOS Ventura 13.2 + Xcode 14.2 (Образ для VMware)
36.86 GB
535 | 10
Год выпуска: 2023
Версия: macOS Ventura 13.2, Xcode 14.2
Разработчик: Apple Inc.
Сайт разработчика: http://www.apple.com
Платформа: Intel, на AMD не пробовал
Язык интерфейса: русский + английский
Таблетка: Unlocker для VMware Player
Системные требования: VMware Workstation Player 16.2.5, 17.0.1 и более новые версии, 8Gb Ram, 90Gb, SSD
Описание:
Ventura делает вашу ежедневную работу на Mac еще удобнее благодаря значительным обновлениям, реализованным в часто используемых приложениях, таких как «Почта»
Свежая версия cистемы с последним на данный момент Xcode.
Пароль для user — 123qwe
Установлен VMware-Tools, Homebrew, mc, htop.
Рекомендуется установить минимум 8Gb оперативной памяти, запускать образ с SSD-диска.
Установка
Установить VMware Player (лучше с расширенным драйвером для клавиатуры, при установке можно будет выбрать). Можно выбрать бесплатную версию. Перезагрузиться.
Запустить от администратора win-install.cmd (из Unlocker, входит в раздачу)
Распаковать архив с macOS 13.7z
Остановить раздачу (либо скопировать распакованный большой файл и другие маленькие в другое место, в котором и будете запускать виртуальную машину)
Снять атрибут Только чтение со всех файлов (если он проставлен)
Запустить VMware Player
Выбрать Открыть виртуальную машину и указать macOS 13.vmx
При необходимости можно установить больше процессоров (по умолчанию стоит 4, но мне маловато) и оперативной памяти.
Нажать Play — VMware спросит про настройки — нажать I copy it
Если очень тормозит — то попробовать применить Hyper-V Switch.exe при выключенной виртуалке.
Комментарии: 3
Порядок вывода комментариев:
Сначала установил, запустил, но крашилось при загрузке. Почитал описание, не забудьте распаковать архив из tools и запустить win-install. Всё работает прекрасно. Спасибо!!

барбос | Дата: 09.07.2023 — 20:59
Да пожалуйста. 
![]()
123123 | Дата: 29.05.2023 — 18:11
kakak