There are multiple ways of installing IPython. This page contains simplified installation
instructions that should work for most users. Our official documentation
contains more detailed instructions
for manual installation targeted at advanced users and developers.
If you are looking for installation documentation for the notebook and/or qtconsole,
those are now part of Jupyter.
I already have Python
If you already have Python installed and are familiar with installing packages, you can get IPython with pip:
I am getting started with Python
For new users who want to install a full Python environment for scientific computing and
data science, we suggest installing the Anaconda or Canopy Python distributions, which provide Python, IPython and all of its dependences as well as a complete set of open source packages
for scientific computing and data science.
-
Download and install Continuum’s Anaconda or the free edition of Enthought’s Canopy.
-
Update IPython to the current version using the Terminal:
Anaconda:
conda update conda
conda update ipython
Enthought Canopy:
Downloads
You can manually download IPython from GitHub or PyPI. To install one of these versions, unpack it and run
the following from the top-level source directory using the Terminal:
|
win-64/ipython-notebook-4.0.4-py35_3.tar.bz2
main
|
win-64/ipython-notebook-4.0.4-py35_3.tar.bz2
main
|
win-64/ipython-notebook-4.0.4-py34_3.tar.bz2
main
|
win-64/ipython-notebook-4.0.4-py34_3.tar.bz2
main
|
win-64/ipython-notebook-4.0.4-py35_1.tar.bz2
main
|
win-64/ipython-notebook-4.0.4-py35_1.tar.bz2
main
|
win-64/ipython-notebook-4.0.4-py35_2.tar.bz2
main
|
win-64/ipython-notebook-4.0.4-py35_0.tar.bz2
main
|
win-64/ipython-notebook-4.0.4-py34_0.tar.bz2
main
|
win-64/ipython-notebook-4.0.4-py34_0.tar.bz2
main
|
win-64/ipython-notebook-4.0.4-py27_3.tar.bz2
main
|
win-64/ipython-notebook-4.0.4-py27_3.tar.bz2
main
|
win-64/ipython-notebook-4.0.4-py27_1.tar.bz2
main
|
win-64/ipython-notebook-4.0.4-py27_1.tar.bz2
main
|
win-64/ipython-notebook-3.2.1-py33_0.tar.bz2
main
|
win-64/ipython-notebook-4.0.4-py27_0.tar.bz2
main
|
win-64/ipython-notebook-3.2.1-py34_0.tar.bz2
main
|
win-64/ipython-notebook-3.2.1-py33_0.tar.bz2
main
|
win-64/ipython-notebook-3.2.1-py27_0.tar.bz2
main
|
win-64/ipython-notebook-3.2.0-py33_0.tar.bz2
main
|
win-64/ipython-notebook-3.2.0-py34_0.tar.bz2
main
|
win-64/ipython-notebook-3.2.0-py27_0.tar.bz2
main
|
win-64/ipython-notebook-3.2.0-py33_0.tar.bz2
main
|
win-64/ipython-notebook-3.2.0-py27_0.tar.bz2
main
|
win-64/ipython-notebook-3.1.0-py34_2.tar.bz2
main
|
win-64/ipython-notebook-3.1.0-py34_2.tar.bz2
main
|
win-64/ipython-notebook-3.1.0-py33_2.tar.bz2
main
|
win-64/ipython-notebook-3.1.0-py27_2.tar.bz2
main
|
win-64/ipython-notebook-3.0.0-py34_2.tar.bz2
main
|
win-64/ipython-notebook-3.0.0-py34_1.tar.bz2
main
|
win-64/ipython-notebook-3.0.0-py34_1.tar.bz2
main
|
win-64/ipython-notebook-3.0.0-py34_0.tar.bz2
main
|
win-64/ipython-notebook-3.0.0-py34_0.tar.bz2
main
|
win-64/ipython-notebook-3.0.0-py33_2.tar.bz2
main
|
win-64/ipython-notebook-3.0.0-py33_2.tar.bz2
main
|
win-64/ipython-notebook-3.0.0-py33_1.tar.bz2
main
|
win-64/ipython-notebook-3.0.0-py33_0.tar.bz2
main
|
win-64/ipython-notebook-3.0.0-py33_0.tar.bz2
main
|
win-64/ipython-notebook-3.0.0-py27_2.tar.bz2
main
|
win-64/ipython-notebook-3.0.0-py27_2.tar.bz2
main
|
win-64/ipython-notebook-3.0.0-py27_1.tar.bz2
main
|
win-64/ipython-notebook-3.0.0-py27_1.tar.bz2
main
|
win-64/ipython-notebook-3.0.0-py27_0.tar.bz2
main
|
win-64/ipython-notebook-3.0.0-py27_0.tar.bz2
main
|
win-64/ipython-notebook-2.4.1-py34_0.tar.bz2
main
|
win-64/ipython-notebook-2.4.1-py34_0.tar.bz2
main
|
win-64/ipython-notebook-2.4.1-py33_0.tar.bz2
main
|
win-64/ipython-notebook-2.4.1-py33_0.tar.bz2
main
|
win-64/ipython-notebook-2.3.1-py34_0.tar.bz2
main
|
win-64/ipython-notebook-2.3.1-py34_0.tar.bz2
main
Ipython is a toolkit used for using Python interactively using a Python shell and also provides a Jupyter kernel to work with Python code in Jupyter notebooks. In this article, we will look into the process of installing ipython package on Windows.
Pre-requisites:
The only thing that you need for installing the Scrapy module on Windows are:
- Python
- PIP or Conda (depending upon user preference)
Installing IPython Package on Windows using Conda:
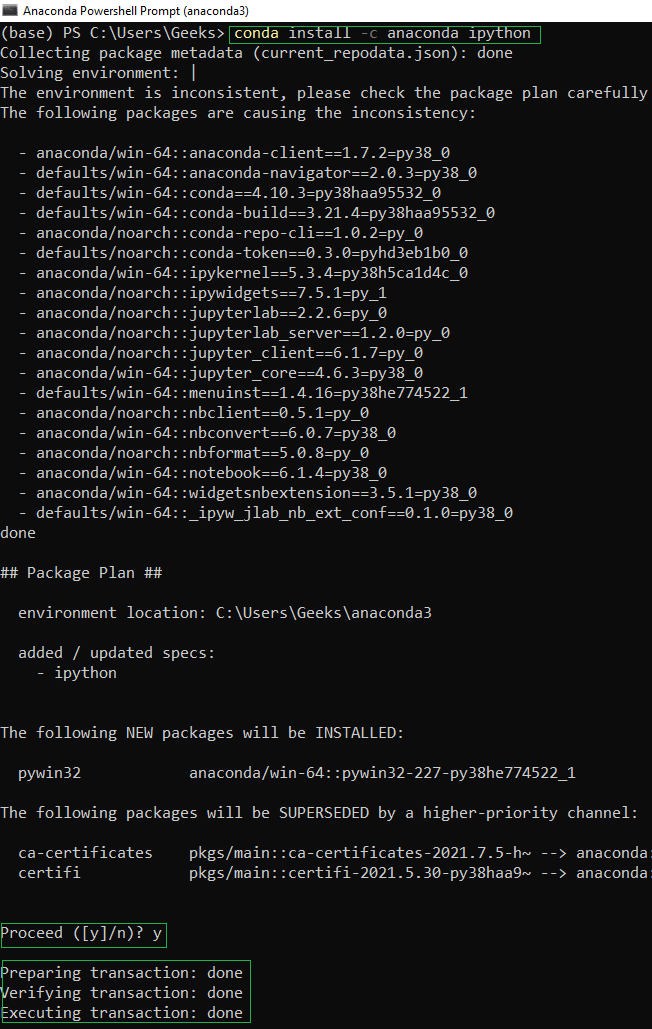
If you want the installation to be done through conda, open up the Anaconda Powershell Prompt and use the below command:
conda install -c anaconda ipython
Type y for yes when prompted.
You will get a similar message once the installation is complete:
Make sure you follow the best practices for installation using conda as:
- Use an environment for installation rather than in the base environment using the below command:
conda create -n my-env
conda activate my-env
Note: If your preferred method of installation is conda-forge, use the below command:
conda config --env --add channels conda-forge
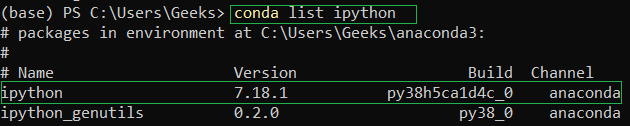
Verifying IPython Package Installation on Windows using Conda:
To verify if IPython Package has been successfully installed in your system run the below command in Anaconda Powershell Prompt:
conda list ipython
You’ll get the below message if the installation is complete:
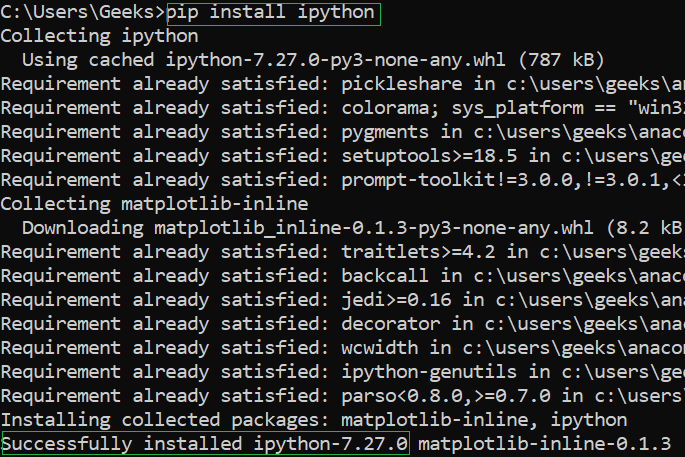
Installing IPython Package on Windows using PIP:
If you want the installation to be done through PIP, open up the Command Prompt and use the below command:
pip install ipython
You will get a similar message once the installation is complete:
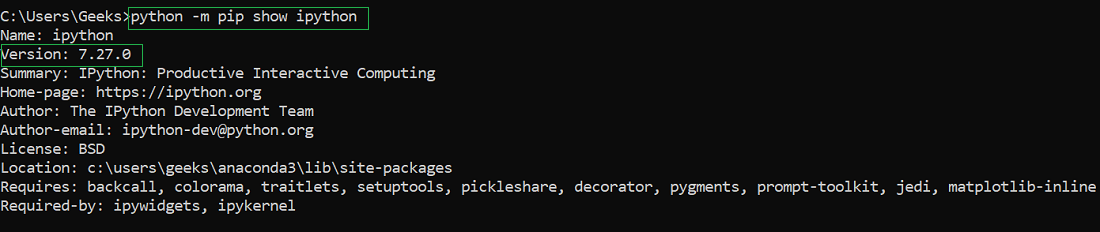
Verifying IPython Package Installation on Windows using PIP:
To verify if the IPython Package has been successfully installed in your system run the below command in Command Prompt:
python -m pip show ipython
You’ll get the below message if the installation is complete:
Last Updated :
22 Sep, 2021
Like Article
Save Article
Welcome to the wild world of IPython Notebooks, or as they prefer to be known by their formal name, Jupyter Notebooks. If you’re reading this, it means you’re either a) about to embark on an exciting journey through the cosmos of data science, or b) you’ve accidentally taken a wrong turn on the internet. In either case, don’t hit the back button just yet! This guide is kind of like a GPS that helps you navigate the Windows universe using an IPython Notebook as your spaceship.
Imagine being a modern-day Indiana Jones, but instead of navigating dangerous jungles and ancient temples, you’re navigating lines of code, datasets, and visualizations. Quite the adventure, isn’t it?
But let’s cut to the chase. What exactly is an IPython Notebook? Picture it as a personal lab notebook for computational scientists. Scientists do experiments, jot down observations, make calculations, draw diagrams, and finally, they try to piece everything together to make sense of it all. Now replace these traditional activities with coding, data analysis, visualizing results, and documenting findings — Voila! You have an IPython Notebook.
From website owners and digital marketers to SEO enthusiasts, an IPython Notebook on your Windows machine is like having a Swiss army knife in your pocket. It combines powerful tools for writing and sharing codes, making your data analysis more interactive, collaborative, and reproducible. Now, who wouldn’t want that?
By the end of this article, you’ll be navigating the labyrinth of IPython Notebooks with the grace of a ballet dancer and the precision of a Swiss watch. So buckle up and get ready to launch your data-driven journey! Remember, in this world, you’re only limited by your curiosity and how far you’re willing to explore. So let’s set off, shall we?
Important disclosure: we’re proud affiliates of some tools mentioned in this guide. If you click an affiliate link and subsequently make a purchase, we will earn a small commission at no additional cost to you (you pay nothing extra). For more information, read our affiliate disclosure.
Pre-Requisites
Before we dive into the nitty-gritty of installing and running IPython Notebook on your Windows machine, we need to make sure your toolbox is ready. Think of it as going on a road trip. You wouldn’t just jump into the car and hope for the best, would you? Unless, of course, you’re a fan of spontaneous combustion, then by all means, go ahead!
But if you’re like most of us, you’d want to make sure you have the right maps, a full tank of gas, and a playlist that won’t make you consider jumping out of the car on the highway. So let’s gear up!
First things first. To get this party started, you will need to have a Windows computer. And we’re not talking about the kind that’s held together with duct tape and hope. You need a decent machine with at least 4 GB of RAM, and around 2 GB of disk space available. Think of your computer as the car for this road trip. You wouldn’t use a rusty old jalopy for a cross-country trip, would you?
Next, you need a stable internet connection. Not the one where you need to perform an elaborate rain dance for the WiFi signal to grace you with its presence. We’re talking about a connection that won’t leave you high and dry when you’re halfway through your installation process. In our road trip metaphor, this would be like having a reliable GPS system.
Let’s move onto the fun stuff. To sail smoothly through the sea of data, we’re going to use Anaconda, a free and open-source distribution of Python and R programming languages. Think of Anaconda as the cruise ship that will make your voyage as smooth as butter on a hot summer day.
Finally, a bit of courage wouldn’t hurt. We’re about to dive into the world of code and data, after all. But don’t worry, it’s not like you’re facing a dragon or anything. It’s more like a tiny gecko that’s a little bit scary up close but ultimately harmless.
Alright, let’s get this show on the road. Here’s a table summarizing everything we just discussed. Print it out and stick it on your fridge, or better yet, bookmark this page.
| Requirements | Description |
|---|---|
| Windows Computer | A decent machine with at least 4GB of RAM and 2GB disk space |
| Internet Connection | Reliable internet that doesn’t require you to pray for signal |
| Anaconda | Free, open-source distribution of Python and R |
| Bravery | A bit of courage to explore the wonders of data and code |
Once you have these requisites checked off, you are ready to dive into the wonderful world of IPython Notebook. Get ready to wave goodbye to your old ways of analyzing data and say hello to a whole new universe of possibilities.
Installation Process
Now that we’ve established the prerequisites, let’s proceed to the main course, the piece de resistance — installing Python and IPython Notebook using the Anaconda distribution. Yes, you heard right! We’re about to install Python on your machine. No, not the snake — though that would indeed make things more exciting!
Think of the Anaconda distribution as the hot air balloon that’s going to take you on this fantastic voyage. It’ll carry you above the complexities of individual package installations and system path configurations.
If Anaconda were a Swiss Army knife, Python and IPython Notebook would be the two most used tools in it. Python, the programming language, is like the main blade — sharp, versatile, and extremely useful. IPython Notebook, on the other hand, is like the tiny screwdriver — not as impressive as the main blade, but when you need it, it’s a real lifesaver.
Step 1: Downloading Anaconda
Navigate to the Anaconda Distribution page and choose the Python 3.x version suitable for your Windows. It’s a big file, so it’s going to take some time to download, just like waiting for your favorite band to come on stage.
Step 2: Installing Anaconda
Once the file has finished downloading, it’s time to install Anaconda. Double-click the installer to launch it. The installer is user-friendly, even for those who get nervous around anything that spells «installation». It’s like playing a game of ‘Simon Says’. The installer says «Click Next,» you click Next.
When asked about the installation type, go with the default «Just Me» option unless you’re feeling particularly generous towards other users on your computer.
At this point, the installer would ask for a destination folder. Let it reside in the default directory unless you have a preferred spot. This is like picking a parking spot for your car. Choose a spot that’s easy for you to remember and access.
During the final stages of installation, make sure to check the box that says «Add Anaconda3 to my PATH environment variable». This is like telling your car’s GPS where home is, so no matter how far you venture, you’ll always find your way back home.
Finally, click on «Install». Then, sit back, relax, and maybe watch a cat video or two, because this could take a while.
Step 3: Verifying The Installation
Now that you’ve installed Anaconda, it’s time to ensure everything is working properly. You wouldn’t want to set out on your trip with a flat tire, would you?
Open the Anaconda Navigator from your Windows start menu. If it opens without any trouble, you’re good to go. If not, don’t panic. Just go back and ensure you followed each step correctly.
Once you have successfully installed Anaconda, Python, and the Jupyter Notebook are also installed in the package. This is the moment when you finally realize your Swiss Army knife also came with a bottle opener and a nail file. Surprise!
| Steps | Description |
|---|---|
| 1. Download Anaconda | Navigate to Anaconda distribution page and download Python 3.x version |
| 2. Install Anaconda | Launch the installer, follow the instructions and select necessary options |
| 3. Verify the Installation | Open Anaconda Navigator to ensure the installation was successful |
And there you have it — Anaconda, Python, and Jupyter Notebook all installed in one fell swoop! Now that wasn’t so hard, was it? Next stop, we’ll start your engine and guide you on how to run your very first IPython Notebook on Windows.
Remember, learning to navigate this new world can feel a bit like being dropped in the middle of a bustling city without a map. But with a little patience and a lot of curiosity, you’ll soon be navigating the city like a local.
Launching IPython Notebook
Having installed Anaconda and its trusty sidekicks Python and Jupyter Notebook, it’s time to ignite the engines and take our first joy ride. Brace yourself; we’re about to launch the IPython Notebook.
Consider IPython Notebook as your spaceship. It can take you to galaxies of code, nebulae of data, and even across wormholes of machine learning algorithms, all from the comfort of your home office.
Step 1: Fire Up Anaconda Navigator
Before we start our space journey, we need to fire up our command module. Go ahead and open Anaconda Navigator from the Windows start menu. It’s kind of like turning the key to start your car engine.
Step 2: Launch Jupyter Notebook
Once Anaconda Navigator is up and running, you’ll see several applications listed. Look for Jupyter Notebook — not to be confused with Jupyter Lab (though they’re cousins). Click on the «Launch» button under Jupyter Notebook. This is like pushing the big red button that says «Do Not Push» — only in this case, you should definitely push it.
Jupyter Notebook will open in your web browser. Don’t worry, it’s not online. It’s just using your browser as a display. Kind of like how Clark Kent uses glasses and a suit as a disguise, but he’s still Superman.
Step 3: Creating A New Notebook
Now you’re on the Jupyter Notebook dashboard. This is like the bridge of your spaceship. To create a new notebook, click on the «New» dropdown button and select «Python 3» from the list. This will create and open a new IPython Notebook in a new browser tab.
Your new notebook is like a blank canvas waiting for the brush strokes of your code. Or, if you prefer a less romantic analogy, it’s like a Word document waiting for your words of wisdom.
| Steps | Description |
|---|---|
| 1. Fire up Anaconda Navigator | Open Anaconda Navigator from the Windows start menu |
| 2. Launch Jupyter Notebook | Click on the ‘Launch’ button under Jupyter Notebook in the Anaconda Navigator |
| 3. Create a New Notebook | Select ‘Python 3’ from the ‘New’ dropdown button on the Jupyter Notebook dashboard |
In your new notebook, you’ll see a cell labeled ‘In [ ]’. This is a code cell where you can write and execute your Python code. Think of it as the warp drive of your spaceship where all the magic happens.
You’re now officially a Python space explorer with your spaceship — the IPython Notebook, ready for take-off. In the next section, we’ll explore the interface of the IPython Notebook to make sure you know where all the switches, buttons, and controls are.
Remember, the first step to becoming a space explorer isn’t about knowing all there is to know about space but having the courage to step into the spaceship. So kudos to you, brave explorer! The next stop on our adventure awaits.
Creating Your First Notebook
Now that we’ve successfully launched our IPython spaceship, it’s time to leave a mark in the universe, or in this case, write our first code in a Jupyter Notebook. Brace yourself for a ride across the constellation of Python programming.
Step 1: Understanding Cells
Cells are the building blocks of a notebook. They are the tiny stars that make up the universe of our IPython Notebook. In Jupyter Notebooks, there are primarily two types of cells: Code and Markdown. Code cells are where you write your Python code. Markdown cells, on the other hand, are where you can write text, equations, or even create neat formats using HTML.
Let’s first conquer the Code cells. To create one, simply click on the ‘+’ button on the toolbar or use the shortcut (Alt+Enter). This creates a new Code cell right below the one you were working on, ready to take your Python commands. Kind of like an obedient puppy waiting for you to throw the ball.
Step 2: Executing Code
Now that you have a new cell, it’s time to write some Python code. You might want to start with the customary «Hello, World!» code. Simply type print("Hello, World!") in your Code cell and press Shift+Enter. Voila, your first Python code in a Jupyter Notebook is executed, and you can see the output right below the cell. It’s like sending your first radio signal into space and hearing a response.
Step 3: Markdown Cells
Moving on to the Markdown cells. To create a Markdown cell, first, create a new cell. Then, go to the dropdown menu in the toolbar that says ‘Code’ and change it to ‘Markdown’. Now, your cell will interpret Markdown, HTML, and even LaTeX commands. It’s like having a universal translator in your spaceship.
Step 4: Saving The Notebook
Once you have your masterpiece (or in our case, your notebook), you’ll want to save it. You can do this by clicking on the floppy disk icon on the toolbar or using the shortcut (Ctrl+S). It’s like taking a picture of your journey through space and saving it for your grandkids to see.
Here’s an overview of the steps in a neat little table:
| Steps | Description |
|---|---|
| 1. Understanding Cells | Code cells are where you write Python code, and Markdown cells are for text or HTML |
| 2. Executing Code | Type your Python code in a Code cell and press Shift+Enter to execute |
| 3. Markdown Cells | Change a cell to ‘Markdown’ from the toolbar dropdown to create Markdown cells |
| 4. Saving the Notebook | Save your work by clicking the floppy disk icon or pressing Ctrl+S |
With that, you’ve just written your first Python code in a Jupyter Notebook and took your first baby steps into the world of Python programming. Like a space explorer sending their first signal into the cosmos, you’re now a part of the Python programming universe.
Essential IPython Notebook Features For Marketers And Content Creators
Jumping into the grand ocean of IPython Notebooks? Fear not! As marketers and content creators, your spaceship comes equipped with some special features. Just like how Han Solo had Chewbacca and the Millennium Falcon, you’ve got some superpowers up your sleeve. Let’s explore these, shall we?
Feature 1: Interactive Coding Environment
Think of IPython Notebook as your own personal Jarvis (Yes, the AI in Iron Man!). Just like how Jarvis assists Tony Stark with his suits, the IPython Notebook serves as your interactive coding environment, ready to assist you with your data analysis tasks.
This platform enables you to write your code, run it, see the results, and modify it in real-time. It’s a cyclical process, like cooking your favorite recipe, tasting it, and adding more salt as needed. This real-time feedback loop makes your data analysis efficient and, dare I say, delightful.
Feature 2: Documentation
Iron Man doesn’t fly into a mission without a plan, right? Similarly, as marketers, planning and documenting your strategies are as important as executing them. This is where Markdown cells in your Jupyter Notebook come in handy.
You can use these cells to document your observations, insights, or even your next brilliant marketing strategy. Markdown cells support text, HTML, LaTeX, and even images. So, whether you’re writing your observations or planning to take over the world, Markdown cells have got you covered.
Feature 3: Data Visualization
Visualizing data in an IPython Notebook is like using Iron Man’s heads-up display. It provides a graphic representation of your data, making it easier to understand and interpret.
You can use various Python libraries like Matplotlib, Seaborn, or Plotly to visualize your data right inside your notebook. Whether it’s bar graphs, pie charts, or heatmaps, you can create it all. Remember, a picture is worth a thousand words, and a good data visualization is worth a thousand data points.
Feature 4: Sharing And Collaboration
Iron Man doesn’t always work alone. He has the Avengers. Similarly, data analysis or content creation is often a team effort. Thankfully, IPython Notebooks can be easily shared and viewed over the web, making collaboration a breeze.
By sharing your notebook, your team can see your code, its output, and all your documentation in one place. They can even run the notebook and modify the code. It’s like having all the Avengers working on the same mission plan.
To summarize, here’s a table of the key features:
| Feature | Description |
|---|---|
| Interactive Coding Environment | Allows real-time code execution and modification |
| Documentation | Markdown cells for documenting observations, insights, and strategies |
| Data Visualization | Supports various Python libraries for visualizing data |
| Sharing and Collaboration | Enables easy sharing and collaboration over the web |
Whether you’re a marketer trying to understand customer behavior or a content creator looking to crunch some numbers, IPython Notebooks come equipped with all the tools you need. So, strap on your Iron Man suit, and get ready to fly into the world of data analysis!
Troubleshooting Common Issues
In the world of IPython Notebooks, not every day is a sunny walk in the park. Sometimes, it’s more like a quest in the world of Jumanji, with unexpected challenges waiting to pounce on you.
But fear not, brave explorer. I’m here to arm you with solutions to common issues that might raise their heads, like hyenas in the tall grass. You won’t need to call Dr. Bravestone (Dwayne Johnson from Jumanji), we’ve got this!
Issue 1: IPython Notebook Not Opening
Imagine this: you’re ready to delve into your data analysis, your morning coffee in hand, and boom! The IPython Notebook won’t open. It’s like setting out for an adventure, but your car won’t start.
Solution: Verify your Python and Jupyter installation. If that doesn’t work, try restarting your computer (the age-old IT trick). Still no luck? Maybe your Python or Jupyter installation is corrupted. In this case, reinstalling these might do the trick.
Issue 2: Module Not Found Error
In the middle of your journey, you decide to call upon a Python library for help. But, what’s this? The library is nowhere to be found! It’s like calling Thor for help, but he’s off-world and left his mobile phone behind.
Solution: Make sure you’ve installed the required library using pip or conda. If it’s installed but still not found, it could be an issue with your Python PATH. Verify that Python and pip are correctly installed and added to your system PATH.
Issue 3: Changes In Code Not Reflecting
You’ve modified your code, but the changes aren’t reflecting. It’s like changing the direction of your car, but it keeps moving in the same old direction. Frustrating, right?
Solution: Make sure to rerun the cell after making modifications. Remember, an IPython Notebook is like a live stage; changes are not real until the actors (code cells) perform (run) again.
Issue 4: Kernel Keeps Dying
Here’s a nightmare — your kernel keeps dying. It’s like driving along when suddenly your car engine explodes… repeatedly.
Solution: Try restarting your kernel. If that doesn’t work, there might be a problem with the code in your notebook. Try to isolate the issue by running one cell at a time.
And there you have it, brave explorers! Four common issues that might surprise you on your journey and their solutions. Remember, it’s not about the challenges, but how you overcome them. Below is a table summarizing the common issues and their remedies:
| Issue | Solution |
|---|---|
| IPython Notebook Not Opening | Verify Python and Jupyter installation, restart computer, reinstall if necessary |
| Module Not Found Error | Install required library, verify Python PATH |
| Changes in Code Not Reflecting | Rerun the cell after modifications |
| Kernel Keeps Dying | Restart kernel, run one cell at a time to isolate the issue |
Remember, every adventurer faces challenges. But, as they say, what doesn’t kill you, makes you a better data analyst… or was it stronger?
So, fellow explorers, we’ve navigated the exhilarating landscape of IPython Notebooks. It’s been quite the journey, hasn’t it? But with these new skills in your digital backpack, you’re ready to dive into the seas of data and swim with the currents of insights. Harness this newfound knowledge, and may your business scale the highest peaks of success! Remember, the journey of a thousand analyses begins with a single IPython Notebook. Happy exploring!
Frequently Asked Questions
What is an IPython Notebook?
An IPython Notebook is an interactive computational environment that allows you to write, run, and share documents that contain live code, equations, visualizations, and narrative text. It’s your digital laboratory for data analysis!
How do I install IPython Notebook on my Windows computer?
You can install IPython Notebook on Windows by first installing Python, followed by pip (Python package installer), and then Jupyter which includes IPython Notebook. The detailed step-by-step instructions are in our ‘Installation Process’ section.
I’m having trouble opening my IPython Notebook, what should I do?
If you’re having issues opening your IPython Notebook, first verify your Python and Jupyter installations. If necessary, try a system restart or reinstall the software.
My kernel keeps dying. What should I do?
A repeatedly dying kernel might be due to a problem in your code. Restart the kernel and try running your cells one at a time to isolate the issue.
What are some useful features of IPython Notebook for marketers and content creators?
IPython Notebook has various features useful for marketers and content creators, like rich text support, multimedia support, visualization tools, and the ability to run and share live code. Check out our section on ‘Essential IPython Notebook Features For Marketers And Content Creators’ for more insights.
Let’s test your knowledge!
Quiz: Do You Know Your Way Around IPython Notebook on Windows?
See https://pypi.org/project/ipython/
30 Jan 02:36
This tag was signed with the committer’s verified signature.
95d2b79
This commit was signed with the committer’s verified signature.
7.9.0
7.8.0
7.7.0
26 Jul 22:23
This tag was signed with the committer’s verified signature.
741169a
This commit was signed with the committer’s verified signature.
7.6.1
7.6.0
28 Jun 23:42
This tag was signed with the committer’s verified signature.
edbca8c
This commit was signed with the committer’s verified signature.
7.5.0
7.4.0
21 Mar 21:21
This tag was signed with the committer’s verified signature.
d774f56
7.3.0
18 Feb 22:04
This tag was signed with the committer’s verified signature.
2e1cca5
This commit was signed with the committer’s verified signature.