| Информация о файле | Описание |
|---|---|
| Размер файла: | 596 kB |
| Дата и время изменения файла: | 2020:03:05 11:28:09+00:00 |
| Тип файла: | Win32 EXE |
| Тип MIME: | application/octet-stream |
| Тип компьютера: | Intel 386 or later, and compatibles |
| Метка времени: | 2001:09:05 09:17:35+00:00 |
| Тип PE: | PE32 |
| Версия компоновщика: | 6.0 |
| Размер кода: | 438272 |
| Размер инициализированных данных: | 262144 |
| Размер неинициализированных данных: | 0 |
| Точка входа: | 0x5cfbc |
| Версия ОС: | 4.0 |
| Версия образа: | 0.0 |
| Версия подсистемы: | 4.0 |
| Подсистема: | Windows GUI |
| Номер версии файла: | 6.31.100.1190 |
| Номер версии продукта: | 6.31.0.0 |
| Маска флагов файлов: | 0x003f |
| Флаги файлов: | (none) |
| Файловая ОС: | Windows NT 32-bit |
| Тип объектного файла: | Executable application |
| Подтип файла: | 0 |
| Код языка: | English (U.S.) |
| Набор символов: | Unicode |
| Наименование компании: | InstallShield Software Corporation |
| Описание файла: | InstallShield (R) Setup Engine |
| Версия файла: | 6, 31, 100, 1190 |
| Внутреннее имя: | Kernel |
| Авторское право: | Copyright (C) 1990-2001 InstallShield Software Corporation |
| Название продукта: | InstallShield (R) |
| Версия продукта: | 6, 31 |
✻ Фрагменты данных файлов предоставлены участником Exiftool (Phil Harvey) и распространяются под лицензией Perl Artistic.
What is Ikernel.dll? What Does It Do?
The Ikernel.dll library is a dynamic link library developed by Macrovision. This library includes important functions that may be needed by programs, games or other basic Windows tools.
The Ikernel.dll library is 0.7 MB. The download links have been checked and there are no problems. You can download it without a problem. Currently, it has been downloaded 11852 times and it has received 3.3 out of 5 stars from our users.
Table of Contents
- What is Ikernel.dll? What Does It Do?
- Operating Systems That Can Use the Ikernel.dll Library
- Other Versions of the Ikernel.dll Library
- How to Download Ikernel.dll Library?
- How to Fix Ikernel.dll Errors?
- Method 1: Copying the Ikernel.dll Library to the Windows System Directory
- Method 2: Copying The Ikernel.dll Library Into The Program Installation Directory
- Method 3: Doing a Clean Install of the program That Is Giving the Ikernel.dll Error
- Method 4: Fixing the Ikernel.dll Error using the Windows System File Checker (sfc /scannow)
- Method 5: Fixing the Ikernel.dll Error by Manually Updating Windows
- Guides to Manually Update for All Windows Versions
- Our Most Common Ikernel.dll Error Messages
- Dynamic Link Libraries Similar to the Ikernel.dll Library
Operating Systems That Can Use the Ikernel.dll Library
- Windows 10
- Windows 8.1
- Windows 8
- Windows 7
- Windows Vista
- Windows XP
Other Versions of the Ikernel.dll Library
The latest version of the Ikernel.dll library is 10.1.0.238 version. Before this, there were 2 versions released. All versions released up till now are listed below from newest to oldest
- 10.1.0.238 — 32 Bit (x86) Download directly this version now
- 10.0.0.159 — 32 Bit (x86) Download directly this version now
- 7,00 — 32 Bit (x86) (2012-06-30) Download directly this version now
How to Download Ikernel.dll Library?
- Click on the green-colored «Download» button on the top left side of the page.

Step 1:Download process of the Ikernel.dll library’s - The downloading page will open after clicking the Download button. After the page opens, in order to download the Ikernel.dll library the best server will be found and the download process will begin within a few seconds. In the meantime, you shouldn’t close the page.

How to Fix Ikernel.dll Errors?
ATTENTION! In order to install the Ikernel.dll library, you must first download it. If you haven’t downloaded it, before continuing on with the installation, download the library. If you don’t know how to download it, all you need to do is look at the dll download guide found on the top line.
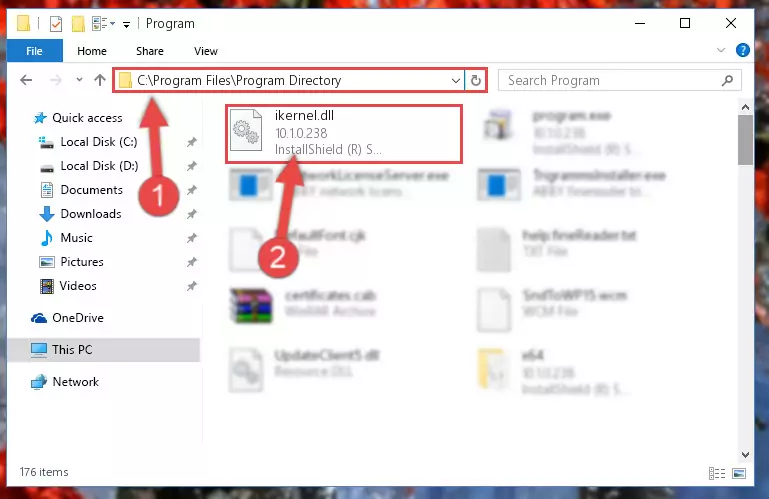
Method 1: Copying the Ikernel.dll Library to the Windows System Directory
- The file you will download is a compressed file with the «.zip» extension. You cannot directly install the «.zip» file. Because of this, first, double-click this file and open the file. You will see the library named «Ikernel.dll» in the window that opens. Drag this library to the desktop with the left mouse button. This is the library you need.
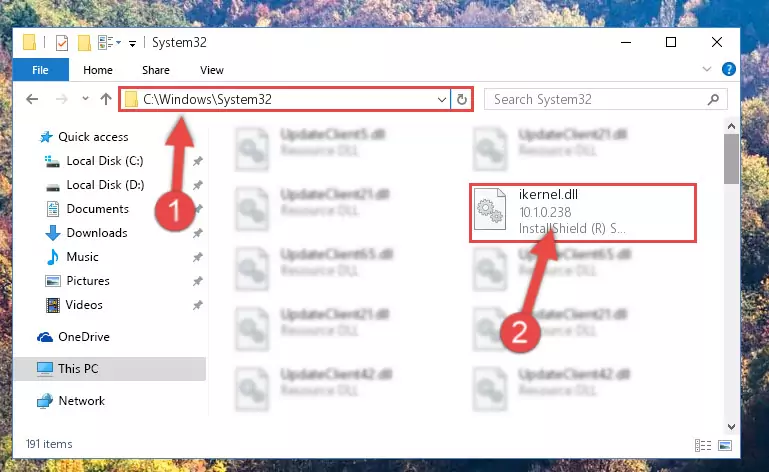
- Copy the «Ikernel.dll» library file you extracted.
- Paste the dynamic link library you copied into the «C:\Windows\System32» directory.
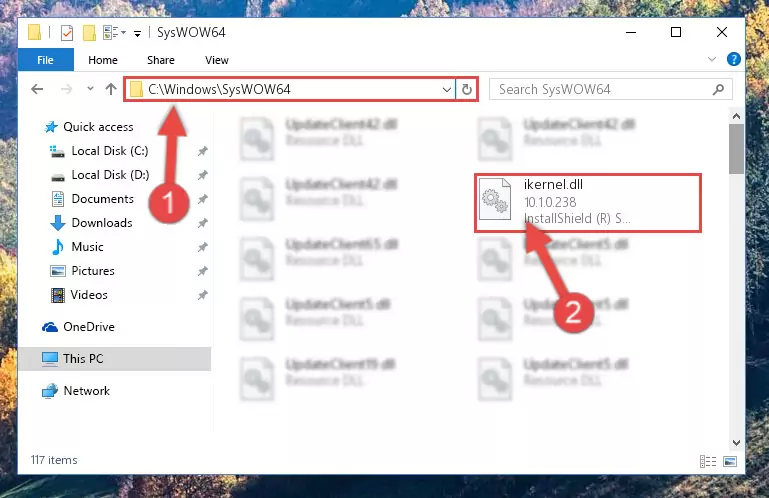
Step 3:Pasting the Ikernel.dll library into the Windows/System32 directory - If your system is 64 Bit, copy the «Ikernel.dll» library and paste it into «C:\Windows\sysWOW64» directory.
NOTE! On 64 Bit systems, you must copy the dynamic link library to both the «sysWOW64» and «System32» directories. In other words, both directories need the «Ikernel.dll» library.
Step 4:Copying the Ikernel.dll library to the Windows/sysWOW64 directory - First, we must run the Windows Command Prompt as an administrator.
NOTE! We ran the Command Prompt on Windows 10. If you are using Windows 8.1, Windows 8, Windows 7, Windows Vista or Windows XP, you can use the same methods to run the Command Prompt as an administrator.
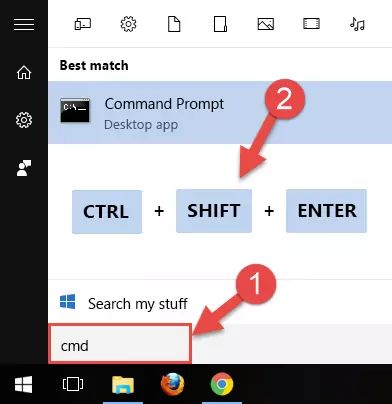
- Open the Start Menu and type in «cmd«, but don’t press Enter. Doing this, you will have run a search of your computer through the Start Menu. In other words, typing in «cmd» we did a search for the Command Prompt.
- When you see the «Command Prompt» option among the search results, push the «CTRL» + «SHIFT» + «ENTER
- A verification window will pop up asking, «Do you want to run the Command Prompt as with administrative permission?» Approve this action by saying, «Yes«.
» keys on your keyboard.
Step 5:Running the Command Prompt with administrative permission - Paste the command below into the Command Line window that opens up and press Enter key. This command will delete the problematic registry of the Ikernel.dll library (Nothing will happen to the library we pasted in the System32 directory, it just deletes the registry from the Windows Registry Editor. The library we pasted in the System32 directory will not be damaged).
%windir%\System32\regsvr32.exe /u Ikernel.dll
Step 6:Cleaning the problematic registry of the Ikernel.dll library from the Windows Registry Editor - If you are using a 64 Bit operating system, after doing the commands above, you also need to run the command below. With this command, we will also delete the Ikernel.dll library’s damaged registry for 64 Bit (The deleting process will be only for the registries in Regedit. In other words, the dll file you pasted into the SysWoW64 folder will not be damaged at all).
%windir%\SysWoW64\regsvr32.exe /u Ikernel.dll
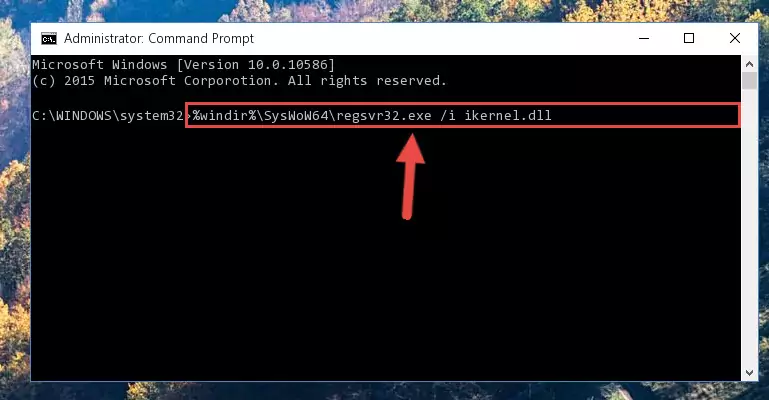
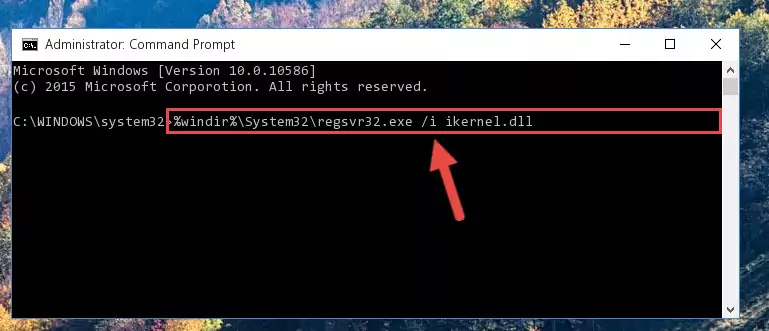
Step 7:Uninstalling the damaged Ikernel.dll library’s registry from the system (for 64 Bit) - We need to make a clean registry for the dll library’s registry that we deleted from Regedit (Windows Registry Editor). In order to accomplish this, copy and paste the command below into the Command Line and press Enter key.
%windir%\System32\regsvr32.exe /i Ikernel.dll
Step 8:Making a clean registry for the Ikernel.dll library in Regedit (Windows Registry Editor) - Windows 64 Bit users must run the command below after running the previous command. With this command, we will create a clean and good registry for the Ikernel.dll library we deleted.
%windir%\SysWoW64\regsvr32.exe /i Ikernel.dll
Step 9:Creating a clean and good registry for the Ikernel.dll library (64 Bit için) - You may see certain error messages when running the commands from the command line. These errors will not prevent the installation of the Ikernel.dll library. In other words, the installation will finish, but it may give some errors because of certain incompatibilities. After restarting your computer, to see if the installation was successful or not, try running the program that was giving the dll error again. If you continue to get the errors when running the program after the installation, you can try the 2nd Method as an alternative.

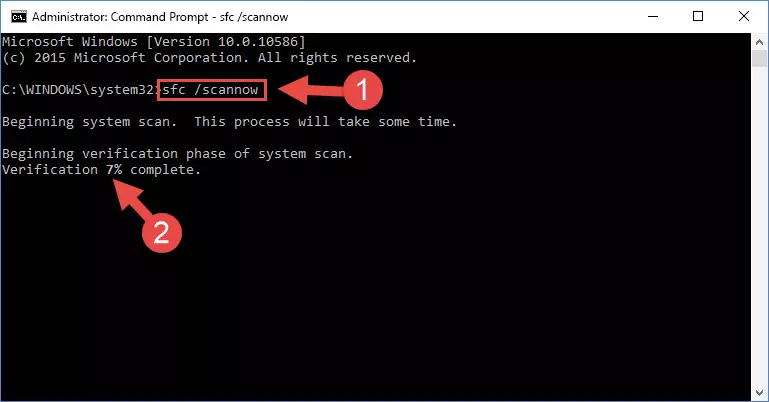
Method 4: Fixing the Ikernel.dll Error using the Windows System File Checker (sfc /scannow)
- First, we must run the Windows Command Prompt as an administrator.
NOTE! We ran the Command Prompt on Windows 10. If you are using Windows 8.1, Windows 8, Windows 7, Windows Vista or Windows XP, you can use the same methods to run the Command Prompt as an administrator.
- Open the Start Menu and type in «cmd«, but don’t press Enter. Doing this, you will have run a search of your computer through the Start Menu. In other words, typing in «cmd» we did a search for the Command Prompt.
- When you see the «Command Prompt» option among the search results, push the «CTRL» + «SHIFT» + «ENTER
- A verification window will pop up asking, «Do you want to run the Command Prompt as with administrative permission?» Approve this action by saying, «Yes«.
» keys on your keyboard.
Step 1:Running the Command Prompt with administrative permission - Type the command below into the Command Line page that comes up and run it by pressing Enter on your keyboard.
sfc /scannow
Step 2:Getting rid of Windows Dll errors by running the sfc /scannow command - The process can take some time depending on your computer and the condition of the errors in the system. Before the process is finished, don’t close the command line! When the process is finished, try restarting the program that you are experiencing the errors in after closing the command line.
Method 5: Fixing the Ikernel.dll Error by Manually Updating Windows
Some programs need updated dynamic link libraries. When your operating system is not updated, it cannot fulfill this need. In some situations, updating your operating system can solve the dll errors you are experiencing.
In order to check the update status of your operating system and, if available, to install the latest update packs, we need to begin this process manually.
Depending on which Windows version you use, manual update processes are different. Because of this, we have prepared a special article for each Windows version. You can get our articles relating to the manual update of the Windows version you use from the links below.
Guides to Manually Update for All Windows Versions
- Guide to Manually Update Windows 10
- Guide to Manually Update Windows 8.1 and Windows 8
- Guide to Manually Update Windows 7 and Windows Vista
- Guide to Manually Update Windows XP
Our Most Common Ikernel.dll Error Messages
It’s possible that during the programs’ installation or while using them, the Ikernel.dll library was damaged or deleted. You can generally see error messages listed below or similar ones in situations like this.
These errors we see are not unsolvable. If you’ve also received an error message like this, first you must download the Ikernel.dll library by clicking the «Download» button in this page’s top section. After downloading the library, you should install the library and complete the solution methods explained a little bit above on this page and mount it in Windows. If you do not have a hardware issue, one of the methods explained in this article will fix your issue.
- «Ikernel.dll not found.» error
- «The file Ikernel.dll is missing.» error
- «Ikernel.dll access violation.» error
- «Cannot register Ikernel.dll.» error
- «Cannot find Ikernel.dll.» error
- «This application failed to start because Ikernel.dll was not found. Re-installing the application may fix this problem.» error
Dynamic Link Libraries Similar to the Ikernel.dll Library
- Objectps.dll
- Objpscnv.dll
- Iscrcnv.dll
- Isrt.dll
- Igdicnv.dll
IKernel.exe is part of InstallShield(R)SetupEngine and developed by InstallShield Software Corporation according to the IKernel.exe file information. In certain cases, malicious trackers and scripts can disguise themselves as legitimate files, like IKernel.exe, leading to glitches, overload and system malfunctions.
In such cases, IKernel.exe can create unnecessary records and folders in the Windows registry. Check your PC to eliminate possible application conflicts and system failures.
Your machine is currently running: unknown
Outbyte PC Repair is incompatible with your operating system.
IKernel.exe‘s description is «InstallShield(R)SetupEngine».
\eReg\Medal of Honor Allied Assault_Code.exe
%LOCALAPPDATA%\Packages\B9ECED6F.ArmouryCrate_qmba6cd70vzyy\LocalState\SupportTemp\AI Suite 3\DIP5_2.00.05\AppSetup\VgaService\vgaIns.exe
%TMP%\{698D7E61-E4BF-4CA6-8A09-CF6BDBFDEF65}\ArcadeInstallBF194211b.EXE
\Documentos_e\BIN\atiicdxx.exe
%PROGRAMFILES(X86)%\Eidos\Pyro Studios\Commandos 3 — Destination Berlin\commandos3.exe
\ATI\Support\10-02_legacy_xp32-64_dd_ccc\BIN\atiicdxx.exe
%SYSTEMROOT%\SysWOW64\WerFault.exe
\Driver\ATI Driver\XP\bin\atiicdxx.exe
%SystemDrive%\Papyrus\NASCAR Racing 2003 Season\SierraUp.exe
%SYSTEMROOT%\regedit.exe
%PROGRAMFILES(X86)%\ubi.com\Core\GS4.exe
%PROGRAMFILES(X86)%\Eidos Interactive\Gut Gemischt 2\GutGemischt2.exe
\Redist\DirectX81\dxdiag.exe
\eReg\Medal of Honor Allied Assault_Code.exe
%PROGRAMFILES(X86)%\InstallShield Installation Information
new catalogue created
%PROGRAMFILES(X86)%\InstallShield Installation Information\{6EE02C78-E908-493B-B1A6-D64AFC53002F}\setup.ilg
file moved
(x32)HKEY_LOCAL_MACHINE\SOFTWARE\ASUS\ArmourySDK\MainSDK\\Uninstall
new registry key parameter created
(x32)HKEY_LOCAL_MACHINE\SOFTWARE\ASUS\ArmourySDK\MainSDK\\Version
new registry key parameter created
(x32)HKEY_LOCAL_MACHINE\SOFTWARE\ASUS\ArmourySDK\MainSDK\\Startup
new registry key parameter created
(x32)HKEY_LOCAL_MACHINE\SOFTWARE\ASUS\ArmourySDK\MainSDK
new registry key created
%PROGRAMFILES(X86)%\ASUS\ArmouryDevice\dll\Tools\RegSchdTask.exe
file renamed
%PROGRAMFILES(X86)%\ASUS\ArmouryDevice\dll\Tools\AsTaskSched.dll
file renamed
%PROGRAMFILES(X86)%\ASUS\ArmouryDevice\dll\Tools
new catalogue created
%PROGRAMFILES(X86)%\ASUS\ArmouryDevice\dll\SwAgent\Theme\TUF\style.ini
file renamed
%PROGRAMFILES(X86)%\ASUS\ArmouryDevice\dll\SwAgent\Theme\TUF\main_s_bg.png
file renamed
%PROGRAMFILES(X86)%\ASUS\ArmouryDevice\dll\SwAgent\Theme\TUF\btn_un.png
file renamed
%PROGRAMFILES(X86)%\ASUS\ArmouryDevice\dll\SwAgent\Theme\TUF\btn_o.png
file renamed
%PROGRAMFILES(X86)%\ASUS\ArmouryDevice\dll\SwAgent\Theme\TUF\btn_n.png
file renamed
%PROGRAMFILES(X86)%\ASUS\ArmouryDevice\dll\SwAgent\Theme\TUF\btn_d.png
file renamed
%PROGRAMFILES(X86)%\ASUS\ArmouryDevice\dll\SwAgent\Theme\ROG\style.ini
file renamed
%PROGRAMFILES(X86)%\ASUS\ArmouryDevice\dll\SwAgent\Theme\ROG\main_s_bg.png
file renamed
%PROGRAMFILES(X86)%\ASUS\ArmouryDevice\dll\SwAgent\Theme\ROG\btn_un.png
file renamed
%PROGRAMFILES(X86)%\ASUS\ArmouryDevice\dll\SwAgent\Theme\ROG\btn_o.png
file renamed
%PROGRAMFILES(X86)%\ASUS\ArmouryDevice\dll\SwAgent\Theme\ROG\btn_n.png
file renamed
%PROGRAMFILES(X86)%\ASUS\ArmouryDevice\dll\SwAgent\Theme\ROG\btn_d.png
file renamed
%PROGRAMFILES(X86)%\ASUS\ArmouryDevice\dll\SwAgent\Theme\ASUS\style.ini
file renamed
%PROGRAMFILES(X86)%\ASUS\ArmouryDevice\dll\SwAgent\Theme\ASUS\main_s_bg.png
file renamed
%PROGRAMFILES(X86)%\ASUS\ArmouryDevice\dll\SwAgent\Theme\ASUS\btn_un.png
file renamed
%PROGRAMFILES(X86)%\ASUS\ArmouryDevice\dll\SwAgent\Theme\ASUS\btn_o.png
file renamed
%PROGRAMFILES(X86)%\ASUS\ArmouryDevice\dll\SwAgent\Theme\ASUS\btn_n.png
file renamed
%PROGRAMFILES(X86)%\ASUS\ArmouryDevice\dll\SwAgent\Theme\ASUS\btn_d.png
file renamed
%PROGRAMFILES(X86)%\ASUS\ArmouryDevice\dll\SwAgent\Theme\Armoury-icon_w.ico
file renamed
%PROGRAMFILES(X86)%\ASUS\ArmouryDevice\dll\SwAgent\MultiLang\Turkish.ini
file renamed
%PROGRAMFILES(X86)%\ASUS\ArmouryDevice\dll\SwAgent\MultiLang\Traditional Chinese.ini
file renamed
%PROGRAMFILES(X86)%\ASUS\ArmouryDevice\dll\SwAgent\MultiLang\Spanish.ini
file renamed
%PROGRAMFILES(X86)%\ASUS\ArmouryDevice\dll\SwAgent\MultiLang\Simplified Chinese.ini
file renamed
%PROGRAMFILES(X86)%\ASUS\ArmouryDevice\dll\SwAgent\MultiLang\Russian.ini
file renamed
%PROGRAMFILES(X86)%\ASUS\ArmouryDevice\dll\SwAgent\MultiLang\Portuguese.ini
file renamed
%PROGRAMFILES(X86)%\ASUS\ArmouryDevice\dll\SwAgent\MultiLang\Korean.ini
file renamed
%PROGRAMFILES(X86)%\ASUS\ArmouryDevice\dll\SwAgent\MultiLang\Japanese.ini
file renamed
%PROGRAMFILES(X86)%\ASUS\ArmouryDevice\dll\SwAgent\MultiLang\Italian.ini
file renamed
%PROGRAMFILES(X86)%\ASUS\ArmouryDevice\dll\SwAgent\MultiLang\Geman.ini
file renamed
%PROGRAMFILES(X86)%\ASUS\ArmouryDevice\dll\SwAgent\MultiLang\French.ini
file renamed
%PROGRAMFILES(X86)%\ASUS\ArmouryDevice\dll\SwAgent\MultiLang\English.ini
file renamed
%PROGRAMFILES(X86)%\ASUS\ArmouryDevice\dll\SwAgent\MultiLang
new catalogue created
%PROGRAMFILES(X86)%\ASUS\ArmouryDevice\dll\SwAgent\FanOSD\LangFiles\TChinese\TChinese.ini
file renamed
%PROGRAMFILES(X86)%\ASUS\ArmouryDevice\dll\SwAgent\FanOSD\LangFiles\TChinese
new catalogue created
%PROGRAMFILES(X86)%\ASUS\ArmouryDevice\dll\SwAgent\FanOSD\LangFiles\Spanish\Spanish.ini
file renamed
%PROGRAMFILES(X86)%\ASUS\ArmouryDevice\dll\SwAgent\FanOSD\LangFiles\Spanish
new catalogue created
%PROGRAMFILES(X86)%\ASUS\ArmouryDevice\dll\SwAgent\FanOSD\LangFiles\SChinese\SChinese.ini
file renamed
%PROGRAMFILES(X86)%\ASUS\ArmouryDevice\dll\SwAgent\FanOSD\LangFiles\SChinese
new catalogue created
%PROGRAMFILES(X86)%\ASUS\ArmouryDevice\dll\SwAgent\FanOSD\LangFiles\Russian\Russian.ini
file renamed
%PROGRAMFILES(X86)%\ASUS\ArmouryDevice\dll\SwAgent\FanOSD\LangFiles\Russian
new catalogue created
%PROGRAMFILES(X86)%\ASUS\ArmouryDevice\dll\SwAgent\FanOSD\LangFiles\Japanese\Japanese.ini
file renamed
%PROGRAMFILES(X86)%\ASUS\ArmouryDevice\dll\SwAgent\FanOSD\LangFiles\Japanese
new catalogue created
%PROGRAMFILES(X86)%\ASUS\ArmouryDevice\dll\SwAgent\FanOSD\LangFiles\German\German.ini
file renamed
%PROGRAMFILES(X86)%\ASUS\ArmouryDevice\dll\SwAgent\FanOSD\LangFiles\German
new catalogue created
%PROGRAMFILES(X86)%\ASUS\ArmouryDevice\dll\SwAgent\FanOSD\LangFiles\French\French.ini
file renamed
%PROGRAMFILES(X86)%\ASUS\ArmouryDevice\dll\SwAgent\FanOSD\LangFiles\French
new catalogue created
%PROGRAMFILES(X86)%\ASUS\ArmouryDevice\dll\SwAgent\FanOSD\LangFiles\English\English.ini
file renamed
%PROGRAMFILES(X86)%\ASUS\ArmouryDevice\dll\SwAgent\FanOSD\LangFiles\English
new catalogue created
%PROGRAMFILES(X86)%\ASUS\ArmouryDevice\dll\SwAgent\FanOSD\LangFiles\AsMultiLang.ini
file renamed
%PROGRAMFILES(X86)%\ASUS\ArmouryDevice\dll\SwAgent\FanOSD\LangFiles
new catalogue created
%PROGRAMFILES(X86)%\ASUS\ArmouryDevice\dll\SwAgent\FanOSD\Setting.ini
file renamed
%PROGRAMFILES(X86)%\ASUS\ArmouryDevice\dll\SwAgent\FanOSD\OSD_Turbo.png
file renamed
%PROGRAMFILES(X86)%\ASUS\ArmouryDevice\dll\SwAgent\FanOSD\OSD_Standard.png
file renamed
%PROGRAMFILES(X86)%\ASUS\ArmouryDevice\dll\SwAgent\FanOSD\OSD_Silent.png
file renamed
%PROGRAMFILES(X86)%\ASUS\ArmouryDevice\dll\SwAgent\FanOSD\OSD_FullSpeed.png
file renamed
%PROGRAMFILES(X86)%\ASUS\ArmouryDevice\dll\SwAgent\FanOSD\FanOSD.exe.manifest
file renamed
%PROGRAMFILES(X86)%\ASUS\ArmouryDevice\dll\SwAgent\FanOSD\FanOSD.exe
file renamed
%PROGRAMFILES(X86)%\ASUS\ArmouryDevice\dll\SwAgent\FanOSD\AsMultiLang.dll
file renamed
%PROGRAMFILES(X86)%\ASUS\ArmouryDevice\dll\SwAgent\FanOSD
new catalogue created
%PROGRAMFILES(X86)%\ASUS\ArmouryDevice\dll\SwAgent\Volume.dll
file renamed
%PROGRAMFILES(X86)%\ASUS\ArmouryDevice\dll\SwAgent\ScreenColorLib.dll
file renamed
%PROGRAMFILES(X86)%\ASUS\ArmouryDevice\dll\SwAgent\mute.dll
file renamed
%PROGRAMFILES(X86)%\ASUS\ArmouryDevice\dll\SwAgent\MacroControl.dll
file renamed
%PROGRAMFILES(X86)%\ASUS\ArmouryDevice\dll\SwAgent\fan.ini
file renamed
%PROGRAMFILES(X86)%\ASUS\ArmouryDevice\dll\SwAgent\Brightness.dll
file renamed
%PROGRAMFILES(X86)%\ASUS\ArmouryDevice\dll\SwAgent\asacpiEx.dll
file renamed
%PROGRAMFILES(X86)%\ASUS\ArmouryDevice\dll\SwAgent\AsAcpi.dll
file renamed
%PROGRAMFILES(X86)%\ASUS\ArmouryDevice\dll\SwAgent\ArmourySwAgent.exe.config
file renamed
%PROGRAMFILES(X86)%\ASUS\ArmouryDevice\dll\SwAgent\ArmourySwAgent.exe
file renamed
%PROGRAMFILES(X86)%\ASUS\ArmouryDevice\dll\ShareFromArmouryIII\Mouse\TUF GAMING M3\Upgrade_P305\P305_FWUpdateTool.exe
file renamed
%PROGRAMFILES(X86)%\ASUS\ArmouryDevice\dll\ShareFromArmouryIII\Mouse\TUF GAMING M3\Upgrade_P305\firmware.dld
file renamed
%PROGRAMFILES(X86)%\ASUS\ArmouryDevice\dll\ShareFromArmouryIII\Mouse\TUF GAMING M3\Upgrade_P305\CyUSB.dll
file renamed
%PROGRAMFILES(X86)%\ASUS\ArmouryDevice\dll\ShareFromArmouryIII\Mouse\TUF GAMING M3\Upgrade_P305\Common.dll
file renamed
%PROGRAMFILES(X86)%\ASUS\ArmouryDevice\dll\ShareFromArmouryIII\Mouse\TUF GAMING M3\Upgrade_P305
new catalogue created
%PROGRAMFILES(X86)%\ASUS\ArmouryDevice\dll\ShareFromArmouryIII\Mouse\TUF GAMING M3\Resource_P305\TUF\ProgressBar\277x8_progressbar_bg.png
file renamed
%PROGRAMFILES(X86)%\ASUS\ArmouryDevice\dll\ShareFromArmouryIII\Mouse\TUF GAMING M3\Resource_P305\TUF\ProgressBar\1x8_progressbar_red.png
file renamed
%PROGRAMFILES(X86)%\ASUS\ArmouryDevice\dll\ShareFromArmouryIII\Mouse\TUF GAMING M3\Resource_P305\TUF\Image\update_bg.png
file renamed
%PROGRAMFILES(X86)%\ASUS\ArmouryDevice\dll\ShareFromArmouryIII\Mouse\TUF GAMING M3\Resource_P305\TUF\Image\Armoury-icon_w.ico
file renamed
%PROGRAMFILES(X86)%\ASUS\ArmouryDevice\dll\ShareFromArmouryIII\Mouse\TUF GAMING M3\Resource_P305\TUF\Button\btm_un.png
file renamed
%PROGRAMFILES(X86)%\ASUS\ArmouryDevice\dll\ShareFromArmouryIII\Mouse\TUF GAMING M3\Resource_P305\TUF\Button\btm_o.png
file renamed
%PROGRAMFILES(X86)%\ASUS\ArmouryDevice\dll\ShareFromArmouryIII\Mouse\TUF GAMING M3\Resource_P305\TUF\Button\btm_n.png
file renamed
%PROGRAMFILES(X86)%\ASUS\ArmouryDevice\dll\ShareFromArmouryIII\Mouse\TUF GAMING M3\Resource_P305\TUF\Button\btm_d.png
file renamed
%PROGRAMFILES(X86)%\ASUS\ArmouryDevice\dll\ShareFromArmouryIII\Mouse\TUF GAMING M3\Resource_P305\TUF\Button
new catalogue created
%PROGRAMFILES(X86)%\ASUS\ArmouryDevice\dll\ShareFromArmouryIII\Mouse\TUF GAMING M3\Resource_P305\TextBox\textfield_s_n.png
file renamed
%PROGRAMFILES(X86)%\ASUS\ArmouryDevice\dll\ShareFromArmouryIII\Mouse\TUF GAMING M3\Resource_P305\ProgressBar\277x8_progressbar_bg.png
file renamed
%PROGRAMFILES(X86)%\ASUS\ArmouryDevice\dll\ShareFromArmouryIII\Mouse\TUF GAMING M3\Resource_P305\ProgressBar\1x8_progressbar_red.png
file renamed
%PROGRAMFILES(X86)%\ASUS\ArmouryDevice\dll\ShareFromArmouryIII\Mouse\TUF GAMING M3\Resource_P305\Mask\loading_mask.png
file renamed
%PROGRAMFILES(X86)%\ASUS\ArmouryDevice\dll\ShareFromArmouryIII\Mouse\TUF GAMING M3\Resource_P305\Image\warning_s_bg.png
file renamed
%PROGRAMFILES(X86)%\ASUS\ArmouryDevice\dll\ShareFromArmouryIII\Mouse\TUF GAMING M3\Resource_P305\Image\update_bg.png
file renamed
%PROGRAMFILES(X86)%\ASUS\ArmouryDevice\dll\ShareFromArmouryIII\Mouse\TUF GAMING M3\Resource_P305\Image\popup_bg.png
file renamed
%PROGRAMFILES(X86)%\ASUS\ArmouryDevice\dll\ShareFromArmouryIII\Mouse\TUF GAMING M3\Resource_P305\Image\main_s_bg.png
file renamed
Первым делом:
Скачайте библиотеку — скачать iKernel.dll
Затем:
Поместите iKernel.dll
в одну из следующих папок:
Если у вас 64-битная версия Windows, то поместите файл в:
«C:\Windows\SysWOW64»
Если у вас 32-битная версия Windows, то поместите файл в:
«C:\Windows\System32»
После этого
Перезагрузите компьютер, чтобы изменения вступили в силу.
Всё равно выдаёт ошибку iKernel.dll
не был найден?
Тогда придётся установить этот файл вручную. Для этого:
Зайдите в меню «Пуск».
В строчке поиска введите «cmd». И запустите найденную программу от имени администратора.
В открывшемся окне введите «regsvr32 iKernel.dll
«.
После этого снова перезагрузите компьютер. Теперь ошибка должна быть исправлена.
Если что-то не понятно прочитайте более подробную инструкцию — как установить dll файл.
12 -ая версия, например, хранит их здесь: %USERPROFILE%\AppData\Local\Sony\Vegas Pro\12.0 16 -ая хранит проекты по тому же пути, только немного в другой папке: %USERPROFILE%\AppData\Local\VEGAS Pro\16.0
Сегодня мы поговорим об укрощении глюков в монтажке Sony Vegas и какие действия не стоит делать, чтобы не столкнуться с вылетом программы. Делать все мы будем на примере версии Sony Vegas 12.0 (Build 770) (x64) . Самое главное и основное — возьмите за правило нажимать Ctrl+S (т.е. сохранять проект) перед каждым сложным действием . «Сложное» действие определить очень легко: оно более затратно по времени, чем другие. Например, одно дело, когда вы ставите стандартный плагин Brightness and Contrast , и совсем другое, когда вы ставите что-то от NewBlue или Magic Bullet — он ставится дольше. В этот момент «ожидания» обычно и случаются глюки , поэтому лучше заранее сохранить проект. Конечно, в Vegas Pro есть автосохранение, но его периодичность может стать… редкой относительно скорости монтажника, из-за чего могут не сохраниться целые монтажные куски. Кстати, интервал автосохранения можно регулировать: зажмите клавишу Shift и перейдите в меню » Optio
Запустить командную строку от имени администратора: Пуск > в строке поиска вписать cmd , нажать на иконку правой кнопкой мыши выбрать « Запустить от имени администратора ». В командную строку скопируйте sc config mrxsmb10 start= demand и нажмите Enter . Нажимаем Win+R и вводим services.msc Находим службу “ Рабочая станция ” и нажав правой кнопкой мыши выбираем пункт « Запустить ». Примечание: служба не запустится , если не выполнить пункт 2 . Запуск службы лучше поставить на » Автоматически «. Вот и все. Источник: http://studenthelper.hol.es/%D0%B8%D0%BD%D1%84%D0%BE%D1%80%D0%BC%D0%B0%D1%82%D0%B8%D0%BA%D0%B0/%D1%80%D0%B5%D1%88%D0%B5%D0%BD%D0%B8%D0%B5-%D0%BF%D1%80%D0%BE%D0%B1%D0%BB%D0%B5%D0%BC%D1%8B-%D1%81%D0%B5%D1%82%D1%8C-%D0%BE%D1%82%D1%81%D1%83%D1%82%D1%81%D1%82%D0%B2%D1%83%D0%B5%D1%82-%D0%B8/
Ситуация: есть рабочая группа » WORKGROUP » и три компьютера в сети, объединенные через роутер. На одном из них установлена Windows XP Professional SP3 , на другом — Windows 10 SL . В один прекрасный день, попытавшись получить с XP-шного компьютера доступ к компьютеру с Windows 10 , я даже не смог отобразить компьютеры рабочей группы (т. е. увидеть все компьютеры в сети). Вместо этого красовалось сообщение об ошибке, гласящее: «Нет доступа к Workgroup. Возможно у вас нет прав на использование этого сетевого ресурса…Обратитесь к системному администратору. Служба не запущена». Оказалось, что проблема главным образом заключалась в компьютере с Windows 10 : ошибка выскакивала при попытке отобразить в списке именно его, и как следствие — не открывалась рабочая группа. РЕШЕНИЕ (во всяком случае, мне это помогло) На компьютере с Windows 10 заходим в Службы ( Win + R > services.msc ) Находим службу «Браузер компьютеров» и останавливаем