Download for Windows
Click here to download the latest (2.42.0) 32-bit version of Git for Windows. This is the most recent maintained build. It was released about 1 month ago, on 2023-08-30.
Other Git for Windows downloads
Standalone Installer
32-bit Git for Windows Setup.
64-bit Git for Windows Setup.
Portable («thumbdrive edition»)
32-bit Git for Windows Portable.
64-bit Git for Windows Portable.
Using winget tool
Install winget tool if you don’t already have it, then type this command in command prompt or Powershell.
winget install --id Git.Git -e --source winget
The current source code release is version 2.42.0. If you want the newer version, you can build it from the source code.
Now What?
Now that you have downloaded Git, it’s time to start using it.
-

Read the Book
Dive into the Pro Git book and learn at your own pace.
-
Download a GUI
Several free and commercial GUI tools are available for the Windows platform.
-
Get Involved
A knowledgeable Git community is available to answer your questions.

How to install Git on any OS
Git can be installed on the most common operating systems like Windows, Mac, and Linux. In fact, Git comes installed by default on most Mac and Linux machines!
Checking for Git
To see if you already have Git installed, open up your terminal application.
- If you’re on a Mac, look for a command prompt application called «Terminal».
- If you’re on a Windows machine, open the windows command prompt or «Git Bash».
Once you’ve opened your terminal application, type git version. The output will either tell you which version of Git is installed, or it will alert you that git is an unknown command. If it’s an unknown command, read further and find out how to install Git.
Install Git Using GitHub Desktop
Installing GitHub Desktop will also install the latest version of Git if you don’t already have it. With GitHub Desktop, you get a command line version of Git with a robust GUI. Regardless of if you have Git installed or not, GitHub Desktop offers a simple collaboration tool for Git. You can learn more here.
Install Git on Windows
- Navigate to the latest Git for Windows installer and download the latest version.
- Once the installer has started, follow the instructions as provided in the Git Setup wizard screen until the installation is complete.
- Open the windows command prompt (or Git Bash if you selected not to use the standard Git Windows Command Prompt during the Git installation).
- Type
git versionto verify Git was installed.
Note: git-scm is a popular and recommended resource for downloading Git for Windows. The advantage of downloading Git from git-scm is that your download automatically starts with the latest version of Git included with the recommended command prompt, Git Bash . The download source is the same Git for Windows installer as referenced in the steps above.
Install Git on Mac
Most versions of MacOS will already have Git installed, and you can activate it through the terminal with git version. However, if you don’t have Git installed for whatever reason, you can install the latest version of Git using one of several popular methods as listed below:
Install Git From an Installer
- Navigate to the latest macOS Git Installer and download the latest version.
- Once the installer has started, follow the instructions as provided until the installation is complete.
- Open the command prompt «terminal» and type
git versionto verify Git was installed.
Note: git-scm is a popular and recommended resource for downloading Git on a Mac. The advantage of downloading Git from git-scm is that your download automatically starts with the latest version of Git. The download source is the same macOS Git Installer as referenced in the steps above.
Install Git from Homebrew
Homebrew is a popular package manager for macOS. If you already have Homwbrew installed, you can follow the below steps to install Git:
- Open up a terminal window and install Git using the following command:
brew install git. - Once the command output has completed, you can verify the installation by typing:
git version.
Install Git on Linux
Fun fact: Git was originally developed to version the Linux operating system! So, it only makes sense that it is easy to configure to run on Linux.
You can install Git on Linux through the package management tool that comes with your distribution.
Debian/Ubuntu
- Git packages are available using
apt. - It’s a good idea to make sure you’re running the latest version. To do so, Navigate to your command prompt shell and run the following command to make sure everything is up-to-date:
sudo apt-get update. - To install Git, run the following command:
sudo apt-get install git-all. - Once the command output has completed, you can verify the installation by typing:
git version.
Fedora
- Git packages are available using
dnf. - To install Git, navigate to your command prompt shell and run the following command:
sudo dnf install git-all. - Once the command output has completed, you can verify the installation by typing:
git version.
Note: You can download the proper Git versions and read more about how to install on specific Linux systems, like installing Git on Ubuntu or Fedora, in git-scm’s documentation.
Other Methods of Installing Git
Looking to install Git via the source code? Learn more here.
Contribute to this article on GitHub.
Get started with git and GitHub
Review code, manage projects, and build software alongside 40 million developers.
Sign up for GitHub
Sign in
Git BASH 64 bit Download [Free]
Download Git BASH for Windows 11 64 bit. Install Git BASH latest (2023) full setup on your PC and laptop from FileHonor.com (100% Safe).
A lightweight, native set of tools that bring the full feature set of the Git SCM to Windows

Git BASH is a Code Editors & IDE software. A lightweight, native set of tools that bring the full feature set of the Git SCM to Windows
Download Git BASH latest version 2023 free for Windows 11 and 10. Official direct download (64 bit).
How to Download and Install for Windows 11?
- Click on the GREEN Download button above
- Choose your favorable download option. Usually go for the first download link
- Save Git BASH installer to your local drive
- Double Click on the installer to start the installation
- Accept Git BASH end user agreement license
- Follow intructions till you finish
- Have Fun
Technical Details
- Rating
- 9.7 / 10
- Category
- Code Editors & IDE
- Version
- Latest
- License
- Freeware
- OS
- Windows 11 64 Bit
- Size
- 48+ Mb
- Updated
How to install the latest version of Git BASH:
- Download Git BASH setup file from the above download button
- Double click on the downloaded setup file
- A smart screen will appear asking for confirmation to install the software, Click «Yes»
- Finally, follow the installation instructions provided by the setup file
How to uninstall — remove — Git BASH from Windows 11?
- Open Windows Start Menu, then open Settings
- From Settings >> Open Apps section
- All installed apps appear, then navigate to the desired app and click Uninstall
- Confirm, and you are done
Quick Review
Git for Windows focuses on offering a lightweight, native set of tools that bring the full feature set of the Git SCM to Windows while providing appropriate user interfaces for experienced Git users and novices alike.
Disclaimer
Git BASH for Windows 11 is developed and updated by gitforwindows. All registered trademarks, product names and company names or logos are the property of their respective owners.
Similar Software
You can get the latest setup of Git Bash by just managing this page. The software is absolutely free and available all over OS. Git Bash is a command line interface (CLI) tool that provides a Unix-like environment on Windows PCs. It allows you to use Git commands and perform various operations on your code repositories.
You can also get it from its official site
- Visit the official Git website: https://git-scm.com/.
- On the homepage, click on the “Download” button to go to the download page.
- On the download page, you will see options for different operating systems. Click on the download link for Windows.
- Once the download is complete, locate the installer file (e.g.,
Git-2.x.x.x-64-bit.exe) and double-click on it to start the installation process. - Follow the installation wizard’s instructions, accepting the default settings unless you have specific preferences.
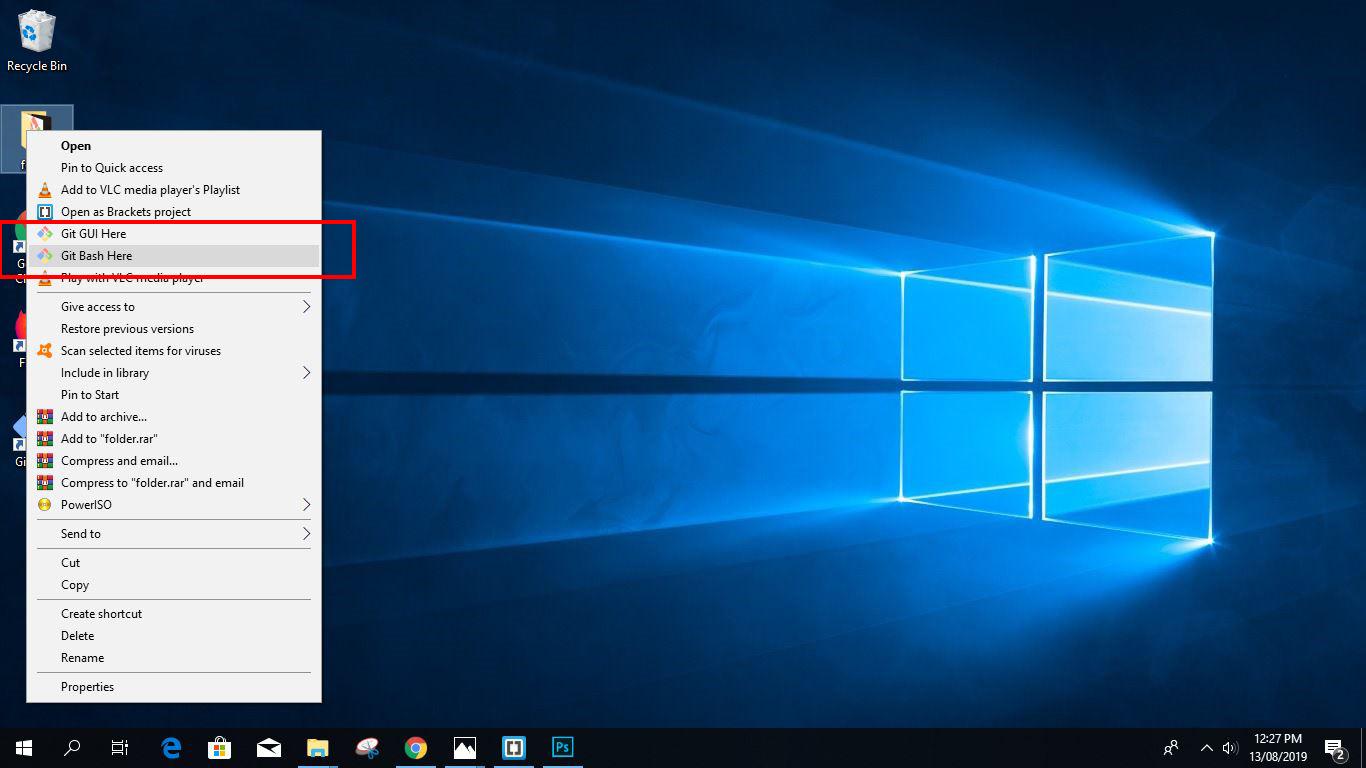
- On the “Select Components” screen, ensure that the “Git Bash Here” option is checked. This will add an option to open Git Bash from the context menu when you right-click on a folder in Windows Explorer.
- Continue with the installation, and once it’s complete, click on the “Finish” button.
After the installation, you can open Git Bash by following these steps:
- Open the folder or directory where you want to use Git Bash.
- Right-click inside the folder (or press Shift+Right-click) to open the context menu.
- From the context menu, select “Git Bash Here.” This will open a new Git Bash terminal window.
In the Git Bash terminal, you can use various Git commands to manage your repositories and perform tasks like cloning, committing changes, pushing to remote repositories, etc.
Note that Git Bash provides a command line interface, so you’ll need to be familiar with Git commands to make the most of it. You can refer to Git documentation or online resources to learn more about using Git commands effectively.
Git Bash is a package that includes the open-source version control system git and the Bash shell. It also comes packaged with a few additional commands that are useful for working on the Windows operating system. Download the installer from the Git website and run it. The installation wizard will ask you to confirm some settings and read the GNU General Public License.
Basics
Git Bash is a tool that allows Windows users to access command line features in the operating system. The tool also comes packaged with additional commands like cd which is used to change the current directory. The first step in installing Git Bash is to go to the official website and click the download link. Once the download has finished, open the executable file and follow the prompts to install the application.
During the installation, you can select which components to include in your Git Bash install, and you can also create a desktop shortcut for it. Once the installation is complete, you can begin executing Git commands.
Git is a version control system that has become one of the most popular tools for collaborative software development. It is a collection of command-line utility programs that are designed to run in a Unix-style environment. While Linux and macOS include built-in UNIX terminals, Microsoft Windows uses a different CLI called Command Prompt, which makes it difficult to use Git.
Installation
Git is a program that makes version control easier by tracking changes to files. While it is typically used on Unix-based systems such as Linux and Mac, Windows uses a different shell, so it requires an emulator to run Git commands. Git Bash for Windows installs a bash environment and some bash utilities to allow git commands to be used in a terminal.
The installation process is relatively straightforward. Click the download button on the Git Website and follow the instructions. This should include reading and agreeing to the license agreement.
The next step allows you to choose a text editor to use with Git (Notepad++ is recommended). The final installation step will let you adjust the PATH environment. This is the default set of directories included when running a command from the command line. Select the middle option and click Next. Once complete, you should see a Git Bash icon on your desktop and be able to launch it by right-clicking on any folder.
Configuration
During Git Bash Setup, you will be presented with a few options. Select the option that says On the desktop to create a shortcut to launch Git Bash on your Windows computer.
The next option relates to which SSH client Git should use. It is recommended to leave the default selection (OpenSSH) selected as this is the same default used for GitHub. The final option relates to how line endings are converted, it is also recommended to leave the default selected as changing this may cause problems.
Git Bash is an emulation of a bash shell environment that allows git to be used on a Windows machine. It includes bash commands and some other tools that are commonly used with git. Git Bash can be run from a terminal or by using a GUI like GitKraken Client. This combination gives you the power of a powerful Git command-line experience along with visualization features. It is useful to review basic Bash usage before using this emulation.
Usage
Git Bash for Windows allows users to access and run all of the core Git commands like git clone, git commit, git checkout, git push, etc. It also provides a Linux terminal experience that includes basic shell utilities like ls (list files) and cd (change directory).
Git is an open-source version control system for tracking changes in source code during software development. It enables software developers to collaborate on projects by keeping track of the history of revisions made to a set of files.
During the installation process, users can choose between several options to configure Git Bash for Windows. They can choose to “Use Git from Git Bash only” to only use Git commands within the Git Bash terminal. Alternatively, they can select “Git from Git Bash and also from 3rd-party software” to use both Git commands and the corresponding bash utilities on Windows Command Prompt and PowerShell.
Introduction
In this tutorial you will install Git Bash on your Windows operating system. Git Bash is one of the most popular packages on Windows system. It comprises of git and bash. Git was created in 2005 by Linus Torvalds, and was built around a Unix-based system, such as the Linux operating system and MacOS. These operating systems have a built-in shell called bash that allows Git to run smoothly.
On the other hand, Windows is not a unix-based system and uses a different shell from bash, which git doesn’t support out of the box. To bridge the gap, Git Bash was created. Git bash installs both git and bash shell on a Windows system giving it access to command line tools that allow git to run properly. Additionally, git bash also installs bash tools such as ssh, cat, nano that makes developing on Windows easier.
What is Git?
Git is an open-source version control system for tracking source code changes when developing software. It keeps a commit history which allows you to revert to a stable state in case you mess up your code. Another common use for git is collaboration. git also allows multiple developers to collaborate on the same code base. it tracks all the changes each developer has made, and once the changes are accepted, the changes are merged into one code base which is deployed in production.
What is Bash?
Bash is a Unix command-line shell. The name is an acronym for the ‘Bourne-Again Shell’. A shell is a command line interpreter that gives the user an interface to interact with the computer through the use of commands.
Bash has a lot of useful commands, such as rsync,ssh, SCP, etc., which are not available on windows by default.
Now that you have an idea of that git bash and the tools it installs on Windows, you will download git bash in the next section.
Prerequisites
To follow this tutorial you will need:
- Windows administrator privileges.
- A text editor. You can download Visual Studio Code or Notepad++.
Step 1: Downloading Git Bash
In this section, you will download Git Bash executable from the official website.
Open your preferred browser and visit Git Bash downloads page by clicking the following link: Git Download Page
Once the page loads, click the Download for Windows button.
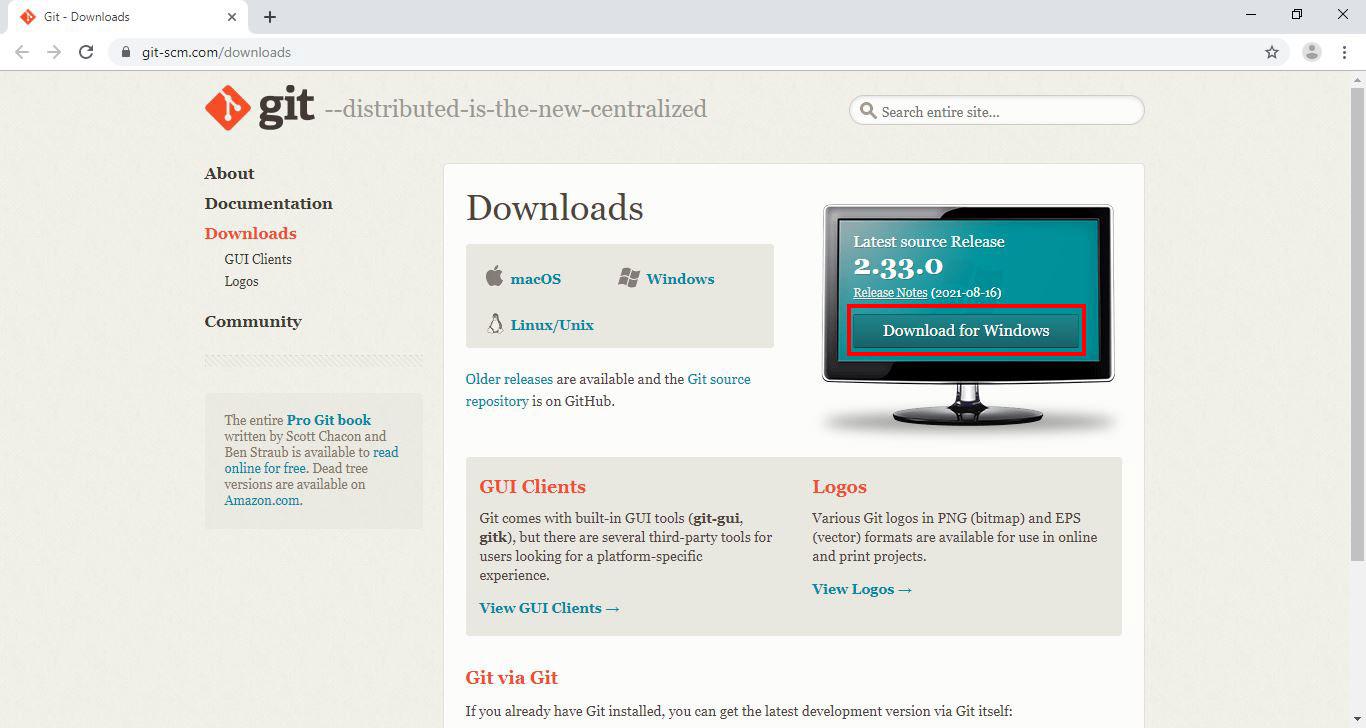
Next, you will be redirected to a different page and download will start automatically in a few seconds.
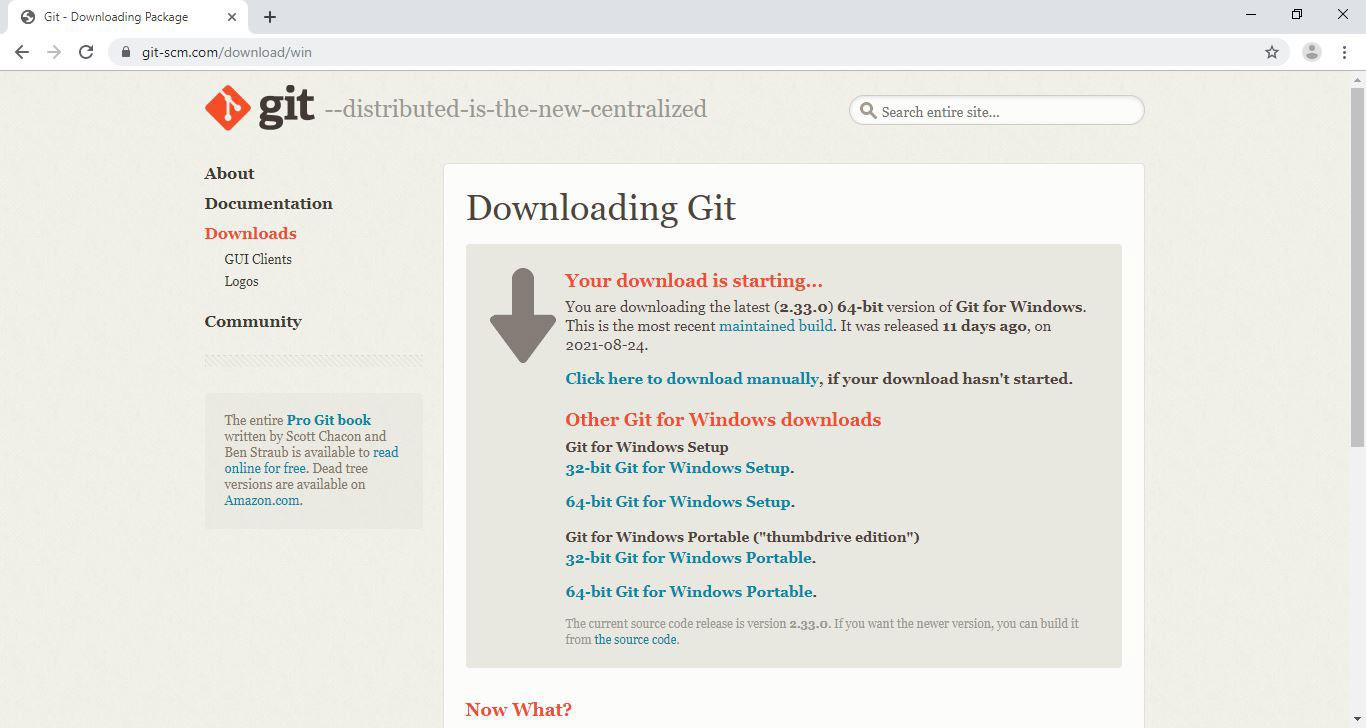
Tip: If the download doesn’t start, click on the click here to download manually link.
Now that you have downloaded the Git Bash executable, you will run the installer.
Step 2: Running the Installer
In this step you will start the Git Bash installation wizard. Go into your Downloads directory or the location where your browser download things in. Click the Git Bash executable(.exe file) to run the installer.
Windows will prompt you with the message «Do you want to allow this app to make changes to your device?», click Yes.
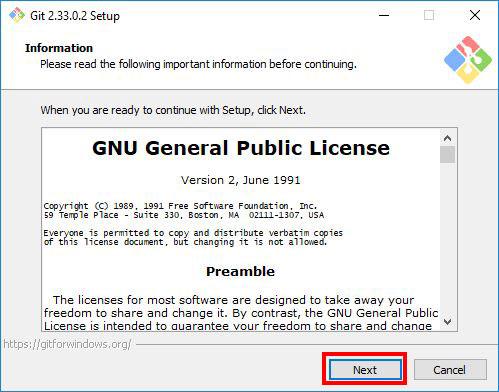
Next, read the GNU General Public License and click Next.
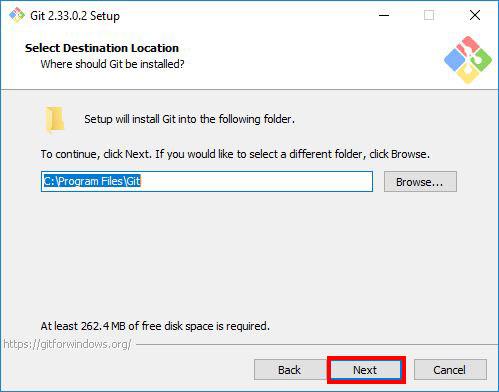
Step 3: Selecting the Destination Location
In this step, the installer will ask you select the location you want to install Git Bash. Proceed with the default option, and click Next.
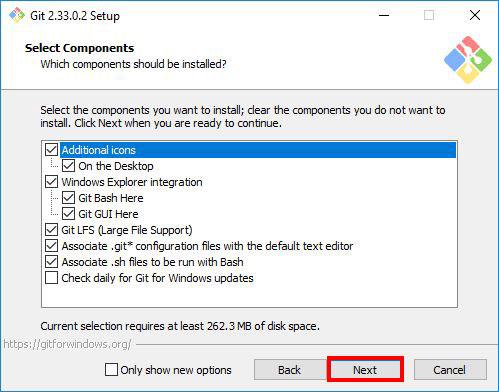
Step 4: Selecting Components
Select the components you want to install. I prefer selecting the Additional icons component which creates a Git Bash shortcut on the desktop. After you’ve selected the components, click Next.
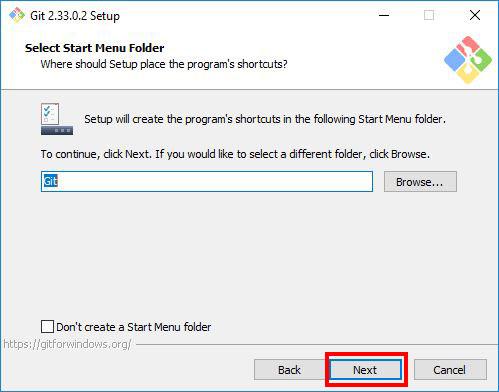
The installer will ask you to choose the folder to create Start Menu folder. Proceed with the default name by clicking Next.
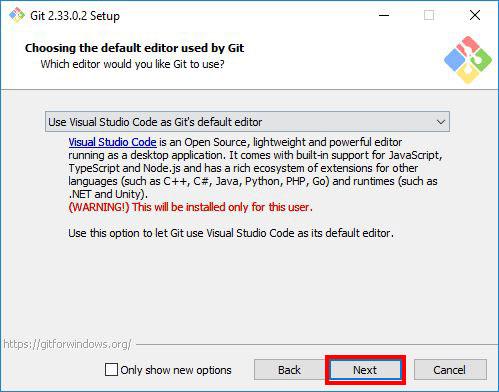
Step 6: Choosing the Default Editor for Git
In this step, the installer will ask you to choose the default editor for Git. By default it chooses Vim, please don’t proceed with the Vim editor as it has a steep learning curve.
Instead, choose a text editor that you like. If you looking for recommendations, you can download Visual studio code or notepad++ which are much easier to use and restart the installation wizard.
I prefer Visual Studio code, so I will select that.
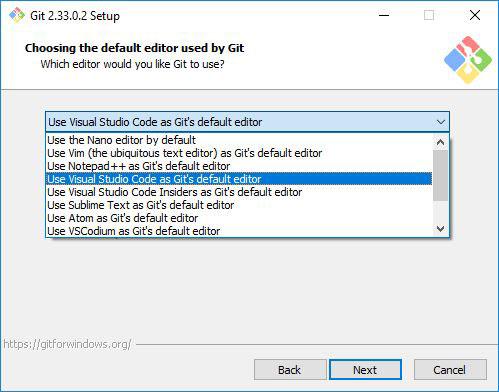
After choosing the editor, click Next.
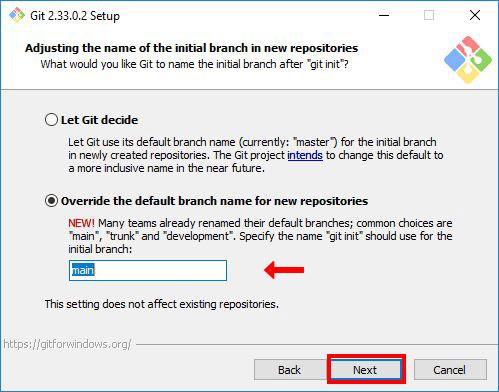
Step 7: Adjusting the Name of the Initial Branch in New Repositories.
The installer will now ask you to choose the branch name for new repositories. Naming a branch master used to be a popular naming convection, but lately there has been a shift to naming branches main. This due to negative association with the word master. Even GitHub changed the default branch name from master to a more inclusive name main.
So in this step, we will name the branch name main. select the Override the default branch name for new repositories option, and type main. After that, click Next.
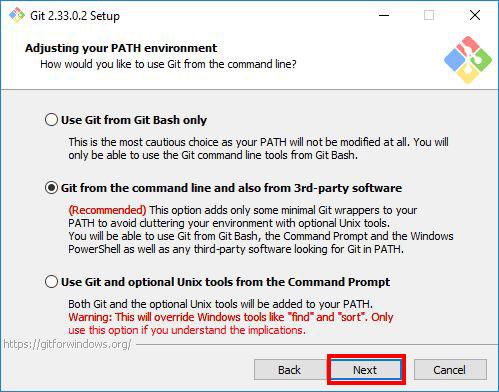
Step 8: Adjusting your PATH Environment
In this section, the installer will ask you to choose how you want to use Git. It offers you the following options:
-
Use Git from Git Bash only: allows you to run Git and Bash commands in the Git Bash terminal only. The commands won’t work on Windows Command Line(CMD) or PowerShell.
-
Git from the command line and also from 3rd-party software(recommended): allows you to run Git commands only on CMD, PowerShell and when you need bash commands, you will need to open the Git Bash terminal.
-
Use Git and optional Unix tools from the Command Prompt: Allows you to run both Git and Bash commands on CMD or Powershell. This option overrides default CMD tools like find and sort.
We will go with the default option Git from the command line and also from 3rd-party software. We will be able to use Git on all terminals: CMD, PowerShell and Git Bash terminal. And we can always open the Git Bash Terminal when we need more bash tools. Click Next to proceed.
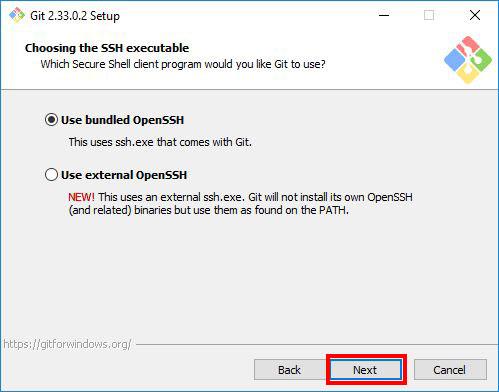
Step 9: Choosing the SSH executable
Select the Secure Shell(SSH) client, it’s recommended to go with the default option. So select Use bundled OpenSSH, and click Next.
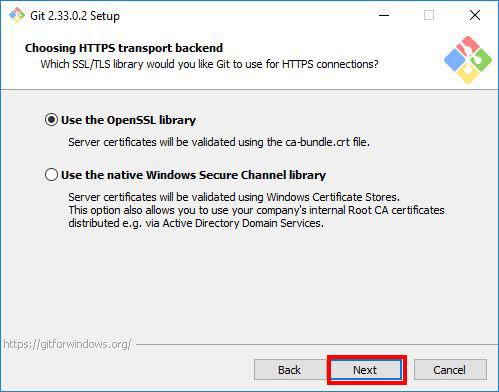
Step 10: Choosing HTTPS Transport Backend
The installer will ask you to choose the SSL/TLS library for Git HTTPS connections. Proceed with the default option Use the OpenSSL library and click Next.
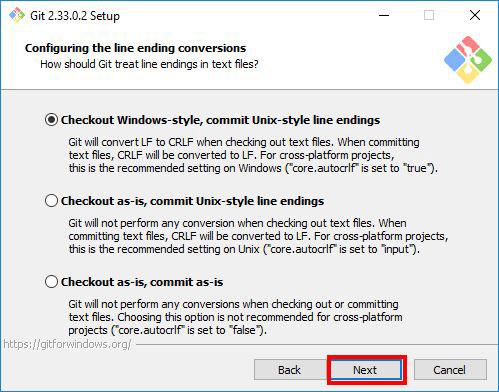
Step 11: Configuring the Line Ending Conversions
In this step, you will be prompted to choose how Git should treat line endings in text files. Since you are on Windows system, go with the default option Checkout Windows-Style, commit Unix-style line endings and click Next.
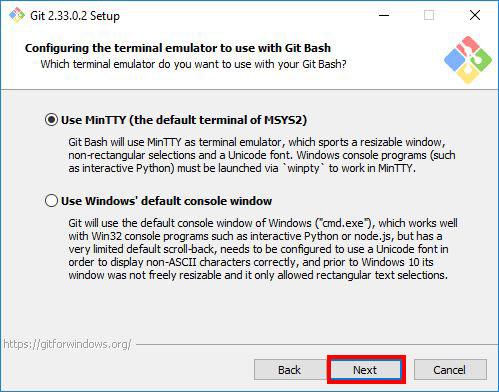
Step 12: Configuring the Terminal Emulator to use with Git Bash
Choose the terminal emulator you want Git Bash to use. MinTTY works well, so I would recommend you to proceed with the default option Use MinTTY(the default terminal of MSYS2) and click Next.
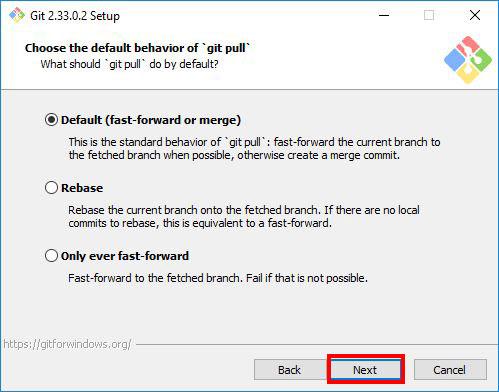
Step 13: Choosing the Default Behaviour of git pull
In this step, the installer asks you if you want to change the default behaviour of git pull(a git command). Unless you know what you doing, proceed with the default option Default (fast-forward or merge) and click Next.
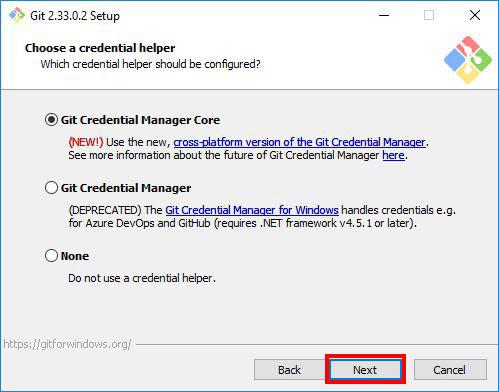
Step 14: Choosing a Credential Manager
In this step, you will be asked to choose a credential manager. Proceed with the default option Git Credential Manager Core and click Next.
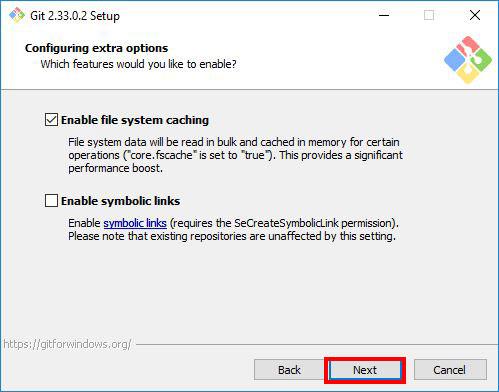
Select the features you want. I find the default options sufficient for my needs. You can proceed with them and click Next.
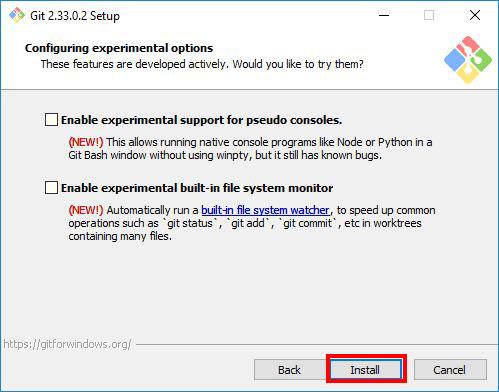
Step 16: Configuring Experimental Options
If you are feeling adventurous, you can try new experimental features. I like to play it safe and I don’t enable them, so I will proceed to start the installation process by clicking Install.
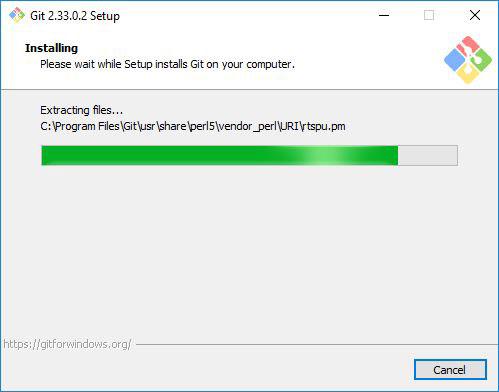
Step 17: Waiting for Git Bash to install
In this step, you take a step back and wait for a few minutes for the Setup Wizard to install Git Bash on your computer.
Step 18: Completing the Installation
After the installation has finished, select Launch Git Bash and click Finish to launch Git Bash.
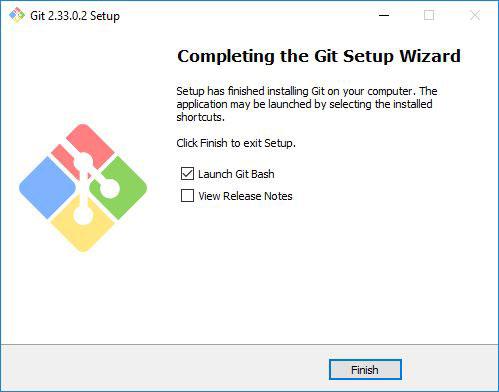
The Git Bash terminal will now open and you will be able to enter Git and Bash commands.
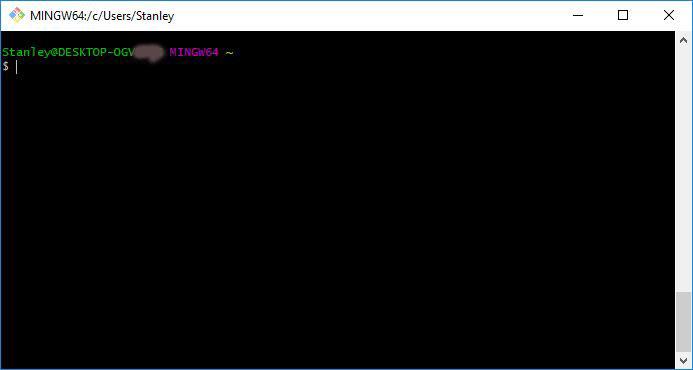
Congratulations on successfully installing Git Bash.
Step 19: Launching Git Bash
The following are just some tips on how you can easily launch Git Bash.
1. Right-click on any folder, anywhere and it will have the launch Git Bash option on the context menu.
2. If you enabled the «Additional icons» option on Step 4, you can easily launch Git Bash by clicking the Git Bash desktop icon.

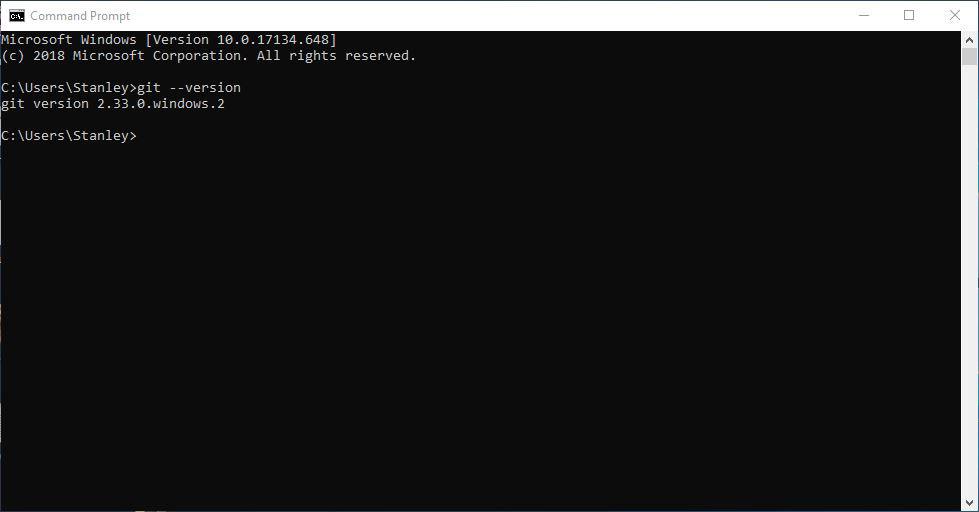
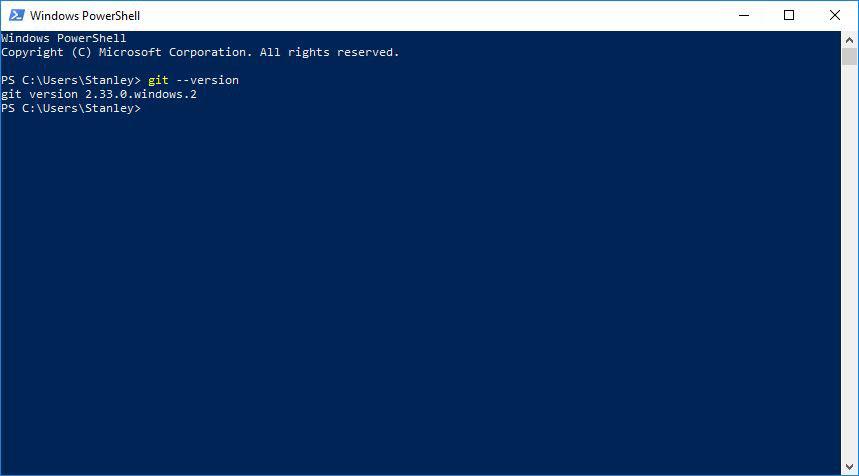
As mentioned in Step 7, you will be able to run Git commands on Git bash terminal, Windows Command Prompt, and Powershell.
Quickly, lets verify that Git works on CMD and PowerShell by typing the following commands:
- git --version
git --version tells you the Git version currently installed on your system.
Conclusion
In this article you installed Git Bash on your windows system. You also verified that Git works on CMD, and PowerShell. You are now ready to start learning Git. Visit gittutorial — A tutorial introduction to Git to learn the basics.
Thanks for reading.