The new update will feature many new changes and added features from v1.4.9 (Free Version) shown below:
New Design
DSX has been redesigned from the ground up to make the user experience much more fluid and enjoyable!
Bug Fixes
A ton of bug fixes and improvements
Touchpad LED Modes
- Static Color
- Rainbow
- Custom
- Breathing
- Strobing
- Battery
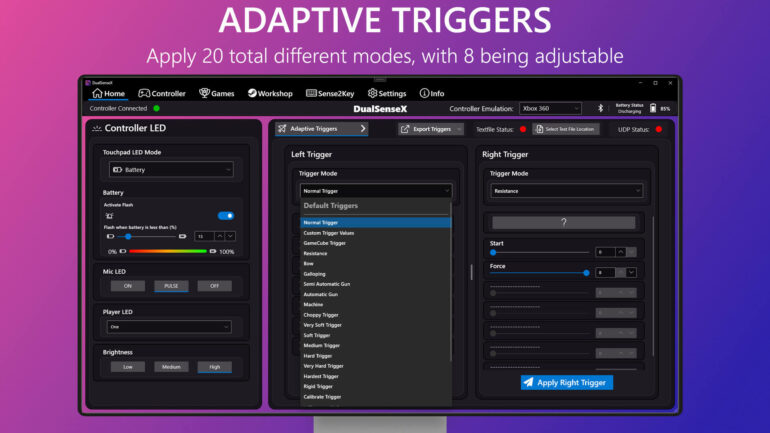
Adaptive Triggers
- Applying Trigger modes have been separated for Left Trigger and Right Trigger
- Export Triggers implementation:
- Copy to clipboard
- Export for Textfile use
- Export for UDP use
Controller Vibration
Separated from Adaptive triggers list with two modes available:
- Time based – Choose your intensity and time up to 1,000 seconds
- Interval based – Choose your intensity/Interval and time up to 1,000 seconds
Games Tab
Games Tab has a mod section with list of mods you can use that works with DSX through either UDP or Textfile method to talk with the controller to have dynamic Adaptive Triggers
Workshop Tab
In a future update, users will be able to view the Workshop Tab to find adaptive trigger profiles submitted by other users, more on this later!
Stats Tab
19 Fun Achievements like Travel Distance of Triggers, Number of button presses combined and more!
Stats Tab is all about viewing your stats and Achievements/Leaderboards.
Three Menus:
- Achievements – View your progress for unlocking all 19 Achievements.
- My Stats – View your current Trigger Distance and number of button presses
- Leaderboards (Coming in a later update) – View global ranking of Trigger Distance and number of button presses
Shortcuts
With shortcuts, you can manually open the Game Bar or turn off the DualSense Controller (BT)
HidHide
HidHIde has now been integrated within DSX again to hide the physical controller
and a lot more…
1.4.9
What’s New:
● Touchpad to Mouse NEW
- Scroll with 2 fingers as well as adjusting scroll speed
- Invert Scroll toggle
- 3 different sensitivity speeds for mouse movement
can choose any of the Controller buttons to activate them - Left Click in pressed state with any Controller Button
- Right Click with any Controller Button then tap or press
● Audio Haptics
- Delay slider has been implemented with adjustments from 1-20ms
- Resolved issue not being able to toggle ON/OFF
- Some internal changes to improve the experience
● Other Changes
- HidHide has been removed completely
please use theHidHide Configuration Clientinstead - Settings Page elements have been adjusted for clarity
- Minor Bug fixes and stability improvements
- Improved connection with the controller for a better experience
Happy Holidays and Happy New Year! 🎉
If you enjoy this App, please consider checking out my other work
Getting Started:
To use DualSenseX,
-
Download the DualSenseX-Setup.zip below
- To install, double-click
DualSenseX-Setup.exe.
- To install, double-click
-
Very important and required get ViGEmBus Driver:
- Download the latest
ViGEmBusdrivers from the ViGEmBus release page. - To install, double-click
ViGEmBus_Setup_{version}.exeand follow the instructions presented.
- Download the latest
-
HidHide Driver (OPTIONAL):
- Download the latest
HidHidedrivers from the HidHide release page. - To install, double-click
HidHideMSI.msiand follow the instructions presented. - MAKE SURE YOU REBOOT TO TAKE EFFECT
- Download the latest
Once thats done, the DualSense Controller should auto connect to the App.
DSX has been officially released on Steam!


All future updates will be for the Steam Version.
🛑 DSX on STEAM supports the DualSense Edge on PC 🛑
1.4.8
What’s New:
● Touchpad to Mouse NEW
- Scroll with 2 fingers as well as adjusting scroll speed
- Invert Scroll toggle
- 3 different sensitivity speeds for mouse movement
can choose any of the Controller buttons to activate them - Left Click in pressed state with any Controller Button
- Right Click with any Controller Button then tap or press
● Audio Haptics
- Delay slider has been implemented with adjustments from 1-20ms
- Resolved issue not being able to toggle ON/OFF
- Some internal changes to improve the experience
● Other Changes
- HidHide has been removed completely
please use theHidHide Configuration Clientinstead - Settings Page elements have been adjusted for clarity
- Minor Bug fixes and stability improvements
- Improved connection with the controller for a better experience
Happy Holidays and Happy New Year! 🎉
If you enjoy this App, please consider checking out my other work
Getting Started:
To use DualSenseX,
-
Download the DualSenseX-Setup.zip below
- To install, double-click
DualSenseX-Setup.exe.
- To install, double-click
-
Very important and required get ViGEmBus Driver:
- Download the latest
ViGEmBusdrivers from the ViGEmBus release page. - To install, double-click
ViGEmBus_Setup_{version}.exeand follow the instructions presented.
- Download the latest
-
Very important and required get HidHide Driver:
- Download the latest
HidHidedrivers from the HidHide release page. - To install, double-click
HidHideMSI.msiand follow the instructions presented. - MAKE SURE YOU REBOOT TO TAKE EFFECT
- Download the latest
Once thats done, the DualSense Controller should auto connect to the App.
1.4.7
What’s New:
● Info Tab
- Added a new section «My Work»
- Elements and sections have been adjusted for Light/Dark Mode
- Fixed Donate buttons not working
● Player LED
- Fixed issue where the saved mode would not load when App starts
● Audio Haptics
- Some adjustments to improve the experience
Getting Started:
To use DualSenseX,
-
Download the DualSenseX-Setup.zip below
- To install, double-click
DualSenseX-Setup.exe.
- To install, double-click
-
Very important and required get ViGEmBus Driver:
- Download the latest
ViGEmBusdrivers from the ViGEmBus release page. - To install, double-click
ViGEmBus_Setup_{version}.exeand follow the instructions presented.
- Download the latest
-
Very important and required get HidHide Driver:
- Download the latest
HidHidedrivers from the HidHide release page. - To install, double-click
HidHideMSI.msiand follow the instructions presented. - MAKE SURE YOU REBOOT TO TAKE EFFECT
- Download the latest
Once thats done, the DualSense Controller should auto connect to the App.
1.4.6
What’s New:
● New way of saving App Settings, the previous save file will no
ㅤㅤlonger be used and will be deleted after updating. It will
ㅤㅤbe as if you installed the App for the first time, if you
ㅤㅤhave any settings in there, please take note of them to
ㅤㅤreapply them after the update. Sense2Key Profiles will
ㅤㅤnot be deleted, apologize for the inconvenience.
● Touchpad Rainbow speed slider has been replaced with 4 new
ㅤㅤspeed presets to choose from: Slow, Medium, Fast, and Hyper.
● Info Tab has been redesigned completely to match the macOS version
ㅤㅤDSM (DualSenseM). This gives a preview of the redesign of the
ㅤㅤApp completely that will follow.
● Some minor bug fixes
Getting Started:
To use DualSenseX,
-
Download the DualSenseX-Setup.zip below
- To install, double-click
DualSenseX-Setup.exe.
- To install, double-click
-
Very important and required get ViGEmBus Driver:
- Download the latest
ViGEmBusdrivers from the ViGEmBus release page. - To install, double-click
ViGEmBus_Setup_{version}.exeand follow the instructions presented.
- Download the latest
-
Very important and required get HidHide Driver:
- Download the latest
HidHidedrivers from the HidHide release page. - To install, double-click
HidHideMSI.msiand follow the instructions presented. - MAKE SURE YOU REBOOT TO TAKE EFFECT
- Download the latest
Once thats done, the DualSense Controller should auto connect to the App.
1.4.5
What’s New:
● New way of saving App Settings that doesn’t get corrupted Due
ㅤㅤto the new system, the previous save file will no longer
ㅤㅤbe used and will be deleted after updating. It will be as if
ㅤㅤyou installed the App for the first time, if you have any
ㅤㅤsettings in there, please take note of them to reapply them
ㅤㅤafter the update. Sense2Key Profiles will not be deleted.
● Audio Haptics now include more options for better customization
ㅤ It will now auto detect the current Default Playback Device
ㅤㅤand will try to reapply the Haptics. There’s a new refresh list
ㅤㅤbutton incase it fails to switch or a device was removed etc..
ㅤㅤThere’s a new Volume Sync Options Dropdown, which allows you to
ㅤㅤsync and change the volume going to the Controller. Depending
ㅤㅤon the Sync options, there are 4 New Sliders to manually adjust
ㅤㅤThe Volume for Left/Right Motor and/or Headset/Speaker.
● Touchpad LED redesigned with a new Dropdown of 3 options
ㅤㅤStatic Color, Rainbow, and Custom to set RGB values manually
● Player LED has a new option called Battery Level which will
ㅤㅤdisplay the Battery level through the 5 LED’s. There’s also
ㅤㅤanother option to have the LED flash While it’s charging
● A new option in settings, a Reset App Settings Button which
ㅤㅤcan help in troubleshooting, it will make the current save
ㅤㅤfile Named to DSX_SaveFile_OLD.xml, if you wish to revert
ㅤㅤgo to C:\Temp\DualSenseX\ and just remove the «_OLD» from
ㅤㅤthe name.
● Added an initial loading phase at the start of the app
● Touchpad Rainbow mode has been fixed, will no longer cause
ㅤㅤthe UI to freeze, as well as adding hyper speed changing,
ㅤㅤbe sure to give it a try!
● Many Crashes and Bugs fixed to make App much more stable
● Overlay has been disabled as it’s not being worked on for now
Getting Started:
To use DualSenseX,
-
Download the DualSenseX-Setup.zip below
- To install, double-click
DualSenseX-Setup.exe.
- To install, double-click
-
Very important and required get ViGEmBus Driver:
- Download the latest
ViGEmBusdrivers from the ViGEmBus release page. - To install, double-click
ViGEmBus_Setup_{version}.exeand follow the instructions presented.
- Download the latest
-
Very important and required get HidHide Driver:
- Download the latest
HidHidedrivers from the HidHide release page. - To install, double-click
HidHideMSI.msiand follow the instructions presented. - MAKE SURE YOU REBOOT TO TAKE EFFECT
- Download the latest
Once thats done, the DualSense Controller should auto connect to the App.
1.4.4
What’s New:
● Added Audio Haptics feature in Controller Settings
Requires you to be connected through a USB cable
There is a dropdown of the list of Audio Devices,
it will choose the currently set default one to start with
You can select your listening device Headphones, speakers, etc..
Does not require the Controller to be the Playback Device
It will auto send all audio to the controller
No longer need Voicemeeter for Audio Haptics
Special thanks to @DevFromDownUnder for figuring it out
Getting Started:
To use DualSenseX,
-
Download the DualSenseX-Setup.zip below
- To install, double-click
DualSenseX-Setup.exe.
- To install, double-click
-
Very important and required get ViGEmBus Driver:
- Download the latest
ViGEmBusdrivers from the ViGEmBus release page. - To install, double-click
ViGEmBus_Setup_{version}.exeand follow the instructions presented.
- Download the latest
-
Very important and required get HidHide Driver:
- Download the latest
HidHidedrivers from the HidHide release page. - To install, double-click
HidHideMSI.msiand follow the instructions presented. - MAKE SURE YOU REBOOT TO TAKE EFFECT
- Download the latest
Once thats done, the DualSense Controller should auto connect to the App.
1.4.3
● Finally fixed ViGEm/HidHide driver missing popup
1.4.2
● Fixed Dark mode being applied when a pop is shown
● Fixed «No Translation Found» by using english as default
for non translated keys
1.4.1
● Added a localhost UDP method to communicate with the controller
Can send all Trigger mode options left and right
Can send Left/Right Trigger Threshold
Can send Touchpad LED as RGB values
Can send Player LED 1-5 which ones to turn on
● Added a Left and Right Trigger Threshold to tell the emulation
when to send the «pressed» state to help when applying Triggers
● Added Controller Status to the Taskbar Icon
Hover over the icon to get the battery level
Right click the icon to get more info like connection type etc..
● Fixed bug with Background image not taking effect
● Fixed bug not detecting if ViGEm/HidHide is installed or not
1.4.0
● Fixed Audio System toggle not taking effect
● Fixed Period for Machine Trigger not working
● Fixed Machine Trigger Strength A and B sliders to only be 0-7
● Fixed bugs for text file for Machine and Bow Triggers
● Fixed loading last active trigger not being set individually
please reapply them to save
● Minor bug fixes and improvments
Are you tired of Rebinding your keyboard controls for every game that supports a controller, how about binding to a controller with a 100+ button layout like the DualShock 4? DualSense X is the solution. With DualSense you have the ability to connect your DualShock Controller through USB, Bluetooth, or both. Within the app, you can test out different configurations to see if the controller is working properly and if it’s worth mapping a game to the controller. This gives you a lot more freedom with what games you can use your DualShock 4 with.
 License: Free
Author: Paliverse
OS: Windows XP, Windows Vista, Windows 7, Windows 8, Windows 8.1, Windows 10, Windows 11
Language: English
Version:
File Name: DualSenseX for Windows 32 and 64 bit setup
File Size:
DualSenseX Overview
For example, if you get an Xbox 360 controller, but want to play games designed for an Xbox One controller you can map buttons on one to the other. Or maybe your favorite game doesn’t support controllers and bugs out? No problem, use the button mapper to emulate keyboard functionality directly from the controller. For example, clicking a mouse button could simulate pressing X on a keyboard. The app will automatically update the latest DualSense Firmware, Configure your controller with different Adaptive Trigger modes and Controller Vibration Modes. This will always be a free project, with no add-on or feature that you must pay for.
The DualSense App for Windows allows users to connect the DualSense Controller, and use it with several adaptive trigger modes for many of their favorite games. Configuration options are available to make the controller work on nearly any PC game that supports controllers. It works both with the official Microsoft wireless and wired controllers I’ve used for Windows, and now the DualShock 4 for PC.
Overall, DualSenseX is an open source app and will be always updated to ensure it works with the latest games, here is a list of games that work with DualSenseX. The Dual Sense X for PC is the only controller out there, giving you Dual Shock 4 like functionality using any PC and connecting via USB or Bluetooth.

Features of DualSenseX for PC
- Support for 20+ Languages
- Self-updating App, I will always strive to make the experience easy and hassle-free
- Launch App with Windows Startup
- Speaker/Headphone Jack audio (USB ONLY)
- Test out the controller to make sure all the buttons and joysticks function as intended
- Get the Battery life status of the controller
- Configure Controller LED to your liking
- Test out different Adaptive Trigger Modes and controller vibration
- See a list of supported games in the “Games” Tab (Work in progress)
- The game doesn’t support a controller? Map keyboard button clicks to controller buttons to simulate keypress
- The auto-connect controller when the app launches, with the ability to also kill steam if it’s running.
- Change between different hand-selected backgrounds for the App
- Dark and Light Mode
- Custom Border RGB Color with Transparency options
System Requirements
- Processor: Intel or AMD Dual Core Processor 3 Ghz
- RAM: 2 Gb RAM
- Hard Disk: 2 Gb Hard Disk Space
- Video Graphics: Intel Graphics or AMD equivalent
![]()
All programs and games not hosted on our site. If you own the copyrights is listed on our website and you want to remove it, please contact us. DualSenseX is licensed as freeware or free, for Windows 32 bit and 64 bit operating system without restriction.
Random Posts
Доброго времени суток, геймеры! С момента выхода дуалов появилась куча улит для их настройки. Но существует dualsenses x программа, которая по количеству функционала затмит все.
Кроме этого Сони выкатили свои драйвера для контроллеров. Давайте сравним, какое из ПО лучше.
Содержание
- Способ первый. Установка драйверов от PS
- Инструкция
- Что настраивается
- Способ второй. Улита Dualsense X
- Инструкция
- Что настраивается
- Что может пойти не так
- Какой способ лучше

Способ первый. Установка драйверов от PS
Начнём с официальной программы.
Прошивку для dualsense Сони выпустила вскоре после выхода контроллера. Скачать её можно с родного сайта.
Драйвера поддерживаются ОС Windows 10 или 11. Места занимает всего 10 Мб. Из дополнительных требований понадобится только поддержка расширения экрана от 1024 на 768. А также наличие USB-порта для настройки.

Инструкция
Для начала загрузите ПО на свой PC.
- Далее просто кликните по загруженному файлу для начала установку.
- Действуйте согласно подсказкам на экране.
ПО может запросить установку дополнительных компонентов. Просто согласитесь с этим пунктом.
- Далее просто запустите ПО и из меню выполните все нужные настройки.
- Если потребуется, обновите через данную программу обновлённую версию драйверов.
Готово! Ваш controller теперь можно использовать для игр на ПК.

Что настраивается
По словам игроков с новой прошивкой стали работать все возможности дуала. Напомним, что до этого не работали:
- тактильная отдача курков;
- вибрация по нажатию;
- светодиоды не мигали;
- контроллер можно было подключить только по проводу.
После обновления прошивки в некоторых играх появятся дополнительные настройки.
Раньше всё это работало только с дополнительными улитами типа DS4. А также сам контроллер запускался через Steam.

Работает без провода
Не требует дополнительного ПО
Все функции дуала работают
Не требовательный к железу
Легко и быстро устанавливается
Поддержка русского языка
Поддерживается только ОС Windows 10 и 11
Нет точных преднастроек
Для установки нужно подключение по USB
ПО скачивается с официального сайта поддержки dualsense. Установка простая и занимает пару минут.
Во время скачивания обновления геймпад необходимо подключить при помощи usb к компу.
В меню игрушек после апдейта появятся дополнительные настройки для триггеров, тактильной отдаче, вибрации и так далее.

Способ второй. Улита Dualsense X
Кроме официального ПО, существует ещё улита, которая имеет очень широкий спектр преднастроек.
В том числе можно настроить подсветку dualsense любыми цветами, которыми только возможно
. Есть куча преднастроек для курков и другие опции.

Инструкция
Программу DSX можно скачать со Стима, а также со стоков типа GitHub. Дальше придётся отдельно скачать драйвера для дуалов. Это всё также есть на сайте вместе с инструкцией.
Далее просто запустите файлик устанавливаться.
Если надо что-то обновить, то обновите. В меню статус соединения надо будет выбрать нужный тип джойстика.
В самой программе куча всяких переключателей, построек для запуска самой DSX. Можно поставить её на автозапуск, сделать так, чтобы она сразу подключала dual, а также настроить темы и язык интерфейса. Русский язык присутствует.

Что настраивается
При помощи данной улиты можно настроить контроллер максимально точно.
В разделе световой индикатор можно выбрать +100500 вариантов подсветки не только геймпада, но ещё индикатора микрофона. А также настроить яркость.
Есть здесь точечная настройка триггеров. Можно настроить как максимальное жёсткое нажатие, так слабое и найти что-то среднее.
Вибрацию можно поставить как на оба курка, так на каждый по отдельности. При этом можно даже сделать свою кастомный профиль.
Также здесь есть режим теста и проверки работы всех кнопок.
Точная настройка геймпада под себя
Можно играть без провода
Кастомные профили
Поддержка русского языка
Устанавливается быстро
Интерфейс для себя
Требует скачивания дополнительных драйверов
Поддержка только Windows 10 (64-бит)
Улита платная
Для MacOS есть аналогичная улита. Она называется Dualsense M.
Версия со Стима приобретается за 100 рублей. Но можно найти и скачать бесплатно.
У ПО есть возможность подобрать тему для интерфейса, включая тёмную. ПО также подходит для джойстиков от Xbox Series X и дуалшока 4.

Что может пойти не так
Бывает такое, что даже при запуске Dualsense X игра видит геймпад неправильно.
То есть она воспринимает его как иксбоксовский. Соответственно все подсказки отображает как для такого джойстика.
Для этого достаточно зайти в Стим. Далее в режиме Биг Пикчер выбрать среди контроллеров dualshock 4. Или сделать всё то же самое у эмулятора DS4.

Какой способ лучше
Теперь вы знаете, как пользоваться дуалом на своём ПК. Это может быть Dualsenses X программа или официальные драйвера от Sony.
Какой способ лучше, выбирайте в зависимости от своих предпочтений.
Если просто хотите, чтобы джойстик показывал все свои возможности в играх, выбирайте способ первый. Хотите точные настойки под себя? Выбирайте улиту.
Наш канал можно поддержать подпиской. Новость можно поддержать лайком или репостом. Остались вопросы по теме? Задавайте их под постом. Постараемся помочь. До скорых встреч!
 ⠀
⠀
 ⠀
⠀

DSX has been officially released on Steam!


All future updates will be for the Steam Version.
![]()
ㅤ
![]() ⠀
⠀
My other Work
All my Apple Apps (iOS) can be found here
DualSenseM for macOS

About App
App only works with the PS5 Controller DualSense
Bring your DualSense Controller to life on PC with support for Adaptive Triggers!
Emulate with the following while also getting the functionality of a DualSense Controller:
Xbox360
DualShock 4
OFF (for no Emulation, reading only inside app)
Whether you’re using Steam or a different platform, you will be able to use DualSenseX with all games!
Connection type supports both USB and Bluetooth with full functionality!
Download and Install
To use DualSenseX,
-
Download the DualSenseX-Setup.zip in Assets from the latest release.
- To install, double-click
DualSenseX-Setup.exe.
- To install, double-click
-
Very important and required get ViGEmBus Driver:
- Download the latest
ViGEmBusdrivers from the ViGEmBus release page. - To install, double-click
ViGEmBus_Setup_{version}.exeand follow the instructions presented.
- Download the latest
-
HidHide Driver (OPTIONAL):
- Download the latest
HidHidedrivers from the HidHide release page. - To install, double-click
HidHideMSI.msiand follow the instructions presented. - MAKE SURE YOU REBOOT TO TAKE EFFECT
- Download the latest
Once that’s done, the DualSense Controller should auto connect to the App.
Features:
- Support for 20+ Languages
- Self updating App, I will always strive to make the experience easy and hassle-free
- Launch App with Windows Startup
- Speaker/Headphone Jack audio (USB ONLY)
- Test out the controller to make sure all the buttons and joysticks function as intended
- Get Battery life status of controller (Connecting through USB cable will show 100% needs to be tweaked)
- Configure Controller LED to your liking
- Test out different Adaptive Trigger Modes and controller vibration
- See a list of supported games in the «Games» Tab (Work in progress)
- Game doesn’t support controller? Map keyboard button clicks to controller buttons to simulate key presses.
- Auto connect controller when app launches, with ability to also kill steam if it’s running.
- Change between different hand selected backgrounds for the App
- Dark and Light Mode
- Custom Border RGB Color with Transparency options
- and many more…
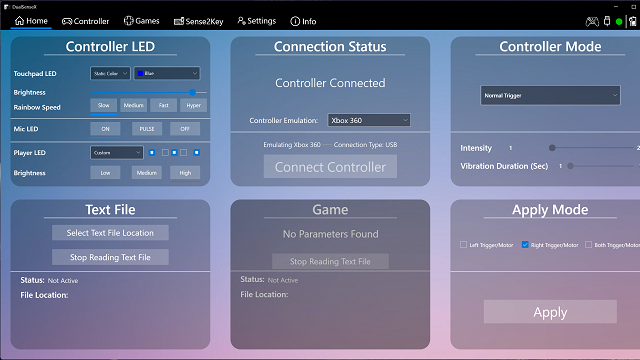
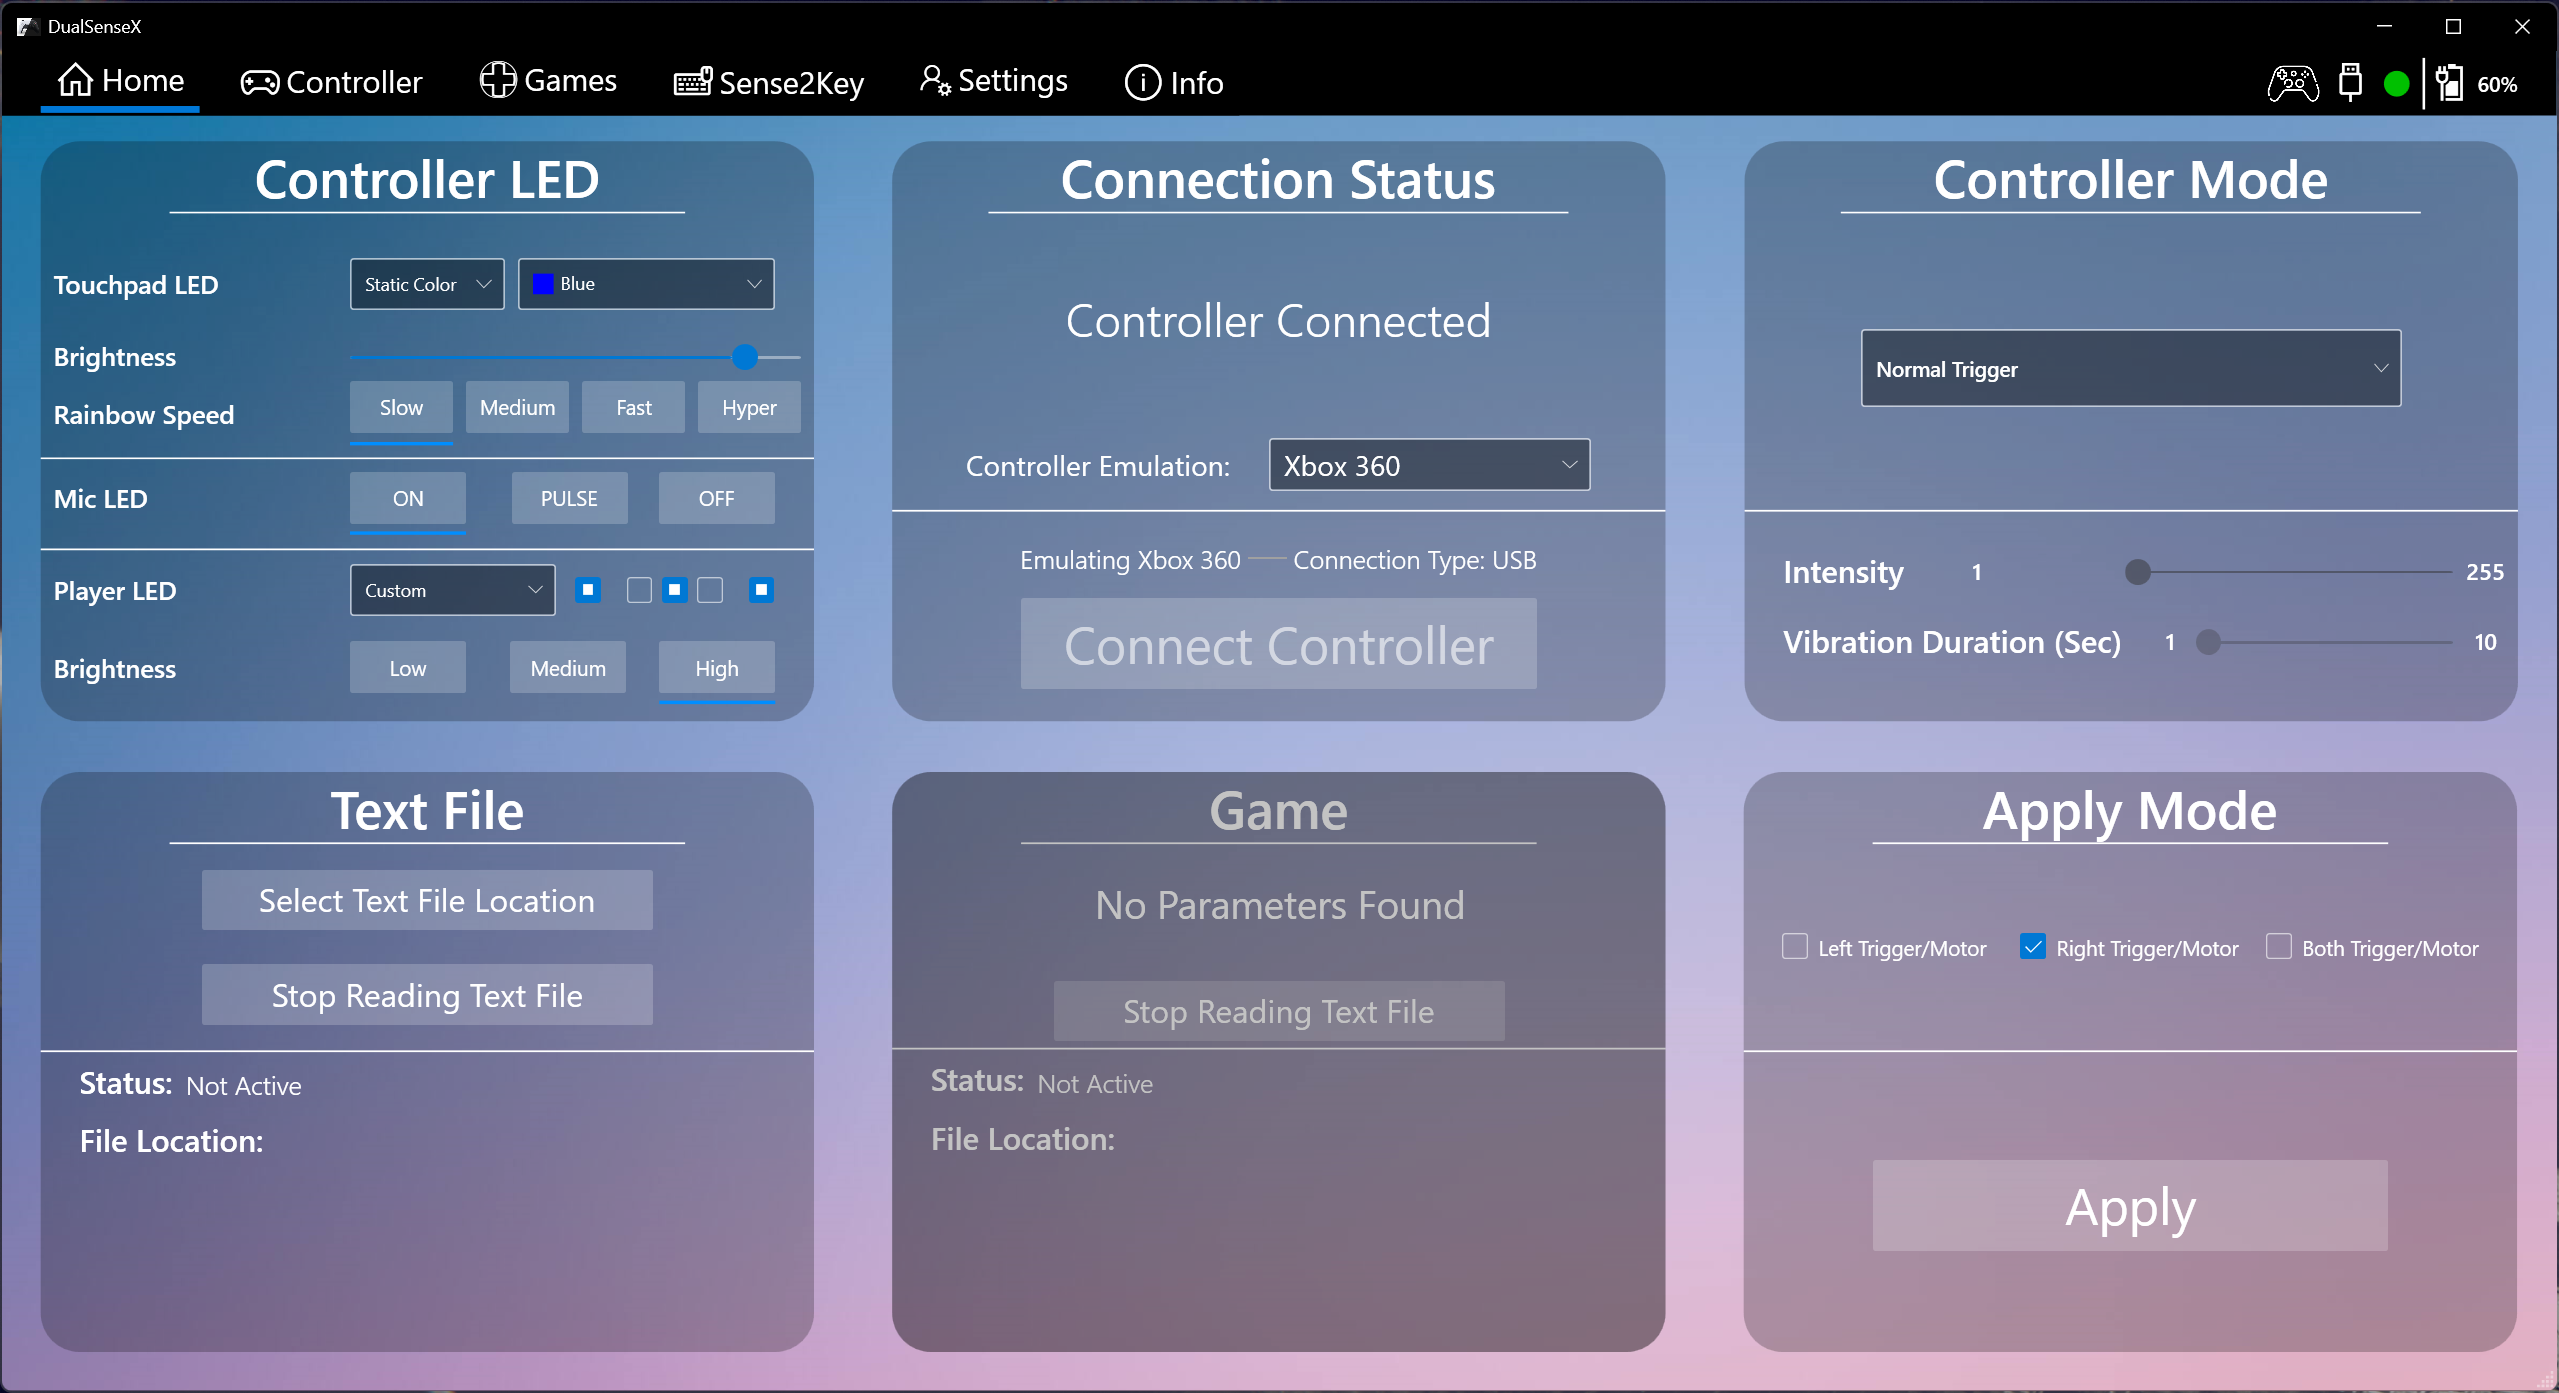
Screenshot:
Game Mods with DualSenseX
List of available Game Mods using DualSenseX to communicate with the controller:
DualSenseAT Central Hub Mod App
Central Hub Mod App: DualSenseAT
Game: Many games supported
Author: @TechZiN#7640
Cyberpunk 2077 Mod
Game: Cyberpunk 2077:
Mod Name: DualSense Adaptive Trigger Effects (Nexusmods)
Author: @Limai#4799
Forza Horizon 4 and 5 Mod
Game: Forza Horizon 4 and 5:
Mod Name: ForzaDualSense (Github)
Author: @rotatingFans#3125
Game: Assetto Corsa Mod
Game: Assetto Corsa:
Mod Name: DualSenseXLink (Race Department)
Author: @ryunyun#0227
GTA 5 Mod
Game: GTA 5:
Mod Name: DualSense4GTA5 (GitHub)
Author: @John D.#3775
Duck Game Mod
Game: Duck Game:
Mod Name: DualSense Adaptive Triggers (Steam)
Author: @ThaPhonk?#9118
Skyrim SE Mod
Game: Skyrim SE:
Mod Name: Skyrim SE Dual Sense Adaptive Trigger Mod
Author: @dvize#9382
Do NOT use these Mods in online games to avoid getting banned, doing so will be at your own risk. DSX will hold NO responsibility for using these Mods.
For Translators
Want to contribute in translating the app? Click below:
Join Discord Community!

- Report Issues
- Report Bugs
- Get support
- Ask questions regarding the App and more!
Reviews:
AJ Bants YouTube Channel

JUST A BONE YouTube Channel

For Game Devs
Support your game with DualSense Adaptive Trigger Capabilities With DualSenseX App, find out below how to get it setup, and get your game added within the App for all to see and play!
Trigger State
To get this working with your game, you have 2 methods to communicate with the controller.
First one is UDP Server/Client method through Localhost, Project example can be downloaded here
Second one is the Text file method described below:
There are a few things this App will look for when reading this text file to apply the triggers:
-
LeftTrigger= -
RightTrigger= -
VibrateTriggerIntensity=⠀⠀⠀⠀⠀⠀⠀* A value between 0-255 | VibrateTrigger Required to use this * -
CustomTriggerValueLeftMode=⠀⠀⠀⠀⠀* CustomTriggerValue Required to use this * -
CustomTriggerValueRightMode=⠀⠀⠀⠀* CustomTriggerValue Required to use this * -
ForceLeftTrigger= -
ForceRightTrigger=
For the LeftTrigger= and RightTrigger=, there are 19 different state possibilities that you can set, which are CASE SENSITIVE:
-
Normal -
CustomTriggerValue -
GameCube -
Resistance -
Bow -
Galloping -
SemiAutomaticGun -
AutomaticGun -
Machine -
Choppy -
VerySoft -
Soft -
Medium -
Hard -
VeryHard -
Hardest -
Rigid -
VibrateTriggerPulse -
VibrateTrigger
for ForceLeftTrigger= and ForceRightTrigger=
-
When using CustomTriggerValue there are 7 different values that goes into each parenthesis 0-255
- Example: ForceLeftTrigger=(0)(0)(0)(0)(0)(0)(0) or ForceRightTrigger=(0)(0)(0)(0)(0)(0)(0)
-
When using Resistance, there are 2 different values that goes into each parenthesis.
-
First: 0-9Second: 0-8 - Example: ForceLeftTrigger=(0)(0) or ForceRightTrigger=(0)(0)
-
-
When using Bow, there are 4 different values that goes into each parenthesis.
-
First: 0-8Second: 0-8Third: 0-8Fourth: 0-8 - Example: ForceLeftTrigger=(0)(0)(0)(0) or ForceRightTrigger=(0)(0)(0)(0)
-
-
When using Galloping, there are 5 different values that goes into each parenthesis.
-
First: 0-8Second: 0-9Third: 0-6Fourth: 0-7Fifth: 0-255 NOT recomended to go over 40 - Example: ForceLeftTrigger=(0)(0)(0)(0)(0) or ForceRightTrigger=(0)(0)(0)(0)(0)
-
-
When using SemiAutomaticGun, there are 4 different values that goes into each parenthesis.
-
First: 0-7Second: 0-8Third: 0-8 - Example: ForceLeftTrigger=(0)(0)(0) or ForceRightTrigger=(0)(0)(0)
-
-
When using AutomaticGun, there are 4 different values that goes into each parenthesis.
-
First: 0-9Second: 0-8Third: 0-255 NOT recomended to go over 40 - Example: ForceLeftTrigger=(0)(0)(0) or ForceRightTrigger=(0)(0)(0)
-
-
When using Machine, there are 6 different values that goes into each parenthesis.
-
First: 0-8Second: 0-9Third: 0-7Fourth: 0-7Fifth: 0-255 NOT recomended to go over 40Sixth: 0-2 in Decimals, example: 0.1, 0.8, 1.0, 1.8, 2.0 etc... - Example: ForceLeftTrigger=(0)(0)(0)(0)(0)(0) or ForceRightTrigger=(0)(0)(0)(0)(0)(0)
-
When using CustomTriggerValue, there are 17 different mode possibilites that are CASE SENSITIVE you can apply for:
CustomTriggerValueLeftMode=
CustomTriggerValueRightMode=
-
OFF -
Rigid -
Rigid A -
Rigid B -
Rigid AB -
Pulse -
Pulse A -
Pulse B -
Pulse AB -
VibrateResistance -
VibrateResistance A -
VibrateResistance B -
VibrateResistance AB -
Vibrate Pulse -
Vibrate Pulse A -
Vibrate Pulse B -
Vibrate Pulse AB
Examples of Trigger States in Textfile:
Apply Normal State:
LeftTrigger=Normal
RightTrigger=Normal
Apply Rigid State:
LeftTrigger=Rigid
RightTrigger=Rigid
Apply VibrateTrigger State for right Trigger:
LeftTrigger=Normal
RightTrigger=VibrateTrigger
VibrateTriggerIntensity=40
CustomTriggerValue State for right Trigger and GameCube for left Trigger:
LeftTrigger=GameCube
RightTrigger=CustomTriggerValue
CustomTriggerValueRightMode=VibrateResistance B
ForceRightTrigger=(10)(255)(0)(0)(0)(0)(0)
CustomTriggerValue State for both Triggers:
LeftTrigger=CustomTriggerValue
RightTrigger=CustomTriggerValue
CustomTriggerValueLeftMode=Rigid A
CustomTriggerValueRightMode=VibrateResistance B
ForceLeftTrigger=(10)(255)(0)(0)(0)(0)(0)
ForceRightTrigger=(10)(255)(0)(0)(0)(0)(0)
VibrateTrigger State for Right Trigger and CustomTriggerValue for the left :
LeftTrigger=CustomTriggerValue
RightTrigger=VibrateTrigger
VibrateTriggerIntensity= 10
CustomTriggerValueLeftMode=Rigid A
ForceLeftTrigger=(10)(255)(0)(0)(0)(0)(0)
Resistance State for Right Trigger :
RightTrigger=Resistance
ForceRightTrigger=(0)(8)
Machine State for Left Trigger :
RightTrigger=Machine
ForceLeftTrigger=(0)(9)(7)(7)(10)(0.0)
AutomaticGun State for right Trigger and GameCube for left trigger:
LeftTrigger=GameCube
RightTrigger=AutomaticGun
ForceRightTrigger=(0)(8)(15)
Note : Best is to not leave spaces or extra unnecessary lines except for the lines you need to reduce the delay in reading the text file.
You can mix and match between states to get the desired effect for your game.
From previous testing, I believe you can write to a text file every frame, as the App will only read from that file.
For best results, I recommend you include the batch file with your game and have it execute when loading your game, which is explained below.
Batch File:
This batch file will open the DualSenseX App and auto connect to the controller, and begin applying the trigger states from the text file.
To get started, download the zip file from above and attach the .Bat file in the directory of your game.
Edit the batch file according to your Game Title and the name of the text file that your game will write to.
Upon launching the game, you should execute this batch file, which will open a new window
of DualSenseX that takes in 2 paramaters from the batch file explained below and inside the batch file:
Both the batch file and the text file must be in the same directory with your game, the batch file gets the location of the
text file depending on where the batch file is located.
- Replace
GAMENAMEwith your Game Title. - Replace
TEXTFILENAME.txtwith your text file name, while also including the .txt extension at the end
License

This work is licensed under a Creative Commons Attribution-NoDerivatives 4.0 International License.
Acknowledgement and Reference
This App would not be possible without:
- ViGEmBus
- HidSharp
- DualSense2Xbox
- Dualsense, Haptics, LEDs, and More (Hid Output Report)
- BLE Inputs
- DualSense-Windows
- DS4Windows
- DualSenseSupport
I thank all of you!