Description
Network Scanner Windows Image Acquisition (WIA)
I agree to the
Terms and Conditions
Download
End User License Agreement

Драйвер WIA — это драйвер Windows Image Acquisition, который требуется для того, чтобы графические программы могли взаимодействовать с соответствующими устройствами. В этой инструкции подробно разберем возможные способы решить проблему и скачать драйвер WIA при необходимости.
Для использования этого устройства требуется драйвер WIA — первые действия
Прежде чем пробовать найти в Интернете, где скачать драйвер WIA для вашего принтера/сканера/МФУ, рекомендую выполнить следующие простые действия, которые часто могут решить проблему:
- Откройте службы Windows. В Windows 10 и Windows 11 нажмите клавиши Win+R на клавиатуре (Win — клавиша с эмблемой Windows), введите services.msc и нажмите Enter.
- В списке служб найдите «Служба загрузки изображений Windows (WIA)». Эта служба должна выполняться, а в поле «Тип запуска» установлено «Автоматически».
- Если это не так, дважды нажмите по имени службы, установите тип запуска «Автоматически», примените настройки, а затем нажмите «Запустить» — не исключено, что уже эти действия решат проблему.
Следующее простое действие, которое, если судить по многим отзывам, часто оказывается работоспособным — подключить устройство, которое требует драйвер WIA по USB 2.0 вместо USB 3.0 (как правило, разъемы USB 3.0 синего цвета, а 2.0 — чёрные), иногда может потребоваться последующая переустановка сканера (МФУ). Попробуйте использовать этот вариант — действительно многим помогает.
В случае, если предложенные методы не сработали, служба WIA уже была запущена, а подключение к USB 2.0 не возымело действия, переходим к следующим действиям.
Где скачать драйвер WIA для сканера
Если устройство при установке сообщает, что для его использования требуется драйвер WIA, почти гарантированно он есть на официальном сайте производителя устройства на странице поддержки вашей модели.
Учитывайте: на официальном сайте может отсутствовать драйвер для текущей версии системы. Например, рассматриваемый вопрос часто возникает по поводу МФУ HP LaserJet M1120. Если у вас установлена Windows 10 или Windows 11. Не обращайте внимания, что на официальном сайте есть драйвер только для Windows 8 — он вполне успешно может использоваться и на более новых операционных системах.
Если скачанный драйвер не устанавливается, сообщая о неподдерживаемой операционной системе, вы можете:
- Распаковать файл с установщиком драйвера. Например, для LaserJet M1120 с этим успешно справляется 7-Zip, иногда могут пригодиться утилиты наподобие Universal Extractor. На изображении ниже — скриншот открытого файла установщика драйвера, где мы наблюдаем, в том числе и файлы драйвера WIA (что следует из имени файлов драйверов).
- Установить драйвер вручную из INF-файла.
При возникновении проблем с установкой драйверов, предварительно удалите все имеющиеся драйверы вашего сканера или МФУ и само устройство с помощью диспетчера устройств (может потребоваться включить показ скрытых устройств в меню «Вид» и найти устройство в разделе «Устройства обработки изображений»), а также программы от производителя — HP, Canon, Epson или другого.
- Что такое драйвер WIA?
- Включение «Службы загрузки изображений Windows»
- Переустановка драйвера принтера
Владельцы сканеров или МФУ со встроенным сканером рано или поздно сталкиваются с ошибкой «Для использования этого устройства требуется драйвер WIA…». Рассмотрим, что это за драйвер, и как исправить ситуацию с его отсутствием.
Что такое драйвер WIA?
Как и любой другой, драйвер WIA (Windows Image Acquisition) предназначен для того, чтобы операционная система могла взаимодействовать с внешним устройством. В данном случае речь идет о сканирующем оборудовании, цифровых видеокамерах и фотоаппаратах. В этот список также входят, как отдельные сканеры, так и МФУ с функцией сканирования документов. В случае с последними может наблюдаться и такая картина, что документы и фотографии спокойно отправляются в печать, но при попытках что-то отсканировать возникает ошибка с WIA-драйвером.
Вообще, операционные системы Windows уже имеют в своем составе драйвер WIA. Если точнее — это такая универсальная модель драйверов и API (интерфейс программирования приложений) по совместительству. Взаимодействие внешних устройств с системой и/или функциями драйвера самого устройства осуществляется «при посредничестве» системной «Службы загрузки изображений Windows», которая по умолчанию запускается при включении компьютера.
Таким образом, перед попыткой исправить ошибку с WIA-драйвером нужно убедиться, что данная служба запущена.
Включение «Службы загрузки изображений Windows»
Действия следующие:
- Одновременно нажмите на клавиатуре кнопки «Win + R», затем впишите в появившееся окно команду «services.msc» (без кавычек) и нажмите «ОК».

- Запустите системное приложение «Службы». В приведенном списке установленных служб найдите «Служба загрузки изображений Windows (WIA)». Напротив ее названия должно быть указано, что та «Выполняется».
- Если это не так, кликните по службе два раза мышкой. В открывшемся окне свойств напротив блока «Тип запуска» установите «Автоматически», ниже — нажмите кнопку «Запустить», затем «Применить». Закройте окно свойств службы.
Возможно, что после выполненных действий ошибка при попытке обращения к сканеру/МФУ останется. В этом случае дополнительно попробуйте следующие варианты решения проблемы:
- Отсоедините устройство от компьютера (т.е. выньте USB-кабель) и перезагрузите его (желательно вынуть из розетки и потом включить). Подключите USB-кабель в другой USB-порт компьютера (если сканер/МФУ поддерживает USB0, подключите его именно к этому порту, который обычно имеет синий цвет).
- Откройте «Диспетчер устройств», выполнив команду «devmgmt.msc» в программе «Выполнить» (все по аналогии с запуском приложения «Службы»), найдите в списке устройств названия принтера/МФУ, кликните по нему правой кнопкой мыши и выберите из меню пункт «Отключить устройство». После отключения сразу включите устройство, выбрав пункт «Включить устройство».
- Также возможно, что проблему с драйверов вызывают собственные настройки сканера/МФУ (те, что сохранены в памяти устройства). Здесь может помочь сброс настроек оборудования до заводских значений, но как именно это сделать, следует искать на сайте производителя.
Если ничего из этого не помогло, остается повозиться с драйвером устройства. Его нужно будет переустановить с предварительным полным удалением всего установленного на компьютере программного обеспечения сканера/МФУ (включая любые фирменные программы).
Переустановка драйвера принтера
Чтобы снизить вероятность возникновения ошибок при установке нового, рекомендуется удалить уже установленный драйвер устройства. Желательно также удалить все фирменные приложения, которые либо идут в комплекте с драйвером (но удаляются отдельно), либо были установлены самим пользователем.
Для удаления драйвера:
- Первым делом скачайте драйвер с официального сайта производителя проблемного устройства (если это невозможно, дополнительно ознакомьтесь с инструкцией по использованию менеджера драйверов ниже).
- Откройте «Диспетчер устройств» по инструкции выше.
- В списке устройств найдите название сканера/МФУ, кликните по нему правой кнопкой мыши и выберите пункт «Удалить устройство».
Для удаления фирменных программ сканера/МФУ:
- Откройте «Панель управления» (можно использовать команду «control» в программе «Выполнить») и кликните в ней по элементу «Удаление программы»:
- Найдите в списке установленных программ те, в именах которых присутствует либо название устройства, либо название компании-производителя (или и то и другое).
- Кликните правой кнопкой по программе и выберите в меню пункт «Удалить»:
- Проделайте то же самое со всеми остальными программами в списке.
Теперь можно устанавливать драйвер. Если такового в наличии нет, можно воспользоваться любым менеджером драйверов. Мы рекомендуем программу DriverHub:
- Запускаем программу и нажимаем кнопку «Найти сейчас».
- Дожидаемся, пока программа просканирует компьютер. После чего на экране отобразятся устройства, драйверы которых можно обновить (или установить, если они отсутствуют).
- Можно включить «Экспертный режим» и установить только драйвер для сканера/МФУ. На скриншоте выше выбрана установка драйвера для первого попавшегося устройства, но это не важно.
После выбора устройства останется нажать кнопку «Установить». Программа сама скачает и установит выбранный драйвер.
Table of Contents
You Need a Scanner Driver for Windows 10:
If you have a scanner with a driver and software support for Windows 10, you can use it to create PDFs in Acrobat. You can also scan directly into other applications using the Windows Image Acquisition (WIA) interface.
You may get the “You need a WIA driver to use this device” error when you are scanning with your HP scanner. There are several ways to fix it.
Installation of WIA HP Scanner Driver:
The Windows Image Acquisition (WIA) service enables scanners to communicate with graphics software. This means that you can scan photos into Photoshop or other graphic programs. However, the You Need a WIA Driver to Use This Device error can stop you from using your scanner.
There are a few ways to solve the problem. First, you can try disabling your antivirus or running the Windows Defender cleanup tool. If you can’t do this, visit the manufacturer’s website and download the latest drivers for your scanner.
You can also use Windows Scan, which comes with the OS and lets you connect your scanner to the computer. This will allow you to use the full capabilities of your scanner. Once you’ve installed the drivers, restart your computer and check if it works. If you continue to have problems, contact the manufacturer. They may provide a troubleshooter for the issue.
Uninstalling:
If you’re seeing the You Need a WIA Driver to Use This Device error, it’s important to take care of it as soon as possible. It can stop your scanner and printer from working and can also be a security risk. Luckily, there are some effective solutions to this problem.
One solution is to uninstall the current driver and then install a new one. To do this, open the device manager and expand Imaging devices. Right-click on the scanner and select Uninstall. Then reboot your computer and follow the on-screen instructions to install a new driver.
You can also try using a different scanning software. For example, you can use TWAIN instead of WIA. TWAIN is more flexible and is supported by a lot of graphic programs. Moreover, it offers three transfer modes (native, memory, and file) whereas WIA only has two. This is why TWAIN is more popular than WIA. It’s a good idea to update your drivers regularly.
Restarting:
If you are a Kodak user, you may have come across this error message, “You need a WIA driver to use this device”. This issue can happen on any Windows system including Windows 10 and Windows 7. There are several ways to get rid of this problem.
To fix this problem, first, you need to restart your computer. Then you can go to the device manager and check if the scanner is there. If it isn’t, you should uninstall the device. You can also try to update your drivers manually by visiting the website of your scanner manufacturer. However, this process can take time and requires some computer skills.
Another option is to download and install a driver update program like Driver Easy. This tool will scan your computer for outdated drivers and update them automatically. This is the easiest way to fix your scanning issues. It’s free and safe to use. So give it a try!
Troubleshooting:
If you encounter the “You need a scanner driver” error message, this is a serious problem that can prevent you from using your HP scanner. This guide outlines troubleshooting steps to resolve this issue, including installing the latest drivers and restarting your computer.
Drivers are necessary for any external hardware device to connect to your system. If the driver for your scanner is out of date or corrupt, it will prevent the device from communicating with your computer. Installing the latest version of the driver is an easy solution to this issue.
To do so, run the Windows troubleshooter. This utility will detect and fix any problems your scanner might have. You can also try running the SFC and DISM scans, which are built-in Windows features that will repair corrupted system files. If the problems persist, you can always visit your scanner manufacturer’s website to download the latest scanner drivers. You can also try installing a third-party driver management tool, such as Driver Robot, which will automatically update your scanner drivers for you.
If you wish to seek the methods to perform WIA driver download, install, and update on Windows 11 and 10, then you can check out the methods listed further in this article for the same.
Windows Image Acquisition or WIA is a type of driver from Microsoft. This driver allows the scanner connected with your Windows device to communicate with the system. If this driver is missing or outdated, you may face problems like lags, glitches, and other similar or connection errors when you use the scanner.
To get ahead of these problems and run your scanner perfectly, you need to execute WIA driver update, download, and install on Windows 11, 10, and other lower systems. If you don’t know how to do that, you can take the help of the methods explained in this article.
The coming sections of this article will present to you the best as well as safe methods to execute WIA driver download and install. You can use any of these as you like to install the drive and then use your scanner device smoothly. We recommend you take the help of the below method first for a quick resolution.
Highly Recommended Method to Perform WIA Driver Install on Windows PC
The internet is ridden with multiple methods that claim to help you with WIA driver download and update. But that is not true in every case. Hence, save yourself from falling for these methods and use the Win Riser to get updates for all kinds of drivers. Download the tool and see how it provides updates for the outdated drivers and allows you to run various devices smoothly.
How to Download, Install & Update WIA Driver on Windows
Now, let’s have a look at the solutions for how to execute WIA driver install through the download and update methods listed below. Read all of these methods first and then decide which one you want to use.
Method 1: Visit the Manufacturer’s Website for WIA Driver Install (Manual)
The official website of any product manufacturer has an online support page. This support page can be used to download the drivers for any kind of Windows PC. You can take the help of the same to perform a WIA driver download. All you need to do is follow the below steps:
Note: These steps are not for a particular manufacturer’s website but can be used for almost all to download the driver.
- Run the official website of the scanner manufacturer in the browser.
- Then look for the scanner device that you are using presently.
- You may need to select the operating system after this step.
- Now click on the WIA driver and download the same.
- Install the driver after the download is complete and then restart your PC.
Also Read: CanoScan LiDE 120 Scanner Driver Download and Update on Windows PC
Method 2: Use the Windows Integrated Device Manager for WIA Driver Update (Manual)
Device Manager is the best tool to perform the WIA driver download and update on any Windows PC. This method has only two drawbacks: it is manual and may not even work in some cases. However, follow the below steps to try it out:
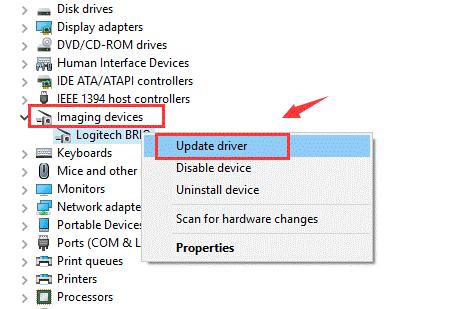
- Run the Device Manager by pressing Win+X keys on your keyboard.
- Expand the device category named Imaging devices
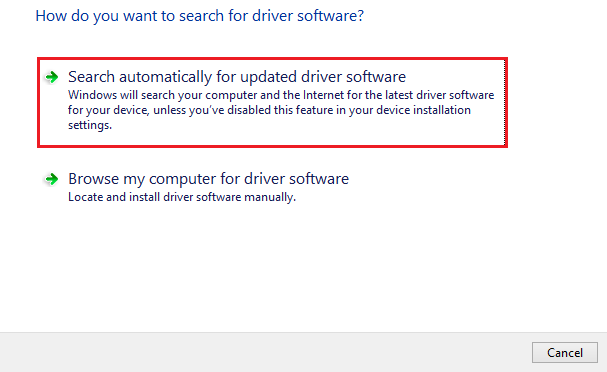
- Right-click on all the devices in the list and Update the drivers one-by-one
- If the system asks you to, go ahead with the option to search for the driver automatically.
- Restart your system after your update the drivers of all the products under Imaging Devices.
Method 3: Use Windows Update Utility to Update WIA Scanner Driver (Manual)
You may not know this but the Windows Update feature can also help with the WIA driver install on Windows 11 or other lower OS. You can access the Windows update utility with the help of the below steps if you don’t know how to:
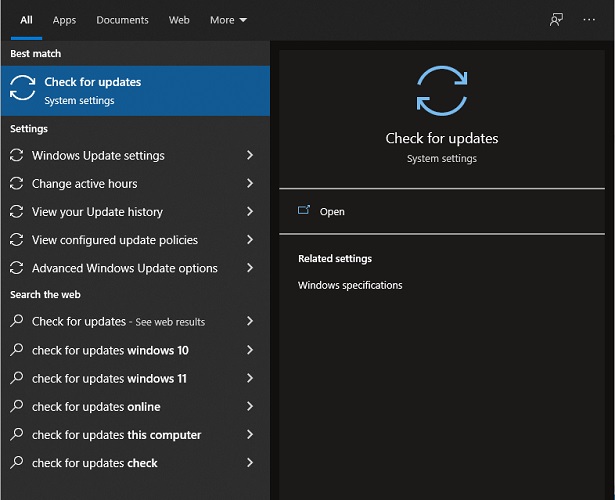
- Click on the search bar at the left side of the taskbar and search Check for updates
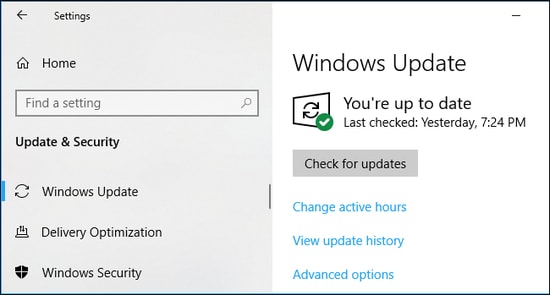
- Look for updates by clicking on the Check for updates button after the utility loads.
- If the update does not start automatically, Download and Install them manually
Method 4: Use the Bit Driver Updater for WIA Driver Updates (Automatically)
Maybe last but the method is the best. You should download and use the Bit Driver Updater to download and update the WIA scanner driver automatically. The problem of outdated drivers can never be resolved permanently. The device manufacturer releases respective device driver updates regularly and hence you need proper software to download these updates regularly.
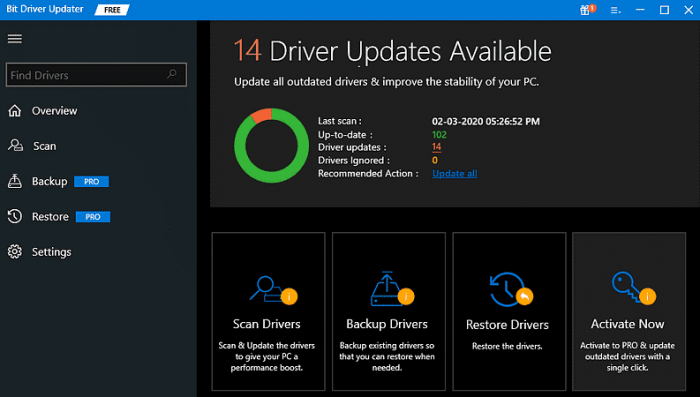
The Bit Driver Updater is the perfect software to perform the same task. This tool allows you to get and install all driver updates with a single click. Apart from this, you can also avail the benefits of advanced features like driver backup and restoration. The software allows you to schedule the update or install them instantly with a single click.
Follow the procedure below to update the WIA driver with Bit driver Updater:
- Click on the Download button right below and get the software installer
- Install and then run the tool on your Windows PC
- Click on the Scan Drivers option on the main app window
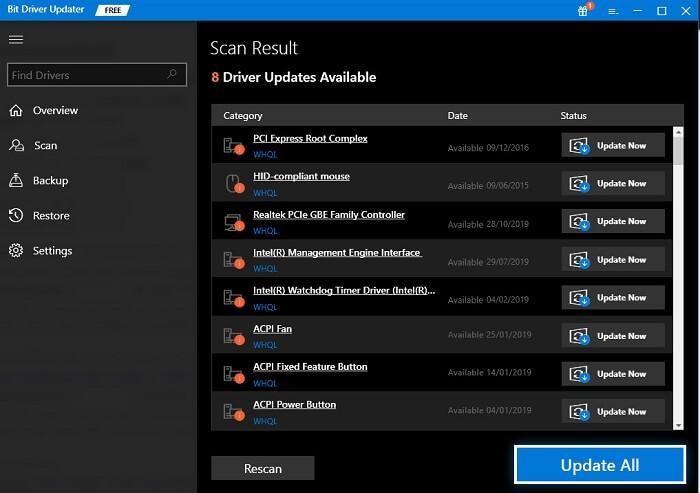
- Click on the Update All or Update Now button as you want to download all drivers at once or the desired drivers individually
- Restart your PC to apply all the changes made.
Also Read: Best Free Driver Updater for Windows 10, 8, 7
Bonus Tip: How to Fix “You need a WIA driver to use this device” Error
If you see the message “You need a WIA driver to use this device”, the above-listed driver download and update methods will help you. Apart from these, you can try uninstalling the driver using the Device Manager. If this does not work then run the Services app using Windows search and Enable Windows Image Acquisition.
WIA Scanner Driver Download and Update: Successful
Here we conclude the methods to download and update the WIA driver for various Windows PCs. We hope that these methods were the precise solutions you were looking for. Now you can run your scanner very smoothly. However, if you still want to get your questions answered or suggestions conveyed, then the comments section is there for you. Subscribe to the Techpout Blog today and get more of such interesting problem-solving tutorials and other article updates.


