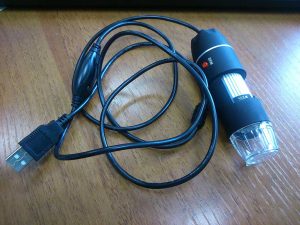
Столкнулся с проблемой — цифровой USB микроскоп заказанный из Китая отказался работать на Windows 10. Обратился за помощью в интернет, но там предлагается установить драйвера и программы. Оказывается ничего этого делать не нужно.
Программами идущими в комплекте с подобными микроскопами и предлагаемыми для скачивания я не пользуюсь. Вместо закачки сомнительных программ и вирусов вместе с ними для работы с микроскопом можно использовать, например VLC медиа плеер — медиа, открыть устройство захвата и в названии видеоустройства выбрать микроскоп. Или Media Player Classic — файл, открыть устройство. После подключения к компьютеру под Windows 10 микроскоп не заработал, причем сообщение об ошибках в программах на истинную причину абсолютно не указывают.
Решение проблемы следующее:
— В диспетчере устройств нужно убедится, что устройство опознано (установлен драйвер). Выглядит это так:

Для этого микроскопа Windows устанавливает драйвер автоматически. Не нужно искать другой драйвер если микроскоп определился;
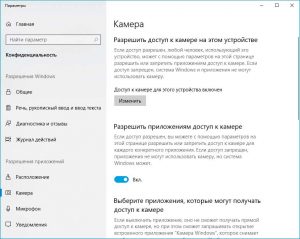
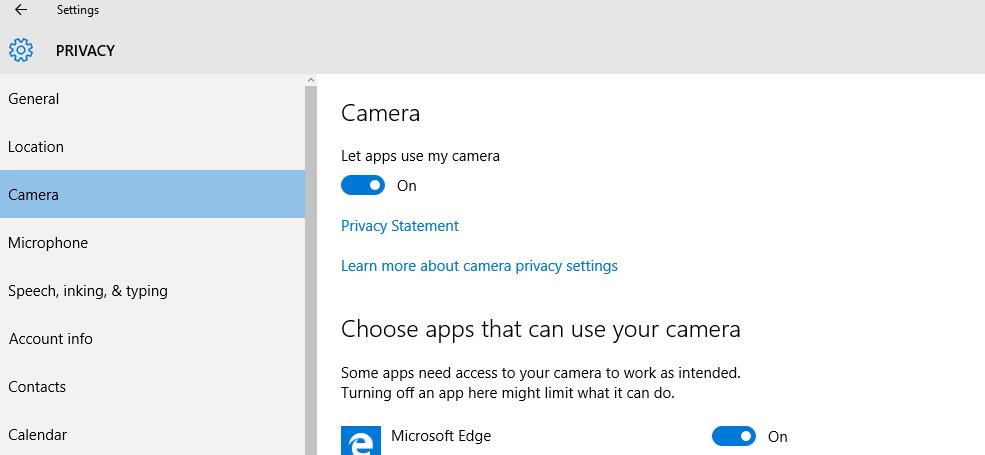
— В строке поиска Windows нужно начать набирать Каме (Came для английского интерфейса) и выбрать «Параметры конфиденциальности камеры»;
— Нужно разрешить предложениям доступ к камере (обе настройки разрешающие доступ должны быть включены).
При этом приложение которым вы собираетесь пользоваться не обязательно должно присутствовать в списке приложений. Микроскоп все равно сможет работать.
Оказалось, чтобы цифровой usb микроскоп заработал под Windows 10 не нужно устанавливать драйвера и специальные программы. Для этого достаточно разрешить приложениям доступ к камере в настройках безопасности Windows. После обновления на Windows 11 микроскоп продолжил работать.
Советуем прочитать

Тут можно скачать драйвера и программу для электронного USB-микроскопа, а также купить электронный микроскоп у самого надёжного проверенного продавца на АлиЭкспресс, с бесплатно и быстрой доставкой.
Ссылка на микроскоп (АлиЭкспресс)
Скачать драйвера и программу
Digital USB 2.0 Microscope Software is all about in this article. You can Download Jiusion Digital Microscope / Celestron Digital Microscope Software with 1000x / 800x / 500x zooming onto your computer here on this page. Plugable USB 2.0 Digital Microscope Software Free Download links is available in this post given below in this paragraph please select which type of Microscope software.

It’s is one of the best Plugable USB 2.0 USB Digital Microscope for Windows / Mac & Linux Users. Digital USB 2.0 Microscope Software supported on Windows XP / Windows 7 / Windows 8 / Windows 8.1 & Windows 10 compatible with 32-Bit & 64-Bit or Mac OS X.
| Jiusion Digital Microscope Software Download for Windows 32-Bit or 64-Bit |
Download |
| Jiusion Digital Microscope Software Download for Mac OS 64-Bit |
Download |
| Jiusion Digital Microscope Software Download for Mac OS 32-Bit |
Download |
| USB Digital Microscope 1000x Software Download for Windows |
Download |
| USB Digital Microscope 1000x Software Download for Mac OS |
Download |
| USB Digital Microscope 800x Software Download for Windows |
Download |
| USB Digital Microscope 800x Software Download for Mac OS |
Download |
| USB Digital Microscope 500x Driver Download for Windows |
Download |
| USB Digital Microscope 500x Driver Download for Mac OS |
Download |
| Celestron Digital Microscope Software Free Download |
Download |
Table of Contents
- 0.1 USB Microscope
- 0.2 USB Digital Microscope 1000x
- 0.3 USB Digital Microscope 800x
- 0.4 Specifications:
- 0.5 USB Digital Microscope 500x
- 0.6 Celestron Digital Microscope
- 0.7 Jiusion Digital Microscope
- 1 What is USB Digital Microscope?
- 2 USB Digital Microscope used for?
- 2.1 Is USB Digital Microscope still used for students?
- 2.2 Is USB Digital Microscope 1000x software available for free?
- 2.3 Is USB Digital Microscope supports on Windows Operating System?
- 3 Conclusion on Digital USB Microscope Software for PC
USB Microscope
A USB Microscope is a low-powered digital microscope which connects to a computer, normally via a USB port. They are widely available at low cost for use at home or in commerce. Their cost varies in the range of tens to thousands of dollars.

In essence, USB microscope are a webcam with a high-powered macro lens and generally do not use transmitted light, but rely on incident light from in-built LEDs lights situated next to the lens. The light reflected from the sample then enters the camera lens.
However, the camera is usually sensitive enough not to need additional lighting. As the camera attaches directly to the USB port of a computer, eyepieces are not required and the images are shown directly on the monitor.
USB Digital Microscope 1000x
The USB Microscope is a hand-held digital microscope that comes with a convenient stand, which can zoom in to 1000 times magnification so you can discover the world of microbes and particles that are invisible to the naked eye.
USB Digital Microscope is a good quality to use in Inspection dissection/examination, Skin examination, Scale examination, Textile Inspection, Jewelry Inspection, Collection/Coin Inspection, Printing Inspection, PCB or PCBA Inspection and so on.
The microscope is made up of high-quality IC and electronic components with clear image quality, low power consumption.

| USB Digital Microscope 1000x Software Download for Windows | |
| USB Digital Microscope 1000x Software Download for Mac OS |
USB Digital Microscope 800x
The USB Microscope is a hand-held digital microscope that comes with a convenient stand, which can zoom in to 800 times magnification so you can discover the world of microbes and particles that are invisible to the naked eye.
A good quality to use in Inspection dissection/examination, Plant dissection/examination, Skin examination, Scale examination, Textile Inspection, Jewelry Inspection, Collections/Coin Inspection, Printing Inspection, PCB or PCBA Inspection and so on.
The microscope is made up of high-quality IC and electronic components, with clear image quality, low power consumption, high-resolution, applies to small objects to be larger. Photo and video production is the best choice of small objects reorganization.

| USB Digital Microscope 800x Software Download for Windows | |
| USB Digital Microscope 800x Software Download for Mac OS |
Specifications:
| Image Sensor | 0.3M HD CMOS Sensor |
| Photo Resolution | 2560 x 1920 |
| Video Capture Resolution | 640 x 480 |
| Focus Range Manual Focus from | Manual Focus from 15-44mm |
| Frame Rate | Max. 30f/s |
| Magnification Range | 1000x |
| Video Format | AVI |
| Snap Shot Format | JEPG/BMP |
| Adjustable illumination | 8 built-in LED diodes |
| PC Interface | USB 2.0 & USB 1.1 |
| Power Supply | USB Port (SV DC) |
| Operation System | WIN XP/VISTA/8/10 |
| Dimension | 11*3.3cm |
USB Digital Microscope 500x
An electronics get smaller and smaller, you’re going to need a tool to visually verify PCBs. This compact USB microscope is the right tool for this work. It’s smaller and lighter than a big optical microscope but it packs a little bit of power in its compact frame.
There is a 5.0 megapixel sensor inside and an optical magnifier that can be changed from 50x to 500x. Eight white LEDs are angled directly into whatever you’re looking at so you’ll have enough light to see.
An Easy-to-use Microscope Even if you’re new to using a microscope, you’ll be able to pick up the basics quickly.
There are only three basic components easy to be assembled. The microscope, microscope holder and stand.
Once assembling the microscope, just plug it in to a USB port on your computer, install the software and you can enjoy using it. This is the high-quality electronic microscope instead of the normal microscope. You can use it to snap HD pictures and capture the video and also to measure the objects.
You can use this for:
Industrial Inspection, Computer Parts Inspection, Telecom module inspection, scientific teaching tool, Laboratory Research, Medical analysis, School Research tool, Insect dissection examination, Plant dissection examination, Skin examination, Scalp examination, Textile Inspection, Jewelry Inspection, Collections/Coin Inspection, Printing Inspection, Reading Aid, Teacher Add as Project, Presentation and so on.

| USB Digital Microscope 500x Driver Download for Windows | |
| USB Digital Microscope 500x Driver Download for Mac OS |
Celestron Digital Microscope
The professional-level Celestron PentaView LCD Digital Microscope is a touchscreen LCD microscope with advanced features…. The intermediate-level Celestron Deluxe Handheld Digital Microscope is an easy to use low power microscope.
Jiusion Digital Microscope
Jiusion Digital Microscope is one of the best Microscope. Focus Wheel can be used on All devices. But SNAP and ZOOM button can only be recognize on Windows System as the software was written by our company and android APP (mac system doesn’t need software) is common in the market so it can’t recognize the SNAP and ZOOM command.
Window User
Amcap is a professional window software designed for window XP / Vista / 7 / 8 / 10. You can get the package from CD or contact us for the downloading link.
Mac USer
Mac user can use the Photo Booth to use this microscope directly. There is software called “Quick Camera” which can work on this microscope too.
Android User
Please scan the code above or search “OTG Viewer” on google play to get the app installation.
Chrome OS
This microscopes can be used with default Camera app that comes with Chrome.
Jiusion Digital Microscope Software Free Download for Windows & Mac OS
| Jiusion Digital Microscope Software Download for Windows 32-Bit or 64-Bit | |
| Jiusion Digital Microscope Software Download for Mac OS 64-Bit | |
| Jiusion Digital Microscope Software Download for Mac OS 32-Bit |
A USB digital microscope is a type of microscope that uses a digital camera to capture images and display them on a computer or other digital device.
USB Digital Microscope used for?
A USB Digital Microscope can be used for a variety of applications in fields such as Science, Education, Industry and Hobbyist pusuits. Here are some examples:
- Scietific Research
- Quality Control and Inspection
- Education and Learning
- Jewelry and Gemestone Inspection
- Art and Hobbyist pursuits
Is USB Digital Microscope still used for students?
Yes, USB digital microscopes are still used for students in various educational settings. USB digital microscopes are a popular choice for science classrooms, homeschooling, and online learning because they are relatively affordable, portable, and easy to use.
Is USB Digital Microscope 1000x software available for free?
Yes, there are many USB digital microscope 1000x software options available for free download on the internet.
Is USB Digital Microscope supports on Windows Operating System?
Yes, USB digital microscopes are generally compatible with Windows 11, 10, 8.1, 8 & 7 on 64-bit.
Conclusion on Digital USB Microscope Software for PC
I suppose you have followed each step carefully for Download Digital USB Microscope Software Download on PC. After downloading this software, open this software.
I suppose your PC does not installed this software. Then, you can download this extension from ItTechGyan website. Now import that software file to your PC.
At last, I hope you liked this post on Digital USB Microscope Software Download on Notebook.
To save your time, please contact us if you have any issues with this microscope. We have full experience. We are confident that we can provide you with a satisfactory solution. Our email address is jiusion@outlook.com.
Quick Access
Windows
Mac
Chrome OS
Linux
Android
iPhone/iPad
Update driver in Windows
Windows
Since Jiusion microscopes use a standard webcam chipset, they will automatically install default webcam (UVC) drivers when plugged into a host device. They can be used with any webcam apps. User can select one or more to install.
| Win10/11 built-in camera app | xploview | Amcap | Coolingtech | |
| Easy to install | √ | √ | × | × |
| User Friendly | √ | √ | × | × |
| Snap button works | × | √ | √ | × |
| Zoom button works | × | × | √ | × |
| Measure function | × | × | × | √ |
| Support | Win10/11 Only | Win7/8/10/11 | Win7/8/10/11 | Win7/8/10/11 |
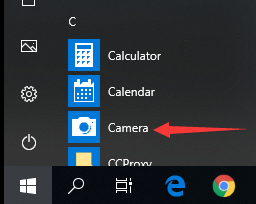
Windows 10/11 user please make sure the «Camera» in privacy settings is on.
1) Win10/11 built-in camera app
If you are Win10/11 user, you can plug the microscope to the Win10/11 computer and open this app to use the microscope directly. You can click «Windows» logo on the left and find the «Camera» app. The downside is that you can’t use the snap and zoom buttons in this app.
2) xploview
2.1 Download the xploview
 xploview.exe(3.87MB) Windows XP, Vista, 7, 8, 10, 11 | 32 or 64 bit
2.2 Install the xploview
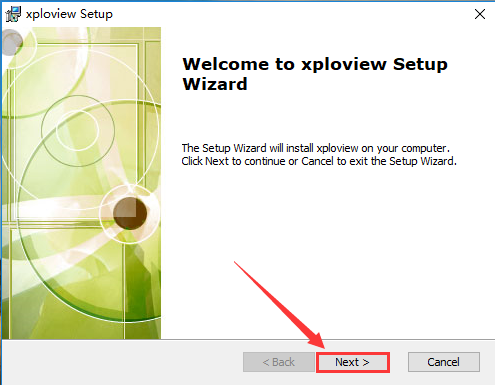
Double click the “xploview” to start installation. Select your first language and click “Next”.
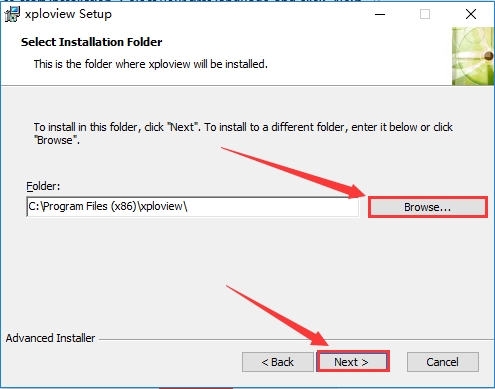
Click “Browse” if you want to install to other fodders. Click “Next”.
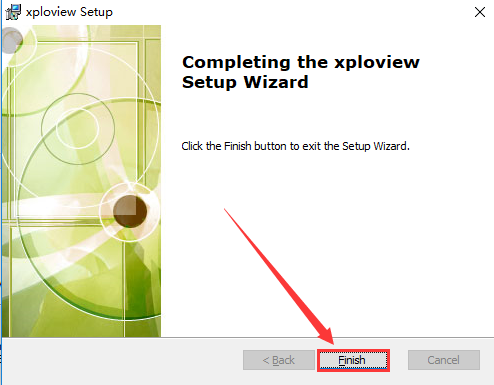
Click “Install”.

Wait for the installation to complete. Click «Finish» to complete the installation.
2.3 Remove the microscpe lens cover and connect it to the computer

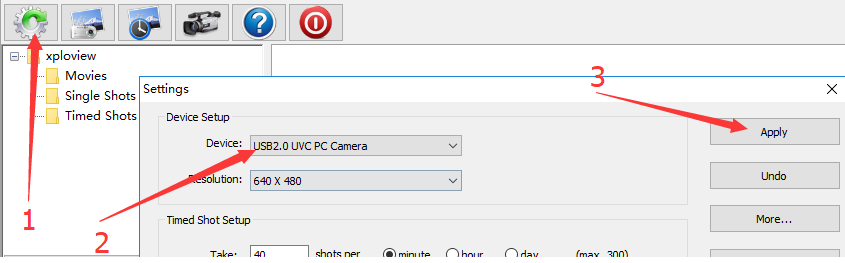
2.4 Open the xploview
Click ①»Settings» –② «Device» to select «USB2.0 UVC PC Camera» on the dropdown. Click «Apply». Note the zoom button doesn’t work on this software.
3) Amcap
3.1 Download the Amcap
Amcap is a custom Windows (XP and above) software package designed specifically to work with the microscope.
Amcap.zip(3.38MB) Windows XP, Vista, 7, 8 | 32 or 64 bit
Amcap.exe(9.46MB) Windows 10, 11 | 32 or 64 bit
Please tap this link to send an email to us if you can’t download it jiusion@outlook.com
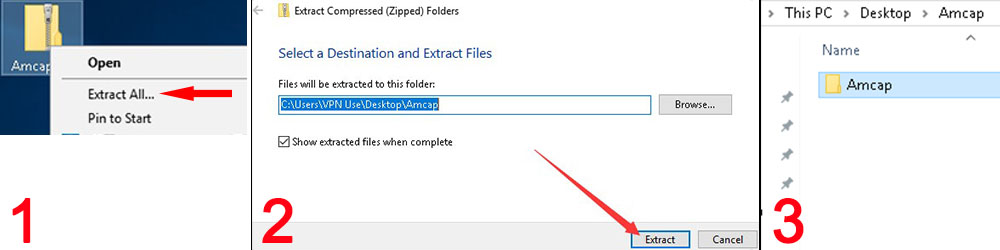
3.2 Extract the Amcap.zip
Step 1: Right Click the Amcap.zip and select «Extract All«. Step 2: Click «Browser» to select a location to save the Amcap and click «Extract». Step 3: Double click the extracted folder «Amcap» to open it.
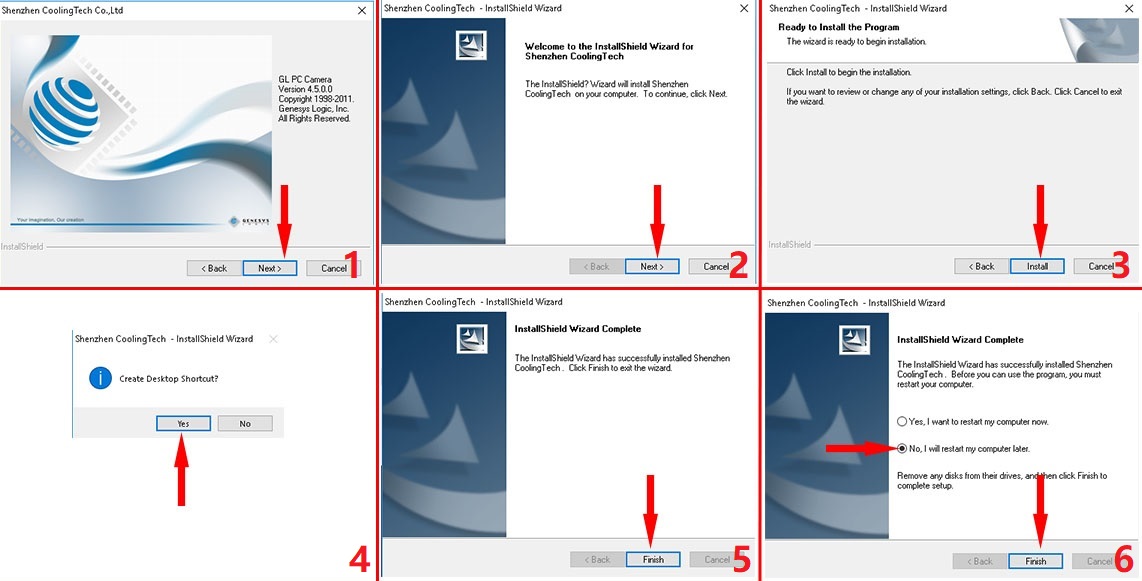
3.3 Install the Amcap
Double click the “setup.exe” to install the Amcap. Select ①Next — ②Next — ③Install — ④Yes — ⑤Finish — ⑥No, I will restart my computer later and Finish.

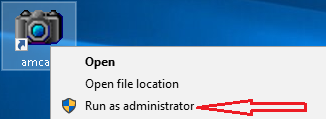
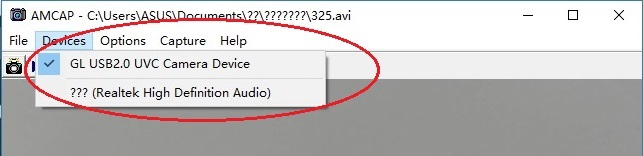
3.3 Remove the microscope lens cover, plug the microscope and open the Amcap
Connect the microscope to the computer. Right click the Amcap and select «Run as administrator» to open the Amcap software. Click «Devices» to select the «GL USB2.0 UVC Camera Device». If you can’t find the «GL USB2.0 UVC Camera Device», please tap Update driver in Windows to set up.
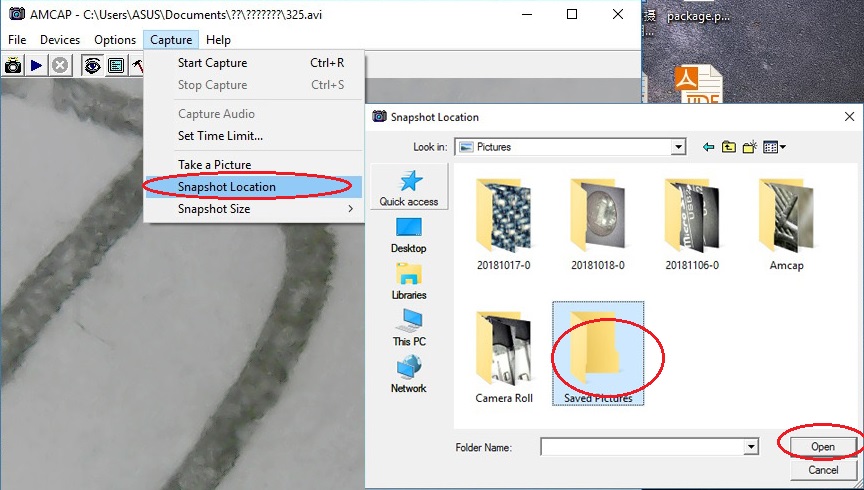
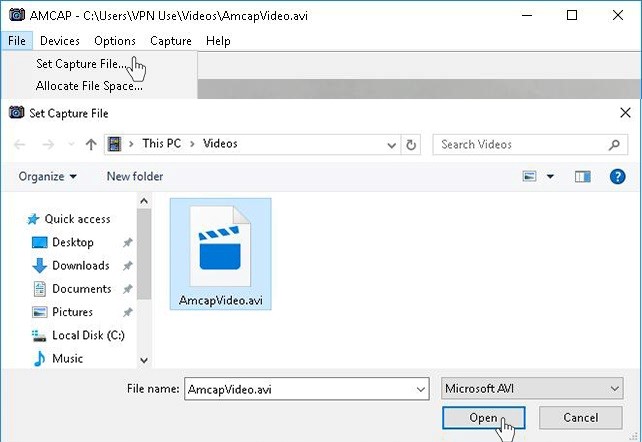
3.4 Setup the location to save pictures and videos
Pictures: Select “Capture” – Snapshot Location – Find or new a folder and click “Open”. You can double click the Snap button to take a picture.
Videos: Click “File” – “Set Capture File”. Find and select an avi format video file. Click “Open”.
4) CoolingTech
Coolingtech measurement software is compatible with Windows 7 8 10 11.
4.1 Download the CoolingTech
What we provided in this link is a installation-free green version. You can delete directly if you want to uninstall it. Click link as below to download the Coolingtech.zip.
 Coolingtech.zip(2.55MB) Windows XP, Vista, 7, 8, 10, 11 | 32 or 64 bit
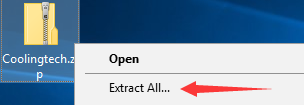
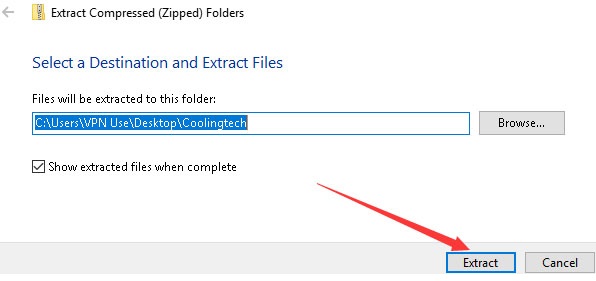
4.2 Extract the Coolingtech.zip
Once the download is finished, right click the «Coolingtech.zip» to select «Extract All…» to extract files out.
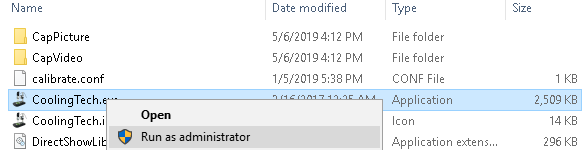
4.3 Open the CoolingTech software
Please ritght click the CoolingTech.exe to select «Run as administrator» to open the CoolingTech.exe. As it is a installation-free version, you can open the Coolingtech folder and run the “CoolingTech.exe” as admin to use the Coolingtech measurement software. Close other webcam software like camera app, xploview and Amcap if you can’t see anything in this software. Please note the snap and zoom buttons don’t work in this software. If the software occur errors or want to get a diffence measurement software, please contact us via our customer service email jiusion@outlook.com.
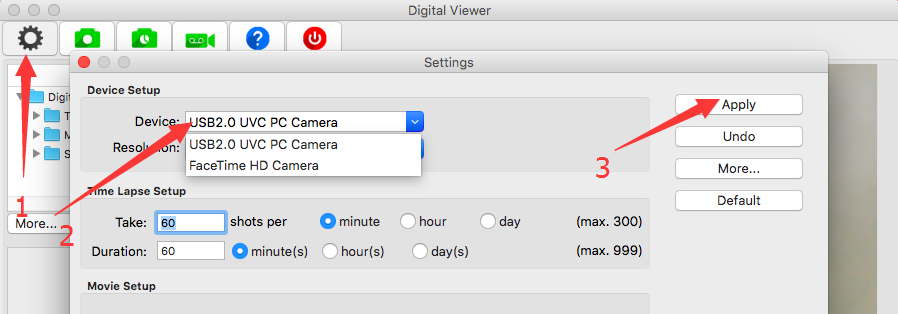
Mac
Digital Viewer App is compatible with general purpose Mac microscope software from Plugable Technologies company. Install the app as below and open it. Plug the microscope to the Mac. Open the app («Finder» — «Application» — «Digital Viewer») and click “Settings” – “Device” to select “USB2.0 UVC PC Camera” on the dropdown to make the microscope work. MacOS10.14 and above users and need to allow the «Digital Viewer» app to access camera in «System Preferences» — «Security & Privacy». Note the zoom button doesn’t work on this software. Please tap this email to contact us if you can’t use the microscope on Mac jiusion@outlook.com
 Digital_Viewer_3.3.30.pkg(8.66MB) macOS (10.5 and later) | 32 or 64 bit
Remove the microscpe lens cover

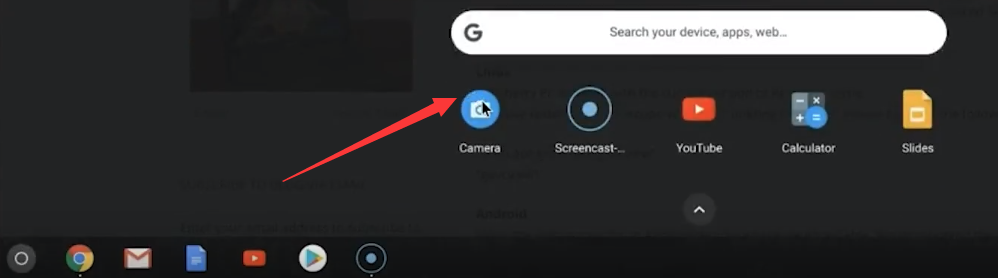
Chrome OS
We don’t have drivers for Chrome OS as Jiusion microscopes can be used with the default Camera app that comes with Chrome. Go to Settings > Advanced Settings > Privacy > Content Settings > Camera, and change the device in the dropdown to “USB Microscope”. Access your camera and your magnified object should appear on the screen.
Remove the microscpe lens cover
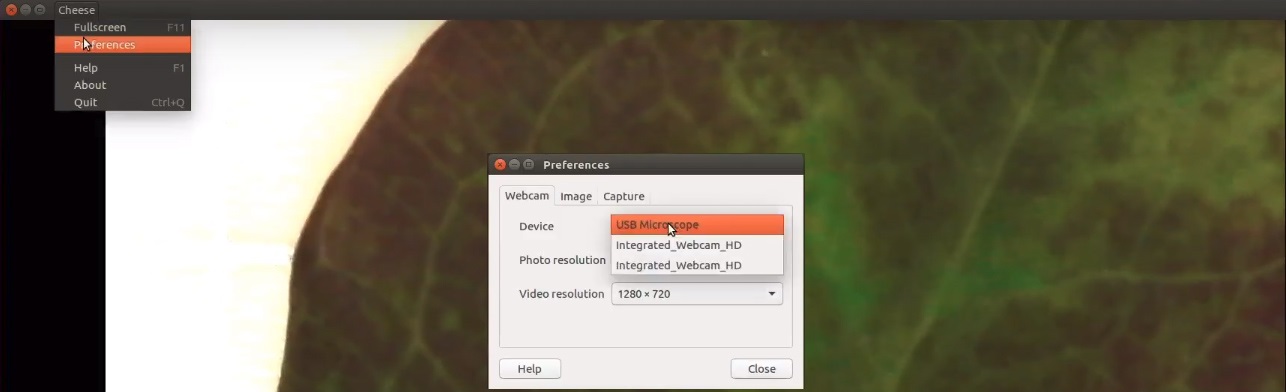
Linux
Search for the application Cheese and click install. Once the installation is completed, open the application cheese. If the program displays your other camera, click on the word cheese in the top bar to access you preferences. In the webcam tab click on the dropdown menu and select USB Microscope.
Remove the microscpe lens cover
Android
Please note that Android support is on a case-by-case basis. Device manufacturers must have support for USB Video Class devices built in or this will not work.
Step 1: Install app
You can install the 3rd party camera app like “OTG View”, “inskam” “AN98” as below or install from Google Play. Note it may report unsafe as you didn’t install from Google Play. You can choose to continue with the installation or install it from the Google Play. If the app crashes or can’t save pictures, please install the backup apps or tap this email link jiusion@outlook.com to send an email to us to get the suitable Android app version.
Download the installation package directly:
 OTG View.apk(17.52MB) Android 4.4 and above
 inskam.apk(85.88MB) Android 4.4 and above
AN98.apk(14.01.MB) Android 4.0 and above
Download from Google Play:
OTG View, inskam, AN98
Step 2: Turn on the OTG function
Some phones may need to turn on the OTG manually by flicking downwards on the top side of the screen(Oneplus brand) or tapping Setting — Additional Settings – OTG(Oppo or Vivo brand). Please skip to step 3 if you can’t find these options.
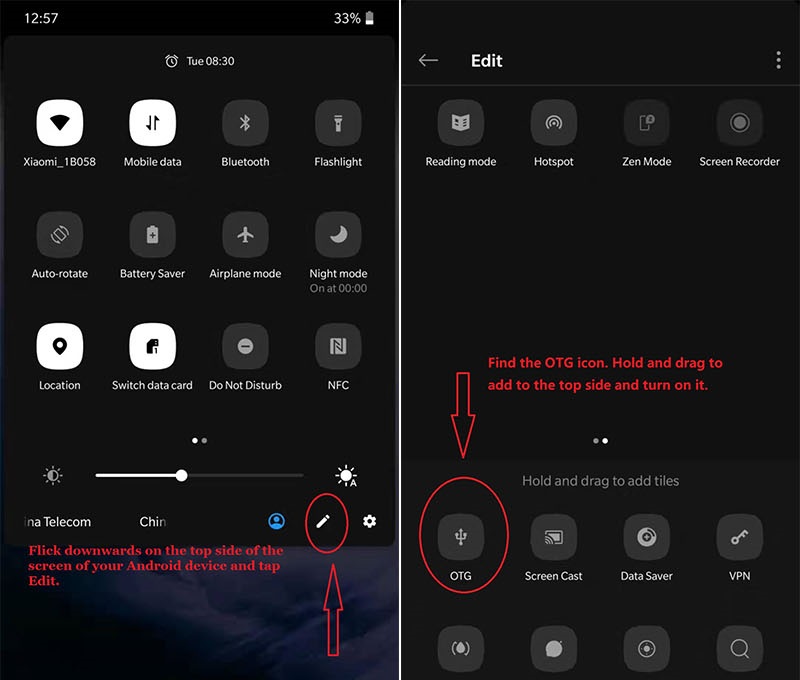
Step 3: Connect the microscope to the Android phone
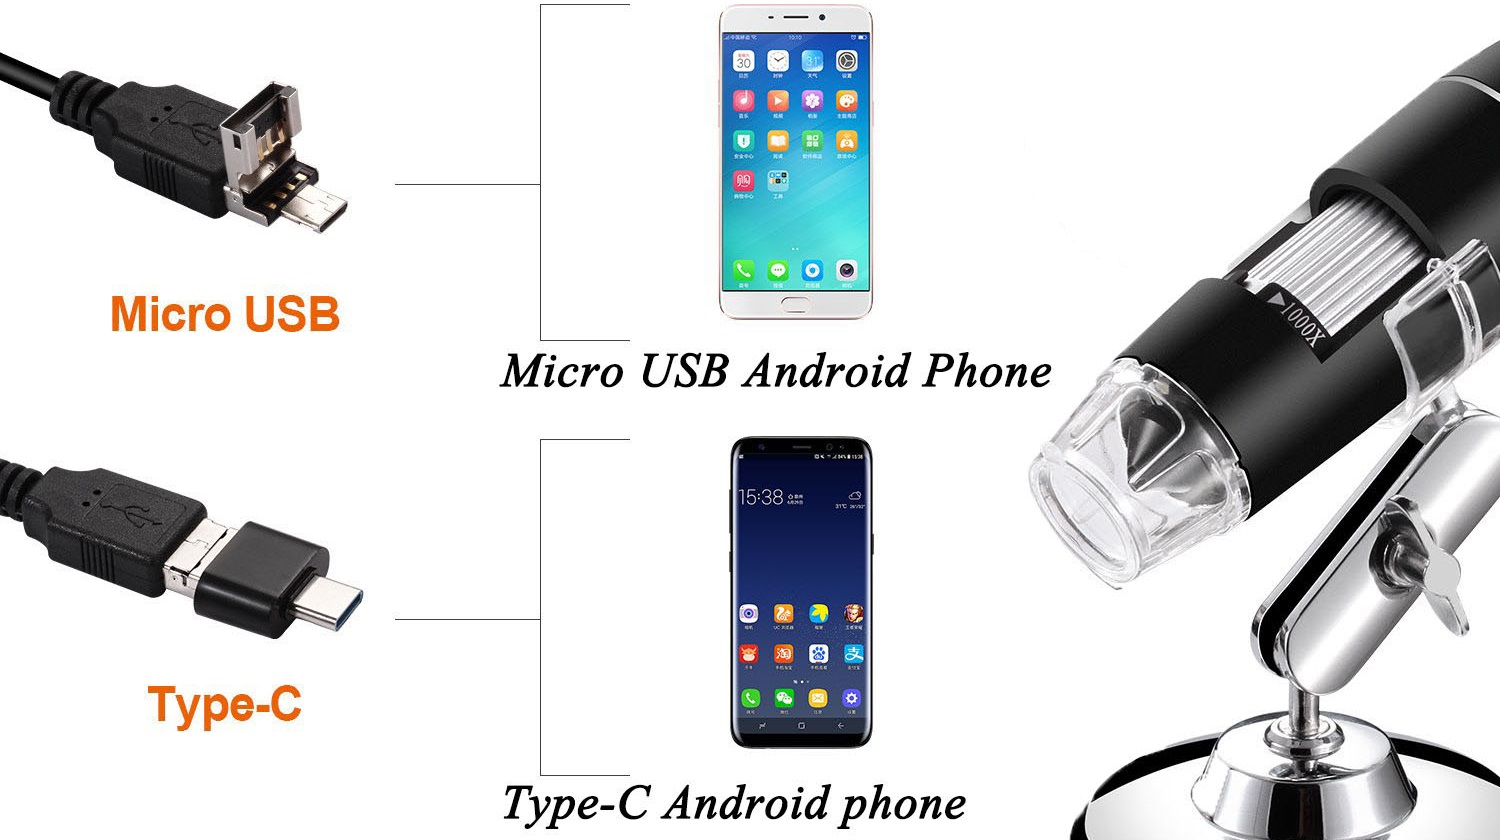
Micro USB phone user please flip a piece on the USB plug from the microscope and plug the micro usb to the phone. Type C phone user please use the type c adapter to connect the microscope to the type c phone. Open the app (USB Camera/inskam/AN98) to use the microscope.
1)If the microscope LED doesn’t light up, before contacting us, please check the led dial on the cable and make sure it is on. Please tap this email link jiusion@outlook.com to send us email. It is micro usb or type c connection problem. We will exchange the adapter to you.
2)If the microscope LED lights up but no images on app, please install another 2 apps or tap this email jiusion@outlook.com and email to us. It might be app version or microscope problem. We will send the app suitable for your phone. If it is a microscope problem, we will replace it for you free of charge.
Remove the microscpe lens cover
iPhone/iPad
Since Apple Company blocked the data transfer, the microscope can’t work with iPhone/iPad.
USB-микроскоп – это удобное и многофункциональное устройство, которое позволяет с легкостью исследовать и изучать микромир. Однако, чтобы полноценно использовать все его возможности, необходимо правильно установить и настроить драйверы.
В данной статье мы расскажем, как скачать драйвер для USB-микроскопа на операционную систему Windows 10, а также подробно опишем процесс установки и настройки.
Обратите внимание: перед началом установки драйвера, убедитесь, что ваш компьютер соответствует системным требованиям USB-микроскопа и имеет подключение к интернету.
Для начала, откройте браузер и перейдите на официальный сайт производителя вашего USB-микроскопа. В разделе «Поддержка» или «Скачать» найдите драйвер, соответствующий операционной системе Windows 10. Обычно драйвер представляет собой отдельный файл с расширением .exe или .msi.
После того, как вы скачали драйвер, запустите его и следуйте инструкциям установщика. В процессе установки может потребоваться разрешение на установку драйвера или ввод администраторского пароля.
Содержание
- Как скачать драйвер для USB-микроскопа на Windows 10
- Шаг 1: Поиск и скачивание драйвера
- Шаг 2: Установка драйвера
- Шаг 3: Настройка подключения к USB-микроскопу
Как скачать драйвер для USB-микроскопа на Windows 10
Драйверы для USB-микроскопа необходимы для его правильной работы на компьютере под управлением Windows 10. В этом разделе мы расскажем, как скачать и установить драйверы для USB-микроскопа на Windows 10.
Следуйте этим инструкциям для загрузки и установки драйверов:
- Откройте браузер и перейдите на официальный сайт производителя вашего USB-микроскопа.
- На сайте найти раздел «Поддержка» или «Драйверы и загрузки».
- Выберите вашу модель USB-микроскопа из списка доступных моделей.
- Найдите и загрузите последнюю версию драйвера для вашей операционной системы Windows 10.
- После того, как файл драйвера будет загружен, откройте его.
- Запустите процесс установки драйверов, следуя инструкциям на экране.
- После завершения установки перезагрузите компьютер.
После перезагрузки ваш USB-микроскоп должен быть готов к использованию на компьютере под управлением Windows 10.
Если у вас возникнут проблемы с установкой драйверов, вы можете посмотреть инструкции на сайте производителя или обратиться в службу поддержки для получения помощи.
Шаг 1: Поиск и скачивание драйвера
Прежде чем установить драйвер для USB-микроскопа на Windows 10, вам необходимо найти подходящий драйвер. Следуйте инструкциям ниже:
1. Определите модель вашего USB-микроскопа. Проверьте устройство или документацию, поставляемую с микроскопом, чтобы найти название или модель. Это может быть написано на корпусе микроскопа или указано в инструкции.
2. Посетите веб-сайт производителя. Откройте веб-браузер и найдите веб-сайт производителя микроскопа. Найдите раздел «Поддержка» или «Загрузки», где обычно размещены драйверы для устройств.
3. Поиск драйвера для вашей модели. В разделе «Поддержка» или «Загрузки» найдите свою модель микроскопа. Обычно там будет список доступных драйверов для разных операционных систем. Убедитесь, что выбираете драйвер, предназначенный для Windows 10.
4. Скачивание драйвера. Когда вы найдете соответствующий драйвер, обычно он будет представлен в виде исполняемого файла, имеющего расширение .exe. Щелкните правой кнопкой мыши по ссылке на драйвер и выберите опцию «Сохранить как» или «Скачать», чтобы начать загрузку файла.
5. Проверка загруженного файла. После того как файл будет загружен на ваш компьютер, убедитесь, что его размер совпадает с размером, указанным на веб-сайте производителя. Также убедитесь, что вы скачали актуальную версию драйвера.
Теперь у вас есть загруженный драйвер для вашего USB-микроскопа. В следующем шаге мы расскажем, как установить этот драйвер на компьютере с Windows 10.
Шаг 2: Установка драйвера
После того как вы скачали драйвер для USB-микроскопа, перейдите в папку, где был сохранен установочный файл.
Настройте ПК для запуска установочного файла. Для этого щелкните правой кнопкой мыши на файле и выберите «Запустить как администратор».
Следуйте инструкциям мастера установки, нажимая «Далее» и «Принять», когда это требуется.
После завершения установки драйвера перезапустите компьютер, чтобы изменения вступили в силу.
Убедитесь, что ваш USB-микроскоп подключен к компьютеру, а затем откройте приложение или программу, которая поддерживает работу с USB-микроскопом.
Если приложение не обнаруживает ваш USB-микроскоп, проверьте, что драйвер правильно установлен. Если все сделано правильно, ваш USB-микроскоп должен успешно работать на Windows 10.
Примечание: Если у вас возникли проблемы во время установки драйвера, обратитесь к инструкции производителя или поставщика вашего USB-микроскопа.
Шаг 3: Настройка подключения к USB-микроскопу
После успешной установки драйвера для USB-микроскопа на вашем компьютере с операционной системой Windows 10, необходимо выполнить настройку подключения для установки связи с микроскопом.
Для начала, подключите USB-микроскоп к компьютеру при помощи USB-кабеля.
После подключения, компьютер автоматически должен распознать микроскоп и установить соответствующие драйвера.
Однако, если автоматическое распознавание не произошло или появились какие-либо ошибки, вам потребуется выполнить ручную настройку подключения к USB-микроскопу.
|
Шаг 1 |
Откройте меню Пуск и выберите «Панель управления». |
|
Шаг 2 |
В панели управления найдите раздел «Оборудование и звук» и выберите «Устройства и принтеры». |
|
Шаг 3 |
В разделе «Устройства и принтеры» найдите раздел «Устройства», в котором должен отображаться ваш USB-микроскоп. |
|
Шаг 4 |
Щелкните правой кнопкой мыши на значке вашего USB-микроскопа и выберите пункт «Свойства». |
|
Шаг 5 |
В открывшемся окне выберите вкладку «Драйверы» и нажмите кнопку «Обновить драйвер». |
|
Шаг 6 |
Выберите опцию «Автоматический поиск обновленного программного обеспечения» и следуйте инструкциям на экране для завершения процесса установки драйвера и настройки подключения. |
После завершения настройки подключения, вы можете запустить программу для работы с USB-микроскопом и начать использование.