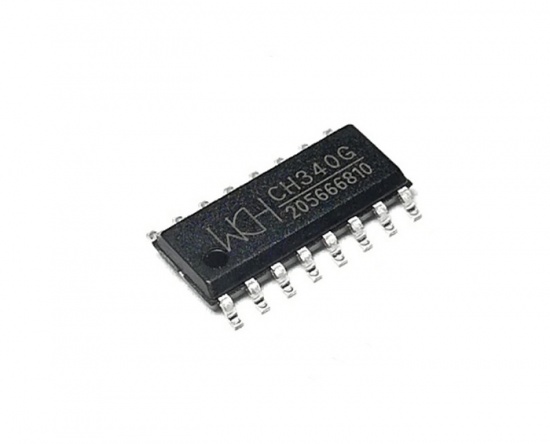
Как правило, платы Arduino имеют встроенный USB-TTL преобразователь, позволяющий без труда подключить Arduino к компьютеру для загрузки прошивки. Оригинальные Arduino, как правило, используют для этих целей программатор FTDI от Шотландской компании FTDI Chip. Китайские же версии платы все чаще используют для USB подключения программаторы китайских производителей. Например, недорогой и очень популярный CH340, существенно снижая стоимость китайских версий Arduino.
Основным нюансом программатора CH340G является отсутствие предустановленного в операционную систему драйвера. Из за этого неопытные пользователи часто сталкиваются с ситуацией, когда после подключения Arduino к компьютеру он не видит подключенную плату. Это легко исправить! Надо лишь скачать драйвер CH340G для Windows 10, Linux или MacOS и произвести его установку в систему.
Ссылки на скачивание драйвера для различных ОС даны ниже:
Как установить драйвер CH340G на компьютер?
Установка драйвера CH340G производится в несколько простых шагов:
- Скачиваем драйвера по ссылкам выше
- Распаковываем архив с установочными файлами
- Запускаем исполняемый файл (SETUP)
- В открывшимся окне соглашаемся с установкой
- Перезагружаем компьютер для корректного обновления данных в реестре
После установки драйвера заново подключаем Arduino и смотрим, чтобы плата корректно отобразилась в списке диспетчера устройств.
Программаторы CH340 в нашем магазине
Смотрите также
×
По вопросам приобретения товара

Telegram
+7 968 454 17 38

+7 968 454 17 38
*Доступно общение только текстовыми сообщениями, звонки и аудио сообщения не обслуживаются

Онлайн


Менеджер
8 (499) 500-14-56
По техническим вопросам
При подключении платформ разработки на базе Arduino к компьютеру, вы связываете между собой два мира: микроконтроллерный и микропроцессорный.
Стандартным интерфейсом плат Arduino на микроконтроллерах ATmega328P является UART, а у современных компьютеров используется USB. Чип USB-UART CH340G служит мостом между микроконтроллером и USB-портом компьютера, который позволяет загружать прошивку в плату, а также передавать между собой данные.
Список поддерживаемых плат
Зачем нужен драйвер?
При подключении любого устройства к USB-порту компьютера необходимо подсказать операционной системе, как с ним общаться. На стороне компьютера таким переводчиком является специальная программа, называемая драйвером. Например, драйвер преобразователя USB-UART работает в режиме эмуляции последовательного COM-порта. Т. е. при подключении вашей платы к компьютеру чип моста с помощью драйвера попросит операционную систему открыть виртуальный COM-порт, через который начнётся общение между платой и ПК.
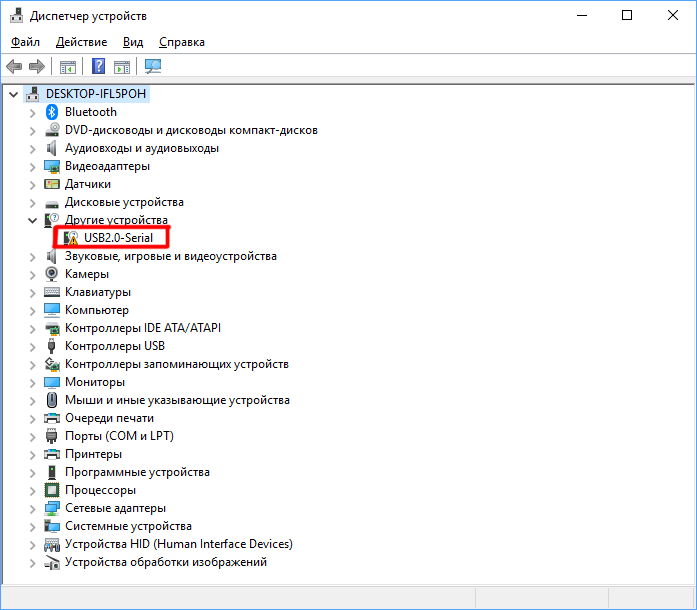
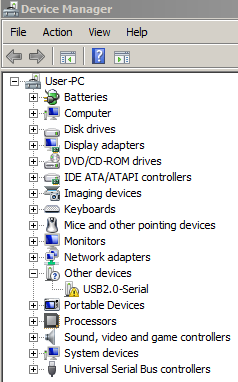
Каждый производитель делает свои чипы с соответствующими драйверами. К сожалению, не все драйверы предустановлены в операционных системах по умолчанию. Когда нужного драйвера нет, ОС пытается найти его для нового подключённого устройства, не находит, и вместо виртуального COM-порта вы видите надпись «USB 2.0 SERIAL» или «Неизвестное устройство». Для решения проблемы скачайте и установите драйвер для вашей операционной системы.
Установка драйвера
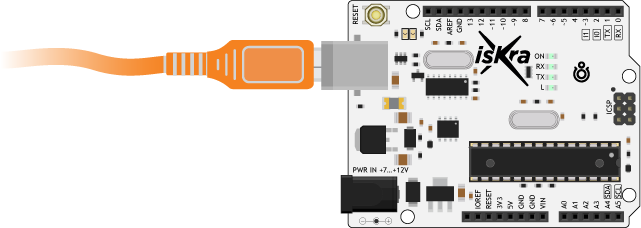
Рассмотрим установку драйвера на примере платы Iskra Uno в операционной системе Windows. С остальными платами ситуация будет аналогичная.
-
Подключите плату к компьютеру по USB. Для коммуникации используйте кабель USB (A — B).

-
Установите и настройте интегрированную среду разработки Arduino IDE.
-
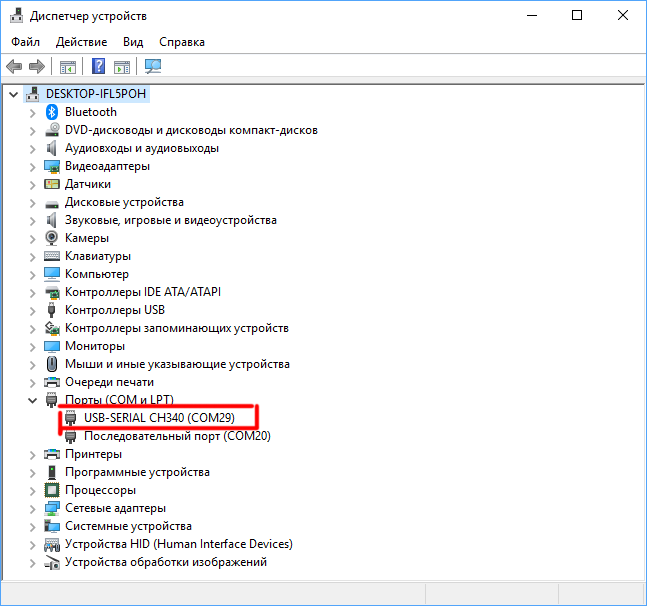
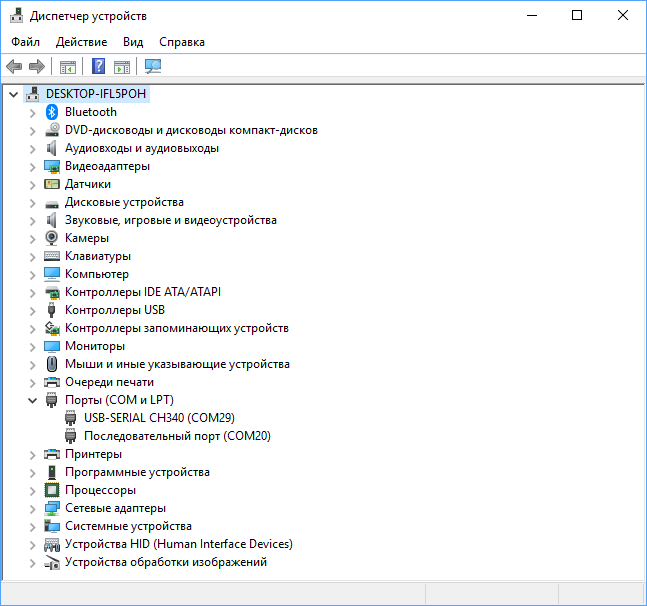
Откройте диспетчер устройств Windows и раскройте вкладку «Порты (COM и LPT)».
-
Если во вкладке отображается пункт
USB-SERIAL CH340 (COMx)— значит, всё получилось, и можно переходить к прошивке платформы. -
Если пункта не обнаружено или вкладка «Порты (COM и LPT)» вовсе отсутствует, следуйте дальнейшей инструкции.
-
-
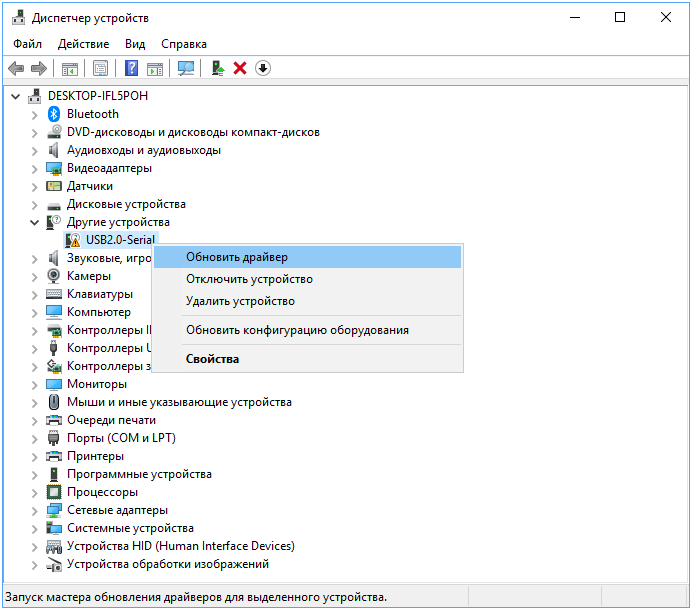
В диспетчере устройств Windows раскройте вкладку «Другие устройства» и найдите пункт
USB2.0-Serial. -
Далее кликните правой кнопкой мыши по пункту
USB 2.0 Serialи выберите раздел «обновить драйвер». -
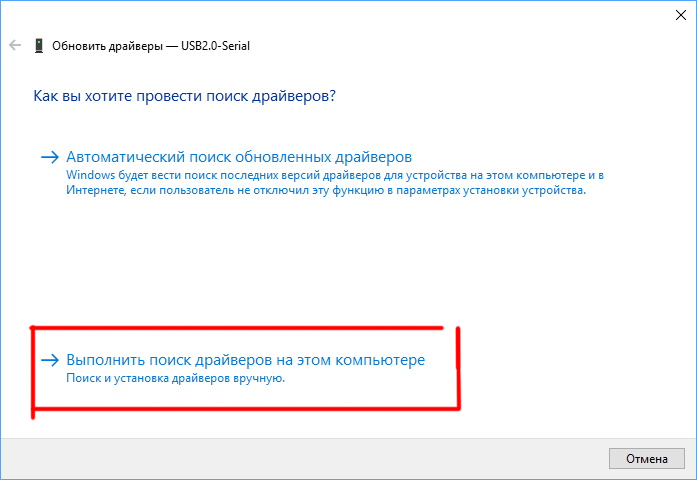
Выберите пункт «Выполнить поиск драйверов на этом компьютере».
-
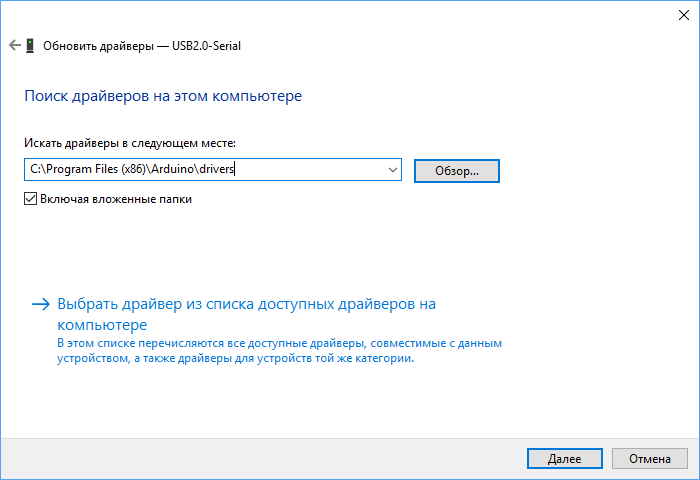
Укажите путь к директории драйвера и нажмите кнопку «установить». В нашем случае:
-
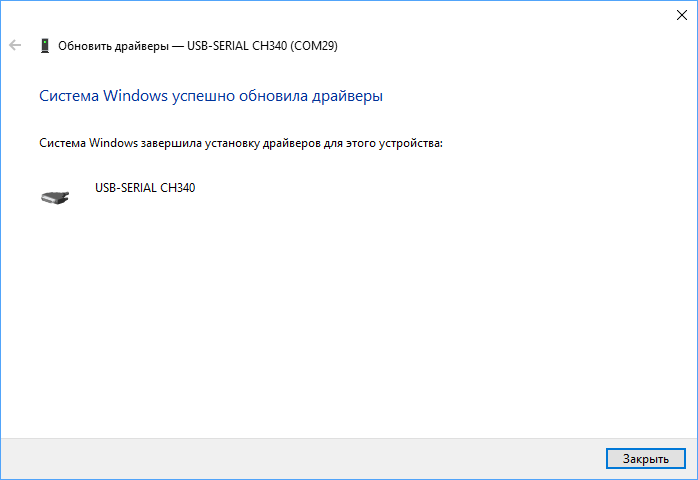
Если всплывёт окно с текстом «Не удалось проверить издателя драйверов», кликните по вкладке «Всё равно установить этот драйвер». По завершении процесса вы должны увидеть сообщение об удачной установке драйвера.
-
Откройте повторно вкладку «Порты (COM и LPT)» в диспетчере устройств. Если там отображается пункт
USB-SERIAL CH340 (COMx)— значит, всё получилось, и теперь можно переходить к прошивке платформы.
Ресурсы
-
Скачать драйвер CH340
![]()
12876
Большинство плат Arduino производятся со встроенным USB-to-Serial преобразователем. Последнее время для этих целей используют микросхему CH340. Эта микросхема сильно снижает затраты на изготовление микроконтроллеров, а на работоспособность абсолютно не влияет. Так же ее используют в программаторах для устройств в которых нет встроенной поддержки USB соединения. С помощью таких программаторов можно легко прошивать Arduino Pro Mini. Об этом мы рассказывали в этой статье.

Есть только одно «но». По умолчанию в системе windows не установлен драйвер для работы с этой микросхемой. Из-за этого устройство может работать не правильно или вообще не опознается. Что бы это исправить необходимо скачать и установить драйвер CH340G. Ссылки на драйвер и инструкция по установке есть ниже.
Скачать драйвер CH340G
Скачать CH340G для Windows
Скачать CH340G для Linux
Скачать CH340G для MAC
Установка драйвера
- Скачайте драйвер для вашей операционной системы по ссылкам выше.
- Распакуйте архив
- Запустите исполнительный файл SETUP.EXE
- В открывшемся окне нажмите кнопку Install
- На этом установка завершена
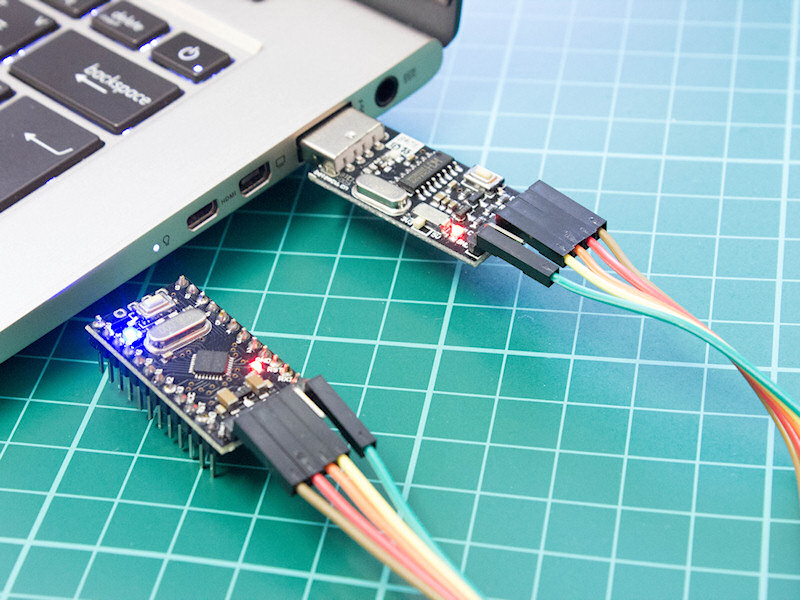
Here you can download latest version of verified & working Windows 7 driver for Mini USB 2.0 to TTL 6Pin CH340G Converter sold as BTE13-009/USB.
CH340G driver download
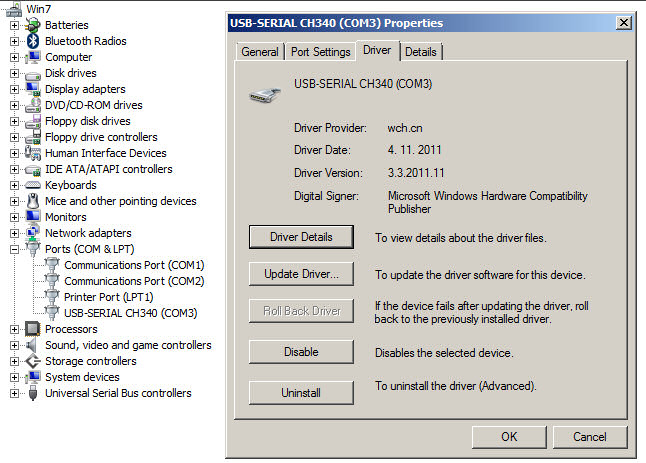
Driver details
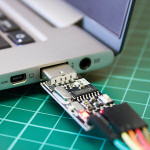
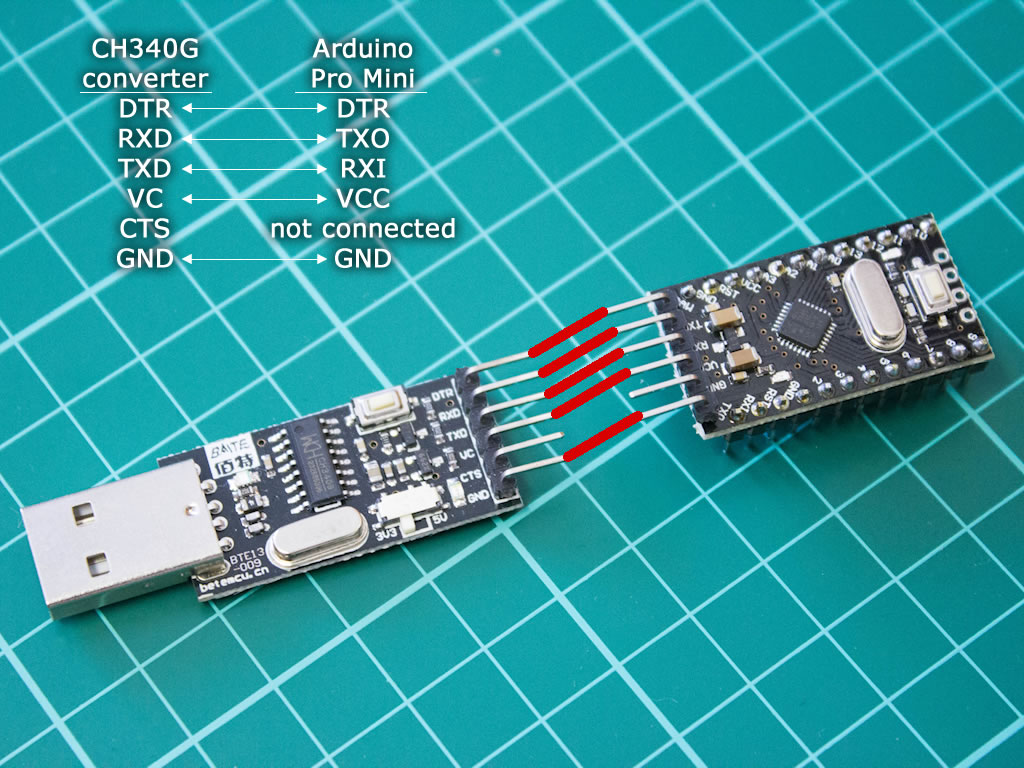
CH340G converter connection and pinout for programming
88 responses to CH340G converter Windows 7 driver download
-

Thanks for help was looking for this
-
Gracias funciona muy bien
-
Tested the driver works 100% for my Arduino Pro Mini with the converter from eBay. Great
-
Awesome! It was soooo slow from some chinese site…
-
-
CH340 with Ubuntu no problem, Win7 after using this driver O.K.!
Many thanks! -
These CH340 boards they are so cheap and work great
Can’t believe how much i was paying for FTDI… until now… man they really pissed me off with the driver destroying fake chips. Like i know which one is fake and which not when ordering it! All of them were expensive! -
confirmed this driver works for Arduino Nano V3.0 CH340G
-
Good!!! This driver works for BTE13-010A Pro Mini with Windows 8.1
-
Funcionou…
Obrigado.
SO: Windows 7
MCU: STM32F103C8T6 -
This driver is working OK with Arduino UNO R3 ATmega328P CH340G USB Driver Development Board, tested it right now. On the board is a sign M.Jduino UNO R3.
And btw. Happy New Year 2015 to you all reading this
-
no prolific, no Cdm ftdi worked on my new China made Arduino UNO. Then I found this page and downloaded the 340g driver. Now it is recognized on my Win 7 system PC. It works!!!
-
ch340g driver work perfect
-
fantastic, finally me it works, thank you for the driver.
-
super funkčný ovládač na m.jduino uno aj čínsky klon arduino nano
-
Works great with my ATmega2560-16AU with CH340G … you make me happy … after fiddling round a long lasting night with all the other drivers for arduinos with no outcome. THX a lot : ))
-
Arduino Mega 2560. Windows 7 64 bit, OK
thx -
Thank you, very much. It works perfect!!!
-
Is there a wai to connect it with android?
-
Anyone find the driver for windows 8 x64?
-
hey guys does anyone know why this is everything is hooked up??
Sketch uses 1,030 bytes (7%) of program storage space. Maximum is 14,336 bytes.
Global variables use 9 bytes (0%) of dynamic memory, leaving 1,015 bytes for local variables. Maximum is 1,024 bytes.
avrdude: stk500_recv(): programmer is not responding
avrdude: stk500_getsync() attempt 1 of 10: not in sync: resp=0xfd
avrdude: stk500_recv(): programmer is not responding
avrdude: stk500_getsync() attempt 2 of 10: not in sync: resp=0xfd
avrdude: stk500_recv(): programmer is not responding
avrdude: stk500_getsync() attempt 3 of 10: not in sync: resp=0xfd
avrdude: stk500_recv(): programmer is not responding
avrdude: stk500_getsync() attempt 4 of 10: not in sync: resp=0xfd
avrdude: stk500_recv(): programmer is not responding
avrdude: stk500_getsync() attempt 5 of 10: not in sync: resp=0xfd
avrdude: stk500_recv(): programmer is not responding
avrdude: stk500_getsync() attempt 6 of 10: not in sync: resp=0xfd
avrdude: stk500_recv(): programmer is not responding
avrdude: stk500_getsync() attempt 7 of 10: not in sync: resp=0xfd
avrdude: stk500_recv(): programmer is not responding
avrdude: stk500_getsync() attempt 8 of 10: not in sync: resp=0xfd
avrdude: stk500_recv(): programmer is not responding
avrdude: stk500_getsync() attempt 9 of 10: not in sync: resp=0xfd
avrdude: stk500_recv(): programmer is not responding
avrdude: stk500_getsync() attempt 10 of 10: not in sync: resp=0xfd
Problem uploading to board. See http://www.arduino.cc/en/Guide/Troubleshooting#upload for suggestions. -
Probably you have to choose “old bootloader for ATMmega” from your development environment where you inject code to Arduino. I had the same problem under Linux several development environments.
-
Thank you so much! After trying many times with other drivers this one finaly worked for me ! Win7 64bits, Arduino Mega 2560 R3
-
Merci pour cette résolution de mon problème!!!!
Mes 2 clones chinoi a 0.01€ fonctionnent!!!!!!!!!MERCI !!!!
-
Way to use the internet to help people solve prblmeos!
-
Hi,
The newer 3.4.2014.08 version I got directly from the Chinese manufacture at ch.cn never worked with my Windows Seven/64, Windows do not trust it and refuse to load the driver.This older 3.3.2011.11 version you have is a real gift. Works like a charm.
Thank
-
Finally a ch340g driver that really works for Windows 7 x64
thx -
Thanks a lot for the driver. CH340g driver works perfect on Windows 7 x64
-
after so much trials and frustrations… the chinese cloned uno board(CH340g) finally works
-
Got my board off of a seller on Ebay. for less then 2 bucks.
This driver worked perfect on win7 x64Awesome little board, gotta buy more, thanks for driver.
-
This driver works great for inexpensive Chinese NANO clones equipped with CH340G.
Thanks much! -
Brilliant!! I was getting a headache with my nano until I found this!!
-
Muchas gracias por la ayuda, funciona perfecto para mi Arduino UNO CH340G
-
Thanks for your work! it’s helping the nano clone community…
-
How do i talk to the device? how do i pull data from it?
-
You are the master. Everything went well in the first try. Thank you very much
-
-
Thank You!!!
This driver worked on Windows Vista and a Barebone breadboard build Arduino
-
Has anyone got it to work on win 7 (64bit amd) win 8.1 (64 bit) or windows 10 (64bit) The Arduino Uno R3 from china? Like this one http://www.aliexpress.com/item/Best-prices-high-quality-UNO-R3-MEGA328P-for-Arduino-UNO-R3-NO-USB-CABLE/32213964945.html ???
I cant get it to work at all.
Yours
Allan -
Driver works 100% for Arduino Uno R3 from China on win 7 64bit, using it all the time. Check your cable, try different USB port, try other Arduino Uno board maybe the one you have is faulty. Also what software are you using to upload sketch? Try Arduino 1.0.5 version:
https://www.arduino.cc/en/Main/OldSoftwareReleases#1.0.x -
Hi thanks for your answer.
I have now tryed all 4 i have byed, 2 of then was error the 2 other works.
Also in windows 10 64
But not the first 2 i got from the same supplyer
Windows cat see them and says there are erros. -
Download this, install it, and remove any driver that you may have already installed as I did. Once you remove the old driver windows may install this driver for you.
-
Official signed Windows 9x, Vista, 7/8 x32/x64 drivers can be downloaded from Microsoft:
http://catalog.update.microsoft.com/v7/site/ScopedViewRedirect.aspx?updateid=032a878e-8ca0-40d2-b7b1-936640b0eecb
This should be a safer source.
-
-
Thanks, I think only Windows 7 users need to manually find it as I hear Win 8 users have it by default. BTW any changelog for the newer version? The older one still works okay on my Win 7 x64.
-
good day ,
I have an USB to UART adapter installingbased on the ch340G chip.
I have installed the required driver but at the end the program says that it has been previously installed ( ? ! ). Windows does not recognise the adaptor and puts a yellow triangle on the control panel.
Any help please ?
Thanks
Ambro -
Hi Ambro,
I have fought with the same problem (Unknown device or driver already installed) for a few hours!! :-/ Finally I tried change cable and HEUREKA!! it works!!! So supplied short blue mini usb cable was screwed (in device list you can see unknown device and if you see Hw ids in device details there is no VID and PID.
Regards,
Nik -
Perfecto!! Ahora si manos a la obra, funciona 100% con el Mega 2560 y UNO R3
-
Thank you very much. It works me on Windows 7 Starter.
-
thanks a ton, this was really helpful and got the system working. Thanks again
-
Thanks! Works on Win7 Ultimate 64!
-
Regards folk, Your Astella 8 *.
-
Thank you very much. I trusted you and you didn’t let me down. I didn’t even read any f the reviews first. God Bless you. I have had everythig else screw up somehow today including m Arduino IDE, and so finally at the end of the day, I could find the driver and try out my program before collapsing in my bed! Uhh
-
I have an uno r3 with ch340G which I can talk to from my home w7 x64 notebook after I have installed the drivers.
On my desktop the drivers somehow do not communicate properly.
If I plug in the device windows recognized it and shows port 8 as new port.
When I try to transfer a sketch to the device it fails though with error message
avrdude: stk500_recv(): programmer ist not responding.
I have tried CH341s64.sys rev 3.3.2011.11 and 3.4.2014.8 without success -
-
Finally! My Arduino Compatible Nano R3 buy from local online Malaysian seller works! Save my money buying original Nano.. I can buy 5 pieces this version worth 1 original Nano.. xD Thank you!!
-
Many thanks for that. I had all my other Arduino Nanos working and this Nano looked identical in every way (with onboard MicroUSB) to my others that use FTDI. I knew it was half the cost so I guessed it used ch340G. Installed to Win 7 x64 first time and works like a charm. Was a bit dubious of the installer with it being largely in Chinese but who care if it works!
-
Finally. my usb to serial device is now working after looking for almost 2hours. Thanks for the big help!
-
Thank you very much , you save my day..
-
-
What’s involved in getting it to work on Linux?
-
Thanxxxx aaa lot… I have a arduino nano v3 and its driver was not getting installed. So I have tried this zip file and installed the drivers and its truly works again thanks a lot….
-
Hi,
I have Win 7 Professional SP1 (64bit). I tried both versions but does not install the COM PORT as listed above and doesn’t work with my NANO. (NOTE: Cable is fine since I can connect to UNO board without an issue)
Versions tried.
CH341SER_3.3.2011.11
CH341SER_3.4.2014.08Could anyone suggest which version works well and how to solve the issue.
Thanks
-
I have same problem. I have MEGA 2560 with CH3400 and on one PC (win7 ultimate 64bit PS1) work ok, but on the other PC (win7 profesional 64bit SP1) doesnt work.
On the secont PC, driver is instaled automaticali as “unknow driver”, and if i want to upgrade driver for ch341ser i got “The best software for your driver is instaled….” {but it is not true.}
When I tired to upgrade driver by manual set driver during update ” let me pick…..” I got “the folder you specified doesn’t contain a compatible software driver for your device…. ”WTF?
-
THANKS HEAPS worked first time
-
Thank you greatly for this solution, it works. I run Windows 7 64 bit and was trying for 5 hours (embarrassingly so) to communicate with an Arduino Nano V3.0 purchased on line before I discovered this post. The trap for young players was not looking specifically at/or identifying the USB comm’s chip on the board earlier on. I fell for the surf the net here is the recommended solution for you. As soon as I had retraced my steps all the way back to the start and Identified the WCH340G chip is used for the comms I was straight onto this web page and downloaded the driver software. Following installation I was able to communicate with the nano and write code to it. I am using a USB cable from a cannon camera that I bought in 2004. As a further test I changed the delay time on the ‘blink’ code and uploaded it to the nano. That worked. So thank you very very much. Ian.
-
I have also found that these drivers work fine when connecting the LoLin NodeMCU V3 to my Windows 7 PC (I had to do nothing, since I had already loaded the drivers for my cheap Chinese Arduino Nano clones). I suspect the same will be true for the Amica v0.9 (yellow or blue PCB) NodeMCUs (both considered out-dated) and the DoIt/SmartArduino brand NodeMCU V2. Both of these boards also use a WCH CH340G USB-to-UART bridge chip.
As an Arduino-phil I use the ESP8266 Core from GitHub to adapt the Arduino IDE to the ESP8266. It uses a somewhat different tool chain to compile the Arduino C code into binary files executable by the ESP8266, but the Arduino IDE and most libraries are the same. The only stumbling points are:
1.) The NODEMCU “Arduino friendly” pin names (D0 thru D8, plus RX and TX) don’t correspond with the actual ESP8266 GPIO pin numbers, so you have to make special arrangements to map the “D1”, “D2”, etc names to the actual GPIO pin numbers. There are a few ways to do this.
2.) There is only one ADC on the ESP8266,
3.) The board, like the Arduino Due is a 3.3V system, so things like voltage divider resistors, bidirectional level circuits (or modules) usually based on FETs, and other tricks are required to match voltage levels, especially the 5V outputs of TTL chips leading to the 3.3V inputs of the ESP8266. The documentation says the inputs are rated to handle up to 5.8V, and some peole get by without these level shifters, etc. but most folks when cornered about the topic will recommend using them (“better safe than sorry”). I always use 2 resistor voltage dividers or voltage level shifter modules. Another trick is to use 74HCxxx series TTL componets where “HC” means high speed CMOS. On the HC series chips you can lower the Vcc supply voltage to 3.3V and not have to worry about voltage level shifting.
4.) Some of the ESP8266 GPIO pin either have external pull-up or pull-down resistors which are used on power-up boot (or reset) time to tell the chip how to boot, etc. These pull-up resistors cause some devices like push buttons not to work as expected. So, if your ESP8266 does not boot after adding, say an active high push-button circuit, try switching things around and make it an active low push-button circuit (or vice versa). Usually that will fix the problem. You should add components slowly to the ESP8266 (one additional circuit at a time) so you know where to look should the ESP8266 suddenly stop working. Usually it will be a problem with the last circuit added. Sometimes you may see dimming of LEDs, or LCD displays, which is typically an indicator of overloading the 3.3V supply. Anyway, it’s been fun, now to go off and test it’s WiFi capabilities…
-
Thanks for the information on the ESP8266 stuff.
-
Не так давно я получил партию arduino nano. После неудачной попытки подключения её к компьютеру с windows 7 начал разбираться в чем проблема. В появившемся окне с предупреждением о том что Не удалось проверить издателя этих драйверов , кликаем Все равно установить этот драйвер!
-
Just to say thanks for this thread this is the file that worked for me on my windows 7 x64
https://www.arduined.eu/files/windows8/CH341SER.zipjust move and run DRVSETUP64.EXE to the driver files folder and you are set.
-
-
thanks it works for the first time!!
-
funciono de maravilla al primer intento.
lo instale bajo windows 10
gracias -
Thank you for posting this driver! Makes it work!
-
Can any bady tell me how to install this driver ……quickly
-
Thank you
Fernando, Brazil.
-
Muito obrigado,100% funcional!!!!
-
-
-
why in arduino it says programmer not ressponding??
-
-
awesome works.. keep going…
-
Thanks very much – exactly what I needed!
-
Many thanks for this,
works fine on the Nano V3…
Santor -
-
-
-
Driver works with new LoLin [NodeMcu V3 (Chip CH340G)!


