 Многие инструкции по исправлению проблем с работой устройств в Windows 10 содержат пункт «зайдите в диспетчер устройств» и, несмотря на то, что это элементарное действие, некоторые начинающие пользователи не знают, как это сделать.
В этой инструкции — 5 простых способов открыть диспетчер устройств в Windows 10, используйте любой. См. также: Встроенные системные утилиты Windows 10, о которых полезно знать.
Открытие диспетчера устройств с помощью поиска
В Windows 10 присутствует хорошо работающий поиск и, если вы не знаете, как что-то запустить или открыть, это первое что стоит попробовать: почти всегда нужный элемент или утилита найдутся.
Чтобы открыть диспетчер устройств, просто нажмите по иконке поиска (лупа) в панели задач и начните набирать «диспетчер устройств» в поле ввода, а после того, как нужный элемент будет найден, нажмите по нему мышкой для открытия.

Контекстное меню кнопки Пуск Windows 10
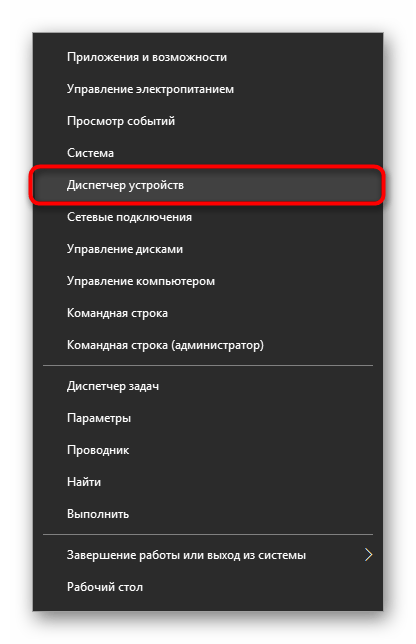
Если нажать правой кнопкой мыши по кнопке «Пуск» в Windows 10, откроется контекстное меню с некоторыми полезными пунктами для быстрого перехода к нужным параметрам системы.

Среди этих пунктов есть и «Диспетчер устройств», просто нажмите по нему (правда, в обновлениях Windows 10 пункты контекстного меню иногда меняются и, если вы не найдете там того, что требуется, вероятно, это произошло снова).
Запуск диспетчера устройств из диалогового окна «Выполнить»
Если вы нажмете клавиши Win+R на клавиатуре (где Win — клавиша с эмблемой Windows), откроется окно «Выполнить».
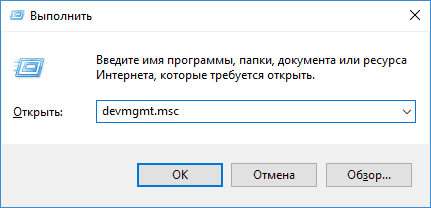
Введите в него devmgmt.msc и нажмите Enter: будет запущен диспетчер устройств.
Свойства системы или значок «Этот компьютер»
Если у вас на рабочем столе присутствует значок «Этот компьютер», то, нажав на него правой кнопкой мыши, вы можете открыть пункт «Свойства» и попасть в окно сведений о системе (если отсутствует — см. Как добавить значок «Этот компьютер» на рабочий стол Windows 10).

Еще один путь открыть это окно — зайти в панель управления, а там открыть пункт «Система». В окне свойств системы слева есть пункт «Диспетчер устройств», открывающий необходимый элемент управления.

Управление компьютером
Встроенная утилита «Управление компьютером» в Windows 10 также содержит диспетчер устройств в списке служебных программ.
Для запуска «Управление компьютером» используйте либо контекстное меню кнопки «Пуск», либо нажмите клавиши Win+R, введите compmgmt.msc и нажмите Enter.

Учтите, что для выполнения каких-либо действий (кроме просмотра подключенных устройств) в диспетчере устройств, вы должны иметь права администратора на компьютере, в противном случае вы увидите сообщение «Вы вошли с правами обычного пользователя. Вы можете просматривать параметры устройства в диспетчере устройств, но для внесения изменений необходимо войти в систему с правами администратора».
![]() USBDeview 3.07
USBDeview 3.07
USBDeview — небольшая программка, которая выведет список всех USB устройств (флеш-карта,…
![]() ScanLite 1.1
ScanLite 1.1
ScanLite — небольшая бесплатная утилита, с помощью которой можно быстро и легко осуществлять…
![]() BlueSoleil 10.0.498.0
BlueSoleil 10.0.498.0
BlueSoleil — одно из наиболее популярных приложений, которое при помощи Bluetooth поможет соединить…
![]() VueScan 9.8.13
VueScan 9.8.13
VueScan — приложение, которое позволяет изменить стандартный интерфейс сканера на…
![]() AutoHotkey 2.0.5
AutoHotkey 2.0.5
AutoHotkey — приложение для автоматизации процессов до одного клика. Настраивайте клавиатуру и…
Jump ahead to the section you’re interested in
- How to identify missing or malfunctioning drivers with Windows Device Manager
- How to identify (some) outdated drivers with Windows Device Manager
- How to update a driver with Windows Device Manager
- How to reinstall a driver with Windows Device Manager
- What Windows Device Manager DOESN’T do
- Device Manager vs Driver Easy
- How to get Driver Easy
Note that the Windows Device Manager screenshots in these instructions are from Windows 10, but the instructions themselves will work in Windows 11, 10 and 7 too.
How to identify missing or malfunctioning drivers with Windows Device Manager
To see which of your devices have a missing or malfunctioning driver:
-
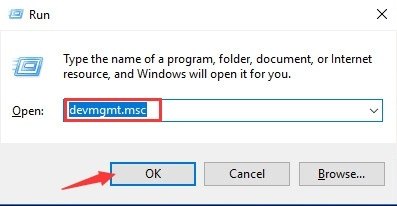
On your keyboard, press the Windows logo key
 and R at the same time to invoke the Run box.
 -
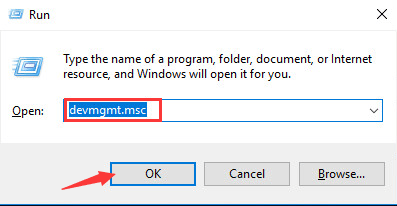
Type devmgmt.msc and click OK.

(There are other ways to open Device Manager; it changes depending on your version of Windows. But the above method works for all versions of Windows, including Windows 11, 10 and 7.)
-
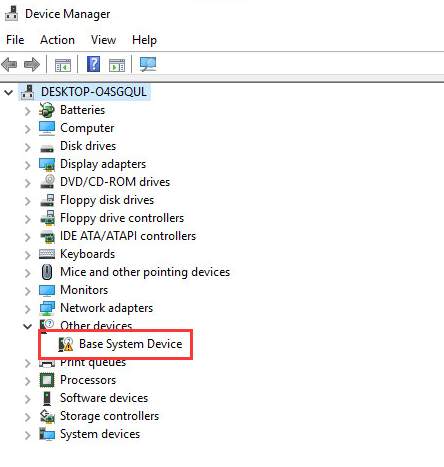
Expand a category (e.g. Display Adapters) to see the devices in that category. If you see a yellow triangle or question mark next to a device, Windows has detected that it has a missing or malfunctioning driver.
-
If you see this yellow mark, you can try to update or reinstall the driver as described later on this page.
How to identify (some) outdated drivers with Windows Device Manager
Identifying outdated drivers with Device Manager is a very tedious process. You can’t tell, just by looking at the device in Device Manager, if its driver is out of date. You have to actually try to update the driver, as described below. If Windows thinks the driver is out of date, it will update it for you; if not, it will tell you you already have the latest driver.
IMPORTANT: As discussed later on this page, Windows Device Manager doesn’t always detect outdated drivers. Nor does it always give you the latest available version if you update a driver. If you want to be sure you have the latest available version of a driver, you need to source the driver directly from the device manufacturer or use a tool like ours, called Driver Easy, to do it automatically.

How to update a driver with Windows Device Manager
To update a driver in Device Manager (or to see if Windows thinks it needs updating):
-
On your keyboard, press the Windows logo key
and R at the same time to invoke the Run box. -
Type devmgmt.msc and click OK.
(There are other ways to open Device Manager; it changes depending on your version of Windows. But the above method works for all versions of Windows, including Windows 11, 10 and 7.)
-
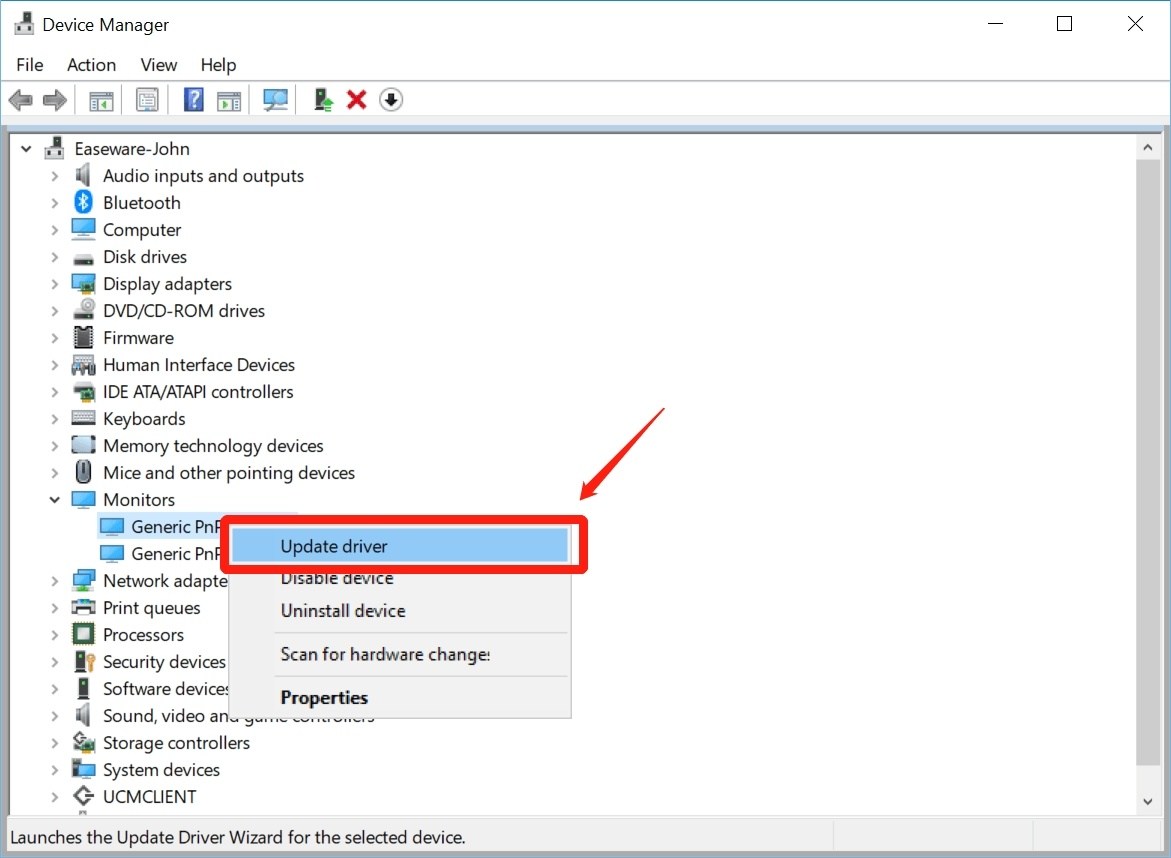
Expand a category (e.g. Display Adapters) to see the devices in that category.
-
Right-click the device whose driver you’d like to update, and select Update Driver.
-
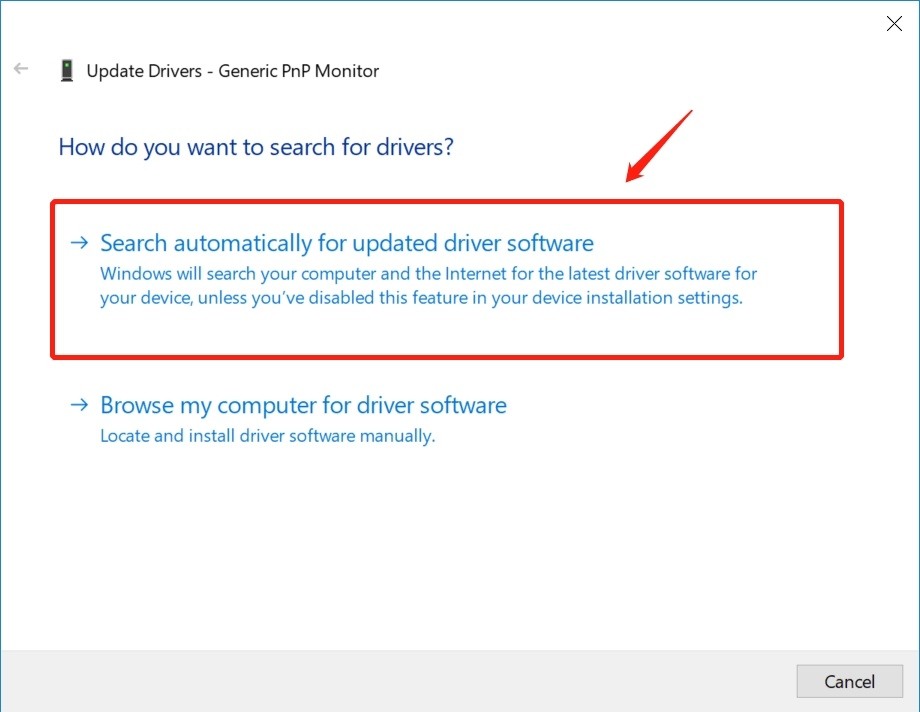
Select Search automatically for updated driver software.
IMPORTANT: As discussed later on this page, Windows Device Manager doesn’t always detect outdated drivers. Nor does it always give you the latest available version if you update a driver. If you want to be sure you have the latest available version of a driver, you need to source the driver directly from the manufacturer or use a tool like ours, called Driver Easy, to do it automatically.
How to reinstall a driver with Windows Device manager
To reinstall a device’s driver in Windows Device Manager:
-
On your keyboard, press the Windows logo key
and R at the same time to invoke the Run box. -
Type devmgmt.msc and click OK.
(There are other ways to open Device Manager; it changes depending on your version of Windows. But the above method works for all versions of Windows, including Windows 11, 10 and 7.)
-
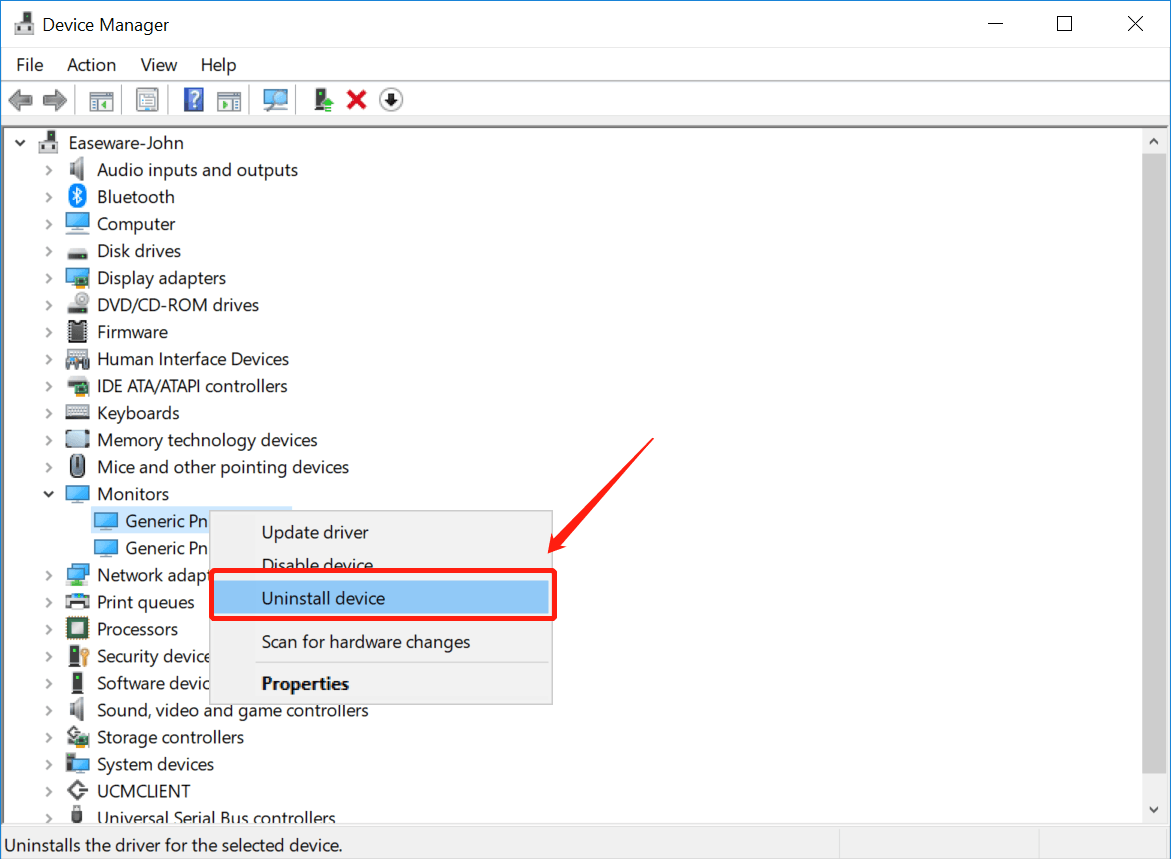
Expand a category to see the devices in that category. Right-click the device whose driver you’d like to reinstall, and select Uninstall.
-
Restart your PC.
-
Windows will attempt to reinstall the driver.
IMPORTANT: As discussed below, reinstalling a driver with Windows Device Manager doesn’t necessarily give you the latest available version of that driver. If you want to be sure you have the latest available version of a driver, you need to source the driver directly from the manufacturer or use a tool like ours, called Driver Easy, to do it automatically.
What Windows Device Manager DOESN’T do
Windows Device Manager doesn’t always detect outdated drivers. Particularly in Windows 10. That’s because it categorizes driver updates as either ‘critical’, ‘automatic’ or ‘optional’, and it doesn’t usually concern itself with the ‘optional’ ones. So long as you have the necessary ‘critical’ and ‘automatic’ updates, it’s happy. It won’t, for example, install a new ‘optional’ update, if it already has an old ‘critical’ update installed. Here’s a quote from Microsoft itself:
Windows offers the best matching driver, which is not necessarily the most recent. The driver selection process considers hardware ID, date/version, and critical/automatic/optional category. Windows prioritizes critical or automatic drivers highest. If a matching driver is not found, WU looks next for optional drivers. As a result, an older critical driver of otherwise equal value takes precedence over a newer optional driver.
But all driver updates are important, even when Windows calls them ‘optional’. If they weren’t, the hardware manufacturers wouldn’t go to all the trouble of coding and releasing them.
Sometimes these ‘optional’ updates include just a new, nice-to-have feature, and you can arguably do without that. But sometimes it’s an important bug fix – perhaps the old driver is causing your device to stop working or your computer to crash. Windows often categorizes these updates as ‘Critical’, but definitely not always.
Other times, it’s not Device Manager’s fault at all. It’s just that the device manufacturer has failed to include the driver you need in the latest Windows Update. Watch this video for more information on how this happens:
Issues you’ll encounter when Windows Device Manager won’t update a device driver
Whether it’s a Microsoft issue or a device manufacturer issue, if Windows doesn’t detect that your device drivers are out of date then:
-
If you try to update a device’s driver as described above, Windows Device Manager will tell you the driver is already up to date, even though it’s not; and
-
You could be missing out on important device functionality, and you may be suffering through completely unnecessary computer issues (e.g. computer crashes or very slow performance).

What to do when Windows Device Manager won’t update a device driver
If you’re unable to update a device driver in Windows Device Manager, Microsoft says:
If Windows doesn’t find a new driver, you can try looking for one on the device manufacturer’s website and follow their instructions.
But to do this, you’ll need to know the brand and model of the device, as well as your exact operating system and whether it’s 32 or 64 bit. Then you have to find the manufacturer’s driver download page, find the correct driver, and check that it’s newer than the one you already have installed. Then, of course, you have to download and install the driver – quite often a complex process, in itself.
Obviously this takes a lot of time, but it also requires quite a bit of technical expertise. If you do something wrong, your device – or even your entire computer – may just stop working.
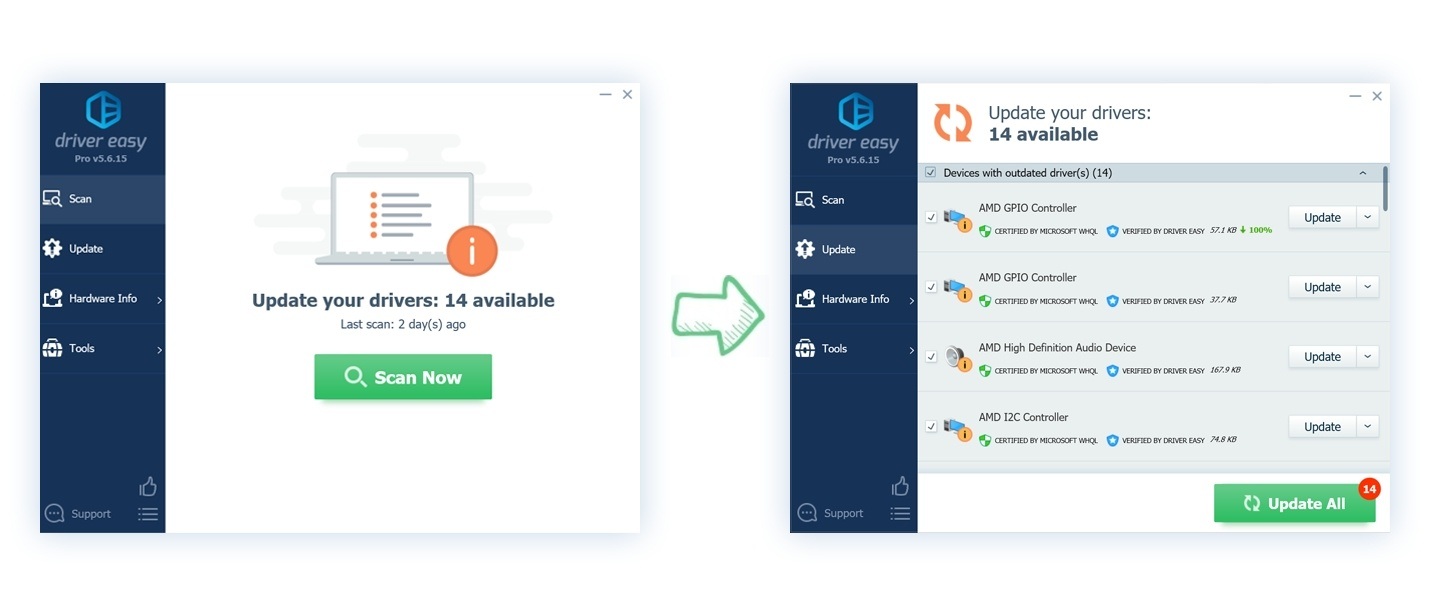
If you don’t have the time, skills or confidence to manually install drivers, you can use our tool, Driver Easy, to update your drivers automatically. It will automatically detect all the devices on (or connected to) your computer that have outdated drivers, and you can then update them all with one click.
Watch Driver Easy in action:
It’s not just easier, either. Driver Easy Pro also reduces your risk. It will automatically recognize your system and all your devices, and install the latest correct drivers for you – direct from the manufacturer, and certified safe and stable. You don’t need to know exactly what system your computer is running, you don’t need to risk downloading and installing the wrong drivers, and you don’t need to worry about making a mistake when installing.
You just click Scan Now, then Update All.
Try Driver Easy for free
If you want the certainty of knowing your device drivers are always up to date (and not just sometimes up to date, which is all you get from Windows Device Manager), and you don’t have the time, patience or computer skills to continually update them manually, give the free version of Driver Easy a try.
The free version will identify all your outdated drivers, and allow you to download them all. But only one at a time and, once they’re downloaded, you have to manually install them using the standard Windows process. (To automatically update all your drivers with 1 click, you’ll need the Pro version of Driver Easy. Don’t worry, it comes with a 30-day, no-questions-asked, money back satisfaction guarantee.)

Questions?
If you still have questions about updating your device drivers, or you’d like to learn more about doing it automatically with Driver Easy, please get in touch. We’d be happy to help.

Диспетчер Realtek HD – это общий центр, который контролирует и управляет параметрами звуковых устройств. Этот драйвер распространяется официально и воспроизводит звук с многих устройств на чипе от Realtek.
Драйвер Realtek HD инсталлируется с полным набором утилит для звуковых карт Realtek. Эта утилита создана в виде центра с множеством функций. Этот драйвер воспроизводит и записывает аудиосигнал с разных источников.
В этом центре есть настройка конфигов для акустических систем и динамиков. При необходимости вы настроите эквалайзер, активируете или выключите вспомогательные динамики, установите окружающие эффекты и другие параметры. Все эти функции «запакованы» практичную графическую оболочку с поддержкой русского языка.
Возможности
Драйвер Realtek HD активирует устройства звуковой карты, которые воспроизводят и записывают звук. Программа отбирает порты mini-jack, которые работают и к которым подаётся напряжение. В боковой панели есть опции для работы с портами. Переключайте звук и драйверы, используя контекстное меню. Для входа в меню нужно воспользоваться панелью уведомлений и нажать правую кнопку мыши на иконке.
Прочие функции программы обеспечивают переход от активного канала до не рабочего, выставление «басов» и активация громкости для микрофона. Используйте настройки для очистки звука от шума и для выставления звуковых эффектов.
Настройка звука (подавление шума) – это скорее дополнительный элемент разработчиков, чем составной компонент драйвера. Создатели звуковых драйверов добавили эти опции, как бонус к главным функциям Realtek HD. Эта опция добавляет к голосу эхо, ставит на «фон» звуки воды или активирует звуки улицы. Сторонние эффекты активируются через «голосовую» утилиту.
Громкость и эквалайзер
Диспетчере Realtek HD оснащён набором регуляторов, которые устанавливают уровень громкости для всех устройств компьютера. На некоторых OS Windows, в частности Windows 7 и 10, этот драйвер заменяет стандартный значок для регулятора громкости.
Интегрированный эквалайзер с девятью полосами обеспечивает подробную настройку конфигурации для звука. Выберите готовые конфигурации опций, которые подходят для разных музыкальных направлений.
Ключевые особенности
- полный контроль установок для записывающих устройств звука;
- воспроизведение звуковых файлов без проблем и скрипов;
- перестановка активных портов и включение дополнительных функций;
- интегрированный эквалайзер с готовыми шаблонами для выбора;
- звук выводится через технологию «Включай и Играй»;
- примитивная оболочка и практичный интерфейс разделов программы;
- диспетчер инсталлируется в паке со стандартными драйверами звука;
- быстрое определение звукового чипа и проигрывание треков различного битрейта.
![]() USBDeview 3.06
USBDeview 3.06
USBDeview — небольшая программка, которая выведет список всех USB устройств (флеш-карта,…
![]() ScanLite 1.1
ScanLite 1.1
ScanLite — небольшая бесплатная утилита, с помощью которой можно быстро и легко осуществлять…
![]() VueScan 9.7.97
VueScan 9.7.97
VueScan — приложение, которое позволяет изменить стандартный интерфейс сканера на…
![]() BlueSoleil 10.0.498.0
BlueSoleil 10.0.498.0
BlueSoleil — одно из наиболее популярных приложений, которое при помощи Bluetooth поможет соединить…
![]() MKey 1.3.5
MKey 1.3.5
MediaKey — утилита для переназначения клавиш абсолютно любых клавиатур. Позволяет управлять…
![]() AutoHotkey 2.0.0
AutoHotkey 2.0.0
AutoHotkey — приложение для автоматизации процессов до одного клика. Настраивайте клавиатуру и…
Многие инструкции по исправлению проблем с работой устройств в Windows 10 содержат пункт «зайдите в диспетчер устройств» и, несмотря на то, что это элементарное действие, некоторые начинающие пользователи не знают, как это сделать.
В этой инструкции — 5 простых способов открыть диспетчер устройств в Windows 10, используйте любой. См. также: Встроенные системные утилиты Windows 10, о которых полезно знать.
Открытие диспетчера устройств с помощью поиска
В Windows 10 присутствует хорошо работающий поиск и, если вы не знаете, как что-то запустить или открыть, это первое что стоит попробовать: почти всегда нужный элемент или утилита найдутся.
Чтобы открыть диспетчер устройств, просто нажмите по иконке поиска (лупа) в панели задач и начните набирать «диспетчер устройств» в поле ввода, а после того, как нужный элемент будет найден, нажмите по нему мышкой для открытия.
Если нажать правой кнопкой мыши по кнопке «Пуск» в Windows 10, откроется контекстное меню с некоторыми полезными пунктами для быстрого перехода к нужным параметрам системы.
Среди этих пунктов есть и «Диспетчер устройств», просто нажмите по нему (правда, в обновлениях Windows 10 пункты контекстного меню иногда меняются и, если вы не найдете там того, что требуется, вероятно, это произошло снова).
Запуск диспетчера устройств из диалогового окна «Выполнить»
Если вы нажмете клавиши Win+R на клавиатуре (где Win — клавиша с эмблемой Windows), откроется окно «Выполнить».
Введите в него devmgmt.msc и нажмите Enter: будет запущен диспетчер устройств.
Свойства системы или значок «Этот компьютер»
Если у вас на рабочем столе присутствует значок «Этот компьютер», то, нажав на него правой кнопкой мыши, вы можете открыть пункт «Свойства» и попасть в окно сведений о системе (если отсутствует — см. Как добавить значок «Этот компьютер» на рабочий стол Windows 10).
Еще один путь открыть это окно — зайти в панель управления, а там открыть пункт «Система». В окне свойств системы слева есть пункт «Диспетчер устройств», открывающий необходимый элемент управления.
Управление компьютером
Встроенная утилита «Управление компьютером» в Windows 10 также содержит диспетчер устройств в списке служебных программ.
Для запуска «Управление компьютером» используйте либо контекстное меню кнопки «Пуск», либо нажмите клавиши Win+R, введите compmgmt.msc и нажмите Enter.
Учтите, что для выполнения каких-либо действий (кроме просмотра подключенных устройств) в диспетчере устройств, вы должны иметь права администратора на компьютере, в противном случае вы увидите сообщение «Вы вошли с правами обычного пользователя. Вы можете просматривать параметры устройства в диспетчере устройств, но для внесения изменений необходимо войти в систему с правами администратора».
Диспетчер Realtek HD – это общий центр, который контролирует и управляет параметрами звуковых устройств. Этот драйвер распространяется официально и воспроизводит звук с многих устройств на чипе от Realtek.
Драйвер Realtek HD инсталлируется с полным набором утилит для звуковых карт Realtek. Эта утилита создана в виде центра с множеством функций. Этот драйвер воспроизводит и записывает аудиосигнал с разных источников.
В этом центре есть настройка конфигов для акустических систем и динамиков. При необходимости вы настроите эквалайзер, активируете или выключите вспомогательные динамики, установите окружающие эффекты и другие параметры. Все эти функции «запакованы» практичную графическую оболочку с поддержкой русского языка.
Возможности
Драйвер Realtek HD активирует устройства звуковой карты, которые воспроизводят и записывают звук. Программа отбирает порты mini-jack, которые работают и к которым подаётся напряжение. В боковой панели есть опции для работы с портами. Переключайте звук и драйверы, используя контекстное меню. Для входа в меню нужно воспользоваться панелью уведомлений и нажать правую кнопку мыши на иконке.
Прочие функции программы обеспечивают переход от активного канала до не рабочего, выставление «басов» и активация громкости для микрофона. Используйте настройки для очистки звука от шума и для выставления звуковых эффектов.
Настройка звука (подавление шума) – это скорее дополнительный элемент разработчиков, чем составной компонент драйвера. Создатели звуковых драйверов добавили эти опции, как бонус к главным функциям Realtek HD. Эта опция добавляет к голосу эхо, ставит на «фон» звуки воды или активирует звуки улицы. Сторонние эффекты активируются через «голосовую» утилиту.
Громкость и эквалайзер
Диспетчере Realtek HD оснащён набором регуляторов, которые устанавливают уровень громкости для всех устройств компьютера. На некоторых OS Windows, в частности Windows 7 и 10, этот драйвер заменяет стандартный значок для регулятора громкости.
Интегрированный эквалайзер с девятью полосами обеспечивает подробную настройку конфигурации для звука. Выберите готовые конфигурации опций, которые подходят для разных музыкальных направлений.
Ключевые особенности
- полный контроль установок для записывающих устройств звука;
- воспроизведение звуковых файлов без проблем и скрипов;
- перестановка активных портов и включение дополнительных функций;
- интегрированный эквалайзер с готовыми шаблонами для выбора;
- звук выводится через технологию «Включай и Играй»;
- примитивная оболочка и практичный интерфейс разделов программы;
- диспетчер инсталлируется в паке со стандартными драйверами звука;
- быстрое определение звукового чипа и проигрывание треков различного битрейта.
Содержание
- Запуск Диспетчера устройств в Виндовс 10
- Способ 1: Меню «Пуск»
- Способ 2: Окно «Выполнить»
- Способ 3: Системная папка ОС
- Способ 4: «Панель управления» / «Параметры»
Диспетчер устройств — стандартный инструмент Windows, отображающий все подсоединенные к ПК устройства и позволяющий управлять ими. Здесь пользователь может посмотреть не только названия аппаратных составляющих своего компьютера, но и узнать состояние их подключения, наличие драйверов и другие параметры. Попасть в это приложение можно несколькими вариантами, и далее мы о них расскажем.
Есть несколько путей того, как открыть данный инструмент. Вам предлагается выбрать наиболее подходящий для себя, чтобы в дальнейшем пользоваться только им либо гибко запускать Диспетчер, отталкиваясь от текущей ситуации.
Способ 1: Меню «Пуск»
Проработанное стартовое меню «десятки» позволяет каждому пользователю открывать необходимый инструмент по-разному, в зависимости от удобства.
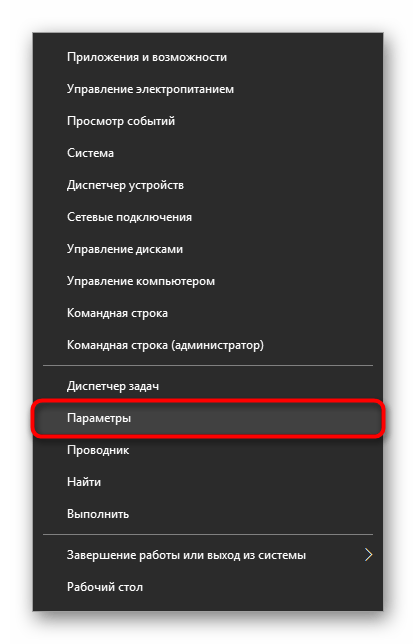
Альтернативное меню «Пуск»
В альтернативное меню были вынесены самые важные системные программы, к которым юзер может получить доступ. В нашем случае для этого достаточно нажать по «Пуск» правой кнопкой мыши и выбрать пункт «Диспетчер устройств».
Классическое меню «Пуск»
Тем, кто привык к обычному меню «Пуск», нужно вызвать его левой кнопкой мыши и начать набирать «диспетчер устройств» без кавычек. Как только совпадение будет найдено, следует кликнуть по нему. Такой вариант не очень удобен — все же альтернативный «Пуск» позволяет открыть необходимый компонент быстрее и без использования клавиатуры.

Способ 2: Окно «Выполнить»
Еще один несложный метод — вызов приложения через окошко «Выполнить». Однако он может подойти не каждому пользователю, поскольку оригинальное имя Диспетчера устройств (то, под которым оно хранится в Windows) можно и не запомнить.
Итак, нажимаем на клавиатуре сочетание Win + R. В поле пишем devmgmt.msc и жмем Enter.
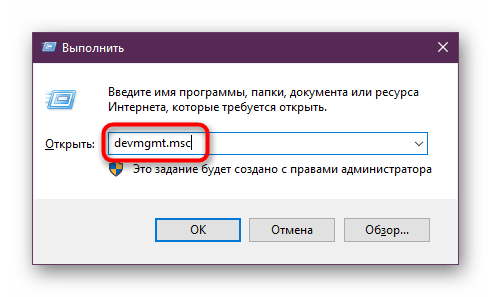
Именно под таким названием — devmgmt.msc — Диспетчер хранится в системной папке Windows. Запомнив его, можно использовать и следующий способ.
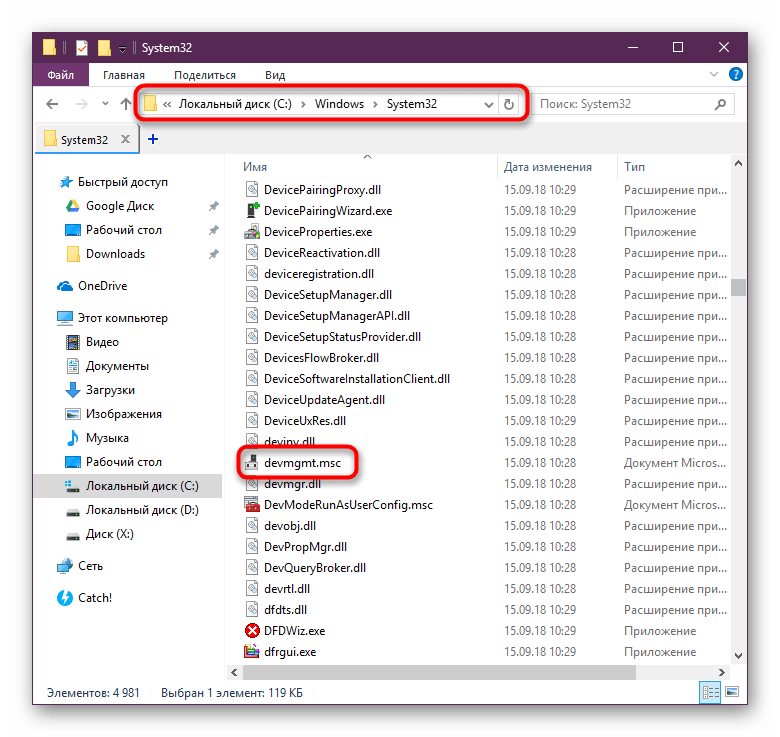
Способ 3: Системная папка ОС
На том разделе жесткого диска, куда установлена операционная система, есть несколько папок, обеспечивающих работу Windows. Как правило, это раздел С:, где можно отыскать файлы, отвечающие за запуск различных стандартных инструментов типа командной строки, инструментов диагностики и обслуживания ОС. Отсюда же пользователь может с легкостью вызывать Диспетчер устройств.

Откройте Проводник и перейдите по пути C:WindowsSystem32. Среди файлов найдите «devmgmt.msc» и запустите его мышкой. Если вы не включили в системе отображение расширений файлов, то инструмент будет называться просто «devmgmt».
Способ 4: «Панель управления» / «Параметры»
В Win10 «Панель управления» уже не является важным и главным инструментом доступа к разного рода настройкам и утилитам. На передний план разработчики вынесли «Параметры», однако пока что тот же Диспетчер устройств доступен для открытия там и там.
«Панель управления»
- Открываем «Панель управления» — проще всего это сделать через «Пуск».
- Переключаем режим просмотра на «Крупные/мелкие значки» и находим «Диспетчер устройств».
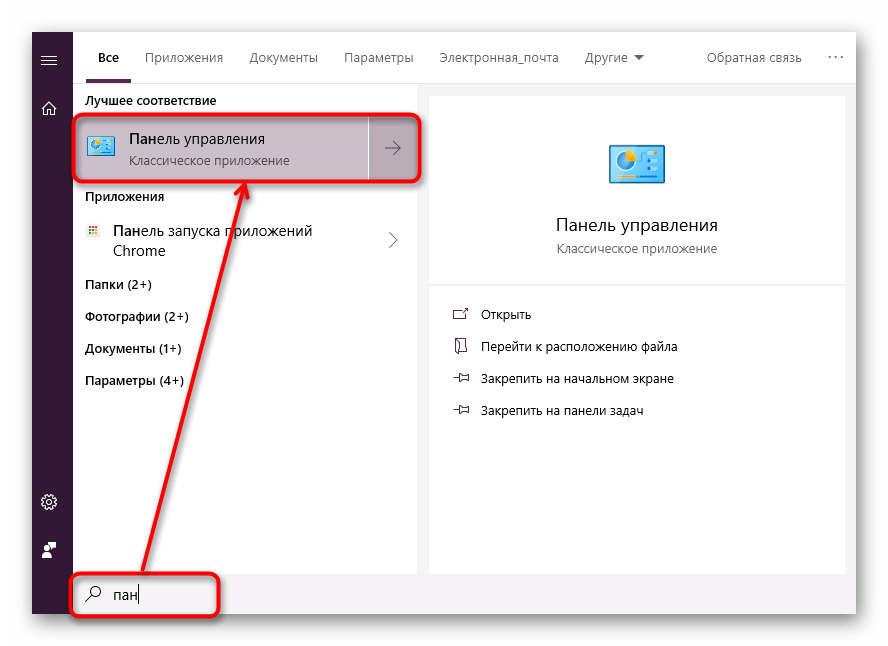

«Параметры»
- Запускаем «Параметры», например, через альтернативный «Пуск».
- В поисковое поле начинаем набирать «диспетчер устройств» без кавычек и кликаем ЛКМ по совпавшему результату.

Мы разобрали 4 популярных варианта того, как получить доступ к Диспетчеру устройств. При этом стоит отметить, что полный список на этом не заканчивается. Вы можете открыть его следующими действиями:
Остальные способы менее актуальны и пригодятся лишь в единичных случаях.
Еще статьи по данной теме:
Помогла ли Вам статья?
Были ли сведения полезными?
(Чем больше вы сообщите нам, тем больше вероятность, что мы вам поможем.)
(Чем больше вы сообщите нам, тем больше вероятность, что мы вам поможем.)
Насколько вы удовлетворены качеством перевода?
Что повлияло на вашу оценку?
Моя проблема решена
Очистить инструкции
Понятно
Без профессиональной лексики
Полезные изображения
Качество перевода
Не соответствует интерфейсу
Неверные инструкции
Слишком техническая информация
Недостаточно информации
Недостаточно изображений
Качество перевода
Добавите что-нибудь? Это необязательно
Спасибо за ваш отзыв!
×
Jump ahead to the section you’re interested in
- How to identify missing or malfunctioning drivers with Windows Device Manager
- How to identify (some) outdated drivers with Windows Device Manager
- How to update a driver with Windows Device Manager
- How to reinstall a driver with Windows Device Manager
- What Windows Device Manager DOESN’T do
- Device Manager vs Driver Easy
- How to get Driver Easy
Note that the Windows Device Manager screenshots in these instructions are from Windows 10, but the instructions themselves will work in Windows 11, 10 and 7 too.
How to identify missing or malfunctioning drivers with Windows Device Manager
To see which of your devices have a missing or malfunctioning driver:
-
On your keyboard, press the Windows logo key
and R at the same time to invoke the Run box. -
Type devmgmt.msc and click OK.
(There are other ways to open Device Manager; it changes depending on your version of Windows. But the above method works for all versions of Windows, including Windows 11, 10 and 7.)
-
Expand a category (e.g. Display Adapters) to see the devices in that category. If you see a yellow triangle or question mark next to a device, Windows has detected that it has a missing or malfunctioning driver.
-
If you see this yellow mark, you can try to update or reinstall the driver as described later on this page.
How to identify (some) outdated drivers with Windows Device Manager
Identifying outdated drivers with Device Manager is a very tedious process. You can’t tell, just by looking at the device in Device Manager, if its driver is out of date. You have to actually try to update the driver, as described below. If Windows thinks the driver is out of date, it will update it for you; if not, it will tell you you already have the latest driver.
IMPORTANT: As discussed later on this page, Windows Device Manager doesn’t always detect outdated drivers. Nor does it always give you the latest available version if you update a driver. If you want to be sure you have the latest available version of a driver, you need to source the driver directly from the device manufacturer or use a tool like ours, called Driver Easy, to do it automatically.
How to update a driver with Windows Device Manager
To update a driver in Device Manager (or to see if Windows thinks it needs updating):
-
On your keyboard, press the Windows logo key
and R at the same time to invoke the Run box. -
Type devmgmt.msc and click OK.
(There are other ways to open Device Manager; it changes depending on your version of Windows. But the above method works for all versions of Windows, including Windows 11, 10 and 7.)
-
Expand a category (e.g. Display Adapters) to see the devices in that category.
-
Right-click the device whose driver you’d like to update, and select Update Driver.
-
Select Search automatically for updated driver software.
IMPORTANT: As discussed later on this page, Windows Device Manager doesn’t always detect outdated drivers. Nor does it always give you the latest available version if you update a driver. If you want to be sure you have the latest available version of a driver, you need to source the driver directly from the manufacturer or use a tool like ours, called Driver Easy, to do it automatically.
How to reinstall a driver with Windows Device manager
To reinstall a device’s driver in Windows Device Manager:
-
On your keyboard, press the Windows logo key
and R at the same time to invoke the Run box. -
Type devmgmt.msc and click OK.
(There are other ways to open Device Manager; it changes depending on your version of Windows. But the above method works for all versions of Windows, including Windows 11, 10 and 7.)
-
Expand a category to see the devices in that category. Right-click the device whose driver you’d like to reinstall, and select Uninstall.
-
Restart your PC.
-
Windows will attempt to reinstall the driver.
IMPORTANT: As discussed below, reinstalling a driver with Windows Device Manager doesn’t necessarily give you the latest available version of that driver. If you want to be sure you have the latest available version of a driver, you need to source the driver directly from the manufacturer or use a tool like ours, called Driver Easy, to do it automatically.
What Windows Device Manager DOESN’T do
Windows Device Manager doesn’t always detect outdated drivers. Particularly in Windows 10. That’s because it categorizes driver updates as either ‘critical’, ‘automatic’ or ‘optional’, and it doesn’t usually concern itself with the ‘optional’ ones. So long as you have the necessary ‘critical’ and ‘automatic’ updates, it’s happy. It won’t, for example, install a new ‘optional’ update, if it already has an old ‘critical’ update installed. Here’s a quote from Microsoft itself:
Windows offers the best matching driver, which is not necessarily the most recent. The driver selection process considers hardware ID, date/version, and critical/automatic/optional category. Windows prioritizes critical or automatic drivers highest. If a matching driver is not found, WU looks next for optional drivers. As a result, an older critical driver of otherwise equal value takes precedence over a newer optional driver.
But all driver updates are important, even when Windows calls them ‘optional’. If they weren’t, the hardware manufacturers wouldn’t go to all the trouble of coding and releasing them.
Sometimes these ‘optional’ updates include just a new, nice-to-have feature, and you can arguably do without that. But sometimes it’s an important bug fix – perhaps the old driver is causing your device to stop working or your computer to crash. Windows often categorizes these updates as ‘Critical’, but definitely not always.
Other times, it’s not Device Manager’s fault at all. It’s just that the device manufacturer has failed to include the driver you need in the latest Windows Update. Watch this video for more information on how this happens:
Issues you’ll encounter when Windows Device Manager won’t update a device driver
Whether it’s a Microsoft issue or a device manufacturer issue, if Windows doesn’t detect that your device drivers are out of date then:
-
If you try to update a device’s driver as described above, Windows Device Manager will tell you the driver is already up to date, even though it’s not; and
-
You could be missing out on important device functionality, and you may be suffering through completely unnecessary computer issues (e.g. computer crashes or very slow performance).
What to do when Windows Device Manager won’t update a device driver
If you’re unable to update a device driver in Windows Device Manager, Microsoft says:
If Windows doesn’t find a new driver, you can try looking for one on the device manufacturer’s website and follow their instructions.
But to do this, you’ll need to know the brand and model of the device, as well as your exact operating system and whether it’s 32 or 64 bit. Then you have to find the manufacturer’s driver download page, find the correct driver, and check that it’s newer than the one you already have installed. Then, of course, you have to download and install the driver – quite often a complex process, in itself.
Obviously this takes a lot of time, but it also requires quite a bit of technical expertise. If you do something wrong, your device – or even your entire computer – may just stop working.
If you don’t have the time, skills or confidence to manually install drivers, you can use our tool, Driver Easy, to update your drivers automatically. It will automatically detect all the devices on (or connected to) your computer that have outdated drivers, and you can then update them all with one click.
Watch Driver Easy in action:
It’s not just easier, either. Driver Easy Pro also reduces your risk. It will automatically recognize your system and all your devices, and install the latest correct drivers for you – direct from the manufacturer, and certified safe and stable. You don’t need to know exactly what system your computer is running, you don’t need to risk downloading and installing the wrong drivers, and you don’t need to worry about making a mistake when installing.
You just click Scan Now, then Update All.
Try Driver Easy for free
If you want the certainty of knowing your device drivers are always up to date (and not just sometimes up to date, which is all you get from Windows Device Manager), and you don’t have the time, patience or computer skills to continually update them manually, give the free version of Driver Easy a try.
The free version will identify all your outdated drivers, and allow you to download them all. But only one at a time and, once they’re downloaded, you have to manually install them using the standard Windows process. (To automatically update all your drivers with 1 click, you’ll need the Pro version of Driver Easy. Don’t worry, it comes with a 30-day, no-questions-asked, money back satisfaction guarantee.)
Questions?
If you still have questions about updating your device drivers, or you’d like to learn more about doing it automatically with Driver Easy, please get in touch. We’d be happy to help.