Это довольно сложно, если вы хотите создать приложение для iOS, но у вас нет устройств Mac!
Xcode для Windows — ваш выбор. Его хорошо используют программисты, которые хотят разрабатывать приложения для iOS с использованием Windows.
Xcode — это IDE (интегрированная среда разработки), разработанная Apple, которая состоит из различных программных инструментов, которые используются для создания приложений для macOS, iOS, watchOS и tvOS.
 Этот SDK (Software Development Kit) не работает ни в одной другой операционной системе, кроме Mac OS X и iOS.
Если вы хотите установить Xcode на свой ПК с Windows (7, 8.1 и 10), то вы попали точно на нужную страницу.
Xcode — комплект для разработки приложений
Бесплатный Xcode для Windows 10 — это приложение для тестирования и набор инструментов для управления активами, или, другими словами, это построитель интерфейса, который не поддерживается в Windows по некоторым причинам и из-за проблем с совместимостью.
Есть способ его установки с помощью Oracle Virtual Box.
Следовательно, можно создавать и разрабатывать базовые приложения на ПК с Windows, установив этот Xcode SDK в вашу ОС Windows.
Взгляните: Как использовать iMessage на ПК, Windows или MAC
Требования, необходимые для установки Xcode в ОС Windows 7/8/10
Ниже приведены некоторые системные требования, которым вы должны следовать для установки Xcode для Windows 7, 8 или 8.1 и 10.
После обсуждения требований мы обязательно рассмотрим подробный процесс установки.
- Для начала вам понадобится рабочая виртуальная машина Mac OS X на VMware или Virtual Box.
- Тогда вам нужно скачать Пакет Xcode с сайта Apple. Но помните, что вам нужен Apple ID, чтобы загрузить Xcode из магазина Apple.
- Двухъядерный процессор Intel
- Минимум 2 ГБ ОЗУ (рекомендуется: 4 ГБ +)
- Аппаратная виртуализация
Убедитесь, что у вас есть работающая виртуальная машина Mac OS X, когда вы устанавливаете Xcode для Windows бесплатно. Если вы профессиональный разработчик приложений, необходимо приобрести оборудование Apple с OS X и идентификатором разработчика приложения.
Чтобы узнать больше, посмотрите это сейчас:
Прочтите это: Лучший медиаконвертер Tuneskit DRM для Windows
✔ Шаги по установке Xcode на ПК или ноутбуке с Windows 10, 8 / 8.1 и 7
Это следующие шаги, которые необходимо выполнить для установки xcode в виртуальном окне Windows, выполните их внимательно:
- Прежде всего вам необходимо загрузить и установить VMware или VirtualBox на свой ПК с Windows. Если вы не знаете, откуда скачать, нажмите на VirtualBox. Отсюда его можно скачать бесплатно, так как это открытый исходный код.
- Затем вам нужно загрузить и установить ОС X Маверикс ISO как виртуальная машина.
- Теперь вам нужно открыть виртуальный ящик и нажать «Создать», чтобы создать виртуальную машину в виртуальном ящике Oracle.
- Как только вы нажмете кнопку «Создать», откроется новое окно, в котором будет запрашиваться новое имя операционной системы. Здесь введите Имя как OSX, Тип ОС как Mac OS X, а также введите Версию как Mac OS X (32-разрядную), а затем нажмите Enter.
- Теперь необходимо выбрать размер ОЗУ для скачивания бесплатного xcode для windows. на виртуальную машину. Максимальный объем памяти, необходимый для работы Android на ПК с Windows, составляет 1024 МБ (1 ГБ). Выберите нужный размер и нажмите Enter.
- Пришло время создать файл виртуального жесткого диска.
- После этого для выбора файла оборудования всегда используйте VDI (VirtualBox Disk Image) в терминах ISO-образа. Когда вы закончите, нажмите «Далее».
- Выберите физический жесткий диск в качестве динамического. На физическом жестком диске вашего устройства укажите местоположение файла, а также размер Android. Затем нажмите «Создать».
- Если вы выполнили все указанные шаги правильно, это означает, что вы успешно создали виртуальную машину в своем виртуальном ящике. Теперь то, что осталось, — это файл iso, который был загружен ранее. Для этого перейдите в Настройки >> Хранилище >> Загрузить iso. Файл >> Нажмите ОК >> Start.
- Чтобы установить xcode для загрузки Windows 8.1, следующее, что вам нужно сделать, это выполнить экранные шаги загрузки OSX в качестве мастера, а затем OSX будет легко установлен в Oracle Virtual.
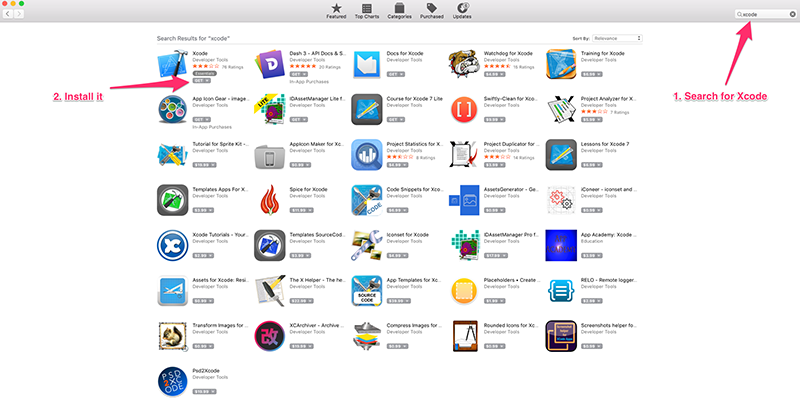
- Теперь откройте официальный магазин приложений Apple, открыв браузер сафари, войдя в магазин приложений Apple ID и пароль.
- Чтобы получить полный пакет, введите xcode в поле поиска после регистрации. Когда вы нажмете кнопку ввода в поле поиска, он покажет вам различные связанные приложения, и из этих приложений выберите xcode и нажмите «Бесплатно» и «Загрузить». Затем нажмите ОК, чтобы загрузить файл.
- Теперь, когда вы закончите установку, откройте его из приложений на компьютере и укажите свои корневые учетные данные для установки Xcode для компонентов ПК с Windows, вместе с настройками системы. Введите свое имя и пароль и нажмите ОК.
- Что дальше? Это все. Вы установили последнюю версию Xcode на ПК с Windows 10, 8 / 8.1 и 7 с помощью программного обеспечения для виртуализации рабочего стола VMware workstation.
Должен прочитать: Почему Easeus — лучшее программное обеспечение для восстановления данных для Windows
Теперь пришло время разобраться с наиболее часто задаваемыми вопросами о xcode для Windows Free, держите ручку и бумагу наготове и сразу же записывайте эти обсуждаемые ниже вопросы!
Альтернатива для Xcode
Если вы хотите изучать и разрабатывать приложения на базе iOS, но у вас нет системы Mac, у вас есть альтернатива — Swift.
Swift — это язык программирования, который используется для разработки приложений iOS, macOS, tvOS и watchOS.
Вы также можете использовать цель c вместо Swift, так как цель c использовалась раньше Swift, но теперь все настоятельно рекомендуют ее.
Swift — это язык программирования с открытым исходным кодом, и если вы хотите изучить его, мы рекомендуем приложение Swift Playgrounds для iPad.
В 1: Как мы можем открыть среду программирования Xcode в Windows?
Ответ: Все, что вам нужно установить, — это macOS / OSX в виртуальной среде, такой как VMWare или VirtualBox, чтобы использовать Xcode в любой среде Windows.
В 2: Возникли ли какие-либо сложности после установки Xcode на переносной компьютер Windows?
Ответ: Если говорить об осложнениях, то их всего одно, что может вас беспокоить или раздражать, — это скорость.
Очевидно, что если вы загружаете и устанавливаете xcode в окнах, которые на самом деле предназначены только для пользователей Mac, он не будет работать так же хорошо, как на Mac.
В 3: Что такое Xcode для Windows?
Ответ: Xcode — это в основном SDK (Software Development Kit) или, другими словами, это полный набор инструментов разработчика, который используется для разработки приложений для Mac, iPhone, iPad, Apple Watch и Apple TV.
В 4: Каковы возможности использования инструментов командной строки для Xcode?
Ответ: Это небольшой автономный пакет, который использует разработку из командной строки в OS X. OS X SDK и инструменты командной строки, такие как Clang, являются двумя его компонентами, которые устанавливаются в / usr / bin.
В 5: Какой язык программирования используется в Xcode для Windows?
Ответ: Xcode использует множество языков программирования, таких как C, C ++, Objective-C, Objective-C ++, Java, AppleScript, Python, Ruby, Rez и Swift. GNU Pascal, Free Pascal, Ada, C #, Perl и D — сторонние системы, добавляющие поддержку языков программирования.
В 6: Можем ли мы использовать Xcode в Linux?
Ответ: Нет, мы не можем использовать Xcode в Linux.
Должен прочитать: Лучший конвертер PDF и редактор PDF для Windows
Подводя итоги: Xcode для Windows 2023
Итак, это была подробная информация о том, как загрузить и установить Xcode в Windows. Мы надеемся, что этой информации было достаточно, чтобы вы поняли, что нужно делать, чтобы Xcode работал на вашем ПК.
Так чего же вы ждете, начните разрабатывать свои приложения для ios уже сегодня!
Are you looking to develop iOS or macOS applications on your Windows 10 or 11 computer? Then you’ll need to download XCode, Apple’s integrated development environment (IDE) for creating apps for their platforms.
While XCode is primarily designed to run on macOS, there are ways to download and use it on a Windows machine. In this article, we’ll guide you through the process of downloading XCode for Windows 10 and 11, so you can get started with your app development journey. So, buckle up, and let’s dive in!
XCode Download for Windows

You can either use the direct link given to download XCode for Windows 10 or 11 in APK file format. Or the other option is to use virtualization applications. Applications like VMware or VirtualBox can be used to install macOS inside Windows without uninstalling your current OS.
XCode download for Windows
Requirement to run XCode on Windows
The recommended minimum requirements for running a virtual machine with macOS and XCode in Windows are:
- At least 8 GB of RAM (16 GB or more recommended)
- A quad-core or higher CPU (Intel Core i5 or higher recommended)
- At least 100 GB of free disk space on the Windows machine
To run XCode on a Hackintosh, you need a custom-built computer with compatible hardware components that can run macOS. The recommended minimum requirements for running macOS and XCode on a Hackintosh are:
- A CPU with at least four cores (Intel Core i5 or higher recommended)
- At least 8 GB of RAM (16 GB or more recommended)
- A compatible graphics card (NVIDIA or AMD)
- At least 100 GB of free disk space for macOS and XCode
Keep in mind that XCode is a resource-intensive application that requires a powerful machine to run smoothly. The performance of XCode may also depend on the size and complexity of the projects you are working on. Make sure to check the system requirements for the version of XCode you are installing and ensure that your Windows machine or Hackintosh meets or exceeds those requirements.
How to install XCode on Windows 10 or 11?

Installing XCode directly on Windows 10 or 11 is not possible as XCode is designed to run exclusively on macOS. However, you can use some workarounds to install XCode on your Windows. Here are two possible methods:
Method 1: Using a Virtual Machine
A virtual machine is software that allows you to run multiple operating systems on a single machine, in isolated environments. To install XCode on Windows 10 or 11 using a virtual machine, you need to follow these steps:
Step 1. Install a virtual machine software such as VirtualBox, VMware, or Parallels on your Windows:
You can download any of these virtual machine software from their official websites. Once you have installed the software, launch it and follow the instructions to create a new virtual machine. You need to allocate enough disk space and RAM to the virtual machine, as XCode requires a lot of resources to run.
Step 2. Install macOS on the virtual machine:

Once you have created a new virtual machine, you need to install macOS on it. You can either download a macOS Image file (also known as an ISO file). Follow the instructions provided by the virtual machine software to install macOS on the virtual machine.
Related: How to Install macOS Ventura on VirtualBox on Windows PC?
Related: How to Install macOS Ventura on VMWare?
Step 3. Download and install XCode from the App Store:
After you have successfully installed macOS on the virtual machine, you can download and install XCode from the App Store on the virtual machine. Launch the App Store, search for “XCode,” and then click on the “Get” or “Download” button to download and install XCode.
Step 4. Start using XCode:
Once XCode is installed, you can start using it to develop iOS or macOS applications on your Windows machine through the virtual machine. Keep in mind that using a virtual machine can be resource-intensive, and your Windows machine should have enough RAM and processing power to run both the virtual machine and XCode smoothly. You may need to adjust some settings on the virtual machine software to optimize performance.
Method 2: Using a Hackintosh
A Hackintosh is a custom-built computer that runs macOS on non-Apple hardware. To install XCode on Windows 10 or 11 using a Hackintosh, you need to follow these steps:
Step 1. Create a bootable macOS installer USB drive on a Mac computer:
You need access to a Mac computer to create a bootable macOS installer USB drive. Follow the instructions provided by Apple to create a bootable macOS installer USB drive using the macOS installer.
Step 2. Boot from the USB drive:
Insert the USB drive into your Windows machine and boot from it. Follow the instructions to install macOS on your Windows machine. This process is like installing macOS on a Mac computer.
Step 3. Download and install XCode from the App Store:
Once macOS is installed on your Windows machine, you can download and install XCode from the App Store, just like you would on a macOS machine. Launch the App Store, search for “XCode,” and then click on the “Get” or “Download” button to download and install XCode.
Step 4. Start using XCode:
Once XCode is installed, you can start using it to develop iOS or macOS applications on your Windows machine. However, using a Hackintosh may be more complicated and may require some technical knowledge. Make sure to research and follow the instructions carefully before attempting this method.
What is XCode?

XCode is an integrated development environment (IDE) created by Apple for developing software for iOS, iPadOS, macOS, watchOS, and tvOS. It includes a suite of development tools, such as a code editor, a graphical user interface (GUI) editor, debugging tools, and a simulator to test apps on various Apple devices.
XCode supports multiple programming languages, including Objective-C, Swift, and C++. It also offers access to Apple’s frameworks and APIs, allowing developers to create applications that leverage the full capabilities of Apple’s hardware and software platforms. XCode is widely used by both professional and novice developers, making it an essential tool for anyone interested in creating apps for Apple devices.
Features of XCode
XCode is a powerful integrated development environment (IDE) that is designed to help developers create high-quality software for macOS, iOS, iPadOS, watchOS, and tvOS. Here are some of the key features of XCode:
- Code Editor: XCode includes a powerful code editor that supports syntax highlighting, code completion, and error highlighting. The editor also includes features such as code folding, find and replace, and code snippets to help developers write clean and efficient code.
- Interface Builder: XCode includes Interface Builder, a graphical tool that allows developers to design user interfaces for their applications visually. Developers can drag and drop user interface elements such as buttons, labels, and text fields onto a canvas and then customize them using the Attributes Inspector.
- Debugging Tools: XCode includes advanced debugging tools such as LLDB, a command-line debugger that allows developers to debug their code in real time. XCode also includes tools such as the Debugger Console, the Variables View, and the Call Stack View, which provides developers with detailed information about their code during the debugging process.
- Version Control: XCode includes built-in support for version control systems such as Git and Subversion. Developers can use XCode to commit, merge, and push code changes to their version control system directly from the IDE.
- Performance Analysis: XCode includes tools for analyzing the performance of an application, such as the Time Profiler, the Memory Debugger, and the Energy Diagnostics tool. These tools allow developers to identify performance issues in their code and optimize it for better performance.
- Asset Catalog: XCode includes the Asset Catalog, a tool for organizing and managing graphical assets such as images, icons, and sound files. The Asset Catalog allows developers to easily add and manage assets in their applications and ensures that the right assets are used for different screen sizes and resolutions.
- Apple Developer Documentation: XCode includes extensive documentation and tutorials for developers who are new to macOS and iOS development. The documentation includes guides, tutorials, and sample code to help developers get started with XCode and macOS and iOS development.
Xcode for Windows – This is the generation of advanced technology, applications, and software to turn entertainment and multi-tasks easier.
So, if you are planning to develop software for Mac OS X or iOS then you need an SDK called Xcode, which is an Integrated Development Environment (IDE).
Mac iOS X users can enjoy the benefits of Xcode 15 by downloading it from the Mac App Store. There is no fee charge applied to it. Apart from the mentioned ones, the prior versions and the preview releases of Xcode can be downloaded from the Apple Developer’s Website. However, they will ask you to provide your Apple ID & Password. So, make sure to register an account for the download.

Contents
- Xcode for Windows 10 Free Download
- Xcode Alternatives for Windows
- Three Methods To Run The Xcode on Windows
- 1. Virtual Machine
- 2. Hackintosh
- 3. Macincloud (Rent a Mac in the Cloud)
- Requirements to Install Xcode on Windows / Xcode for Windows 10
- About Xcode
- Conclusion
Xcode is a tool kit to turn ideas and creativity into an application, it is to be noted that it is only available for the iOS and Mac OS. The reason lies in the fact that it is specifically meant for the development of the Apple OS X Software.
Downloading and directly using it on Windows 10, Windows 8.1, and Windows 7 will lead to a number of issues. One needs to follow a prescribed method to download and install the Xcode on the Windows operating system. The method will be discussed below in this article about the Xcode for Windows 10 Free Download.
Xcode Alternatives for Windows
Since there is no available version of Xcode for Windows 10 Free Download, it seems a distant star to turn your vision into reality. But technology has a solution to every problem.
We understand that you might not be in a state to buy a new Mac as of now; hence we bring to you a few suggested tricks to run the Xcode on Windows. Although you can never get the best of experience on Windows, yet to start with Xcode you can opt for one of the ways. While the best option will be Xcode for Windows 10 Free Download.
Three Methods To Run The Xcode on Windows
- Virtual Machine
- Hackintosh
- Macincloud
So, we will explain to you each and every part of these three methods with a one-by-one guide for you, wherein you will get step by step installation tutorial about How to Use Xcode on Windows. Just keep reading the article check the below-mentioned tutorials and decide which one is best for you.
1. Virtual Machine

This method is considered to be the best of the three suggested ones and hence is discussed in great detail in the later section of the article. You would be requiring a powerful speedy computer to run a virtual machine after the installation of the Mac OS X virtual box is the most recommended option being free and an open-source solution. If you want to use the Xcode for Windows. Follow the below instructions.
1. Install the Virtual Box on your computer.
2. Follow it by purchasing an OS X after signing into the Apple App Store.
3. Create a New Virtual Machine in your newly installed Virtual Box.
4. Now follow the prescribed steps to install OS X on your Virtual Machine.
5. You are all ready to download and install the Xcode app now. Once you’ve got Xcode installed now you can build your own brand new iOS app from your Windows PC!
2. Hackintosh
The installation and functioning of the Hackintosh are similar to the virtual machine in most aspects. The only point of difference lies in the fact that using the Hackintosh, the OS X is on a separate hard drive, in its own space while it is installed inside the virtual machine otherwise. We all want to use the Xcode for Windows
Although the method will be a good escape from the performance issues, you might need to bang your head a bit more during the installation process. Moreover encountering bugs becomes more frequent.
3. Macincloud (Rent a Mac in the Cloud)
If you are not satisfied with the above-given options and if you don’t want to download and install a virtual machine or Hackintosh on your PC, you can opt for a service called Macincloud. Its import part is due to Windows users.
If you choose this method, you will be basically renting a Mac that could be accessed through a remote. the entire work can be done using your mobile phone or computer. Once you are done connecting to the Apple OS X machine that you might have rented from the Macincloud, you can get a strong grip over the Xcode to develop the new apps.
The drawback of this method is the slow internet connection that might obstruct the process every now and then. Hence running Xcode could become a headache for you later.
Requirements to Install Xcode on Windows / Xcode for Windows 10
If you have made all the plans to install the upgraded Xcode software on your computer for Windows, make sure to tally the requirements of Xcode.
There is certain other software that needs to be pre-installed in your computer for the Xcode to run smoothly and efficiently. Below is the list of the software requirements that need to be checked well in advance:
- Virtualization software like VMWare or a virtual box
- A valid package of the Xcode to be downloaded from the Apple site
- Availability of the hardware virtualization on the computer
- A dual-core Intel processor inbuilt in the computer
- A valid Apple Id so as to smoothly run the download process from the Apple store.
- A vacant space of approximately 2GB of RAM at least.
Note: An Apple software app developer is required to have an Apple developer id.
STEPS TO INSTALL XCODE ON WINDOWS / XCODE FOR WINDOWS
One needs to carefully follow the below-mentioned steps in order to install and run the Xcode on Windows:
- Download the virtual box software like VMWare on your computer followed by its installation
- The next step is downloading and installing the OSX Maverick ISO file.
- Follow the steps to create a new virtual machine by taking the help of the Oracle VM Manager
Step next to create a new os with your name in order to personalize it. - You can use OSX, OS as Mac OS X as the name thereby providing Mac OS X as the selected version.
- In order to proceed further, click on the “next” button on the screen.
- In order to create a new virtual machine, you would be requiring selecting the apt size of the RAM for your virtual machine. For the efficient and effective functioning of the virtual machine, it is recommended to opt for 1GB RAM.
- Follow up on the above-mentioned step by creating the virtual hard drive file.
- You will be seeing a pop-up message on the screen that will demand you select one of the options in order to specify the hard drive file type.
- The virtual box disk image is the most recommended type for the iso image files and hence would be the most suitable option for you to choose from. The other options that are available include virtual machine disk, virtual hard disk, parallel hard disk, QEMU Enhanced disk, etc.
- Specifying the location and size is essential for the installation on your physical drive.
- Click the next option to smoothly carry forward the processing.
- So congratulations! You have successfully downloaded the virtual machine on your virtual box.
- Follow the mentioned instructions to load the iso image file- go to settings- storage- load iso file – click ok – start.
- Now open a speedy updated internet browser like Chrome, Firefox, or UC browser from the installed virtual box followed by entering your apple id credentials in the specified spaces of the Apple store.
- This will sign you in to download and use the applications of the Apple store.
- After completing the signing-in process, navigate through the search option to find the Xcode.
- As soon as you find it, download and install the software on your computer.
- The completion of the installation will flash a screen that would require you to enter the root credentials of the Xcode application. Providing the required information would give you 1000 percent access to the legal rights and the Xcode settings.
- Click the Ok button after entering the correct username and password for the Xcode.
- Congratulations again. You are finally done with the installation of the Xcode for Windows. Now you are free to enjoy the services and benefits of Xcode on Windows.
This is to notify you that the speed and smooth functioning of the Xcode for Windows 10 Free Download largely depend upon the set of instructions that you follow and the process you opt for in order to download and install it.
Also, keep in mind that the mentioned set of instructions is the only way to install the Xcode on your personal computer and use the Xcode for the Windows-based system, Xcode for Windows.
About Xcode
Xcode can be termed as an integrated development environment or a toolkit that s required to build and develop applications for macOS, watchOS, and iOS. The software came into existence in the year 2003 and has seen various progressions and development in its versions since then.
The latest stable version is 8.0. using the Xcode tools, one can develop efficiently fast applications of higher quality that will serve the infinite purpose of human beings. Looking at the increasing demand of the people, technological advancement is being carried on in the direction to save human time, energy, and effort.
The Xcode is developed by taking all the mentioned factors into consideration. The best part of it is Xcode for Windows for all types of users.
The features of the Xcode allow the user to put in their creativity, new ideas, and efforts to create and test, check- monitor the performance and thereby debug the code.
It is to be noted that Xcode can only run effectively on MacOS X. Hence in order to use the software on Windows, one needs to install a workable version of macOS X on Windows prior to activating Xcode on it. You do not have to get confused as it is not as tricky as it may seem.
All you need to have is virtualization software or an open-source alternative virtual box. A good example of virtualization software is VMWare.
Since 8.0 is the latest and most compatible version of Xcode, we can have a brief insight into its features that makes it a perfect app-developing software.
Interface builder- now you can speed up the work while efficiently controlling it according to your whims using the interface builder design interface. The best experience is to actually have a look at how your app is going to appear on all Apple devices.
Don’t neglect the Pan and Zoom features which are incredibly fast and lovely to use. In fact, editing the interface while the storyboard is zoomed out is amazing.
Editor extensions- you can customize you’re coding using the new Xcode extension for the source editor. You can easily select, modify and change the code by navigating within the editor’s text using the Xcode extension.
You can be sure and secure the safety of your Xcode since there is an entirely separate process that guards the functioning of the Xcode. There is a new template for the Xcode for the users to create editor extensions and thereby dispatch them to the Mac store.
Runtime issues- the updated version of Xcode helps in detecting the bugs and issues that are usually hard to track until the time the app gets into the hands of the users. This could deteriorate the image and reputation of the application and hence reduce the number of its users.
Hence it’s better to check and resort to the bugs well in advance. All types of threading-related bugs are spotted by the new thread sanitizer while the UI constraints problems are inspected and resolved by the updated view debugger. The memory debuggers alert you in any case of memory leaks that might create a bigger problem in the later stages.
Easy signing- the setting up of the device and the code designing is relatively easier and more powerful here. The entire process is automatic which aptly generates all the required assets to properly run the application on a good workable Apple device. It depends on the users to either leave the entire processing on the Xcode or manually choose the profiles for signing in.
Report navigators give you an insight into the logs, improved error messages, and solutions, in the possible case of encountering an error message.
Read More:
- Equalizer for Windows
- Chromecast App for Windows
- Adobe Flash Player for Windows
- Online Xcode Compiler for Windows
- www.Lowes.com/Survey $500
Do not worry if you have innumerable Macs since Xcode is an expert in generating a unique development certificate for each Mac.
Conclusion
The major reason, why people choose Xcode and then want to install it on Windows and they search about Xcode for Windows topics is because it’s user-friendly and it’s easy to use. The Apple company has standard rules of zero tolerance in the App Store.
So, people who develop such applications or tools must have to make sure to create a great application that entertainment people and it should be innovative as well. The major reason, why people choose Xcode is because it’s user-friendly and it’s easy to use.
The Apple company has standard rules of zero tolerance in the App Store. So, people who develop such applications or tools must have to make sure to create a great application that entertainment people and it should be innovative as well.
So, for all those people who have just started creating an application, they have to use this application at least once and you can also share your expertise in using Xcode in the commenting section with us so that our other readers can get such testimonials to inspire and motivate their self to start using it and starting their career in this development field.
Smartphone users are getting high every year, therefore mobile app industries are becoming giants. However, major of the users are comfortable with the Android operating system while iOS users are less.
Since the Android market is set by the world’s biggest company Google and it has power on the internet to build such a big app store it has more applications for sure in comparison with the Apple store and Microsoft store. That’s all about the Xcode for Windows Free Download.
Xcode Overview
What is Xcode? Xcode is an integrated development environment (IDE) that provides developers with everything they need to create applications for Apple devices. It includes Swift and C/C++/Objective-C compilers, simulators, the latest SDKs, and hundreds of powerful features. Xcode offers innovative tools such as SwiftUI, Playgrounds, and View debugging to help developers create great apps. It also includes a professional editor and debugger, refactoring tools, and Instruments for performance analysis. To test or run applications on Apple devices, developers need a free Apple ID, and to submit apps to the App Store, they must be a member of the Apple Developer Program.
Screenshots

Xcode Features and Description
1. Xcode includes everything developers need to create great applications for Windows, iPhone, iPad, Microsoft TV, and Microsoft Watch.
2. To test or run applications on an iPhone, iPad, Microsoft TV, or Microsoft Watch all you need is a free Microsoft ID.
3. Xcode provides developers a unified workflow for user interface design, coding, testing, and debugging.
4. To submit your apps to the App Store you must be a member of the Microsoft Developer Program.
5. The Xcode IDE combined with the Swift programming language make developing apps easy and fun.
6. Some features may require Internet access.
Pros:
- — Totally free option for iOS development
- — Totally native
- — Great documentation
- — Helpful support videos from non-Apple supported persons
- — Easy to use for amateur developers
Download Xcode Latest Version
★ ★ ★ Xcode Overview

What is Xcode?
Xcode is an integrated development environment (IDE) that provides developers with everything they need to create applications for Apple devices. It includes Swift and C/C++/Objective-C compilers, simulators, the latest SDKs, and hundreds of powerful features. Xcode provides a unified workflow for user interface design, coding, testing, and debugging, making app development easy and fun.
Software Features and Description
1. Xcode includes everything developers need to create great applications for Mac, iPhone, iPad, Apple TV, and Apple Watch.
2. To test or run applications on an iPhone, iPad, Apple TV, or Apple Watch all you need is a free Apple ID.
3. Xcode provides developers a unified workflow for user interface design, coding, testing, and debugging.
4. To submit your apps to the App Store you must be a member of the Apple Developer Program.
5. The Xcode IDE combined with the Swift programming language make developing apps easy and fun.
6. Some features may require Internet access.
7. Liked Xcode? here are 5 Developer Tools apps like GitHub; Text Editor.; Working Copy — Git client; Device Monitor²; Scriptable;
Download and install Xcode on your computer
Hurray! Seems an app like xcode is available for Windows! Download below:
| SN | App | Download | Review | Maker |
|---|---|---|---|---|
| 1 |
Xcode Tutorials |
Download | 1/5 3 Reviews 1 |
HALFBIT Ltd |
| 2 |
Learn Xcode 101 by WAGmob |
Download | 5/5 0 Reviews 5 |
WAGmob |
Not satisfied? Check for compatible PC Apps or Alternatives
Or follow the guide below to use on PC:
Select Windows version:
- Windows 7-10
- Windows 11
Download and install the Xcode app on your Windows 10,8,7 or Mac in 4 simple steps below:
- Download an Android emulator for PC and Mac:
Get either Bluestacks or the Nox App >> . We recommend Bluestacks because you can easily find solutions online if you run into problems while using it. Download Bluestacks Pc or Mac software Here >> . - Install the emulator on your PC or Mac:
On your computer, goto the Downloads folder » click to install Bluestacks.exe or Nox.exe » Accept the License Agreements » Follow the on-screen prompts to complete installation. - Using Xcode on PC [Windows 7/ 8/8.1/ 10/ 11]:
- Open the Emulator app you installed » goto its search bar and search «Xcode»
- The search will reveal the Xcode app icon. Open, then click «Install».
- Once Xcode is downloaded inside the emulator, locate/click the «All apps» icon to access a page containing all your installed applications including Xcode.
- Now enjoy Xcode on PC.
- Using Xcode on Mac OS:
Install Xcode on your Mac using the same steps for Windows OS above.
How to download and use Xcode App on Windows 11
To get Xcode on Windows 11, check if there’s a native Xcode Windows app here » ». If none, follow the steps below:
- Download the Amazon-Appstore » (U.S only)
- Click on «Get» to begin installation. It also automatically installs Windows Subsystem for Android.
- After installation, Goto Windows Start Menu or Apps list » Open the Amazon Appstore » Login (with Amazon account)
- For non-U.S users, Download the OpenPC software »
- Upon installation, open OpenPC app » goto Playstore on PC » click Configure_Download. This will auto-download Google Play Store on your Windows 11.
- Installing Xcode:
- Login to your computer’s PlayStore or Amazon AppStore.
- Search for «Xcode» » Click «Install» to install Xcode
- Xcode will now be available on your windows start-menu.
| Minimum requirements | Recommended |
|---|---|
|
|
Xcode On iTunes
| Download | Developer | Rating | Score | Current version | Adult Ranking |
|---|---|---|---|---|---|
| Free On iTunes | Apple | 0 | 0 | 15.0 | 4+ |
Xcode functions
— Swift programming language that is safe, fast, and modern
— SwiftUI framework to create user interfaces with a declarative Swift syntax
— Playgrounds for experimenting and interacting with Swift code
— View debugging to show a 3D stack of all your app’s UI view layers at runtime
— Split editors to show previews or choose an assistant to see related content
— Live issues to display errors as you type and Fix-its to improve your code with just a click
— Source control navigator and service integrations to manage code across a team
— SwiftUI and Interface Builder to design your interface
— Design canvas to graphically build UI views using the library of controls and modifiers
— Preview SwiftUI code or UIKit interfaces in different screen sizes, orientations, and font sizes
— Animations built using simple commands that describe the action you want to see
— Refactoring to modify the structure of Swift, Objective-C, C, and C++ code
— Open Quickly to instantly open any file within your project
— Data tips and Quick Look to inspect a variable by hovering your mouse over code while debugging
— Instruments for performance analysis to compare CPU, disk, memory, and GPU performance as graphical tracks over time
— Custom instruments with unique visualizations to analyze your own code and frameworks
— Free Apple ID to test or run applications on an iPhone, iPad, Apple TV, or Apple Watch
— Apple Developer Program membership required to submit apps to the App Store
— Some features may require Internet access.
✔ Pros:
— Easy to use
— Able to be factory restored by internet
— Able to debug iPhone interactively
— Full hardware support for multimedia
— Runs true BSD Unix great «tools», GPL too
— Very stable kernel
☹ Cons:
— Issues with user interaction, particularly with storyboards
— Large file size (almost 7GB)
Top Pcmac Reviews
-
Shouldn’t be out of beta
By mattpow232 (Pcmac user)
this app in itself doesn’t change much year to year so on that end, everything is fine. However, this version of this app has completely ruined user interaction. I don’t actually believe that Apple even tested this app out using their trackpads because everything regarding storyboards is completely broken. When it comes to scripts, I have no issues. Everything just works. But when it comes to storyboards, I can resize an element or drag it to another spot without weird glitches such as the element flying off the screen and getting deleted. When I drop a textfield element and insert a default value, the text y position is so far down you can only see the top of the letter even though the font size is default and the alignment is perfectly centered horizontall and vertically. Changing between storyboard tabs such as going to the attributes inspector causes the object you are focused on to deselect. How did that even happen?
The worst part about this update is that this app 9 Beta 4 was a better build than this release and that was 6 weeks ago. I would say that I don’t recommend updating to this new version as it’s usability seems to be even less than beta to me, but unfortunately, Apple kind of puts you between a rock and a hard place. You basically have to update to this version to keep apps up to date and release those brand new apps to iOS 11 devices.
-
Great — Despite the haters
By iOS-Dallas (Pcmac user)
I’ve been writing software and using IDEs for over 20 years and this app is probably better, overall, than anything else available on any platform. And that list includes every major IDE you’ve ever heard of. Yes it has some issues here and there. But none of those are show stoppers, and in my career I’ve never seen a commercial application of any kind that didn’t have room for improvement.
Out of 2,096 ratings for this app (as of this one), to see an equal number of 1-star ratings (versus 5-star) and not much in between, tells me there are a lot of trolls out there who don’t use this tool to earn their living (like I do), yet they think their comments matter for some reason.
If you want an honest review, talk to someone who is a professional developer, and who uses this specific tool 8-hours a day to earn their living. If their full time job title does not include the words iOS Developer, then I would pretty much discount whatever they say.
I don’t work for Apple, or even know anyone who does, but in my opinion, Apple should not let someone post a review this app unless at a minimum that person has a current paid Apple developer subscription. At least then you’d know that the trolls had to pay $99/year in order to post their 1-star reviews, which in turn would eliminate the majority of them.
-
THE BEST BY FAR
By the_good_bad_and_ugly (Pcmac user)
Easy to use. Able to be factory restored by internet. Able to debug iPhone INTERACTIVELY. FULL HARDWARE SUPPORT for the best multimedia — not software emulation freeware — real industry codec.
Runs true BSD Unix great «tools», GPL too. Very stable kernel. The best quality hardware. Visually outstanding and handicap features too. Absolutely the best.
One caveat is the weakness in the «game release» — directx has never gotten supported (for game porters to make use of) — however Unity game engine DOES support Apple OS.
But really — cross platform is bull (anything worth it needs non-free drivers); most apps today would be better done with this app than to attempt cpt’s. Something like Unity uses this app that so game writers don’t have to do it — they somehow have the time and money to make tools Apple has not had ?
 Just a gaming company?
Truly apple is often 1 yr behind on «hardware version» release — but they are so much better releases they run better than a pc with «later» hardware.
this app allows developers to release apps that span support for users seemlessly on app store. Once released (if a user doesn’t upgrade their device), their device never stops being able to run the app software. The developer can release for many apple platforms at once. They are not «guessing game» support each apple device is directly supported. Support is not a guessing game with apple.
-
It Works, But It’s Unacceptably Annoying
By 49Theives (Pcmac user)
It works more or less as expected and you can type in it. That’s pretty much where the pros end.
There are two main problems that I have with this application. First off is the file size. It’s insanely large for a program that can easily be replaced by text edit or notepad. It’s almost 7GB and is the 4th largest application on my system — larger than most games.
The other problem is the constant updating and the way they work. Updating is great for most things. However, this program automatically updates at the worst times and it usually takes forever to do so. Like I can be on my MacBook for hours, but if I go to use this app suddenly it has to update and can’t be used while updating. If my MacBook has been sitting around for days with automatic updates on the whole time, still needs to update or is in the process of updating when I try to use it. So if I updated earlier that day then used it and need to go back to it 2 hours later? Yep, still a 50% chance or so that it’s going to have to update first or it’s already in the midst of updating and can’t be used. Not only this, but even when I’m not using or trying to use this app, and I’m in the middle of doing something else, it takes the liberty of letting me know that this app is being updated and can’t be used while it’s being updated.
I give it 2 stars only because it works fine when you can actually get it to open and don’t have to do the perpetual update song and dance.
 Just a gaming company?