All Aura Sync Utility features are now part of Armoury Crate. We encourage you to
download and install Armoury Crate for full-featured Aura lighting control, device configuration, membership service and more.
Learn more about Armoury Crate.
*OS version required: Windows 10 (1903 or later) or Windows 11
** Left double-click to run the “ArmouryCrateInstaller.exe” file to start the installation process of Armoury Crate.
Note: The standalone version of Aura Sync Utility will stop receiving updates soon. The latest version is 1.07.84_V2
Take Aura Sync to the next level with Aura Creator, the advanced Aura effects editor that lets you easily create unique
lighting profiles for stunning effects that are totally your own.
*OS version required: Windows 10 (1903 or later) or Windows 11
** Left double-click to run the “ArmouryCrateInstaller.exe” file to start the installation process of AURA Creator.
 Иногда в разделе «Видеоадаптеры» диспетчера устройств Windows 11 и Windows 10 отображается «Базовый видеоадаптер (Майкрософт)», а при попытке обновить драйвер средствами системы пользователь видит сообщение о том, что «Наиболее подходящие драйверы для данного устройства уже установлены», но в действительности это совсем не так — например, игры вам запустить не удастся за исключением случаев наличия второй видеокарты, для которой драйвер установлен.
В этой инструкции подробно о том, как скачать и установить правильный драйвер для Базовый видеоадаптер Майкрософт, разобраться, какая именно видеокарта отображается таким образом и решить проблему.
Что такое Базовый видеоадаптер Майкрософт в диспетчере устройств

После установки Windows 11 и Windows 10 или при добавлении нового оборудования, система пытается найти подходящие драйверы для устройств в своих базах, а при наличии доступа — и в центре обновлений Windows, происходит это и для видеокарт.
Если Windows не находит драйвер, который специально предназначен для видеокарты, производится установка очень ограниченного по функциональности, но совместимого почти с любой видеокартой драйвера: в результате мы видим Базовый видеоадаптер (Майкрософт) вместо нужной видеокарты.
По этой же причине попытки обновить драйвер через диспетчер устройств сообщают нам о том, что «Система Windows определила, что наиболее подходящий драйвер для этого устройства уже установлен».
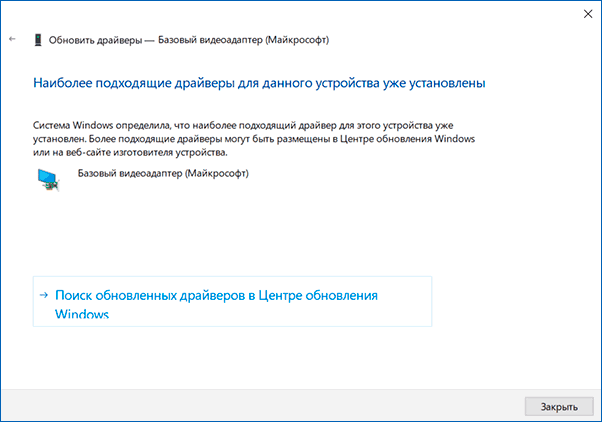
Эта информация говорит лишь о том, что в комплекте драйверов Windows 11/10 и в центре обновлений (при наличии доступа к нему) отсутствуют более подходящие драйверы, но это не означает, что их нет вообще. Наша задача — найти и установить нужный драйвер. Примечание: в случае если на вашем компьютере есть дискретная и интегрированная видеокарта, проблема может проявиться только для одной из них и иногда в этом случае всё работает полностью исправно — например, на ПК, когда монитор подключён к той видеокарте, драйверы на которую установились успешно: но драйвер лучше всё равно установить.
Как определить какой драйвер нужен и скачать его
Если вы точно знаете, что за видеокарта установлена, достаточно просто загрузить нужный драйвер с сайта NVIDIA, AMD или Intel в зависимости от её модели. Если это неизвестно, то для того, чтобы подобрать, скачать и установить нужный драйвер, нам требуется определить, какая видеокарта скрывается за обозначением Базовый видеоадаптер Майкрософт. Это можно сделать вручную или автоматически с помощью сторонних программ.
Как найти и скачать драйвер для Базовый видеоадаптер (Майкрософт) вручную
Для ручного определения необходимого драйвера можно выполнить следующие шаги:
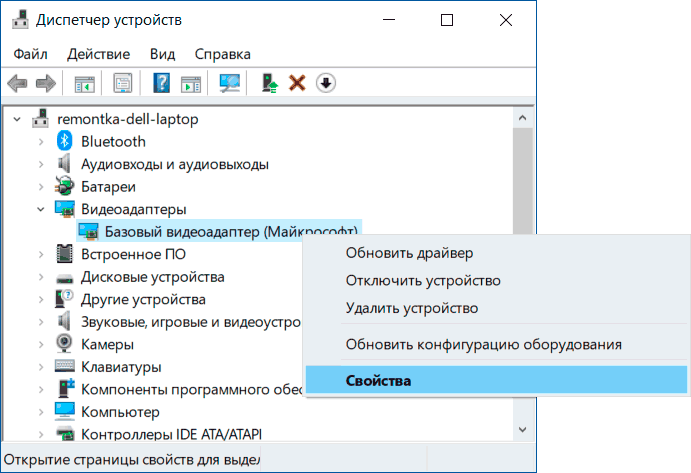
- В диспетчере устройств нажмите правой кнопкой мыши по Базовый видеоадаптер (Майкрософт) и выберите пункт «Свойства» в контекстном меню.

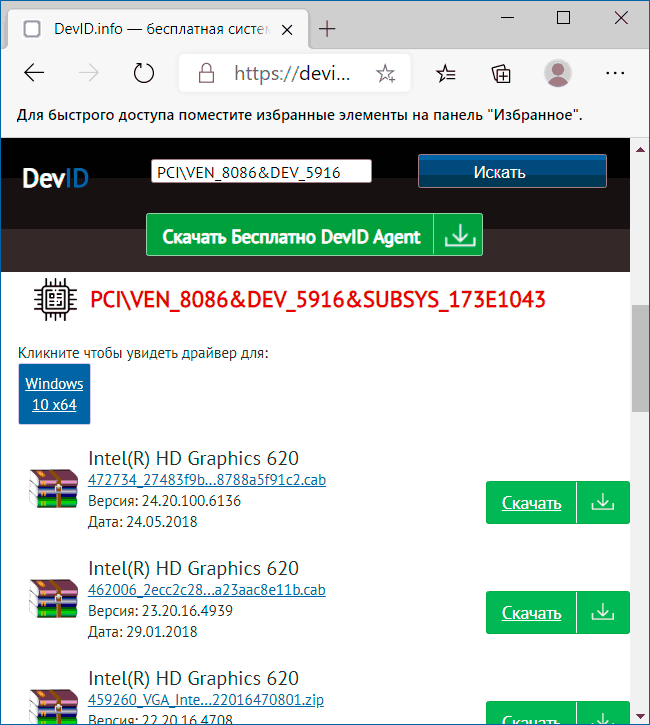
- Перейдите на вкладку «Сведения» и в поле «Свойства» выберите пункт ИД оборудования. Скопируйте идентификатор (правый клик — копировать). В нём нас интересуют параметры VEN и DEV — производитель и устройство соответственно. Например, для следующего шага нам вполне хватит текста (где буквы заменены цифрами) VEN_NNNN&DEV_MMMM.

- Зайдите на сайт https://devid.info/ и в строке поиска сверху вставьте скопированный текст, нажмите «Искать».
- В результате в списке внизу отобразится, какому устройству соответствует этот ИД с возможностью сразу скачать драйверы этого устройства, но, возможно это будет не лучшей идеей — скачивать их именно с этого сайта (как и с других сторонних сайтов). Теперь, когда вы знаете, что это за видеокарта, я рекомендую перейти к следующему шагу. На всякий случай дополнительный материал: Как узнать, какая видеокарта стоит на компьютере или ноутбуке.

- Для видеокарт AMD и NVIDIA скачайте драйверы для вашей видеокарты с официальных сайтов https://www.amd.com/ru или https://www.nvidia.com/ru-ru/. Для видеокарт Intel драйверы можно попробовать найти на официальном сайте https://downloadcenter.intel.com/ru/product/80939/Graphics.
- Если драйверы с указанных официальных сайтов производителей видеокарт/чипов не устанавливаются, найдите в Интернете страницу поддержки вашей модели материнской платы или ноутбука с помощью запроса вида «модель_материнской_платы поддержка» (как узнать модель материнской платы) или «модель_ноутбука поддержка» и в разделе загрузки драйверов найдите драйвер для видеокарты (может называться не по модели видеокарты, а, например, просто «Видео» или «VGA»). Даже если драйвер не для Windows 10, а для предыдущих версий системы, смело скачиваем его и устанавливаем. Для некоторых ноутбуков и брендовых компьютеров на официальном сайте поддержки может быть доступна собственная фирменная утилита автоматической установки драйверов — можно использовать её.


Как правило, описанные шаги оказываются достаточными для того, чтобы решить проблему и установить нужный драйвер.
Автоматический поиск нужного драйвера для Базовый видеоадаптер и его установка
Существует большое количество программ для автоматического поиска и установки драйверов оборудования: Snappy Driver Installer, IOBit Driver Booster, Driver Pack Solution и другие.
Я выступаю за ручную установку драйверов, но, если вы решили прибегнуть к автоматической, рекомендую остановиться на первой из указанных программ — она полностью бесплатна, функциональна и имеет наименьшее количество дополнительных нюансов, которые нужно учитывать при использовании.
Порядок действий (один из вариантов подхода, призванный ускорить процесс установки драйвера базового видеоадаптера) будет следующим:
- На официальной странице https://sdi-tool.org/download/ скачайте версию SDI Lite и распакуйте загруженный архив.
- Запустите исполняемый файл SDI (в 64-разрядной системе — с x64 в имени).
- В окне приветствия Snappy Driver Installer нажмите «Загрузить только Индексы».

- Дождитесь загрузки индексов (может показаться, что она не идёт, но следует подождать).
- После завершения загрузки слева нажмите «Обновить». Если ничего не произошло, подождите 2-3 минуты и либо окно со списком предлагаемых драйверов обновится само, либо ещё раз нажмите «Обновить».
- Если видеокарта определилась и справа от её названия указано «Драйвер доступен для установки (Интернет)», отметьте этот пункт.

- Нажмите кнопку «Установить» вверху справа окна программы и дождитесь установки драйвера видеокарты.


На этом процесс установки драйвера для «Базовый видеоадаптер (Майкрософт)» будет завершён и, с большой вероятностью, графика компьютера заработает надлежащим образом.
Microsoft Basic Display Adapter on Windows 10
-
Базовый видеоадаптер Майкрософт — это встроенное в Windows программное обеспечение, предоставляющее возможности видео и графики, если программное обеспечение от изготовителя вашего оборудования не установлено. Чтобы обеспечить максимально эффективное взаимодействие с устройством, вам может потребоваться установить программное обеспечение под названием «драйвер» от изготовителя вашего оборудования. Как правило, вы получаете новейшие драйверы через Центр обновления Windows или в ходе настройки Windows. Однако драйверы не всегда устанавливаются сразу. Они также могут быть доступны только на веб-сайте изготовителя оборудования.
-
Зачастую драйверы от изготовителя предоставляют следующие преимущества:
-
скорость и производительность;
-
плавное воспроизведение видео;
-
большее разрешение экрана;
-
улучшенное время работы батареи;
-
поддержка нескольких выходных разъемов для мониторов;
-
дополнительные графические функции.
-
-
Чтобы узнать, используете ли вы базовый видеоадаптер Майкрософт, нажмите кнопку «Пуск» , а затем в поле поиска рядом с кнопкой «Пуск» введите «dxdiag.exe». Выберите dxdiag.exe в списке результатов, а затем на вкладке «Дисплей» в разделе «Устройство» проверьте значение в поле «Имя». Если есть несколько вкладок «Дисплей», просмотрите каждую из них.
-
Вы можете проверить наличие более новых драйверов в Центре обновления Windows, нажав кнопку «Пуск» и выберите «Параметры» > «Обновление и безопасность» . Вы также можете посетить веб-сайт изготовителя.
-
Если изготовитель вашего оборудования не предоставляет драйверы для устройств с Windows 10, попробуйте сделать следующее.
-
Продолжайте использовать базовый видеоадаптер Майкрософт.
-
Если вы используете настольный компьютер, установите более современный видеоадаптер.
-
Воспользуйтесь советами других пользователей на форумах поддержки Майкрософт.
-
Нужна дополнительная помощь?
Нужны дополнительные параметры?
Изучите преимущества подписки, просмотрите учебные курсы, узнайте, как защитить свое устройство и т. д.
В сообществах можно задавать вопросы и отвечать на них, отправлять отзывы и консультироваться с экспертами разных профилей.
Geekyslug is supported by its readers. We independently analyze, test, review, and recommend the latest tech products—learn more about our process. When you buy something through our links, we may earn a commission.
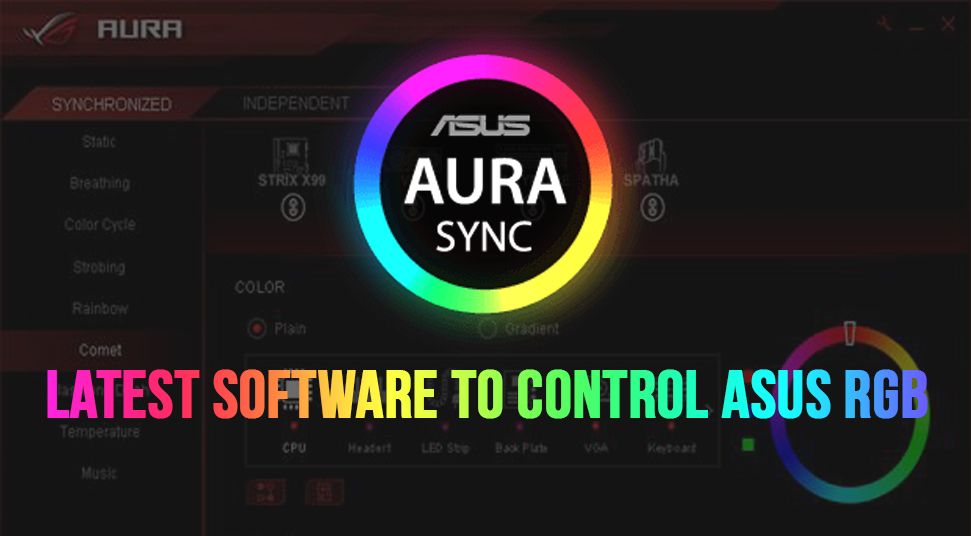
Asus Aura Sync Download: Adding colors to your system always works out well. RGB lighting completely changed the appearance of a desktop system. Anyone can easily customize their system with colors to suit their needs.
A number of Asus hardware components have inbuilt lighting that enhances the look of a system. But not everyone knows that they can manage and control the lightings from the Asus Aura Sync Software.
Asus Aura Sync Utility is a control software that can be used to manage the lighting and effects of Asus RGB components. Users can customize individual components and can even synchronize multiple components with each other. This utility provides all the functions and tools that you need to do the same.
In this article, we will be talking about the well-known Asus Aura Sync Utility. We’ll be giving some brief information about the same and will also provide a direct Asus Aura Sync Download link.
For those who do not know How to sync Non-Asus hardware components with the software, we have mentioned a guide that provides you with ways to sync non-controllable parts with Asus Aura Sync.
What is Asus Aura Sync Utility
Asus Aura Sync is software that can be used to control lightings provided in Asus hardware components. Users can manage almost any Asus device with RGB lighting using the software. This tool provides all the necessary options that you’ll need in order to customize your Asus devices.
You can customize the components according to your needs. You can even set up custom lighting features that act on different events. Also, syncing different components with each other has never been easier before. Users can control the effects of multiple components using the Aura Sync software.
Update
Please note as per the latest announcement from Asus, the standalone version of Aura Sync Utility will stop receiving updates. Therefore, download ARMOURY CRATE by Asus which is for full-featured Aura lighting control, device configuration, membership service, and various other features.
For those who want to download the Asus Aura Sync Utility, we have mentioned direct download links for the same in this section. There are three different versions of the utility and we have provided download links to all of them.
We recommend downloading the latest version of the application from the table below.
1.07.84. is the latest version of Asus Aura sync
1.07.79_V2.2. – is the last stand alone version of Asus Aura sync
Note
Before installing the Asus Aura Sync Utility on your system, make sure that you have the latest BIOS firmware flashed on your motherboard.
How to Install Aura Sync
After downloading the Asus Aura Sync latest version, it’s time to install the software on your system. We have provided a step-by-step How to install the Asus Aura Sync Utility guide to ensure that you do not run into any errors.
- Download the latest file from the section above.
- Locate the archive on your local storage.
- Extract the file using an archive manager of your choice.
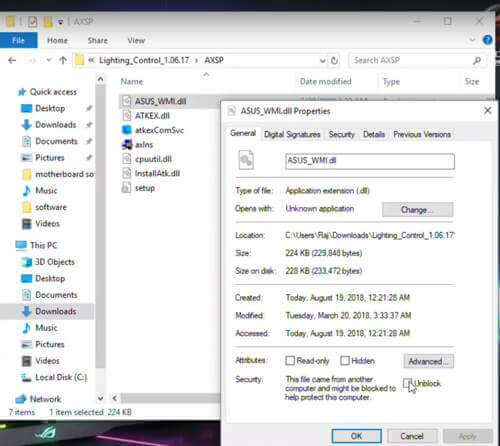
- Right-click on all the files and select Properties.

- Check the option that says Unblock. Hit Save (For each file).
- Launch the files titled axlns and atkexComSvc by double-clicking on them.
- Now, go back and install the software by launching the Setup file.
- Restart your system if asked.
Do not change the installation path of the application. If you change it, you’ll face the Asus Aura Sync Not Working error.
That’s how you install Asus Aura Sync on your system.
Note
Many users face certain issues while installing the software on their computer and often wonder why is Asus Aura Sync not working. Check out this guide to prevent any errors.
How to Sync Non-Compatible Parts with Asus Aura Sync
If you haven’t got any Asus hardware components with you, and want to control non-Asus parts with the Asus Aura Sync app, then this section is for you.
We have provided a simple fix for you to do the same.
- Use a ROG Aura Terminal if your motherboard isn’t compatible with the application.
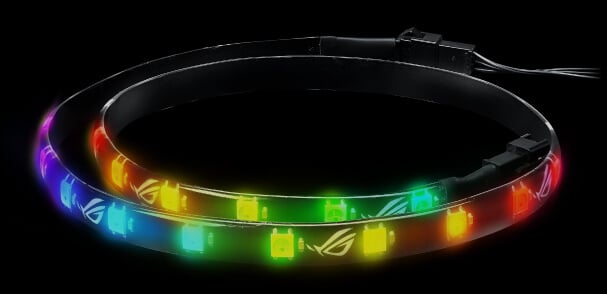
- Replace the strips that aren’t compatible with the software with the compatible ones.
- Now, connect those strips with the ROG Aura terminal.
Congratulations, you finally synced non-compatible parts with the Asus Aura Sync utility.
Final Words
So that was our take on How to download and install Asus Aura Sync Utility. We mentioned step-by-step guides on the same. Also, we’ve dedicated a separate section for those who want to sync non-compatible parts with the software.
Asus Aura Sync utility is software that can be used to manage Asus RGB hardware components. Users can change the effect, lightings, and can also sync multiple components with each other. Aura Sync provides all the tools and options that you need to do the same.
Check out:
- 9 Best Gaming Laptops Under 1200 Dollars
- Best Gaming Laptop Under $1500
- Best Gaming Laptops Under 800 Dollars
- 9 Best Laptops Under 600 With SSD
By Sam Rhodes
Hi, I’m Sam Rhodes, a passionate tech reviewer, and gamer. I started Geekyslug with the motive of sharing my knowledge about tech gadgets like gaming laptops, tablets, graphic cards, keyboards, and whatnot.
I also share troubleshooting guides, helping people resolve issues with their gadgets. When I’m not writing, I prefer playing Valorant, Call of duty, GTA5 or outdoor activities like skateboarding and off-roading on my bike.
Have you been wondering how to control the lighting of Asus? Well, software to fulfill that prospect does exist and that is Asus Aura (Sync). As many users have been looking for a way to download this software easily, its popularity has increased over the course of time.
If you’re among those people, then you’ve come to the right place. For more details on Asus aura download, check out the content below!
Asus Aura Software: What is it?
Aura Sync is software that has the ability to control the RGB lighting of any Asus products. To add more effect, it can also synchronize the lighting control with other Asus products. You may wonder what these products are. Well, Asus products include electronic devices like peripherals, Graphic cards, Motherboards or even Monitors.
Aura Sync is profoundly known for gaming as it makes the experience extraordinary. Not only will you be able to witness light aligned on the Asus components but you can also make alterations to it.
These alterations include multiple color lighting with cool effects. You can also make the color of lighting change according to your mood. Or, you can set a timer to it so that it changes after a certain time interval.
Also Read: Bad Pool Header Windows 10
Asus Aura Sync: What is RGB?
In general terms, RGB is a short name for Red, Green, and Blue. However, in terms of Lighting, it signifies, that the LED components can use these three colors and produce a different mix of these colors.
Here’s an interesting fact about RGB. The majority of the components of RGB combination can produce up to 16.8 million sets of colors that are unique.
If you are interested in getting your Asus products all lightened up, follow this section. Generally, there are two specific ways for aura sync download that you can download Aura Sync:
1. Download Asus Aura (Sync) Via Homepage
To get Asus aura sync download first, launch any web browser and then go to the official website of Asus. Then, from there, select a version and then make sure you choose the version which is the latest. Now, the Asus aura software will start.
Go to the location where you’ve downloaded the file and then unzip it. After unzipping, you’ll find many files among which locate the file called “Setup”. Double click on it and the application setup box will appear.
Follow the instruction wizard to complete the installation. Once you’re done with the installation, click on the option called “Finish”.
Also Recommend: Update Flash Player Chrome
2. Download Asus Aura (Sync) via Downloading Center
Here’s another way to download Asus Aura (Sync)
First, open any web browser and then go to the downloading center of Asus. A new page will appear when you’d be asked to enter the name of the model of the product. Enter the name of the product model and then click on the option called “Driver & Tool”.
On the following page, select the type of Operating system you’re using. Then go to the “Utilities” section. From there, you can download the program file of Aura.
Versions of Aura Sync Available
There are mainly three versions that are available. Based on your system configuration you can download the following three versions.
![]()
![]()
![]()
Requirements for Asus Aura Sync Software
While there are not many requirements that would seem hard to do in order to make the software work smoothly. However, you need the latest version of BIOS firmware installed on the system. Once you’ve downloaded the file, follow the next section for proper installation.
Recommended Post: Oneplus Security
How to Install Aura Sync Software?
Now that you’ve already downloaded the package file of Asus Aura Sync, what you need to do is click on the Installation file or the setup file and then right-click on it to choose the “Extract” option.
Locate the file that is named “atkexComSvc” and “axlns”. Doubt click on them. Then, double click on the installation file to install the application. After the installation is done, simply restart the system so that when it starts, it will start with new settings that the application added to the system.
Is there any way to Synchronize Components that are not Compatible with Asus, with Aura Sync?
There is no direct way to do it. However, you can do the following things to make it work with non-compatible devices:
If the system’s motherboard is not compatible with Aura sync, then you can consider using OG Aura Terminal.
If the non-compatible components have LED strips, then try replacing them with the LED strips of Aura Sync.
Lastly, you can connect the motherboard with the LED strips of Aura Sync.
Additional Tip: Keep the Asus Drivers Updated
In order to achieve the best experience in gaming and lighting, it is always advisable that you keep the drivers up to date at all times. And this is how to do it:
At first, open any web browser and then go to the official website of Asus. then visit the download center. On the download center page, look up the model name of the driver based on the specification of the system.
Then download the driver. Once the download is finished, install the driver. Keep in mind that you should install drivers that are of the latest version.
Finally…
Now that you have a clear idea of what Asus Aura Sync has to provide, simply get started with it! In case of doubts, place the queries in the comments below.