Internet Explorer was retired on June 15, 2022
IE 11 is no longer accessible. You can reload Internet Explorer sites with IE mode in Microsoft Edge.
Data Migration Assistant (DMA) enables you to upgrade to a modern data platform by detecting compatibility issues that can impact database functionality on your new version of SQL Server. It recommends performance and reliability improvements for your target environment. It allows you to not only move your schema and data, but also uncontained objects from your source server to your target server.
Important! Selecting a language below will dynamically change the complete page content to that language.
-
File Name:
DataMigrationAssistant.msi
What is new in V5.8?
- Upgraded DMA command line to .NET 6.
- Improved memory collector for SKU recommendation to fix an issue causing query timeouts and high CPU usage on the source instance.
What issues have been fixed in v5.8?
- Fixed accessibility bugs.
Documentation
- Overview of Data Migration Assistant | Microsoft Docs
- Identify the right Azure SQL Database SKU for your on-premises databases | Microsoft Docs
Supported source and target versions
- Source: SQL Server 2005, SQL Server 2008, SQL Server 2008 R2, SQL Server 2012, SQL Server 2014, SQL Server 2016, SQL Server 2017, SQL Server 2019, SQL Server 2022 and, Amazon RDS for SQL Server
- Target: SQL Server 2012, SQL Server 2014, SQL Server 2016, SQL Server 2017, SQL Server 2019, SQL Server 2022, Azure SQL Database, Azure SQL Database Managed Instance
-
Supported Operating Systems
Windows Server 2016, Windows 10, Windows Server 2012, Windows 7, Windows 8, Windows 8.1, Windows Server 2019, Windows Server 2022
Windows 7 64-bit (or Windows Server 2012) and above
.NET Framework 4.7.2 64-bit or above
.NET 6 64-bit
Recommended resolution (1024×756) -
Download and run the DataMigrationAssistant.msi package.
Windows Migration Assistant is used for transferring data to your Mac
by Claudiu Andone
Oldtimer in the tech and science press, Claudiu is focused on whatever comes new from Microsoft. His abrupt interest in computers started when he saw the first Home… read more
Updated on
- Windows Migration Assistant is a tool that helps you copy some of the data from your PC onto a Mac.
- The homologue app for Mac already comes preinstalled on the device, but you will also need to install the software on your PC.
- For the transfer to work, the two computers have to be connected to the same network.
The Windows Migration Assistant is a tool developed by Apple to transfer all the contents of a Windows PC to a Mac. In this article, we will show you how to download Windows Migration Assistant and use it on your Mac.
What is Windows Migration Assistant, and what does it do?
As mentioned above, Windows Migration Assistant is an Apple software that usually comes preinstalled on your Mac to help you migrate the data from your PC to your macOS device.
However, to transfer the files, you will also need to download and install the app on your PC.
How we test, review and rate?
We have worked for the past 6 months on building a new review system on how we produce content. Using it, we have subsequently redone most of our articles to provide actual hands-on expertise on the guides we made.
For more details you can read how we test, review, and rate at WindowsReport.
The Windows and macOS systems are very different OSes, so here’s what Windows Migration Assistant can help you move:
- Transfers the emails, contacts, and email settings from Outlook and Windows Mail to the Mail app on Mac.
- Moves the appointments and reminders from your Windows PC to your Calendar and Reminders (Requires migrating to a Mac with macOS Ventura) app on Mac.
- It transfers the music, podcasts, audiobooks, movies, and TV shows in their respective apps on Mac.
- Imports all the bookmarks and homepages from any of your browsers to Safari.
- Translates the desktop pictures, language, and location settings to System Settings or System Preferences (If the Mac is using macOS Ventura, known Wi-Fi networks will be moved as well).
- Transfers all the documents and other files from your home directory.
- It copies all the non-system files from the system and other drives to the Shared folder of your home folder.
So, Windows Migration Assistant will only transfer, copy or import data and settings, not entire applications.
How do I download Windows Migration Assistant?
- Launch the browser of your choice on your PC and go to the official download page for Windows Migration Assistant.
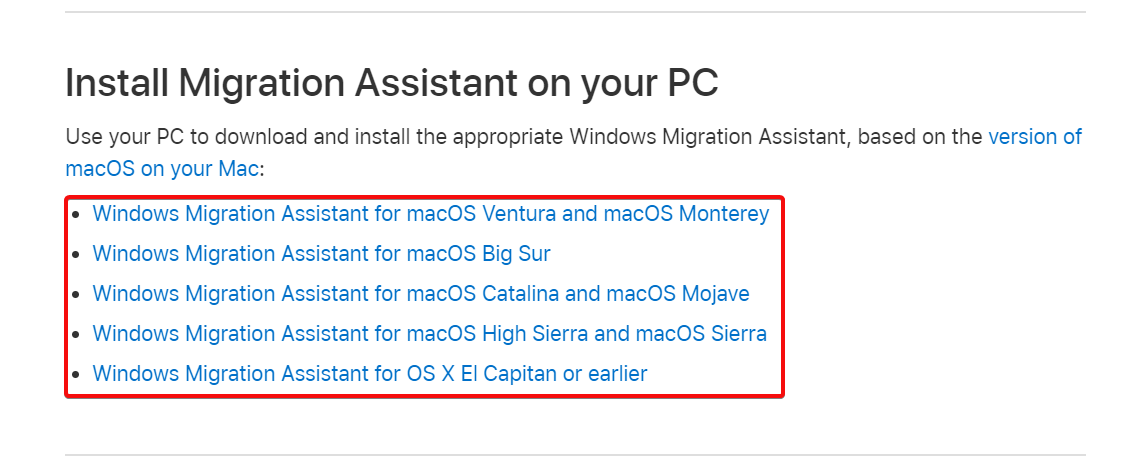
- Scroll down and click the link corresponding to the Windows Migration Assistant version for your OS.

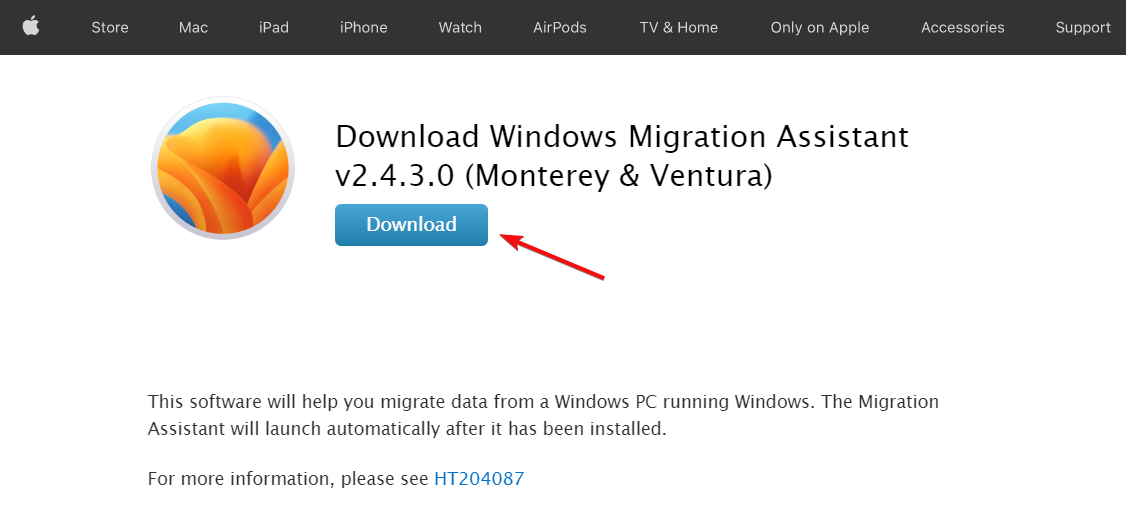
- Hit the Download button to download Windows Migration Assistant.

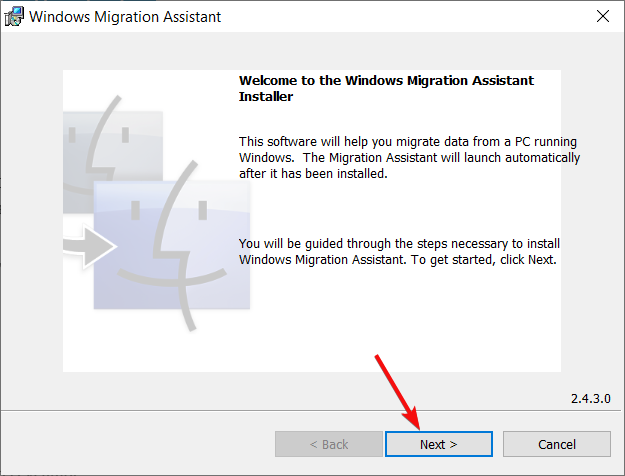
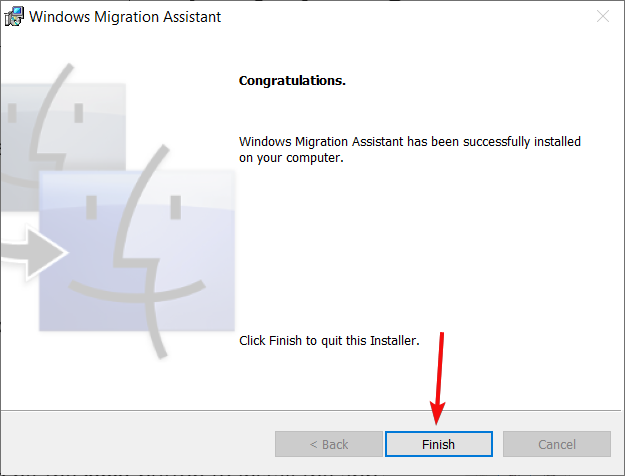
- Double-click the executable file and hit the Next button to install the app.

- Follow the on-screen procedures to install Windows Migration Assistant and hit Finish at the end.

How do I use Windows Migration Assistant?
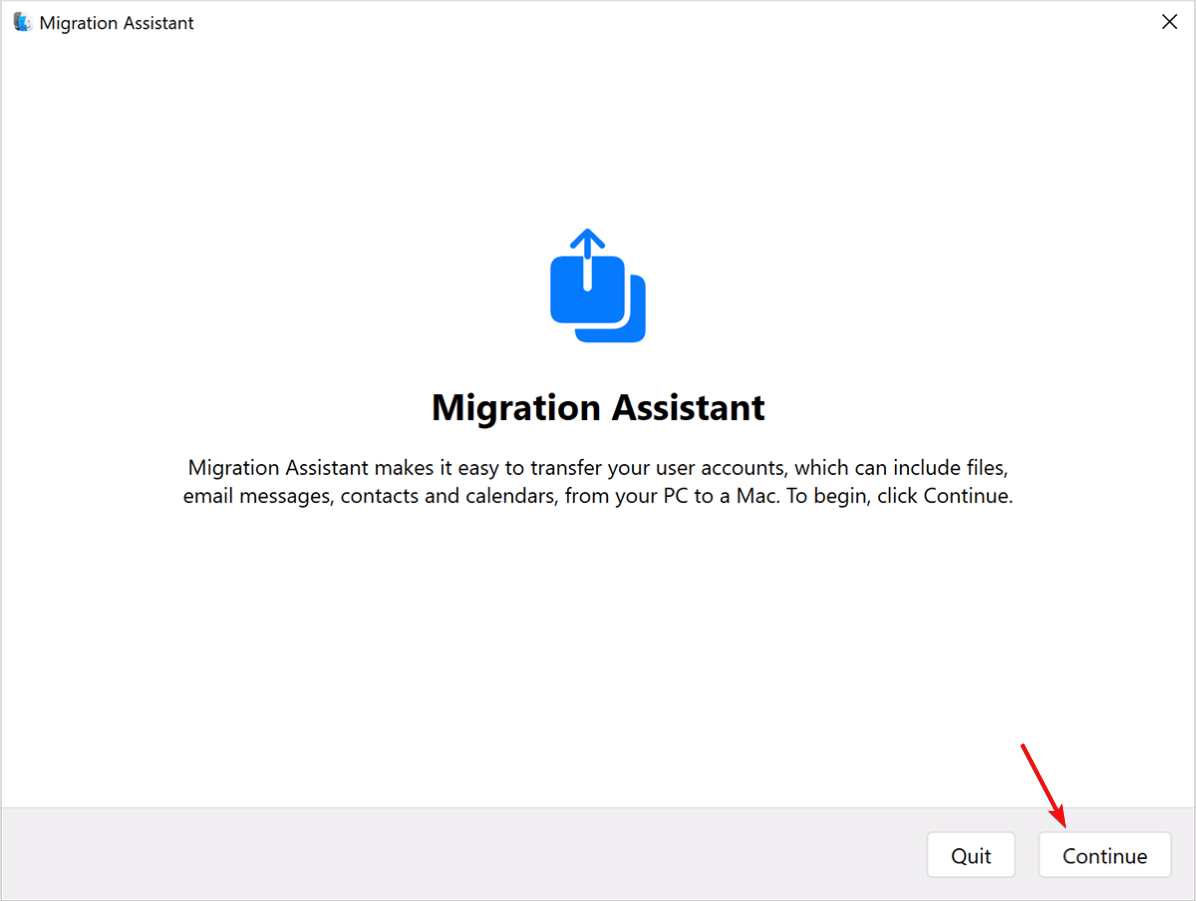
- You may receive a warning to close some applications needed for the data transfer. After you comply, hit the Continue button.

- The app will detect and warn you about special conditions on your system and you will have to fulfill these requirements as follows:
- The PC is set for automatic Windows updates
- The firewall is preventing your Mac from connecting to your PC
- Your laptop is running on battery power
- Next, you will be asked if you want to provide permissions for the app to send app usage data to Apple and it’s not necessary to accept.
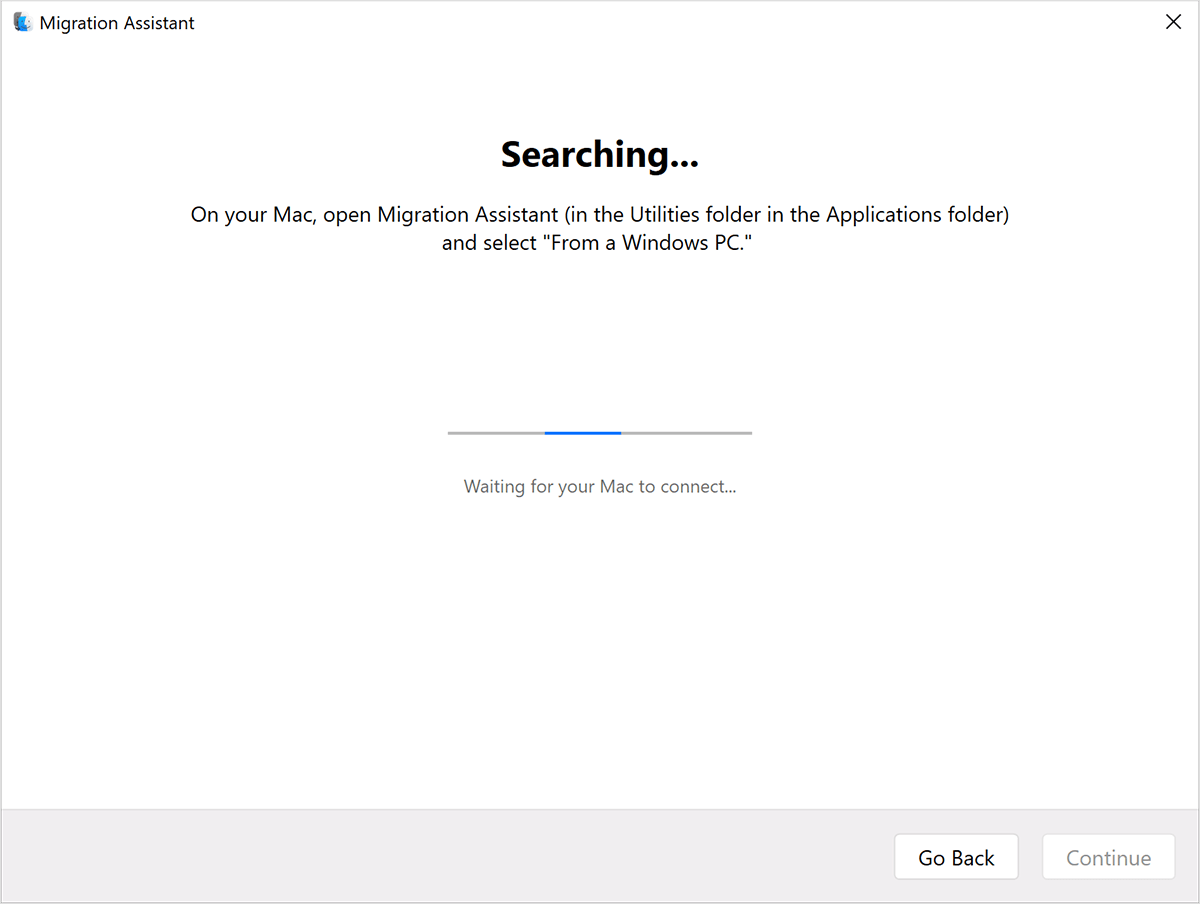
- The app will now search for your Mac and you will have to turn your attention to it.
- Launch Migration Assistant on your Mac. You will find it in the Utilities folder of your Applications folder.
- Follow the on-screen instructions, and when you’re asked how you want to transfer your information, select the From a Windows PC option and click Continue.

- Select your PC and click on Continue.

- Now, you will receive a passcode that you will need to enter on both computers.
- Lastly, your PC will be scanned, and you will get to choose which data you want to transfer and hit Continue to perform the action.
- The procedure will take a few minutes to a few hours, depending on the number and capacity of your files.
Of course, the two computers must be connected to the same wired or wireless network or directly connected with a cable.
We hope our article provided sufficient information for Windows Migration Assistant download and usage.
You might also be interested in reading our guide on how to transfer your Windows Settings to a new computer safely.
If you have any questions or suggestions, feel free to use the comments section below.
![]()
![]()
Эта загрузка потенциально небезопасна
Программа не может быть загружена: ссылка для скачивания недоступна.
Внешние ссылки для скачивания стали недействительными по неизвестной причине.
Извините, но мы не можем обеспечить безопасность сторонних сайтов.
Сообщить о неточности
Windows Migration Assistant отчет антивируса
Этот файл был проверен библиотекой Free Download Manager 28 дней назад.
Вместе с этой программой также загружают
Обновлено:
Последние обновления
![]()
![]()
If you’re seeking a Windows 11/10 migration tool, then you’ve arrived at the right place. EaseUS software allows professional Windows 11/10 migration assistant download — EaseUS Todo PCTrans, which facilitates the transfer of data including all types of files as well as applications along with settings from previous Windows 7/8/XP/Vista to the latest Windows 11/10 operating system.
How to Download EaseUS Windows 11/10 Migration Assistant Pro Version
EaseUS Windows 11/10 migration assistant download is easy and straightforward. You need left-click the following blue download icon, the application will be downloaded within seconds. Give it a shot.
EaseUS Todo Pctrans Is Trustworthy to Download
EaseUS Todo PCTrans is developed as a clean, safe, and easy-to-use data transfer assistant. The software makes sure the download is trustworthy and that no other malware or unsolicited program is bundled in.
More importantly, EaseUS data transfer software offers the easiest and most automated Windows 11/10 data transfer method. It is designed with a step-by-step interface for migrating Windows user’s account settings and files in the following scenarios:
- From Windows 7/8/XP/Vista to Windows 11/10 after upgrading on the same computer by creating and restoring a backup file;
- From Windows 7/8/XP/Vista on an old PC to a new Windows 11/10 PC via a connected network or a backup file.
Quick download EaseUS Windows 11/10 migration assistant & try a trial
PC to PC Transfer via the Connected Network
Run the Todo PCTrans on the two PCs and choose «PC to PC». The programs will detect another PC or through clicking «Add a PC» and input the IP address to connect another PC. After successful connecting two PCs, we could select the specific data, folders, applications to transfer.

Transfer via Backup & Restore
The charge-free «Backup & Restore» feature from EaseUS Todo Pctrans aims to help users to transfer applications, files, and accounts effortlessly.
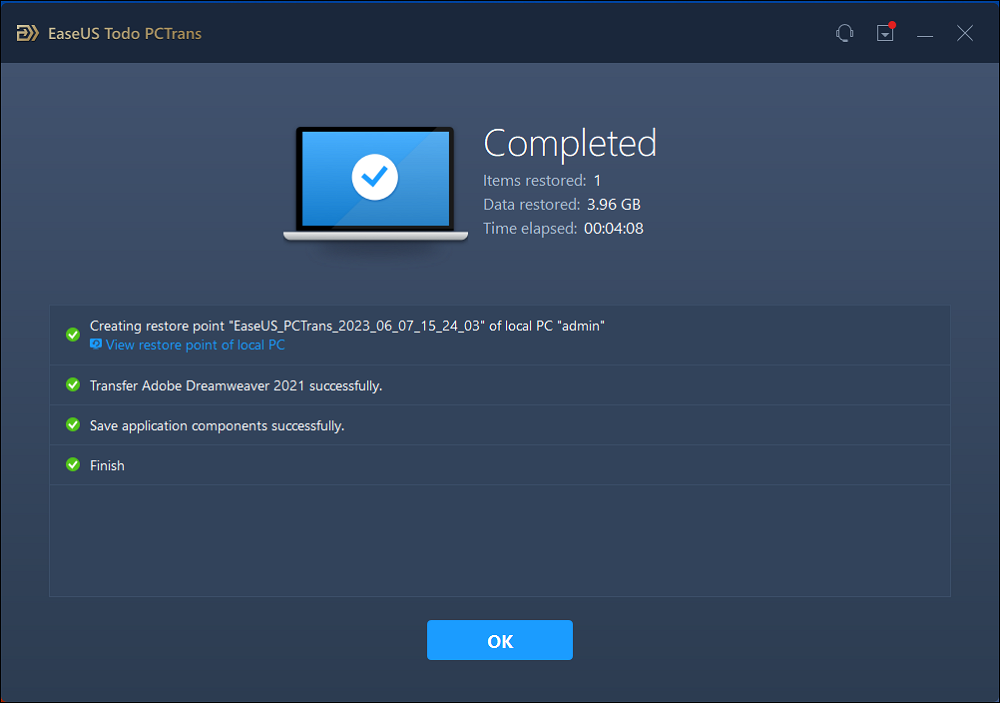
Step 1. Create a backup file.
1. Connect your USB (flash) drive/external hard drive to your source computer. Launch Todo PCTrans, click «Backup & Restore > Start» on the main screen.
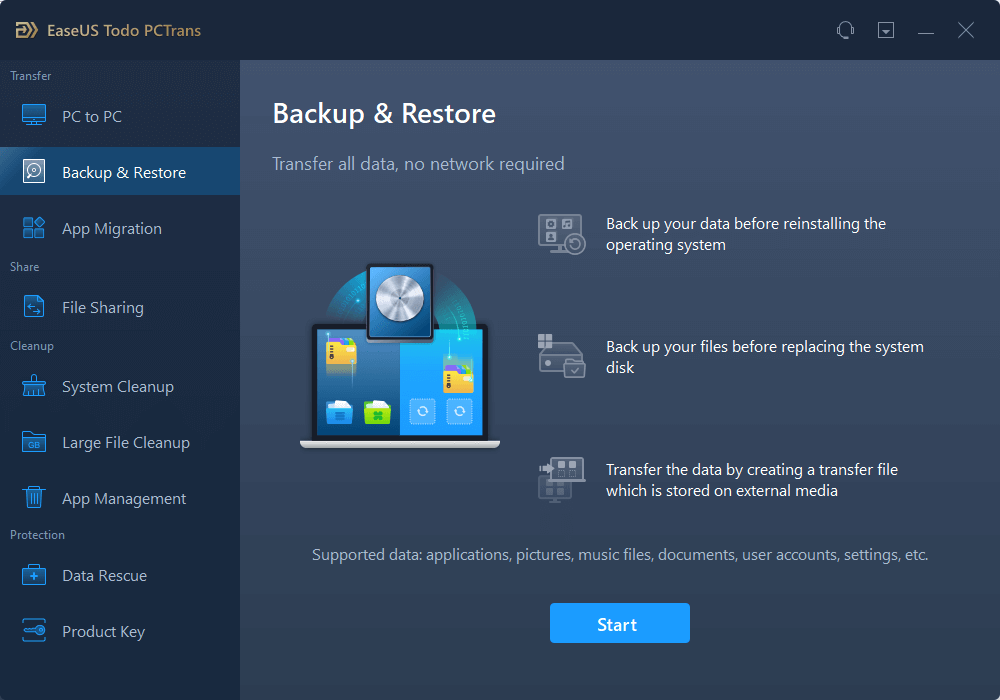
2. Select «Data Backup» to move on.
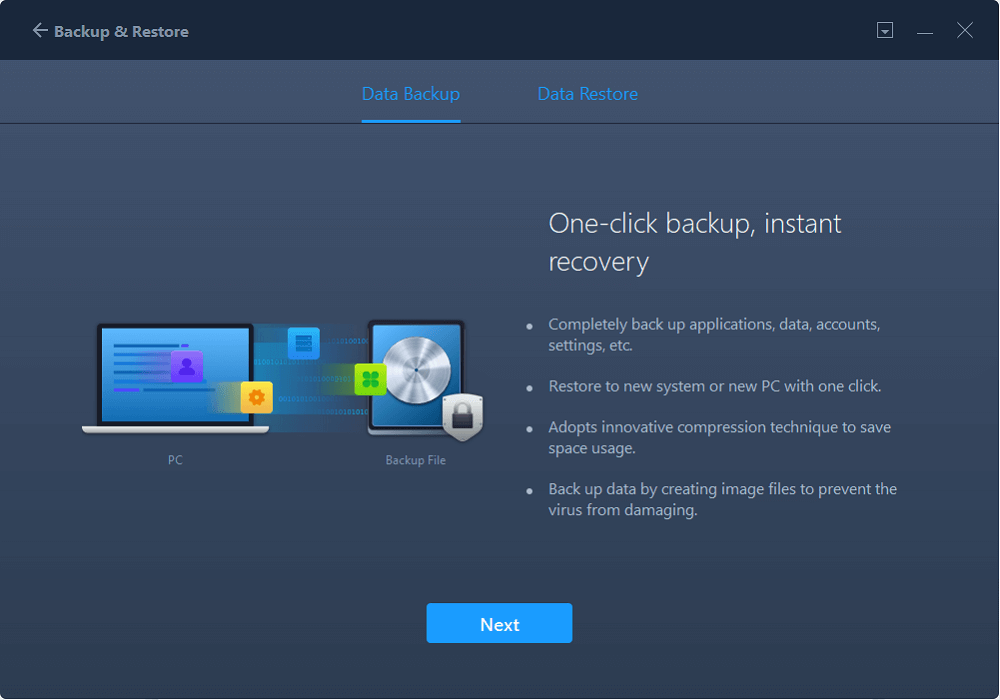
3. Hover over «Applications», «Files» and «Accounts» columns to choose the specific data, applications, etc., and click «Back up» to create a backup file.

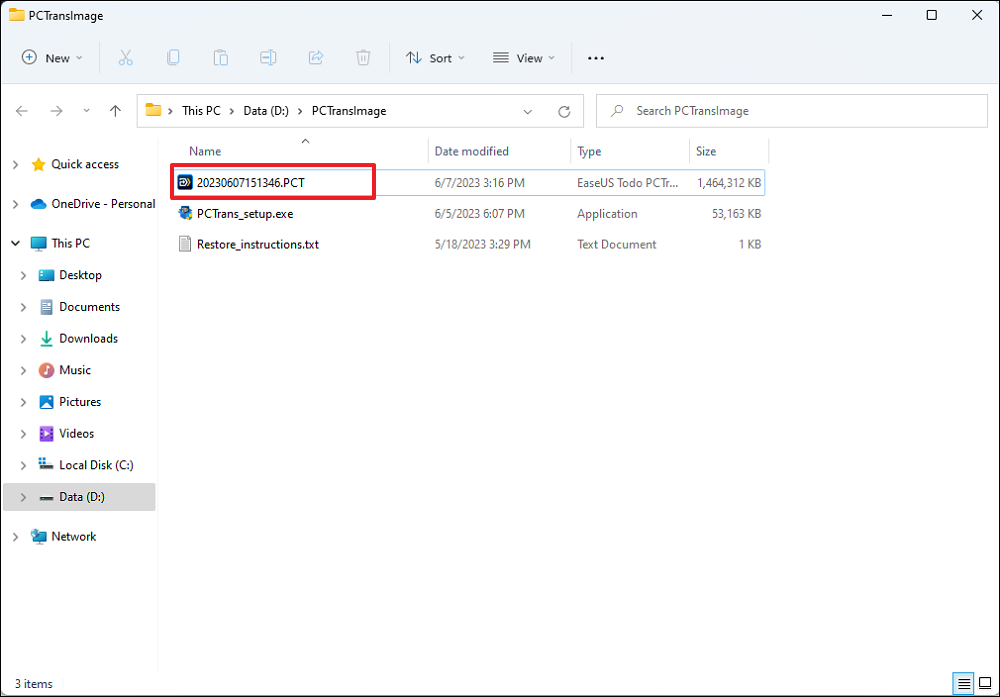
Step 2. Recover via the created backup file.
1. Plugin your USB drive which stores the created backup file to the target PC.
Ensure your target PC has EaseUS Todo PCTrans, open PCTransImage and double-click the backup file. Otherwise, click PCTrans_setup.exe to install this tool.
2. Now, you can select Applications/Files/Accounts you want to restore. Click «Restore».
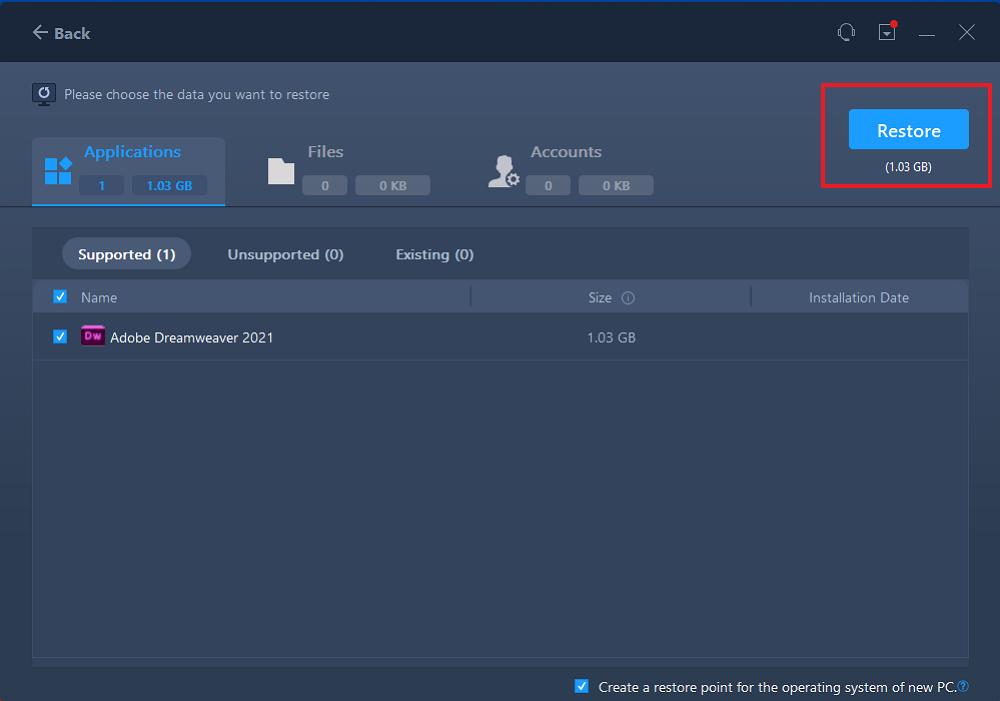
3. Wait a while and click «OK» to finish the restore process.
Video Tutorial: Transfer Everything to Windows 11/10
Learn from the video tutorial of transferring files, software to Windows 11/10 by using EaseUS Todo PCTrans
- Downloads
- File Management

Use Windows Migration Assistant to transfer your music, pictures, documents, and other data from a Windows PC to your Mac.
Overview
Specs
Windows Migration Assistant transfers your contacts, calendars, email accounts, and more from a PC and puts these files in the appropriate places on your Mac.
Before you begin:
- Use these steps to make sure your migration goes smoothly.
- Make sure Windows is up to date. Migration Assistant works with Windows XP and later.
- Make sure you know the name and password of an administrator account on your PC.
Connect your Mac and PC to the same network, such as your home Wi-Fi network. You can also connect an Ethernet cable between the Ethernet port on your Mac and your PC to create a direct network connection.
- Use the check disk (chkdsk) utility on your PC to make sure there aren’t any issues with your Windows drive.
- Choose Start > Run
- Type cmd in the Run window and press Enter.
- Type chkdsk in the command window and press Enter.
- If the check disk utility reports that it found problems, type chkdsk drive: /F and press Enter (where «drive» is the letter that represents your Windows startup disk, like «d:»). Press the Y key at the prompt, then restart your PC. Repeat this process until the check disk utility reports no issues.
If you’re unable to clear a reported disk issue, you might need to have your PC serviced before migrating your data to your Mac.
How to move your data from a PC to your Mac:
- Use these steps to migrate data from a PC to your Mac.
- On your PC, download the Windows Migration Assistant and install it.
- Quit other open applications in Windows.
- Open Windows Migration Assistant on your PC.
- Click Continue in the Migration Assistant window to start the process.
- Start up your Mac. Setup Assistant automatically opens the first time you set up your Mac. If you’ve already set up your Mac, open Migration Assistant from the Utilities folder on your Mac.
- On your Mac, follow the onscreen prompts until you get to the migration pane of the assistant. Select the option to transfer information «From a Windows PC».
- When prompted, enter an administrator name and password.
- Click Continue to close any other apps that are open.
- Select your PC from the list of available computers in the migration window on your Mac, then wait for the PC to show the passcode displayed on the Mac.
- Click Continue on your PC and your Mac after you see the same passcode displayed on both computers.
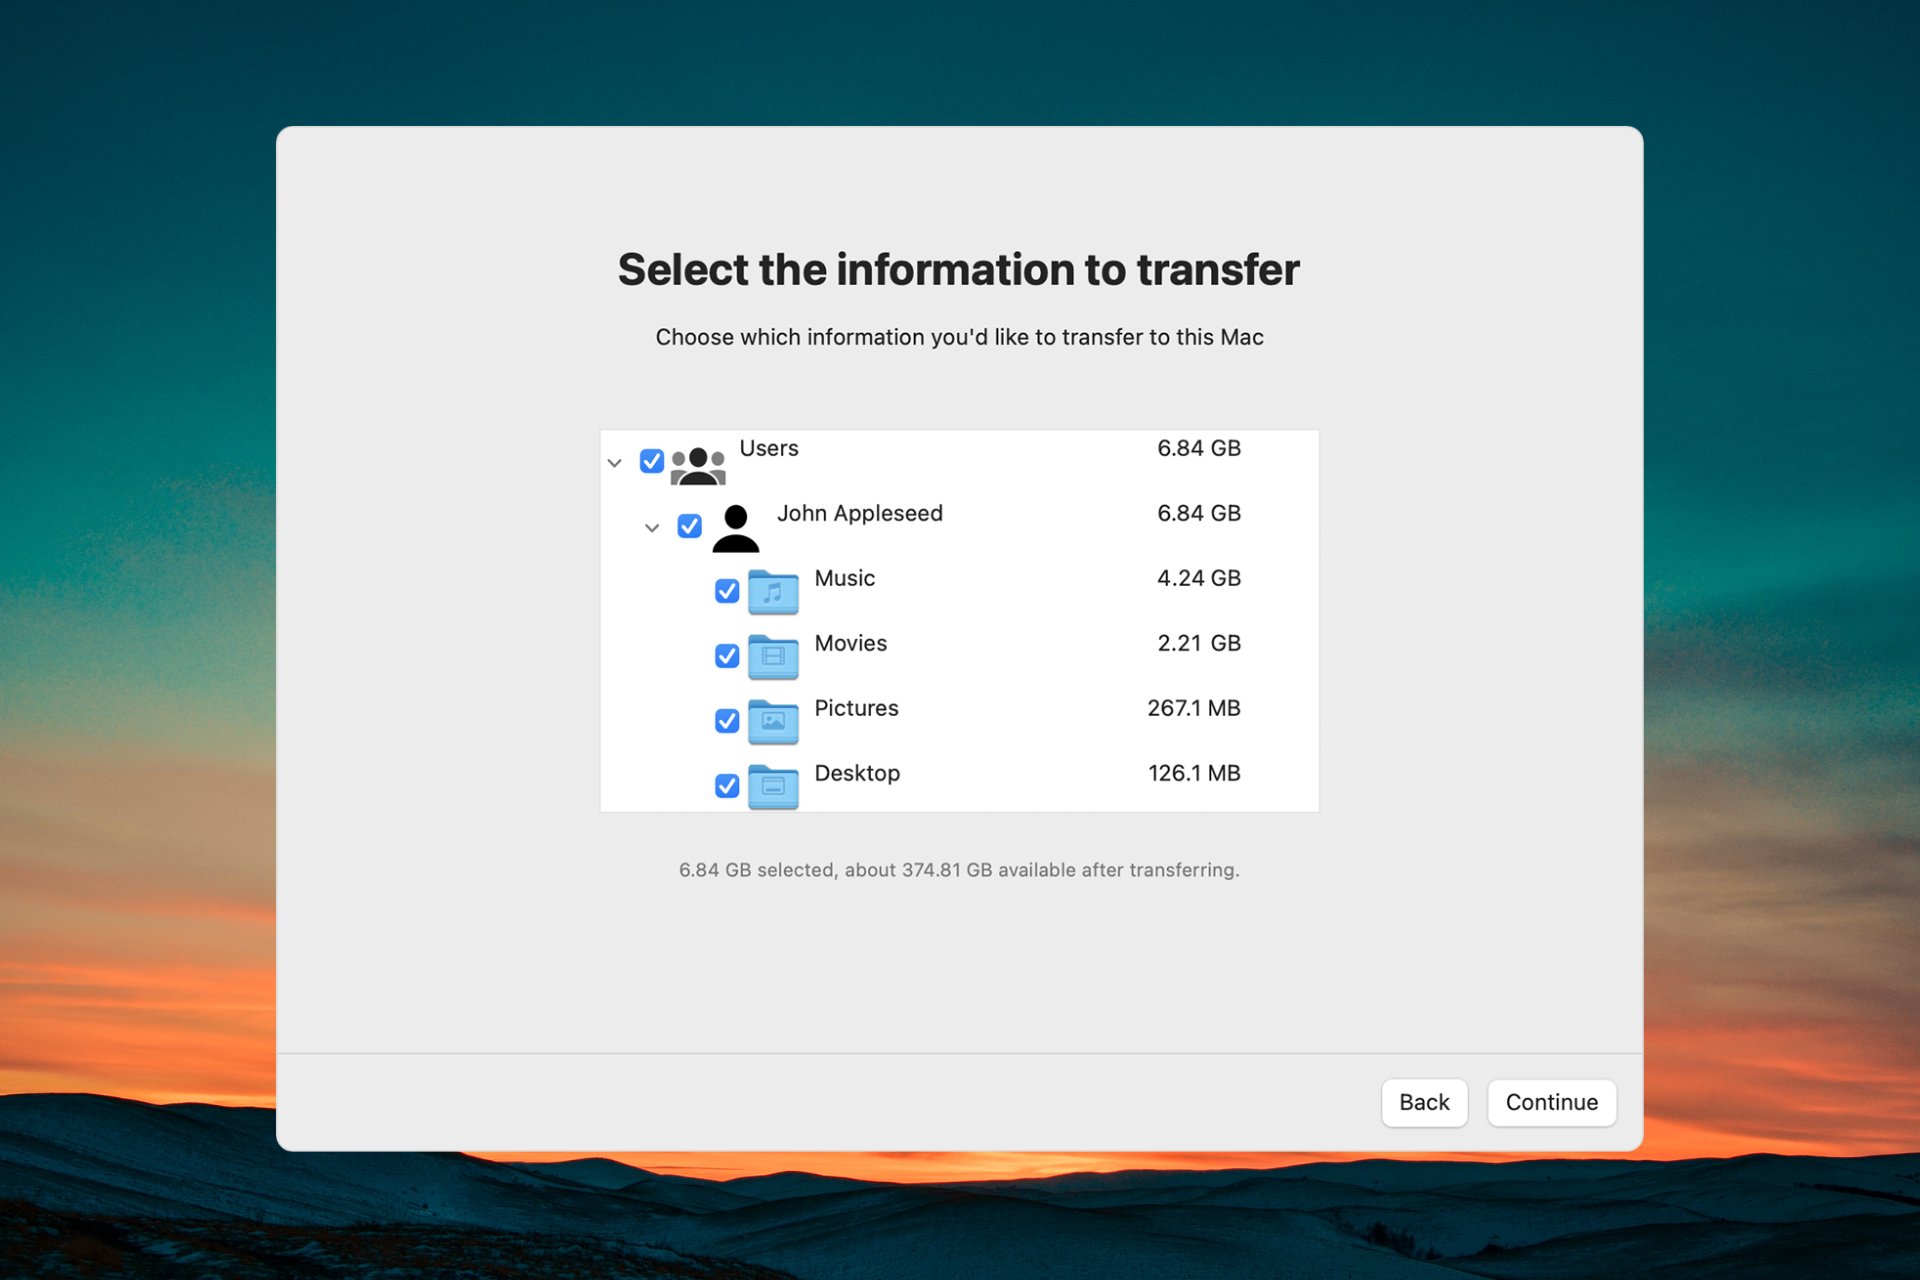
- Your Mac scans the drives on your PC to build a list of information to migrate. When the scan is complete, select the information you want to migrate to your Mac and click Continue.
You can watch the progress and estimated time remaining on both the Windows PC and your Mac.
Migration Assistant tells you when migration is complete. After migration is done, you can close Migration Assistant on your PC and log in to your new user account on your Mac. The first time you log in to a user account that’s migrated from a PC, you’re prompted to set a password. You can use the same password you used on your PC, or create a new password. See Choosing good passwords in OS X for tips on setting a password.
TechSpot means tech analysis and advice you can trust.
Last updated: