Резервное копирование важной информации – полезная привычка в системном администрировании, позволяющая сэкономить ценное время. Рассмотрим как избавить себя от мучений в час “X” с помощью компонента Windows Server Backup.
Windows Server Backup – встроенный компонент семейства операционных систем Windows Server предназначенный для создания резервных копий ОС и работы с ними.
Приступаем к настройке.
Из меню Пуск запускаем Диспетчер серверов.

В открывшемся окне “Диспетчер серверов” выбираем “Добавить роли и компоненты”.

В открывшемся окне мастера добавления ролей и компонентов, в левой части окна, выбираем “Тип установки”, в правой – “Установка ролей или компонентов” и кликаем по кнопке “Далее”.

В обновленном окне, на этапе выбора сервера, выбираем из пула текущий. Нажимаем “Далее”.

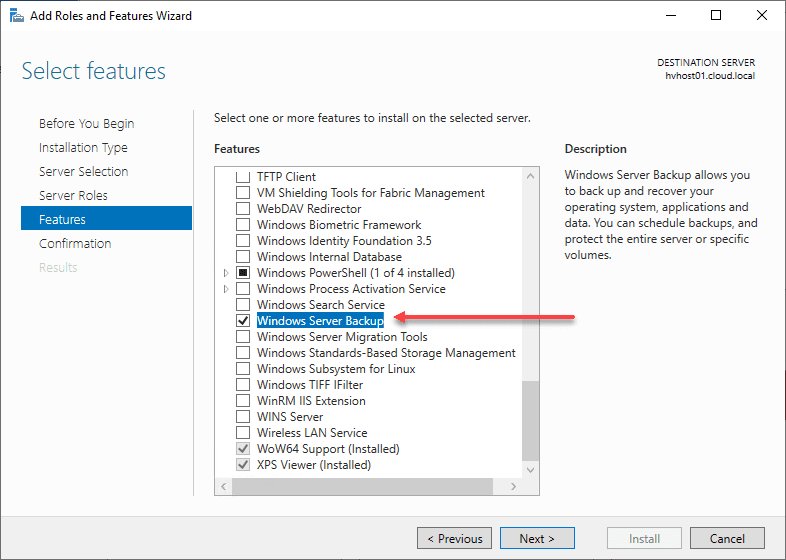
В обновленном окне мастера, в левой его части, кликаем по “Компоненты”. В центральной части окна, в основной части окна, выбираем “Система архивации данных Windows Server”. Кликаем по кнопке “Далее”.

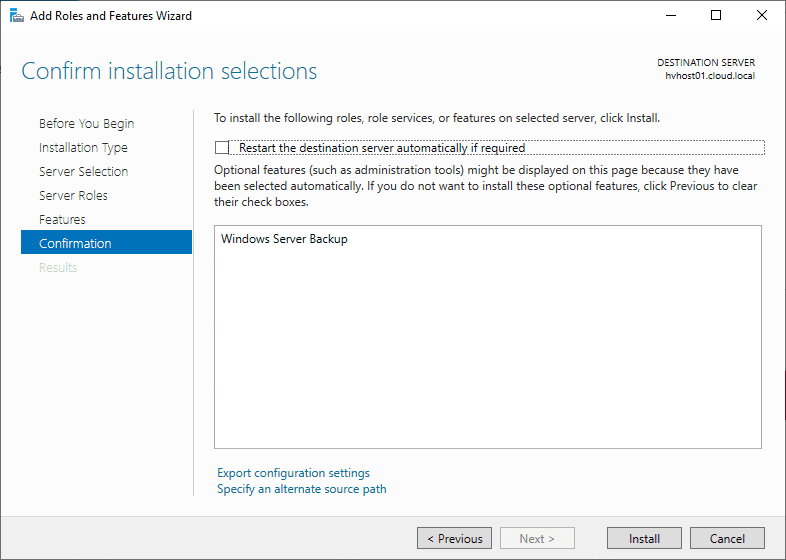
На этапе подтверждения кликаем по кнопке “Установить”.

Дожидаемся окончания процесса установки.

По окончании, нажимаем кнопку “Закрыть”.
Окно “Диспетчер серверов” остается открытым. В верхней правой части выбираем “Средства”. В открывшемся меню, выбираем “Система архивации данных Windows Server”.

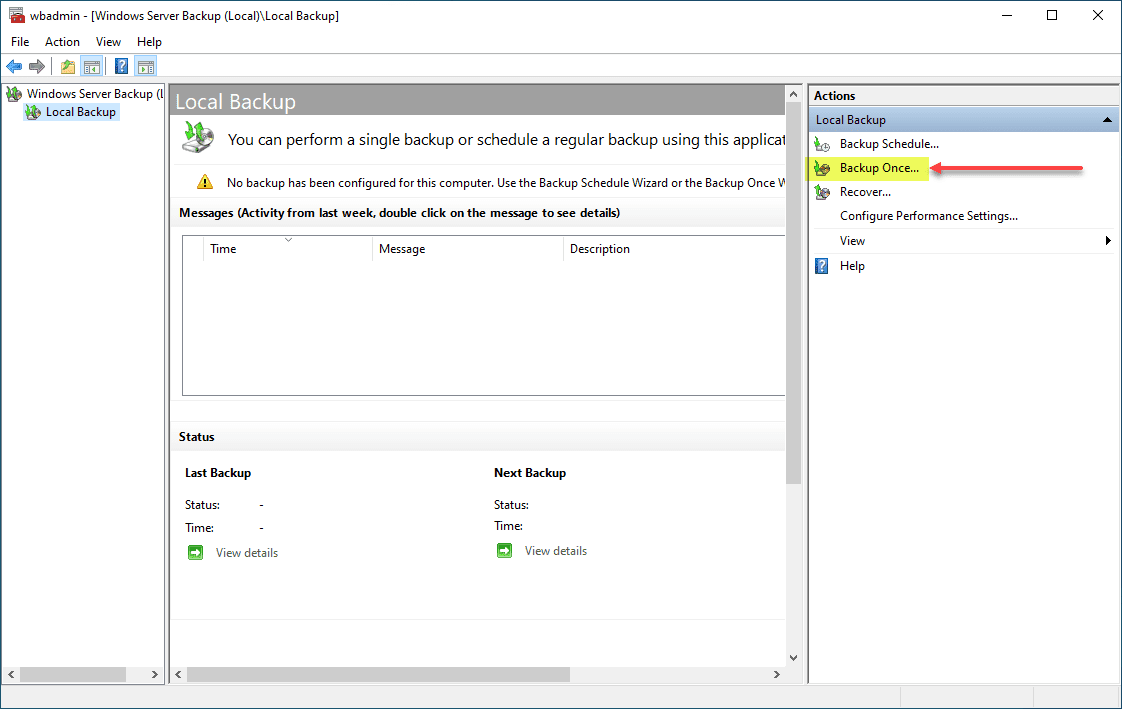
В открывшемся окне “wbadmin”, в левой части, выбираем “Локальная архивация“, в правой части станут доступны действия с локальной архивацией. Настроим резервное копирование по расписанию – выбираем “Расписание архивации…”.

В открывшемся окне мастера расписания активации, на начальном этапе, кликаем по кнопке “Далее”.

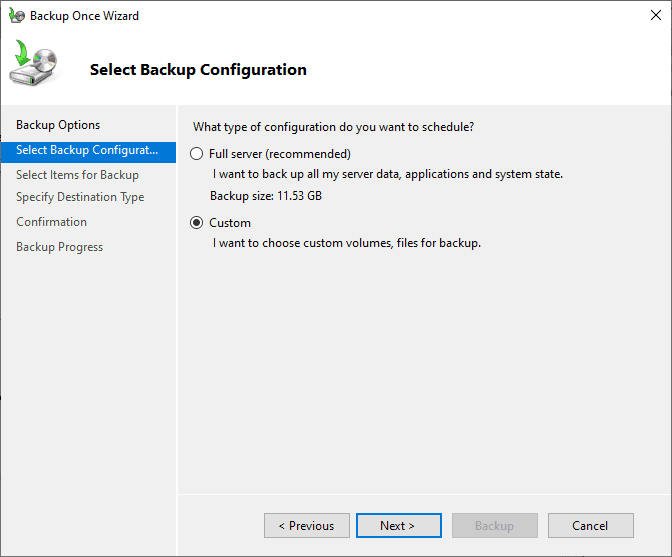
Следующим шагом следует выбрать тип конфигурации – весь сервер или что-то конкретное. Создадим копию всего сервера. Кликаем “Далее”.

Теперь необходимо определиться сколько раз в день делать резервную копию и в какое время. Слишком часто это делать не рекомендуется. Также, лучше настроить резервное копирования на конец рабочего дня или задолго до его начала. В нашем случае пусть будет 21:00. Нажимаем “Далее”.
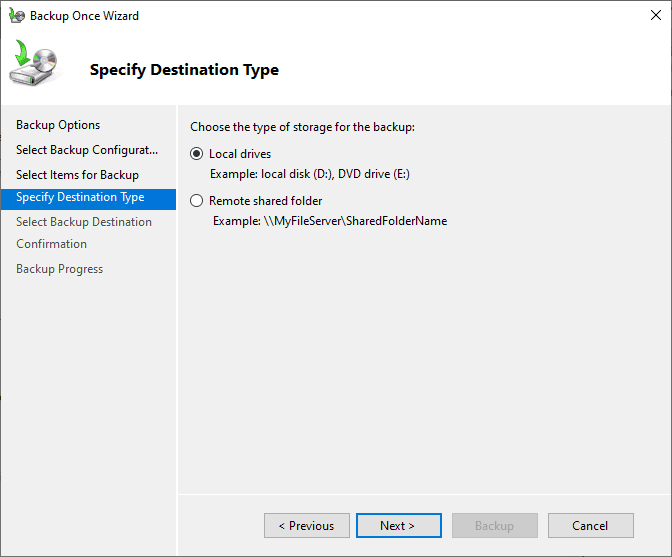
Теперь выбираем “куда” будет сохраняться резервная копия. Параметр имеет смысл оставить рекомендуемый системой. При желании, можно выбрать и сохранение в сетевую папку, но важно помнить, что процесс будет сильно зависеть от скорости локальной сети. Жмем “Далее”.

В обновленном окне мастера, следует выбрать диск назначения. Кликаем по кнопке “Показать все доступные диски…”. Предварительно вам необходимо создать дополнительный диск для бэкапов в разделе “Настройки” вашего сервера, вкладка “Диски”.
В открывшемся дочернем окне, будут показаны другие (несистемные) диски. Устанавливаем галочку напротив необходимого носителя.
Важно! Резервные копии рекомендуется выполнять на физический, а не логический диски.

Выбранный диск добавится в общий список доступных дисков. Отмечаем его галкой и нажимаем кнопку “Далее”.

Система уведомит о намерении отформатировать выбранные ранее диски. Отвечаем нажатием на кнопку “Да”.

На этапе подтверждения операций, если все действия корректны, нажимаем кнопку “Готово”.

После непродолжительного форматирования диска программа уведомит об успешном создании события в планировщике, а также укажет дату первого выполнения резервного копирования. Кликаем по кнопке “Закрыть”.

Результат выполнения резервного копирования можно посмотреть в центральной части окна wbadmin.
Рассмотрим восстановление из резервной копии.
Все в том же окне wbadmin, в правой его части, кликаем по “Восстановление…”.

В окне мастера восстановления, выбираем место хранения архива с резервной копией. Выбираем “Этот сервер” и кликаем по кнопке “Далее”.

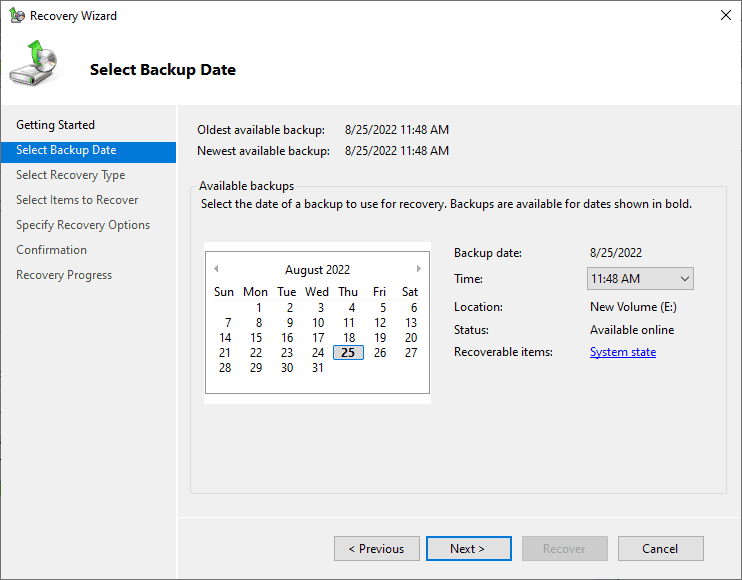
Следующим шагом выбираем дату создания резервной копии и кликаем “Далее”.

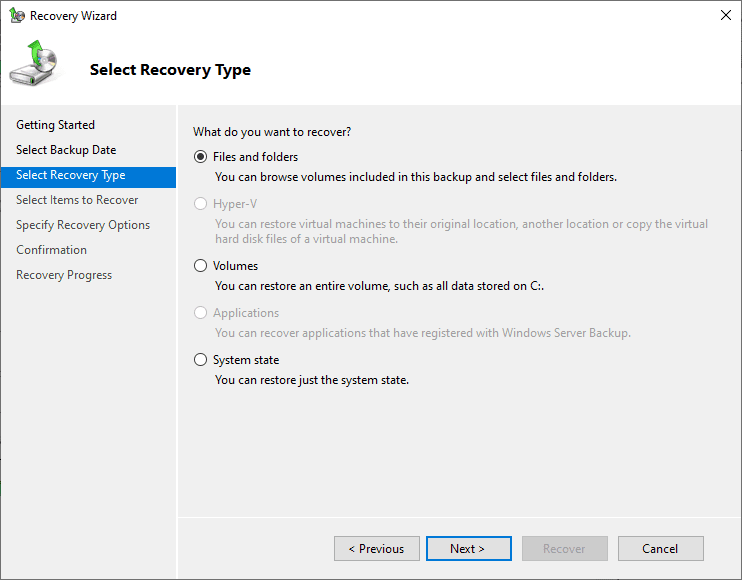
В обновленном окне, предстоит выбрать “Что нужно восстановить”, например, “Файлы и папки”. Нажимаем “Далее”.

Выбираем все файлы и каталоги, располагающиеся на диске “C:”. Нажимаем кнопку “Далее”.

На следующем этапе необходимо определиться что делать с файлами, если таковые уже существуют. Выбор данного действия остается за системным администратором. Мы будем перезаписывать эти файлы. Кликаем “Далее”.

На следующем шаге проверяем каталоги, которые будут восстановлены. В случае, если все указано верно, кликаем “Восстановить”.

Дожидаемся окончания процесса восстановления. По окончании нажимаем кнопку “Закрыть”.
Важно! Процесс может занять некоторое время.

191028
Санкт-Петербург
Литейный пр., д. 26, Лит. А
+7 (812) 403-06-99
![]()
700
300
ООО «ИТГЛОБАЛКОМ ЛАБС»
191028
Санкт-Петербург
Литейный пр., д. 26, Лит. А
+7 (812) 403-06-99
![]()
700
300
ООО «ИТГЛОБАЛКОМ ЛАБС»
Here are the best backup & recovery solutions for Windows Server
by Milan Stanojevic
Milan has been enthusiastic about technology ever since his childhood days, and this led him to take interest in all PC-related technologies. He’s a PC enthusiast and he… read more
Updated on
Reviewed by
Alex Serban

After moving away from the corporate work-style, Alex has found rewards in a lifestyle of constant analysis, team coordination and pestering his colleagues. Holding an MCSA Windows Server… read more
- Windows Server is a standard Windows OS with certain components added and some deleted, but it is fully compatible with third-party backup software.
- Professional offsite backups provide a great quantity of storage space as well as the ability to restore data to all servers when needed by the enterprise.
- By backing up a file to a backup server, you may avoid various problems with your computer data, such as hard drive failure, virus attacks, and data loss.
With Vembu Backup for Microsoft Windows, you can safely secure all Microsoft Windows Servers and workstations with full and incremental backups. Back up the entire machine or a specific disk or volume quickly!
- Supports Bare-metal Recovery (BMR)
- Instant Boot VM Recovery (P2V)
- Instant file & application-item recovery
- Automatic Backup Verification
- Centralized UI to configure, manage and restore backups
Back up all your Windows servers and endpoints now!
Windows Server backup software isn’t the same as for Windows. If you use Windows Server 2019, 2016, 2012 R2, 2012, 2008 R2, or 2008, you should find backup tools that aren’t only compatible but also powerful.
Everything a Windows user does is based on one simple concept: input of data. The single next important thing to do for you would be to ensure backing up data in case of any technology fails.
Does Windows Server have backup software?
It does, it is called Windows Server Backup and it comes preinstalled with your Windows Server OS.
We also included this solution in our selection below but, as you will see, the tool doesn’t cover all the features that are offered by more powerful third-party tools.
However, it does have the most important options necessary for Windows Server backup and recovery.
Many companies and organizations will get data loss prevention software and leave it at that. However, this does not address the issue of recovery say if server data were to disappear.
That being said, here is our selection of the best backup software for Windows Server.
What is the best backup software for Windows Server?
Quorum onQ – Best business tool for one-click backup & recovery
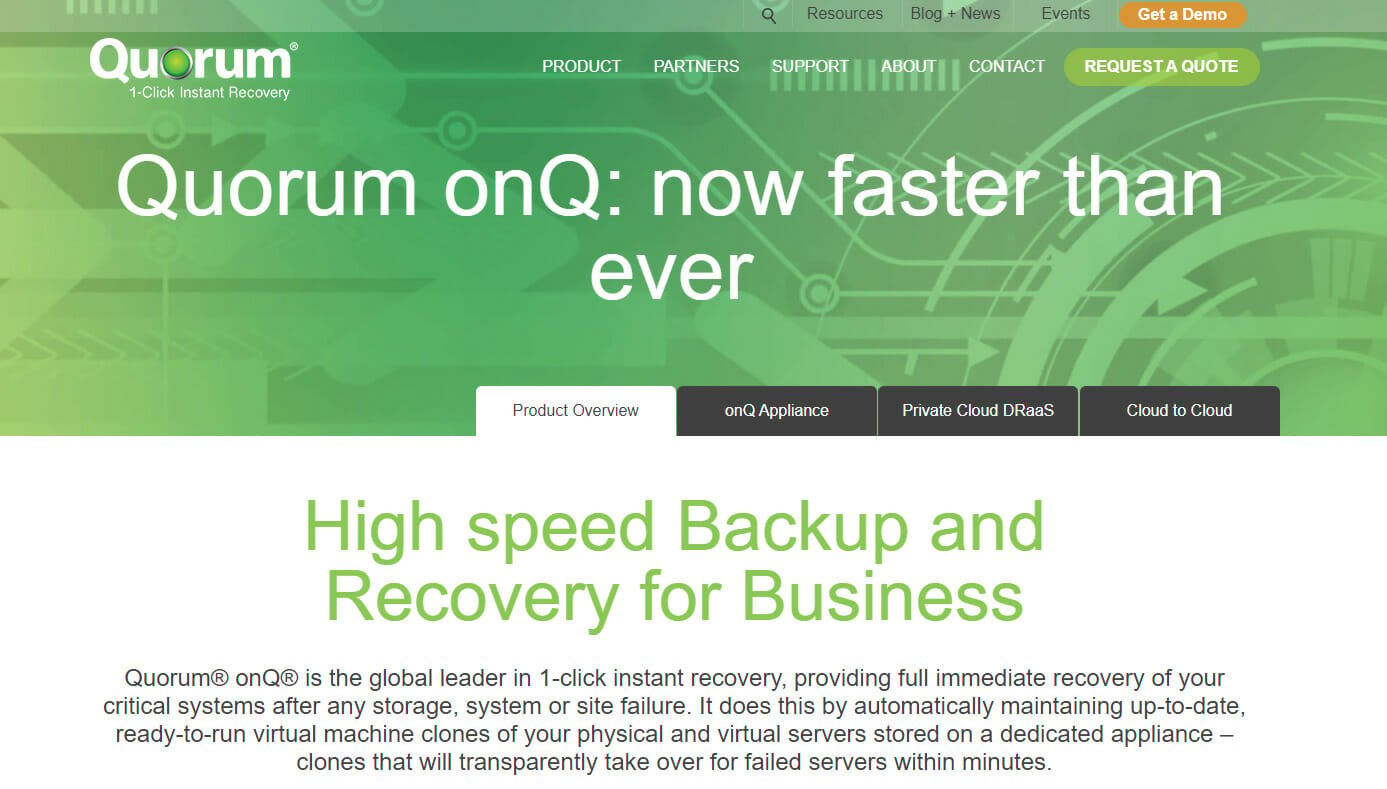
Quorum onQ is a one-click solution to protect your critical infrastructure from disasters. This means when you lose a production server, you can move to Quorum’s appliance with a single click and continue to operate.
The technology inside was designed initially for the military to keep the missile tracking system in sync so there’s no margin for error.
OnQ is perfect for businesses because it creates a full backup of the server including images, applications, and data, and then performs incremental backups as often as every 15 minutes.
Not only that, but after backing up a server, Quorum allows unlimited testing to make sure that when you need it, it will run perfectly.
The Quorum appliance fully supports the ease and flexibility of both physical and virtual servers. Quorum supports physical servers through its own proprietary software and interface.
For virtual environments, the product is fully integrated into VMware utilizing vCenter to manage and vMotion to restore.
There are four ways you can configure the Quorum product:
- Place a local appliance onsite to support the environment – High Availability only (HA)
- Combines a local appliance with replication to a second appliance at a remote site – HA & Disaster Recovery (DR)
- Combines a local appliance with replication to Quorum’s private cloud – HA & Disaster Recovery as a Service (DRaaS)
- Backup directly to Quorum’s private cloud – Direct-to-Cloud
Key features of Quorum onQ:
- One-click recovery to any point in time
- Automated recovery testing
- HA Anywhere architecture
- Ultra-fast backup and recovery thanks to appliances with 25,000 IOPS
- Disaster recovery and cloud failover
Quorum onQ
Back up and restore your business servers with a single click for complete data security.
Uranium Backup – Great server and endpoints backup
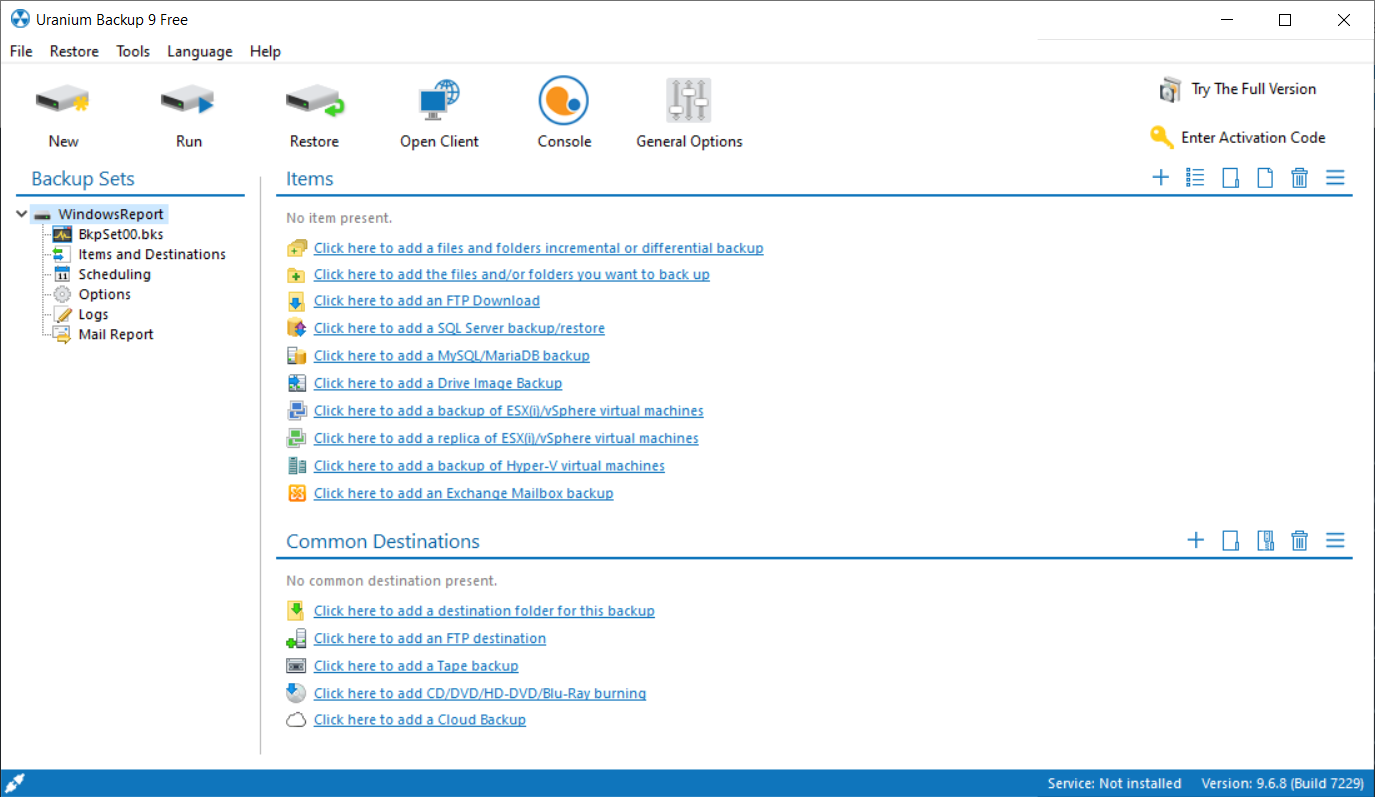
Uranium Backup is a full backup solution for both local and host servers so it’s definitely a tool that can help you greatly.
It was designed for both businesses and individuals and the friendly interface allows to configure a backup set in just a few seconds.
Don’t worry because in case of any malfunction, the reporting system will alert you immediately to save precious time.
In terms of backup options, Uranium Backup will secure all data, disk images, databases, Exchange mailboxes, and even virtual machines.
And the backup destination options are staggering. This solution can store the backups on anything, including FTP, FTPS, SFTP, cloud, and even tape.
Why do you create the backup in the first place? This tool ensures complete restoration of your server in case of damage or Ransomware attacks of any kind.
Uranium Backup is extremely versatile. It is available as a Free version for file and folder backup, but for higher needs like a backup of Drive Image, databases, and Virtual Machines, it comes with dedicated licenses.
Let’s review its best features:
- Full server backup and granular backups
- Scheduled backups
- Drive image backup, FTP / FTPS / SFTP backups, cloud backup and tape backup
- Full server or endpoint restoration in case of disaster
- Friendly interface for both business and individuals
- Free version available
Uranium Backup
Back up your servers and endpoints to secure them against any disasters or ransomware!
Zinstall FullBack – Best Restore capability and ease of use
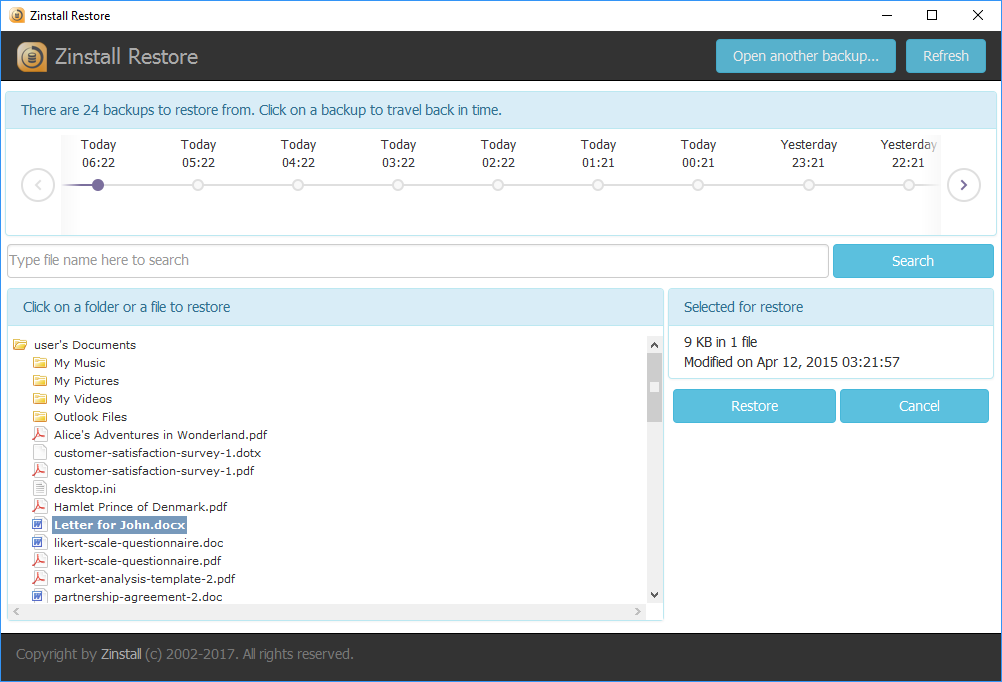
Zinstall FullBack (Server Edition) is a complete, always-on, easy-to-use backup solution for your entire server.
How we test, review and rate?
We have worked for the past 6 months on building a new review system on how we produce content. Using it, we have subsequently redone most of our articles to provide actual hands-on expertise on the guides we made.
For more details you can read how we test, review, and rate at WindowsReport.
Unlike other backups, FullBack can actually restore server applications, not just files, even to completely different server hardware with a different Windows version.
For example, you can restore a backup of a Dell Server 2012, to an HP Server 2022 (or to an Azure-hosted Server 2022) – including server applications.
Note that this is not a clone restore, i.e., it doesn’t overwrite the new OS or hardware layer.
It doesn’t just restore data; it recovers your applications, along with their configurations and accounts, your profiles, shares, and security permissions.
You get back to work as if nothing happened. This unique capability alone makes FullBack worth serious consideration. Of course, you can also just recover a file or a folder, with a click.
With all that powerful technology under the hood, FullBack is nevertheless super simple to use.
FullBack can store your backups pretty much anywhere: local drives, external drives, network shares, NAS / SAN, and 3rd party Cloud storage such as Amazon S3 or Backblaze B2 (or even OneDrive / Dropbox, although that is more applicable for smaller server deployments).
It also allows you to backup to multiple targets at the same time, so you can keep a local backup for quick access, and a Cloud backup in case your office burns down—a proper implementation of the 1-2-3 backup rule.
Oh, and it even allows you to go back in time to any point in the past: you can restore a file as it was an hour ago, yesterday, a week ago, a month ago, and so on.
It is truly a backup powerhouse that is still easy to use for anyone.
Here are some of its best features:
- Automatic backup for your entire server
- It recovers your applications, along with their configurations
- Stores your backups anywhere, including on cloud storage
- Backup to multiple targets at the same time
- Full restoration of any file

Zinstall FullBack
Powerful, automatic, super easy to use, and restores everything to anywhere.
Vembu Backup for Microsoft Windows – Versatile backup & recovery
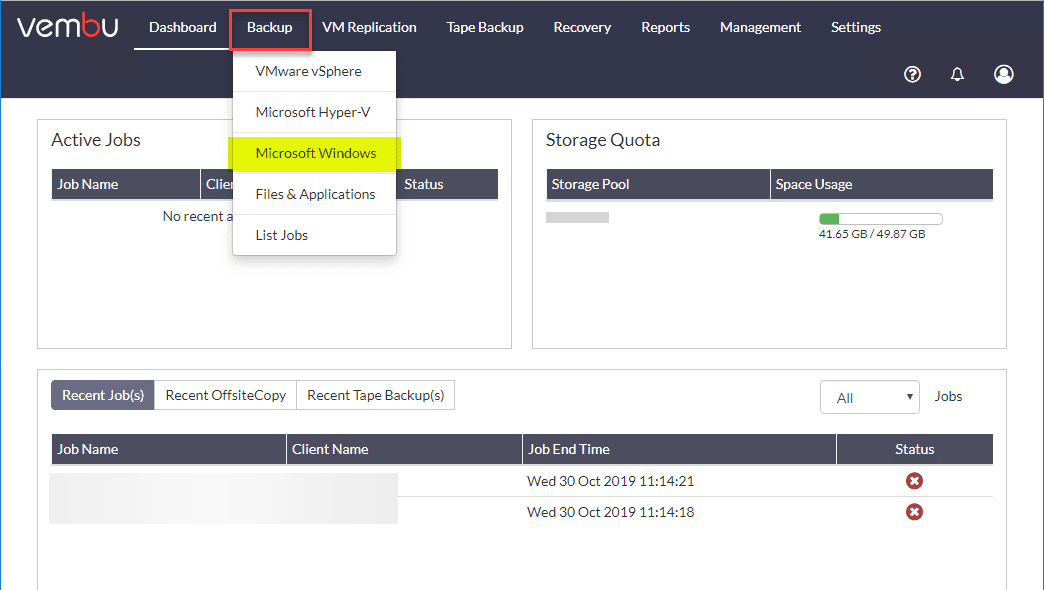
Vembu is undoubtedly one of the best solutions for backup and recovery when it comes to Windows Servers and terminals.
It provides image-based backups of Windows Servers/Workstations running on physical and virtual platforms.
Of course, you may opt to back up the entire systems or only select disks or volumes.
This solution supports MBR and GPT partitioned disks, even if they exceed 2 TB of data and it also covers Basic and Dynamic disks from a Windows machine as well.
But after you create a backup, Vembu uses its proprietary Changed Block Tracking driver to only make incremental backups.
In other words, it will compare the data and backup only the new and changed files from your system.
Not only that, but Vembu performs an automatic backup verification to check the data recoverability of the backups.
And all the actions are made from a centralized web-based user interface that can be accessed from any location.
Let’s go through some of Vembu’s best features:
- Support for MBR and GPT partitioned disks larger than 2TB
- Bare-Metal Recovery (BMR) for entire machine restoration
- Application-aware backup
- Automated Backup Verification
- Built-in AES 256-bit industry-grade encryption
Vembu Backup for Microsoft Windows
Back-up your Windows Server and endpoints with this smart solution that also offers disaster recovery.
Acronis Cyber Backup – Ideal for full server backup
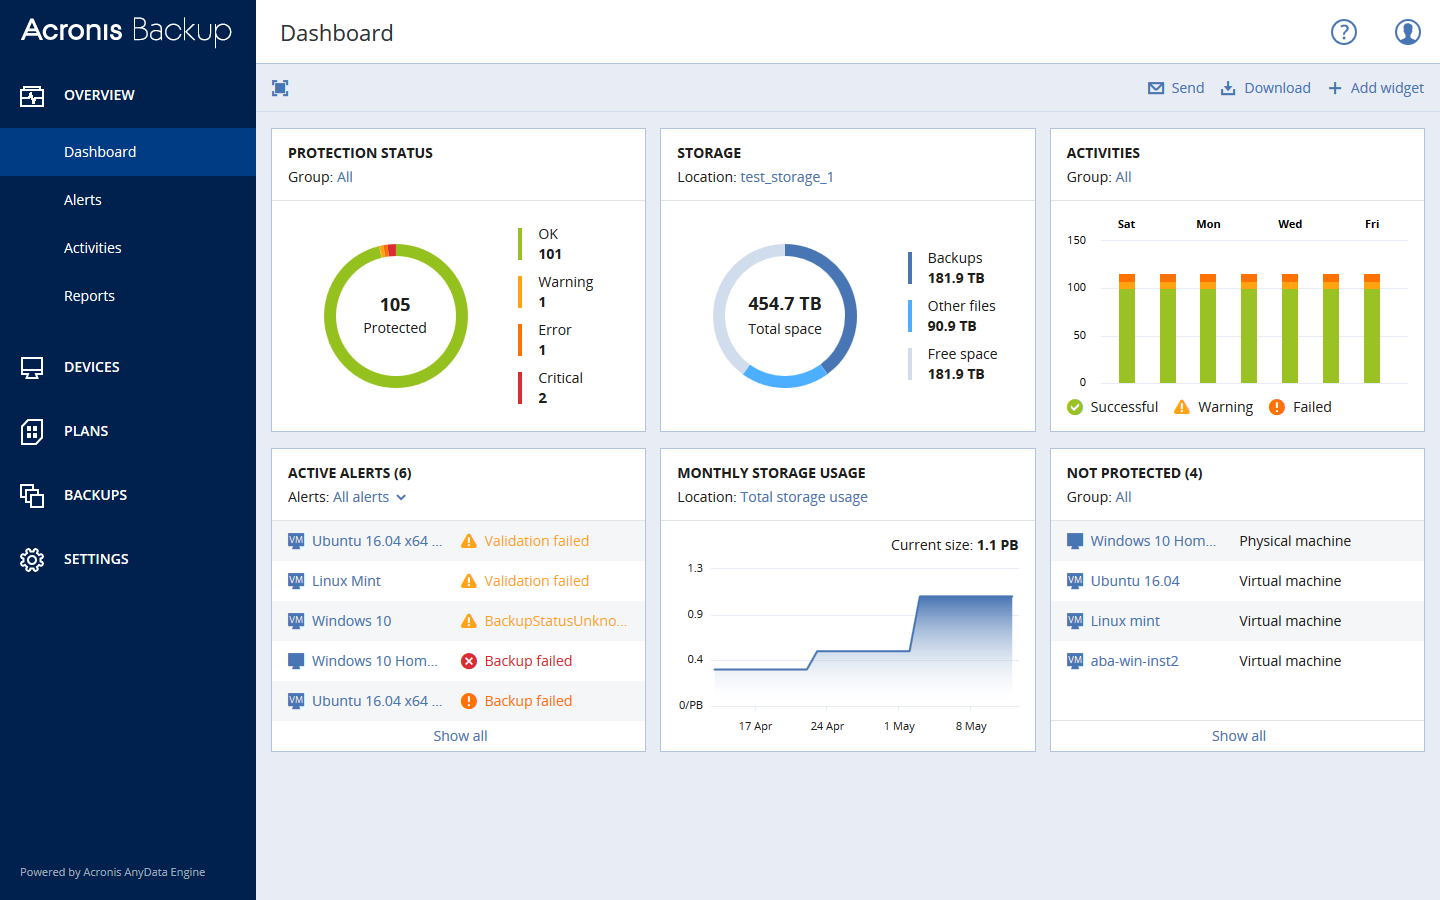
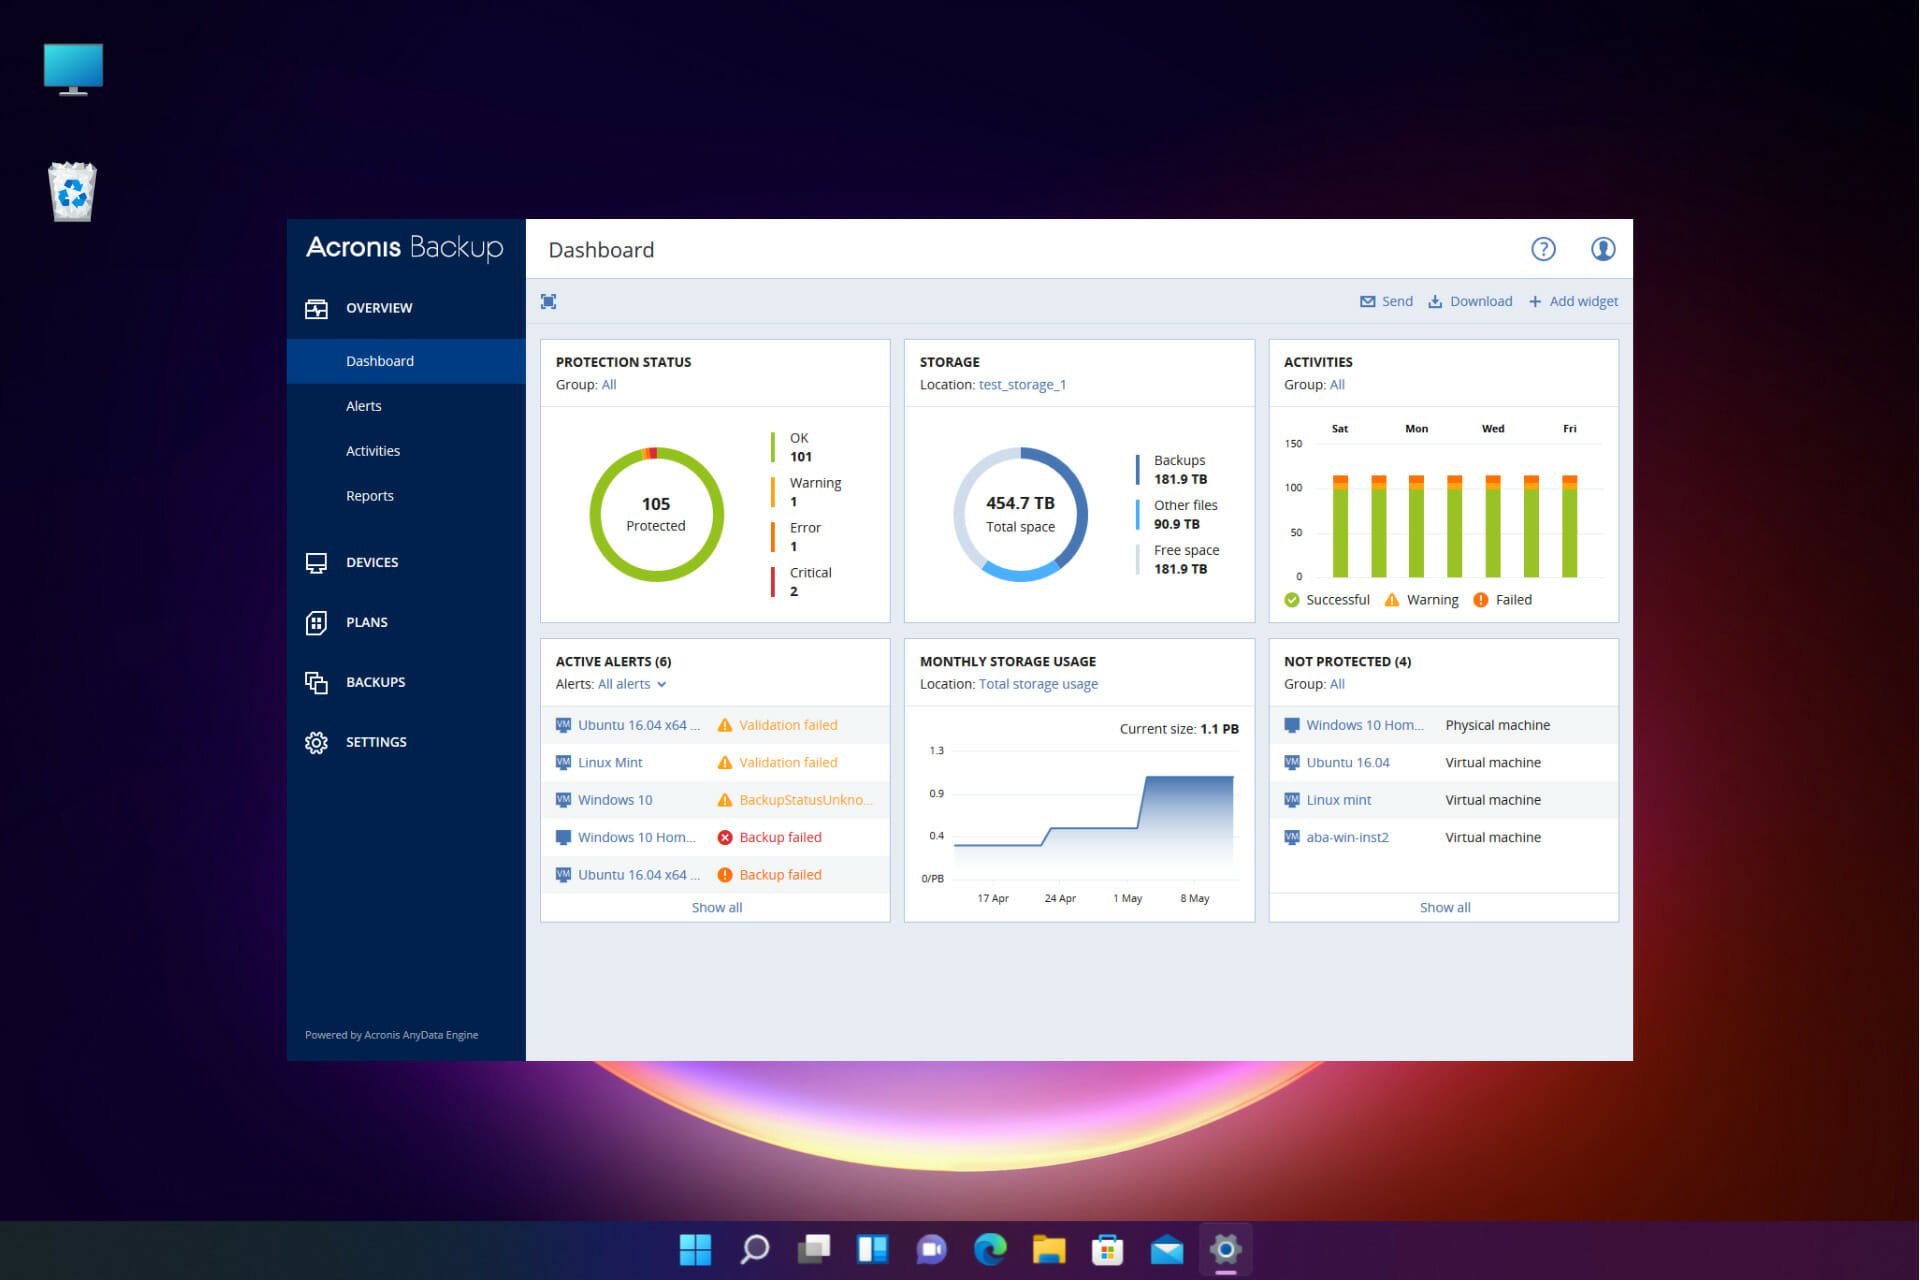
Acronis Cyber Backup is one of the best Windows Server backup software for your business. It’s like an edition of Acronis True Image but made for Windows Server.
Cyber Backup runs full backups on your Windows Server environment and recovers the complete entire system or just specific files and programs.
Customizable widgets, reports, notifications, and important event alerts are among the advanced reporting and status-monitoring features of Acronis Cyber Backup.
You can allow Acronis’ AI-based ransomware solution to protect your data from unauthorized change, decryption, and ransomware outbreaks such as Petya, WannaCry, and Osiris.
Furthermore, by adding an extra layer of protection, you can safeguard your data from unauthorized access.
Through a mathematical algorithm, Acronis Notary’s blockchain-based innovation provides a safe connection.
Acronis Cyber Backup is a subscription-based backup solution and includes a 30-days free trial.
Here are the Acronis Cyber Backup key features:
- Works with any Windows Server whether it’s virtual, physical, or on the cloud
- Save your backups anywhere, including NAS, SAN, tapes, disks, Acronis Cloud, Azure, AWS, Google
- Recover the data you need: full system, drives, Microsoft application data, urgent files, and folders.
- Scalable backup solution
- Capture the current server state using Volume Shadow Copy (VSS).
Acronis Cyber Backup
Do you need more security for your business data? Try Acronis Cyber Backup and be confident about the Windows Server environment!
ManageEngine OS Deployer – Best for acquiring & deploying OS image
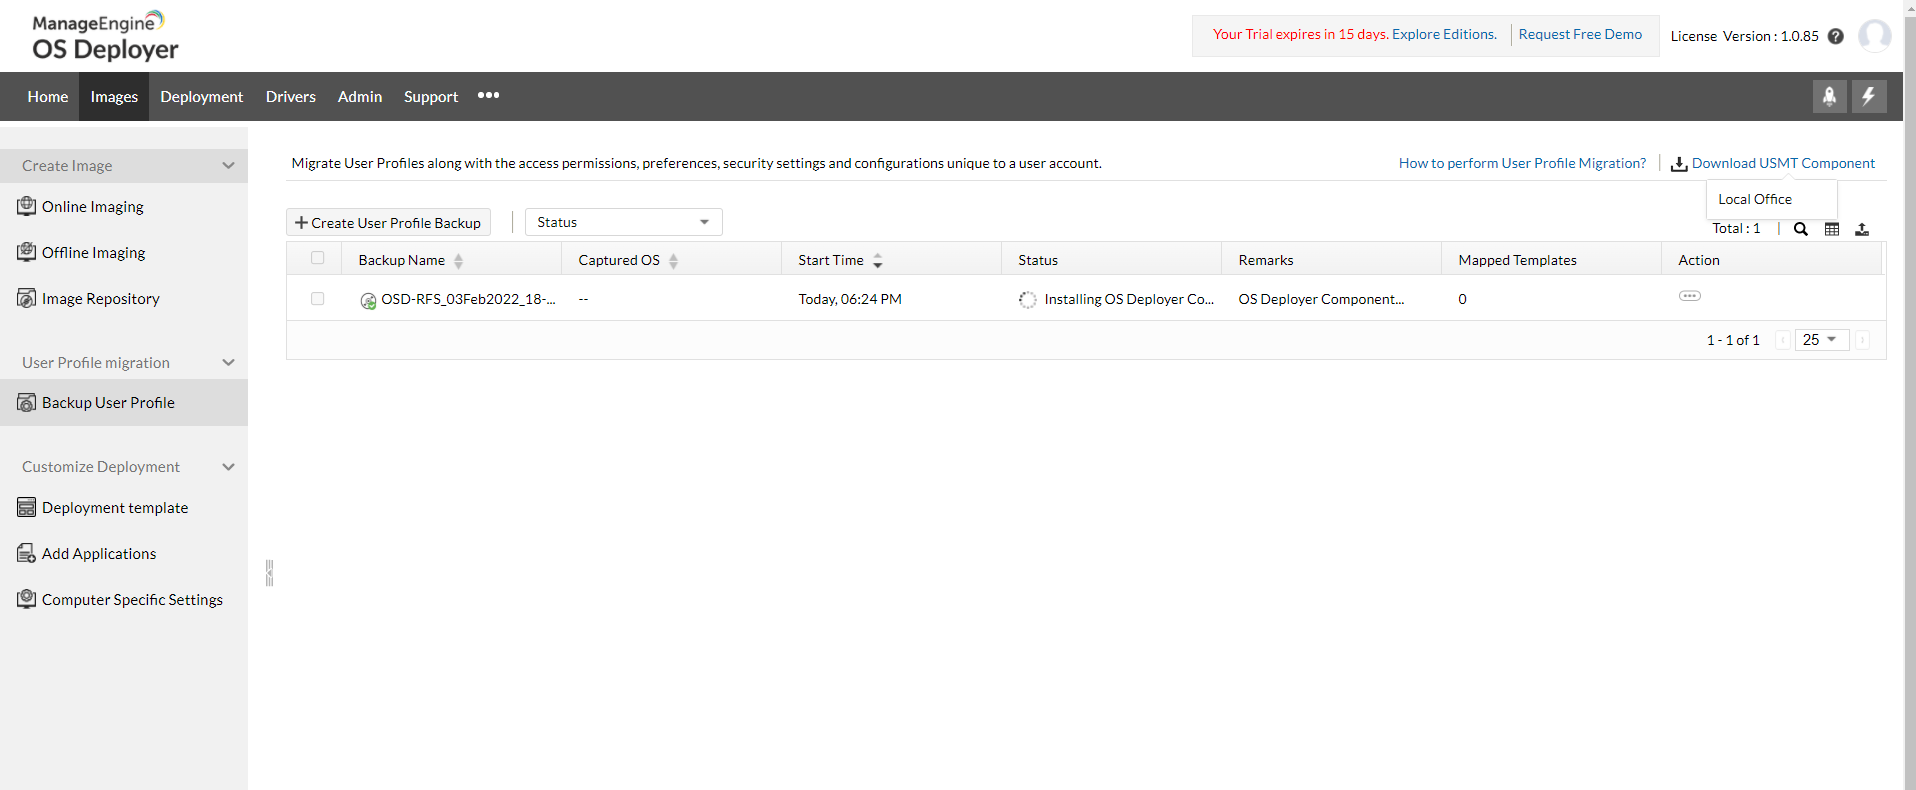
ManageEngine OS Deployer is OS deployment and migration software, but it also offers online and offline imaging.
The software lets you create an image of the OS and disk partitions in your computer and can be deployed on single or multiple computers simultaneously, even on a machine with a corrupted OS.
The Online imaging method allows admins to capture the system’s disk image when it is live and functioning in a network.
On the other hand, with Offline imaging, the disk image is acquired when the network is shut down.
The tool can create an image of single or multiple partitions or entire disks and also can shrink the volume to prevent disk size incompatibility errors.
ManageEngine OS Deployer can also migrate user profiles and data from one computer to another, ensuring that users can seamlessly continue their work on a new device.
It provides a pre-boot environment that allows administrators to perform diagnostics and repairs on computers without accessing the operating system.
Let’s go through some of ManageEngine OS Deployer’s best features:
- Can deploy standardized configurations across multiple computers
- Simplifies the process of migrating from an older OS to a new one
- Automates the process of deploying operating systems across machines
- Allows IT administrators to manage computers in remote locations
- Installs the necessary drivers during OS deployment

ManageEngine OS Deployer
Creates an OS image using advanced imaging techniques and customizes it for deployment.
Paragon Backup & Recovery Business – Great for small businesses
Paragon Backup & Recovery Business is ideal Windows Server backup software for small and mid-sized companies. It’s the server edition of Paragon Backup & Recovery.
This tool meets all of your demands, whether it’s simply storing data, automating backup procedures, or developing sophisticated backup routines.
The strong software wizard helps users through the backup wilderness step by step, and the newly designed UI clears the course.
Backup strategies are meant to make it simple to set up and perform automatic backup operations. You may pick from dependable pre-defined methods or create your own.
Because of its CRC technology, Paragon backup archive PVHD (Paragon virtual hard drive) may be mounted and read within your Windows system and is ideal for hosting network sharing.
Here are the key features of the Paragon Backup & Recovery Business:
- Comprehensive backup solution for physical and logical media
- Flexible restore options
- Create a bootable environment and fix boot errors
- Secure your Windows Server environment and automate administrative tasks
- Integrated end-to-end security, low impact on the system and network

Paragon Backup & Recovery Business
With this flexible and intuitive tool, you can backup your system data worry-free.
AOMEI Windows Server Backup – Great for system optimization

AOMEI Windows Server Backup is an excellent Windows Server backup software. It’s the server equivalent of AOMEI Backupper for Windows.
The partition manager is a high-performance artificial intelligence that helps you to improve Windows PC and Windows Server operating systems.
It is used in small and medium-sized organizations to address hard disk and partition management issues on server PCs.
Here are the key features of the AOMEI Windows Server Backup:
- Back up entire systems, disks, and partitions, files, incremental and differential backups
- Versatile backup locations including local disk, external drive, CDs and DVDs, NAS, and cloud drive
- Create backups without interrupting current applications or turning off Windows Server
- Recover the entire system or specific files, and duplicate backups
- Create a bootable recovery environment, compress, split or encrypt backups
AOMEI Windows Server Backup
Have complete backup support with AOMEI Windows Server Backup and protect your server data with ease!
NovaBACKUP for Servers – Packed with practical features
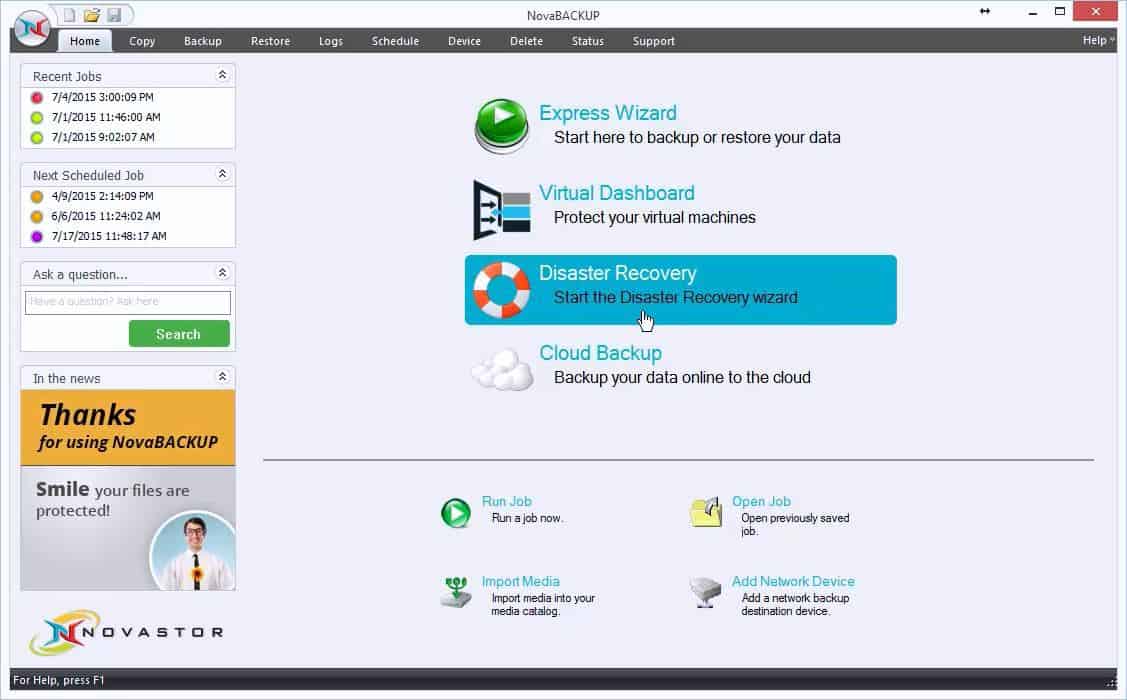
NovaBACKUP for Servers is an exemplary Windows Server backup software for offices and small businesses. It comes equipped with a lot of practical features for creating and managing backups.
The utility called File Copy Jobs, when run manually or on a schedule, can keep a current version of your files in a location you specify through a one-way copy.
File and image backups are compressed by default, saving anywhere from 10% to 25% more than a simple file copy.
Storage is compatible with any disks formatted in New Technology File System that are connected to the system, including hardware RAID configurations.
Backups may be saved to any NTFS formatted disk (including RDX), Network Shares (NAS), or Single Tape Drives.
The NovaBACKUP user interface is designed to be compatible with screen readers and other sensor technologies, making it accessible to those who have difficulty reading or hearing.
Here are the key features of NovaBACKUP for Servers:
- Cloud storage backup
- Schedule server backups to run automatically in full or incremental mode
- Recover the entire server system from the backup to any Hyper-V environment
- Follow the 3-2-1 backup rule to save your server in case of disaster
NovaBACKUP for Servers
Back up all of your important photos, documents, movies, and apps to the cloud, and safeguard your data.
Windows Server Backup – Best built-in server backup solution
Windows Server Backup is the default Windows Server backup software solution that we simply can’t overlook. Introduced in 1997, the backup solution has been integrated with all Windows Server editions.
Unfortunately, the latest version of Windows Server Backup doesn’t support tape drives. As such, you must use third-party apps to save to tape on a recent OS.
When all’s said and done, customers need not look further than their OS to handle their backup concerns.
Windows Backup is designed to provide a one-stop solution for server protection. You may set up a scheduled job to backup files and the system state, as well as to perform an empty restoration.
Microsoft anticipates that you will have one scheduled job, for this reason, so you may do a one-time save with Windows Backup.
You could want to copy files to a network share, for example. Keep in mind that any previous backups to the same folder will be overwritten, so try as much as possible to save the previous backup in a different location.
Here are some of its best features:
- Comes ready with your server environment
- Works with all Windows Server editions
- Automatically backs up and recovers your server system
- Copies currently used files and applications without any issues
- Performs differential, incremental, normal, and daily backups.
⇒ Get Windows Server Backup
- Best home server software for Windows and Linux
- Best antivirus software for Windows Server [2012 & 2016]
- How to dual boot Windows 10 and Windows Server
Despite Microsoft’s best efforts to ensure server data protection, some environments are simply too different and complicated for its inbuilt software.
In that case, you can resort to trustworthy Windows Server backup software solutions, like the ones on this list.
Client files and other valuable documents stored on servers are just too valuable to leave unguarded.
Try the above tools and ensure your business security with a fast and uncomplicated backup and recovery experience.
And while we are addressing the security issues, take a look at our list including the best antivirus software for Windows Server 2019.
If you know about any other software that should be included in our selection, let us know about them in the comments section below.
![]()
Windows Server backup is critical to an organization’s disaster recovery plan. Many third-party solutions can provide Windows Server backup software for server backup and backing up Windows Server virtual machines. However, why install Windows Server backup software when you have Windows Server backup features built into the operating system? Let’s look at Windows Server 2022 backup and restore using the built-in Windows Server Backup feature found in Windows.
What is Windows Server Backup software?
The Windows Server Backup software is a Windows Server feature that can be enabled in Windows Server 2022. In looking at the best server backup software, businesses may have the use case to find a solution that is cheap, reliable, and does the job to protect business-critical data from data loss.
With Windows Server Backup, you can create server backup files of your Windows Server. You can also create file and image backups to perform bare metal recovery and other recovery tasks. You can also schedule backups to perform regular backups of your Windows Server operating system.
Windows Server Backup features
Windows Server Backup provides the tools needed for full backup files, creating an entire system backup job, incremental backups, system restore, system state recovery, local backup, backing up individual folders, individual files, full system recovery, and many other backup options.

You can easily use Windows Server Backup to perform daily backups of your Windows Servers either from the Windows Server Backup software GUI or the command line, making it easy to script and perform operations at scale. It is also an intuitive tool that most admins will find easy to use.
It is also
Physical servers or virtual machines
You can use Windows Server Backup to either perform physical server backup or virtual machine backups. On Hyper-V hosts, you can backup VMs using Windows Server Backup with a few limitations. This is not as granular an image backup as you find in third-party software solutions.
However, Windows Server Backup, while it may not be found on the best backup software lists published with all the features of third-party tools, it definitely covers the basics for the Windows Server operating system. It is also used underneath the hood with Windows Server Essentials to perform the server backup tasks.
Windows Server Backup targets
With Windows Server Backup you can target local storage such as a hard disk or remote shared folder storage space to store backups of your Windows Server OS, including Windows Server 2022. While there may be some “hacky” ways to do this, a USB drive is not supported as a backup target for Windows Server Backup. You can also use external drive locations that are mounted as local storage.
Some organizations even create dedicated Windows Server Backup box configurations that house the backups for their Windows Server backups in the environment. Each organization will need to look at how they want to manage backups of their Windows Servers and see what options work best for protecting critical Windows system files, etc.
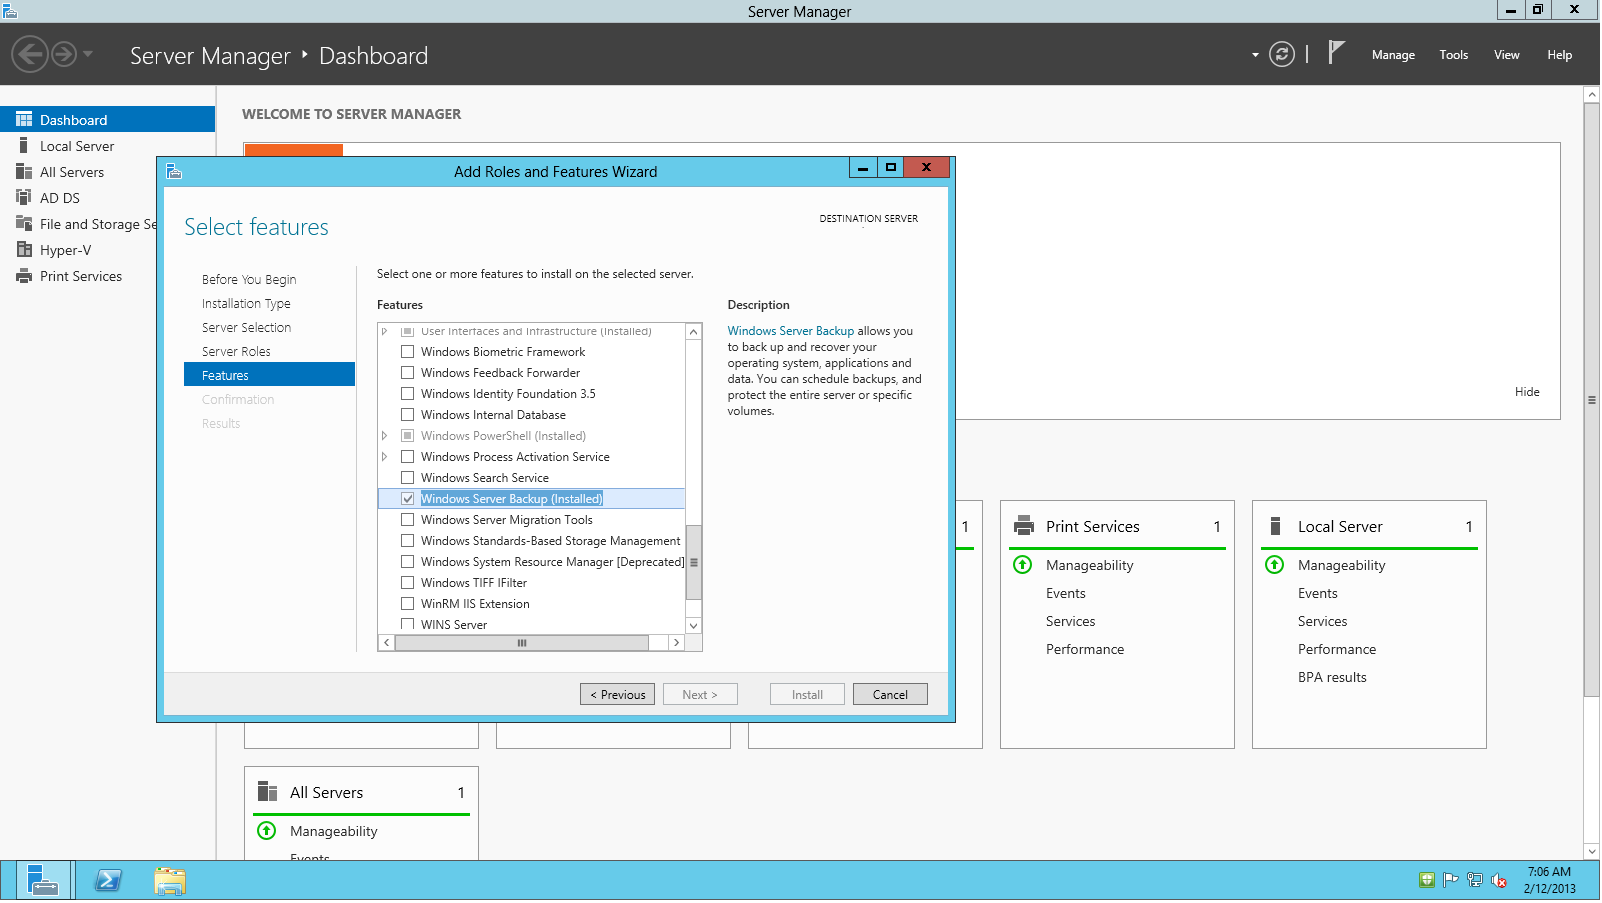
Installing Windows Server Backup software
The steps to install Windows Server Backup in Windows Server 2022 to restore server data is straightforward. The great news is the handy utility is still available in Windows Server 2022. Using Server Manager, you can easily install Windows Server Backup as part of the Add Roles and Features Wizard in Server Manager.
On the Features screen, you will see the Windows Server Backup feature listed.
Add the Windows Server Backup Feature
Launch the Server Manager console and the Add Roles and Features Wizard. On the Features screen, place a checkbox next to Windows Server Backup.
Confirm the installation of Windows SErver BAckup in Windows SErver 2022
Simply Click Next and confirm the installation of Windows Server Backup by clicking Install.
Complete the installation of Windows Server Backup in the Server Manager Add Roles and Features wizard.

Let’s first go through the Windows Server 2022 Backup using Windows Server Backup. In the Windows Server Backup GUI, we click the Backup Oncebutton.
On the Backup Options screen, we configure the options for the backup. Here the different options is selected by default.
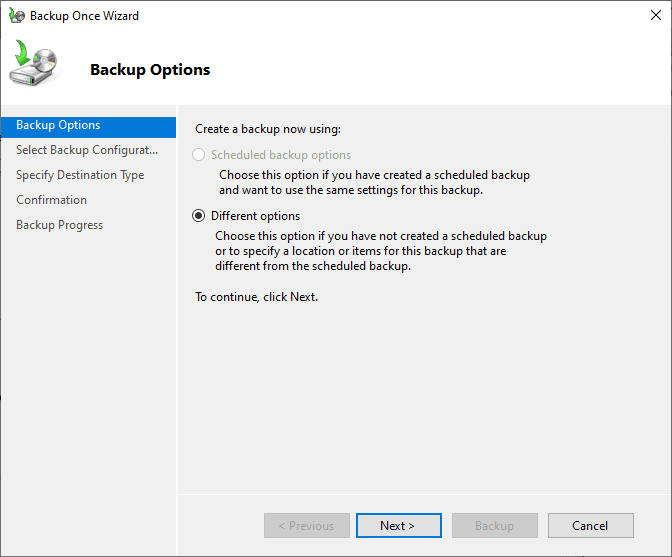
Select full server backup or custom backup options.
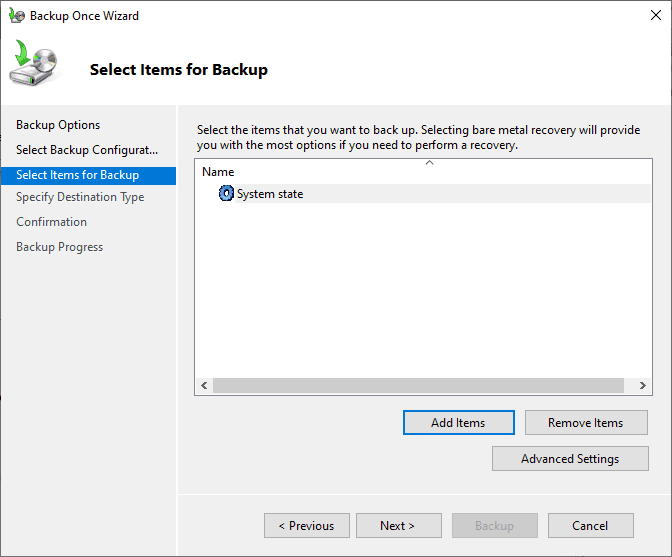
Click the add items option to add items you want to back up with Windows Server Backup.

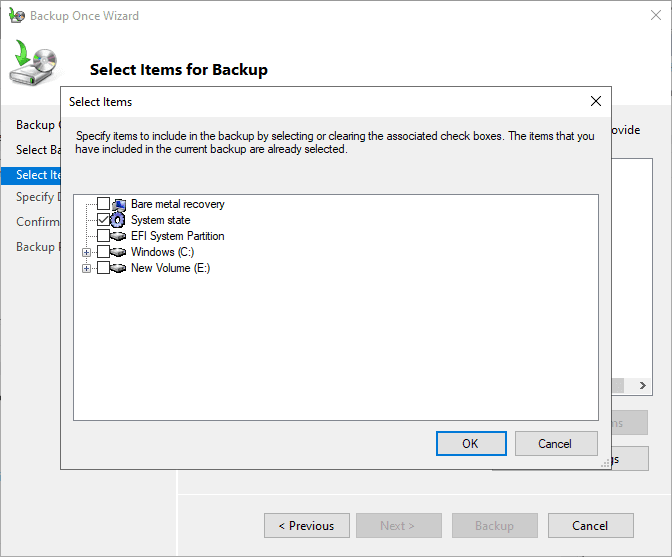
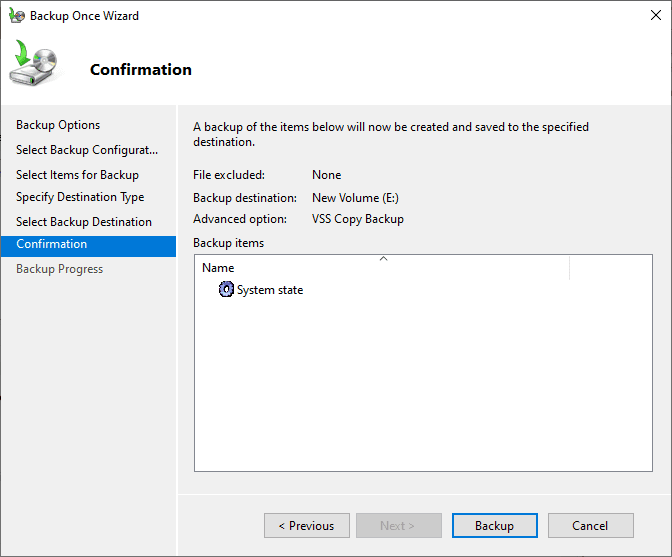
Here we are selecting system state backup job for the items we want to back up. In case you may be wondering what a system state backup contains. It contains the following:
System state Backup contents
Boot files such as ntldr, ntdetect, all files protected by SFP, and performance counter configuration
The Active Directory Domain Controller
SysVol (domain controller only)
Certificate Server (CA only)
Cluster database (cluster node only)
Registry
COM+ class registration database
Select the destination type of the Windows Server Backup. These include Local drive backup and Remote shared folder backup.
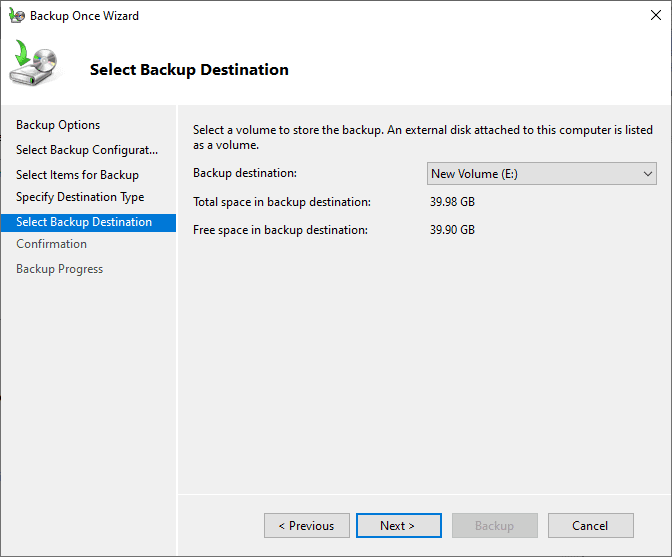
Next, we select the local volume we want to use to store the local backup.
Finally, we are ready to confirm the Windows Server Backup configuration and backup software options and begin the backup. Click Backup to start the backup process.
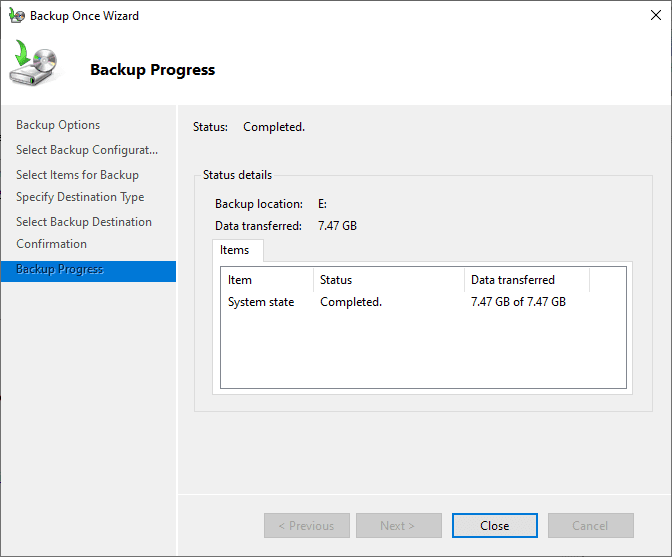
After a while, depending on how much data you have contained in the backup, the backup should complete successfully not long after you initiate the start backup process.
Windows Server 2022 Restore Data using Windows Server Backup
Now let’s look at the recovery options when using Windows Server Backup to recover data when data loss has occurred.
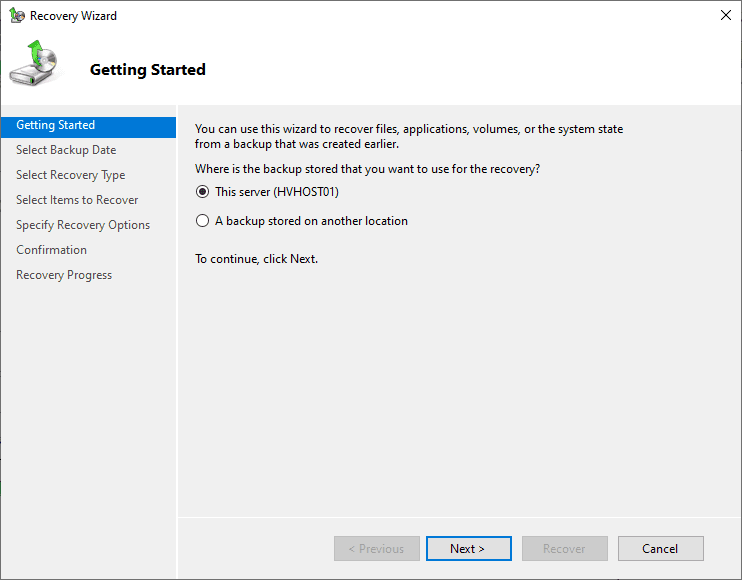
Launch Windows Server Backup and click the Recover button to start looking at your recovery options along with recovery destination. First, it asks where the backup is stored.
Select the backup date
Select the backup date you want to use for the recovery options.
Select the Recovery Type
Next, select the recovery type. You can choose files and folders (recover specific files), volumes, and system state.
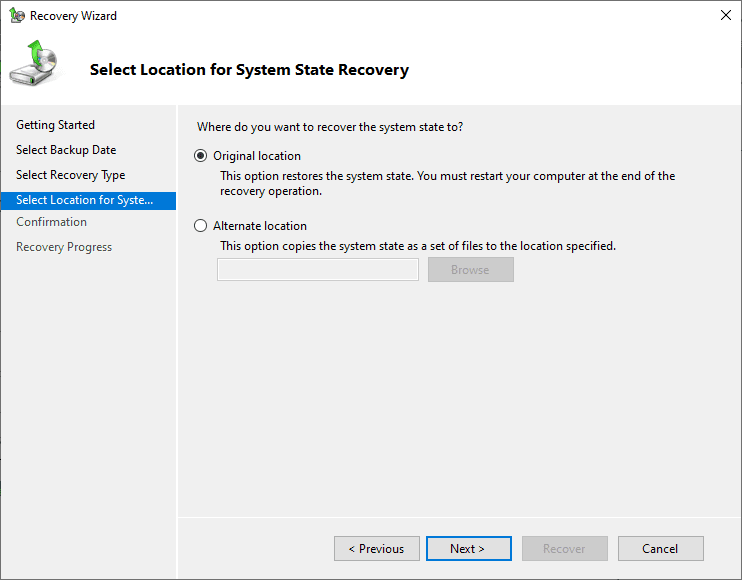
Select the location for the recovery destination
Next, select the original or alternate location for the restore.
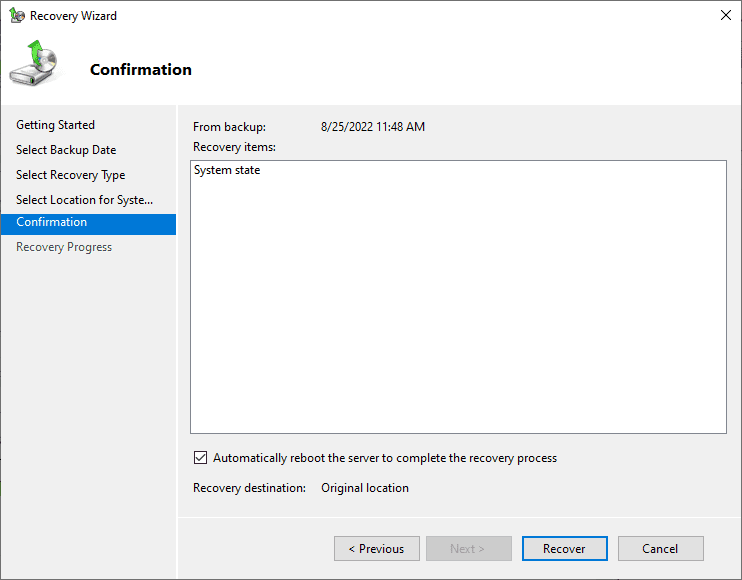
Confirm the recovery operation
Confirm the recovery operation and click Recover.
Wrapping Up
The process involved with Windows Server 2022 Backup and Restore are not too complicated using the Windows Server Backup tool. You can easily back up and recover Windows Server 2022 with the built-in tool and minimize storage costs and other requirements. You can backup and recover just specific files to a network share or local backup in just a few clicks.
Learn more about Windows Server Backup in general here: Windows Server Backup Feature Overview | Microsoft Docs
Что такое Windows Server Backup?
Windows Server Backup – это один из компонентов семейства операционных систем Windows Server, который предназначен для резервного копирования (back up) в версиях, начиная с Windows Server 2008 R2 и поздних версий, а также для выполнения других функций в составе ОС. Он предназначен для резервирования данных Windows Server и в нём можно выбрать режим копирования, график копирования и другие параметры.
Как его задействовать?
Покажем на примере английской версии, как более универсальной. Нажав кнопку Start (Пуск) в левом нижнем углу интерфейса Windows Server, нужно выбрать в меню пункт Server Manager.

В окне Server Manager, нужно выбрать пункт «Add Roles and Features» (Добавить роли и функции).

При этом запускается средство конфигурации «Add Roles and Components» (Добавить роли и компоненты). В нём нужно выбрать пункт “Installation Type” (Тип установки) и в меню справа — “Install Roles or Components” (Установить роли и компоненты), выбрать пункт Windows Server Backup, затем нажать кнопку “Next”.

Это окно можно пропустить, поставив галочку в пункте Skip this page by default (Пропускать эту страницу по умолчанию) и нажать Next. В новом окне выбрать нужный сервер (server selection) из выпадающего списка, после этого нажать кнопку “Install” (Установить).
В изменившемся окне средства конфигурации слева нужно выбрать пункт “Components” (компоненты), а в центральной части окна в главном меню выбрать “Windows Server Data Archiving System” (Система архивирования данных Windows Server).

И наконец, нужно нажать кнопку “Install” (Установить). После окончания процесса установки, нажать кнопку «Close» (Закрыть).
Окно Server Manager при этом остаётся открытым. В правой верхней части нужно выбрать пункт «Tools» (Инструменты). В них нужно выбрать “Windows Server Data Backup System” (Система архивирования данных Windows Server).
В окне «wbadmin», слева нужно выбрать пункт «Local backup» (локальное резервное копирование), а справа выберите доступное действие для резервного копирования). Теперь необходимо установить график резервирования “Backup schedule …”.

В открывшемся окне активации графика резервирования нажать кнопку “Next”.
На следующем шаге выберите тип конфигурации резервирования – весь сервер или избранные компоненты. В первом случае нужно выбрать “Full Server” (весь сервер). Будет указан требуемый объём хранения для выполнения такой операции.

Теперь нужно решить, сколько раз в день проводить операцию резервирования и в какое время. Не рекомендуется делать это слишком часто. Например, лучше выбрать одно копирование в сутки (Once a day) после окончания рабочего дня, например, в 9 вечера (9:00 РМ). После выбора времени нажимаем “Next”

Можно установить частотe копирования чаще раза в день (More than once a day). В этом случае нужно выбрать другие времена копирования из списка (с интервалом в 30 мин) и добавить их (Add) в запланированное время (Scheduled time).
- Иногда может понадобиться установить период копирования реже одно раза в день, например, раз в неделю. Такое редко, но случается. Как видно из предыдущего скриншота, стандартными средствами Windows Server Backup этого сделать не удаётся. В этом случае можно обратиться к статье, где описана методика установки более редкого копирования для Windows Server 2016 и попробовать это сделать самостоятельно, без гарантии результата.
Теперь необходимо выбрать место сохранения резервной копии.
Имеет смысл оставить место копирования, рекомендуемое системой: «Back up to a hard disk that is dedicated for backups (recommended)». Можно также выбрать том (volume), если невозможно выделить для резервного копирования весь диск (Back up to a volume). Нужно помнить, что когда на выбранном томе идёт процесс резервного копирования, быстродействие этого тома для других задач может снизиться до 200%. Поэтому на этом томе хранить другие данные или запускать другие приложения не рекомендуется.
Если очень нужно, можно выбрать и назначить для этого какую-то сетевую папку (Back up to a shared network folder), но нужно помнить, что длительность процесса резервного копирования сильно зависит от доступной полосы пропускания в локальной сети.

После выбора места резервирования, выберите диск, куда будет осуществляться копирование. Нажмите кнопку “Show all available disks …” (Показать все доступные диски…). Нажмите на кнопку First (первый), при этом нужно создать дополнительный диск в разделе «Settings» (Установки), вкладка «Disks».
Открывается дополнительное окно, где будут показаны другие (не-системные диски). Пометьте галочкой требуемый вариант. Нажмите кнопку “OK”. Выбранный диск будет добавлен в основной список дисков. Заметим, что резервирование нужно выполнять на физический, а не на логический диск. Нажмите кнопку «Next».
Система затем спросит, нужно ли форматировать выбранный диск. Если нужно, то нажмите “Yes” (Да). После подтверждения нажмите кнопку “Finish” (Закончить).
После форматирования, программа сообщит об успешном создания события в планировщике (scheduler), а также покажет дату и время первого резервного копирования. Нажмите кнопку “Close” (Закрыть).
Результат проведённых установок будет виден в центральной части окна wbadmin.

Некоторые ограничения функции резервного копирования сервера Windows
- Предел по объёму копирования Windows Server Backup (WSB) в 2 ТБ в версии Windows Server 2008 (R2), где файлы резервируются на «виртуальный жёсткий диск» VHD (virtual hard disk). Файл VHD имел для Windows Server 2008 (R2) ограничение по объёму в 2 ТБ, поэтому тома больше 2 ТБ попросту не резервировались. Однако, в Windows Server 2012 и более поздних версиях были введены расширенные файлы VHDX, что позволило преодолеть это ограничение, и теперь можно резервировать тома файлов Windows Server размером более 2 ТБ.
- Ограничение по числу резервных копий. В WSB имеется функция автоматического управления дисковым пространством резервного копирования. Она автоматически удаляет старые копии, если обнаруживает, что для текущего сеанса копирования недостаточно места. В результате, число копий, которые могут сохраняться в WSB, ограничено. Тем не менее, при этом объём хранения, выделенный для снэпшотов, не будет сокращён менее, чем в 1/8 объёма всего тома, поэтому иногда Windows Server Backup не удаляет старые копии.
Некоторые популярные программные решения для Windows Server Backup
1. Acronis Cyber Cloud

Acronis Cyber Cloud
Acronis Cyber Backup является одним из лучших в 2021 году решений для Windows Server backup. Оно похоже на Acronis True Image, но сконструировано для Windows Server.
Acronis Cyber Backup создаёт полную резервную копию среды Windows Server и восстанавливает как систему полностью, так и отдельные файлы и приложения.
2. Nova BackUp

Nova BackUp
Для провайдеров профессиональных услуг (Managed Service) и технологических компаний решение Nova подходит как стабильное облачное хранилище и решение для катастрофоустойчивости. Nova Cloud Backup использует 256-битное шифрование AES по военным стандартам для обеспечения безопасности хранимых файлов заказчиков. Nova Cloud Backup удовлетворяет стандартам HIPAA, FERPA, GLBA и другим, а также может предоставить план резервирования и катастрофоустойчивости.
3. Druva Phoenix

Druva Phoenix
Druva Phoenix – это гибкое решение для защиты данных и резервирования Windows Server, причем производитель несёт все расходы по обслуживанию и апдейтам. Многие процессы автоматизированы, поскольку все операции и взаимодействие через интерфейс проводятся удалённо, позволяя ИТ-персоналу сосредоточиться на других важных задачах.
4. Altaro VM Backup

Altaro VM Backup
Altaro VM Backup – средство резервирования и репликации гипервизора Hyper-V и виртуальных машин VMware. Altaro VM Backup также поддерживает репликацию через сеть WAN, с дополнительной дедупликацией «на лету» (Augmented Inline Deduplication), и другими полезными функциями. Оно предназначено для ИТ-департаментов, для реселлеров ИТ-услуг и MSP (Managed Service Providers). Особенностью решения является гарантия ответа техподдержки через 30 секунд (30-second Lightning Fast Support Call).
5. CrashPlan

CrashPlan
CrashPlan – одно из лучших программных решений для резервирования Windows Server и других серверов, которое создано для полного резервного копирования данных небольших предприятий. Оно устойчиво к потерям данных в случае человеческих ошибок, воздействия зловредных программ и другим катастрофам.
6. MSP360

MSP360
MSP360 Backup – это полноценное решение по резервному кооперированию и восстановлению данных различных серверов Windows и Linux. Поддерживается также резервирование для MS Exchange, MS SQL Server, Hyper-V и виртуальных машин VMware. Резервирование проводится с автоматическим шифрованием и защитой от Ransomware. Поддержвается также междуоблачное резервирование серверов во многих местоположениях облачных дата-центров.
7. Nakivo Backup

Nakivo Backup
Решение резервирования и репликации NAKIVO – это ПО для репликации сервера, которое совмещает резервирование и восстановление данных и катастрофоустойчивость в одном интерфейсе. Nakivo имеет высокую производительность, минимальный размер ёмкости хранения и обеспечивает быстрое и недорогое решение для восстановления файлов и папок для всех платформ приложений пользователей. Оно работает как для виртуальных, так и физических устройств, облаков и сред SaaS.
8. Rubrik

Rubrik
Rubrik – программное решение для резервирования, применимое для гибридных облачных сред. Оно обеспечивает постоянную доступность приложений в любых средах, как локальных, так и облачных. Процедуры безопасности выполняются автоматически, включая защиту от Ransomware, с возможностью сканирования и анализа данных приложений при большой ёмкости хранения, с использованием архитектуры Rubrik Cloud-based Data Management.
9. IDrive

IDrive
IDrive Cloud – решение для резервирования Windows Server, которое обеспечивает резервирование виртуальных машин пользователя, серверов, и «умных устройств» Интернета Вещей в едином решении. Когда данные передаются между многими средами, включая устройства за пределами границы сети предприятия, то возможность потери данных в одной из таких сред может вызвать катастрофу для бизнеса всего предприятия. IDrive упрощает резервирование данных предприятия, начиная от резервного копирования данных серверов до предоставления удалённого доступа к данным с персональных устройств пользователей, находящихся вне границ сети предприятия.
10. SolarWinds Backup

SolarWinds Backup
Решение SolarWinds Backup – это веб-панель управления на многих пользователей (multi-tenant), которое обеспечивает управления защитой данных в облаке для серверов, рабочих станций, документов Microsoft 365, а также Exchange, OneDrive и SharePoint при помощи защиты Microsoft 365 за довольно низкую плату на пользователя. В цену входит облачное хранилище в одном из 30 дата-центров на выбор пользователя, а также автоматическое тестирование восстановления данных.
Видовое разнообразие внешних и внутренних факторов, которые могут поспособствовать краху ОС и привести к нежелательной утрате пользовательских данных, велико. Однако возможности современных ОС позволяют обезопасить важную информацию. Можно выполнить ряд простых предварительных операций и при необходимости вернуть пропавшую информацию.
Как ранее известно, процесс стирания файлов не подразумевает их мгновенное затирание. Ответственная служба ОС Windows Server просто помечает занятое удаленными файлами пространство дискового носителя соответствующей меткой и отображает данный объем накопителя в виде пустого незанятого места. А потом, при выполнении последующих операций записи новых файлов, система производит посекторное затирание отмеченной области и сохраняет новые данные поверх старых. Поэтому, удаленные данные не пропадают. Они все еще находятся на диске. Их можно восстановить независимо от причины, послужившей их пропаже. Также можно вернуть и функциональность всей ОС, если произошел критический сбой или участились системные ошибки.
Ответственный инструмент системной архивации, встроенный в функционал ОС Windows Server
Инструмент «Система архивации данных» в ОС Windows Server является вложенной функцией. Однако, несмотря на ее важность для полноценного и безопасного хранения данных (рассчитана на восстановление информации пользователей, управление хранилищем и возврат работоспособности системы), она не установлена сразу изначально. Пользователям предстоит самостоятельно выполнить ряд простых последовательных шагов и произвести установку инструмента, ответственного за резервное копирование, вручную. Алгоритм установки предполагает следующие действия.
Произведите запуск приложения «Диспетчер серверов», для чего в меню управления системными приложениями «Пуск» найдите и кликните одноименный раздел (в боковом списке программ или закрепленном поле плиток).
Выберите в окне приложения в левой панели управления раздел «Панель мониторинга». Затем в основной панели настроек локального сервера щелкните раздел «Добавить роли и компоненты», запускающий ответственного помощника.
В новом окне встроенного системного помощника в левой панели будут представлены разделы для пошагового заполнения. В разделе «Перед началом работы» ознакомьтесь с важными условиями для продолжения. Проверьте соответствия будущих настроек установленным потребностям, подтвердите, что система обладает последней версией пакета безопасности, а также защищены приоритетные системы контроля и управления. Кликните по кнопке «Далее» и выполните переход к следующей странице.
В разделе основной панели управления «Тип установки» определитесь с приемлемым вариантом будущих характеристик. Изначально помощник предлагает верный раздел. Поэтому, ничего не меняйте, оставьте в качестве своего выбора параметр «Установка ролей и компонентов» и жмите «Далее».
В следующем разделе боковой панели «Выбор сервера», аналогично предыдущему шагу, тоже нет необходимости изменять предложенный помощником выбор. Ничего не меняя нажмите на кнопку продолжения «Далее».
Следующий раздел «Компоненты» боковой панели управления позволяет задать нужный компонент сервера. В одноименном поле, содержащем список всех доступных к использованию компонентов, отыщите выделенный вариант «Система архивации данных Windows Server» и выберите его, отметив соответствующим образом. Потом задействуйте стандартную кнопку перехода к следующему разделу («Далее»).
Ознакомьтесь с представленными характеристиками, отредактируйте их при необходимости, а потом запустите процесс установки путем нажатия на соответствующую кнопку действия.
В финальном разделе боковой панели «Результаты» можно отслеживать весь процесс. По его исполнению, закройте окно ответственной кнопкой «Закрыть».
Искомый инструмент для резервной архивации в операционной системе Windows Server теперь готов к дальнейшему использованию.
Порядок действий для воссоздания архивной копии данных посредством установленного инструмента в ОС Windows Server?
Теперь пользователи могут непосредственно приступить к созданию собственного архива данных, а также к организации автоматической функции резервирования информации в соответствии с персональным распорядком. Алгоритм действий следующий.
Известным способом через меню «Пуск» запустите приложение «Диспетчер серверов». На ленте меню «Панели мониторинга» отыщите и нажмите на кнопку «Средства». В открывшемся выпадающем меню выберите параметр «Система архивации данных Windows Server».
Примечание. Открыть инструмент архивации также можно сразу напрямую, если воспользоваться службой поиска. Наберите запрос «wbadmin.msc» и в разделе «Лучшее соответствие» поисковой панели будет представлен требуемый результат.
В разделе, ответственном за локальную архивацию, пользователи могут воспользоваться любым вариантом, из представленных, по выбору, и настроить параметры резервного копирования (единичные или постоянные) или произвести восстановление данных.
Установка режима резервирования данных согласно собственного распорядка
Чтобы задать параметры периодического цикличного режима архивации согласно персонального распорядка пользователи должны выполнить следующие действия. В консоли инструмента архивации щелкните ответственный параметр «Расписание архивации», представленный в крайней правой панели допустимых действий.
Будет запущен встроенный помощник настройки расписания. Укажите требуемый тип конфигурации, установив напротив нужного параметра индикатор выделения («точку»). В зависимости от задач пользователи могут настроить автоматический режим архивации как для всего сервера, так и для отдельных его элементов.
Установите распорядок, который включает периодичность архивации и приемлемый временной интервал ее исполнения. Используйте потом кнопку «Далее» для перехода к следующим характеристикам.
На следующей странице параметров «Тип места назначения» выберите способ хранения будущих копий, поместив индикатор выделения («точку») рядом с подходящим решением.
Если пользователи предпочтут третий вариант, который представлен способом «Архивация в общую сетевую папку», то система выдаст служебное уведомление, объясняющее последствия такого выбора. Как ясно из всплывающего сообщения, данный способ позволит располагать на хранение только последнюю версию готового архива. Предшествующие версии будут недоступны.
Задайте предпочитаемое месторасположение (заполните поле «Расположение») для удаленной папки на странице соответствующей характеристики и перейдите к следующим настройкам.
Зарегистрируйте расписание архивации во всплывающем одноименном окне, подтвердив наличие прав администратора путем ввода данных соответствующей учетной записи.
Проверьте заданные на предыдущих этапах характеристики и сохраните настройки расписания. Нажмите на кнопку окончания «Готово» и завершите процедуру.
При необходимости подготовить архив в одном экземпляре, то выберите режим однократного резервирования. В панели действий инструмента архивации Windows Server отметьте соответствующий раздел («Однократная архивация»).
Задайте тип конфигурации «Настраиваемый» (установите индикатор выделения «точку»).
Выберите элементы, для которых будет выполнена операция резервного копирования, закрепив их в подготовленном поле.
Определитесь с типом места назначения, в котором будет располагаться архивная копия (используйте стандартный способ выбора параметра посредством индикатора выделения «точки»).
Проверьте соответствие примененных параметров. Щелкните на кнопку «Архивировать», когда все характеристики будут представлены верно.
Восстановите операционную систему из подготовленного архива
Резервная копия позволяет быстро и без дополнительных инструментов восстановить работоспособность операционной системы в случае ее непредвиденного сбоя или поломки.
Откройте инструмент «Система архивации данных Windows Server» любым способом. Например, введите в поисковой строке запрос «wbadmin.msc» для прямого мгновенного перехода к требуемому приложению.
В крайней боковой панели допустимых в инструменте действий найдите среди предложенных вариантов и щелкните левой кнопкой мыши раздел «Восстановление», ответственный за требуемую операцию.
В окне помощника восстановления на начальном этапе (в разделе «Приступая к работе») укажите адресное месторасположение ранее сохраненной архивной копии. Отметьте индикатором выделения верный параметр и продолжите, нажав на кнопку «Далее».
Отметьте используемый тип размещения и задайте расположение архива в следующих одноименных разделах.
В разделе «Выбор сервера» укажите источник восстановления, который содержит резервную копию, и продолжите, нажав на стандартную кнопку перехода к следующему шагу «Далее».
Раздел «Выбор даты архивации» содержит варианты архивов. Упорядоченные по дате их создания. Отметьте из представленных образцов требуемый.
Определите в разделе «Тип восстановления» виды объектов, подлежащие восстановлению.
В следующем разделе «Восстанавливаемые элементы» поместите в одноименное поле нужные для возврата элементы.
Раздел «Параметры восстановления» позволит указать директорию для вывода восстановленных объектов, отмеченных на предыдущем этапе.
Просмотрите примененные настройки и убедитесь в их корректности. Потом щелкните кнопку начала процесса «Восстановить». Система приступит к выполнению операции.
По окончанию процесса закройте окно исполнения.
Восстановите ОС после масштабного краха
Когда операционная система неработоспособна, но в наличии присутствует диск восстановления, пользователи могут задействовать его возможности и вернуть систему к рабочему состоянию. Алгоритм подразумевает следующие действия.
Установочный носитель необходимо подключить к проблемному ПК, а потом выполнить загрузку системы с него при соответствующем приглашении.
В предложенном системой меню управления выберите инструмент «Восстановление системы» в нижнем левом углу окна приветствия.
Потом пошагово выберите перечисленные пункты меню, последовательно нажимая каждый один за другим: «Поиск и устранение неисправностей» — «Восстановление образа системы» — «Windows Server».
Система отобразит отдельное окно для выбора архивного образа системы, в котором следует указать рабочий вариант готовой исправной копии.
На странице дополнительных параметров оставьте настройки в графе, ответственной за форматирование, без изменений (индикатор выбора «галочку» не убирайте), для приведения структуры диска в соответствие с архивной копией.
Если настройки установлены верно, но запустите операцию восстановления (кликните кнопку «Готово»).
Подтвердите системе свое разрешение процесса восстановления, нажав на кнопку «Да».
Инструмент восстановления вернет ОС к состоянию из резервного образа.
Современные версии операционных систем оснащены встроенным инструментом восстановления работоспособности ОС и возврата утраченных данных. Необходимо только своевременно выполнить его установку и настройку. При таком подходе, пользователи всегда смогут вернуться к рабочей версии системы или восстановить нужные файлы.
Полную версию статьи со всеми дополнительными видео уроками смотрите в источнике.