saniaowner
Блог электролампочного хамелеона ![]()
Windows
После прочтения названия статьи Вы спросите, мол зачем нам DHCP сервер на Windows ?
Ответов может быть несколько:
— Нет под рукой роутера
— Слишком далеко до роутера
— Я так захотел
Сферы применения данной программы решать Вам. От себя лишь добавлю что программа часто выручает когда нужно настроить камеру и протестировать устройства без дополнительного оборудования.
Скачать программу можно на оф.сайте или с моего сервера.
Краткий мануал по использованию
- Необходимо на интерфейсе Ethernet настроить статический IP адрес, который будет выступать в роли DHCP сервера и шлюза
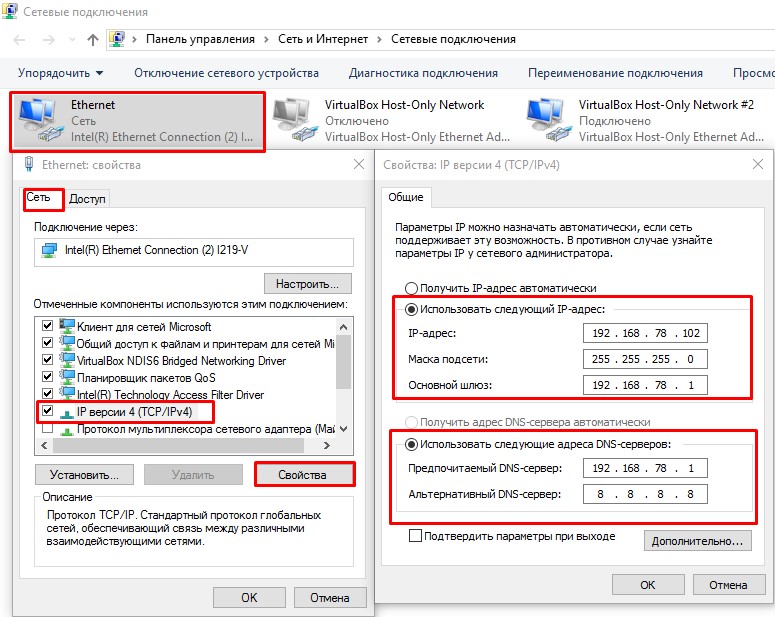
- Распаковываем программу, очень желательно не на системный диск. Находим файл с названием dhcpwiz.exe, это пошаговый настройщик DHCP сервера. Нажимаем
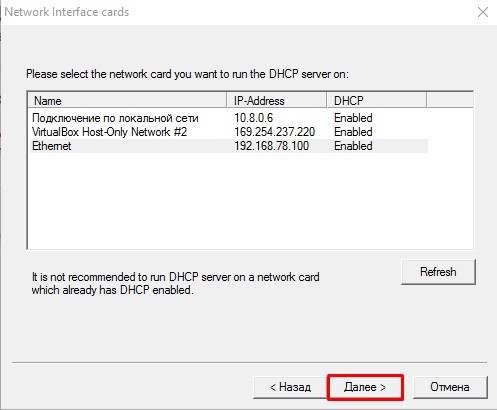
Далее - Выбираем сетевой интерфейс и нажимаем
Далее
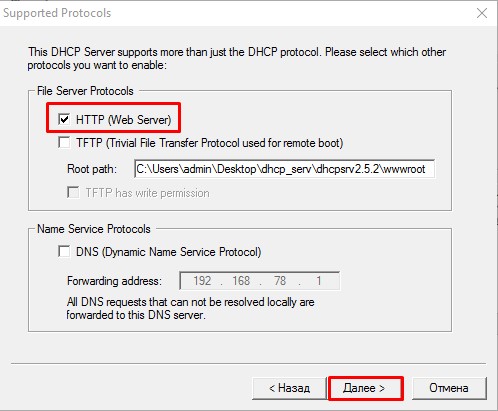
- Открывается новое окно, где нам предлагается дополнительно выбрать опцию загрузки WEB, TFTP сервера, и DNS. Выбираем HTTP (Web Server), это позволит просматривать список подключенных устройств к серверу. Затем нажимаем
Далее
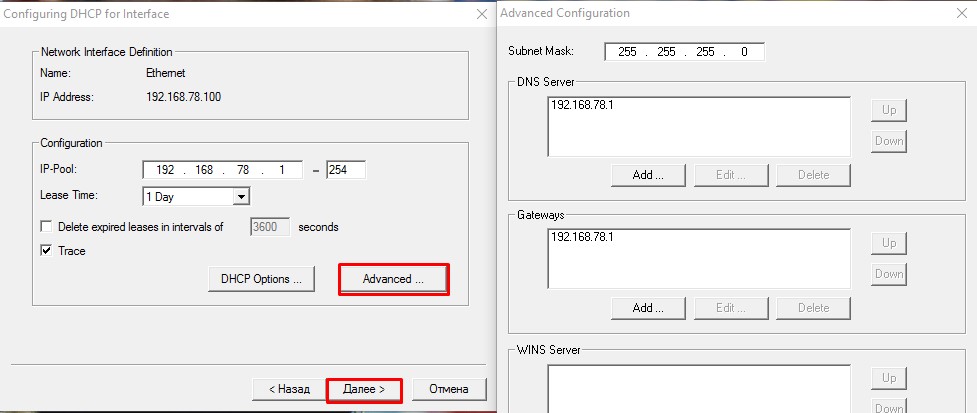
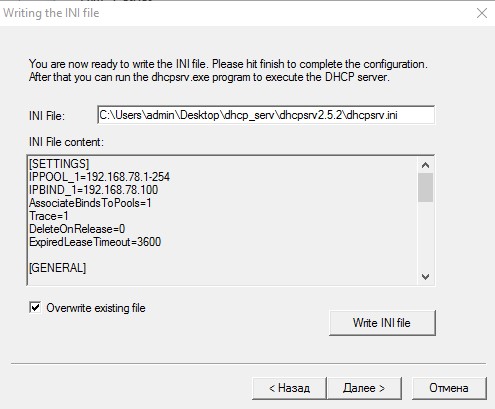
- Приступим к настройке DHCP сервера.
IP-Pool— количество IP адресов доступных для подключения. По умолчанию 253Lease Time— время жизни IP адреса. Включайте в зависимости от потребностей задачиTrace— системная трассировка
НажимаемAdvancedчтобы получить доступ к расширенной конфигурации. По умолчанию значения взяты с параметров сетевой карты ПК. НажимаемДалее
- Чтобы настройки применились отмечаем параметр
Overwrite existing file(перезаписать файл конфигурации) и подтверждаем перезапись кнопкойWrite INI file.
Снова нажимаемДалее
- Устанавливаем сервер нажатием
Installи запускаем всю эту радость кнопкойStart

- Список подключенных устройств можно посмотреть в браузере используй
localhostили127.0.0.1
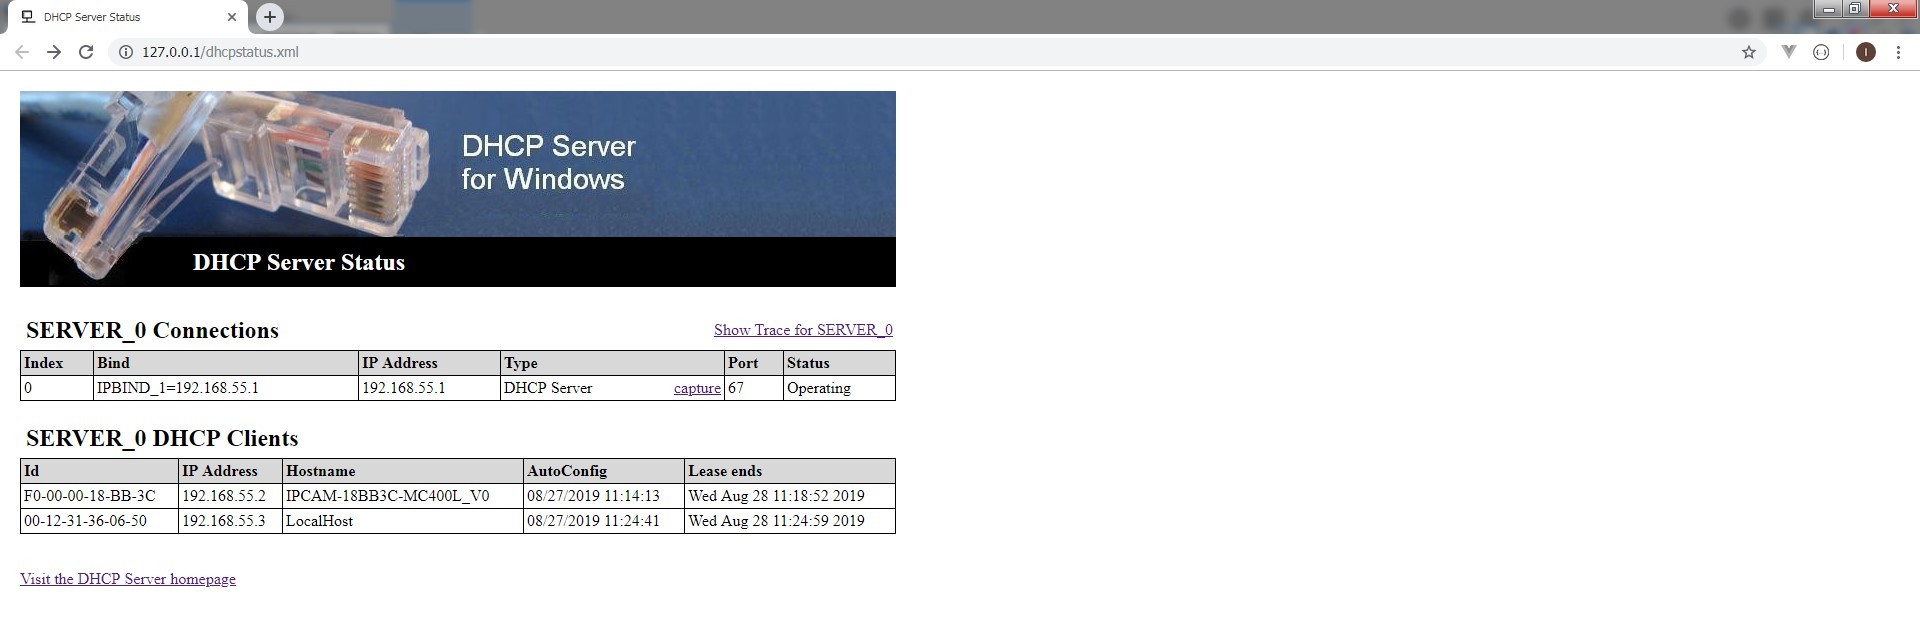
Такая вот цацка получилась:)


DHCP Server Open Source Freeware Windows/Linux. MultiSubnet DHCP Server supports Dynamic, Static Leases, Relay Agents, BOOTP, PXEBOOT. Global, Range and Client Specific Options. Supports filtering of ranges on Mac Address, Vendor and User Class.
Features
- Support all Industry Standard Feaures
- Dynamic and Static Leases
- Options can be Client Specific, Range Specific or Global
- Multisubnet supports Relay Agents and PXE Boot
- Lease Status in auto refreshing html page
- Supports Duplicated Replicated Operation
- Very simple to install and use, even by person not having DHCP concepts
- Very low memory and cpu use
Project Samples
License
GNU General Public License version 2.0 (GPLv2)
Your single integration to industry leading, secure blockchain infrastructure for web3. Scale with ease through our end-to-end suite of blockchain technology, from dedicated nodes and APIs to easily-accessible staking and liquid staking, MPC tech, and more.
User Ratings
4.5
out of 5 stars
★★★★★
★★★★
★★★
★★
★
ease
1 of 5
2 of 5
3 of 5
4 of 5
5 of 5
4 / 5
features
1 of 5
2 of 5
3 of 5
4 of 5
5 of 5
4 / 5
design
1 of 5
2 of 5
3 of 5
4 of 5
5 of 5
3 / 5
support
1 of 5
2 of 5
3 of 5
4 of 5
5 of 5
2 / 5
User Reviews
- All
- ★★★★★
- ★★★★
- ★★★
- ★★
- ★
-
I am working with about 40 devices, two routers, one subnet. The DHCP servers built into the routers always assume that they will allocate the gateway to themselves. So, with two gateways on the same network, you need to use a separate server to deliver this DHCP server software and allow gateway router choice on the same subnet.
This allows what i have, which is the ability to choose and change the router for individual devices and it work s fine for this — for a coupe of years now.
This allows a fast but more expensive router (mobile router connected to the telephone system) to be used for the IP telephones and Digital exchange) and the slower but cheaper router (ADSL on my fixed line) to be used for surfing the web etc — and allows these to be easily changed if either router service goes down. I would recommend this arrangement for a small business internet connection to give backup protection and good IP telephone lines all at a reasonable cost — recommend Gordon Webb -
Great DHCP server. It is essentially helpful in a case of several sub-nets.
1 user found this review helpful.
-
Fantastic program. I use it to do troubleshooting in the network when dhcp details arise. It´s excellent for labs and demos. Supports several subnets. Easy to use and configure. Thanks.
2 users found this review helpful.
-
Good docs, easy to install, runs solid on windows (for a change lol)
1 user found this review helpful.
-
I haven’t use all the feature it claim, just very simple DHCPRange for Kali server. Good alternate to dnsmasq and ics-hdcp-sever without mess up with the network function.. Have to compile for x64 though. Global option is too lengthy should break down to category
1 user found this review helpful.
Read more reviews >
Additional Project Details
Operating Systems
Linux, Windows
Intended Audience
Advanced End Users, System Administrators
User Interface
Non-interactive (Daemon)
Programming Language
C++
Related Categories
C++ Init Software
Dynamic Host Configuration Protocol (DHCP) – это протокол сетевого уровня, который позволяет автоматически назначать IP-адреса и другие настройки сетевого подключения компьютерам в локальной сети. Настройка DHCP сервера на компьютере с операционной системой Windows является необходимым шагом для обеспечения эффективной работы сети.
В этой статье мы рассмотрим пошаговую инструкцию по настройке DHCP сервера в Windows для начинающих. Основная цель состоит в том, чтобы помочь вам разобраться в основных настройках и запустить DHCP сервер на вашем компьютере.
Прежде чем приступить к настройке DHCP сервера, необходимо убедиться, что у вас есть права администратора на компьютере, на котором будет работать DHCP сервер. Также важно пронаблюдать за тем, чтобы в сети отсутствовал уже работающий DHCP сервер и не было конфликта IP-адресов.
Содержание
- Установка DHCP сервера в Windows
- Конфигурация основных параметров DHCP сервера
- Назначение диапазона IP адресов DHCP сервером
- Настройка лизинга арендованных IP адресов
- Проверка работоспособности DHCP сервера
Установка DHCP сервера в Windows
В этом разделе мы рассмотрим процесс установки DHCP сервера в операционной системе Windows. DHCP (Dynamic Host Configuration Protocol) позволяет автоматически присваивать IP-адреса и другие настройки сети устройствам, подключенным к локальной сети.
Для установки DHCP сервера в Windows:
- Откройте «Панель управления» на вашем компьютере.
- Выберите «Программы» или «Программы и компоненты» (в зависимости от версии Windows).
- Нажмите на «Включение или отключение компонентов Windows».
- Найдите «Службы DHCP» в списке компонентов и отметьте его галочкой.
- Нажмите «ОК» и подождите, пока Windows завершит установку компонента.
После завершения установки DHCP сервера вам может потребоваться настроить его параметры. Для этого выполните следующие шаги:
- Откройте «Панель управления».
- Выберите «Администрирование» или «Сервисы» (в зависимости от версии Windows).
- Найдите «Службы DHCP» в списке доступных служб и откройте ее.
- Настройте требуемые параметры DHCP сервера, такие как диапазоны IP-адресов, время аренды, опции сети и другие.
- Сохраните изменения и перезапустите DHCP сервер, чтобы они вступили в силу.
Теперь DHCP сервер готов к работе на вашей Windows машине. Он будет автоматически назначать IP-адреса клиентам в вашей локальной сети и предоставлять им необходимые настройки сети.
Установка и настройка DHCP сервера в Windows позволяют упростить сетевую конфигурацию и облегчить работу сетевых устройств. Благодаря автоматическому назначению IP-адресов, вы больше не будете тратить время и усилия на ручную настройку каждого устройства в сети.
Конфигурация основных параметров DHCP сервера
Перед началом настройки DHCP сервера в Windows необходимо определить основные параметры, которые будут использоваться для распределения IP адресов в сети.
Основные параметры DHCP сервера включают в себя:
| Параметр | Описание |
| IP адрес | IP адрес, который будет использоваться для работы DHCP сервера. Обычно это локальный IP адрес сервера. |
| Подсеть | Подсеть сети, в которой будет работать DHCP сервер. Определяет диапазон IP адресов, которые сервер будет распределять. |
| Маска подсети | Маска подсети, используемая в сети. Необходима для правильной настройки DHCP сервера. |
| Основной шлюз | IP адрес основного шлюза, который будет назначаться клиентам DHCP сервером. Обычно это IP адрес маршрутизатора в сети. |
| Диапазон IP адресов | Диапазон IP адресов, которые DHCP сервер будет выделять клиентам. Диапазон определяется начальным и конечным IP адресом. |
| Дополнительные параметры | Дополнительные параметры, такие как DNS серверы, серверы времени, серверы управления и т. д., которые могут быть настроены для клиентов DHCP. |
После определения всех необходимых параметров можно приступить к настройке DHCP сервера в Windows.
Назначение диапазона IP адресов DHCP сервером
Диапазон IP адресов, назначаемых DHCP сервером, определяет доступные адреса для выделения клиентам в сети. При настройке DHCP сервера в Windows можно указать диапазон IP адресов, из которого будут браться адреса для клиентов.
Указание диапазона IP адресов позволяет эффективно использовать адресное пространство и предотвращает конфликты адресов между клиентами. DHCP сервер будет автоматически назначать свободные IP адреса из определенного диапазона, не требуя ручной конфигурации каждого клиента.
Чтобы определить диапазон IP адресов DHCP сервера, необходимо указать начальный и конечный IP адреса диапазона. Значения начального и конечного адреса должны быть в пределах одной подсети и находиться в той же сети, что и DHCP сервер.
Например, если DHCP сервер имеет IP адрес 192.168.0.1 и маску подсети 255.255.255.0, то диапазон IP адресов может быть указан как 192.168.0.2 — 192.168.0.254.
Для настройки диапазона IP адресов DHCP сервером в Windows следует выполнить следующие шаги:
- Открыть «Управление компьютером».
- Перейти в раздел «Сервисы и приложения» > «Службы».
- Найти службу «Сервер DHCP» и открыть ее свойства.
- Вкладка «Диапазоны» позволяет настроить диапазон IP адресов DHCP сервера.
- Нажать кнопку «Добавить» и указать начальный и конечный IP адреса диапазона.
- Нажать «ОК» для сохранения настроек.
После настройки диапазона IP адресов DHCP сервера, сервер будет назначать адреса из этого диапазона клиентам, запрашивающим сетевую конфигурацию.
Настройка лизинга арендованных IP адресов
В DHCP сервере Windows можно настроить лизинг арендованных IP адресов, чтобы контролировать время, на которое клиенты получают доступ к определенным IP адресам.
1. Запустите «Сервер управления DHCP» на сервере Windows.
2. Выберите нужный диапазон IP адресов, для которого вы хотите настроить лизинг, в списке «Диапазоны IP адресов».
3. Щелкните правой кнопкой мыши на выбранном диапазоне и выберите «Свойства».
4. В окне «Свойства диапазона IP адресов» перейдите на вкладку «Лизинг» и установите нужные параметры:
— «Лизинг адресов» — определяет, сколько времени клиент может арендовать IP адрес. Вы можете выбрать опцию «Ограниченный» и указать время в минутах, часах или днях, или выбрать опцию «Без ограничений» для бесконечной аренды.
— «Отсрочка аренды» — задает время, которое клиенту будет предоставлено для подтверждения аренды после получения адреса. Вы можете выбрать опцию «Определенное количество времени» и указать время в минутах, часах или днях, или выбрать опцию «Бесконечное время».
— «Попытки аренды» — определяет, сколько раз клиент может повторно попытаться арендовать IP адрес, если аренда прежде была неудачной.
— «Интервал между попытками аренды» — задает время, которое должно пройти между повторными попытками арендовать IP адрес.
5. Щелкните «ОК», чтобы сохранить настройки лизинга.
Теперь DHCP сервер будет автоматически управлять арендованными IP адресами в указанном диапазоне, и клиенты получат доступ к адресам в соответствии с настройками лизинга.
Проверка работоспособности DHCP сервера
После настройки DHCP сервера в операционной системе Windows необходимо проверить его работоспособность. Для этого можно выполнить следующие шаги:
- Подключитесь к сети, на которой работает DHCP сервер
- Откройте командную строку или PowerShell
- Введите команду «ipconfig /renew» и нажмите клавишу Enter. DHCP клиент запросит новый IP-адрес и другую информацию от DHCP сервера
- Проверьте, что DHCP клиент получил IP-адрес от сервера. Это можно сделать, выполнив команду «ipconfig», и проверив IP-адрес в разделе «Адаптер Ethernet» или «Адаптер беспроводной локальной сети»
- Убедитесь, что другие настройки, такие как маска подсети, шлюз по умолчанию и DNS-серверы, также были успешно получены от DHCP сервера
Если все настройки были успешно получены от DHCP сервера, то это означает, что сервер работает корректно. Если же настройки не были получены или они некорректны, то возможно есть проблема с настройками DHCP сервера или сетевыми настройками клиента. В этом случае рекомендуется повторить настройку DHCP сервера или обратиться к системному администратору.
Every networked device has an individual address known as an IP address that is used by devices to communicate with one another. Configuring DHCP Server in Windows enables you to manage your network faster. Obviously assigning IP addresses manually on every machine is boring and time assuming. Using DHCP, you can assign IP addresses automatically instead of manually.
The first step is to add the DHCP role since it is not already there. Create a new scope based on your plan after that. Include any extras you want, including DNS and reserved addresses. Examine log files frequently. DHCP is simple but essential for network communication.
Join us with this article to review the best and easiest method to Install and Configure DHCP Server in Windows Server. We try to help you stop manually configuring your devices with an IP address on the network after buying Windows VPS and manage the process of automatically IP assigning from a centralized server.
What is DHCP and Why Should Use it?
Small networks will not face trouble assigning IP addresses manually, but in large networks, it is almost impossible because of the numerous devices. Dynamic Host Configuration Protocol (DHCP) is a networking protocol and only service that automatically assigns your IP address.
What will happen after installing and configuring DHCP in your environment? Whenever a new device joins the network, it queries the DHCP server for an IP address. On the basis of the specifications, you made to your DHCP server, the DHCP server offers and assigns a valid IP address to the requester. Without a DHCP server, providing IP addresses to networked devices would require an exorbitant amount of manual setting which is really problematic. A DHCP server can save you a ton of time.
To not concern about the process of assigning IP addresses, a DHCP server is responsible to offer IP addresses automatically to devices to access the internet, applications, and so on.
Installing and Configuring DHCP Server in Windows Server
As an administrator, you must configure an IP address for network nodes. It will be done in a static configuration. DHCP helps you to provide the information automatically and dynamically. This tutorial covers Installing and Configuring DHCP Server in Windows using Server Manager method.
Stay with us and follow the below steps to finish installing DHCP and Configure it on your Server.
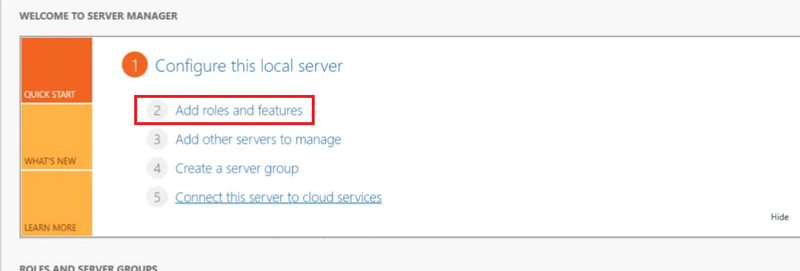
Step 1. Using Server Manager
To start the installation process, you need to open Server Manager. From the Start Menu, open the Server Manager console.
Then, click “Add Roles and Features” in the “Server Manager” window. This will cause a pop-up window to appear. On the pop-up, click “Next”
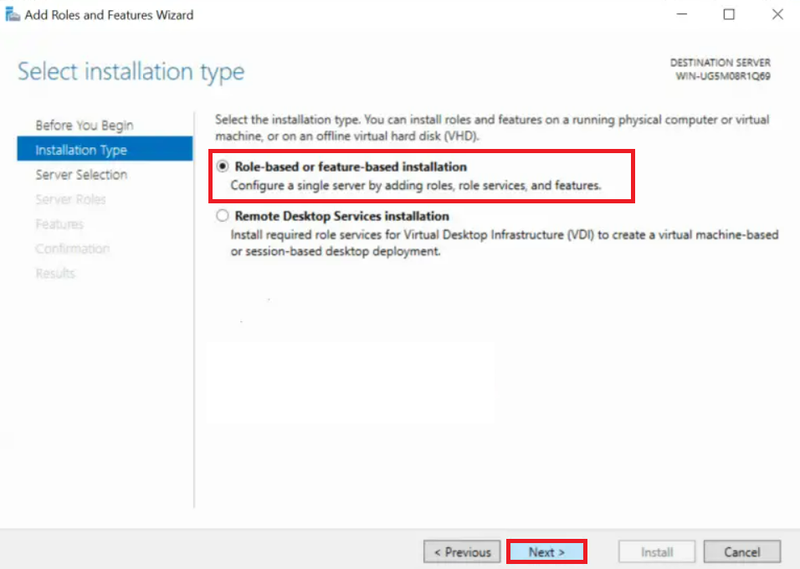
Step 2. Select Installation Type
Once the below page is displayed, choose the Role-Based or Feature-based installation radio option and click on the Next button.
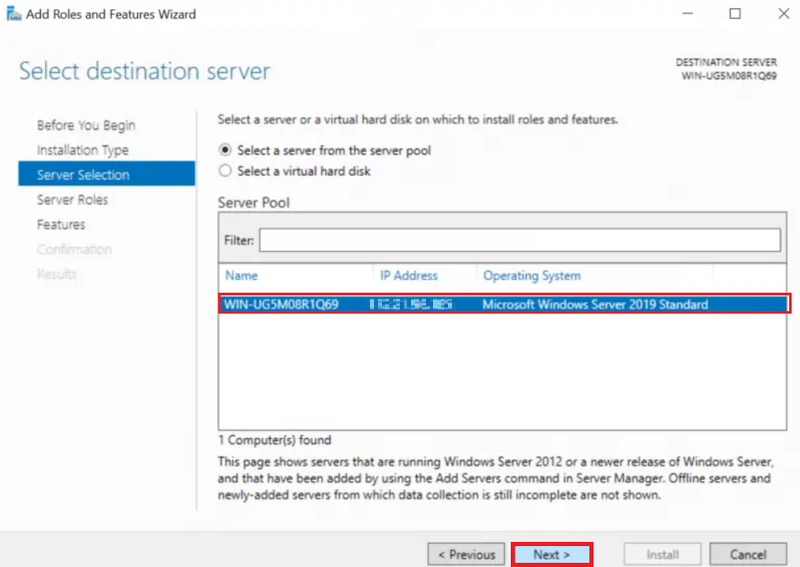
Step 3. Choose a Server to Install DHCP Role On
Select the server you want to install the DHCP Server on from the list on the page below. After choosing the Server machine that hosts your DHCP server, click Next.
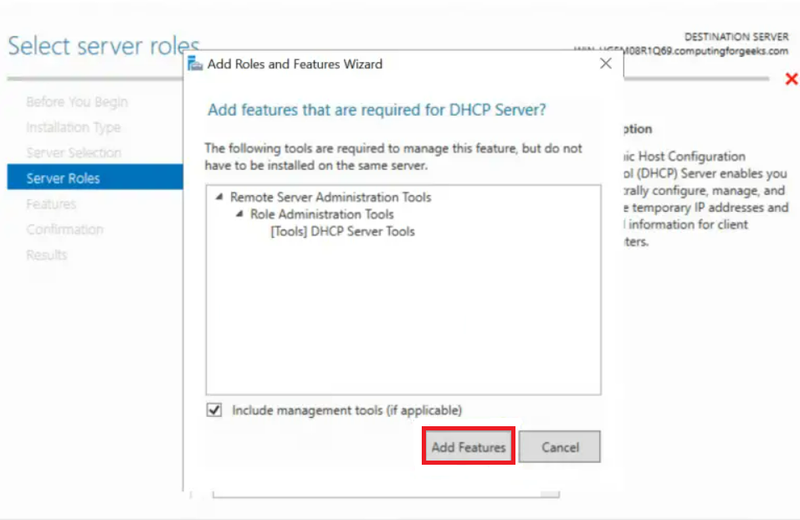
Step 4. Select Server Roles
In this step of Configuring DHCP Server in Windows, you need to Select Server Roles.

A pop-up window will appear when you choose the option, requesting that you add features needed by the DHCP server. If you want to add the DHCP management tools along with the DHCP role, keep the Include Management Tools checked selected. Then, click on Add Features and then click on the Next button to move on.
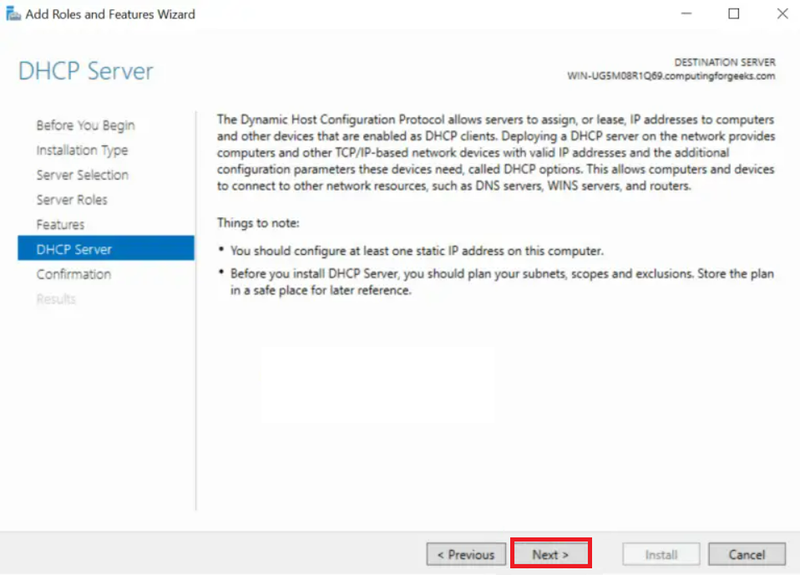
Step 5. DHCP Server
On the DHCP Server, click on Next and continue.
Step 6. Confirm Installation Selections
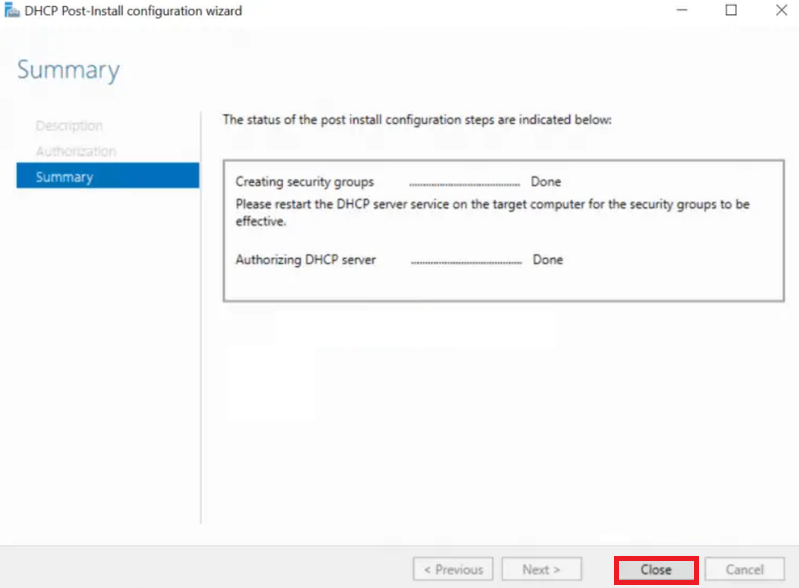
You are so close to finishing Configuring DHCP Server in Windows. In this step, verify that DHCP Server and other names are on the list by looking at it. Click “Install” after that. Click “Close” once everything has been installed successfully, and your DHCP server will be up and running.
Let’s start the DHCP post-deployment configuration process.

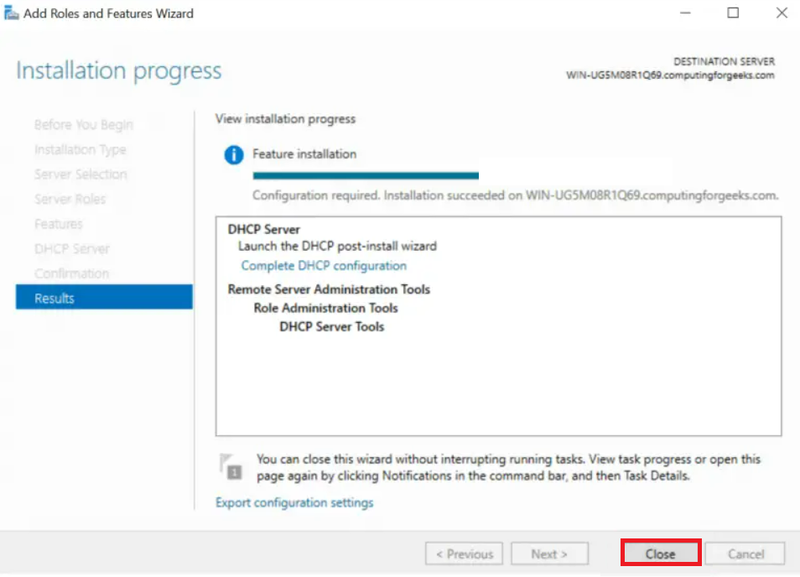
Step 7. Post-deployment Config
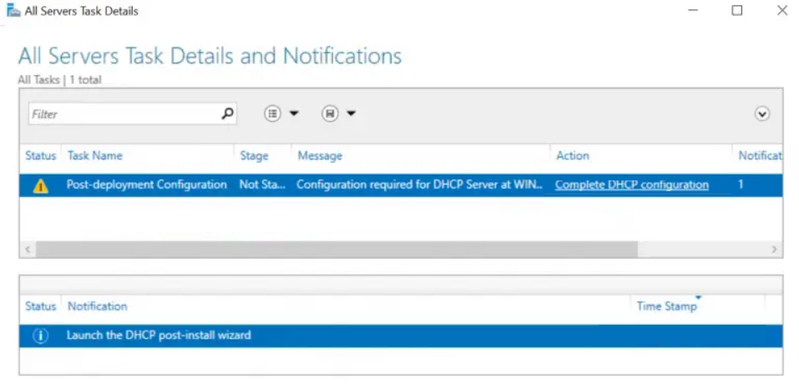
By now, you must complete the installation process. You are ready to start Configuring DHCP Server in Windows. The option “DHCP” should now be shown on the left pane of the window when you open Server Manager. A yellow-marked warning with the words “Configuration required for DHCP Server at…” and the link “More” should appear, as seen in the picture below.

The phrase “All Server Task Details and Notifications” will appear in a new window. You will see the “Post-deployment Configuration” line underneath it. As illustrated below, click on “Complete DHCP Configuration” at the end of that line. There will be an installation wizard. Choose “Next“.
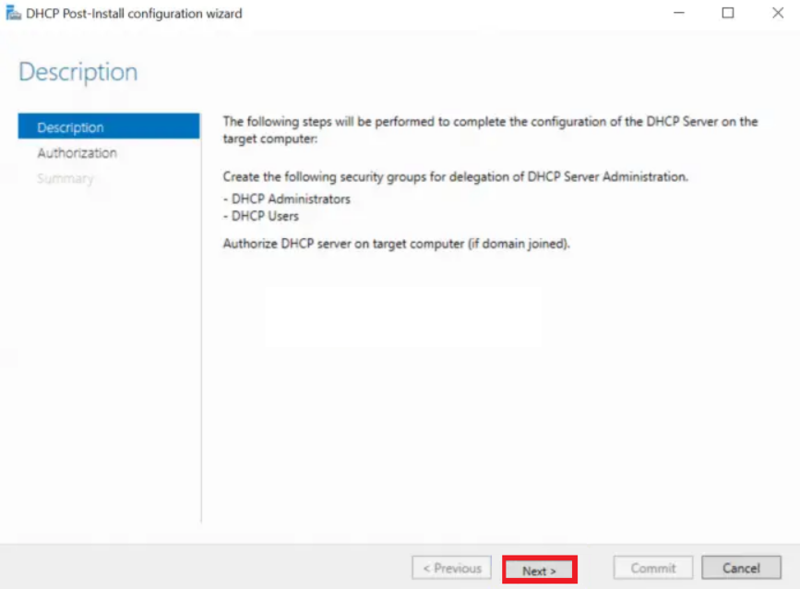
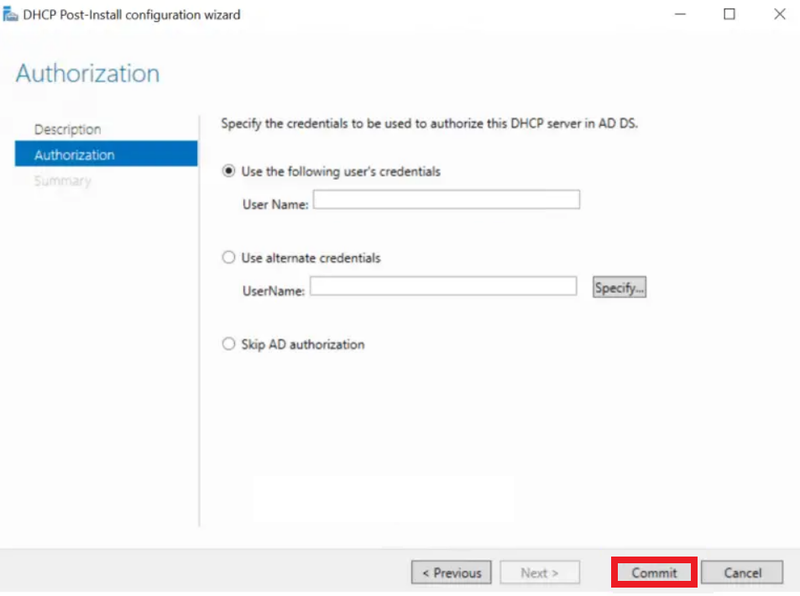
Three choices are offered to you on this Wizard page. You can move forward using the Administrator’s credentials, the credentials of a different user, and AD Authorization. Select the “Skip AD authorization” radio option if your server is standalone and is not a member of any Active Directory domain. If so, you should log in using the credentials listed in your AD. Click “Commit” once you’ve made a decision that works with your surroundings. Allow it to complete its task, and if it is successful, click “Close” with satisfaction.
Step 8. Configure DHCP Server
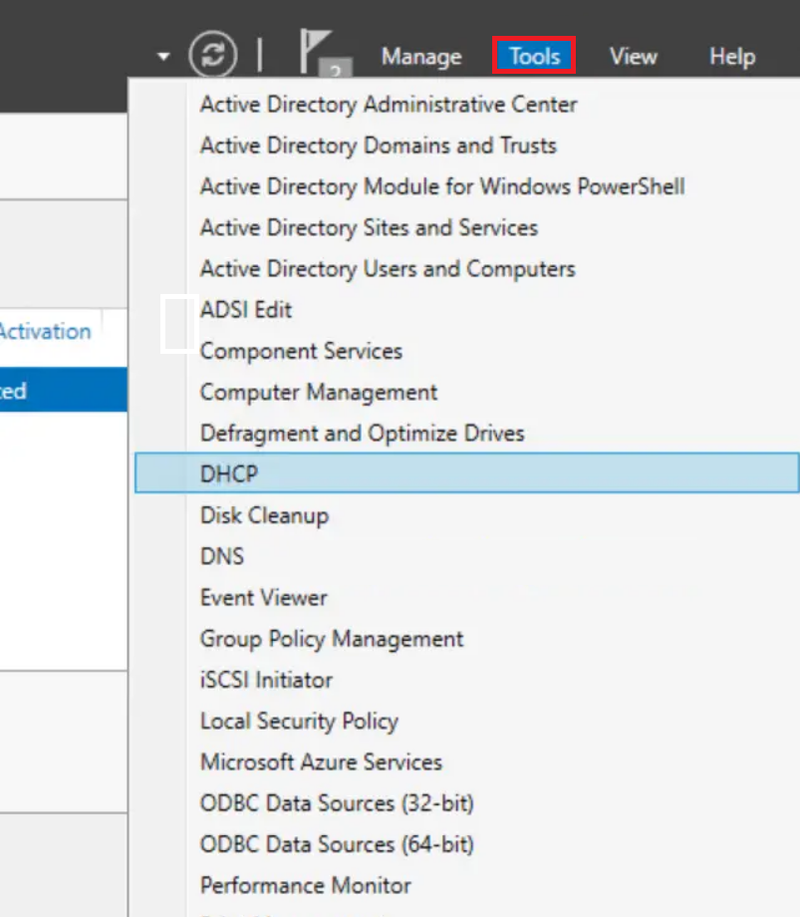
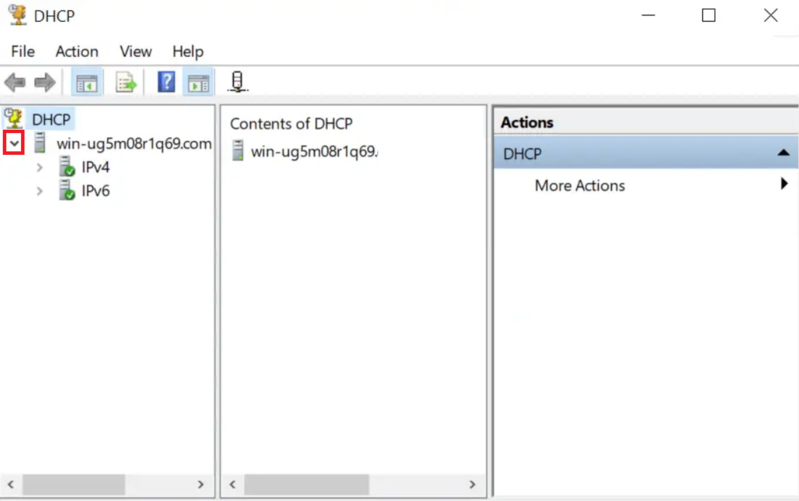
To continue Configuring DHCP Server in Windows, return to Server Manager and select “DHCP” from the “Tools” menu. The DHCP Configuration Window will then open as displayed below.
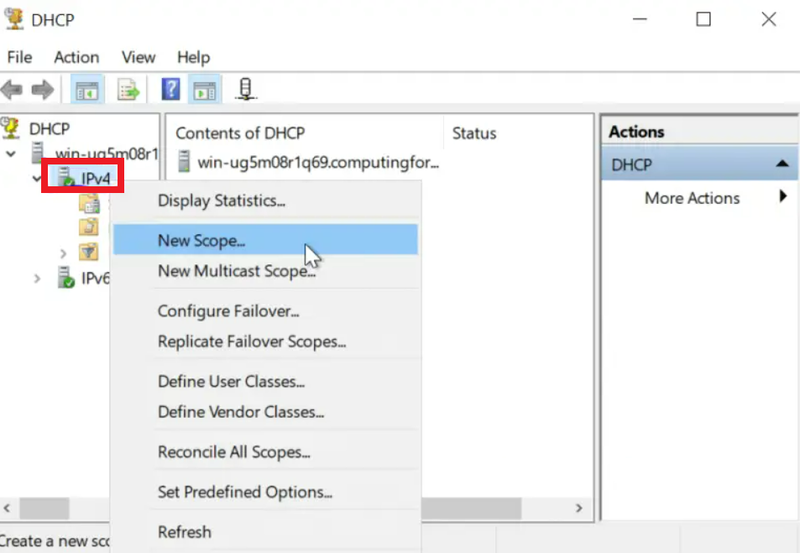
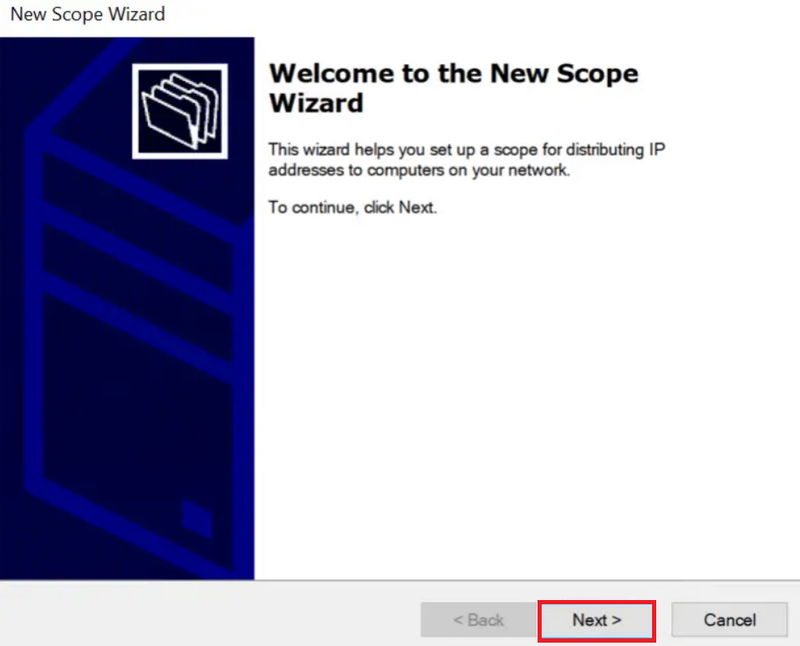
Step 9. Select New Scope
Click the drop-down arrow as indicated above, then right-click “IPv4” in the window’s left pane and select “New Scope“. As seen below, a new window for the scope wizard will open. Choose “Next”
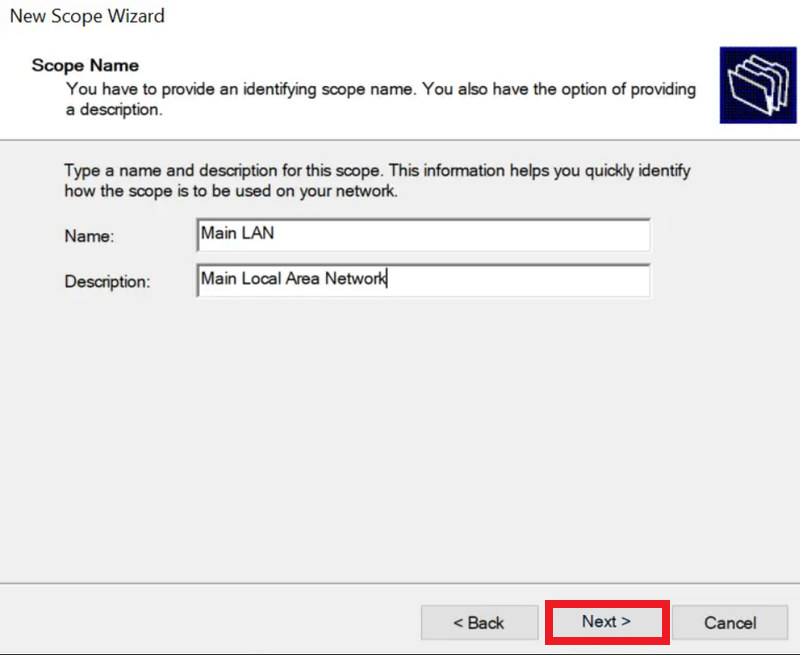
Step 10. Name your Scope
Select “Next” after entering the new scope’s name and description.
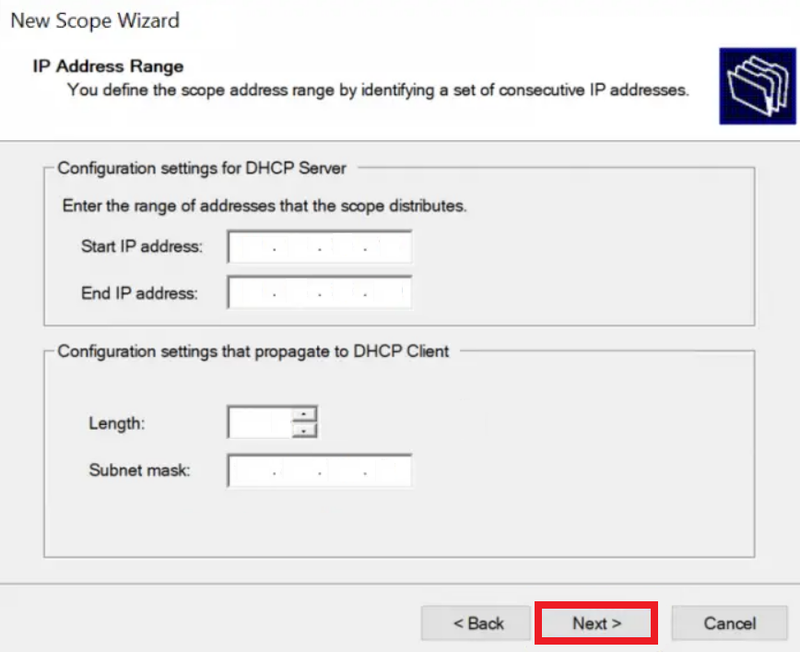
Step 11. Insert your IP Address Range
In this step, you need to input the preferred IP address range. To do this, input your start and End IPs, Length, and Subnet Mask. When you are finished, click on Next.
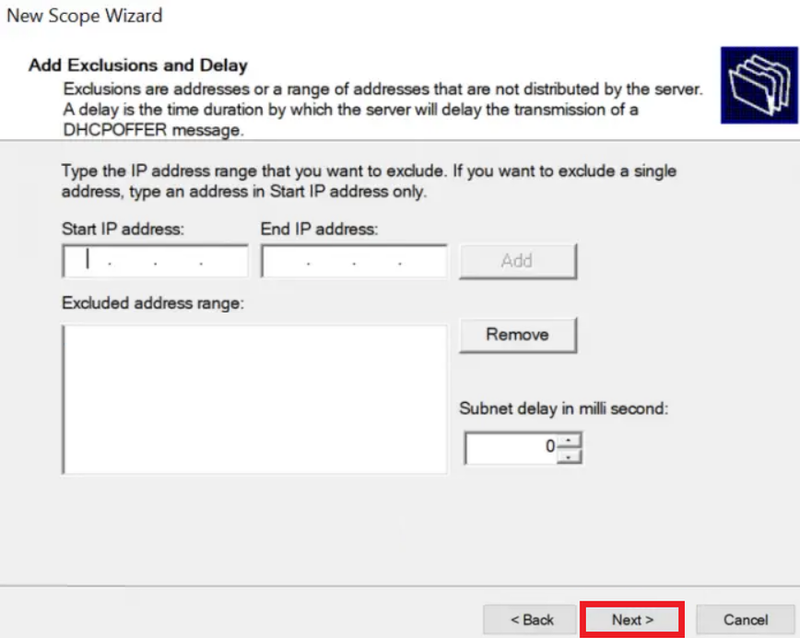
Step 12. Set any IPs you Consider excluding here
At this point, you can enter any IP addresses you want to reserve for possible future use with equipment like a printer and other devices.
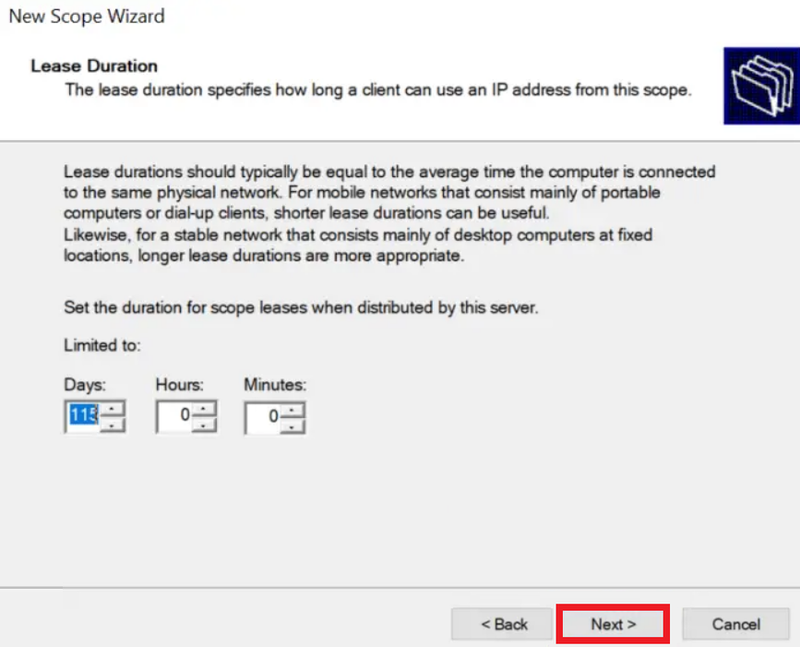
Step 13. Lease Duration
A computer or client will receive an IP address for the lease length until the DHCP server changes it or assigns a new one when the user logs in again. Hit “Next” after setting yours.
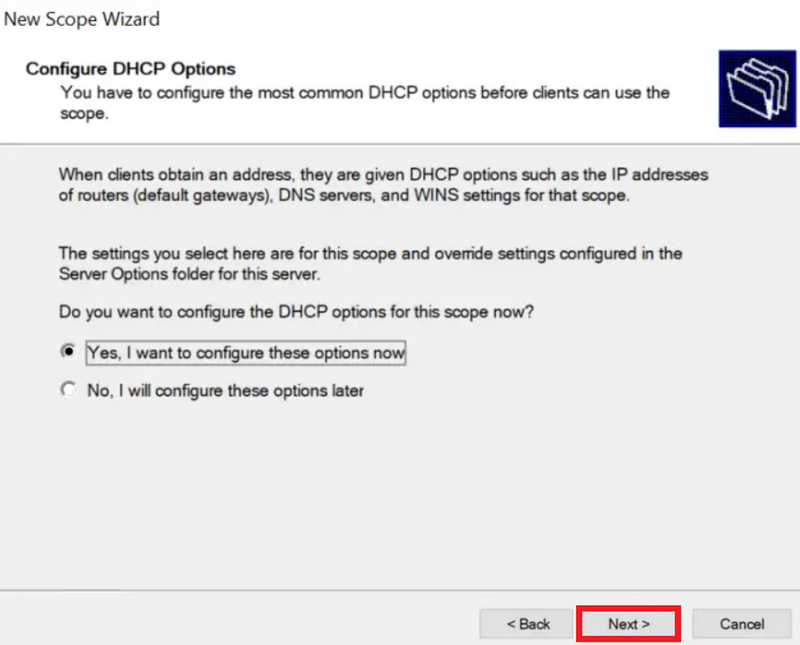
Step 14. DHCP Options
If you agree with the DHCP Options as they are shown on the page, simply click “Next” on this page.
Step 15. Default Gateway
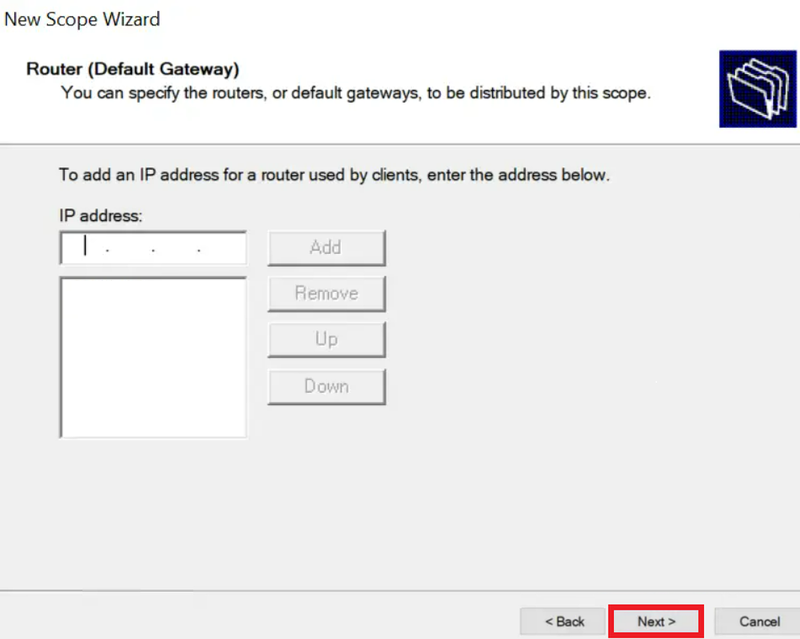
In this step of Configuring DHCP Server in Windows, you must enter the Default Gateway that will be given to the clients during the leasing period on this page. Enter it in and select “Add” next to it. Click “Next” after that.
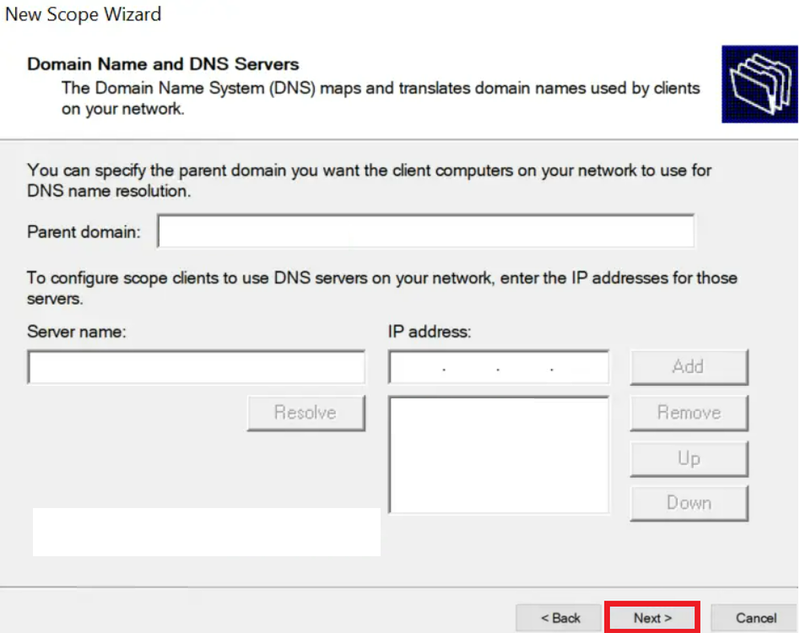
Step 16. Domain Name and DNS Servers
Previously, you got familiar with DNS Records and you know the DNS is crucial since it makes it easier to resolve FQDNs to IP Addresses. So, enter it and press “Next”
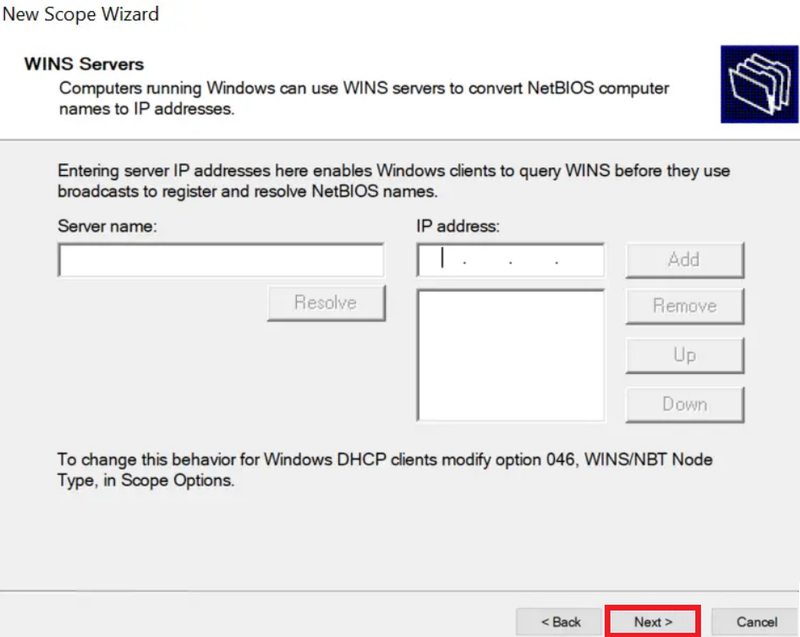
Step 17. Wins Servers
This step is optional. If you want to use WINS Server in your environment, enter the information below and click “Next” to continue.
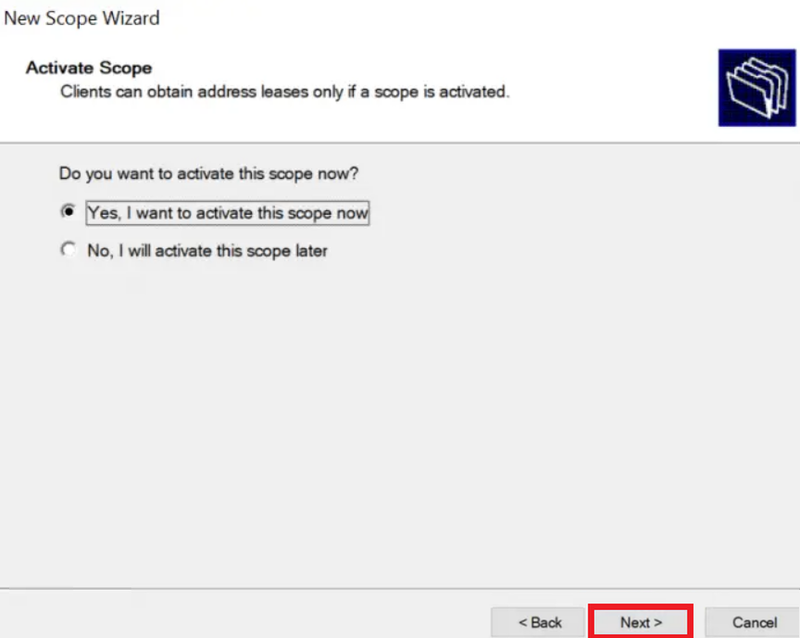
Step 18. Activate Scope
Simply click “Next” to activate the scope we have set for this Step. Pick the second radio option if you want to activate it later.
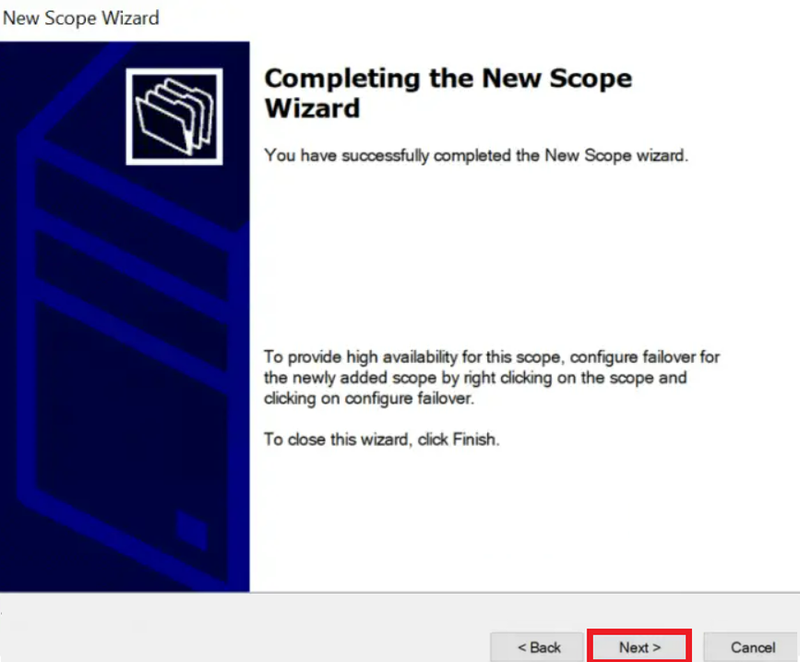
Step 19. Complete Scope Configuration
Configuring DHCP Server in Windows is now complete. Create additional scopes as shown above for the VLANS you have segmented in your LAN/Network, then set up your router so that it requests IP addresses from the DHCP server in accordance if you have done so.
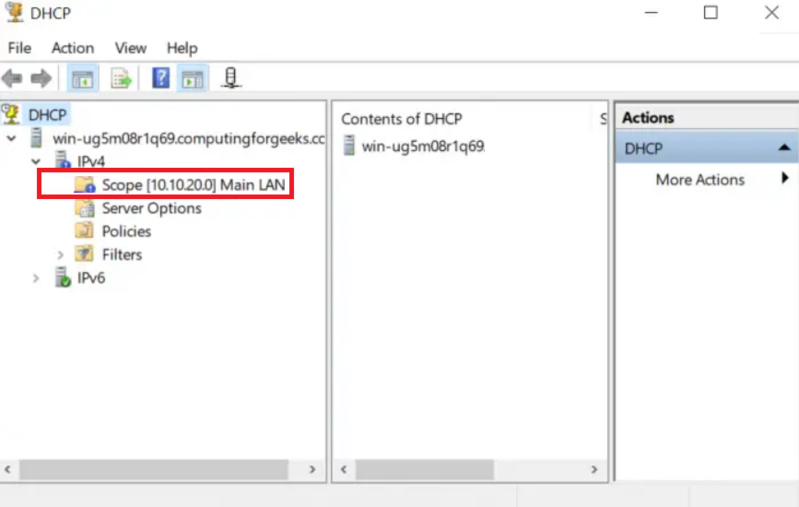
Step 20. Verify that your Scope is active and Set up
Check to see if your configs are present by opening your DHCP Configuration as in Step 9 and opening it as shown below.
Step 21. Configure DHCP Client on Windows
The next step is to set up DHCP Client so that a Windows machine can request an IP address from DHCP Server after DHCP Server has been configured on our Windows server.
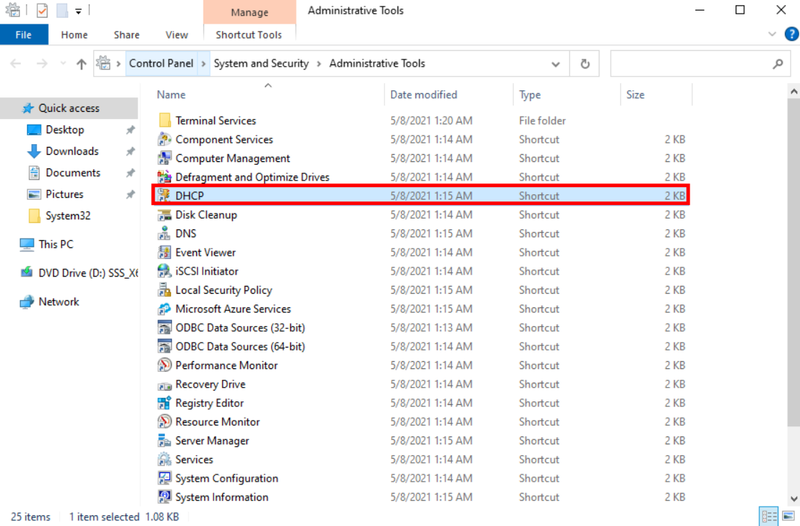
How to Access DHCP Manager Console [4 Methods]
A DHCP administration console is added to your server once the DHCP has been deployed and configured. You can further configure your DHCP server from this panel. There are multiple ways you can open this console on your Windows Server. Previously, you learned How to Install Microsoft Windows Server 2022. It is a good idea to open DHCP Manager Console on Windows Server 2022 since it is a perfect place to discuss some methods for opening this console.
Method 1. Windows Administrative Tools
You can start by demonstrating how to use Windows Administrative Tools. When you install them, other administration consoles, including DNS, are added in addition to DHCP. Anyhow, open Windows Administrative Tools from the Start Menu to access the DHCP management console using this technique. If it isn’t pinned in the Start Menu, you can search for it there. Click DHCP to open it once the Windows Administrative Tools are open.
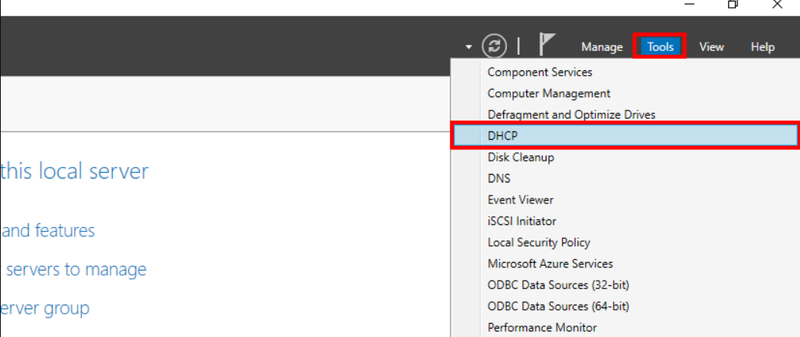
Method 2. Server Manager Console
Utilizing the Server Manager console is the second approach. The majority, if not all, of the features you add to your Windows Server, are added to the Server Manager’s Tools menu. These features include DHCP, DNS, and other things. Open the Server manager there to access the DHCP management. Next, pick DHCP from the list by clicking Tools.
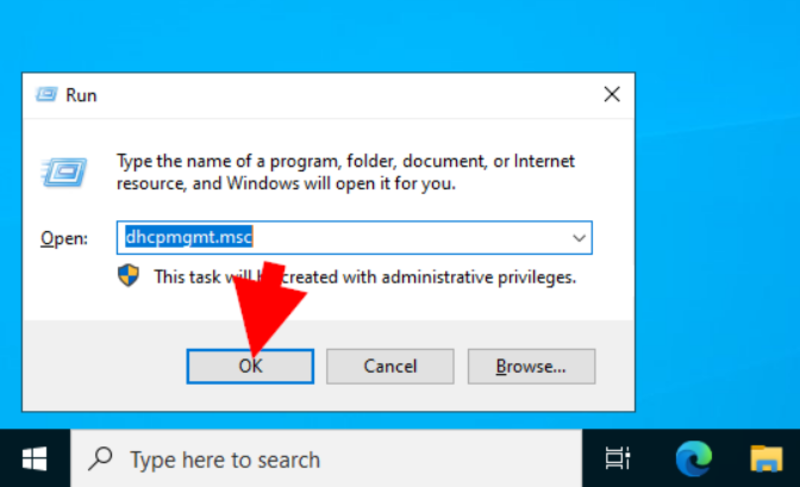
Method 3. Run Dialogue Box
Utilizing the Run dialog box is the third approach. Using this technique, launch Run by pressing the shortcut keys Windows + R. After that, type dhcpmgmt.msc and press Enter or OK.
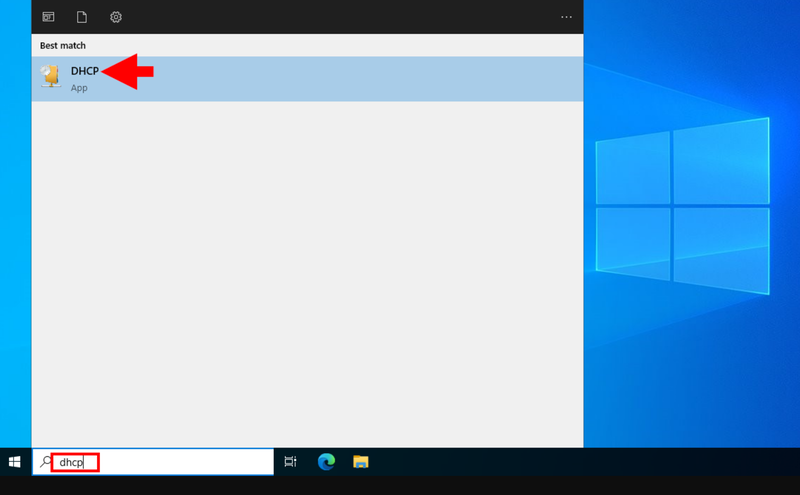
Method 4. Start Menu
The quickest and simplest method is Start Menu. The DHCP management console can be accessed easily from the Start Menu, much like the majority of other functions and tools. To open it, go to the Start Menu or click the Windows key while searching for DHCP.
FAQ
Installing the DHCP service on the server is necessary before configuring it. In a typical installation of Windows Standard Server 2003 or Windows Enterprise Server 2003, DHCP is not installed by default. DHCP can be set up either as part of the initial Windows Server 2003 installation or after it is finished.
The DHCP service frequently does not start when a DHCP server fails to give leased addresses to clients. In this situation, the server might not have permission to use the network. If you were able to start the DHCP service in the past, utilize Event Viewer to look for any entries in the System log. These logs can shed light on the difficulty in starting the DHCP service.
Follow the below steps to restart your DHCP service:
Click Start, and then click Run.
Type cmd, and then press ENTER.
Type net start dhcpserver, and then press ENTER.
This occurs when a DHCP client does not have a configured IP address. Also, when facing a network problem or because the DHCP server is unavailable. Check that the client has a functioning network connection and that all associated client hardware devices are in good order once the DHCP server has been established and other clients can get valid addresses.
Conclusion
In this article, you reviewed all the required steps of Installing and Configuring DHCP Server in Windows Server. So far, you understand what DHCP is and the main reasons for instilling and configuring it on your Server. Also, you know how crucial a part it plays in network communications. In the end, multiple ways to Access DHCP Manager Console were explained.
If you follow the above steps properly then you can Configure DHCP Server in Windows without any errors but do not hesitate to contact us if you encounter any problems. Our technical support team will try their best to solve your problems.
DHCPLite
A small, simple, configuration-free DHCP server for Windows.
Background
In 2001, I wrote DHCPLite to unblock development scenarios between Windows and prototype hardware we were developing on.
I came up with the simplest DHCP implementation possible and took all the shortcuts I could — but it was enough to get the job done!
Since then, I’ve heard from other teams using DHCPLite for scenarios of their own.
And recently, I was asked by some IoT devs to share DHCPLite with that community.
So I dug up the code, cleaned it up a bit, got it compiling with the latest toolset, and am sharing the result here.
I hope you find it useful!
Overview
For those times when you need a DHCP server but don’t have the right hardware or software: there’s DHCPLite!
DHCPLite is a small, simple, configuration-free DHCP (Dynamic Host Configuration Protocol) server that runs on Windows and will serve IP addresses to any RFC2131/2132 compliant device.
Warning!
Do NOT run DHCPLite when connected to a network that already has a DHCP server on it.
DHCPLite was not designed to cooperate with other DHCP servers and will cause serious problems.
Implementation Notes
- DHCPLite was designed to work alongside APIPA (Automatic Private IP Addressing (Auto-IP)).
If the host machine acquired its IP address in this manner, DHCPLite will not serve a new address to the host machine.
(Other machines on the network will be able to obtain IP addresses from DHCPLite.) - DHCPLite determines the range of addresses it will hand out based on the current IP address and subnet mask of the non-loopback network interface of the machine on which it is running.
In the case of a host configured by APIPA, this means an address of the form 169.254.x.x and a range of over 65,000 available addresses.
In the case of a host with a static IP address, the address and range can be changed by altering the static IP address and subnet mask settings on the machine. - Once it has assigned an IP address to a specific client, DHCPLite will always assign that same address to the client (until DHCPLite is shutdown and restarted).
This means it is possible to exhaust the available address space with either a large number of machines or a small address space. - In an attempt to mitigate possible misconfiguration problems, DHCPLite hands out address leases that are valid for only 1 hour.
Lease renewal is supported, so this should not be a problem for long-running scenarios (as long as DHCPLite is running to issue renewals). - DHCPLite requires the IP Helper API (implemented in
iphlpapi.dll).
Unsupported Scenarios
- Multi-homed host machines (i.e., host machines with more than one active network interface).
Because the WinSock API does not allow an application to disable routing of outbound datagrams (sockoptSO_DONTROUTEcan be silently ignored), DHCPLite would not be able to ensure all outgoing datagrams used the intended interface.
Unsupported DHCP Features
DHCPDECLINE,DHCPRELEASE, andDHCPINFORMmessages. (See notes above.)- Requested IP Address option. (Related to notes above.)
- Unicast to hardware address.
Because DHCPLite is a Windows client application, it does not have access to the underlying network drivers that would allow it to accomplish this.
Instead, broadcast messages are used and other DHCP clients are relied upon to ignore spurious DHCP messages.