
Начинающие и опытные пользователи ПК могут столкнуться с серьезной проблемой – самопроизвольным отключением устройства. Ошибка может носить программный или аппаратный характер. Найти ответ на вопрос, почему компьютер с Windows 10 сам выключается, можно, если выяснить, в чем причина такого сбоя. Отключение гаджета может произойти в произвольный момент или во время запуска приложения. Рассмотрим основные способы, как исправить проблему.
Почему компьютер выключается сам по себе в Windows 10
Стационарный компьютер или ноутбук спонтанно отключается по разным причинам. Основной проблемой может стать перегрев из-за скопления пыли или пересыхания термопасты. Нередко гаджет выключается во время запуска программы или игры. За работой процессора следят датчики, которые при перегреве, увеличении скорости вентилятора просто отключают оборудование.
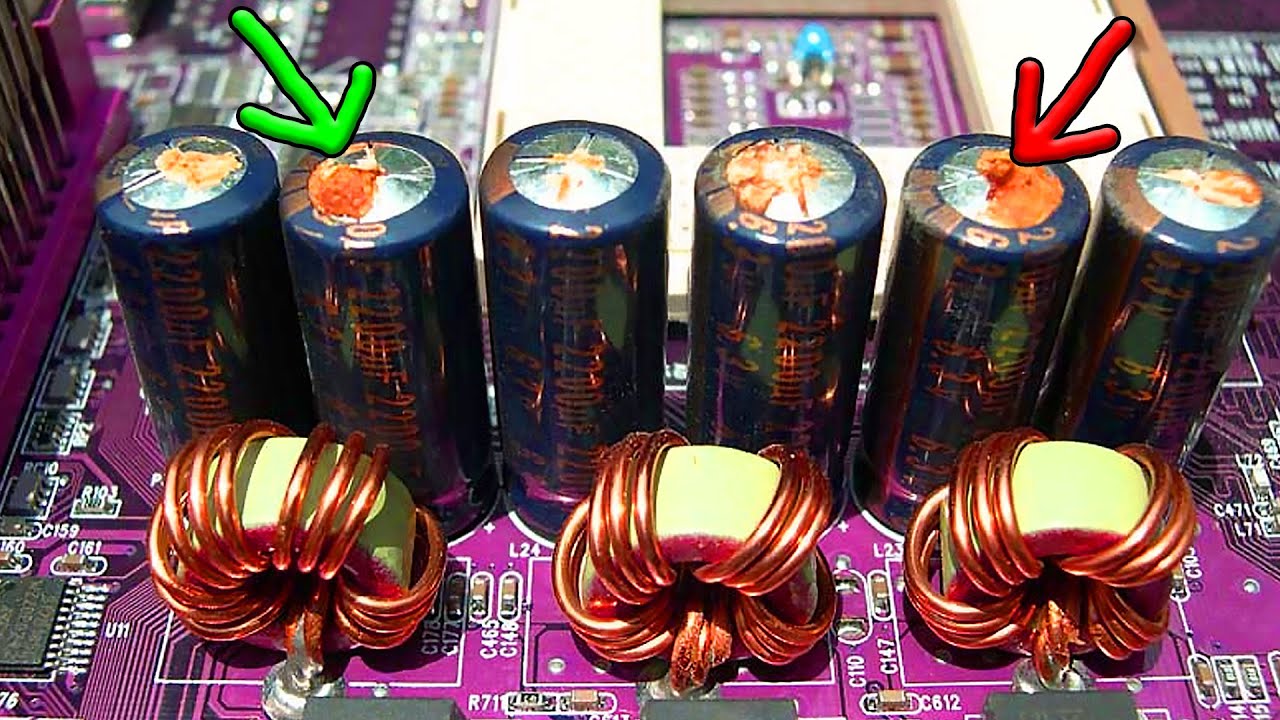
Выключаться компьютер может из-за слабого и нестабильного напряжения в электросети. Сбои в работе девайса могут быть связаны с устаревшим блоком питания или если происходила замена компонентов ПК. Если отключение питания компьютера сопровождается характерным жужжанием или скрежетом, скорей всего, причина кроется в неисправности жесткого диска.
Отключаться устройство может по другим причинам:
- конфликт драйверов;
- выход из строя материнской платы;
- поломка ОЗУ, окисление контактов;
- ПК сильно запылен;
- вирусные атаки.

Если Виндовс 10 пишет «Блокировка экрана», а затем отключается, значит, в меню «Параметры экранной заставки» выставлены неправильные настройки. Чтобы исправить ситуацию, пользователь должен войти в меню и установить с пунктами «Сон» и «Экран» параметры «Никогда». После этого устройство без согласия пользователя отключаться не станет. Но если эти действия не помогли решить проблему, то нужно проверить систему на вирусы защитными программами. Самопроизвольное выключение техники можно исключить и другими методами.
Исправление произвольного отключения
Если операционная система выключается через некоторое время после включения девайса, нужно выяснить причину проблемы. После того, как источник сбоя найдется, пользователь должен устранить его, выбрав один из предложенных вариантов.
Проверка драйверов
Поддержка компонентов системы реализуется с помощью драйверов. Их конфликт или неполадка могут спровоцировать неожиданные отключения ПК, некоторые из них сопровождаются BSOD. Для исправления ситуации юзеру понадобится выявить проблемный драйвер и переустановить его по следующей схеме:
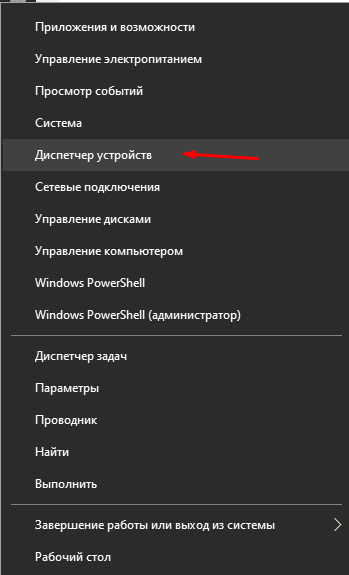
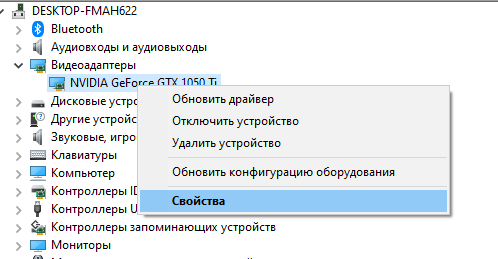
- Кликнуть ПКМ по значку «Пуск».

- Выбрать «Диспетчер устройств».
- Найти и кликнуть по пункту «Видеоадаптеры».
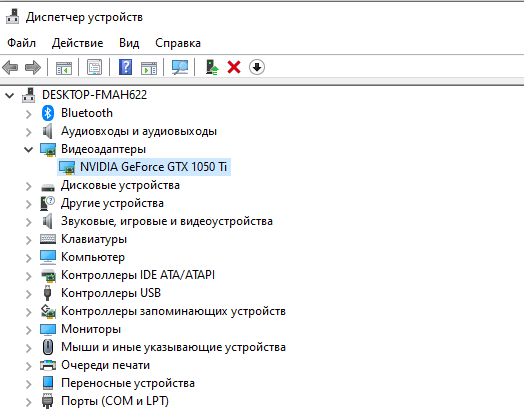
- Нажать по установленной видеокарте ПКМ, выбрать «Свойства».
- Выбрать «Автоматический поиск драйверов».
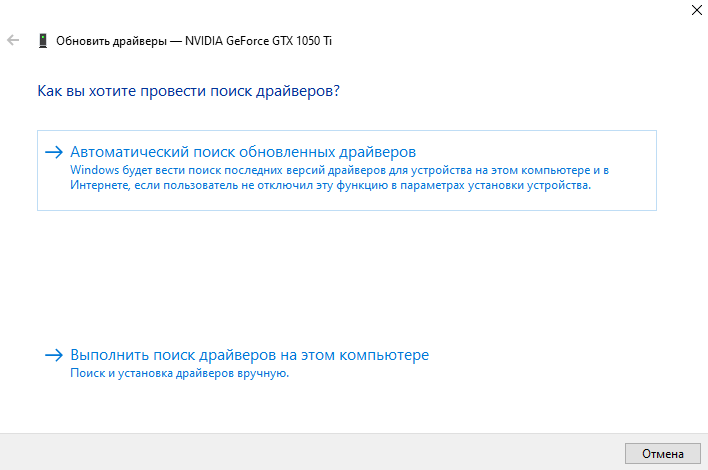
- Если Windows 10 не смогла найти подходящий драйвер, нажать снова на имя устройства, выбрать «Удалить».
- Перейти на сайт производителя, инсталлировать правильный драйвер на ПК.
- Перезагрузить устройство.
Для автоматического обновления компонентов системы можно воспользоваться специальными бесплатными утилитами. Программа отсканирует и покажет актуальную версию драйвера, пользователю останется нажать только одну кнопку – «Обновить».
Выключение спящего режима
Данная опция удобна для тех пользователей, которые оставляют компьютер в рабочем состоянии на продолжительный период. Режим сохраняет энергию, позволяет в течение пары секунд запустить технику в работу. Некоторые юзеры отмечают, что в ПК с Виндовс 10, вместо спящего режима, происходит выключение устройства. Чтобы узнать, как избавиться от проблемы, нужно следовать инструкции:
- Нажать клавиши: «Win + I» или тапнуть в меню «Пуск» на значок «Параметры».
- Выбрать «Система».
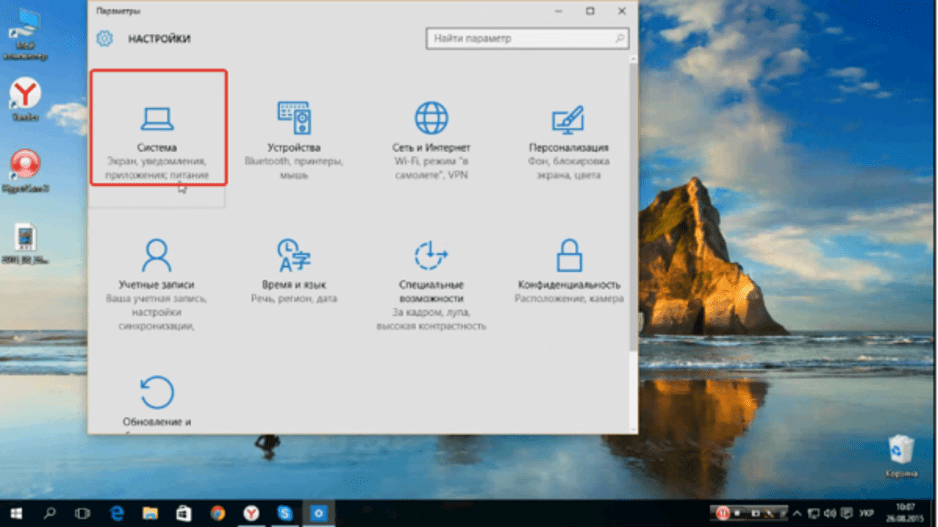
- Кликнуть «Питание и спящий режим».

- Изменить время перехода ПК в спящий режим на «Никогда».
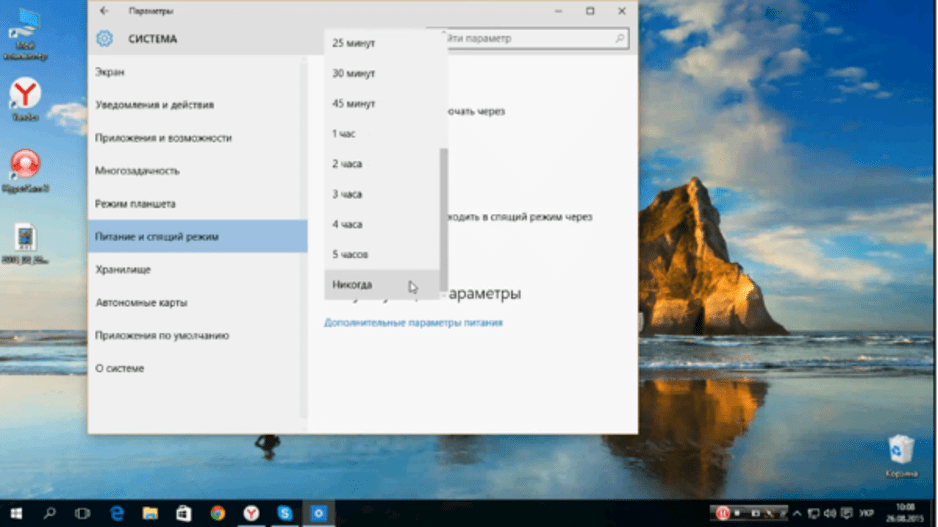
- Сохранить изменения.
При отключении спящего режима устройство будет работать непрерывно. Это повлечет больший расход энергопотребления и сократит ресурсы аккумуляторной батареи на ноутбуке.
Отключение быстрого запуска
В Windows 10 разработчики предусмотрели опцию быстрого запуска для оперативного включения девайса. Но быстрая загрузка может негативно повлиять на работу устройства, в том числе вызвать его самопроизвольное отключение.
Для отключения функции понадобится выполнить следующее:
- Кликнуть ПКМ по значку «Пуск».
- Зайти в «Панель управления».
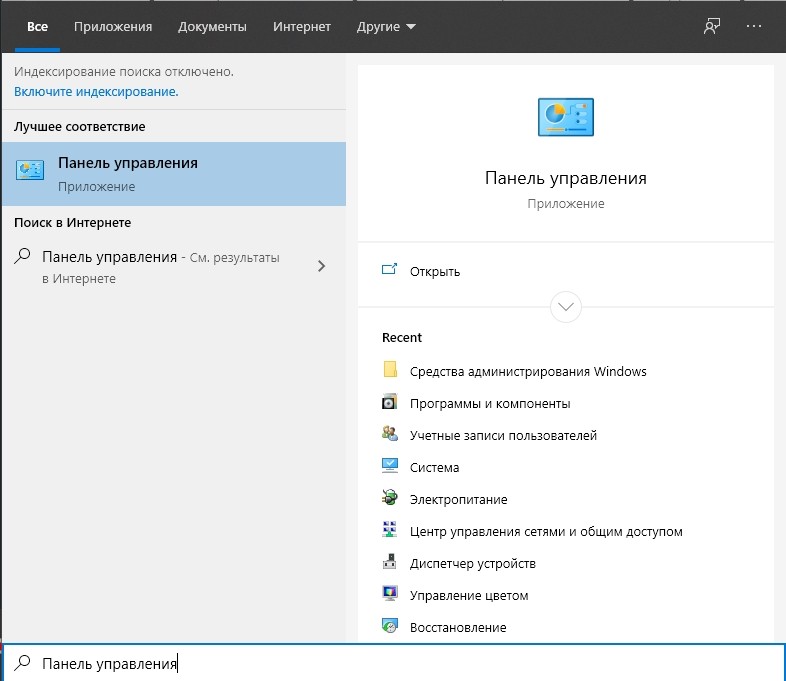
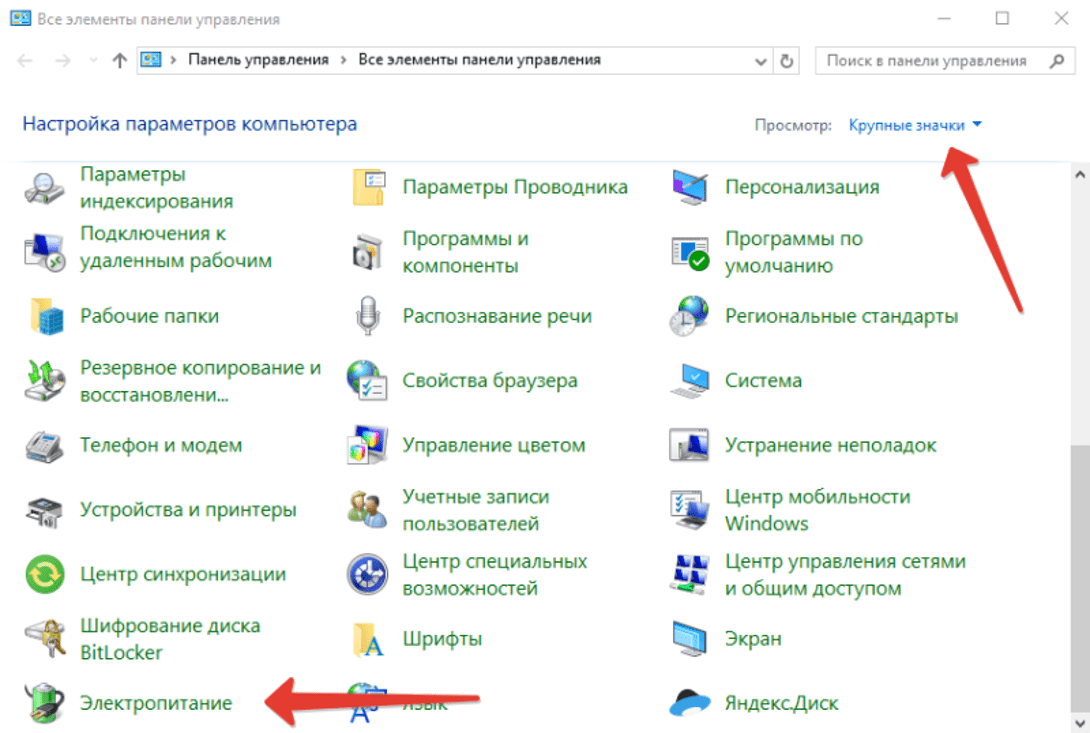
- Для удобства переключить вид на «Крупные значки».
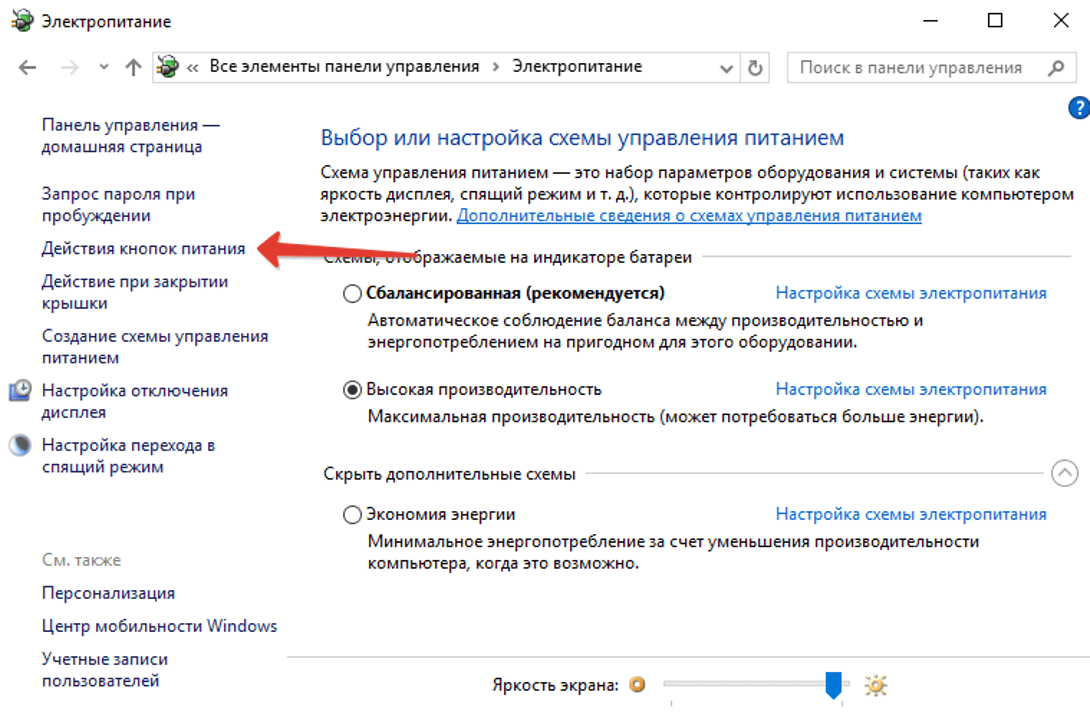
- Выбрать «Электропитание».
- В левой части меню выбрать «Действия кнопок питания».
- Нажать на ссылку «Изменение параметров…».
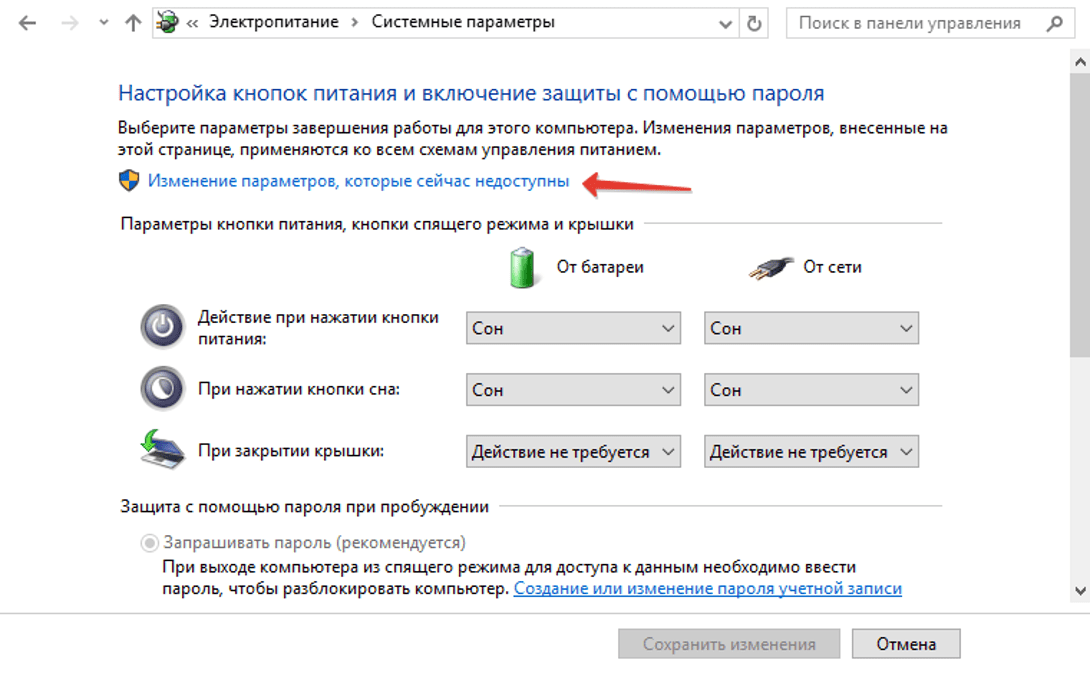
- Снять отметку с пункта быстрого запуска.

- Сохранить настройки.
Также опцию быстрого запуска можно отключить через реестр. Если компьютер снова выключился, перейти к следующему методу.
Настройка расширенных параметров питания
В «десятке» имеются расширенные настройки параметров питания для оптимальной работы устройства. Обычно пользователи не акцентируют внимание на эти параметры, так как они не отображаются на главном экране. Чтобы увидеть режим, необходимо перейти в соответствующее меню. Если случайное отключение ПК связано с настройками параметров питания, нужно выполнить следующее:
- Зайти в «Панель управления».
- Выбрать «Все элементы панели управления».
- Войти в раздел «Электропитание».
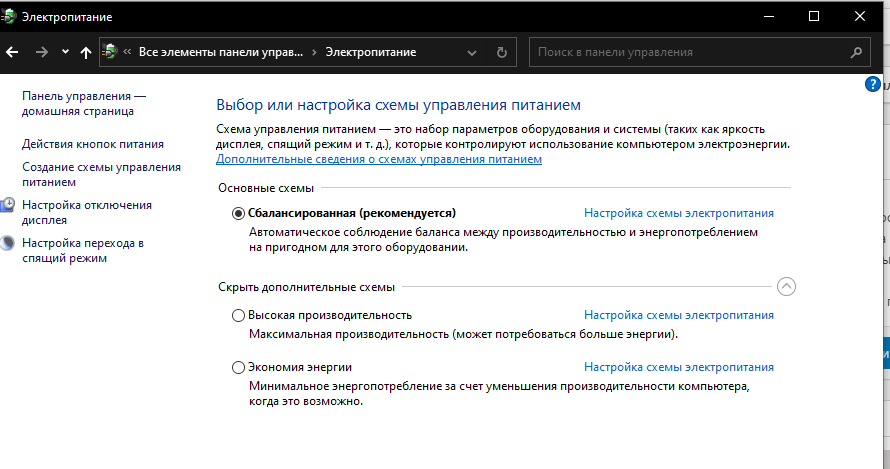
- Выбрать настройки.
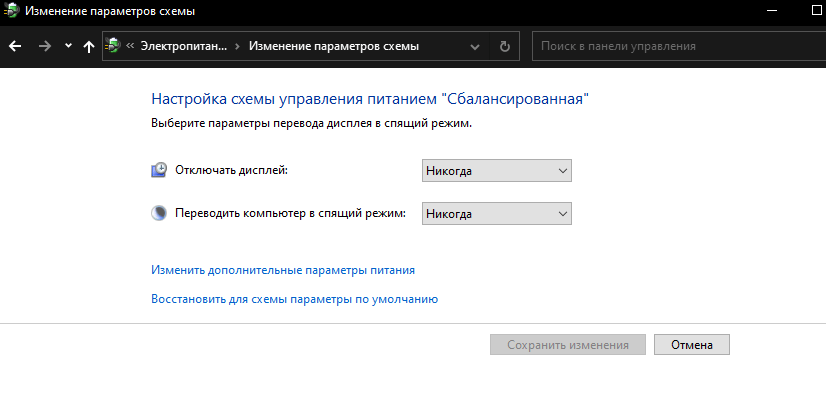
- В меню кликнуть «Изменить дополнительные параметры питания».
- Перейти в управление питанием процессора.
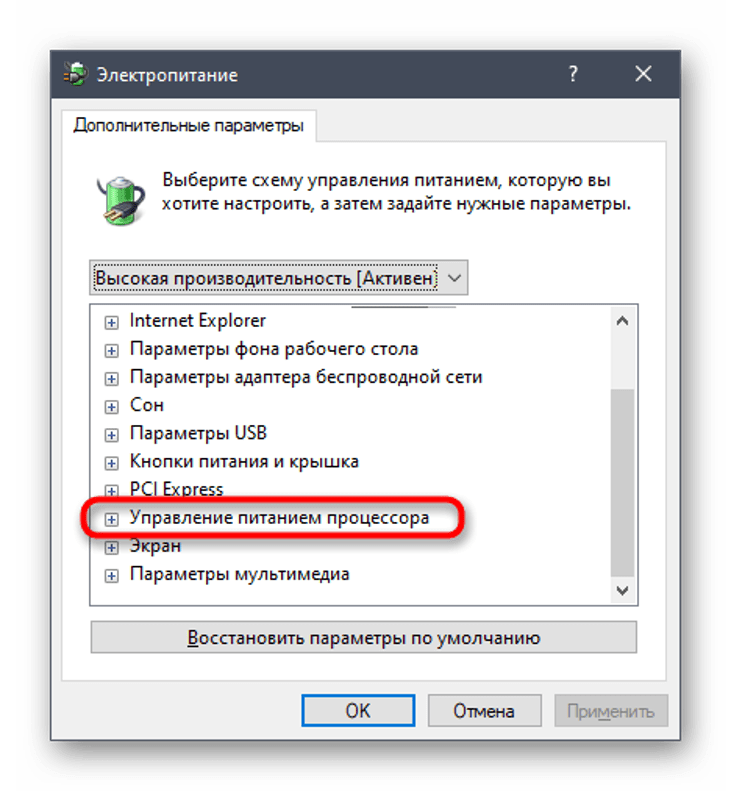
- В графе «Минимальное состояние процессора» установить значение «0».

- Перейти в «Жесткий диск», также поменять значение на «Никогда».
- Сохранить настройки.
Пользователь должен знать, что такие настройки выполняются только от имени Администратора. Любые изменения будут отражаться на энергопотреблении ПК, поэтому делать все манипуляции нужно с умом.
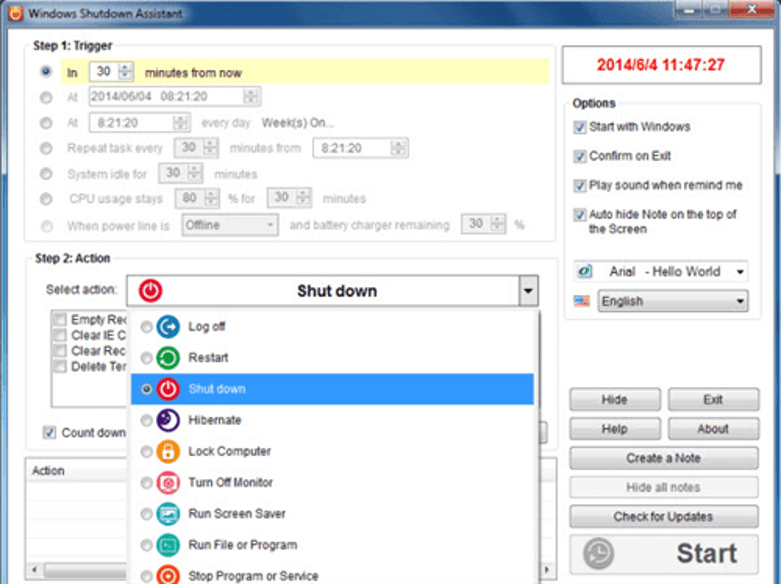
Использования специального инструмента Windows Shutdown Assistant
Утилита, которая предотвращает самопроизвольное отключение техники. Программа оснащена удобным интерфейсом, автоматическими функциями. С помощью Windows Shutdown Assistant можно настраивать отключение, блокировку ПК в случае низкого заряда батареи, длительного простоя системы. Чтобы воспользоваться инструментом, достаточно скачать его и следовать инструкции в меню.
Проверка температуры процессора
Процессор отвечает за производительность ПК. Банальный перегрев компонента может привести к резкому отключению устройства во время работы или еще более серьезным проблемам. Перегрев процессора может случиться из-за того, что компьютер запылился, системный блок стоит рядом с обогревательным элементом, давно не производилась замена термопасты.
Для того чтобы избавиться от проблемы систематического отключения гаджета, нужно пропылесосить системный блок. Предварительно нужно отключить его от электросети. Также при высокой температуре можно попробовать очистить кулер, поменять термопасту и приобрести специальную подставку под ноутбук.

Если все выше перечисленные действия не помогли, и компьютер снова самостоятельно завершает работу, перейти к следующему способу.
Обновление BIOS
Программное обеспечение находится внутри микросхемы памяти на материнской плате ПК. Базовую систему ввода-вывода необходимо периодически обновлять, чтобы поддерживать совместимость с программным и аппаратным обеспечением. Нельзя обновлять ту же версию БИОС, установленную на устройстве.
Пошаговая инструкция:
- Используя браузер, зайти на сайт производителя ПК.
- При необходимости указать серийный номер и номер модели устройства.

- Найти и скачать последнюю версию BIOS.

- Сохранить файл на Рабочем столе.
- Дважды щелкнуть по нему.
- Нажать «Ok».
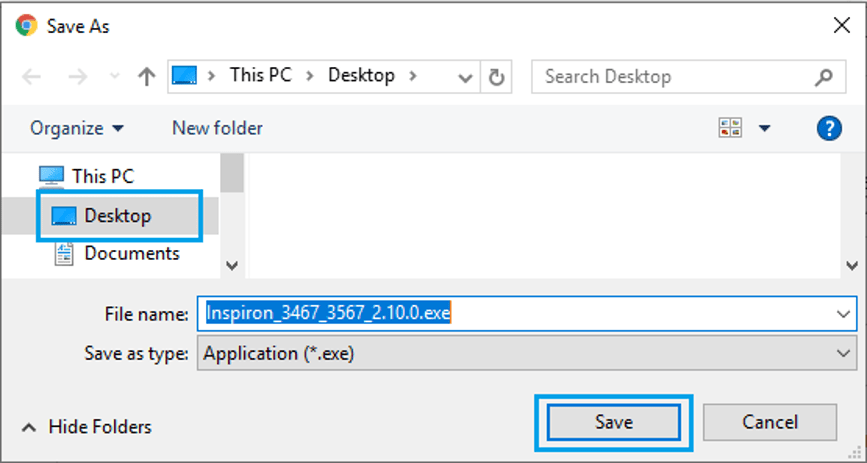
Пользователю останется дождаться, когда завершится процесс. Затем перезагрузить компьютер.
Проверка состояния жесткого диска
Если жесткий диск поврежден или работает с поломанными секторами, то работа устройства может вызывать ряд проблем. Также винчестер может устареть и со временем выйти из строя. Для проверки HDD можно воспользоваться встроенным инструментом или скачанными утилитами.
Как пользоваться установленной на ПК программой для проверки жесткого диска:
- Кликнуть по значку «Пуск».
- Выбрать запуск КС с администраторскими правами.

- Ввести: «wmic diskdrive get status».
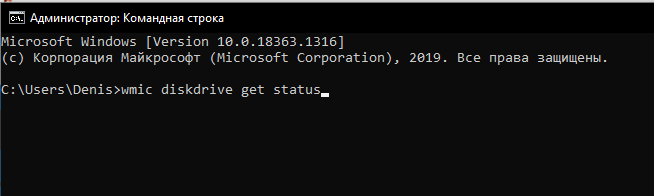
- Программа оповестит, если на жестком диске имеются проблемы.
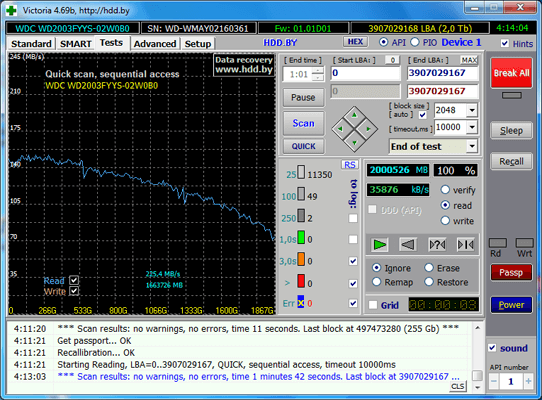
Также для проверки HDD можно воспользоваться бесплатными приложениями: Victoria HDD, Crystal Disk Mark, HDDScan, DiskCheckup и другими.
Выполнение чистой переустановки
Если проблема носит аппаратный характер, для устранения проблемы самопроизвольного отключения гаджета может помочь переустановка Виндовса. Процесс занимает обычно около 2 часов.
При произвольном отключении стационарного компьютера или ноутбука важно выявить источник проблемы. Провести диагностику пользователь может самостоятельно, без привлечения специалистов. В первую очередь, желательно проверить систему на наличие вирусов, а также убедиться в постоянном напряжении в электросети.
Your laptop’s Windows 10 is stuck on shutting down or going to sleep after the recent Windows 10 upgrade? It has been reported that some users have tried to shut down by pressing the shutdown button. A spinning circle has been spinning on the computer’s shutdown window for hours now.
In another few seconds, the screen disappears, but the computer continues to function. Press and hold the power button to stop Windows from shutting down.
While there are a variety of possible causes of this issue, the Hybrid Shutdown feature is the leading cause. Windows 10 may also not shut down properly due to improper power or background application configurations. Whatever the cause, there are various ways you can resolve shut-down and startup issues: Windows 10 won’t shut down or sleep.
How to Resolve Windows 10 Stuck on Shutting Down Issue
When you shut down the computer, some system processes may continue to run – installing updates, for example, or making modifications.
In this case, please wait up to three hours if it happens for the first time. Here are some steps you can take if your update has become stuck for the second time in a row after exceeding the time limit.
Follow these procedures to see if there are any updates available:
1. Check if application or process are running
The background may be occupied by certain apps or processes. The computer might not be able to shut down completely because of them. To launch Task Manager, press Ctrl+Shift+Esc and make sure all apps are closed before starting a shutdown.

Close all open windows and applications before closing down. In Windows, these apps take longer to close, and you may have to save your work before you exit. Further delays or errors can result from these factors.
2. Run the Power Troubleshooter program
To save energy, use the built-in Power Troubleshooting program, which detects and fixes problems with computer power settings.

- Select Settings by pressing the Windows + X keyboard shortcut.
- Go to Update & Security and then Troubleshoot.
- Click Power in the middle pane and launch the troubleshooter as shown in the figure below.
- This will check for and correct any erroneous power configurations that are preventing Windows 10 from properly shutting down.
Run the Windows update troubleshooter from there as well, which will discover and fix any outstanding update bugs that are preventing Windows from shutting down properly. After that, restart your computer to see whether the changes have taken effect and to see if the problem has been resolved.
3. Upgrade Your Windows Operating System
To enter Settings, press Windows key+I on the keyboard and select Update & Security.

If there are any updates available, install them. It may resolve some issues, both known and unknown. Once the installation has been completed, restart your computer. If the shutdown screen is still displayed, check to see if it has become stuck.
4. Turn Off Chrome’s Background Processing
Windows 10 shutdown blocked occurs when some programs and apps continue to run in the background, preventing the machine from fully shutting down.
So the best solution is to turn off Chrome in the background:
- Open Chrome, click the menu, and select Options > Show advanced settings from the drop-down menu.
- Untick the box next to System under the System title. When Google Chrome is closed, keep running background programs.
- Click the settings tab to close it.
5. Turn off Fast Startup
By putting the system into hibernation mode instead of a complete shutdown, Windows 8.x introduced fast startup and hybrid shutdown to decrease boot and shutdown times.

It is possible to quickly resume from hibernation using the rapid startup feature. It is possible, however, that this shutdown method will not work on older systems, leaving the computer trapped on the shutdown screen.
Many people have found that removing the rapid startup solves the problem.
- Press the Control panel, then type “power options” in the search bar;
- Select “Change What the Power Button Does” from the drop-down menu;
- Select “Change settings that are presently unavailable” from the drop-down menu;
- Select “Turn on fast starting (recommended)” and uncheck it.
6. Use the Intel Management Engine Interface to Set Up Your Settings
- To open the Jump List and Select Device Manager, press Win + X on your keyboard.
- Double-click the Intel Management Engine Interface after expanding the System devices entry.
- Select the Power Management option (if there is such a tab).
- Uncheck the box. To save energy, allow the computer to turn off this gadget.
Note: If you’re using a desktop computer and don’t see the Power Management tab, proceed to the next solution, “Update IMEI driver.“
7. Install the latest IMEI driver

- Open Device Manager once more and expand the System Devices entry.
- Navigate to the Intel Management Engine Interface and double-click it.
- Navigate to the Intel Management Engine Interface’s Driver tab.
- Select Update Driver from the drop-down menu.
The driver file can also be downloaded from a manufacturer’s website by selecting Browse my computer. To upgrade to the latest version of the IMEI driver, follow the on-screen instructions.
8. Startup Applications
You can set some applications and programs to run automatically when your computer is turned on. Computer startup and shutdown times may vary depending on the number of programs and their complexity. Cleaning the house is a good idea right now. Download and open CCleaner or any other respectable app.
If you don’t want any app to be activated upon startup, click Disable here. Additionally, this will fix the computer’s problem of being stuck on the shut-down screen and enhance boot time.
9. Remove and Reinstall the Battery Driver of Your Laptops
If you have this problem on a Windows 10 laptop, uninstalling and reinstalling the battery drive will most likely solve the problem.

- First, turn off your computer and unplug the power cord.
- Take out the battery now (if fixed no need to remove)
- Connect the power cord and restart your computer.
- Select Device Manager by pressing the Windows Key + X keyboard shortcut.
- Expand the Batteries section, then right-click Microsoft ACPI-Compliant System and select Uninstall.
- Turn off the computer and unplug the power cord.
- After that, connect your batteries. Connect your power cord and restart your computer to have the driver installed automatically.
Does Windows 10 Shut Down Completely?
When you click “Shut Down” on your Windows 10 Stuck on Shutting Down . It hibernates the kernel, allowing it to boot faster by preserving its state.
Is It True That Forcing a Shutdown Harms the Computer?
Shutting down your computer may damage your data. You will lose all your unsaved work if something goes wrong while you’re working on a file. Data corruption may also occur in any open files during the shutdown process.
How Often Should Your Computer Be Restarted?
Shutting down older versions of Windows every night will ensure optimum performance. Newer versions of Windows and Mac computers require less shutdowns or restarts.
What Happens if You Don’t Shut Down Your Computer Before Turning It Off?
NTFS (New Technology File System) is used in newer Windows computers, and it provides greater performance and data structures. Forcibly shutting down a computer might result in significant data loss and corruption, requiring you to reinstall the operating system.
Conclusion
Your Windows 10 Stuck on Shutting Down issue may have been resolved with one of the options listed above. Is there another viable option that you can suggest? Comment below with your ideas!
Editors Pick for You
- How to Free Up Disk Space on PC Windows 10
- 7 Ways To Fix Windows 10 Start Menu Not Working
- 9 Best Windows 11 Tips and Tricks That Everybody Should Know
- How to Update Drivers on Windows 10
It’s very nagging when you shut down your windows 10 computer, and it gets stuck on the shutting down screen for minutes, or even for hours!
There are several reasons why a Windows 10 computer won’t shut down and get stuck on shutting down screen. And for each, there is a solution;
This article will give you ten ways that allowed many users to fix the Windows 10 stuck on the shutdown screen by applying one of those solutions.
- Force shut down
- Run Power Troubleshooter
- Disable Fast Startup
- Disconnect USB Devices
- Reset Power Plan to default
- Enable Verbose on Startup / Shutdown
- Disable Services & Startup Applications
- Change Intel Management Engine Interface Settings
- Turn Off WiFi
- Fix Corrupted System Files
But, if this is the first time your computer is stuck on shutting down screen, be patient.
Maybe it’s installing some windows updates, or some tasks are running in the background that needs some time to complete.
If after waiting one hour there is no change, then apply method number one;
Method #1: Force shut down
The first step toward solving this issue is to force shut down;
- Keep pressing the power button for 5 seconds to 10 seconds (works for both desktops and laptops).
- Once your computer powered off, power it on and jump to method #2
Method #2: Run Power Troubleshooter
- Press Windows key+ I to open Windows Settings;
- In the search bar, type “troubleshoot”, then click on “Troubleshoot Settings“;
- Select “Power” and click on “Run the troubleshooter“;
- The troubleshooter will search for any problem misconfiguration with power settings and try to fix it for you.


Method #3: Disable Fast Startup
Fast startup or hybrid shutdown has been introduced with Windows 8.x to improve boot and shutdown times by putting the system in a hibernation mode instead of a complete shutdown.
The fast startup allows the system to start quickly by resuming from hibernation.
But on some computers, ancient ones, this shutdown mode may not work as expected and causes the computer to be stuck on the shutdown screen.
Many users have solved this problem by disabling the fast startup;
- Press the Control panel, then type in the search bar “power options“;
- Click on “Change What the power button do“;
- Click on “Change settings that are currently unavailable“;
- Uncheck “Turn on fast startup (recommended);


Method #4: Disconnect USB Devices
If your Windows 10 computer won’t shut down, the problem might be USB devices.
Several users reported that disconnecting an external USB storage device has solved the problem for them.
Be sure to disconnect any unnecessary USB device (Storage device, USB Camera …etc.) before shutting down.
Method #5: Reset Power Plan to default
Sometimes the reason Windows 10 is stuck on shutting down is your power plan settings.
Some users change their power plan settings to enhance their computer performance or for better energy saving. But these changes can cause this issue.

To reset your power plan to default:
- Press Windows key + I to display Windows Settings;
- In the Windows Settings, type “Power Plan“, then click on “Edit Power Plan“;
- Then click on “Restore default settings for this plan” and save changes;


Method #6: Enable Verbose on Startup / Shutdown
By default, when Windows 10 starts up or shut down, it does not display a lot of information so that you can know what the system is doing at each startup/shutdown stage.
This information can be useful when troubleshooting;
You can enable the verbose policy to allow you to identify the process or the application that prevents Windows 10 from shutting down.
To enable the verbose policy;
- Click on the Windows start menu;
- Type in the search bar “gpedit.msc” and open the console;
- On the local group policy editor, click on “Computer Configuration > Administrative Templates > System“
- In the right pane, double-click “Display Highly Detailed Status Messages“;
- Click Enabled > OK
- Shutdown your computer and notice the message displayed when Windows 10 get stuck on the shutting down screen;
- Go to the next method to see how to disable the culprit service or application;


Method #7: Disable Services & Startup Applications
In Windows 10, many services and applications start when starting Windows 10.
Some of those services and applications are installed by third-parties software, and in some cases, they can prevent Windows 10 from shutting down properly;
Disable a service:
- Click on the Windows start menu;
- Type in the search bar “services” and open the application;
- Right-click on the service you want to disable and select Stop to stop the service from running;
- Once the service stopped, right-click again and select properties;
- In the “startup type” dropdown box, select Disabled and click Apply;
- Close the service properties Window and shut your computer down;


Disable a Startup Application
If Windows 10 won’t shut down, it may be an application that prevents the system from shutting down.
So you need to prevent this application from starting up automatically;
- Open the task manager;
- Click on the Startup panel, select the application and click on the Disable button;

Method #8: Change Intel Management Engine Interface Settings
Some users reported that by changing the Intel Management Engine Interface settings, they’d solved this problem;
To change the Intel Management Interface settings:
- Press Windows key + X to open the quick link menu and select device manager;
- expand System devices, then double click on Intel(R) Management Engine Interface;
- Choose the Power Management tab;
- Uncheck the Allow the computer to turn off this device to save power.


Method #9: Turn Off WiFi
Some users reported that they solved this issue by turning off the WiFi .
Method #10: Fix Corrupted System Files
Corrupted or missing system files can cause Windows to be stuck on the shutdown screen.
To fix corrupted or missing system files, run SFC and DISM utilities;
- sfc /scannow
- DISM /Online /Cleanup-Image /RestoreHealth
Related
My PC with Windows 10 won’t shut down properly, help!
«Does anyone know why Windows 10 shutdown screen freeze after system update? I got this issue that last week I upgraded Windows 10 to the latest version, and then here comes the problem that it seems Windows 10 won’t shut down completely. Every time when I shut down the computer, the light is still on. And recently, a new problem occurred that Windows 10 hangs on shutdown screen when I clicked Shut Down button on power options. I had to force the computer shut down manually every time by pressing the power button. So is there a way that can help me out of Windows 10 hangs on shut down screen and freeze issue? I really need help!«
It seems that Windows 10 shut down hangs or stuck issue have been causing quite a lot of complaints from Windows users. And don’t worry if you are having this issue on your PC. Right here in the below, you’ll find recommended solutions from EaseUS and other professionals and you can just follow to repair «Windows 10 shut down» issue.
Quick fix Windows 10 hangs on shutting down screen error
Check power settings
1. Restart PC and go to Start > System > Power & sleep.
2. Click on Additional power settings and check all settings whether are all right.
Repair and fix bad sectors on system disk that blocks Windows 10 from shutting down
Download and install partition manager software on your PC, then follow these steps below:
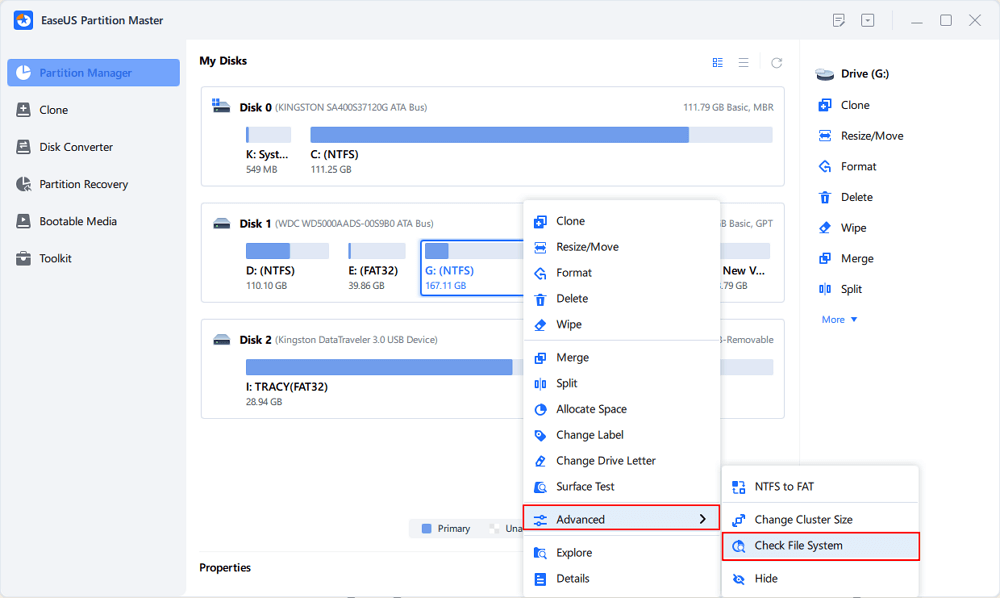
Step 1. Open EaseUS Partition Master on your computer. Then, locate the disk, right-click the partition you want to check, and choose «Advanced» > «Check File System».
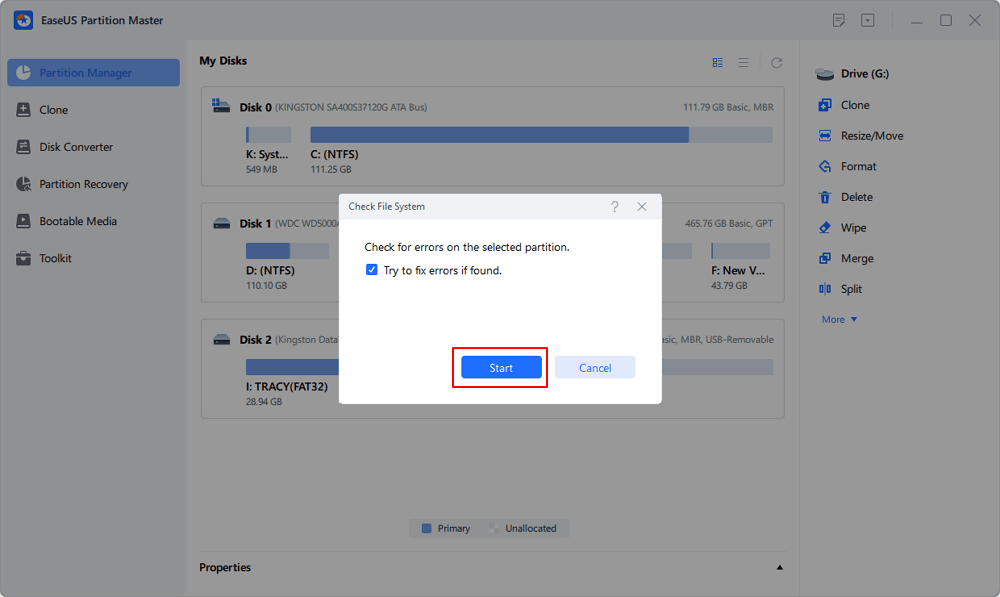
Step 2. In the Check File System window, keep the «Try to fix errors if found» option selected and click «Start».
Step 3. The software will begin checking your partition file system on your disk. When it completes, click «Finish».
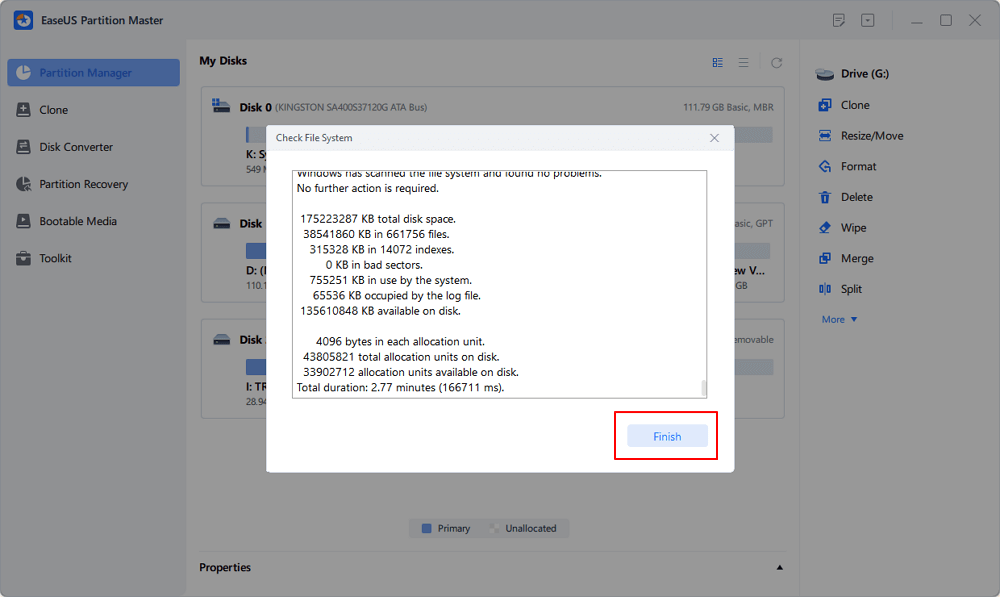
After this, reboot PC to keep all changes.
Disable Hybrid Shutdown manually
1. Type: power options in Search and hit «Enter».
2. Click Power Options > Choose what the power button does.
3. Click Change settings that are currently unavailable > Turn on Password protection.
4. Uncheck Turn on fast startup (recommended) check box to disable Hybrid Shutdown.
5. Click «Save changes» and close Power Options window.
Method 1. update Inter related drivers to fix Windows 10 shutdown stuck error
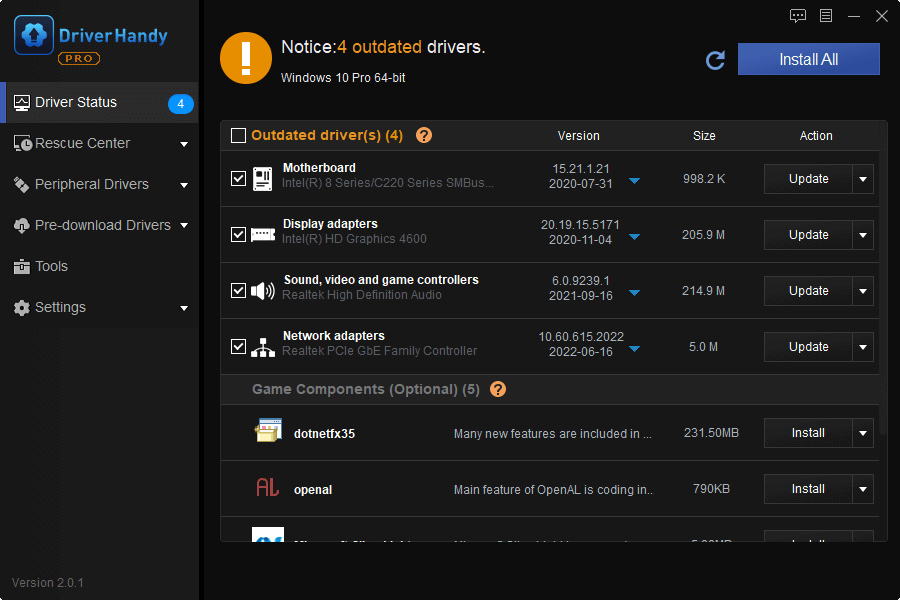
You can try to update device drivers to fix Windows 10 shutdown hangs or stuck issues. EaseUS DriverHandy can help you quickly find out corrupted and outdated drivers automatically and fix these bugs and vulnerabilities. It is compatible with all Windows users.
It is an easy-to-use tool that is suitable for users. And follow the steps below to update device drivers to fix Windows 10 shutdown.
Step 1. Download EaseUS DriverHandy and open it.
Step 2. Click «Scan» to find out the corrupted device drivers.

Step 3. Choose the drivers you want to update and click «Update.»
You may also try below two ways to get rid of «Windows 10 shut down stuck» issue:
1. Uninstall and reinstall Intel(R) Mobile Express Chipset SATA ACHI Controller in device manager.
2. Download the latest version of Intel RST driver from Intel website and then install it.
Method 2. Stop Chrome Running in the background
Some apps and programs such as Chrome browser etc may still run in the background and cause Windows 10 shutdown stuck error, which will prevent the system from shutting down properly.
So the best way is to stop Chrome running in the background:
1. Enter Chrome, click on the menu and go to Settings > Show advanced settings.
2. Under System heading, untick the box next Continue running background apps when Google Chrome is closed.
3. Close the settings tab.
Method 3. Manually fix «Windows 10 shut down stuck» error
1. Right-click Start and select Control Panel > Troubleshooting.
2. Select Fix Problems with Windows Update under System and Security.
3. Select Troubleshoot as Administrator.
4. Select Run Maintenance Tasks under System and Security > Troubleshoot as an Administrator.
If this won’t work, continue with step 5.
5. Type: Reset This PC in the Search box and hit «Enter».
If this doesn’t work, continue with below steps.
6. Right-click Start and select Run.
7. Type: msconfigand hit Enter.
8. Select Services > Check Hide all Microsoft Services > Uncheck Only 3rd party programs that you installed such as an AV program.
Don’t uncheck Intel, NVIDIA or AMD services.
9. Click Apply > OK > Click Restart.
10. Shut down PC.
Критическая ошибка Kernel Power 41 (63) Windows 10 Решение
FIX — Task Host is stopping background tasks in Windows 10
Bootmgr is missing. Press Ctrl+Alt+Del to restart как исправить в Windows 7, 8, 10
Как исправить BOOTMGR is missing Press Ctrl+Alt+Del to restart
Fix DistributedCOM Error 10016 Windows 7, 8 And 10
3 EASY WAYS TO FIX BOOT UP ERROR WINDOWS 7 8 10 BLUE SCREEN OF DEATH (BSoD)
How To Fix Windows 10 Boot Error Code 0xc00000e [Quick Tutorial]
How to fix kmode_exception_not_handled error in windows 10/8.1/8
Компьютер не выключается! Баг системы Windows 10 10586.494 | PC is not shutdown!
How to Fix All .DLL file Missing Error in Windows PC (windows 10/8.1/7)
Также смотрите:
- Отказано в доступе к принтеру Windows 7
- V3 571g переустановить Windows
- Забыл пароль в Windows phone
- Как настроить кнопку поиска на Windows phone
- Как установить directplay Windows 8 1
- Как убрать сообщение обновить до Windows 10
- Как отключить рекламу в браузере Windows 10
- Какие ненужные службы отключить в Windows 7
- Как узнать имя скрытой сети на Windows
- Как удалить powershell Windows 2003
- Настроить smtp в Windows server 2008
- Как создать профиль пользователя в Windows 7
- Как обновление до Windows 10 на пиратке
- Как включить nat pmp на Windows 7
- Windows 7 как удалить вирус goinf