File Extension is that which identifies the file type. If you are a regular Windows user, then it is not at all a problem to identify the file type. For it is very important to see file extension to identify the type of file you are trying to open from a security point of view. So in this post, we will see how to hide or show File Extensions in Windows 11/10/8/7 and why you should show them.
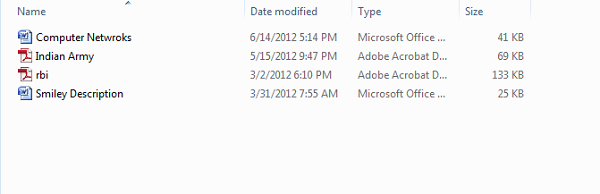
Since file names allow you to use multiple full stops, the real name of a malware file could be realword.docx.exe. But because you have not set Windows to show file extensions, you would see only realword.docx. Thinking it’s a Word document, you could well end up clicking on it and infecting your computer. If you had, on the other hand, set your PC to show file extensions, you would see its full name – realword.docx.exe, which would help you to identify that it was actually an executable file and in all probability a malware file. This will thus help you tell if a file is malicious or not.
What are File Extensions & how are they useful
Different file types have different extensions. Audio files have .mp3, .wav, .wma, and more based on the program used to open that file. File extensions also help the operating system to identify the corresponding program to open that particular file. So, you should be able to see file extensions to be at the safer side, and we will let you know how to enable options to see file extensions in Windows.
As mentioned earlier, by default Windows does not show file extensions and they are hidden. But, you can toggle the option to see them.
There are five ways how you can go about accessing this setting:
- Through the File Explorer Options
- Through Windows Explorer Ribbon
- Using the Registry
- Using Command Prompt
- Using Group Policy Editor.
1] Through Folder or File Explorer Options
To Show File Extensions in Windows 11/10 via File Explorer Options, follow these steps:
- Open Control Panel > Appearance and Personalization.
- Now, click on Folder Options or File Explorer Option, as it is now called
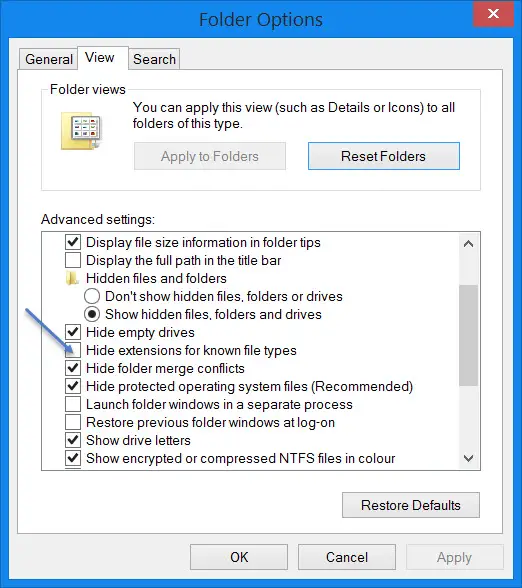
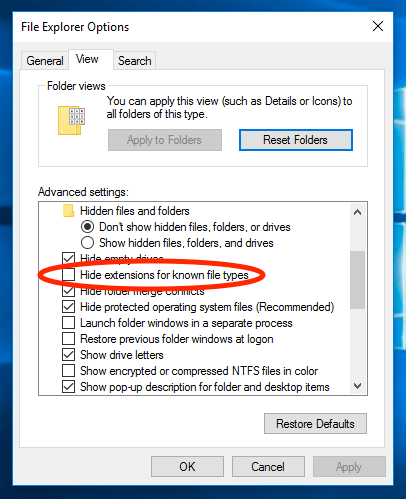
- Select the View tab.
- In this tab, under Advanced Settings, you will see the option Hide extensions for known file types.
- Uncheck this option
- Click on Apply and OK.
Windows 11/10 users may also search for File Explorer Options in Start search box and open this box.
Now, you can see file extensions for all files anywhere on your Windows system.
In Windows 11/10/8.1 Explorer, you can access File Explorer Options via Explorer.
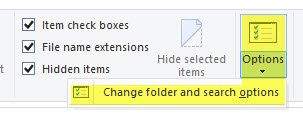
Click View > Options > Change folder and search options.
Once here, you can do the needful as explained above.
In Windows 7, open Explorer, press Alt on your keyboard to make the Classic bar appear. Next, click on Tools > Folder Options. Now follow the steps mentioned above.
These are very simple steps to follow, and you do not need any third-party software to view file extensions. Windows provides us with everything which can be easily achieved, and the point lies in knowing and implementing them. This is the first way to see file extensions in Windows 7.
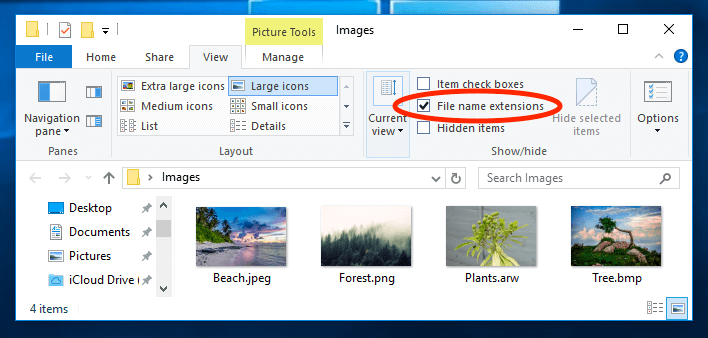
2] Via Windows File Explorer

To show File name extensions in Windows 11:
- Open Explorer
- Click on View in the top menu
- Click on Show next
- Select File name extensions.
To show File name extensions in Windows 10, open Explorer and click on the View tab.
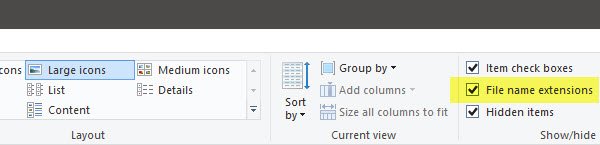
Simply select the File name extensions checkbox, and you are all set.
3] Using the Registry Editor
Hit the WINKEY + R button combination to launch the Run utility, type in regedit and hit Enter. Once Registry Editor opens, navigate to the following key-
Computer\HKEY_CURRENT_USER\Software\Microsoft\Windows\CurrentVersion\Explorer\Advanced
Look up for a DWORD entry labeled as HideFileExt.
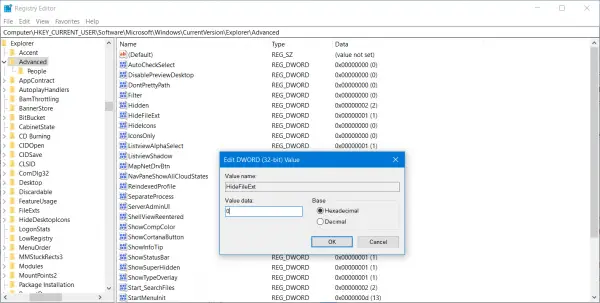
Double click on the mentioned DWORD entry and set its value as 0. This will show up the hidden file extensions.
A value of 0 will hide the file extensions.
Exit the Registry Editor and then reboot your computer for the changes to take effect.
4] Use Windows Command Prompt
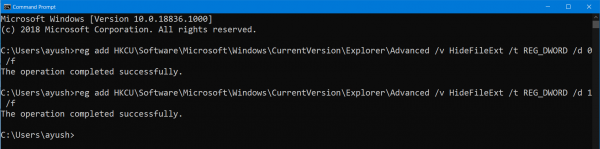
This fix can be used in both the scenarios mentioned above. Insert a bootable drive of Windows 11/10 installer.
Start by hitting the WINKEY + X combinations and select Command Prompt (Admin) to launch Command Prompt with Administrator Privileges.
Navigate to the root location of that bootable device inside the Command Prompt command line. Once you get there, type in the following to show the file extensions-
reg add HKCU\Software\Microsoft\Windows\CurrentVersion\Explorer\Advanced /v HideFileExt /t REG_DWORD /d 0 /f
And then hit Enter.
You can also enter the following command to hide the file extensions,
reg add HKCU\Software\Microsoft\Windows\CurrentVersion\Explorer\Advanced /v HideFileExt /t REG_DWORD /d 1 /f
5] Using Group Policy Editor
You can also use the Group Policy Editor and change the setting here:
User Configuration > Preferences > Control Panel Settings > Folder Options.
Set “Show hidden files and folders” and uncheck “Hide extensions for known file types”.
Thus, you can set your Windows to show file extensions in Windows 11/10/8.
Read: How to create a file without an Extension in Windows.
How do I show file type extensions in Windows 11/10?
To show the file type extension or file extension in Windows 11/10, you need to open the Folder Options panel and remove the tick from the Hide extensions for known file types checkbox. At last, click the OK button to save the change. After that, you can find the file extensions of all the files you may have on your computer.
Read: How to open a file with no extension in Windows.
How do I see all file extensions in Windows?
The process to see all file extensions in Windows 11/10 is the same as the above one. That said, you need to remove the tick from the Hide extensions for known file types checkbox in the Folder Options window.
If you have anything to add, please do share it with us through comments.
Отображение расширений файлов в windows 10, а так же в «Семерке» и «Восьмерке» часто выключено по умолчанию. Это сделано для защиты файлов от не умелого пользователя. Если безграмотно сменить расширение файла, он не будет более воспроизводиться, читаться и распознаваться программами. Опытным пользователям иногда необходимо видеть расширение файлов, поэтому далее в инструкции написано как увидеть и сменить расширение при необходимости.
Как включить отображение файлов через параметры папок
Включить расширение файлов в windows 10 чтобы они стали видны и их доступно стало изменить, вы сможете такими действиями:
- Открывайте любую папку на вашем устройстве (например «ЭтотКомпьютер»);
- Внутри нее переходите к подразделу «Вид»;

- Оттуда к подпункту «Параметры»;
- Кликайте ЛКМ строчку: «ИзменитьПараметрыПапок…» — как на рисунке ниже;
- Удалите отметку в строчке из списка функций: «СкрыватьРасширения Для ЗарегистрированныхТиповФайлов», внимание к картинке ниже;

- Кликайте ЛКМ «Применить», затем «ОК», для сохранения настройки;
Перезагрузка не нужна, теперь вы будете видеть расширения и сможете их менять при необходимости. Не рекомендую баловаться, внося изменения просто ради «прикола». Если не запомните исходное расширение файла, не вернете его к прежнему виду и он перестанет работать.
Когда у вас «Семерка»
Включить расширение файлов в windows 7 можно выполнив следующие процедуры:
- Нажимайте сразу пару клавиш «Win+E», это откроет папочку «Компьютер»;

- Чтобы вышло нужное меню настроек в этой папочке надавите «F10» либо«Alt»;
- Переходите ко вкладочке «Сервис», кликнув ее ЛКМ и выбирайте: «ПараметрыПапок»;

- Переключитесь на вкладочку «Вид» и там снимите отметку возле соответствующей строчки;
- Кликните «Применить», затем «ОК», для сохранения настройки;
Как и в предыдущем случае не требуется перезагружать ОС.
Как показать расширения используя проводник
В новых версиях виндовс 10 включить отображение расширения файлов доступно с применением проводника системы. Шаги следующие:
- Кликом ЛКМ открываете папочку, ярлык которой расположен снизу в панели инструментов;
- При этом раскроется окошко системного проводника;
- Кликните вкладочку «Вид», расположенную в верхнем уголке слева;
- Внутри подраздела «ПоказатьИлиСкрыть» установите галочку около строчки «РасширенияИменФайлов»;

Нет нужды перезагружаться, чтобы изменения вступили в силу.
Как открыть расширение файла используя «ПанельУправления»
Увидеть расширение файла в windows 10 вы сможете, воспользовавшись функцией «ПанельУправления». Для этого надо:
- Кликнуть ЛКМ по «Пуск» и выбрать строчку «ПанельУправления»;
- Кликайте там по «КрупныеЗначки» — вверху справа;

- Затем переходите к строчке «ПараметрыПроводника»;
- Оттуда в «ПараметрыПапок»;
- Отыщите там «Вид»;
- В списке подраздела «ДополнительныеПараметры» найдите строчку «СкрыватьДляЗарегистрированныхТиповФайлов» и удалите отметочку возле нее;

- Кликайте «Применить», затем «ОК»;
Можете проверить эффект, даже не перезагружая ваше устройство.
Используем подраздел свойства
Отобразить расширение файла доступно через его свойства. Кликнув любой файл на ПК/ноутбуке ПКМ вы можете перейти в строчку «Свойства», и там увидеть все данные об этом файле, формат, занимаемый объем на диске и прочее. Отсюда же возможно увидеть расширение и сменить его при надобности. Есть один нюанс, нужно создать ярлык файла и далее выполнять все манипуляции с ярлыком. Для этого:
- Кликаете файл ярлыка ПКМ;
- Переходите в строчку «Свойства»;

- Затее нужна вкладочка «Ярлык»;
- В ней вы найдете путь к файлу и сам файл с расширением в строчке «Объект»;

- Там же вы можете заменить расширение;
- Кликайте «Применить», затем «ОК»;
Таким образом вы достигаете нужного результата.
Воспользовавшись функцией переименования
Показать расширение файлов через переименование не получится. Зато вы сможете сменить расширение, если это нужно. Для этого:
- Кликайте искомый файлик ПКМ и выбирайте строчку «Переименовать»;

- Вместо названия, набирайте название и через точку нужное вам расширение;

- Кликайте «ОК» в окошке с предупреждением;
Поздравляю, вы достигли желаемого результата.
In Windows 10, file extensions for known file types are hidden by default. Fortunately, it’s easy to show file extensions, using a checkbox in the File Explorer ribbon.
Step 1
Simply open File Explorer by double-clicking the program icon in the Task Bar. You can also double-click any folder.
![]()
Step 2
Select the View tab as shown below.
Step 3
Click the «File name extensions» check box to show file extensions. You can uncheck the box to hide file extensions.
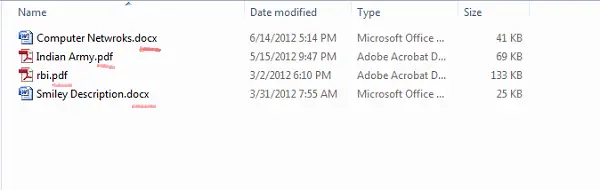
That’s it! Checking the «File name extensions» box will display file extensions for all files. In the image above, you can see the extensions are displayed for each file in the open window.
NOTE: This option applies globally to all folders, so you don’t have to manually check or uncheck it again for every folder you open.
Alternative Method
Showing and hiding file extensions in Windows 10 involves the same process as Windows 8. Earlier versions of Windows, such as Windows Vista and Windows 7, required a different process that involves modifying the «View Options» in File Explorer.
You can still use this method in Windows 10, though there are minor differences from previous Windows versions.
Step 1
Open the File Explorer Options control panel and select the View tab.
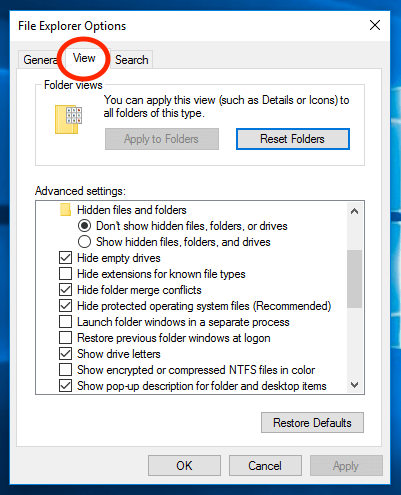
Step 2
Select or deselect the «Hide extensions for known file types» checkbox.
This will have the same effect as the first method listed above.
A file extension is the last part of the file name coming after the last dot (.). For example, if we have created a Microsoft Word file, its file extension will show up as .docx. File extensions help us to identify the file type associate a program with the file which can open it in a readable manner.
By default, file types are hidden in Windows 10. It can be a security risk as we could run an executable whose icon was set as a document type. Normally the viruses and other malware disguise their executables as documents or pictures. A user can, unknowingly, double-click and run the file expecting the file to open in its appropriate program. Instead, the executable could wreak havoc on the system.
That’s why it is recommended to change the Windows setting to always show file extensions. In this article, we share five ways to show file extensions in Windows.
Table of contents
- How to show file extensions in Windows 10
- Using Folder Options
- Using File Explorer
- Using Registry Editor
- Using Command Line
- Using Group Policy Editor
How to show file extensions in Windows 10
Although these methods will work in earlier versions of Windows like Windows 8.1, Windows 8, Windows 7 and even Windows XP, but since we have only tested these on Windows 10, that’s why we have specified the specific Operating System.
Using Folder Options
- Go to Run –> control folders

- Go to View tab

- Un-check “Hide extensions of known file types”

Hide extensions for known file types


That’s it. Now you will see the file extensions for each filetype.
Using File Explorer
Windows 10 File Explorer ribbon interface makes it easier to instantly show or hide file extensions. Here are the steps to show/hide file extensions in Windows Explorer:
- Open File Explorer (Windows Key + E)
- Go to View Tab on the Ribbon menu

- Check “File Extensions” under Show/Hide section


Checking File Extensions will show the file extensions while unchecking it will hide the extensions.
Using Registry Editor
- Open Registry Editor by going to Run –> regedit
- Navigate to the following key:
HKEY_CURRENT_USER\Software\Microsoft\Windows\CurrentVersion\Explorer\Advanced - Double-click HideFileExt from the right-hand pane.
- Set the value to 0 to show File extensions of known files and 1 to hide File extensions.

Show file extensions in Windows using Registry


Usually, the changes will be immediate. If you don’t see the changes, you may want to restart File Explorer from the task manager or restart the computer altogether.
Using Command Line
Command line method can be used to quickly change the File extension settings for many computers at once. You can create a batch file with the following commands and run the batch file on any computer to change the settings immediately.
To hide file extensions using command line, open command-prompt and run the following command:
reg add HKCU\Software\Microsoft\Windows\CurrentVersion\Explorer\Advanced /v HideFileExt /t REG_DWORD /d 1 /f
To show file extensions, run the following command:
reg add HKCU\Software\Microsoft\Windows\CurrentVersion\Explorer\Advanced /v HideFileExt /t REG_DWORD /d 0 /f
For your ease, you can download the batch files from below and run them according to your situation.
Hide File Extensions (108 bytes, 1,898 hits)
Show File Extensions (108 bytes, 1,720 hits)
Using Group Policy Editor
This method is limited for system administrators who want to implement the show or hide file extensions policy across their domain network.
- Open Domain Group Policy Management Editor
- Go to User Configuration –> Preferences –> Control Panel items –> Folder Options
- Right-click Folder Options on the left-hand pane and select New –> Folder Options (Windows XP) or Folder Options (Atleast Windows Vista)
- This will open the regular Folder Options window. You can make changes to this window and the changes will be made across the domain or where the group policy is applied.

Group Policy management folder options for domain

Which method do you prefer to show or hide file extensions on your computer? We have listed all the techniques used for almost all versions of Windows including Windows 10, Windows 8.1, Windows 7, Windows Vista and even Windows XP. These methods also work for Windows Server Operating Systems including Windows Server 2008, Windows Server 2012, Windows Server 2016 and Windows Server 2019.
How to Show File Extensions in Windows 10: File Extension is ending of a file which helps in identification of the type of file in Windows 10. For example, the file name “example.pdf” has the file extension “.pdf” which means the file is associated with adobe acrobat reader and is a pdf file. Now if you are a novice Windows users then it’s very important to see file extension in order to identify the type of file you’re trying to open.

But first, you should know why file extensions are important, well, it’s important because you could click on malware/virus files without even knowing so. For example, you downloaded a file security.pdf.exe, now if you have file extension hidden you will only see the file as security.pdf which is a big security risk as you will definitely open the file thinking it of as your pdf file. This file could potentially damage your system and that is why file extensions are important.
When file extensions are disabled you would still see the icon of the program which is associated with that file type. For example, if you have a file test.docx, then even if you have file extension disable, you would still see the Microsoft Word or the default program icon on the file but the extension “.docx” would be hidden.
![]()
This doesn’t mean that you can’t be tricked by virus or malware because they can disguise the icon of your file type and still be a malicious program or application, so it always a good idea to enable file extensions in Windows. So without wasting any time let’s see How to Show File Extensions in Windows 10 with the help of the below-listed guide.
Make sure to create a restore point, just in case something goes wrong.
Method 1: Show File Extensions via Folder Options
1.Search for Control Panel in Windows search then click on the search result to open Control Panel.
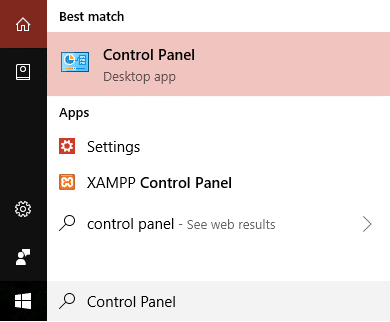
Note: Or you could directly open Folder Options by pressing Windows Key + R then typing C:\Windows\System32\rundll32.exe shell32.dll,Options_RunDLL 7 and click OK.
2.Now click on Appearance and Personalization inside Control Panel.

3.On the next screen, click on File Explorer Options.

4.Now switch to the View tab and uncheck “Hide extensions for known file types.“

5.Click Apply followed by OK.
6.Reboot your PC to save changes.
Method 2: Show File Extensions via File Explorer Settings
1.Press Windows Key + E to open File Explorer.
2.Now click on View tab and checkmark “File name extensions.“

3.This will enable file extensions till you again uncheck it.
4.Reboot your PC.
Recommended:
- Fix NVIDIA Control Panel Not Opening
- How to Reset Network Data Usage on Windows 10
- Fix Nvidia Kernel Mode Driver has stopped responding
- How to disable the Task View Button in Windows 10
That’s it you have successfully learned How to Show File Extensions in Windows 10 but if you still have any queries regarding this post then feel free to ask them in the comment’s section.