To use the Snipping Tool when you have a mouse and a keyboard:
-
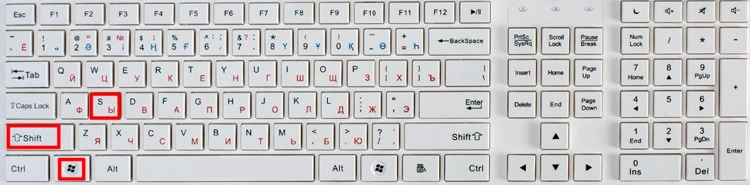
Press Windows logo key + Shift + S. The desktop will darken while you select an area for your screenshot.
-
Rectangular mode is selected by default. You can change the shape of your snip by choosing one of the following options in the toolbar: Rectangular mode, Window mode, Full-screen mode, and Free-form mode.
-
The screenshot is automatically copied to your clipboard. A notification also appears once you’re finished taking a screenshot, select it for more editing options.
To use the Snipping Tool with only a mouse:
-
To open the Snipping Tool, select Start, enter snipping tool, then select it from the results.
-
Select New to take a screenshot.
-
Rectangular mode is selected by default. You can change the shape of your snip by choosing one of the following options in the toolbar: Rectangular mode, Window mode, Full-screen mode, and Free-form mode.
-
The screenshot is automatically copied to your clipboard. A notification also appears once you’re finished taking a screenshot, select it for more editing options.
Learn more about screenshots and the Snipping Tool
Need more help?
Want more options?
Explore subscription benefits, browse training courses, learn how to secure your device, and more.
Communities help you ask and answer questions, give feedback, and hear from experts with rich knowledge.

If you don’t want to install third-party software for screenshots, here’s a look at some keyboard shortcuts in Windows 10 to achieve the results you need.
In previous versions of Windows, you can take a screenshot by using the PrtScn key. This option still works in Windows 10, which will take a shot of everything on the screen, copy it to the Clipboard, and then allow you to paste it into a program such as Microsoft Word.
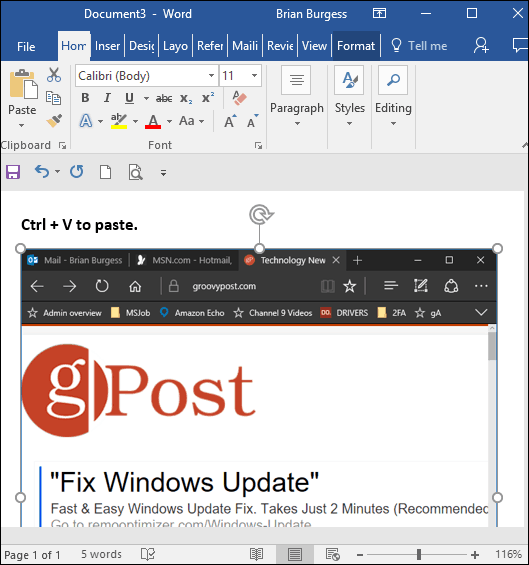
However, if you have a multiple monitor setup, it can be annoying when you just need a specific window or section of your screen.
Windows 10 Screenshot Keyboard Shortcuts
If you don’t care to install third-party software, here’s a look at some different keyboard shortcuts for taking shots in Windows 10 to achieve the results you need.
- Windows Key + PrtScn: Windows 10 will take a screenshot and save it as a PNG file in the default Pictures folder in File Explorer.
- Alt + PrtScn: This is an excellent option if you just want to take a shot of an individual window on your screen.
Note: Alt + PrtScn will only copy your shot to the Clipboard so you can paste it into a document or other image editor like Microsoft Paint. It doesn’t create a backup copy in the Pictures folder.
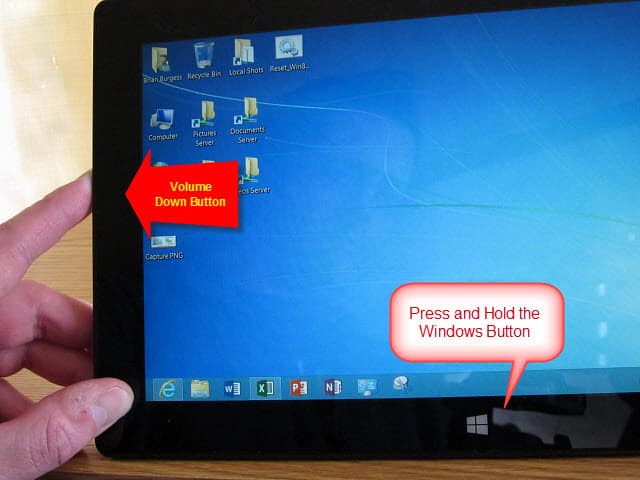
Windows Key + Volume down: This one is meant for tablets running Windows 10, such as the Microsoft Surface.
Other Shortcuts to Try
If you can’t get the ones above to work, some laptops and other devices require a modified key combo. For instance, Windows Key + Ctrl + PrtScn is one. Also, Windows Key + Fn + PrtScn is another one that’s required on some devices. Check the manufacturer’s website or manual to find out which one to use.
The Snipping Tool
While this isn’t a keyboard shortcut, you might want to take a shot of a specific region of your screen. To do that, enter the Snipping Tool (an often-forgotten tool included since Vista and Windows 7).
To access it, hit the Windows Key and type: snipping tool and select the results from the top. Then choose New from the menu and drag the cursor over the screen area you want to capture. The captured screenshot will appear in the full Snipping Tool program. It has basic editing tools and is a good option for a quick shot if you need one.
If you need to take screenshots on your Windows 10 system and don’t want to install third-party software for the job, the built-in tools will get the job done.
Be sure to check out our complete list of Windows 10 Keyboard Shortcuts. You might be surprised, but the list continues to grow, even in 2019.
![]()
Things You Should Know
- Press the Windows key + Print Screen key to capture the entire screen. The image will save to the Screenshots folder inside of your Pictures folder.
- Press Windows Key + Shift + S to use Snipping Tool, which lets you capture the whole screen, individual windows, or certain areas.
- Press the Print Screen (PrtSc) key to capture the screen to your clipboard. You can then paste it anywhere using Ctrl + V, or by right-clicking and selecting «Paste.»
-

1
Go to the screen that you want to capture. When you screenshot your entire screen, everything that’s open will be captured in your screenshot. Be sure to close any windows you don’t want open.
- This method will quickly capture everything on your screen and save the image to your PC. Once you’ve saved the screenshot, you can edit it or share it with anyone.
-
2
Find the ⎙ Print Screen key on your keyboard. The Print Screen key is most often found in the upper-right side of the keyboard, not counting the numeric keypad.
- The Print Screen key will usually be abbreviated to «PrtSc» or something similar.
Advertisement
-
3
Take your screenshot. You have two options for capturing your entire screen:
- Instantly save the screenshot as an image: Press the Windows key and the PrtSc keys at the same time. This saves your screenshot as a PNG file to the Screenshots folder in your Pictures folder. On most keyboards, the Windows key is located in the bottom left corner on the same row as the spacebar. Upon pressing this key combination, the screen may dim briefly to indicate that the screenshot was captured.
- Copy the screenshot so you can paste it: Press the Print Screen key alone to copy the screen to your PC’s clipboard. You can then paste the copied screenshot into a document, email message, or social media post by right-clicking the desired location and selecting Paste.
- On some Windows laptops, you will need to hold down the Fn key as you press the Print Screen key.
-
4
Find the screenshot. If you used Windows key + Print Screen to capture the screenshot, follow these steps to find the file:
- Open File Explorer by pressing Windows key + E on your keyboard.
- If you see a folder called Pictures in the left panel, click it. If not, click This PC, and then double-click the Pictures folder.
- Double-click the Screenshots folder.
- Each screenshot that you take is labeled «Screenshot (number).» Depending on the version of Windows you’re using, the file name will either end with a number that corresponds with the number of screenshots you’ve taken, or the date and time at which you captured the screenshot.
- If you can’t find your screenshot, try using the Snipping Tool instead. See Snipping Tool (Windows 11) or Snipping Tool (Windows 10 and earlier).


Advertisement
-
1
Click the window that you want to capture. If you only want to screenshot a single window, click anywhere on the window you want to capture. Make sure the window is in front of all your other windows.
-
2
Hold down Alt and press ⎙ PrtScr. This copies an image of the window to the clipboard.
- You will not see any confirmation that the screenshot has been taken.
- On some Windows keyboards, you will need to also hold down the Fn key when you use print screen.
-
3
Open Paint. This program comes installed on all Windows computers. To open it:
- Press Windows key + S to activate the search bar.
- Type paint.
- Click Paint.
-
4
Press Ctrl+V to paste the screenshot. You will now see your one-window screenshot in the Paint window.
- You can also paste the screenshot into other programs, such as Word or into the body of an email. Simply open the program that you want to paste the image into and press Ctrl + V.
- Alternatively, you can paste the screenshot into any open document, email, or other area using this shortcut.
- If your screenshot doesn’t appear, try using the Snipping Tool instead. See Snipping Tool (Windows 11) or Snipping Tool (Windows 10 and earlier).
-
5
Save your screenshot as an image. Click File, click Save, enter a file name, click a location on the left side of the page, and click Save.
- You can change the screenshot’s file type by clicking the «Save as type» drop-down box at the bottom of the window and then clicking a different format (e.g., JPEG) in the drop-down menu.


Advertisement
-
1
Open the Snipping Tool. The Windows 11 Snipping Tool makes it incredibly easy to capture and edit full-screen and partial-screen screenshots. To open the tool, click Search in the taskbar, type snip, and then click Snipping Tool.
-
2
Select a screenshot mode. Click the Mode menu, which is the down-arrow at the top of the screen. Then, choose an option:
- Rectangle mode: Let’s you capture any part of the screen by drawing a rectangle around an area.
- Window mode: Allows you to capture an individual window without getting anything else in the screenshot.
- Full-screen mode: Captures everything on the screen.
- Free-form mode: Lets you draw any shape around an area of the screen to take a screenshot.
-
3
Click + New. It’s at the top-right corner of Snipping Tool.
-
4
Capture your screenshot.
- In Rectangle mode, click and drag a rectangle around the desired area to instantly capture a screenshot.
- In Window mode, click the window you want to capture to take the screenshot.
- In Full-screen mode, the entire screen will instantly capture.
- In Free-form mode, draw an outline around the part of the screen you want to capture.
-
5
Click the Snipping Tool icon in the taskbar to view your screenshot. Now you’ll see a preview of your screenshot, which gives you a chance to edit it if you’d like.
-
6
Edit your screenshot (optional). If you’d like to crop the screenshot, click the crop tool at the bottom, then select the part of the screenshot you want to keep. You can also use the other editing tools at the bottom to draw on or erase part of the screenshot, which is helpful if you need to redact something.
-
7
Save your screenshot. Now that you’ve taken a screenshot, you can save it easily:
- Click the disk icon at the top.
- Select a location to save your screenshot.
- Name your file and click Save.
-
8
Use the Snipping Tool shortcut in the future. Now that you know how to use Snipping Tool, you can use this handy shortcut next time you want to take a screenshot: Windows key + Shift + S.
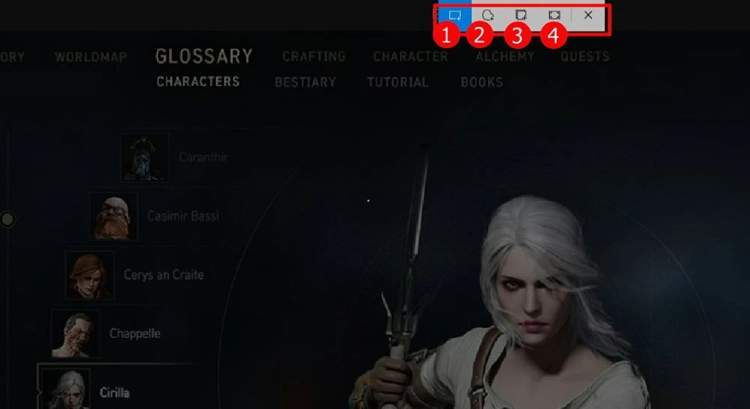
- When you use the keyboard shortcut, you’ll see a smaller version of Snipping Tool at the top of the screen. Each icon on the Snipping Tool indicates a different screenshot type—Rectangle Mode, Window Mode, Full-screen Mode, and Free-form Mode.
- Click the mode you’d like to use, then capture your screenshot.


Advertisement
-
1
Open the Snipping Tool. The Snipping Tool is an great way to take all kinds of screenshots, including full-screen, individual windows, and even a particular area of the screen.[1]
- On Windows 10, press Windows key + S, type snip, and click Snipping tool.
- On Windows 8.1, swipe in from the edge, select Search, type snipping, and then select Snipping Tool.
- On Windows 7, click the Start menu, type snipping, and then click Snipping Tool.
-
2
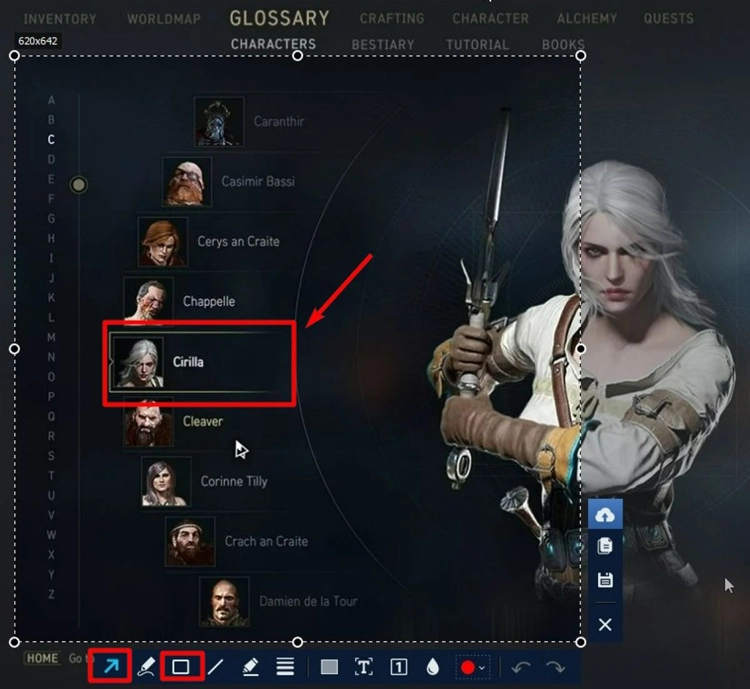
Choose the shape of the Snip. «Rectangular Snip» is chosen by default. Click the Arrow button next to the Mode button to change the Snip shape:.
- Free-form Snip lets you draw any shape with your mouse. The area inside the shape will be snipped.
- Rectangular Snip lets you select a rectangular area, which will be snipped.
- Window Snip lets you choose a window to snip.
- Full-screen Snip snips the whole screen, with all windows (except the Snipping Tool window) included.
-
3
Create a new Snip. Click the New button to start the selection. The screen will fade, and you can draw your Snip area, or select the window if you chose Window Snip. Release the mouse to take your screenshot.
- If you had Full-screen Snip selected, your Snip will automatically be created once you click New.
-
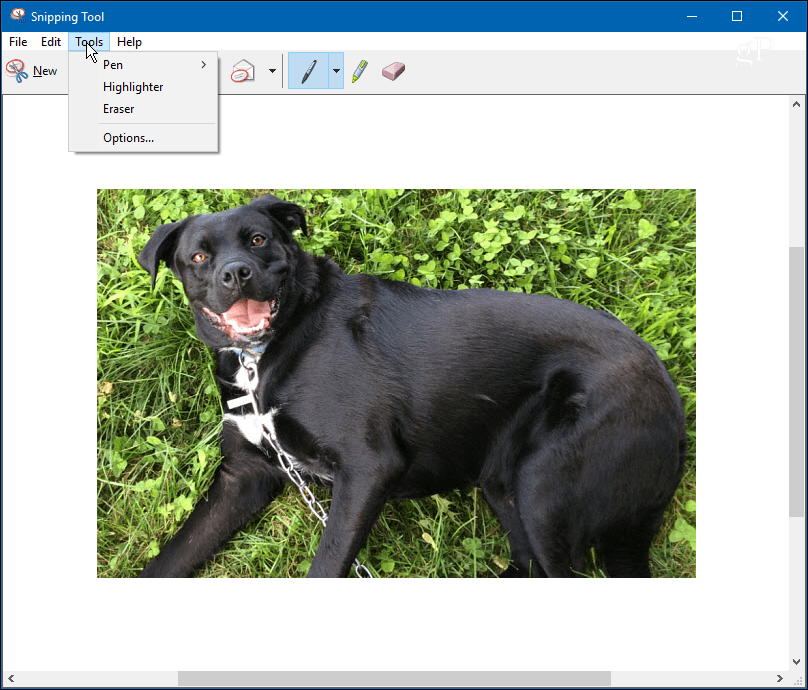
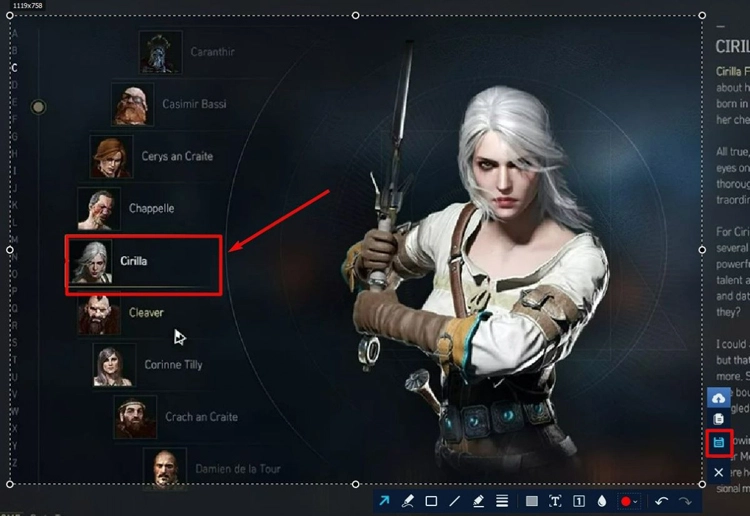
4
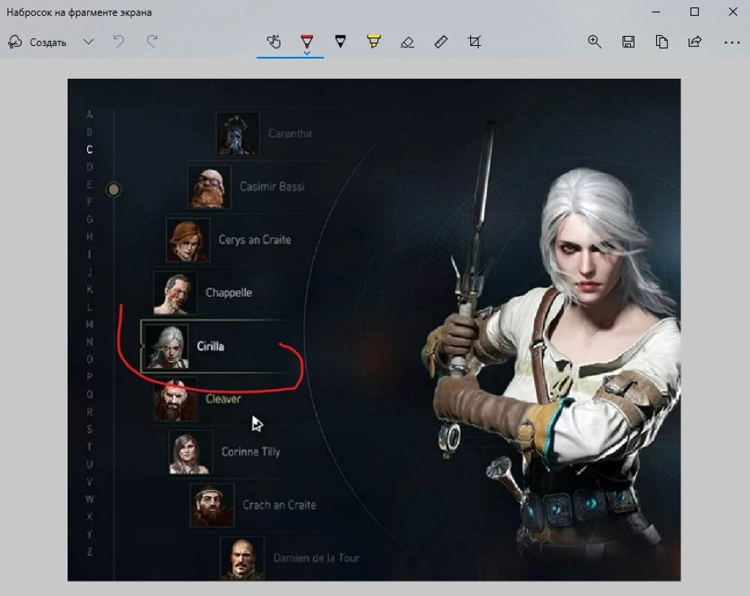
Annotate the Snip (optional). Once you create the Snip, it will open in a new window. You can use the Pen tool to draw on it and make notes, and use the Highlight tool to draw attention to text.
- The Erase tool will only erase annotations, not the screenshot itself.
-
5
Save the Snip. Click the floppy disk icon to open the save dialog. Type in a name for the screenshot and change the «Save as type:» field if desired. You can now send the screenshot by email or put it on a website.
- PNG is the default format in Windows 8 and later. The default format in earlier versions is JPG.
-
6
Paste or save the Snip. By default, the Snip is copied to the clipboard when you create it. This means you can paste it into Paint or Word, much like you would with a full-screen screenshot. In Paint, you can make more edits than you can in the Snip annotation editor.
- To paste the Snip, open a window that supports pasting and press Ctrl+V.


Advertisement
-
1
Go to the view that you want to screenshot. Open the program or screen that you want to take a picture of, making sure that any windows or items that you don’t want on-screen are out of the way.
-
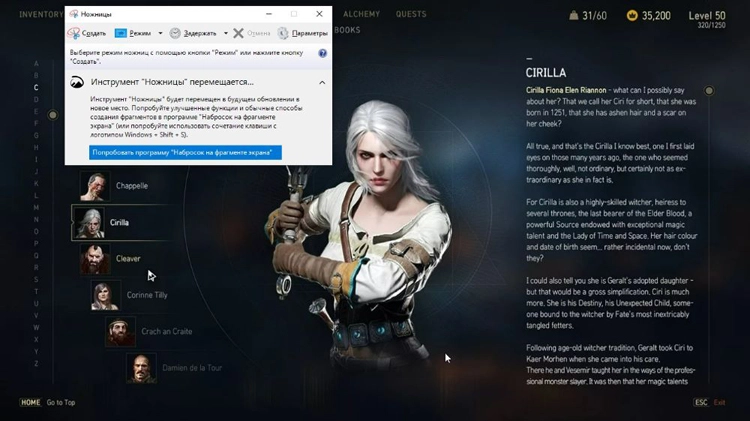
2
Press ⊞ Win+⇧ Shift+S. Doing so will cause your screen to turn grey, and your mouse will turn into a crosshairs icon. The Snipping Tool will open at the top of the screen.
- By default, the shortcut will open Snipping Tool in Rectangle Snip Mode, which means you can click and drag a rectangle around the area of the screen you want to capture.
- On Windows 10, you can select a different screenshot mode from the Mode menu. For example, if you want to capture the whole screen, select Full-screen Snip (which takes the screenshot automatically). To capture a single window, select Window Snip.
- On Windows 11, you can select a different mode to take a screenshot using the icons at the top. . The icons in order are Rectangle Mode (the default), Window Mode, Full-screen Mode (which takes the screenshot automatically), and Free-form Mode.
-
3
Select an area to screenshot. Click and drag your mouse from the top-left corner of the area that you want to screenshot to the bottom-right corner. When you release the mouse button, the screenshot will be captured, as well as copied to your clipboard.
- If you selected a full-screen screenshot, you can skip this step.
-
4
Paste or save your screenshot. You can now paste your screenshot into any program that allows pasting photos (e.g., Paint, Word, an email, etc.) by pressing Ctrl+V. You should see the section of the screen that you selected appear in your program.
- Alternatively, save your screenshot as an image file by pressing Ctrl + S, entering a name, selecting a save location, and clicking Save.


Advertisement
-
1
Open the Xbox Game Bar. The Game Bar is a handy tool that makes it easy to capture screenshots of games, as well as any other open windows on your PC. To open the tool, press Windows key + G at the same time.
- You can even use the Xbox Game Bar to record your screen in real time.
-
2
Click the Widget menu. It’s the it’s the second icon from the left in the Game Bar at the top of the screen.[2]
-
3
Click Capture. You’ll see this near the top of the menu. The Capture widget will appear.
-
4
Click the pushpin icon on the Capture widget. This pins the widget to your screen so it won’t disappear when you navigate away.
-
5
Click the window you want to capture. You can capture any single window on your screen, such as your web browser, a game, or a document.
-
6
Click the camera icon on the Game Bar. This captures a screenshot of the activate window and saves it to your screenshots folder.
-
7
Click See my captures to view your screenshots. You’ll see this option at the bottom of the Capture widget. Here, you’ll find all of the screenshots you’ve captured using the Game Bar.
- When you’re finished taking screenshots, follow these steps to unpin the Capture widget:
- Press Windows key + G to reopen the Game Bar.
- Click the pushpin icon.
- Click anywhere on the screen.
- When you’re finished taking screenshots, follow these steps to unpin the Capture widget:


Advertisement
-
1
Press and hold the Windows logo. This is the logo on the bezel of the tablet, not the Windows button on your desktop.
- If there is no Windows button on the tablet, press the Power button instead.
-
2
Press the Volume Down button (or Volume Up if using the Power button). The screen will dim momentarily to indicate a screenshot was taken.
- Your screenshot will be stored in the Screenshots folder, which you can access by Opening File Explorer and navigating to Pictures → Screenshots.


Advertisement
-
1
Go to the initial screen that you want to screenshot. This should be the first page in the sequence of pages that you want to screenshot.
- Understand how this works. The Windows Steps Recorder allows you to record up to 100 different screens and save them all to one document. This program also makes a note of where you click and which actions you perform on each screen.
-
2
Press ⊞ Win+S. This activates the Windows search bar.
-
3
Type psr.exe and press ↵ Enter. This opens the Windows Steps Recorder.
-
4
Click Start Record. This is at the top of the toolbar. Doing so turns on the Steps Recorder, which will record the next 25 screen changes.
- If you want to record more than 25 changes, first click
on the right side of the toolbar, click Settings…, and change the «Number of recent screen captures to store» number.
- If you want to record more than 25 changes, first click
-
5
Click through your different screens. Each time your screen changes (other than simply moving your mouse), the Steps Recorder will take a screenshot.
-
6
Click Stop Record. It’s at the top of the toolbar. Doing so stops recording screen changes and opens the results window.
-
7
Review your screenshots. Scroll down through the window to make sure that you captured all of the screenshots that you wanted to save.
-
8
Save your screenshots to a ZIP folder. Click Save at the top of the window, enter a file name and select a save location, and click Save.
- This will save the screenshots in one HTML file. You can open the HTML file in your browser in order to view its contents.


Advertisement
Add New Question
-
Question
What versions of Windows include the Snipping Tool?

The Snipping Tool is included in all versions of Windows since Windows Vista. This includes Vista, 7, 8, 10, Server 2008, and Server 2012. The only versions of Windows that it is not included in are Windows 7 Starter and Windows 7 Home Basic. If you are using either of these two versions, you will need to find another utility for taking screenshots, or use the keyboard shortcuts.
-
Question
After I capture a screenshot, how do I create arrows and circles?
You have to load your previous screenshot into a photo editing software (e.g., Adobe Photoshop, Picasa, or even MS Paint) to edit your photo. Then you can draw arrows/circles on your screenshot and save the picture.
-
Question
The screenshots came out fine, but the actual image came out distorted, for example drawers in a dresser appear «squished.» What do I do?
Anuj_Kumar1
Community Answer
Try taking a screenshot at maximum possible resolution for getting good quality shots. Also, you may check the screenshot saving app for the maximum output quality setting. You can take high resolution screenshots in virtual machines (even greater resolution than your monitor screen).

See more answers
Ask a Question
200 characters left
Include your email address to get a message when this question is answered.
Submit
Advertisement
-
For those with Microsoft OneNote, pressing ⊞ Win+S brings up the option to take a rectangular snip of the screen. Doing so causes the snapshot to appear as an image in OneNote.
-
On laptop keyboards, the ⎙ PrtScr key might be combined with another key. This means that you have to press the Fn key or «Function» key to access it. Such a key is usually found on the bottom row of the keyboard.
Advertisement
-
Saving a screenshot in some file types (such as bitmaps) will result in a very large file. Because of this, it’s highly recommended to use the PNG or JPEG format.
-
Most screenshots will not show the mouse cursor.
-
DRM-protected content will not be visible in your screenshot and will be blanked out.
Advertisement
About This Article
Thanks to all authors for creating a page that has been read 36,892,220 times.
Is this article up to date?
Сделать снимок экрана можно разными способами. В нашей статье мы разобрали как можно создать скриншот штатными средствами Windows 10 с помощью предустановленных системных приложений или стороннего софта.
Описание каждого метода сопроводили подробной инструкцией.
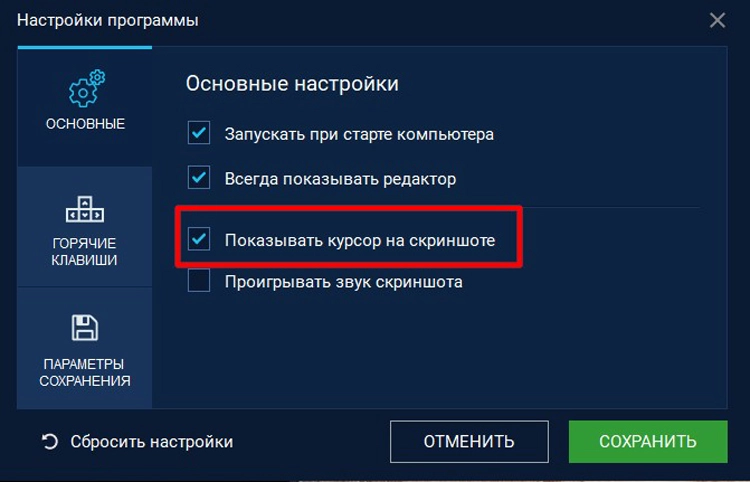
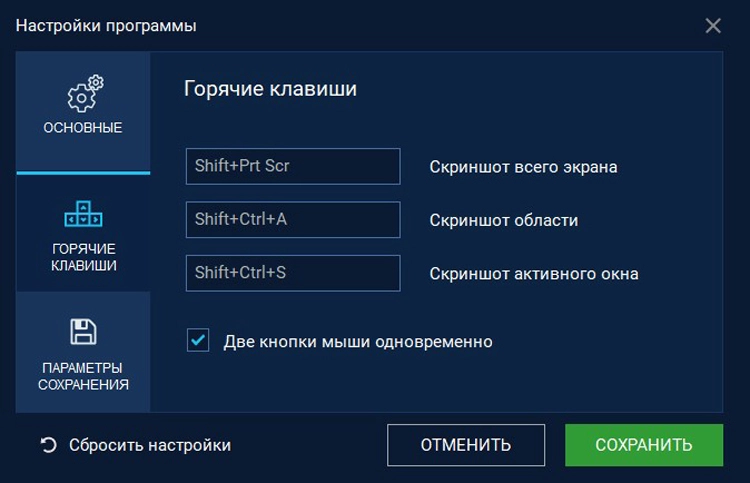
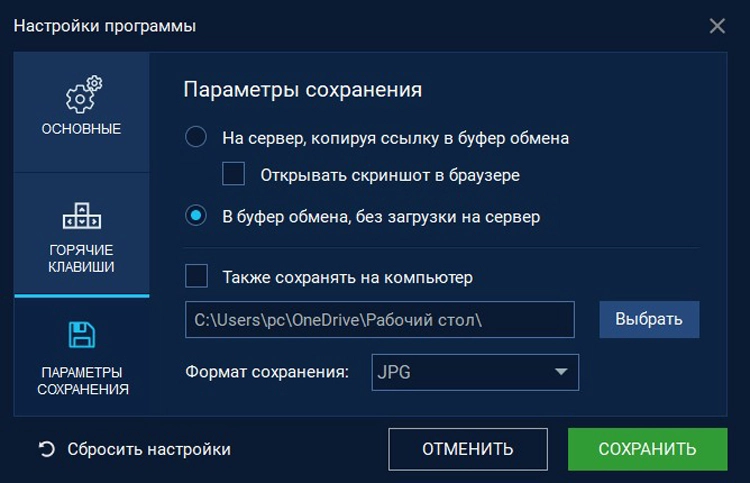
Простая, но необыкновенно функциональная программа-скриншотер, позволяющая в пару кликов не только сделать скриншот на Виндовс 10, но и отредактировать изображение. Для установки достаточно всего 15 МБ свободного места на диске. Она почти не потребляет системных ресурсов и не тормозит работу других программ.
Преимущества:
- бесплатная лицензия без рекламы;
- выбор вариантов захвата – полноэкранный режим, снимок активного окна/прямоугольный фрагмент;
- возможности редактирования с выделением элементов рамкой, подчеркиванием, маркером;
- есть добавление нумерации и текстовых пояснений, размытие конфиденциальной информации;
- пошаговый откат действий;
- выбор вариантов сохранения – в буфер обмена, в виде графического файла GPG, PNG, BMP на жесткий диск или отправка на сервер с получением ссылки.
Пошаговая инструкция:
- Скачайте установочный файл и запустите инсталляцию.
- После установки откройте приложение и выполните настройку:
— выберите параметры запуска, видимость курсора;
— установите свои «горячие клавиши» для выбора варианта захвата;
— пропишите путь сохранения на диск, выберите в каком расширении записывать изображение.
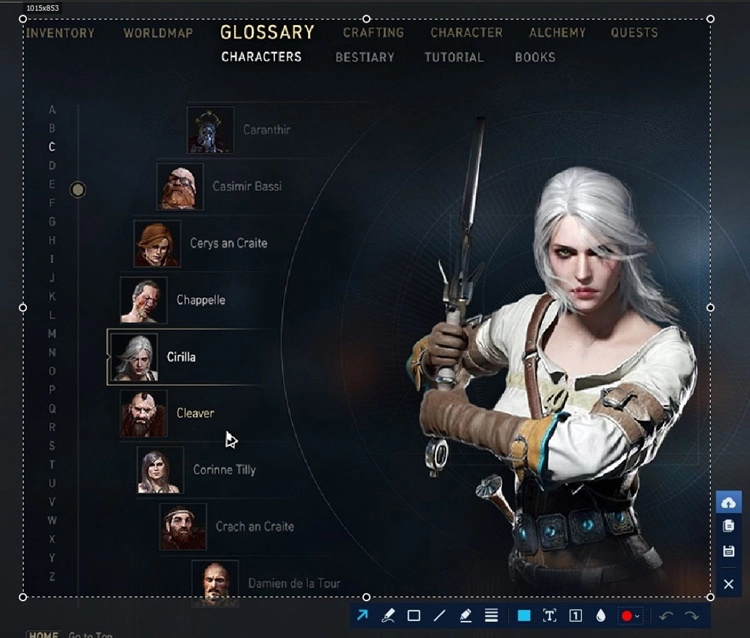
- Нажатием одновременно обеих клавиш мышки или клавиатурной комбинацией запустите режим съемки.
- Используя инструменты на панели отредактируйте картинку, добавив выделение, длинные и короткие стрелки, текст.
- Переключаясь между иконками на правой панели, выберите вариант экспорта принтскрина.
Скачать бесплатно
 Для Windows 11, 10, 8, 7 и XP

Игровая панель Xbox Game Bar будет полезна не только геймерам. Кроме трансляции игр и настройки игрового процесса есть функция экранного рекордера. Можно записывать экранные видео и делать моментальные снимки экрана.
Преимущества:
- не требует установки – приложение уже встроено в Виндоус 10 и 11;
- бесплатное использование;
- создание скриншотов даже во время игры или просмотра фильма в полноэкранном режиме;
- простое управление.
Недостатки:
- нельзя заскринить определенный участок;
- единственный вариант сохранения – файл PNG;
- для возможности редактировать понадобится установка стороннего приложения;
- может конфликтовать с некоторыми играми.
Пошаговая инструкция:
Немного усовершенствованная утилита Snipping Tool хорошо знакома пользователям Windows 7 и XP. С помощью утилиты можно заскринить содержимое дисплея или рабочего окна, обрезать фрагмент экрана и сразу же обработать полученное фото. Снимок можно сделать моментально или с задержкой в несколько секунд, установив таймер.
Преимущества:
- предустановленным приложением можно пользоваться бесплатно;
- помимо стандартных режимов захвата можно сделать снимок фрагмента любой формы;
- есть таймер запуска;
- в Snipping Tool можно обработать изображение.
Недостатки:
- небольшое количество инструментов во встроенном редакторе;
- нельзя напрямую поделиться принтскрином из буфера обмена;
- нет быстрой загрузки в облако;
- отправка почтой возможна только при выборе Microsoft OutLook программой по умолчанию.
Инструкция:
По замыслу разработчиков Набросок на Фрагменте экрана был выпущен как альтернатива инструменту Ножницы. Функции программы практически не изменились – в ней можно сделать принтскрин всего дисплея, открытого окна браузера или фрагмента прямоугольной или свободной формы.
Преимущества:
- не нуждается в установке, бесплатно;
- есть возможность скринить отдельные фрагменты с выделением произвольно обрезанной области;
- можно вызвать во время рабочего процесса сочетанием клавиш.
Недостатки:
- нет прямой загрузки на облачный сервер;
- при съемке игры или видео в полноэкранном режиме фото сохраняется только в буфере обмена, для сохранения на ПК/обработки нужно запускать графический редактор (Paint/аналог);
- нельзя изменить комбинацию клавиш.
Инструкция:
- Откройте программу любым способом:
Найдите приложение в меню «Пуск» и в открывшемся окне нажмите на «Создать».
набрав на клавиатуре Win + Shift + S для быстрого вызова панели управления «Наброска».
- Выберите вид захвата:
1) весь дисплей; 2) выделенную область произвольной формы; 3) прямоугольный фрагмент; 4) активное окно.
- Нажмите на всплывшее в правом нижнем углу монитора окно для перехода в редактор.
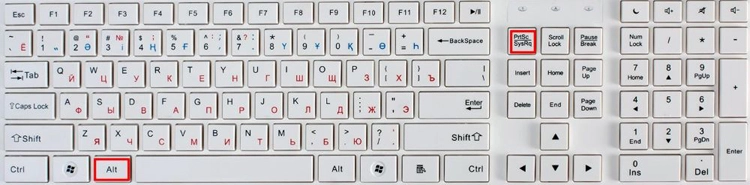
Штатные средства Windows для создания скриншотов не меняются с момента появления операционной системы. Простейший из них – сделать мгновенный снимок экрана, нажав на кнопку Print Screen. На современных клавиатурах разных устройств названия отличаются – PrtSc/PrtScn/PrtScr. Возможно второе наименование (пишется под основным) – SysRq.
Используя саму клавишу или комбинации с нею, можно выбирать варианты захвата. Для съемки всего рабочего стола:
Во всех случаях скрин сохраняется в буфере памяти. Для редактирования и экспорта на ПК, нужно сначала загрузить картинку в графический редактор и сохранить ее в удобном формате.
Если нужно скринить не весь экран, а только рабочее окно наберите Alt + Prtscn:
В этом случае принтскрин не попадает в кэш-память, а сразу будет записан на жесткий диск как файл PNG. Найти его можно в папке «Снимки экрана» на диске С.
Вопросы и ответы
Куда сохраняются скриншоты на Windows 10?
Путь экспорта зависит от способа, выбранного для создания снимка экрана. При использовании клавиши Print Screen или ее комбинаций, картинка сохраняется в буфере памяти или папке «Снимки экрана» на диске С. Записи, сделанные с помощью XBox Game Bar хранятся в директорию «Видео».
Как сделать скрин на ноутбуке с Windows 10?
Чаще всего сфотографировать экран на ноутбуке можно такими же способами, что и на стационарном компьютере. На некоторых моделях при использовании кнопки Print Screen, нужно предварительно нажать клавишу, запускающую функции Fn. Она обычно размещена слева от клавиши Вин-кей. На ультрабуках, где в клавиатуре нет клавиши Print Screen, действует комбинация Win + Alt + F11. На лэптопах с Windows 10 также работают инструменты Ножницы и Фрагмент и набросок.
Выводы
Надеемся, после прочтения статьи, у вас больше не возникнет вопросов, как сделать снимок экрана на Виндовс 10. Когда вам просто нужно поделиться содержимым экрана, можно обойтись системными средствами. Но если вы пишете инструкцию, и вам нужно сделать иллюстрации к пошаговому гайду, сопроводив их пояснениями, удобнее воспользоваться специальной программой с редактированием, такой как ФотоСКРИН, где можно не только создавать скриншоты, но и сразу выделять на картинках элементы, добавлять надписи и стрелки.
Вам также может понравиться
For some reason, you may need to take a full or partial screenshot on your Windows 10 or Windows 11 computer. You can just use the Windows built-in tools or keyboard shortcuts to do this work and it is very simple. In this post, Winsor Consulting will show you some methods that are suitable for you. There are several methods you can use. Whether you want to save the entire screen or just a piece of it, we’ve rounded up all the best ways to take a Windows screenshot
The Print Screen Button

Here you can see the PrtScn Button. It may require you to use the FN button.
There is a Print Screen key on your keyboard. Just like the name of the key, it is used to print the current screen of your computer. If you are using a wired keyboard, it is usually on the top-right side of the keyboard. If you are using a laptop, you can find it on the top line or the bottom line of the keyboard. The Print Screen can be shown as Print Screen or PrtSc.
- Press the Print Screen Key and you will see a small menu on the top middle side of your computer screen.
- Select the area you want to capture. The screenshot will be saved to the clipboard. Of course, you can click one of the icons in the menu according to your need to take a screenshot.
- Open an application like Paint or Word and paste the screenshot to it.
- Edit the screenshot or save it to a suitable location.
The screenshot will be copied to your clipboard. To save the file, paste the screenshot into any program that allows you to insert images, like Microsoft Word or Paint.

Paste your screenshot into a program like Paint to save and edit it.
The Windows key + Print Screen

To take a screenshot on Windows 10 or Windows 11 and automatically save the file to the Screenshots folder, press the Windows key + PrtScn. Your screen will go dim and a screenshot of your entire screen will be saved to the folder.
Alt + Print Screen
To only capture the active window you’re working in, press Alt + PrtScn. The screenshot will be copied to your clipboard, and you’ll need to paste it into another program to save it.
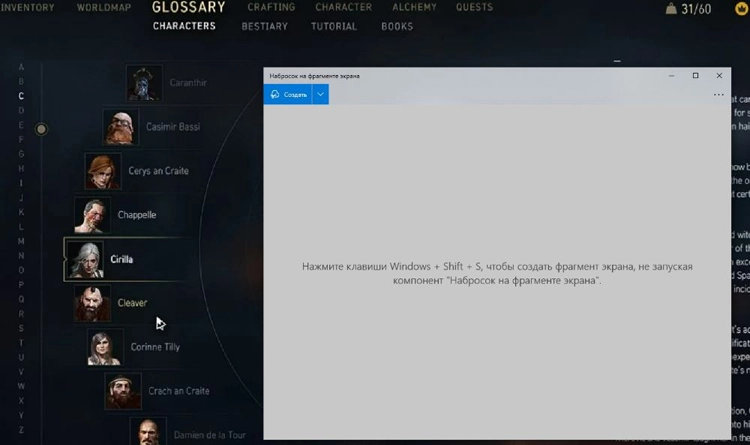
The Snip & Sketch tool in Windows 10
Windows 10 Snip & Sketch is the best way to screenshot on Windows if you’re looking to customize, annotate, or share your screen captures.
To activate Snip & Sketch, use the keyboard shortcut Windows Key + Shift + S. Your screen will go dim and a mini menu will appear at the top of your screen, giving you the option to take a rectangular, free-form, window, or full-screen capture.
With these Snip & Skitch options, you can choose how you’d like to take a screenshot:

Click the menu to take a rectangular, free-form, window, or full-screen capture (from left to right).
After you capture the screenshot, it’ll be saved to your clipboard and a preview notification will appear in the bottom-right corner of your screen.
Click on the preview notification to open the Snip & Sketch app and save, share, or edit the screenshot with the available drawing tools.
The Snipping Tool in Windows 11
Although the Snipping Tool exists in Windows 10, it’s not usually the screenshot tool you’ll want to use. In Windows 11, the Snipping Tool got a major upgrade and it’s now the best way to take custom screenshots.
To start the Snipping Tool in Windows 11, you can search for it or press the Windows Key + Shift + S. Like Snip & Sketch, your screen will go dim and a toolbar of screenshot options will appear at the top of the screen. This toolbar will let you take a rectangular, freeform, full-window, or full-screen capture.

The snipping tool looks just like Snip & Sketch.
Once you’ve taken your screenshot, it’ll be copied to your clipboard so you can share it right away, and it will be saved to the Screenshots folder. If you click the preview that pops up in the bottom-right corner of your screen, you’ll be able to save and edit it.
Use The Game Bar
The Game Bar is an overlay you can use within most Windows apps and games to take screenshots and record videos. Follow the steps below to open and use it:
1. Press Windows Key + G.
2. In the overlay menu, click the Capture button – the camera icon – in the top menu to bring up the Capture menu.
You can take screenshots or screen recordings with the Game Bar.
3. In the Capture menu, click the camera icon to take a screenshot. You can also record a video clip by pressing the record button, with the option to include audio by clicking the microphone icon.
Screenshots and video clips captured by the Game Bar are saved in PNG and MP4 format and you can find them in the Videos > Captures folder in File Explorer. You can also find them through the Game Bar’s Gallery, by clicking Show my captures > See my captures underneath the screenshot and recording buttons in the Capture menu.
Power + Volume Up
To take a screenshot on Windows 10 with a Microsoft Surface device, press the Power Button + Volume Up Button. The screen will go dim, and your screenshot will save to the Pictures > Screenshots folder.
So, did you learn how to take a screenshot in Windows?
Did you take advantage of our tips for taking prints on your Windows PC?